Figuring out what your engine timing needs are is relatively easy
Finding the parts to accomplish it might be a little bit harder
After you set your initial timing based on total timing described in the previous post, make sure your carburetor idle RPM is close to normal between 600 Ė 800 RPM and a quick idle screw adjustments for best idle. This is just to get it close to the final settings I will be talking about carburetor tuning in the next post.
A vacuum gauge and a hand vacuum pump as described in a previous post #703 is essential to have to tune your distributor or carburetor, in fact I have a few vacuum gauges sitting in my tool box for the times when having more than one simplifies taking readings. In fact if you donít have one thereís no need to read any further, you would only be guessing whatís happening and what you need to do. For this section you need a vacuum gauge hooked up to manifold vacuum and in the cab so you can read it when youíre driving down the road, this doesnít have to be a permanent installation unless you want it to be.
First I want to figure out what I want, then what I have, and then bring the two together. Time and time again I see articles describing what we want but very few that tell you how to determine if it fits your needs, and then to make some kind of adjustment that might be a good adjustment or bad one and not checking it. I always want to verify what Iím doing and the change is actually happening the way I expect it to.
The biggest problem with vacuum readings is that they keep changing because of a number of different reasons, but they are of a value for you to know for where you are at and changing conditions just to set things up. The mechanical/vacuum controlled distributor is not able to compensate for all the changes that happen to changing conditions that could effect what should be happening, so we need to set up a compromise to help it out and somewhat of a standard to take your measurements at.
The two things that effect vacuum readings the most are temperature and altitude, in a more precise statement Pressure Altitude. The day that you are doing the tuning and taking the readings should be about 60 degrees Fahrenheit, between 55 Ė 65 degrees. This should put you in the middle ground as far as temp is concerned, higher temps equals thinner air (less dense) and lower temps equals thicker air (more dense). As far as altitude you need to do the tuning at the normal altitude that you plan at driving at, plus or minus 500 feet, you can find out what your altitude is at your local airport. Normally youíre going to tune to your altitude and the occasional drive to a higher or lower altitude is not a concern, but if you relocate to a higher or lower altitude of plus or minus 1000 feet as a normal driving area a re-tuning is recommended.
General information about vacuum readings and altitude. For every 1000 foot altitude change the engine vacuum will go up or down 1 inch of vacuum reading (Hg). So an engine that makes 18 Hg at idle at sea level, when its relocated to 4000 foot higher will only generate 14 Hg at idle. Also as you go up and down in altitude the air fuel ratio of your carburetor changes, as you go higher the air fuel ratio will go richer and as you go lower it will go leaner. Not much you can do about the change except pull over to the side of the road and re-jet/re-tune your engine, not very practical (smile), just be aware of it and as the change happens your engine is not going to be running at optimum settings.
The vacuum canister adds additional timing on to the total timing talked about in the previous post. This additional timing is used during lighter than WOT loads and is where your going to find increased fuel mileage and a cleaner running engine with good throttle response thru the different load conditions.
How much vacuum advance timing do I want to add? If you look at the previously posted graph you see the two upper red lines at 52 & 56 degrees. This is the range thatís generally considered a good target area for the vacuum advance timing. I prefer to stay around the 52 degree plus or minus 1 degree line (51 Ė 53 degrees). To much timing at cruise RPM going down the road is not a knocking or pinging its like a very slight hesitation very minor feeling, it could be overlooked by some or just feeling a little odd and as you start applying a little more throttle and your vacuum drops a little it goes away. You take your total timing and subtract it from 52 degrees and this is the amount of vacuum advance timing that you want plus or mines 1 degree. My set up is 52 Ė 33 Total Timing = 19 so I want a vacuum advance with 18 - 20 degrees. (This is crankshaft degrees, keep that in mind)
How much vacuum advance do I have (in the vacuum canister on the car/truck)? There are three numbers that I interested in. (1) At what vacuum Hg does the vacuum canister start to advance the timing? (2) How many degrees does the vacuum canister add to the total timing? (3) At what vacuum Hg does the vacuum canister have all the degrees applied? With the engine at operating temp, vacuum port on carb capped off, and mechanical timing set as in previous post (initial timing set). Hookup your vacuum hand pump to the canister and timing light, with the engine running at idle start slowly applying vacuum to the canister and watch the timing mark. You want to write down at what vacuum Hg does the timing mark start to advance/change (this would be generally between 3 Ė 8 Hg). Continue applying vacuum to the vacuum canister, you want to find out how may degrees the canister applies and at what vacuum Hg itís applied. Write this information down (this could be any where between 10 Ė 20 Hg). You might have to apply the vacuum a few times to determine at what vacuum Hg things happen, try to be as accurate as possible.
One problem you could run into when trying to measure the vacuum canister in the above paragraph. If the engine RPM increases as more timing is added to the initial timing when you go above 800 RPM the mechanical advance starts adding timing. We just want to know how much the vacuum canister is adding, not what the additional mechanical advance might be adding because of increased RPM. A workaround to this problem is to set your initial timing (advancing timing) until no RPM change is noted on the timing mark and adjust the idle RPM below 800 (this is just a temporary setting to take the readings, not for driving around). Generally youíre not going to run into this problem when your initial timing is set to 15 Ė 18 degrees for your distributor, but if your initial timing is about 5 degrees you could see this problem. After you take your readings or any time you have to use this workaround to take measurements, reset your initial timing to what I would say is required to meet your total timing as described in the previous post. At the end of this post I will talk about chousing a distributor for your engine, all this information is in setting up what you have sitting in front of you on your engine and donít try to read into it that you need to change your distributor to increase performance, all the different distributors can be made to work for street performance.
Next you need to hookup the vacuum line from your carb to the vacuum canister and take it out for a drive to gather more information. The vacuum canister that you have in your car/truck should be good enough for you to gather the information. You need the vacuum gauge and RPM gauge in the cab to take the measurements. There are two measurements that I want. (1) What is the vacuum Hg reading at WOT? This is thru 1000 Ė 3500 RPM probably in 2nd or 3rd gear (not in overdrive), normally you will find this number to be about 1 Ė 3 Hg. (2) What is the vacuum Hg reading at cruise? This is cruising down the road on level land (not going up or down hill) at your cruise MPH (mine is 65 MPH). This is in overdrive with the torque converter locked up if so equipped, how the car/truck would normally be used at your normal MPH cruise.
More general information about the two vacuum Hg readings above. First the readings that we obtain we are going to use to determine the right vacuum canister for the car/truck sitting in front of you at your location. I think most of you have seen the charts on how to pick a carburetor size by cubic feet per minute (CFM) for a particular engine cubic inch displacement (CID). In general an engine with a certain CID has the potential/ability to generate/create a set amount of vacuum at sea level (yes a cam size can affect this). The factory generally matches the carburetor this way and depending on how the engine will be used a smaller CFM carburetor may be used on an engine. With a smaller carb CFM you might see a higher vacuum reading Hg at WOT they could be up about 8 Hg, with a larger carb CFM you could see vacuum Hg readings down at 0 Hg at WOT. With a larger carb CFM than a particular CID engine can handle it creates problems in street performance tuning, not that it can not be overcome it just makes it a little bit harder unless youíve gone to big. Keep in mind if you change your carburetor to a larger or smaller CFM one that refiguring of your vacuum canister needs might be required. Every car/truck has a different load to maintain a steady cruise speed going down the road and at this light load condition we want all the additional timing that the vacuum canister is supplying. Be careful about taking this reading that youíre on a level surface and not driving into a head or tail wind, drive both directions on the same road and the vacuum readings should be with in Ĺ Hg in both directions.
We now have all the information we need to figure out what vacuum canister we need to fit the engine and setup. Iím going to be using my numbers for the example below you should be using your readings and plugging them in to figure out your needs.
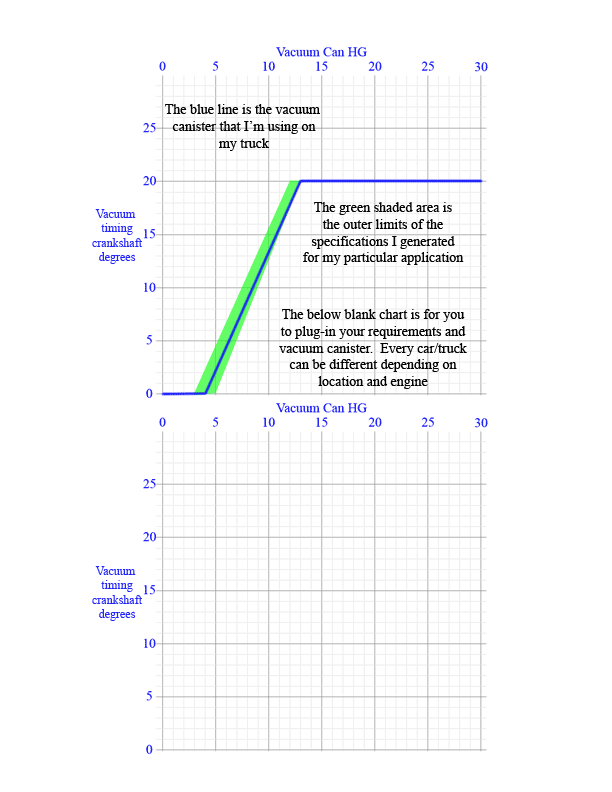
I want a vacuum canister with 18 Ė 20 degrees advance (see above on how to figure)
I want the vacuum canister to start advancing the timing at about 2 Ė 4 Hg above WOT vacuum reading (my WOT reading is Ĺ - 1 Hg) that means I want my vacuum canister to start increasing the timing at 3 Ė 5 Hg.
I want all the vacuum advance degrees in at 1 Ė 2 Hg below cruise MPH vacuum Hg (my cruise Hg is 14) that means I want a vacuum canister that has all the degrees in at 12 - 13 Hg.
Now to find a vacuum canister to meets my needs. By outward appearance all the vacuum canisters look similar but the difference is in how they would meet my needs regarding the above specifications I generated listed above. The above tolerances you might have to expand a little to fit a particular vacuum canister choice but I recommend staying as close as possible in chousing a vacuum canister for your engine and set up.
There are a number of different vacuum canisters to chouse from for the stock stile distributors (point or HEI stile), but over the years the specifications have been striped out of the parts books and when your down at the parts store the parts man just wants to know what car/truck and engine your using it on (not much help there). On custom distributors adjustable vacuum advance canisters are commune place and retro fitting to the stock stile distributors also exist. Regardless on what canister you decide to use check it before you install it, thereís no need to install it just to find out that itís not going to work for your setup/specifications. You canít bench check how many crankshaft degrees that a particular canister will give you but you can check at what Hg it starts to advance and at what Hg is the entire advance applied. Hookup your hand vacuum pump to the vacuum canister you have in your hand and start applying vacuum until the canisters advance rod starts to move, this is when the degrees will start to advance. Continue applying more vacuum until the canister advance rod just contacts the full advance stop, this is the Hg that all the advance is accomplished. Personally I want to check the vacuum canister out before installing it, even if I know what the specifications are for the one I have sitting in my hand, I never just trust it, always check.
(Adjustable vacuum advance canisters) There are a number of them out there by different manufactures. The adjustment is normally accomplished by inserting an alien wrench in the vacuum port and turning it a number of turns (clockwise all the way in and up to 10 turns counterclockwise all the way out). Some adjust at what vacuum the vacuum canister starts to change the advance and at what vacuum all the advance is applied, others might change the number of degrees that are applied by turning the alien wrench. Then some also have the ability to change both the degrees applied and at what vacuum. All I can say about them is if you canít adjust them to meet your specifications that you generated in this article there no use to you and you need to look for another one that meets your needs. I was surprised by the adjustable vacuum advance canister that came with my JEGís distributor (no markings on the canister to identify it by manufacturer), I was able to adjust it to meet my needs/generated specifications.
Any time you change a vacuum canister in your distributor you need to make sure that the initial timing didnít change, if it did you need to reset it plus check it out as described above to make sure it meets your generated specifications. Always check to make sure itís doing what you want it to do.
Hear is a chart that might help you. In the top chart it shows my generated specifications and the canister specifications that Iím using. The bottom chart is blank for you to plug in your numbers and help figure out what canister you need.
Hear is a link to an article written by Lars Grimsrud and Duke Williams (Distributor Vacuum Advance Control units Specs and facts for GM Distributors) That I would recommend reading for better understanding of vacuum canister selection. The link is to a PDF format file and you need Adobe Acrobat to read it
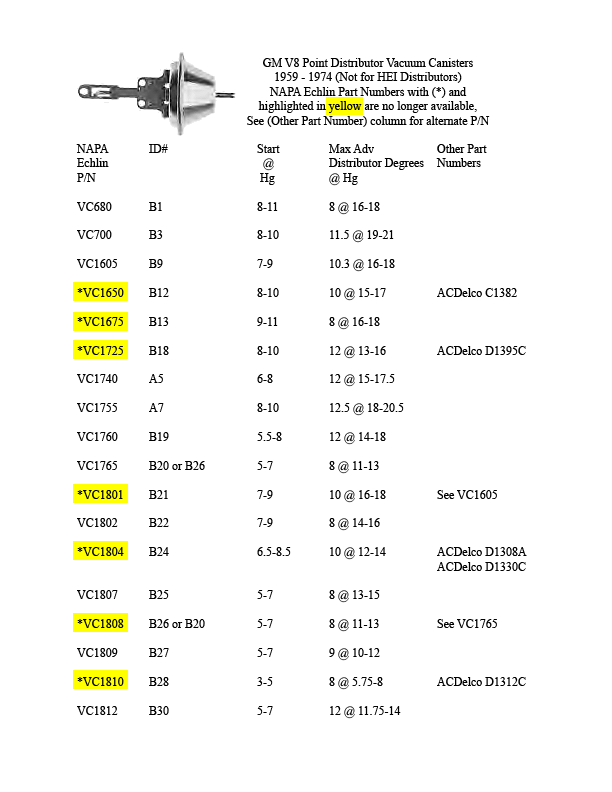
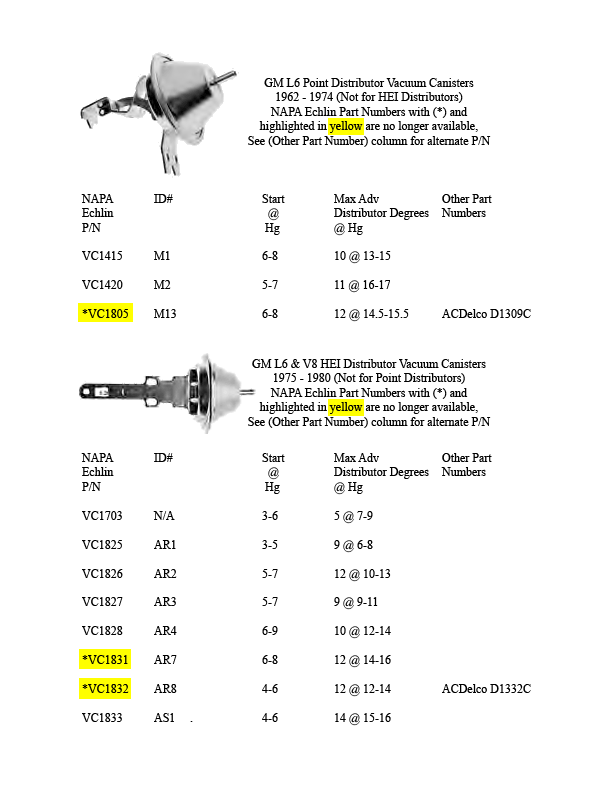
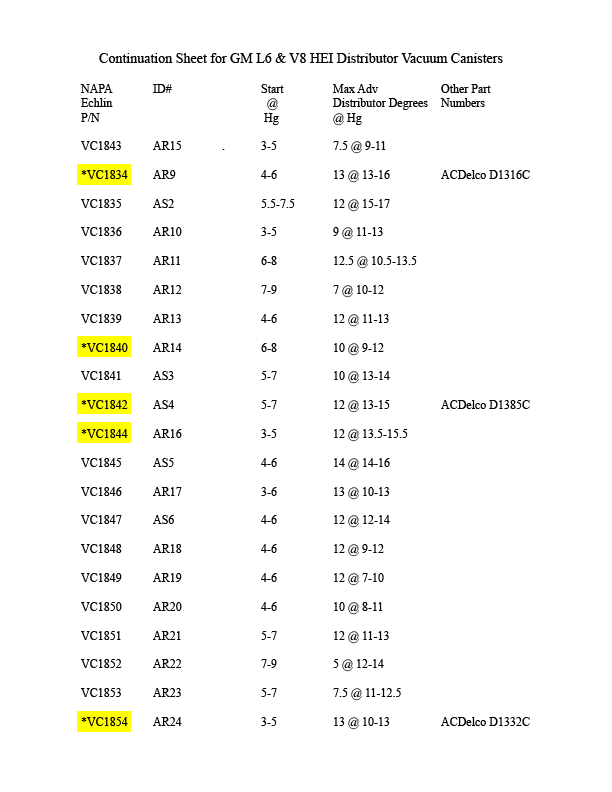
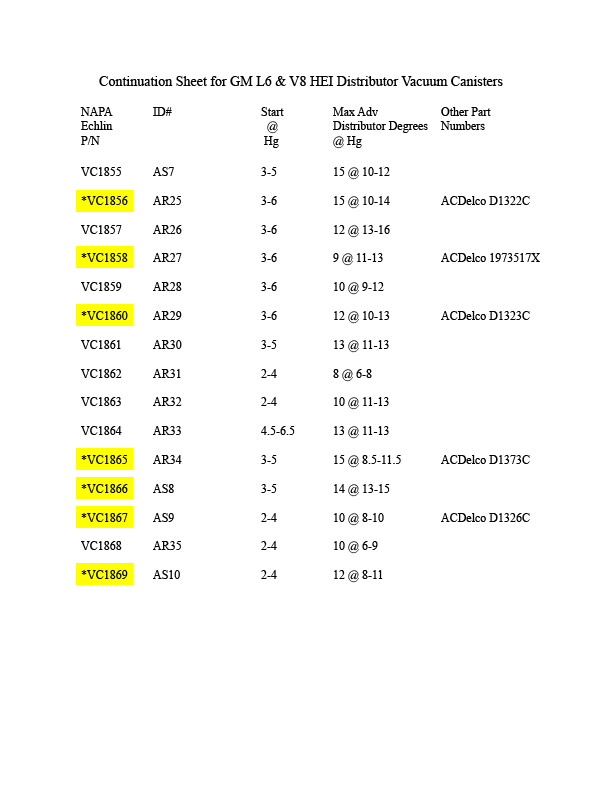
http://www.lbfun.com/warehouse/tech_...ance_Specs.pdf There are minor differences between the specifications that I have written above but the primary thing that I believe would be for you to measure what you have and chouse the vacuum canister based on what you have sitting in front of you at your location. I took the vacuum canisters that are listed in the article and looked to see if there still being carried in the NAPA catalog (Echlin part numbers) and adding ACDelco part numbers for the ones that are no longer being carried by NAPA. (See the list in the below pictures) Keep in mind that the vacuum canister degrees are in distributor degrees and you need to multiply them by 2 to convert them to crankshaft degrees.
One question that continues to crop up is do I connect my distributor vacuum advance canister to full time vacuum or ported vacuum? As far as Iím concerned it all depends on the distributor that youíre using and if your engine likes the additional timing at idle. Your initial timing setting is based on total timing, with a distributor that has its initial timing down around 5 degrees or below I would consider hooking the vacuum up to full time vacuum and with the initial timing at about 15 degrees I would use ported vacuum. Ported vacuum becomes full vacuum at about 1000 RPM as the throttle is increased so I donít think that having additional advance between letís say 600 Ė 1000 RPM is that important unless your engine likes it. Iíve found that at idle RPM with the maximum vacuum Hg reading under a no load condition that the small block Chevy likes about 18 degrees initial advance setting but as the load on the engine is increased not to WOT but some where in-between you could find yourself in a knocking/pinging condition when lugging the engine. This is a transition area from idle (no load) to an increased load as your accelerating, the vacuum canister removes the additional timing as the vacuum goes down and the RPMís go up but the air fuel ratio that the carb is supplying might not be rich enough to support the additional timing. I think youíre going to find that an initial timing of about 15 degrees is around the right area to compensate for the transition plus delaying the additional timing being added till after 1000 RPM will prevent the problem.
For a street car/truck with a street engine I think the HEI distributor is the best choice in distributor to chouse. They generally come with about 20 crankshaft degrees of advance timing and require less maintenance than a point distributor. All the different distributors will work and can be adjusted and work just fine for the street and if you want to stay with a stock look the point distributors will work just fine for street performance.
I spent a lot of time in this article taking about vacuum and taking readings. One thing that needs to be added is before you start doing any of the checks above you need to make sure that you donít have any vacuum leaks around your carb and manifold. Vacuum leaks can throw your readings off.
I hope you have a better understanding of whatís happening under your distributor cap as you drive your ride around and how to measure it & modify it to achieve improved performance. I donít think that it is as mysterious as some might want you to believe.
Enjoy your build