Thanks guys, and LT7A you have hit the nail on the head. I didnt want another project that goes on for years before it hits the road (like my last build-7 years), so I am making use of anything that I have that works and is safe. It's also a major joy just leaving it old and rusty looking, as nothing is worse than trying to make changes while not scratching paint or denting things. As for my comment about being onto the easy stuff, I may have spoken too soon. Case in point, the mounting of the radiator, electric fan and tranny cooler:
Heres what I ended up trying to finangle together. The front sheet metal all bolts together as one unit, and then the entire assembly can be bolted to the rad cradle. These trucks have a sharply tapered front end, so space is at a premium, and the rad assembly all sits in that narrow grill. To make matters worse, this particular truck has seen some hard use on the farm, and sliding that sheet metal onto the cradle is a 2 man job that requires compressing the cradle while you fit the sheet metal. I needed to come up with something that bolts onto the cradle, rather than welds on, so heres what I did:
This is the narrow front end sheet metal clip that everything has to fit into:

And this is the cradle being modified. The bottom of the rad will simply sit in these 2 wide hooks, with rubber pads to protect it from shocks. The rad is offset slightly to the passenger side to buy some much needed room (rad outlet and serpentine belt tensioner conflict):

The top of the rad will be held in place by a plate with a grooved channel. The design of this is not mine, I got the idea from Tempest67s Dale build (Thanks Tempest67, that idea was clever!). The aluminum strip on the top of the rad is encased in a piece of rubber tube with a slit cut into it, and that rubber tube is then encased by a U-channel. Here is the rad with the slit tube in place:

And here is the grooved plate. The 2 little hooks sticking out front will be for the fan bracket:

The top plate has slightly oblonged holes give minor back & forth adjustment. Up & down adjustment of the rad can be done (if needed) by varying the thickness of the rubber pads or the slit tube, or adding other spacers. Of course that top plate has to bolt onto something, so heres what I came up with:

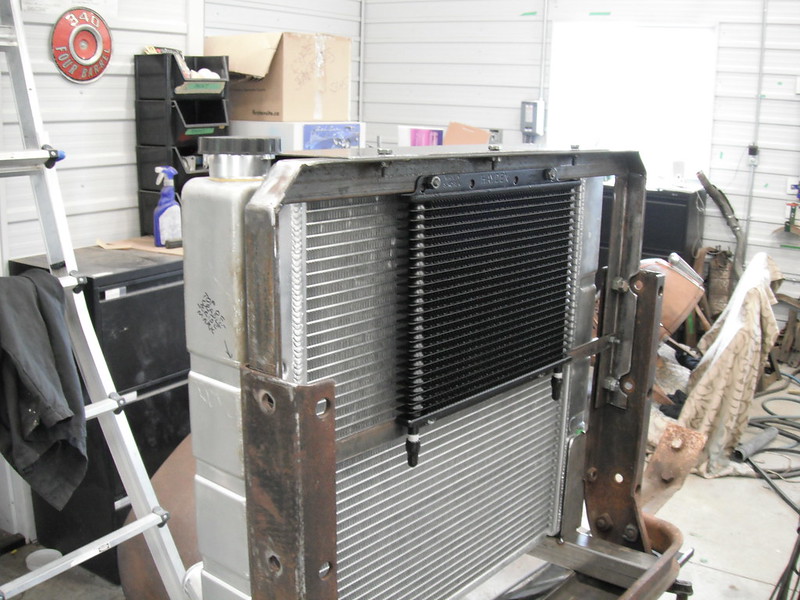
This assembly bolts to the remains of the factory cradle, and looks simple, but it took some serious fiddly work. The bolts that attach this new piece to the factory cradle posts are nestled into the corner and they JUST fit ( a few thousandths clearance between the points of the bolt head and the angle iron as you turn them in). The big notches in the angle iron allow enough room to put a ⅝ socket onto the bolts that hold the front sheet metal to the factory cradle posts. The upper corners of the new assembly hit the sheet metal during a fitment check, so they had to be sliced at an angle and strengthened/rewelded. The height of the new assembly was based on the sweet spot I found that lets me juggle installation and clearance issues. The rad cap sits partially under the sheet metal, and can be accessed for maintenance, and the lower rad outlet will be able to clear the serpentine belt tensioner pulley. It was a 3D jigsaw puzzle! Here is the top plate that secures the rad, bolted to the new cradle extension:

Wherever possible, I welded in studs so that I can instal/remove parts using just a socket or wrench (rather than using nuts and bolts which require you to somehow weasel 2 hands into an already tight space). Here is the fan (Hayden 16 inch reversible model 3700), bolted onto the studs of the fan support:

And here is the flipside, where the tranny cooler (Hayden model 678) is installed on the studs. It looks kinda funny mounted up high like that, but my fan is also mounted tight to the top so the tranny cooler is right in the path of the air drawn by the fan.
Sometimes you may notice a small X lightly scored into metal pieces I have fabbed. I do this where its easy to accidentally mix up where a part goes. I use a small cutoff wheel to mark the passenger side piece with an X so that I dont accidentally install it on the driver side.
Id have liked to have posted a pic of the whole mess in place with the front end sheet metal installed, but I have to wait till I have a helper to do this. My fingers are crossed that there are no hidden clearance issues lurking in wait. Confidence level is about 80 percent
After a test fit, I'll take it all apart and do full welds.
More to come!