Been working on the truck on and off lately and don’t have my pics yet organized to show what I’ve done. For now I thought I’d share how I went about building my exhaust. For cutting the mandrel bends I have a jig I made up that works well for me. You can see how I made the jig and how it works in a couple of the pics below. Picture of the jig below:

I used MDF to make the jig. The jig body is built up from several pieces of MDF. The thickness of the jig will need to be less than the diameter of the pipe. Here, I used three pieces of MDF. The width of the jig will be the inside bend width of the u-bend. U-bends will have a long radius bend of 1.5xD (diameter). To get the inside width of the u-bend you can calculate it as 1.5xDx2-D, or measure it. You will find out most of the time it’s a little greater than “theoretical”.


Once you have the jig body assembled, find the center and put a half circle on it with a compass as show below. I then nibble away the excess with a chop saw then finish it off on a sander.


You will also need to drill a through hole on your center mark. I also recess the hole a little on the back for a carriage bolt. You will attach a radius cutting guide with the center bolt. The radius cutting guide is simply a strip of metal with a hole drilled in the middle of it and a slit cut down the center of it. I stack a couple of wasthers under it to get it to the height of the pipe.


The finished jig is show below. The finished jig allows you to cut the correct anle to match the routing of your exhuast. The jig also ensures you cut along a line that intersects the radiaus center point of the bend to esure the plane end of the cut is round. [/img]
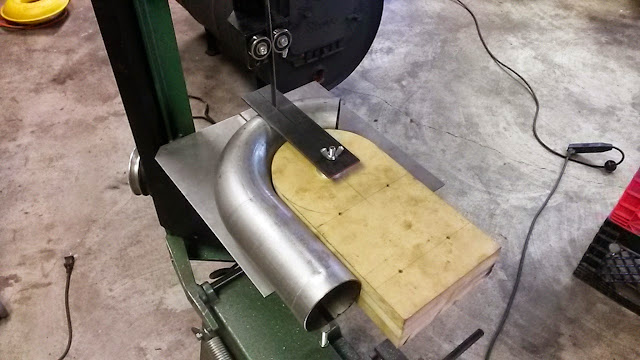

I use an adjustable square to find the angle of the cut.

Once you know the angle of the cut from your adjustable square, use it to set up the appropriate angle on the jig. No mesuring or math here. The two pictures below show two different methods for finding the correct angle on the jig from your adjustable square.


Once the jig is adjusted, cut the pipe.

The picture below shows the final cut piece and the angle of the cut.

Below shows how to jig up a pipe angle without the straight leg of the u-bend. I usually make use of the straight leg but if you have some left over and un-utilized bends you can cut angle sections out of it. The first picture shows setting the piece in the jig. The second and third pictures show the two different methods for finding the correct angle on the jig from your adjustable square.


I use an inexpensive Harbor Freight band saw. I like to use the bi-metal blades by SuperCut. They don’t alawys have them at Harbor Freight. I think the bi-metal blades are worth ordering because the last much longer.
You can tilt the chop arm up and turn it into a table top band saw as show in the previouse pictures.

For my exhaust supply I use all aluminized piping and u-bends. U-bends can be hard to find other than mail order. There’s a muffler shop in Tokepa, KS that has a mandrel bending machine, which is really rare given how expensive the machines are. I live about an hour from there so I made a trip to pick up some pieces from him. He may be willing to ship; the shops name is Hogan Muffler & Brake,
www.hoganmuffler.com.
For the straight sections, I would check with a local exhaust shop first before a parts store. In my experience, an exhaust shop will give you a better price on exhaust piping.
You will need a separate jig for each size of exhaust piping you are working with since they all have a different bend radius. For far I have one made up for 2, 2-1/2 and 3 in. pipe.
I had also built the exhaust for a 52 Chevy that I used to own after splitting the stock manifold. Here are some pictures of my 52 exhaust whose routing was a little tighter and more complicated than my AD/S10 project. Building exhaust like this is pretty easy to do, it’s just a little time consuming.


