
|
Register or Log In To remove these advertisements. |
|
|
|
|||||||
 |
|
|
Thread Tools | Display Modes |
 12-26-2018, 07:55 PM
|
#1 |
|
Senior Member
 Join Date: Sep 2017
Location: Bryan, Texas
Posts: 2,286
|
Welding a patch panel
I've got these small patch panels to weld in. I have them fitting pretty tight. I've heard they should fit the hole snug and I've heard that they should have space around them so they can expand.
Is this too tight? 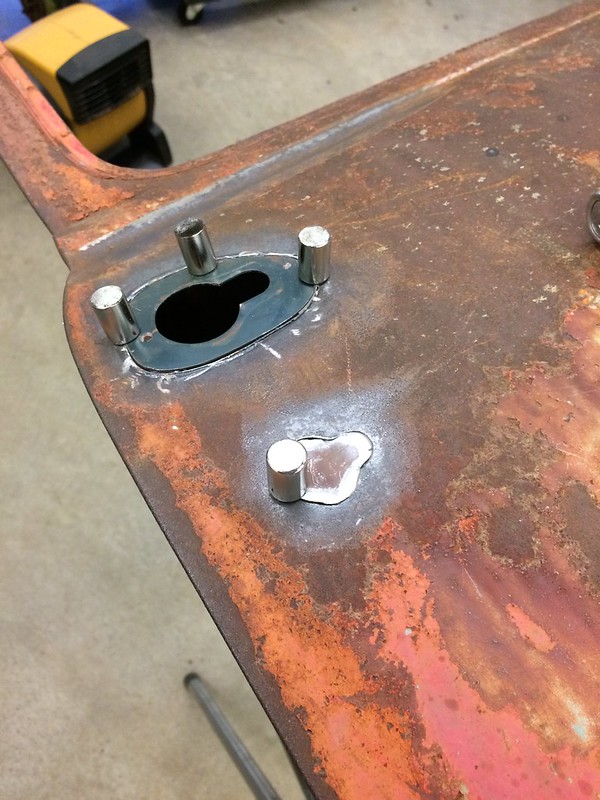 IMG_2119 by Robert Moorman, on Flickr IMG_2119 by Robert Moorman, on Flickror does it really matter that much on small patches?
__________________
8man-aka Robert 1948 on a S10 Frame, small block with a carb 1954 Cab, 53 Front and Bed, 50 Doors, S10 Frame, Power TBD Build thread: "]http://67-72chevytrucks.com/vboard/showthread.php?t=746899&highlight=wife%27s+48[/URL] [/URL]http://67-72chevytrucks.com/vboard/showthread.php?t=840204 |

|

|
|
12-26-2018, 08:45 PM
|
#2 | |
|
Registered User
Join Date: Dec 2010
Location: washington NJ
Posts: 766
|
Re: Welding a patch panel
Quote:
|
|
|
|
|
|
12-26-2018, 08:50 PM
|
#3 |
|
Registered User
Join Date: May 2011
Location: Reno Nevada
Posts: 378
|
Re: Welding a patch panel
A good rule of thumb is leave a gap around the patch the same gap as the wire thickness. Vic
|
|
|
|
|
12-26-2018, 08:52 PM
|
#4 |
|
Registered User
Join Date: Nov 2010
Location: calgary alberta
Posts: 7,866
|
Re: Welding a patch panel
I usually leave a little space around the patch so the weld goes through better and you know it isn't just a surface weld. small spot welds all around the perimeter and then fill in the spaces between the spots slowly. let the welds and surrounding area cool to the same temp as surrounding metal before proceeding to the next weld. it's good to have something else to do in between otherwise you always wanna come back too soon and then you have distorted metal to deal with.
too many magnets will distort the weld process and make porosity, like you were welding dirty steel with no gas, so you may wanna get rid of those as soon as possible. I like the little clamps for that reason plus they always leave that little bit of room for the weld. large "C" clamp style vice grips work well too if you can get them in there. the cleco rivets work well too if you have a small "hole" in the gap between the metal parts so the rivet will fit through then use a small flat washer on the back side https://www.amazon.com/Welding-Clamp.../dp/B01CHGL1AW https://www.amazon.ca/Intergrips-Cla.../dp/B01MDS55LE https://www.musclecardiy.com/bodywor...ld-body-metal/ |
|
|
|
|
12-26-2018, 08:54 PM
|
#5 |
|
Registered User
Join Date: Sep 2018
Location: Batesville,MISSISSIPPI
Posts: 312
|
Re: Welding a patch panel
As you start tacking the patch it will swell and not fit right, so it needs room all around.
|
|
|
|
|
12-26-2018, 09:00 PM
|
#6 |
|
Post Whore
 Join Date: May 2015
Location: Alabama
Posts: 14,600
|
Re: Welding a patch panel
I've done it both ways..tight and loose...really no difference...your still gonna need to hammer and dolley it a little to get it back in shape...just take your time and go slow...when you grind, only grind the weld..not the surrounding metal....I say weld away....
__________________
Mongo...aka Greg RIP Dad RIP Jesse 1981 C30 LQ9 NV4500..http://67-72chevytrucks.com/vboard/s...d.php?t=753598 Mongos AD- LS3 TR6060...http://67-72chevytrucks.com/vboard/s...34#post8522334 Columbus..the 1957 IH 4x4...http://67-72chevytrucks.com/vboard/s...63#post8082563 2023 Chevy Z71..daily driver |
|
|
|
|
12-26-2018, 09:00 PM
|
#7 |
|
Registered User
Join Date: Sep 2018
Location: Batesville,MISSISSIPPI
Posts: 312
|
Re: Welding a patch panel
bigger patch panels will swell too.
|
|
|
|
|
12-26-2018, 09:00 PM
|
#8 |
|
Registered User
Join Date: Nov 2010
Location: calgary alberta
Posts: 7,866
|
Re: Welding a patch panel
also, clean to bare metal on both sides because the weld draws contaminants in from the back side and around the weld on the front side.
there goes that patina, lol. |
|
|
|
|
12-26-2018, 09:06 PM
|
#9 |
|
Registered User
Join Date: Nov 2010
Location: calgary alberta
Posts: 7,866
|
Re: Welding a patch panel
here is a shot of the cleco rivets and flat washers used to hold the sheet metal parts together. drill a small hole in the gap to allow the rivet to slip through and use a washer on both the front and back sides.
https://weldingweb.com/showthread.ph...ge-grip-clamps |
|
|
|
|
12-26-2018, 09:28 PM
|
#10 |
|
Senior Member
Join Date: Sep 2017
Location: Bryan, Texas
Posts: 2,286
|
Re: Welding a patch panel
Thanks guys.
Raven, I pulled the magnets off as soon as I took the picture. Not knowing why, but I did. I also have the second book you referenced and I've read it a couple of times. You said to clean the back side as well, but it is inside the door in this case. I don't know how I would clean it. I am using a wire wheel on a die grinder to knock the paint and rust off the metal to weld it. Also, I'm only cleaning back about 1/2". I wanted to get everything soda blasted, but we don't have anyone near who does it and I wanted to get these holes filled in so I can finish the door handle change. Joe said I am bench racing, or overthinking, but since I only want to do the 54 metal repair ONE TIME, I thought I'd ask. I have Clecos, but have not used them yet. I guess it's time to pull them out and make the metal fit with them in place. I'm using the .023 easy grind wire and I am using a cutting wheel to take off the proud part of the weld.
__________________
8man-aka Robert 1948 on a S10 Frame, small block with a carb 1954 Cab, 53 Front and Bed, 50 Doors, S10 Frame, Power TBD Build thread: "]http://67-72chevytrucks.com/vboard/showthread.php?t=746899&highlight=wife%27s+48[/URL] [/URL]http://67-72chevytrucks.com/vboard/showthread.php?t=840204 |
|
|
|
|
12-26-2018, 09:58 PM
|
#11 |
|
Registered User
Join Date: Nov 2010
Location: calgary alberta
Posts: 7,866
|
Re: Welding a patch panel
I use a lot of these roloc discs. they come off the backer with a slight turn and have scotchbrite in various "grits", sanding discs in various grits, flap discs in various grits and also the clean and strip style abrasive. they work really well and come in a couple different sizes. I also use weld through primer on the area like the inside of the door panels when I have them scuffed down and before welding. it is high in zinc so like galvanizing but the mig still works. remember to cut the mig wire after each weld so you get a nice chisel tip to cut through the primer or other slag and get a weld started
https://www.amazon.ca/s/?ie=UTF8&key...l_8xss85nptg_e https://www.amazon.ca/Industrial-Sci...de=11849097011 https://www.napaonline.com/en/p/MMM05917 https://search.eastwood.com/ppc/weld...iAAEgKsuPD_BwE |
|
|
|
|
12-26-2018, 10:28 PM
|
#12 |
|
Post Whore
Join Date: May 2015
Location: Alabama
Posts: 14,600
|
Re: Welding a patch panel
I used magnets quite a bit on mine...once I got it all tacked in I pulled them...they should be fine...if you can get your hand to the backside you might be able to hand sand the area...I had places I couldnt get to at all....I just went ahead and welded it with no ill effects
__________________
Mongo...aka Greg RIP Dad RIP Jesse 1981 C30 LQ9 NV4500..http://67-72chevytrucks.com/vboard/s...d.php?t=753598 Mongos AD- LS3 TR6060...http://67-72chevytrucks.com/vboard/s...34#post8522334 Columbus..the 1957 IH 4x4...http://67-72chevytrucks.com/vboard/s...63#post8082563 2023 Chevy Z71..daily driver |
|
|
|
|
12-26-2018, 11:53 PM
|
#13 |
|
Registered User
Join Date: Jul 2007
Location: Toppenish, WA
Posts: 15,345
|
Re: Welding a patch panel
I'm thinking that how much gap you have might well depend on if you are using mig or tig. Mig wanting a small gap.
I agree 100% with just doing small welds at a time and letting it fully cool before hitting it again. I've seen too many warped panels that guys thought they could get away with running long beads on that were warped so bad that they weren't usable when done. One of the last jobs one of my buddies did before having a stroke was replacing the roof on an AD that a couple of guys working in a local shop decided that the could run a continuous bead across the roof without stopping to let it cool. I didn't get any photos as he was finishing the job when I saw it but I did see the old roof.
__________________
Founding member of the too many projects, too little time and money club. My ongoing truck projects: 48 Chev 3100 that will run a 292 Six. 71 GMC 2500 that is getting a Cad 500 transplant. 77 C 30 dualie, 454, 4 speed with a 10 foot flatbed and hoist. It does the heavy work and hauls the projects around. |
|
|
|
|
12-27-2018, 12:41 AM
|
#14 | |
|
Registered User
Join Date: Feb 2010
Location: Lebanon, Ohio
Posts: 1,359
|
Re: Welding a patch panel
Quote:
https://www.ebay.com/itm/3M-Green-Co...-/301028309091 Two months ago I bought a wet sander for $145 on Ebay. It was $512.25 on Amazon -- seriously.
__________________
Bob "It won't take long and it won't cost much." '55 3100 (383/700R4)--'55 Belair Sedan (350/4-speed)--'64 'Vette Conv. (327/4-speed)--'68 GTO Conv. (462/4-speed)--'69 Cutlass Conv. (350/TH350)--'06 'Vette Conv. (LS2/6-speed) Bob's Retirement Build - My 55 TF Bob's 700R4 Build (how-to) |
|
|
|
|
|
12-27-2018, 03:14 AM
|
#15 | |
|
Senior Member
 Join Date: May 2007
Location: Doodah Kansas
Posts: 7,748
|
Re: Welding a patch panel
I would drill that one that is a funny shape with a step drill till its round and make a round patch instead of that one.
the top patch I would scribe the new cut (so you can place it correctly) but not cut it out till you weld it in. that piece with the hole in it is going to look like an egg noodle after a couple tacks. if need be, cut it out square and larger and patch it. MIG will work, the way I set up my MIG welder for sheetmetal is I turn the heat to the lowest setting and turn the wire speed up a little at a time till the tack pushes back. you will want a little gap, someone said the width of the wire you are using and thats as good a guide as any. Quote:
for what its worth, bench racing is planning the next step without doing the first step, not overthinking. bench racing is making a shopping list for bolt hardware for the 4 link on the car you dont even own yet. overthinking is a different problem, and not one you are suffering from currently. its normal to ask questions and want to get it right, and there are a lot of guys who can help you here.
__________________
the mass of men live lives of quiet desperation if there is a problem, I can have it. new project WAYNE http://67-72chevytrucks.com/vboard/s...d.php?t=844393 |
|
|
|
|
|
12-27-2018, 02:39 PM
|
#16 |
|
Registered User
Join Date: Dec 2000
Location: Boise, Idaho
Posts: 6,003
|
Re: Welding a patch panel
I am personally into fast-hot welds so it doesn't create a large "HAZ" (Heat Affected Zone.)
And if I missed it somewhere in one of the posts, DO NOT COOL THE WELDS! Think about this, the metal is made of a lattice work of molecules. When you heat the metal they separate apart, the hotter it gets the more separated they get, until it's liquid, right? It's that simple, think about it, the hotter it gets the further apart these molecules are from one an other. If you let it cool naturally, those molecules basically go back to where they were. They will end up a little tighter just because the surrounding air is cooler than the metal so they are being "cooled" a little, so it will shrink a tad. But if you cool the weld the molecules RUN together gathering closer tightening the metal making that area smaller! THAT is what warps the metal. This is a HUGE misconception that I causes a lot of damage doing over the years before I finally learned. You want a hot fast weld, two or even one at a time. Then WALK AWAY and do something else and come back to it. If it is cool enough to put your tongue on it, then you can do one or two more, then WALK AWAY. I personally like tight fitting gaps. With the FAST HOT weld, you WILL penetrate so there is no worry with that. Do some test welds, a bunch of them until you are comfortable knowing you are getting a little penetration and not too much. Brian
__________________
1948 Chevy pickup Chopped, Sectioned, 1953 Corvette 235 powered. Once was even 401 Buick mid engined with the carburetor right between the seats! Bought with paper route money in 1973 when I was 15. "Fan of most anything that moves human beings" Last edited by MARTINSR; 12-27-2018 at 02:47 PM. |
|
|
|
|
12-27-2018, 03:16 PM
|
#17 |
|
Senior Member
Join Date: Sep 2017
Location: Bryan, Texas
Posts: 2,286
|
Re: Welding a patch panel
Joe, I didn't understand the bench racing. Thanks for clearing that up. I am trying to do research prior to jumping in, so I need to ask questions to keep moving forward.
Martin, that makes sense. I had heard to use an air gun to cool the welds, but your description makes much more sense, although I'll not be testing the heat with my tongue. Before I read your post, I had already grabbed a couple of scraps and started testing temp and speed settings on the MIG. I liked the setting where it got full penetration quickly. Speed is set so I got very little "proud" areas, a little on top and a little on bottom. It seemed to work well on the scraps. Do you planish each "dot" and then grind it smooth prior to doing the next weld "dot"? Or do you complete the weld doing one dot at a time until the entire weld is complete and then finish it?
__________________
8man-aka Robert 1948 on a S10 Frame, small block with a carb 1954 Cab, 53 Front and Bed, 50 Doors, S10 Frame, Power TBD Build thread: "]http://67-72chevytrucks.com/vboard/showthread.php?t=746899&highlight=wife%27s+48[/URL] [/URL]http://67-72chevytrucks.com/vboard/showthread.php?t=840204 |
|
|
|
|
12-27-2018, 03:18 PM
|
#18 | |
|
Registered User
Join Date: Feb 2010
Location: Lebanon, Ohio
Posts: 1,359
|
Re: Welding a patch panel
Quote:

__________________
Bob "It won't take long and it won't cost much." '55 3100 (383/700R4)--'55 Belair Sedan (350/4-speed)--'64 'Vette Conv. (327/4-speed)--'68 GTO Conv. (462/4-speed)--'69 Cutlass Conv. (350/TH350)--'06 'Vette Conv. (LS2/6-speed) Bob's Retirement Build - My 55 TF Bob's 700R4 Build (how-to) |
|
|
|
|
|
12-27-2018, 03:33 PM
|
#19 |
|
Post Whore
Join Date: May 2015
Location: Alabama
Posts: 14,600
|
Re: Welding a patch panel
Dran,, you have to alternate sides of your toungue... top and bottom equally...then the molecules will line right back up..
__________________
Mongo...aka Greg RIP Dad RIP Jesse 1981 C30 LQ9 NV4500..http://67-72chevytrucks.com/vboard/s...d.php?t=753598 Mongos AD- LS3 TR6060...http://67-72chevytrucks.com/vboard/s...34#post8522334 Columbus..the 1957 IH 4x4...http://67-72chevytrucks.com/vboard/s...63#post8082563 2023 Chevy Z71..daily driver Last edited by mongocanfly; 12-27-2018 at 04:00 PM. |
|
|
|
|
12-27-2018, 03:35 PM
|
#20 |
|
Registered User
Join Date: Nov 2010
Location: calgary alberta
Posts: 7,866
|
Re: Welding a patch panel
dransport, you are prolly just not holding your mouth right. you gotta get that down pat first and THEN hold your tongue on the weld till it cools the steel off. otherwise your lips get chapped from the extended heat time. haha.
nice write up Brian. there is also the easy grind welding wire as well. it is softer from what I hear. never used it yet though, personally. |
|
|
|
|
12-27-2018, 03:39 PM
|
#21 |
|
Registered User
Join Date: Feb 2010
Location: Lebanon, Ohio
Posts: 1,359
|
Re: Welding a patch panel
NOW you tell me! Thanks for the tips, guys!
__________________
Bob "It won't take long and it won't cost much." '55 3100 (383/700R4)--'55 Belair Sedan (350/4-speed)--'64 'Vette Conv. (327/4-speed)--'68 GTO Conv. (462/4-speed)--'69 Cutlass Conv. (350/TH350)--'06 'Vette Conv. (LS2/6-speed) Bob's Retirement Build - My 55 TF Bob's 700R4 Build (how-to) |
|
|
|
|
12-27-2018, 04:02 PM
|
#22 |
|
Post Whore
Join Date: May 2015
Location: Alabama
Posts: 14,600
|
Re: Welding a patch panel
Your probly like most of us that dont read all the way thru the instructions...it was probably on the last page...
__________________
Mongo...aka Greg RIP Dad RIP Jesse 1981 C30 LQ9 NV4500..http://67-72chevytrucks.com/vboard/s...d.php?t=753598 Mongos AD- LS3 TR6060...http://67-72chevytrucks.com/vboard/s...34#post8522334 Columbus..the 1957 IH 4x4...http://67-72chevytrucks.com/vboard/s...63#post8082563 2023 Chevy Z71..daily driver |
|
|
|
|
12-28-2018, 12:32 AM
|
#23 |
|
Registered User
Join Date: Dec 2000
Location: Boise, Idaho
Posts: 6,003
|
Re: Welding a patch panel
LOLOL, thanks for the laughs guys. I haven't tried the easy grind wire. I have drifted away from the MIG a little. On sheet metal welds like these, I gas weld now most of the time.
I have been welding with .023 MIG wire and a torch, and actually even no filler rod in many cases plannishing the metal to a perfect seam before simply melting the two together. Been having a ball learning that! Brian
__________________
1948 Chevy pickup Chopped, Sectioned, 1953 Corvette 235 powered. Once was even 401 Buick mid engined with the carburetor right between the seats! Bought with paper route money in 1973 when I was 15. "Fan of most anything that moves human beings" |
|
|
|
|
12-28-2018, 12:55 AM
|
#24 |
|
Registered User
Join Date: Jun 2013
Location: Somewhere
Posts: 3,057
|
Re: Welding a patch panel
I've read that OA is a cooler weld process than various arc but seem to have trouble making my (probably) crappy regulators make pressure low enough and wonder what size tip to use.
|
|
|
|
|
12-28-2018, 01:16 AM
|
#25 |
|
Registered User
Join Date: Dec 2000
Location: Boise, Idaho
Posts: 6,003
|
Re: Welding a patch panel
I got a "jewelers torch" like this and that changed everything.
 Brian
__________________
1948 Chevy pickup Chopped, Sectioned, 1953 Corvette 235 powered. Once was even 401 Buick mid engined with the carburetor right between the seats! Bought with paper route money in 1973 when I was 15. "Fan of most anything that moves human beings" |
|
|
|
|
| Bookmarks |
|
|


 Linear Mode

