
|
Register or Log In To remove these advertisements. |
|
|
|
|||||||
 |
|
|
Thread Tools | Display Modes |
|
|
 03-07-2007, 04:56 PM
|
#1 |
|
Registered User
 Join Date: Aug 2005
Location: Hillsboro Oregon
Posts: 6,449
|
Home-Made Speaker Kick Panels
I decided to take a stab at the fiberglass kick panel deal. I like these because they provide a nice enclosure volume for any set of decent mids. I’m running Infinity Kappa components with the tweets in the dash where the AC balls would go if equipped. That was not my first choice for location but the PO had installed some garbage 70’s map lights there so the tweets made a nice replacement for now.
I bought everything I needed to do this at Home Depot and Joann Fabrics. I have to give credit to greasmonkey’s FAQ for the idea (at least that’s where I first saw it). I followed his basic idea, but made a few changes. First, I used a dense ¼” fiberboard for the backing instead of fiberglass. Because of this there was no need for the ½ round edging. I just sand rounded the edges of the fiberboard. It also allowed me to cut a groove in the back of the panel at the depth of the speaker wire to run it from the hole to the top of the panel and still allow the panel to sit flush against the sheet metal (see pics). 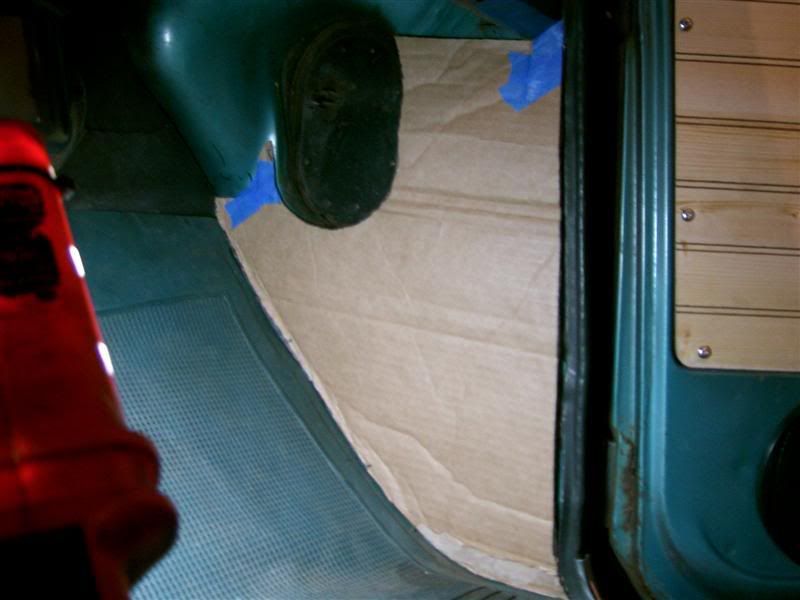 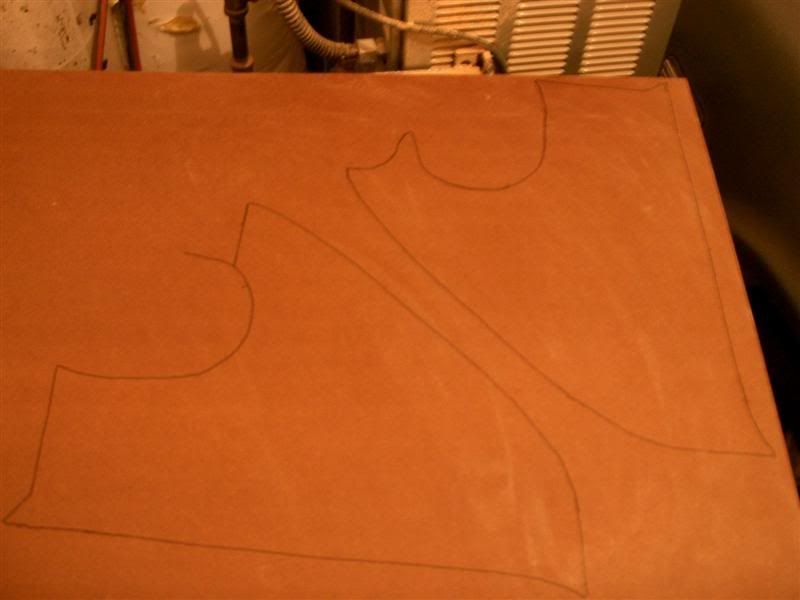  I placed the driver’s side speaker lower than the passenger side to clear the e-brake pedal. I decided to move the pedal itself over on the lever (drill welds, move right, re-weld) as can be seen in one of the pics. That’s not necessary, but I didn’t want to be kicking the kick panel all the time, or even close to it. I also removed the Highbeam/Lowbeam switch. I run brights all the time (because they’re not very bright) so I just tie-wrapped the harness up under the dash and made a nice jumper for the plug so I have full time brights. After I do the headlight relay mod I’ll come up with a better alternative for the switch. 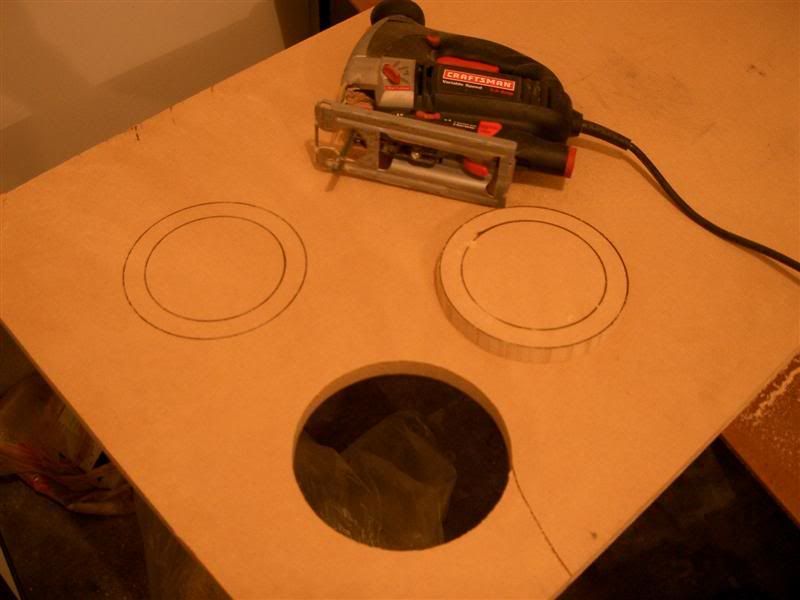      
Last edited by Frizzle Fry; 03-07-2007 at 10:55 PM. |

|

|
|
03-07-2007, 04:59 PM
|
#2 |
|
Registered User
Join Date: Aug 2005
Location: Hillsboro Oregon
Posts: 6,449
|
Re: Home-Made Speaker Kick Panels
  
|
|
|
|
|
03-07-2007, 05:06 PM
|
#3 |
|
Registered User
Join Date: Aug 2005
Location: Hillsboro Oregon
Posts: 6,449
|
Re: Home-Made Speaker Kick Panels
I used a hot glue gun for all the fastening of the materials. I also used spray adhesive as well as hot glue for the vinyl. I wasnt able to get the vinyl to stretch completely over the entire structure, so I had to cut out some extra material (same with the t-shirt and the fiber cloth). The place I made those cuts is out of sight when they are installed.
    I did apply the resin to the t-shirt material (not shown) before adding a single layer of fiber cloth. Trust me with these two layers they are very rigid.    
|
|
|
|
|
03-07-2007, 05:14 PM
|
#4 |
|
Registered User
Join Date: Aug 2005
Location: Hillsboro Oregon
Posts: 6,449
|
Re: Home-Made Speaker Kick Panels
        
|
|
|
|
|
03-07-2007, 05:17 PM
|
#5 |
|
Registered User
Join Date: Aug 2005
Location: Hillsboro Oregon
Posts: 6,449
|
Re: Home-Made Speaker Kick Panels
Here you can see the purpose of the groove:
    
|
|
|
|
|
03-07-2007, 05:22 PM
|
#6 |
|
Registered User
Join Date: Aug 2005
Location: Hillsboro Oregon
Posts: 6,449
|
Re: Home-Made Speaker Kick Panels
Another thing I did was figure out how to locate the factory air-vent puller bracket holes in the kick panel. I taped a piece of card-stock over the holes and tried to make the holes visible by rubbing over them with the side of a crayon (a relief). In my case they didnt show up very well (at all) so I just eyeballed them and started poking around with a jewelers screwdriver until I found the two holes. With the card stock taped only on one edge I was able to flip it out of the way to put the kick panel in place under it. Mark the panel and viola. They are close enough if you oversize the holes in the panels (I used a ¼ bit).
    
|
|
|
|
|
03-07-2007, 05:27 PM
|
#7 |
|
Registered User
Join Date: Aug 2005
Location: Hillsboro Oregon
Posts: 6,449
|
Re: Home-Made Speaker Kick Panels
The panels are held in place by the air-vent puller brackets, a tight fit around the floor and dash edges, and one sheet metal screw on each side. Those screws are located right behind the speakers as far down and back (toward the door) as I could reach. I considered using a hot glue gun to mount them, but decided one extra screw hole on each side was acceptable (the PO already put several on each side anyway
).
     Now I just need some carpet... |
|
|
|
|
03-07-2007, 05:32 PM
|
#8 |
|
Questionable
Join Date: Mar 2005
Location: Atlanta
Posts: 13,376
|
Re: Home-Made Speaker Kick Panels
Nice work Mike, and thanks for sharing. This should go in the FAQ also. You make it look so easy
 What was the total prep and build time? What was the total prep and build time?
__________________
If I've got anything up for grabs, it'll be here: 7-hole gauge cluster for a 67-72 p/u FREE (link) I can't check the forum daily. If I don't reply to you within 24 hours, drop me a PM! I'm (hopefully) still alive and will reply faster to a PM. |
|
|
|
|
03-07-2007, 05:43 PM
|
#9 | |
|
Registered User
Join Date: Aug 2005
Location: Hillsboro Oregon
Posts: 6,449
|
Re: Home-Made Speaker Kick Panels
Quote:
 ), so I spent an hour or two here and there over about ten days or so. I'd say it could be done in 3-4 days allowing for overnight curing. ), so I spent an hour or two here and there over about ten days or so. I'd say it could be done in 3-4 days allowing for overnight curing.
|
|
|
|
|
|
03-07-2007, 05:46 PM
|
#10 |
|
Registered User
Join Date: Oct 2006
Location: Springfield, MO
Posts: 375
|
Re: Home-Made Speaker Kick Panels
Those are nice...would love to have some.
__________________
1969 C/10 swb, 350, powerglide (daily driver) 2005 CRV (wife's ride) |
|
|
|
|
03-07-2007, 05:43 PM
|
#11 |
|
Junior Member
Join Date: Feb 2007
Location: Sunny CA
Posts: 98
|
Re: Home-Made Speaker Kick Panels
Mike, great job! Your attention to detail is outstanding, perfect fit and finish. I've had speaker kicks on the 'to do' list for years, but now I'm thinking more like bribing you to build me a set...no, really! My '69 C-20 is the same color inside, same steering wheel...I better go check and make sure my trucks still here!!!

__________________
Ryan Metal Massacre Fabrication New Projects: -New radiator core supports, steel and stainless -Aluminum radiators -Aluminum dual electric fan shrouds '69 C-20 Custom '69 Nova...BIG BBC soon '72 3-door 'Burb...in a few '94 K2500 454 'Burb |
|
|
|
|
03-07-2007, 05:44 PM
|
#12 | |
|
Hittin E-Z Street on Mud Tires
Join Date: Nov 2004
Location: Greenville, SC
Posts: 23,090
|
Re: Home-Made Speaker Kick Panels
Quote:
What sucks is that it sits in a depression in the floor and moving it will put a lump in the carpet.... Where am I going to put the stupid thing on mine??? Those look great! Great job  And Jason's right, this is DEFINATELY a new FAQ!
__________________
Jesse James 1967 C10 SWB Stepside: 350/700R4/3.73 1965 Ford Mustang: 289/T5-5spd/3.25 Trac-Loc 1968 Pontiac Firebird: Project Fire Chicken! 2015 Silverado Double Cab 5.3L Z71 2001 Jeep Wrangler Sport 4.0L 5spd 2020 Chevrolet Equinox Premium 2.0L Turbo 2011 Mustang V6 ~ Wife's ride American Born, Country by the Grace of God  1967 CST Shop Truck Rebuild! My 1967 C-10 Build Thread My Vintage Air A/C Install Project "On a Dime" Trying my hand at Home Renovation! 1965 Mustang Modifications! |
|
|
|
|
|
03-07-2007, 05:50 PM
|
#13 | |
|
Registered User
Join Date: Aug 2005
Location: Hillsboro Oregon
Posts: 6,449
|
Re: Home-Made Speaker Kick Panels
Thanks guys! They sound better than they look
Quote:
|
|
|
|
|
|
03-07-2007, 06:02 PM
|
#14 | |
|
Hittin E-Z Street on Mud Tires
Join Date: Nov 2004
Location: Greenville, SC
Posts: 23,090
|
Re: Home-Made Speaker Kick Panels
Quote:
Great idea! By using a newer column or actually modding just the lever? I got the cheapo plastic kick panels and my switch is useless behind it. 
__________________
Jesse James 1967 C10 SWB Stepside: 350/700R4/3.73 1965 Ford Mustang: 289/T5-5spd/3.25 Trac-Loc 1968 Pontiac Firebird: Project Fire Chicken! 2015 Silverado Double Cab 5.3L Z71 2001 Jeep Wrangler Sport 4.0L 5spd 2020 Chevrolet Equinox Premium 2.0L Turbo 2011 Mustang V6 ~ Wife's ride American Born, Country by the Grace of God 1967 CST Shop Truck Rebuild! My 1967 C-10 Build Thread My Vintage Air A/C Install Project "On a Dime" Trying my hand at Home Renovation! 1965 Mustang Modifications! Last edited by 67ChevyRedneck; 03-07-2007 at 06:02 PM. |
|
|
|
|
|
03-07-2007, 05:48 PM
|
#15 |
|
Registered User
Join Date: May 2005
Location: Beaverton, OR
Posts: 3,728
|
Re: Home-Made Speaker Kick Panels
Nice work for sure! I keep putting mine off because of a million other things I have going on leading into the mountain bike season.
__________________
New Project: 1966 LWB C20 Plans: 1/2 ton conversion Dropmember front Dropmember rear Corvette discs Restored raised bed http://67-72chevytrucks.com/vboard/s....php?p=4295210 |
|
|
|
|
03-07-2007, 06:24 PM
|
#16 |
|
Gone Fishing
Join Date: Aug 2005
Location: Fort Worth, Texas 76135
Posts: 12,361
|
Re: Home-Made Speaker Kick Panels
Breat idea and nice work
__________________
68 Chevy Short Fleetside LSX Swap Under Way 3.73 posi 2.5/4 drop  Frame of resto has been started Frame of resto has been started2022 Hyundai Tucson Limited 2019 Chevy Traverse Redline Edition Wifes Ride Build Thread http://67-72chevytrucks.com/vboard/s...=1#post3483616 |
|
|
|
|
03-07-2007, 07:39 PM
|
#17 |
|
GEARHEAD
Join Date: Jan 2007
Location: CENTRAL,PA
Posts: 2,284
|
Re: Home-Made Speaker Kick Panels
Allways feels better when ya make something better than you can buy!! GR8 work!
|
|
|
|
|
03-07-2007, 08:28 PM
|
#18 |
|
Registered User
Join Date: Mar 2001
Location: Moore, Ok
Posts: 1,149
|
Re: Home-Made Speaker Kick Panels
Those look great!!!!! This is one that belongs in the FAQ for sure. Good pics and description a quality tech article. Thanks Mike!
__________________
72 SWB parts and pieces Oklahoma |
|
|
|
|
03-07-2007, 09:53 PM
|
#19 |
|
Senior Member
Join Date: Jan 2004
Location: Harvest, AL
Posts: 545
|
Re: Home-Made Speaker Kick Panels
I love you man! this thread is so being bookmarked for later reference
|
|
|
|
|
03-07-2007, 10:17 PM
|
#20 |
|
Registered User
Join Date: Aug 2006
Location: Bakersfield,CA
Posts: 7,893
|
Re: Home-Made Speaker Kick Panels
thats great man, awesome job
__________________
-steven Alte Seele S.S. "Allison" '72 C/10 LWB 350SB/TH350 - DD PITBULL IS NOT A CRIME |
|
|
|
|
03-07-2007, 10:21 PM
|
#21 |
|
'69 Step
Join Date: Mar 2005
Location: Marion, Texas
Posts: 722
|
Re: Home-Made Speaker Kick Panels
turned out nice..
|
|
|
|
|
03-07-2007, 10:48 PM
|
#22 |
|
Registered User
Join Date: Sep 2004
Location: Teeswater, Ontario, Canada
Posts: 173
|
Re: Home-Made Speaker Kick Panels
There already is a FAQ in there about the kick panels. Although Frizzle Fry has picture of some of the steps that aren't shown it the other FAQ. It should be add to the other one though.
Also when I made mine I put the truck clearance lights in them. On the wires for the lights and the speakers I used the bullet style connector to make the easily removable. I guess it could comprimse sound quality but it sure beats the AM radio.
__________________
Jamie _______________________________ 72 Chevy Cheyenne 350/th350 LWB 03 Chevy Silverado Sporty Shorty 4.8L |
|
|
|
|
03-07-2007, 11:02 PM
|
#23 |
|
Senior Member
Join Date: Dec 2005
Location: Humble, Texas
Posts: 262
|
Re: Home-Made Speaker Kick Panels
ya know i ended up making me some as well and the bad part i forgot is after i made them and set them in there to mount i realized at that time i couldnt use my hi-beams anymore without relocating the switch (which i didnt want to do and did not do) haha
__________________
Redneck Rampage 1972 Chevrolet C-10 LWB 350 1972 Chevrolet K-20 LWB 502 LiFtEd |
|
|
|
|
03-08-2007, 01:06 AM
|
#24 |
|
Registered User
Join Date: Dec 2004
Location: Saskatchewan, Canada
Posts: 1,371
|
Re: Home-Made Speaker Kick Panels
I've thought about doing this, but one question: How well do the floor vents work now with the handles spaced out from the original location on the tin kick? Are they just out 3/8" or so (wood+fibreglass+vinyl), or are they more than that? If I could make that work, that would be killer!
__________________
1964 Chevy Short Fleet: Tornado 1972 Chevy C10: Fast Orange Secondaries Wide Open |
|
|
|
|
03-08-2007, 09:59 AM
|
#25 |
|
Account Suspended
Join Date: Jan 2006
Location: Fort Worth
Posts: 155
|
Re: Home-Made Speaker Kick Panels
Very nice work. I've been thinking about doing this myself....SOLD me on doing it.
It should be really easy to change the high beam switch over from the floor mount switch to a toggle/momentary push button & relay. You could put the switch basically anywhere handy.... Again - very nice work. Now that you've done these, what would you do differently next time? I would love to hear your thoughts...so I can learn from you. 
|
|
|
|
|
| Bookmarks |
|
|


 Hybrid Mode
