
|
|
|
 09-23-2011, 01:32 PM
|
#1 |
|
Registered User
Join Date: Mar 2011
Location: spokane, wa
Posts: 45
|
Sue's 51 build
Hi everyone. I'm not new to the site but haven't posted much, just a question here and there. I've appreciated all the help and advice and though I should take the time to start my own build thread. I'm a little techno-challenged so be patient with me regarding the posting of pictures.
The truck is a 1951 3100 that I found on a farm about 50 miles southwest of Spokane Washington. It was in pieces and the motor was gone but otherwise complete. We loaded it on a trailer with a backhoe and hauled it home in the middle of the winter about a year and a half ago. It was in typical shape for it's age and for having been a farm truck and probably never parked inside. [IMG] 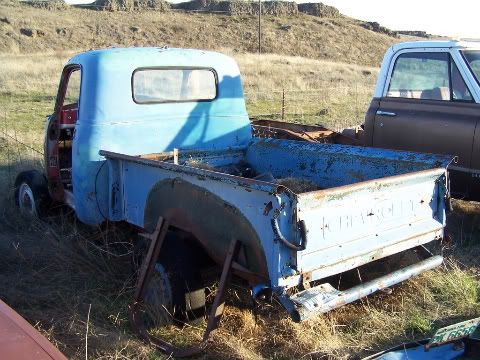 [/IMG] [/IMG][IMG] 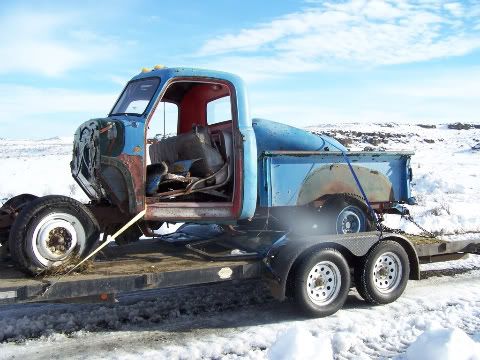 [/IMG] [/IMG]The plan is to make it a daily driver for my wife so it's getting all the mods to make it a safe, reliable and comfortable truck that will be somewhat affordable and easy to drive. I've been working on it on and off since bringing it home but am paying as I go so progress depends on the limited funding I have available. The truck has the usual rust issues but is not as bad as some I've seen. I won't bore everyone with a lot of pictures of the truck as it was, everyone knows what a rusty beat up 51 Chevrolet pickup looks like. I'm going to post this now to see if everything works and add some more shortly. I have figured out how to put up pictures but only one under the other. Can someone tell me how to put them side by side to save scrolling? |

|
|
09-23-2011, 02:05 PM
|
#2 |
|
Registered User
Join Date: Apr 2009
Location: Faribault, MN
Posts: 385
|
Re: Sue's 51 build
You're doing fine. Scrolling down is just as good as scrolling to the side. Anxious to see more.
|
|
|
|
09-23-2011, 02:10 PM
|
#3 |
|
Registered User
Join Date: Jul 2011
Location: Las Vegas - Nev. aka Sin City
Posts: 1,835
|
Re: Sue's 51 build
good start on that truck - love stories like that - best of luck
|
|
|
|
09-23-2011, 02:29 PM
|
#4 |
|
Registered User
Join Date: Mar 2011
Location: spokane, wa
Posts: 45
|
Re: Sue's 51 build
Okay, on with the build. Here is the frame just back from being sand blasted. I'm not making a show truck so I'm not going to be filling all the unused holes and making it all pretty. Functionality and affordability are the key words for this build and I plan to do about 95% of the work myself.
[IMG] 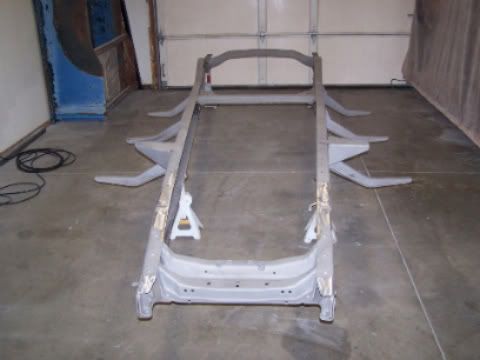 [/IMG] [/IMG]After removing the unwanted hangers and crossmembers, I boxed the frame rails in front and installed a Mustang II crossmember from Speedway. I'm using tubular control arms to eliminate the need for a strut rod and a Mustang II power steering rack to make it easy to steer and turn. It will have power brakes as well with 11" rotors. [IMG] 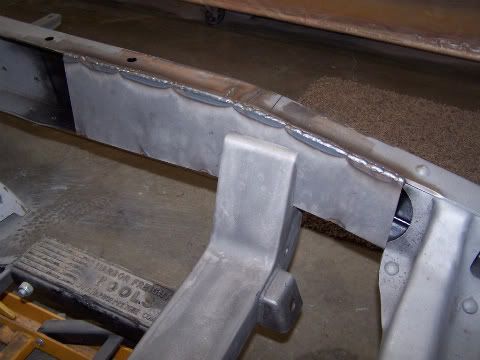 [/IMG] [/IMG][IMG] 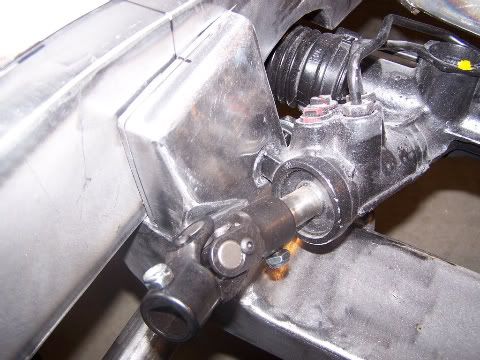 [/IMG] [/IMG]The rear suspension is a four-bar setup with coil-overs from Alden Shocks. I found a 9" Ford rearend that was already set up with brand new disc brakes. It was close enough to the right width that I didn't have to narrow it although because I went with some pretty wide tires, I may have to modify my bed and rear fenders a little to make everything fit. [IMG] 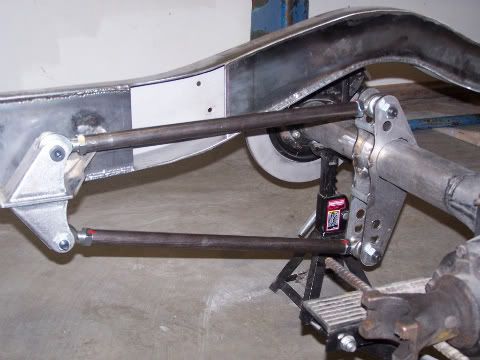 [/IMG] [/IMG]
|
|
|
|
09-23-2011, 02:54 PM
|
#5 |
|
Registered User
Join Date: Apr 2011
Location: San Diego CA
Posts: 241
|
Re: Sue's 51 build
Looking good. I'd much rather scroll down then side to side.
|
|
|
|
09-23-2011, 03:47 PM
|
#6 |
|
Certified Car Nut
Join Date: Jan 2005
Location: Inglewood, California
Posts: 3,118
|
Re: Sue's 51 build
Looking great man, keep posting those pictures.
|
|
|
|
09-25-2011, 02:11 PM
|
#7 |
|
Registered User
Join Date: Mar 2011
Location: spokane, wa
Posts: 45
|
Re: Sue's 51 build
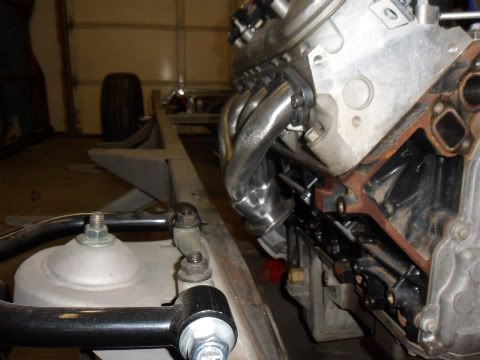
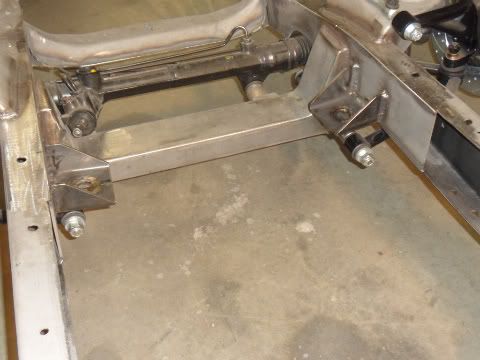
Worked some overtime this weekend to buy parts so haven't made any progress on the built. Here are a few more pictures of the current state of the project. This is a better picture of the completed front suspension and steering rack. I had to space my steering rack away from the crossmember an additional inch and a half for clearance for the steering linkage.
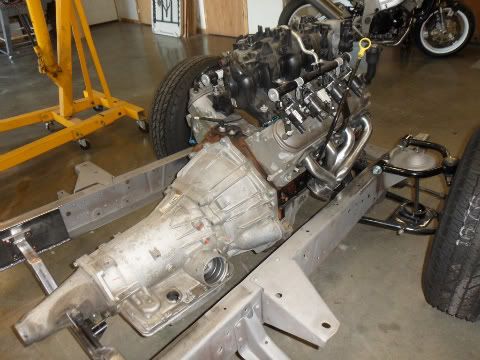
[IMG] 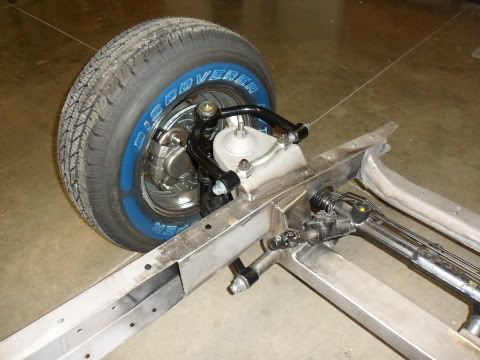 [/IMG] [/IMG]This one shows the completed 4-link setup with the panhard bar tacked into place. [IMG] 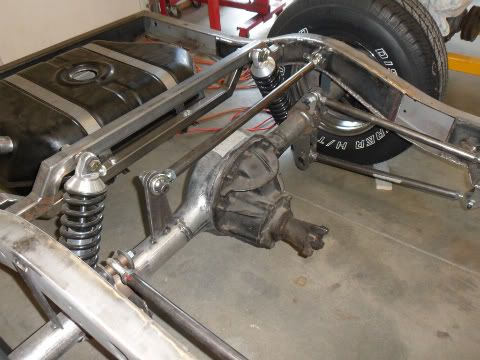 [/IMG] [/IMG]Here is a close-up of the front suspension minus the shock and sway bar which I have yet to install. The mounting bracket that came with the "Mustang II" sway bar isn't compatible with mounting bracket holes that are in the "Mustang II" compatible lower control arms. So much for the "bolt right up and go" theory. [IMG] 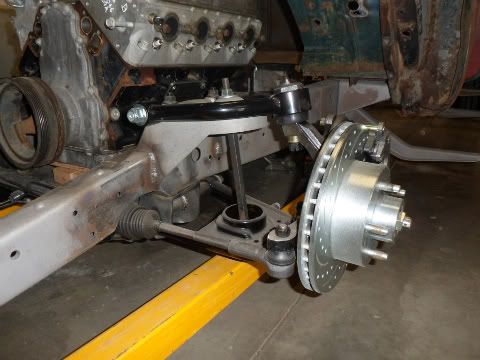 [/IMG] [/IMG]Here is a shot of the front end with the motor in place. In keeping with the goal of a safe, reliable and driver friendly truck that my wife will like and want to drive, I selected a fuel injected 5.3 Vortec motor out of a 2005 GMC pickup. It is backed with a 4L60E four speed overdrive transmission from a 2001 half ton 2WD pickup. With almost 300 HP from the stock motor, and the prospect of getting 20+ MPG, I think this is the perfect setup for a truck that will be driven regularly. I have the motor mounts built but am waiting for my headers to arrive before installing them. I also still have to build a transmission crossmember that will match the rear coil-over and fuel tank crossmembers. I also plan to replace the entire original firewall with a 4" recessed firewall. [IMG] 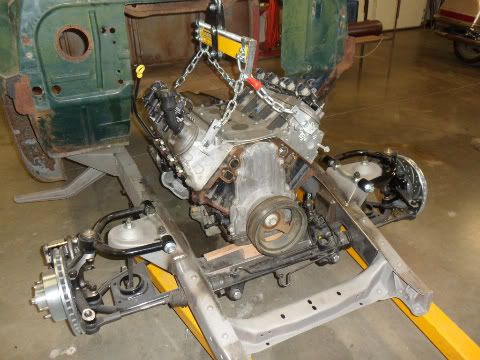 [/IMG] [/IMG]As previously stated, I plan to do the majority of the work on this project myself. What I don't have the tools or expertise to do myself, will be done with the capable assistance of my brother Bruce with Rodlink LLC in West Richland, WA. Bruce has been building street rods for over thirty years and there isn't anything he can't do with sheetmetal and a welder. This beautiful little all steel 32 is the latest example of his work. It's his personal car that I was privileged to be able to contribute to by doing the bodywork on after he rebuilt the entire thing from a total. Look for this one in the magazines once he finishes the interior this winter. [IMG] 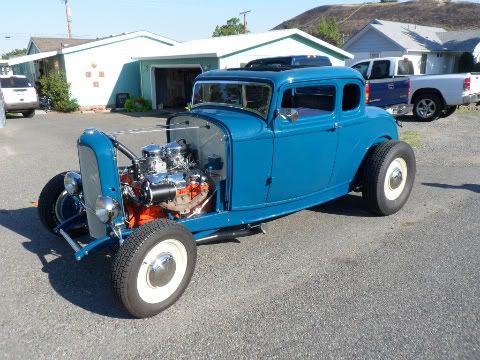 [/IMG] [/IMG]
|
|
|
|
09-25-2011, 02:29 PM
|
#8 |
|
Registered User
Join Date: Sep 2005
Location: Glendale Arizona
Posts: 1,188
|
Re: Sue's 51 build
You might want to add a gusset on the crossmember tube (last pic) and a support on rear tube arm . They have been finding out that the MK II are starting to show cracks on main crossmembers because of deflection. Just a suggestion I did it to mine, beautiful build you have!

Last edited by Rude Dude; 09-25-2011 at 02:51 PM. Reason: incorrect typo |
|
|
|
09-25-2011, 02:44 PM
|
#9 |
|
Registered User
Join Date: Sep 2005
Location: Glendale Arizona
Posts: 1,188
|
Re: Sue's 51 build
Here is how I did my sway bar and double shear rear on tube bottom arm.
|
|
|
|
09-25-2011, 03:10 PM
|
#10 |
|
Registered User
Join Date: Sep 2005
Location: Glendale Arizona
Posts: 1,188
|
Re: Sue's 51 build
Here is a good read on supporting the rear arm
http://www.jalopyjournal.com/forum/s...d.php?t=257826 Last edited by Rude Dude; 09-25-2011 at 03:10 PM. Reason: Miss spelled |
|
|
|
10-06-2011, 10:55 PM
|
#11 |
|
Registered User
Join Date: Feb 2011
Location: Santa Rosa, CA
Posts: 672
|
Re: Sue's 51 build
Your build is coming along very well! looks like you will have quite the ride!
|
|
|
|
10-09-2011, 02:05 PM
|
#12 |
|
Registered User
Join Date: Mar 2011
Location: spokane, wa
Posts: 45
|
Re: Sue's 51 build
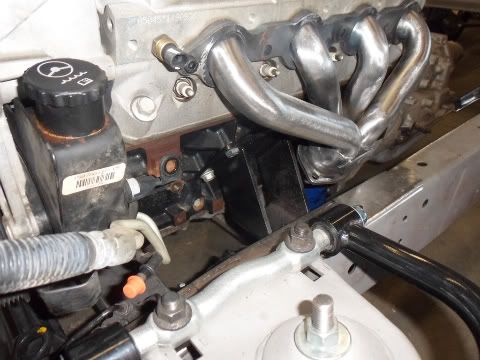
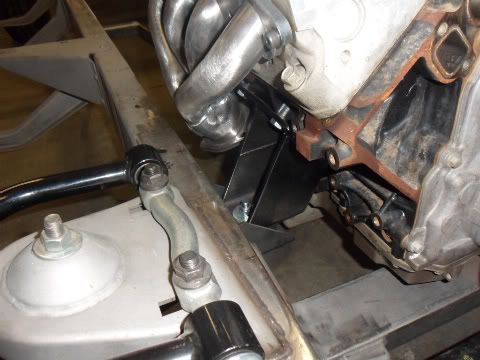
Okay, I finally got my block hugger headers from Sanderson Headers. The driver's side fits about like I envisioned and gives me sufficient clearance from my motor mount and the steering linkage. The passenger side clears the starter fine but dumps out too close to the motor mount as I had it mocked up. I will have to make a slight modification on the motor mount but nothing too drastic. I'm glad I waited to get them do discover this, I hate cutting new welds loose.
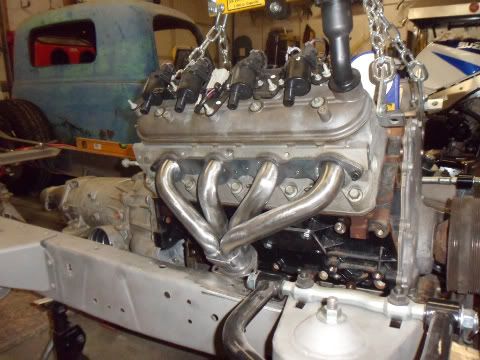  Here are a couple of pictures of the mount that attaches to the motor held in place with a jack. 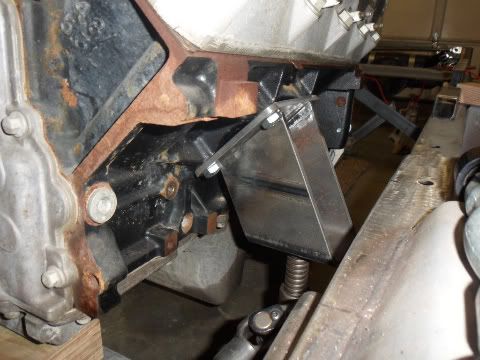 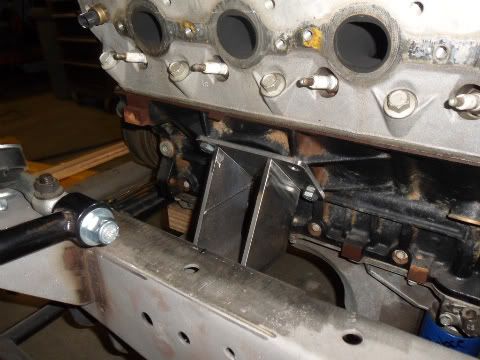 So, I got up Saturday morning all ready to start tacking my mounts into place and went to turn my shielding gas on and found that the valve had been open for who knows how long and all the gas was gone. *&#% I hate when that happens. Oh well, what's a few more days in the big picture of things. I'll get some more gas on Monday and get back to it then. |
|
|
|
10-09-2011, 05:38 PM
|
#13 |
|
Registered User
Join Date: Jun 2008
Location: Oak Forest, Ill.
Posts: 194
|
Re: Sue's 51 build
Are you SURE you want a 4 inch recessed firewall???? That really eats up the leg room and it is not needed for a Gen3 engine install into an AD truck. Make sure that is what you really want before you weld in your mounts.
Jeff |
|
|
|
10-14-2011, 12:58 PM
|
#14 |
|
Registered User
Join Date: Mar 2011
Location: spokane, wa
Posts: 45
|
Re: Sue's 51 build
Okay, I finally finished the transmission crossmember. I hope to get the motor mounts done this weekend.
 The decision to recess the firewall was based on my desire to use a stock fan. Sue and I are both on the shorter side so a little less leg room isn't really an issue for us. Four inches is just a conservative estimate. I'll recess it only as much as needed and it may well end up being somewhat less than that when it's done. |
|
|
|
10-15-2011, 10:00 PM
|
#15 |
|
Registered User
Join Date: Mar 2011
Location: spokane, wa
Posts: 45
|
Re: Sue's 51 build
I finally finished the motor mounts today. I fabricated the mounts from some heavy duty square and rectangular tubing I had on hand. The only things I had to buy were the rubber mount kit and some bolts. They may not be show quality mounts but they will work just fine and the price was right.
|
|
|
|
10-20-2011, 10:03 AM
|
#16 |
|
Senior Member
 Join Date: Mar 2011
Location: West Plains, Missouri
Posts: 7,559
|
Re: Sue's 51 build
Like how everything is coming together on this build, nice job.....Jim
__________________
my build thread: http://67-72chevytrucks.com/vboard/s...d.php?t=459839 Jimbo's long bed step build:http://67-72chevytrucks.com/vboard/s...t=464626<br /> |
|
|
|
10-20-2011, 08:44 PM
|
#17 |
|
Registered User
Join Date: Sep 2005
Location: Glendale Arizona
Posts: 1,188
|
Re: Sue's 51 build
Great job on the mounts!
|
|
|
|
10-21-2011, 02:03 PM
|
#18 |
|
Registered User
Join Date: Sep 2011
Location: Surrey UK
Posts: 28
|
Re: Sue's 51 build
Lucky wife!!! Could I find a wife that would do like that for me over there, stateside?
I wish you well with it. Andrew |
|
|
|
11-17-2012, 01:42 PM
|
#19 |
|
Registered User
Join Date: Mar 2011
Location: spokane, wa
Posts: 45
|
Re: Sue's 51 build
He everyone, I can't believe it's been over a year since I've posted here. I had to put the project on hold while I helped my son start his motorcycle roadracing career. How time flies when your traveling all over the country and maintaining a race bike. It has been quite a ride but I'm ready for a few months off and a chance to get back to work on the build. I haven't done much at all on the truck but am back to work on it this weekend. My brother is coming up tomorroe to finish up the heavy welding on the four link setup and crossmembers. I'm working on hanging the doors today in preparation for the chop. I'll get some pictures posted tonight when I come in from the shop.
|
|
|
|
11-17-2012, 02:41 PM
|
#20 |
|
Senior Member
Join Date: Mar 2011
Location: West Plains, Missouri
Posts: 7,559
|
Re: Sue's 51 build
Glad to see you back. I was wondering what had become of this build, will be ready for some pics and the updates....Jim
__________________
my build thread: http://67-72chevytrucks.com/vboard/s...d.php?t=459839 Jimbo's long bed step build:http://67-72chevytrucks.com/vboard/s...t=464626<br /> |
|
|
|
11-17-2012, 04:26 PM
|
#21 |
|
Registered User
Join Date: Mar 2011
Location: spokane, wa
Posts: 45
|
Re: Sue's 51 build
Thanks Jim. It's interesting to hear from you, I actually looked through your entire build thread last night. I really like the way your truck turned out, you do excellent work. I envision my truck looking a lot like yours when its done so I will probably have a few questions for you as I go. I found a really straight and rust free set of doors without wing windows for my truck last fall and just finished putting them on. The driver's door fits really well but the passenger door sticks out at the bottom on the latch side. I'll have to play with it a little more but expect to have to do some cutting and pasting to get it right. By the way, what are you working on now?
|
|
|
|
11-17-2012, 07:36 PM
|
#22 |
|
Registered User
Join Date: Mar 2011
Location: spokane, wa
Posts: 45
|
Re: Sue's 51 build
Here are the doors I scored last fall for $50 dollars each. They are very straight with no rust through anywhere. The passenger door has some surface rust on the exterior but they are both really solid. I had to break off and drill out all six hinge bolts on the passenger side but only one on the driver's side. I rebuilt the hinges with new pins and springs and they will work just fine. I just couldn't justify spending $300 dollars for new ones. I also had to cut some access holes in the cab to replace the backing nuts for the hinges, I wasn't planning to leave those louvers in there anyway
 My plan for the winter is to chop the top two and a half inches and replace the rusted out corners of the cab. If I get all that done before racing season starts next spring I'll work on the recessed firewall and replacing the cab floor. Also, what do most of you do with the drip rails? I would prefer to shave them off but don't want water running into the cab if I get caught in a rain shower. My plan for the winter is to chop the top two and a half inches and replace the rusted out corners of the cab. If I get all that done before racing season starts next spring I'll work on the recessed firewall and replacing the cab floor. Also, what do most of you do with the drip rails? I would prefer to shave them off but don't want water running into the cab if I get caught in a rain shower.
|
|
|
|
11-19-2012, 01:17 AM
|
#23 |
|
Registered User
Join Date: Mar 2011
Location: spokane, wa
Posts: 45
|
Re: Sue's 51 build
Well I got a little bit done on the build today. My brother Bruce from Rodlink Inc stopped by and finished welding up my fuel tank and coilover shocks crossmembers as well as the panhard bar brackets. This allowed me to cut the temporary brackets from between the differential and the frame and let the truck actually sit on the coilovers. The ride attitude is just what I was aiming for and the suspension works great. I'm really pleased with the way it turned out. Bruce also helped me massage the ill fitting passenger door into shape so it fits flush all the way around with really nice gaps. I also removed the windlace channel from inside the cab and got the passenger side drip rail removed. I just need to remove the other drip rail and I'll be ready to start marking out the cut lines for the chop. I'm really getting back into working on this truck, it's been too long without any real progress.
|
|
|
|
11-19-2012, 01:19 PM
|
#24 |
|
Registered User
Join Date: Nov 2011
Location: Langley, BC
Posts: 702
|
Re: Sue's 51 build
Very nice work. Lookin' good.
__________________
56 Chevy PU http://67-72chevytrucks.com/vboard/s...d.php?t=531955 Question: Know how to sell your truck for $50,000? Answer: Spend $100,000 building it. |
|
|
|
11-18-2012, 12:25 AM
|
#25 |
|
Senior Member
Join Date: Mar 2011
Location: West Plains, Missouri
Posts: 7,559
|
Re: Sue's 51 build
Thanks for the compliments about my build. I'm enjoying the truck and very happy with it. Nothing in the works right now, maybe something coming up next week. Will have to see if it pans out. Your doors look great...Jim
__________________
my build thread: http://67-72chevytrucks.com/vboard/s...d.php?t=459839 Jimbo's long bed step build:http://67-72chevytrucks.com/vboard/s...t=464626<br /> |
|
|
 |
| Bookmarks |
|
|


 Hybrid Mode
