
|
|
|
 10-01-2009, 06:05 PM
|
#1 |
|
Registered User
Join Date: Nov 2008
Location: So. Cal.
Posts: 452
|
Re: Project "49 No Buck$"
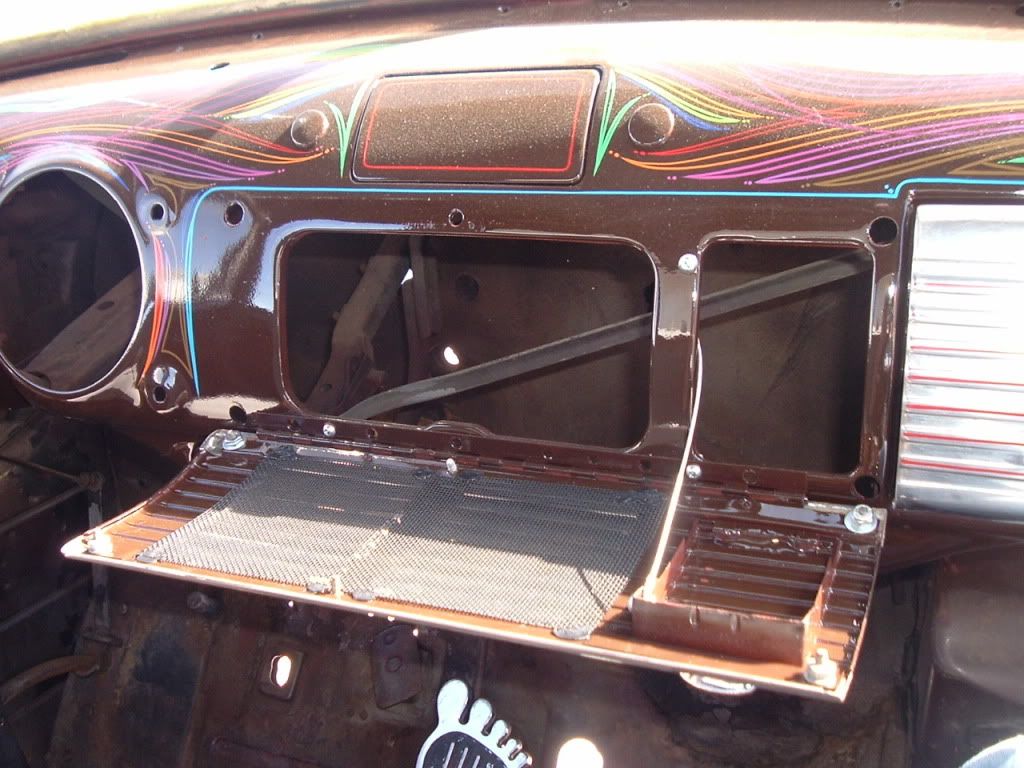
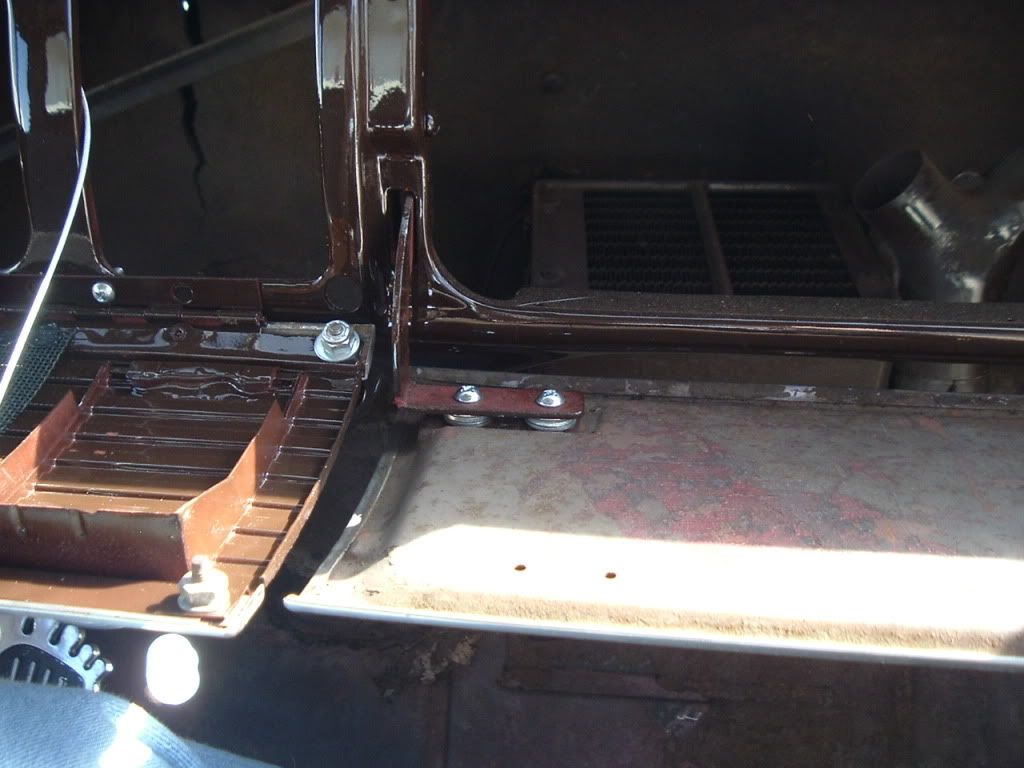
I didn't take any pics of how I put this all together, but thought I should show the finished version. I wanted a stereo in the truck, but wasn't putting it under the seat or cutting a hole in the dash. So this was my idea... I'll build a panel behind it when I'm at that point, but you can see where it's going. I used a 12" hinge I picked up at OSH, took the ashtray back off, glued the front on where it was even with the front of the cover. Ashtray handle opens it. I even used some washers to kick out the bottom of the glovebox, so it was even with the other door. Here you go...
__________________
It's all about the stance, baby! http://67-72chevytrucks.com/vboard/s...d.php?t=320546 Last edited by kustombrad; 10-02-2009 at 09:53 PM. Reason: added stuff |

|

|
|
09-27-2011, 02:36 PM
|
#2 | |
|
Registered User
Join Date: Sep 2011
Location: Texas
Posts: 44
|
Re: Project "49 No Buck$"
Quote:
Now that you have the truck on the road how has this worked out? Thanks, |
|
|
|
|
|
09-27-2011, 03:05 PM
|
#3 |
|
Registered User
Join Date: Aug 2011
Location: Kingsport, TN
Posts: 36
|
Re: Project "49 No Buck$"
Just too cool, great idea; may have to borrow it myself when the time comes.
|
|
|
|
|
10-04-2011, 11:27 AM
|
#4 | |
|
Registered User
Join Date: Aug 2011
Location: Kingsport, TN
Posts: 36
|
Re: Project "49 No Buck$"
Quote:
 bummerrrrrrrr bummerrrrrrrr
|
|
|
|
|
|
10-05-2011, 01:45 PM
|
#5 |
|
Registered User
 Join Date: Mar 2005
Location: apple valley, ca
Posts: 2,670
|
Re: Project "49 No Buck$"
If you like that mod, just wait until you see what he's done lately to the rest of the interior. You guys are going to flip.
That's all I'm going to say for now................
__________________
Check out my latest endeavor: https://roundsixpod.com My build threads: '55 Chevy: http://67-72chevytrucks.com/vboard/s...d.php?t=247512 '64 C-20: http://67-72chevytrucks.com/vboard/s...d.php?t=446527 |
|
|
|
|
10-05-2011, 10:58 PM
|
#6 | |
|
Senior Member
  Join Date: Nov 2008
Location: Glendora, CA
Posts: 6,336
|
Re: Project "49 No Buck$"
Quote:

|
|
|
|
|
|
10-01-2009, 06:52 PM
|
#7 |
|
Registered Chevy Owner
Join Date: Aug 2008
Location: Snohomish, wa
Posts: 1,557
|
Re: Project "49 No Buck$"
That looks super clean!
__________________
Love is fleeting, but Chevy trucks are forever!!!!  1970 Chevy CST C10 long box 350/400  2008 Chevy Silverado short box 4x4 Had; 1951 Chevy short box 307/T5 1988 Chevy shot box 4x4 350/350 1971 Chevy C10 long box 4x4 350/350 1971 Chevy C20 long box 350/350 1971 Chevy C10 long box 350/350 |
|
|
|
|
10-02-2009, 04:04 PM
|
#8 |
|
Registered User
Join Date: Jun 2009
Location: Nashville, TN
Posts: 54
|
Re: Project "49 No Buck$"
That is the coolest dash I have ever seen.
__________________
55 1st Series 5 window, getting an s10 frame and 350 sbc Keeping it LOUD and ROUGH - just like BOONEMAN 
|
|
|
|
|
10-06-2009, 10:35 AM
|
#9 |
|
Registered User
Join Date: Nov 2008
Location: So. Cal.
Posts: 452
|
Re: Project "49 No Buck$"
Anybody have some original gauges converted to 12 volt, they want to sell? Mine are way too tired and 6 volt to boot! I need to keep with the old hot rod theme. Brad
__________________
It's all about the stance, baby! http://67-72chevytrucks.com/vboard/s...d.php?t=320546 Last edited by kustombrad; 10-06-2009 at 12:52 PM. Reason: needed to fix |
|
|
|
|
10-12-2009, 03:43 PM
|
#10 |
|
Registered User
Join Date: Nov 2008
Location: So. Cal.
Posts: 452
|
Re: Project "49 No Buck$"
I'll finish shooting the chassis this week, but I shot a bunch of parts yesterday!
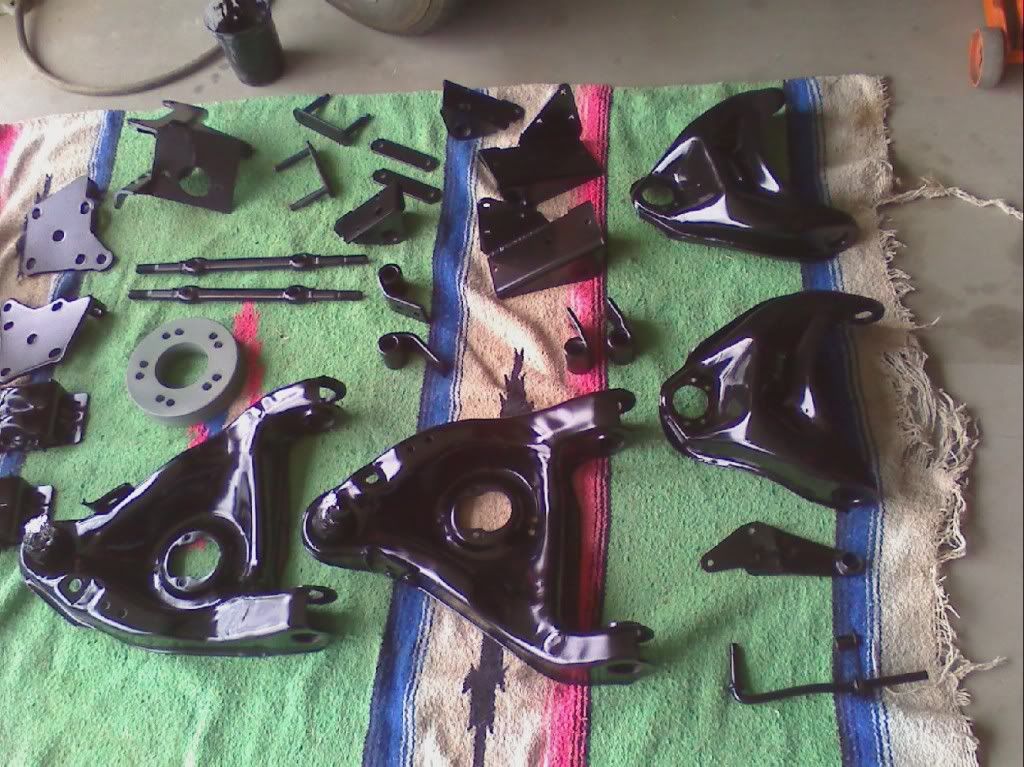 A lot of the smaller stuff is painted and in a box, but the bigger stuff is looking good for a bunch of old crap! I sand blasted everything nice and clean, shot a coat of metal etch primer on them and then sprayed it with some Eastwood ceramic semi-gloss chassis black. They now have a nice egg-shell sheen going on. I need to put the bushings in and hopefully this Sunday (Bakersfield Hot Rod Reunion is on Saturday... Be There!!!!) I'll start assembling the frame. I'm still shooting for Christmas time to be done... A lot of the smaller stuff is painted and in a box, but the bigger stuff is looking good for a bunch of old crap! I sand blasted everything nice and clean, shot a coat of metal etch primer on them and then sprayed it with some Eastwood ceramic semi-gloss chassis black. They now have a nice egg-shell sheen going on. I need to put the bushings in and hopefully this Sunday (Bakersfield Hot Rod Reunion is on Saturday... Be There!!!!) I'll start assembling the frame. I'm still shooting for Christmas time to be done...
__________________
It's all about the stance, baby! http://67-72chevytrucks.com/vboard/s...d.php?t=320546 |
|
|
|
|
10-12-2009, 03:55 PM
|
#11 |
|
Registered User
Join Date: Mar 2008
Location: Waukee, Iowa
Posts: 1,608
|
Re: Project "49 No Buck$"
Looks good,
 but when are we going to get more info on the wipers! but when are we going to get more info on the wipers!
__________________
build threads: 86 Suburban 88 Jeep 6.0 swap 49 Chevy truck 54 Chevy wagon 86 Suburban lowered 4/6 54 Chevy wagon 49 Chevy/s10 mix 88 Jeep Wrangler rockcrawler |
|
|
|
|
10-12-2009, 04:05 PM
|
#12 |
|
Registered User
Join Date: Nov 2008
Location: So. Cal.
Posts: 452
|
Re: Project "49 No Buck$"
"The Wipers!" I need to mount them up, just so I can shut you guys up! LOL Anyway, I drew up my pattern on Corel Draw to match the one I'd bent up. I shot it over to a friend of mine to cut it out on his laser and haven't gone by to pick it up yet. I guess I need to get it and mount it up, so everyone has an idea of how this works! Sorry I've taken so long by getting side-tracked on the rest of the truck!!! Brad
__________________
It's all about the stance, baby! http://67-72chevytrucks.com/vboard/s...d.php?t=320546 |
|
|
|
|
10-12-2009, 04:16 PM
|
#13 |
|
Registered User
Join Date: Mar 2008
Location: Waukee, Iowa
Posts: 1,608
|
Re: Project "49 No Buck$"
Yep, we're looking forward to you shutting us up!
__________________
build threads: 86 Suburban 88 Jeep 6.0 swap 49 Chevy truck 54 Chevy wagon 86 Suburban lowered 4/6 54 Chevy wagon 49 Chevy/s10 mix 88 Jeep Wrangler rockcrawler |
|
|
|
|
10-12-2009, 11:23 PM
|
#14 |
|
Slots go on anything!
Join Date: May 2003
Location: Richardson, TX
Posts: 5,957
|
Re: Project "49 No Buck$"
Your truck is trick, Brad. I dig it!
|
|
|
|
|
10-13-2009, 12:08 AM
|
#15 |
|
Senior Member
Join Date: Nov 2008
Location: Glendora, CA
Posts: 6,336
|
Re: Project "49 No Buck$"
Man, are you a Jack of All Trades, or what? Designing, Fab skills, welding, pinstriping, painting. Hats off to you for sure.
|
|
|
|
|
10-13-2009, 05:46 PM
|
#16 |
|
Registered User
Join Date: Nov 2008
Location: So. Cal.
Posts: 452
|
Re: Project "49 No Buck$"
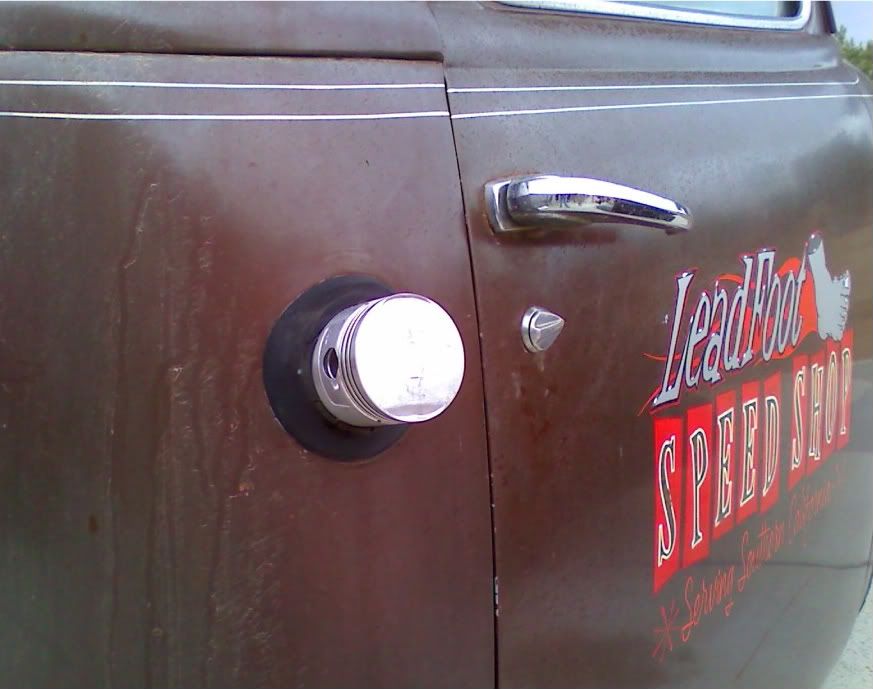
My friend Alex had a cool idea of what to use to fill up the old gas tank spout. He said a piston would look *****in' if you could find one that size. So after checking the spout with calipers and doing the metric check (easier to find pistons that way) I came out with 60.5mm. I went to ebay and typed in 62mm so I could make it tight enough not to leak and found a brand new '69 CB750 Honda piston for $19 w/free shipping! Now I need to make a mount that uses the wristpin and that's all done. I'm having way too much fun!
__________________
It's all about the stance, baby! http://67-72chevytrucks.com/vboard/s...d.php?t=320546 |
|
|
|
|
04-24-2015, 11:22 PM
|
#17 | |
|
Registered User
Join Date: Dec 2011
Location: McFarland, CA
Posts: 55
|
Re: Project "49 No Buck$"
Quote:
|
|
|
|
|
|
04-25-2015, 01:20 AM
|
#18 | |
|
Registered User
Join Date: Nov 2008
Location: So. Cal.
Posts: 452
|
Quote:
Posted via Mobile Device |
|
|
|
|
|
04-25-2015, 01:27 AM
|
#19 | |
|
Registered User
Join Date: Dec 2011
Location: McFarland, CA
Posts: 55
|
Re: Project "49 No Buck$"
Quote:
|
|
|
|
|
|
10-13-2009, 06:20 PM
|
#20 |
|
Slots go on anything!
Join Date: May 2003
Location: Richardson, TX
Posts: 5,957
|
Re: Project "49 No Buck$"
The piston head would be a cool place for the "soda" opener, too.
|
|
|
|
|
10-14-2009, 05:35 PM
|
#21 |
|
Registered User
Join Date: Oct 2007
Location: pittston,PA
Posts: 1,183
|
Re: Project "49 No Buck$"
really intrested in the wiper mount. i pm'd you awhile ago but didn't get a response back. stil intrested if you could pm me thanks john.
__________________
There is nothing you can't fix with a BFH or a FIRE WRENCH. 1997 chevy k1500 ext cab z71 (daily driver) sold 1996 chevy k1500 reg cab 4x4(daily driver)totaled 2008jeep patriot (wife's daily driver 2008 chevy 1500 ext cab 4x4 sold 2011 chevy 1500 crew cab ltz (daily driver) 1996 chevy 1500 reg cab 4x4 project sold 2006 pontiac grand prix gxp (daily work commuter) |
|
|
|
|
10-15-2009, 10:24 AM
|
#22 |
|
Senior Member
Join Date: Nov 2008
Location: Glendora, CA
Posts: 6,336
|
Re: Project "49 No Buck$"
"Soda"....

|
|
|
|
|
10-15-2009, 09:59 PM
|
#23 |
|
Registered User
Join Date: Nov 2008
Location: So. Cal.
Posts: 452
|
Re: Project "49 No Buck$"
I don't see a bottle opener in my future (hey I drink Bud Light...twist off!) A bit of advice for all you gearheads out there. I traded an old jet ski years ago for a parts washer and a STEAM CLEANER and that thing has been one of the best things I've ever scored! I was using it tonight and that thing kicks ass! I also did some wheeling and dealing for a cabinet sand blaster (full of aluminum oxide) and those 2 things are the best investment I ever made for working on cars and trucks! Just a thought...
__________________
It's all about the stance, baby! http://67-72chevytrucks.com/vboard/s...d.php?t=320546 |
|
|
|
|
10-16-2009, 04:29 PM
|
#24 |
|
Formerly- 1972SuperCheyenne
Join Date: Oct 2008
Location: Wake Forest NC
Posts: 5,782
|
Re: Project "49 No Buck$"
I am hoping to pick up a first series 55 shortly and your build is very motivating. I have alot more time and ideas than cash so your idea is right on in my book. Thanks for posting pics. Great work so far.
__________________
--Josh My Build Thread:http://67-72chevytrucks.com/vboard/s...d.php?t=799218 A good crossthread is better than Loctite any day. Life is not about what you have, but who you have to share it with. |
|
|
|
|
11-07-2009, 03:13 PM
|
#25 |
|
Registered User
Join Date: Nov 2008
Location: So. Cal.
Posts: 452
|
Re: Project "49 No Buck$"
Frame is sandblasted and painted! All the little pieces were blasted and painted and A-arms have new bushings and ball joints. It's starting to look like a frame again!
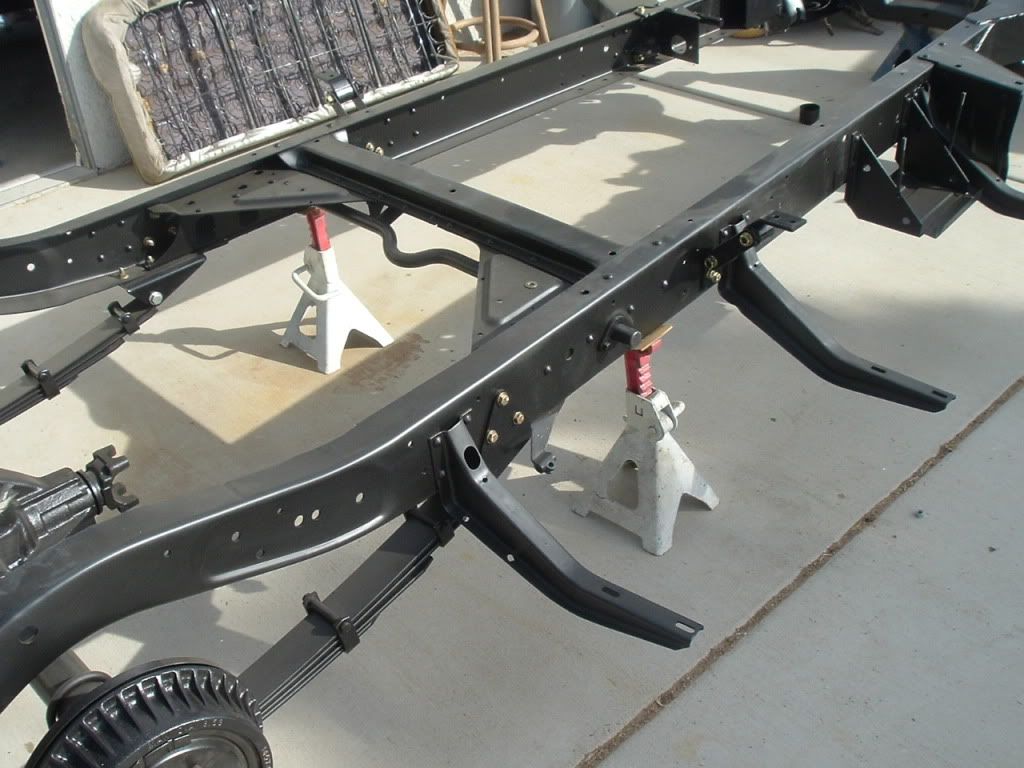 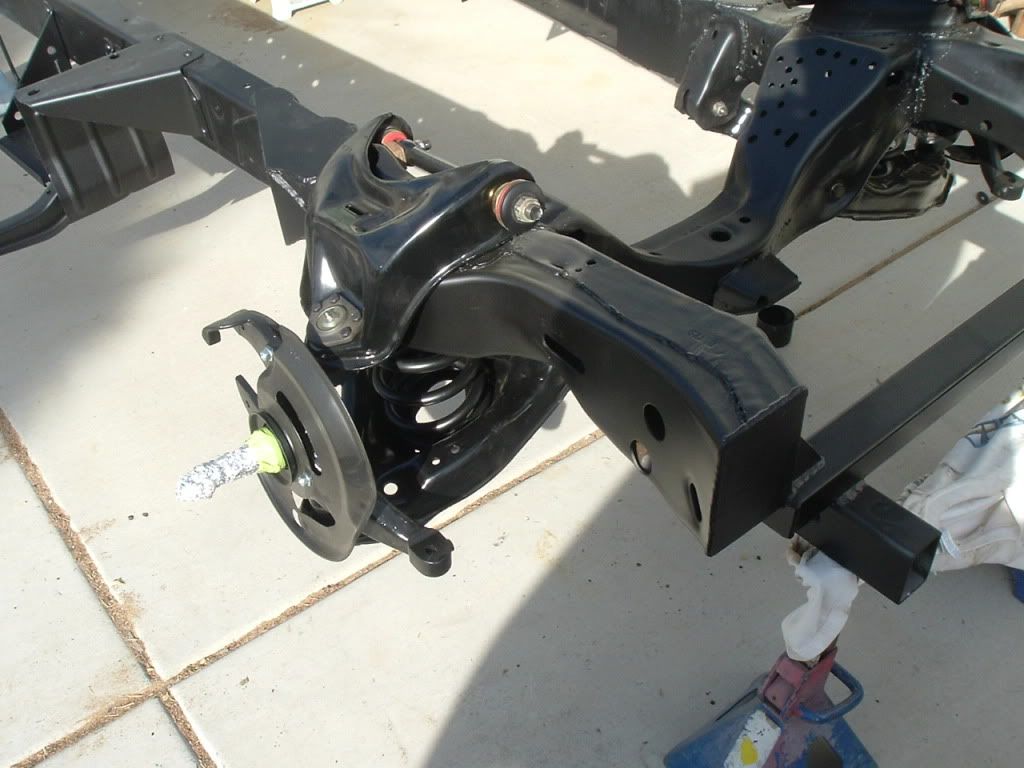 Still not spending a bunch of money (about $175 in paint and metal etch primer. And around $250 for all new front bushing and ball joints) just taking my time and doing it right! I'm a HUGE believer in RED Locktite on any suspension or frame piece, blue on everything else. It's a little dusty, but you can see that the semi-gloss black works good on all the underside stuff. Still not spending a bunch of money (about $175 in paint and metal etch primer. And around $250 for all new front bushing and ball joints) just taking my time and doing it right! I'm a HUGE believer in RED Locktite on any suspension or frame piece, blue on everything else. It's a little dusty, but you can see that the semi-gloss black works good on all the underside stuff.
__________________
It's all about the stance, baby! http://67-72chevytrucks.com/vboard/s...d.php?t=320546 |
|
|
|
 |
| Bookmarks |
| Thread Tools | |
| Display Modes | |
|
|


 Hybrid Mode
