
|
 07-08-2014, 10:05 PM
|
#226 |
|
Registered User
Join Date: Jun 2004
Location: Spartanburg, SC
Posts: 1,963
|
Re: My daily driver/beater : How I turned lemons in lemonade
Here's the stage 2 deluxe kit an you can see those tabs welded to the arms. Along with the big difference between the arm cross member as well.
 Sorry for throwing all this in here, I've just wanted trailing arms on my truck for a while so I've looked at all kinds of ways to try an do it.
__________________
Paul '78 GMC Serria 15 Heavy Half. 361/NV3500/3.73. Former LWB NV3500 swap Trailing arm swap '98 ECSB Z71 daily driver -traded  '03 burb. Family cruiser http://upstategmtrucks.com/ |

|

|
|
07-08-2014, 10:07 PM
|
#227 |
|
Needs a Big Block
Join Date: Oct 2003
Location: Red Deer , Alberta
Posts: 1,198
|
Re: My daily driver/beater : How I turned lemons in lemonade
Hey Tx. This is my 64 with an extreme dropmember , 3" spindles and a 26.68 tall tire aired up, there's TONS of clearance underneath ,
So I wouldn't worry about airing up on a lumpy road, I used to run a sectioned crossmember , 3" spindles and bags , and there's WAAAAAY More clearance now... 
__________________
1964 Short box On dropmembers and billets 1962 Suburban family cruiser 1972 K10 |
|
|
|
|
07-08-2014, 10:09 PM
|
#228 | |
|
Registered User
Join Date: Jun 2004
Location: Spartanburg, SC
Posts: 1,963
|
Re: My daily driver/beater : How I turned lemons in lemonade
Quote:
Don't mention my name to Dave, he will probably hang up on you....
__________________
Paul '78 GMC Serria 15 Heavy Half. 361/NV3500/3.73. Former LWB NV3500 swap Trailing arm swap '98 ECSB Z71 daily driver -traded '03 burb. Family cruiser http://upstategmtrucks.com/ |
|
|
|
|
|
07-09-2014, 08:55 AM
|
#229 |
|
Registered User
Join Date: Apr 2001
Location: DALLAS,TX
Posts: 21,919
|
Re: My daily driver/beater : How I turned lemons in lemonade
I don't see why the PB unit wouldn't work w/OE arms unless there's an issue w/the fromt mounts width (I know the Spherical joints utilize spacers so it's possible the OE arm bushings are too wide).
__________________
67SWB-B.B.RetroRod 64SWB-Recycle 89CCDually-Driver/Tow Truck 99CCSWB Driver All Fleetsides @rattlecankustoms in IG Building a small, high rpm engine with the perfect bore, stroke and rod ratio is very impressive. It's like a highly skilled Morrocan sword fighter with a Damascus Steel Scimitar..... Cubic inches is like Indiana Jones with a cheap pistol. |
|
|
|
|
07-09-2014, 10:08 AM
|
#230 |
|
I'm just glad to be here!
Join Date: Jan 2008
Location: Longview, TX
Posts: 4,788
|
Re: My daily driver/beater : How I turned lemons in lemonade
I know this might be more work to do this but here is an idea that I have been kicking around for awhile on the trailing arms under a '73-'87 body.
Start with a lwb 63-72 frame, cut it down to the '73-'87 swb length (117.5" vs the 115" for the 63-72). Cut the rails behind the axle to fit properly with the bed. Cut/modify the front frame horns to bolt the front bumper and core support on, and lastly, fabricate cab mounts. For the rear, you could even do the frame mod that Rob at No Limit did to their JT truck to kick up the rear rails 4" to help get it that much lower. The side benefit to doing this is that the truck could still be used until the majority of the "new" chassis is done...
__________________
Karl  1965 Chevy Stepside(Grandpa's Old Blue) and (July 2015 Shop Build!)(2020, the Saga Continues) http://67-72chevytrucks.com/vboard/s...d.php?t=372424 The LST Challenge: http://67-72chevytrucks.com/vboard/s...=1#post7812257 Korbin's 1st Square: "Sunburn" http://67-72chevytrucks.com/vboard/s...d.php?t=418618 1985 GMC Sierra: "White Trash", Korbin's 2nd now... http://67-72chevytrucks.com/vboard/s...d.php?t=632305 Henry - 1984 Chevrolet, Owen's 1st Square |
|
|
|
|
07-09-2014, 10:30 AM
|
#231 | |
|
Registered User
Join Date: Jun 2004
Location: Spartanburg, SC
Posts: 1,963
|
Re: My daily driver/beater : How I turned lemons in lemonade
Quote:
__________________
Paul '78 GMC Serria 15 Heavy Half. 361/NV3500/3.73. Former LWB NV3500 swap Trailing arm swap '98 ECSB Z71 daily driver -traded '03 burb. Family cruiser http://upstategmtrucks.com/ |
|
|
|
|
|
07-09-2014, 11:09 AM
|
#232 | |
|
Registered User
Join Date: Apr 2001
Location: DALLAS,TX
Posts: 21,919
|
Re: My daily driver/beater : How I turned lemons in lemonade
Quote:
The Panhard bar would be similar. NoLimits offer a PHB kit that would prob work well as well as a PB unit if a guy didn't wan't to fab from scratch.
__________________
67SWB-B.B.RetroRod 64SWB-Recycle 89CCDually-Driver/Tow Truck 99CCSWB Driver All Fleetsides @rattlecankustoms in IG Building a small, high rpm engine with the perfect bore, stroke and rod ratio is very impressive. It's like a highly skilled Morrocan sword fighter with a Damascus Steel Scimitar..... Cubic inches is like Indiana Jones with a cheap pistol. |
|
|
|
|
|
07-09-2014, 12:21 PM
|
#233 |
|
Registered User
Join Date: Jun 2004
Location: Spartanburg, SC
Posts: 1,963
|
Re: My daily driver/beater : How I turned lemons in lemonade
TX - If you havent seen it check out how this guy is doing his rear setup. This could possibly be adapted to these trucks. It could at least give you ideas anyway.
http://67-72chevytrucks.com/vboard/s...=630982&page=4 He also did a similar setup on his ladies truck here: http://67-72chevytrucks.com/vboard/s...d.php?t=531177
__________________
Paul '78 GMC Serria 15 Heavy Half. 361/NV3500/3.73. Former LWB NV3500 swap Trailing arm swap '98 ECSB Z71 daily driver -traded '03 burb. Family cruiser http://upstategmtrucks.com/ |
|
|
|
|
07-09-2014, 12:30 PM
|
#234 |
|
Watch out for your cornhole !
 Join Date: Jun 2003
Location: Azle, Texas
Posts: 14,162
|
Re: My daily driver/beater : How I turned lemons in lemonade
Made a 100 dollar Craigslist buy this morning.
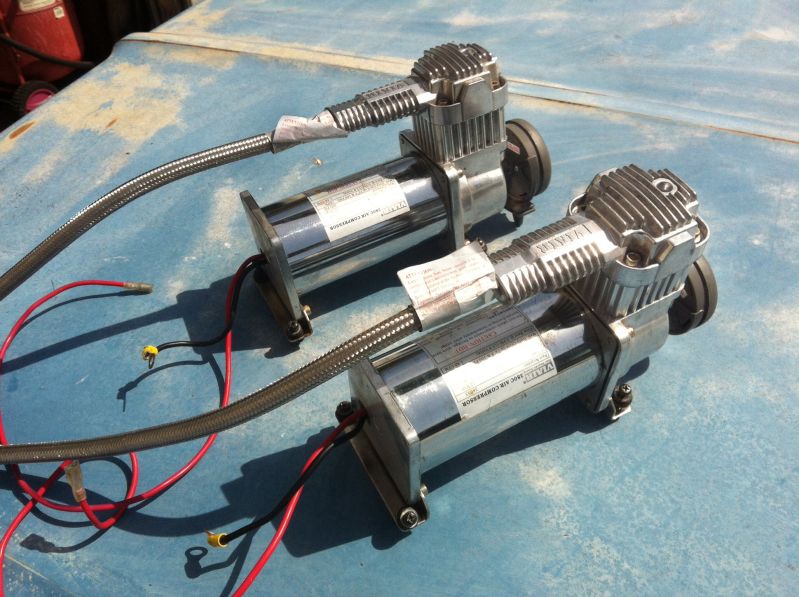 Not my first choice dream compressor set but for what I paid versus new price, I can listen to them run a few seconds longer to fill my tank. Then stopped off and bought a big pile of new grade 8 hardware to replenish my shop stock. I suspect this project is going to use more than a few of them. 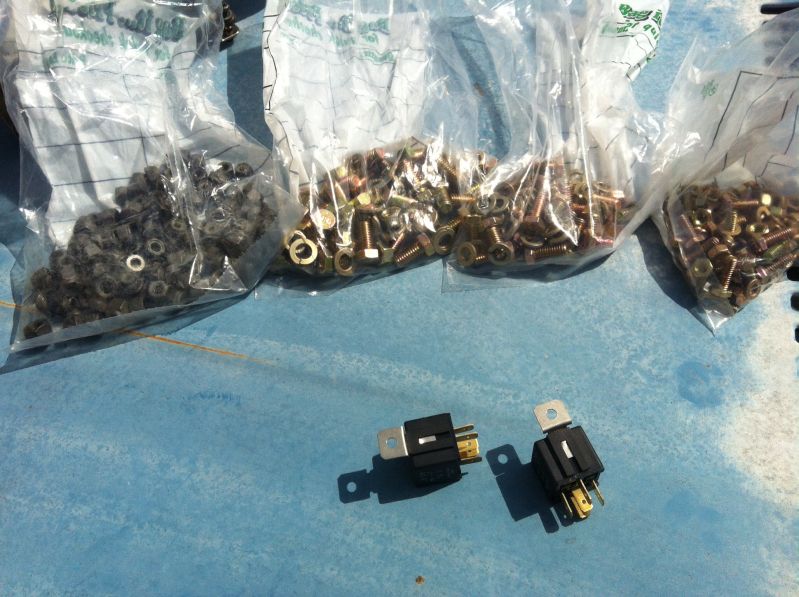
__________________
I'm on the Instagram- @Gearhead_Kevin |
|
|
|
|
07-09-2014, 12:43 PM
|
#235 |
|
Watch out for your cornhole !
Join Date: Jun 2003
Location: Azle, Texas
Posts: 14,162
|
Re: My daily driver/beater : How I turned lemons in lemonade
Paul, Scot, Karl, and the rest, while we're talking here, let me ask opinions.
I'm tempering my choices with the timeline that I will get this thing done this winter. Besides suspension, I'm going to need to do firewall mods to address my AC box clearing my front tires, possibly hood hinge mods for the same reason, freshen up my engine, build new trans crossmember and new exhaust and much more. There's a lot of ground to cover in a few months. I just don't want to get bogged down into months of measuring and figuring. Plus, I work on the floor so under truck work isn't pleasant to do. Am I being a worry wart on the AOL setup in the back ? Setting aside concerns for the safety of the leaf springs being thinned down then cycled up and down a whole bunch, it's far and away the easiest route to go. I could build or buy a notch, weld it in, crossbar brace it, do bag and shock mounts and I'd be finished and onto the next thing. I currently have a flip kit and no other rear mods. I want my finished ride height to be three inches lower than it is now with the option to air it down a further 2-3 inches.
__________________
I'm on the Instagram- @Gearhead_Kevin |
|
|
|
|
07-09-2014, 01:40 PM
|
#236 |
|
Registered User
Join Date: Jul 2009
Location: San Jose Ca
Posts: 2,871
|
Re: My daily driver/beater : How I turned lemons in lemonade
I never cared for the AOL. I bought my 4 link/panhard/upper and lower bag plates delivered for 575 from Custom Connection when they had a sale. I know its more time and work but should result in a much better set up.
__________________
David Used parts build: http://67-72chevytrucks.com/vboard/s...d.php?t=638991 My brother's Nova: http://www.67-72chevytrucks.com/vboa...d.php?t=727985 Rear suspension rework: http://www.67-72chevytrucks.com/vboa...d.php?t=750557 Instagram: myfabguy |
|
|
|
|
07-09-2014, 04:11 PM
|
#237 | |
|
Registered User
Join Date: Apr 2001
Location: DALLAS,TX
Posts: 21,919
|
Re: My daily driver/beater : How I turned lemons in lemonade
Quote:
My main concern about the 2-link arrangment is the short length of the bars + their solid attatchment to the rear housing such a short distance away. OE truck-arm 2-links are over twice the length @ 51" C/C of the pivot points & their construction + mounting points allow flex. The 2-leaf/AOL works except for wheel hop issues. I don't know I would 'worry' about spring breakage unless you used the truck for heavy loads. What about making your own 2-link/Billy Bars or modifying the Ekstensive units for more articulation? Me personally? I'd purchase a T/A x-member from Summit & see if I could make it work within the 73-87 frame. If not, re-sell the part & view the financial loss as a small learning expense. I'm 100% for the OE T/A arrangement over AOL or Billy Bars. TX.... I might have an ECE unit you could play with & test.
__________________
67SWB-B.B.RetroRod 64SWB-Recycle 89CCDually-Driver/Tow Truck 99CCSWB Driver All Fleetsides @rattlecankustoms in IG Building a small, high rpm engine with the perfect bore, stroke and rod ratio is very impressive. It's like a highly skilled Morrocan sword fighter with a Damascus Steel Scimitar..... Cubic inches is like Indiana Jones with a cheap pistol. Last edited by SCOTI; 07-09-2014 at 04:32 PM. |
|
|
|
|
|
07-09-2014, 04:18 PM
|
#238 |
|
I'm just glad to be here!
Join Date: Jan 2008
Location: Longview, TX
Posts: 4,788
|
Re: My daily driver/beater : How I turned lemons in lemonade
I think the AOl set up is by far the simplest way to get low and have adjustability. On the other hand, it has been said to not ride as well as other options. Depending on the budget for this build, you have a ton of options. Part of me wants to say go with the PB Fab set up in the rear too, but that is a bit heavy on the wallet.
No Limit's Fatbar 4-Link rear suspension is $1175 with the air bags and shocks and all brackets. You will have to do some kind of notch on your own. PB Fab's 4-link rear suspension is complete and a bolt in assembly. No pricing on their web site, but at Pro Performance it is listed as $1800. PB Fab's Trailing Arm rear suspension for 73-87 trucks is also complete and bolt in. Pro Performance has it listed as $1822 with air bags and shocks. This one will allow you to keep the stock bed floor in place, may not get as low as you want. Ride Tech has their bolt in $-link kit that has been seen around here and N2TRUXX did a nice write up on his install. List price is $1700 with out shocks, Ride Tech RQ series shocks add another $250. I would want to ride in a couple of trucks with the different suspensions before I could decided. I have heard that they all are great, each just seems a matter of personal preference. Price wise from my list above, the No Limit Fatbar would win out. Fab'ing up a notch would be inexpensive and easy for you and your skills.
__________________
Karl 1965 Chevy Stepside(Grandpa's Old Blue) and (July 2015 Shop Build!)(2020, the Saga Continues) http://67-72chevytrucks.com/vboard/s...d.php?t=372424 The LST Challenge: http://67-72chevytrucks.com/vboard/s...=1#post7812257 Korbin's 1st Square: "Sunburn" http://67-72chevytrucks.com/vboard/s...d.php?t=418618 1985 GMC Sierra: "White Trash", Korbin's 2nd now... http://67-72chevytrucks.com/vboard/s...d.php?t=632305 Henry - 1984 Chevrolet, Owen's 1st Square |
|
|
|
|
07-09-2014, 04:30 PM
|
#239 | |
|
I'm just glad to be here!
Join Date: Jan 2008
Location: Longview, TX
Posts: 4,788
|
Re: My daily driver/beater : How I turned lemons in lemonade
Quote:
http://www.ballisticfabrication.com/...nt_p_1226.html With your googlefo working, you might even find a better price on the joint. The link are is nothing more then 2" sq tube with a simple axle bracket on the other end. I have even seen the sq tube mounted to the existing leaf spring pad on the rear axle using the u-bolts and plate from the leaf springs. I might even look into this for my '85 I'm doing. Cost would seam to be much lower...
__________________
Karl 1965 Chevy Stepside(Grandpa's Old Blue) and (July 2015 Shop Build!)(2020, the Saga Continues) http://67-72chevytrucks.com/vboard/s...d.php?t=372424 The LST Challenge: http://67-72chevytrucks.com/vboard/s...=1#post7812257 Korbin's 1st Square: "Sunburn" http://67-72chevytrucks.com/vboard/s...d.php?t=418618 1985 GMC Sierra: "White Trash", Korbin's 2nd now... http://67-72chevytrucks.com/vboard/s...d.php?t=632305 Henry - 1984 Chevrolet, Owen's 1st Square |
|
|
|
|
|
07-09-2014, 05:10 PM
|
#240 |
|
Watch out for your cornhole !
Join Date: Jun 2003
Location: Azle, Texas
Posts: 14,162
|
Re: My daily driver/beater : How I turned lemons in lemonade
I think I've formed up my plans on the back end. I'm going to heavily copy the Ekstensive kit with a few changes of my own.
2 inch square tubing .250" wall thickness for two link bars. Johnny Joints with misalignment spacers and square tube bungs on the front ends of the bars. https://www.ruffstuffspecialties.com.../125RESET.html I'll make my own step notch with cross braces between them. The commercially sold ones are nothing but a stack of 1/4" plate steel that you weld together like a jigsaw puzzle. I'll make my own bag brackets I'll make my own shock mounts I'll make my own panhard bar setup. I didn't buy my plasma cutter to use as a foot stool. To recap, I have on order currently.... -PB Extreme Dropmember -four Dominator bags -Little Larry's Four Play valve box -Ruff Stuff Johnny Joints I have the compressors on hand. Will need to buy a bunch of 1/4" plate steel and some 2" tubing. Then I'll need fittings, tank, and all the rest of the tidbits to complete the system. Right or wrong, that's the direction I'm going. Those are some big bad Johnny Joints. I think they will address most of the weakness of the 2 bar configuration.
__________________
I'm on the Instagram- @Gearhead_Kevin |
|
|
|
|
07-09-2014, 05:40 PM
|
#241 | |
|
Registered User
Join Date: Apr 2001
Location: DALLAS,TX
Posts: 21,919
|
Re: My daily driver/beater : How I turned lemons in lemonade
Quote:
__________________
67SWB-B.B.RetroRod 64SWB-Recycle 89CCDually-Driver/Tow Truck 99CCSWB Driver All Fleetsides @rattlecankustoms in IG Building a small, high rpm engine with the perfect bore, stroke and rod ratio is very impressive. It's like a highly skilled Morrocan sword fighter with a Damascus Steel Scimitar..... Cubic inches is like Indiana Jones with a cheap pistol. |
|
|
|
|
|
07-09-2014, 06:44 PM
|
#242 | |
|
Watch out for your cornhole !
Join Date: Jun 2003
Location: Azle, Texas
Posts: 14,162
|
Re: My daily driver/beater : How I turned lemons in lemonade
Quote:
__________________
I'm on the Instagram- @Gearhead_Kevin |
|
|
|
|
|
07-09-2014, 08:12 PM
|
#243 |
|
Registered User
Join Date: Jun 2004
Location: Spartanburg, SC
Posts: 1,963
|
Re: My daily driver/beater : How I turned lemons in lemonade
Kevin your plan sounds good to me. I can't say good or bad about any other setup as this will be my first truck with bags as well. All my experience has been helping my friend Matt on his 72 which is a trailing arm setup.
Since I took these pictures I'll post them anyways.    The factory trailing arms fit the Porterbuilt cross member just fine....
__________________
Paul '78 GMC Serria 15 Heavy Half. 361/NV3500/3.73. Former LWB NV3500 swap Trailing arm swap '98 ECSB Z71 daily driver -traded '03 burb. Family cruiser http://upstategmtrucks.com/ |
|
|
|
|
07-10-2014, 12:17 AM
|
#244 | |
|
Registered User
Join Date: Apr 2001
Location: DALLAS,TX
Posts: 21,919
|
Re: My daily driver/beater : How I turned lemons in lemonade
Quote:
__________________
67SWB-B.B.RetroRod 64SWB-Recycle 89CCDually-Driver/Tow Truck 99CCSWB Driver All Fleetsides @rattlecankustoms in IG Building a small, high rpm engine with the perfect bore, stroke and rod ratio is very impressive. It's like a highly skilled Morrocan sword fighter with a Damascus Steel Scimitar..... Cubic inches is like Indiana Jones with a cheap pistol. |
|
|
|
|
|
07-10-2014, 05:50 AM
|
#245 |
|
Registered User
Join Date: May 2009
Location: Monroe, LA
Posts: 2,103
|
Re: My daily driver/beater : How I turned lemons in lemonade
Very interested in this suspension transformation. I will be watching.
__________________
Keith SOLD - 1963 C10 Short Fleet 350/700R4 4/6 drop 1967 GMC Super Custom - Short Fleet COPO concept w/427 BBC T-400 w/Doug Nash overdrive 4/6 Drop, Buddy Buckets, etc... Frame Off (In Progress) I call it "Vulgar Display of Power" 1980 Silverado Original paint 49k Original miles 4/6 drop Check out my build thread here: http://67-72chevytrucks.com/vboard/s...=1#post6209941 |
|
|
|
|
07-10-2014, 06:37 AM
|
#246 |
|
Watch out for your cornhole !
Join Date: Jun 2003
Location: Azle, Texas
Posts: 14,162
|
Re: My daily driver/beater : How I turned lemons in lemonade
I appreciate everyone's dialog on the whole subject. Lets hope the path I have chosen works well. I'll get to practice doing plenty of plasma cutting when building the notch.
I also have a press brake ordered which should help me do some better fab work on the notch and bag brackets and such. It will bend 1/4 inch plate up to 12 inches wide. http://www.swagoffroad.com/20-TON-Pr...-Kit_p_40.html I figure between my drill press, plasma cutter, and now this press brake, I should be able to build brackets like these for nothing more than the cost of the raw steel. 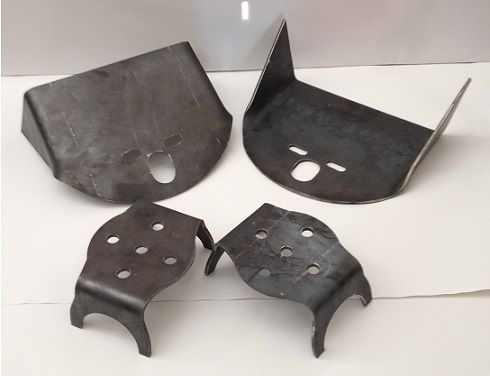 And I've got my steering rack coming from Amazon.com
__________________
I'm on the Instagram- @Gearhead_Kevin Last edited by Tx Firefighter; 07-10-2014 at 06:55 AM. |
|
|
|
|
07-10-2014, 08:51 AM
|
#247 | |
|
Still Learning
Join Date: Jul 2009
Location: Central Oklahoma
Posts: 10,108
|
Re: My daily driver/beater : How I turned lemons in lemonade
Quote:
 What did that puppy set you back? I think I could build the whole setup in a pinch. That might be a nice winter project. But if I can buy one pretty cheap it would be a nice add to the shop. |
|
|
|
|
|
07-10-2014, 08:55 AM
|
#248 | |
|
Registered User
Join Date: Jun 2004
Location: Spartanburg, SC
Posts: 1,963
|
Re: My daily driver/beater : How I turned lemons in lemonade
Quote:
__________________
Paul '78 GMC Serria 15 Heavy Half. 361/NV3500/3.73. Former LWB NV3500 swap Trailing arm swap '98 ECSB Z71 daily driver -traded '03 burb. Family cruiser http://upstategmtrucks.com/ |
|
|
|
|
|
07-10-2014, 09:17 AM
|
#249 | |
|
Registered User
Join Date: Apr 2001
Location: DALLAS,TX
Posts: 21,919
|
Re: My daily driver/beater : How I turned lemons in lemonade
Quote:
__________________
67SWB-B.B.RetroRod 64SWB-Recycle 89CCDually-Driver/Tow Truck 99CCSWB Driver All Fleetsides @rattlecankustoms in IG Building a small, high rpm engine with the perfect bore, stroke and rod ratio is very impressive. It's like a highly skilled Morrocan sword fighter with a Damascus Steel Scimitar..... Cubic inches is like Indiana Jones with a cheap pistol. |
|
|
|
|
|
07-10-2014, 09:48 AM
|
#250 |
|
Farm Truck
Join Date: Aug 2006
Location: Jersey Village, Texas
Posts: 547
|
Re: My daily driver/beater : How I turned lemons in lemonade
Are you buying the press fully welded?
__________________
1969 CST/10 1984 K5 Blazer 4x4 2016 Dodge Ram 2500 4x4 Mike Jersey Village, Tx |
|
|
|
 |
| Bookmarks |
|
|


 Linear Mode

