
|
 10-30-2013, 11:37 PM
|
#226 |
|
Registered User
Join Date: Sep 2012
Location: Mt. Prospect, ILL
Posts: 820
|
Re: 1952 1 Ton Rebuild
thanks
I forgot to post some pictures of it primed. I thought I'd put the door and fender in the right place to see if what I did actually made a difference. |

|

|
|
10-31-2013, 06:26 AM
|
#227 | |
|
Registered User
Join Date: Jun 2011
Location: Floyds Knobs, IN
Posts: 430
|
Re: 1952 1 Ton Rebuild
Quote:
Good Luck and pay attention to the details. I remember you saying that you wanted to get this done over spring break  Keep up the good work. |
|
|
|
|
|
11-03-2013, 11:12 PM
|
#228 |
|
Registered User
Join Date: Sep 2012
Location: Mt. Prospect, ILL
Posts: 820
|
Re: 1952 1 Ton Rebuild
I got some POR 15 on the floor pan.
Made a side by side picture to see what the floor looked like when i bought it, to now. Just for fun. |
|
|
|
|
11-03-2013, 11:26 PM
|
#229 |
|
Registered User
Join Date: Oct 2013
Location: Bozeman, Mt
Posts: 8
|
Re: 1952 1 Ton Rebuild
yeeeeeaaahhhh that's gonna be one sweeeet truck man!!!
|
|
|
|
|
11-04-2013, 12:17 AM
|
#230 |
|
Registered User
Join Date: Sep 2012
Location: Mt. Prospect, ILL
Posts: 820
|
Re: 1952 1 Ton Rebuild
Ha ha thanks brother
Yeah that's the hope, plan, and goal. |
|
|
|
|
11-05-2013, 02:53 AM
|
#231 |
|
Registered User
Join Date: Oct 2013
Location: Bozeman, Mt
Posts: 8
|
Re: 1952 1 Ton Rebuild
looks like you are well on your way with this one, keep up the good work. I looked through your whole thread its cool to see how things are coming along with your build
|
|
|
|
|
11-12-2013, 12:07 AM
|
#232 |
|
Registered User
Join Date: Sep 2012
Location: Mt. Prospect, ILL
Posts: 820
|
Re: 1952 1 Ton Rebuild
Thanks Greasy
I started working the back half of the cab over the past several days. There were a couple small dents in the passenger side. Instead of pounding them out, the PO just filled them in with bondo. I sanded took off the top 2 layers of paint, and pounded out almost all the dents, and sanded a little more. I just wanted to take a picture of how ugly it looked before I made it one color. Next step was the cab corner that was more rusted than I originally thought. When we first got the truck you couldn't see that rusted out line in the corner. When I rolled the cab on it's end to put a dolly under it, I cracked the bondo and found this. I cut out the corner this morning. |
|
|
|
|
11-12-2013, 12:17 AM
|
#233 |
|
Registered User
Join Date: Sep 2012
Location: Mt. Prospect, ILL
Posts: 820
|
Re: 1952 1 Ton Rebuild
My dad and I were looking at the old panel, and discovered it was actually patched with another truck's corner. The arrows are pointing to some of the seams the previous owner made fixing this corner.
I think it's funny that this isn't the truck's second, but third chance on life. (and hopefully not the last) I got the new corner clamped and almost welded up. I'll finish tomorrow. These Chinese-made aftermarket parts are kinda crap. the flange that mounts the door jamb was about an inch too long, and the flange on the outside of the cab wasn't long enough. (where small clamp is in the last photo.) But these were just minor inconveniences. I got them sorted in about a half an hour. Just 207 days till Power Tour 2014. It'll be here before I know it... Happy Veterans day. |
|
|
|
|
11-12-2013, 07:34 PM
|
#234 |
|
Registered User
Join Date: Jun 2011
Location: Floyds Knobs, IN
Posts: 430
|
Re: 1952 1 Ton Rebuild
Nick, Looking at your last photo of your weld, you need a short skip weld along the entire seam and then go back and fill in the spaces. Don't try to weld it all at one time. Youy will get the metal too hot and will have trouble with it pulling. I used a bunch of short welds spread out to keep the deformation down.
You progress is looking good and stay patient. 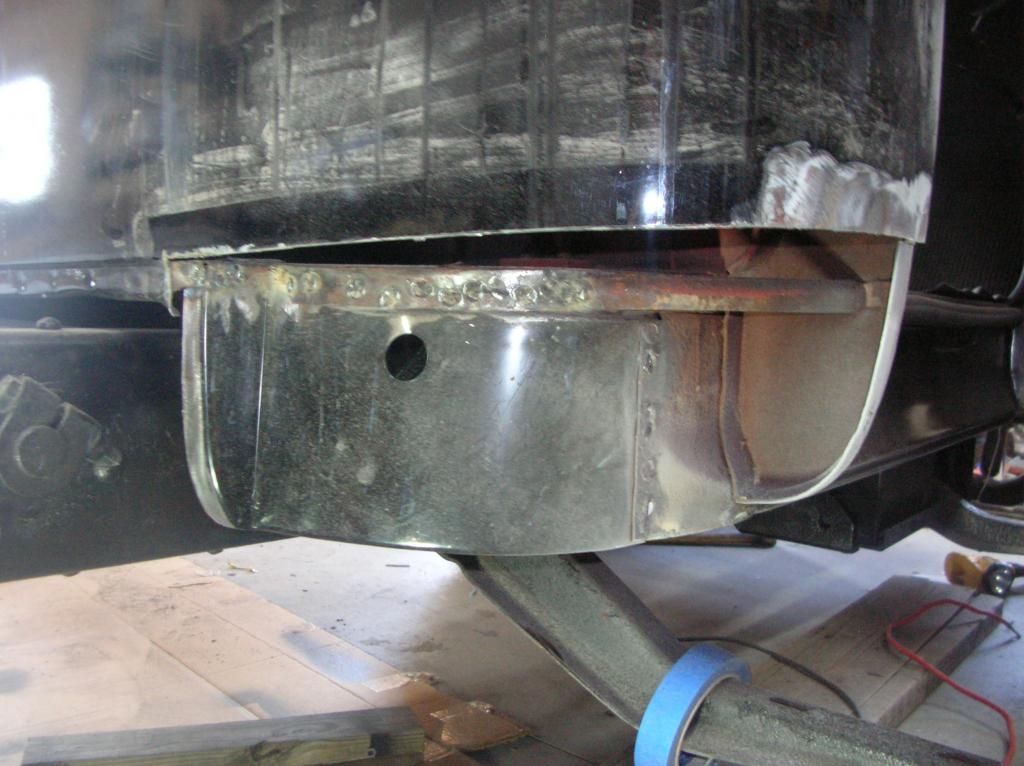 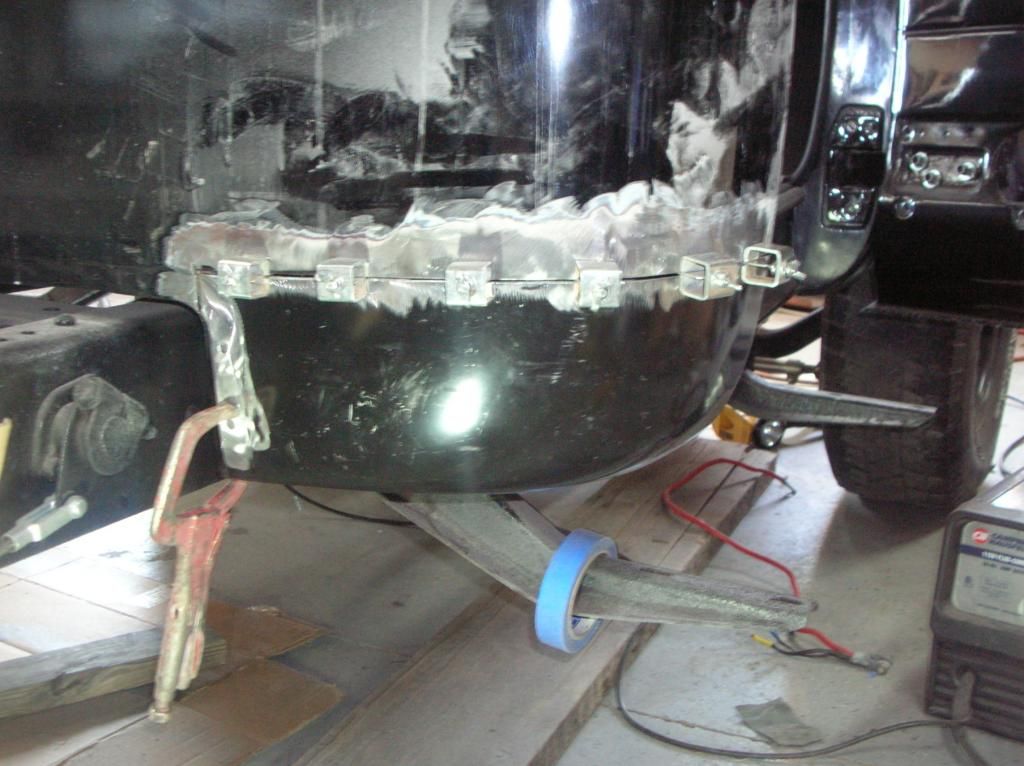 
Last edited by coralhead; 11-12-2013 at 07:41 PM. |
|
|
|
|
11-12-2013, 09:22 PM
|
#235 |
|
Registered User
Join Date: Oct 2010
Location: Ocean Springs, MS
Posts: 1,746
|
Re: 1952 1 Ton Rebuild
What kind of fasteners are those, and where can I get them? Thanks
__________________
Gary 1971 Chevrolet C/10 1951 GMC 100 1977 GMC C15 1955 Chevrolet 3100 |
|
|
|
|
11-12-2013, 09:51 PM
|
#236 | |
|
Registered User
Join Date: Jun 2011
Location: Floyds Knobs, IN
Posts: 430
|
Re: 1952 1 Ton Rebuild
Quote:
|
|
|
|
|
|
11-12-2013, 11:12 PM
|
#237 |
|
Registered User
Join Date: Sep 2012
Location: Mt. Prospect, ILL
Posts: 820
|
Re: 1952 1 Ton Rebuild
Thanks, I actually was doing a bunch of short welds, but when I filled in between. Instead of the whle seam, I tacked it in place, but skip welded between each clamp.
Coralhead is correct, you can get a set of butt weld clamps at harbor freight. A set of 8 clamps for $8. Last edited by mechanixman; 11-12-2013 at 11:21 PM. |
|
|
|
|
11-13-2013, 07:23 AM
|
#238 |
|
Registered User
Join Date: Jun 2011
Location: Floyds Knobs, IN
Posts: 430
|
Re: 1952 1 Ton Rebuild
Nick, on a side note. Sometimes you don't need to use the whole patch panel to make the repair. My corners were the same shape as yours but I only used the amount of patch needed. You can see that by cutting the upper piece of patch off you don't have the long verticle weld to smooth out. As a plus you wll have a nice piece of flat metal to fill in other places as needed.

|
|
|
|
|
11-13-2013, 09:05 AM
|
#239 | |
|
Registered User
Join Date: Oct 2010
Location: Ocean Springs, MS
Posts: 1,746
|
Re: 1952 1 Ton Rebuild
Quote:
__________________
Gary 1971 Chevrolet C/10 1951 GMC 100 1977 GMC C15 1955 Chevrolet 3100 |
|
|
|
|
|
11-13-2013, 12:25 PM
|
#240 |
|
Registered User
Join Date: Jan 2012
Location: Eastern Ontario, Canada
Posts: 1,041
|
Re: 1952 1 Ton Rebuild
I tried those clamps and don't like them. Leaves too much gap.
__________________
1952 Canadian Chevy 1300 C4 IFS & D44 IRS 5.3 HO L33 My Build: http://67-72chevytrucks.com/vboard/s...d.php?t=632938 
|
|
|
|
|
11-20-2013, 01:56 PM
|
#241 |
|
Registered User
Join Date: Sep 2009
Location: Chicago, IL.
Posts: 105
|
Re: 1952 1 Ton Rebuild
I just made 6 of them. They worked great for me when I chopped the top. By the way, you guys are making some excellent strides. keep up the good work and you'll have her on the road sooner rather than later.
|
|
|
|
|
11-22-2013, 12:01 AM
|
#242 |
|
Registered User
Join Date: Sep 2012
Location: Mt. Prospect, ILL
Posts: 820
|
Re: 1952 1 Ton Rebuild
One step closer to paint!
|
|
|
|
|
11-22-2013, 09:17 AM
|
#243 |
|
Registered User
Join Date: May 2010
Location: Lawrenceville, Ga
Posts: 2,640
|
Re: 1952 1 Ton Rebuild
I've used those clamps with some success but getting the bars out of after you loosen them up can be a problem.
Mechanixman, you are doing some nice work. Keep it up. |
|
|
|
|
12-05-2013, 03:59 PM
|
#244 |
|
Registered User
Join Date: Dec 2013
Location: Cross Creek FL
Posts: 37
|
Re: 1952 1 Ton Rebuild
Great work dude! Keep it up and keep sharing the progress!
|
|
|
|
|
12-05-2013, 04:22 PM
|
#245 |
|
Registered User
Join Date: Jul 2011
Location: Las Vegas - Nev. aka Sin City
Posts: 1,835
|
Re: 1952 1 Ton Rebuild
nice work
|
|
|
|
|
12-07-2013, 02:01 PM
|
#246 |
|
Registered User
Join Date: Sep 2012
Location: Mt. Prospect, ILL
Posts: 820
|
Re: 1952 1 Ton Rebuild
Thanks guys
Not too much to report. I've wet sanded the cab, and I'm just waiting on an opportune time to try painting it. We bought a kerosene heater that should be more than warm enough to heat the garage, but it's still freezing in there. I originally planned on using the infamous purple HF hvlp guns. But I may have found a paint booth I can rent out on a sunday for a $100. So we'll see how that goes. My only problem is trying to find a way to get it there. |
|
|
|
|
12-08-2013, 04:47 AM
|
#247 |
|
Registered User
Join Date: Jan 2011
Location: Redmond, OR
Posts: 754
|
Re: 1952 1 Ton Rebuild
My skills are minimal (first try at paint and body work), but I found this Devilbiss gun worked fine for what I needed for about the same price as the HF gun.
http://www.ebay.com/itm/Devilbiss-Gr...item1e833a7374
__________________
68 Chev C20- son has it now 83 K20 - bought from son 70 C20 - in progress |
|
|
|
|
12-08-2013, 11:37 AM
|
#248 |
|
Registered User
Join Date: Apr 2013
Location: St. Peters, Missouri
Posts: 155
|
Re: 1952 1 Ton Rebuild
Another thought on the clamps. As FarmerSid has stated, they can leave a bit of a gap. You can fit your patch tight and mark where you will place your clamps, then open that spot a little bigger. If you find that the patch is too tight after tacking, you can run a body saw blade to get a gap.
Here is a pic where the clamp area has a bigger gap.  mechanixman, Nice progress on the build. Keep up the good work. Shawn
__________________
My build thread - http://67-72chevytrucks.com/vboard/s...d.php?t=582647 |
|
|
|
|
12-15-2013, 12:01 AM
|
#249 |
|
Registered User
Join Date: Sep 2012
Location: Mt. Prospect, ILL
Posts: 820
|
Re: 1952 1 Ton Rebuild
Thanks Shawn
It's been quite a while since I have posted anything. (A lot longer than I thought it was.) So I figured it'd be a good time to do a long update. My cousin bought this 1.5 ton a couple months before I bought mine. It's a 1953 4100 Original 235 sm420 with PTO, and a working dump bed. I finally got a picture of it last Thanksgiving. Next three pictures are of the final metal work before I have it completely ready for paint. I've tried using a couple (different) spot welders to get finish off that section in the three pictures, but none of them actually welded them together, so I eventually decided to get off my lazy butt and drill/weld the inner and outer cowl panels together. Some finish grinding, and you almost can't tell. |
|
|
|
|
12-15-2013, 12:19 AM
|
#250 |
|
Registered User
Join Date: Sep 2012
Location: Mt. Prospect, ILL
Posts: 820
|
Re: 1952 1 Ton Rebuild
So all this took place today:
First picture is how the frame sat for the past couple months. I decided it was time to finally bring it in the garage so I can actually work on it during the winter season. Only problem was that if I wanted to realistically work on it, I'd have to put it in the garage nose first; something this truck has never done before. So I had to do a three point turn in the street by myself. (Something I really wouldn't recommend, it took me 5 hours between shoveling and pushing) Dad and I got the cab on the frame in a couple minutes, not a big deal at all. We thought it would be a good time to see how the motor fit in the engine compartment. And I must say I'm pleased. It's low enough I have a better center of gravity, it's just far back enough that it doesn't hit the radiator, and far forward enough that I don't need to touch the firewall or floor. The only problem I'll have once this thing is put together, I won't be able to reach the 3 or 5 cylinder spark plugs do to the manifold and the steering box. The shifting location of the T-5 is just where I expected it to be, not too inconvenient in my opinion. Any thoughts on it? How would you guys have done it? Right now I have about an inch from the top of the shifting plate to the bottom of the cab, and I haven't put in the cab mounts yet. The last picture was the last one I took tonight, I like to think the truck looks rather sinister from that angle. |
|
|
|
 |
| Bookmarks |
|
|


 Linear Mode

