
|
Register or Log In To remove these advertisements. |
|
|
|
|||||||
 |
|
|
Thread Tools | Display Modes |
 10-16-2011, 03:49 PM
|
#26 |
|
Account Suspended
Join Date: May 2011
Location: 67-72 HQ
Posts: 103
|
Re: So I'm at a light....(PIC'S)
I have hear that too.. I also have a 700. I might try to get the minimum spline and see about adjusting on the shafts and maybe the shift hole...
|

|

|
|
11-09-2011, 02:59 AM
|
#27 |
|
Registered User
Join Date: May 2000
Location: Petrolia,Ontario,Canada but working in Port Huron,Mi.
Posts: 1,769
|
Re: So I'm at a light....(PIC'S)
UPDATE.
I finally got the out put shaft from Advance Adapters and got into the 700. First was to remove the pan and then pull the filter. 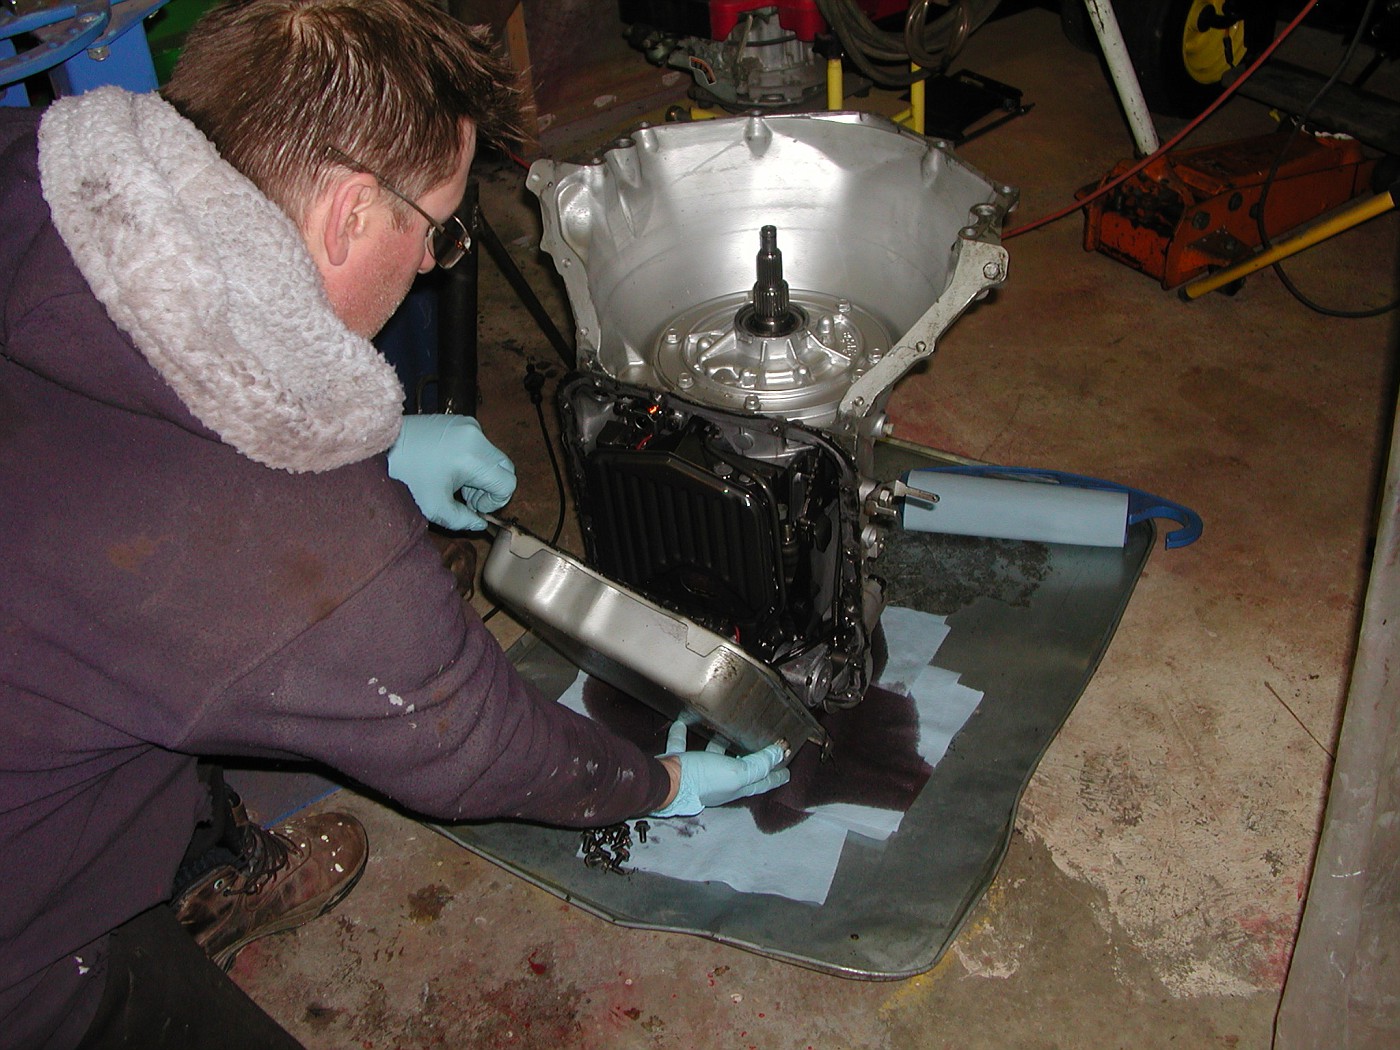 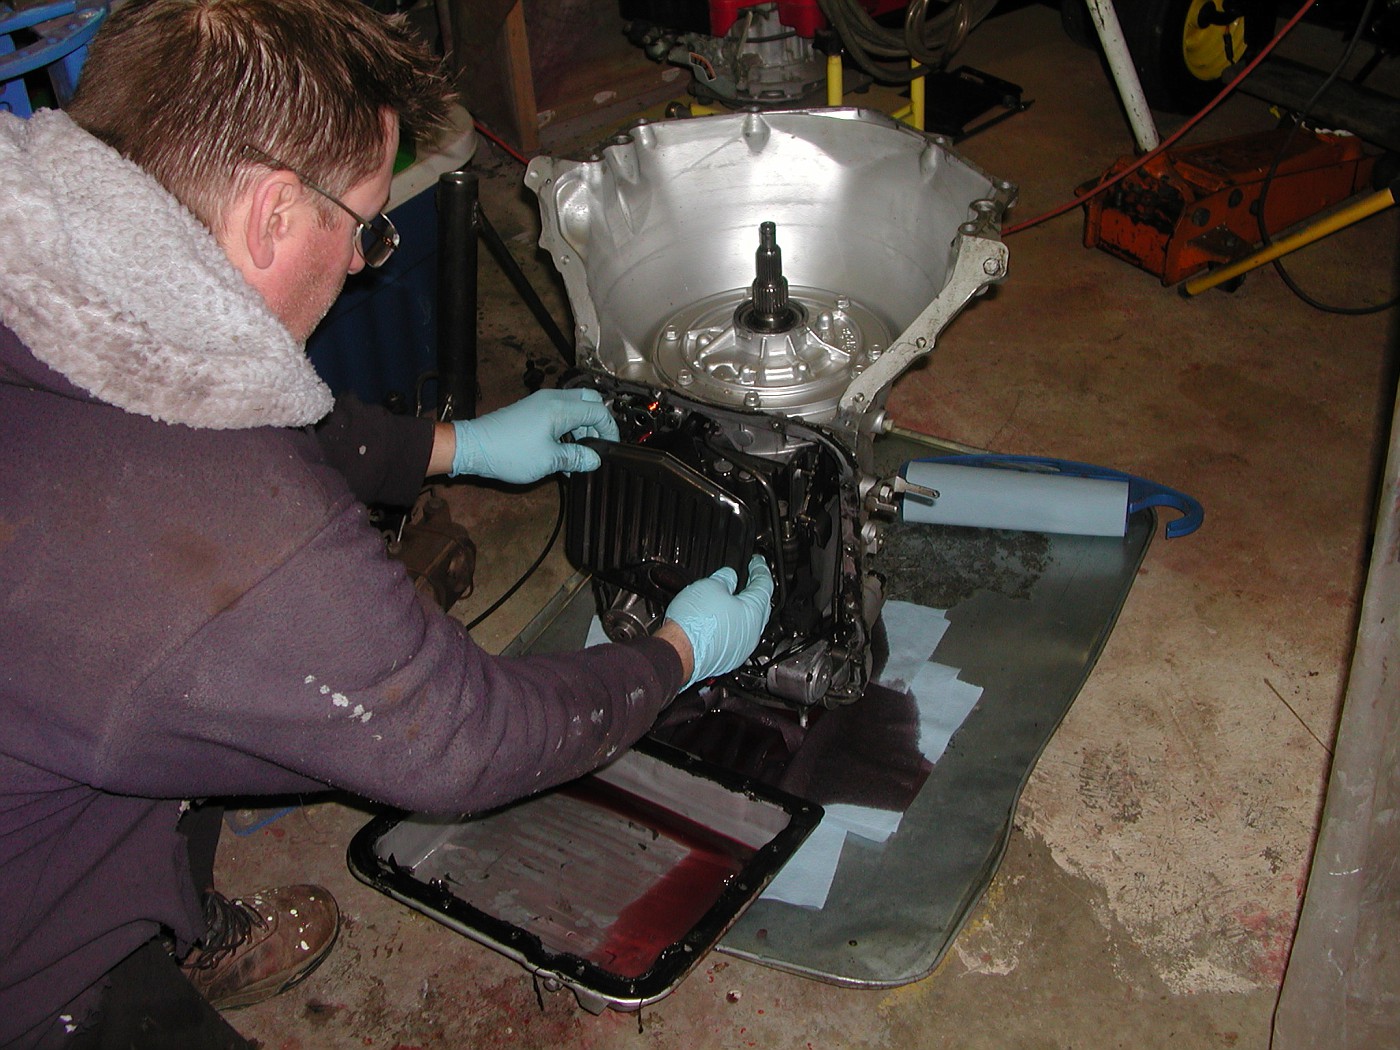 Don't forget the filter seal.I used a pick to remove it.   I used my engine stand to work on the valve body. I attached the cradle and then lifted it onto the engine stand. The trans is at a nice working height now. 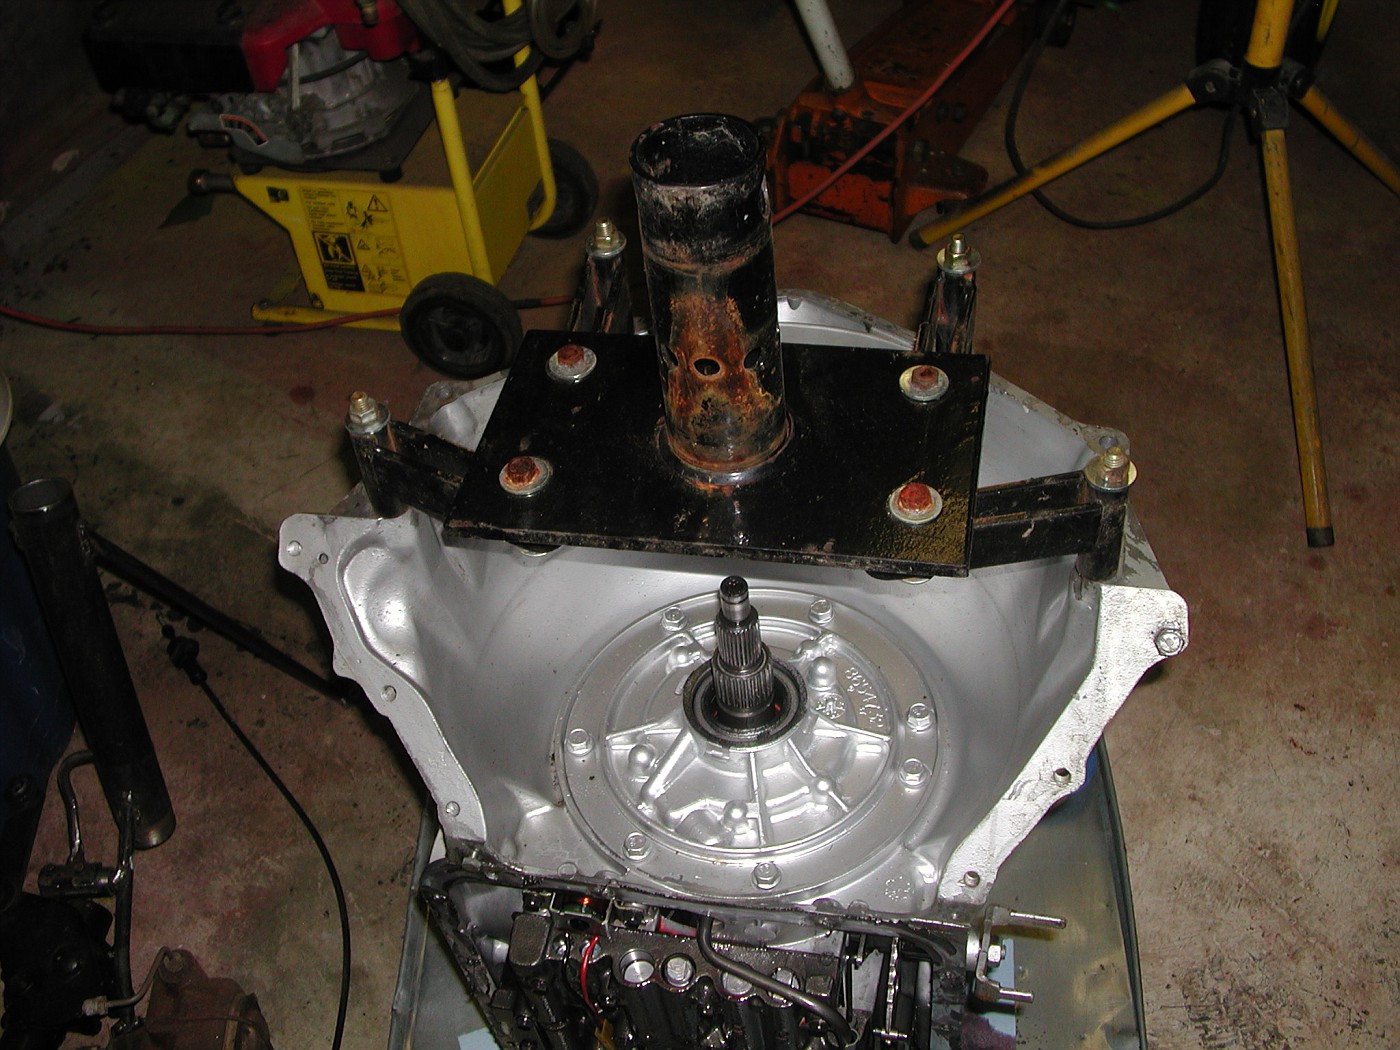 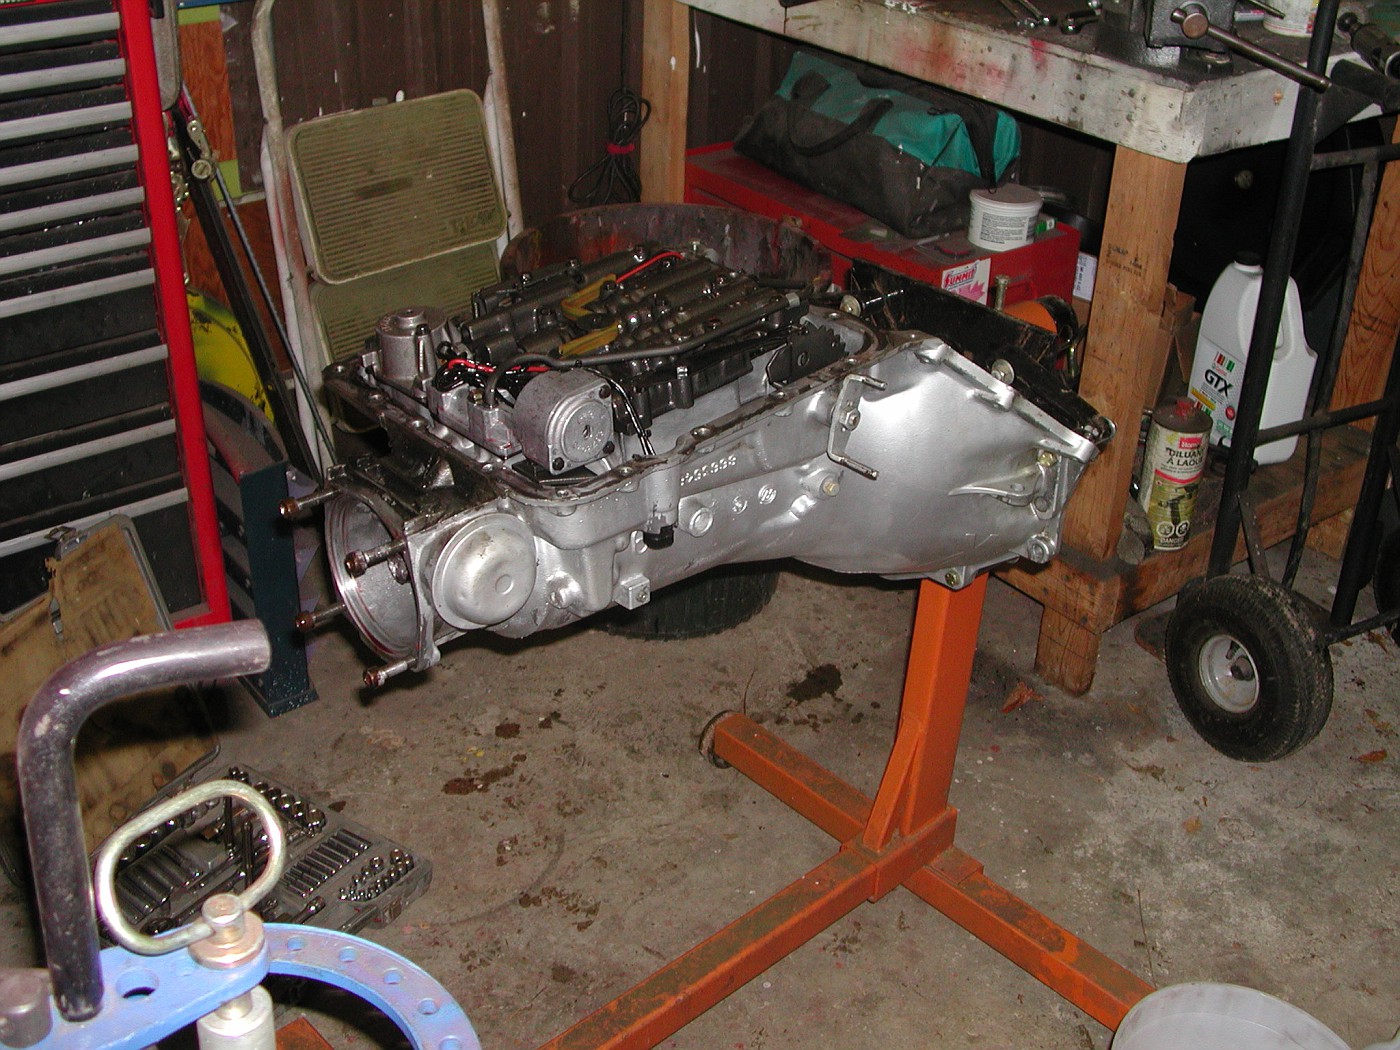 1st removed the governor gear cover. 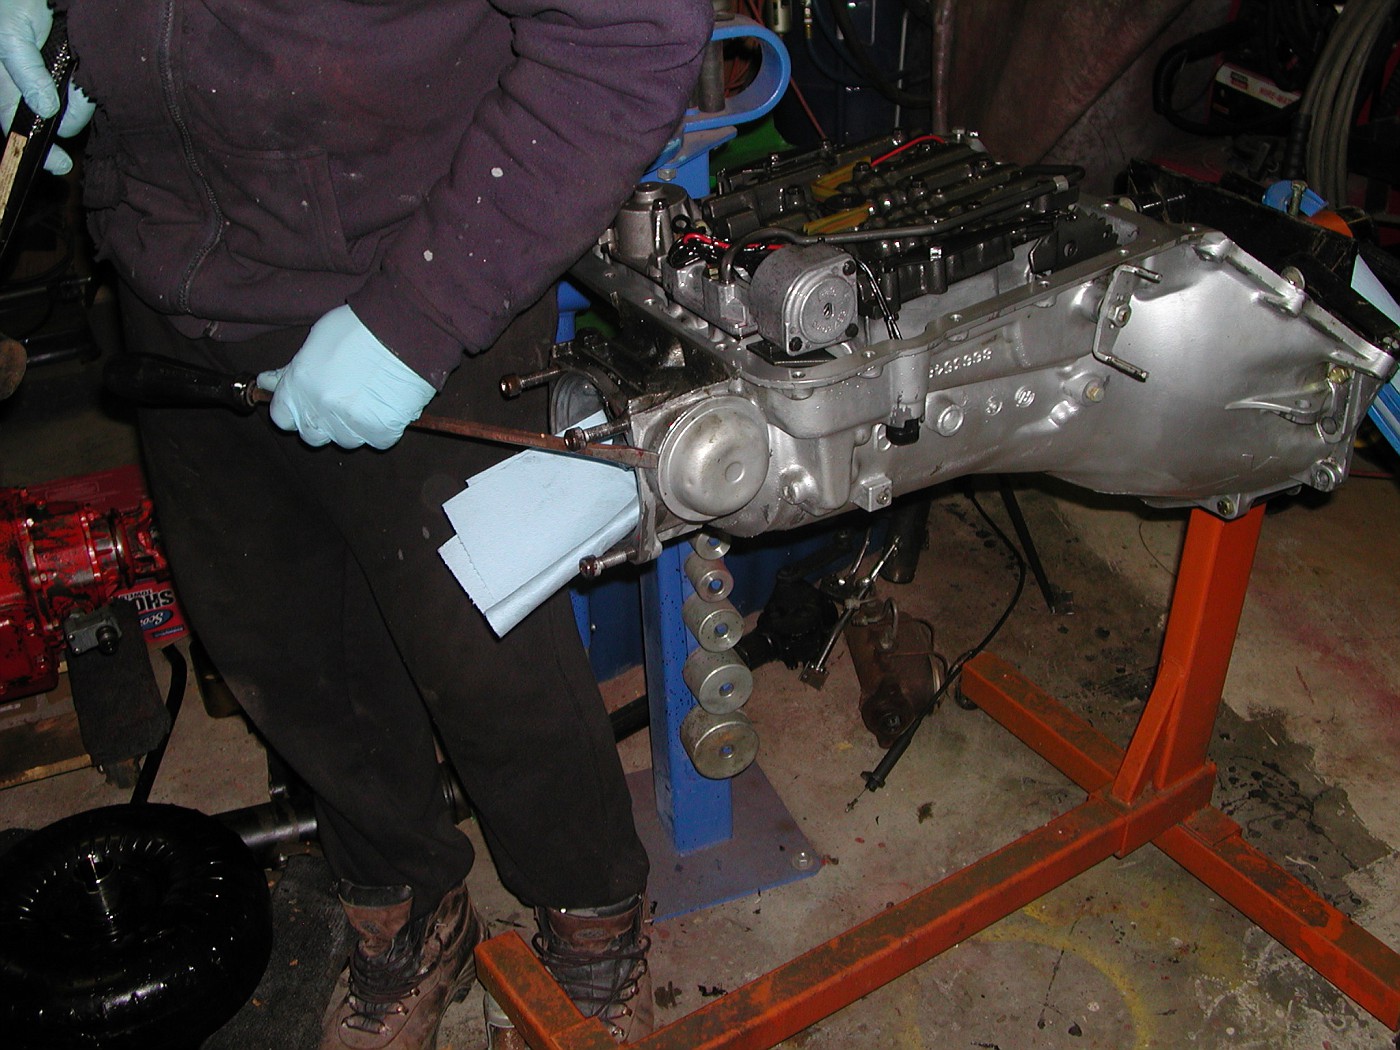 Cover removed with O-ring 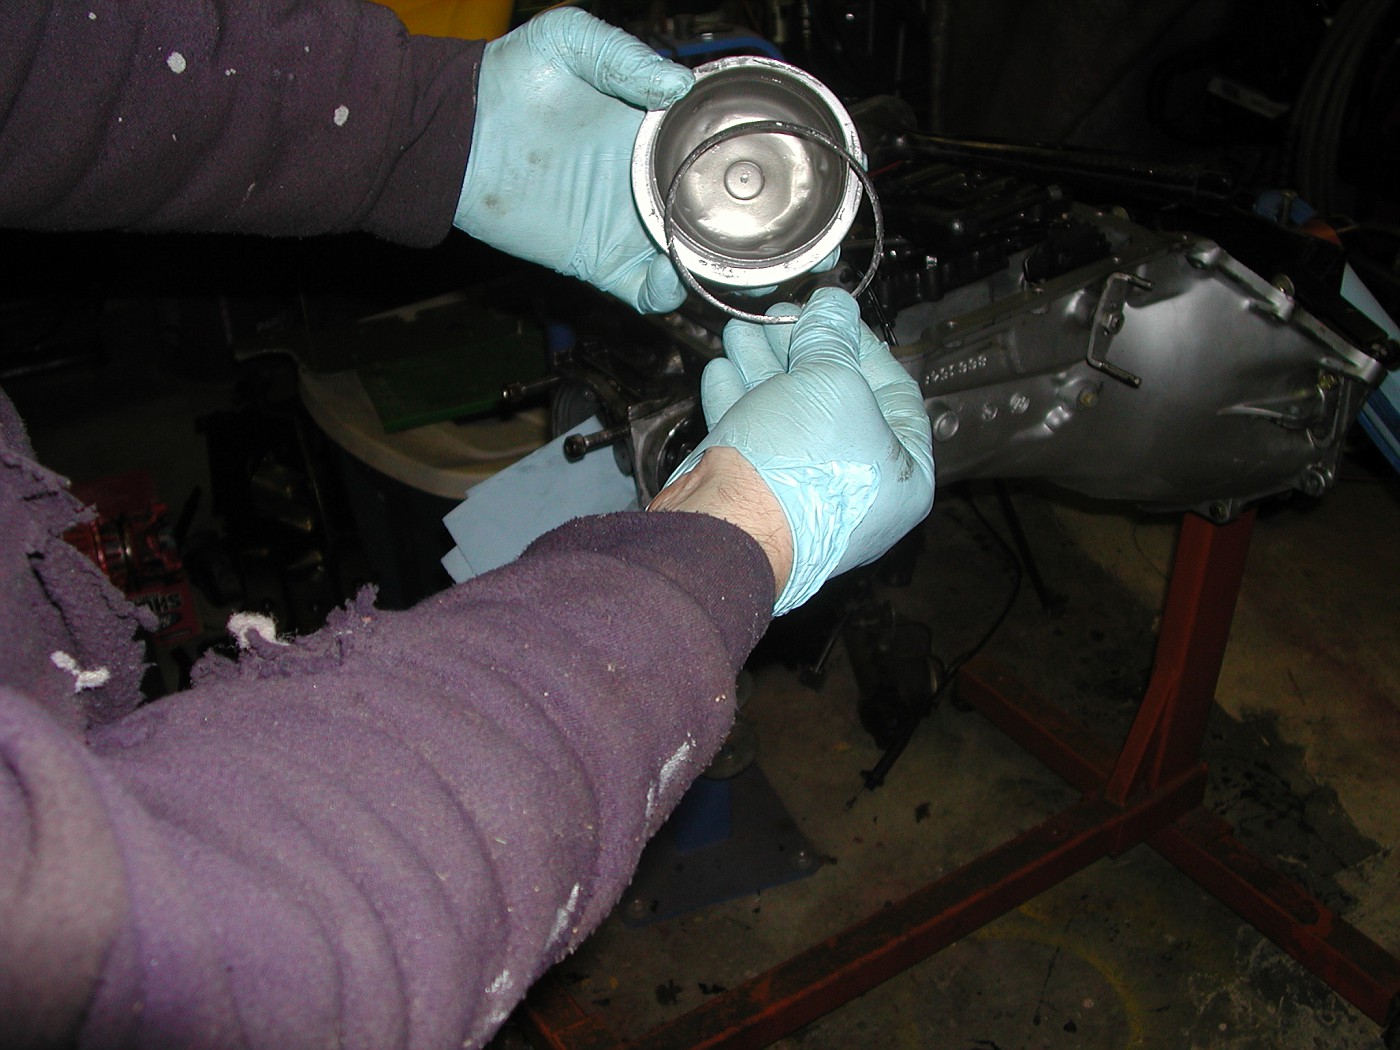 Then with a clockwise twist, the gear is easily removed. 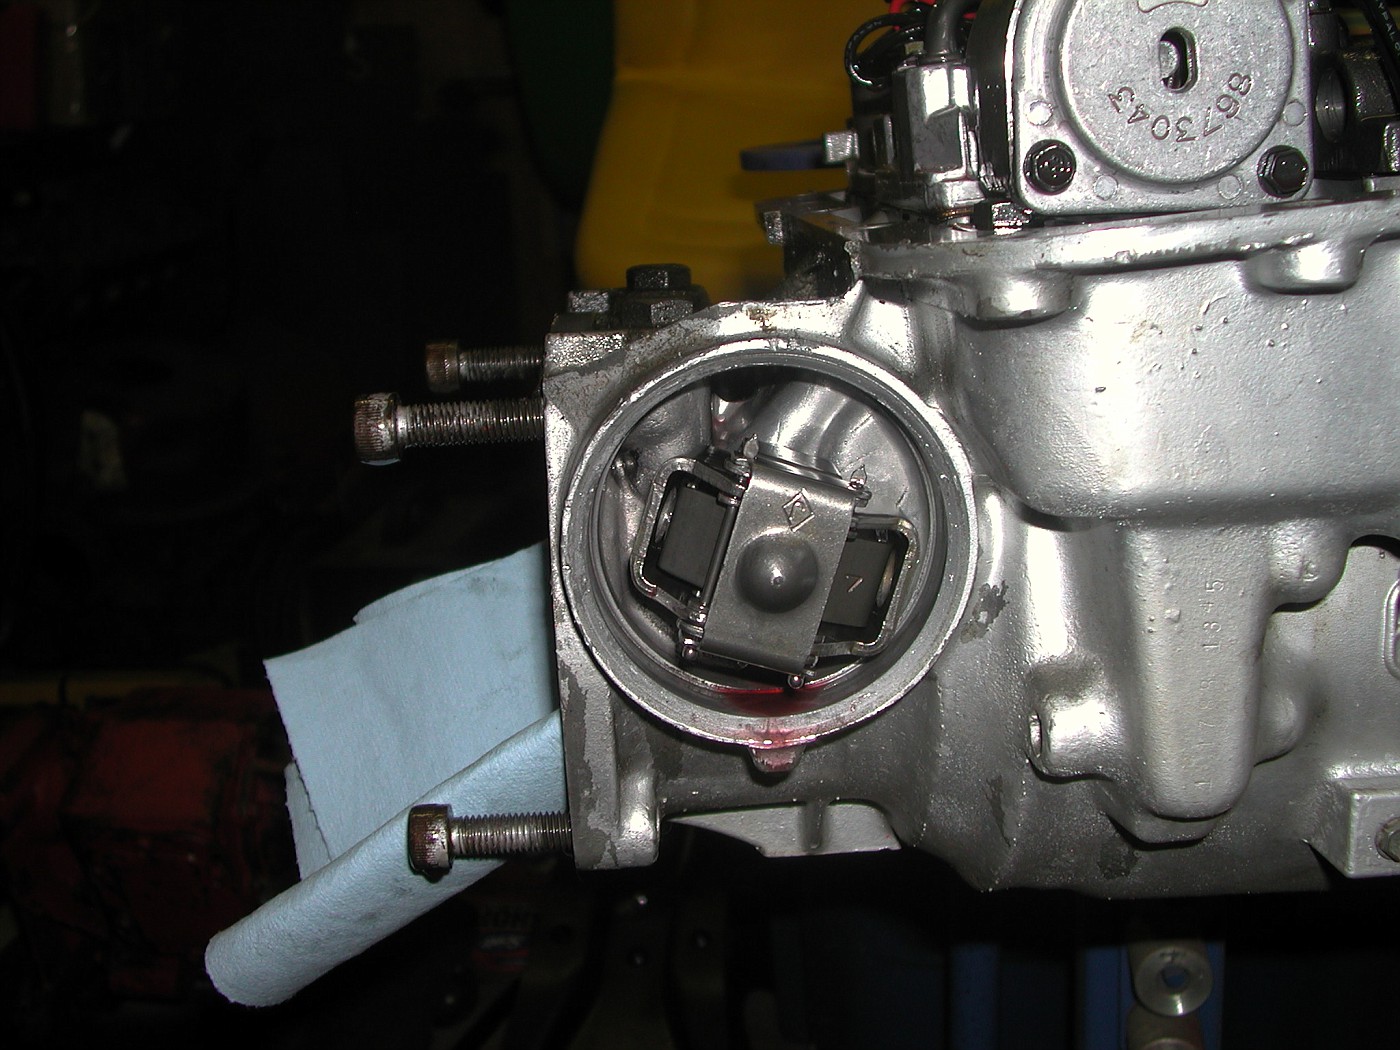 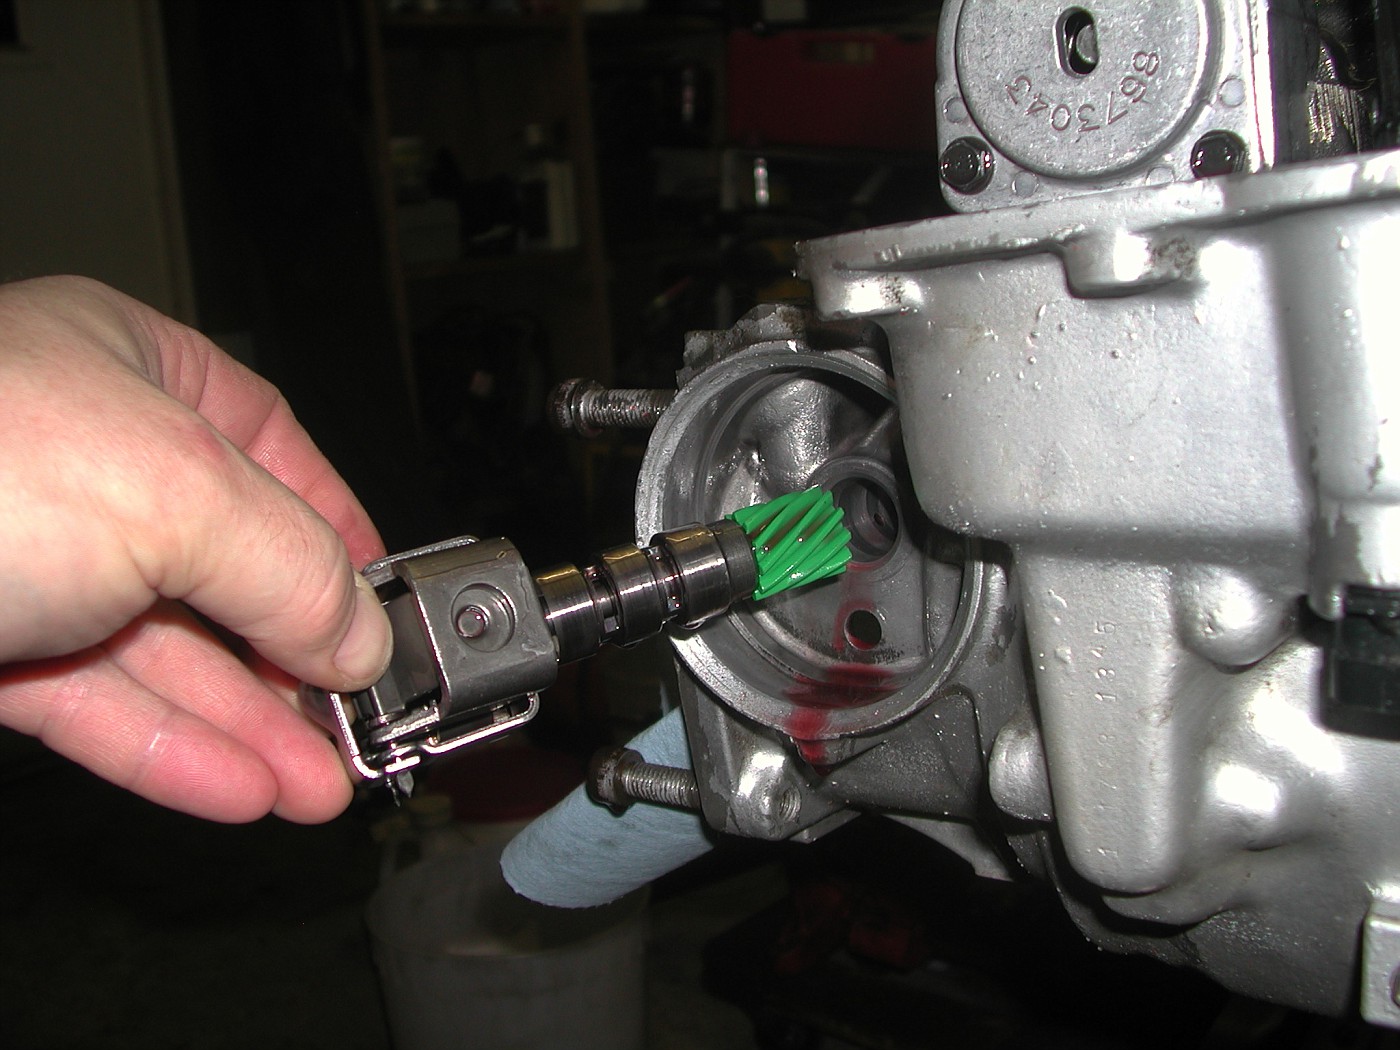 This is the main valve body with wiring for the TCC (Torque Converter Clutch) Solenoid. 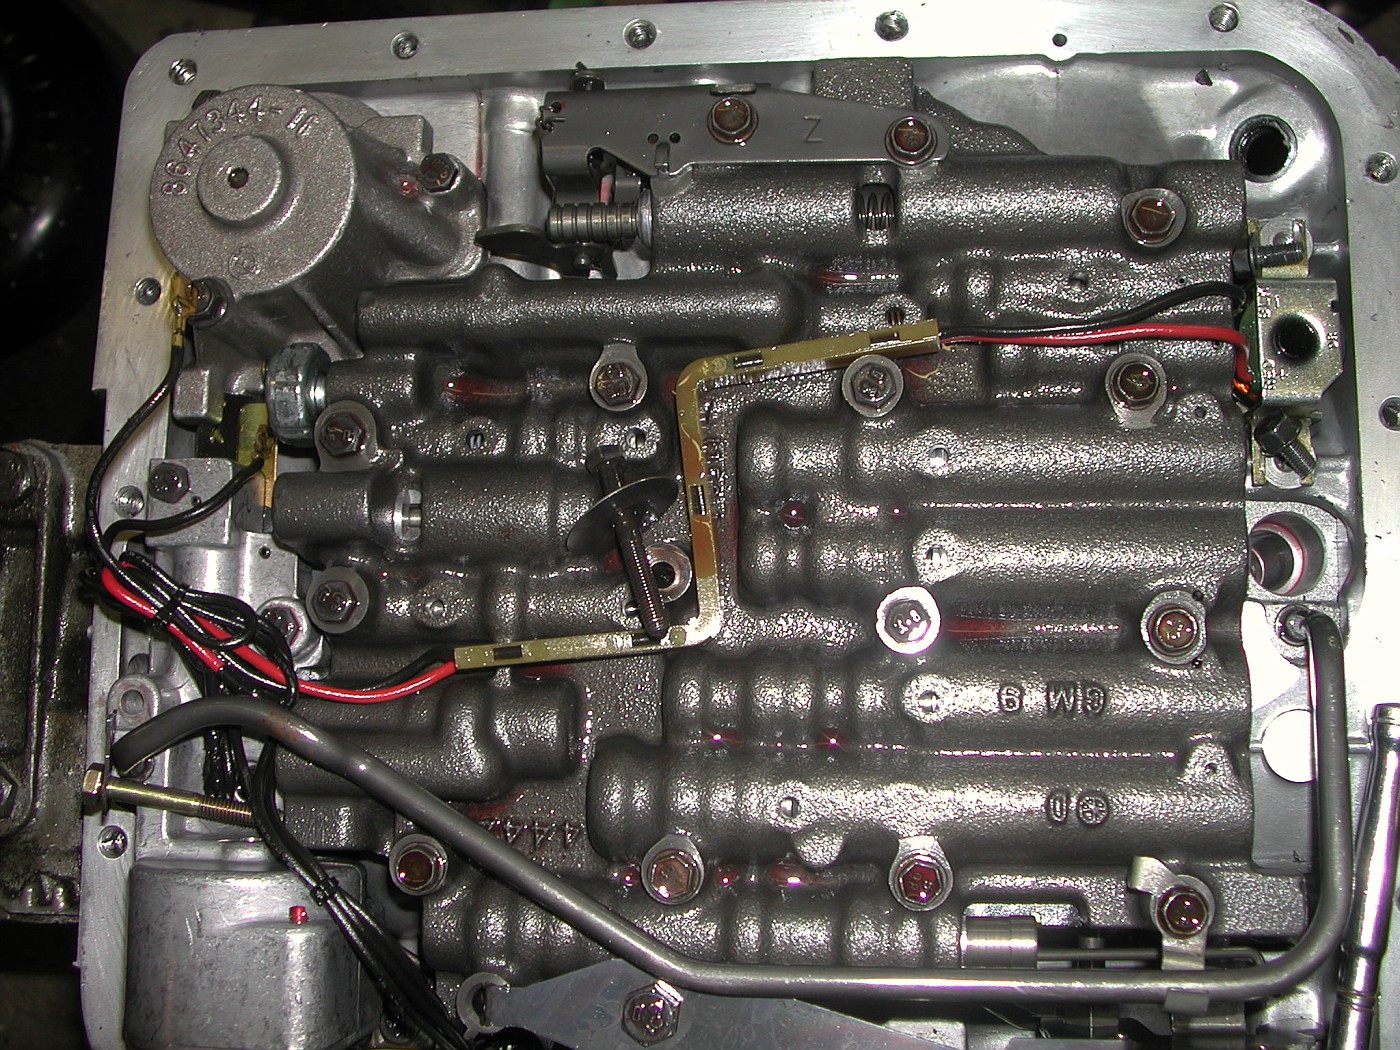 Remove the two 10mm bolts and the TCC solenoid can be lifted out. 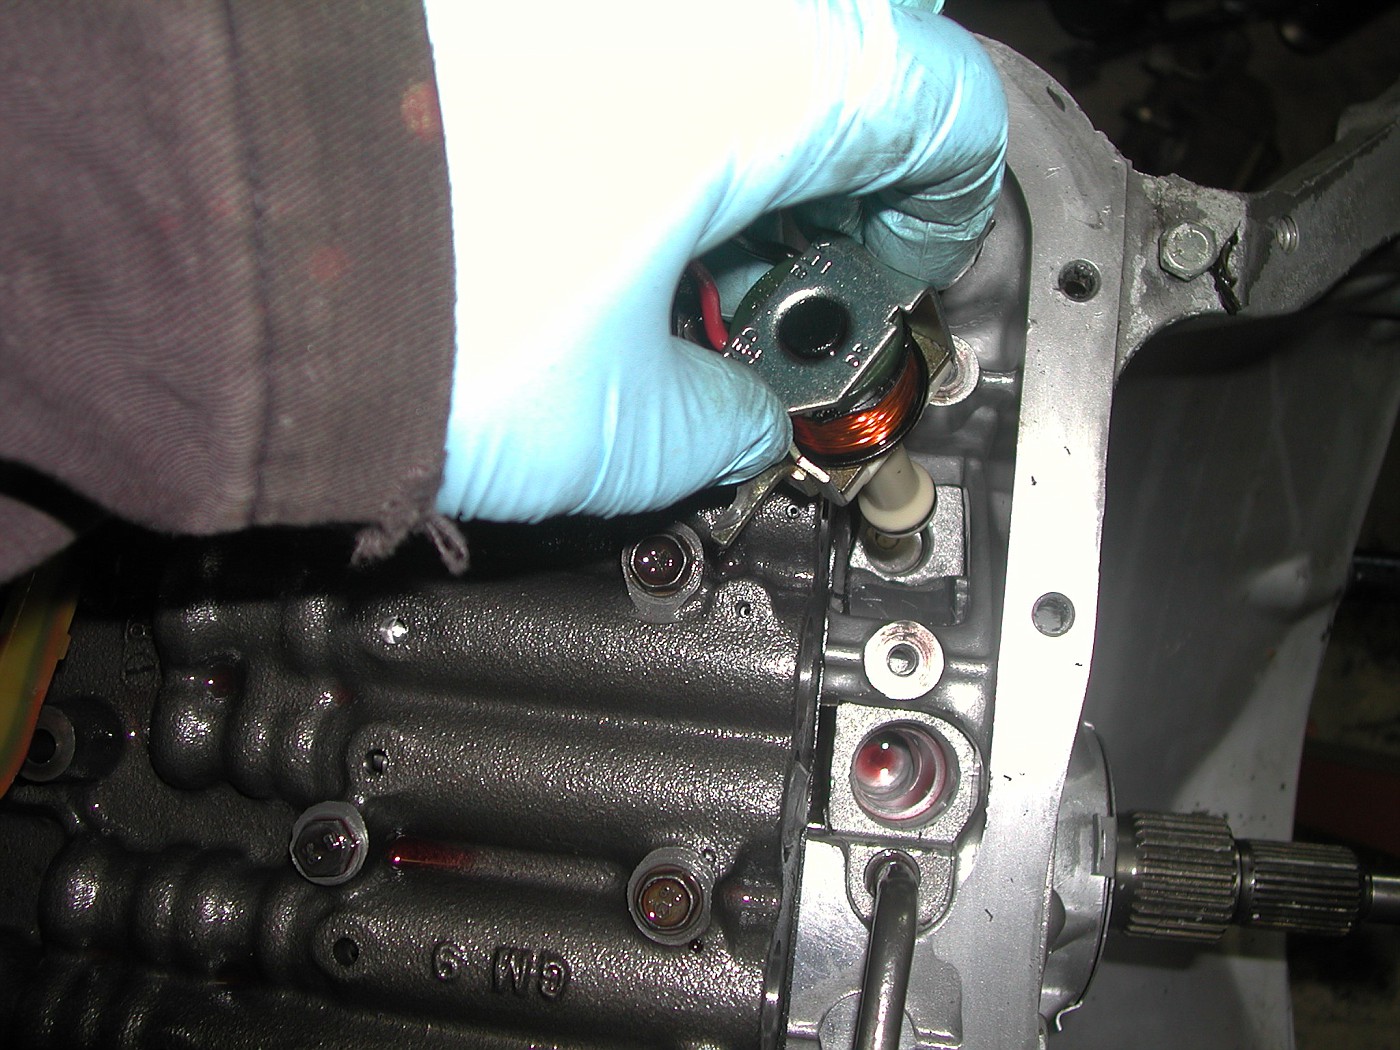 This is the forward clutch feed tube. Carefully pry up at each end with a screw driver to remove. 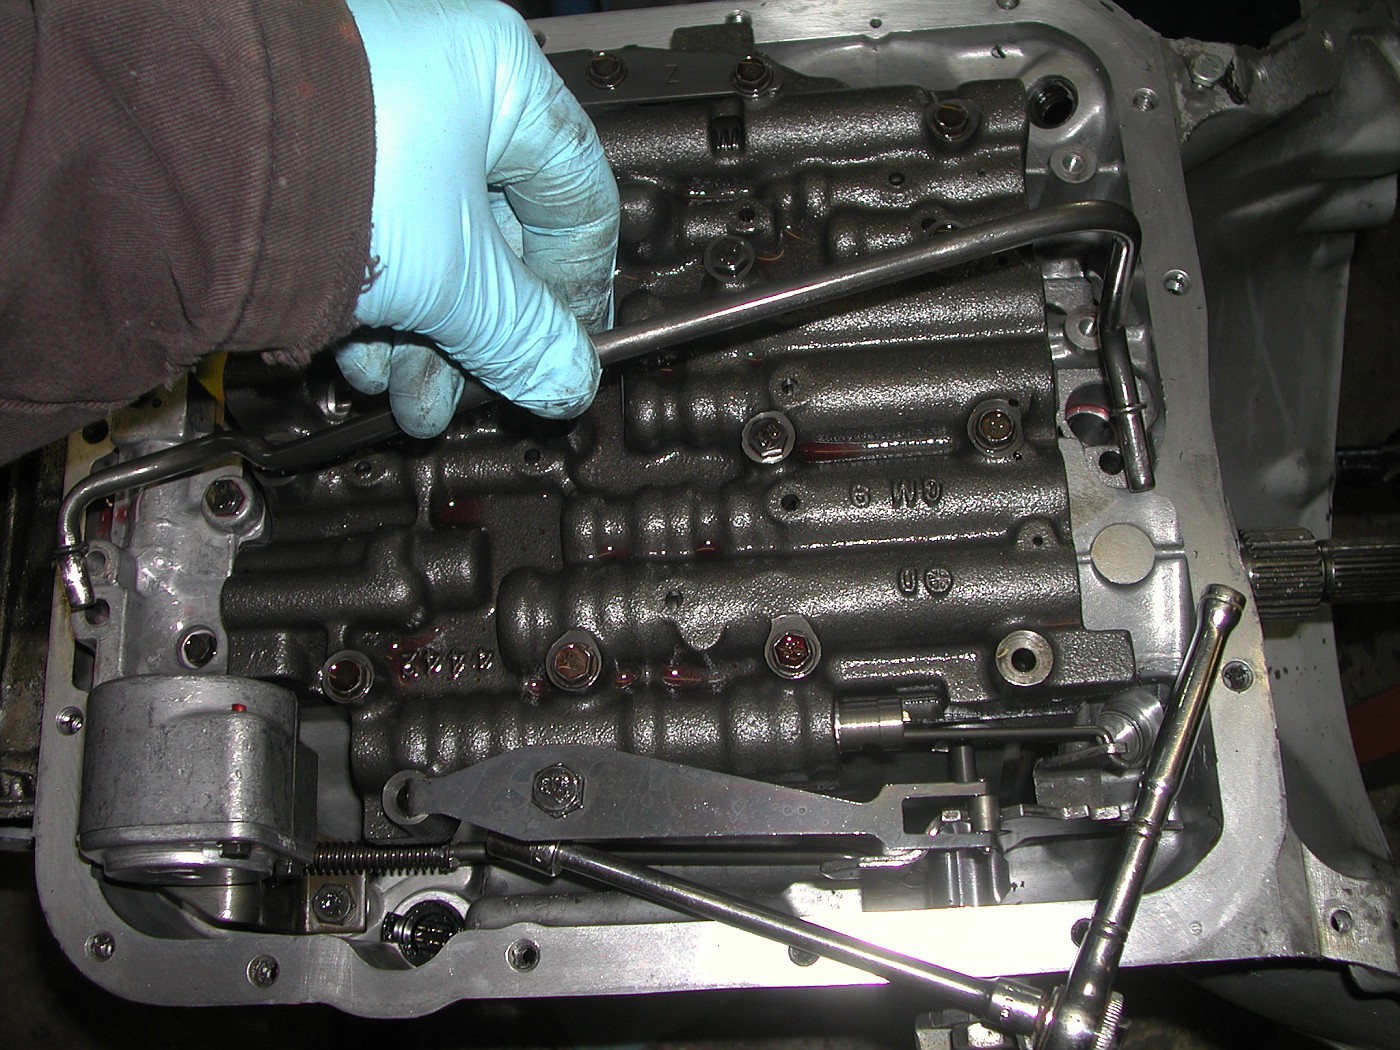 The valve body bolts, removed and sitting by their specific holes. 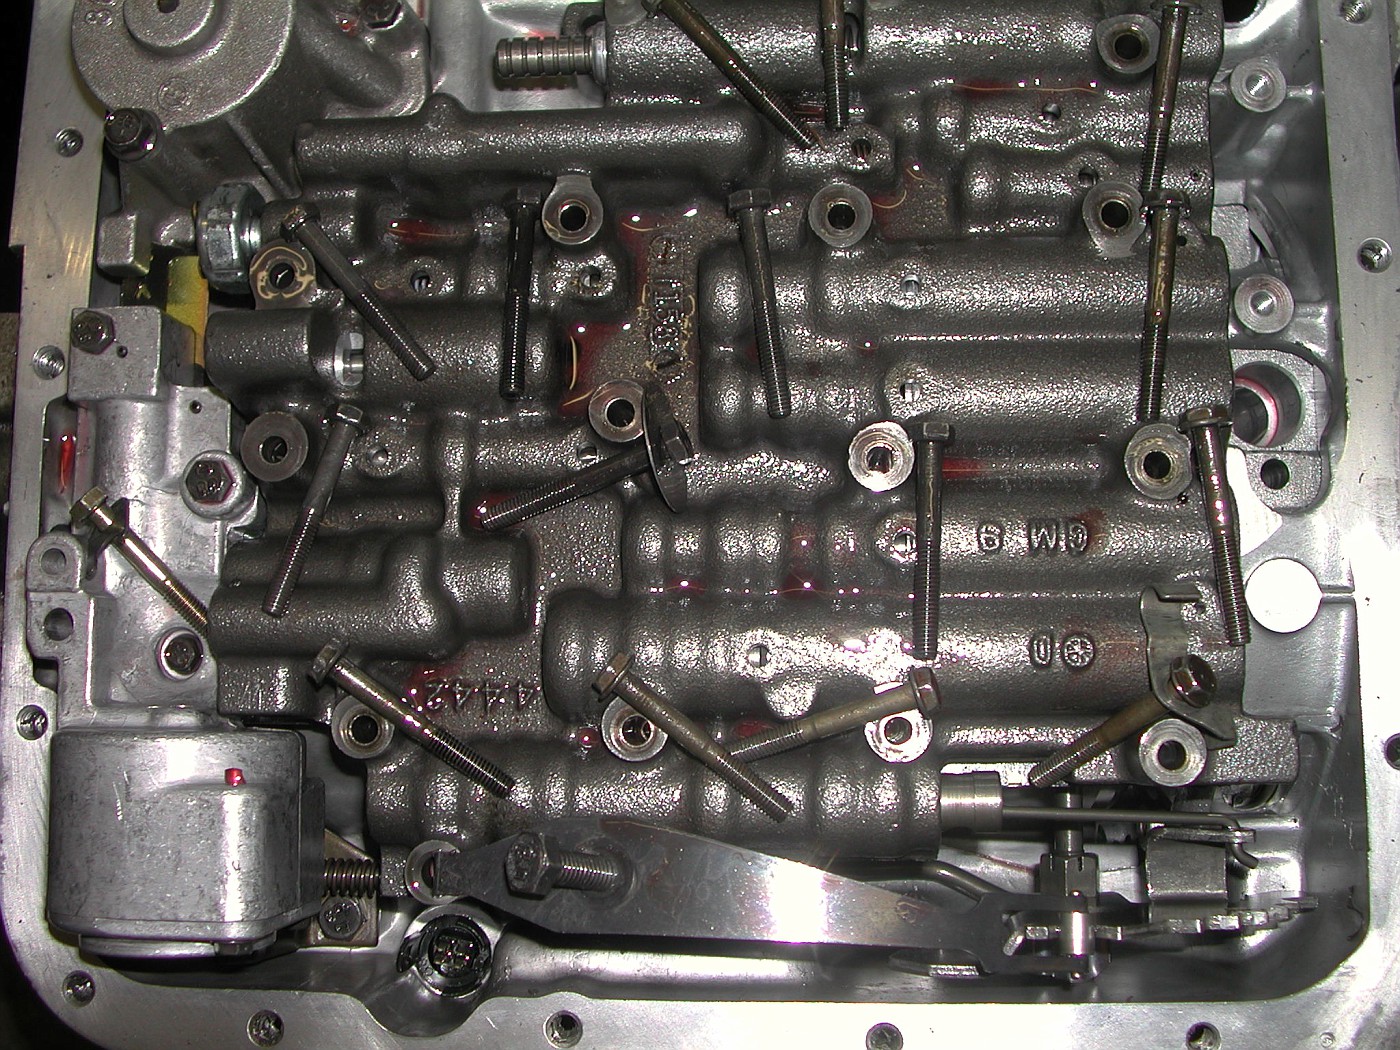 I carefully pried up the main valve body to reveal the gasket, spacer plate and two check balls. 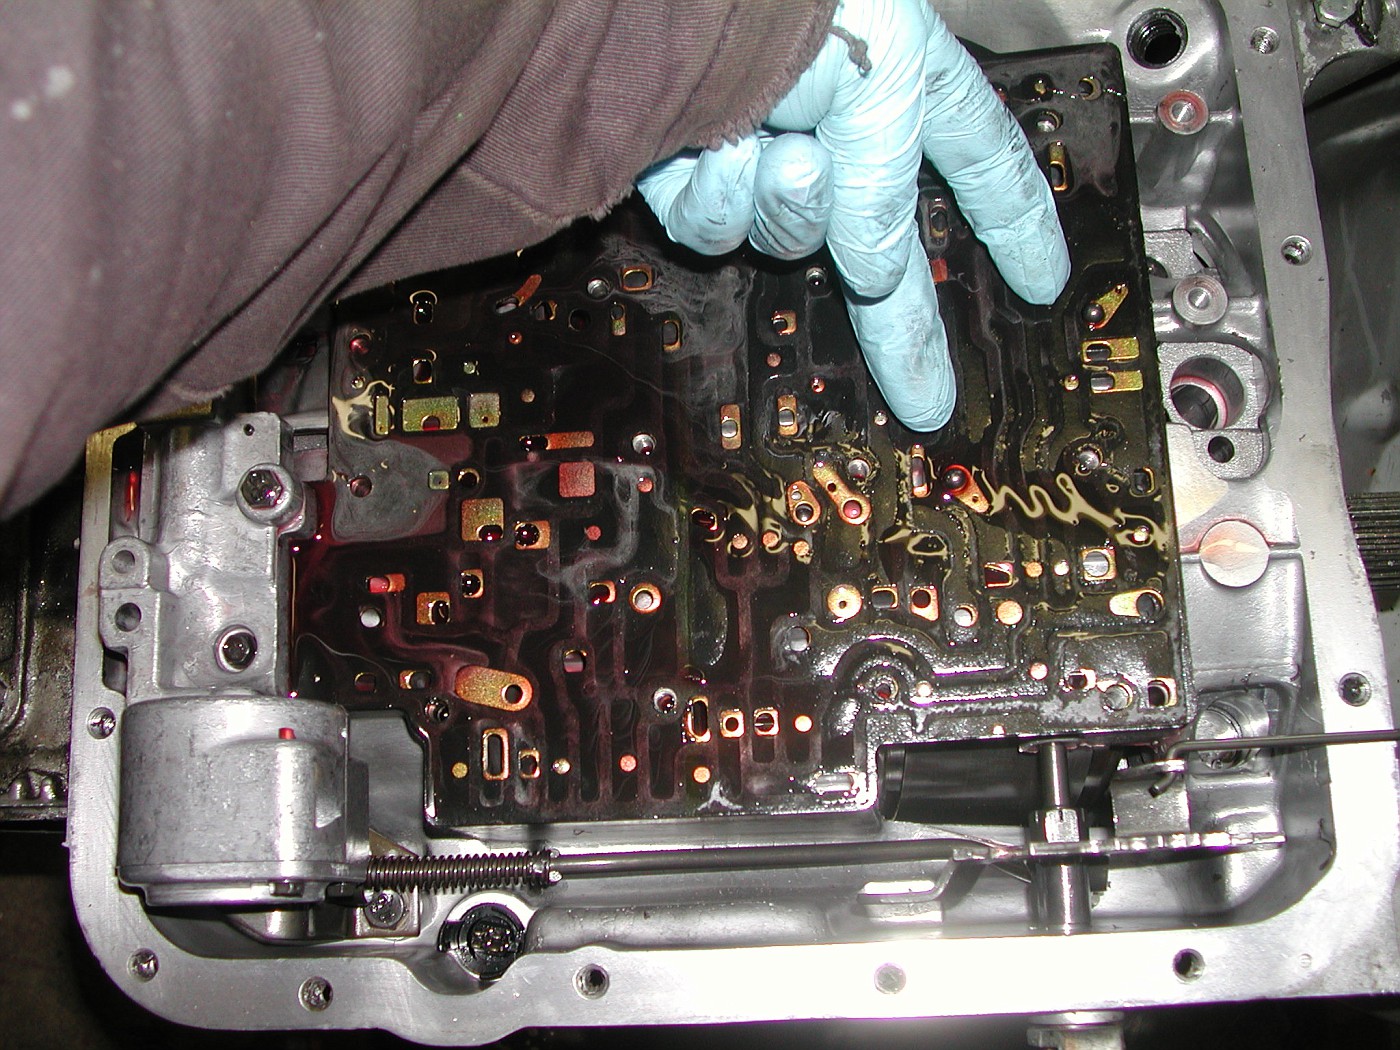 Then the Auxiliary Valve Body need's to come off. Two 10mm bolts and one 8mm bolt and it will lift off. 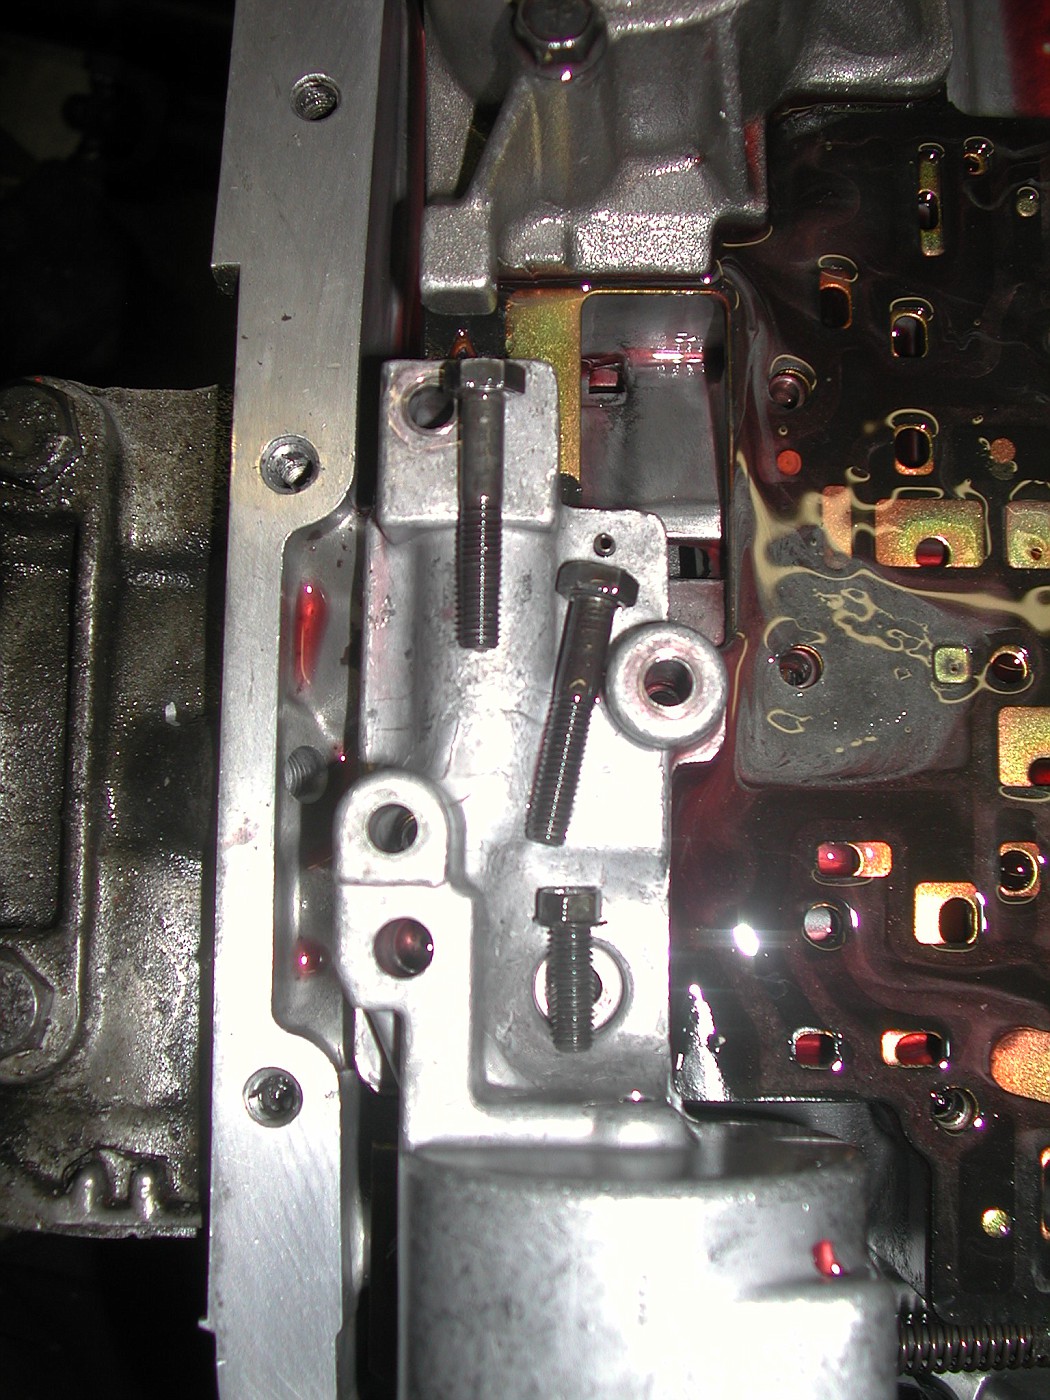 Be careful, there is a check ball in the Aux. Valve Body (Yellow circle) which can easily get lost. 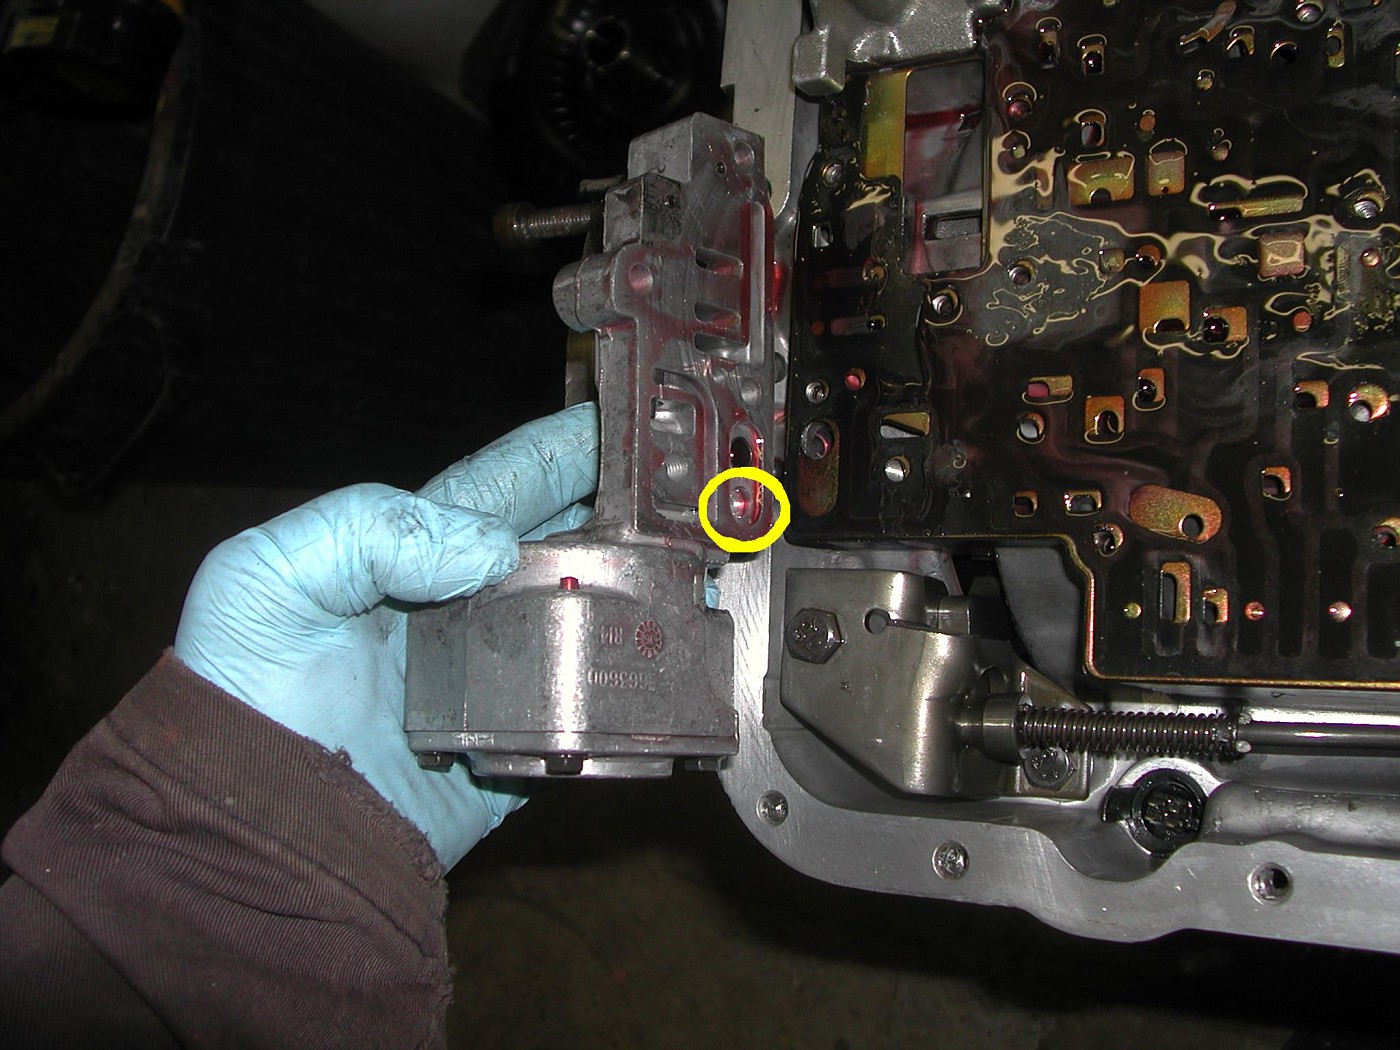 Here is where that check ball goes. 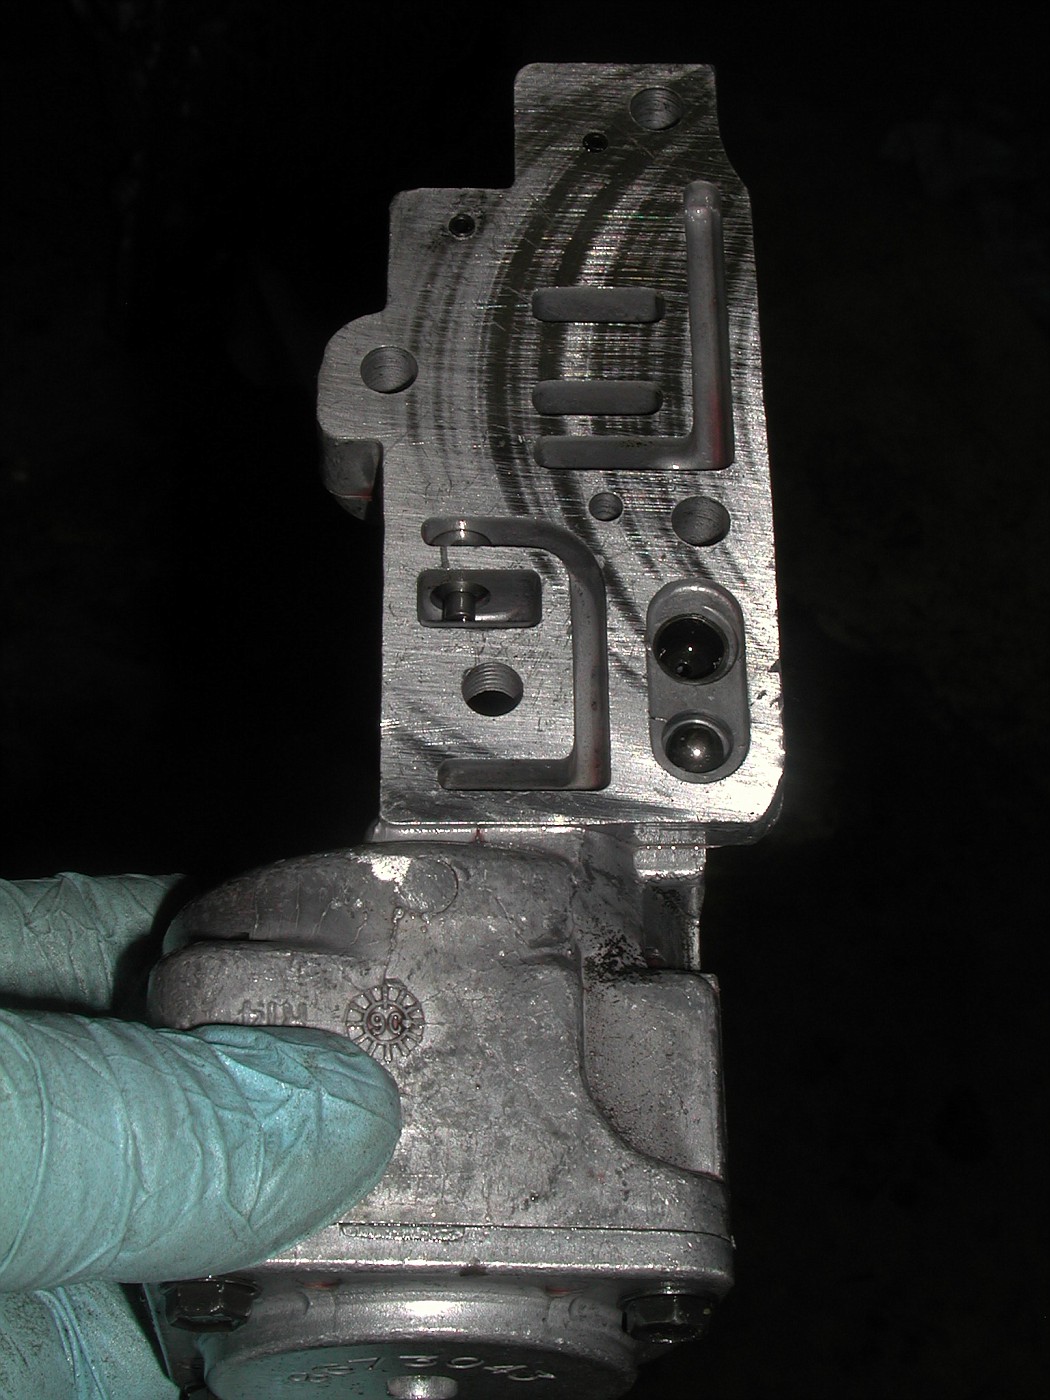 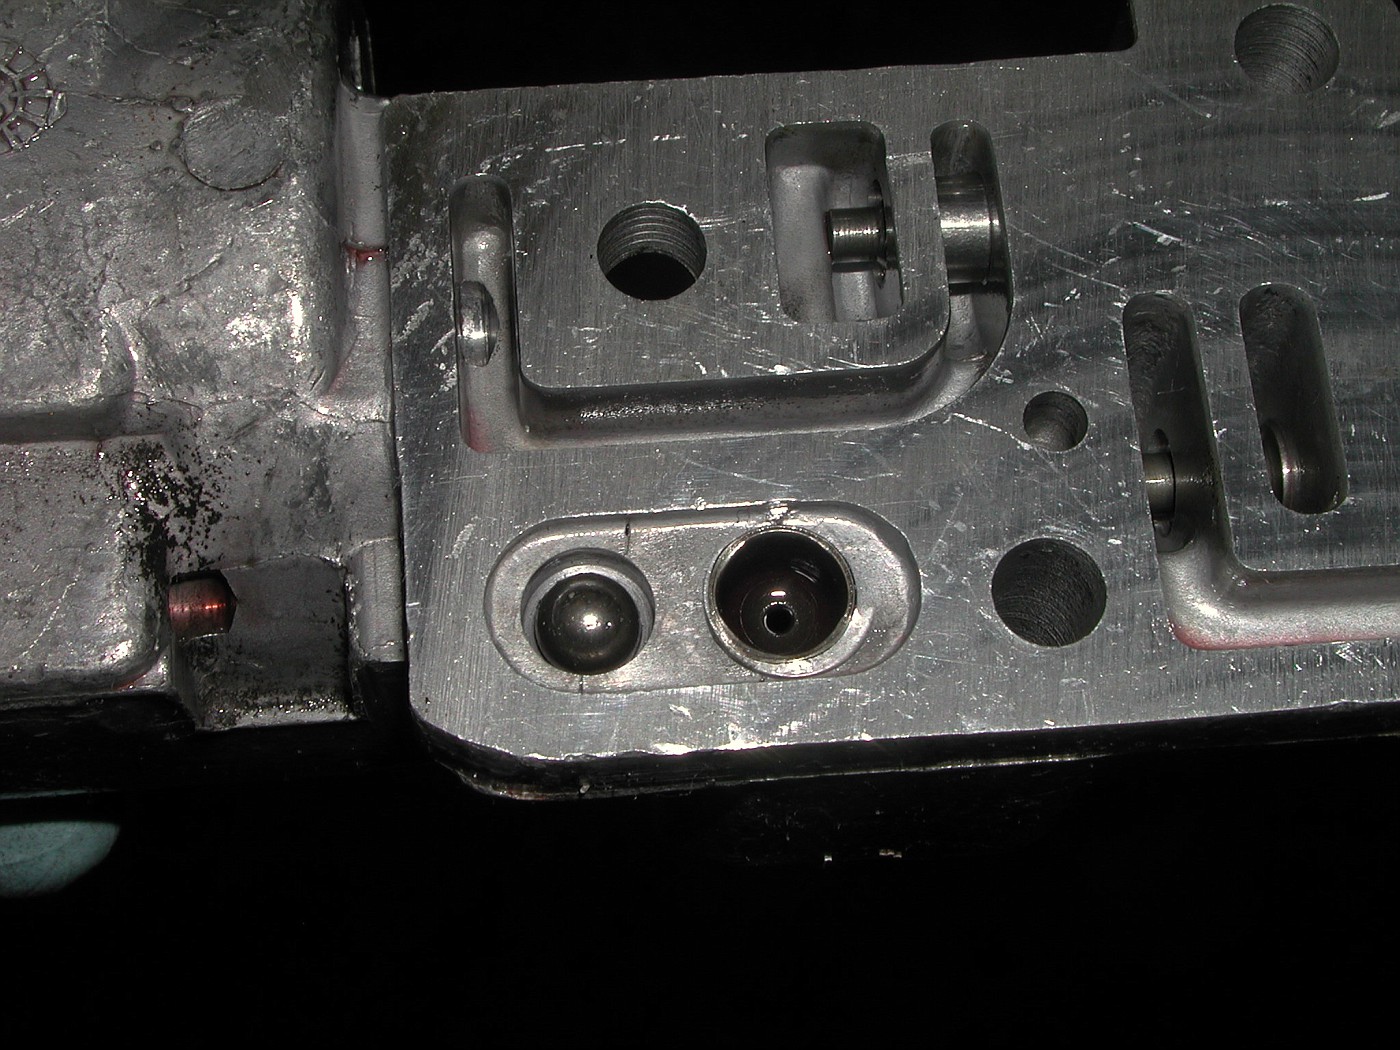 Next is the 1-2 Accumulator.Three 10mm bolts and the cover comes off. Again I placed the bolts near their holes for reference. 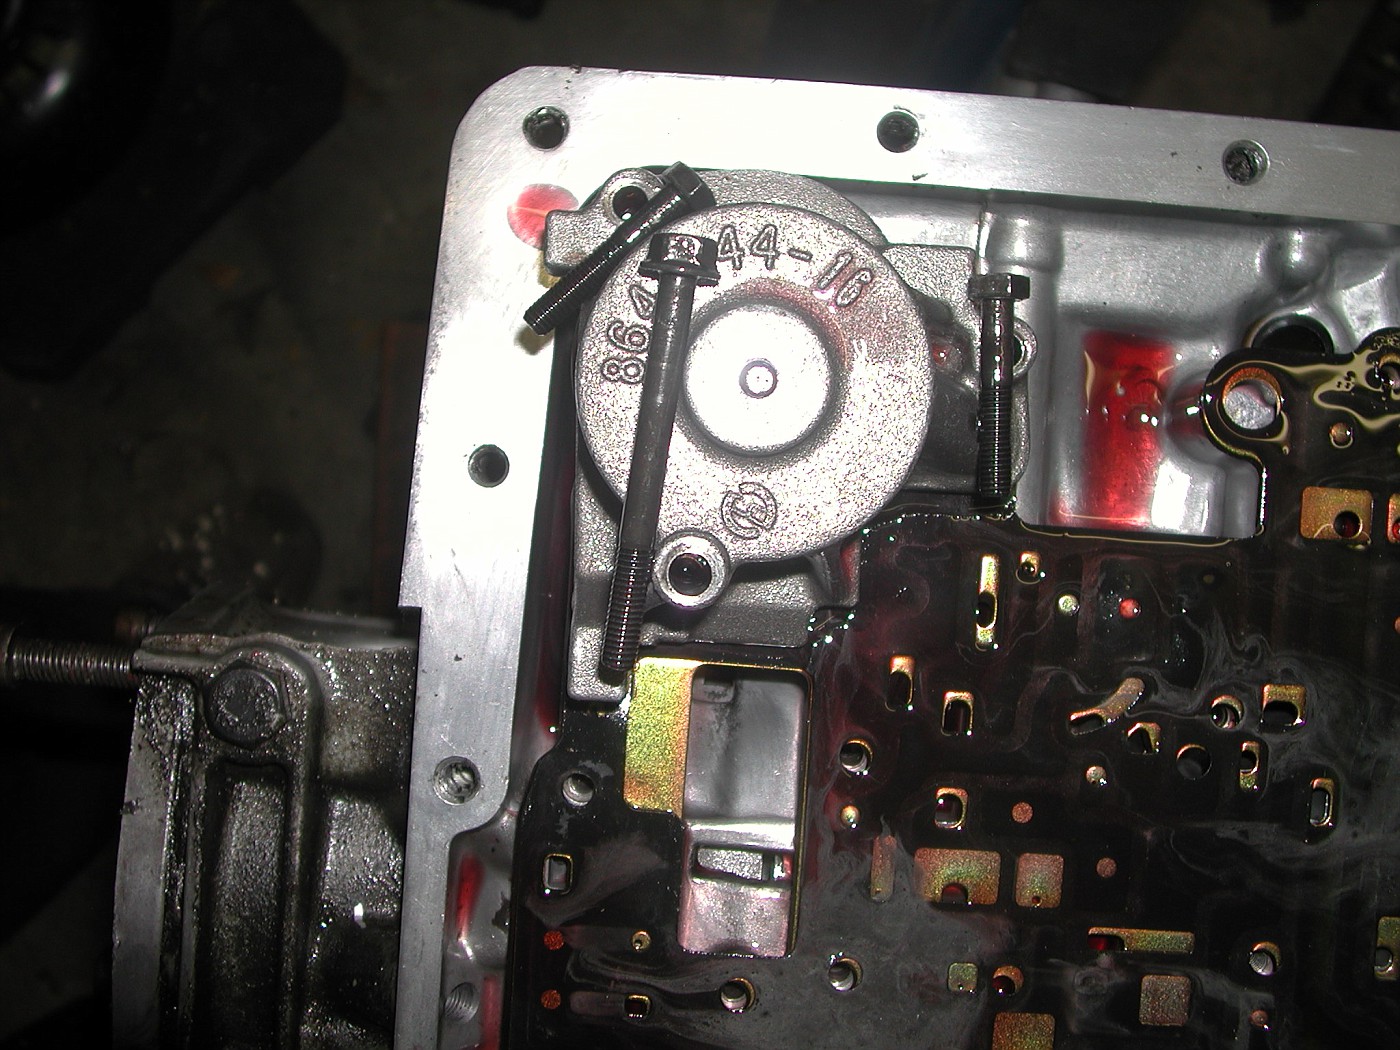 There is a large spring inside the Accumulator.  I can now remove the valve body gasket and spacer plate. 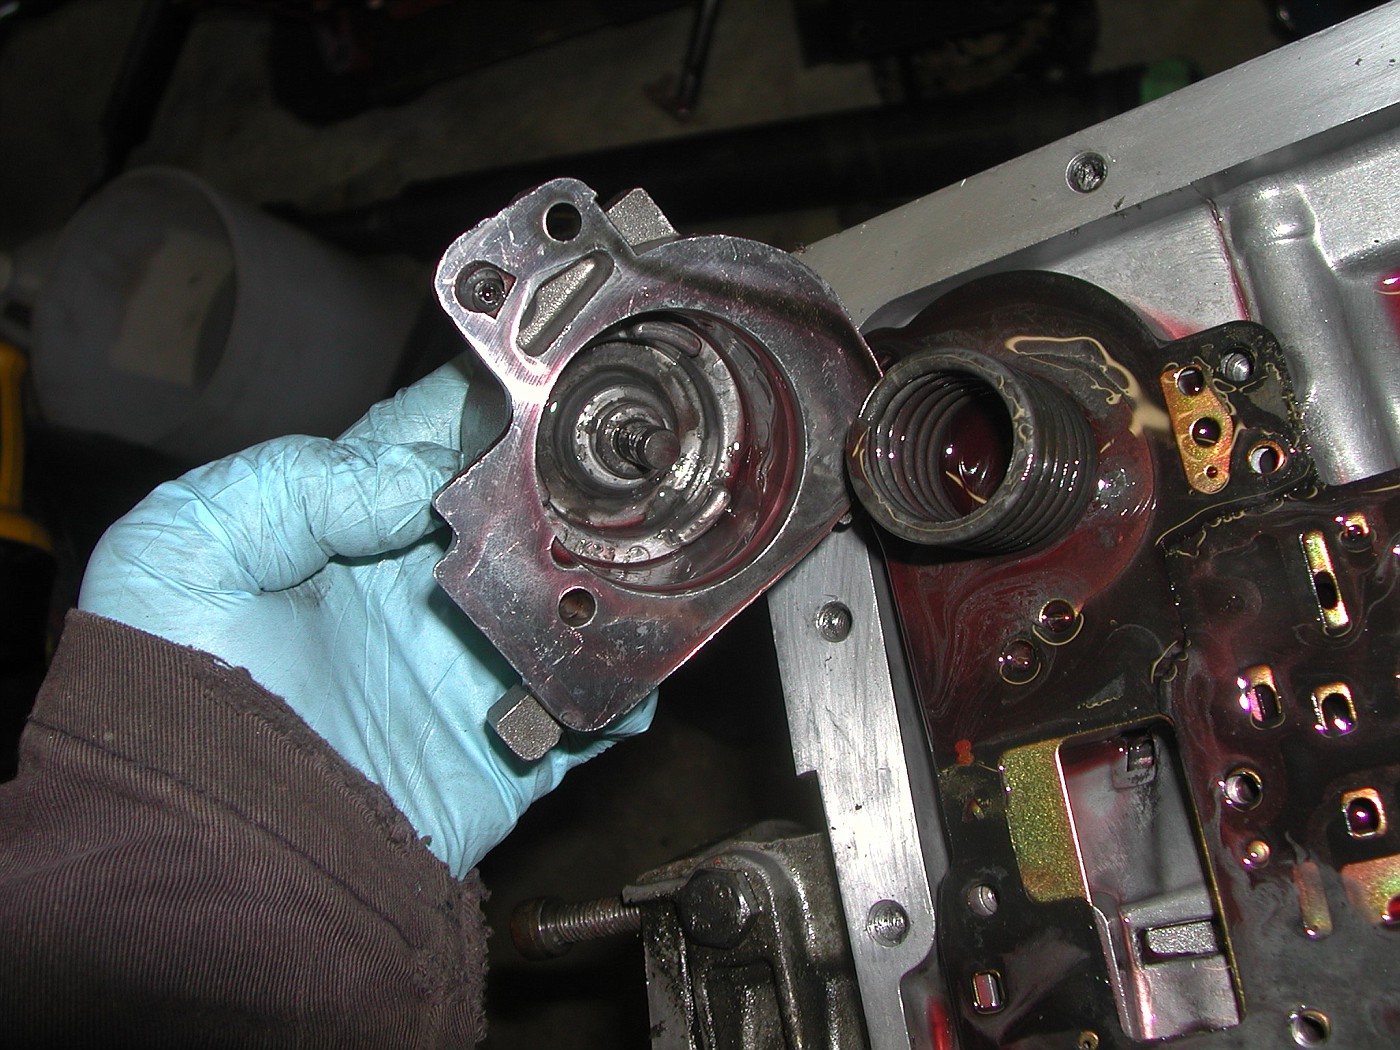 You'll be able to see another Accumulator spring. 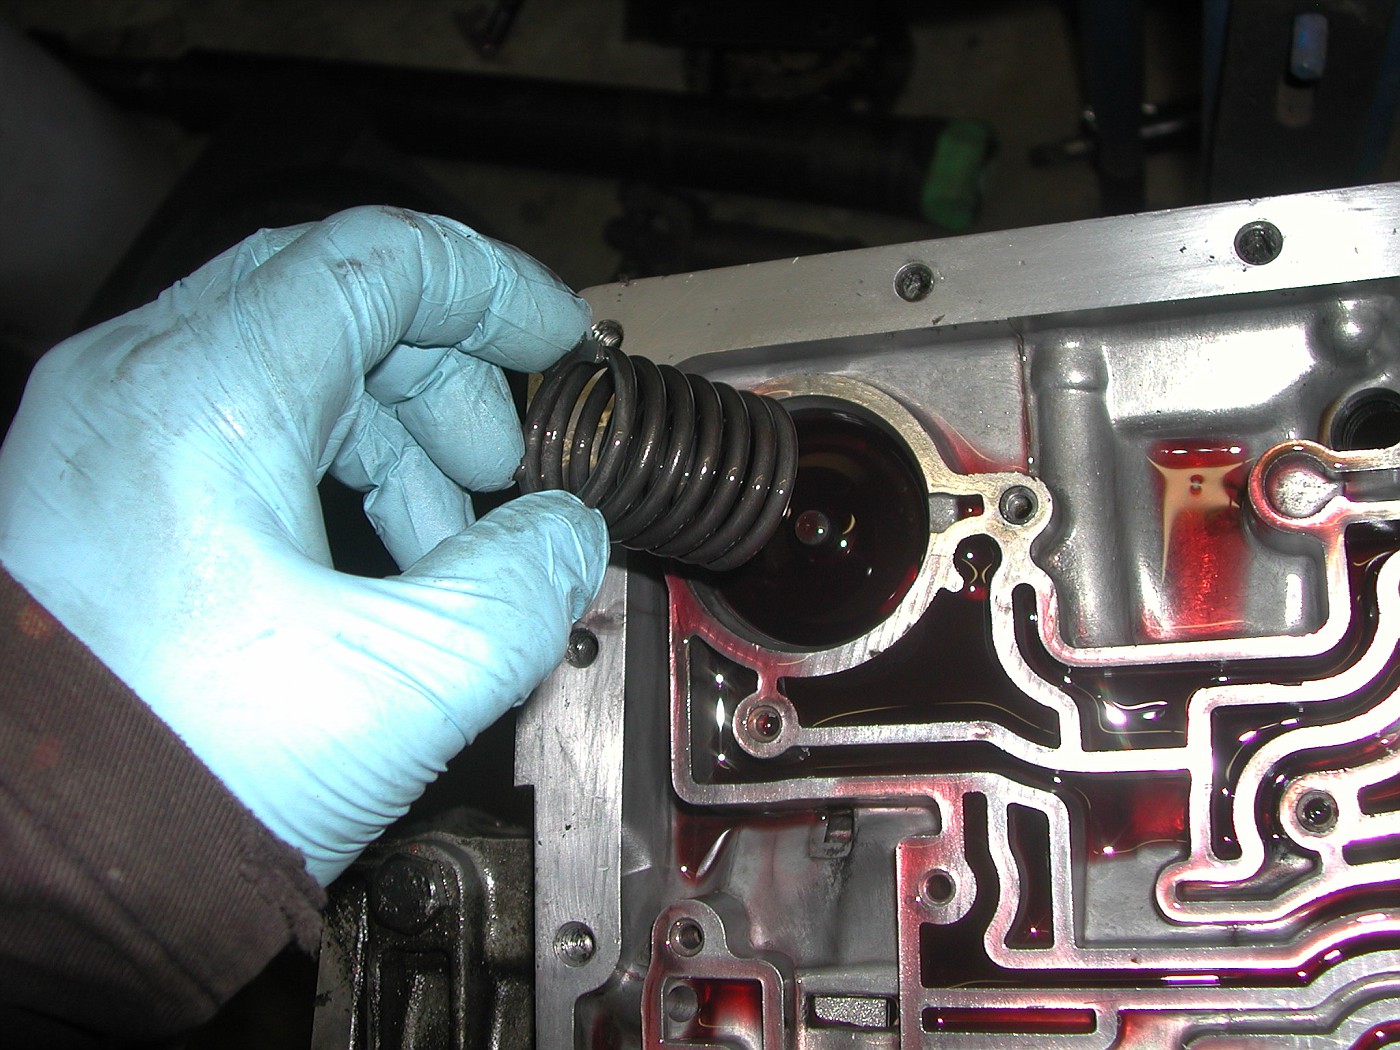 For reference I noted the position of two removable checked balls. 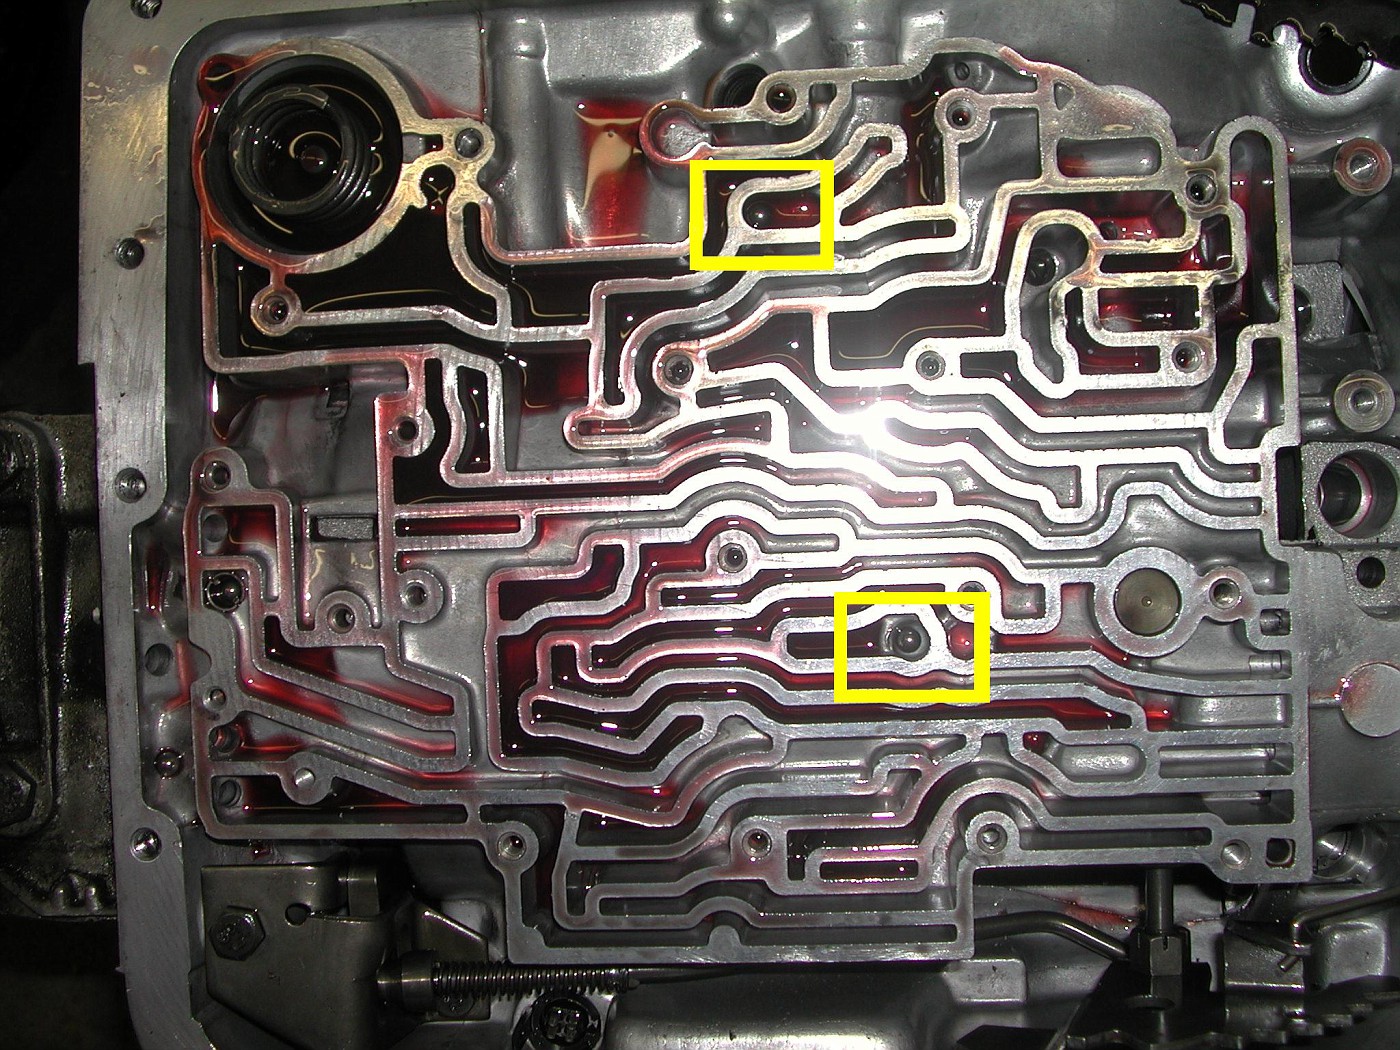 Continued.... .
__________________
71 blazer,350SBC,approx.375HP,700R4,factory GM TPI.Dual electric fans,33x12.5x15 ATR on stock suspension. Petrolia,Ontario,Canada but working in Port Huron,MI. See ALL my Blazer pic's HERE Last edited by BobbyK; 11-16-2011 at 10:37 AM. |
|
|
|
|
11-09-2011, 03:42 AM
|
#28 |
|
Registered User
Join Date: May 2000
Location: Petrolia,Ontario,Canada but working in Port Huron,Mi.
Posts: 1,769
|
Re: So I'm at a light....(PIC'S)
Next...the servo cover.To remove the Servo cover a snap ring need's to be removed. This is done easily with a screw driver
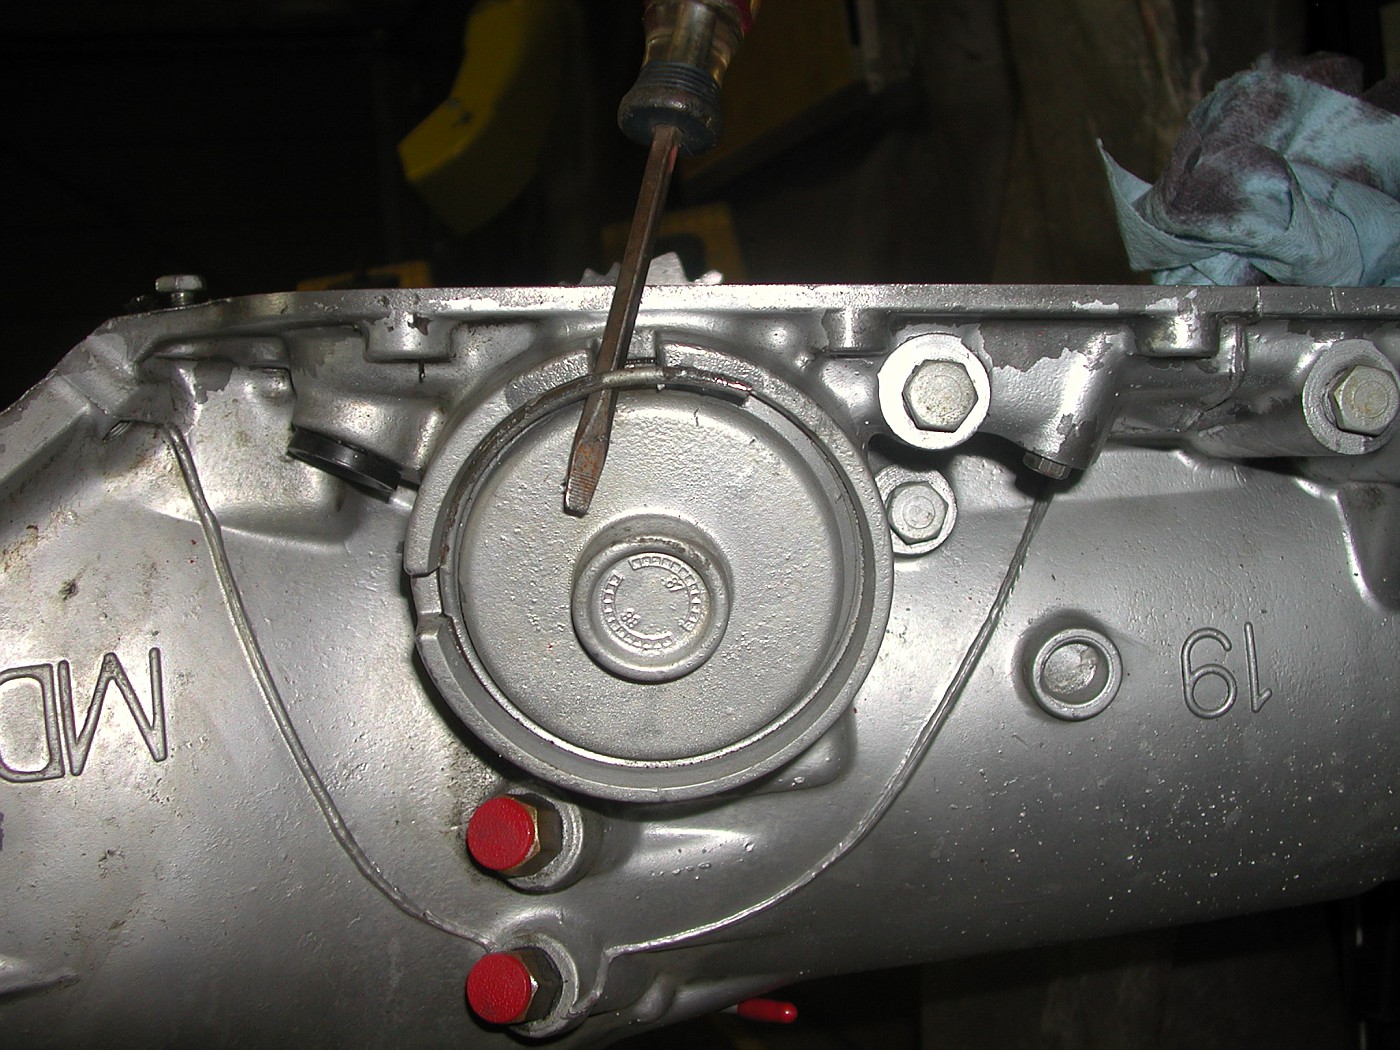 Wiggle while pulling the cover out. This will reveal a blue O-ring. Pry the O-ring out so you can cut it. 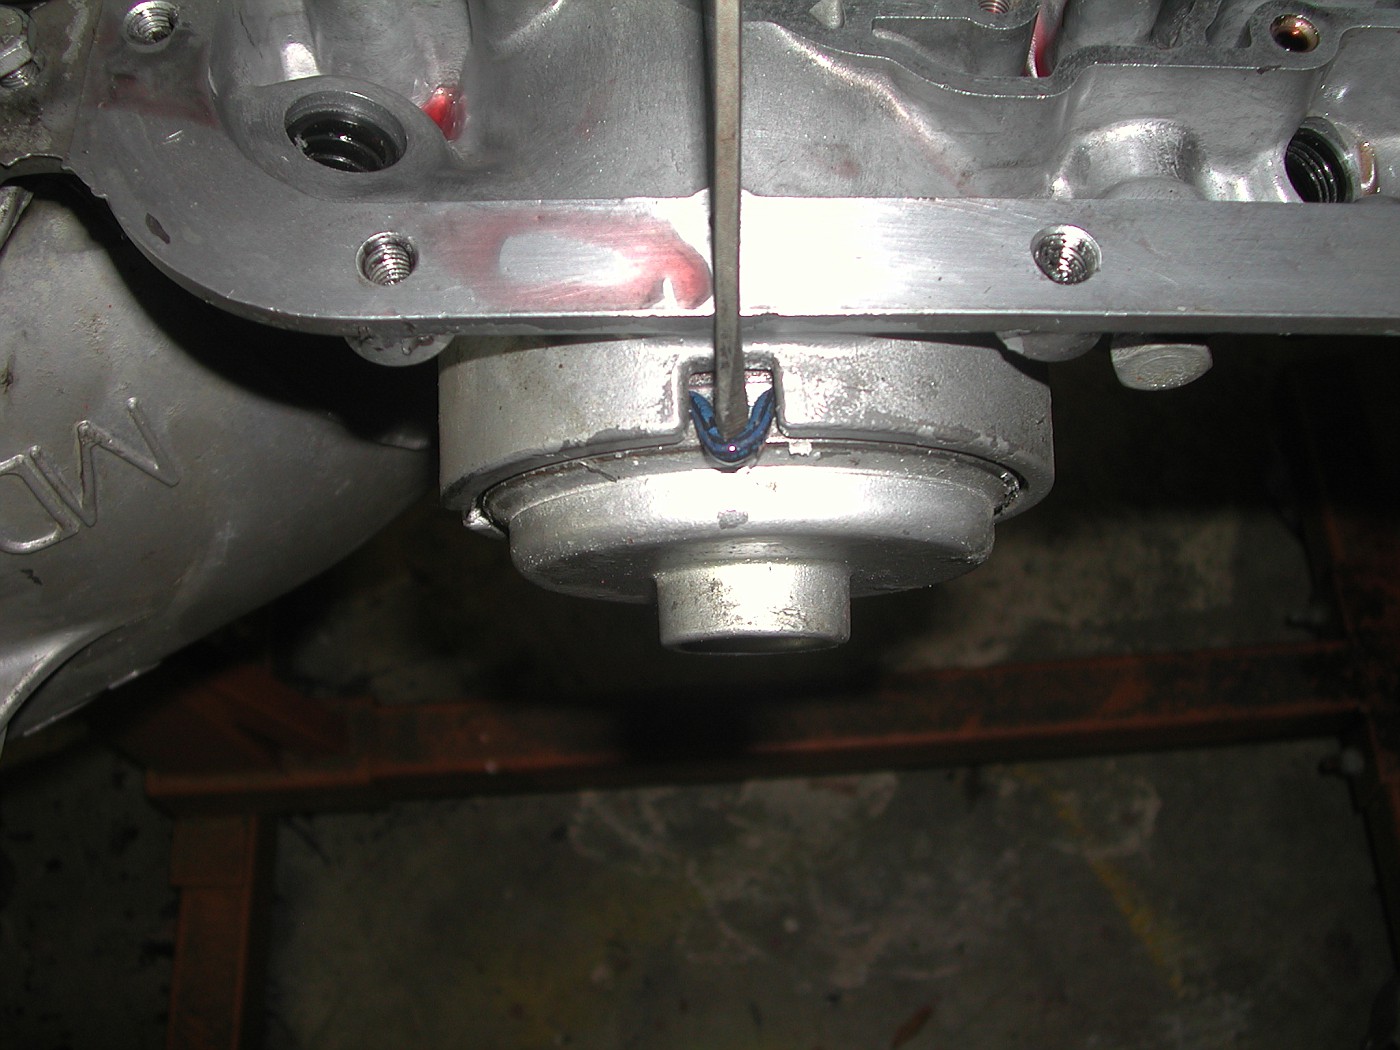 Once the o-ring is cut, pull on one end of it until it is out. 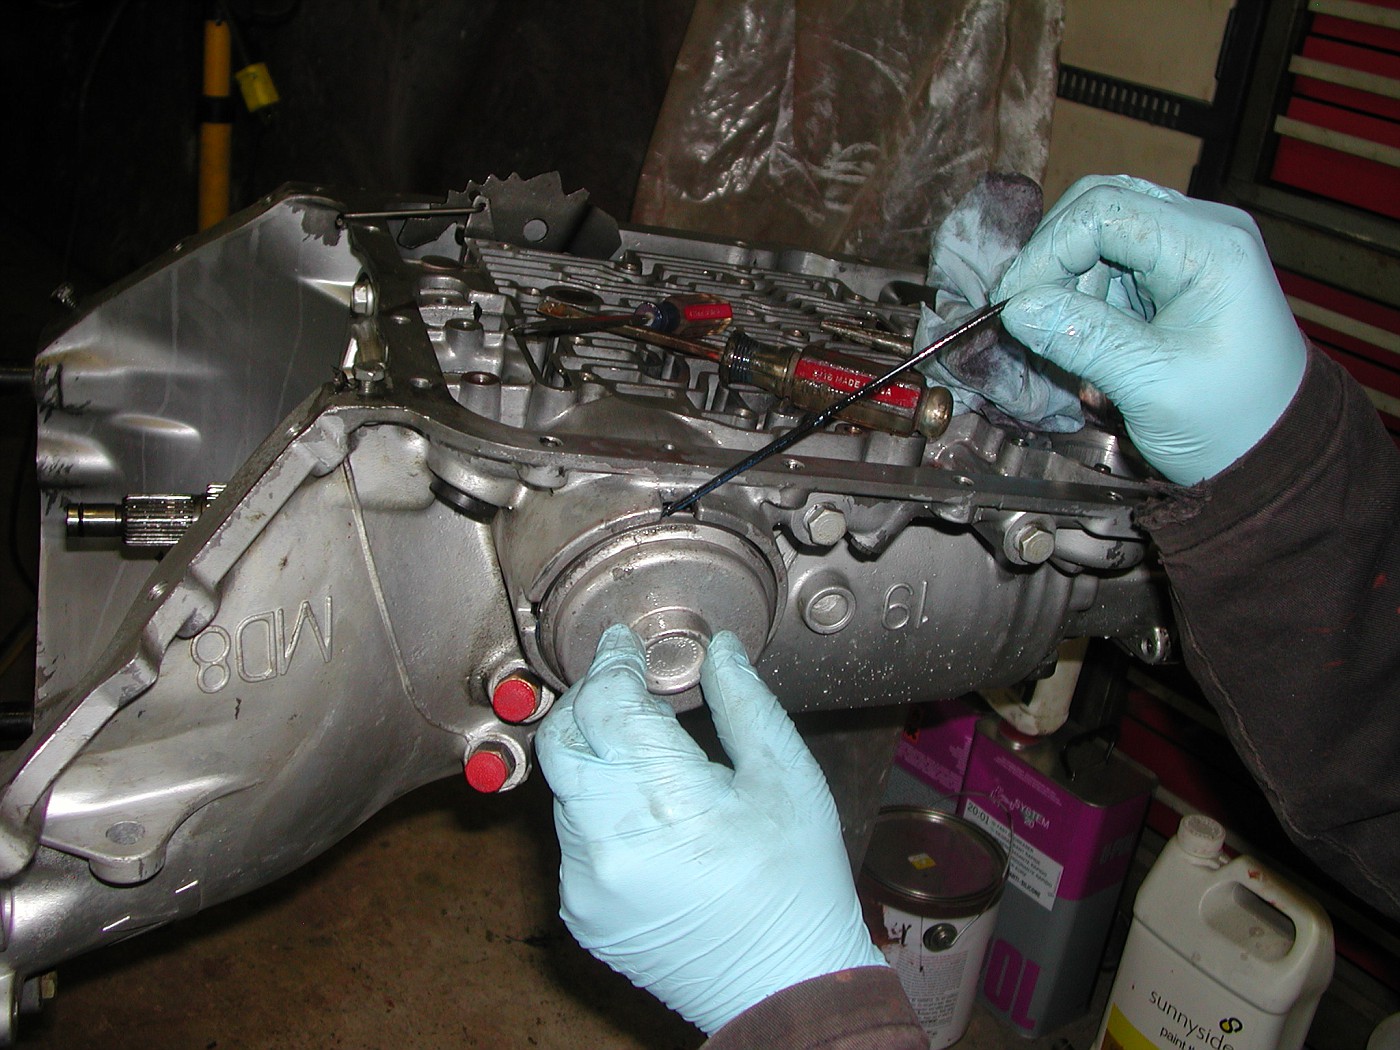 Then the servo cover will then slide right out. 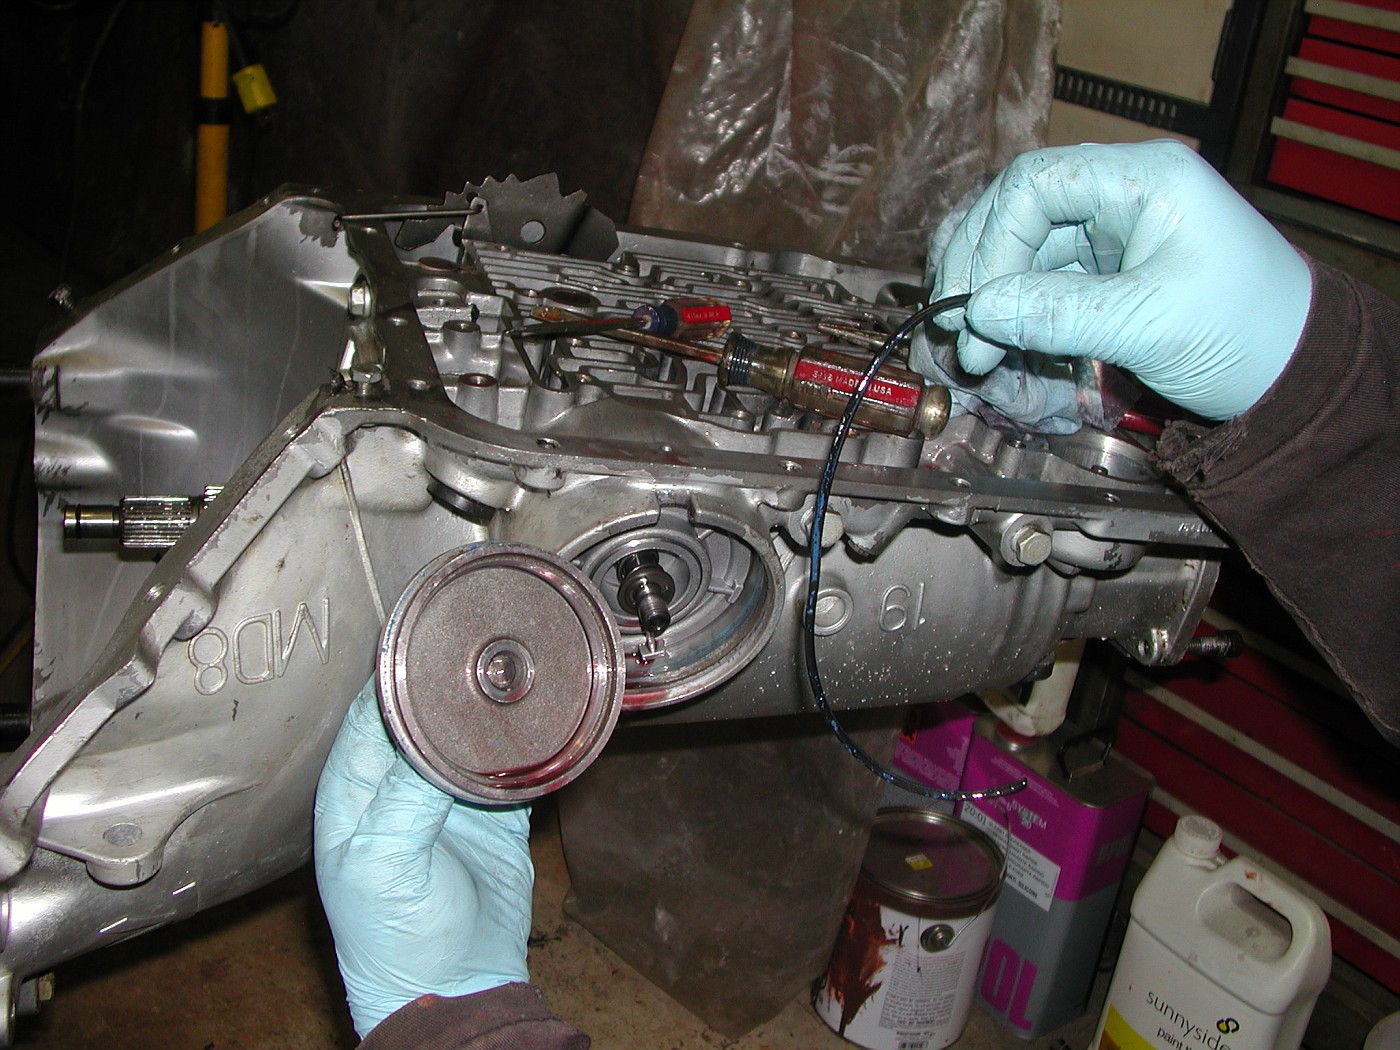 For reference, I used a magnet to show the check balls. 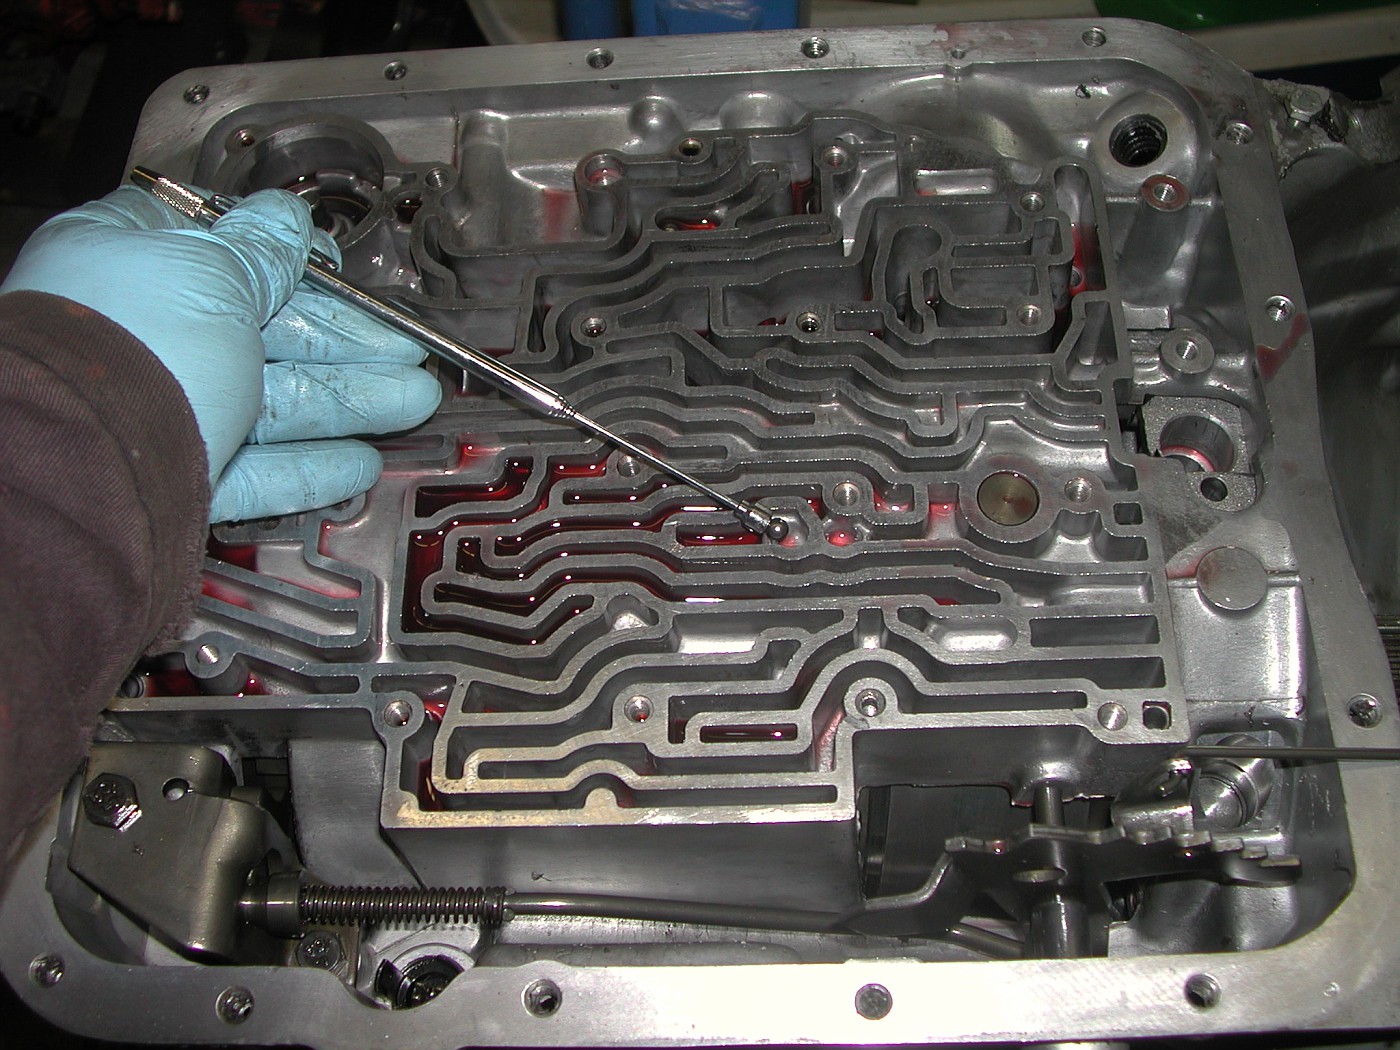 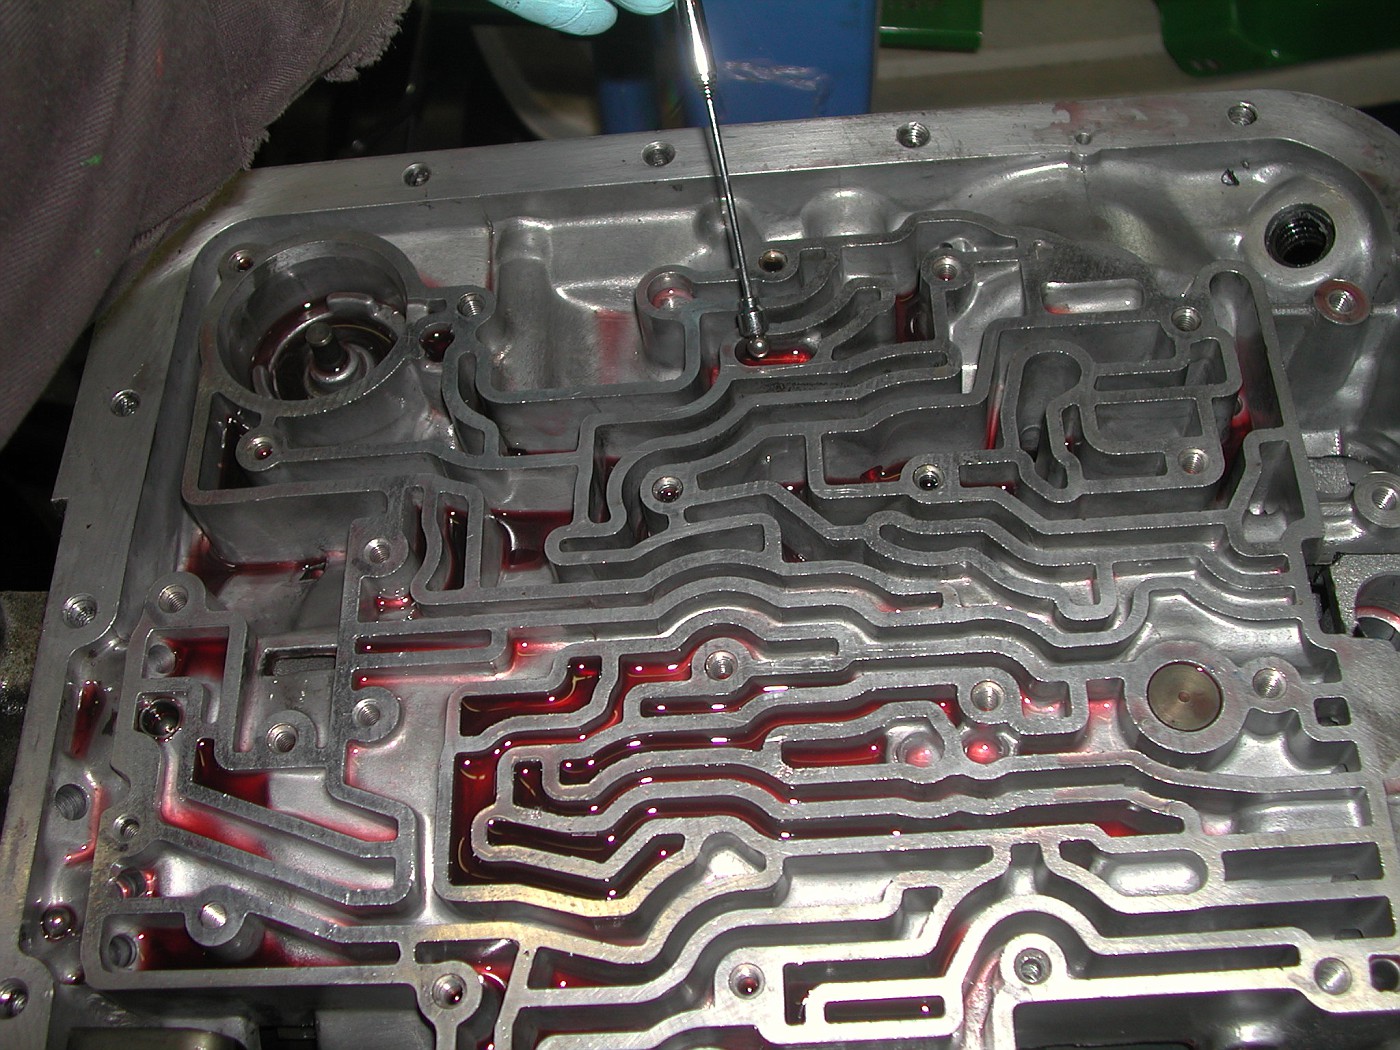 This is the time to remove the 2-4 band anchor pin. I used a strong magnet to remove the pin. 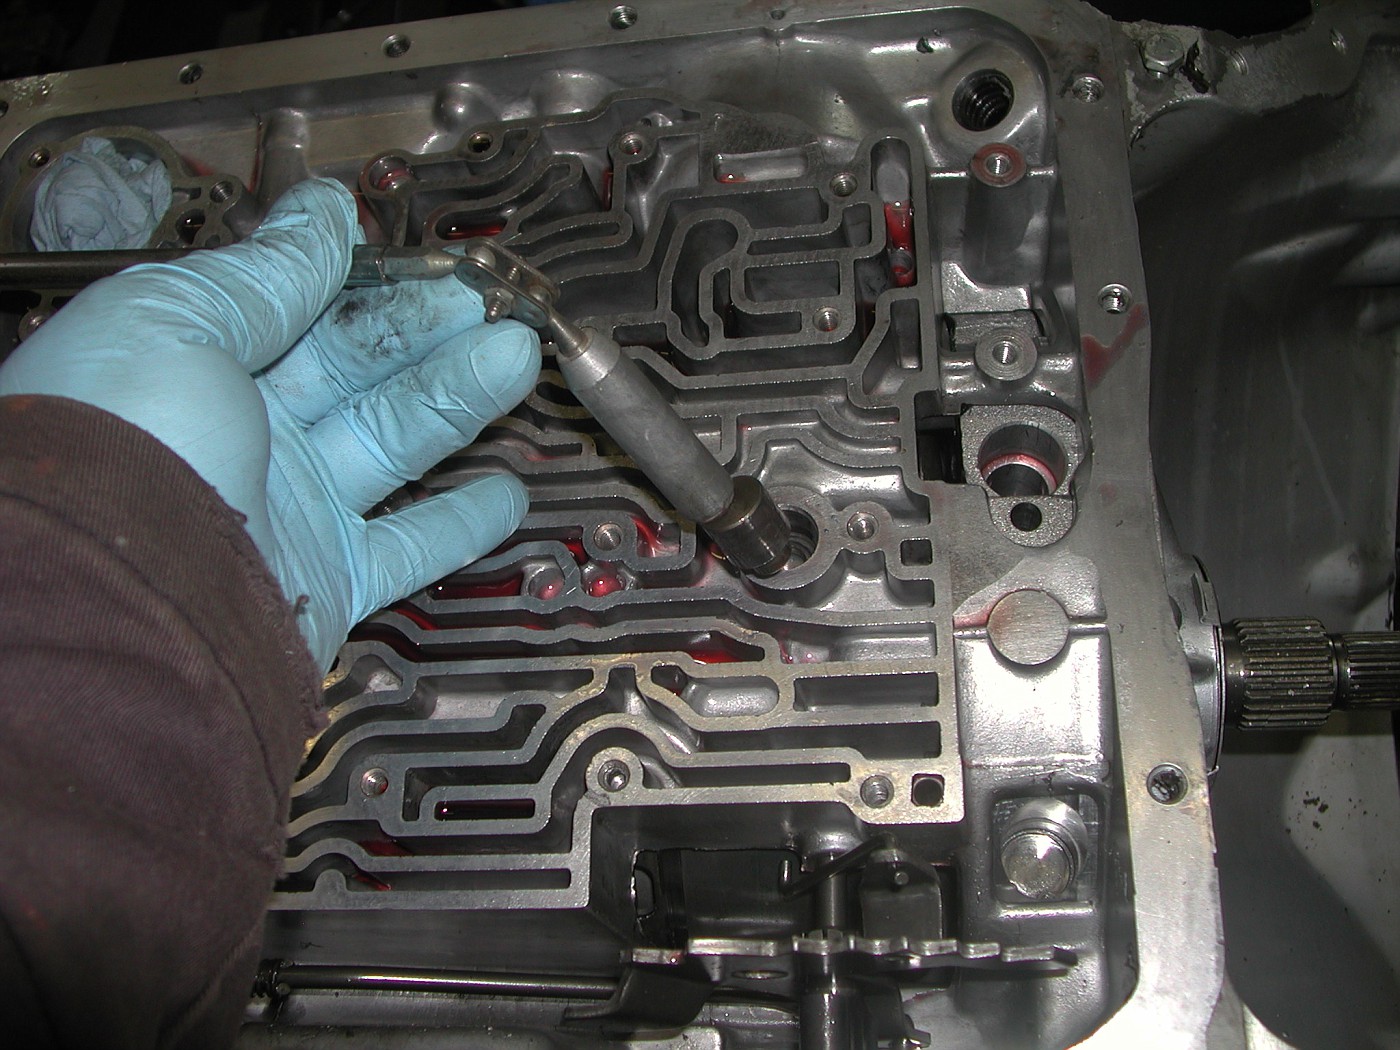 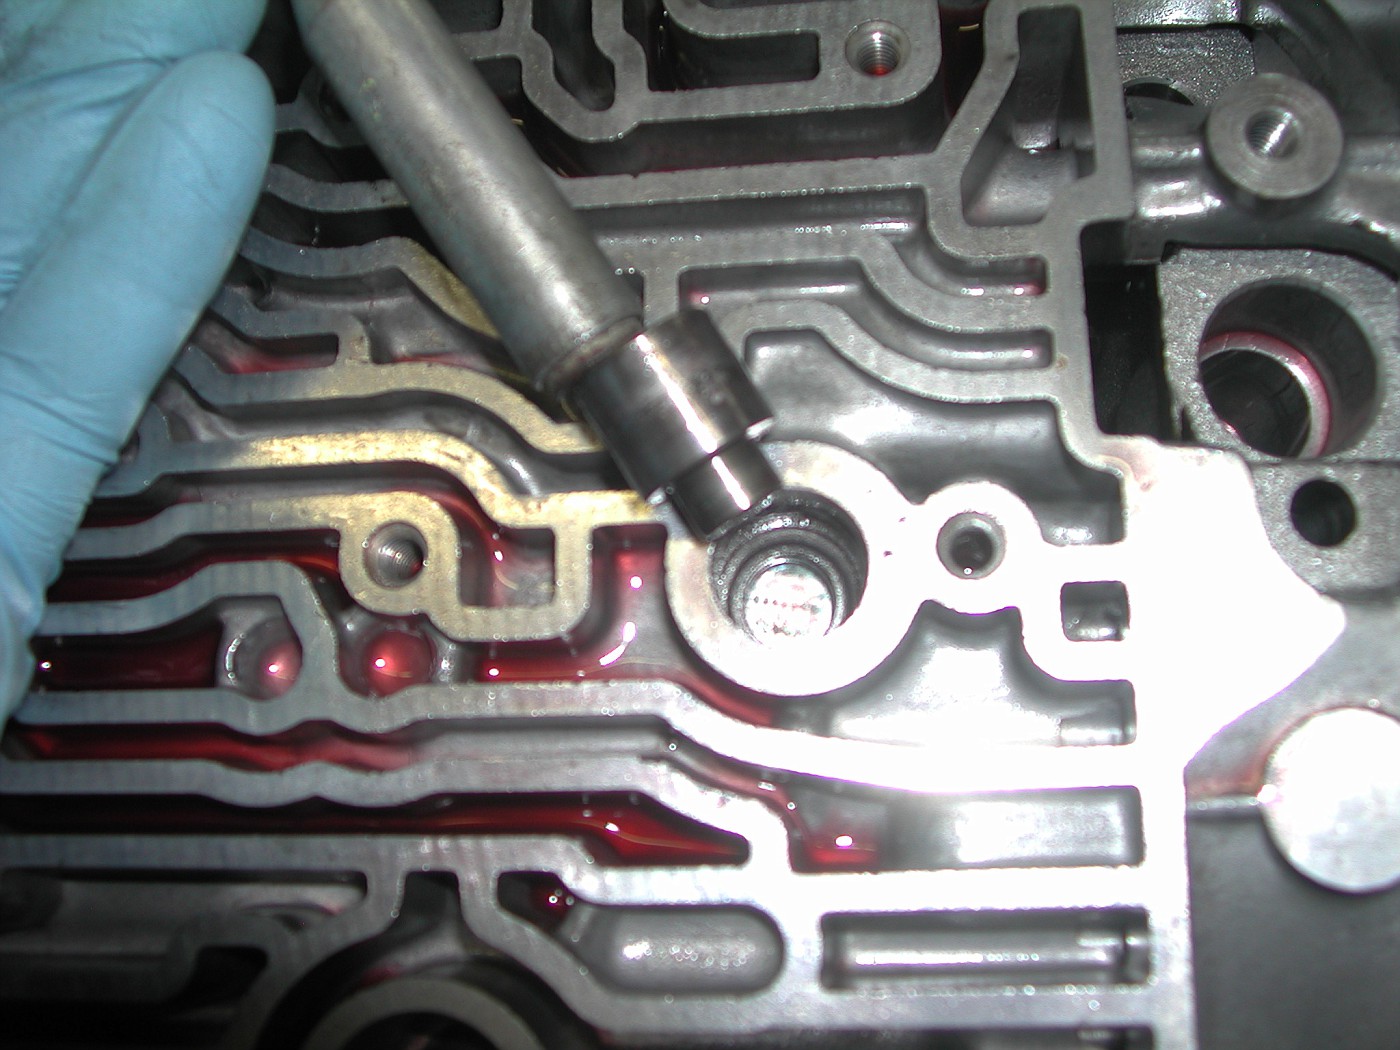 Moved on to the front pump cover. I removed the 7 cover bolts. One seen for reference. 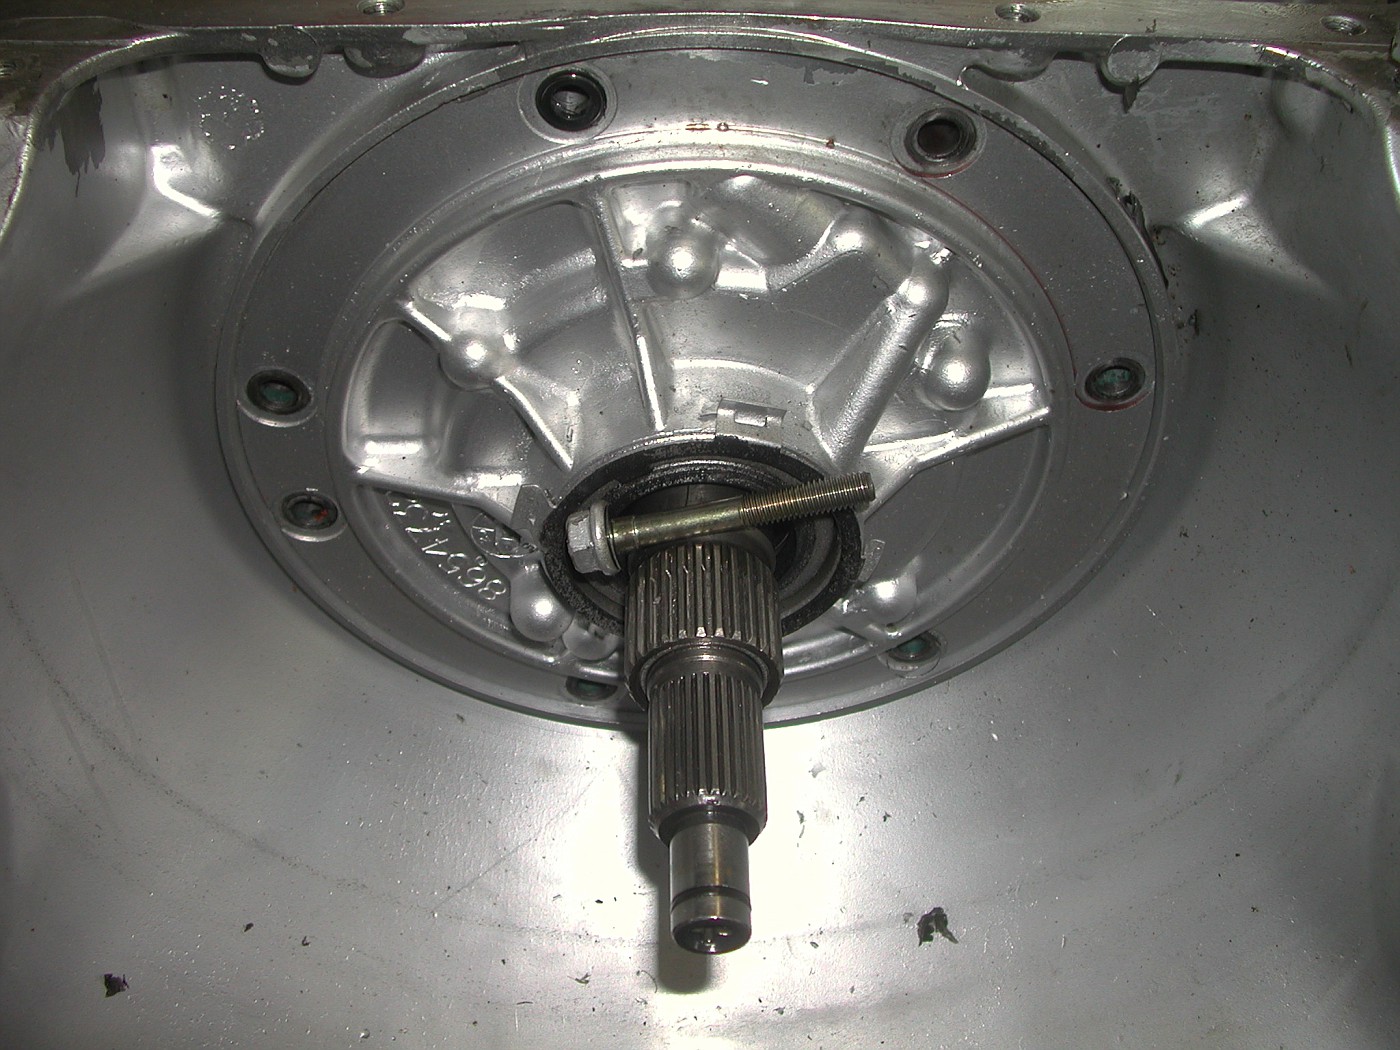 Using a large screw driver, I CAREFULLY pried the pump out of the trans. Once the O-rings are clear of the sealing surfaces you can simply wiggle the pump out. 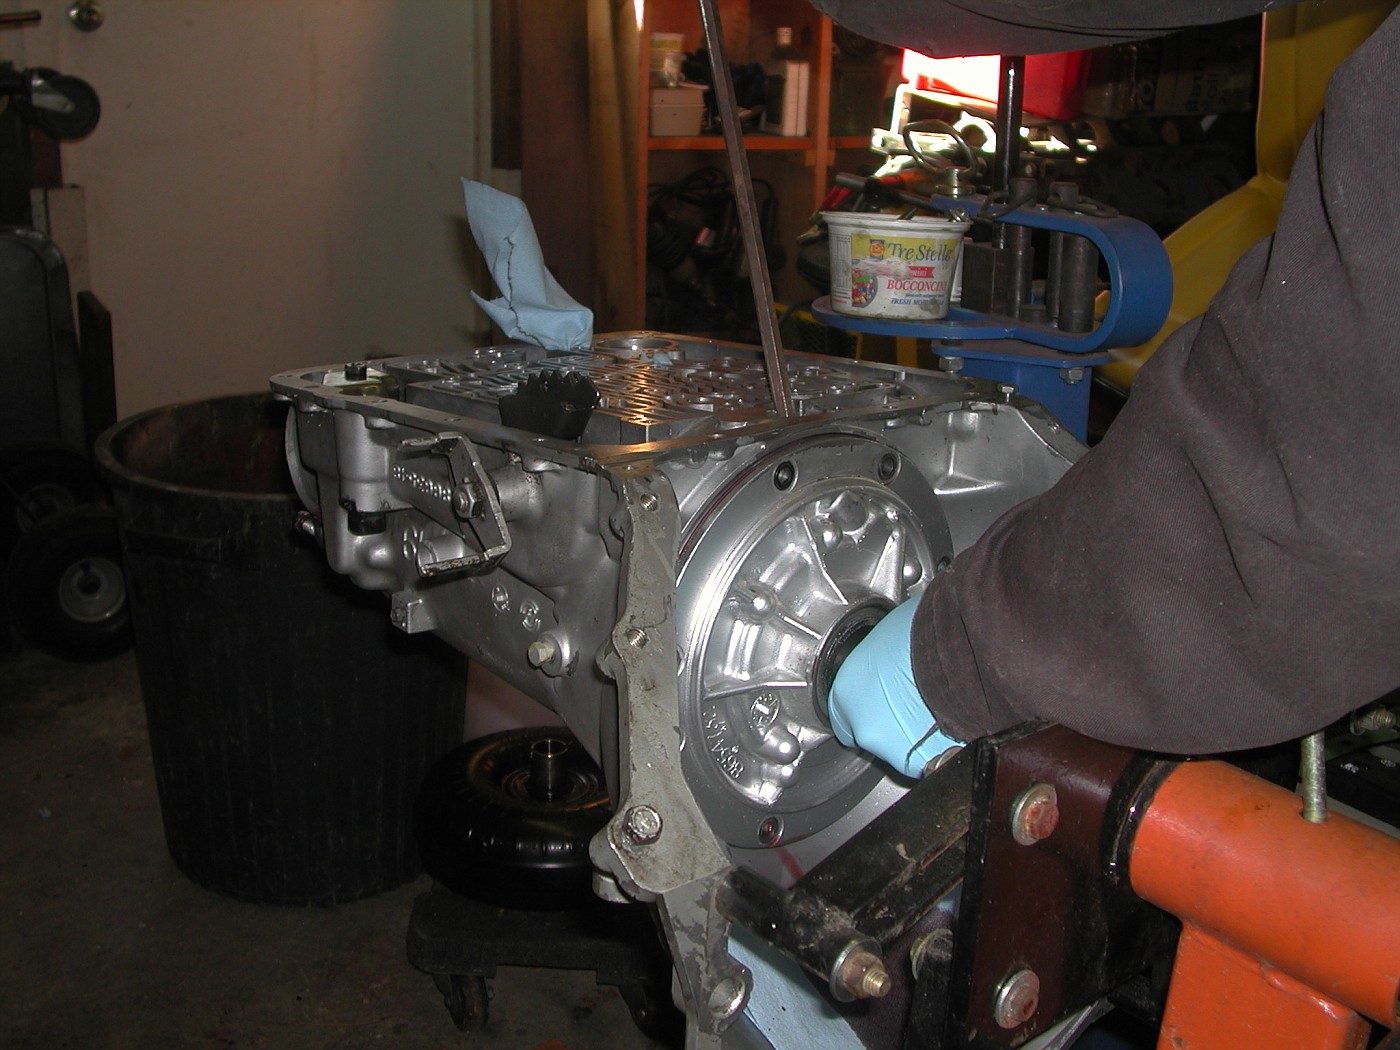 This is where you place the screw driver to pry out the pump. Don't go crazy prying on things. You can damage parts if you are not careful. 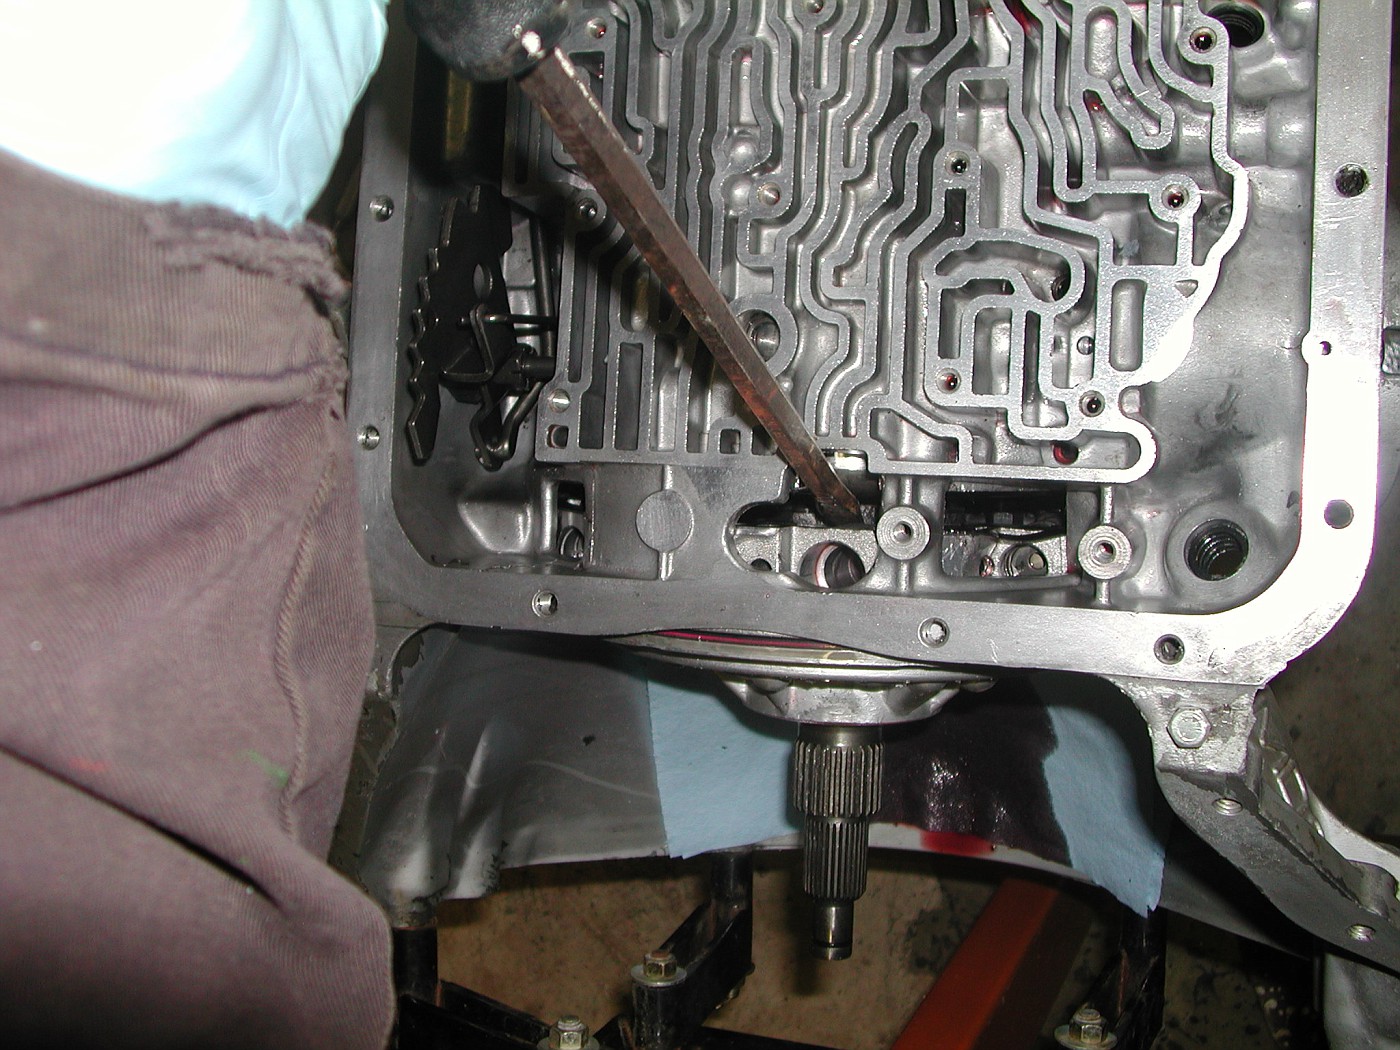 Once the pump cover O-ring's are past the sealing surface you can wiggle the cover off the input shaft. 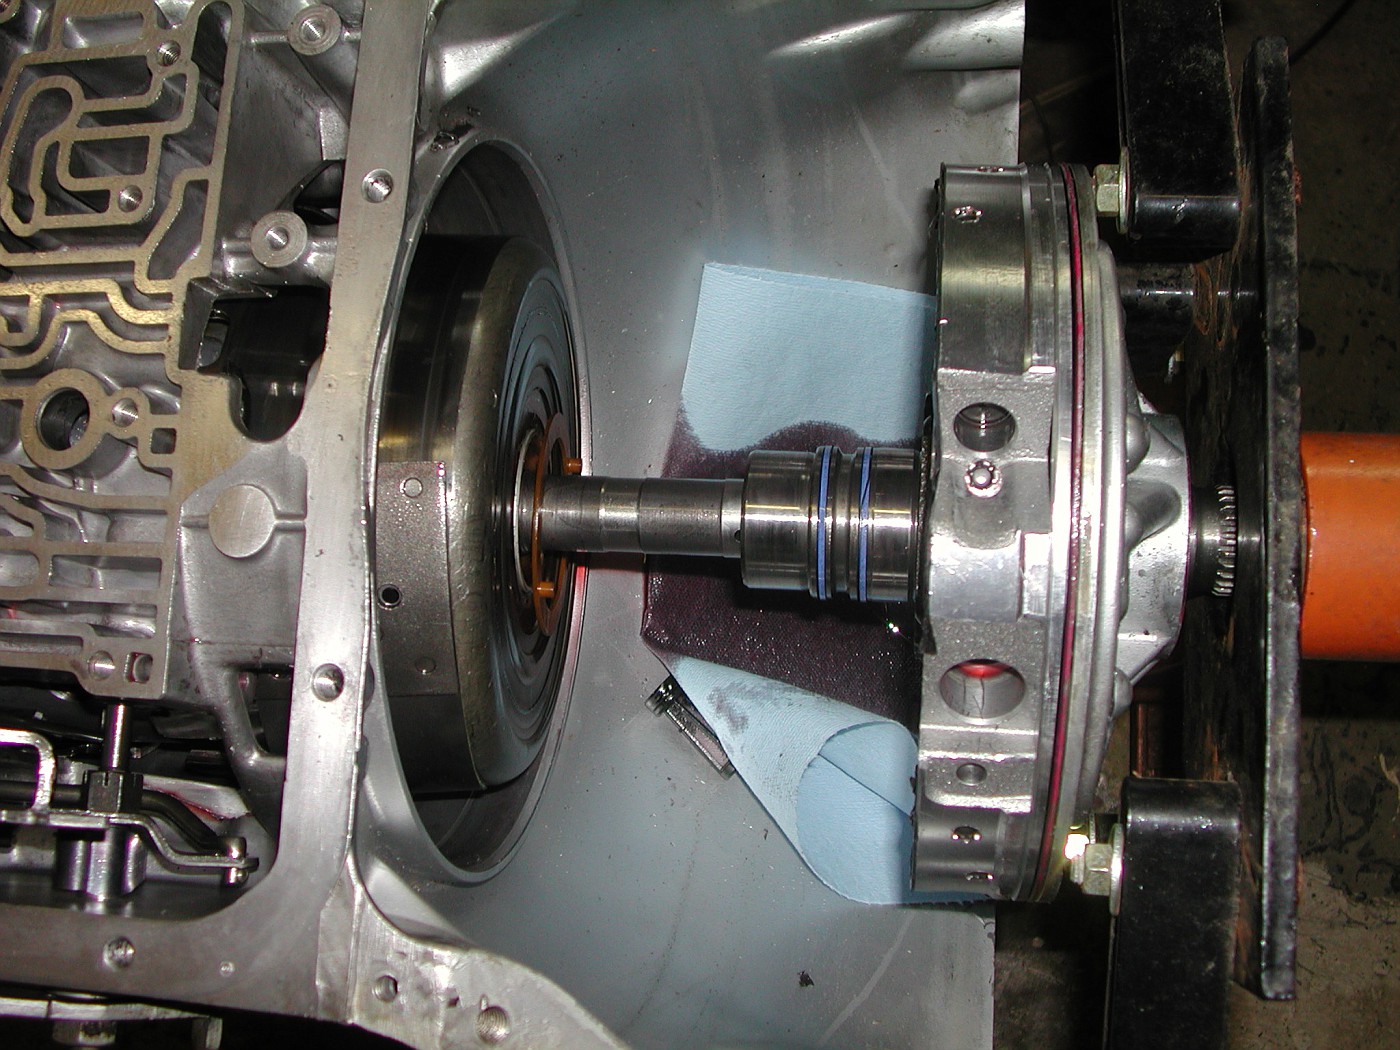 This is the oil pump screen. You can see it has caught some debris. Looks to be black gasket maker 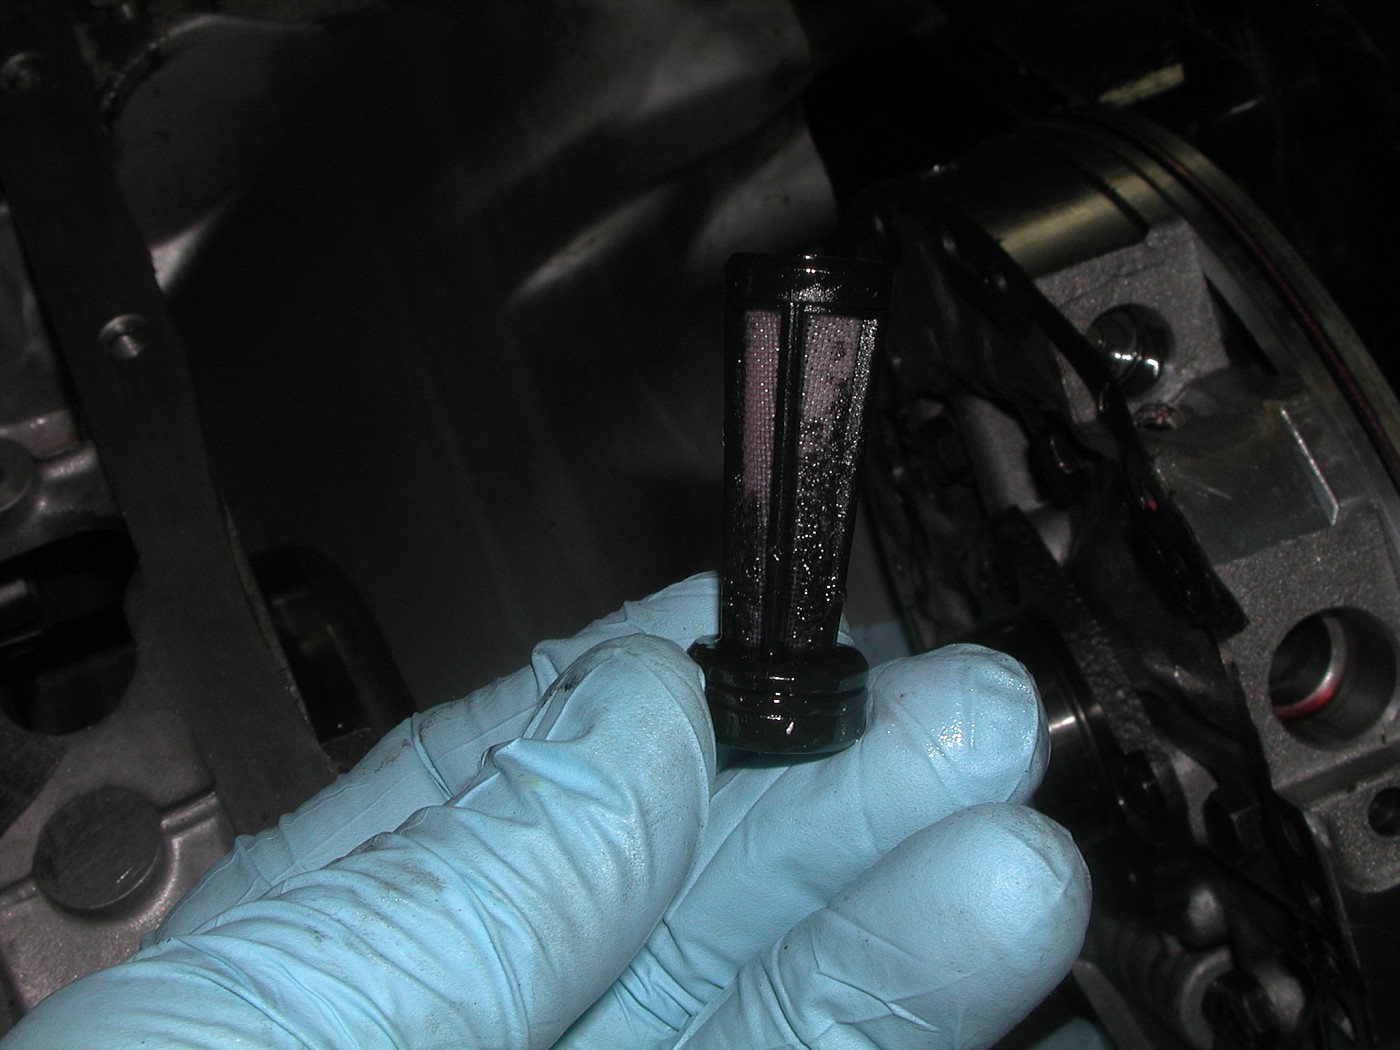 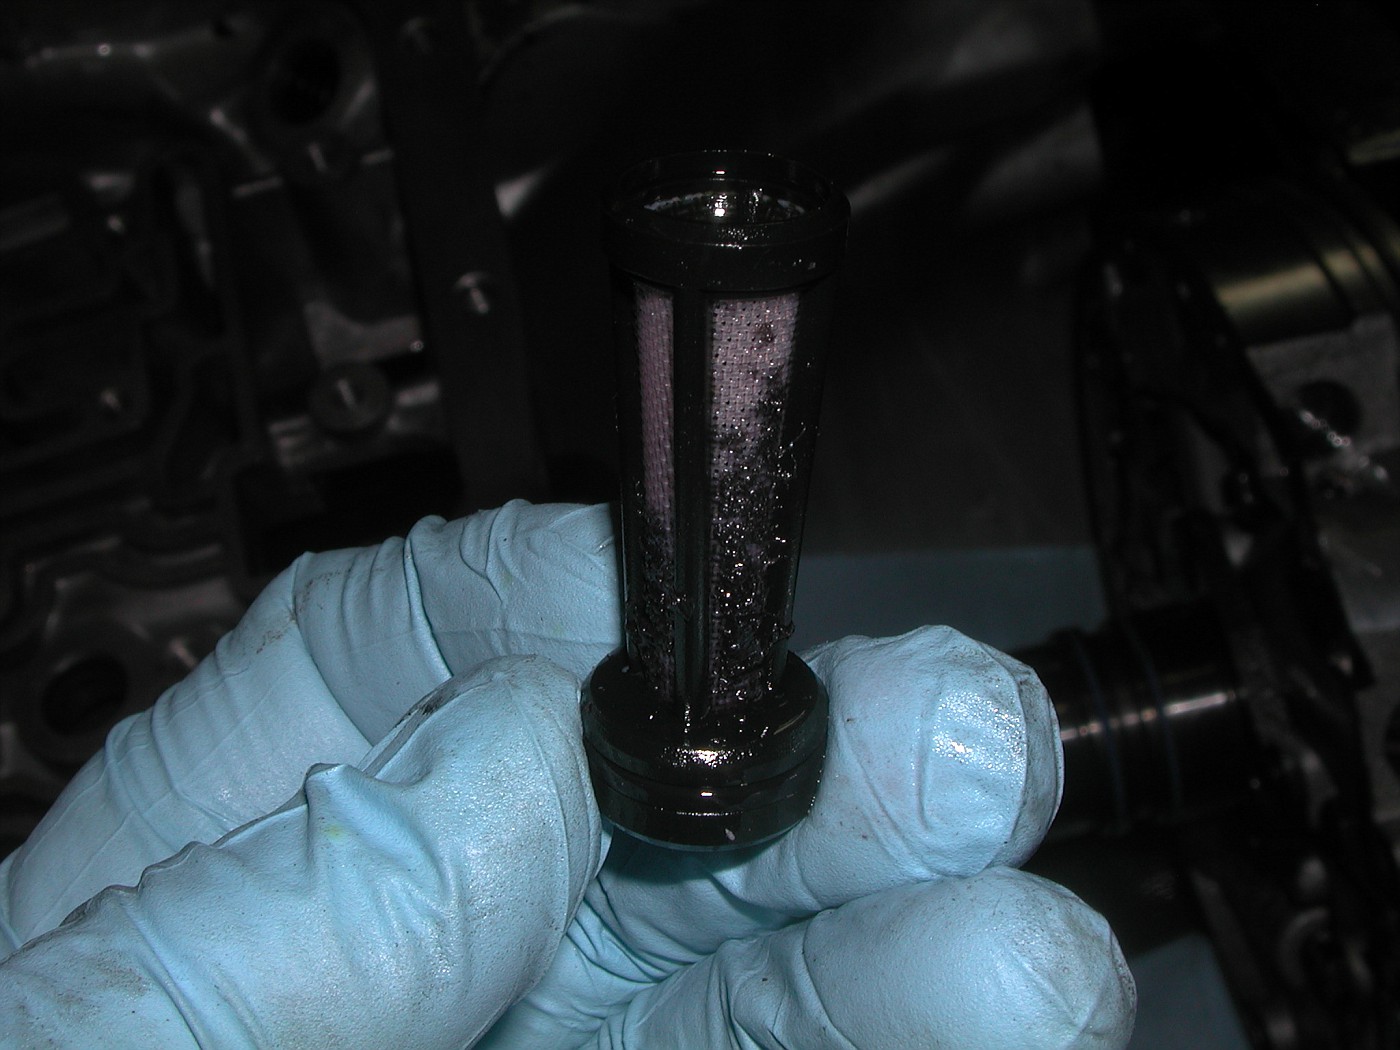 This hole in the pump cover is where the pump screen came from. 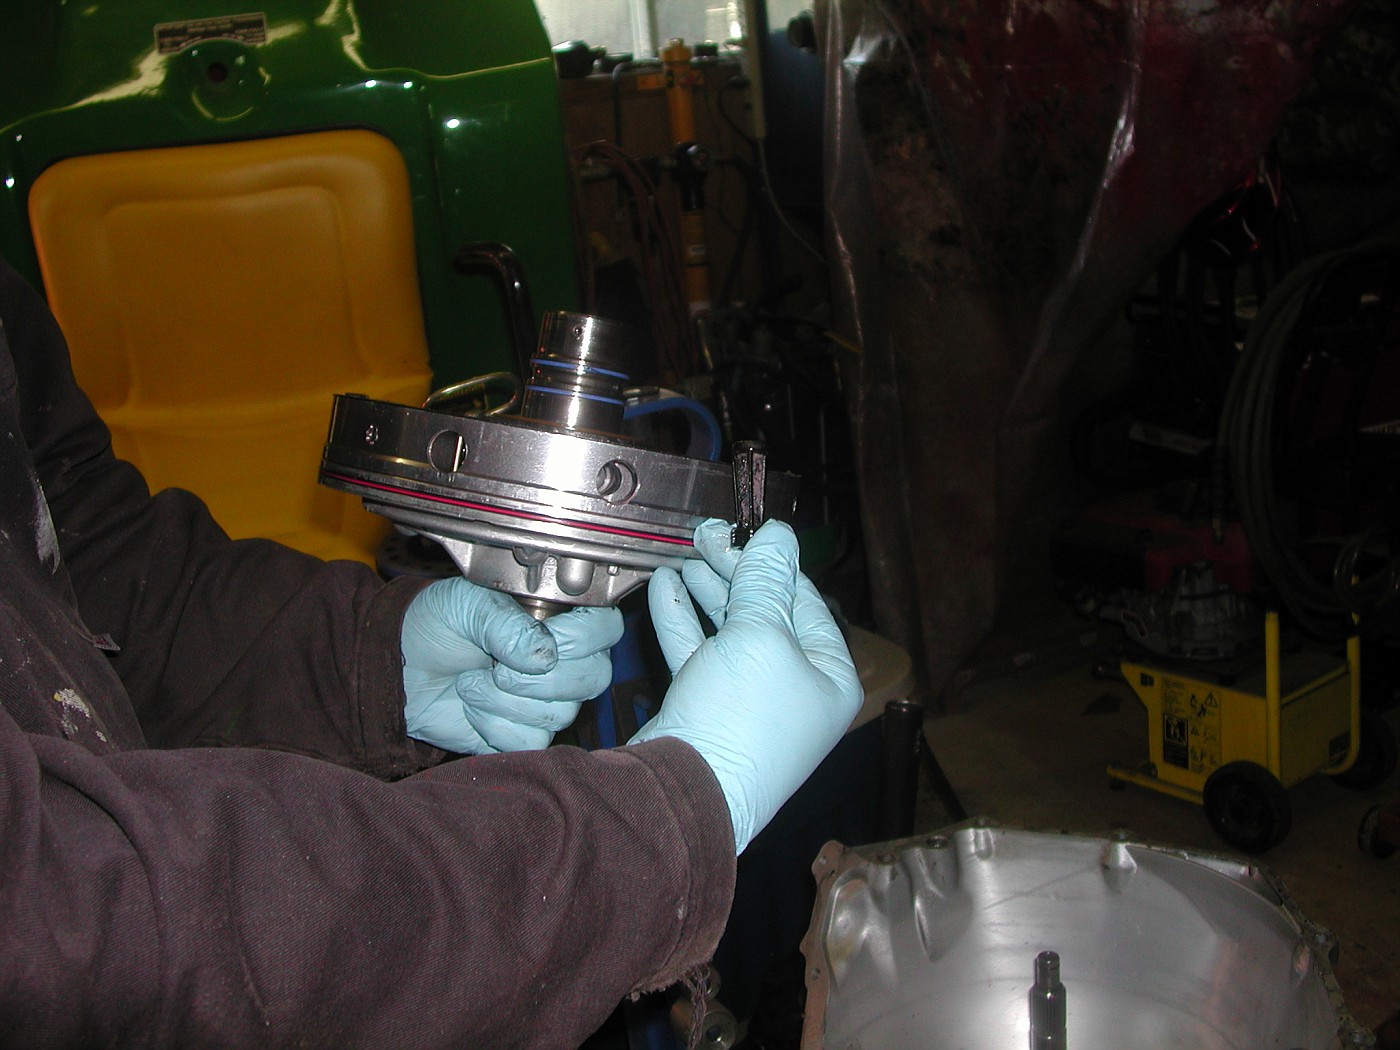 The back side of the pump cover. Under the center section of the cover is where the actual pump is.  Looking in the trans with the pump off. You will see the low/reverse clutch drum. 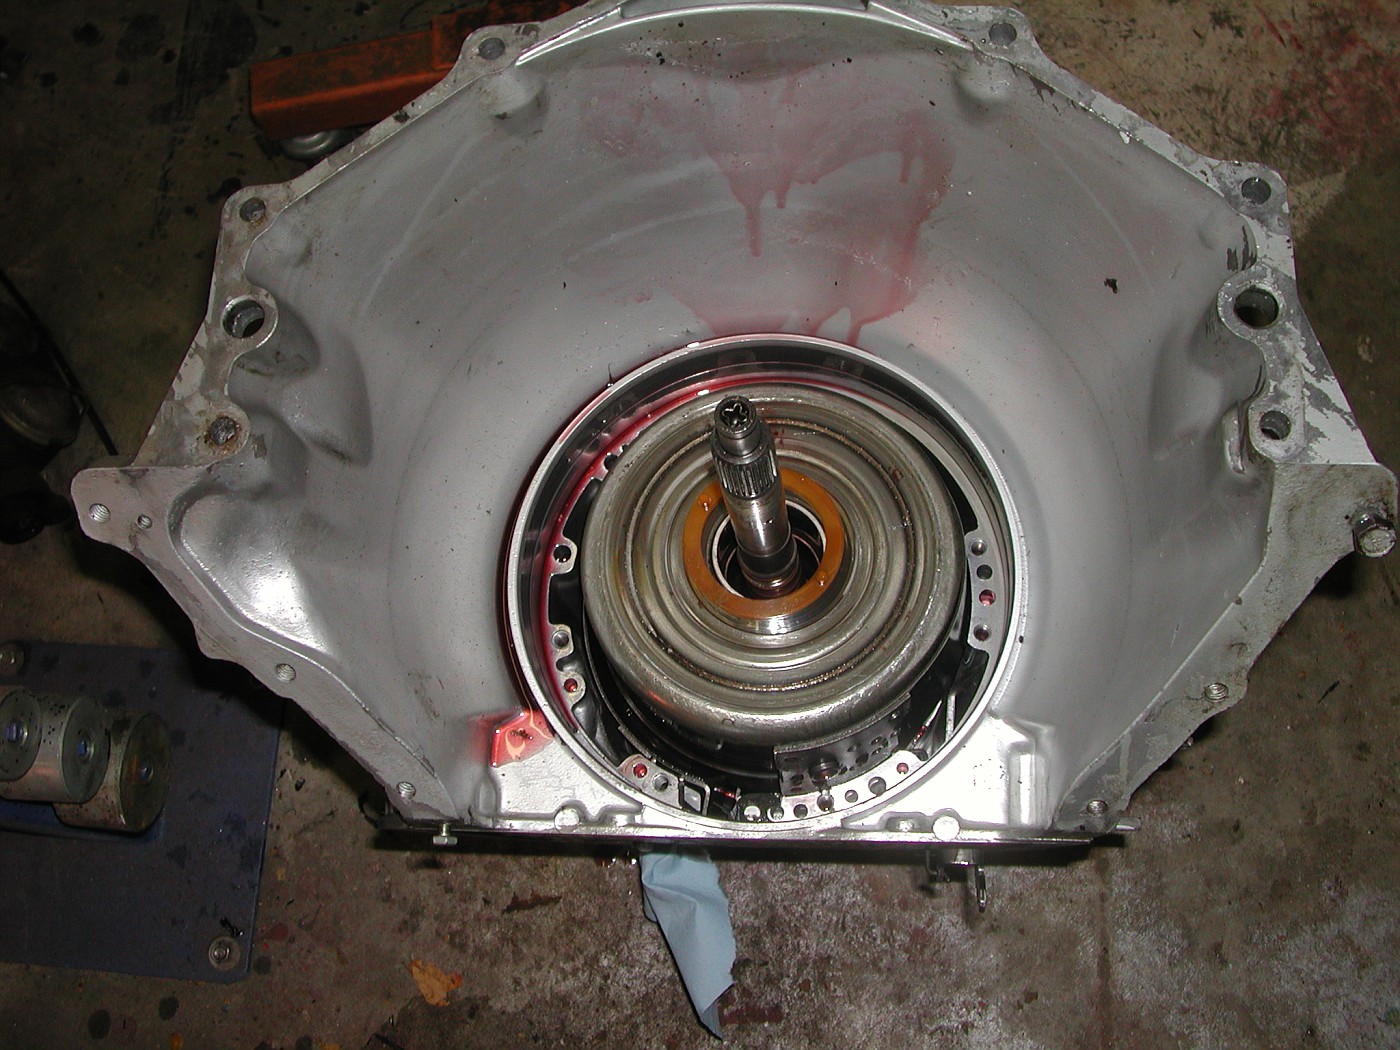 Now you can lift out the input housing assembly. 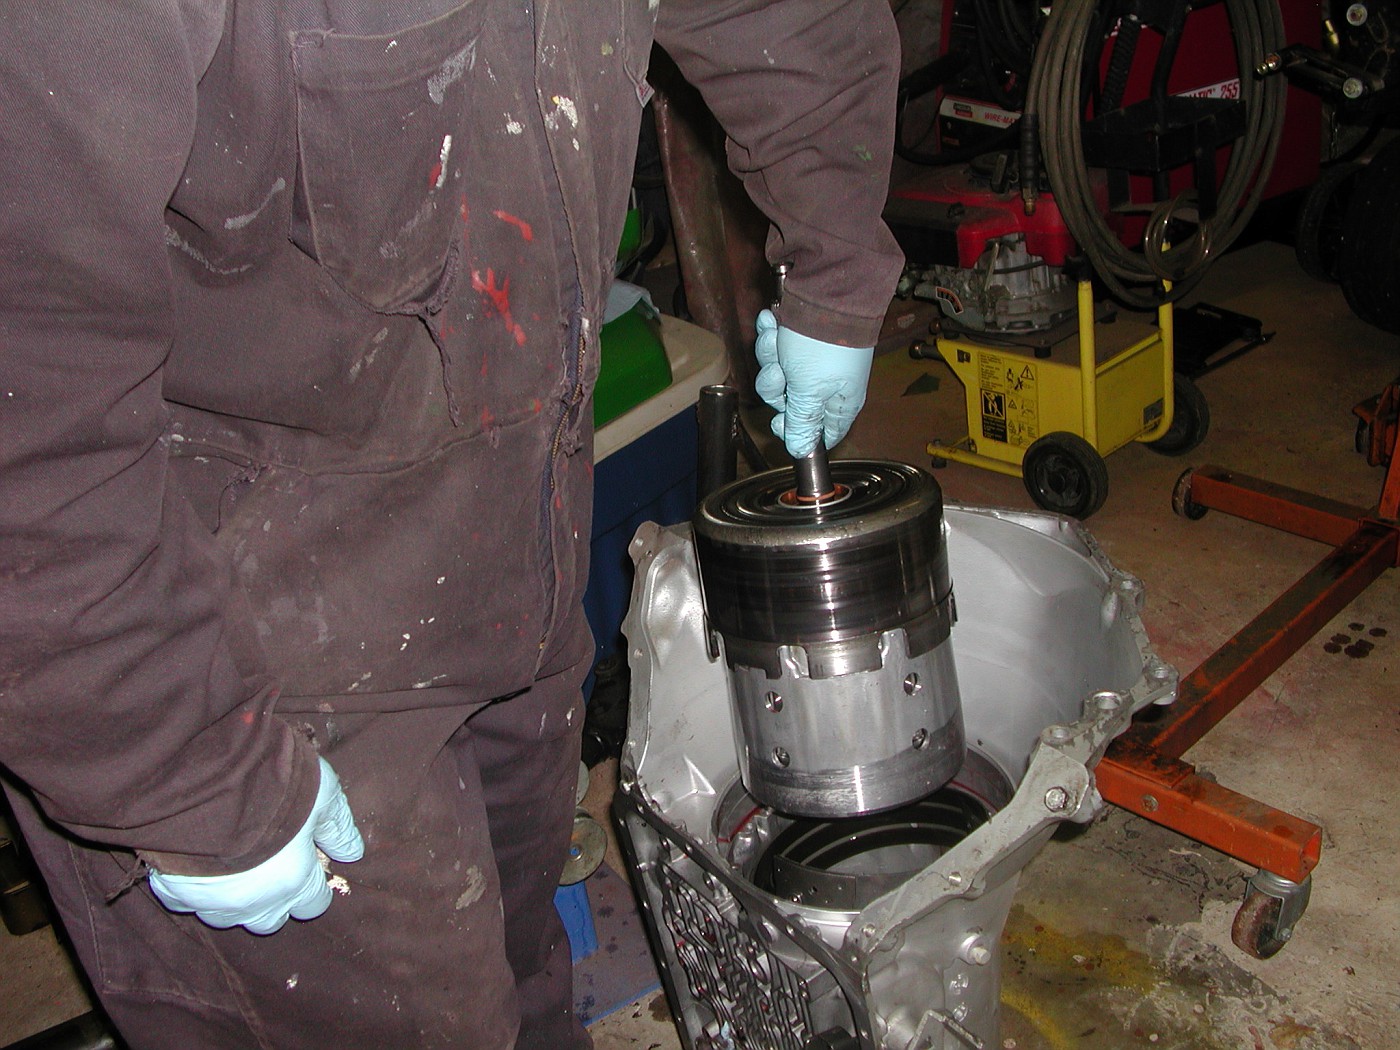 You'll then be able to see the input gear assembly and the sun gear shell. 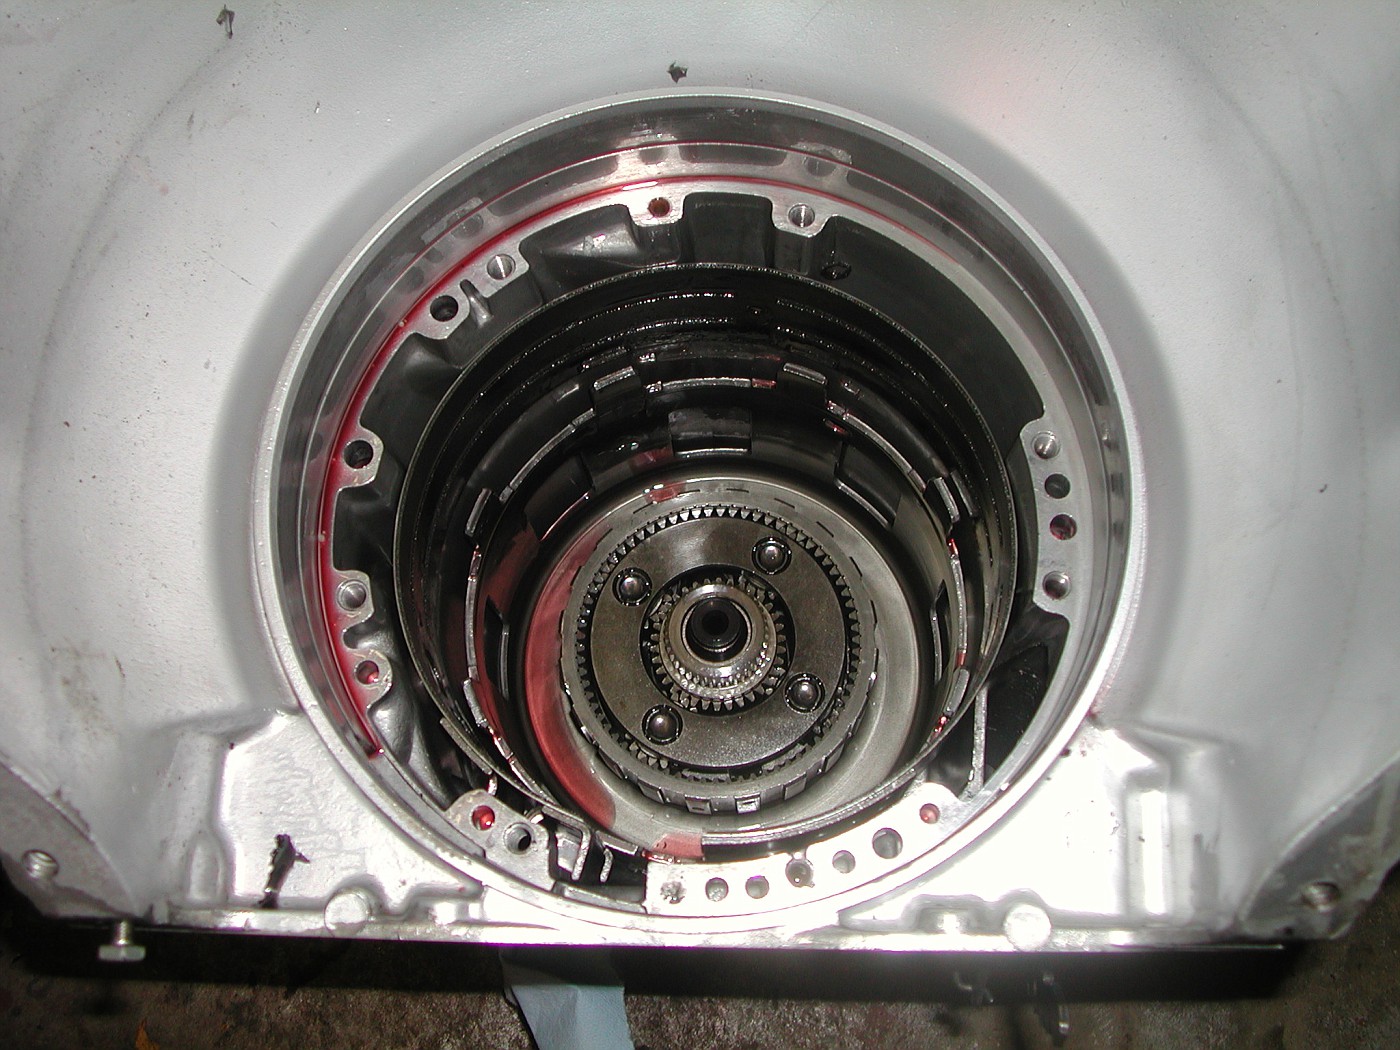 This is a close-up of the 2-4 band. There doesn't seem to be any glazing,gouges or cracking.  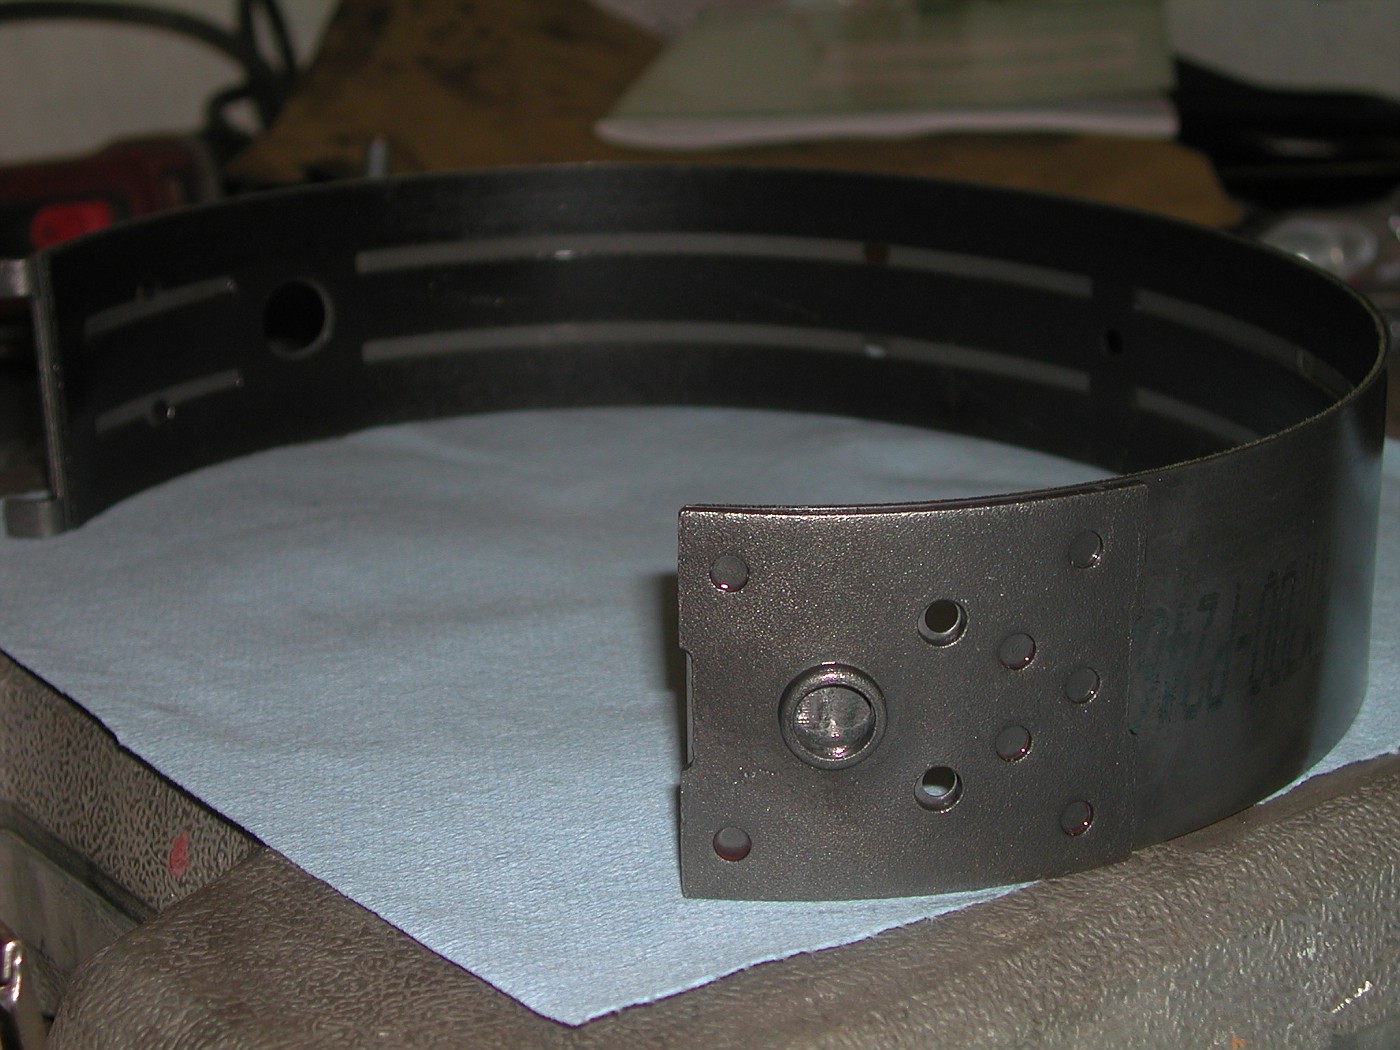 Removing the input sun gear. 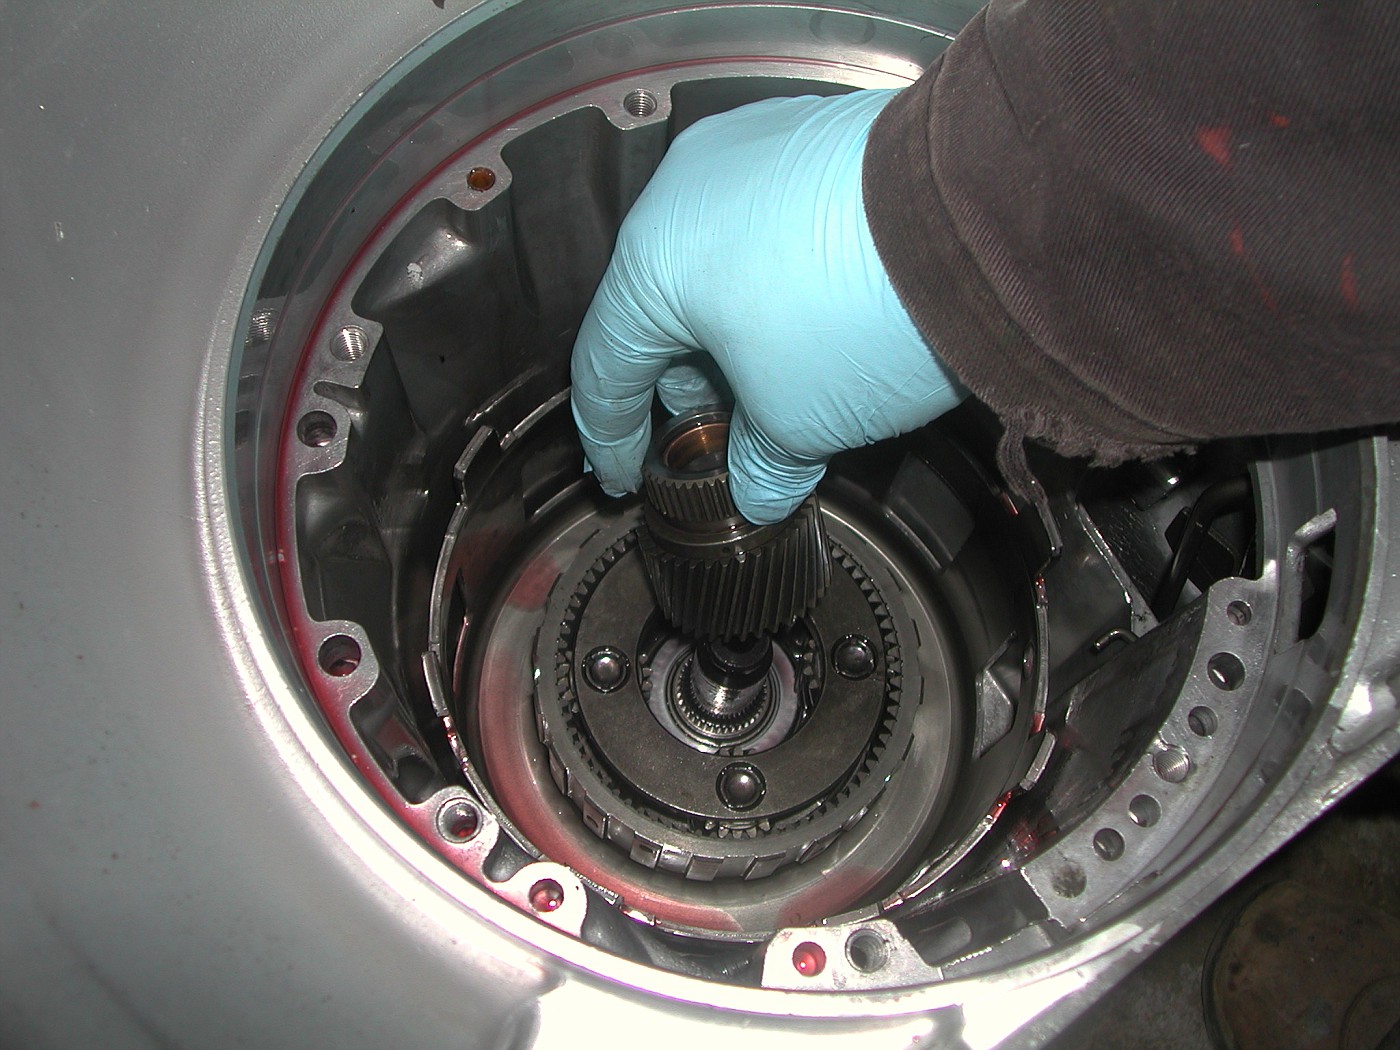 Now I can finally get to the snap ring that holds in the output shaft. I used some regular snap ring pliers but it would have been much easier with the proper type of snap ring pliers. A pair of Snap-on srp2's would work nicely here. 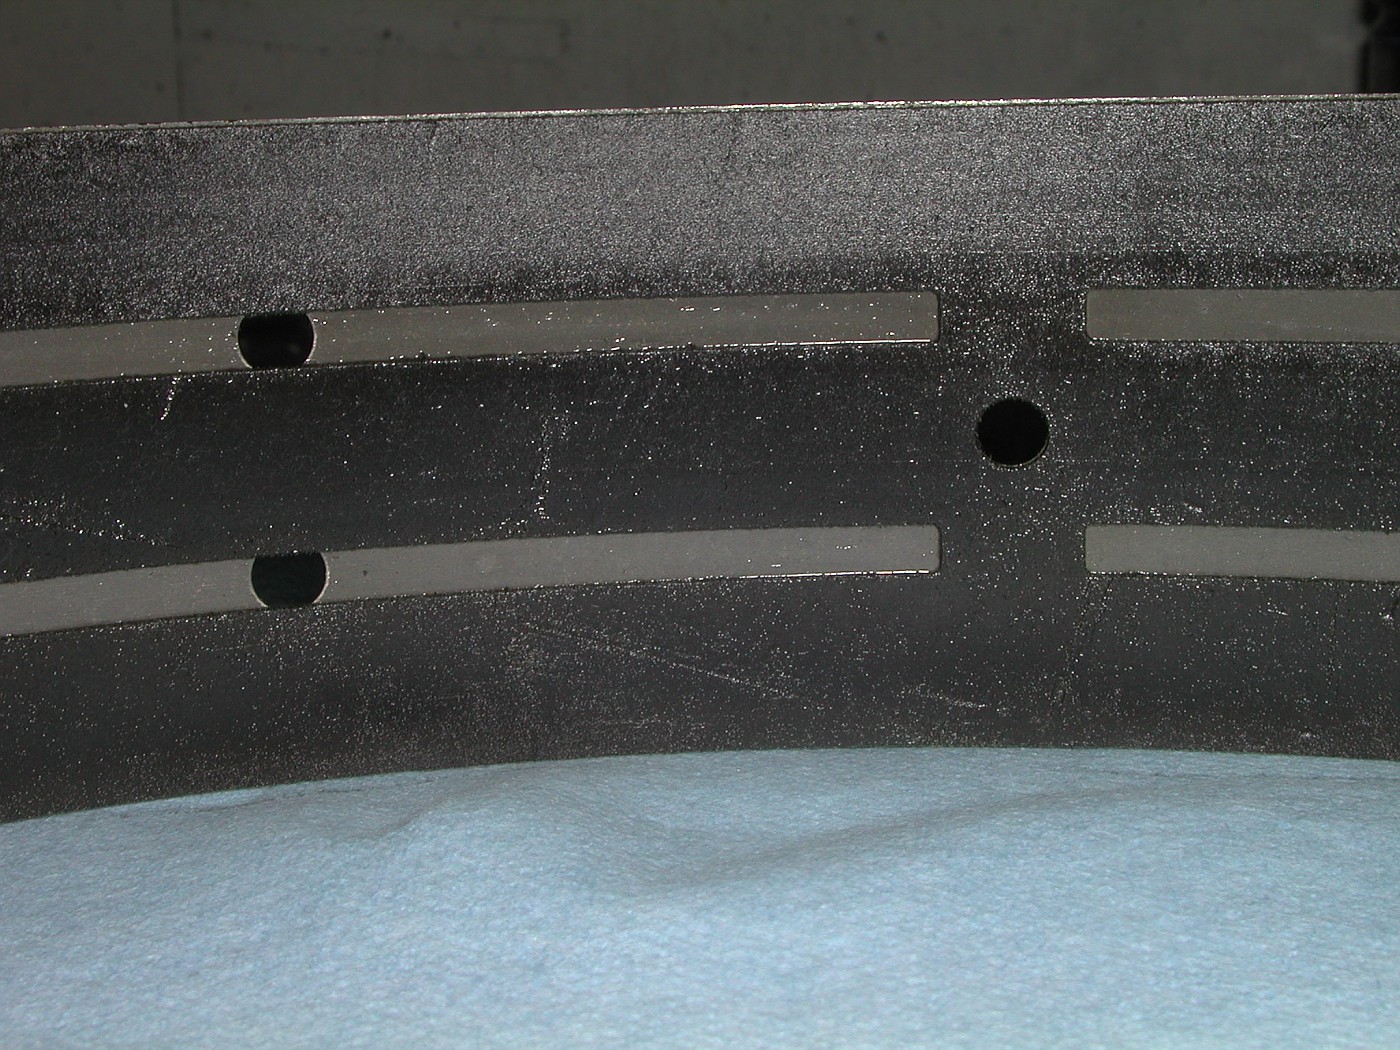 After the snap rings comes off I removed the input carrier. 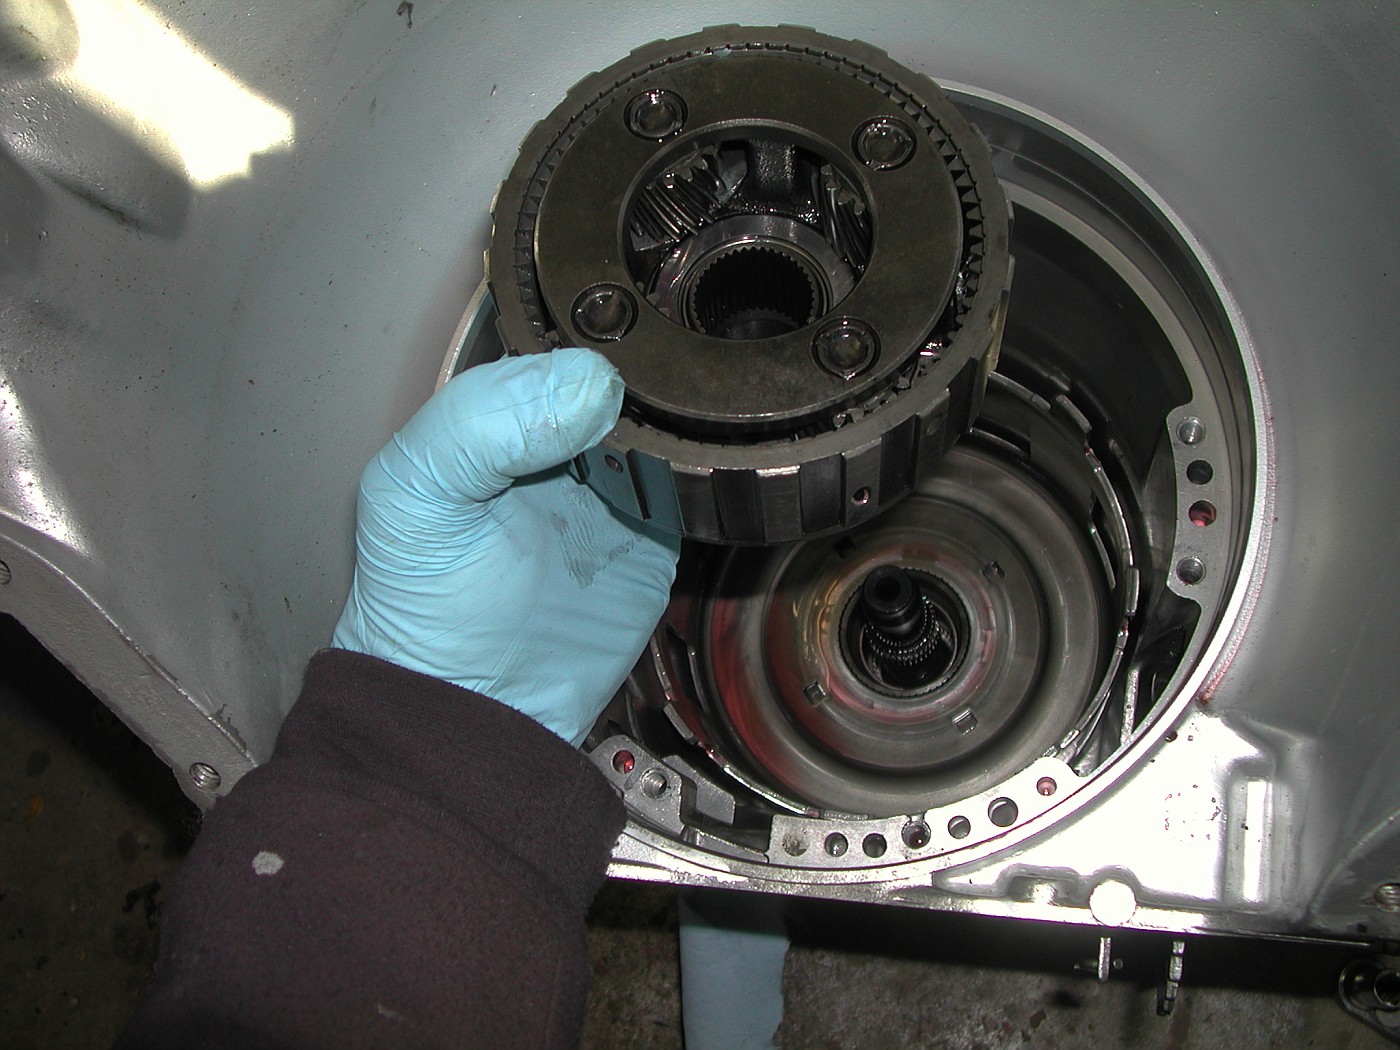 Back side of the input carrier.  Then the Sun gear shell can be removed. 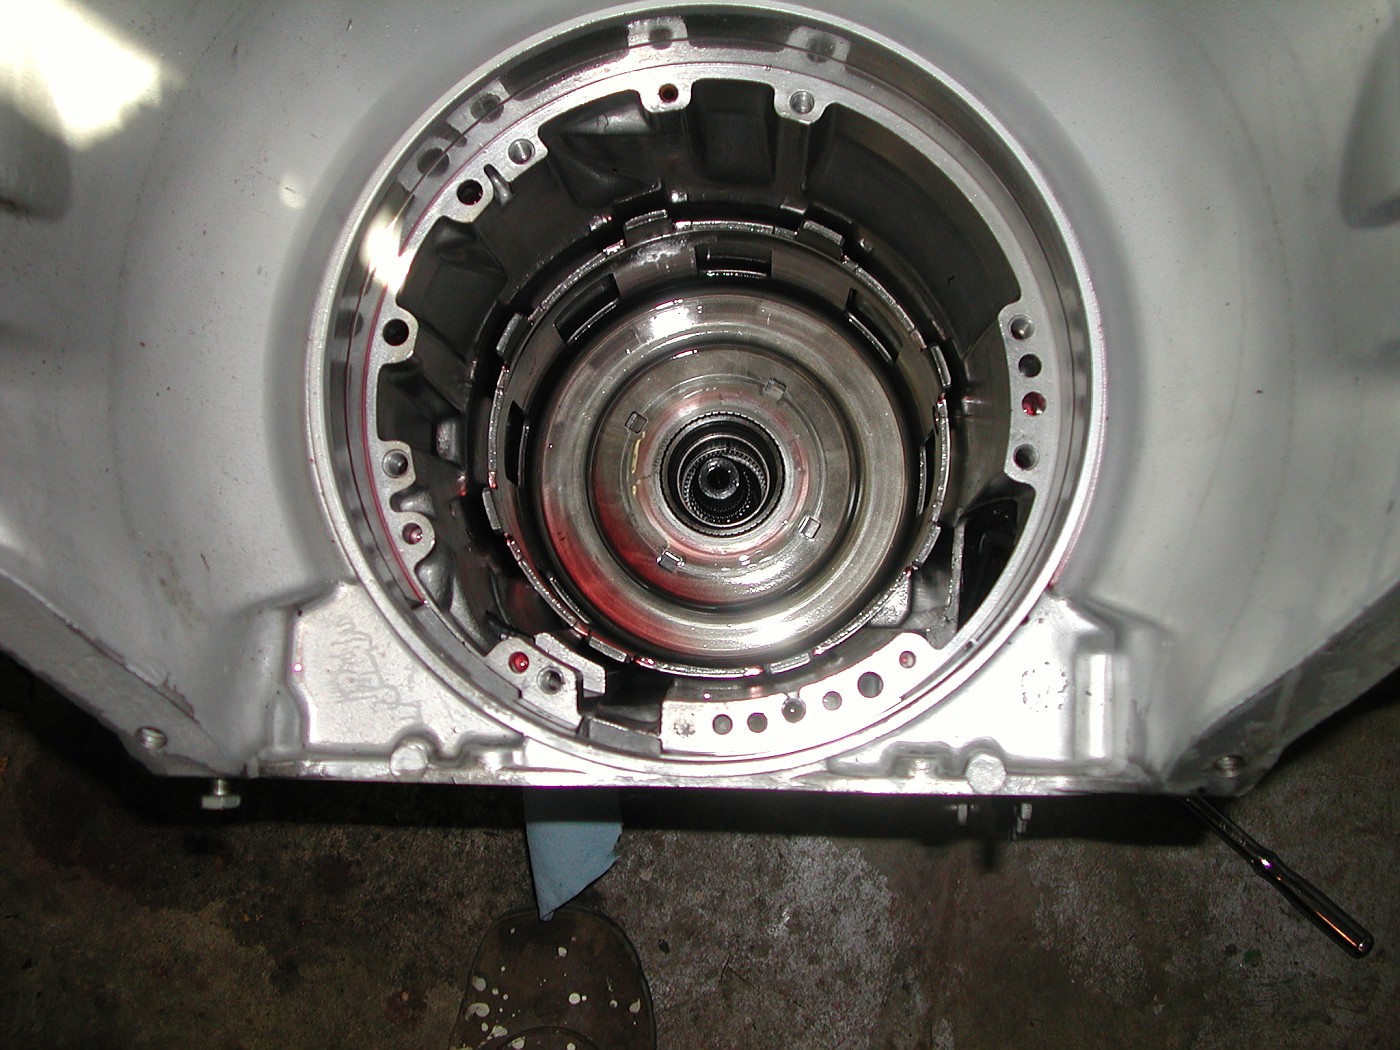 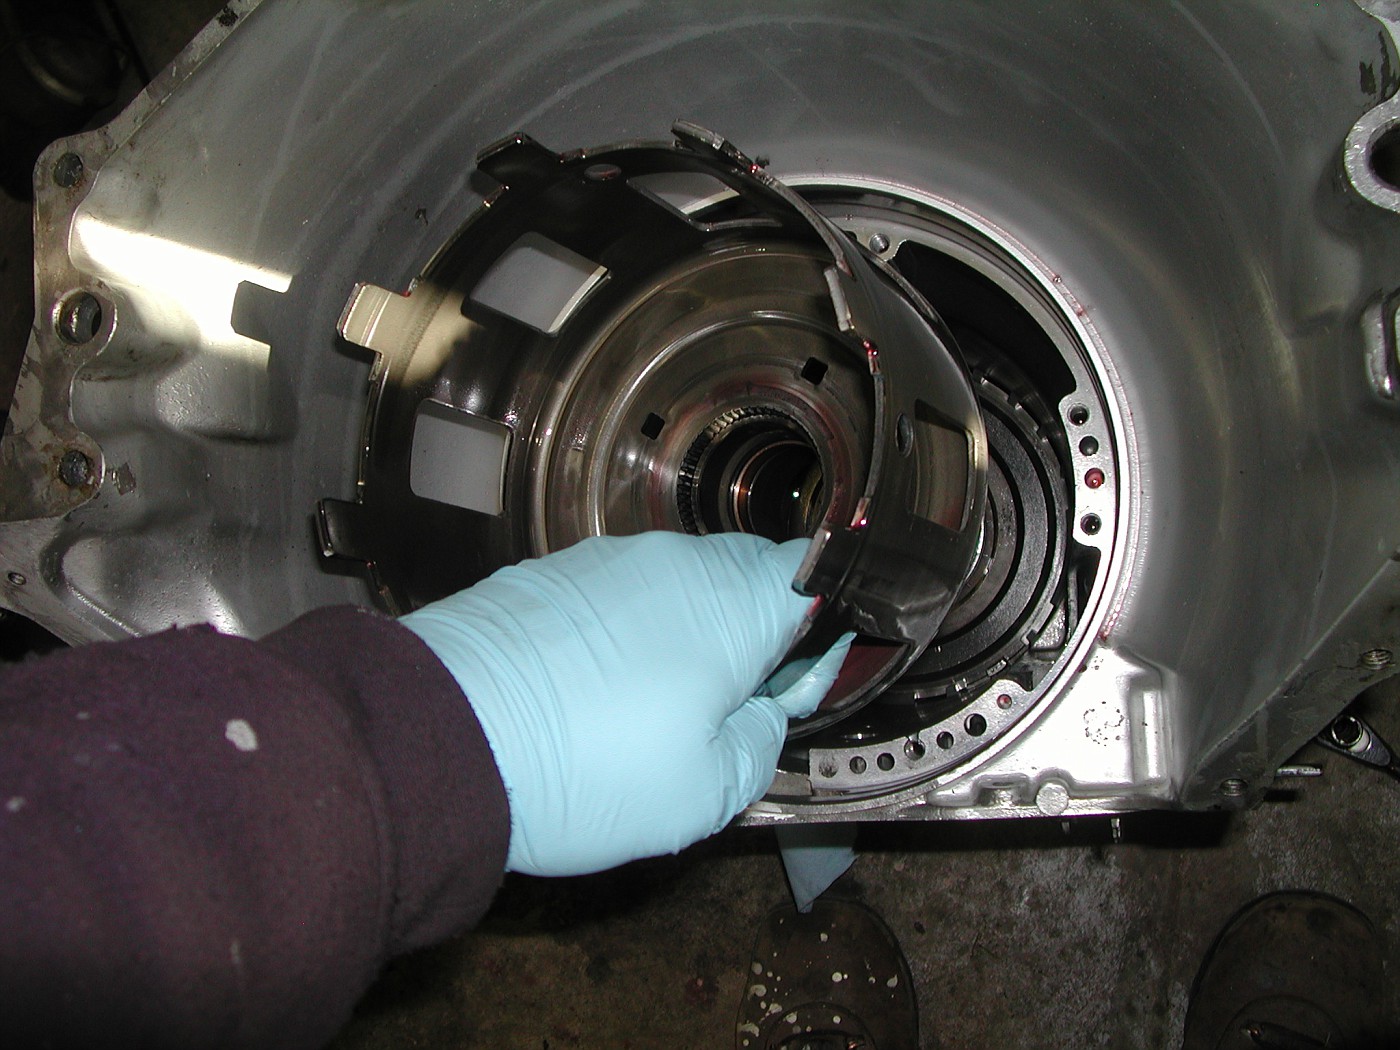 This is the back side of the Sun Gear Shell. The reaction Sun Gear attached to the bottom of the Sun Gear Shell can easily be removed by just pulling on it. 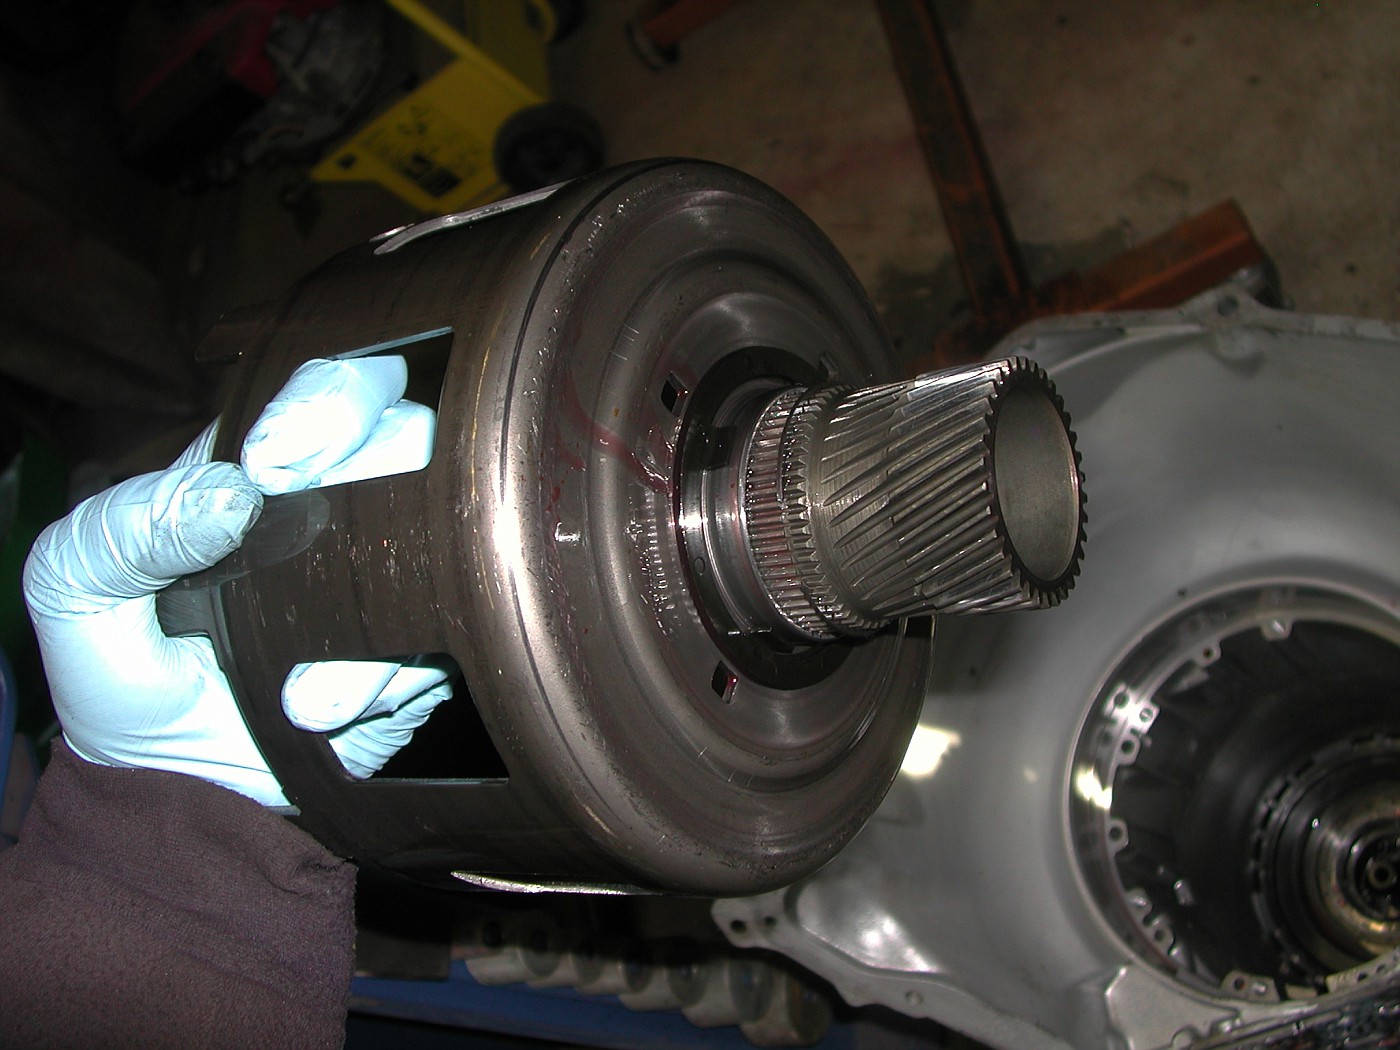 I laid the trans on it's side and easily removed the broken output shaft. 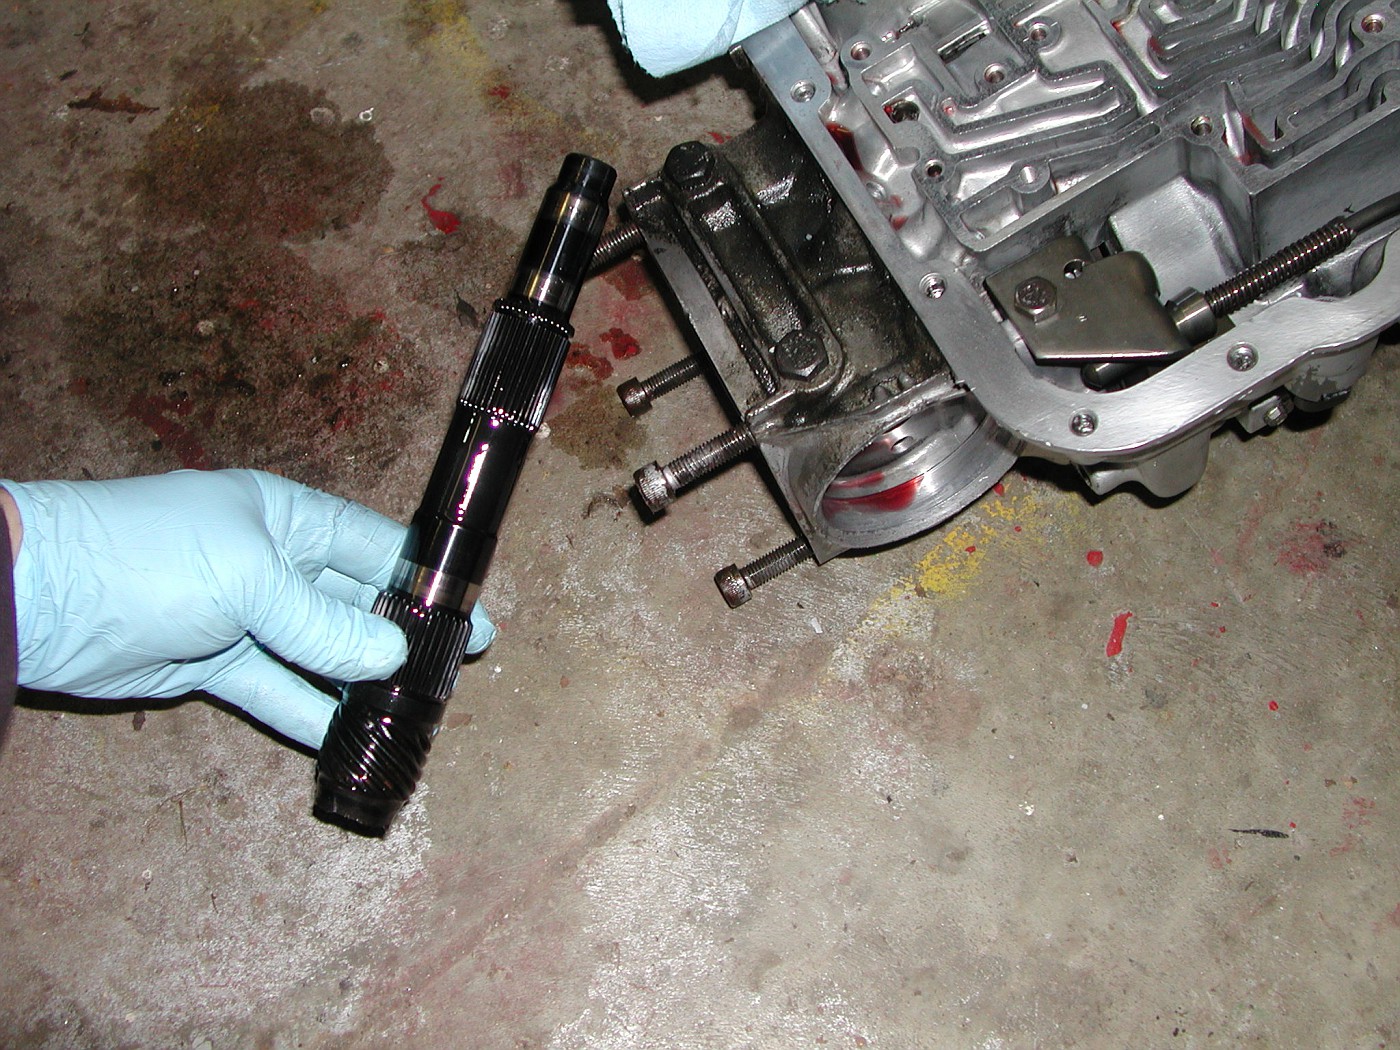 New output shaft above the old broken one  Continued. .
__________________
71 blazer,350SBC,approx.375HP,700R4,factory GM TPI.Dual electric fans,33x12.5x15 ATR on stock suspension. Petrolia,Ontario,Canada but working in Port Huron,MI. See ALL my Blazer pic's HERE Last edited by BobbyK; 11-09-2011 at 03:50 AM. |
|
|
|
|
11-09-2011, 03:58 AM
|
#29 |
|
Registered User
Join Date: May 2000
Location: Petrolia,Ontario,Canada but working in Port Huron,Mi.
Posts: 1,769
|
Re: So I'm at a light....(PIC'S)
I stood the trans on it's end to install the new output shaft. 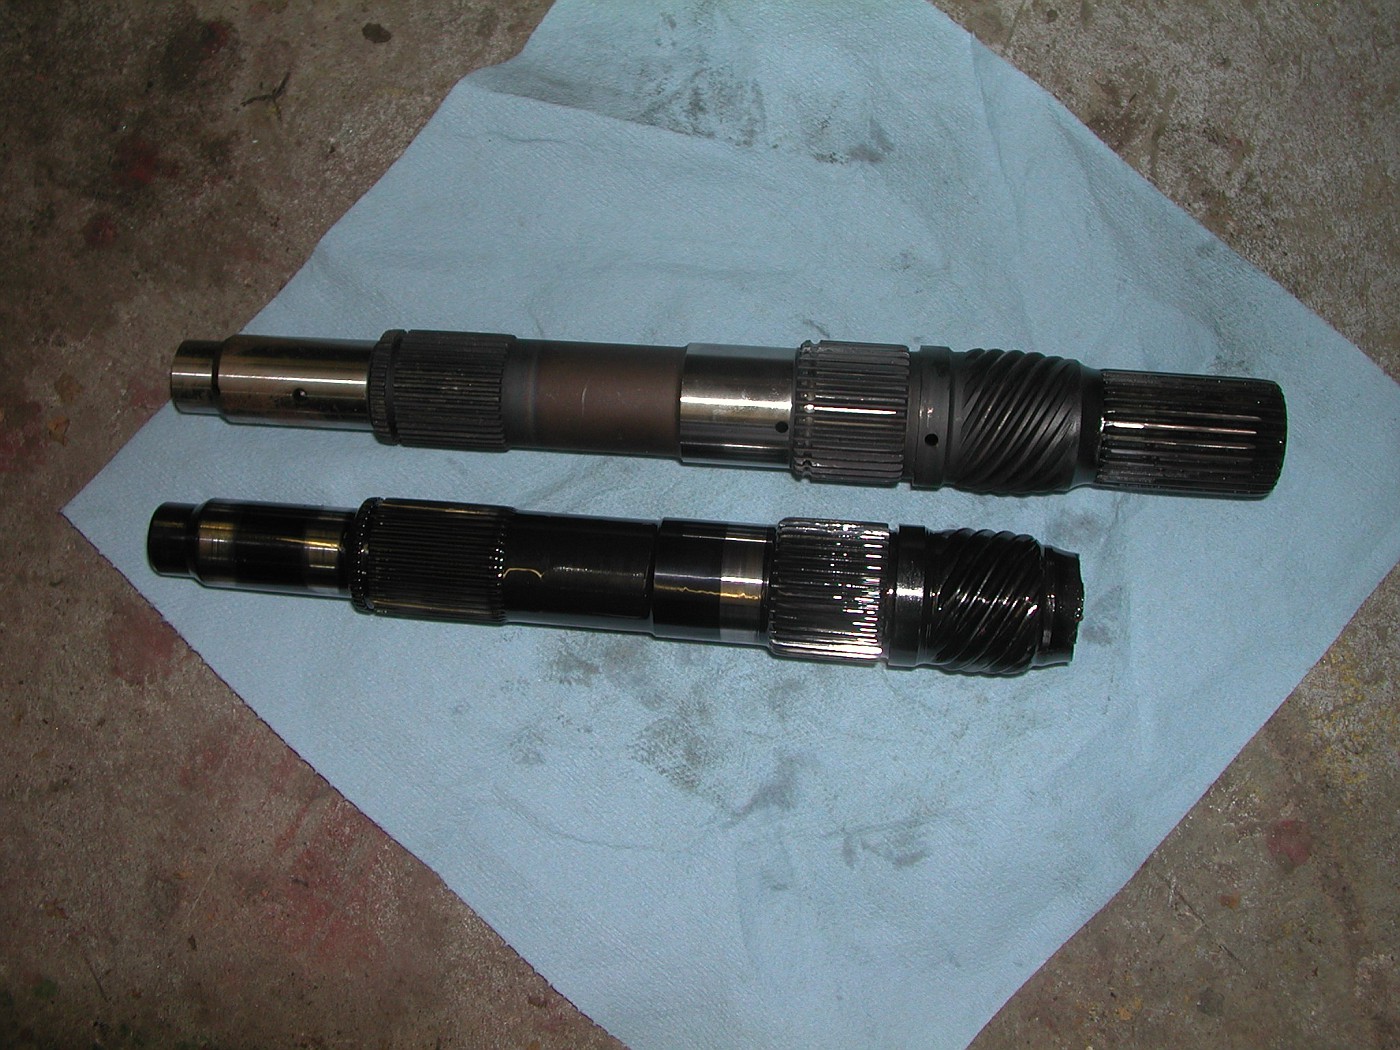 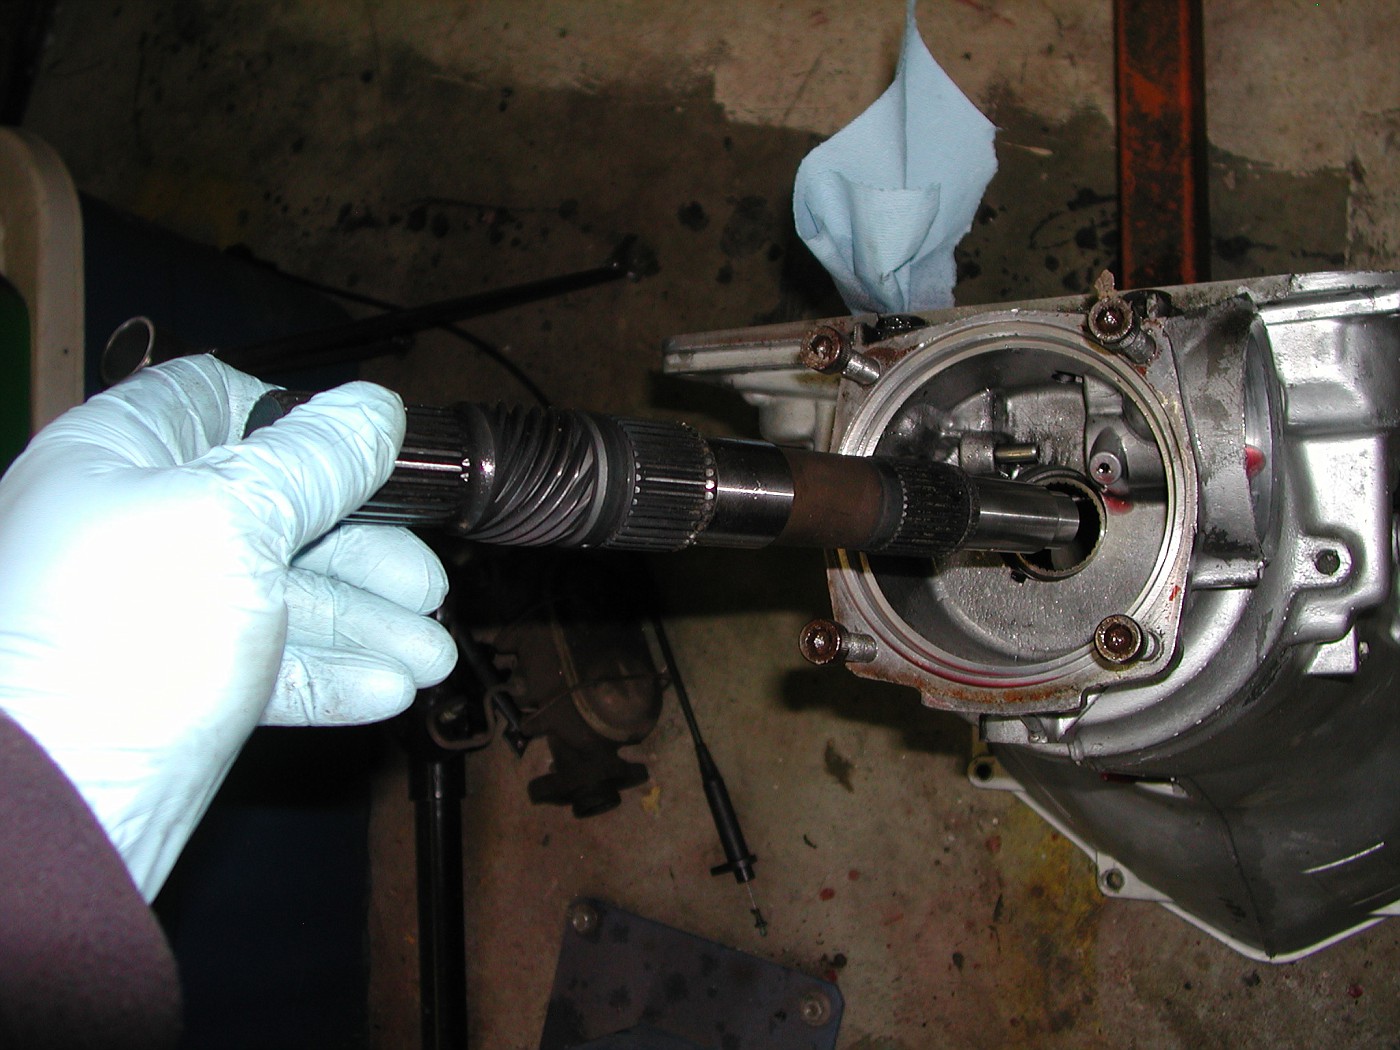 It should slide in easily with no binding and only a slight interference fit. 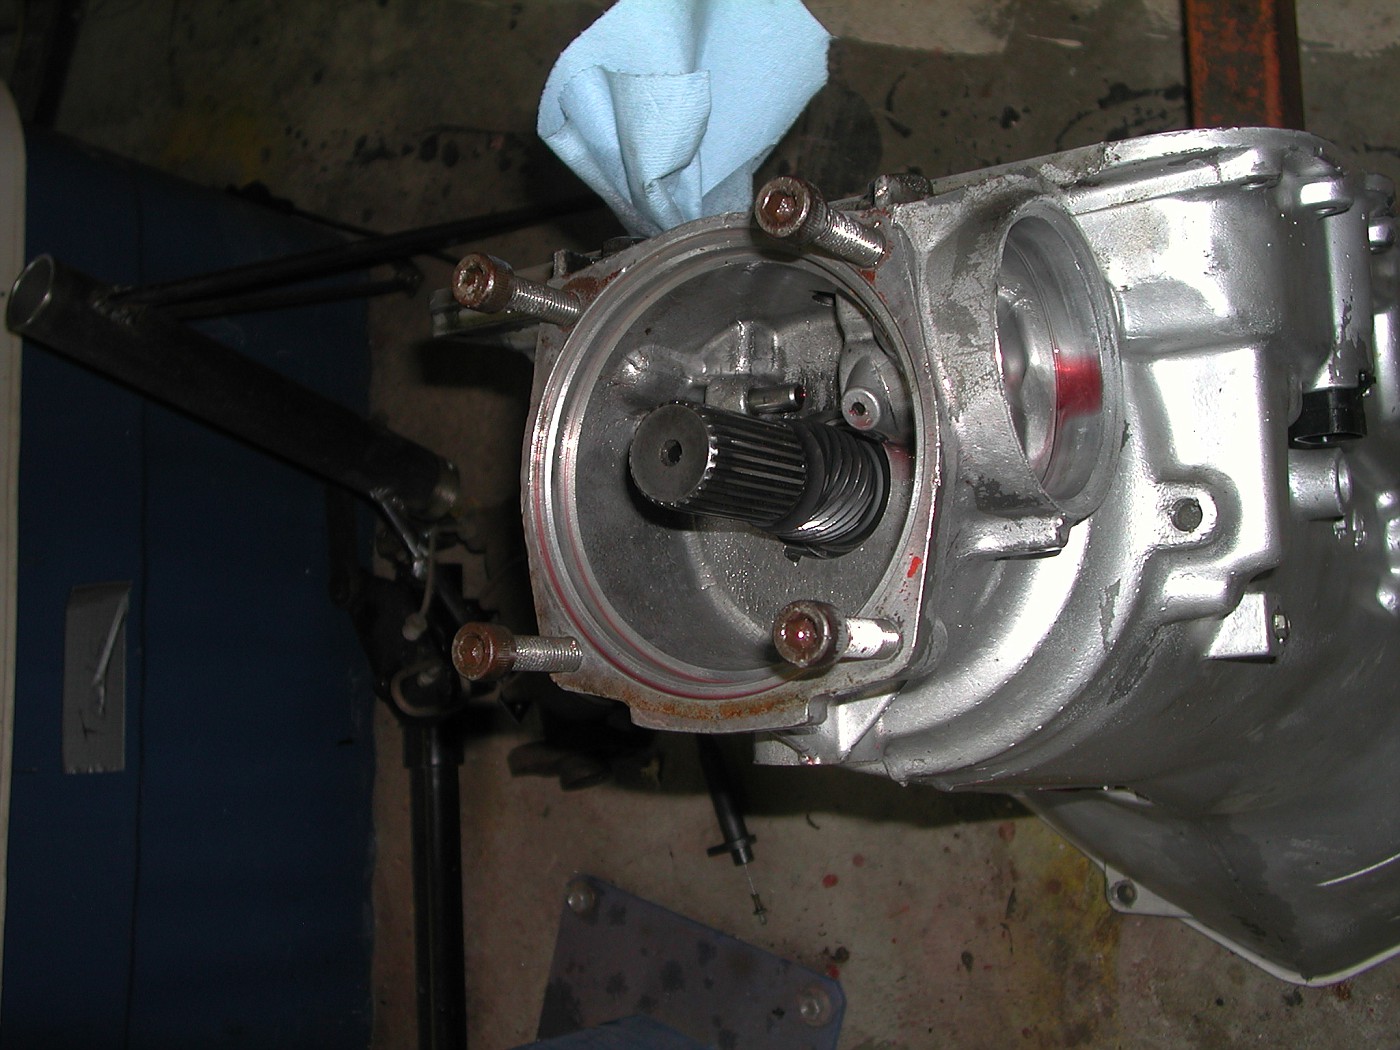 What it looks like fully seated 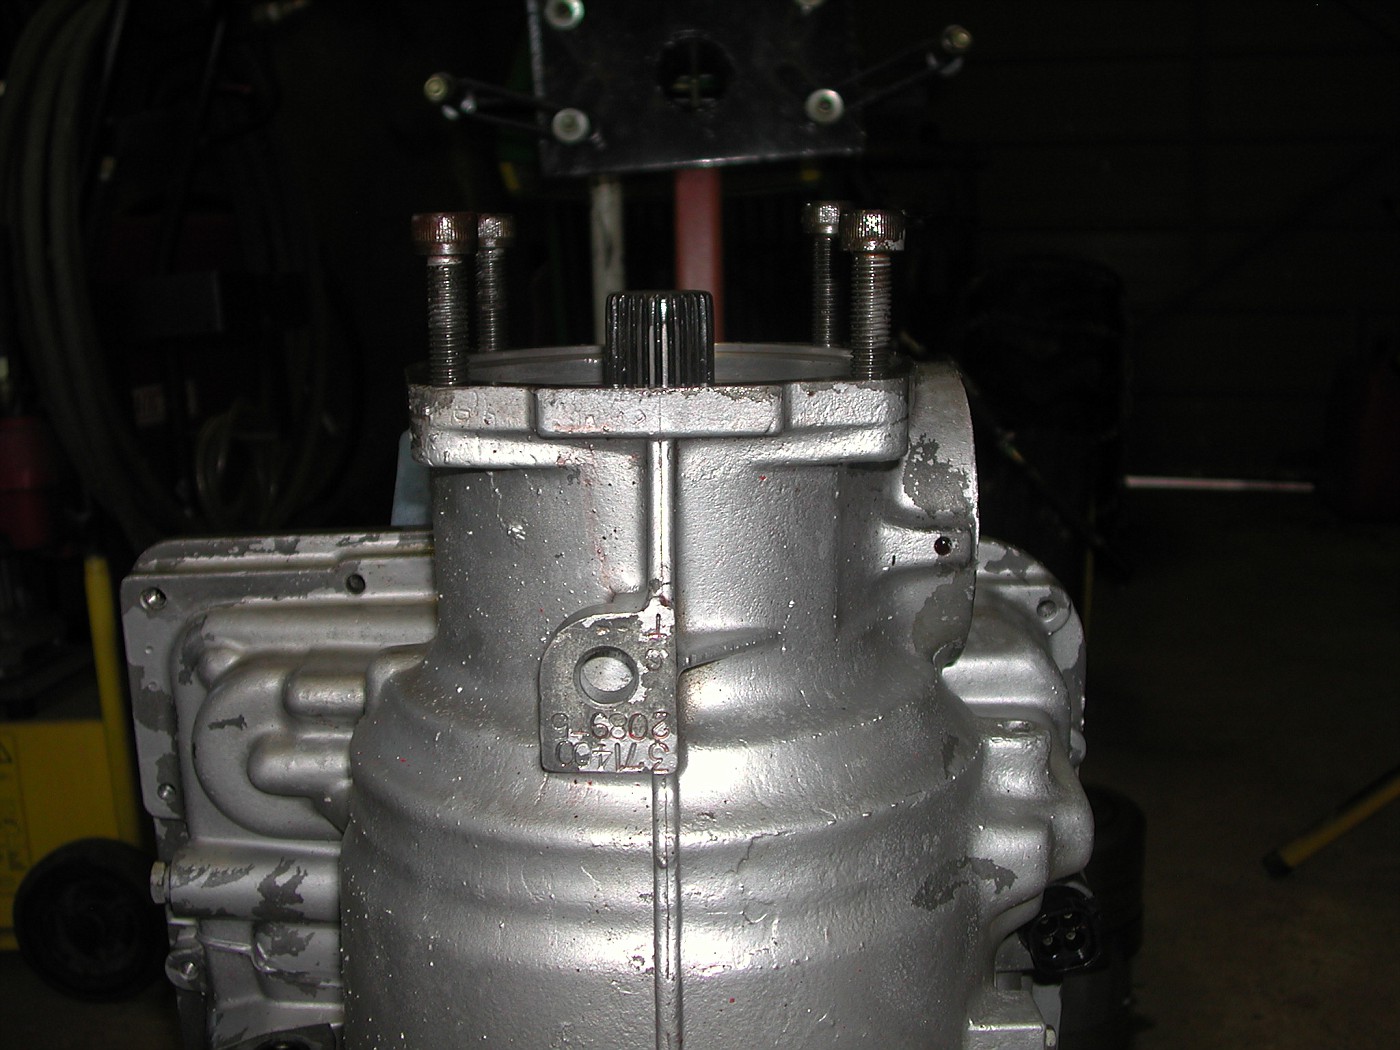 The next 3 pic's are just for reference. All the valve body bolts are 10mm 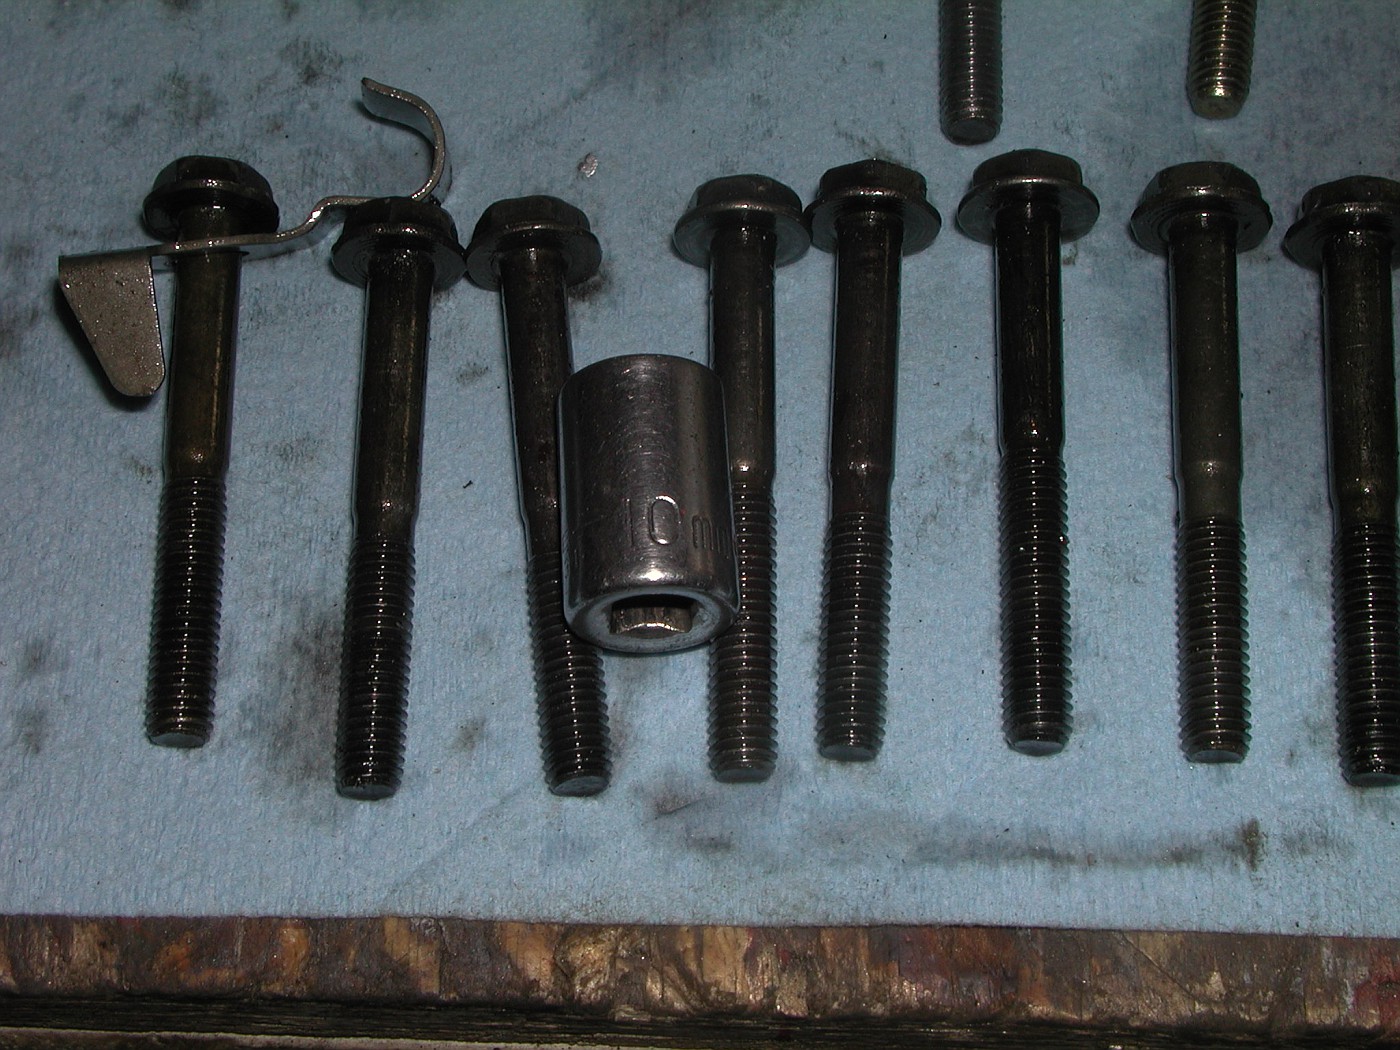 There is only one 8mm bolt for the Aux. Valve body and one 13mm bolt for the detent spring.The pump cover bolts and pan bolts are also 13mm. 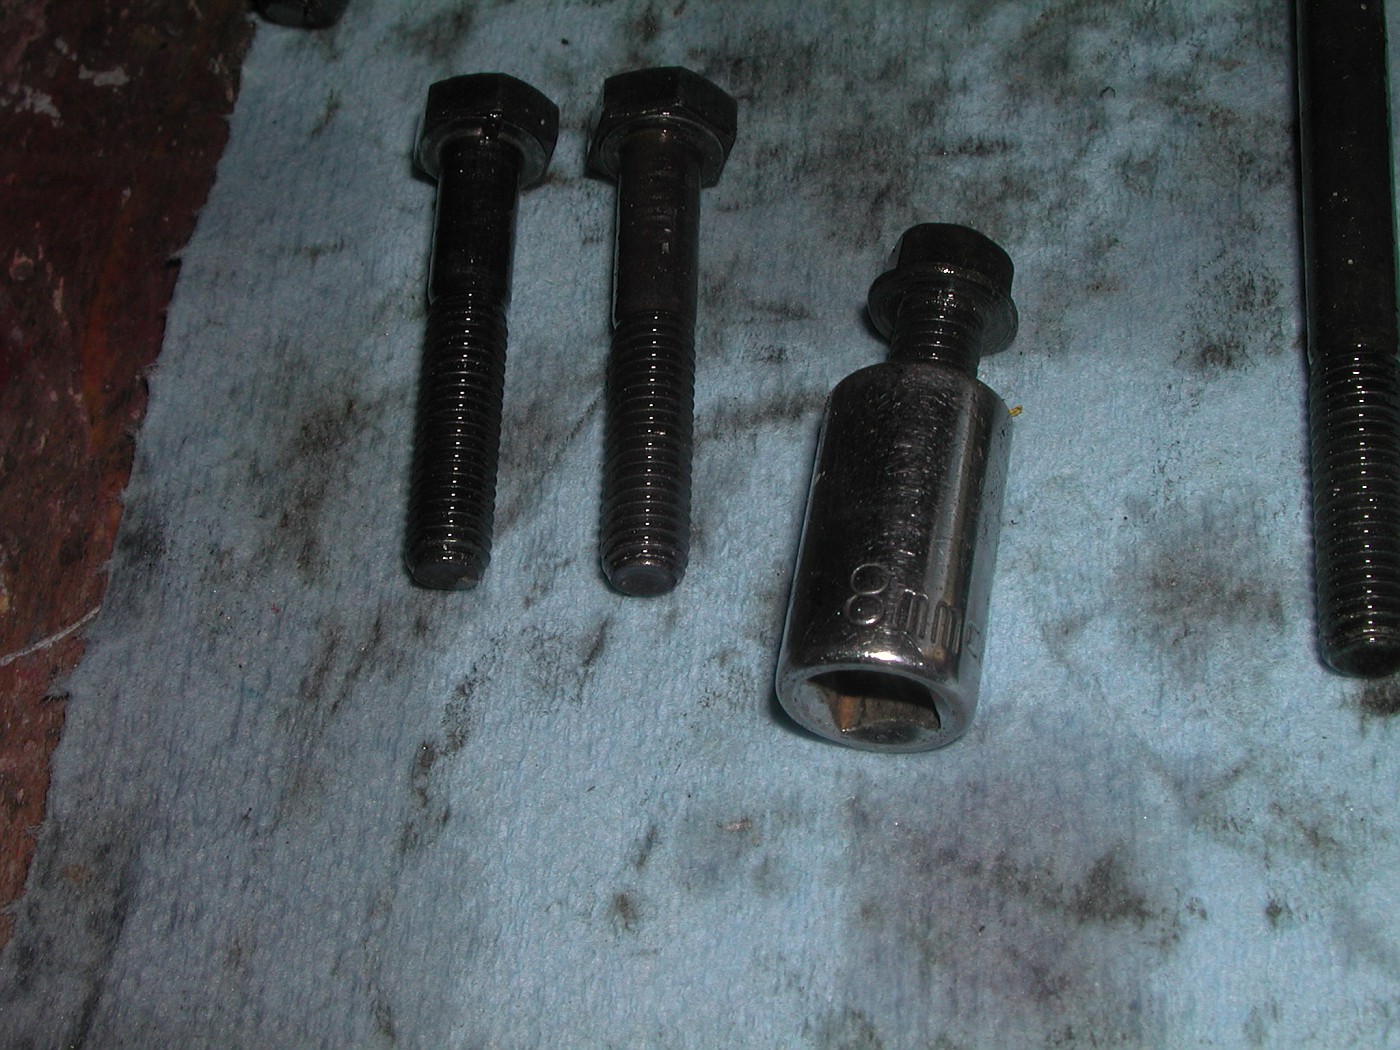 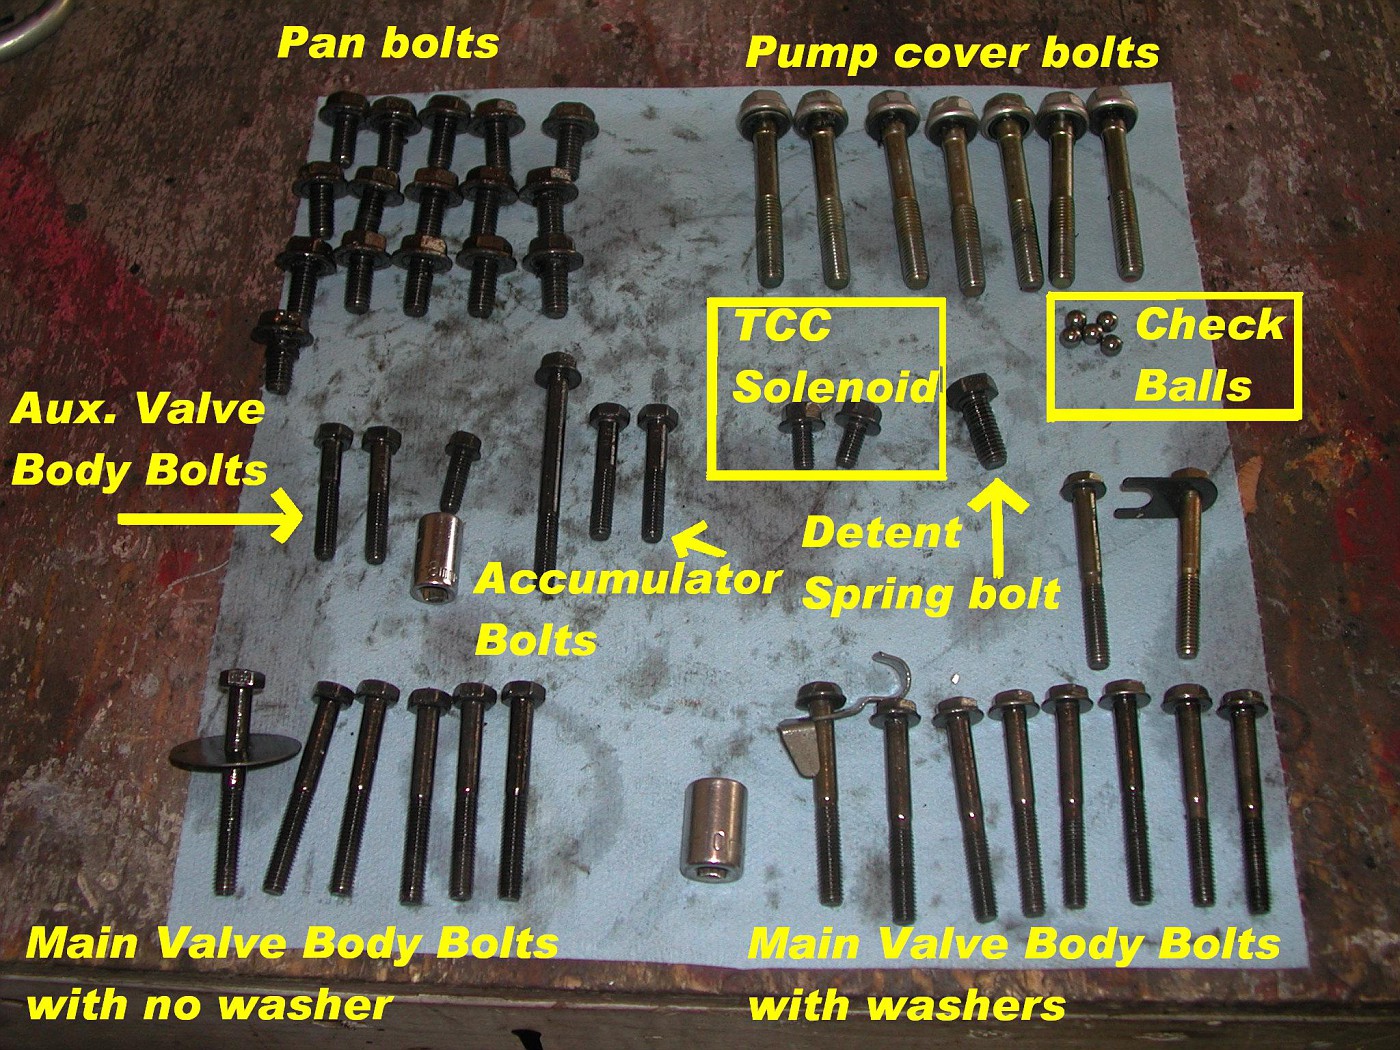 I'm now waiting on a seal kit from TCI. I'll post pic's when I get more done. .
__________________
71 blazer,350SBC,approx.375HP,700R4,factory GM TPI.Dual electric fans,33x12.5x15 ATR on stock suspension. Petrolia,Ontario,Canada but working in Port Huron,MI. See ALL my Blazer pic's HERE Last edited by BobbyK; 11-09-2011 at 02:20 PM. |
|
|
|
|
11-09-2011, 10:55 AM
|
#30 |
|
Registered User
Join Date: Oct 2009
Location: Prescott, Arizona
Posts: 2,396
|
Re: So I'm at a light....(PIC'S)
Glad to see it's finally coming together. I hope the new shaft treats you better. Mine hasn't snapped yet (fingers crossed)
|
|
|
|
|
11-09-2011, 11:04 AM
|
#31 |
|
Post Whore
 Join Date: Feb 2000
Location: Rose Hill, KS, USA
Posts: 12,683
|
Re: So I'm at a light....(PIC'S)
What a great detailed post! Nice work Bobby!
__________________
1970 Blazer with a 400 sbc and 4" lift 1980 Pontiac Trans Am, 455 Oldsmobile 2012 Kawasaki Concours 14 |
|
|
|
|
11-09-2011, 08:11 PM
|
#32 |
|
Registered User
Join Date: Mar 2004
Location: Sacramento, CA
Posts: 1,084
|
Re: So I'm at a light....(PIC'S)
Wow, great post Bobby. I think I can now spell 'automatic'. Almost wish I had one I could work on.
__________________
'71  Jimmy, 350, SM465, NP205, 2in Tuff Country lift, 33s on rallies, TBI, softtop and hardtop Jimmy, 350, SM465, NP205, 2in Tuff Country lift, 33s on rallies, TBI, softtop and hardtop"If life was fair you'd be able to afford one of each and a garage large enough to house them all." |
|
|
|
|
11-09-2011, 08:19 PM
|
#33 |
|
Senior Member
 Join Date: Dec 1999
Location: TN/VA
Posts: 6,388
|
Re: So I'm at a light....(PIC'S)
Wow!!!!!
|
|
|
|
|
11-09-2011, 08:32 PM
|
#34 |
|
6>8 Plugless........
 Join Date: Sep 2007
Location: Prairie City, Ia
Posts: 17,141
|
Re: So I'm at a light....(PIC'S)
Very nice write up! is it me or is the new out put shaft a little different than the one that broke? It has a groove cut in the splines abouve the govonor drive gear and the old one does not. Is it an update or just a one part fits all deal?
__________________
Ryan 1972 Chevy Longhorn K30 Cheyenne Super, 359 Inline 6 cylinder, Auto Trans, Tilt, Diesel Tach/Vach, Buckets, Rare Rear 4-link and air ride option Build Thread 1972 GMC Sierra Grande Longhorn 4x4 1972 Chevy Cheyenne Super K20 Long Step side tilt, tach, tow hooks, AC, 350 4 speed 1972 C10 Suburban Custom Deluxe 1969 Chevy milk truck 1971 Camaro RS 5.3 BTR STG3 Cam Super T10 1940 Ford 354 Hemi 46RH Ford 9" on air ride huge project Tired of spark plugs? Check this out. |
|
|
|
|
11-09-2011, 10:27 PM
|
#35 |
|
One of the First
Join Date: Jan 2000
Location: St. Augustine,FL.
Posts: 4,049
|
Re: So I'm at a light....(PIC'S)
Umm - Wow - X3! Thats kool...

|
|
|
|
|
11-09-2011, 11:44 PM
|
#36 | |
|
Registered User
Join Date: May 2000
Location: Petrolia,Ontario,Canada but working in Port Huron,Mi.
Posts: 1,769
|
Re: So I'm at a light....(PIC'S)
Quote:
I'm sure they had made changes through out the years. The old output shaft was bought from A/A and installed by TCI in 1999. I have thrown away the broken end of the old output shaft but it has a smaller tapered neck before the splines start (at the end of the shaft) the new one transitions from the splines with no taper down. The tapered part is of course where it broke.
__________________
71 blazer,350SBC,approx.375HP,700R4,factory GM TPI.Dual electric fans,33x12.5x15 ATR on stock suspension. Petrolia,Ontario,Canada but working in Port Huron,MI. See ALL my Blazer pic's HERE |
|
|
|
|
|
11-09-2011, 11:44 PM
|
#37 |
|
Back in the sticks
Join Date: Jan 2001
Location: Fordland, MO
Posts: 3,188
|
Re: So I'm at a light....(PIC'S)
Outstanding post for those of us that have never been brave enough to get inside one of these tranny's. Question: What year 700R4 is your core and is there a better/worse core to get.
Reason I ask is that my original 700 in the 71 died and when I had it rebuilt I went with a 1992 and up core based on the tranny builders recommendations. Has been a good choice, this rebuild has lasted 10 years, just doesn't have many miles on it. Matter of fact, the road trip pulling the Blazer home to MO was its biggest test so far. It did great by the way. My engine wasn't very happy with the work out I gave it though.
__________________
1971 Cheyenne C-10 w/700R4 and Tuned Port Injection 1969 K5 Blazer w/Tuned Port 2010 2SS/RS Flaming Orange Camaro 2011 K1500 Suburban 2014 K1500 Pickup 2008 Nissan Altima? The wifes' hoopty |
|
|
|
|
11-10-2011, 12:11 AM
|
#38 |
|
Registered User
Join Date: May 2000
Location: Petrolia,Ontario,Canada but working in Port Huron,Mi.
Posts: 1,769
|
Re: So I'm at a light....(PIC'S)
Very crude photoshop of the broken output shaft. You can see the tapered area of the old shaft where as the new shaft is splined all the way to the shoulder where the speedo gear engages.

__________________
71 blazer,350SBC,approx.375HP,700R4,factory GM TPI.Dual electric fans,33x12.5x15 ATR on stock suspension. Petrolia,Ontario,Canada but working in Port Huron,MI. See ALL my Blazer pic's HERE |
|
|
|
|
11-10-2011, 12:19 AM
|
#39 | |
|
Registered User
Join Date: May 2000
Location: Petrolia,Ontario,Canada but working in Port Huron,Mi.
Posts: 1,769
|
Re: So I'm at a light....(PIC'S)
Quote:
The cut off was supposed to be 1987 back when I got the trans. Supposedly the 1988 and above 700's had all the updates to the castings as well as the internals. The trans has about 15K on it with no troubles at all. City driving, a few trips 4x4ing in Hollister California, as well as cross county trips. Since the install I've gone to : Seattle to Santa Barbara,California, Santa Barbara to Flagstaff, Flagstaff to Detroit, Detroit to my home in Ontario, Canada.
__________________
71 blazer,350SBC,approx.375HP,700R4,factory GM TPI.Dual electric fans,33x12.5x15 ATR on stock suspension. Petrolia,Ontario,Canada but working in Port Huron,MI. See ALL my Blazer pic's HERE Last edited by BobbyK; 11-10-2011 at 10:32 AM. |
|
|
|
|
|
11-10-2011, 12:29 AM
|
#40 |
|
Back in the sticks
Join Date: Jan 2001
Location: Fordland, MO
Posts: 3,188
|
Re: So I'm at a light....(PIC'S)
I'm hoping mine stands up that long. Its only got about 10K miles on it. When the guy built it, he ran the TCC hydraulicly so it automatically locks up at about 35 mph. Seems to have worked out well. Like I said, towing the Blazer on a car carrier through all the mountains didn't seem to affect it any. Just had a couple of engine overheating issues that I had to sort out along the way. My electric fans weren't working like they were supposed to. I had also switched to a set of 19lb/hr injectors and I think they helped my gas mileage. I got 8-10 mpg towing.
__________________
1971 Cheyenne C-10 w/700R4 and Tuned Port Injection 1969 K5 Blazer w/Tuned Port 2010 2SS/RS Flaming Orange Camaro 2011 K1500 Suburban 2014 K1500 Pickup 2008 Nissan Altima? The wifes' hoopty |
|
|
|
|
11-14-2011, 07:22 AM
|
#41 |
|
Account Suspended
Join Date: Nov 2011
Location: Homelessvets.org
Posts: 16
|
Re: So I'm at a light....(PIC'S)
Can you please confirm the new part number.. Im about to do this to my k5.. Any details or tips on doing this?
|
|
|
|
|
11-14-2011, 12:18 PM
|
#42 |
|
Registered User
Join Date: May 2000
Location: Petrolia,Ontario,Canada but working in Port Huron,Mi.
Posts: 1,769
|
Re: So I'm at a light....(PIC'S)
This is it.
http://www.advanceadapters.com/products/pn-50-6900/ Sorry, no tips right now. This is the 1st I'm doing this myself.
__________________
71 blazer,350SBC,approx.375HP,700R4,factory GM TPI.Dual electric fans,33x12.5x15 ATR on stock suspension. Petrolia,Ontario,Canada but working in Port Huron,MI. See ALL my Blazer pic's HERE |
|
|
|
|
11-14-2011, 12:19 PM
|
#43 | |
|
Registered User
Join Date: Oct 2009
Location: Prescott, Arizona
Posts: 2,396
|
Re: So I'm at a light....(PIC'S)
Quote:
When I bought mine, it is of that newer design too that you just received. Mine is also splined all the way up. Maybe it's a stronger piece and I shouldn't be so worried about it. |
|
|
|
|
|
11-14-2011, 01:28 PM
|
#44 | |
|
Registered User
Join Date: May 2000
Location: Petrolia,Ontario,Canada but working in Port Huron,Mi.
Posts: 1,769
|
Re: So I'm at a light....(PIC'S)
Quote:
__________________
71 blazer,350SBC,approx.375HP,700R4,factory GM TPI.Dual electric fans,33x12.5x15 ATR on stock suspension. Petrolia,Ontario,Canada but working in Port Huron,MI. See ALL my Blazer pic's HERE |
|
|
|
|
|
11-15-2011, 01:45 AM
|
#45 |
|
Registered User
Join Date: May 2000
Location: Petrolia,Ontario,Canada but working in Port Huron,Mi.
Posts: 1,769
|
Re: So I'm at a light....(PIC'S)
UPDATE
I got this from TCI. It's a gasket kit... $68.00. Comes with ALL the gaskets and O-ring's you'll need to reseal the trans. 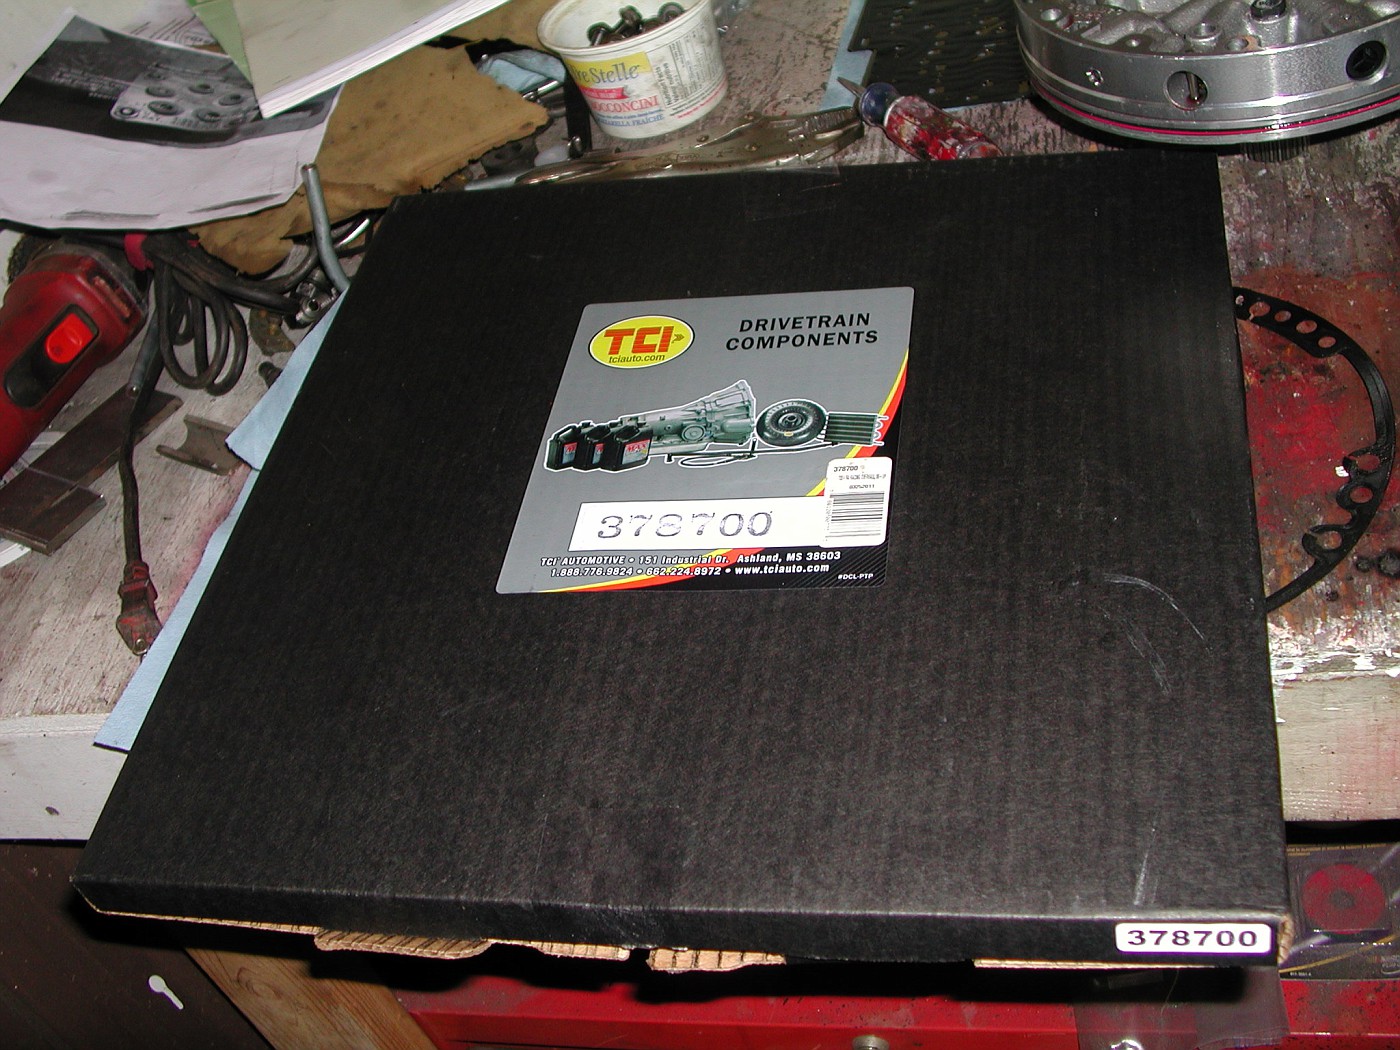 Hard to see here, but I've reinstalled the reverse clutch band anchor pin. Just a tip.... the band needs to go into the case BEFORE you attempt to reinstall the input assembly. 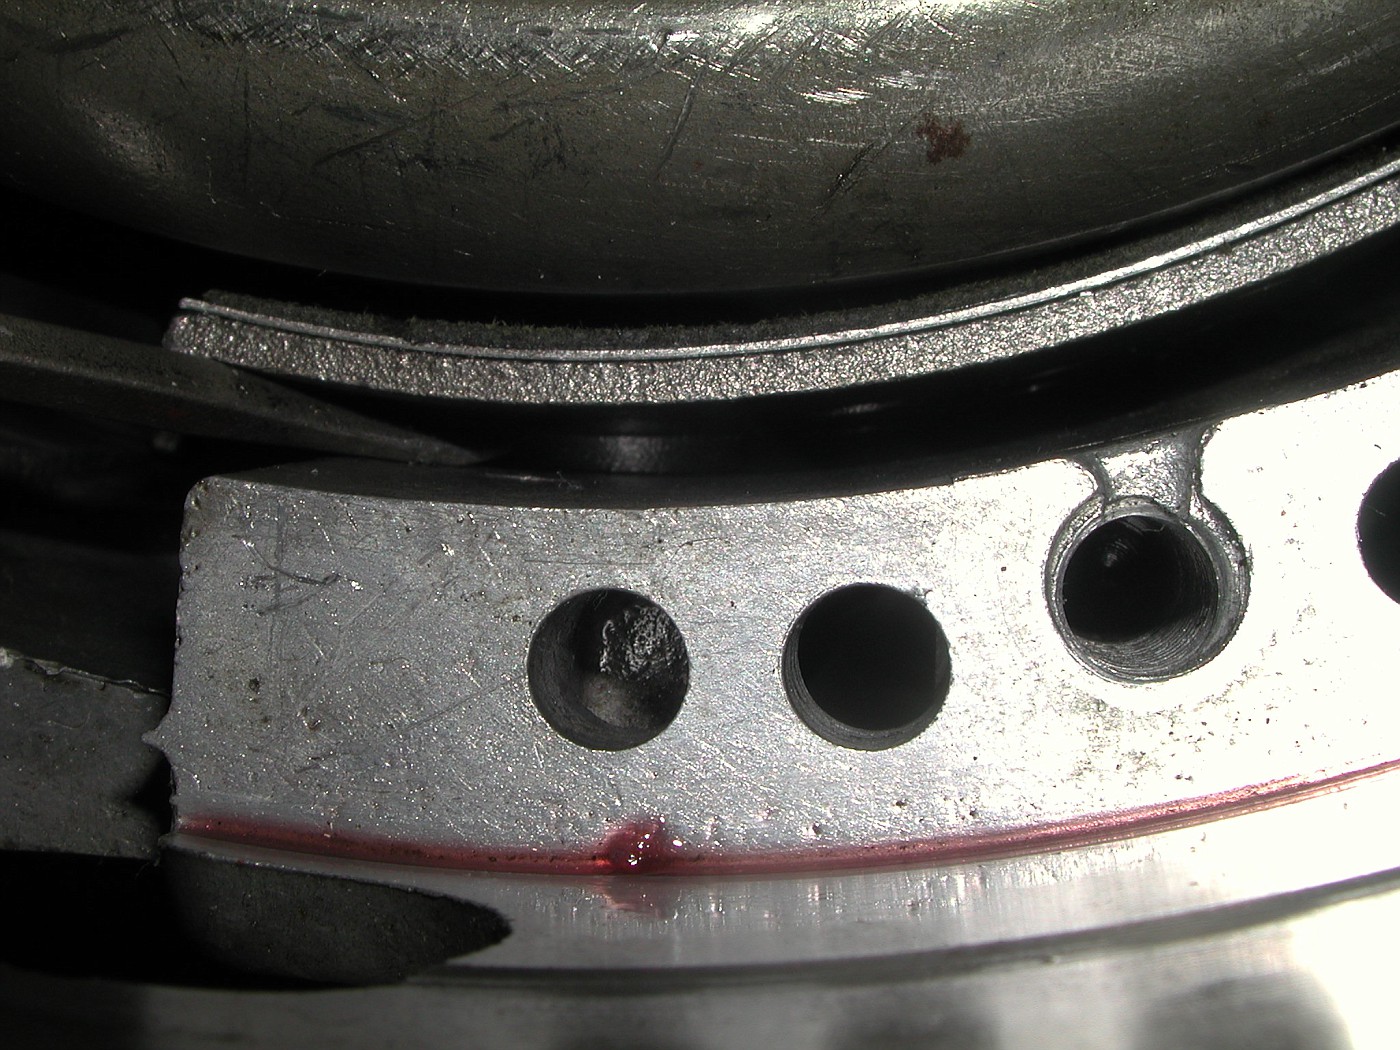 Servo pin up against the band. 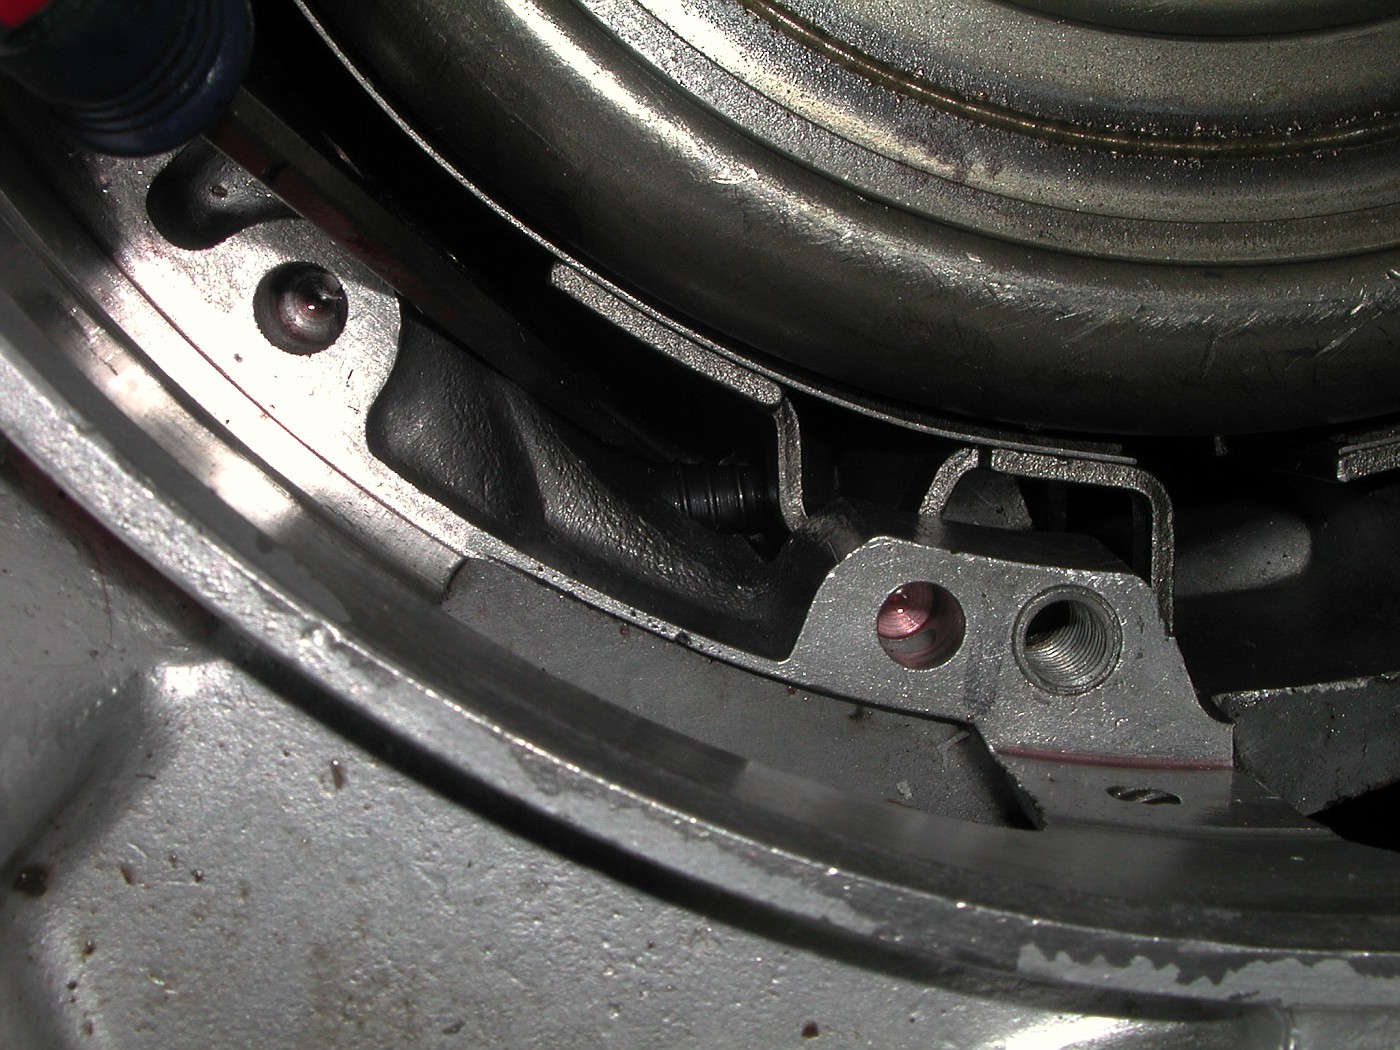 Reverse clutch band now installed. 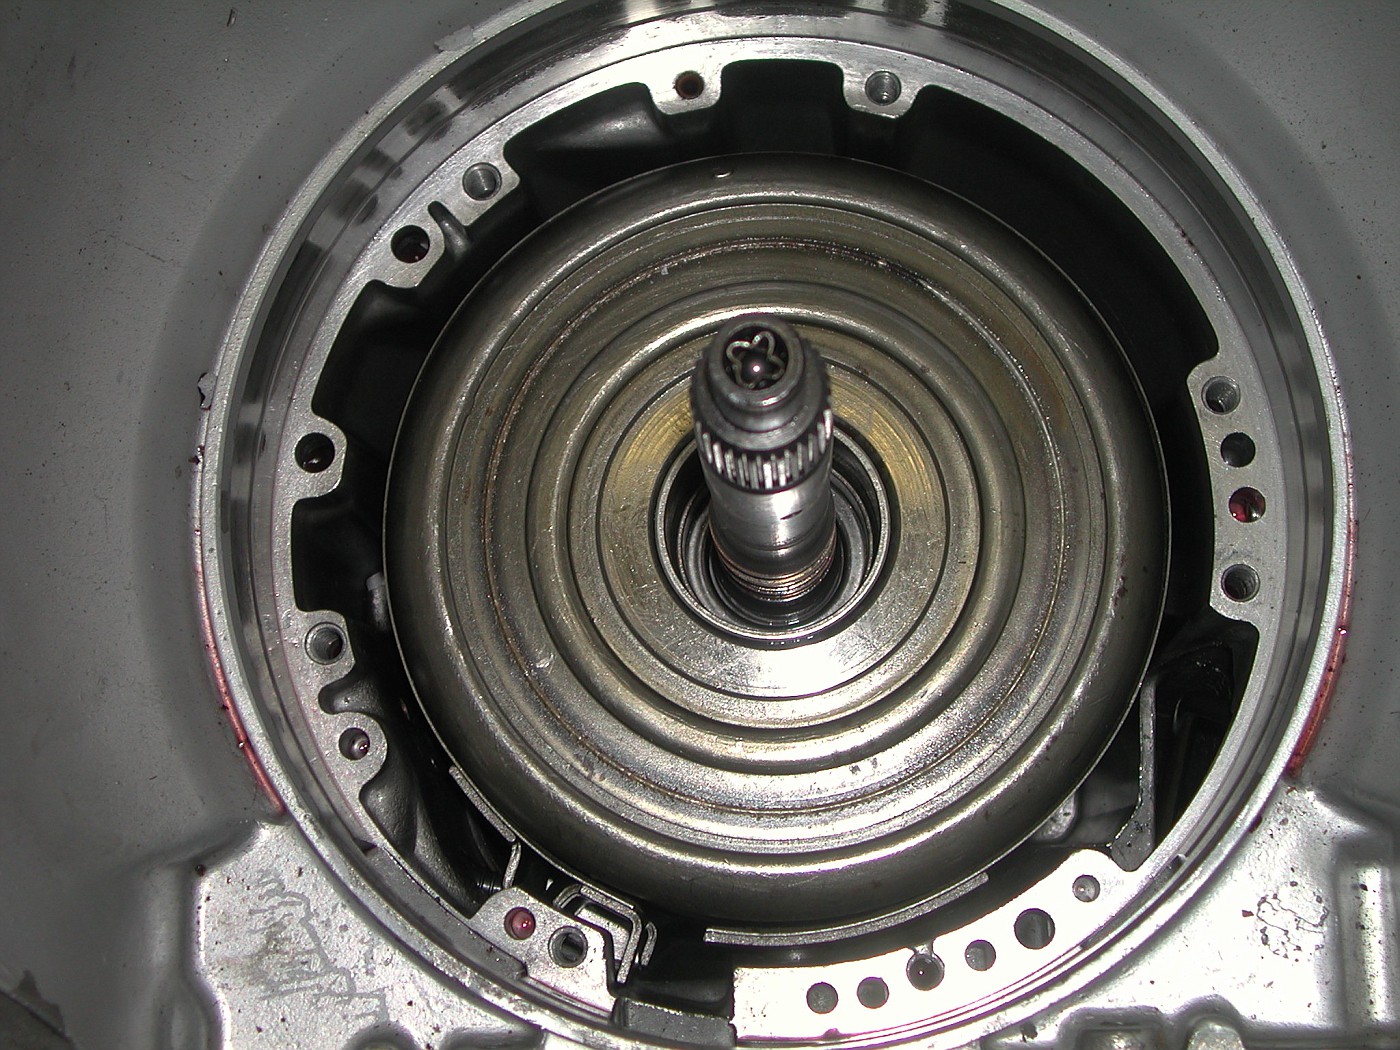 Replaced the servo cover O-ring. 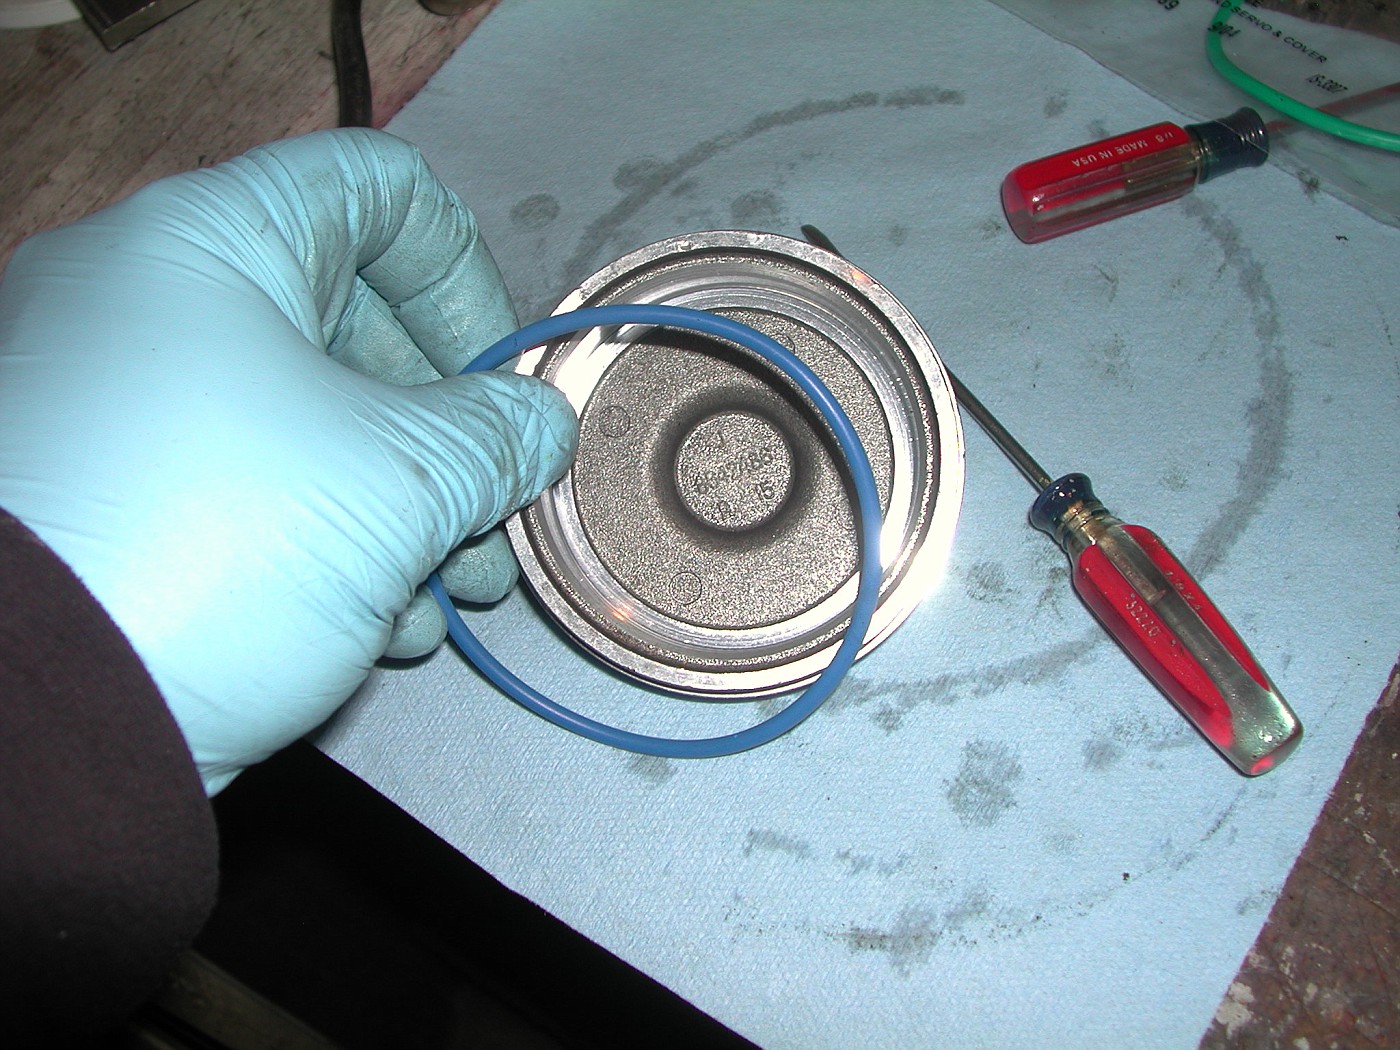 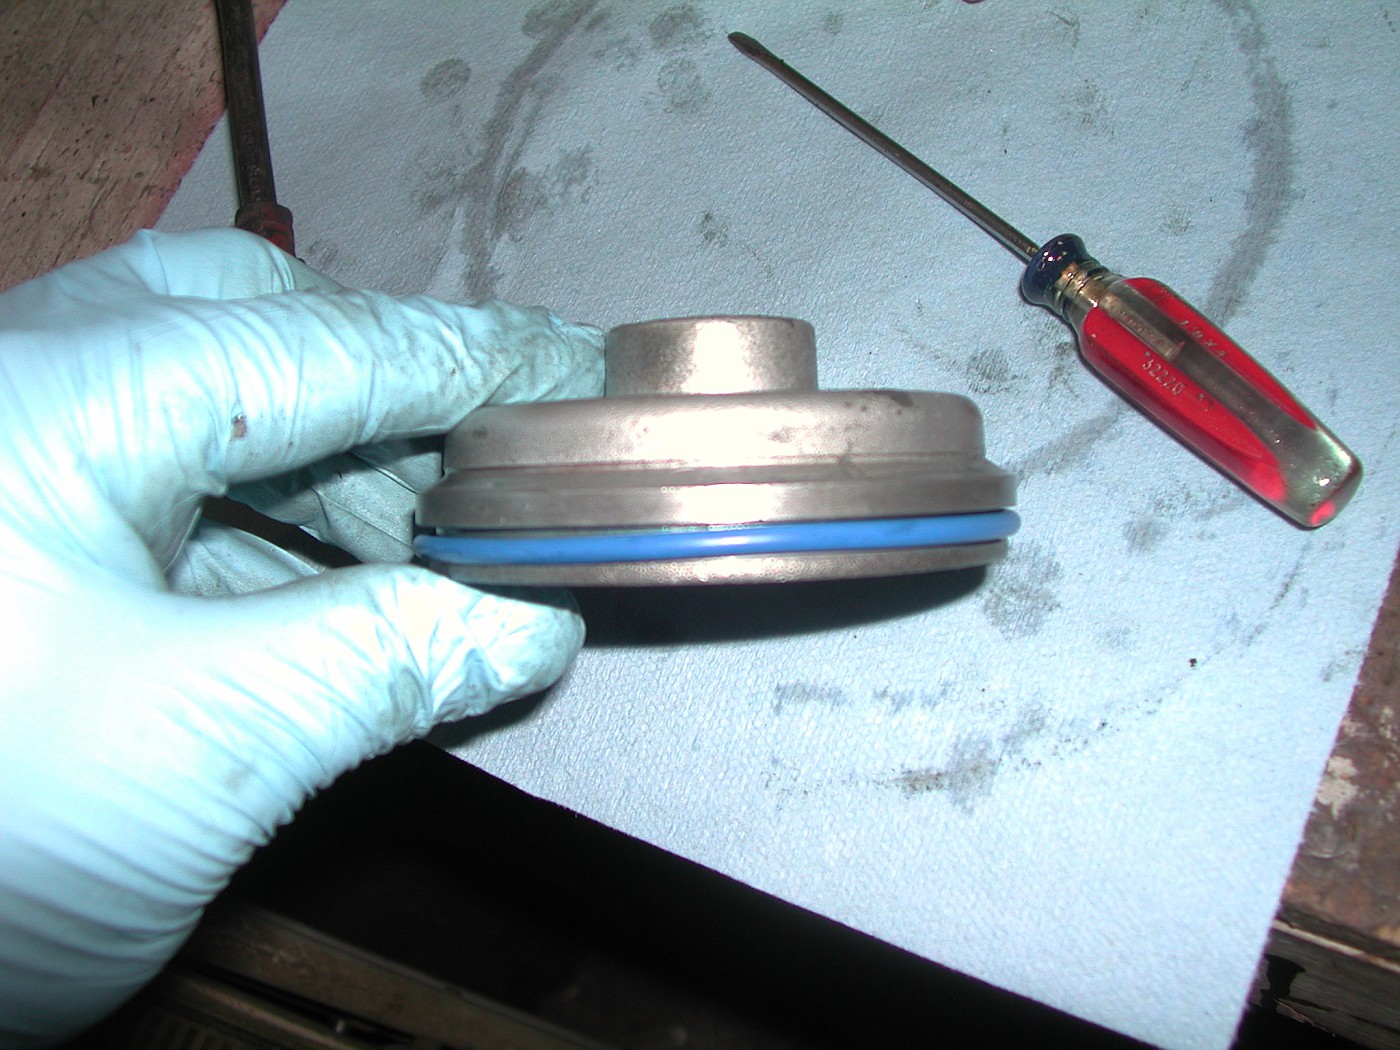 One side of this piece is machined...the other isn't. Make sure the un-machined surface faces the cover. 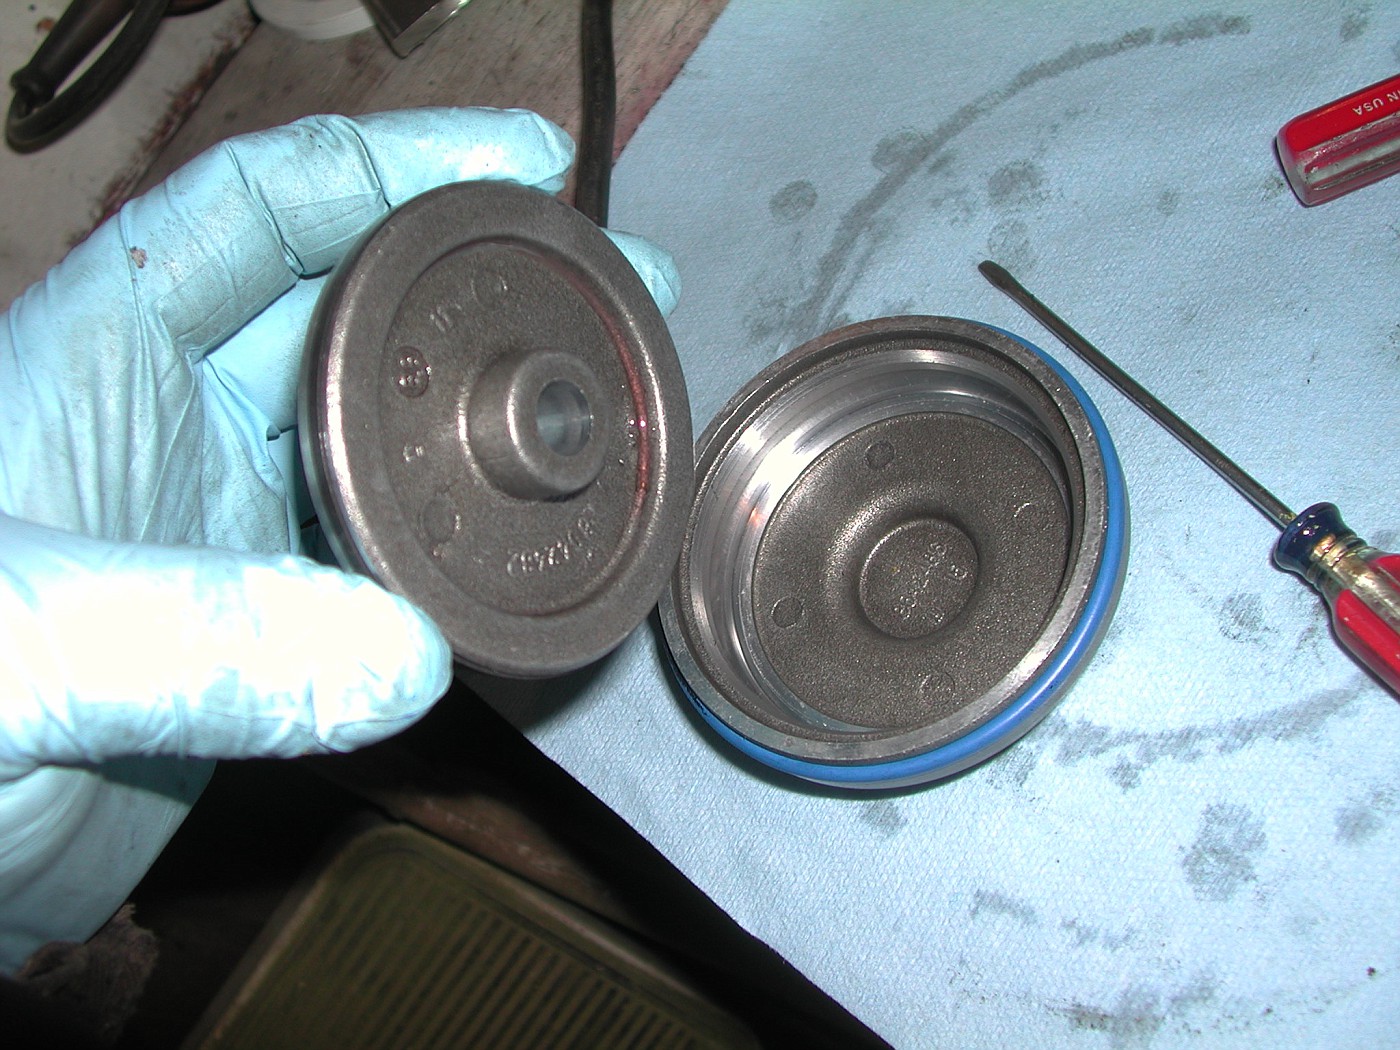 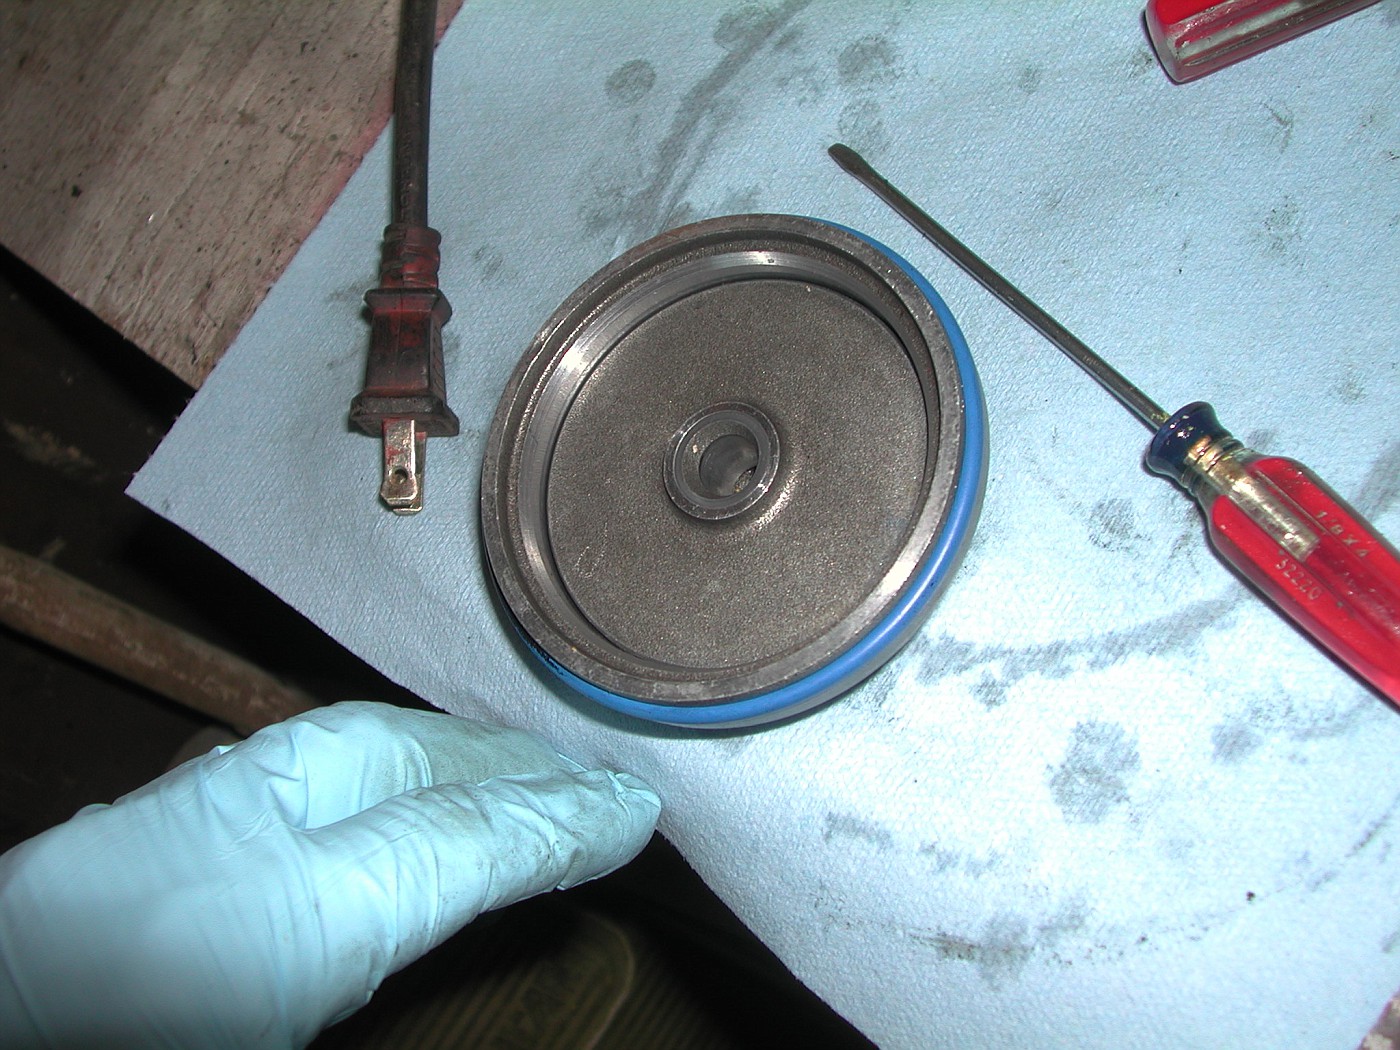 To install the servo cover: Slide back in the housing and push in by hand. 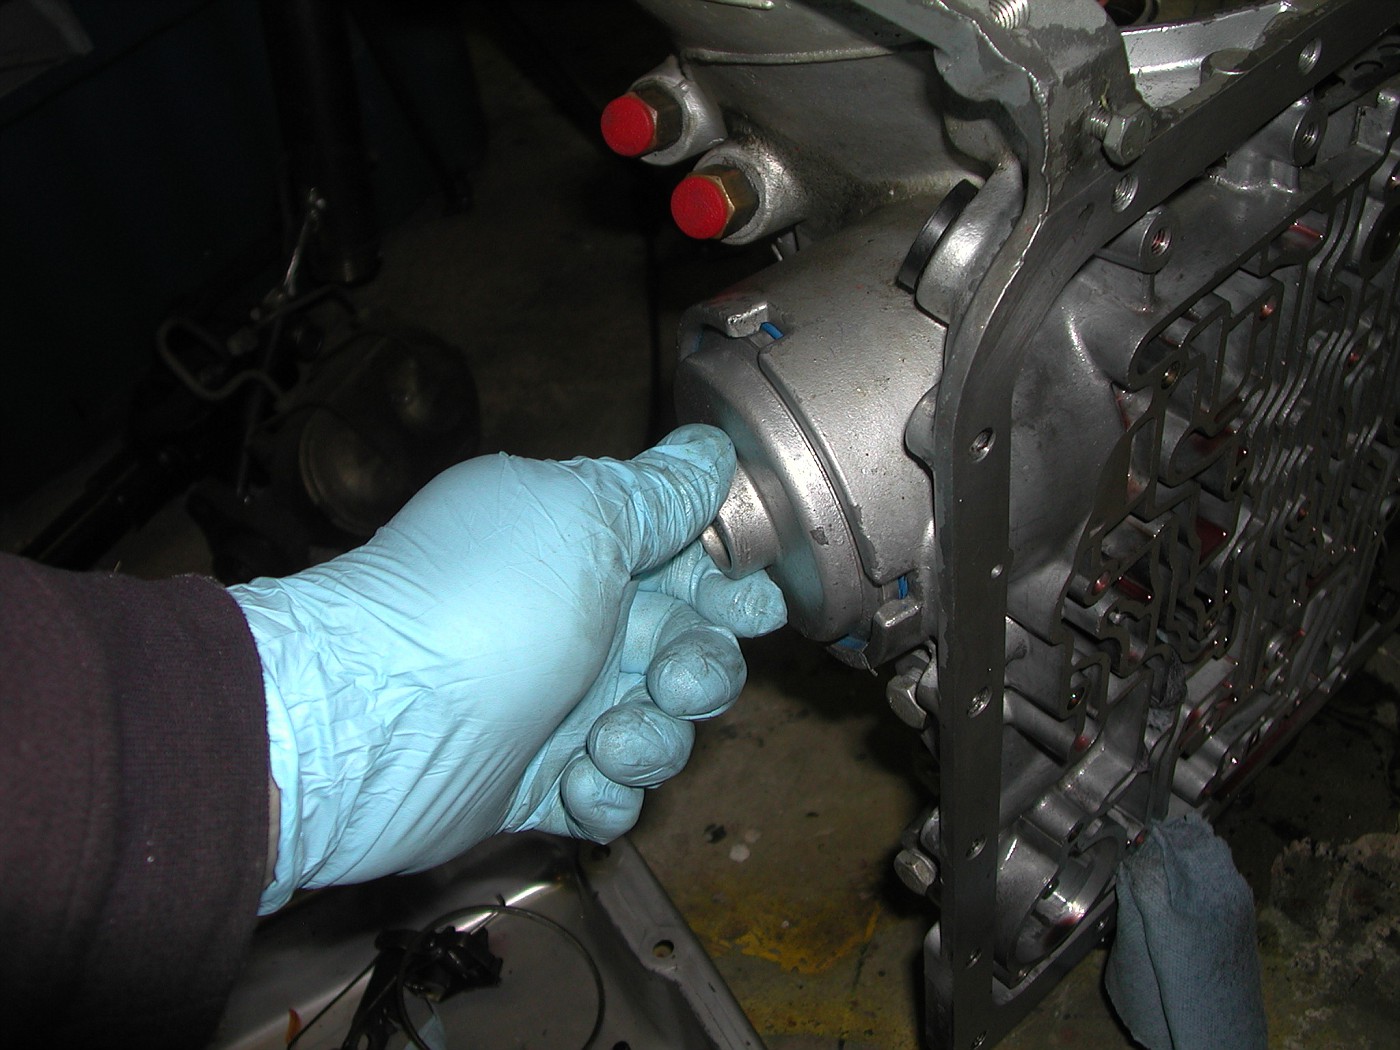 To get the servo cover to fully seat I needed to place the trans on the ground. I needed to get some "weight" behind me. Just keep steady pressure on the cover and it will pop back in place. There is a proper GM tool for this, but I don't have it.  You can see the recess the cover need's to clear. The spring clip will fit into that recess. 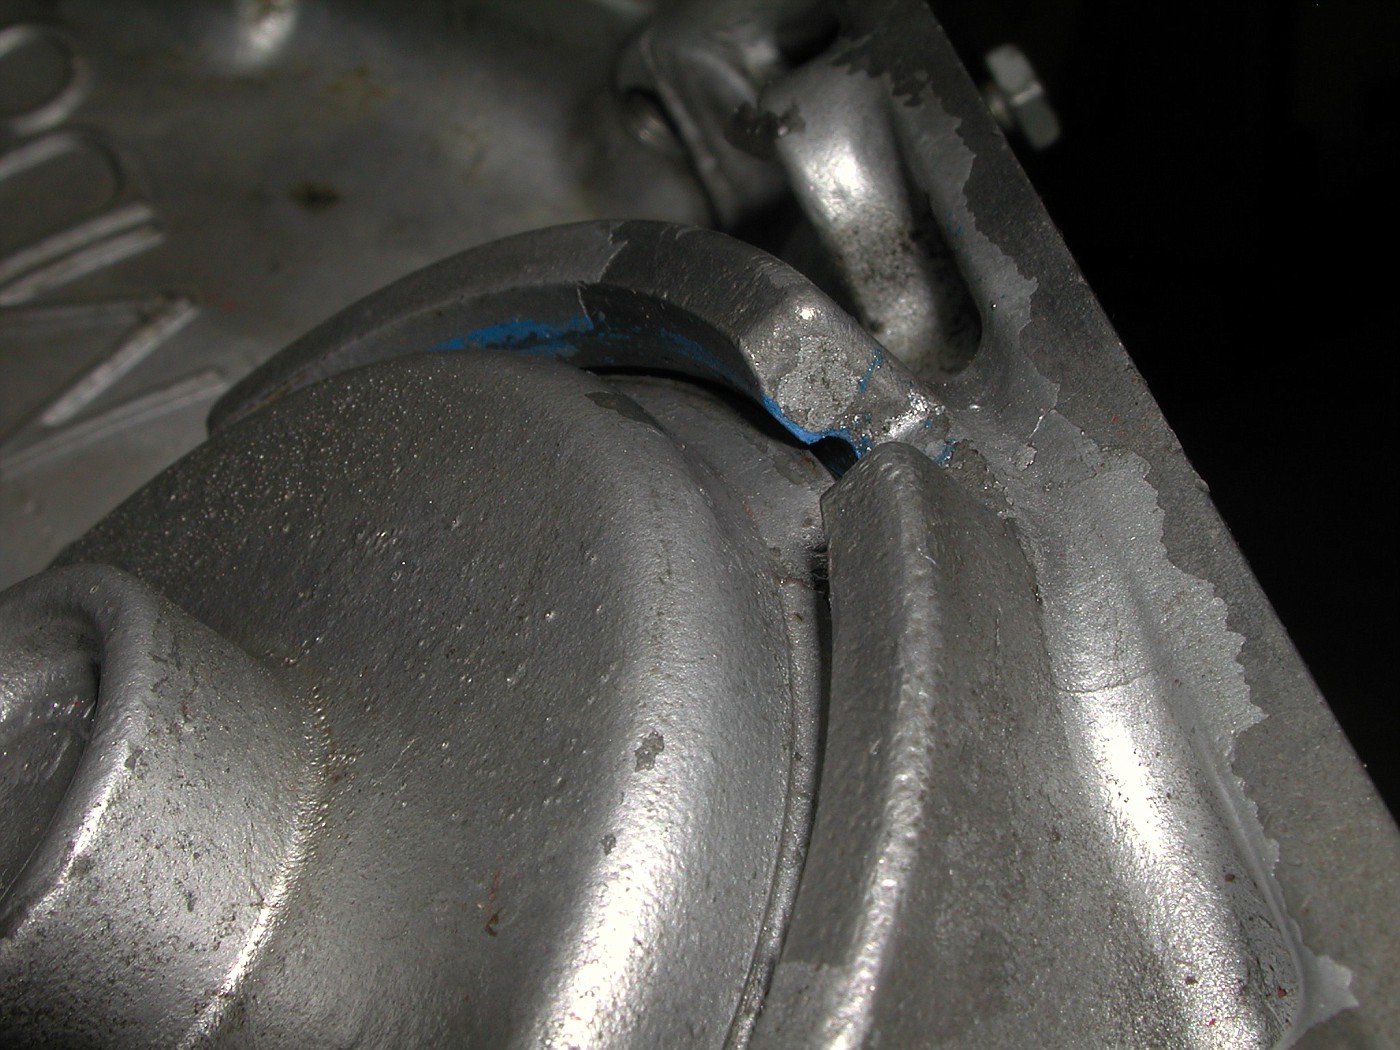 Lifting the trans up into the engine stand so I could work on the valve body 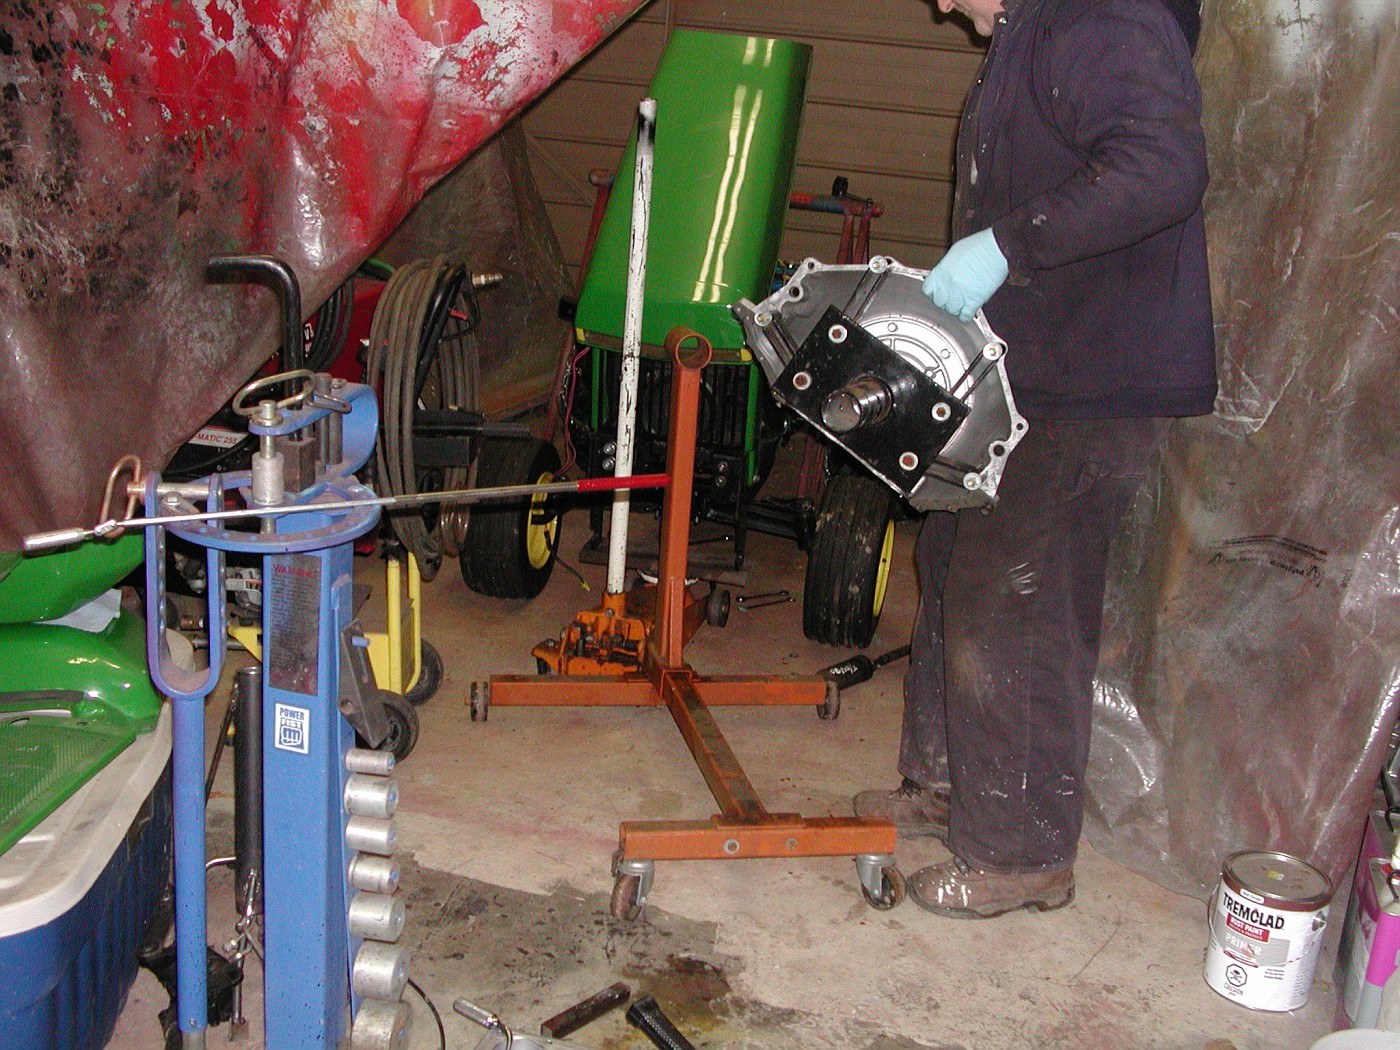 The governor gear goes in easily. Remember the O-ring before placing the cap back on. A few tap's with the dead blow hammer and it seals right up. 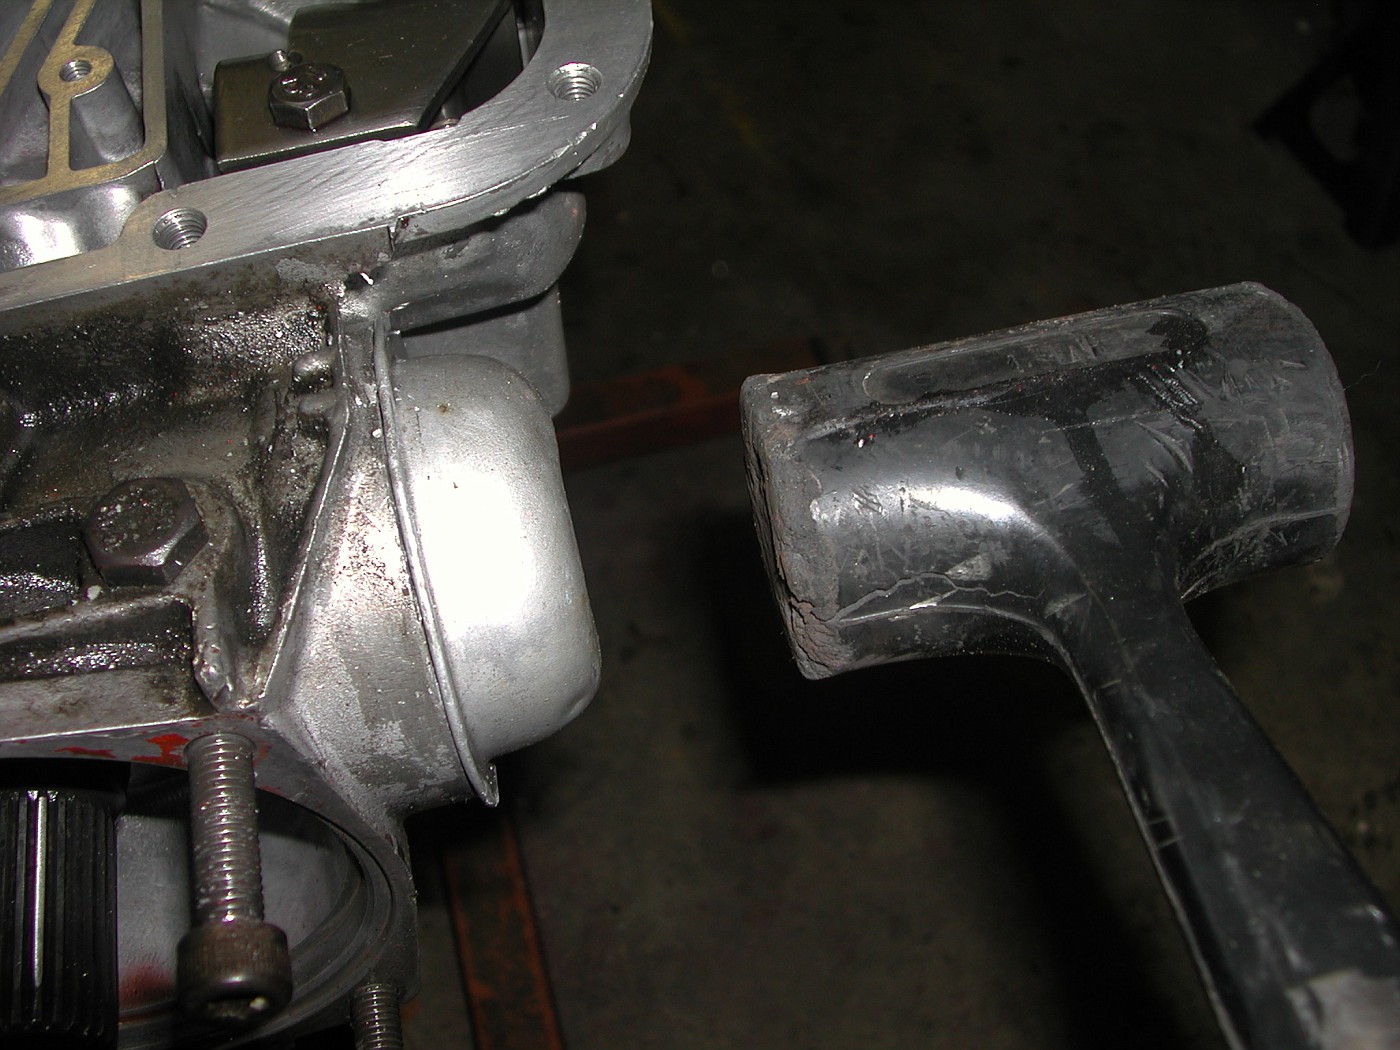 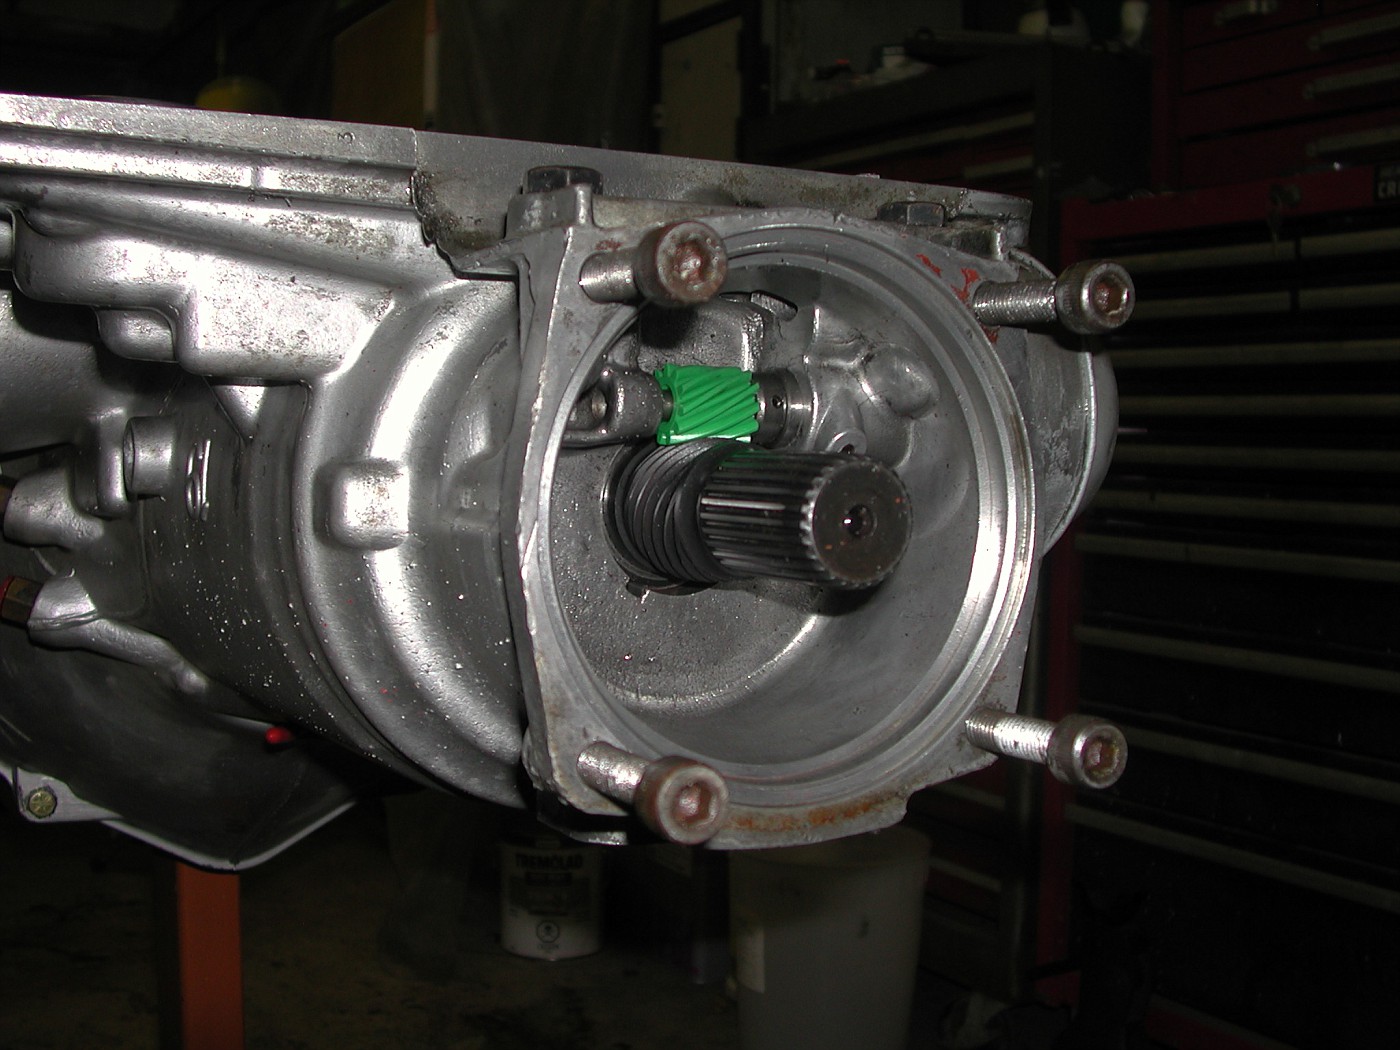 Time to start on the valve body. I printed off some of my pic's I had taken earlier in the build and brought them out to the garage. They were a great reference, as I took this thing apart over two weeks ago. 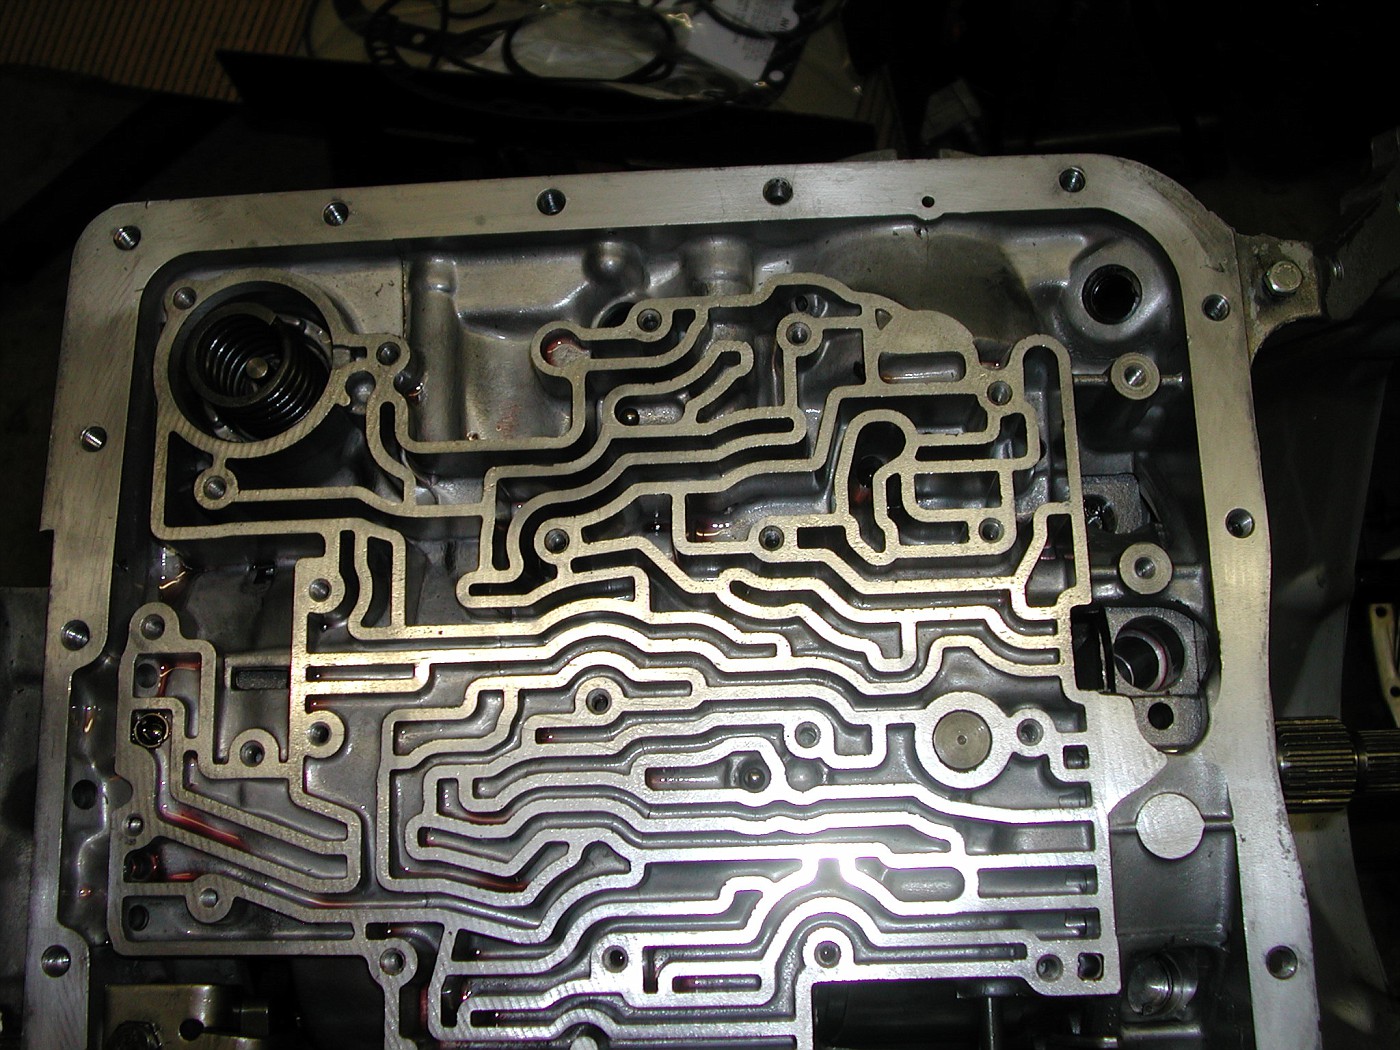 Bottom valve body gasket in 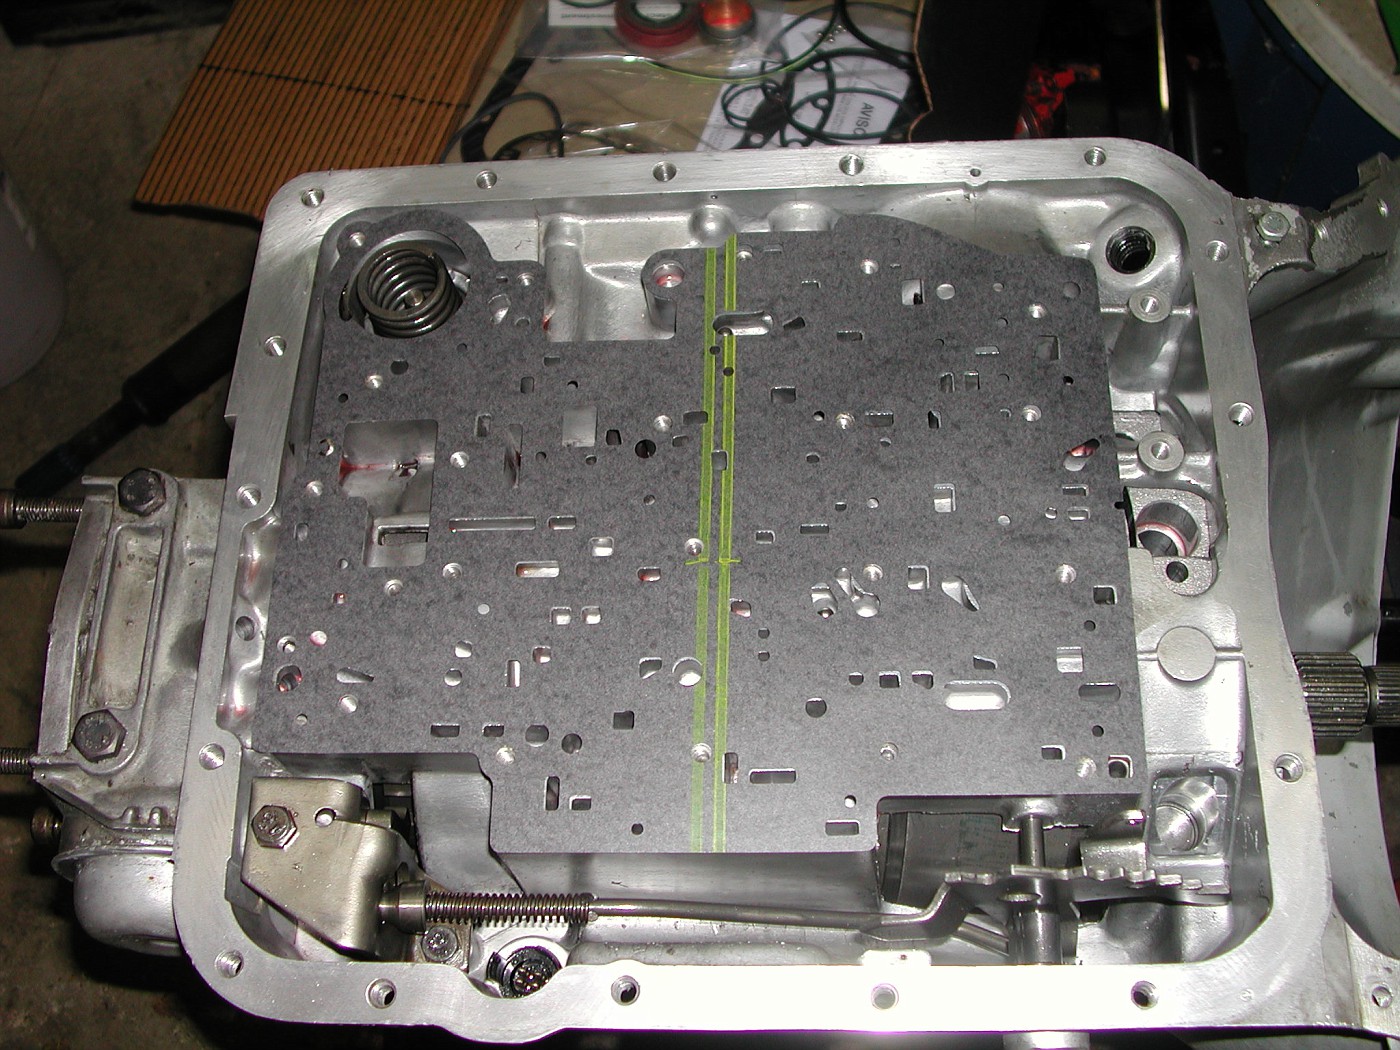 Spacer plate on next. 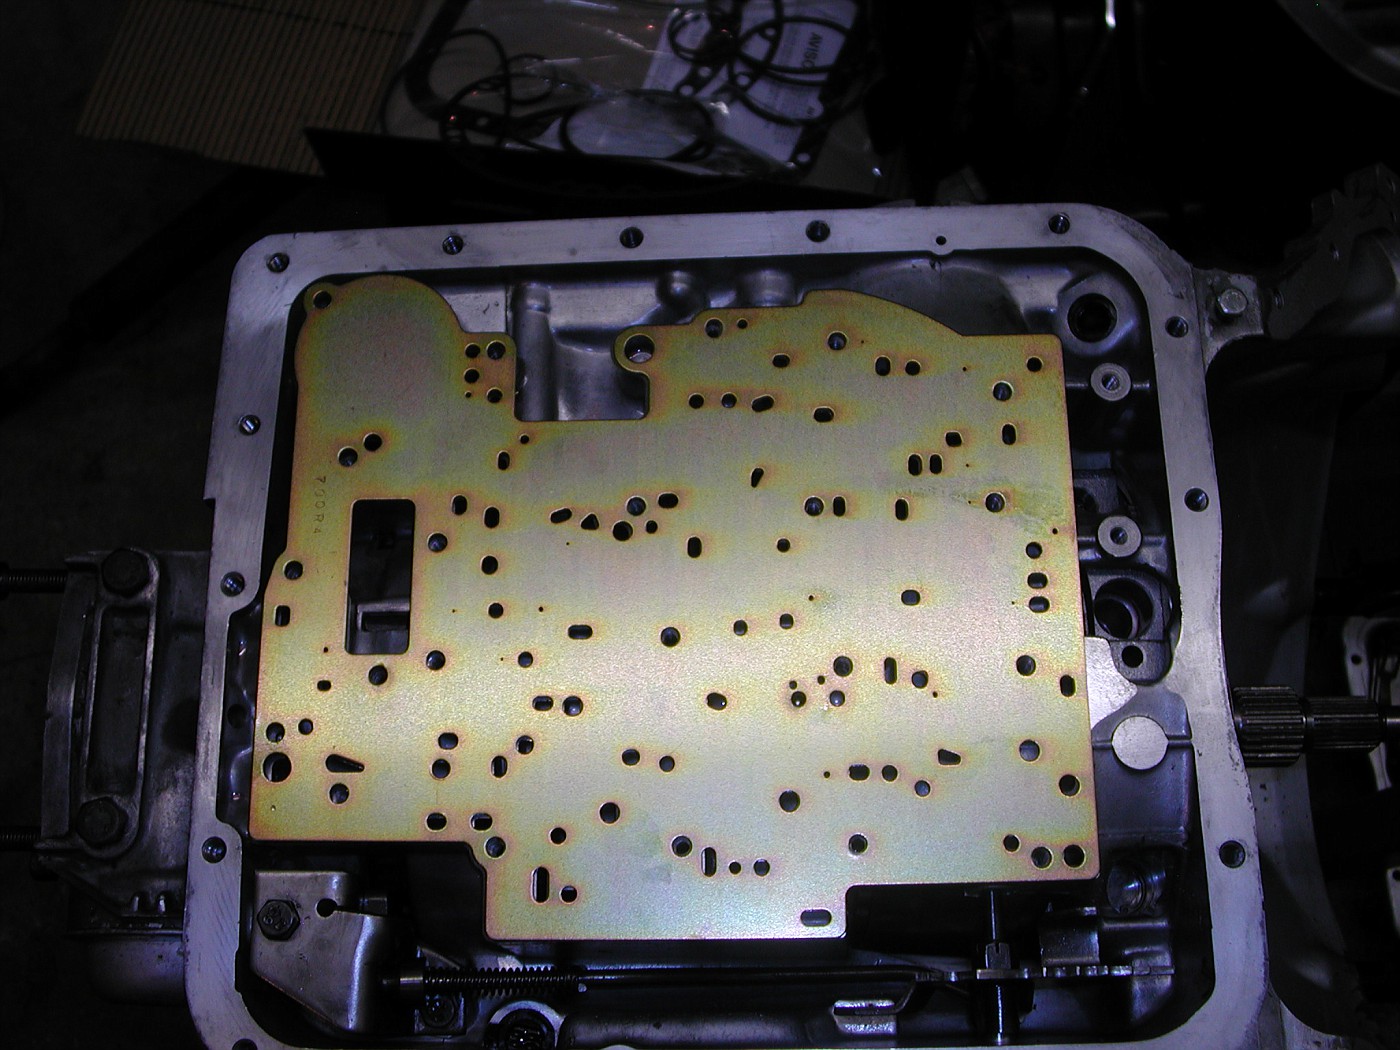 Then the top gasket and check ball's back on. 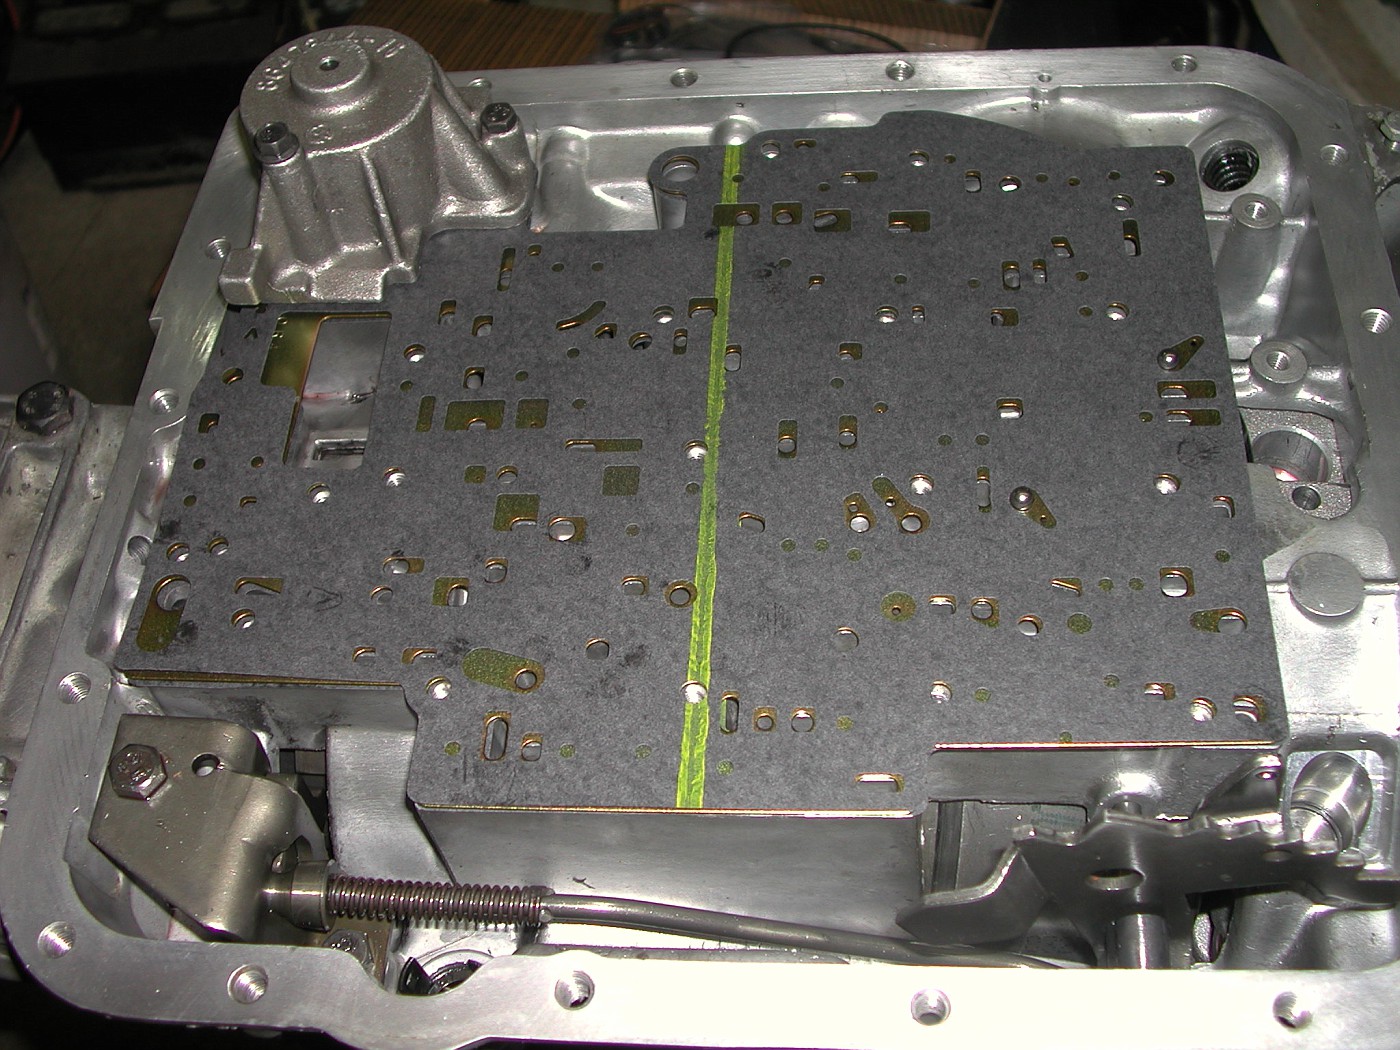 Don't forget the Aux. Valve body check ball. 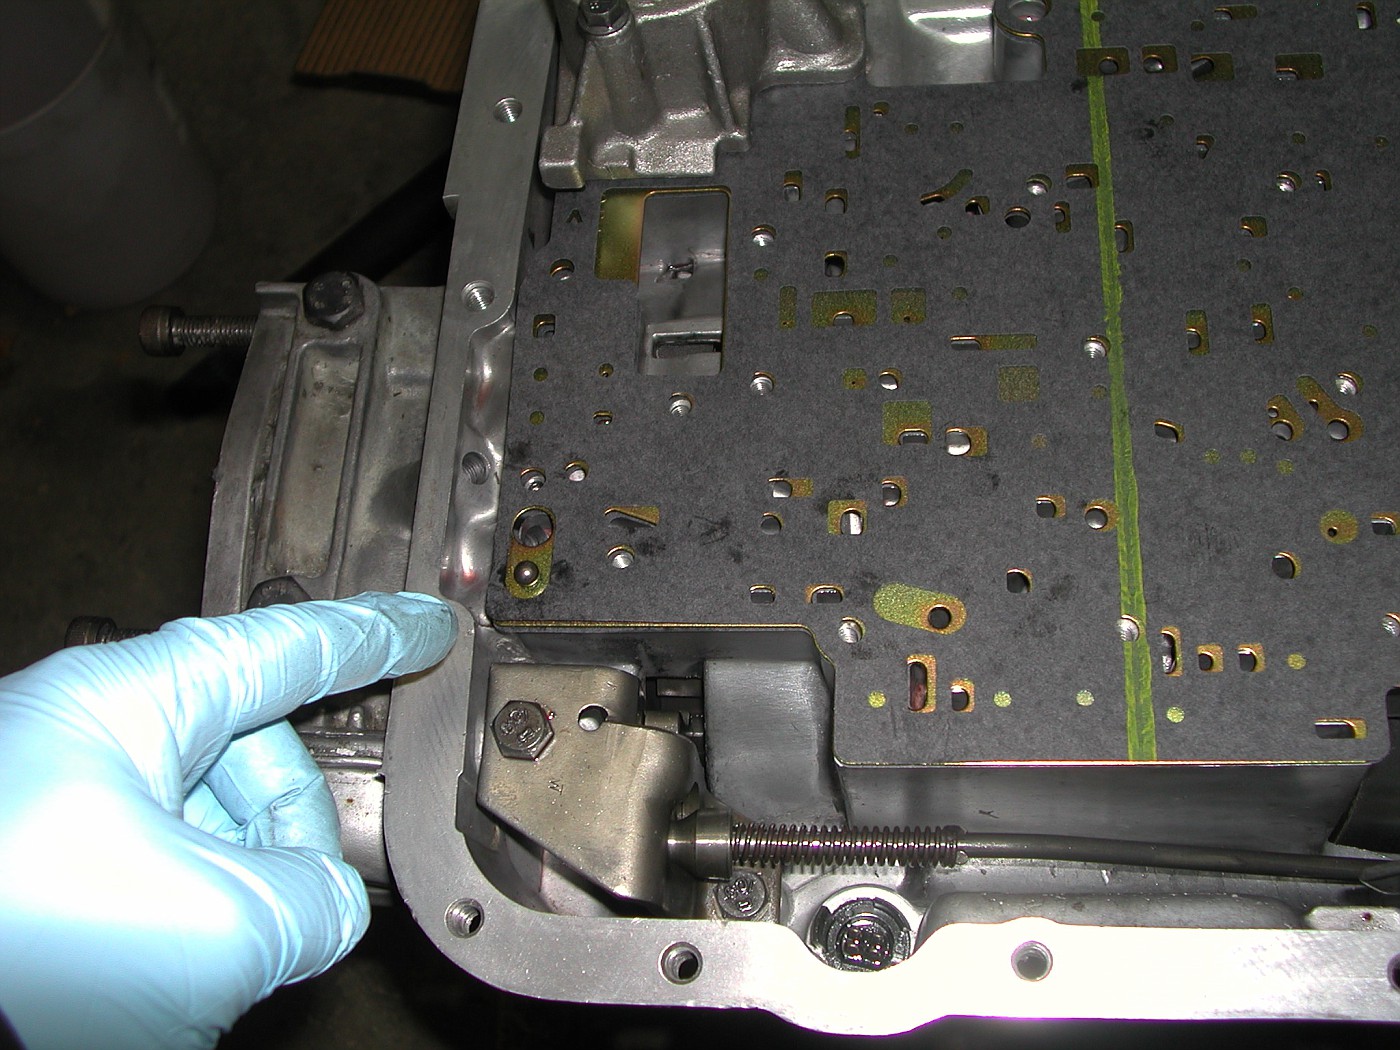 I threaded all the bolts back in just finger tight. Bolted down the Accumulator and Aux. Valve Body here. 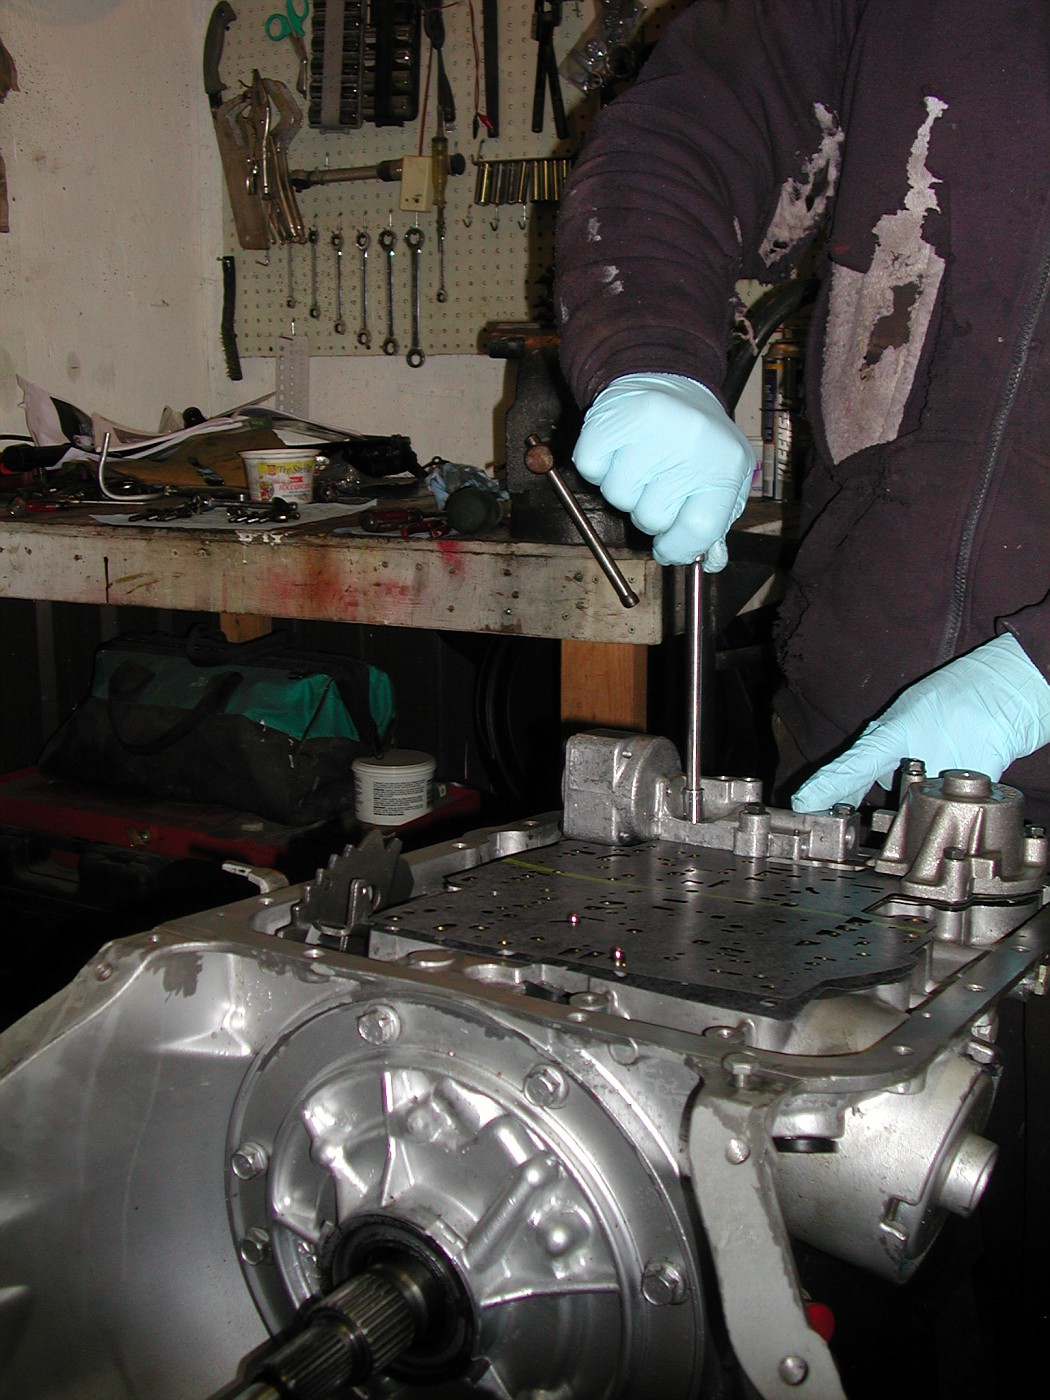 Then the main valve body was placed back on. The forward clutch feed tube was easily pressed back in the appropriate holes. 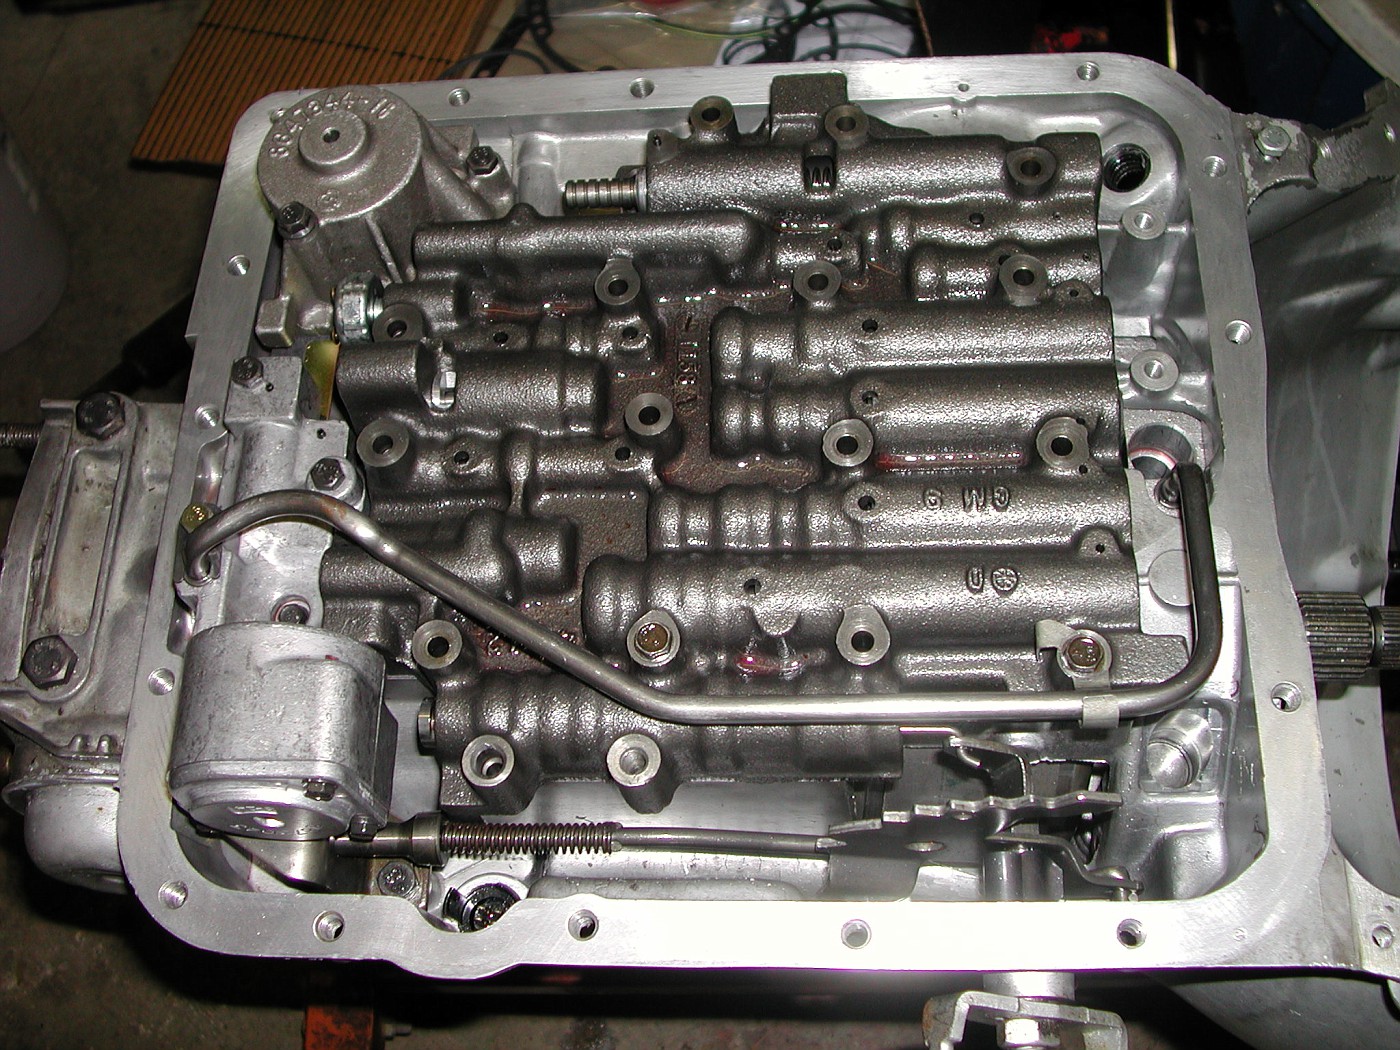 TV valve linkage. This is what the TV cable attaches to. 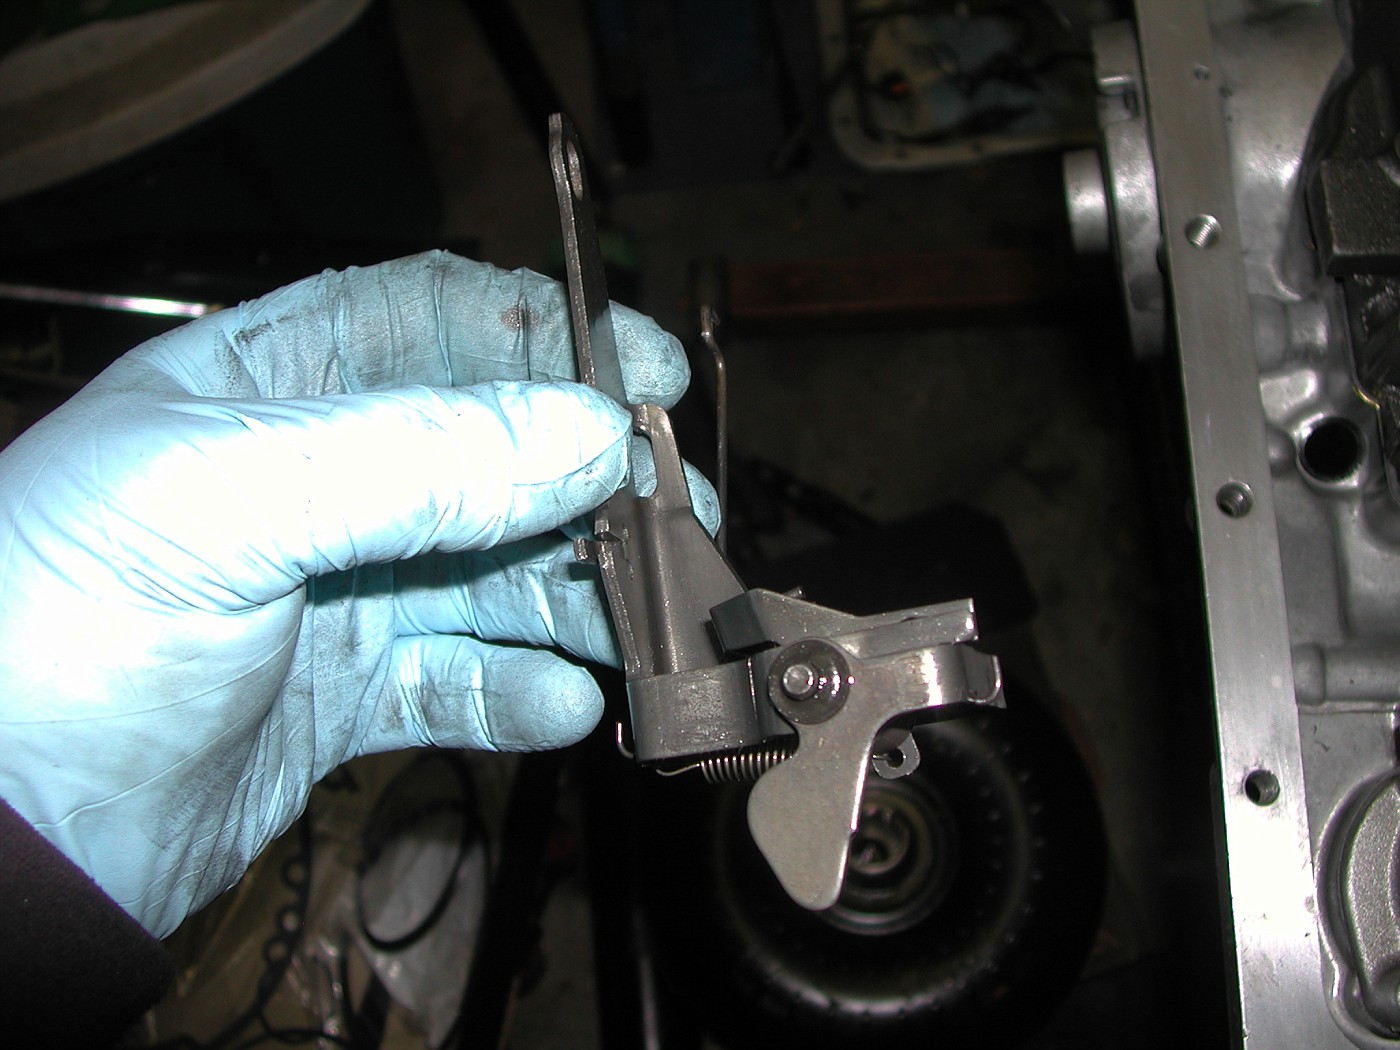 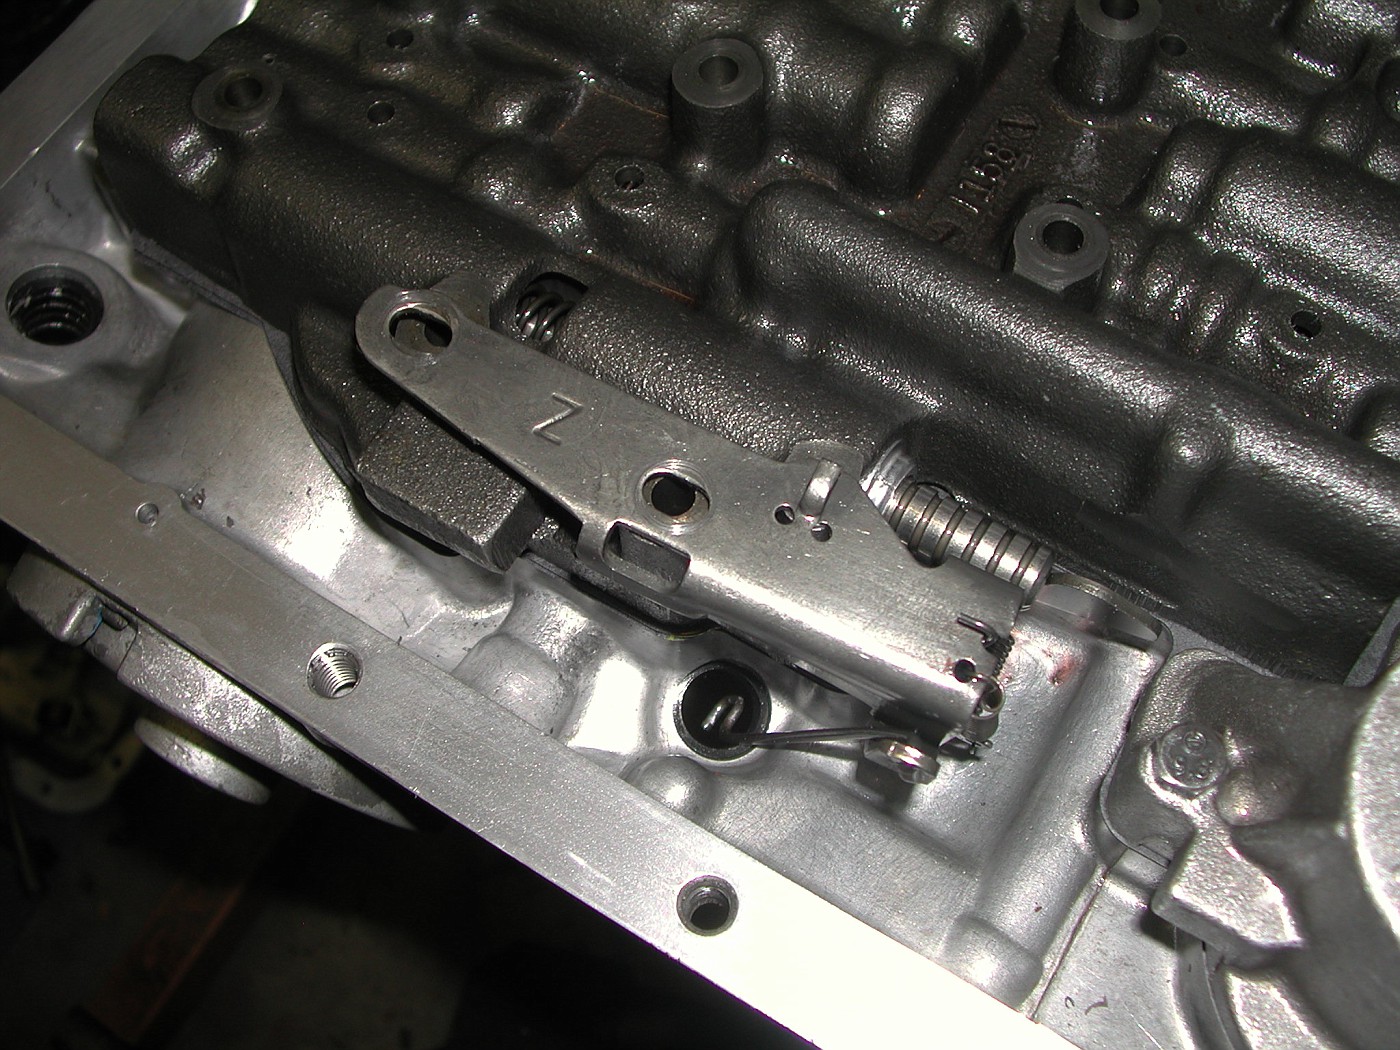 Had to depress the detent spring in order to thread the bolt in it's spot. 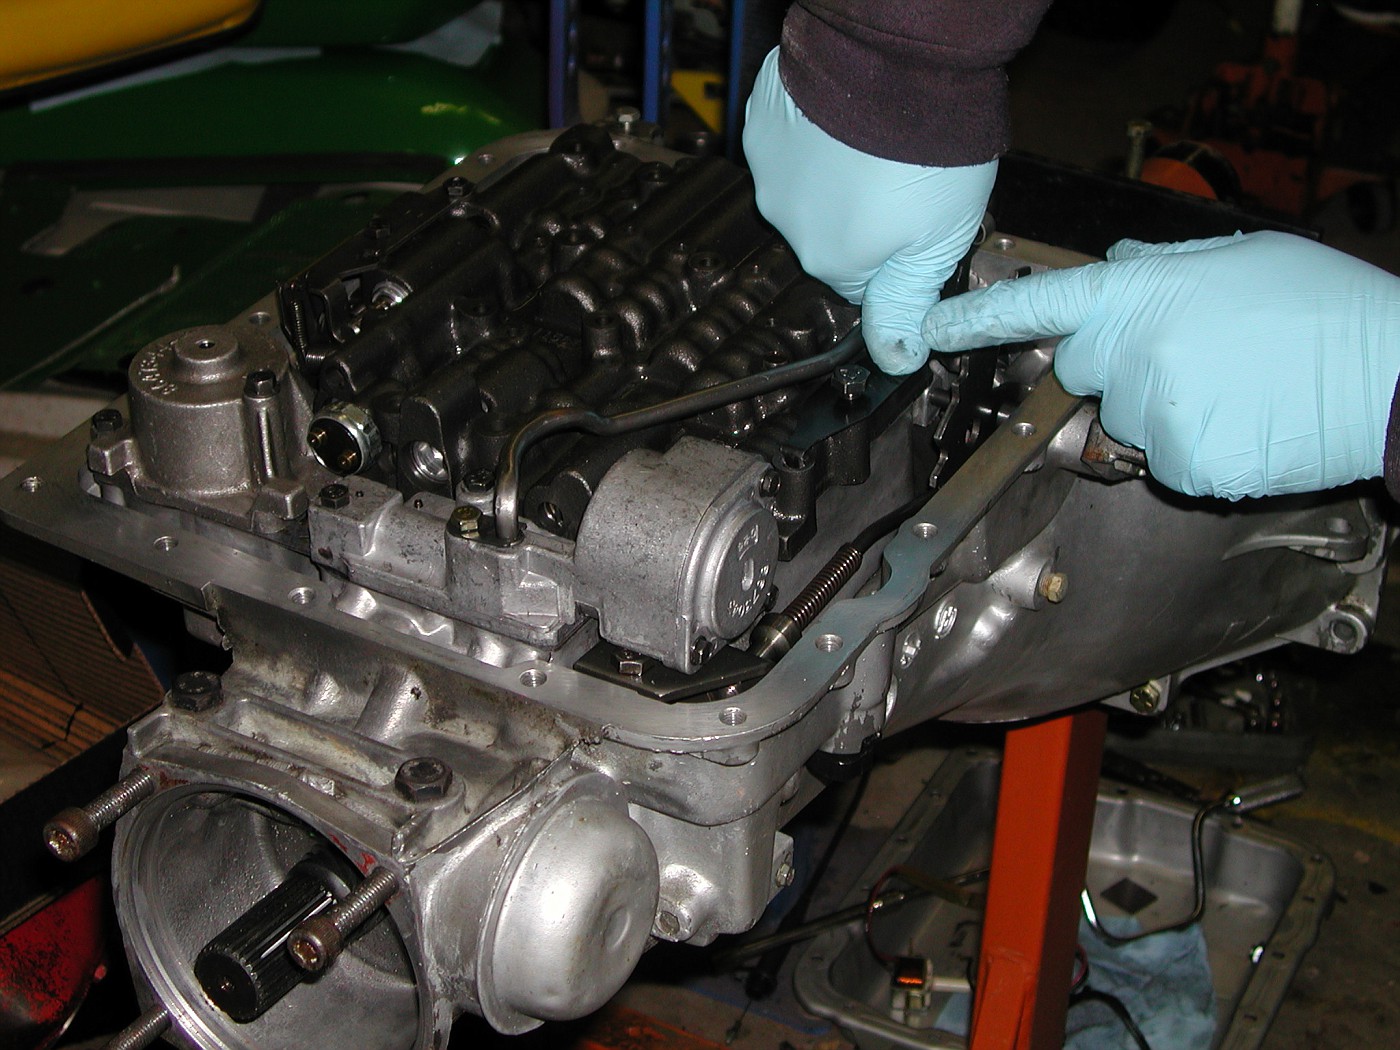 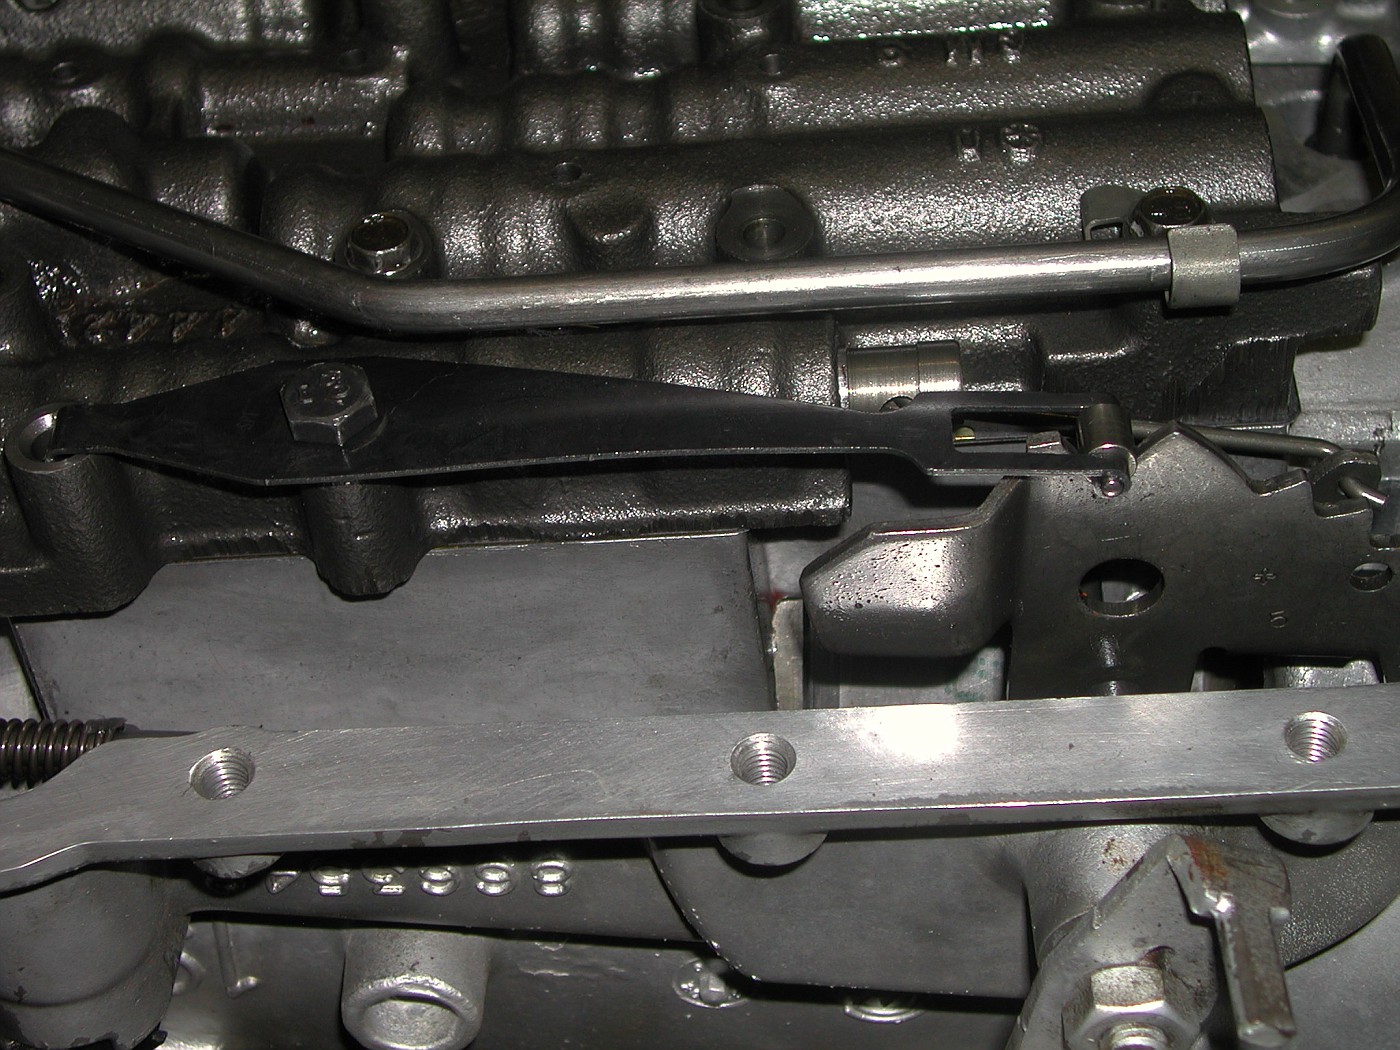 Bolted down the TCC solenoid....  and connected the wires to the pressure sender. 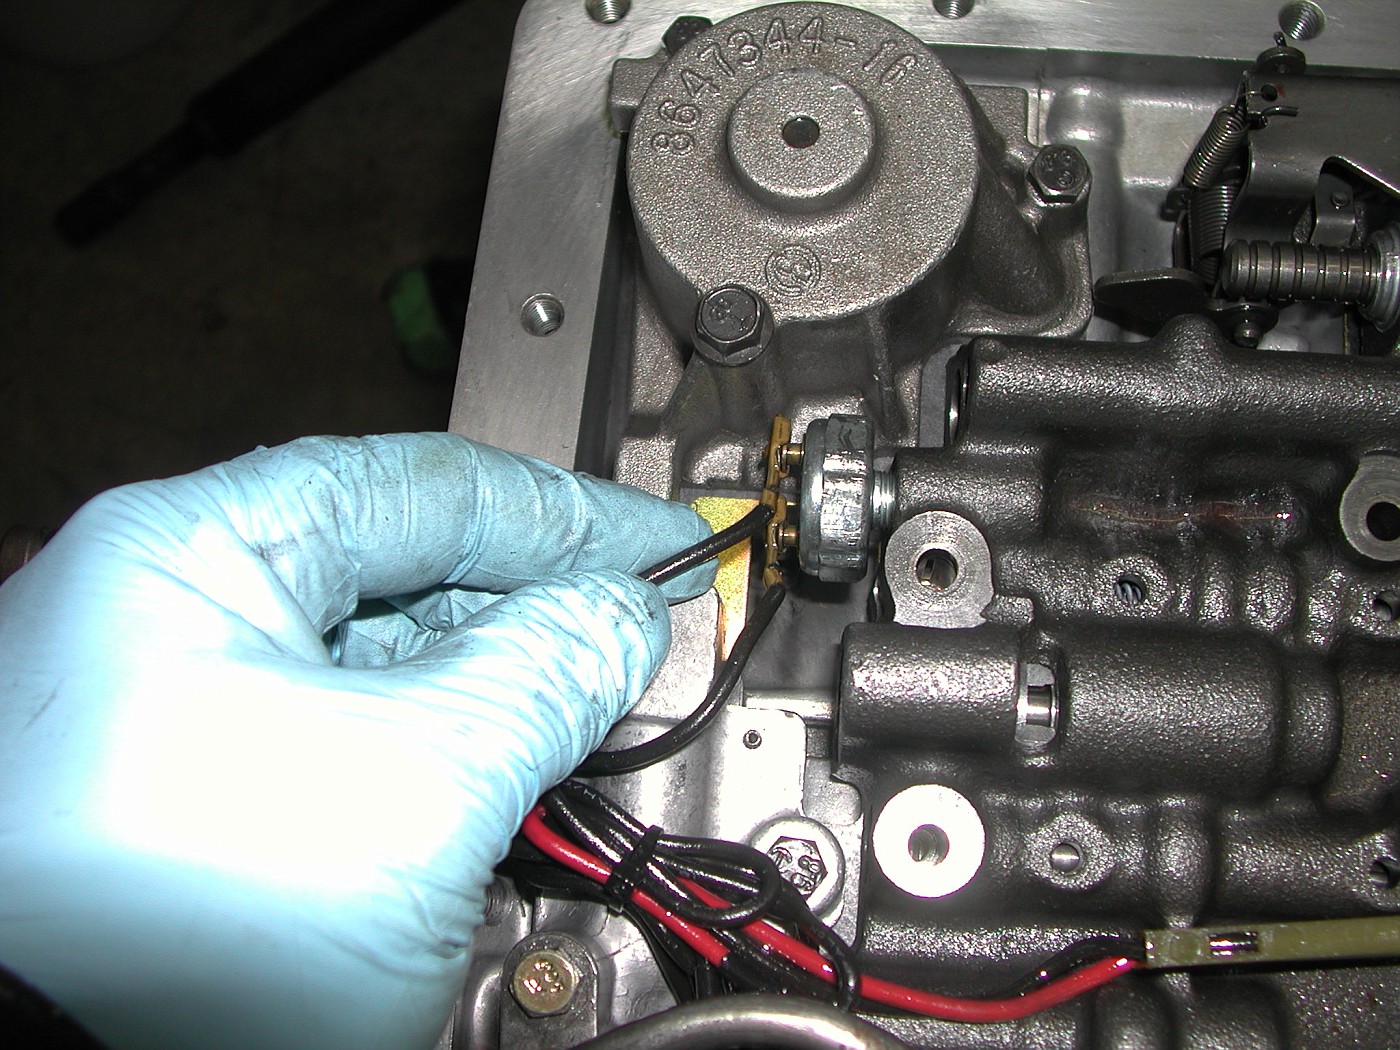 Reconnected the wiring harness to the bulkhead connector. 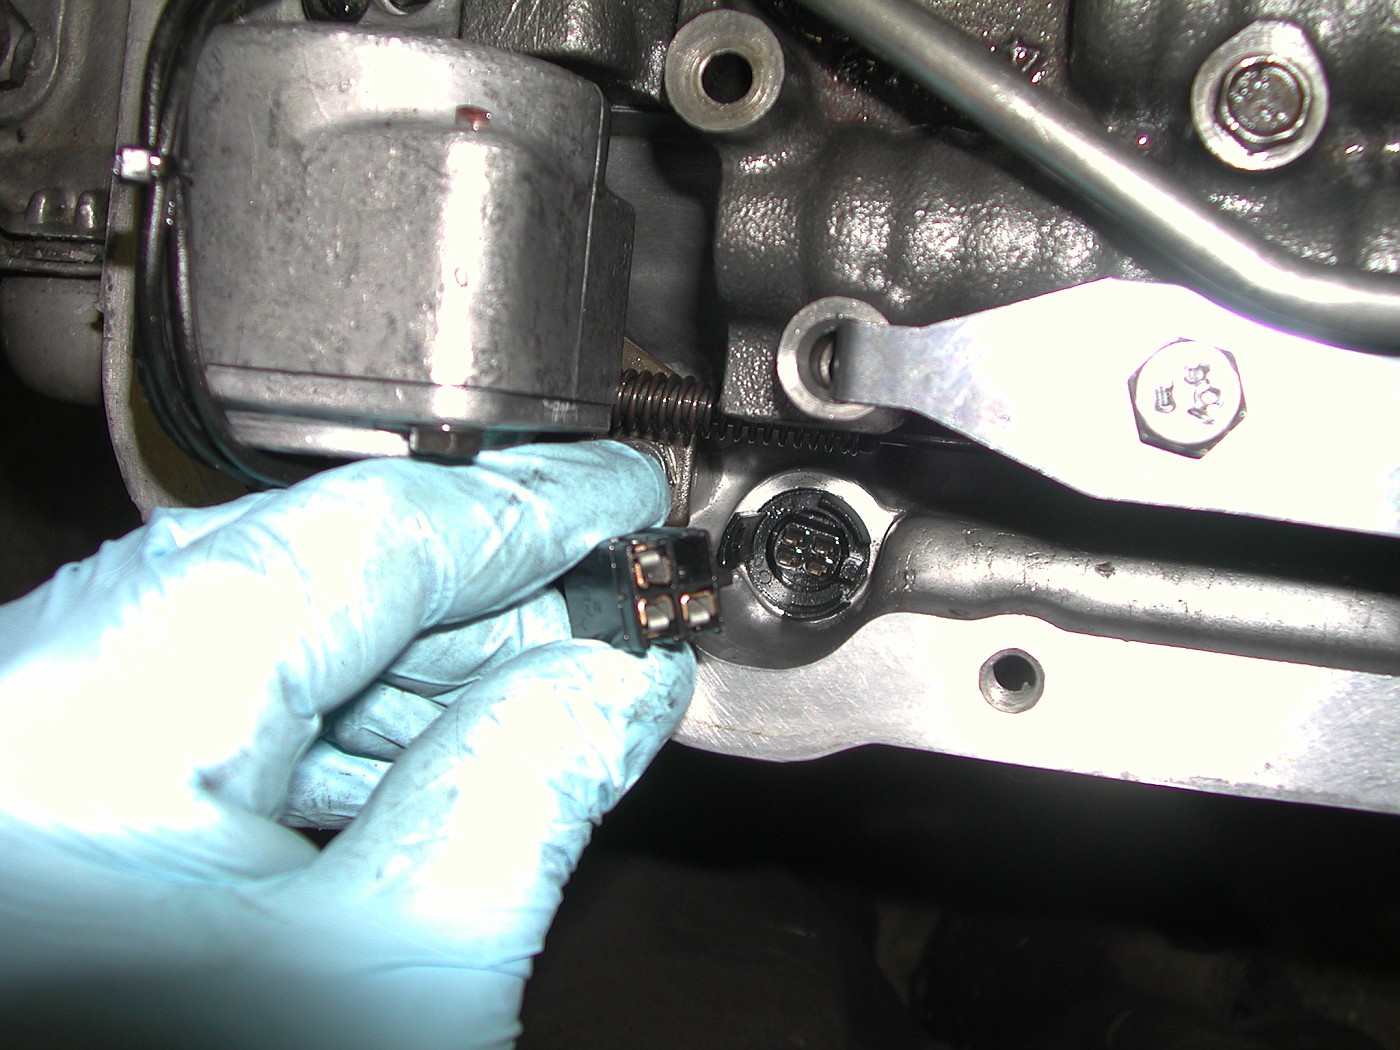 The manual says to torque all the Main Valve Body bolts, Aux. Valve body and Accumulator bolt's to 8ftlb's. 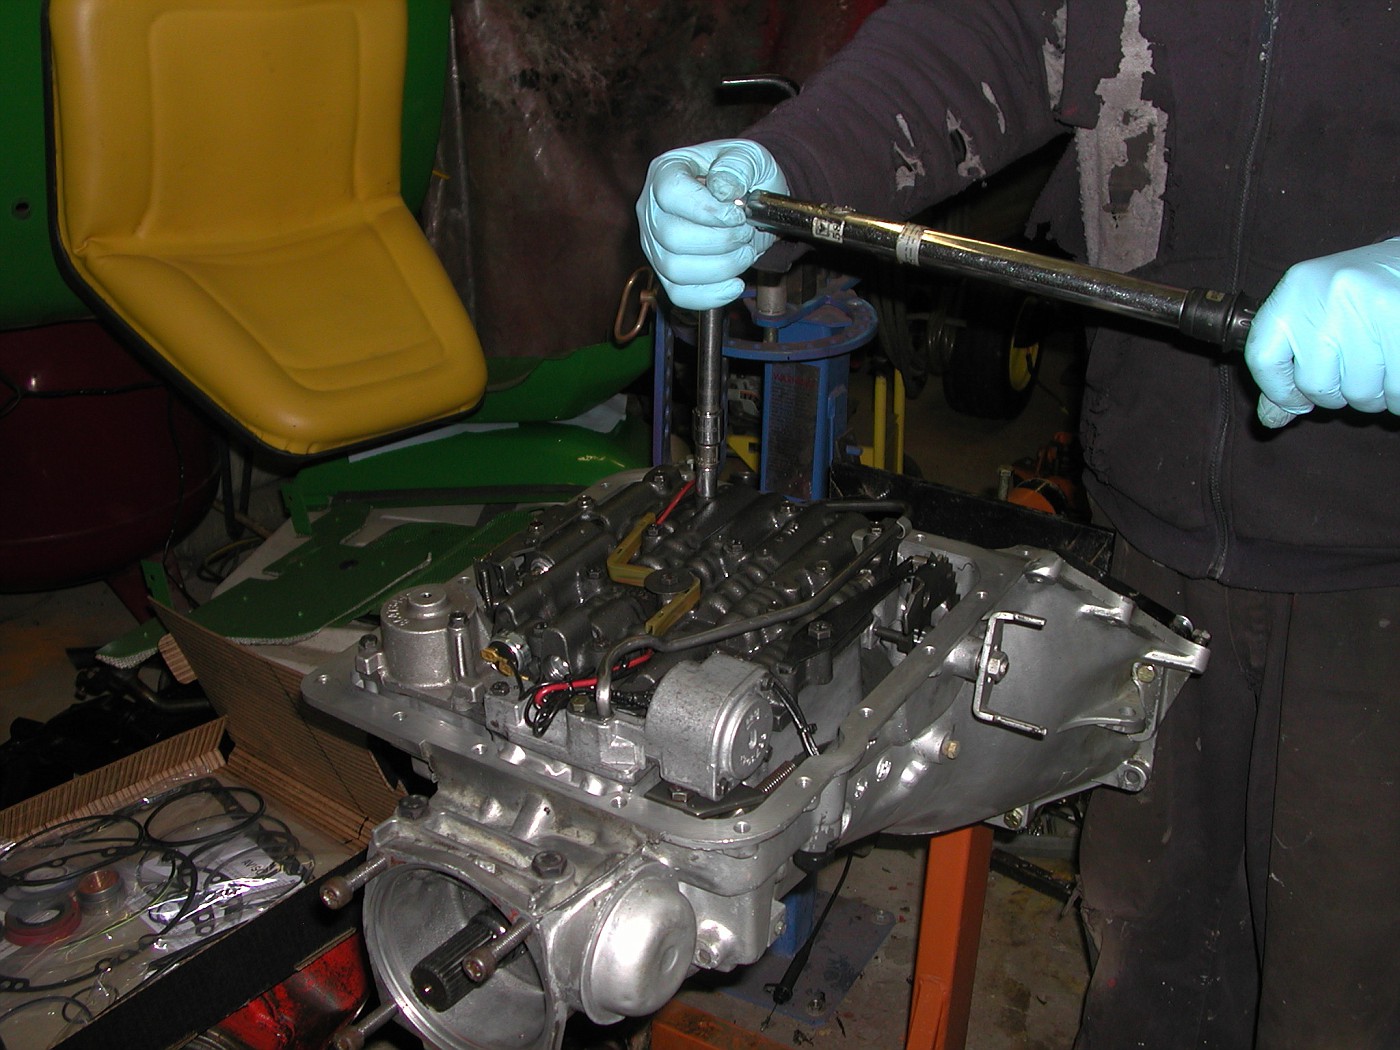 I carefully slid the pump back onto the input shaft. I say carefully as the Teflon seals on the input shaft can easily be torn. Torqued the 7 pump cover bolts to 18ftlb's  I'll pick up a filter tomorrow and hopefully get it back in the blazer. .
__________________
71 blazer,350SBC,approx.375HP,700R4,factory GM TPI.Dual electric fans,33x12.5x15 ATR on stock suspension. Petrolia,Ontario,Canada but working in Port Huron,MI. See ALL my Blazer pic's HERE |
|
|
|
|
11-15-2011, 10:07 PM
|
#46 |
|
Registered User
Join Date: Dec 1999
Location: Austin, TX, USA
Posts: 7,714
|
Re: So I'm at a light....(PIC'S)
Nice work and great writeup. Looks like you have been clean and thorough so should be good to go!
__________________
44 Willys MB 52 M38A1 64 Corvette Coupe 68 Camaro 'vert LT1 & TH700 69 Z/28 355 12.6's @110 69 Chevy Short Step 4 1/2"/7" drop 72 Jimmy 4WD 4spd 4" & 35's 02 GMC 2500HD 4x4 Duramax |
|
|
|
|
11-16-2011, 12:35 AM
|
#47 |
|
Registered 1971 K5
Join Date: Dec 2008
Location: SO.CEN.CAL
Posts: 428
|
Re: So I'm at a light....(PIC'S)
Great work, great info.
|
|
|
|
|
11-16-2011, 02:52 PM
|
#48 |
|
Registered User
Join Date: Feb 2003
Location: Santa Ana, CA
Posts: 2,191
|
Re: So I'm at a light....(PIC'S)
Bobby - I wish you would be a little more specific when you say you broke your transmission and then fixed it. Just kidding of course. All of your project threads are outstanding. Love this write-up!
|
|
|
|
|
11-19-2011, 12:57 AM
|
#49 |
|
Registered User
Join Date: May 2000
Location: Petrolia,Ontario,Canada but working in Port Huron,Mi.
Posts: 1,769
|
Re: So I'm at a light....(PIC'S)
UPDATE
I got the trans back in the blazer today. It's a tricky job by yourself and therefor took a LOT longer than it should have. I was able to remove the T/C and trans without taking the exhaust off. So I tried to install it with the exhaust on. It's tricky getting the trans back under the truck. I finally had to jack the front of the truck up high enough so I could slide the trans and jack under the truck as one unit.  Without disconnecting the exhaust I needed to come in from the side to be able to pass the exhaust. 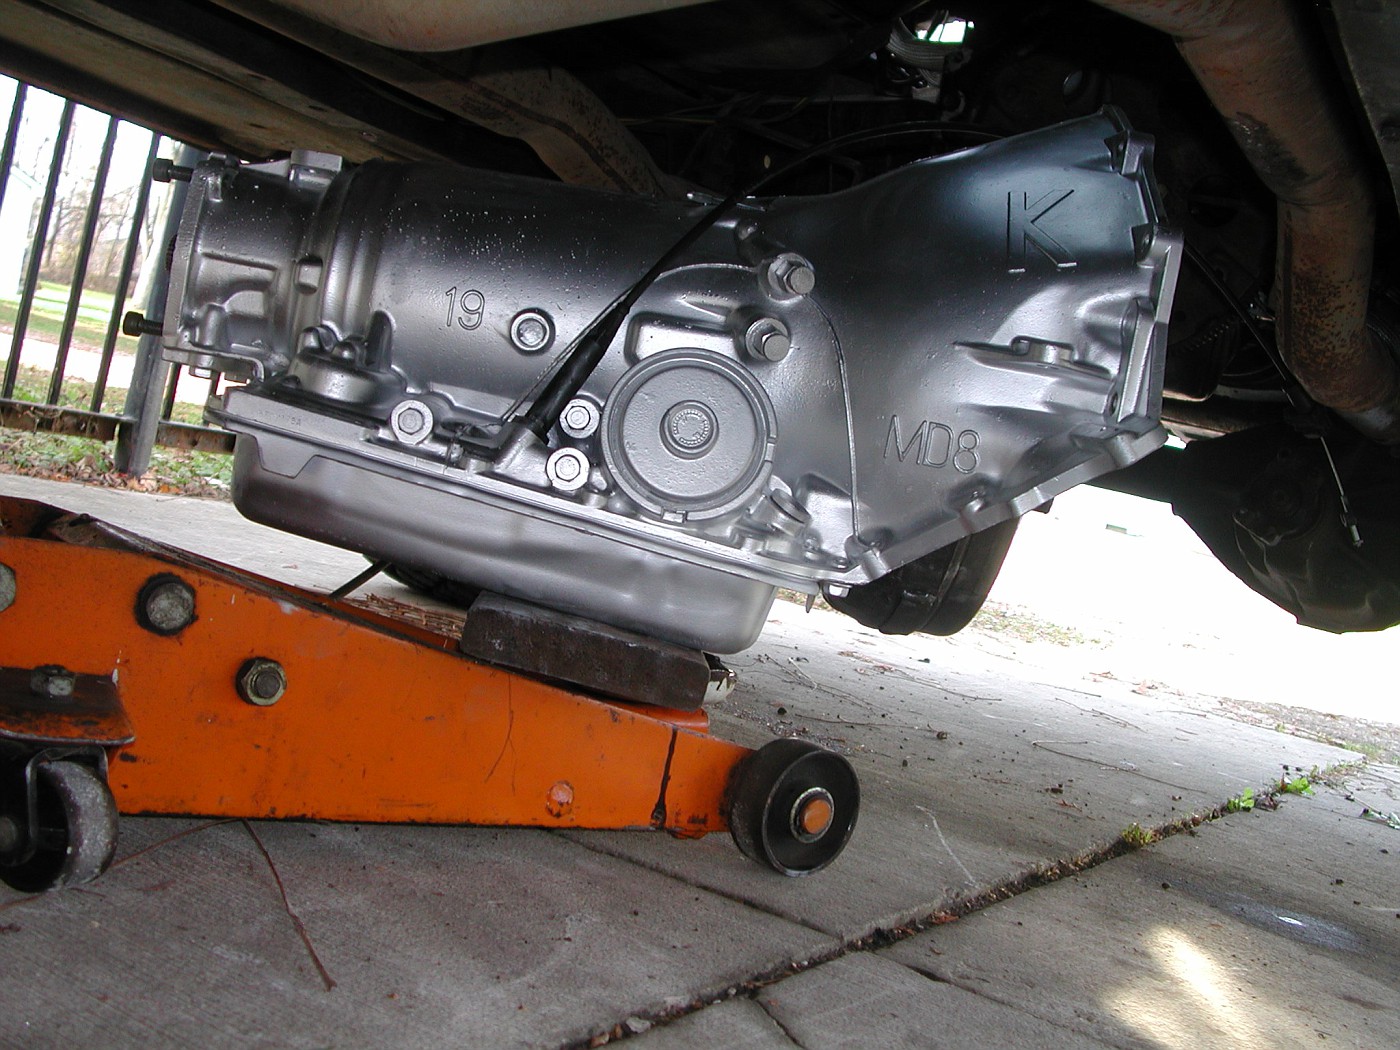 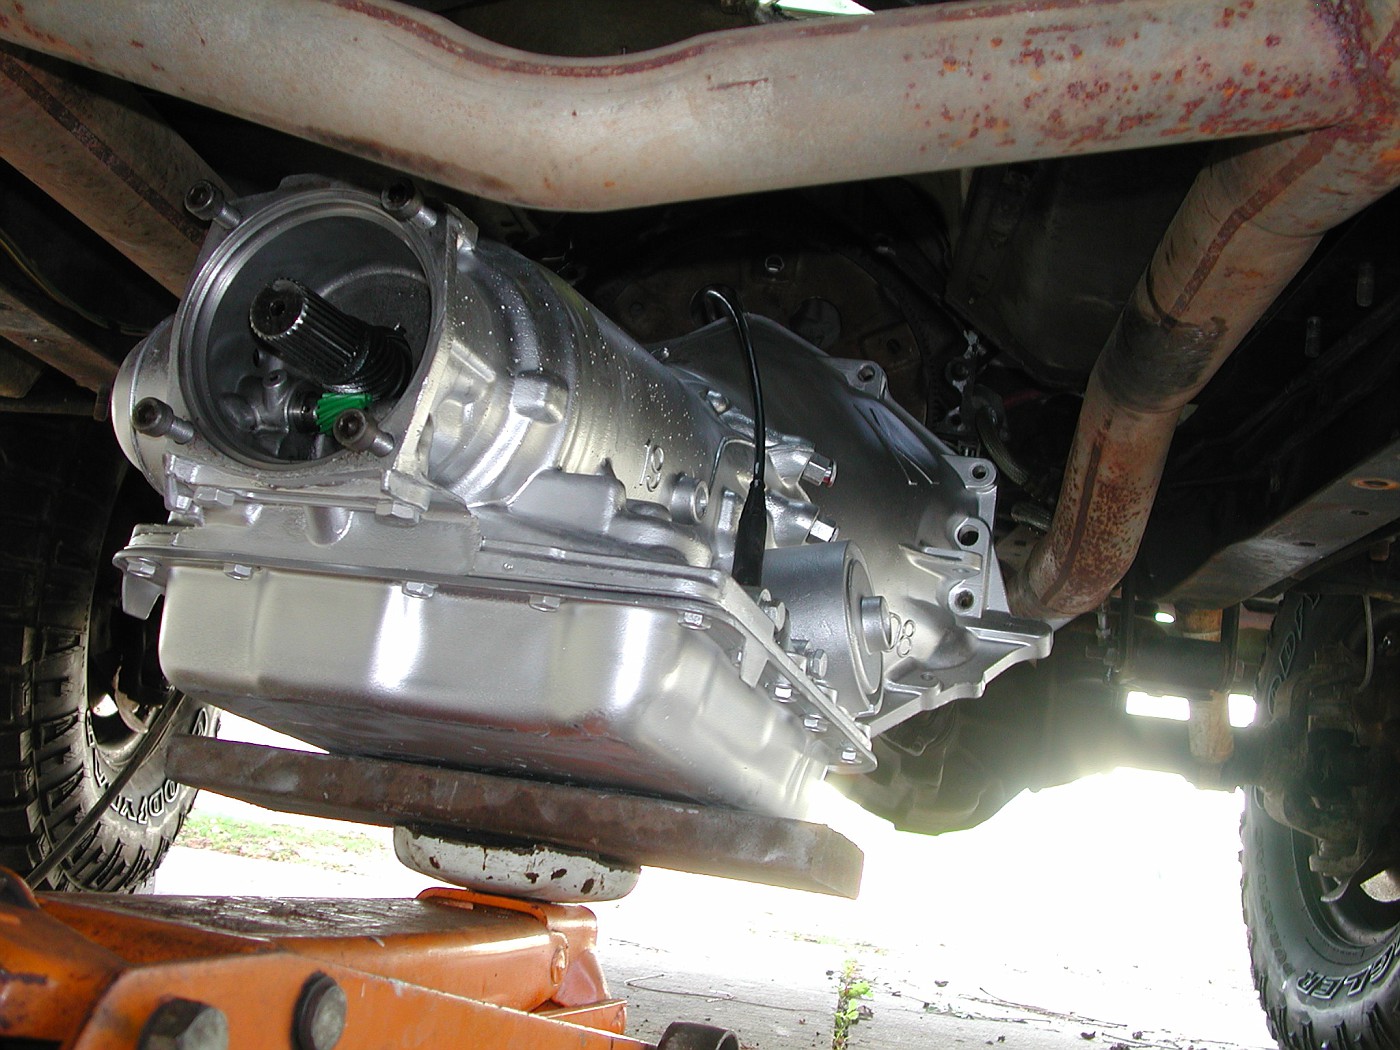 The tab I'm pointing to will inhibit the trans from getting past the exhaust. I jacked it up as high as I could then I "nugged" one tab over the exhaust, jacked the trans up a little more then "nugged the other tab over the exhaust. Once clear of the exhaust I just had to thread in the six bolts and connect the cooler lines.  Getting the Transfer case(T/C) hooked to the trans is VERY difficult due to the shape and WEIGHT of the T/C. I tried balancing it on the jack but of course it would eventually end up sliding off. I decided to build a simple JIG to steady the T/C on the jack. 1"x1" square tubing with a piece of scrap pipe welded to it. 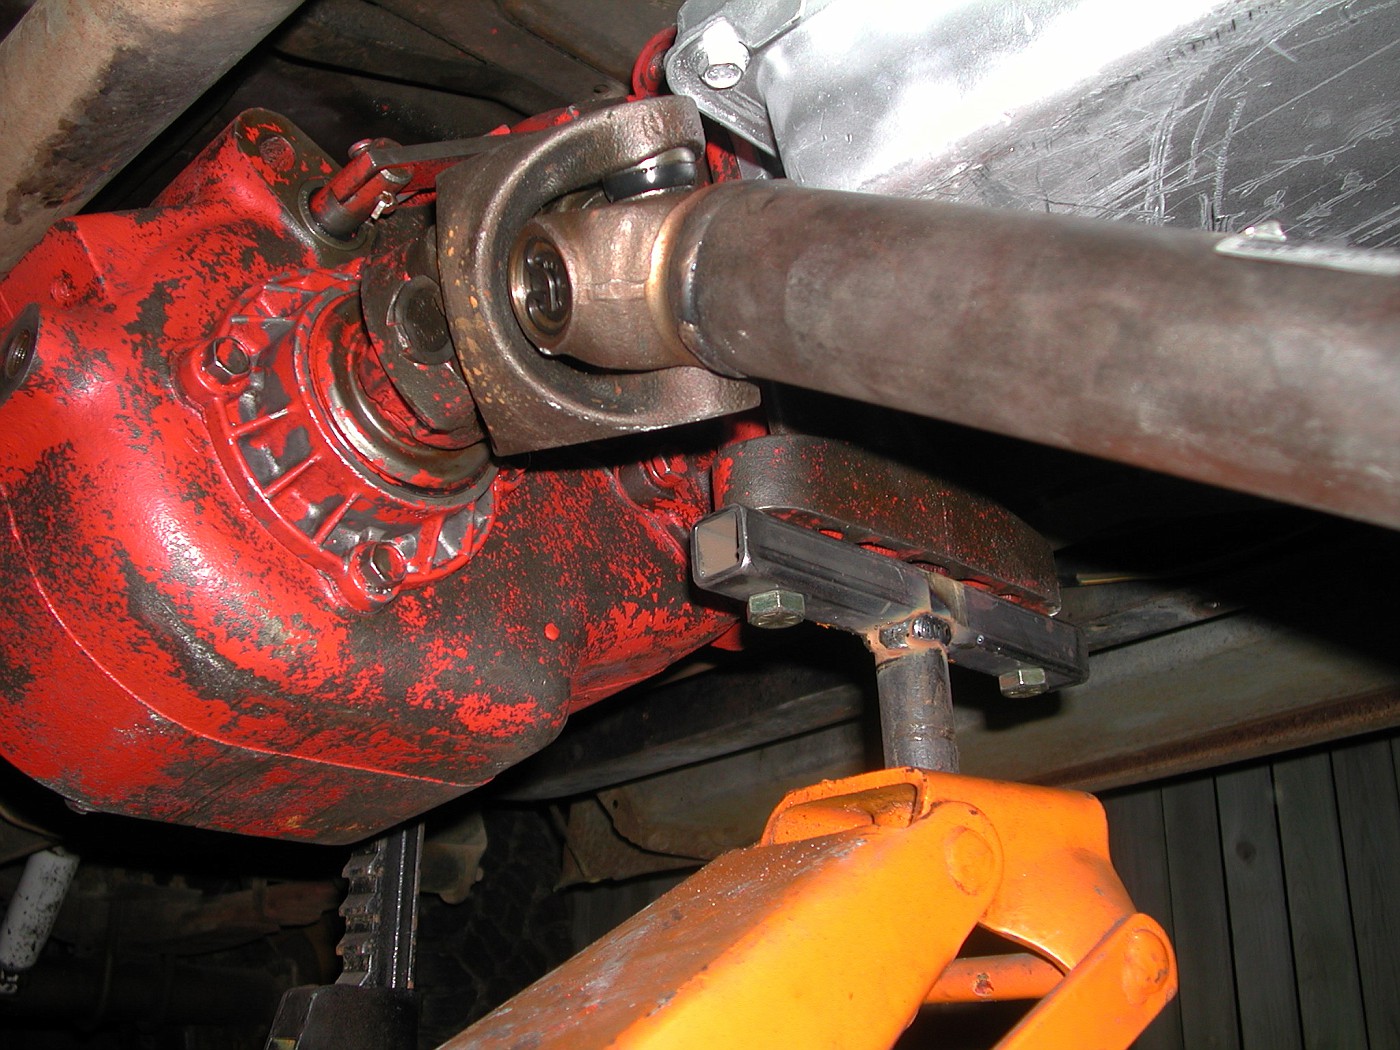 The JIG worked excellent. WAYYY safer too. I still had to muscle it a little to mate the Trans and transfer case together but I didn't have the fear of the T/C coming down on my head or hands. 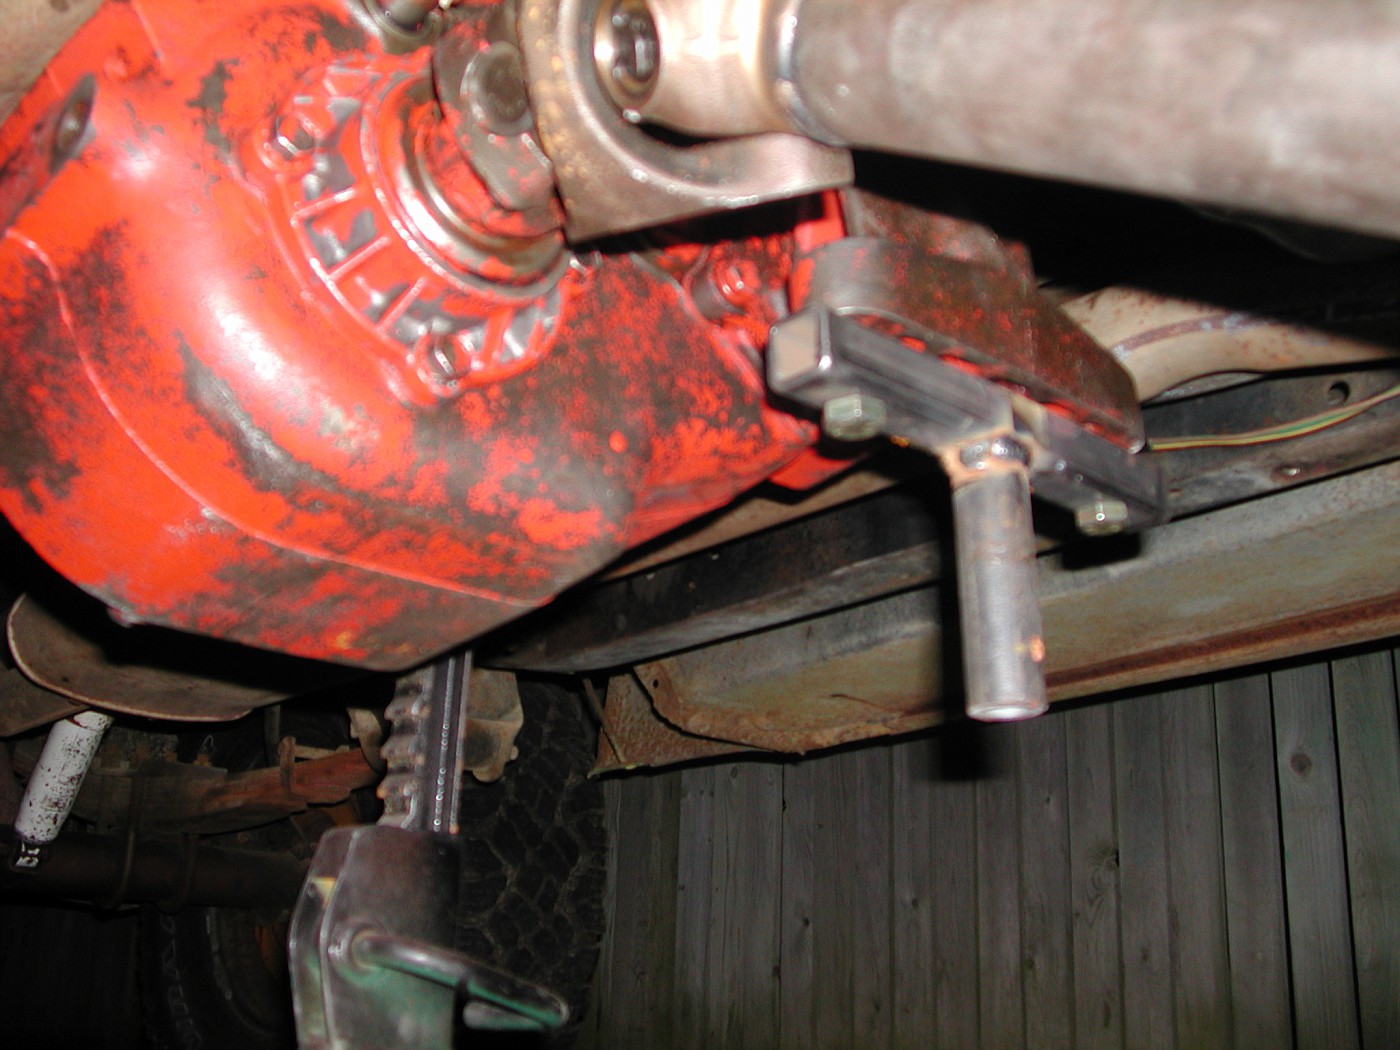 I Still need to install the cross member, fill the trans with ATF and reconnect the drive shafts. Hopefully I can get to that Saturday...we'll see. .
__________________
71 blazer,350SBC,approx.375HP,700R4,factory GM TPI.Dual electric fans,33x12.5x15 ATR on stock suspension. Petrolia,Ontario,Canada but working in Port Huron,MI. See ALL my Blazer pic's HERE |
|
|
|
|
11-20-2011, 05:31 PM
|
#50 |
|
Registered User
Join Date: May 2000
Location: Petrolia,Ontario,Canada but working in Port Huron,Mi.
Posts: 1,769
|
Re: So I'm at a light....(PIC'S)
Just a quick post.
It's all together and on the road again. Seem's to be working just fine. .
__________________
71 blazer,350SBC,approx.375HP,700R4,factory GM TPI.Dual electric fans,33x12.5x15 ATR on stock suspension. Petrolia,Ontario,Canada but working in Port Huron,MI. See ALL my Blazer pic's HERE |
|
|
|
|
| Bookmarks |
|
|


 Linear Mode

