
|
 08-25-2014, 09:26 AM
|
#526 |
|
Registered User
Join Date: Feb 2013
Location: Lakeside Ariz
Posts: 445
|
Re: 1957 Chevy truck re-rebuild
Jim nice work on the steering column. I need to do the same thing on an El Camino column that I am working on now. Rich
|

|

|
|
08-25-2014, 12:42 PM
|
#527 |
|
Registered User
Join Date: Jan 2012
Location: Motown
Posts: 7,677
|
Re: 1957 Chevy truck re-rebuild
do the 57 hoods have any stock bracing in them? my 58 hood has the X brace and a center brace to minimize oil canning. though i may borrow you idea and add some bracing to mine. above 70 mph my whole hood starts to flex and move in the center section. sort of like watching a lava lamp
 it was quite startling at first. around 100 mph you'd think all the paint would fly off. 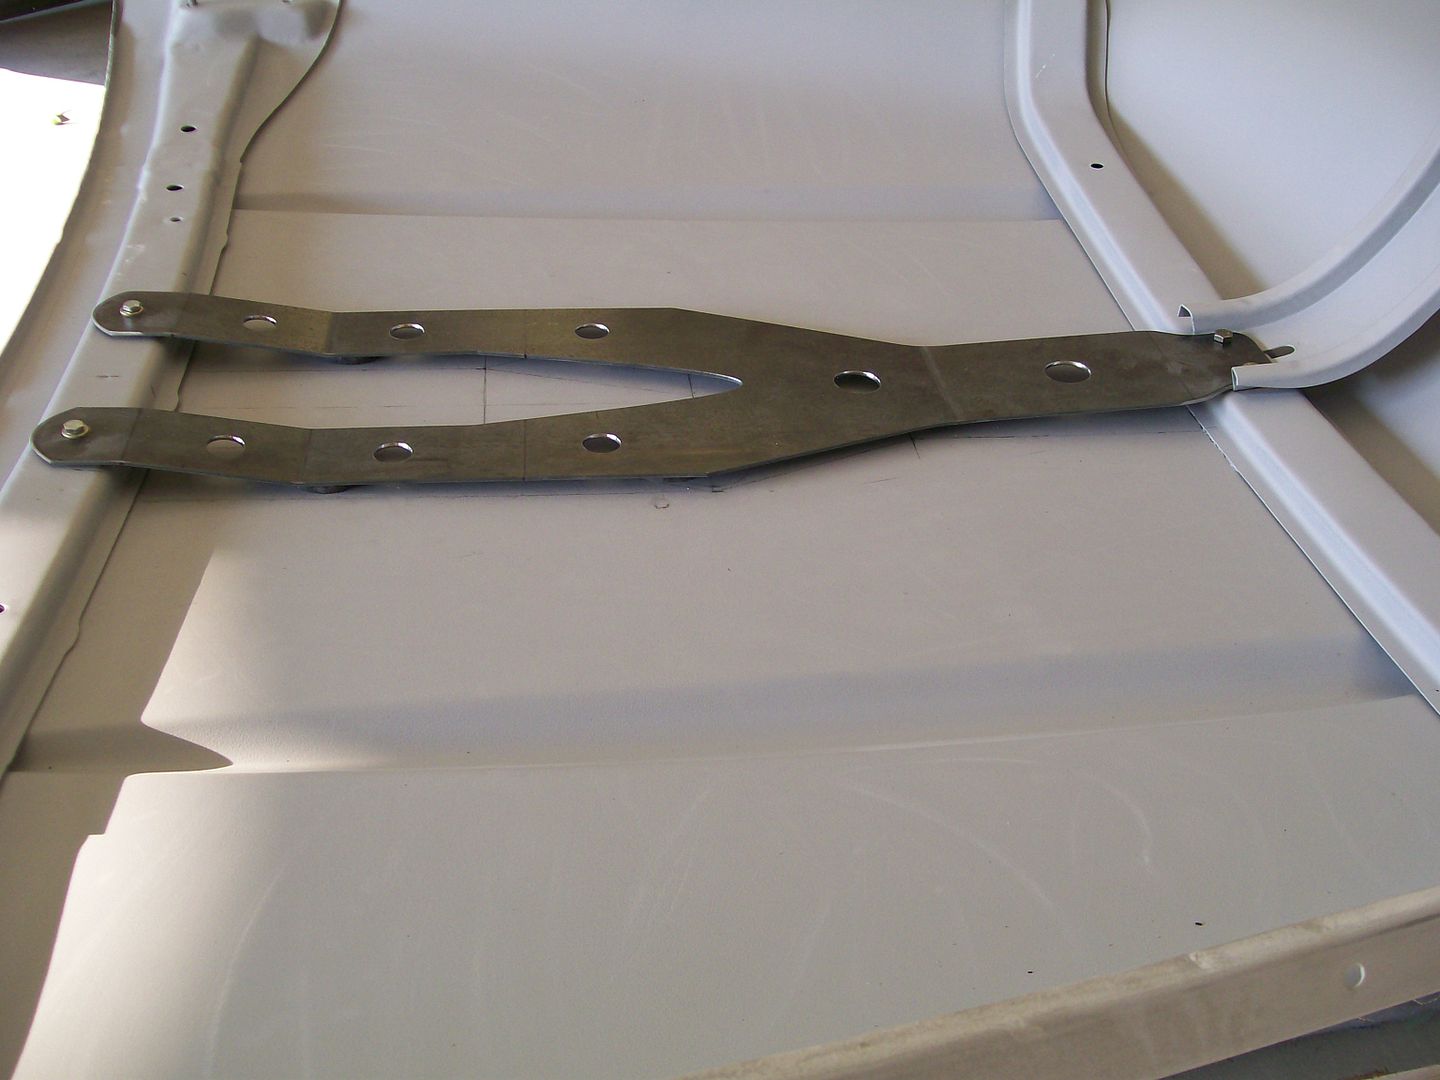 here is the best pic i could find of the underside of my hood i used a medium density foam rubber under the center support in the factory locations 
__________________
cool, an ogre smiley Ogre's 58 Truk buildhow to put your truck year and build thread into your signature shop air compressor timer |
|
|
|
|
08-25-2014, 06:10 PM
|
#528 | |
|
Registered User
Join Date: Aug 2012
Location: Salem Mo
Posts: 647
|
Re: 1957 Chevy truck re-rebuild
Quote:
There is one cool thing about this steering column that I don't think the aftermarkets offer, you can still use the steering wheel locking devise. Instead of using the key switch that inturn rotates a gear assembly that pushes up the pin that locks the steering wheel and at the same time pushes a rod downward that operates the electrical ignition switch lower on the column that we have removed in this case. By using the rod that comes down to operate the electric ignition switch we can push it up and down to operate the steering wheel lock. I added a bit of rod from the dimmer switch, then put a 90 degree bend to it. Then made a simple plate with two recessed areas to lock the rod into locked position and non lock position. In the pics I have a piece of vacuum hose on the rod, later I'll change it to a vacuum hose cap. In the free position.  Now the locked position.  There, now at least we have a choice to have it locked or un-locked.
__________________
My 57 Chevy truck build.http://67-72chevytrucks.com/vboard/s...d.php?t=541132 |
|

|
|
|
08-25-2014, 06:20 PM
|
#529 | |
|
Registered User
Join Date: Aug 2012
Location: Salem Mo
Posts: 647
|
Re: 1957 Chevy truck re-rebuild
Quote:
I'm fairly new to these trucks but have read where others have had the same high speed hood issues you mentioned..... 100 mph, well perhaps they only like 75 or 80.  My issues where simply black sanding and I said to myself, this just ain't gonna happen, I'm not dealing with a flexing hood. So as I usually do, I sought a solution. Since this picture I found on Amazon a sheet of 1/4" adhesive backed foam rubber. I'd like to follow much of my brace with the foam rubber. I'm thinking I should be in good shape when all is done.
__________________
My 57 Chevy truck build.http://67-72chevytrucks.com/vboard/s...d.php?t=541132 |
|
|
|
|
|
09-08-2014, 01:09 AM
|
#530 |
|
Registered User
Join Date: Aug 2012
Location: Salem Mo
Posts: 647
|
Re: 1957 Chevy truck re-rebuild
Pretty well finished fitting most of the interior back together. I'm getting excited to getting this on the road.
The cup holders still get a coating on the insides of satin black, the upper rings will stay chrome. The stainless trim on the floor tunnel is not pushed in all the way but otherwise it is how it's gonna be.  Next on the list is taking care of the brake system. I have to install an adjustable proportioning valve and the line lock. I decided to locate the items under the master cylinder. With proper plumbing I will have it where the rear brake lights will turn on when the line lock is working also. I cut one plate, then decided I wanted every thing tucked up tighter under the master cylinder, so I cut the second one on the left that brought everything closer.  This should get me what I'm looking for.  Everything mounted in place.  Master cylinder, line lock, proportioning valve, check.
__________________
My 57 Chevy truck build.http://67-72chevytrucks.com/vboard/s...d.php?t=541132 |
|
|
|
|
09-08-2014, 09:12 AM
|
#531 |
|
Registered User
Join Date: Aug 2007
Location: Corona, California
Posts: 7,998
|
Re: 1957 Chevy truck re-rebuild
Interior is looking great.
Nice fab work on the brake lines. Kim |
|
|
|
|
09-08-2014, 09:29 AM
|
#532 |
|
Navy Radioman Veteran
Join Date: Jul 2007
Location: Western Kentucky
Posts: 1,350
|
Re: 1957 Chevy truck re-rebuild
Very nice...
__________________
1987 Chevrolet R10 Silverado BBC Build thread - SOLD 1986 GMC Sierra Classic - SOLD 1957 Chevy Step Side - At the Body Shop Daily Driver; 2005 Chevrolet Silverado 4x4 Z71 Stepside |
|
|
|
|
09-08-2014, 10:31 AM
|
#533 |
|
Registered User
Join Date: Feb 2013
Location: Lakeside Ariz
Posts: 445
|
Re: 1957 Chevy truck re-rebuild
Very nice work Jim.
Rich |
|
|
|
|
09-10-2014, 11:49 PM
|
#534 |
|
Registered User
Join Date: Dec 2012
Location: new york
Posts: 292
|
Re: 1957 Chevy truck re-rebuild
Good lord you have a lot of hours into making some kick arse parts. It's a killer truck bro. Kudos to you.
__________________
Magic happens with a welder and a grinder. My custom tubular c10 laying rockers. http://67-72chevytrucks.com/vboard/s...78#post5970778 |
|
|
|
|
09-10-2014, 11:58 PM
|
#535 | |
|
Senior Member
  Join Date: Nov 2008
Location: Glendora, CA
Posts: 6,336
|
Re: 1957 Chevy truck re-rebuild
Quote:
__________________
'55 Big Window Shortbed, Drive-It-&-Work-On-It slid down the "slippery slope" to a Frame-Off Rodstoration! LQ4/4l85e/C4 IFS/Mustang 8.8 rearend w/3.73's Dan's '55 Big Window "Build" - Well, Kinda! |
|
|
|
|
|
09-11-2014, 12:34 AM
|
#536 |
|
Registered User
Join Date: Aug 2012
Location: Salem Mo
Posts: 647
|
Re: 1957 Chevy truck re-rebuild
Thanks everybody, after a couple of years of bodywork and fabrication it feels great seeing all the pieces start coming together.
__________________
My 57 Chevy truck build.http://67-72chevytrucks.com/vboard/s...d.php?t=541132 |
|
|
|
|
09-11-2014, 02:06 PM
|
#537 |
|
Registered User
Join Date: Jan 2012
Location: Eastern Ontario, Canada
Posts: 1,041
|
Re: 1957 Chevy truck re-rebuild
That's what sets apart a nice truck from a very nice truck.
__________________
1952 Canadian Chevy 1300 C4 IFS & D44 IRS 5.3 HO L33 My Build: http://67-72chevytrucks.com/vboard/s...d.php?t=632938 
|
|
|
|
|
09-14-2014, 11:45 PM
|
#538 | |
|
Registered User
Join Date: Aug 2012
Location: Salem Mo
Posts: 647
|
Re: 1957 Chevy truck re-rebuild
Quote:
I finally finished the brake lines front to rear. I didn't fill it with brake fluid and bleed the system yet. Hopefully I will be painting most of the front of the truck in the next couple of weeks. By removing much of the brake system including the booster and master cylinder I have less parts to cover to keep over spray getting on them. I'm just glad to have everything fitted and formed for later. Where many build their trucks and hide the master cylinder and accessories, I figured I'd whoop it up. I've shown the booster, cylinder, proportioning valve and line lock, now to finish the metal brake lines. We've all seen where the factory will coil the metal line before it screws into the master cylinder. This procedure allows the metal line to flex as the body and frame flexes while driving down the road. Using the coil line idea I got a piece of 2 1/4" exhaust pipe and start coiling the line.  With the two fronts I coiled them opposite of each other and the rear I coiled it to head in it's own direction.  Checking the clearance of the steering column I had to shape the lines slightly so the won't make contact, all in all the extra bends add to the detail of the lines.  Brakes....done.
__________________
My 57 Chevy truck build.http://67-72chevytrucks.com/vboard/s...d.php?t=541132 |
|
|
|
|
|
09-15-2014, 09:33 AM
|
#539 |
|
Registered User
Join Date: Feb 2013
Location: Lakeside Ariz
Posts: 445
|
Re: 1957 Chevy truck re-rebuild
Nice work. and another step closer. Rich
|
|
|
|
|
09-15-2014, 10:08 AM
|
#540 |
|
Registered User
Join Date: Aug 2007
Location: Corona, California
Posts: 7,998
|
Re: 1957 Chevy truck re-rebuild
Those coiled brake lines look real nice.
Kim |
|
|
|
|
09-28-2014, 09:55 PM
|
#541 |
|
Registered User
Join Date: Aug 2012
Location: Salem Mo
Posts: 647
|
Re: 1957 Chevy truck re-rebuild
Finally, the time has come for some exterior paint. In a fortunate turn of events I got a week off and the weather has been very cooperative.
I started on Sunday, very focused to get paint on much of the cab and forward. I started with 400 grit on all the panels to sand the feather fill primer. Once done and I approved all the finish on the panels I went to 600 grit for a final sanding. Then came the taping and masking papering of all the paint work I've already done.  The I cleaned and cleaned with pre cleaner to remove left over sanding dust from the surface and all the cracks and crevices, all the time wearing rubber gloves, just the sweat and oil from your fingers can cause issues and fish eyes. I took me 3 days to sand, mask, and clean. Finally time for sealer (slightly over reduced epoxy primer) one medium to wet coat.  I'm doing a two tone, but I need a pin stripe to split the two colors. I love the red pin stripe on the dash, so I spray two coats of red where I want to split the two tone.    I can honestly say, I didn't get much sleep this last week, I knew I was venturing into new territory for myself. I had so many options of how to paint all the pieces. I could jam everything, where I spray all the door jams then assemble and spray as one piece, or, be stubborn and do every piece separately. I've had this truck together and apart perhaps 15 times now so I chose the hard way, I am gonna do this in pieces. Problem is, I have to have all the pieces together to lay out the pinstripe. So, Thursday morning sealer, Thursday afternoon, red paint, Thursday night, no sleep, Friday morning, assembly of the panels, then lay out the pinstripes. Nervous, absolutely..... one panel at a time then the hood, should have had my Wheaties this morning. Yes, new socks, great for spacing, great for no scratching.  Time for a short break, relax, settle the heart rate.... I can't wear the rubber gloves for the pinstripe, the tape adhesive sticks to the gloves. The concern about the bare hands is, I can not use the pre cleaner to wash the panels anymore, the primer and paint is to fresh and will make a mess. With clean hands I start laying tape where I want the red to be when done.   Ok, whats up with all the extra tape??? The 1/4" is the direct split between the black and silver. The 1/8" is merely decorative, it will have black both on top and bottom of it. I wanted a 1/4" space between the two pinstripes, by putting small pieces of 1/4" tape between them I keep an accurate 1/4" between the two pinstripes. I will remove the small pieces before painting. Once I got all the striping done I disassembled the truck and it was time for silver paint. The silver is the bottom color so it will be easier to mask it off. Also, if I sprayed the black first, then if I didn't mask it perfectly and some of the sparkle of the silver floated on to the black it would stand out more than if some black drifted onto some silver. With this next picture I sprayed the silver, then after I sprayed the silver I had lunch. I ran the 1/8" pinstripe up over the headlights, the more I thought about it, I just couldn't leave it that way. Yes, I know, it looks good on the Batmobile. I'm looking for the black to be an authoritative/aggressive color and I feared the over the headlight pinstripe would remove some of the aggressive look I'm looking for. Once the silver dried I cut the tape then sanded the tape line. this is why you will see a red stripe going over the headlight. It will all be black so the red stripe will disappear later.  Once the silver dried it was masking time. In this case I taped to the 1/4" pinstripe line.     How cool is this that although I lived through this process this week, this is now a diary that I can relive the whole thing again. It's getting long winded here. Tomorrow I'll start with the black.
__________________
My 57 Chevy truck build.http://67-72chevytrucks.com/vboard/s...d.php?t=541132 |
|
|
|
|
09-28-2014, 10:42 PM
|
#542 |
|
Senior Member
 Join Date: Aug 2010
Location: Shasta Lake, CA.
Posts: 1,619
|
Re: 1957 Chevy truck re-rebuild
Lookin' Good ! Nice work, I like the red stripe splitting the colors.
BTW the coiled brake lines should be mounted vertically like the factory does, otherwise the potential is there to trap air in the top of the coils and cause a mushy peddle feel.
__________________
Glen & Jane's Rides 57 GMC NAPCO Long Bed V8 4 speed Bought 2008 7 other cars & trucks , 5 trailers '56 Chevy Long Bed I6, 4 speed Bought 1990 Sold 8.22.2020 56 GMC Suburban Pickup V8, 4 speed Hydramatic Bought 1996 Sold 10.11.2020 My Other Tinkerings http://67-72chevytrucks.com/vboard/s...75#post8967275 |
|
|
|
|
09-28-2014, 10:48 PM
|
#543 | |
|
Registered User
Join Date: Aug 2012
Location: Salem Mo
Posts: 647
|
Re: 1957 Chevy truck re-rebuild
Quote:
Thanks.
__________________
My 57 Chevy truck build.http://67-72chevytrucks.com/vboard/s...d.php?t=541132 |
|
|
|
|
|
09-29-2014, 09:27 AM
|
#544 |
|
Registered User
Join Date: Feb 2013
Location: Lakeside Ariz
Posts: 445
|
Re: 1957 Chevy truck re-rebuild
Jim that is a lot of work done. Can't wait to see it all painted. Rich
|
|
|
|
|
09-29-2014, 09:40 AM
|
#545 |
|
Registered User
Join Date: Oct 2013
Location: Oklahoma City Okla
Posts: 196
|
Re: 1957 Chevy truck re-rebuild
Things are looking great. Thanks for taking the time to post all of the information and the pictures. Looking forward to the rest of the paint.
Dwight |
|
|
|
|
09-29-2014, 11:08 AM
|
#546 |
|
Registered User
Join Date: Aug 2007
Location: Corona, California
Posts: 7,998
|
Re: 1957 Chevy truck re-rebuild
Looking very nice.
Kim |
|
|
|
|
09-29-2014, 12:13 PM
|
#547 |
|
56 - autocross
Join Date: Apr 2010
Location: Camarillo, Ca
Posts: 1,121
|
Re: 1957 Chevy truck re-rebuild
Is it going to look similar to your wall?
|
|
|
|
|
09-29-2014, 01:57 PM
|
#548 |
|
Registered User
Join Date: Aug 2012
Location: Salem Mo
Posts: 647
|
Re: 1957 Chevy truck re-rebuild
Baldeagle SR, yes, I am exhausted. I know it sounds strange but the time it took to put 2 coats of clear on the cab fenders, doors, and hood was nearly 3 hours. The hardest part was keeping a focus in my mind and my eyes. I've only done one paint job since 1998, over time you lose the natural ability to spray paint so it takes more concentration now.
tune_1, I think I remember you checking in before and appreciating the commentary along with the pics, you're welcome. Thanks Kim, I know you've mentioned perhaps tackling your own paint. I know pictures are worth a thousand words, I figure these may help you in the future. hotrod1, ahhh, I do seem to have a red stripe addiction going. I got more pics uploaded, let's see how this turns out. Going to the black color you can see the exposed red pin stripe being covered.   I did 3 coats of black. I learned a lesson with the glove box door. I had it hanging separately when I painted the dash. I forgot to spray the glove box door on the first coat of black, no biggy, I'll get it with the next two coats. It looked fine, I sand and buffed, it still looked fine. Then I had installed it and rolled the truck out. As I looked closely I could see specks and shimmers of red showing through. Only detectable, in the direct sunlight, so I scuffed the surface, taped off the existing red pinstripe, sprayed 2 coats of black then cleared it again. The Glove box was a small lesson to learn, I might have been tempted to do 2 coats on the truck, I'm glad the glove box told me to do 3 coats of black, I'd hate to have to redo the black on the rest of the truck. Now that the black has dried for about 4 hours I peeled back the pinstripe tape, nervously hoping that I covered and sealed all the edges well.  And the rest of the tape and paper. Remember, the base coat is fast drying color, no gloss.  There are decisions to be made, one decision is where to start and stop the colors and pinstripes. Often times I would stop at the edge of the door with the pinstripe and silver. In the case of the '57 Chevy truck doors the weather stripping is right there, so I brought the silver to where the weather stripping will break the colors.  The fender looking good.  The hood, base coat with all it's colors.  Finally getting clear coat sprayed.  I don't have a paint booth with a baking oven but I do have plenty of sunshine. I'm gonna have a ton of wet sanding and buffing, preferably I want the paint to be settled and cured, the hot sun will do the job.    There we are, I took about 100 pictures, I figured these few will tell a story. I did get a couple of runs, fortunately they are on edges, if they were on large straight areas it would suck, I can sand and remove the ones on edges, if they are on flat areas, try as you may, there is usually a sign of where the run was. I'll start the sanding and buffing tomorrow, I'm looking to get the same finish as I got on the dash and firewall. Hopefully this will either help or guide some of you as you venture into your new territory of the world of painting.
__________________
My 57 Chevy truck build.http://67-72chevytrucks.com/vboard/s...d.php?t=541132 |
|
|
|
|
09-29-2014, 06:04 PM
|
#549 |
|
Senior Member
Join Date: Jul 2009
Location: Tomball, Texas
Posts: 1,592
|
Re: 1957 Chevy truck re-rebuild
Dang that looks AMAZING Jim!!! All the hours and hard work are sure paying off for you. Great job!
__________________
Rick 78 GMC K15 SWB, 350/NV4500/NP205/4.10s Project Hazel 71 GMC C25 350/TH400 - Project Angie 59 Chevy SWB Stepside (next in line? Not sure now  ) )2001 GMC Sierra K2500 |
|
|
|
|
09-29-2014, 06:53 PM
|
#550 |
|
Registered User
Join Date: Oct 2013
Location: Oklahoma City Okla
Posts: 196
|
Re: 1957 Chevy truck re-rebuild
Looking really good.
Dwight |
|
|
|
 |
| Bookmarks |
|
|


 Linear Mode

