
|
 01-25-2012, 05:40 PM
|
#601 |
|
Registered User
Join Date: Nov 2010
Location: Carlsbad, CA
Posts: 1,584
|
Re: Junkyard Jimmy Super Low Buck Build Thread
Cluster is lookin good. I like your punch list; it means we can look forward to quite a few interesting reads about the work you do on your truck.
__________________
- Jim - My Daily Driver is a 1969 Chevrolet Custom/20 Fleetside 350/TH400/Eaton H052 4.10 and its Project thread is here http://67-72chevytrucks.com/vboard/s...d.php?t=456911 |

|

|
|
01-28-2012, 12:09 AM
|
#602 |
|
GEARHEAD
Join Date: Aug 2003
Location: MN
Posts: 6,120
|
Re: Junkyard Jimmy Super Low Buck Build Thread
I really like my job and there are times I love it. This was a good week. A majority of my time is spent driving around, going to our customers properties and doing their boiler and pressure vessel inspections (the easy part of my job). Sometimes that is dull and the miles can drain you, but this week was pretty good. Zurich Direct is a subsidiary and they mostly insure automotive related businesses. Dealerships, body shops, junkyards, parts stores, repair shops and the like.
This week I went to one of the few remaining hot rod shops in the state, Rogers Rod and Customs and got to spend some time talking to the owner. Current projects included 63 and 66 chevy pickups, 72 torino, 57 chevy bel air, 32 ford(all original being turned into a hot rod), a couple 40's customs and a mustang. Awesome shop! They do everything frome full frames to the final assembly, whatever the customer wants. I'll also be going to Classics Plus in Shakopee soon, very similar operation. Earlier that day I had a stop at a junkyard I hadn't been to before. Got my work done then got permission to wander the yard (St Francis Auto Parts and there are 4 67-72 chevy trucks there). Today I was at Wagamon Brothers in Minneapolis and they do performance engines and crate motors. Huge shop, nice tooling and do anything you can imagine for any motor you can think of. I also went to Kremer Spring, which is more than just a spring shop, they also do big rig repairs and body work. One of their projects was converting a jeep unlimited rubicon into a truck style using one of the new Mopar kits for the local dealership. I have some pics on my cell phone I'll try and download later. While I was there I talked to a couple of their spring guys about my sagging Jimmy rearend. They gave a few options. The least expensive is just adding some blocks, which they can make and charge about $40 for. Next option is to bring in the springs and they will add a leaf and re-arch to get the lift back, which was going to be more, but not sure how much. They don't like the universal add a leaf kits. Said they are not good for the original springs (talking about the arched ones you add into the middle of your spring pack). They make their own leafs, re-arch the originals to where they need to be then match a new leaf into those packs for a proper fit. They can also just re-arch the original springs for $100 but said it would probably only last a couple years before they sagged down again without adding a new leaf to stabilize it. Then he said "well, we do have some pull off blocks." Those are lift blocks that they remove from trucks when they do spring replacements, etc. So for $20 I got some almost new lift blocks, just over 1" tall, which should be almost perfect to level out my jimmy. 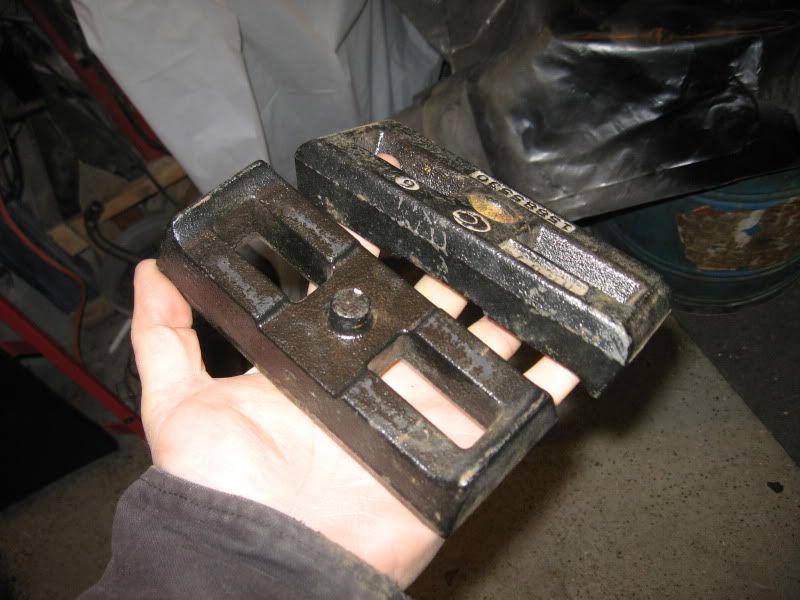 One of the manufacturing businesses I visited this week had a company president that's a car guy. I saw the pics on the wall of a couple cars, asked about them, and it turned into a half hour BS session on trucks (he had a 72 chevy once), projects and keeping our first cars (his was some mid 70's van he still has). These kind of stops are great, but now next week I'll be slogging through a couple pork plants, a turkey plant, a soybean plant, a hospital and a few others places that are not nearly as much fun. Gotta take the good with the bad right? Oh and tickets go on sale tomorrow for...  
__________________
If no one knows what you're doing, they can't tell you you're doing it wrong HG's Dream Car Build - Shelby Cobra Kit Build your own adjustable track bar 71  Long Fleet C/10 Long Fleet C/10 72  Jimmy 4x4 (Junkyard Jimmy) Jimmy 4x4 (Junkyard Jimmy)HG's Plow Truck '78  K35 Dually K35 DuallyBigass Farm Truck HG's thread of miscellaneous stuff |
|
|
|
|
02-05-2012, 02:40 PM
|
#603 |
|
GEARHEAD
Join Date: Aug 2003
Location: MN
Posts: 6,120
|
Re: Junkyard Jimmy Super Low Buck Build Thread
Today I went topless. And if thats not a wierd enough sentence anywhere but this forum, think about doing it in MN in February. It's getting nipply.
 This winter is like no other I can remember in my 44 years. Supposed to be in the 40's today and we are smoking some baby backs this afternoon. My son got his drivers license thursday so as a reward for helping me get the top off, I let him cruise it around the block before it went back into the garage. 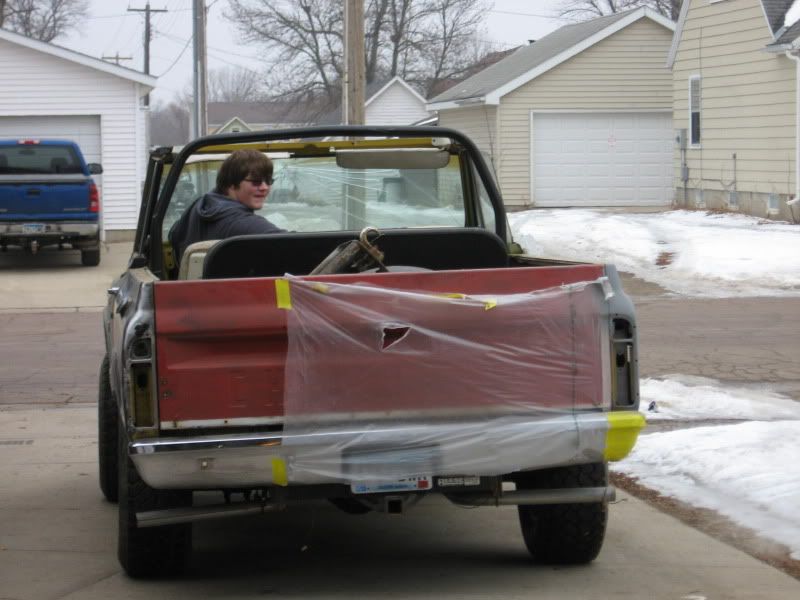 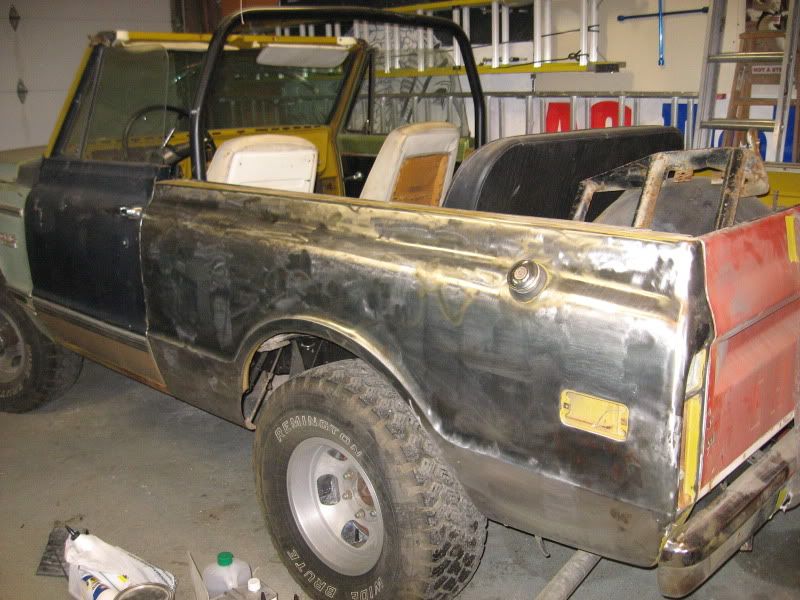 Now I can finish stripping paint off the bed rails and have access to the windshield frame for some pinhole repairs. My work load this past week and the next couple weeks my limit my garage time, but I should have this bedside in primer fairly soon. Then I'll do the windshield frame and look for any more trouble spots inside the tub so I can prep it for some als liner. BTW, that brief drive around the block was absolutely the best road trip I've had since I got my C-10 running right this past summer. I tried getting the rear U-bolts loose to slide my new blocks in. No go so far. Sprayed them with some penetrating oil a couple days back, still no luck with my impact driver hammering away. Tried a 5 foot pipe on the breaking bar and had no luck with that either. If I have to buy new U-bolts I'll probably go with a kit to flip them so the threads point upward, like this... http://offroaddesign.com/catalog/uboltreversal.htm
__________________
If no one knows what you're doing, they can't tell you you're doing it wrong HG's Dream Car Build - Shelby Cobra Kit Build your own adjustable track bar 71 Long Fleet C/10 72 Jimmy 4x4 (Junkyard Jimmy)HG's Plow Truck '78 K35 DuallyBigass Farm Truck HG's thread of miscellaneous stuff Last edited by hgs_notes; 02-05-2012 at 02:47 PM. |
|
|
|
|
02-05-2012, 05:54 PM
|
#604 |
|
GEARHEAD
Join Date: Aug 2003
Location: MN
Posts: 6,120
|
Re: Junkyard Jimmy Super Low Buck Build Thread
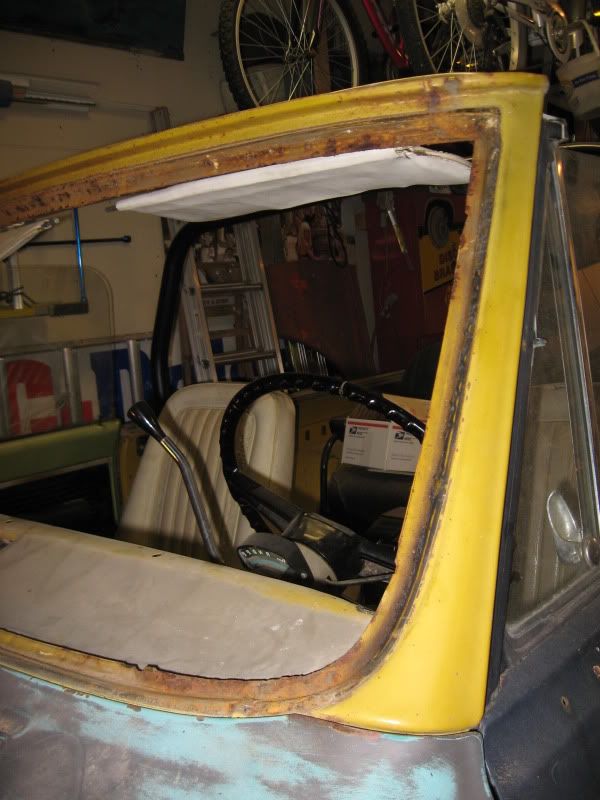
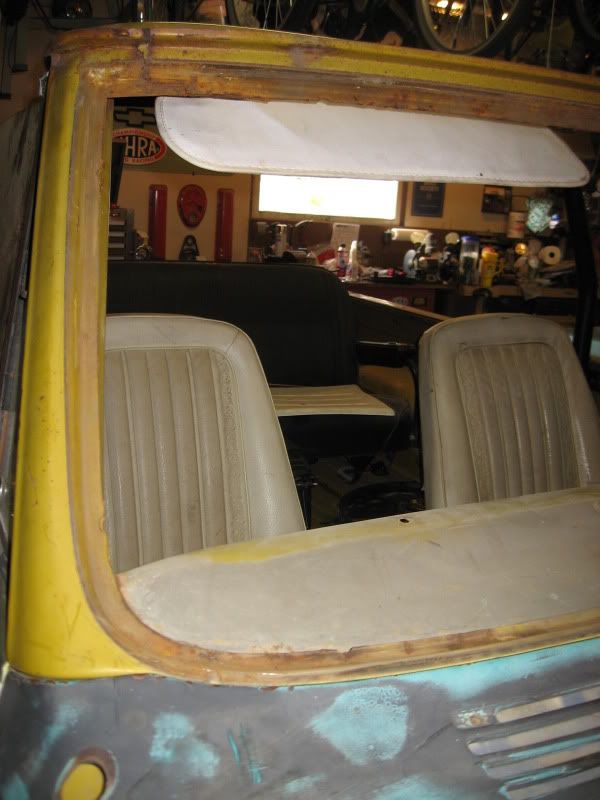
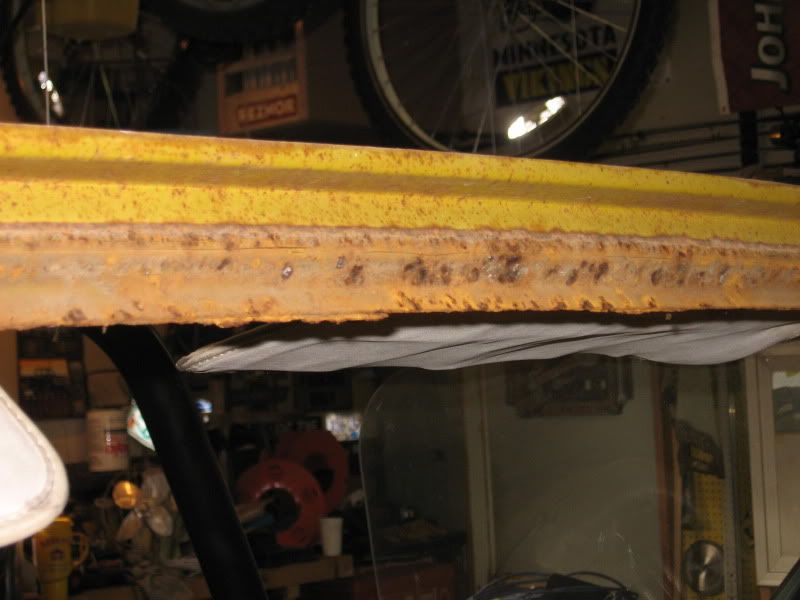
I took a little more time in the garage and got the old cracked windshield out. I think I got the trim pieces out without wrecking them. It looked alright under the gasket, but I'll have to wire wheel or sandblast it to be sure. The top middle (3rd pic) had the most corrosion, not sure if there are any pinholes yet. I pulled the visors out also. Not in very good shape, but worth a few bucks for the mounts. New visor pads from a truck or whatever can be slid onto the mounts. I'll post them in the classifieds for anyone interested. Now I feel like I can move forward with the body work.
__________________
If no one knows what you're doing, they can't tell you you're doing it wrong HG's Dream Car Build - Shelby Cobra Kit Build your own adjustable track bar 71 Long Fleet C/10 72 Jimmy 4x4 (Junkyard Jimmy)HG's Plow Truck '78 K35 DuallyBigass Farm Truck HG's thread of miscellaneous stuff Last edited by hgs_notes; 02-08-2012 at 10:27 PM. |
|
|
|
|
02-08-2012, 10:36 PM
|
#605 |
|
GEARHEAD
Join Date: Aug 2003
Location: MN
Posts: 6,120
|
Re: Junkyard Jimmy Super Low Buck Build Thread
Good news and bad news. The bad is that I found some rust on the windshield frame I didn't look at before. Right on the bottom inside that was hidden behind the gasket. Very disappointed with that. It's repairable, just a pain in the @$$.
 The good news is that I talked to my friends at the body shop here and they said I can use their spray booth to do my jimmy in. So that will be a better set up to work in when it comes time. Looks like I'll be cutting the bottom flat edge off the windshield frame and into the pinch weld for the gasket there. It should be a fairly easy piece to hand cut and form. This way I'll be able to get inside the frame and see how bad that is. I could probably sandblast in there a bit, then seal it up good in there to stop any further rust. I need to buy some sandblast sand soon. I hate stripping paint with a wirewheel when there is so much that needs to be done. Wondering what I'll find under the paint on the doors.
__________________
If no one knows what you're doing, they can't tell you you're doing it wrong HG's Dream Car Build - Shelby Cobra Kit Build your own adjustable track bar 71 Long Fleet C/10 72 Jimmy 4x4 (Junkyard Jimmy)HG's Plow Truck '78 K35 DuallyBigass Farm Truck HG's thread of miscellaneous stuff |
|
|
|
|
02-09-2012, 12:11 AM
|
#606 |
|
Vintage 4x4s
Join Date: Sep 2010
Location: Prior Lake, MN
Posts: 4,305
|
Re: Junkyard Jimmy Super Low Buck Build Thread
Mike, i bet it felt good to see the Jimmy driving around the block. Curious to see how you fix that windshield area, maybe it will give me some pointers for that little spot on my firewall i need to fix.
__________________
67 GMC K1500 Custom- 305V6 SM420, PTO, Ram Assist, yellow (the outcast) (project period correct upgrades) 67 GMC C2500 351V6 TH400, AC, PS, PB (can't decide what to do with. Update, decided to keep and will restore  ) )86 CHV K30 502 th400, apple red NEW 71 CHV K20 350 SM465, ochre (saved work truck) 71 CHV K20 292 SM465, white, tach, PTO, (future project) 72 CHV K20 350 350th, medium blue (project stocker) 01 CHV K2500hd crew, indigo blue ^3 dont run and the others don't see winter either '86 K30 Cummins "Fireside" thread: http://67-72chevytrucks.com/vboard/s...d.php?t=649649 '71 K20 "get driveable" thread: http://67-72chevytrucks.com/vboard/s...d.php?t=590642 '72 K20 Build Thread: http://67-72chevytrucks.com/vboard/s...=493477&page=6 |
|
|
|
|
02-09-2012, 02:32 AM
|
#607 |
|
VA72C10
 Join Date: Mar 2008
Location: Midlothian, VA
Posts: 25,269
|
Re: Junkyard Jimmy Super Low Buck Build Thread
Well, the rust is a downer but you've been able to meet all the other challenges on this one no problem! Cool deal on the paint booth!
__________________
Looking for a 67-72 swb or blazer project in or around VA. 
|
|
|
|
|
02-09-2012, 10:30 PM
|
#608 | ||
|
GEARHEAD
Join Date: Aug 2003
Location: MN
Posts: 6,120
|
Re: Junkyard Jimmy Super Low Buck Build Thread
Quote:
Quote:
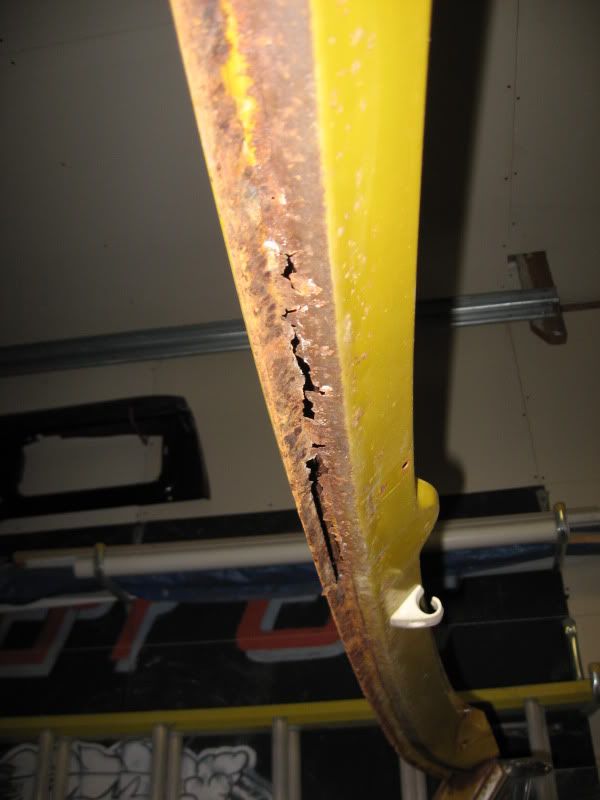
So I'm looking at my rusty windshield frame and wanted to determine just how rotted out this thing is. I start poking at it with a screw driver and basically every spot that has some brown is a hole waiting for the paint to fall out of. It's far worse than I imagined. So much for my rust free body. 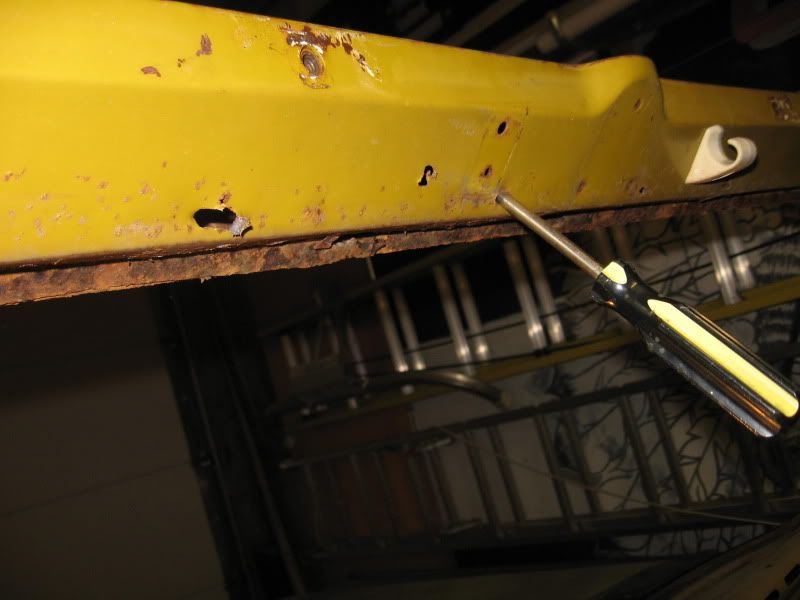 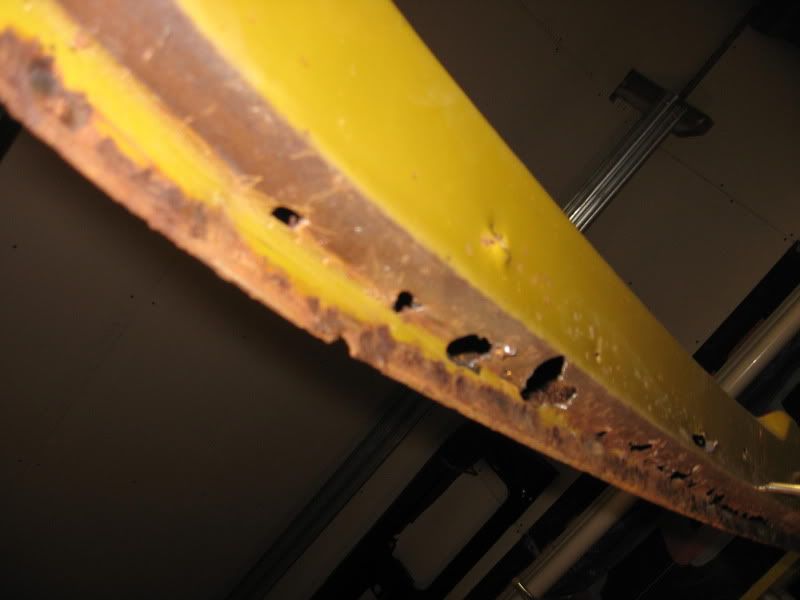 I wire wheeled the outside part of the gasket flange and find a couple small holes and some areas that are getting there. It might be salvageable. 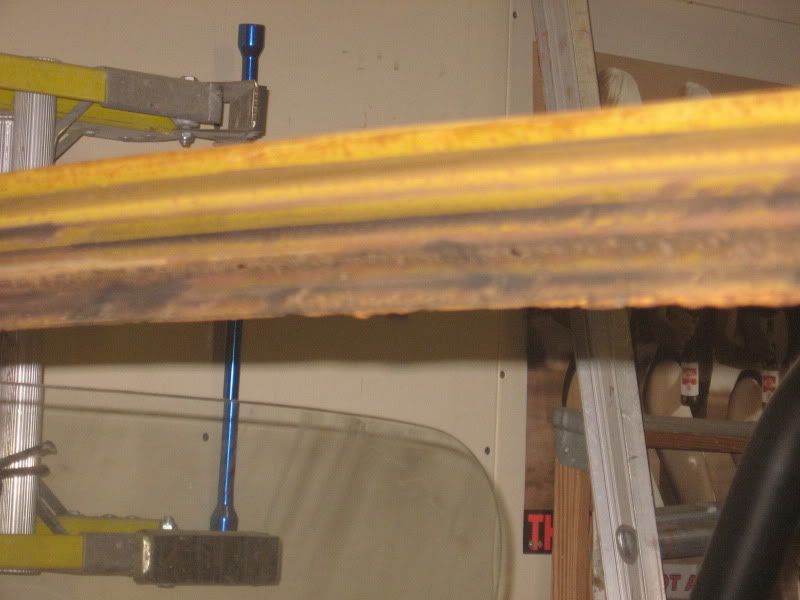 I could see where that front panel has split off from the rest of the frame, so I look closer and figure out that it would not be too hard to remove that part of the panel. I started with my air chisel on the pinch weld where the gasket seats. It split pretty easy where it wasn't rusted away already. Then on top I just used a mini crowbar and screw driver to pop the spot welds. 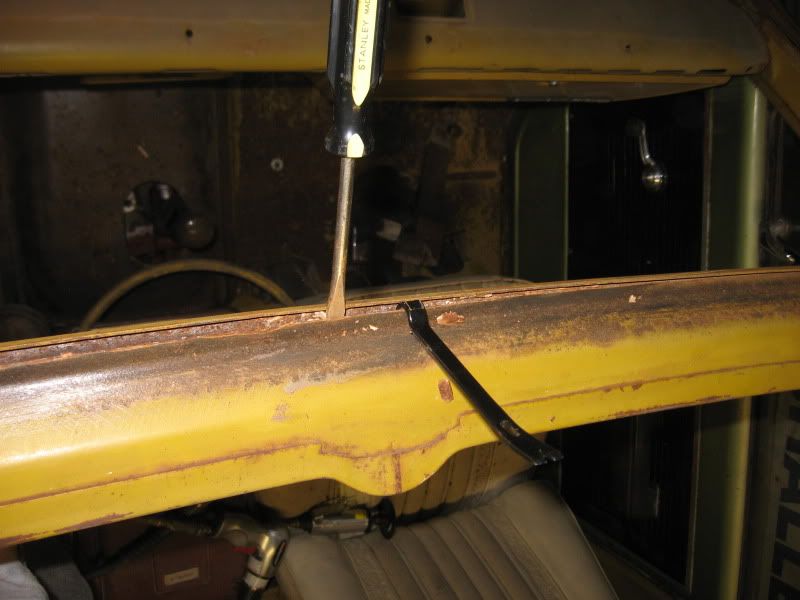 This end was the hardest because it had the least amount of rust, but still not a big problem. 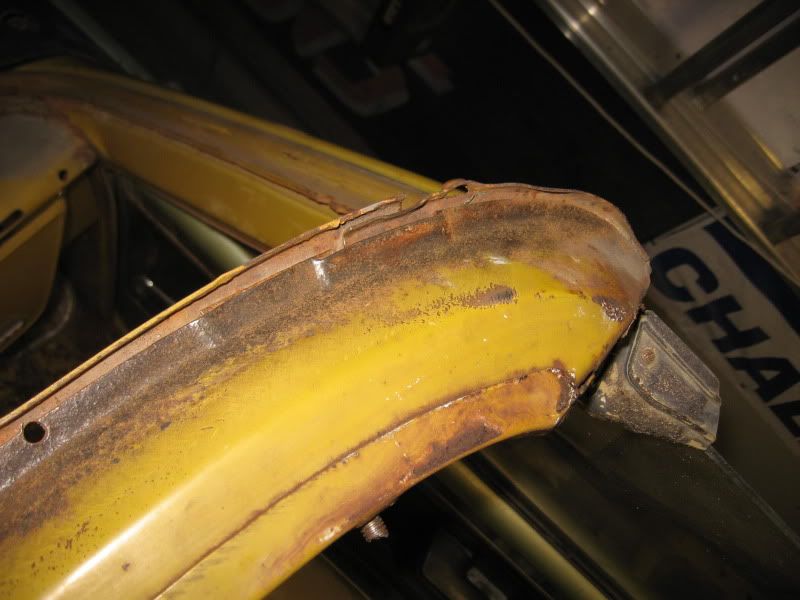 And here it is... 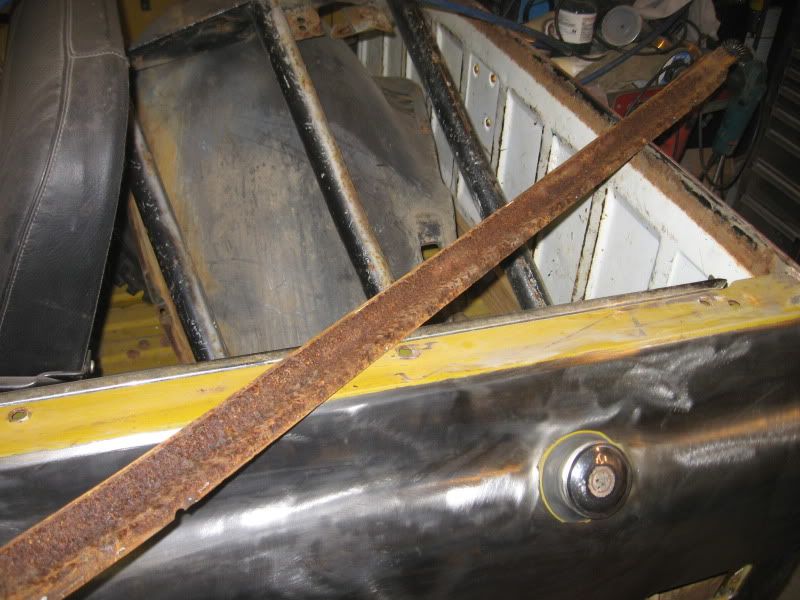 And the inside...  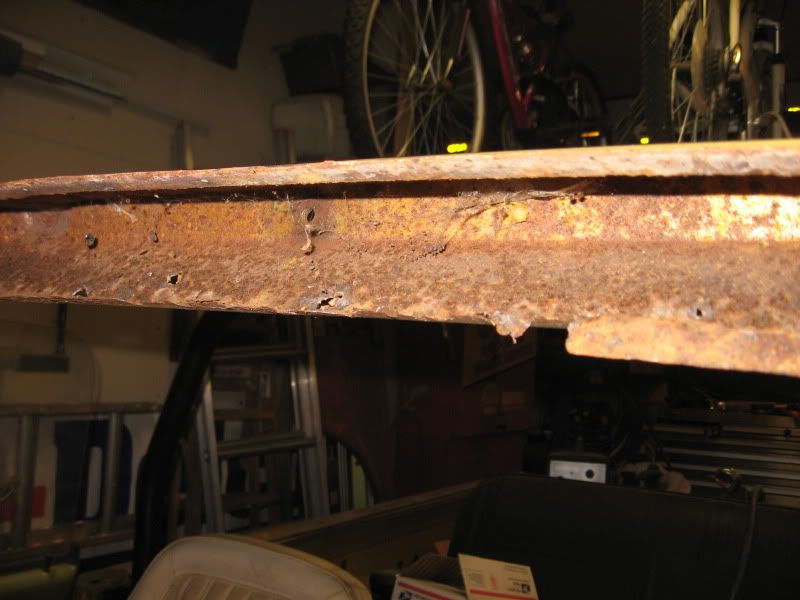 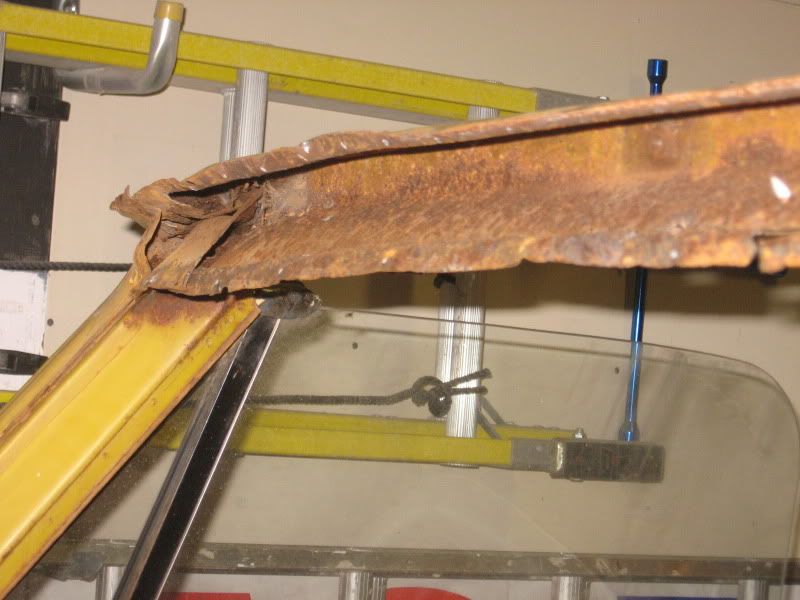 I think the front panel will need some small patches, but I'll sandblast it first and see what's left. The inner panel is a mess. There are places from end to end I can poke a screw driver through. At this point I am out nothing but my time. I decide that I'm going to try and make a new inner panel. Probably in 2 pieces, but I need to find someone with a shrinker/stretcher or buy one of the little air ones that is combined with a flanging tool. Wish me luck fellas, I'm going to need it. This is way past my previous comfort zone for rust repair. I cut it about 1/2" down from the upper bend. Much lower and the rust was still bad where the cut would be. I can use this as a flange to use panel adhesive to hold the patch in place. The inside will get sandblasted. Once the patch is in place I'll seal it up with rustoleum or something like it. Then after the front panel is fixed up, put it back in place. Thats the plan anyway. 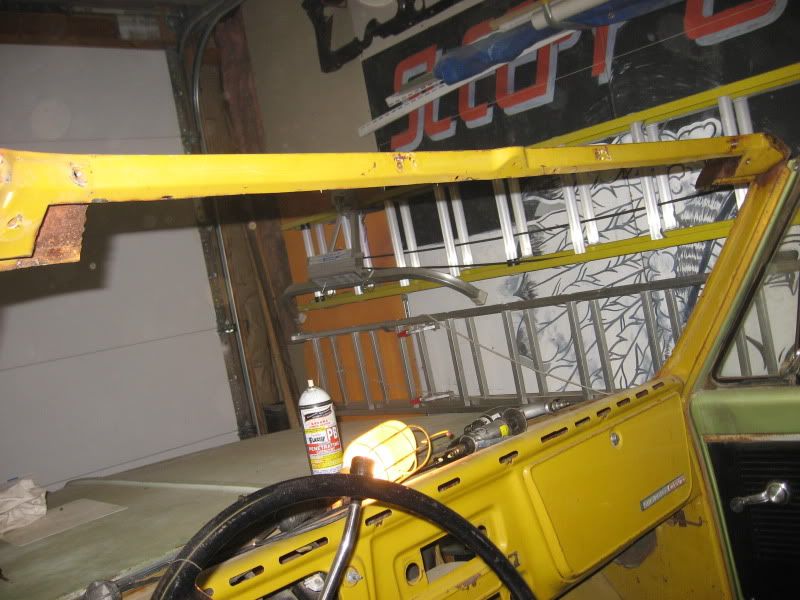 Inner panel back side. Icky. 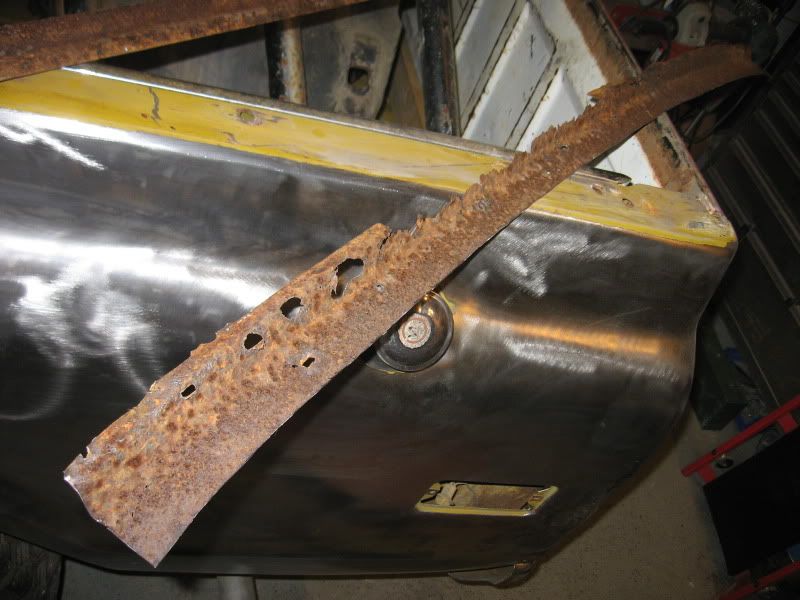
__________________
If no one knows what you're doing, they can't tell you you're doing it wrong HG's Dream Car Build - Shelby Cobra Kit Build your own adjustable track bar 71 Long Fleet C/10 72 Jimmy 4x4 (Junkyard Jimmy)HG's Plow Truck '78 K35 DuallyBigass Farm Truck HG's thread of miscellaneous stuff |
||
|
|
|
|
02-11-2012, 05:00 PM
|
#609 |
|
GEARHEAD
Join Date: Aug 2003
Location: MN
Posts: 6,120
|
Re: Junkyard Jimmy Super Low Buck Build Thread
I didn't have any luck finding someone locally with a shrinker/stretcher, so I found one of these on ebay today at a discount from new that was only used a couple times.
http://www.eastwood.com/shrinker-str...stwo-jaws.html I know of at least 3 places here in town I can get the sheetmetal and bend it to the right profile. Then I just need to see if I can make a replacement panel. If it goes well and I can make a good fitting patch panel I plan on making some extras to sell and make my money back for the tool purchase. I sandblasted the front panel and its not any worse than I thought, but will need some work to fix a few spots, then seal it up good to prevent any future problems. I should see what kind of deal I can find on a spot welder. It would sure make reinstalling this easier.
__________________
If no one knows what you're doing, they can't tell you you're doing it wrong HG's Dream Car Build - Shelby Cobra Kit Build your own adjustable track bar 71 Long Fleet C/10 72 Jimmy 4x4 (Junkyard Jimmy)HG's Plow Truck '78 K35 DuallyBigass Farm Truck HG's thread of miscellaneous stuff |
|
|
|
|
02-11-2012, 07:05 PM
|
#610 | |
|
VA72C10
Join Date: Mar 2008
Location: Midlothian, VA
Posts: 25,269
|
Re: Junkyard Jimmy Super Low Buck Build Thread
Quote:
__________________
Looking for a 67-72 swb or blazer project in or around VA.
|
|
|
|
|
|
02-14-2012, 10:06 PM
|
#611 |
|
GEARHEAD
Join Date: Aug 2003
Location: MN
Posts: 6,120
|
Re: Junkyard Jimmy Super Low Buck Build Thread
New tools were delivered today, can't wait to get started. Also may have found a winner on my paint color. I bought one of these today and the wife likes it. It's gold, but has just a hint of copper in it, so it is more brassy looking. It will probably be this or the amber gold metallic ford color seen below.
__________________
If no one knows what you're doing, they can't tell you you're doing it wrong HG's Dream Car Build - Shelby Cobra Kit Build your own adjustable track bar 71 Long Fleet C/10 72 Jimmy 4x4 (Junkyard Jimmy)HG's Plow Truck '78 K35 DuallyBigass Farm Truck HG's thread of miscellaneous stuff |
|
|
|
|
02-15-2012, 08:39 PM
|
#612 |
|
GEARHEAD
Join Date: Aug 2003
Location: MN
Posts: 6,120
|
Re: Junkyard Jimmy Super Low Buck Build Thread
I stopped at the body shop today to look through the color chip books and we think we can create the color I want by mixing up some of the ford amber gold and a porsche gold (forget the actual name) and find a ratio between the two that will make a fantastic gold color with some pearl and metallic.
Cleaned off some space from my work bench and tried out the new tools. That went well, so I found a guy in town that just installed a new power sheetmetal shear and had him cut me a piece to start fabbing up my patch panel. Cost me $5. He doesn't have a brake yet, so I had to go to another shop and that guy let me use his (free). I had a section of the rusty panel to use as a guide for the correct angle. I just did a single bend so I could use the shrinker/stretcher to make the curve, then planned to bend the windshield gasket flange in the vise. It took about an hour for my first try. It's not perfect but is about as good as any reproduction panels I've used so far. Once I start tacking it in place it should fit in about as good as you can get. 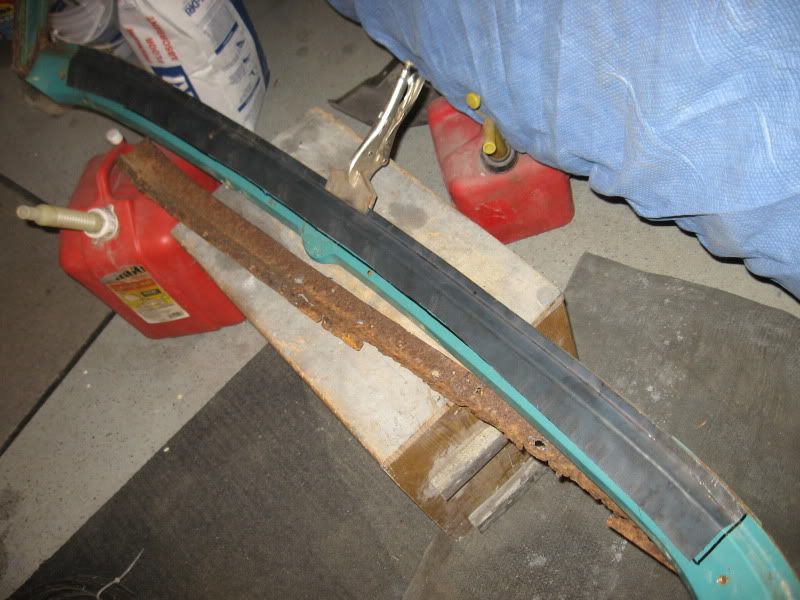 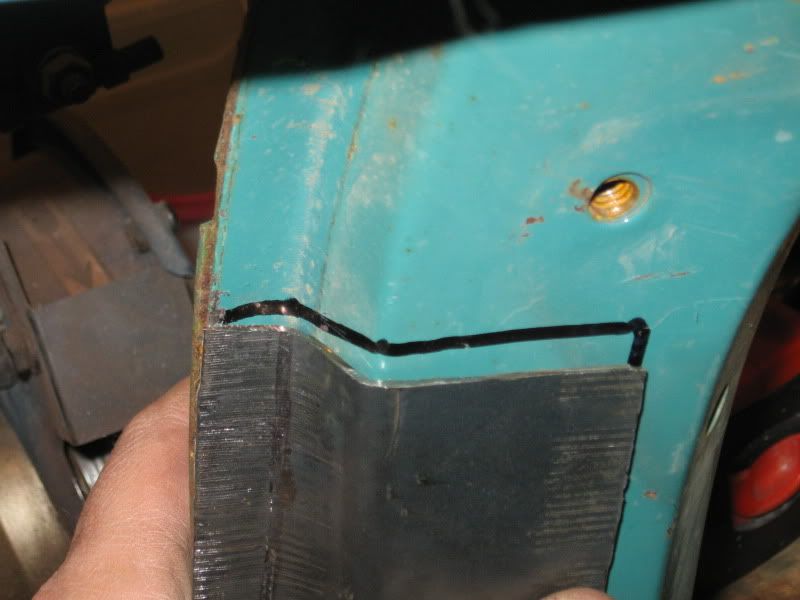 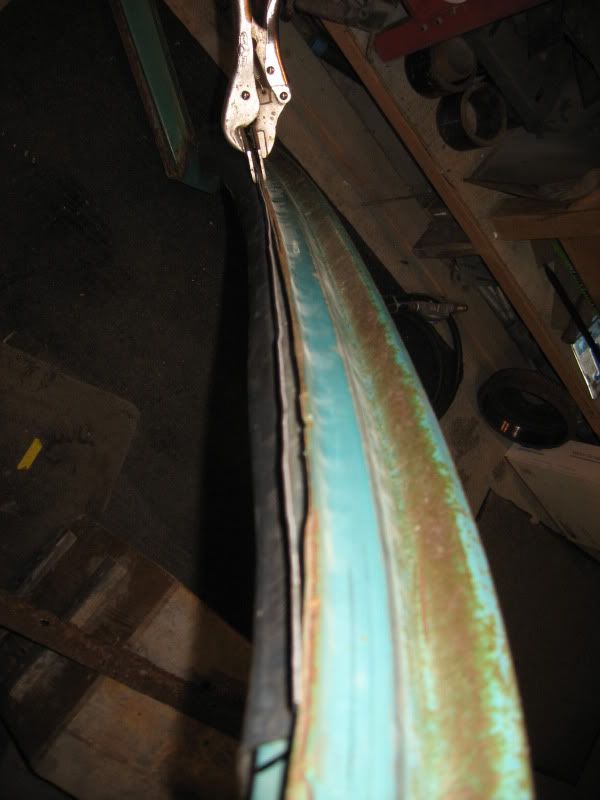 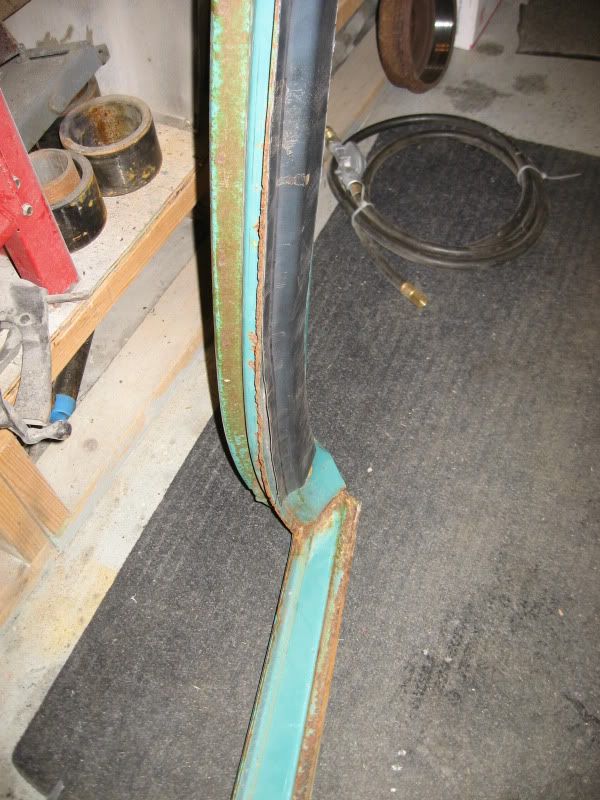
__________________
If no one knows what you're doing, they can't tell you you're doing it wrong HG's Dream Car Build - Shelby Cobra Kit Build your own adjustable track bar 71 Long Fleet C/10 72 Jimmy 4x4 (Junkyard Jimmy)HG's Plow Truck '78 K35 DuallyBigass Farm Truck HG's thread of miscellaneous stuff |
|
|
|
|
02-16-2012, 08:00 PM
|
#613 |
|
GEARHEAD
Join Date: Aug 2003
Location: MN
Posts: 6,120
|
Re: Junkyard Jimmy Super Low Buck Build Thread
No one's impressed with my patch? Oh well, back to the grind. I'm going to re-assemble the windshield frame by putting the front panel back in first, then the patch. To do that I need to get the front panel fixed up. There was quite a few holes in it, but I'm getting much better at filling those with my welder.
First it was sand blasted, then I hit the spots with holes with my wire wheel on an angle grinder. The welder is set to its lowest output and a fairly slow wire speed. Then I just do little tiny spot welds around the edge of the hole. Once that is built up a bit I use that as a backer to weave across over the hole. This method kept me from making things worse by blowing holes through it. I've found that the main reason a hole blows through is not having the weld area clean enough, which causes it to pop and blow through. Once I was done on the inside I flipped it over, cleaned it up a bit with a grinder, then went over it again to clean up any pin holes left behind. Then just clean the welds up with a flapper disc on the angle grinder and call it done. 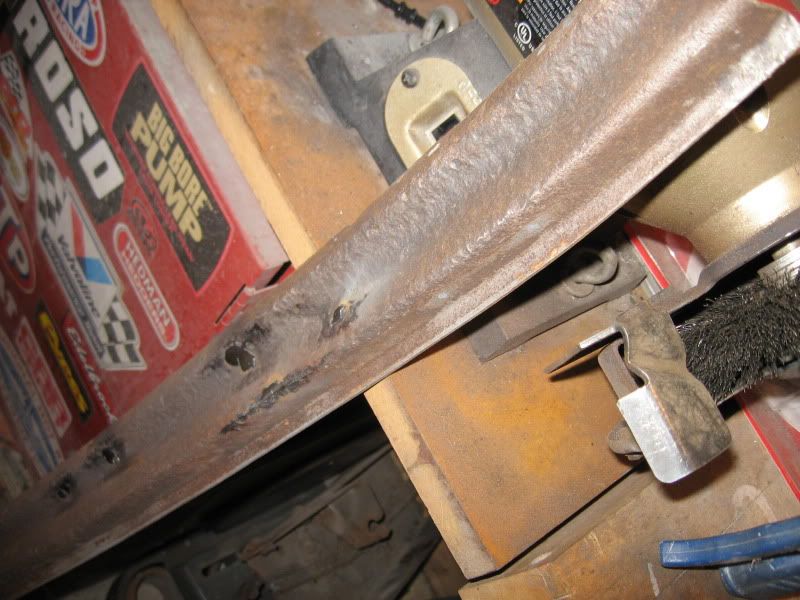 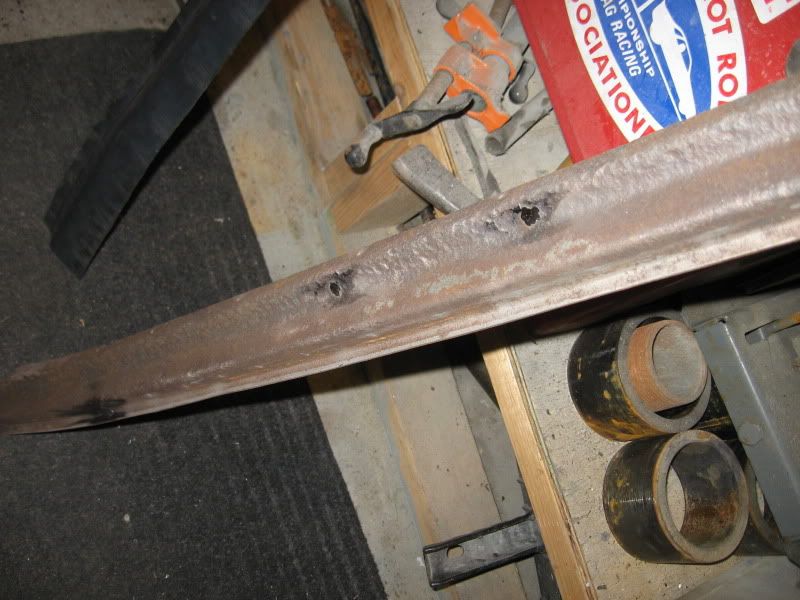 Next step is to clean up the frame on the truck to prep it for the repaired parts. In my case I need to sandblast the inside, then fix some of the spot welds that were loose. Then I'll paint the inside of that and the front panel with some rust encapsulator. I think I'll use the panel adhesive to reinstall the front panel. Then for the patch it will be a mix of welding to attach the patch in and adhesive on the gasket flange. Just have to see how it goes when I get to that point. Spot welders, the kind with the 2 electrodes that clamp onto the pieces to be welded, is something I could use. I'm looking at a couple but not sure I'll pull the trigger on one of those yet. There is a cheap version of one that hooks into a stick welder and has a consumable electrode and has a mixed bag from reviewers. Eastwood also sells it as do many others. Might be worth a shot. Any one have an opinion on these... http://www.harborfreight.com/spot-weld-gun-98759.html This is what I would like to get (back order)... http://www.harborfreight.com/230-vol...der-45690.html
__________________
If no one knows what you're doing, they can't tell you you're doing it wrong HG's Dream Car Build - Shelby Cobra Kit Build your own adjustable track bar 71 Long Fleet C/10 72 Jimmy 4x4 (Junkyard Jimmy)HG's Plow Truck '78 K35 DuallyBigass Farm Truck HG's thread of miscellaneous stuff |
|
|
|
|
02-16-2012, 09:11 PM
|
#614 |
|
Senior Member
Join Date: Nov 2003
Location: Brookings, SD
Posts: 10,497
|
Re: Junkyard Jimmy Super Low Buck Build Thread
Looking good!! Keep up the good work.
__________________
Some people are like slinkies, they aren't good for anything, but you can't help but smile when you see one tumble down the stairs. |
|
|
|
|
02-17-2012, 09:19 PM
|
#615 |
|
Registered User
Join Date: Jul 2011
Location: Des Moines, Iowa
Posts: 3,016
|
Re: Junkyard Jimmy Super Low Buck Build Thread
Toyota has a color similar, Sundance Metalic

__________________
project: "my happy mess" |
|
|
|
|
02-18-2012, 06:14 PM
|
#616 | ||
|
GEARHEAD
Join Date: Aug 2003
Location: MN
Posts: 6,120
|
Re: Junkyard Jimmy Super Low Buck Build Thread
Quote:
Quote:
Today I did the sandblasting inside the windshield frame, then used some rustoleum rust converter on it. I'm going to use 2 coats and hope for the best. If it rusts through sometime down the road, well I guess it'll need fixing again. Not really the worst spot to match paint on later if needed. 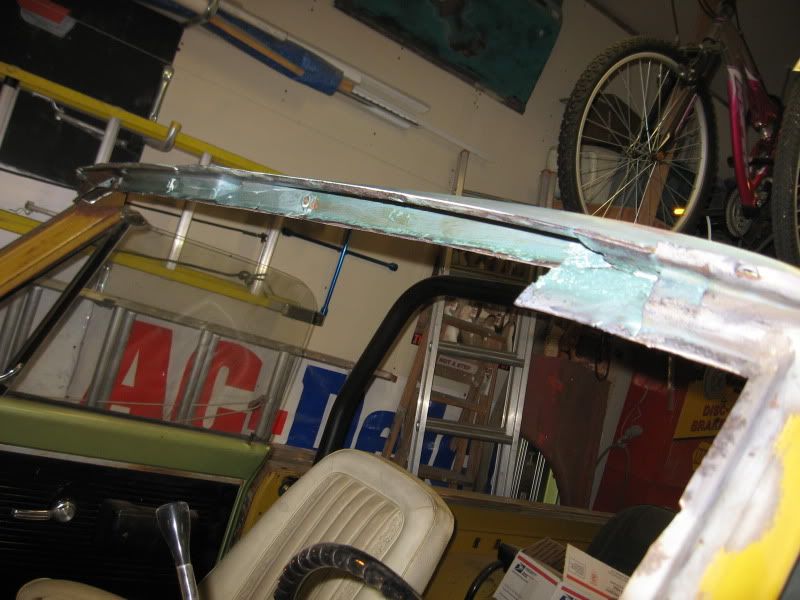 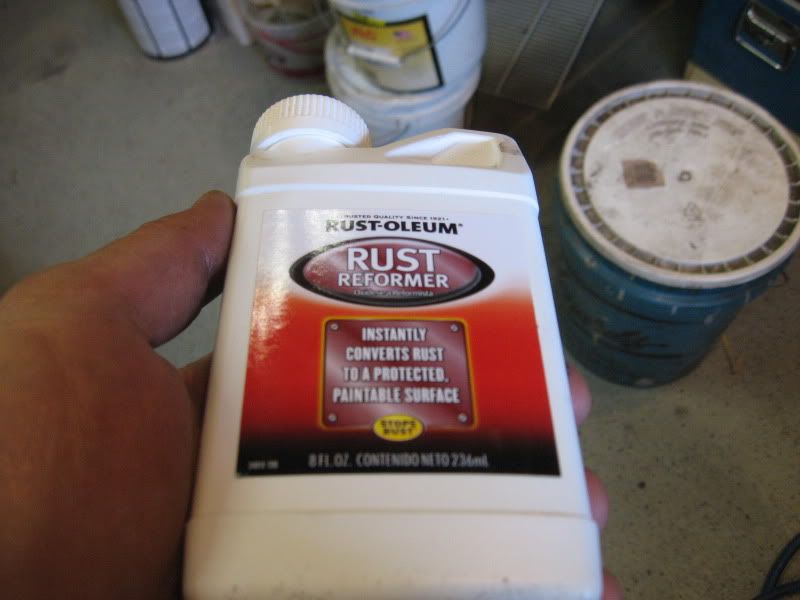 Since I was already covered in sand I blasted the push bar also. I'll get some primer/paint on it before too long. I think my left over chassis paint would work good for this. Chip resistant.  Sometime in the next few days I'll get that front panel back on and then see how my patch works out. You may be intersted to know that the front panel above the windshield is much thicker steel than the back bottom part. It's about .070" and the back part is about .050". If the front was as thin as the back it would have been a total goner with rust. Almost forgot that a couple more small holes showed up on the passenger side of the windshield frame, above the top corner. So I have to do a little more welding to close it up. My advice to anyone looking to buy a blazer/jimmy is bring a small screw driver or scribe and poke at any surface rust you see around the windshield. Especially behind where the gasket is on top. Mine looked ok in the photos and I never noticed how bad it was until I pulled the windshield out. It was toast. No regrets on buying the tub though. It's still far better than anything I could get around here. I've been able to learn some new techniques for body repairs and got some cool new tools to work with.
__________________
If no one knows what you're doing, they can't tell you you're doing it wrong HG's Dream Car Build - Shelby Cobra Kit Build your own adjustable track bar 71 Long Fleet C/10 72 Jimmy 4x4 (Junkyard Jimmy)HG's Plow Truck '78 K35 DuallyBigass Farm Truck HG's thread of miscellaneous stuff |
||
|
|
|
|
02-19-2012, 05:01 PM
|
#617 |
|
GEARHEAD
Join Date: Aug 2003
Location: MN
Posts: 6,120
|
Re: Junkyard Jimmy Super Low Buck Build Thread
Kind of bouncing around on different tasks. I need to let that rust converter set up and I didn't have enough panel adhesive to install the front panel of the windshield frame, so I took care of my seat mounting problem.
If you remember the drivers seat frame holes lined up on the front, but someone changed the rear mounting under the floor. The little plate with nuts was moved a couple inches back so I could only bolt the front of the seat down. Not exactly safe. The holes were still in the floor, so I cut some 1/4" x 2" steel to about 4-1/4" long, drilled holes in that to match the seat frame and the floor holes, threaded the holes, screwed in some 5/16-18 x 1-1/2" bolts, spot welded the bolt heads and have some nifty heavy duty seat backing plates. Instead of bolting down through the seat bracket and into the floor, I'll have some studs sticking up and use nuts on the top end. 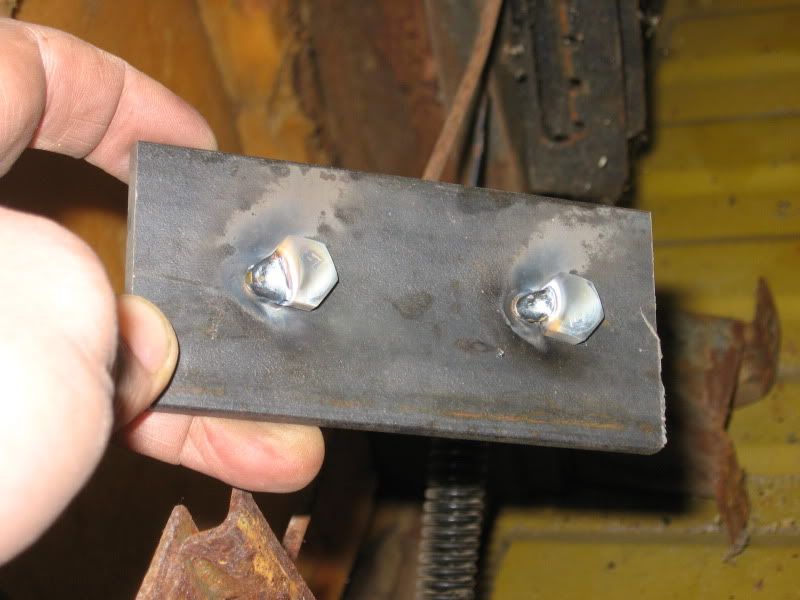 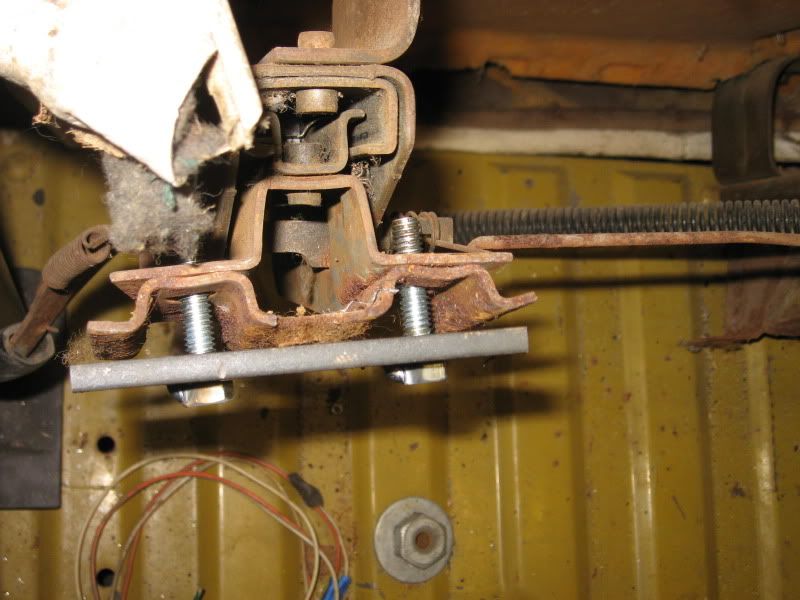
__________________
If no one knows what you're doing, they can't tell you you're doing it wrong HG's Dream Car Build - Shelby Cobra Kit Build your own adjustable track bar 71 Long Fleet C/10 72 Jimmy 4x4 (Junkyard Jimmy)HG's Plow Truck '78 K35 DuallyBigass Farm Truck HG's thread of miscellaneous stuff |
|
|
|
|
02-25-2012, 12:28 PM
|
#618 |
|
GEARHEAD
Join Date: Aug 2003
Location: MN
Posts: 6,120
|
Re: Junkyard Jimmy Super Low Buck Build Thread
Since the last update I had fallen on some ice and had some pretty nasty back pain. Today is the first day I've felt I could move around and not make it worse. Just a dull ache now rather than the sharp pain in the ribs I had until yesterday.
 This morning I finally got the rest of the pinholes filled and reinstalled the front panel of the windshield frame. I needed to tweak the curve a bit on one end for fit, otherwise I went right back in just fine. I added some adhesive between the layers in the top corners since the spot welds were loose there. I will probably end up adding some welds outboard of this panel on the top to get it nailed down solid. I'll post a pic of that when I do it so you know what I'm talking about. I went with adhesive on all of the seams because it bonds the panels together real good and also completely seals the steel from any moisture along the entire seam. This will stop any more rust right in the pinch weld area and act as a seal in addition to the normal seam sealer used in the drip rail. Now just wait a few hours for it to set up and I can continue with the fit of the repair panel I made. Kind of excited to see how this goes. I can't recall seeing anyone else on the board doing this kind of repair, but it must have been done before. 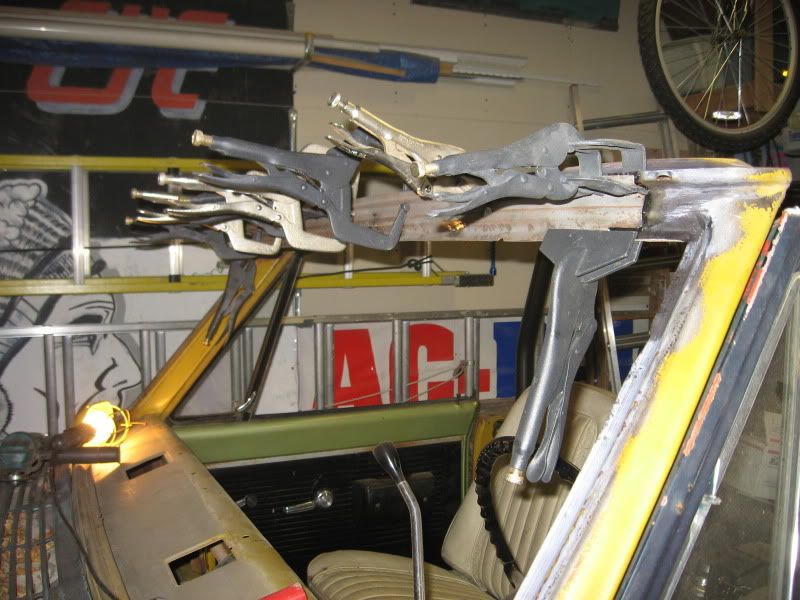
__________________
If no one knows what you're doing, they can't tell you you're doing it wrong HG's Dream Car Build - Shelby Cobra Kit Build your own adjustable track bar 71 Long Fleet C/10 72 Jimmy 4x4 (Junkyard Jimmy)HG's Plow Truck '78 K35 DuallyBigass Farm Truck HG's thread of miscellaneous stuff Last edited by hgs_notes; 02-25-2012 at 12:33 PM. |
|
|
|
|
02-26-2012, 10:23 AM
|
#619 |
|
GEARHEAD
Join Date: Aug 2003
Location: MN
Posts: 6,120
|
Re: Junkyard Jimmy Super Low Buck Build Thread
Success!
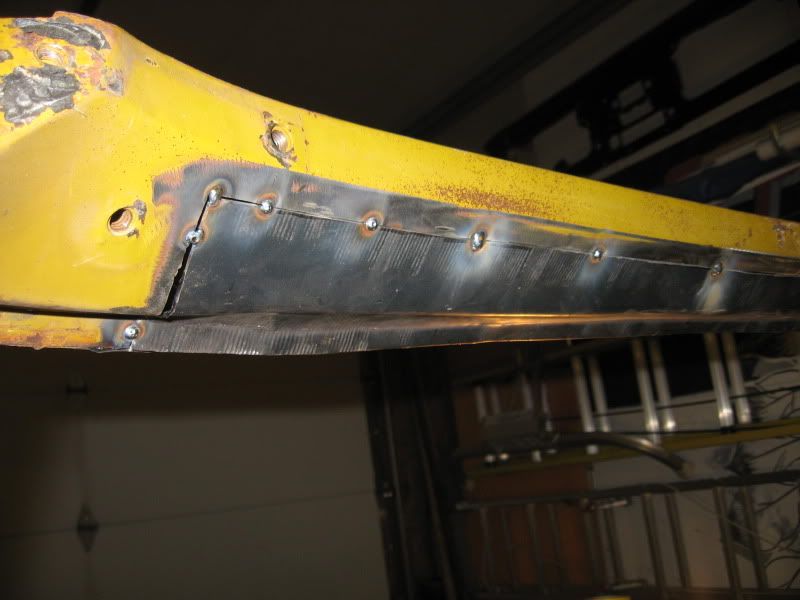
    Believe it or not, this is the first time my repair panel has been clamped into this frame for a test fit. All the work on it to this point was using another frame and the pieces I cut out for reference. I need to make a little adjustment on the right side and a little trimming, but overall, I could not be happier with the fit. Once this is welded and glued into the frame, I can see the light at the end of the bodywork tunnel. 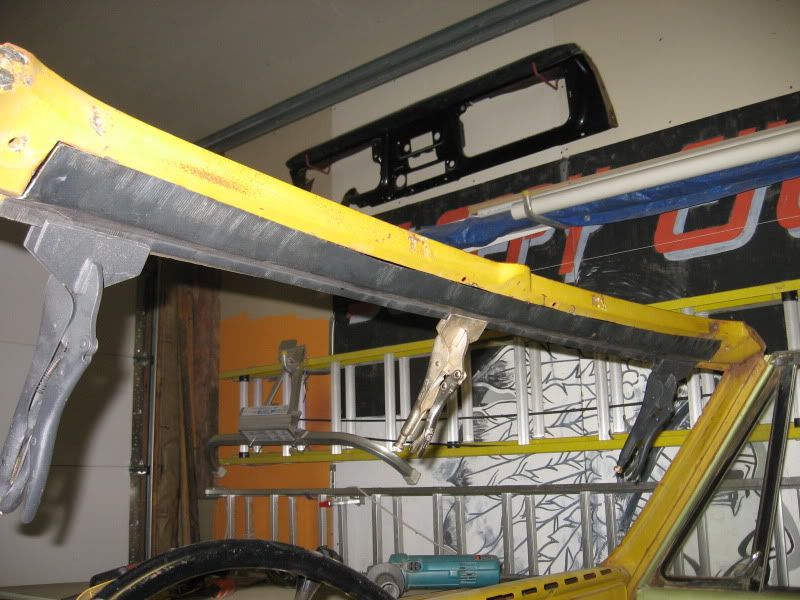  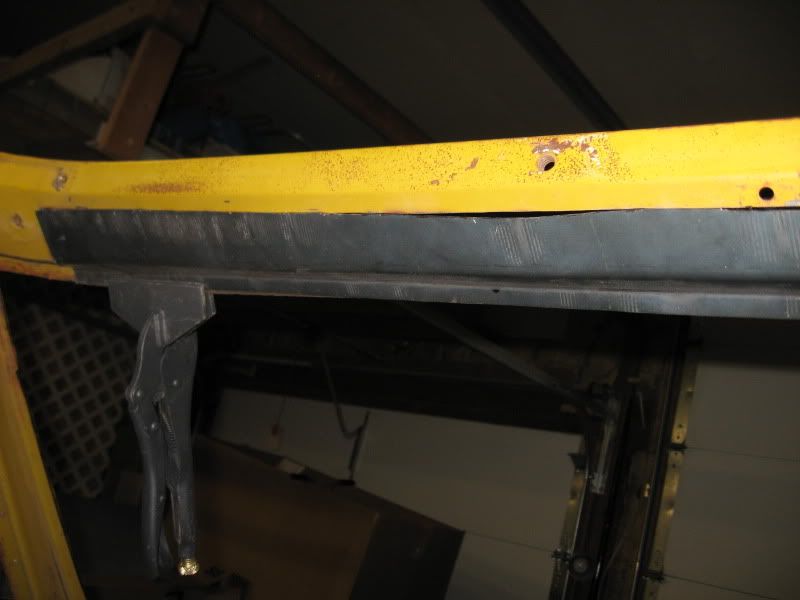
__________________
If no one knows what you're doing, they can't tell you you're doing it wrong HG's Dream Car Build - Shelby Cobra Kit Build your own adjustable track bar 71 Long Fleet C/10 72 Jimmy 4x4 (Junkyard Jimmy)HG's Plow Truck '78 K35 DuallyBigass Farm Truck HG's thread of miscellaneous stuff |
|
|
|
|
02-26-2012, 11:21 AM
|
#620 |
|
Vintage 4x4s
Join Date: Sep 2010
Location: Prior Lake, MN
Posts: 4,305
|
Re: Junkyard Jimmy Super Low Buck Build Thread
Mike, looks great, looking forward to more photos of the process as you finish up this repair. Keep it up.
__________________
67 GMC K1500 Custom- 305V6 SM420, PTO, Ram Assist, yellow (the outcast) (project period correct upgrades) 67 GMC C2500 351V6 TH400, AC, PS, PB (can't decide what to do with. Update, decided to keep and will restore )86 CHV K30 502 th400, apple red NEW 71 CHV K20 350 SM465, ochre (saved work truck) 71 CHV K20 292 SM465, white, tach, PTO, (future project) 72 CHV K20 350 350th, medium blue (project stocker) 01 CHV K2500hd crew, indigo blue ^3 dont run and the others don't see winter either '86 K30 Cummins "Fireside" thread: http://67-72chevytrucks.com/vboard/s...d.php?t=649649 '71 K20 "get driveable" thread: http://67-72chevytrucks.com/vboard/s...d.php?t=590642 '72 K20 Build Thread: http://67-72chevytrucks.com/vboard/s...=493477&page=6 |
|
|
|
|
02-26-2012, 04:22 PM
|
#621 | |
|
GEARHEAD
Join Date: Aug 2003
Location: MN
Posts: 6,120
|
Re: Junkyard Jimmy Super Low Buck Build Thread
Quote:
   If anyone is interested in having me fab up some patches for your own rusty windshield frame, just PM me. I can make it like this one or shorter pieces, as needed. I have a pretty good original frame I use as a guide.
__________________
If no one knows what you're doing, they can't tell you you're doing it wrong HG's Dream Car Build - Shelby Cobra Kit Build your own adjustable track bar 71 Long Fleet C/10 72 Jimmy 4x4 (Junkyard Jimmy)HG's Plow Truck '78 K35 DuallyBigass Farm Truck HG's thread of miscellaneous stuff |
|
|
|
|
|
02-26-2012, 07:37 PM
|
#622 |
|
VA72C10
Join Date: Mar 2008
Location: Midlothian, VA
Posts: 25,269
|
Re: Junkyard Jimmy Super Low Buck Build Thread
Looks really good!
__________________
Looking for a 67-72 swb or blazer project in or around VA.
|
|
|
|
|
02-27-2012, 07:29 PM
|
#623 |
|
6>8 Plugless........
 Join Date: Sep 2007
Location: Prairie City, Ia
Posts: 17,140
|
Re: Junkyard Jimmy Super Low Buck Build Thread
Great work on that repair! That is an awesome patch panel you made and I'm sure you could sell those! Once you get that welded back up, I'd go a long the out side windshield lip and drill some holes and spot weld the 2 pieces back together just to make it stronger. You did a great job on it though! Sorry to hear about your trip and fall. Next time go some where in the spring!
__________________
Ryan 1972 Chevy Longhorn K30 Cheyenne Super, 359 Inline 6 cylinder, Auto Trans, Tilt, Diesel Tach/Vach, Buckets, Rare Rear 4-link and air ride option Build Thread 1972 GMC Sierra Grande Longhorn 4x4 1972 Chevy Cheyenne Super K20 Long Step side tilt, tach, tow hooks, AC, 350 4 speed 1972 C10 Suburban Custom Deluxe 1969 Chevy milk truck 1971 Camaro RS 5.3 BTR STG3 Cam Super T10 1940 Ford 354 Hemi 46RH Ford 9" on air ride huge project Tired of spark plugs? Check this out. |
|
|
|
|
02-28-2012, 07:20 PM
|
#624 | |
|
GEARHEAD
Join Date: Aug 2003
Location: MN
Posts: 6,120
|
Re: Junkyard Jimmy Super Low Buck Build Thread
Quote:
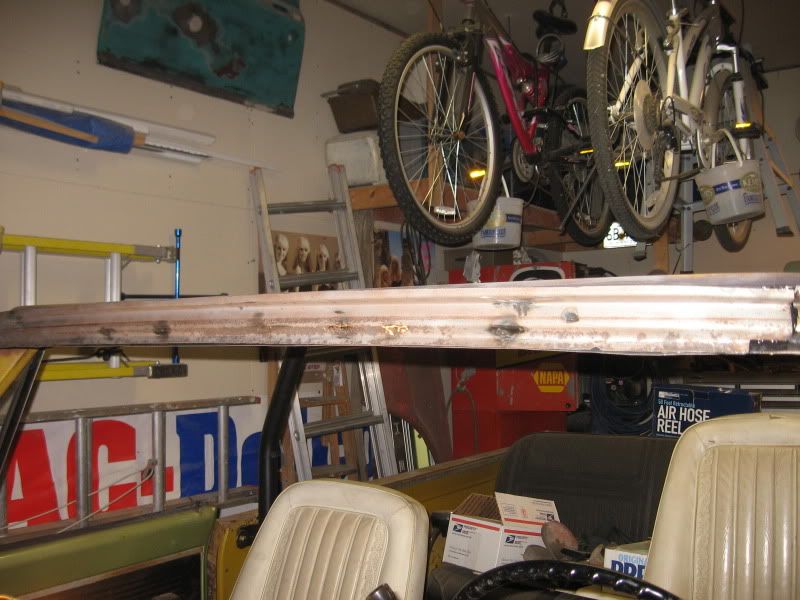
Now that the inner panel is welded up I'll do the pinchweld area for the windshield gasket. Looks like I have some holes to drill. This is the most welding I've done in a little while. Just starting to get my groove back. I found another trouble spot though, the last few inches on the driver side is real thin (2nd pic). I couldn't get it to weld, just burnt away. One more small patch, spot weld the flange, and it's ready for bodywork and primer. 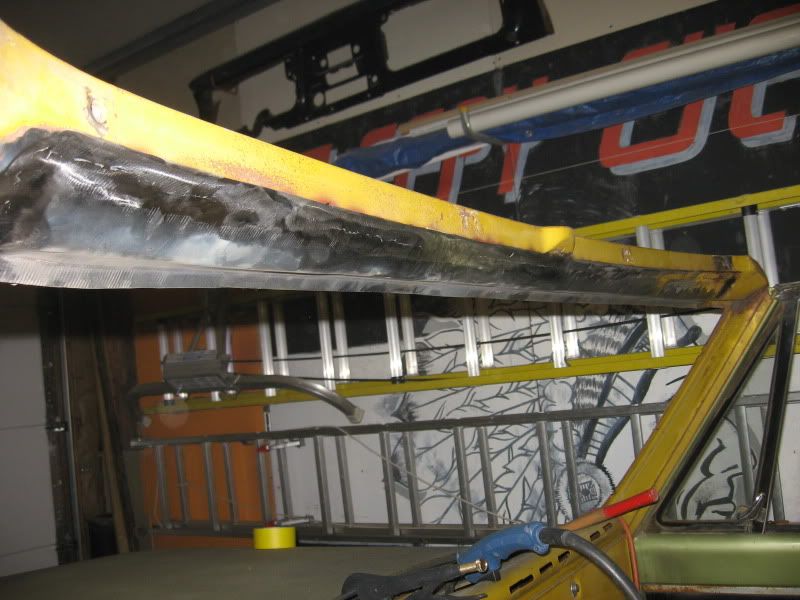 Bad pic, but it is paper thin on the left. 
__________________
If no one knows what you're doing, they can't tell you you're doing it wrong HG's Dream Car Build - Shelby Cobra Kit Build your own adjustable track bar 71 Long Fleet C/10 72 Jimmy 4x4 (Junkyard Jimmy)HG's Plow Truck '78 K35 DuallyBigass Farm Truck HG's thread of miscellaneous stuff |
|
|
|
|
|
02-28-2012, 08:26 PM
|
#625 |
|
Senior Member
Join Date: Nov 2003
Location: Brookings, SD
Posts: 10,497
|
Re: Junkyard Jimmy Super Low Buck Build Thread
Looking good!! When do you plan to paint this one?
__________________
Some people are like slinkies, they aren't good for anything, but you can't help but smile when you see one tumble down the stairs. |
|
|
|
 |
| Bookmarks |
|
|


 Linear Mode

