
|
 09-24-2010, 10:39 AM
|
#51 |
|
Registered User
Join Date: Jun 2010
Location: Charleston Wv
Posts: 159
|
Re: 56 pro touring build
Looks great!
Posted via Mobile Device |

|

|
|
09-24-2010, 11:39 AM
|
#52 |
|
Certified Car Nut
Join Date: Jan 2005
Location: Inglewood, California
Posts: 3,118
|
Re: 56 pro touring build
Anything is looking really nice. Keep up the good work.
|
|
|
|
|
10-10-2010, 10:20 PM
|
#53 |
|
56 - autocross
Join Date: Apr 2010
Location: Camarillo, Ca
Posts: 1,121
|
Re: 56 pro touring build
The frame cross member is close to done. TIG welded the cross members and bracing. We have one 1 1/2 inch tube tube in the front of the "X" that has not been installed as this will go all the way to the sides of the cab. It will attach to the outriggers that will attach the roll cage to the frame. We will install it when we test fit the cab. Right now we are waiting for a rear end, sway bar ends, brakes, and rims.
|
|
|
|
|
10-11-2010, 01:39 AM
|
#54 |
|
Registered User
Join Date: Nov 2008
Location: Prince George, BC, CAN
Posts: 60
|
Re: 56 pro touring build
This is a very intriquing thread to read. Welding looks great, too. Now maybe I overlooked the obvious, and I don't want to sound like a know-it-all, but I'm wondering where the driveshaft will live with all the cross members in place and the C-notch. Am I not seeing something, or is it pretty tight underneath?
PS - Keep posting the pics, I love to see what everyone else is doing!
__________________
If the women don't find you handsome, they should at least find you handy... Red Green Keep your stick on the ice, Woodbutcher |
|
|
|
|
10-11-2010, 01:53 AM
|
#55 |
|
56 - autocross
Join Date: Apr 2010
Location: Camarillo, Ca
Posts: 1,121
|
Re: 56 pro touring build
You are right. It is a concern. I do not have the rear end that is going in the truck but we do have a 12 bolt. we took some measurements and it may be close, but not sure. We am waiting for a friend to get me a deal on one (ford 9"). If it is an issue, we will cut out the center section in between the small braces and weld in a hoop. We just cant wait anymore. We were willing to take the chance. I do know for sure that the front cross may have an issue so that was another reason that it is not welded in yet. This truck will be coilovered and not bagged, so I am not sure how much of the notch we will be using. We are looking for a 7" or so ride height. We might just be using an inch or so of the notch. Stay tuned to see.
|
|
|
|
|
10-12-2010, 10:45 PM
|
#56 |
|
Registered User
Join Date: Sep 2009
Location: Albuquerque, NM
Posts: 540
|
Re: 56 pro touring build
Was wondering if you could show a few pictures? #1. Need a picture of the firewall on the backside of the seam where you shaved off the lip. #2. Can you show the weld inside of the tube that you used to box in the frame. #3When you are shaving the frame did you use plugs or just weld the hole closed?
__________________
FAT MIKE My 59 http://67-72chevytrucks.com/vboard/s...d.php?t=400201 My 47 http://67-72chevytrucks.com/vboard/s...d.php?t=386848 |
|
|
|
|
10-13-2010, 01:35 AM
|
#57 |
|
56 - autocross
Join Date: Apr 2010
Location: Camarillo, Ca
Posts: 1,121
|
Re: 56 pro touring build
Hey Fat Mike (I feel funny calling you that). I am not happy with the way the firewall came out because of the warping. We will cut it out and start over. We did weld the three panels together where they join. The panels just did not line up too well. If I had to do it over again, I would have gone on to other things and let it alone. We (you and I) both wanted and asked Cajundragger (I think) about pictures of what he did with that internal cowl. He said that he got rid of it but I have not seen any pics yet. We will cut ours to get the old firewall and try to reattach it but it may be garbage. I dont really see too much use for it anyways as we are not going to use the old ventilation system anyways. The stiffening tubes (I hope this is what you are referring to) located in the frame box will be welded to the inside of the old frame rails once we have the frame on a level surface. It will be the final part of the frame build. Want to make sure that everything is right. We found out the hard way that every important step needs to be at least tacked in place with the frame in a level position. Once tacked in we put it back on the rotisserie and it sure makes things easier. All the smaller holes were just welded shut. We have not done the big ones yet and dont know if we are. If so, I would use a plug. If I did not answer your questions correctly or need more info let me know.
Last edited by hotrod1; 10-13-2010 at 01:37 AM. Reason: mistake |
|
|
|
|
10-13-2010, 04:59 PM
|
#58 |
|
Registered User
Join Date: Sep 2009
Location: Albuquerque, NM
Posts: 540
|
Re: 56 pro touring build
Thank you for the info!!
__________________
FAT MIKE My 59 http://67-72chevytrucks.com/vboard/s...d.php?t=400201 My 47 http://67-72chevytrucks.com/vboard/s...d.php?t=386848 |
|
|
|
|
10-16-2010, 01:21 AM
|
#59 |
|
Registered User
Join Date: Dec 2009
Location: Ventura, Ca.
Posts: 439
|
Re: 56 pro touring build
My son and I are going down to Pomona on Sunday, Call me if you need anything.
bb
__________________
http://67-72chevytrucks.com/vboard/s...d.php?t=385404 |
|
|
|
|
11-02-2010, 01:43 PM
|
#60 |
|
56 - autocross
Join Date: Apr 2010
Location: Camarillo, Ca
Posts: 1,121
|
Re: 56 pro touring build
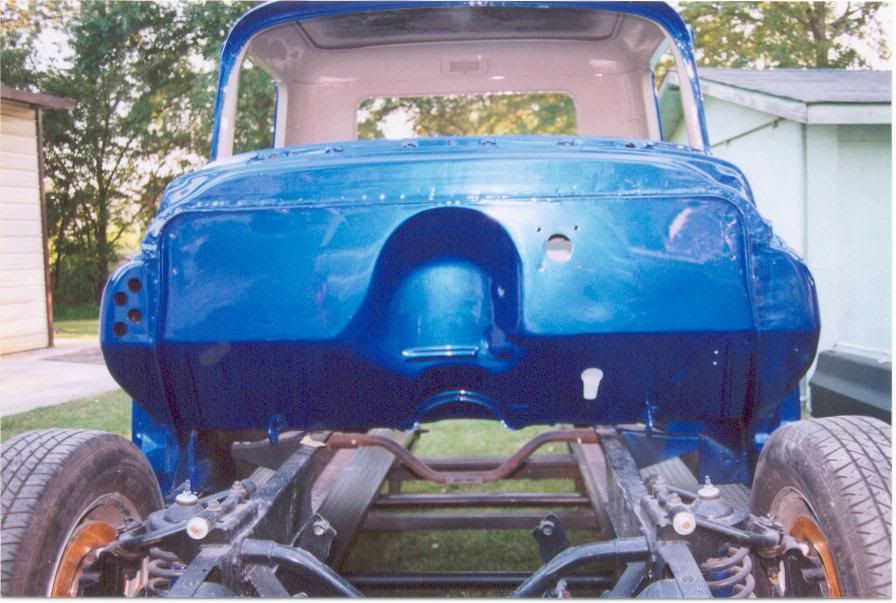
While waiting for the rearend, brakes, and mock up powertrain we decided to redo the firewall.
Used tape to outline the cut area and used a fiber wheel on an angle grinder for the straight cuts and a air scroll saw for the corners. Also cut the internal cowl from the inside of the cab. Piece of cake. Everything is a piece of cake after working on the frame. After all the cuts, there were some spot welds that needed a bit of help from an air chisel. Here is how it looks. Not quite sure what to do with the side air cowls. Any suggestions? We wont need them for air as that will be closed off. |
|
|
|
|
11-02-2010, 04:30 PM
|
#61 |
|
Registered User
 Join Date: Feb 2010
Location: Cardiff, CA
Posts: 131
|
Re: 56 pro touring build
I did see one guy run his A/C and heater hoses through there to hide them. Or you could just mount some speakers.
Last edited by Spackle100; 11-02-2010 at 04:31 PM. |
|
|
|
|
11-02-2010, 04:42 PM
|
#62 |
|
Registered User
Join Date: Feb 2010
Location: Cardiff, CA
Posts: 131
|
Re: 56 pro touring build
|
|
|
|
|
11-02-2010, 05:17 PM
|
#63 |
|
Registered User
Join Date: Sep 2009
Location: Albuquerque, NM
Posts: 540
|
Re: 56 pro touring build
Ironworks project gallery also put his ac controls in that same spot. Check out his build when you get a chance. Can you also show pictures of the internal cowl that your arte cutting out while you are doing it.
__________________
FAT MIKE My 59 http://67-72chevytrucks.com/vboard/s...d.php?t=400201 My 47 http://67-72chevytrucks.com/vboard/s...d.php?t=386848 Last edited by Fat Mike; 11-02-2010 at 05:27 PM. |
|
|
|
|
11-02-2010, 05:35 PM
|
#64 |
|
56 - autocross
Join Date: Apr 2010
Location: Camarillo, Ca
Posts: 1,121
|
Re: 56 pro touring build
He Mike: Where would I find his build. I did not see it.
|
|
|
|
|
11-02-2010, 05:47 PM
|
#65 |
|
Registered User
Join Date: Sep 2009
Location: Albuquerque, NM
Posts: 540
|
Re: 56 pro touring build
The shop is called ironworks speed and custom. I find it under google. He has a 48 truck and a 57 under the project gallery.
__________________
FAT MIKE My 59 http://67-72chevytrucks.com/vboard/s...d.php?t=400201 My 47 http://67-72chevytrucks.com/vboard/s...d.php?t=386848 |
|
|
|
|
11-02-2010, 08:22 PM
|
#66 |
|
Registered User
Join Date: Feb 2010
Location: Cardiff, CA
Posts: 131
|
Re: 56 pro touring build
Yeah, I remember seeing that build. Nuckin futs for sure. I think the frame alone won an award or something.
http://www.ironworksspeedandkustom.c...ls.php?album=3 Last edited by Spackle100; 11-02-2010 at 08:25 PM. |
|
|
|
|
12-23-2010, 02:07 AM
|
#67 |
|
Registered User
Join Date: Dec 2009
Location: Ventura, Ca.
Posts: 439
|
Re: 56 pro touring build
Greg
Whats the latest on your build ??? Hope all is well and you stayed dry this past week. I might have some painted parts pics tomorrow ??? bb
__________________
http://67-72chevytrucks.com/vboard/s...d.php?t=385404 |
|
|
|
|
12-23-2010, 03:23 AM
|
#68 | |
|
Registered User
Join Date: Feb 2004
Location: lynchburg ohio
Posts: 736
|
Re: 56 pro touring build
Quote:
Greg "GT" Tholen |
|
|
|
|
|
12-23-2010, 03:33 AM
|
#69 |
|
56 - autocross
Join Date: Apr 2010
Location: Camarillo, Ca
Posts: 1,121
|
Re: 56 pro touring build
Before welding the boxing plate to the frame the tubes are welded to the plate itself from the back. Once the boxing plate is welded to the frame and the frame is complete and leveled, I will weld the tube to the outside frame rail from the inside of the frame through the tube. So I will access the welding through the holes in the boxing plate. Hope this helps. I guess it will make sense when I do it and take pics to show it in progress.
|
|
|
|
|
12-23-2010, 03:40 AM
|
#70 |
|
Registered User
Join Date: Feb 2004
Location: lynchburg ohio
Posts: 736
|
Re: 56 pro touring build
Yes it makes sense in your explaination. Just curious as to how you are going to weld inside of the tube to the outside of the frame. Your tube looks like 1 5/8"-1 3/4"? Are you going to Mig,Tig,or Stick weld. I have been a welder for 16 years and I was just curious. The frame is 2 3/4" wide now with boxing plate? Not trying to be a pain just want to follow and understand. I like your idea as it will make the chassis very ridgid!
Greg Last edited by 71'tahoe; 12-23-2010 at 03:41 AM. |
|
|
|
|
12-26-2010, 11:40 AM
|
#71 |
|
56 - autocross
Join Date: Apr 2010
Location: Camarillo, Ca
Posts: 1,121
|
Re: 56 pro touring build
So we welded in the passengers side firewall and did some grinding. Not too bad. Not quite finished. Then cut out the other side. (I figured that we did not want to do a step by step demo on the site on the first side of the firewall as we were not sure how it was going to go. Mistakes and all. We will show more detail on the drivers side firewall.) After that traced and cut out the drivers side firewall. Used a 4 1/2 grinder with a cut off wheel. Where it got dicey we used an air scroll saw from Harbor Freight (these things are junk. Work for 3 seconds and then stop). We then painted everything that we could see with POR 15. I happened to get a can of this stuff that the factory dripped paint on the can lip before closing it off. Just 1 drop. What a nightmare getting it open. Had to completely destroy the can. This stuff is amazing. Talked to the distributor and they said that this stuff has crazy glue in it. Wearing gloves is a must. I had some spots on my arms (above the gloves) that just about dried and had to scrub it off with a rock. When done, put the left over 15 in 2 mason jars. Dont get any on the threads or lid. When getting this stuff out of the jar/can use a turkey baster to put into another container for painting. Dont pour it (gets either the can lip or the jar lid with paint and then u will have issues getting it opened again). Close up the remaining paint ASAP as it likes to set up with more exposure to the air. CLEAN UP ASAP. You will never get this stuff off anything after it sets up except with a grinder.
Well we decided to go with a LQ4 engine. Did the homework and found a guy that was selling one. He gave me the story that he bought the engine from a wrecking yard to put into a client car (he was a mechanic). The client backed out he he was left with the engine. He gave me a warranty. Checked it out as good as I could. The only thing that I could not do was take off the oil pan. Everything looked really good though. Well I guess not good enough. After draining the oil and taking off the pan, I found a torn up valve pushrod inside. Not good. It looked like they replaced the rockers with roller rockers and new push rods and maybe lost one; I dont know; but it did have all the pushrods there. Just an extra one in pieces in the bottom end. Well, absent all the pieces, the bottom end looks OK. (Called the guy and no answer and no call back. Left emails as well. I dont anticipate any return calls or warranty replacement. If the guy had integrity I would have already heard from him.) The reluctor wheel did have a knick. That will have to be replaced. Decided to take it all the way down to nothing and take it to the machine shop just to make sure. The engine looks almost brand new inside with very little wear to the cylinders. The bearing look OK as well. The oil filter really did a good job from not letting metal pieces get to them. We will find out the real story after the magniflux. Stay tuned. |
|
|
|
|
12-26-2010, 03:19 PM
|
#72 |
|
Registered User
Join Date: Dec 2009
Location: Ventura, Ca.
Posts: 439
|
Re: 56 pro touring build
holy smokes greg, looks like you guys have been busy..... Bummer about the engine, I have not made it that far yet, hope to soon. Who is doing the machine work for you ??? I have someone in mind but would be curious if you like the shop you are using ??
__________________
http://67-72chevytrucks.com/vboard/s...d.php?t=385404 |
|
|
|
|
12-26-2010, 03:34 PM
|
#73 |
|
56 - autocross
Join Date: Apr 2010
Location: Camarillo, Ca
Posts: 1,121
|
Re: 56 pro touring build
Hey Bob: Just checking out your build. It is coming out great. The color is HOT!!!!!
I have a friend that does editorial Car Craft magazine. He recommends JGM Engineering. He said they are not the cheapest or most expensive but their work has been great. I hope that I will not really need them too much. |
|
|
|
|
12-26-2010, 11:35 PM
|
#74 |
|
Registered User
Join Date: Sep 2009
Location: Albuquerque, NM
Posts: 540
|
Re: 56 pro touring build
Sorry to hear about your motor! Hope it all works at a very good price.
__________________
FAT MIKE My 59 http://67-72chevytrucks.com/vboard/s...d.php?t=400201 My 47 http://67-72chevytrucks.com/vboard/s...d.php?t=386848 |
|
|
|
|
12-27-2010, 12:20 AM
|
#75 |
|
Registered User
Join Date: Jun 2006
Location: Idaho
Posts: 8,800
|
Re: 56 pro touring build
I stored a little left over POR-15 in a mason jar too and just the little bit of air in the jar made it harden up. I now buy quarts instead of a gallon.
__________________
1959 Chevy Short Fleetside w/ 74 4WD drive train (current project) OrrieG Build Thread 1964 Chevelle Malibu w/ 355-350TH (daily driver) Helpful AD and TF Manual Site Old Car Manual Project |
|
|
|
 |
| Bookmarks |
|
|


 Linear Mode

