
|
|
|
 01-15-2014, 07:53 PM
|
#1 |
|
Watch out for your cornhole !
 Join Date: Jun 2003
Location: Azle, Texas
Posts: 14,162
|
Re: The Hillbilly Deluxe dually build
Good progress today.
I stopped by the spring shop on my way home from the station and got a dozen new sliders. They were a buck a piece. 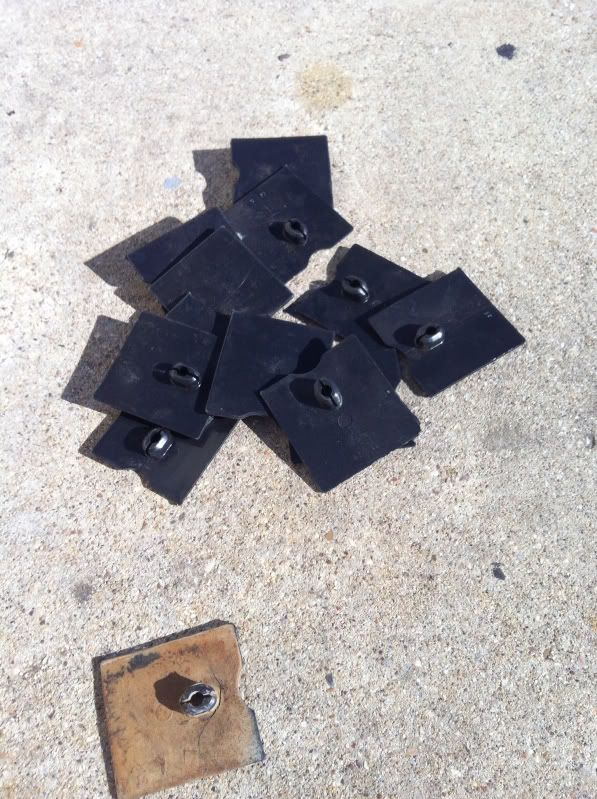 Old versus new... 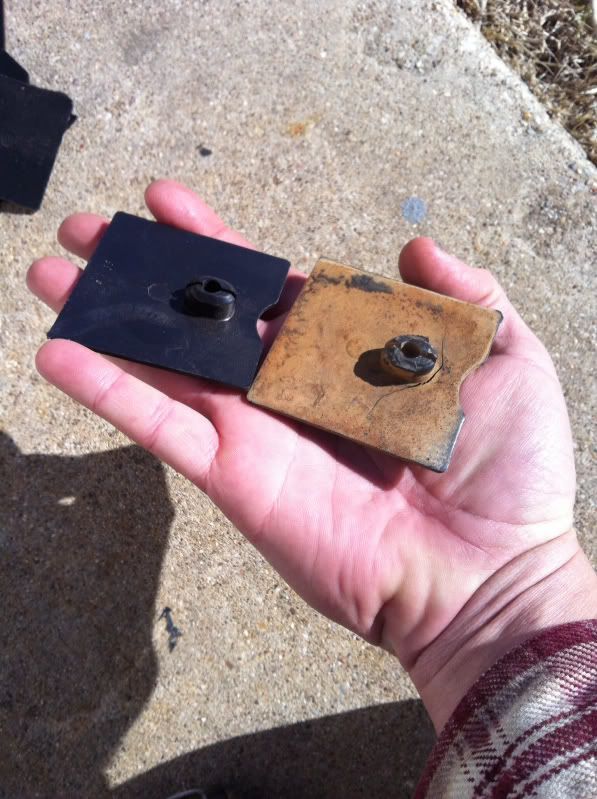 Installed into the leafs...   Then I reassembled the leaf packs and installed them under the truck. Now, for the hard part, wrestling the 14 bolt up under there. I did some sketchy stuff with ratchet straps, a floor jack, and some luck.  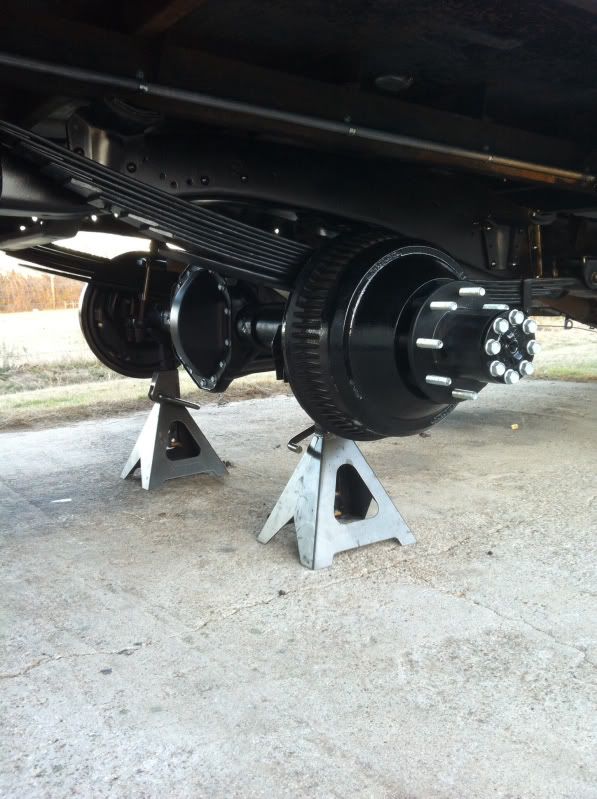 The weather tomorrow is supposed to be reasonable so I have set aside the entire day for making more progress. As a reminder, I have to remove all of the hubs and brakes off this rearend and swap them with parts from the original rearend due to differences in park brake cable configuration. Tomorrow I'll also hit the tire store and have two of the old tires dismounted off of the original steel wheels so I can powdercoat them and use them as inside duals along with my Alcoas. Scoti, I'm about ready to bring your wheels and tires to the station. I can work it whatever day of the week is easiest for you. Let me know and I'll figure out what day to bring them up there.
__________________
I'm on the Instagram- @Gearhead_Kevin |

|

|
|
01-16-2014, 06:20 AM
|
#2 |
|
Registered User
Join Date: May 2007
Location: Mooresville NC/Gainesville GA
Posts: 499
|
Re: The Hillbilly Deluxe dually build
Looking great!
__________________
Eric Evans Queen City Shop Truck http://67-72chevytrucks.com/vboard/s...34#post6139834 66 GMC http://67-72chevytrucks.com/vboard/s...d.php?t=543110 |
|
|
|
|
01-16-2014, 09:46 AM
|
#3 | |
|
Registered User
Join Date: Apr 2001
Location: DALLAS,TX
Posts: 21,992
|
Re: The Hillbilly Deluxe dually build
Quote:
__________________
67SWB-B.B.RetroRod 64SWB-Recycle 89CCDually-Driver/Tow Truck 99CCSWB Driver All Fleetsides @rattlecankustoms in IG Building a small, high rpm engine with the perfect bore, stroke and rod ratio is very impressive. It's like a highly skilled Morrocan sword fighter with a Damascus Steel Scimitar..... Cubic inches is like Indiana Jones with a cheap pistol. |
|
|
|
|
|
01-16-2014, 10:08 AM
|
#4 |
|
Watch out for your cornhole !
Join Date: Jun 2003
Location: Azle, Texas
Posts: 14,162
|
Re: The Hillbilly Deluxe dually build
The next weekend day I work will be Sunday the 26th. Let me know by that Saturday and I can load them up and bring them the next morning.
__________________
I'm on the Instagram- @Gearhead_Kevin |
|
|
|
|
01-16-2014, 10:14 AM
|
#5 | |
|
Registered User
Join Date: Apr 2001
Location: DALLAS,TX
Posts: 21,992
|
Re: The Hillbilly Deluxe dually build
Quote:
__________________
67SWB-B.B.RetroRod 64SWB-Recycle 89CCDually-Driver/Tow Truck 99CCSWB Driver All Fleetsides @rattlecankustoms in IG Building a small, high rpm engine with the perfect bore, stroke and rod ratio is very impressive. It's like a highly skilled Morrocan sword fighter with a Damascus Steel Scimitar..... Cubic inches is like Indiana Jones with a cheap pistol. |
|
|
|
|
|
01-16-2014, 06:24 PM
|
#6 |
|
Watch out for your cornhole !
Join Date: Jun 2003
Location: Azle, Texas
Posts: 14,162
|
Re: The Hillbilly Deluxe dually build
For those of you who haven't followed every single post of this build thread, let me recap to give you the background of what I'm doing right now.
I cleaned up and did some work on an extra 1980 model rearend I had been saving. The idea was to swap it out for the current rearend since it has 4.10 gears which are much better than 4.56 gears for my usage. Only after getting it all cleaned, painted, rebuilt, and detailed did I realize that the 80 model and 88 model rearends use completely different configurations of park brake cables. So, I have to disassemble both rearends and swap brake backing plates and cables between them. So, today I got the 88 model rear up on stands and took it all apart to harvest the backing plates and cables. Then I got them all cleaned up and powdercoated. 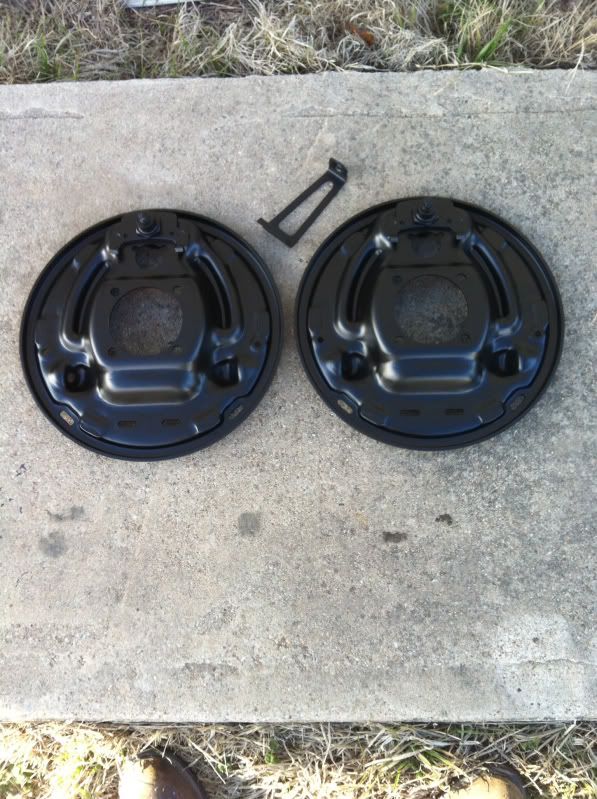 I didn't take any pictures of the cleaned up cables, but they're clean and pretty. Then I finished up with some odds and ends basically dragging my feet on ripping the hubs off of the nice clean rear. It's got to be done but I just didn't have the motivation today. I wound up working on my stepside a bit today instead. But, I did get the bracket for the brake hose installed, the brake lines cleaned and painted, shock absorbers installed today. I also spent some time messing with the driveshaft. I wasn't happy with how the splined slip section moved so I cleaned and polished that and also spent some time cleaning up the u joints, grease zerks, and greasing everything. The u joints look and feel very good so I didn't change them. 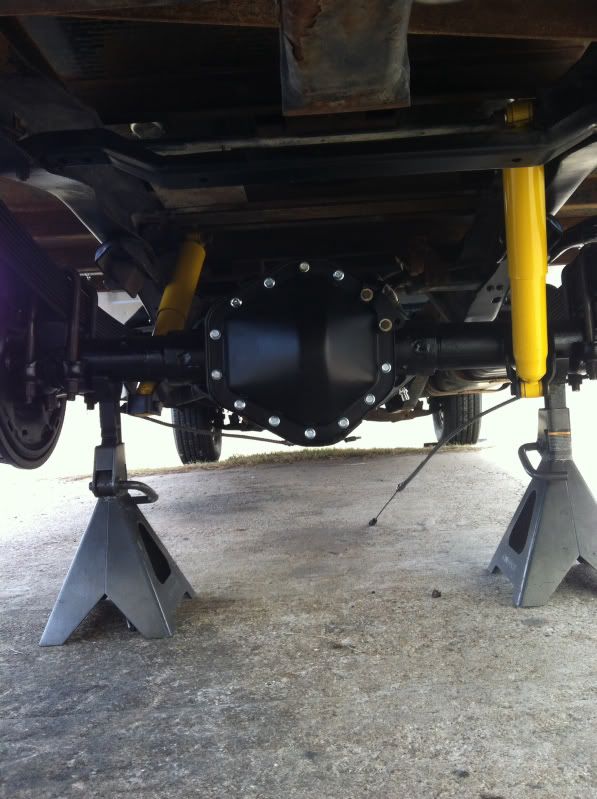 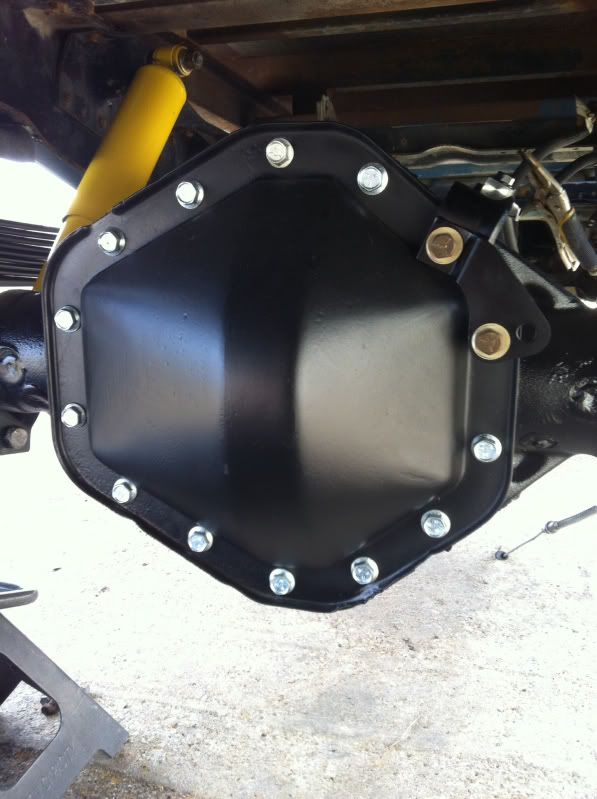 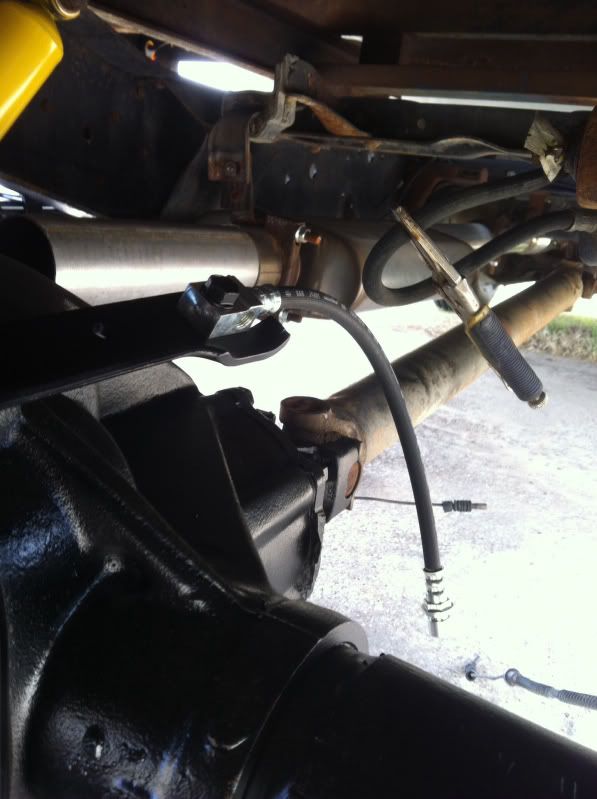 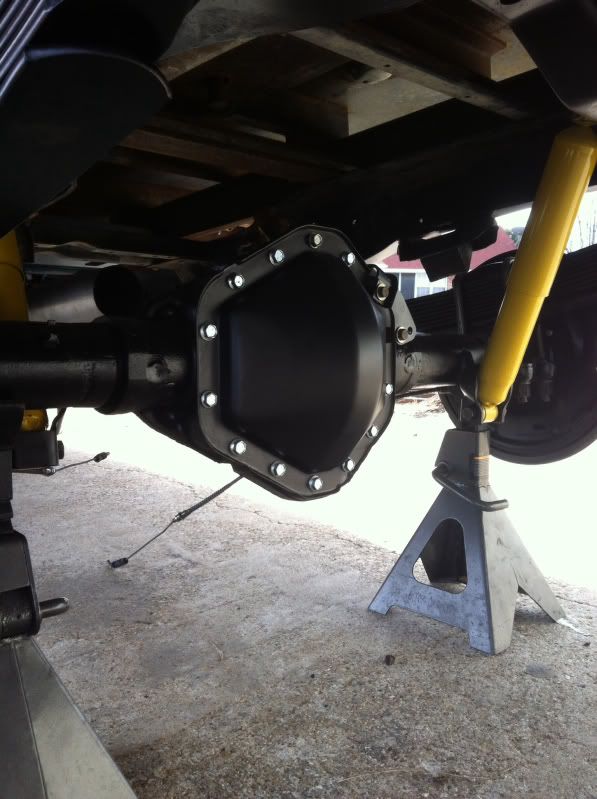 I need to stop by the parts store and get some fluid to fill it up with and three feet of hose for the vent tube that goes up to the frame. Depending on how tight of a leash Valerie puts on me this weekend, I should be able to get everything done up under there. The weather looks promising.
__________________
I'm on the Instagram- @Gearhead_Kevin Last edited by Tx Firefighter; 01-16-2014 at 06:29 PM. |
|
|
|
|
01-16-2014, 10:27 PM
|
#7 |
|
Registered User
Join Date: Apr 2009
Location: Pflugerville, TX
Posts: 594
|
Re: The Hillbilly Deluxe dually build
Looking good! You have great attention to detail. If I had half your patience, my truck might actual be more than a frame in my garage.

|
|
|
|
|
01-18-2014, 04:37 PM
|
#9 |
|
Watch out for your cornhole !
Join Date: Jun 2003
Location: Azle, Texas
Posts: 14,162
|
Re: The Hillbilly Deluxe dually build
Thank you for the positive comments fellas.
This morning I pulled the hubs and brakes off the rearend to swap backing plates. All done now. Everything is entirely back together. Brake lines installed and tightened, all clips and brackets in place. Brakes adjusted and park brake pedal adjusted. Now to bust down two wheel and tires and powdercoat a pair of steel wheels for my inner pair. 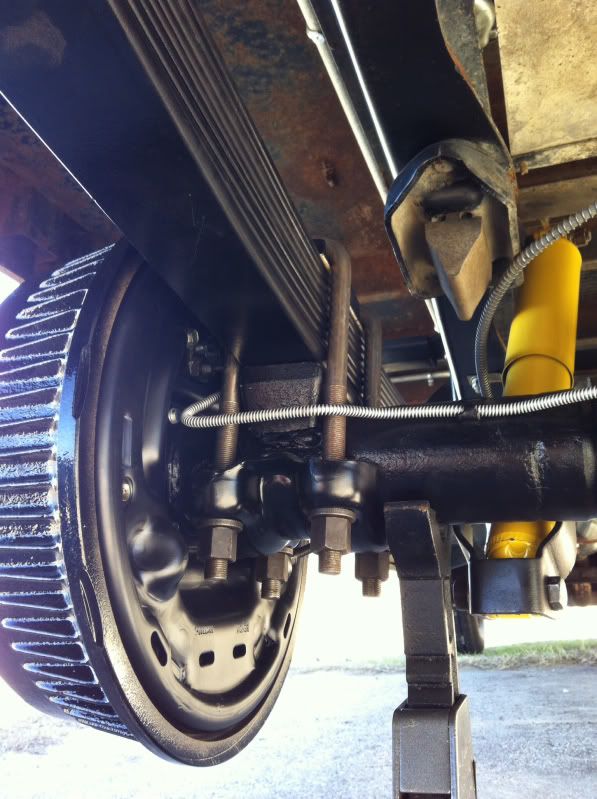 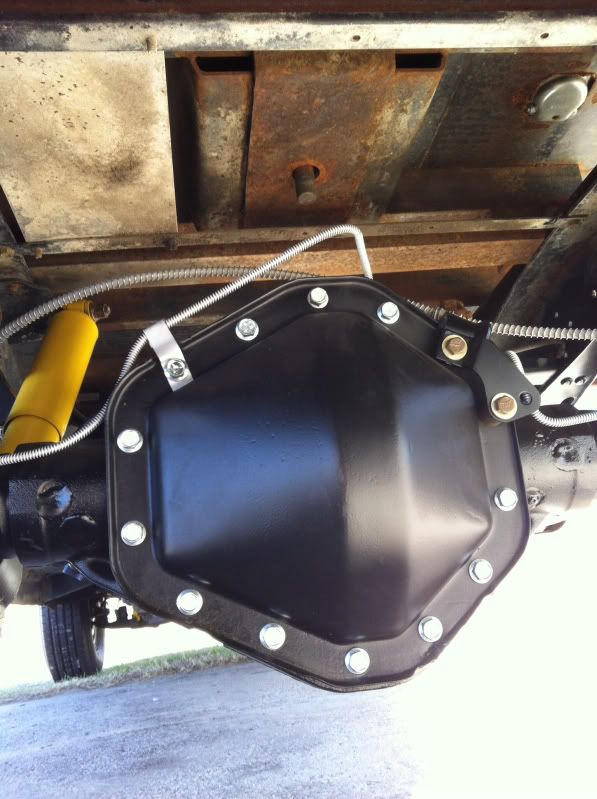 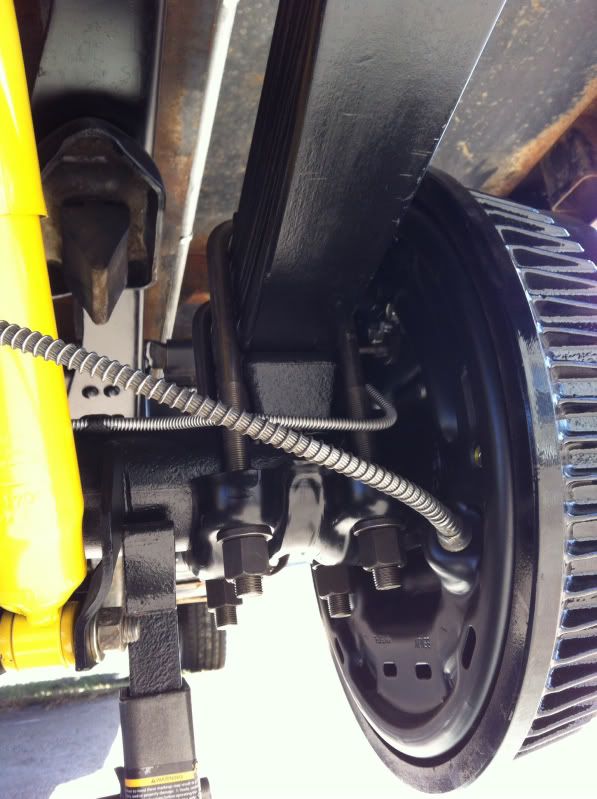 I need to remove the rear brake load sensing valve from the frame and modify the brake line then hook up the new rear brake hose and bleed the brakes. Also need to install new rearend breather hose and fill it with fluid. 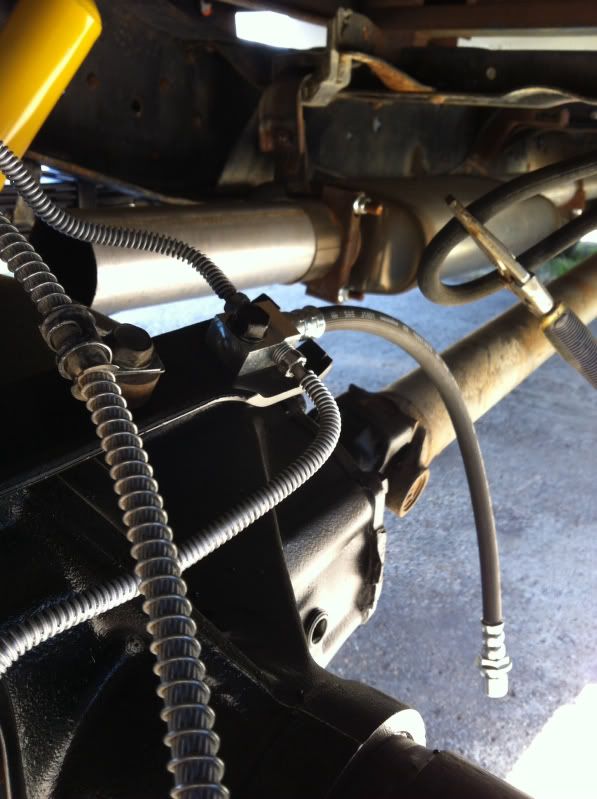
__________________
I'm on the Instagram- @Gearhead_Kevin |
|
|
|
|
01-18-2014, 05:47 PM
|
#10 |
|
Senior Member
Join Date: Apr 2004
Location: sw colorado
Posts: 2,720
|
Re: The Hillbilly Deluxe dually build
you have a spectacular looking rear end there Kevin....
|
|
|
|
|
01-18-2014, 05:53 PM
|
#11 |
|
Watch out for your cornhole !
Join Date: Jun 2003
Location: Azle, Texas
Posts: 14,162
|
Re: The Hillbilly Deluxe dually build
Why thank you. I work out.......side a lot of hours under this thing fussing over the little details.
I've decided to do some more exhaust work. I have a short pipe coming out of the muffler that just dumps straight at the nice clean rearend and suspension. I think I want to figure out how to get the pipe over the axle to protect my hard work. Does anyone have a lead on a generic 3 inch tailpipe ? I don't relish buying a length of straight pipe and three separate mandrel bends to make my own. Hoping for something cheaper than that. Also, I'm taking suggestions on mudflaps. My old ones were 24 inches wide like normal big trucks use. I want something neat. Still mulling that over.
__________________
I'm on the Instagram- @Gearhead_Kevin Last edited by Tx Firefighter; 01-18-2014 at 05:58 PM. |
|
|
|
|
01-18-2014, 06:10 PM
|
#12 |
|
Registered User
Join Date: Dec 2007
Location: Palmer, Alaska
Posts: 13,821
|
Re: The Hillbilly Deluxe dually build
Check out a tail pipe for a 1998 k3500 with a 6.5TD or a 2004 GMC savanna van.
They are passenger side exit but it should be too hard to cut and flip it around.
__________________
 CHEVY ONLY CHEVY ONLY
|
|
|
|
|
01-18-2014, 07:44 PM
|
#13 |
|
I know the pieces fit
Join Date: Nov 2007
Location: MONTGOMERY, AL
Posts: 5,523
|
Re: The Hillbilly Deluxe dually build
I have a pair of 3" mandrel bent tail pipes for a square that I got from summit. Let me know which side and I'll get a part number for you.
|
|
|
|
|
01-18-2014, 07:49 PM
|
#14 | |
|
Watch out for your cornhole !
Join Date: Jun 2003
Location: Azle, Texas
Posts: 14,162
|
Re: The Hillbilly Deluxe dually build
Quote:
You can see my muffler there in front of the axle. If I can slip a generic tailpipe in there to get the exhaust at least over the axle I'll be happy. Even if I have to cut the tailpipe short due to not exiting in a nice place under the bed, that would at least protect my hard work on this rear part of the truck.
__________________
I'm on the Instagram- @Gearhead_Kevin |
|
|
|
|
|
01-18-2014, 08:00 PM
|
#15 |
|
I know the pieces fit
Join Date: Nov 2007
Location: MONTGOMERY, AL
Posts: 5,523
|
Re: The Hillbilly Deluxe dually build
I have these in my parts pile, not on the truck, so no comment on the fit.
http://www.summitracing.com/parts/imo-370127 I can email you the IMCO tail pipe PDF parts catalog I found them in if you'd like to see it. |
|
|
|
|
01-18-2014, 08:20 PM
|
#16 |
|
I know the pieces fit
Join Date: Nov 2007
Location: MONTGOMERY, AL
Posts: 5,523
|
Re: The Hillbilly Deluxe dually build
I noticed summit has it listed as chevy/ford/dodge tailpipes and I'm sure it fits multiple applications, but in the catalog that is the part number for a 73-87 truck.
|
|
|
|
|
01-19-2014, 06:02 PM
|
#17 |
|
Watch out for your cornhole !
Join Date: Jun 2003
Location: Azle, Texas
Posts: 14,162
|
Re: The Hillbilly Deluxe dually build
I believe I have found a workable tailpipe to order. Its a Magnaflow brand intended for Dodge truck apps. There just aren't many 3 inch driver side tailpipes on the market. I'll have to do a cut and flip on the Dodge pipe but it looks like my best option at this time.
My money tree is looking pretty puny for the next few days so I've just been busying myself with little details until later this week when I can spare a few bucks. Today I removed the rear brake load sensing valve and finished plumbing my brake line. First a few poor quality pics of what I'm working with. Fluid pressure from the master cylinder comes in here.... 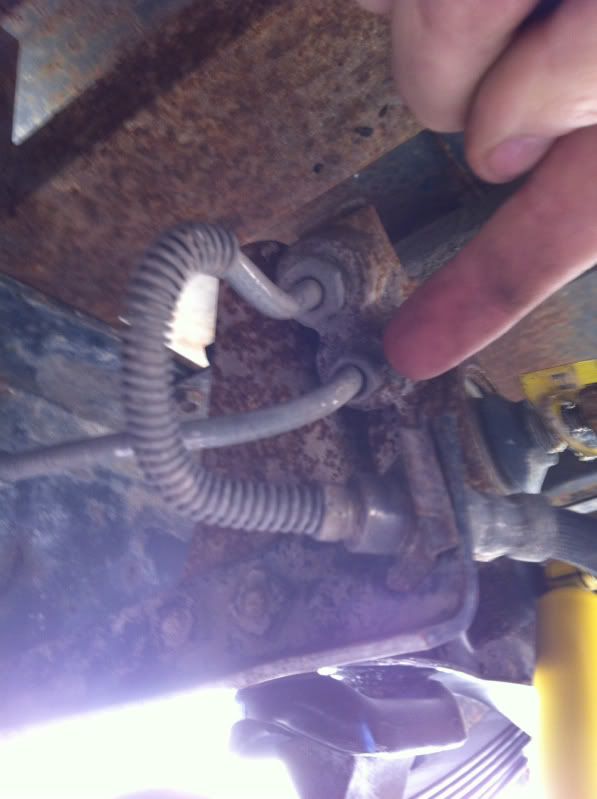 Then comes out of the valve here... 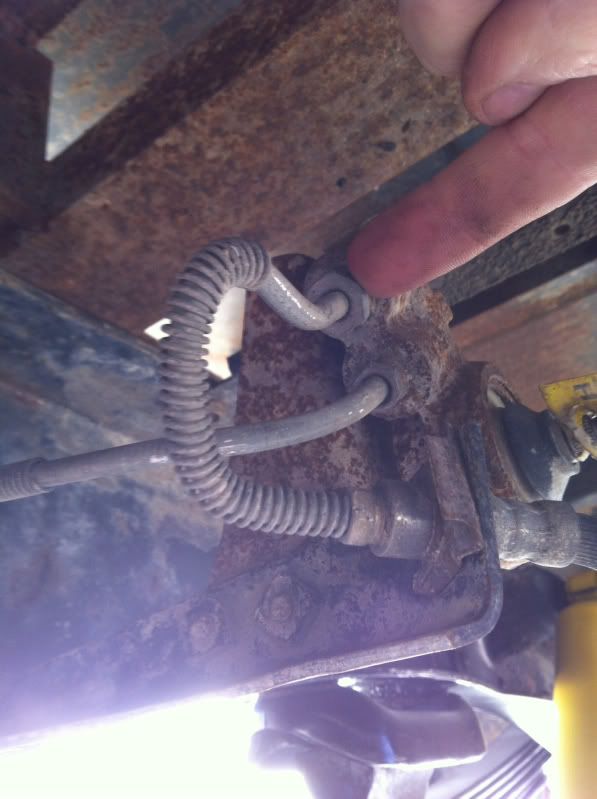 Which loops over and connects to the hose... 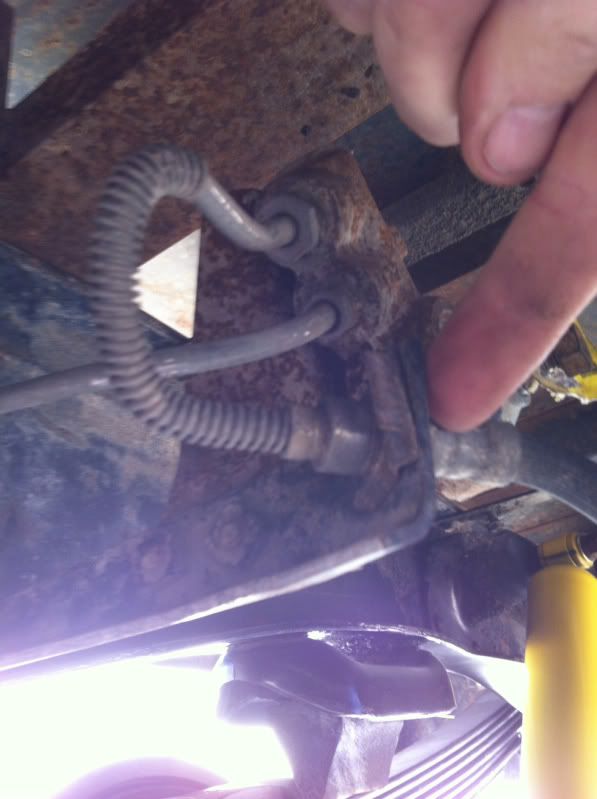 My solution was to remove the valve and bend the hardline to allow it to screw directly into the hose. Now I have master cylinder pressure fed directly to the rear brakes just as GM did on millions of earlier model trucks. I prefer straight brake systems without these valves in line because I've struggled with these valves failing in the past. I figured to go ahead and solve the problem before it becomes a problem. 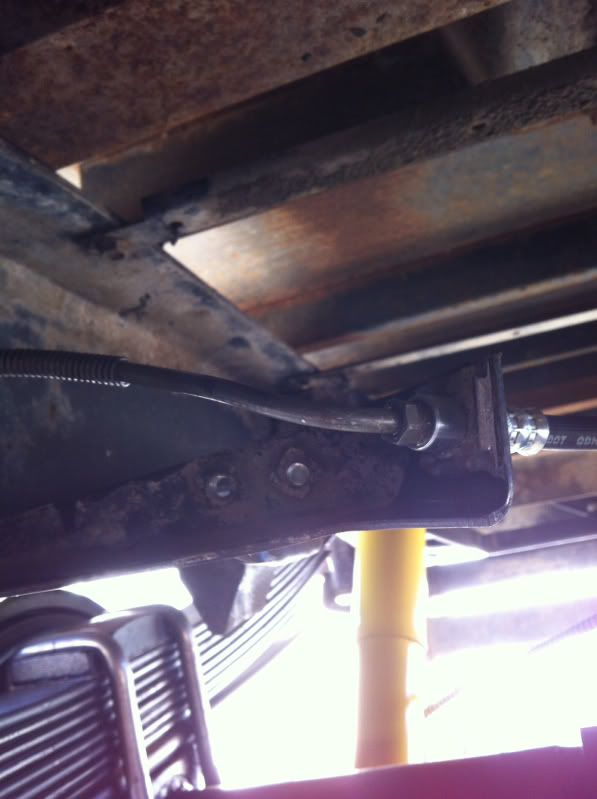 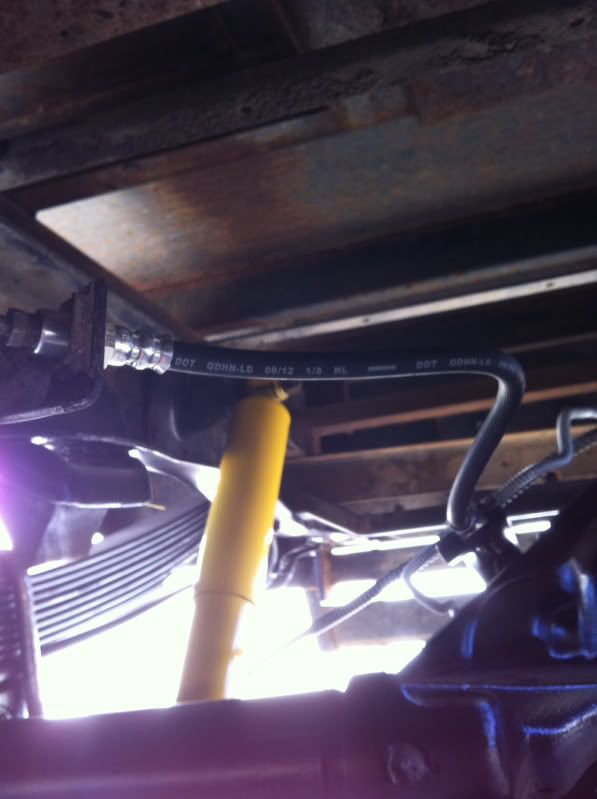 The old valve and all the tools needed to do this job. Total time was about 5 minutes. 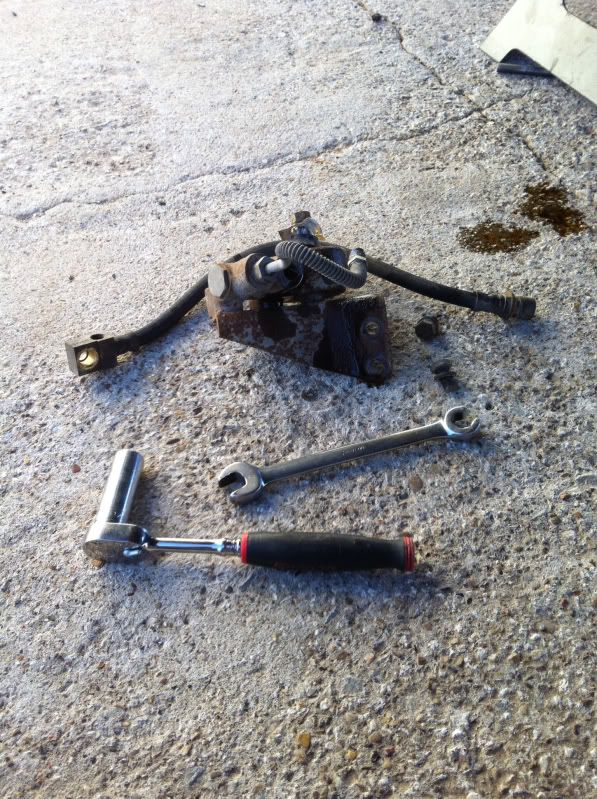 The only other progress was to install a new differential breather hose using new hardware and a little effort at sanitary routing. Not picture worthy. Next is powdercoating two steel wheel for the inners. By then my money tree will have grown back a little.
__________________
I'm on the Instagram- @Gearhead_Kevin |
|
|
|
|
01-19-2014, 06:23 PM
|
#18 |
|
Registered User
Join Date: Apr 2011
Location: Kansas City, MO
Posts: 39
|
Re: The Hillbilly Deluxe dually build
The info on the backing plates is exactly what I needed for confirmation. I was going to change over to the newer style parking brake cable, but didn't realize the backing plates were different until I looked at the cables.
Thanks for that info. Now if I can just find the right ones... |
|
|
|
|
01-19-2014, 06:31 PM
|
#19 | |
|
Watch out for your cornhole !
Join Date: Jun 2003
Location: Azle, Texas
Posts: 14,162
|
Re: The Hillbilly Deluxe dually build
Quote:
I forgot to mention in my post above, all of the brake parts interchanged between the 80 and 88 brakes. All I did was unbolt the brakes from the 80 model back plates and bolt them directly to the 88 plates. The park brake lever for the passenger side brake is the only difference. I just used the 88 model one when I put it all back together. Shoes, cylinders, springs, adjusters, etc, exactly the same.
__________________
I'm on the Instagram- @Gearhead_Kevin |
|
|
|
|
|
01-20-2014, 12:52 AM
|
#20 |
|
Registered User
Join Date: Nov 2013
Location: Antioch, Ca.
Posts: 456
|
Re: The Hillbilly Deluxe dually build
I'm really enjoying your rebuild, and I admire your restraint in not "CHARGING" it on the credit card as I'm sure a lot of projects end up being!!!
__________________
Take Care Troy |
|
|
|
|
01-20-2014, 02:21 AM
|
#21 |
|
Registered User
Join Date: Feb 2009
Location: Southern Oregon
Posts: 1,352
|
Re: The Hillbilly Deluxe dually build
Cool build. I always learn alot from your threads and posts. Quality work!
__________________
1967 C10 Suburban 454/TH400/3.07's An Average Joe and His 'Burb: http://67-72chevytrucks.com/vboard/s...d.php?t=775843 |
|
|
|
|
01-21-2014, 02:32 PM
|
#22 |
|
Senior Member
Join Date: Apr 2009
Location: Lawrence KS
Posts: 821
|
Re: The Hillbilly Deluxe dually build
subscribed

__________________
1981 Chevy C30 440 Holmes 42K one owner miles |
|
|
|
|
01-22-2014, 02:08 PM
|
#23 |
|
Watch out for your cornhole !
Join Date: Jun 2003
Location: Azle, Texas
Posts: 14,162
|
Re: The Hillbilly Deluxe dually build
Not too much progress today. I've been short on time the last couple of days.
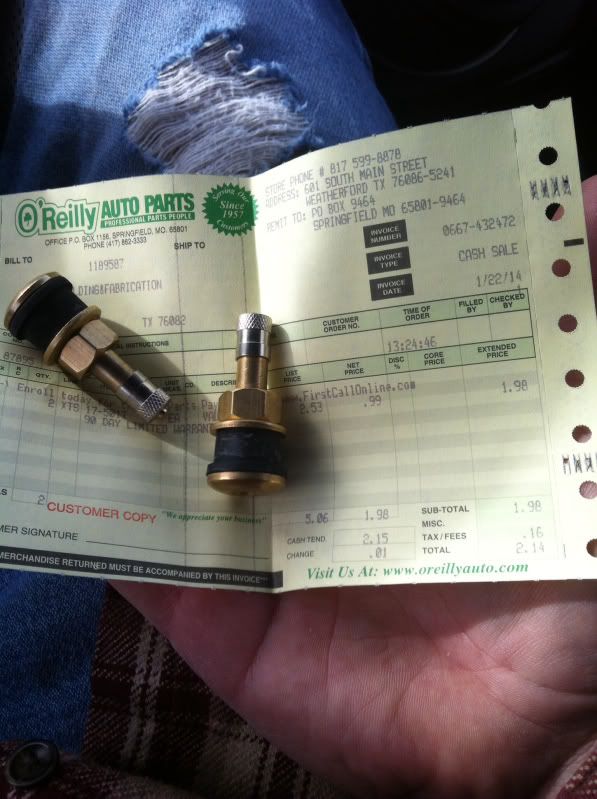
I did get the tires busted off two of the stock wheels so I can restore them to use as rear inner wheels. 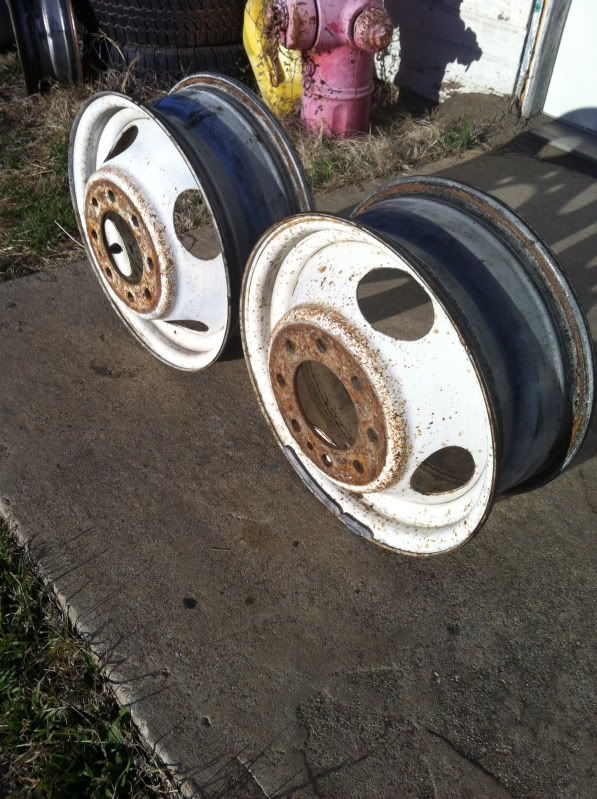 Then dipped into the stripper vat to get them to bare metal. 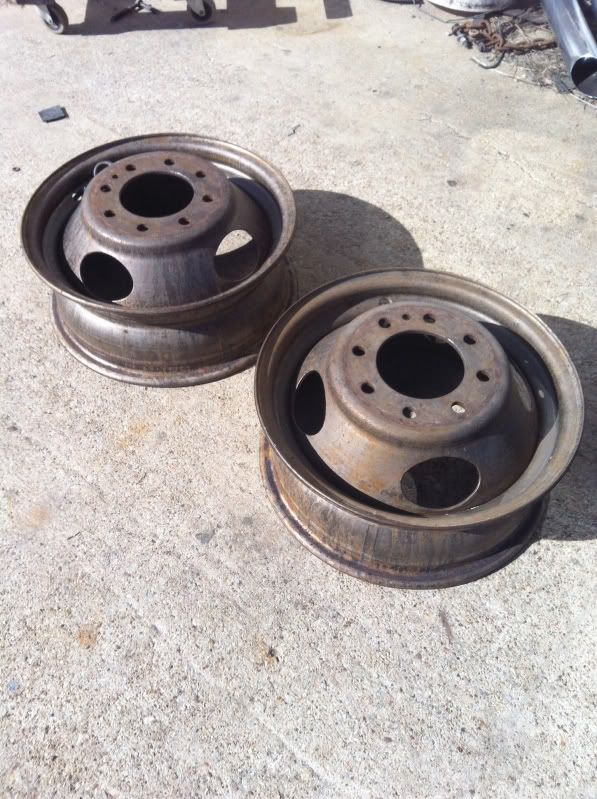 Next is to sandblast and powdercoat them. I should be able to get them finished Friday. Then to mount the new tires to them. Also, not shown in pictures, I got the rear brakes bled and started adding oil to the rear differential. On these full floaters, I always fill them with fluid then drop each side down and let it hang at an angle for awhile, then refill fluid level. This dropping and hanging each side causes the gear oil to migrate outward to the hub cavities and submerge the bearings in oil so they don't run dry upon initial test drive. The factory setup relies on centrifugal motion to slosh gear oil outward to the bearings as the truck is driven, but you'd be driving on dry bearings until you turned left and right enough to get the oil out to the ends of the axle. I'm about to go pick my daughters up from school and will run by the parts store to get a pair of new valve stems for these wheels. I'm running true heavy truck bolt in brass valve stems on these. They're only a couple of bucks each, but a bit hard to find. I'm having to go by a parts store I usually don't frequent to get them. Still, worth the effort as opposed to rubber pull through valve stems as used on cars and light trucks.
__________________
I'm on the Instagram- @Gearhead_Kevin |
|
|
|
|
01-22-2014, 02:37 PM
|
#24 |
|
Registered User
Join Date: Feb 2013
Location: Cary, NC
Posts: 816
|
Re: The Hillbilly Deluxe dually build
Interesting technique on the FF. Is it just those axles that need to be gravity filled that way or do all axles need it?
__________________
Austin 1996 Chevrolet K1500 Silverado 1979 Chevrolet K10 Scottsdale - Carolina K10 - My 4.8L Twin turbo build - Project Short Stroke - Instagram - TheBlueBomber1996 |
|
|
|
|
01-22-2014, 06:35 PM
|
#25 | |
|
Watch out for your cornhole !
Join Date: Jun 2003
Location: Azle, Texas
Posts: 14,162
|
Re: The Hillbilly Deluxe dually build
 Two dollars and fourteen cents out the door for the pair. The kid behind the counter kept trying to sell me some chrome crap in a blister package for 6 bucks. Finally I virtually blocked him behind the counter and made him go into the back with my part number and find them in the bulk packaging. I wanted true brass high pressure truck valve stems not chrome plated car stems. Quote:
Here is why.... On a semi float axle, the outer bearings are inside of the tube. There is one bearing per side. On a FF axle, there are two bearings per side, and they fit around the outside of the axle tube. The hub which contains the bearings acts as a reservoir to contain a pool of gear oil that the bearings ride in. If you think about it, the bottom of the bearings are below the axle tube (since they fit AROUND the tube), so the gear oil would have to run out the tube in sufficient quantity to fill the hub cavity for lubing the bearings. I have something like 70 dollars for the new bearings here so I want to make double up sure they are well lubed the first time I release the brake and drive away. The hub acts as a reservoir. 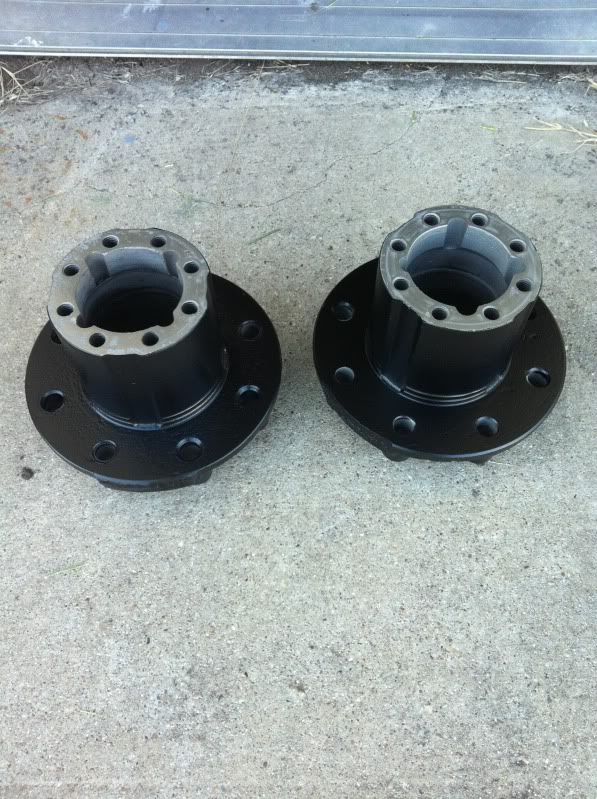 The lube travels out the axle tube and fills the hubs. Note the machined area where the bearings ride on the outside of the axle tube as opposed to more common semi float axles where they ride inside the tube. 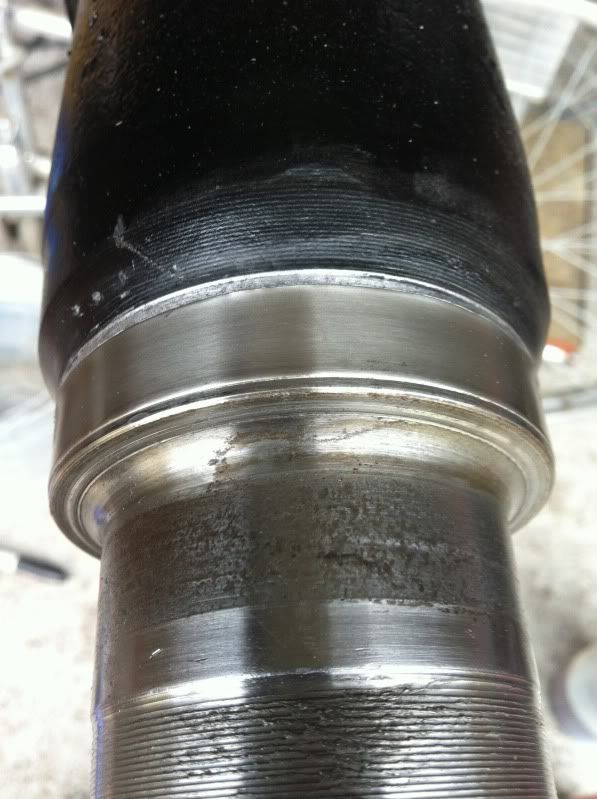 Now, some mechanics just pack the bearings with grease when they install them. In this way, the bearings are well lubricated from the start. Then, the gear oil eventually mixes with the grease and dissolves it. I just don't care for that method after the effort and expense I did on this project to make sure everything is "just right". I'm not saying its wrong, I just chose to do it the slower and more tedious way of tilting the axle side to side as I continue topping the level up.
__________________
I'm on the Instagram- @Gearhead_Kevin |
|
|
|
|
 |
| Bookmarks |
|
|


 Hybrid Mode
