
|
 11-25-2009, 12:17 AM
|
#826 | |
|
Still Learning
Join Date: Jul 2009
Location: Central Oklahoma
Posts: 10,108
|
Re: LFD's 4dr Tahoe Build
Quote:
I have a little .06" 304 SS stashed out in my "salvage" area. I was thinking about using it to build our gas tank too. Just wondering what you are doing for a pump and bulkhead to mount it? Filler tube should be pretty easy to fab but not too sure if it will need the addition of a vent for making easy fill ups? Keep up the great builds! 
|
|

|

|
|
11-25-2009, 12:17 AM
|
#827 |
|
Senior Member
Join Date: Jul 2005
Location: Winters Ca. 95694
Posts: 4,843
|
Re: LFD's 4dr Tahoe Build
Thanks but it has a full floor for the 3rd row seats. I have put way too many hours into keeping this floor as low as humanly possible and still be able to lay frame with a 31.5" tall rear tire. How many C10's have you seen with the frame rails on the ground and only a 2" step in the floor! Also this tube work is nothing compared to what the rest of the frame will look like. It will have a photo shoot before getting the body placed back over it and they will be in the build book to see.
Kevin LFD Inc. |
|
|
|
|
11-25-2009, 03:08 AM
|
#828 | |
|
Registered User
 Join Date: Aug 2005
Location: Hillsboro Oregon
Posts: 6,449
|
Re: LFD's 4dr Tahoe Build
Quote:

|
|
|
|
|
|
11-25-2009, 03:57 AM
|
#829 | |
|
Registered User
Join Date: Sep 2009
Location: Medford, OR.
Posts: 207
|
Re: LFD's 4dr Tahoe Build
Quote:
|
|
|
|
|
|
11-25-2009, 12:07 PM
|
#830 | |
|
Senior Member
Join Date: Jul 2005
Location: Winters Ca. 95694
Posts: 4,843
|
Re: LFD's 4dr Tahoe Build
Quote:
This is where Rock Valley comes into play. They are providing the pump, mounting plate (weld in style), sender unit and pick up screens. I will have a vent in the tank for ease of filling right next to the fill tube and it will tie back into the fill door area. Their is nothing worse than trying to fill a tank that just keeps clicking off on you.  Frizzle, were have you been hiding, time to get back on the V8 builds don't ya think?  Kevin LFD Inc. |
|
|
|
|
|
11-25-2009, 12:18 PM
|
#831 |
|
Registered User
Join Date: Jun 2007
Location: Netherlands
Posts: 191
|
Re: LFD's 4dr Tahoe Build
Nice tank, but may i ask.... why stainless steel? i have made mine and a few for others out of aluminium. Stainless steel at the thickness you use.07 (1,77 mm) weigths about 14 kg/m2 against 8.3 for aluminium 3 mm thick.(sorry for the metric figures)u can even make the internals out of 2 mm alu.
But as i said, nice tank, like to see it all welded up.
__________________
Anybody can restore a classic, takes a man to cut one up..... http://www.arnoldscustoms.com Last edited by 38chevyhotrod; 11-25-2009 at 12:19 PM. |
|
|
|
|
11-25-2009, 12:40 PM
|
#832 | |
|
Senior Member
Join Date: Jul 2005
Location: Winters Ca. 95694
Posts: 4,843
|
Re: LFD's 4dr Tahoe Build
Quote:
I will weld it all up once the fill neck and pump plate are installed so I can avoid the tank pulling or pushing in one direction.Kevin LFD Inc. |
|
|
|
|
|
11-25-2009, 12:51 PM
|
#833 |
|
Rods
Join Date: Nov 2002
Location: Bryan, TX
Posts: 1,398
|
Re: LFD's 4dr Tahoe Build
As a non structural weld im thinking i can use a spool gun on the tank.. Not sure how the baffels ill go though
__________________
Just keepin it simple.  1965 C-10 Ext cab build. 350??(Does it count at 2 truck if I had to cut one up?) 1966 C-10 lwb 283 auto 1970 Suburban in pieces 1971 Blazer 4wd....restore someday. all factory CST 1972 Blazer 4wd parts truck still a roller 1972 GMC Sierra Grandee 1998 Chevy ext driver. 2005 F**D the wife drive...(cant fix women) |
|
|
|
|
11-25-2009, 08:16 PM
|
#834 |
|
Senior Member
Join Date: Jul 2005
Location: Winters Ca. 95694
Posts: 4,843
|
Re: LFD's 4dr Tahoe Build
Well I had an hour to kill between honey do's for tomorrow so I made the first 2 mounts. They are 8" long and centered on the sides of the tank front to back. Their are 2 braces per side, the one you can see facing down and one just like it facing up and welded to the first one. This just gives a good "grab" on the side of the tank and a lot of support on the tank in both up and down directions. Next I will do 2 straps running front to back also out of SS. The rear will pin into bracket that will be on the top of the front edge of the trailer hitch and the front mounts will hang off the tube work and have a T-bolt that will tighten the tank up against 1/8" rubber straps between the tank mounts that will go on top for the tank to tighten against. But with just these two side mounts I can stand on the top of the tank with out flex. I used 7/16" bolts with a large square nut welded in side the frame rails.
The first pic is with the system at level 3 (90% up). Second pic is level 2 (ride height 50%) with 8" of tank clearance. Third is level 1 (10%) up and the last is aired out but the front still has 1 1/2" to come down after we put the new front top arms in so that will raise the tank another 1/4"+ or so. But all in all I feel it will work out great! Kevin LFD Inc. [IMG] 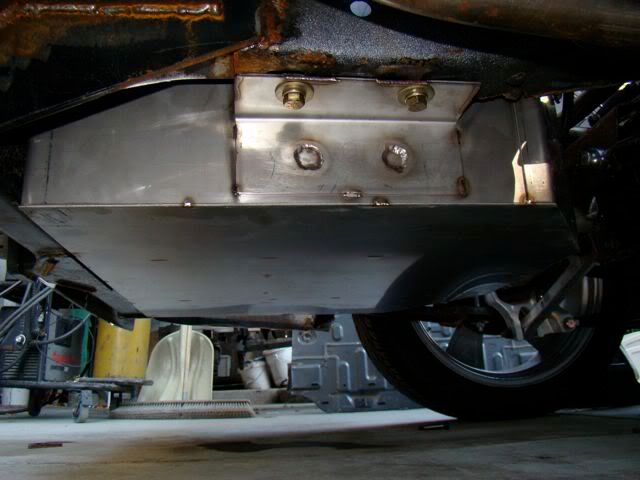 [/IMG] [/IMG][IMG] 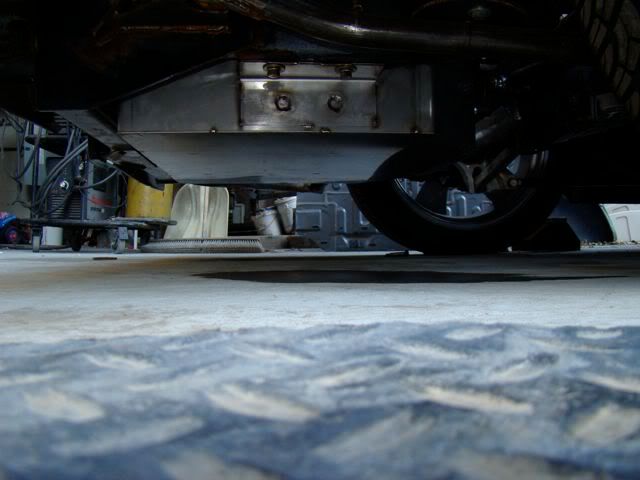 [/IMG] [/IMG][IMG] 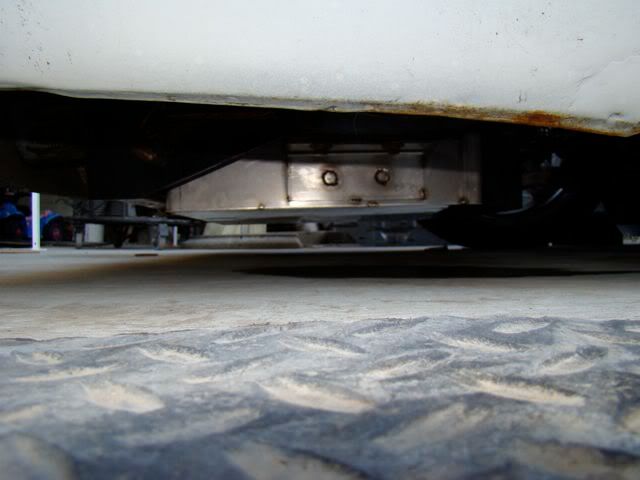 [/IMG] [/IMG][IMG]  [/IMG] [/IMG]
|
|
|
|
|
11-26-2009, 12:50 AM
|
#835 |
|
Still Learning
Join Date: Jul 2009
Location: Central Oklahoma
Posts: 10,108
|
Re: LFD's 4dr Tahoe Build
That is a nice looking tank! I think it will work very good. Keep the pictures coming. How much is the kit for the tank going to set you back with the pump and all? I may be interested in one too. thanks,
Mike |
|
|
|
|
11-26-2009, 01:41 AM
|
#836 |
|
high-Tech Red Neck
Join Date: Feb 2008
Location: Livingston, MT/On my boat WA/BC/AK
Posts: 2,294
|
Re: LFD's 4dr Tahoe Build
Kevin, how hard is it to tig that stainless? I have been wanting to learn, but just havent got off my bum and done it.
__________________
"He used to be a pretty nice feller, now he's a welder!" |
|
|
|
|
11-26-2009, 02:31 AM
|
#837 | |
|
Registered User
Join Date: Jun 2007
Location: Netherlands
Posts: 191
|
Re: LFD's 4dr Tahoe Build
Quote:
The only thing i experience is the warping of the material. But that is with every material you weld.
__________________
Anybody can restore a classic, takes a man to cut one up..... http://www.arnoldscustoms.com |
|
|
|
|
|
11-26-2009, 02:48 AM
|
#838 | |
|
Senior Member
Join Date: Jul 2005
Location: Winters Ca. 95694
Posts: 4,843
|
Re: LFD's 4dr Tahoe Build
Quote:
The mounting plate (8w x 15.5L x 1" deep) correct pump for my LSX motor and the sending unit for my gauge was $425 + shipping. The pump mount is done in SS and has the locking ring like the 73+ tanks do and the Sender is drilled and tapped for easy mounting. Kevin LFD Inc. |
|
|
|
|
|
11-26-2009, 03:09 AM
|
#839 | |
|
high-Tech Red Neck
Join Date: Feb 2008
Location: Livingston, MT/On my boat WA/BC/AK
Posts: 2,294
|
Re: LFD's 4dr Tahoe Build
Quote:
I think it should be easy enoguh to do using a tank selector for a 70's model with saddle tanks, seeing as how the wrecker has an external fuel pump. Did you fab the lock ring, or did it come with the kit?
__________________
"He used to be a pretty nice feller, now he's a welder!" |
|
|
|
|
|
11-26-2009, 11:49 AM
|
#840 | |
|
Senior Member
Join Date: Jul 2005
Location: Winters Ca. 95694
Posts: 4,843
|
Re: LFD's 4dr Tahoe Build
Quote:
Kevin LFD Inc. |
|
|
|
|
|
11-26-2009, 09:48 PM
|
#841 |
|
Registered User
Join Date: Sep 2009
Location: Medford, OR.
Posts: 207
|
Re: LFD's 4dr Tahoe Build
Hey Kevin, Happy Thanksgiving! Thought I'd wave as I went by. I just passed Winters on my way to Modesto.
|
|
|
|
|
11-27-2009, 07:01 PM
|
#842 |
|
Registered User
Join Date: Nov 2006
Location: Springfield/Kansas City
Posts: 1,842
|
Re: LFD's 4dr Tahoe Build
Wow! Those seats turned out really nice, almost like they're supposed to be there.
|
|
|
|
|
11-27-2009, 11:35 PM
|
#843 | |
|
Senior Member
Join Date: Jul 2005
Location: Winters Ca. 95694
Posts: 4,843
|
Re: LFD's 4dr Tahoe Build
Quote:
Your truck sure is looking good but one questions for ya. Did you get to keep the color matched guitar from the music video? That was just too cool! Kevin LFD Inc. |
|
|
|
|
|
11-30-2009, 12:04 PM
|
#844 | |
|
Registered User
Join Date: Jul 2000
Location: East Bay,CA
Posts: 298
|
Re: LFD's 4dr Tahoe Build
Quote:
__________________
51 Chevy 3100 Deluxe Cab(SOLD)  65 **stang 6cyl 70 C10 Long Bed Fleetside(1st truck,thanks Dad![SOLD]) 72 C10 Short Bed Fleetside 73 Blazer 2WD Catalina Blue White Top(Needs Love) 73 Blazer 2WD Work in progress LT1/4L60E 83 Grand National (SOLD) 94 Blazer K1500 Silverado (SOLD) 96 Impala SS All original (NEXT IN LINE 2 B SOLD) 99 Tahoe 2DR, 2WD 
|
|
|
|
|
|
11-30-2009, 01:29 PM
|
#845 |
|
Senior Member
Join Date: Jul 2005
Location: Winters Ca. 95694
Posts: 4,843
|
Re: LFD's 4dr Tahoe Build
I sent him an e-mail Saturday and a PM but have not heard back on ether yet? The price was a steel if you could finish it your self. Just for a sounding board if I were to sell mine as is right now it would be in the $25-35k range with parts and time figured in. I know that seams like a lot but $ and hours don't lie.
Kevin LFD Inc. |
|
|
|
|
12-02-2009, 02:53 AM
|
#846 |
|
Senior Member
Join Date: Jul 2005
Location: Winters Ca. 95694
Posts: 4,843
|
Re: LFD's 4dr Tahoe Build
PorterBuilts new hood hinge kit showed up tonight and I can't wait to give it a shot. I hope to have a chance to do the install and write up by mid next week if not sooner. I am so tired of having to lift the hood on and off by my self or asking for help. With my front tire size of 30.5" and being able to lay frame I did not have a lot of options. I even went as far as working up a new 4 link forward tilt set up but this will save so much time and frustration (better left to other projects) and will allow better working conditions as well.
Have you guys seen what comes in the kit? Quality cut and welded parts, machined bushings and a but load of SS nuts, bolts, flat washers and lock washers. Out of all the hardware the only things that are not SS are the two pivot bolt sets and I assume that is just because SS does not have a ware rate like Non SS does. Definitely well worth what the asking price is and then some. Thanks Nate for another Great product! Kevin LFD Inc. [IMG] 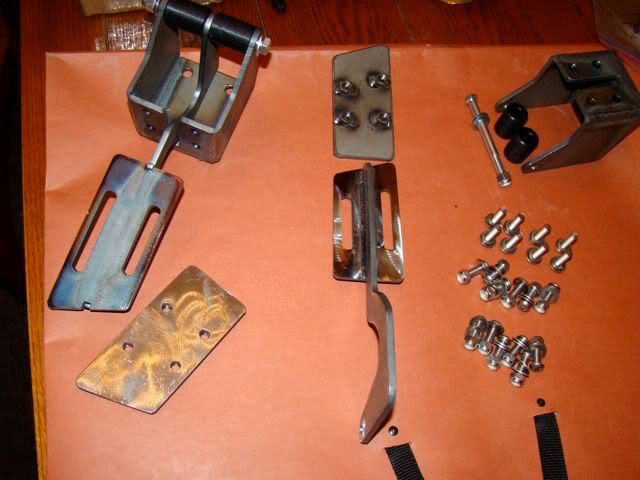 [/IMG] [/IMG]
Last edited by Rokcrln; 12-02-2009 at 02:58 AM. |
|
|
|
|
12-03-2009, 12:35 AM
|
#847 |
|
Registered User
Join Date: Aug 2005
Location: Hillsboro Oregon
Posts: 6,449
|
Re: LFD's 4dr Tahoe Build
That looks really nice.
|
|
|
|
|
12-03-2009, 12:40 AM
|
#848 |
|
low n' slo
Join Date: Mar 2009
Location: rosenberg, texas
Posts: 5,139
|
Re: LFD's 4dr Tahoe Build
they do look nice..maybe one day..
 i was lookin at my moms 96 explorer today and it looks like the hinge setup is similar..i just glanced at it. i didnt really look into it much but it looks like it folds into the firewall too.
__________________
67 1/2 ton Suburban - Project DRGNWGN. Build thread -_--_--_ _________ _--_-_ -/____|__|__\__ ,.,,,.,.,,.,|_O _______ O_] |
|
|
|
|
12-03-2009, 01:56 AM
|
#849 | |
|
Senior Member
Join Date: Jul 2005
Location: Winters Ca. 95694
Posts: 4,843
|
Re: LFD's 4dr Tahoe Build
Quote:
Kevin LFD Inc. |
|
|
|
|
|
12-03-2009, 01:56 AM
|
#850 |
|
Senior Member
Join Date: Jul 2005
Location: Winters Ca. 95694
Posts: 4,843
|
Re: LFD's 4dr Tahoe Build
PorterBuilt's DropMember Hood Hinges How-To LFD style So I have been killing my self setting my hood on and off during my 72 Tahoe build. With a 30.5" tall front tire little things like hood hinges kind of get in the way. So my thoughts are that since Nate from PorterBuilt street rods is the reason I am so low and can not run a stock hinge that he should be the one to fix the problem as well! And now he has!! What Nate has come up with is a cowl mounted Hinge kit that really works. Not like the others that only let your hood open half way or the $1K scissor type that are hard to set up right then they still are not real stable (side to side) when they are up. This install took me about 4 hours to complete and the results are out standing. Easy to install with basic tools (plus a welder), the hood opens up 7" higher then stock hinges, way more solid and firm then any hoods I have dealt with. Also since these are a single pivot point style hinge un-like the factory hinges you will not have to push the rear of the hood down for it to close all the way. It will line up the same way every time you open or close the hood. Their were a few snags and we will get to that as they come up in the install. Lets get to it! Ok first thing to do is remove the hood, cowl and stock hood hinges. Then you need to find the center point of the front of the cowl area and put a piece of masking tape their that you can write on. Then from this center mark you will go left and right 23" each way so the hinges will be 46" from center to center. I used masking tape to make all my marks on so it is easy to change if you make a mistake and also it will help protect the paint for the painted guys. Ok so once you make your two hinge marks 46" apart from each other you are ready to make a templet so you can transfer the hinge mounting holes and center slot. So the first step is to mark the hinges for Passenger and Drivers side. Take the hinge box's and set them side by side so the top of the box's are touching like in the pic and not the bottoms. Once you have done this put a P on the left one for Passenger and a D on the right one for Drivers side. [IMG]  [/IMG] [/IMG]Take one of the hinges and place it face down on a piece of poster board and trace the out line of the hinge box, center slot and the 4 mounting holes. Now their is a P and a D to this templet as well so put a mark showing what is what. After I cut this out I placed the box back over it and used a transfer punch to get exact centers for the holes. [IMG] 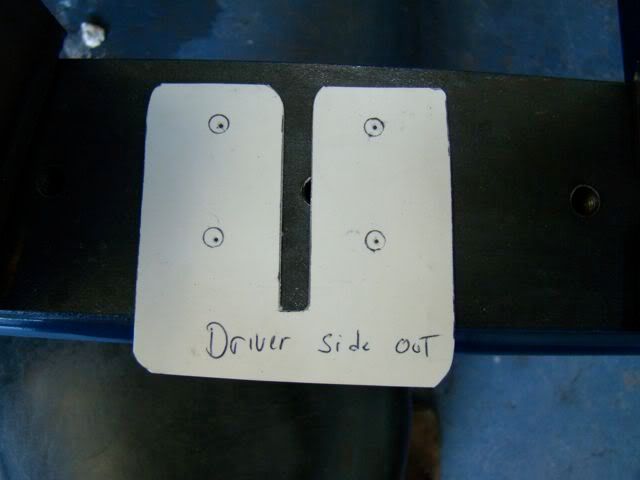 [/IMG] [/IMG]Then take the templet and place it so the 46" marks you made are in the center of the slot you cut out and that the bottom of the templet is tight to the bottom of the wire gutter. I used 2 small magnets to holt it in place while I transferred the mounting holes with a center punch. and marked the slot with a pen. [IMG] 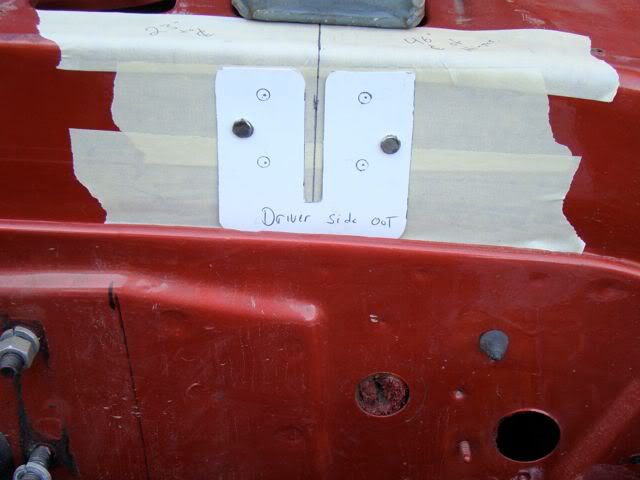 [/IMG] [/IMG]Then I drilled out the the 4 mounting holes with a 5/16" bit but I did not cut the slot out yet. First I set the Passenger side box over the area where it will go and marked out the area I needed to remove so it could slide into the cowl. Only remove as little as you have to so it will fit. Then slide it into place and install 4 bolts just to locate it in the correct spot. It should be sitting flat to the bottom of the cowl at this time. I then used a C clamp to hold it tight so I could mark and drill the 2 bottom holes that will go through the cowl in to the cabin. Note! At this point I chose to use regular hardware for all my mock up because SS is great but does not lend it self well for going in and out too much. So I will keep the SS in a bag and when I am ready for final assembly I will set it all with the regular hardware, tighten it all down and then when I am happy with it I will remove 1 bolt at a time and install the SS with a bit of anti-sieze. [IMG] 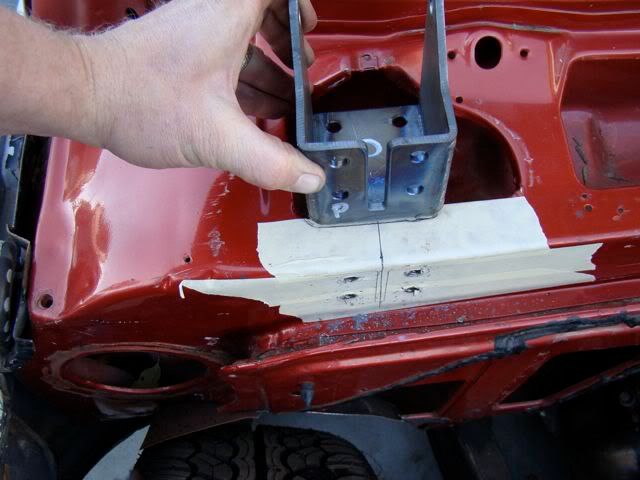 [/IMG] [/IMG][IMG] 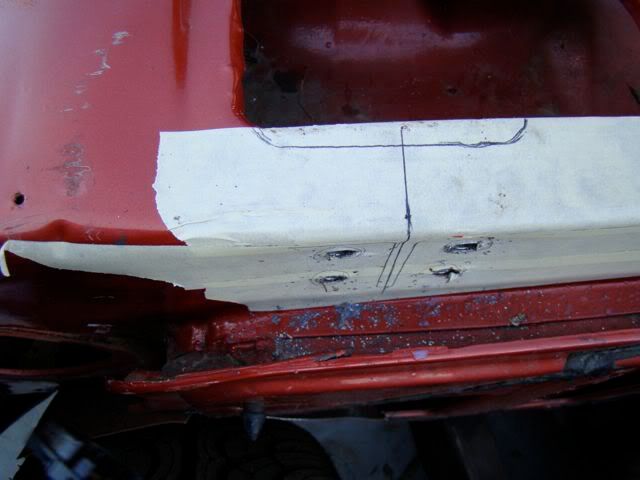 [/IMG] [/IMG][IMG] 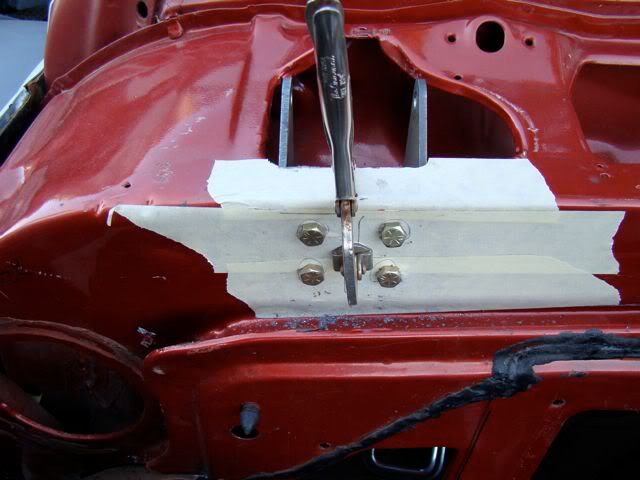 [/IMG] [/IMG][IMG] 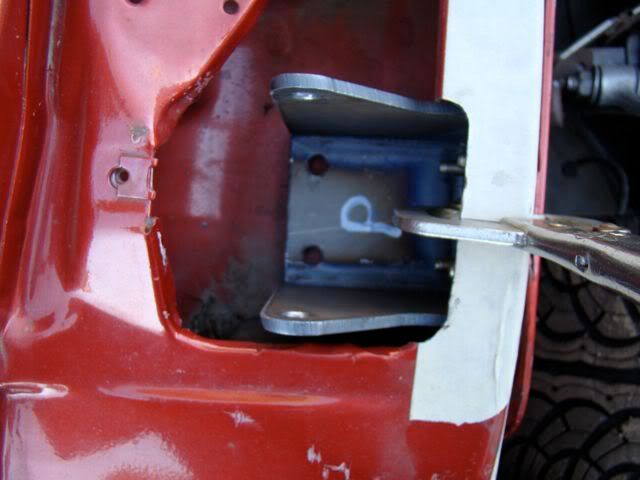 [/IMG] [/IMG]Then I marked for the (2) 3/8" holes for the center slot. The first one went at the bottom of the marked out slot but 1/4" up. The top hole will be for now right on the corner of the top of the cowl. After they are drilled I removed the tape and scribed 2 lines from top to bottom of each hole. I marked mine just inside the lines of where I thought it would end up then I cut out the section. I then clamped the box back in place using the bolts to align it once again. I then took a die grinder and gently remove the rest of the metal around the slot until it was just flush with the slot cut in the box. By doing it this way you end up with a very clean hole that just looks right. [IMG] 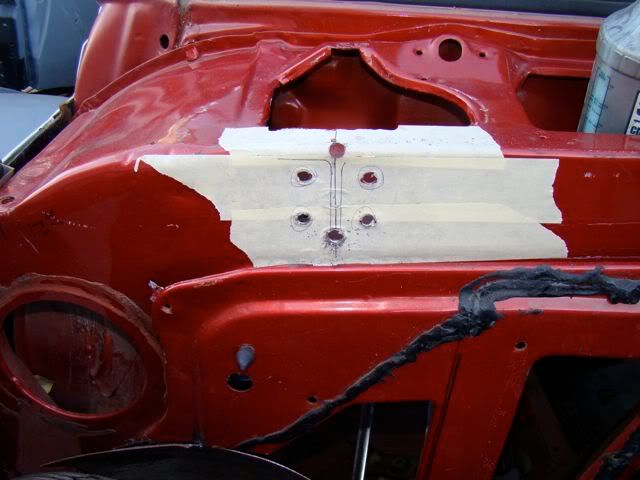 [/IMG] [/IMG][IMG] 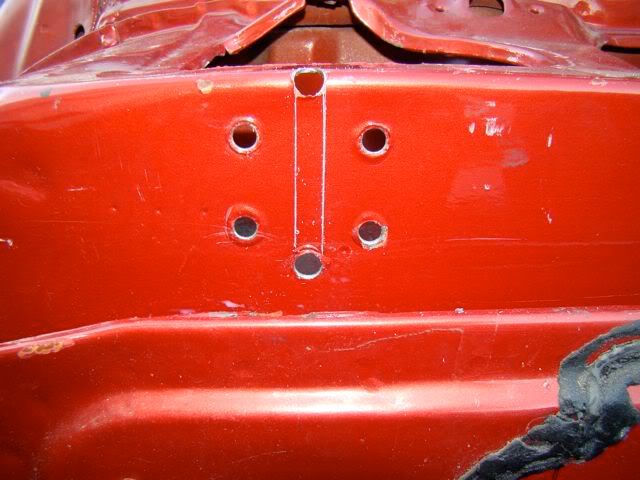 [/IMG] [/IMG][IMG]  [/IMG] [/IMG]Kevin LFD Inc. |
|
|
|
 |
| Bookmarks |
|
|


 Linear Mode

