
|
Register or Log In To remove these advertisements. |
|
|
|
|||||||
 |
|
|
Thread Tools | Display Modes |
 09-10-2010, 08:46 PM
|
#76 |
|
Registered User
Join Date: Aug 2009
Location: Corinth, TX
Posts: 210
|
Re: My 1957 Chevy Truck "Journey"
Thanks Kim.....I have some finish work to do to it, but for the most part it is done.
I put it in after work today, but I am to tired to crawl back under the truck to take any pictures. For such a short week it sure has been a long one.  Oh, and how is your build coming along?? Tim
__________________
Better to have it and not need it, then to need it and not have it. Fork In The Road....Cummins Build My Build Thread... Alternative A/C Mounting for LS Engines 4L60E Transmission Rebuild Info Trailing Arm How To |

|

|
|
09-10-2010, 09:12 PM
|
#77 | |
|
Registered User
Join Date: Aug 2007
Location: Corona, California
Posts: 7,998
|
Re: My 1957 Chevy Truck "Journey"
Quote:
Now that my son is back in school I should be able to make some progress. Kim |
|
|
|
|
|
09-10-2010, 11:05 PM
|
#78 | |
|
Registered User
Join Date: Aug 2009
Location: Corinth, TX
Posts: 210
|
Re: My 1957 Chevy Truck "Journey"
Quote:
I am going to be installing a hydro-booster (from a 94 Astro Van) and I was wondering....do you have to change the OEM brake pedal mount like you did on yours or can I use it?? I plan on using your idea of mounting the booster back by the bed....not sure if I am going to make a tilt bed or move it further back and have an access door in the bed to access it.
__________________
Better to have it and not need it, then to need it and not have it. Fork In The Road....Cummins Build My Build Thread... Alternative A/C Mounting for LS Engines 4L60E Transmission Rebuild Info Trailing Arm How To |
|
|
|
|
|
09-11-2010, 12:29 AM
|
#79 | |
|
Registered User
Join Date: Aug 2007
Location: Corona, California
Posts: 7,998
|
Re: My 1957 Chevy Truck "Journey"
Quote:
Kim |
|
|
|
|
|
09-11-2010, 12:41 AM
|
#80 |
|
Registered User
Join Date: Aug 2009
Location: Corinth, TX
Posts: 210
|
Re: My 1957 Chevy Truck "Journey"
Ok, cool....one less piece to make...although I do like to fabricate.
 Glad to hear you will be getting back to the truck soon...and Oh, I hear ya on the kids going to school....had to spend a little over 700 buck on clothes and supplies....mine are still in elementary.
__________________
Better to have it and not need it, then to need it and not have it. Fork In The Road....Cummins Build My Build Thread... Alternative A/C Mounting for LS Engines 4L60E Transmission Rebuild Info Trailing Arm How To |
|
|
|
|
09-11-2010, 08:32 AM
|
#81 |
|
Registered User
Join Date: Aug 2007
Location: Corona, California
Posts: 7,998
|
Re: My 1957 Chevy Truck "Journey"
Mines in the 4th grade. We have him in parochial school so it does cost a little.
Kim |
|
|
|
|
09-11-2010, 10:52 PM
|
#82 |
|
Registered User
Join Date: Aug 2009
Location: Corinth, TX
Posts: 210
|
Re: My 1957 Chevy Truck "Journey"
Ok, Installed my new transmission cross-member last night and today I worked on getting everything centered and all of my angles correct.
So, here are some pictures with measurments...kinda boring but...it is a necessity in getting it all set up correctly. If anyone notices anything wrong or that needs a second look please let me know...I hate having to do double later on down the line that could have been prevented. Tim 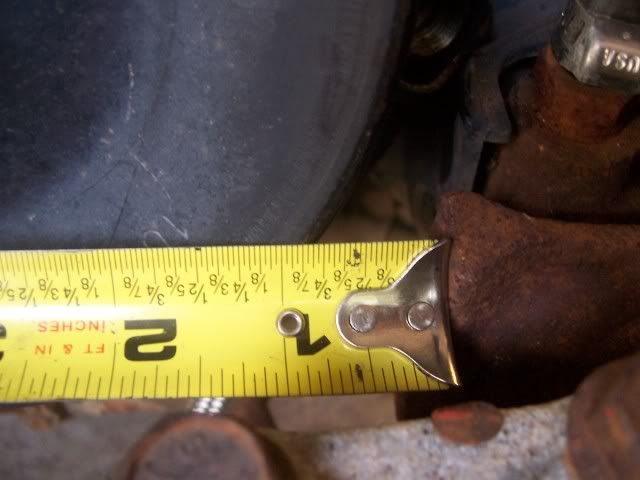 This is of the P/S to steering gearbox (side) housing clearance. 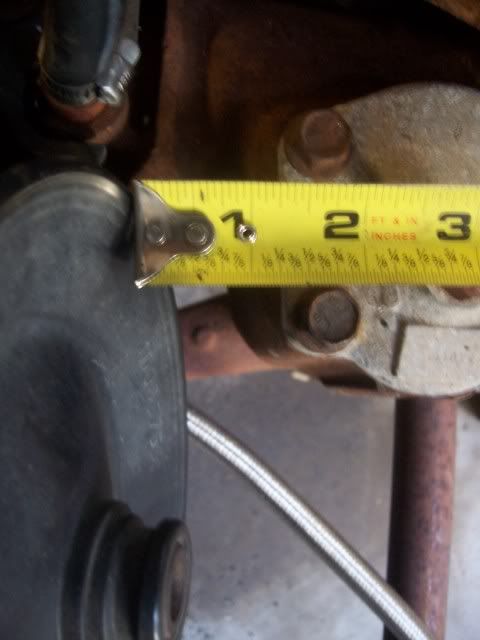 This is the P/S pulley clearance at the steering gearbox. (front) 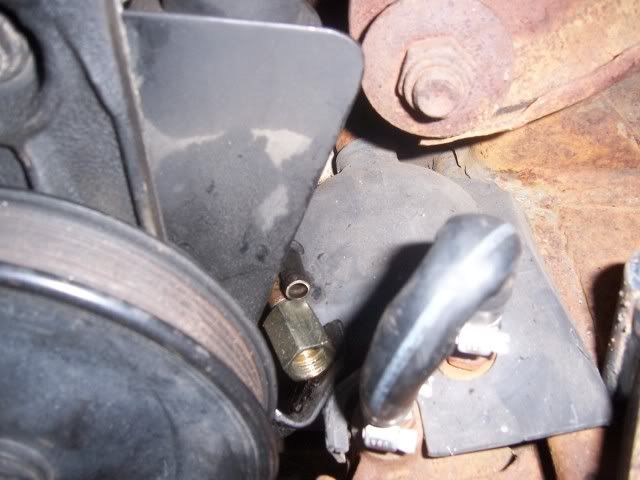 Hoses coming off of the P/S pump....very close to hitting the gear box. 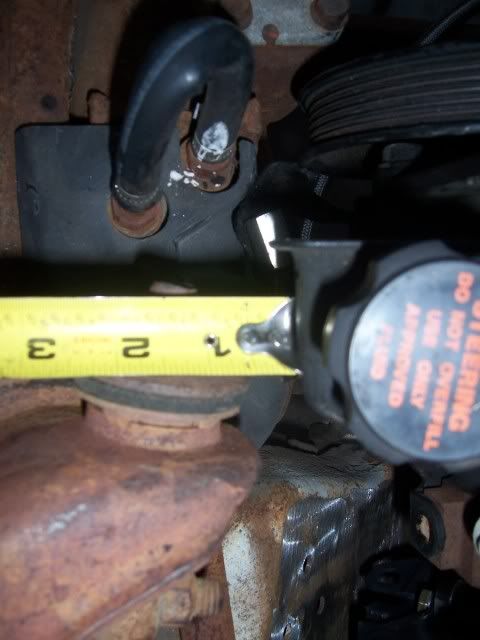 Clearance of P/S reservoir to upper control arm. 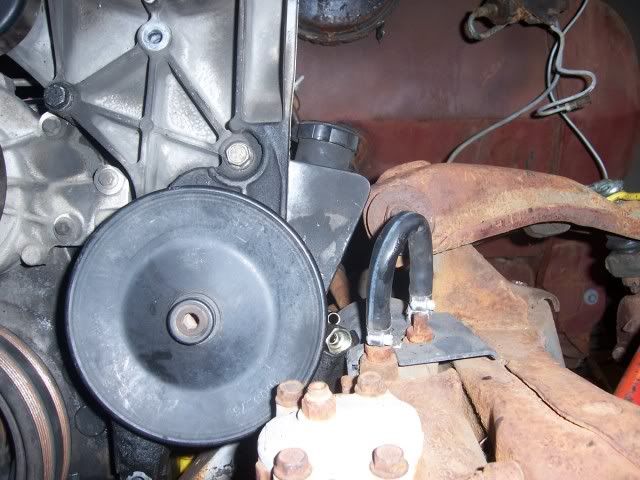 Shows how tight everything is on the driver side. 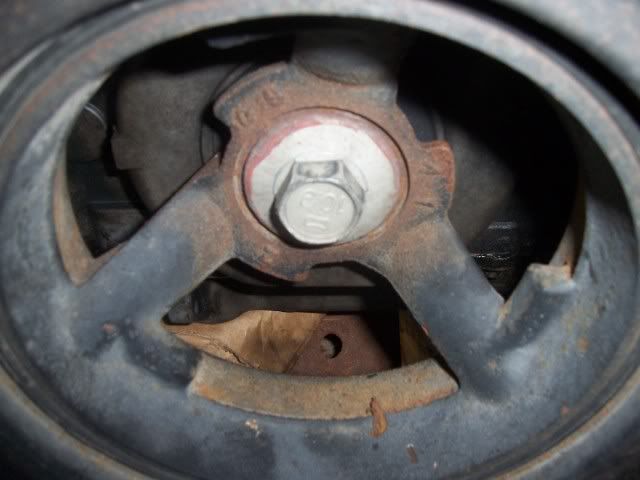 Showing reference of crank bolt to hole in the clip....right above the skid plate....hole looks to be the center of the clip??? 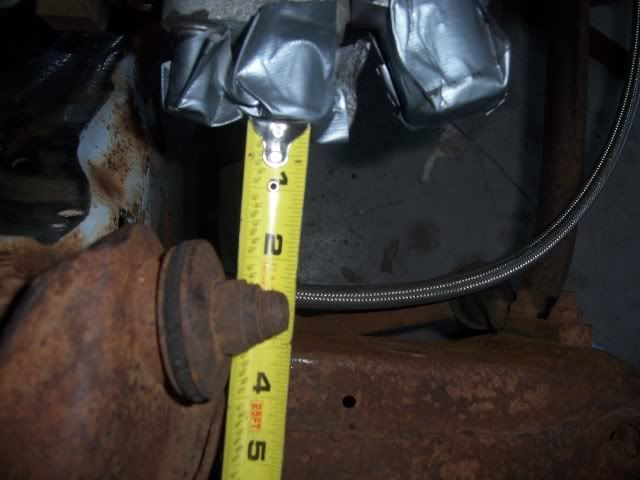 Water pump outlet....clearance between control arm and fittings. 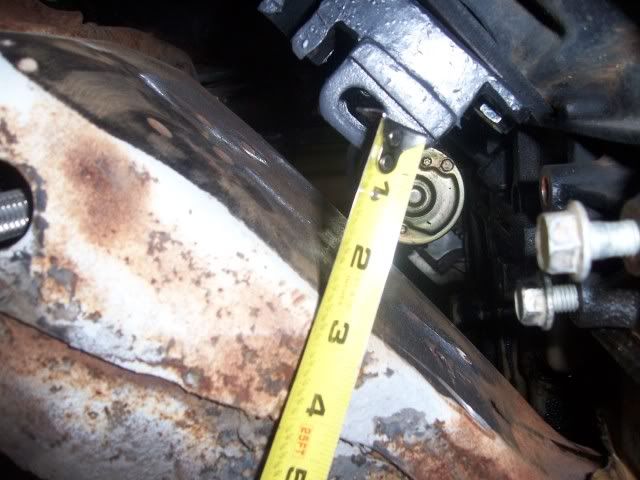 Not much of an engine mount needed.
__________________
Better to have it and not need it, then to need it and not have it. Fork In The Road....Cummins Build My Build Thread... Alternative A/C Mounting for LS Engines 4L60E Transmission Rebuild Info Trailing Arm How To Last edited by ambryatim; 09-11-2010 at 11:01 PM. |
|
|
|
|
06-20-2011, 09:56 PM
|
#83 |
|
Registered User
Join Date: Sep 2010
Location: Plano, TX
Posts: 319
|
Re: My 1957 Chevy Truck "Journey"
Looks good man! Seems you are a little further along than me. Good motivation!
|
|
|
|
|
08-14-2011, 09:02 PM
|
#84 |
|
Registered User
Join Date: Aug 2009
Location: Corinth, TX
Posts: 210
|
Re: My 1957 Chevy Truck "Journey"
After finally catching on some side work and other things...I will be getting back to work on the 57 real soon (when the kids start school) LOL!!!......I have not fully welded in the sub frame just yet...I have been looking at some of the other clip installs (like mine) and I noticed something.
Each of us are stretching the wheel base some what and to help center the wheel in the opening....what I have noticed that some have cut there frame back further than I have and some not as much. The oddity here is that they all seem to be pretty centered in the wheel well regardless of what some photo's show. Here are some examples. Mine..... 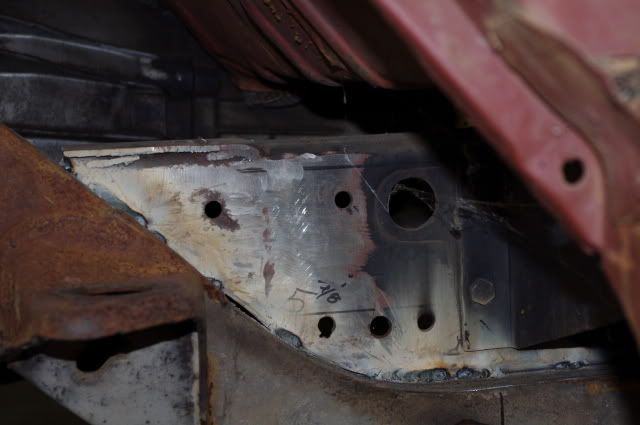 55metalmonkeys...(Good work by the way) 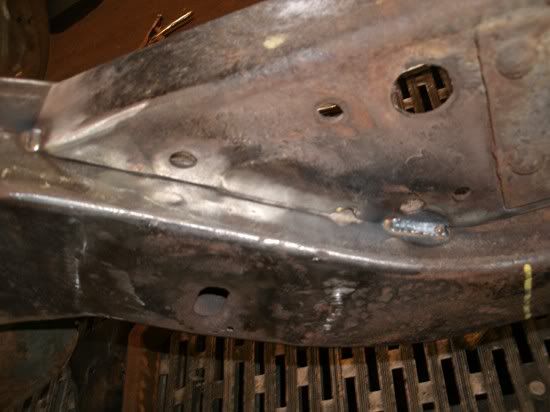 Red Foreman....(Good work on yours too) 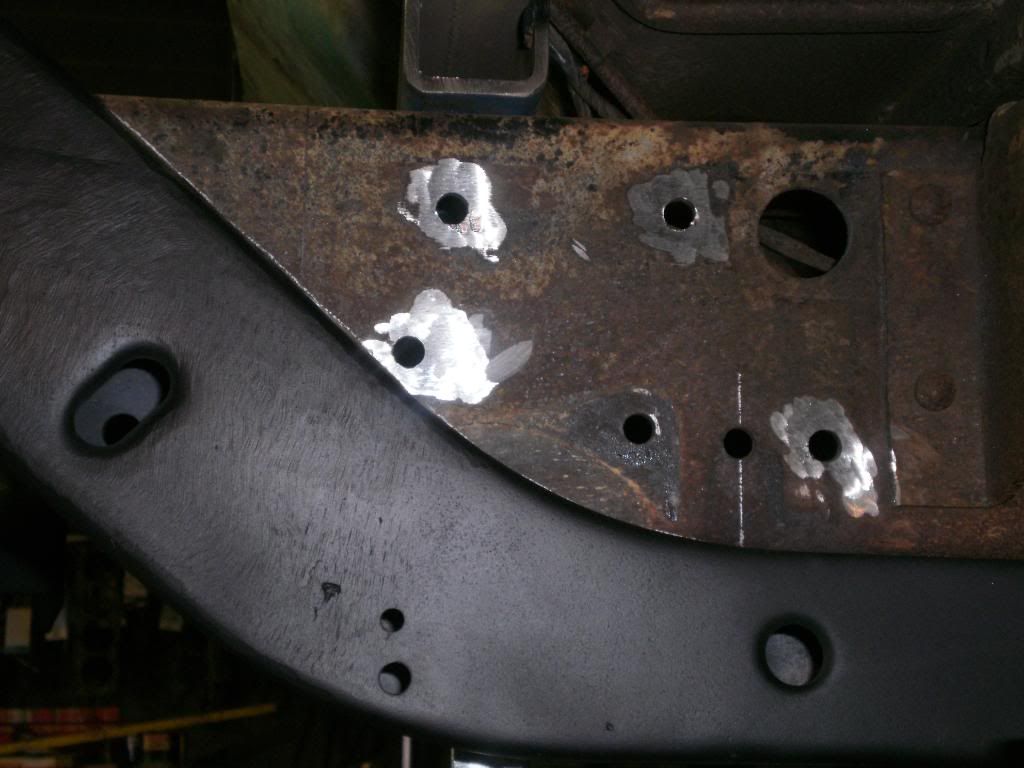 Ok, 55metalmonkey used a wheel base jig and Red Foreman used a radiator support/clip style jig....me I used bar measurements. As you can see in the photos my cut is between 55metalmonkeys and Red Foremans.... based on the the holes for the old leaf spring mounts and the clutch pedal mounting holes. 55metalmonkey cut off alot more than Red Foreman and me not so much.... So, I am wondering if that is normal and that every truck is that different or is it the clips we are grafting in and they are all that much different??? I might be grasping at straws here..but, inquiring minds wanna know. LOL!! Oh, I will note that mine is a LWB frame...could that have something to do with it??? I plan on cutting down the rear of the frame to make the truck a SWB....just wanting to be sure I did not screw something up. 
__________________
Better to have it and not need it, then to need it and not have it. Fork In The Road....Cummins Build My Build Thread... Alternative A/C Mounting for LS Engines 4L60E Transmission Rebuild Info Trailing Arm How To |
|
|
|
|
10-13-2011, 05:42 PM
|
#85 |
|
Registered User
Join Date: Aug 2011
Location: Trumansburg ny
Posts: 230
|
Re: My 1957 Chevy Truck "Journey"
mine looks pretty centered and i think its about a 1/2" farther out than metal monkeys. 1/2" past the second hole that is. my wheel base is only extended 3/4" though. Yes i think they are all different and the measurment shows more on the frame than in the wheel well.
|
|
|
|
|
10-13-2011, 10:46 PM
|
#86 |
|
Registered User
Join Date: Apr 2011
Location: Caldwell, Idaho,United States
Posts: 143
|
Re: My 1957 Chevy Truck "Journey"
here's mine, I found that weather or not you grind the rib or parting line flat on the clip has a lot to do with where you end up as far as horizontal placement. the 1/2" fore or aft has a lot to do with the preparation of the clip and the truck frame. I ended up very close to 1/2" longer than the measured original axle to axle and yet the hole is completely cut off.
__________________
Learn to deal with reality, or reality will deal with you. |
|
|
|
|
10-14-2011, 07:20 AM
|
#87 |
|
Registered User
Join Date: Aug 2011
Location: Trumansburg ny
Posts: 230
|
Re: My 1957 Chevy Truck "Journey"
Judging by your photos i am 1/2" farther back with mine and my wheel base was extende 3/4" ,go figure?
|
|
|
|
|
10-14-2011, 07:26 AM
|
#88 |
|
Registered User
Join Date: Dec 2009
Location: Melbourne Australia
Posts: 549
|
Re: My 1957 Chevy Truck "Journey"
Hey Ambryatim, good ya back, funny that I scoured & dissected your thread & pics & also used yours as a reference before I cut mine. You should disregard that picture as I had to go back & trim another 1/2" more off mine. I always had the feeling that I bungled the 1st measurment somehow with all the excitement but happy where its at now.
Here is the current picture & where I'm at atm, all welded up & painted. |
|
|
|
|
10-14-2011, 05:21 PM
|
#89 |
|
Registered User
Join Date: Apr 2011
Location: Caldwell, Idaho,United States
Posts: 143
|
Re: My 1957 Chevy Truck "Journey"
Ambryatim, here's my engine install, I used tall/narrow 69 Camaro motor mount frame stands and stock Chevy small block rubber motor mounts, the engine sits higher than yours which helps with the heater hose and power steering line clearances a lot, good thing these trucks have a lot of room under the hood.
__________________
Learn to deal with reality, or reality will deal with you. |
|
|
|
|
10-14-2011, 05:38 PM
|
#90 |
|
Registered User
Join Date: Aug 2009
Location: Corinth, TX
Posts: 210
|
Re: My 1957 Chevy Truck "Journey"
What is the height of the camaro mount to the center of the bolt hole?? I have fab'd up some of my own mounts and will be cutting them soon. Your clearances look good.
__________________
Better to have it and not need it, then to need it and not have it. Fork In The Road....Cummins Build My Build Thread... Alternative A/C Mounting for LS Engines 4L60E Transmission Rebuild Info Trailing Arm How To |
|
|
|
|
10-14-2011, 07:09 PM
|
#91 |
|
Registered User
Join Date: Apr 2011
Location: Caldwell, Idaho,United States
Posts: 143
|
Re: My 1957 Chevy Truck "Journey"
21/8" between crossmember and bolt center.2" between Camaro pan and crossmember.
__________________
Learn to deal with reality, or reality will deal with you. |
|
|
|
|
10-14-2011, 07:12 PM
|
#92 |
|
Registered User
Join Date: Apr 2011
Location: Caldwell, Idaho,United States
Posts: 143
|
Re: My 1957 Chevy Truck "Journey"
Anyone know what the goofy bent "cup" thing is on the front of the crossmmember??? I'm planning on shaving it, looks like a rock catcher to me.
__________________
Learn to deal with reality, or reality will deal with you. |
|
|
|
|
10-14-2011, 07:28 PM
|
#93 |
|
Registered User
Join Date: Dec 2009
Location: Melbourne Australia
Posts: 549
|
Re: My 1957 Chevy Truck "Journey"
Pretty much a bash plate allthough I don't know why yours is cupped like that?? Mine's wrapped flat & trim.
|
|
|
|
|
10-14-2011, 10:28 PM
|
#94 | |
|
Registered User
Join Date: Aug 2009
Location: Corinth, TX
Posts: 210
|
Re: My 1957 Chevy Truck "Journey"
Quote:
Posted via Mobile Device
__________________
Better to have it and not need it, then to need it and not have it. Fork In The Road....Cummins Build My Build Thread... Alternative A/C Mounting for LS Engines 4L60E Transmission Rebuild Info Trailing Arm How To |
|
|
|
|
|
02-23-2012, 12:35 PM
|
#95 |
|
Registered User
Join Date: Aug 2009
Location: Corinth, TX
Posts: 210
|
Re: My 1957 Chevy Truck "Journey"
WOW!! Its been a while....now see on the ZR@Rick's and RedForeman's those measurements are closer to where I am at....makes me feel better.
I hope to have some more pics up soon. This dang economy makes it hard to make much progress worth posting. But, Progress is progress. But now I have a new dilemma....whether to use the 4L60E or get a 5 Speed????
__________________
Better to have it and not need it, then to need it and not have it. Fork In The Road....Cummins Build My Build Thread... Alternative A/C Mounting for LS Engines 4L60E Transmission Rebuild Info Trailing Arm How To |
|
|
|
|
03-06-2012, 09:04 PM
|
#96 |
|
Registered User
Join Date: Aug 2009
Location: Corinth, TX
Posts: 210
|
Re: My 1957 Chevy Truck "Journey"
Well, I decided that I would take a look at the cab to see how bad it is and how much work it might need.
I have to replace the cab corners and will also have to replace at least the the rockers on the driver side and maybe the step on the passenger side. I started on the driver side and used a 4" cup wire wheel to check the damage and this is what I found. 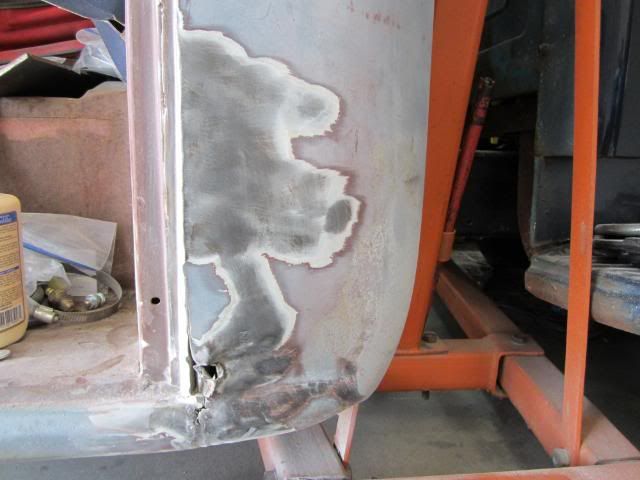 Driver side...they hit something.  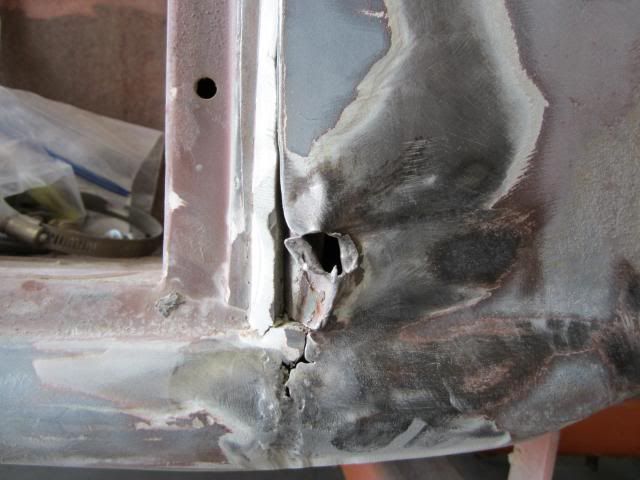 The white vertical stuff is filler.  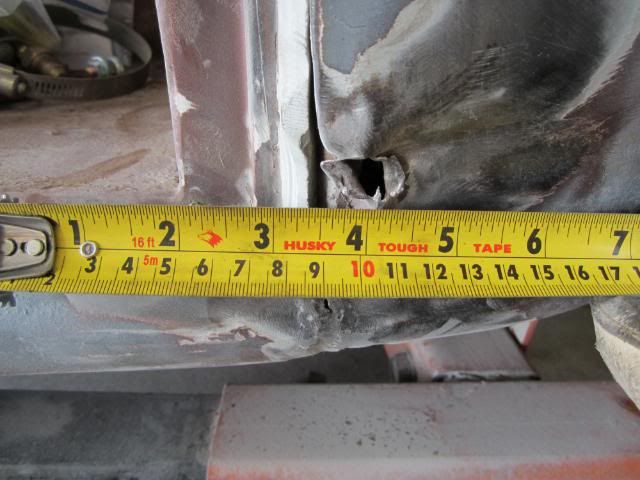 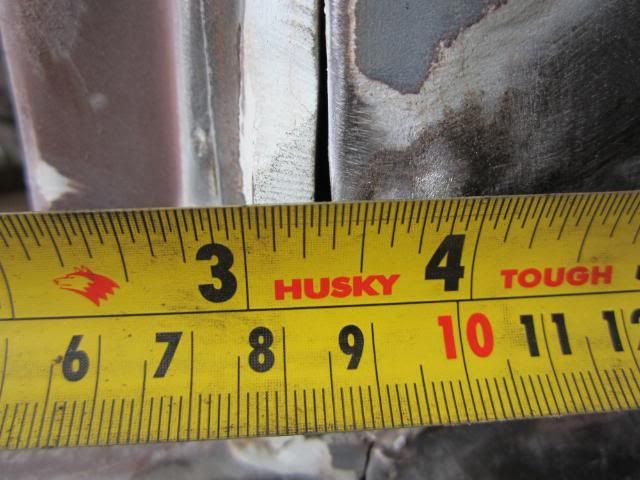 They used it to fill the gap between the door and the jam!!! Man that is very upsetting. 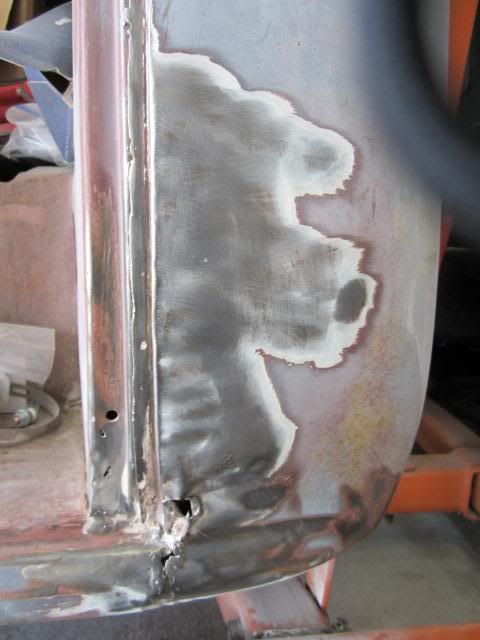 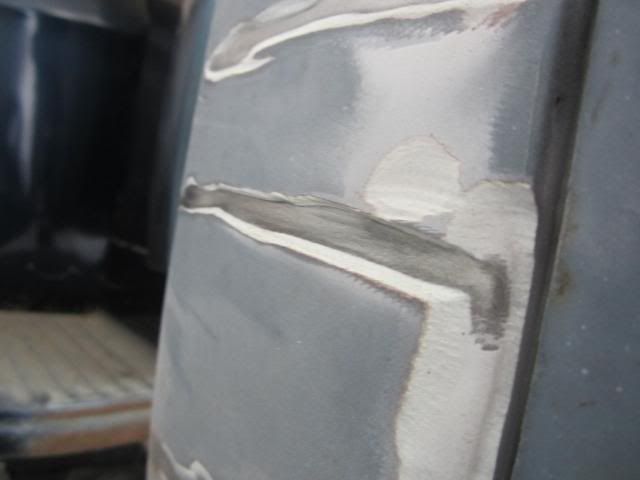 Passenger side.   Not as much filler but, still not good. 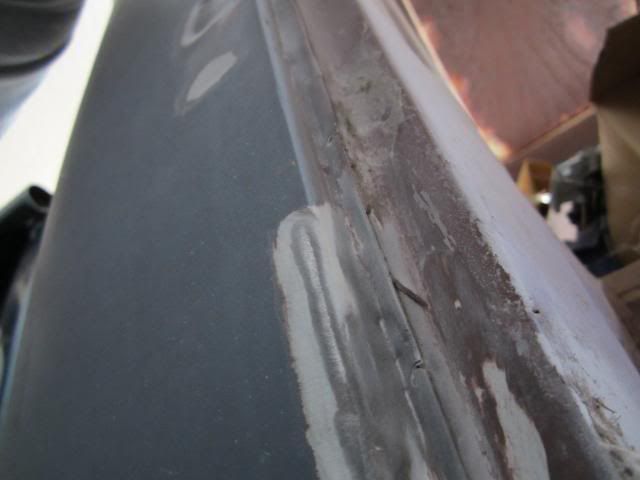 I was trying to catch a shot of the build up...angle is from the bottom looking up.  Rear of the cab.....I can feel small dings and dents not real major a little hammer and dolly work and it should be good. 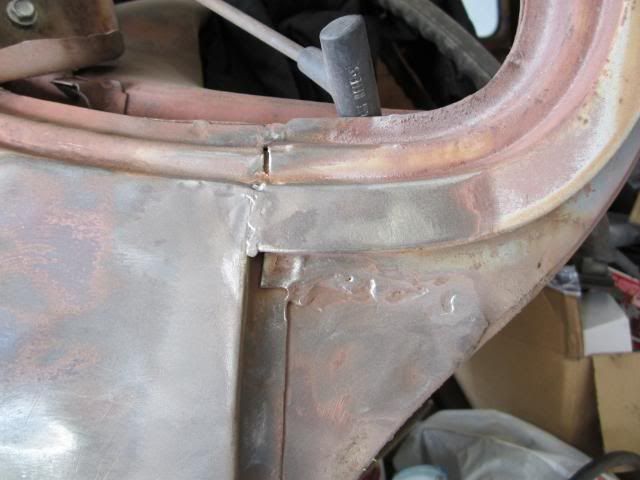 Driver "A" pillar section. I have a question about this area...does it look like it has been repaired or does it look like original??? Looks like I will be getting a 101 class in body work....if any one has pointers on how to tackle these areas and a good technique to use for hammer and dolly work. I am all EARS....cause lord knows I need all the input and pointers I can get. Have read this to get an idea of some of the repairs, but hands on input is greatly appreciated.
__________________
Better to have it and not need it, then to need it and not have it. Fork In The Road....Cummins Build My Build Thread... Alternative A/C Mounting for LS Engines 4L60E Transmission Rebuild Info Trailing Arm How To |
|
|
|
|
03-06-2012, 11:30 PM
|
#97 |
|
Registered User
Join Date: Aug 2007
Location: Corona, California
Posts: 7,998
|
Re: My 1957 Chevy Truck "Journey"
It's amazing how much filler is on some of these trucks.
Your "A" pillar looks a lot like mine did and as far as I know there was no repair in that area on mine. Kim |
|
|
|
|
03-06-2012, 11:33 PM
|
#98 | |
|
Registered User
Join Date: Aug 2009
Location: Corinth, TX
Posts: 210
|
Re: My 1957 Chevy Truck "Journey"
Good to know, Thanks Kim.
As for the filler...I know...I am going to build a dolly for the cab and move it outside to continue the removal of the paint and filler....hopefully it is not too bad. Should I wire wheel it or use a sander/DA to remove the stuff?? Quote:
__________________
Better to have it and not need it, then to need it and not have it. Fork In The Road....Cummins Build My Build Thread... Alternative A/C Mounting for LS Engines 4L60E Transmission Rebuild Info Trailing Arm How To |
|
|
|
|
|
03-06-2012, 11:48 PM
|
#99 |
|
Registered User
Join Date: Aug 2007
Location: Corona, California
Posts: 7,998
|
Re: My 1957 Chevy Truck "Journey"
If you can get some of these types of discs they work pretty good. 3m and Norton have them also. Be sure and wear a mask no matter what you use as the dust is terrible.
Kim http://abrasives4sale.com/strip-clean.htm |
|
|
|
|
03-06-2012, 11:53 PM
|
#100 | |
|
Registered User
Join Date: Aug 2009
Location: Corinth, TX
Posts: 210
|
Re: My 1957 Chevy Truck "Journey"
Thanks, I believe I can get those at Home Depot. I will check in the morning.
Quote:
__________________
Better to have it and not need it, then to need it and not have it. Fork In The Road....Cummins Build My Build Thread... Alternative A/C Mounting for LS Engines 4L60E Transmission Rebuild Info Trailing Arm How To |
|
|
|
|
|
| Bookmarks |
|
|


 Linear Mode

