
|
|
|
 05-14-2023, 08:21 AM
|
#1 |
|
Registered User
Join Date: Jun 2014
Location: Mocksville, NC
Posts: 1,740
|
Re: Sullii the 72 GMC 1500
I think I've already mentioned my flipped tierod mod, but I was finally able to wrap that up. I went back and forth about whether I wanted to get one of those (expensive!) kits, or find a way to do it myself. I looked at tapered sleeves and couldn't find any that were right. Looked at getting spindles that haven't been drilled yet but CPP said nope. Ultimately I decided to just ream out the hole from the bottom like the VW crew does. I know this leaves an hourglass shaped hole in the spindle and reduces contact area on the tierod end, but if you look at the tierod compared to the depth of the hole it's not as much of a concern as you'd think. The tierod only engages in about 2/3 of the hole anyway, so tapering it from the opposite side results in a loss of only 1/6 of the contact depth. I'm not towing, autocrossing, or running large wheels so I think it will be just fine! I will monitor them closely for a while and if I see any excessive wear I will readdress this again later. By the way, if you wanted to know, the correct reamer is PN 89411 from Speedway which is a 1.5" per foot taper.
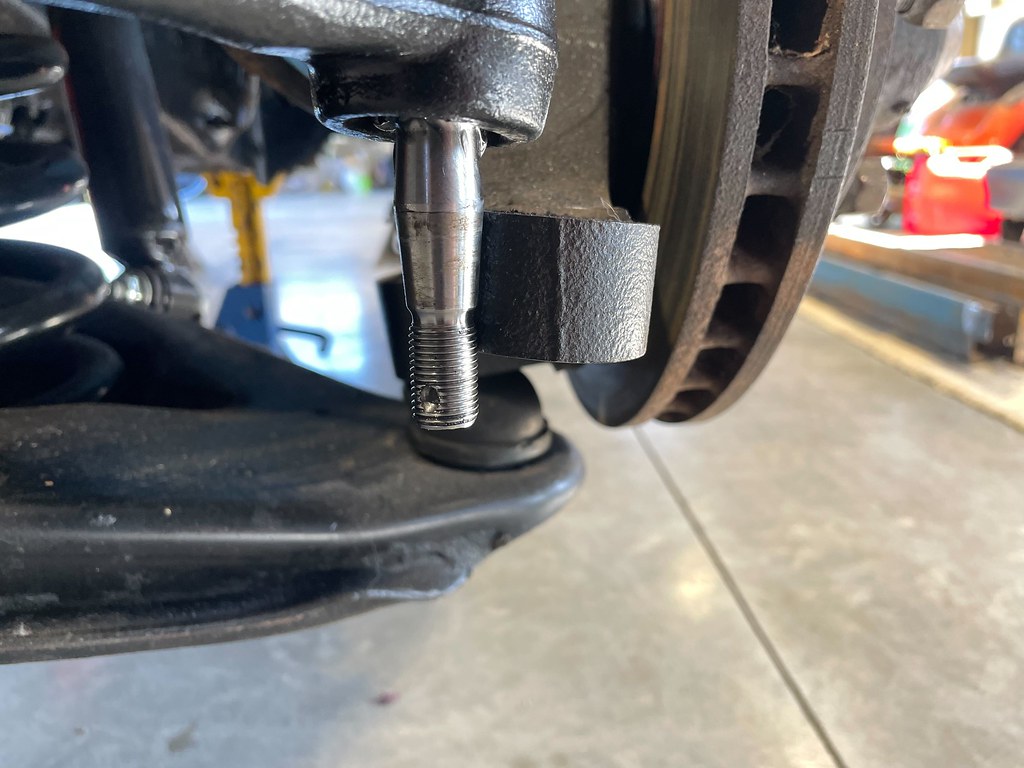   Here is a comparison before and after the tierod flip. My tierod angle was terrible after sectioning the crossmember. With the sectioning, every suspension point moved up 1.5" except the inner tierod connection point. This created a drastic bump steer condition that needed to be addressed. After flipping the tierod, the angle is pretty much back to where it needs to be. Before 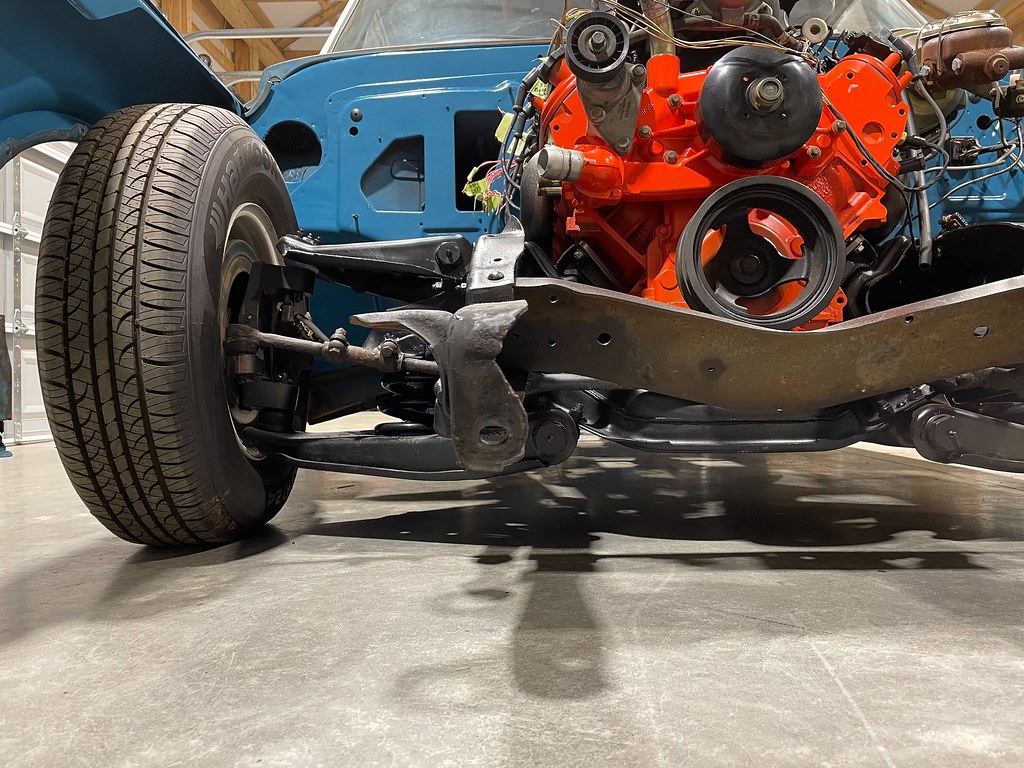 After  The clearance to the wheel is close but it will work. This is a stock 15x6 wheel, so anything 15" with more backspacing would not work. If you're running larger wheels, then no problem.  While I was working on the front suspension, I decided to finally finish off the notch on the upper arm. This is for clearance to the steering shaft since I sectioned the crossmember. Normally you don't have to notch this much, but since I also body dropped the truck 1" I had to go a little deeper. 
__________________
Builds: Green Gus the 68 C10 ; Sullii the 72 1500 - Instagram: @dr.hewitt - C10 Concept/Development Photos: Master Thread |

|

|
|
05-14-2023, 09:47 AM
|
#2 |
|
Registered User
Join Date: Mar 2015
Location: washington
Posts: 2,177
|
Re: Sullii the 72 GMC 1500
I am watching this with interest.
Always something when you change one item it affects three others. Do it once and do it right seems to be your motto. Nice work. Cheers |
|
|
|
|
05-14-2023, 08:15 PM
|
#3 | |
|
Registered User
Join Date: Jun 2014
Location: Mocksville, NC
Posts: 1,740
|
Re: Sullii the 72 GMC 1500
Quote:
__________________
Builds: Green Gus the 68 C10 ; Sullii the 72 1500 - Instagram: @dr.hewitt - C10 Concept/Development Photos: Master Thread |
|
|
|
|
|
05-14-2023, 08:55 PM
|
#4 |
|
Registered User
Join Date: Jun 2014
Location: Mocksville, NC
Posts: 1,740
|
Re: Sullii the 72 GMC 1500
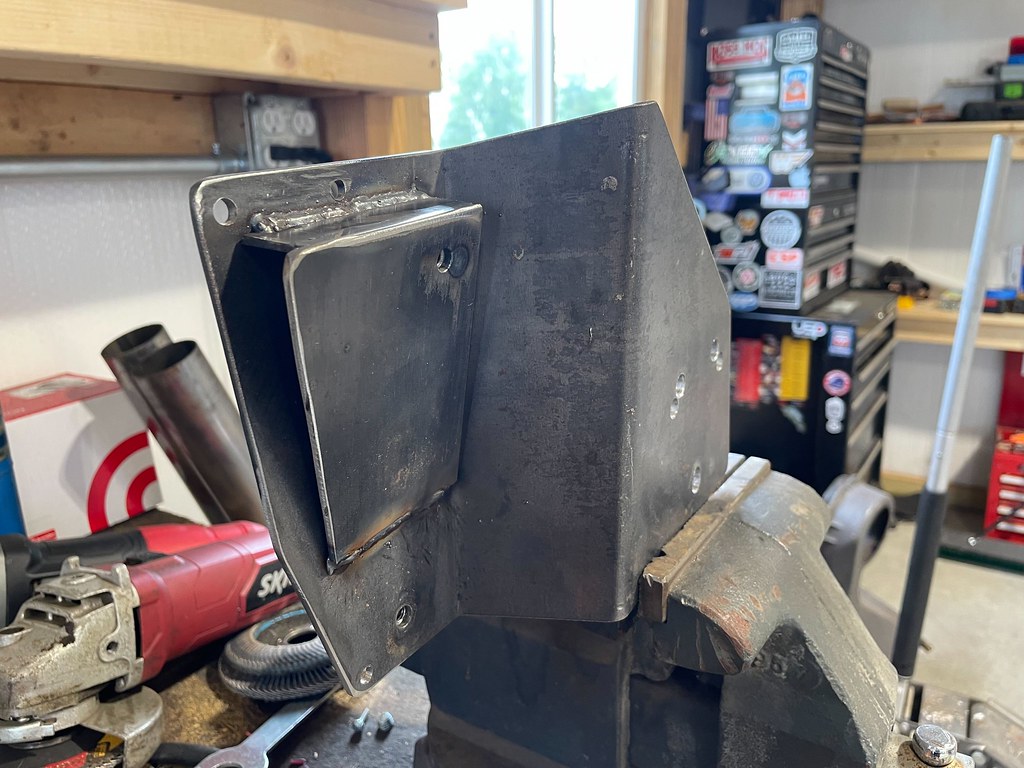
I've been very slowly making progress on my center crossmember throughout this entire build. It started with flipping my trailing arm mounts to help correct pinion angle and limit the downstream effects of lowering my rear end so much. Then I eventually cut the 4.5" holes to allow for the exhaust pass throughs. Then I added the reinforcing hoops to strengthen the holes I cut. Through all this, I kept noticing how low the center of the crossmember actually hangs below the frame rails. Additionally, the front scoops down and would make for a very bad day if it were to catch on something. I decided I needed to flatten the bottom of my crossmember. I know I've seen it done before, but for this mod I decided to skip the forum research and do it on my own. I wanted to flatten it such that it was no longer the lowest part of the frame. I was able to get it high enough to where it's level with the bottom of the rivets holding in the crossmember.
  You may have noticed the tab hanging off the rear of this plate. That is my integrated carrier bearing mount. On my other truck, I had to flip the carrier bearing mount from top to bottom so I could raise the bearing up to correct driveshaft angles. This is a consideration that must be made when lowering this much with a two piece driveshaft. I like to keep the two piece because it helps with clearance under the cab. I figured, since I'm going through all this work I might as well make the mount part of the crossmember.   At this point, I was able to do all my driveshaft measurements. First was length. I determined the stock driveshaft will work if I shorten the front shaft 3.25". I will leave this task to a professional driveshaft shop. Next up, driveshaft angles. Starting with the engine, it is at a fixed -3.7 degrees. I can't change that because my clearances are already tight enough to the cab. That means driveshaft 1 has to either be -4.7 or -2.7 degrees (1 degree difference from engine). If I go -4.7, that means my pinion has to be -4.7 as well, which puts driveshaft 2 at +4.3 degrees. That results in 8.9 degrees on the universals which is unfavorable. The -4.7 option was appealing because I could bolt the carrier bearing directly to the mount with no spacers. The -2.7 degree option requires a 1/4" spacer to reach this angle. Not a big deal though. This gives me an angle of +2.3 degrees on driveshaft 2 and a universal angle of 5 degrees. This is much more acceptable. In order to achieve this on the rear end, it must match driveshaft 1 and therefore needs to be -2.7 degrees. Bolted straight to the drop blocks, the rear is at -6.7 degrees, so I will need to add some 4 degree shims and it will be perfect.  While figuring all this out, my little helper was very confused. 
__________________
Builds: Green Gus the 68 C10 ; Sullii the 72 1500 - Instagram: @dr.hewitt - C10 Concept/Development Photos: Master Thread |
|
|
|
|
05-14-2023, 09:34 PM
|
#5 |
|
Registered User
Join Date: Jun 2014
Location: Mocksville, NC
Posts: 1,740
|
Re: Sullii the 72 GMC 1500
This next round of updates is a big milestone for me. It's when I finally get to put some power to the electrical system and make some things move! But before we get to that, I had to finish up my throttle pedal. I bought a 5.3 DBW throttle pedal mounting plate specifically made for 67-72 trucks from a board member here. I wanted to like this plate, I really did (esp for the price), but it just did not work that well. The mounting holes didnt line up, the hardware it came with was terrible, and it put the pedal in an awkward position. It was very high off the ground and made it hard to push the pedal. It was designed to get "full pedal travel", which technically it did. However, these DBW sensors reach wide open throttle at about 50% travel, so you really could move the pedal closer to the floor. With that in mind, I ended up making an angled mounting surface attached to the original plate I bought. With the original bracket the pedal mounting surface was vertical. After modification, it was at about 75 degrees. This got the pedal in a much more comfortable position.
    Now that I had a throttle pedal, it was time to have some fun! At this point, everything was in place to turn the key and see if things would power up. For this test, I just ran a temporary battery cable from my battery to my starter, and another from starter to my firewall bulkhead. Cautiously, I turned the key and I could hear the fuel pump relay switching which was a good sign. Next, I hit the throttle and sure enough the throttle body sprung into action. I know this is just a photo but I promise that throttle body is actuated by my daughter holding the throttle wide open from inside the cab! We were able to get a full wide open throttle body with the pedal mashed to the floor, which is exactly what I wanted with the modified bracket.  Next test was to turn the key a little further and see if the starter would come alive. I don't have photographic proof, but the engine did indeed start to turn over. I removed the spark plugs to make this task easier on the starter. After a few seconds, the oil pressure jumped up to a solid 30 psi. I think at cranking speeds this is acceptable for now. We will see where it ends up once the motor is running. This really just confirms for me that the oil pump is working, I installed the new barbell correctly, and the new oring on the oil pickup is properly in place!  With all that excitement out of the way, it was time to do a compression test. This is where things start to get serious. I followed all the recommended steps for this test. Throttle wide open, coils disconnected, spark plugs out, and crank with starter for several compression cycles. My results are shown below. They ranged from 60 psi up to 170 psi. When I first saw the 60 psi my heart sank. After some reading, I tried a common test which is to put a bit of oil in the cylinder and retest. For cylinder #2, that brought the compression from 60 psi up to 145 psi. At this point, I feel like I'm at a crossroads with this motor. I can either keep pressing on, or pull it back out and try to dig deeper into these compression results. I think the fact that this motor sat for 2 years before I could get it to this point may have contributed to these poor compression readings. If I can start the motor and quite literally "knock the rust off" it may bring these readings back to acceptable values. I wonder if there's anything I could hurt by trying to start a motor if it has bad compression... 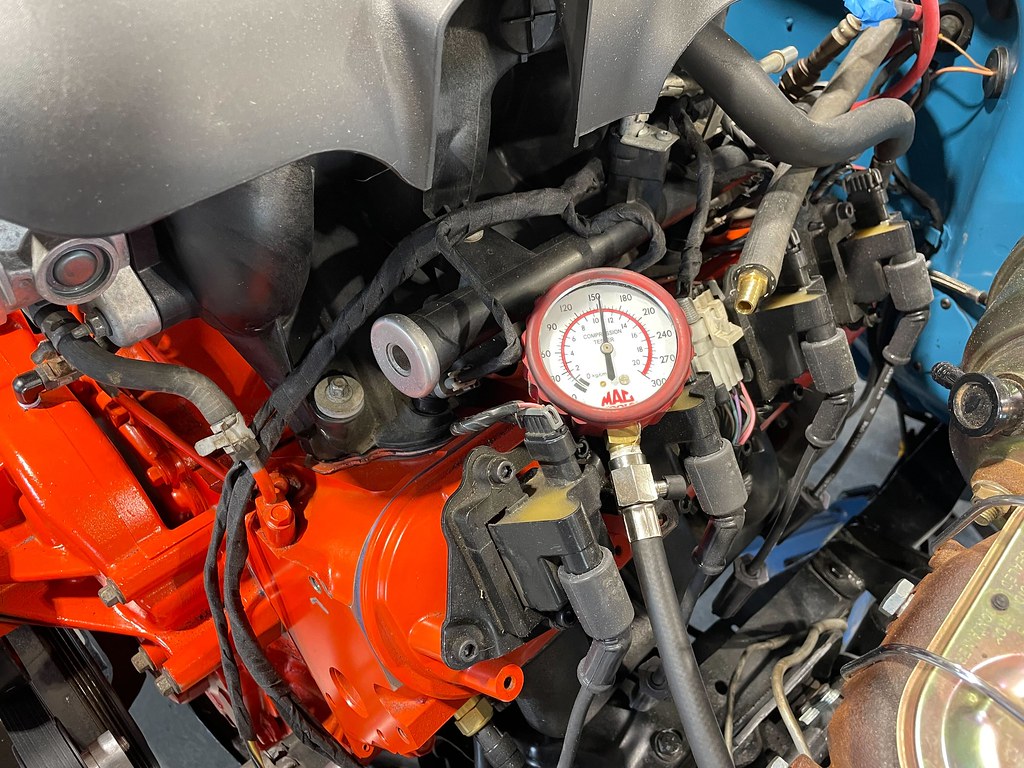  Side note, I did not mess with cylinder 8 because I could not tighten down the compression test fitting in the spark plug port due to poor clearance with the firewall, so this result may not be accurate. All other cylinders had a good seal on the fitting. With this new dilemma to ponder, I decided to take care of a simple task on my checklist. Reinstalling the heater box was simple enough with a new seal kit. Originally I was going to paint this box black, but after cleaning it up I kinda liked the original grey against the blue. A little turn of the key and slide of the air control demonstrated that the blower motor still works properly. Don't forget to reinstall the little ground strap on the motor! 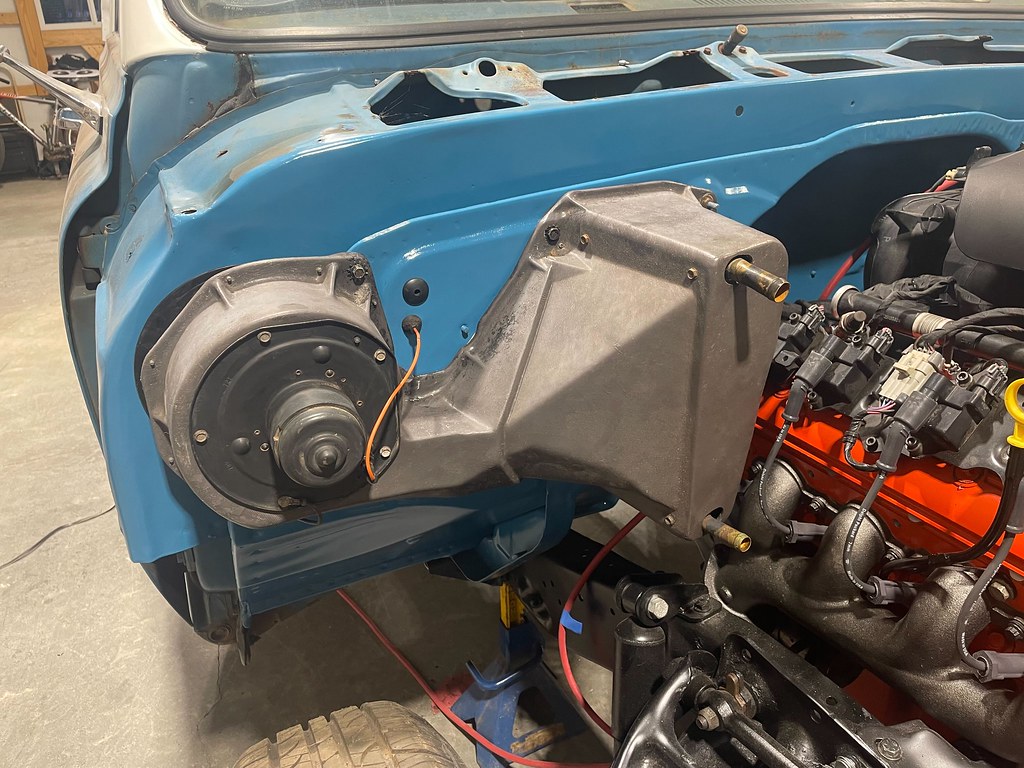 Oh what to do about my poor compression results... These numbers are going to haunt me until I either decide to pull the motor for further investigation, or just fire it up and see what happens.
__________________
Builds: Green Gus the 68 C10 ; Sullii the 72 1500 - Instagram: @dr.hewitt - C10 Concept/Development Photos: Master Thread |
|
|
|
|
05-14-2023, 07:41 PM
|
#6 |
|
Senior Member
 Join Date: Mar 2011
Location: Hanover NJ
Posts: 4,135
|
Re: Sullii the 72 GMC 1500
X2
__________________
Doc & Kim build http://67-72chevytrucks.com/vboard/s...d.php?t=722288 I am from the desert http://67-72chevytrucks.com/vboard/s...d.php?t=650332 basket case build SOLD http://67-72chevytrucks.com/vboard/s...d.php?t=648557 |
|
|
|
|
05-14-2023, 09:15 PM
|
#7 |
|
Senior Member
Join Date: Mar 2011
Location: Hanover NJ
Posts: 4,135
|
Re: Sullii the 72 GMC 1500
lol on the helper
__________________
Doc & Kim build http://67-72chevytrucks.com/vboard/s...d.php?t=722288 I am from the desert http://67-72chevytrucks.com/vboard/s...d.php?t=650332 basket case build SOLD http://67-72chevytrucks.com/vboard/s...d.php?t=648557 |
|
|
|
|
05-15-2023, 08:17 AM
|
#8 |
|
Senior Member
Join Date: Aug 2004
Location: Centennial, CO
Posts: 2,905
|
Re: Sullii the 72 GMC 1500
Nice progress. It's great to know that all the electrical mods are functioning.
Just fire it and see what happens. Mine was very similar. It sat with Kroil in the cylinders for about a year after I tested it. I finally fired it up and it's running just fine idling in the garage. That may be different once it's under load, but that's a problem for future me. It was pretty rough for the first minute of so, then evened out. That may have been the rings un-sticking or the injectors clearing out, but either way it smoothed out and appears to be ok now. These engines are known for gumming up the rings and I suspect that's what you (and I) are seeing. I haven't re-tested it, but I probably should. Maybe this summer.
__________________
ClusterTruck: 68 C10 Bought in 89, wrecked in 03. Slow low $ rebuild started '17. 6.0 & TKO http://67-72chevytrucks.com/vboard/s...d.php?t=788602 93 K1500 Short Step, 350, NV4500, EBL flash ECU. Vortec heads & roller cam someday... 05 Jeep Wrangler Unlimited. 3 lift & 6-speed 02 E320 the insurance total free car 13 Tahoe LTZ |
|
|
|
|
05-15-2023, 09:29 AM
|
#9 |
|
Registered User
Join Date: Apr 2014
Location: Azle,Texas
Posts: 2,248
|
Re: Sullii the 72 GMC 1500
Fantastic progress! I'd say fire it up and let it get up to temp. I'm expecting the same results when I get to that stage, since mine has been sitting for over 5 years.
__________________
Brian 1972 C10, "Loyd", LWB to SWB, 5.3, L83/6L80e, 4:11 Tru Trac, Air Ride, VA, DD, 20" Coys, 4 wheel disc, A quick LS swap turned into a 6 year frame off resto-mod. |
|
|
|
|
05-22-2023, 06:39 AM
|
#10 |
|
Registered User
Join Date: Jun 2014
Location: Mocksville, NC
Posts: 1,740
|
Re: Sullii the 72 GMC 1500
I've decided for now to keep pressing on and at least fire this thing up before I go to extremes and tear the motor back out. Thanks everyone for the feedback. With that, I'm back to knocking things off the list. First up is correcting the rear pinion angle. I gave the details in my previous post on how I arrived at needing a 4 degree adjustment. This was easy enough with some 4 degree shims from Speedway. I realized that with these I will also gain another 1/4" of drop. Not much, but when you consider how low my truck is already it all starts to add up. When I dropped the truck back on the ground I noticed how low everything was hanging and feared I was way below the dreaded scrub line. The technical definition of scrub line is an imaginary line from the contact patch of one tire to the opposite rim (the flat tire). This is the blue line below and I am juuust barely in the good. Now, if both rear tires go flat (red line) then I am royally screwed but I may have much greater issues if that's the case.
  Before I let the truck down on the ground, I threw some shims on the front upper control arms because I had a ton of negative camber with the 3" drop springs. Like, 9 degrees worth. I'm not opposed to camber, my R32 is running 5 degrees in the rear (Camber Gang); however, on my truck I want it to be close to stock alignment specs. I don't like the look of camber on the front of these trucks. Anyway, in doing this I realized that I had an oversight when I notched my upper arm for my steering shaft. I placed the notch BEFORE I added the shims. If you've ever aligned the front of a dropped truck you know you need a healthy stack of shims to get it back in alignment. Now, my notch is shifted compared to my steering column. I ran it through it's range of motion and it is close, very close. I may need to address this in the future.  Next, it was time to roll the truck out of the way and work on something I've been putting off for a while: prepping parts for paint. That's right, paint. I don't know exactly why the patina outside and clean interior/engine is really a thing, but I like that style as well. So, I had to do something about my exhaust and core support. For the exhaust I tried something that ended up looking really good. This is just mild steel pipe so it rusts pretty quickly, even after touching it with greasy hands. I decided to scuff it all up and give it a brushed look and then hit it with some high heat flat clear. The final result is plenty good enough for me.   For the core support, I was originally going to just leave it but when you get some natural light on it you start to notice how terrible it looked. Especially with the open grill on a GMC, this had to be addressed. With inspiration from KyleSeal and his recently completed core support, I decided it was time to tackle mine as well. I spent about two hours hitting it with a wire wheel and then sand paper. After that it was a quick bath and then set outside to bake in the sun. I used Krylon Fusion matte black and I really like this spraypaint. My old go-to paint was Rustoleum but that stuff takes an eternity to dry. The Krylon dries much quicker and looks better.  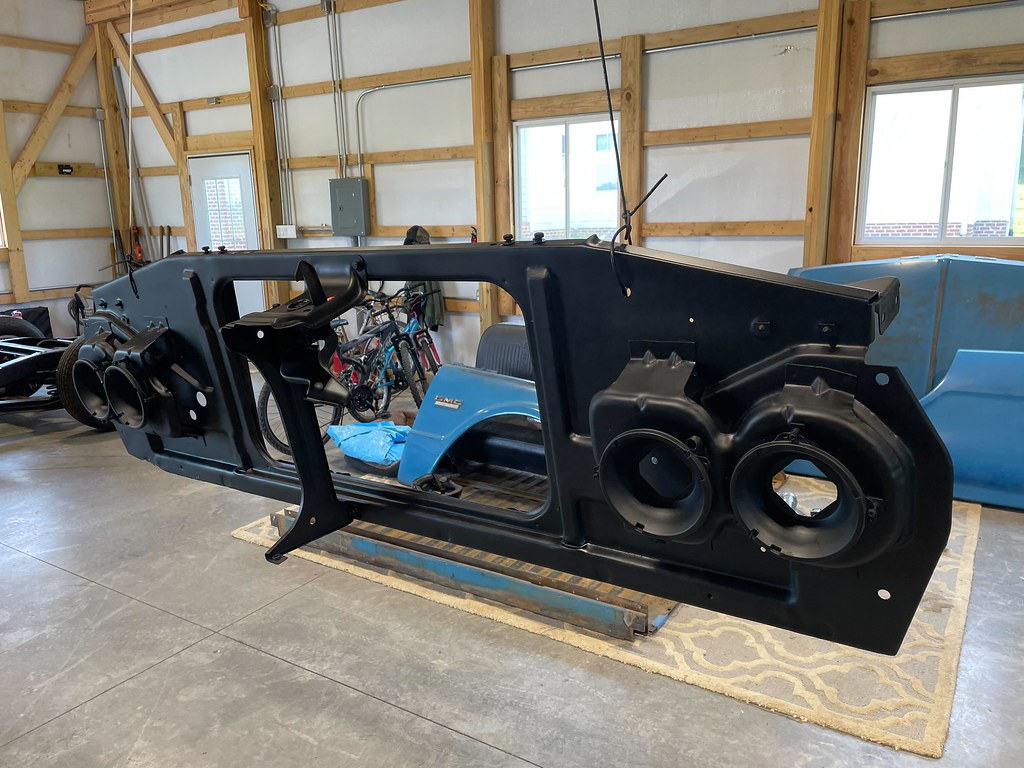  I have an aluminum radiator on the way and now I'm trying to decide if I should paint it black so the whole core support area looks uniform behind the grill. That's something I can figure out once I start test fitting the radiator.
__________________
Builds: Green Gus the 68 C10 ; Sullii the 72 1500 - Instagram: @dr.hewitt - C10 Concept/Development Photos: Master Thread |
|
|
|
|
05-22-2023, 07:48 AM
|
#11 |
|
Registered User
Join Date: Apr 2014
Location: Azle,Texas
Posts: 2,248
|
Re: Sullii the 72 GMC 1500
If you find that your new 4 degree shims lowered the truck too much for comfort, you can do what I did, which was to shave the angle you need directly into the lowering block. Accomplishes the same thing and adds no more drop.
I noticed the same thing on the Krylon vs the Rustoleum. Core support looks great man.
__________________
Brian 1972 C10, "Loyd", LWB to SWB, 5.3, L83/6L80e, 4:11 Tru Trac, Air Ride, VA, DD, 20" Coys, 4 wheel disc, A quick LS swap turned into a 6 year frame off resto-mod. |
|
|
|
|
05-22-2023, 11:53 AM
|
#12 |
|
Registered User
Join Date: Jun 2014
Location: Beaverton, Oregon
Posts: 196
|
Re: Sullii the 72 GMC 1500
I sectioned my crossmember 2" and raised all steering linkage up 2". Now I'm worried about the drag link hitting the bottom of my 350 SBC. Of course now I'm still waiting to get the engine back so I can't check. Did you raise your steering components up at all?
__________________
My 1970 C10 ChassisFab LWB to SWB Build Thread |
|
|
|
|
05-22-2023, 12:31 PM
|
#13 | |
|
Registered User
Join Date: Jun 2014
Location: Mocksville, NC
Posts: 1,740
|
Re: Sullii the 72 GMC 1500
Quote:
And just because I don't like new pages without a photo, here's a random one I never posted. This is from last year, before I moved the truck to my house. That mound of dirt beyond the fence is where my garage is now. 
__________________
Builds: Green Gus the 68 C10 ; Sullii the 72 1500 - Instagram: @dr.hewitt - C10 Concept/Development Photos: Master Thread |
|
|
|
|
|
05-22-2023, 10:07 PM
|
#14 |
|
Senior Member
Join Date: Jan 2007
Location: Turlock, CA
Posts: 8,460
|
Re: Sullii the 72 GMC 1500
Great pic
__________________
I live in California, but identify as a Texan  "If a job's worth doing, it's worth doing well" Survivor "Lil Mint" (67 c10 40k mile light green original paint) Project "C10 Fever" (68 factory black 396 swb) Project "Little Sister" (70 c10 blue original paint refresh) Project "Blue Bomb" (70 c30 blue original paint refresh) SOLD Project "Vitamin C" (71 c10 orange original paint refresh) SOLD |
|
|
|
|
05-25-2023, 11:51 AM
|
#15 |
|
Registered User
Join Date: Jun 2014
Location: Mocksville, NC
Posts: 1,740
|
Re: Sullii the 72 GMC 1500
Now that the core support is finally done, it has unlocked a few more items that I can work on. One thing I hadn't thought about up until recently was the air intake. To me, the air intake is the most out of place looking piece of a modern engine swap. Even so, I did not see a way around one without swapping out the whole intake setup on my engine. With this budget build, that was not happening. So, for now I am going to run a basic cold air intake. This is a universal swap kit from LS Swaps Performance Group made to work with a truck MAF sensor. This is just moc up. I will eventually paint the inlet pipe so it blends in better.
   I also had a chance to get the front end pieces reinstalled. First up was the bumper. If you recall, I did a 1" body drop which required dropping the frame horns down 1". This moved the bumper down with it to match with the dropped body. The bumper lines up nicely and all I have left is to mount the braces. Here's a visual reference for what will be very close to the final ride height. The bumper is the lowest part of the center line of the truck.  Before I completely reassemble the front end I wanted to determine if I should repaint the black on the grill. I keep going back and forth between leaving it, painting it back to original '72 style, or removing all the black. I think I've decided on touching up the black, but not repainting it completely. One thing I noticed is I kinda like the look of the black surrounding the headlights. I might have to paint my headlight surrounds even though GM never did this on the GMC.  
__________________
Builds: Green Gus the 68 C10 ; Sullii the 72 1500 - Instagram: @dr.hewitt - C10 Concept/Development Photos: Master Thread |
|
|
|
|
06-01-2023, 12:18 PM
|
#16 |
|
Registered User
Join Date: Jun 2014
Location: Mocksville, NC
Posts: 1,740
|
Re: Sullii the 72 GMC 1500
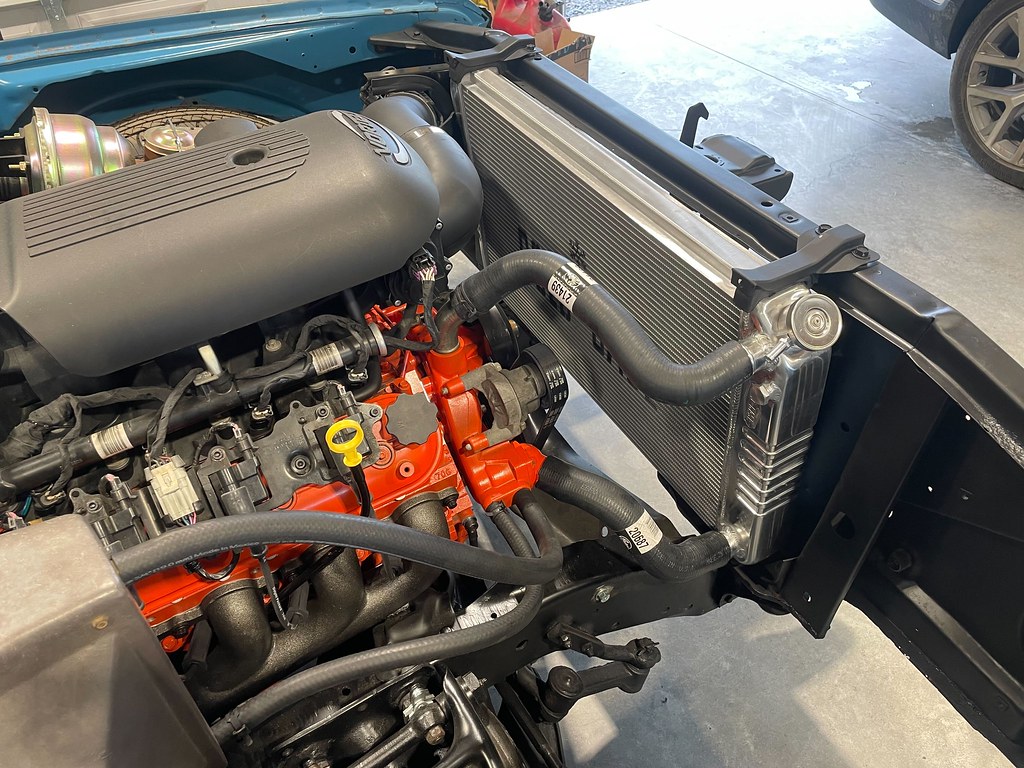
Pressing on with punch list items. It was time to figure out the cooling system. I had planned on using the original radiator but it was beyond dirty. I considered having it cleaned and tested, but at that point I'm half way to the cost of a new radiator. I decided to go with a Cold Case GMT558ALS LS swap radiator for C10s. This fits in the stock location but has both inlet and outlet on the passenger side, so it really cleans up the coolant line routing. The only thing to note with fitment is you need the 4-core radiator brackets. I didn't discover this until I tried to install the radiator and found out my original 3-core mounts were too short. For lines, I used a Gates 21439 top hose and 20687 bottom hose, both with a little trimming of the ends. The heater hoses are just Gates 5/8" and 3/4" lines sold by the foot. I wanted to use stock style constant tension clamps but didn't know what sizes to use. I errantly measured the outer hose diameter and ordered those sizes in mm. That did not give me enough expansion in the clamp to get over the flare on the ports! After installing the lines and measuring again across the flare, I ordered sizes to match these measurements and the clamps fit much better. These clamps are from Bell Metric and are very nice. The sizes I ended up with are as follows: 5/8 heater hose, 24mm. 3/4 heater hose, 27mm. Upper water pump line, 46mm. Lower water pump line and both radiator lines, 50mm. Remaining items for the cooling system are overflow tank and fans. I will update later on those items.
  I was also able to get the front lights installed and wired up. I've had the engine bay harness cleaned up and just sitting inside the cab since I stripped it down while doing the LS harness, so at this point it was just plug and play. I discovered that my front blinker bulbs were blown. I also had no marker lights but ultimately discovered that it was due to the blown blinker bulbs. The wiring diagrams I've seen have the markers wired as always on with the lights, but mine were wired to be on with the lights AND blink with the blinkers. Apparently GM wired these trucks up both ways. This also lead to the realization that the rear markers are always on and do NOT blink with the blinkers. This seems funny to me and I may have to make a modification to the wiring to remedy this. It's a small thing but it bothers me that it's different front to rear. Other than that, the lights work great!   Now that I am beginning to put body panels back on I am circling back to aesthetic updates to the truck. The front grill has always bothered me on this truck. I've always liked the C10 grills more, but for some reason my GMC grill just looked extra ugly. I decided to repaint all the black like factory and WOW did it revive the front end of this truck. I used Rustoleum flat black and it looks amazing in person. The original paint on the grill appeared to be brushed on, so I used a foam brush to paint everything by hand. It gave the paint just enough imperfections to blend right in with the rest of the truck without looking out of place. I also painted the headlight surrounds like I mentioned in the previous post and that also helped improve the overall appearance to me. I feel like this is how GM should have painted these originally, especially since they were painted on the C10s. At this point, I am completely satisfied with how the front end turned out and think I can kill any thoughts I had of converting it to a C10 front end.  
__________________
Builds: Green Gus the 68 C10 ; Sullii the 72 1500 - Instagram: @dr.hewitt - C10 Concept/Development Photos: Master Thread Last edited by hewittca; 06-02-2023 at 07:19 AM. |
|
|
|
|
06-01-2023, 07:20 PM
|
#17 | |
|
Senior Member
Join Date: Mar 2011
Location: Hanover NJ
Posts: 4,135
|
Re: Sullii the 72 GMC 1500
Quote:
__________________
Doc & Kim build http://67-72chevytrucks.com/vboard/s...d.php?t=722288 I am from the desert http://67-72chevytrucks.com/vboard/s...d.php?t=650332 basket case build SOLD http://67-72chevytrucks.com/vboard/s...d.php?t=648557 |
|
|
|
|
|
06-01-2023, 08:12 PM
|
#18 |
|
Registered User
Join Date: Apr 2014
Location: Azle,Texas
Posts: 2,248
|
Re: Sullii the 72 GMC 1500
The grille changes made a big difference. I've had the same feelings about the grilles on Chevy vs GMC, but I have to agree here as well. Leave it GMC!
 It's definitely more unique, I hardly ever see them around here... but Chevrolets all the time. It's definitely more unique, I hardly ever see them around here... but Chevrolets all the time. Have you given any more thought about your future wheel wells? I have been planning all along on leaving mine factory, but I know they're going to be the limiting factor on my ride height. I would love to go the whole 9 yards with Porterbuilt hood hinges and some sweet fiberglass wheel wells, but I don't want to drop that much cash as well. I think I could live with the less expensive styles that are sheet metal panels, like the ones Jason VaNatta makes. Whatever wheel wells you go with do you plan on painting them blue or black? I can't make up my mind on that either. Also, what are your hood hinge plans? sorry if I missed that...
__________________
Brian 1972 C10, "Loyd", LWB to SWB, 5.3, L83/6L80e, 4:11 Tru Trac, Air Ride, VA, DD, 20" Coys, 4 wheel disc, A quick LS swap turned into a 6 year frame off resto-mod. |
|
|
|
|
06-26-2023, 10:53 AM
|
#19 | |
|
Junior Member
Join Date: Apr 2023
Location: Anchorage, Alaska
Posts: 97
|
Re: Sullii the 72 GMC 1500
Quote:
Beautiful truck btw, love what you've done with it |
|
|
|
|
|
06-27-2023, 06:36 AM
|
#20 | |
|
Registered User
Join Date: Jun 2014
Location: Mocksville, NC
Posts: 1,740
|
Re: Sullii the 72 GMC 1500
Quote:
__________________
Builds: Green Gus the 68 C10 ; Sullii the 72 1500 - Instagram: @dr.hewitt - C10 Concept/Development Photos: Master Thread |
|
|
|
|
|
06-14-2023, 02:21 PM
|
#21 |
|
Registered User
Join Date: Mar 2015
Location: washington
Posts: 2,177
|
Re: Sullii the 72 GMC 1500
I used the Black Widow-Venom 250 mufflers also. They are loud but not too bad till you step on it. Then they are loud! Everyone within a couple blocks will know you! BG
Guess it depends on how and where you drive. I also reversed the trailing arm attachment points. Just don't add the type of sway bar that attaches to the arms. It's just dangerous. Let us know how you like the sound. Cheers. |
|
|
|
|
06-14-2023, 10:11 PM
|
#22 | ||
|
Registered User
Join Date: Jun 2014
Location: Mocksville, NC
Posts: 1,740
|
Re: Sullii the 72 GMC 1500
thanks everyone!
Quote:
Quote:
__________________
Builds: Green Gus the 68 C10 ; Sullii the 72 1500 - Instagram: @dr.hewitt - C10 Concept/Development Photos: Master Thread |
||
|
|
|
|
06-25-2023, 09:54 AM
|
#23 |
|
Registered User
Join Date: Jun 2014
Location: Mocksville, NC
Posts: 1,740
|
Re: Sullii the 72 GMC 1500
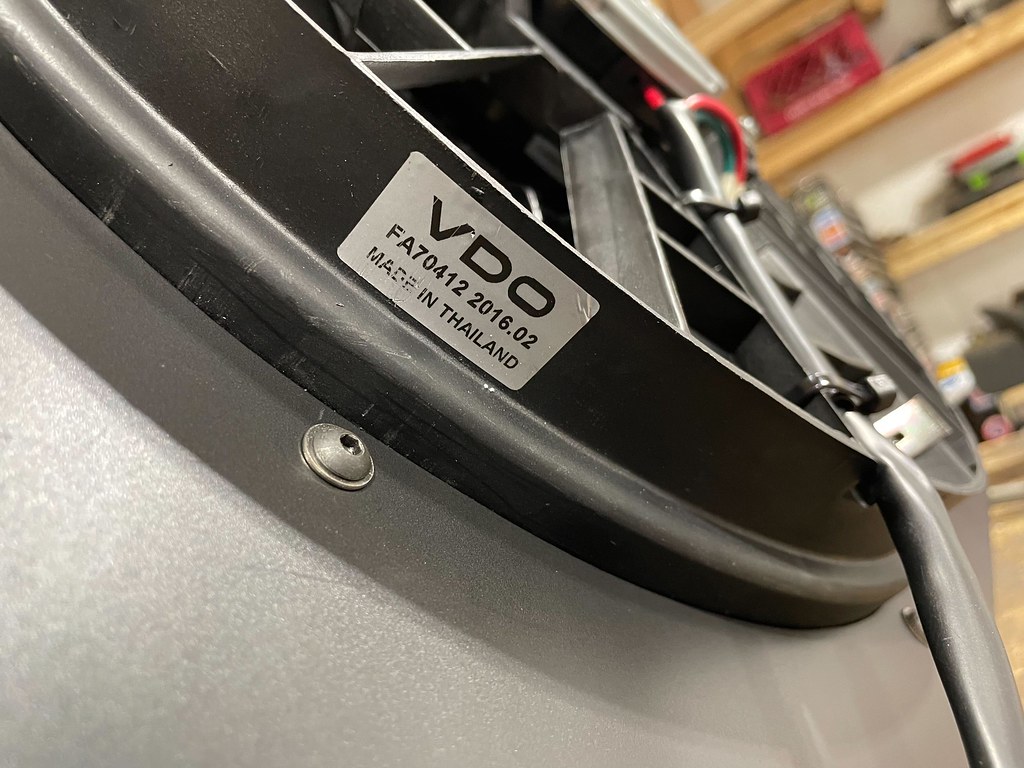
The last part of my cooling system that needed to be completed was the fan. I decided early on that I didn't want to keep the mechanical fan that came on my donor motor. At one point, a friend of mine donated a Ford Taurus fan to fill the void left by the mechanical fan. I learned from him that this fan was a popular option because its one of the best OEM two speed electric fans. Apparently Ford used it after they were experiencing overheating issues with the Taurus. Anyway, this fan has a build in shroud that made it quite tricky to integrate into a unit that I could bolt in the C10. After additional research, I found that the Volvo 850 from the 90's had the same fan but in a bolt on housing. I decided to get one of these instead and build my own shroud. I ordered PN FA70412 from Rock Auto and was surprised to see it was a VDO fan. This should do quite nicely. The one thing to note with this fan is the two speed power works differently than it would work with a typical GM fan 1 and fan 2 output control. This VDO fan is 12V to the green wire for low speed or 12V to the red wire for hi speed. The GM outputs are 12V to green for low and 12V to green AND blue for hi. I've read that this fan is sufficient enough just on low speed to cool an LS, so for now I have just hooked up the low speed side to the fan 1 output from the PCM. If that proves insufficient, I will have to add a few relays to trick the outputs into working like the Volvo fan controller.
 I ended up using a scrap piece of 14 gauge aluminum I had to build my shroud. Thicker than I think it needed to be, but definitely made a stout shroud. The angle in the shroud is to accommodate the angle of the radiator. Notice the notched corner on the side pieces... this was because I had to cut those out to fit the piece in the metal break. I should have bent the bottom two bends first. Lessons learned.  I mounted the shroud with a few bolts across the top and two on the bottom. For the bottom two, I facilitated assembly by welding some threaded inserts onto the core support.  After a quick coat of flat black paint, its ready for final install. With the radiator installed for the final time, I also filled the system with coolant. I decided to go with an open system so I could use standard green coolant. I made sure to fill the engine from the return port on the water pump before connecting the top hose. This greatly reduces the possibility of trapping air in the system, and also gives you coolant in the block for the first start. Otherwise, you won't get coolant flowing through the block until the thermostat opens for the first time. My overflow tank is a Doorman 603-001 and mounts to the core support with a few bolts.   With the shroud installed, this pretty much finalizes how my engine bay will look for now. I have nothing else to add under the hood and do not have any further plans until after I make sure this truck is a reliable driver. At that point, I will start to look into cleaning up the engine bay a bit more with things like fender wells and maybe a nicer engine cover and relocating the coils. 
__________________
Builds: Green Gus the 68 C10 ; Sullii the 72 1500 - Instagram: @dr.hewitt - C10 Concept/Development Photos: Master Thread Last edited by hewittca; 06-25-2023 at 04:09 PM. |
|
|
|
|
06-25-2023, 10:23 AM
|
#24 |
|
Registered User
Join Date: Jun 2014
Location: Mocksville, NC
Posts: 1,740
|
Re: Sullii the 72 GMC 1500
Another little side project I started a while ago and was able to finish up was modifying the brake and clutch pedal shafts. I always thought it was awkward how high these pedals were. I thought it would be nice to change these, and decided to go ahead with that thought once I saw how clay68c10 did his here. Basically, the pedal faces are moved forward so the pedals shafts come straight down instead of down and towards you. This makes the transition from throttle to brake much more natural and modern.
  These pedals were welded up by my friend at work where we have a welding table. We both learned that the brake spring makes a nice heater coil while welding! After only a few tacs it was cherry red. After that, we connected the ground clamp directly to the pedal shaft... another lesson learned.  With the LS swap, you need a dual function switch on the brake pedal. One normally open circuit for the brake lights, and one normally closed circuit for the PCM which needs to see 12V on the TCC brake switch when you are not on the brakes. I used ACDelco PN D850A which was a direct fit to the pedal bracket. I also had to add a clutch switch for the CPP input to the PCM which, like the brakes, needs to see 12V when you are off the clutch. I had a Essen MTCRS-26DH rocker switch lying around, so I used that. I had to weld a tab to the clutch to activate the switch. I added a pink wire in parallel between the brake and clutch switch that will go to a keyed power on terminal in my fuse panel. This will provide the 12V needed when the key is on. 
__________________
Builds: Green Gus the 68 C10 ; Sullii the 72 1500 - Instagram: @dr.hewitt - C10 Concept/Development Photos: Master Thread |
|
|
|
|
06-14-2023, 03:54 PM
|
#25 |
|
Senior Member
Join Date: Aug 2004
Location: Centennial, CO
Posts: 2,905
|
Re: Sullii the 72 GMC 1500
Sweet! It's looking good. I really like the exhaust exit location.
__________________
ClusterTruck: 68 C10 Bought in 89, wrecked in 03. Slow low $ rebuild started '17. 6.0 & TKO http://67-72chevytrucks.com/vboard/s...d.php?t=788602 93 K1500 Short Step, 350, NV4500, EBL flash ECU. Vortec heads & roller cam someday... 05 Jeep Wrangler Unlimited. 3 lift & 6-speed 02 E320 the insurance total free car 13 Tahoe LTZ |
|
|
|
 |
| Bookmarks |
|
|


 Hybrid Mode
