
|
|
|
 08-27-2007, 06:07 PM
|
#1 |
|
Senior Member
Join Date: May 2004
Location: johnstown, NY
Posts: 2,393
|
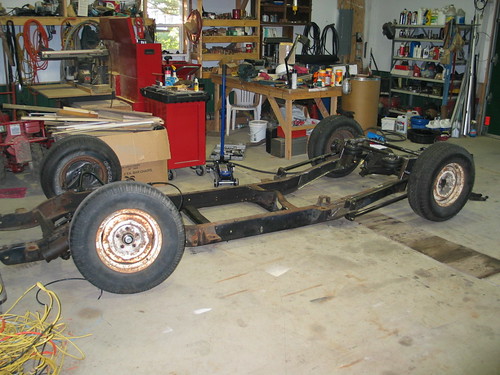
Re: progress pics
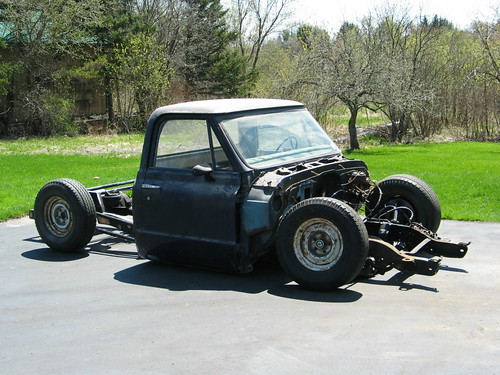
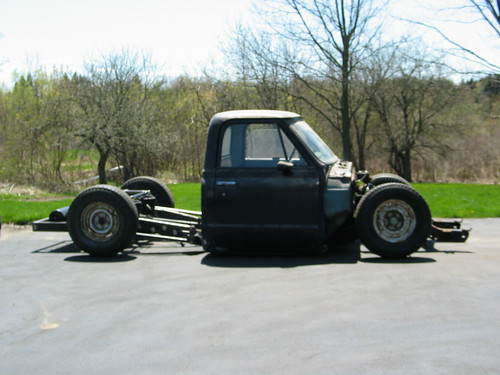
Heres a couple new pics:
Last edited by jlaird; 08-27-2007 at 06:08 PM. |

|

|
|
08-27-2007, 09:12 PM
|
#2 |
|
True Addiction
Join Date: Nov 2005
Location: FTL
Posts: 415
|
Re: progress pics
Jlaird, I think I see a Porterbuilt dropmember in your near future. I just installed mine, I highly recommend it. Great quality.
|
|
|
|
|
08-27-2007, 10:32 PM
|
#3 | |
|
Senior Member
Join Date: May 2004
Location: johnstown, NY
Posts: 2,393
|
Re: progress pics
Quote:
|
|
|
|
|
|
03-09-2008, 09:03 PM
|
#4 |
|
Registered User
Join Date: Oct 2007
Location: hopewell jct new york
Posts: 140
|
Re: progress pics
did u purchase upper control arms because ur ball joints are binding cause i did the same lower arm as u and i cant get mine to come as close ot the crossmember and i wanan know how to fix it im thiinking about pie cutting the upper to make the arm streight cause the ball joint mounts on an angle im mad confused on what to do
|
|
|
|
|
03-09-2008, 11:55 PM
|
#5 |
|
Senior Member
Join Date: May 2004
Location: johnstown, NY
Posts: 2,393
|
Re: progress pics
billdo, I'm not quite following what your saying. You can't get what close to the crossmember? The reason I got the uppers was because the cost to rebuild the stockers with new balljoints and crosshafts was reason enough to just spend a little more and get the tubulars.
|
|
|
|
|
03-10-2008, 12:28 AM
|
#6 |
|
Registered User
Join Date: Oct 2007
Location: hopewell jct new york
Posts: 140
|
Re: progress pics
my bad my lower control arm will not come as close to the crossmember like yours there is 3 inches or so from lower a arm to crossmember. thats all the travel i get cause my upper ball joint just stops
Last edited by billdo; 03-10-2008 at 12:28 AM. |
|
|
|
|
08-27-2007, 10:52 PM
|
#7 |
|
Senior Member
 Join Date: Aug 2006
Location: Atascadero, CA
Posts: 1,152
|
Re: progress pics
Looks Sick!!!! These trucks looks so good low like that! I will be watching this build thread for sure!!!
__________________
(Project truck) 1970 C10 under complete transformation  My current build thread http://67-72chevytrucks.com/vboard/s...d.php?t=212871 Other project: C5 corvette swap into 70 c10 http://67-72chevytrucks.com/vboard/s...=1#post2413517 On Hold |
|
|
|
|
09-17-2007, 05:47 PM
|
#8 |
|
Senior Member
Join Date: May 2004
Location: johnstown, NY
Posts: 2,393
|
Re: progress pics
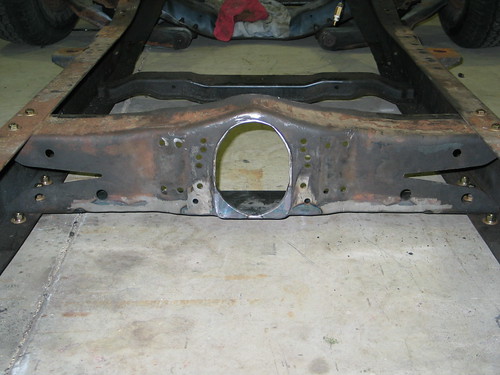
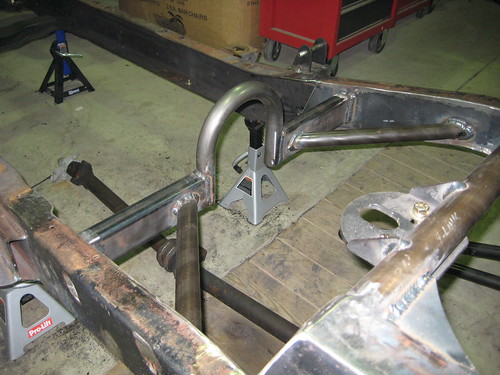
a little progress, actually it looks like I went backwards, because I took the cab off, but had to to chop the trailing arm crossmember. So that is what I finished (except for the exhaust cutouts). She cant go any lower, shes on the ground! Heres some pics. Next up is to make a crossmember that goes between the trailing arm x-member and the axle.
Last edited by jlaird; 09-17-2007 at 05:48 PM. |
|
|
|
|
09-17-2007, 06:27 PM
|
#9 |
|
The LuvShack Garage
Join Date: Jan 2004
Location: Maple Grove, TN (West Side)
Posts: 30,470
|
Re: progress pics
Looking awesome, can't wait to see the body on that frame

__________________
Owner/Op: "TN Classic Transport Carriers" The Toy: "Square Vette" 72 Hybrid Blazer Toy Barn: "LuvShack" 40 x 60 x 20 Shop Big Piggy: "Goliath" 07 Kodiak C4500 Lil Piggy:"Maddy" 88 Silverado 3500 Hauler: "Feathers" 14 Aluma 8218T |
|
|
|
|
09-25-2007, 07:35 PM
|
#10 |
|
Senior Member
Join Date: May 2004
Location: johnstown, NY
Posts: 2,393
|
Re: progress pics
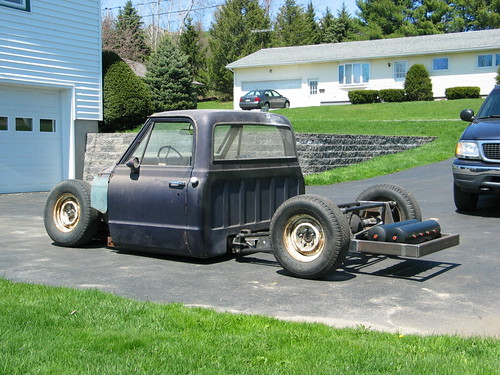
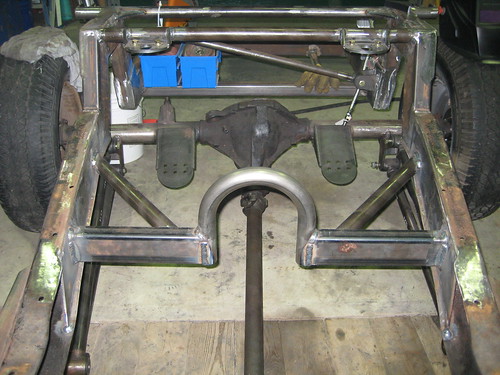
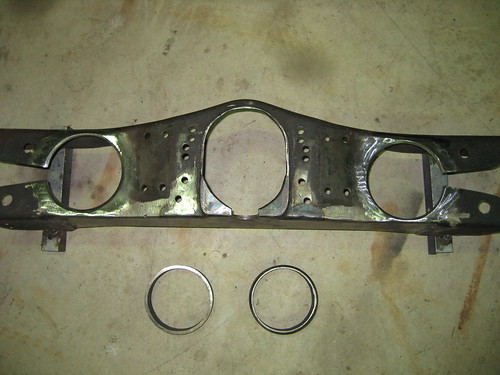
Got the driveshaft loop x-member finished as well as the exhaust cutouts almost done. Some pics:
|
|
|
|
|
03-10-2008, 04:35 AM
|
#11 | |
|
Signals in the bumper.
Join Date: Feb 2003
Location: East TN
Posts: 856
|
Re: progress pics
Quote:
__________________
Jeff C. 1981 Chevrolet Silverado - Under major construction...again. link 1962 Chevrolet Impala 4D Sedan moredoorclassics.com 1936 Ford Pickup - Frame-off in progress link 1979 Chevrolet Camper Special Flatbed link |
|
|
|
|
|
03-10-2008, 05:14 AM
|
#12 | |
|
Senior Member
Join Date: May 2004
Location: johnstown, NY
Posts: 2,393
|
Re: progress pics
Quote:
http://*****************/SteelTubingBent.php |
|
|
|
|
|
03-11-2008, 04:42 AM
|
#13 |
|
Registered User
Join Date: Oct 2007
Location: hopewell jct new york
Posts: 140
|
Re: progress pics
i know i did the same bag pocket step for step as u but my upper ball joint wont let me go as low
|
|
|
|
|
03-11-2008, 06:29 AM
|
#14 | |
|
Senior Member
Join Date: May 2004
Location: johnstown, NY
Posts: 2,393
|
Re: progress pics
Quote:
|
|
|
|
|
|
09-26-2007, 01:44 AM
|
#15 |
|
True Addiction
Join Date: Nov 2005
Location: FTL
Posts: 415
|
Re: progress pics
Very nice work, keep it up. How did u determine the drive shaft loop height? Without transmission in.
|
|
|
|
|
09-26-2007, 08:24 AM
|
#16 | |
|
Senior Member
Join Date: May 2004
Location: johnstown, NY
Posts: 2,393
|
Re: progress pics
Quote:
|
|
|
|
|
|
09-26-2007, 11:55 AM
|
#17 | |
|
Registered User
 Join Date: Aug 2005
Location: Hillsboro Oregon
Posts: 6,449
|
Re: progress pics
Quote:
That's good, becuase I was gonna tell you that I had to raise the upper "hoop" on the TA X-Member for my one-piece driveshaft + 8" notch. With that notch you definately would too, but a two pice DS takes care of that! Nice work What's the dia. on your exhaust cut-outs? Last edited by Frizzle Fry; 09-26-2007 at 11:56 AM. |
|
|
|
|
|
09-26-2007, 12:12 PM
|
#18 |
|
Senior Member
Join Date: May 2004
Location: johnstown, NY
Posts: 2,393
|
Re: progress pics
They have a 4" inner diameter, so will be good for something like a 3" exhaust pipe.
|
|
|
|
|
09-26-2007, 08:29 AM
|
#19 |
|
Tot Roddin'
Join Date: Apr 2005
Location: Mid-MO
Posts: 24,461
|
Re: progress pics
Nice looking truck!
__________________
-Nate  1969 CST SWB - Project Blank Slate (4.5/6" ECE Static Drop, 6-lug disc brake upgrade (manual), Billet Specialties Vintec 20x8.5 255/40 (F) 20x10 295/40 (R), 250 I-6) 1960 AMF Skylark - Tot Roddin' (Lowered with custom frame; soon to include custom push bar and interior) 2008 Silverado CrewCab 1LT (5.3L, 3:73, 4x4, LT1, Z-71, Towing Package) Last edited by 72BlckButy; 09-26-2007 at 08:29 AM. |
|
|
|
|
10-02-2007, 03:11 AM
|
#20 |
|
:( BYEBYE :(
Join Date: Sep 2007
Location: terre haute indiana
Posts: 200
|
Re: progress pics
i know its a little bite late but heres a crappy pic of my steering linkage made from 2 astro van linkages
 
|
|
|
|
|
10-02-2007, 11:26 AM
|
#21 |
|
Commander Taco Bello
Join Date: Sep 2006
Location: Des Moines, Iowa
Posts: 2,232
|
Re: progress pics
great work man. glad to see some progress.
on the topic of the split drive shaft. Are you concerned at all that the travel of the axle will pull on the carrier bearing? obviously normal up and down is fine, but with the extra travel that you'd get with air bags, i'm curious if the axle will put more preasure on the CB. in my application (bagged with a split shaft) it didn't seem to put any additional pressure on the CB, but i only have a C-notch, not a step. Also, my bags are mounted on the T-arms, so my travel is not much. |
|
|
|
|
10-02-2007, 11:52 AM
|
#22 | |
|
Senior Member
Join Date: May 2004
Location: johnstown, NY
Posts: 2,393
|
Re: progress pics
Quote:
|
|
|
|
|
|
11-07-2007, 12:22 AM
|
#23 |
|
Complete Street Customization
Join Date: Jan 2007
Location: Knoxville, TN
Posts: 103
|
Re: progress pics
wheres the progress??????????????????
__________________
1968 GMC SWB (Build thread: http://67-72chevytrucks.com/vboard/s...d.php?t=269230) 1998 Chevrolet Silverado Z71 Southern Born Customs
Knoxville, TN 865-934-9126 |
|
|
|
|
11-08-2007, 09:00 PM
|
#24 |
|
Senior Member
Join Date: May 2004
Location: johnstown, NY
Posts: 2,393
|
Re: progress pics
frame and all the suspension parts are going to the powder coater tomorrow. It will be nice to see something in my garage that is one color! Cant wait....
I will post pictures when I get it back. They said two weeks. |
|
|
|
|
11-08-2007, 09:06 PM
|
#25 | |
|
Señor Member
Join Date: May 2002
Location: Edge of the world
Posts: 5,367
|
Re: progress pics
Quote:
 Hopefully your powder guys can handle it.
__________________
|
|
|
|
|
 |
| Bookmarks |
|
|


 Hybrid Mode
