
|
 07-07-2013, 05:59 PM
|
#126 |
|
Registered User
Join Date: Jun 2009
Location: CENTRAL,NJ
Posts: 586
|
Re: Another OLD BLUE Build Thread - 71 Chevy
Love the build...glad to see the pup made it!
|

|

|
|
07-07-2013, 10:56 PM
|
#127 |
|
Registered User
Join Date: Feb 2011
Location: SHAWNEE, KS
Posts: 191
|
Re: Another OLD BLUE Build Thread - 71 Chevy
Thanks man. Gertrude made sure she helped out to the fullest today by making sure the tennis ball was never outside of our reach just in case we wanted to throw it for her.
Goal achieved! I would have never gotten it done if my buddy wouldn't have came and helped me for multiple hours. Thanks man.  Had to cut and rotate the collector flanges on the pax side for d-shaft clearance.  Outside under 'er own power as promised!  Finished Exhaust  Not perfect, but I'll be damned if it didn't turn out pretty good.  Modded the linkage on the garage door opener (again) now she pulls in and out on 37's with no modifications.  Dark pictures, but it is now 20.5" (down from 23.5") to the bottom of the frame rail and 28.5" from center of hub to bottom of front wheel well (down from ~31.5) So it came out to an overall suspension drop of 3" which doesn't include the other 3" of clearance I gained by raising the t-case.  Hubba Hubba  I have air in the brakes or a leak somewhere. They are really spongy. I might have to buckle down and buy a flaring kit that doesn't suck... Got a bunch of other stuff to do, but I achieved my goal this weekend and got to drive'er around the block. I am so excited to have it moving under it's own power again. The new exhaust setup sounds amazing |
|
|
|
|
07-14-2013, 09:08 PM
|
#128 |
|
Registered User
Join Date: Feb 2011
Location: SHAWNEE, KS
Posts: 191
|
Re: Another OLD BLUE Build Thread - 71 Chevy
Didn't get a whole lot done this weekend.
Managed to pull'er outside and wash off all the grinding dust. I'm torn because the tonneau cover looks so clean but I really want to put the gas tank back under the truck and mount a normal truck toolbox that goes over the rail. I still have the leftover one from when I sold my dodge.  WOW, check out this old before picture... Had to have lost 6" or more.  Walked into NAPA and asked for the biggest battery cable they had. $80 later I had myself a sufficient length of 2/0 wire and the appropriate connectors. The off the shelf 4 gauge would get hot crankin this big motor over. Shouldn't have any issues now, but dang that stuff is expensive...   Took'er for a spin spongy brakes and all, the tranny shifts hard enough that she slows down pretty quick when I downshift. This 'ol girl is ganna have a hell of a time connecting to the pavement, and I think the IROK's might have a grim life expectancy. The new suspension so far is incredible, rides super smooth, no death wobble with confident handling feel. It does have a lot more body roll, but then again the suspension actually moves now unlike before... |
|
|
|
|
07-21-2013, 07:42 AM
|
#129 |
|
Registered User
Join Date: Feb 2011
Location: SHAWNEE, KS
Posts: 191
|
Re: Another OLD BLUE Build Thread - 71 Chevy
Now that my photobucket bandwidth reset, more pics!
 Fixed 3 different transmission leaks yesterday. The pass-through electrical connector on the TH400 had a chunk out of it's o-ring  Don't be a dipstick, buy a quality dipstick...  New rubber gasket and installed a drain plug. Transmission fluid smells much better than gear oil, but I still don't like bathing in it...  Of course the new gasket interferes with the TC cover so now I get to modify that again. Also installed one of the two ACCEL spark plug wires with ceramic 90* fitting. The #7 wire now actually goes underneath the header along the block then up the back of the block. #5 needed a different angle than 90* so the other one wont work for me, I did some creative zip tying instead to keep it off the header. Reflared the rear brake line for the 3rd time and finally got it to quit leaking. I still have one more leak up front that I need to reflare. |
|
|
|
|
09-29-2013, 09:02 AM
|
#130 |
|
Registered User
Join Date: Feb 2011
Location: SHAWNEE, KS
Posts: 191
|
Re: Another OLD BLUE Build Thread - 71 Chevy
I am less than pleased that it has been ~2 months since I have done anything with this.
It is not due to to a total lack of fabricating stuff though. For 2 reasons, I started my own domain/hosting. 1. I was tired of going over free photobucket bandwidth and my own domain with unlimited storage/bandwidth is the same cost as photobucket pro. 2. I have been building a lot of non-4x4 related stuff lately. If you so choose, check out the other stuff I have been working on: WWW.OOBERFABRICATION.COM So after being complainy pants a couple of months ago about my brake lines, I finally got around to fixing them. I cut off the brake line at the front that was leaking and reflared it - still leaked, reflared it - still leaked, reflared it - still leaked.... All in all, I bet I reflared it 7 times before I got really pissed off and gave up. Not sure why I was riding the struggle bus on this, so I gave my dad a call. He came by and got it on the 2nd try.... :shaking: Thats what I get for following the directions. Turns out I was leaving too much brake line sticking through the clamp and it was getting bunched up/offcentered inside the die. So we got all of the leaks fixed and started bleeding the brakes. Rear brakes bled out right away, front brakes were another story. I kept getting large amounts of air out of the front calipers. Long story short, it took a while but I finally figured out that the air was coming in around the threads on the bleeder screws. After I figured out what was happening, I put teflon tape around the bleeders, hooked the mity-vac up and they bled correctly the first try. She will lock up all 4's now if you get on it hard enough. Also got the front body mounts bolted up. Filled up with $50 in premium, and went for a spin. Everything went great until the ol' gal got a case of the shakes. Drove back to the house and found a loose TRE nut. Got that fixed and bolted on the steering stabilizer. With Gertrude helping of course.   Took it back out for another drive and WOW, just WOW. This thing is nuts beyond my expectations. With the new modifications, the tranny doesn't leak a drop, the steering feels nice, the e-fan works perfectly, the exhaust sounds awesome (gives me the chills at full bore :grinpimp  Since I have unlimited bandwidth now, here are lots of pics:   The wheel was turned a little in this pic. The tire is further from the wheel well. The tires don't rub anywhere and this thing actually turns pretty sharp for what it is. All else fails, turning with throttle works pretty good with the rear welded :smokin:   Thought this was a cool pic:  This is the first time I have driven it any appreciable distance since installing a new axle, crossmembers, motor mounts, tranny parts, and front suspension. I am VERY impressed. After all of those mods at the same time, during/after my ~2hrs worth of test drives I tightened a total of two nuts and one bolt. Other than that, the test drives were flawless. As I sit here the next morning, I am still amazed at how well everything works so far. The slider type leaf spring suspension in the front just works. It no longer feels like I am driving a sky-scraper. Whats next: 1. Shorten/install front d-shaft 2. Install hubs 3. 4wd burnouts?? 4. Traction bar 5. Sway bar (already got a plan and parts going on for this one) 6. This thing NEEDS no less than a roll cage, suspension seats, and 5pt harnesses. |
|
|
|
|
10-24-2013, 11:25 PM
|
#131 |
|
Registered User
Join Date: Feb 2011
Location: SHAWNEE, KS
Posts: 191
|
Re: Another OLD BLUE Build Thread - 71 Chevy
OK, so I didn't get my list done this weekend...
") But I have an excuse! But I have an excuse!I was blowing things up on Saturday instead...  Anybody ever seen the exploding targets before??  Freakin sweet. Freakin sweet.Anyways... Went through a pile of 6+ D60 hubs to make 2 working ones  Discovered that my brake pads had failed waaaay prematurely. They came with the axle, I'm pretty sure they were the cheapest ones available. The friction material had worked loose on the rivets and was barely held onto the backing plate.  Did some heavy duty grinding on the front shaft CV to get it rotating smooth at full limit strap droop.  Got it installed, but called it quits before I got a chance to put the wheels back on. I didn't end up having to shorten it. Between putting the bigger axle in and raising the drive train, it ended up being the perfect length.  Aaaaand thats how she sits now. I did get a chance to brew my first 5 gallon all grain batch of beer on Monday! Hmm, that sounds suspiciously like another excuse though... |
|
|
|
|
12-30-2013, 10:36 PM
|
#132 |
|
Registered User
Join Date: Feb 2011
Location: SHAWNEE, KS
Posts: 191
|
Re: Another OLD BLUE Build Thread - 71 Chevy
Wow, 2 months
 I'm a slacker. I'm a slacker.Posting this to keep myself motivated. On Saturday when we had a beautiful 60* day I took'er out and she put a smile on my face  . This thing is just nuts. . This thing is just nuts. Got the brakes and proportioning valve all tuned in. Stops great now. Still waiting for somebody with a go-pro to come over and hang out with me for an afternoon to get some footage.  Backed in and ready for some work. Spent ~3hrs cleaning the garage so I am fully ready to "Do Work Son".  So I have New years day off. Planning on getting some work done! 1. Build rear traction bar 2. Build and mount rear sway bar - it doesn't need it when driving "normally", but then again, who drives "normally" with 500HP and a spool in the rear?  3. Lengthen rear driveshaft (still haven't decided if I will attempt this myself or have a shop do it) 4. There is still a damn leak on the trans. Given it is much smaller than the previous one. There are only a couple of external seals that I haven't replaced yet, so I am sure it is one of those. 5. Wire neutral safety switch. |
|
|
|
|
12-31-2013, 10:46 PM
|
#133 |
|
Registered User
 Join Date: Dec 2012
Location: Moses Lake Washington
Posts: 162
|
Re: Another OLD BLUE Build Thread - 71 Chevy
Glad to see you back at it, interested in what you will come up with for the sway bar, very nice fab work so far, keep at it Gertrude's truck is almost finished!
__________________
My build: Project "Lazarus" 8.1 Vortec and Allison in a 72 swb k10  http://67-72chevytrucks.com/vboard/s...d.php?t=555878 |
|
|
|
|
01-02-2014, 09:18 AM
|
#134 | |
|
Registered User
Join Date: Feb 2011
Location: SHAWNEE, KS
Posts: 191
|
Re: Another OLD BLUE Build Thread - 71 Chevy
Quote:
 The wife ended up getting New Years Day on call, so I spent most of it with her. I did manage to finish the swaybar though. Here are the completed pictures:   The full writeup and how-to is here: Ol Blue 71 Chevy Rear Swaybar From Junkyard Parts - OOBER FABRICATION Can't wait to take it out and see how much of a difference it made. |
|
|
|
|
|
01-12-2014, 09:18 AM
|
#135 |
|
Registered User
Join Date: Feb 2011
Location: SHAWNEE, KS
Posts: 191
|
Re: Another OLD BLUE Build Thread - 71 Chevy
Got some work done yesterday.
Measured rear driveshaft length and dropped off at the shop to have lengthened ~3-4" along with new Spicer Joints. I was going to skimp and re-use the joints that were in it, but decided it wasn't worth getting stranded somewhere. Swapped out my air lines on my reel and down to the tank to 1/2" ID and WOW, my air tools sing now. I didn't realize how much the smaller hose was restricting flow. I still have a 3/8" filter/dryer down on the tank, but a 1/2" setup at northern tool would have ran me an extra ~$100+ by the time I got it hooked up, so it will have to wait.  Mmmmm Oklahoma Joes.....  Started doing some dreaming on the rear bumper yesterday. I am building it today. You might have to squint real hard to imagine it. I think I am going to cut off the lower rear 1/4 panel from where the top tube is down. I plan on having the tubing on the side supported by the frame and the body is currently in the way. So my choices are to drill a huge hole and run a tube through the body, or just cut it off.   I'm doing research looking for pictures right now. But I want it to look like an old CUCV rear bumper with the drop down in the middle but be made out of tube plated on the outside with an integrated receiver instead of flat steel. It makes sense in my head  On a side note, anyone with a 67-72 want to go measure the distance from the front of the bed to the back of the cab for me to compare to? I have a sneaking suspicion that mine might be 1/2" further away than it needs to be. Thanks in advance. |
|
|
|
|
01-12-2014, 10:16 AM
|
#136 |
|
Registered User
Join Date: Feb 2011
Location: SHAWNEE, KS
Posts: 191
|
Re: Another OLD BLUE Build Thread - 71 Chevy
kinda like a combination between this:
 and this:  Time to go see what I can come up with. |
|
|
|
|
01-12-2014, 11:12 PM
|
#137 |
|
Registered User
Join Date: Feb 2011
Location: SHAWNEE, KS
Posts: 191
|
Re: Another OLD BLUE Build Thread - 71 Chevy
Well, so much for the truck looking bumper with the lower part in the middle. That got ditched promptly when I realized how much ground clearance I would loose.
On with the pics. Did he?  Yep.  Not needed.  Bendin some tube.  Taking shape.  Where we called'er quits.  Still gotta add lots more tube and bracing. Also some lights and expanded steel for steps. Either I'm a tweaker or my I-phone is starting to take some awful pics. Might be time to get a real camera. |
|
|
|
|
01-17-2014, 09:09 AM
|
#138 |
|
Registered User
Join Date: Feb 2011
Location: SHAWNEE, KS
Posts: 191
|
Re: Another OLD BLUE Build Thread - 71 Chevy
Got my lengthened rear driveshaft back from the shop last night and got'er installed this morning.
 Small victories, but victories nonetheless! For my traction bar, I have decided to wait until I built my skid plate / belly pan where it will most likely have to attach. I want it to hang low enough to give the driveshaft some protection while also preventing axle wrap. My goal this weekend is to finish up the rear bumper. |
|
|
|
|
01-29-2014, 12:01 PM
|
#139 |
|
Registered User
Join Date: Jun 2006
Location: Indiana
Posts: 4,859
|
Re: Another OLD BLUE Build Thread - 71 Chevy
Just to show my lack of off roader knowledge, are the slider boxes just lower the over all frame height by the lenght of the shackle?
Also, what brand tube bender do you have?
__________________
'70 GMC C1500 LWB Power disc brakes. WooHoo! Posi 6 Lug Dana 60 |
|
|
|
|
02-01-2014, 06:45 PM
|
#140 | |
|
Registered User
Join Date: Feb 2011
Location: SHAWNEE, KS
Posts: 191
|
Re: Another OLD BLUE Build Thread - 71 Chevy
Quote:
Here is an article I wrote a little while ago that shows the tubing bender that I use and some other options out there: http://www.ooberfabrication.com/tool...ubing-benders/ |
|
|
|
|
|
02-01-2014, 06:46 PM
|
#141 |
|
Registered User
Join Date: Feb 2011
Location: SHAWNEE, KS
Posts: 191
|
Re: Another OLD BLUE Build Thread - 71 Chevy
YYYYYYYEEEEEEESSSSSSSSSSS!!!!!!!!!
I finally have a tow rig....kind of. Bought an '02 3/4 ton Yukon XL 4x4 with an 8.1 Liter today. The good: It is awesome It was dirt cheap Fully loaded with autoride and sunroof Brand new t-case (supposedly) Brand new radiator (appears to be true) 4 wheel disks/tow package Already tinted in the front The bad: Bad tranny Questionable p/s pump Cracked windshield Looks like someone went bezerk on the interior will require quite a few junkyard trips The passenger side body is pretty well trashed (cosmetics don't bother me too much but I will probably put new doors on it and straighten the 1/4 panel some) Freshly delivered Via towtruck   Time to start pricing out tranny parts. I think I want to do this one myself. Why? Beats me, guess I am a glutton for punishment... There is NO WAY I am taking a loan out and buying a $20K+ tow rig. That's not how I work. So I am going to build this one up to it's former glory. |
|
|
|
|
02-03-2014, 08:43 AM
|
#142 |
|
Registered User
Join Date: Feb 2011
Location: SHAWNEE, KS
Posts: 191
|
Re: Another OLD BLUE Build Thread - 71 Chevy
Got the rear bumper on Ol' Blue done yesterday.
Still need to do a couple things like cut and cap the end of the tube at the tire and maybe add another support tube, but for now it is done because I ran out of weekend. I like how it turned out. Light, Simple, yet pretty strong short of a really hard hit.  The expanded steel is flush with the top of the tubes, so if you get down on eye level you can't see it. It is the best material I could come up with. Not slick and lets dirt/mud fall through. The Crazyblaze didn't really have much of a step in the rear, so I wanted to make this one more useful.  You can see the full bumper build with more pictures HERE |
|
|
|
|
02-14-2014, 08:38 PM
|
#143 |
|
Registered User
Join Date: Feb 2011
Location: SHAWNEE, KS
Posts: 191
|
Re: Another OLD BLUE Build Thread - 71 Chevy
UPDATE!!
So, not sure why I have been so cryptic about it, but I have been going through a long drawn out "quiet title" process with this truck. It is of no fault of Shilo who I bought it from but more a stupid Kansas law and bureaucratic red tape. I did all the paperwork and filing myself. Couldn't have done it without the help of Kingsolver72 from on this forum (He gave me copies of what he used to get the quiet title on his truck. Thanks Scott!!!!!!!!!!). Yesterday I got the official judgement signed by the judge that said: I own this truck, KHP put a new VIN on it, and KDR assign a title and do it MEOW! So, more about that later. For now I'm sure you all want pics (do any of you actually read this anyways? )Pulled 'er out of the garage for the first time in a while.  First view of the rear bumper from more than ~5 ft away  Final inspection at the Kansas Highway Patrol station  Attaching the new VIN plate. (sorry Larry, you are famous now)  Not sure about you, but this is the first time I have seen one of these:  So since we are legal now and don't have to worry about getting Ol' Blue impounded and put in federal pound me in the a$$ prison, Gertrude and I went for a cruise as non-rebels for the first time. All is right in the world.  The rear swaybar made a HUUUUUGE difference. I mean HUGE! It doesn't even need a front swaybar, I am perfectly happy driving it anywhere just like it is. Brings me to the next set of mods: This thing is LOUD, I almost need earplugs just to go down the highway. Also, I forgot how loud gear driven t-cases are when you let off the gas at highway speed. Need to install a heater. I have a compact forklift heater unit, I just need to stick it somewhere and hook it up. Needs a horn, a lady in a suburban nearly killed me in a roundabout today. Really lady....you couldn't hear me coming for the last 1/2 mile???? That is all for now. I have my new VIN and License plate and am ecstatic about it. |
|
|
|
|
02-23-2014, 09:22 AM
|
#144 |
|
Registered User
Join Date: Feb 2011
Location: SHAWNEE, KS
Posts: 191
|
Re: Another OLD BLUE Build Thread - 71 Chevy
So yesterday was pretty productive. I spent the morning cleaning and rearranging my garage so the ridiculously huge suburban would fit inside. I had to take one of my workbenches and put it in the basement.
 Went for multiple cruises throughout the day and inconspicuously invited some family members over to hang out for a bit....  ....then enlisted in their help to push big bertha into the garage  Knocked quite a bit of stuff off my "to do" list. Hard to see in red, but the daily driver always gets serviced first. The order to remember is this: Wife's car, my car, the closest to being finished project, then down from there.  So I was driving Ol' Blue around yesterday and brought some pizza home for dinner. The Wife came downstairs before eating and said she could hear AND feel me get home and pull into the garage (on the second floor of our house with the shower ON). Something is going to have to change with the exhaust on this truck. The bonus on it being quieter is that I would actually drive it a lot more, currently I won't drive it to work because I don't want to wake up the entire neighborhood in the morning. |
|
|
|
|
02-23-2014, 08:53 PM
|
#145 |
|
Registered User
Join Date: Feb 2011
Location: SHAWNEE, KS
Posts: 191
|
Re: Another OLD BLUE Build Thread - 71 Chevy
My 2 year old HVAC hole cover made from cardboard was beginning to look weathered, and I needed a place to mount my trans overflow bottle. So I made a quick plate out of scrap aluminum.
Got all of the parts for this a LONG time ago. Made from a $1 store water bottle, a filter and some fittings.  Template  Cut piece of aluminum and weatherstripped for a little sound deadening.  Finished, a little on the ricer side but I think it matches the valve covers rather well   Getting all of my vents filtered and up high to be ready for the DUNES! Anybody have a group going to Little Sahara this year and if so, what date are you going?? Got the suburban all torn apart. Pulled the radiator and power steering pump. Got the new pump put in but the radiator is leaking from the d-side core, so I have to go see if it is repair-able. |
|
|
|
|
02-23-2014, 11:18 PM
|
#146 |
|
Registered User
Join Date: Nov 2009
Location: Edmonton Alberta
Posts: 286
|
Re: Another OLD BLUE Build Thread - 71 Chevy
My god...
Your a master fabricator going back to school for your MBA in your 30's (hope I didn't shoot too high  )... And I'm over here, 24, just trying to be responsible enough to feed my self and pay the power bill )... And I'm over here, 24, just trying to be responsible enough to feed my self and pay the power billThank you for some awesome reading material while I eat pizza
__________________
1989 3+3 2wd Dually. 454 BB. Factory loaded for the day, including Alcoa rims. |
|
|
|
|
03-01-2014, 04:04 PM
|
#147 | |
|
Registered User
Join Date: Feb 2011
Location: SHAWNEE, KS
Posts: 191
|
Re: Another OLD BLUE Build Thread - 71 Chevy
Quote:
The masters degree is just another tool in the toolbox. I may not use it all the time but when I do, I am very glad to have it. (don't regret it a bit other than being a little on the expensive side $$$) Been doin' work. Got the new radiator and power steering pump in the suburban. She can run and steer now, just can't move. Transmission is next. Since "snowmageddon" is coming tomorrow, I wanted to get a heater set up in Ol' Blue. Maybe I will finally get to try out 4wd!? Starting with this:  The brand is ACME and part number 201437. I googled it and couldn't find anything about it. It has been sitting on a shelf in the basement for 4+ years now. Lesson of the day The vast majority of the time, I am too much of a cheapa$$ to buy the first product that I find. In this case I was looking for heater duct with ~2.5" ID. 1. LMC TRUCK - part 32-1980 which is QTY 2 of 2 1/2" ID ducts one 15" long one 25" long - $19.95 (can pickup locally) 2. Summit Racing - Universal Duct Dorman 96004 - QTY 1 of 2 1/2" ID duct x 72" - $18.97 + Shipping 3. AutoZone - Universal Duct Dorman 96004 - QTY 1 of 2 1/2" ID duct x 72" - $10.88 shipped free to the nearest AutoZone in 2 days Don't get me wrong, I love summit racing but they work kinda like Wal-Mart where they get you in there to get the stuff you want then jack the price up on the stuff you need. LMC truck may have the part that is made to bolt in, but most of the time with a tiny bit of ingenuity you can find the same parts cheaper somewhere else in bulk (at least in this example). So I will be picking up my new duct work from AutoZone on Monday. But for now I'm off to the store to get a bunch of 5/8" heater hose, fittings, and switches to get this heater at least partially working. |
|
|
|
|
|
03-02-2014, 10:56 PM
|
#148 |
|
Registered User
Join Date: Feb 2011
Location: SHAWNEE, KS
Posts: 191
|
Re: Another OLD BLUE Build Thread - 71 Chevy
Had a rough day with Ol' Blue today.
Got the heater mostly installed on Saturday, had to try it out today. Snowmageddon was mostly a bust we only got maybe 4-5" of snow. Took the truck to get Chinese food and go to the parents house. All was going great until we were almost ready to leave. Went to start the truck and not only did it not start but the starter got stuck on so it sat there cranking until I could remove the quick disconnect on the battery. It didn't hit me until I was almost to the auto parts store to pick up a new starter that I had spilled a bunch of coolant down the intake the day before. I think it drained down the side of the block and froze up in the starter solenoid making it stick on. Regardless, I rolled around in the snow and ~5* weather to replace the starter (a whopping $34.99) and all is right again. I had suspicions that the starter was on its last leg anyways, hopefully the new one is sealed up a little better. Started on the first kick after I got it installed so we headed home. Get halfway home and she starts running funny then shuts off. I pulled onto a side street because I had a feeling I knew what it was. Since my gas gauge is currently not working, I keep a small gas can in the bed. Good thing I do, it was enough to get me to the gas station. Installed the heater in the glove box hole. My air duct wont come in till tomorrow so for now it just blows into the dash. Worked great and kept the cab toasty and mostly defogged. I didn't have time to make it pretty yet. The on/off/on switch is currently electrical taped to the dash. There must be a compromise between family, work, and hobbies.  Lines running to the water pump, won't look so "out there" once the wheel wells are back in.  No action shots, but the 4wd works great, had it up to 45-50 with no vibrations while locked in. 
|
|
|
|
|
03-16-2014, 12:10 AM
|
#149 |
|
Registered User
Join Date: Feb 2011
Location: SHAWNEE, KS
Posts: 191
|
Re: Another OLD BLUE Build Thread - 71 Chevy
So today was AWESOME. Finally got to take Ol' Blue for a small shakedown run.
First, ran some ducting to my defrost vents in case snowmageddon ever decides to show up.  There are two defrost vents on these old trucks. The third port will just warm the dash/interior.  Had my dad follow me out to his land, it had been a while since I was last out there so we made a family event out of it. It is ~55 miles out of town. That means in total I probably drove Ol' Blue ~130 miles today with very few hiccups. Hiccup #1 the tachometer wire started shorting out of the firewall and made the truck stumble until I figured it out. For now it is just cut, I'll fix it tomorrow. Hiccup #2 I discovered that my metal fuel line along the frame rail is too close to the exhaust. Took a while to figure out but when we were driving around slow it would randomly sputter and shut off. When I would check my clear fuel filter it would be empty. Crank it for a bit and it would fire up and run for ~50ft. Turns out it was just vapor locking because the metal line was too hot. Any other driving besides slow crawling had enough airflow for it to cool off. Here are pics of the biggest ditch that we could find that wasn't heavily wooded.   Tires fit up in the wheel wells nicely. Front and rear they both just barely kiss the fenders. Not sure if it even warrants trimming the more.  Rear suspension flexed with swaybar still attached.  Front compressed.  Front Drooped  Short video. Yes, I know it is weak sauce, but it is still better than driveway pics. Exhaust sounds awesome, but it is still too loud. Especially when crawling/going slow. 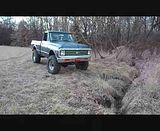 Not sure if I am going to make it to Big Meats Run. As of right now I would just have to drive Ol' Blue out there. My tow rig hasn't moved on its own yet and I haven't had any time to work on it. If I do plan on going I need to at least get these done: Fix tachometer re-run fuel lines Fix fuel gauge so I can stop worrying about running out of gas Take out a small loan to afford the premium fuel to drive this thing ~400 miles round trip 
|
|
|
|
|
03-18-2014, 10:22 PM
|
#150 |
|
Registered User
Join Date: Feb 2011
Location: SHAWNEE, KS
Posts: 191
|
Re: Another OLD BLUE Build Thread - 71 Chevy
I might have gotten distracted on my lunch break today, but I finally found something tall enough that I could show the leaf spring sliders in action.
 Just a lil' 953D, but the tracks are ~3ft tall   This is full limit-strap droop, so that is as far as the sliders will travel with the current setup.   I'm a used equipment appraiser BTW, so if you need anything equipment related or just want to BS, hit me up. |
|
|
|
 |
| Bookmarks |
|
|


 Linear Mode

