
|
|
|
 12-16-2014, 10:18 PM
|
#1 |
|
Post Whore
 Join Date: Mar 2013
Location: Southern Oregon
Posts: 10,384
|
Re: 46 pickemup in NJ "the Rebuild"
WOW! I'm stoked!!! Super super excited to get my 292 back!!! Man that makes me excited! Thanks for the dyno pulls and yeah you'll have to get a youtube account and they are free...so looking forward to more videos!

__________________
1966 Chevy C10 "Project Two Tone" http://67-72chevytrucks.com/vboard/s...d.php?t=596643 1964 GMC "Crustine" semi-build:http://67-72chevytrucks.com/vboard/s...d.php?t=665056 My youtube channel. Username "Military Chevy": https://www.youtube.com/channel/UC_h...fzpcUXyK_5-uiw |

|

|
|
12-16-2014, 10:48 PM
|
#2 |
|
Registered User
Join Date: Dec 2010
Location: washington NJ
Posts: 766
|
Re: 46 pickemup in NJ "the Rebuild"
so after spending 2 hours trying to figure out how to do this on our new mac lets see if this video works.
|
|
|
|
|
12-16-2014, 10:50 PM
|
#3 | |
|
Registered User
Join Date: Dec 2010
Location: washington NJ
Posts: 766
|
Re: 46 pickemup in NJ "the Rebuild"
Quote:
|
|
|
|
|
|
12-16-2014, 10:51 PM
|
#4 |
|
Registered User
Join Date: Dec 2010
Location: washington NJ
Posts: 766
|
Re: 46 pickemup in NJ "the Rebuild"
lets try this..............
http://vid42.photobucket.com/albums/...pstt3dbyux.mp4 |
|
|
|
|
12-17-2014, 04:00 PM
|
#5 |
|
Registered User
Join Date: Dec 2010
Location: washington NJ
Posts: 766
|
Re: 46 pickemup in NJ "the Rebuild"
some more dyno porn.................just ignore my dopey wife
 http://vid42.photobucket.com/albums/...psw8amgcpo.mp4 |
|
|
|
|
12-17-2014, 10:03 PM
|
#6 |
|
Post Whore
Join Date: Mar 2013
Location: Southern Oregon
Posts: 10,384
|
Re: 46 pickemup in NJ "the Rebuild"
Dang it sounds good! Wow, What are the specs on the cam?
__________________
1966 Chevy C10 "Project Two Tone" http://67-72chevytrucks.com/vboard/s...d.php?t=596643 1964 GMC "Crustine" semi-build:http://67-72chevytrucks.com/vboard/s...d.php?t=665056 My youtube channel. Username "Military Chevy": https://www.youtube.com/channel/UC_h...fzpcUXyK_5-uiw |
|
|
|
|
12-18-2014, 06:16 PM
|
#7 | |
|
Registered User
Join Date: Dec 2010
Location: washington NJ
Posts: 766
|
Re: 46 pickemup in NJ "the Rebuild"
Quote:
|
|
|
|
|
|
12-18-2014, 06:18 PM
|
#8 |
|
Registered User
Join Date: Dec 2010
Location: washington NJ
Posts: 766
|
Re: 46 pickemup in NJ "the Rebuild"
Forgot to mention that the dyno pulls showed the carb was to small. The guys at the shop said a 600 cfm is the way to go and would probably get it to hit 300 hp.
|
|
|
|
|
12-26-2014, 09:08 PM
|
#9 |
|
Registered User
Join Date: May 2013
Location: Centerville,Ma.
Posts: 1,223
|
Re: 46 pickemup in NJ "the Rebuild"
Looking good, nice to see you making more progress. Having the motor staring at you will be good motivation. I think you made a good decision on how to fix the back of the cab. Cutting the back out and trying to fab a replacement without experience with making panels and access to an english wheel could have created a bigger problem. You now have a solid panel to work with and when done even if it isn't perfect nobody will ever notice unless you point it out. Keep up the good work.
Bob |
|
|
|
|
12-26-2014, 09:26 PM
|
#10 |
|
Registered User
Join Date: Feb 2012
Location: Warrington, PA
Posts: 26
|
Re: 46 pickemup in NJ "the Rebuild"
Paintman I didnt realize I'm only an hour from you. I would have come up for a day and helped you body work the back of the cab with you. The way you are heading I think it will work out good. If you need any parts for the truck let me know I have extras of some stuff. Here is my '46
|
|
|
|
|
12-26-2014, 11:19 PM
|
#11 | |
|
Registered User
Join Date: Dec 2010
Location: washington NJ
Posts: 766
|
Re: 46 pickemup in NJ "the Rebuild"
Quote:
|
|
|
|
|
|
12-26-2014, 11:17 PM
|
#12 | |
|
Registered User
Join Date: Dec 2010
Location: washington NJ
Posts: 766
|
Re: 46 pickemup in NJ "the Rebuild"
Quote:
|
|
|
|
|
|
12-26-2014, 11:24 PM
|
#13 | |
|
Registered User
Join Date: Dec 2010
Location: washington NJ
Posts: 766
|
Re: 46 pickemup in NJ "the Rebuild"
Quote:
|
|
|
|
|
|
12-27-2014, 12:57 AM
|
#14 |
|
SAVING ONE TRUCK AT A TIME
Join Date: Feb 2010
Location: sherwood oregon
Posts: 1,141
|
Re: 46 pickemup in NJ "the Rebuild"
progress is looking great. nice fix on the back panel.
__________________
53-suburban (99% done) 40-pick up (99.9% done) 12-cc lb dually D-max (dd) 61-crew cab D-max "PAY LESS FOR WHAT YOU NEED PAY MORE FOR WHAT YOU WANT" 53 BURBAN BARN FIND:http://67-72chevytrucks.com/vboard/s...d.php?t=404091 1940 PROJECT MOON SHINE:http://67-72chevytrucks.com/vboard/s...d.php?t=551088 1961 CREW MAX: http://67-72chevytrucks.com/vboard/s....php?p=6957999 |
|
|
|
|
12-27-2014, 12:05 PM
|
#15 |
|
Senior Member
Join Date: Jul 2012
Location: Oblong, Illinois
Posts: 7,017
|
Re: 46 pickemup in NJ "the Rebuild"
Just went through your entire build. Great work and really appreciate your sense of humor with your updates! Nice work on the house and patio too. Looking forward to more updates.
|
|
|
|
|
01-27-2015, 06:41 PM
|
#16 |
|
Registered User
Join Date: Dec 2010
Location: washington NJ
Posts: 766
|
Re: 46 pickemup in NJ "the Rebuild"
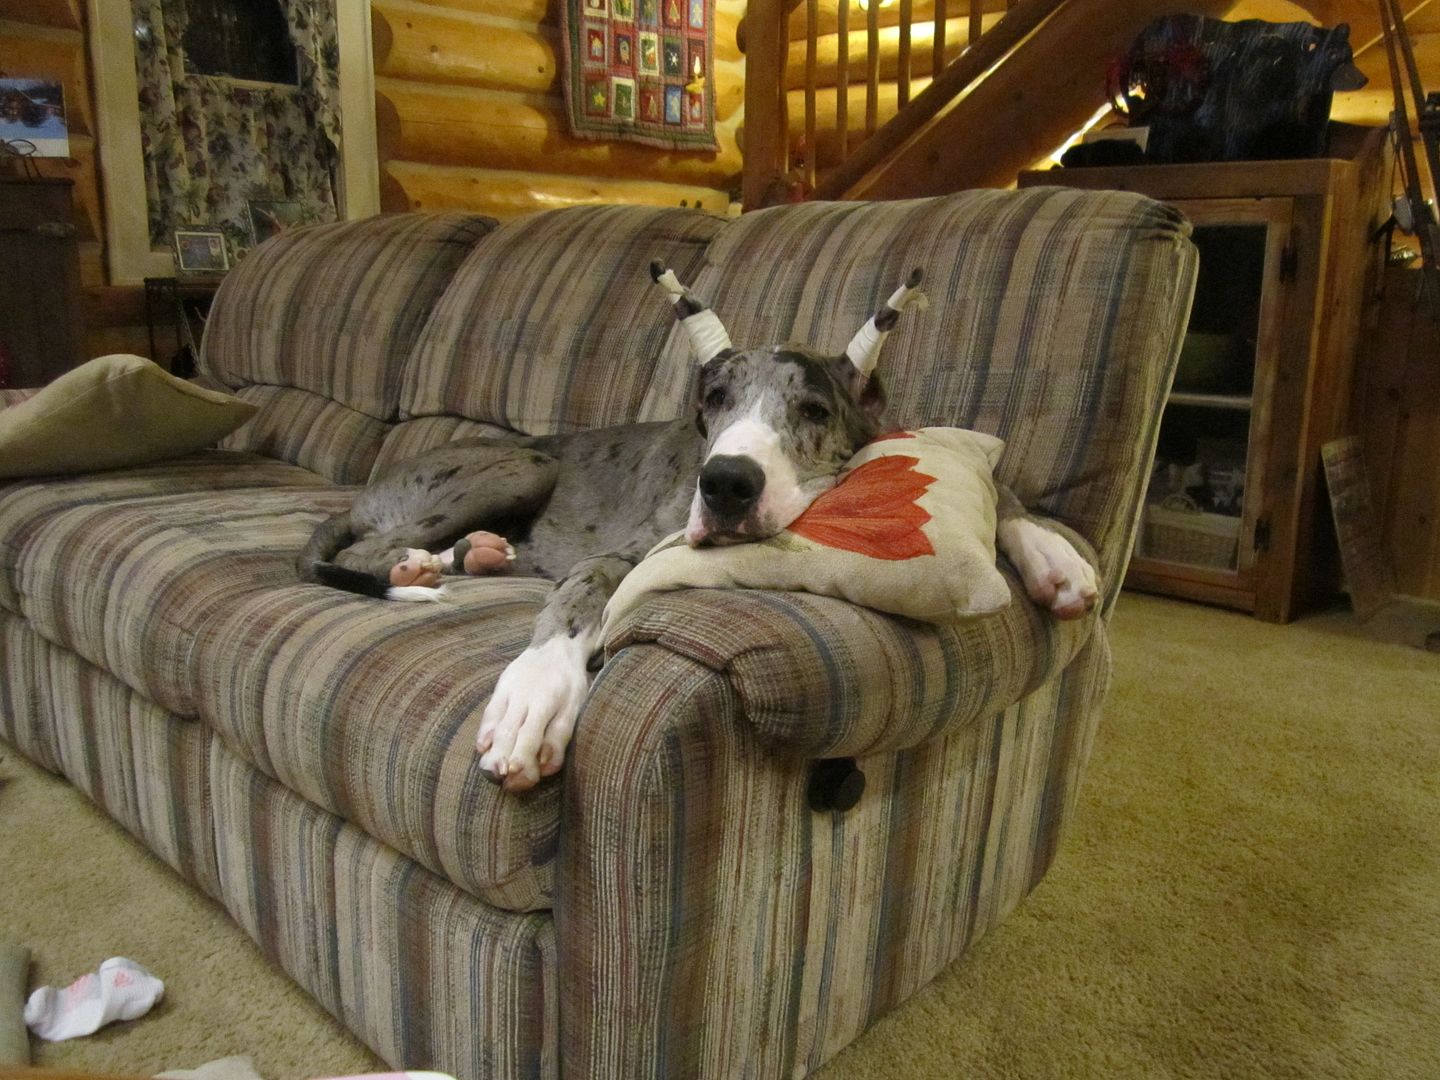
The Paintman is back with more fun filled adventures! Sorry for the slow updates but things have been kind of hectic at the Paintman's household. First off, with kids, the Holidays just seem to keep me out of the garage. Then our 6 month old Great Dane had some health issues. Unfortunately Mr. Magoo had a bad case of Pano (or long bone). For those of you who don't know, Pano is a condition that fast growing dogs sometimes get (Magoo gained 60 pounds in 4 months). Basically the bones grow faster then the rest of the body. Thus the muscles and tendons tear and swell the joints. This leads to taking care of a paralyzed 100 pound dog for 2 weeks. I'll let your imagination figure out what my wife and I were going through. Fortunately after a shot of morphine and 20 days on horse pain killer pills, Magoo is back to his old self, full of piss and vinegar! But I digress.
 [/URL] [/URL]In between caring for Magoo,working, and entertaining the wife and kids, I spent a few days prepping the inside of the cab for paint. After going through about 50 sheets of sand paper, 10 sanding discs, and a whole bunch of skinned knuckles... I thought I was ready set the cab down on the floor and flip it up on its nose for prepping and painting of the underside. Then I remembered that one of the previous owners of the truck had absolutely no business building hot rods. "What do you mean you ask"? Well the seat that came in the truck was never mounted to anything! That's right it was just sitting on a 1/2" piece of plywood that was cut oversize so it would rest on the seat riser. that meant if I was to stop short...well you get the picture, Paintman hood ornament. Sooooo, the Paintman (who also has absolutely no business building a hot rod), set forth on an epic adventure in seat mounting. First off I thought about buying a new seat because the one that came with the truck, although comfy, was a little bit to wide as it rubbed the doors. Also the seat frame did not lend itself to making a mounting bracket easily. I considered buying a seat from either Glide or Bengals but kind of coughed at $700. I really like the way the base of their seats tilted forward though because I plan on mounting the fuse block under the seat. So after I a quick trip up the road to the local junkyard and spending $50 this is what I came home with. 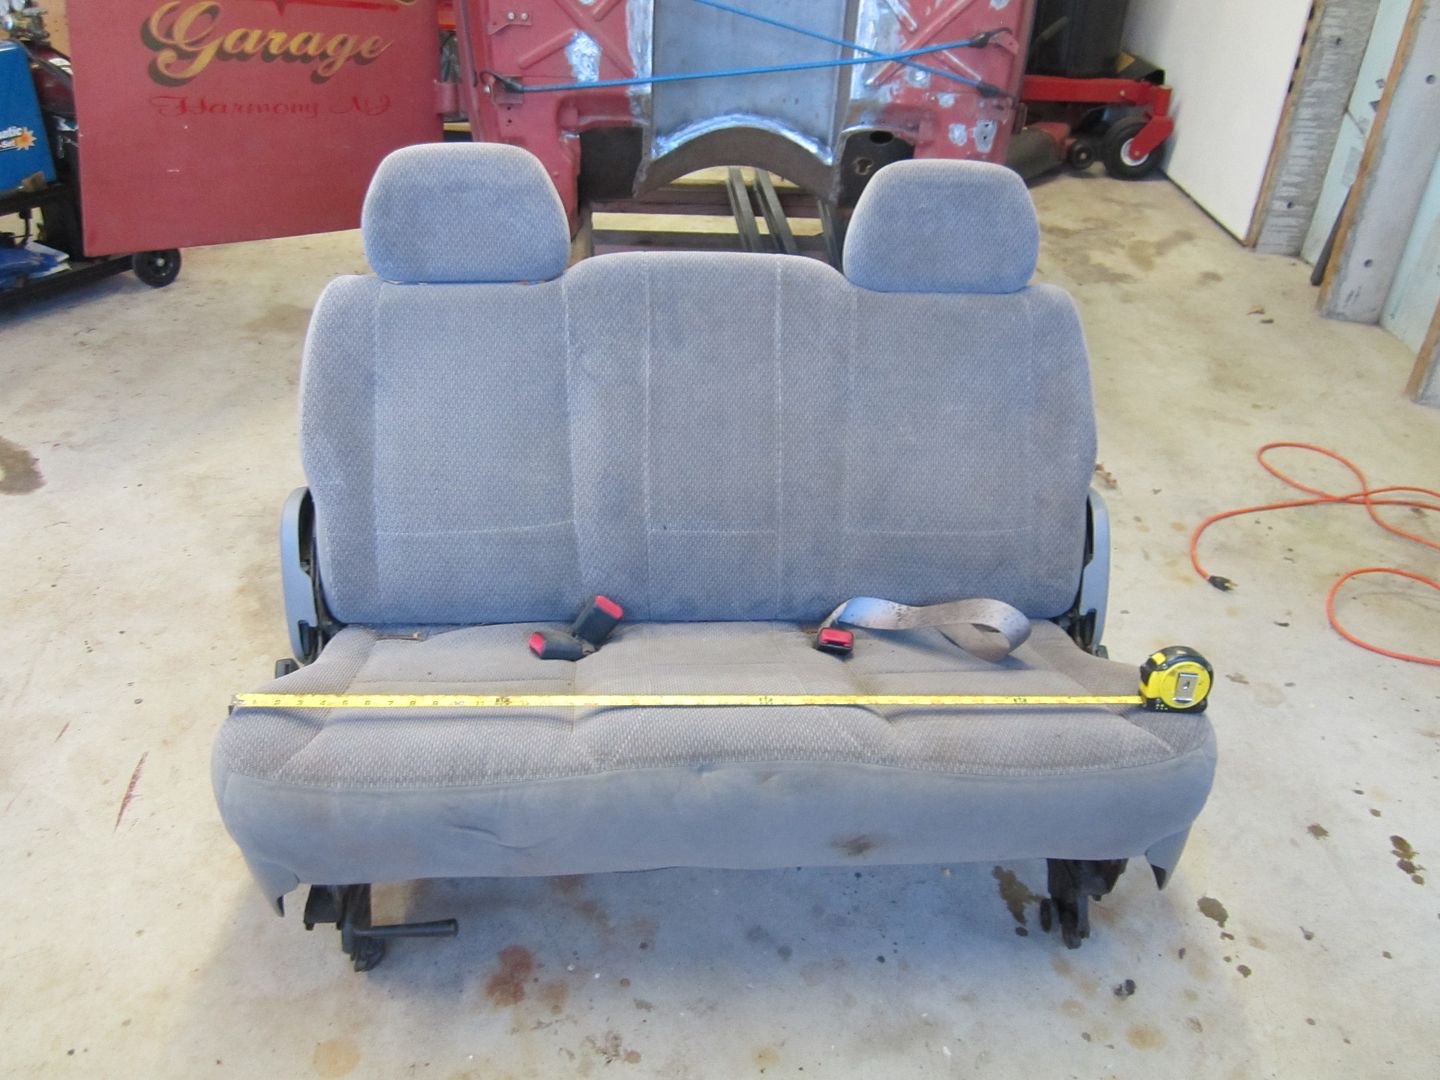 [/URL] [/URL] . |
|
|
|
|
01-27-2015, 07:22 PM
|
#17 |
|
Registered User
Join Date: Dec 2010
Location: washington NJ
Posts: 766
|
Re: 46 pickemup in NJ "the Rebuild"
I have know idea what the seat came out of because I found it in a trailer full of all kinds of other seats. And of course as usual the kid working at the front desk had know idea either. I am assuming its out of some kind of mini van as it measures just under 49".
So for this lesson class we will attempt to mount a seat that is only about 10 years old into a truck that is about 70. First off I stripped all the junk off the bottom of the frame so I had a nice clean slate to work with. 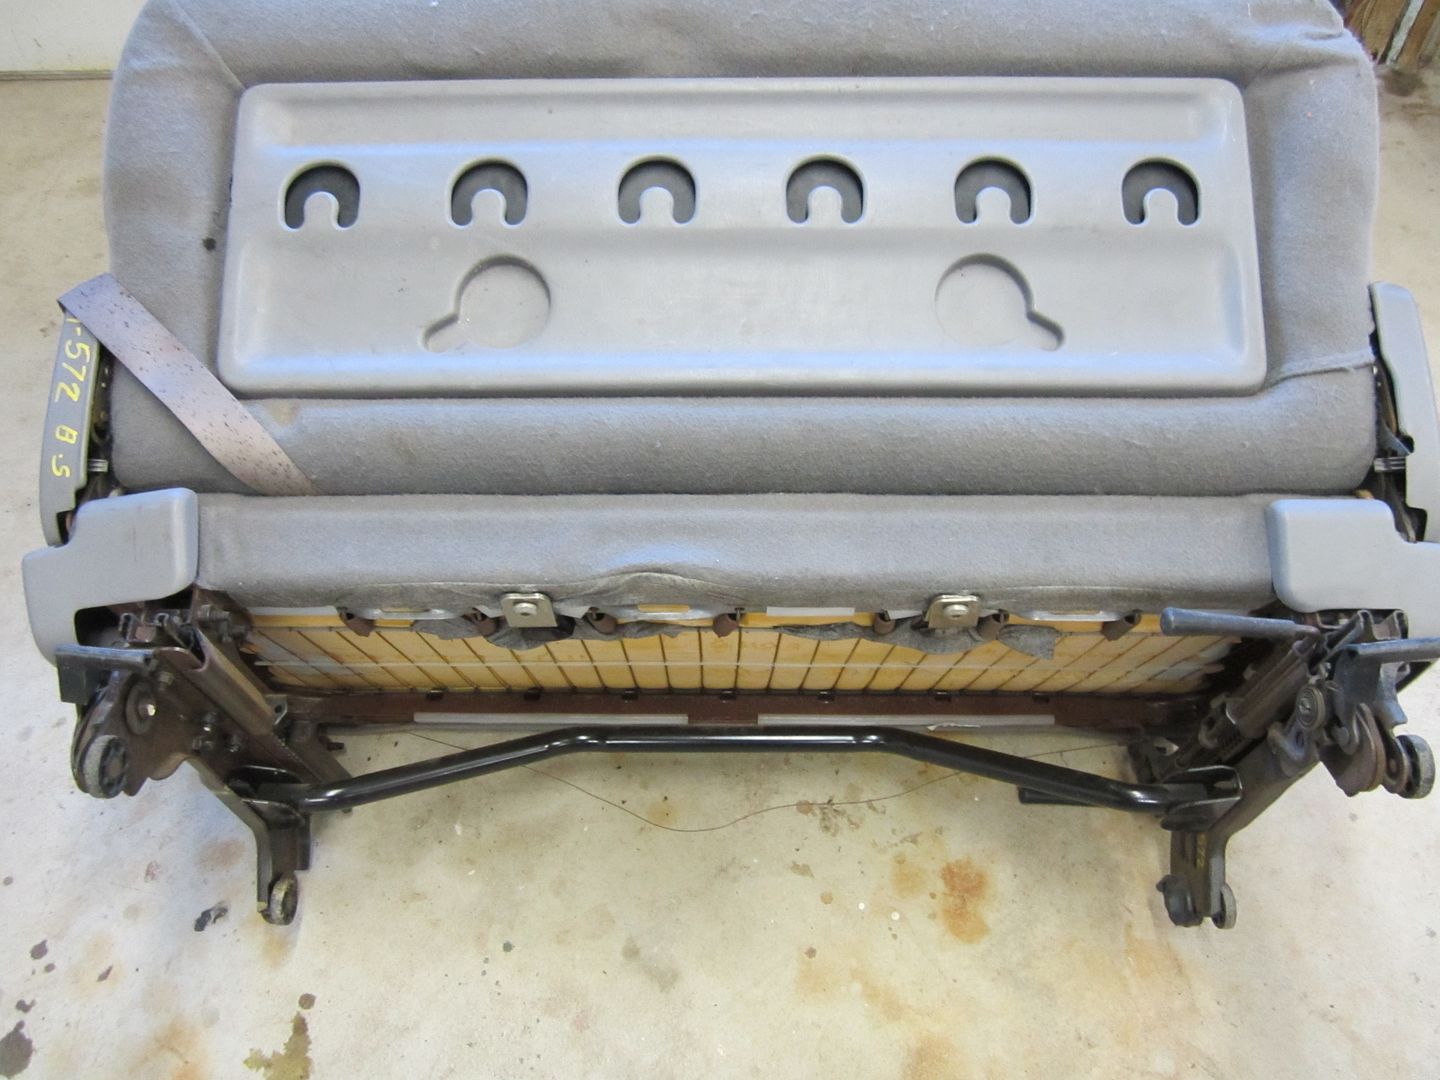 [/URL] [/URL]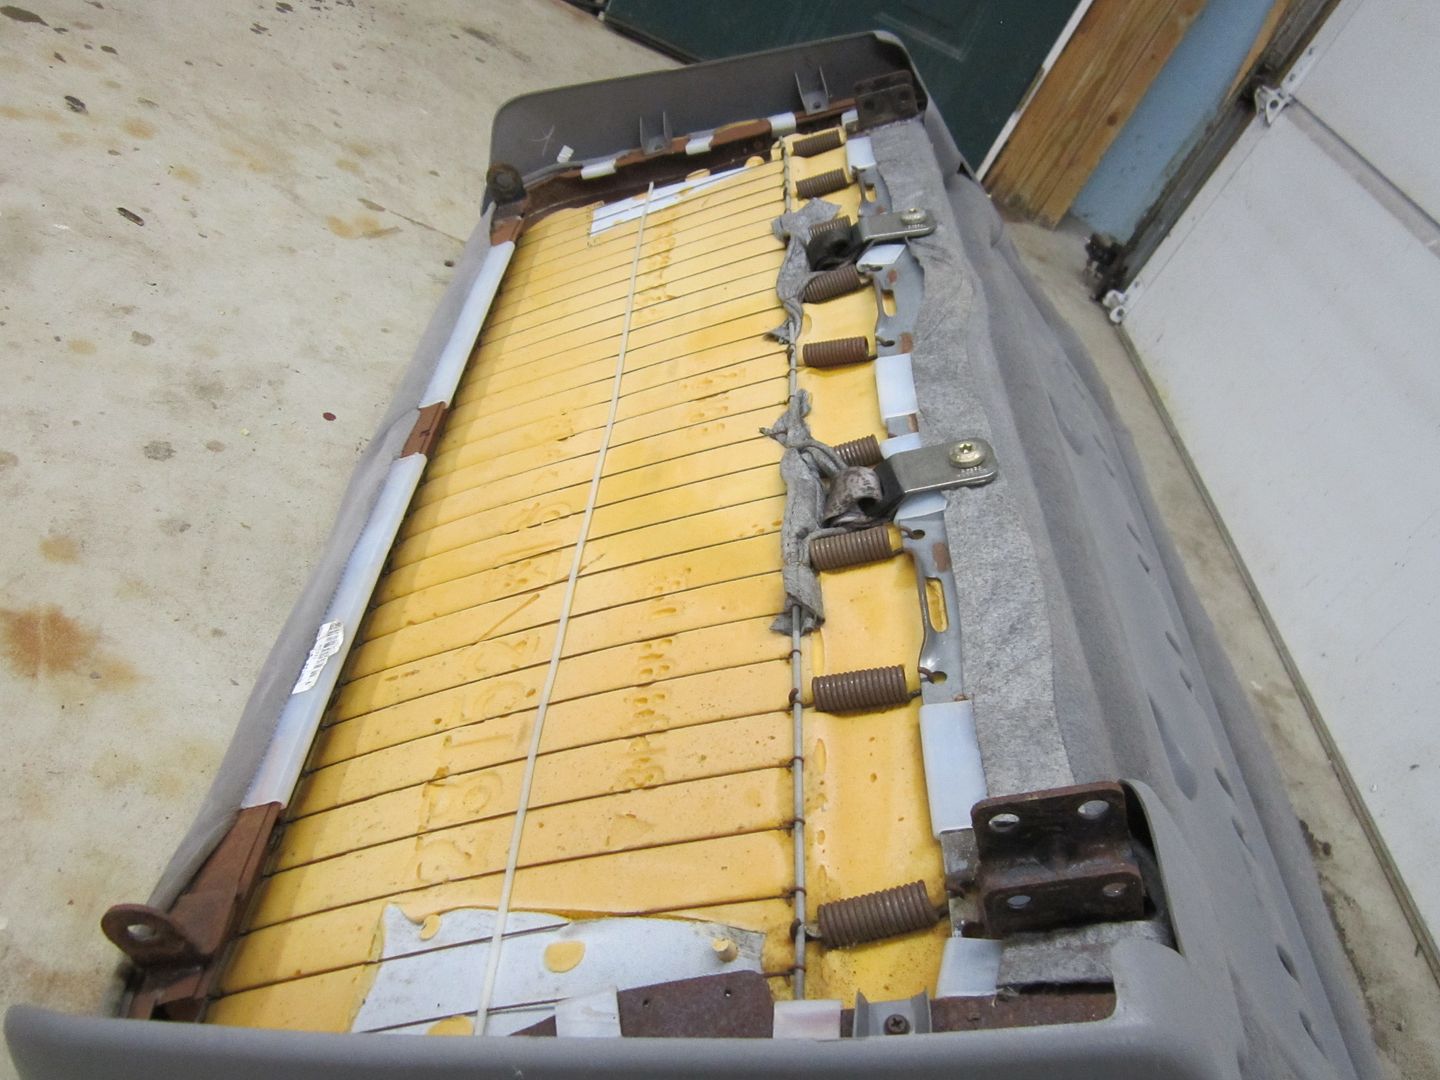 [/URL] [/URL]Because the base of the new seat is somewhat thicker and tilted towards the back I needed to trim down the seat riser. Heres a pic of the old and new seat. 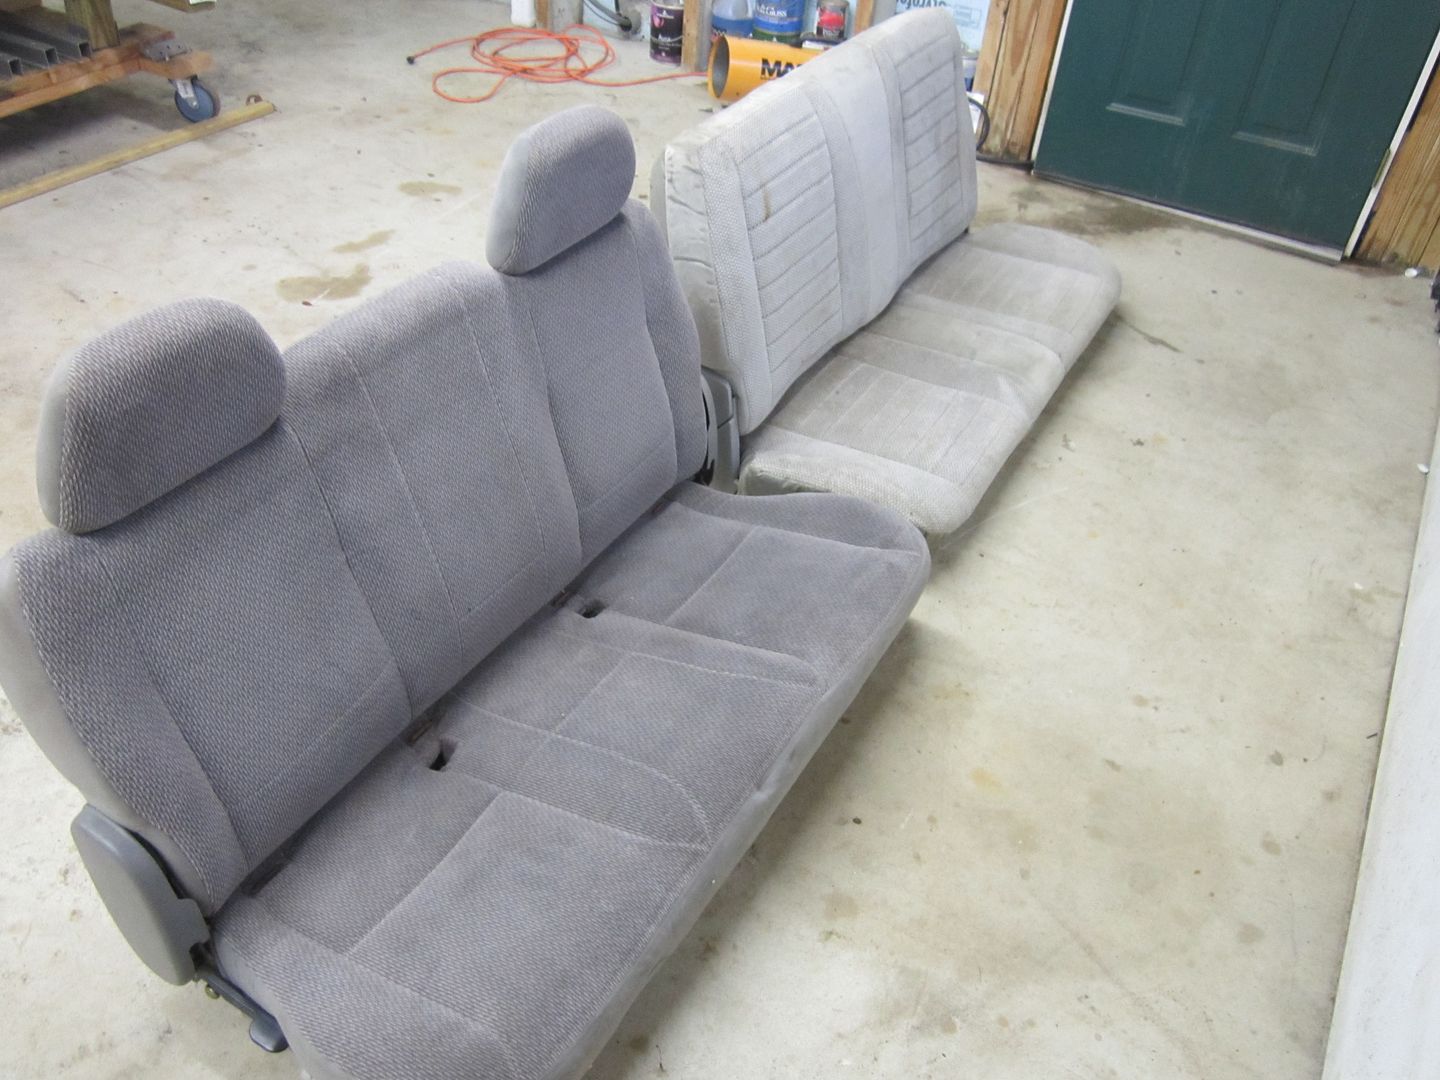 [/URL] [/URL]
|
|
|
|
|
01-27-2015, 07:38 PM
|
#18 |
|
Registered User
Join Date: Dec 2010
Location: washington NJ
Posts: 766
|
Re: 46 pickemup in NJ "the Rebuild"
I think I trimmed about 1 1/2" off the top of the riser. Because the base of the seat was tilted back at an angle I had to trim the riser level with the floor to get the correct comfort for my fat but. I just took a piece of duct tape and used it as a guid for cutting the riser.
 [/URL] [/URL]Because I trimmed the original factory lip off the top of the riser it left the riser somewhat flimsy. so I went about reinforcing the inside perimeter of the riser with some 1" square stock. This is all pinned in with about 16, 1/4-20 bolts, and lock nuts. This not only stiffened the riser bak up but also gave me a structure on which I could reinstall the factory cross sills and mount a base for the mounting brackets. 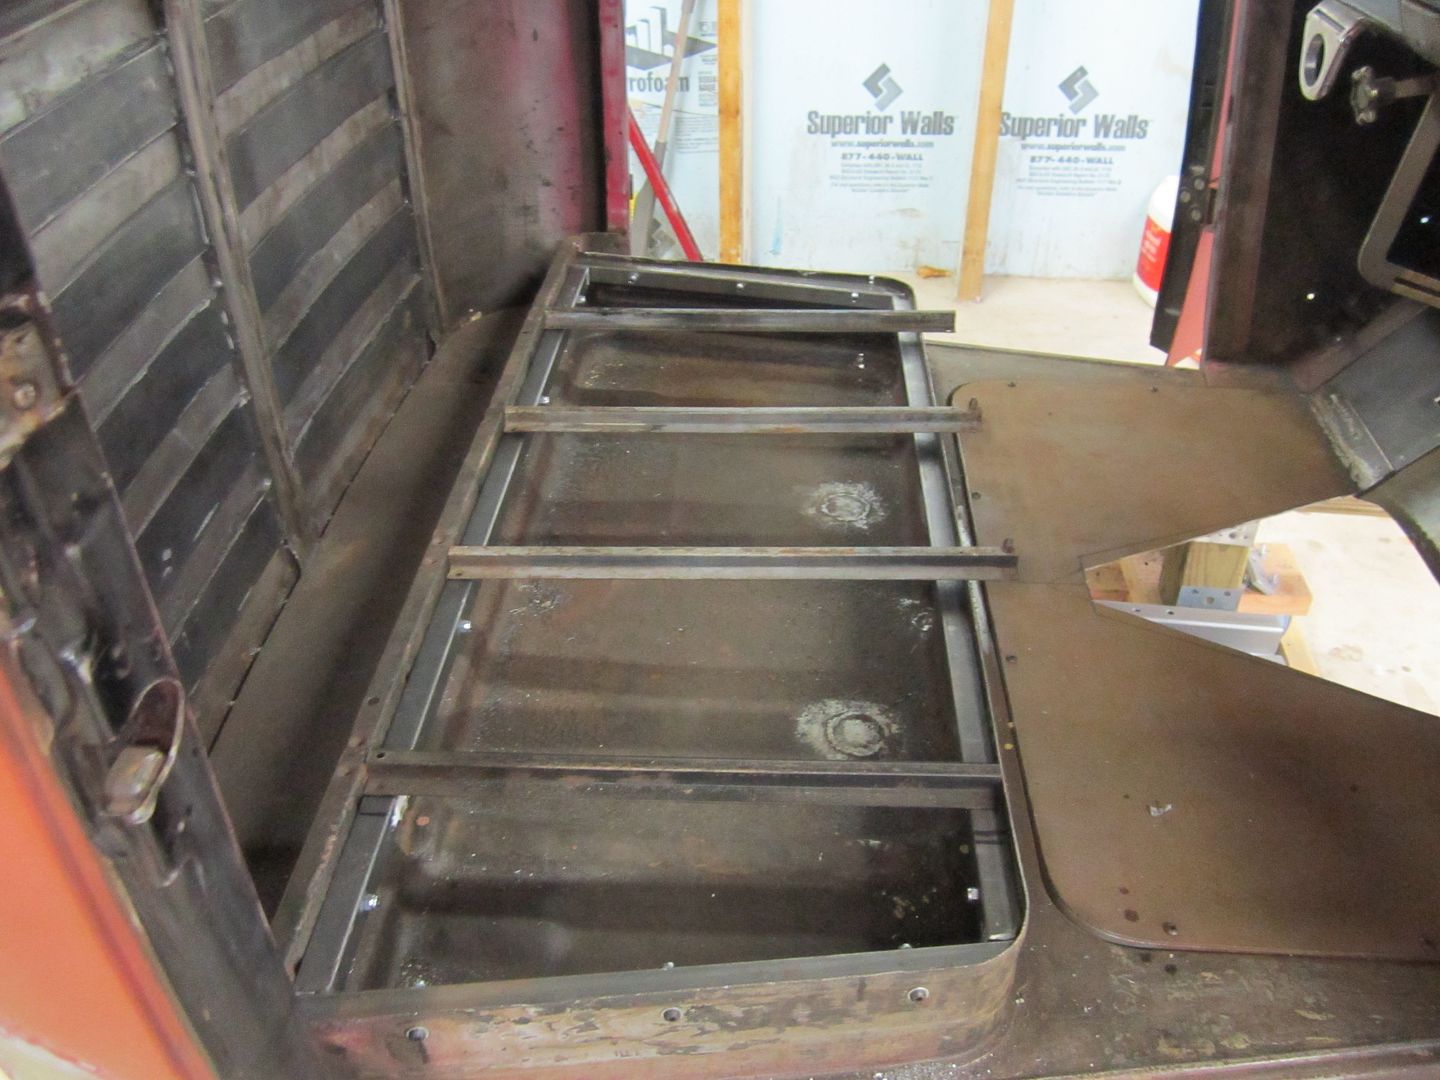 [/URL] [/URL]Next up was making 2 filler plates out of 16 gauge on each end of the riser. This would give me a surface to mount the seat brackets to. 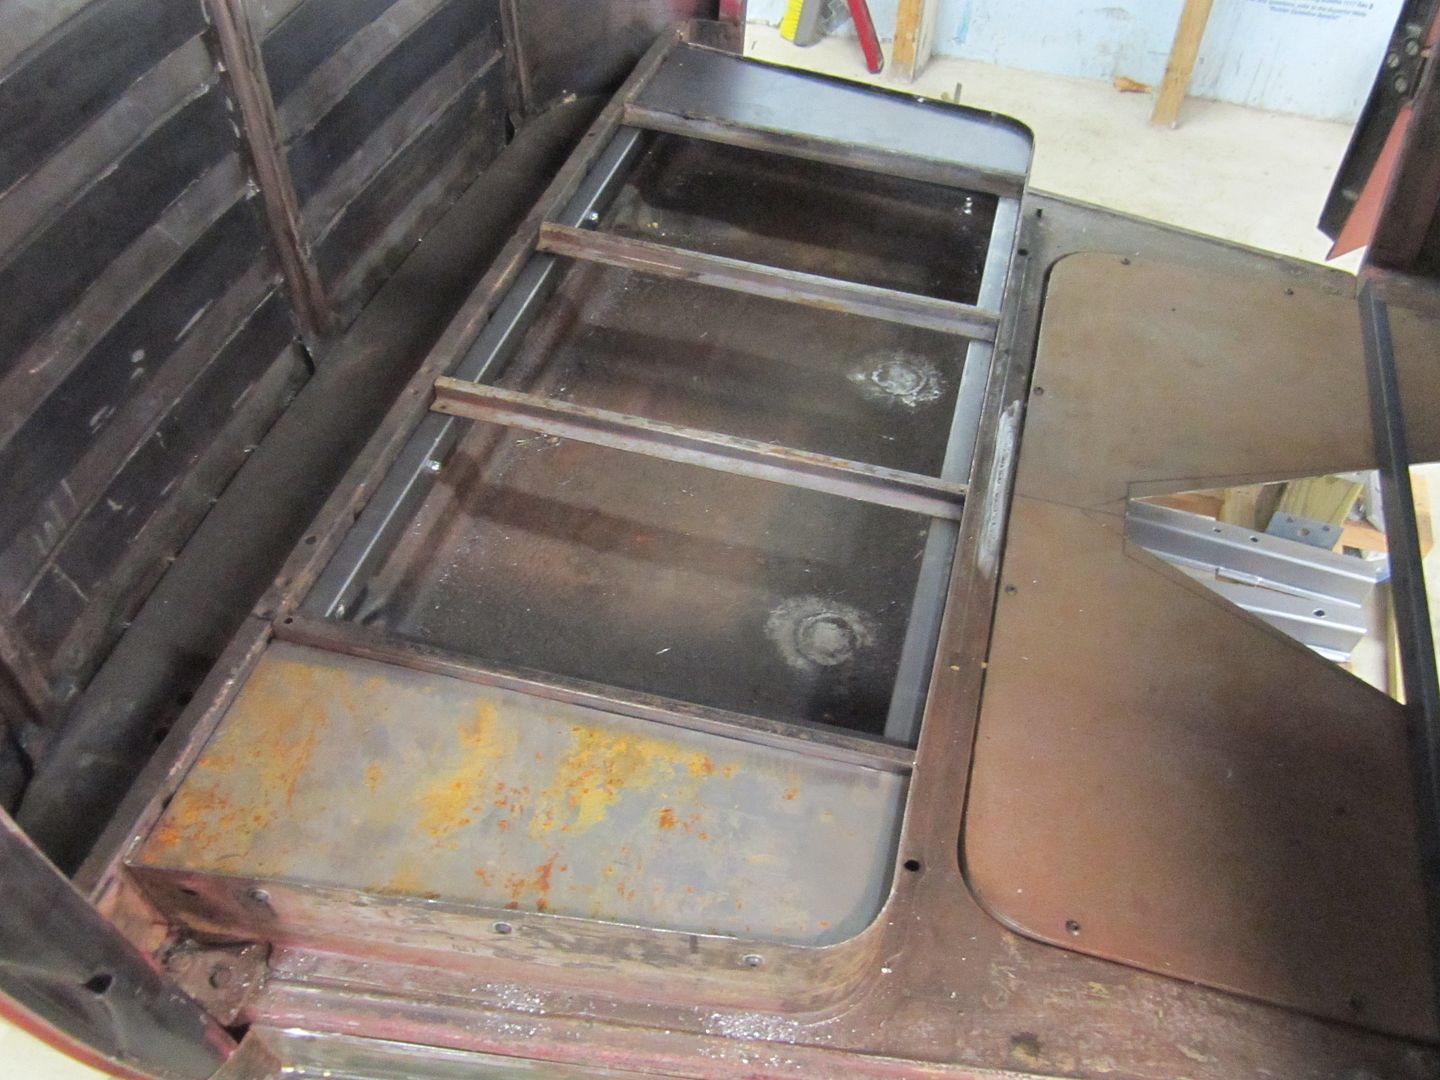 [/URL] [/URL]
|
|
|
|
|
01-27-2015, 08:01 PM
|
#19 |
|
Registered User
Join Date: Dec 2010
Location: washington NJ
Posts: 766
|
Re: 46 pickemup in NJ "the Rebuild"
So now the tricky part. Since I knew I was going to mount the fuse block and possibly the heater under the seat, I wanted to make the removal and installation as easy as possible. After much thought and of course alcohol consumption I came up with making a bracket out of 2 pieces of angle iron. One permanently mounted to the seat riser the other mounted in reverse direction on the seat. ( If that makes any sense.
First off I cut and fitted the 2 pieces of 1" angle iron and bolted them to the seat frame using 9/16 bolts. 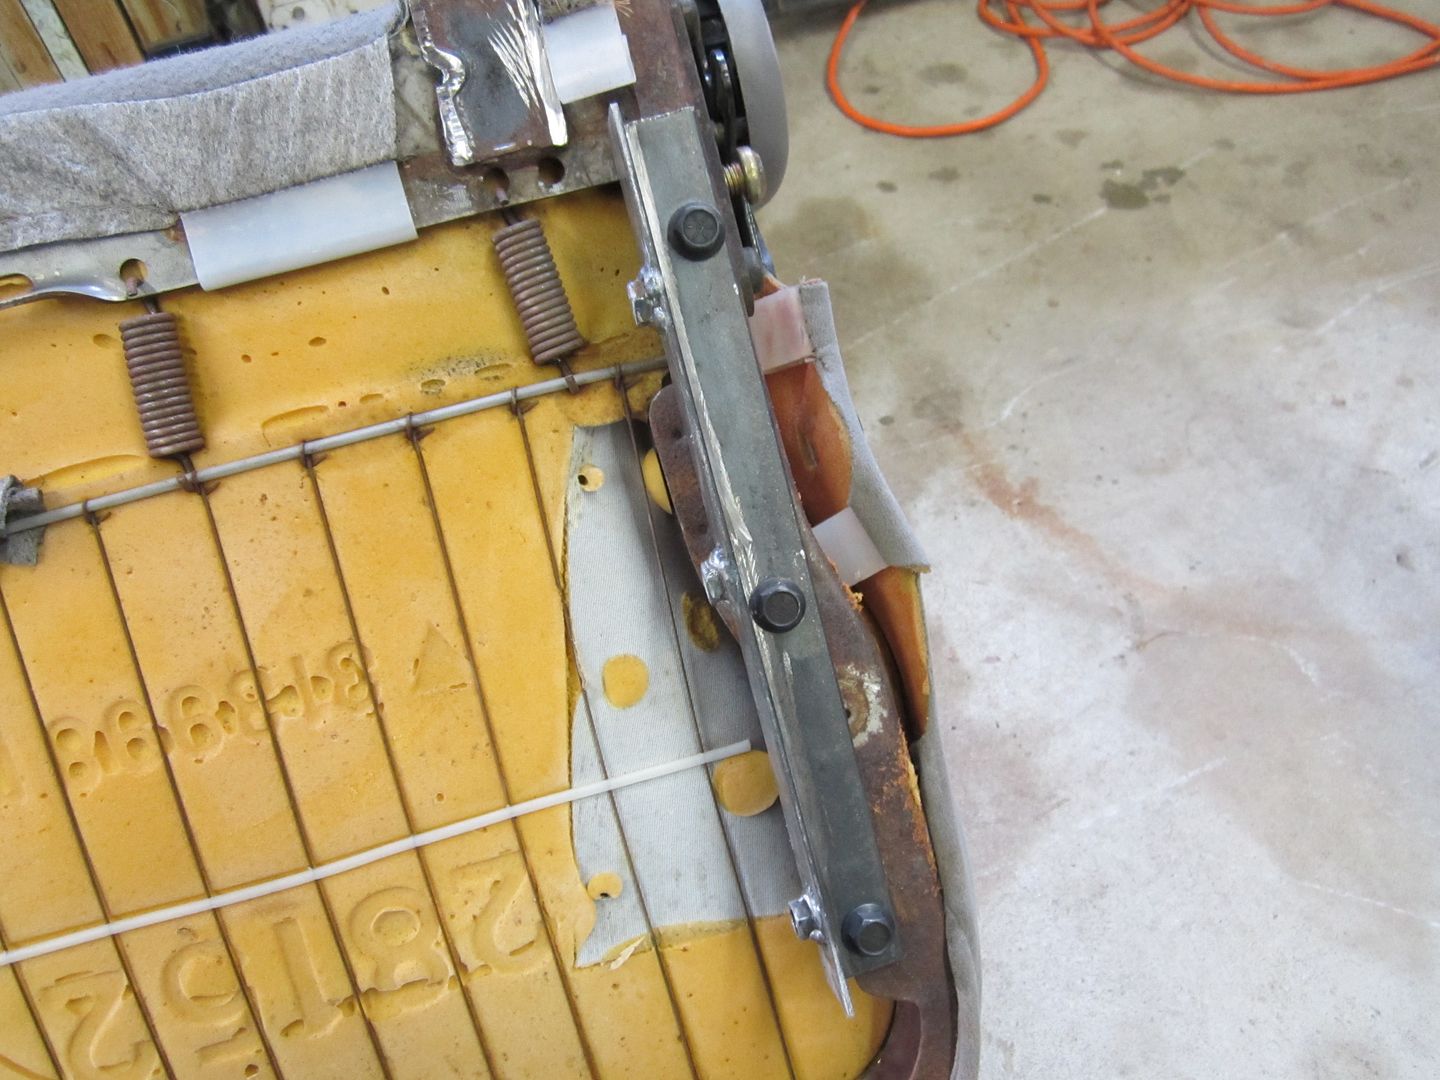 [/URL] [/URL]Then I took 2 pieces of 1-1/2 angle iron and set them in place where I kind of thought their final resting place would be. Ignore the tack welds and holes that came later 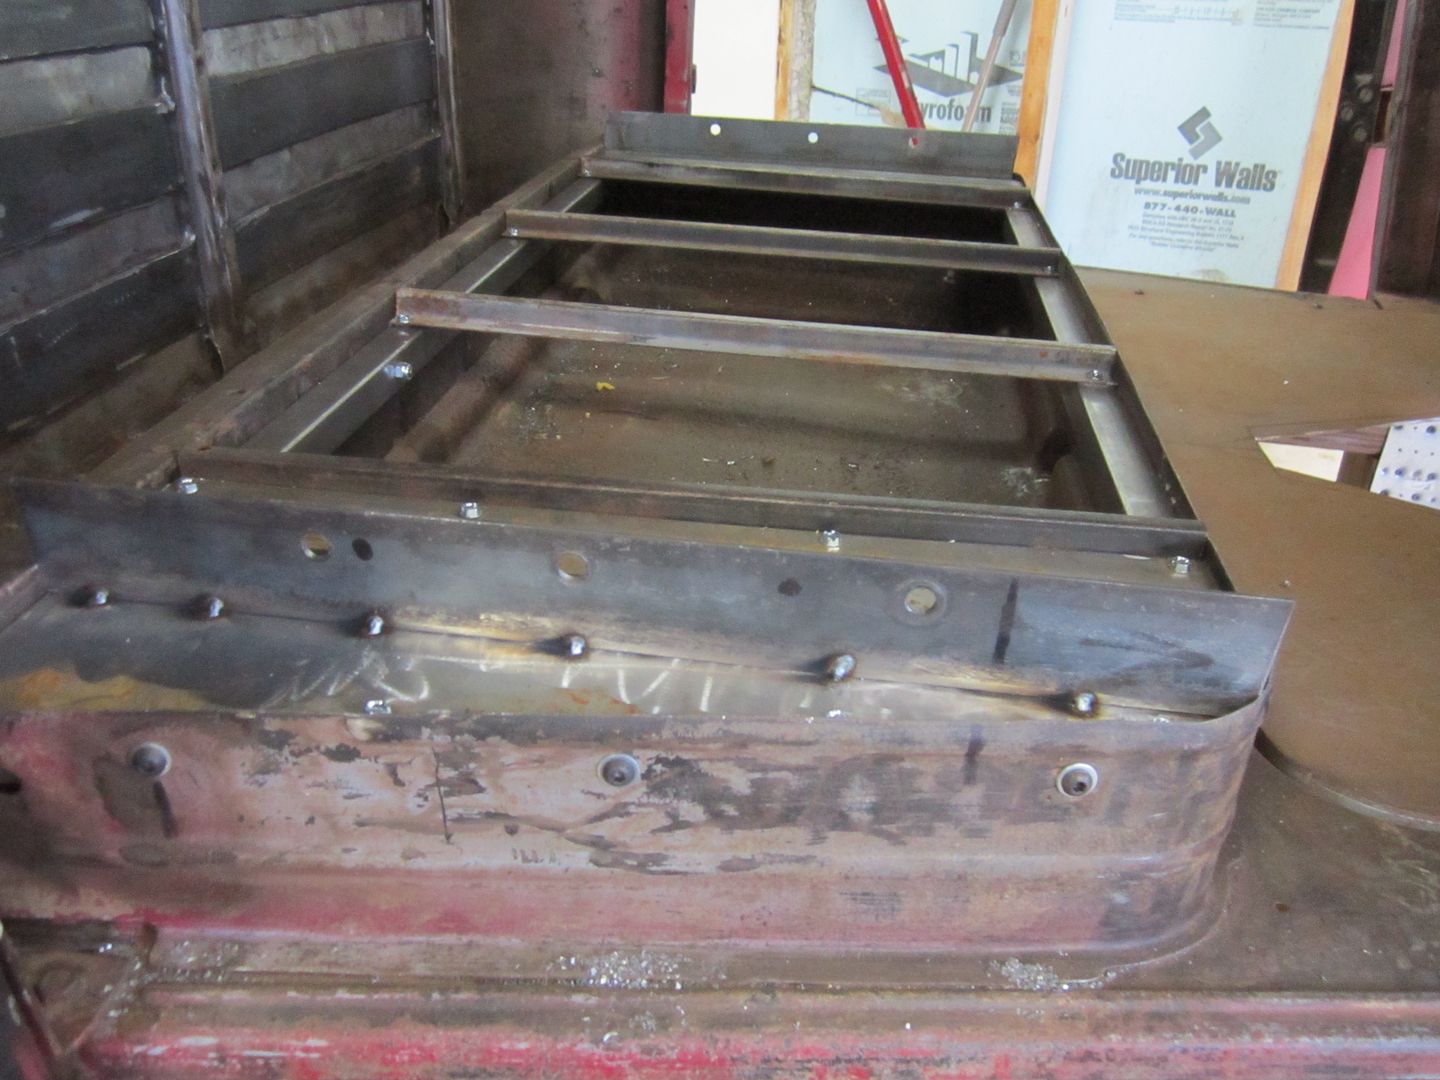 [/URL] [/URL]Then I took the seat with the brackets bolted to the bottom and set it in the truck and adjusted to center and front to back were I thought was best 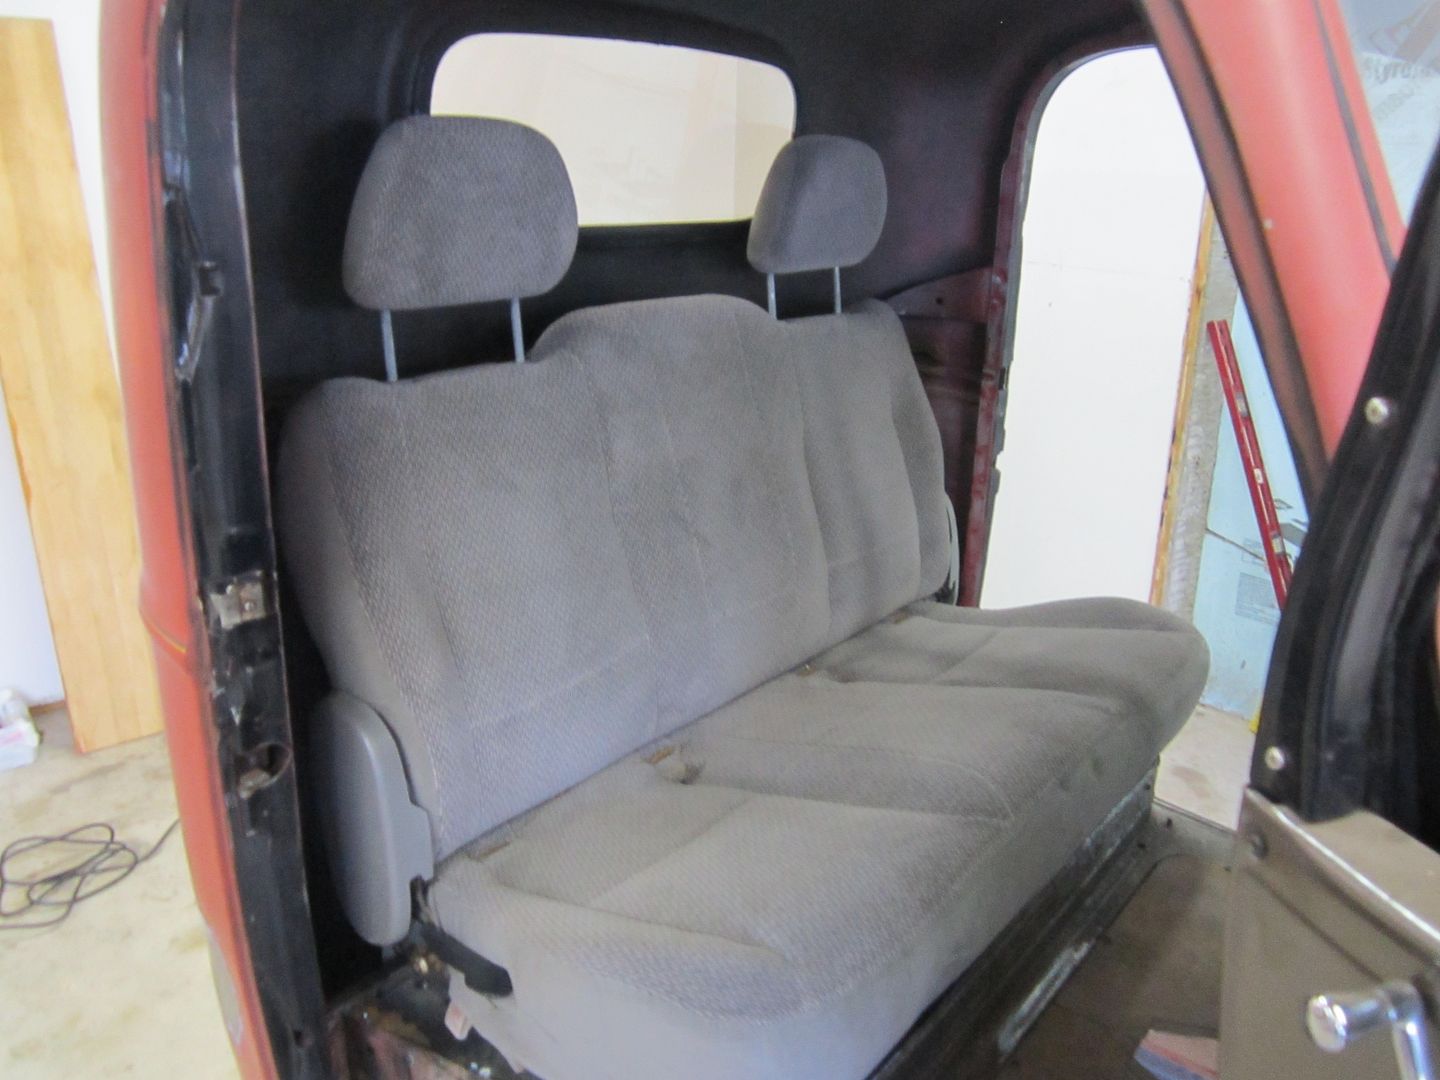 [/URL] [/URL]After being certain of the position of the seat was correct, I just drilled 3 small holes on each side of the seat through the bracket on the riser and bracket mounted to the seat. Then I screwed it all together with some small sheet metal screws. This step was crucial as I needed everything to stay in perfect alignment when I took the seat back out, as the plan was to use welded nuts on the back side of the brackets bolted to the seat. so once I got the seat back out I took the brackets of and drilled larger holes through the brackets. Then I bolted them back together and tacked nuts to the back side.  I guess I got penetration... The nuts were cherry red and this is what the back side looked like. 
|
|
|
|
|
01-28-2015, 12:47 AM
|
#20 |
|
Registered User
Join Date: May 2013
Location: Centerville,Ma.
Posts: 1,223
|
Re: 46 pickemup in NJ "the Rebuild"
Just a thought, I would rather spend hours now engineering a seat belt that will work even if you need to add some bracing to the pillars,than dealing with a harness for years. You will soon find yourself sitting on the harness. Even if you use a 70's style setup that needs to be manually tightened instead of an enertia setup used in modern cars.
|
|
|
|
|
01-28-2015, 10:19 PM
|
#21 |
|
SAVING ONE TRUCK AT A TIME
Join Date: Feb 2010
Location: sherwood oregon
Posts: 1,141
|
Re: 46 pickemup in NJ "the Rebuild"
Your new seat looks great. I made the mistake of measuring my old seat and had my new seat made to the same bottom height. I did not take into consideration how much the old springs would give compared to the new foam. End result is good but sit a little higher in the cab.
__________________
53-suburban (99% done) 40-pick up (99.9% done) 12-cc lb dually D-max (dd) 61-crew cab D-max "PAY LESS FOR WHAT YOU NEED PAY MORE FOR WHAT YOU WANT" 53 BURBAN BARN FIND:http://67-72chevytrucks.com/vboard/s...d.php?t=404091 1940 PROJECT MOON SHINE:http://67-72chevytrucks.com/vboard/s...d.php?t=551088 1961 CREW MAX: http://67-72chevytrucks.com/vboard/s....php?p=6957999 |
|
|
|
|
01-29-2015, 10:46 AM
|
#22 |
|
Registered User
Join Date: Dec 2002
Location: Cactus Patch So. Az
Posts: 4,749
|
Re: 46 pickemup in NJ "the Rebuild"
I think the Mopar third seat was made for these trucks,
1 & 2 are in the 46 and 3 is in a 37 Chevy
__________________
53 TuTone Extended Cab 350 4-Spd 3:08 (SOLD) 53 Chevy Moldy pearl green ZZ-4 4L60E 9" 3:25 55 GMC 1st Black Mll (ZZ4) ZZ6 TKO 600 5 sp 3:73 62 Solidaxle Corvette Roman Red (327 340hp 4spd 3:36) C4 & C5 suspension tube chassis LS 3 4L70E 65 Corvette Coupe 327 350hp 4spd 4:11 78 Black Silverado SWB (350/350) 5.3 & 4L60E 3:42 2000 S-Type 3.0 (wife cruiser) 2003 GMC SCSB 5.3 4L60E 3:42 |
|
|
|
|
02-01-2015, 04:07 PM
|
#23 |
|
Registered User
Join Date: Dec 2010
Location: washington NJ
Posts: 766
|
Re: 46 pickemup in NJ "the Rebuild"
Ok back at it! The next adventure for Paintman is seat belts. As mentioned previously the door pillar on the 46 is way to small to have any hope in mounting the belt slide. I had considered a 4 or 5 point harness but that seemed to be even more trouble figuring out a safe mounting configuration. With a racing type harness set up, if you do not have the mounting points in the right geometry to one another, there is a good chance having your back compressed or even broken in an accident.
Sooooo after a quick click on the "Buy it Now" button, a set of Juliano's bench seat belts were on their way. Here's what comes in the box. 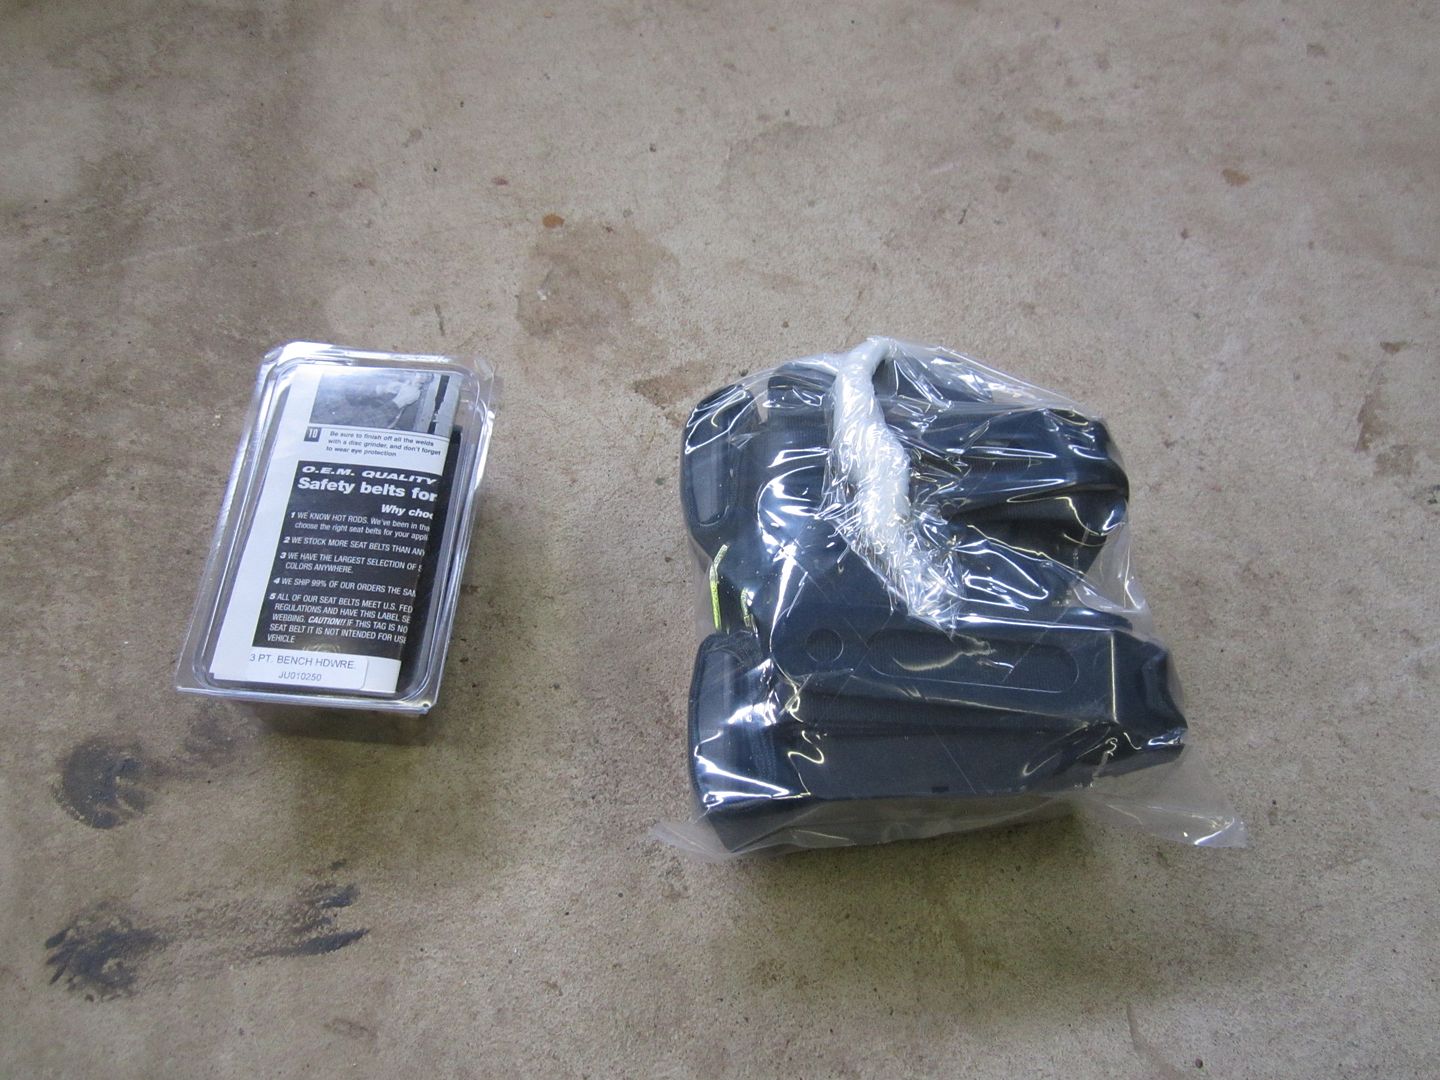 [/URL] [/URL] [/URL] [/URL]So now that I have all the pieces, I can further evaluate just how much room I will need on the door pillar to mount the bracket. From what I understand the bracket needs to be directly above the locking mechanism which will be mounted on the floor behind there seat riser. If I just add a little more material to the pillar it still would not put the bracket above the locking mechanism and it's to far forward. It seems to me it has to go up and back 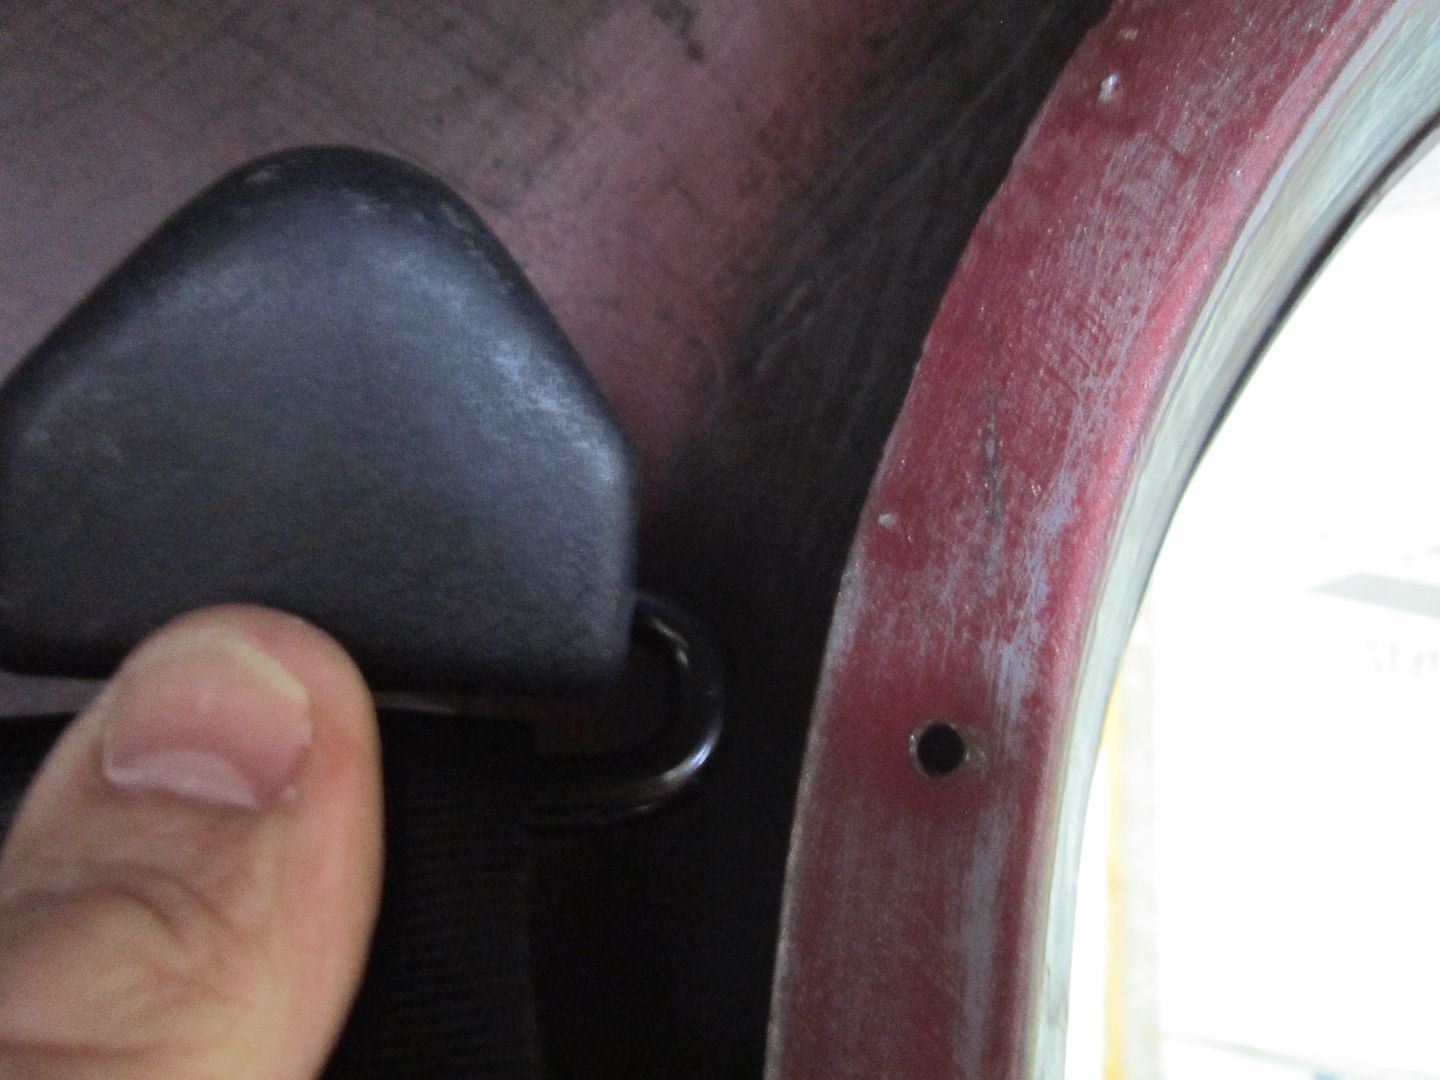 [/URL] [/URL]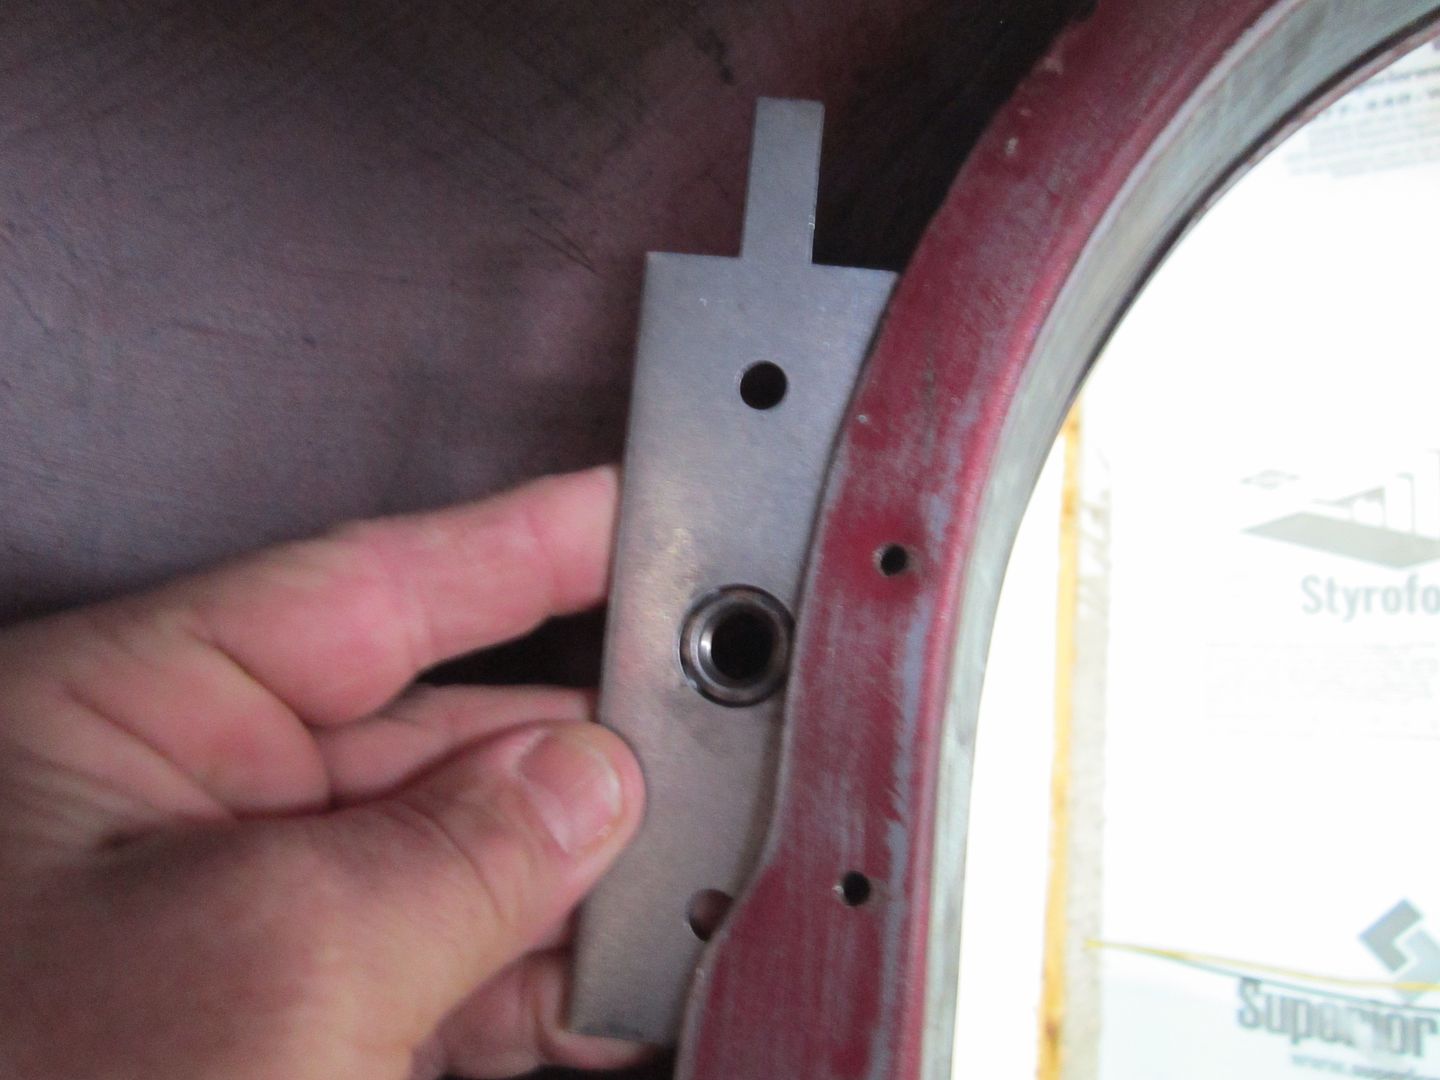 [/URL] [/URL]So here's my plan. I made a template out of cardboard to see what a larger pillar would look like. I don't think just butt welding a piece to the pillar would be strong enough in the case of an accident. I think what I will do is tuck a piece of 18 gauge behind the pillar, make a bunch of small holes in the pillar, and butt weld it in place. Then go along the entire length of the seem and weld it all in place. Here's a pic of the cardboard tucked in tight behind the pillar and cab frame work. Anybody see anything wrong with how I plan on welding this in place? Any better or stronger way to do this??????  [/URL] [/URL]
|
|
|
|
|
02-02-2015, 10:27 AM
|
#24 |
|
Registered User
Join Date: May 2013
Location: Centerville,Ma.
Posts: 1,223
|
Re: 46 pickemup in NJ "the Rebuild"
That looks like it would work ok. The worst case scenario is that if you did have a wreck it might bend over some but it would still keep you in place. Lets face it old cars or trucks are not built as safe as new stuff, but they are usually driven a lot more carefully.
|
|
|
|
|
02-02-2015, 06:31 PM
|
#25 | |
|
Registered User
Join Date: Dec 2010
Location: washington NJ
Posts: 766
|
Re: 46 pickemup in NJ "the Rebuild"
Quote:
|
|
|
|
|
 |
| Bookmarks |
|
|


 Hybrid Mode
