
|
|
|
 11-14-2015, 10:30 AM
|
#1 |
|
Registered User
Join Date: Dec 2013
Location: Purmerend, Netherlands
Posts: 1,657
|
Re: 1969 Custom/10 clean up
Well Steve, easy
 You have to measure with the engine at the new hight, how your angle is working out. Maybe try to put some woodblocks under the existing mounts and transmount to see if you have enough room. If so, measure the angle at the joints at the trannie and the axle, that way you know if you're still at the right angle. If you are around the 3 degrees, you'll be okay. Keep in mind that you both do the enginemounts and transmount to get the angle right again, if else, you've got to twist the axle for the right angle... Hope you understand my explanation? PM me for good ol' Dutch if not
__________________
Cheers!! Kees. 1959 Chevy Fleetside Longbed My build: http://67-72chevytrucks.com/vboard/s...d.php?t=643426 Kool Guyz CC Instagram: _King_Kustom_ |

|

|
|
11-29-2015, 07:35 PM
|
#2 |
|
Registered User
Join Date: Aug 2010
Location: Hoofddorp, the Netherlands
Posts: 582
|
Re: 1969 Custom/10 clean up
Well Kees, the new engine mounts and raising the transmission tail by 2mm (ehh 1/10th of an inch) fixed it, so the header clears the control arm now.
having tackled that problem I set out to fix another, the leaking transmission. Pulled of the transmission pan and I don't know what the PO has been doing, but he welded up three holes? and the pan looks pretty beat up, but I decided to leave it like that..just replacing the seal and sprayed it with heat resistant clear coat  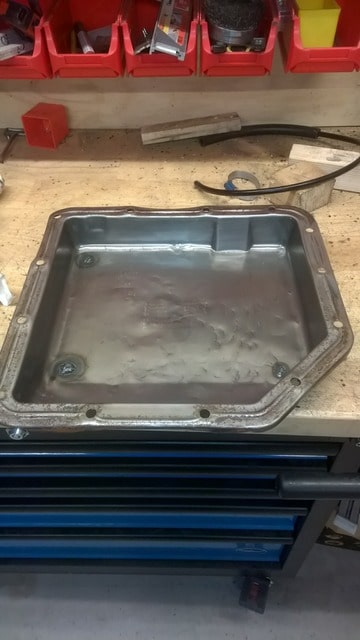 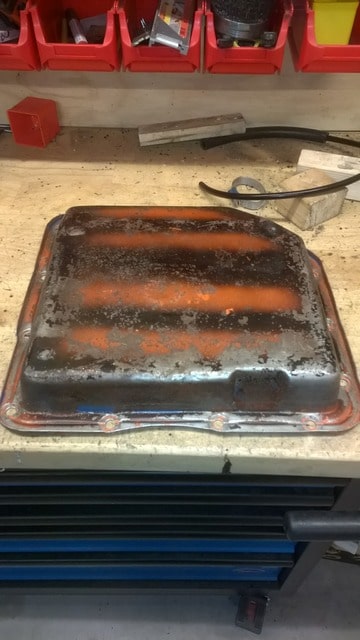 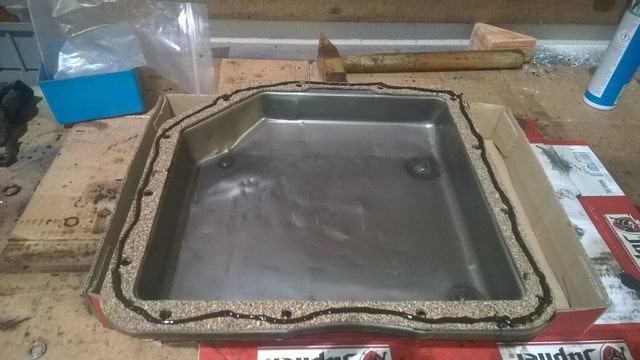 then finished my doorpanels, we made them from a thin kind of plywood, I decided to paint them black. 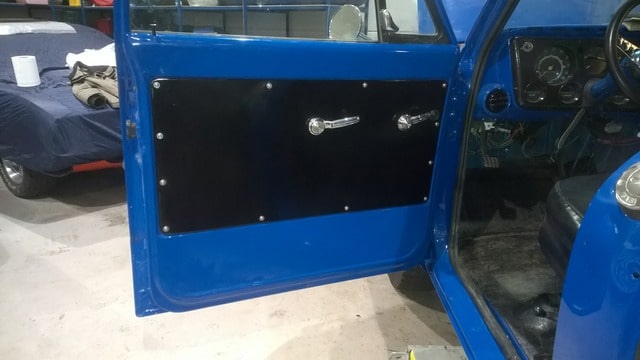 and now a dumb question to which I think I know the answer, but I want to be sure. what is the correct position for this lever when in PARK position? picture nr 1: 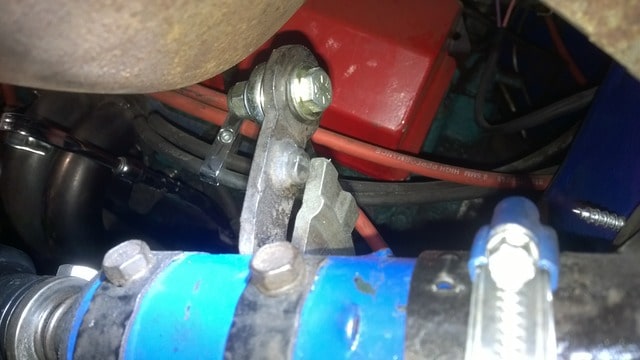 or picture number 2? 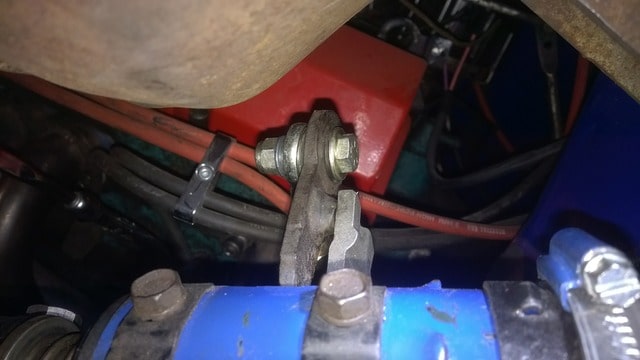 I assume picture nr 2? but I don't know what the lever plate holding thing is called, so I don't know what to google for..
__________________
Feedback is always welcome! projects: 1969 Chevy C10 1950 GMC 100 1958 Chevy C60 Viking ratrod Last edited by Steve-W; 11-29-2015 at 07:44 PM. |
|
|
|
|
11-30-2015, 01:10 AM
|
#3 |
|
Registered User
Join Date: Jan 2009
Location: San Antonio, Texas
Posts: 1,374
|
Re: 1969 Custom/10 clean up
I don't know the answer on the park lever, since my truck is in pieces, and I can't check. That door panel turned out very nice!
__________________
1972 C10 LWB, 350/350 Deconstruction began 5/2009, mostly completed restoration, 5/2017 |
|
|
|
|
11-30-2015, 03:15 PM
|
#4 |
|
Registered User
Join Date: Dec 2013
Location: Purmerend, Netherlands
Posts: 1,657
|
Re: 1969 Custom/10 clean up
Just 2 mm?
Not much, but if it solved the problem Don't see what you mean with the Parklever? Park is usually counter clockwise, all the way left... But you know that! So that wouldn't be the right answer??? Doorpanel is nice!
__________________
Cheers!! Kees. 1959 Chevy Fleetside Longbed My build: http://67-72chevytrucks.com/vboard/s...d.php?t=643426 Kool Guyz CC Instagram: _King_Kustom_ |
|
|
|
|
11-30-2015, 06:12 PM
|
#5 |
|
Registered User
Join Date: Aug 2010
Location: Hoofddorp, the Netherlands
Posts: 582
|
Re: 1969 Custom/10 clean up
the metal bracket (shift lever lock plate?) prevents you from pulling the gear selector straight from P into any gear, you have to pull your selector towards you before you can move it down right? so where does it sit on the bracket or lock plate when in park. above the bracket like in pic 1, or on the first position like on pic 2
__________________
Feedback is always welcome! projects: 1969 Chevy C10 1950 GMC 100 1958 Chevy C60 Viking ratrod |
|
|
|
|
11-30-2015, 06:58 PM
|
#6 |
|
Registered User
Join Date: Jan 2009
Location: San Antonio, Texas
Posts: 1,374
|
Re: 1969 Custom/10 clean up
Here is a picture I took of mine when I was taking it apart. The shifter was in NEUTRAL at the time. I don't know if this will help at all.
__________________
1972 C10 LWB, 350/350 Deconstruction began 5/2009, mostly completed restoration, 5/2017 |
|
|
|
|
11-30-2015, 08:53 PM
|
#7 | |
|
Registered User
Join Date: Aug 2010
Location: Hoofddorp, the Netherlands
Posts: 582
|
Re: 1969 Custom/10 clean up
Quote:
__________________
Feedback is always welcome! projects: 1969 Chevy C10 1950 GMC 100 1958 Chevy C60 Viking ratrod |
|
|
|
|
|
11-30-2015, 10:28 PM
|
#8 |
|
Registered User
Join Date: Jan 2009
Location: San Antonio, Texas
Posts: 1,374
|
Re: 1969 Custom/10 clean up
It was definitely in Neutral. I have the pictures I took of the steering wheel/shift indicator at the same time. sorry
__________________
1972 C10 LWB, 350/350 Deconstruction began 5/2009, mostly completed restoration, 5/2017 |
|
|
|
|
12-01-2015, 03:14 AM
|
#9 | |
|
Registered User
Join Date: Aug 2010
Location: Hoofddorp, the Netherlands
Posts: 582
|
Re: 1969 Custom/10 clean up
Quote:
__________________
Feedback is always welcome! projects: 1969 Chevy C10 1950 GMC 100 1958 Chevy C60 Viking ratrod |
|
|
|
|
|
12-01-2015, 10:31 AM
|
#10 |
|
Registered User
Join Date: Jan 2009
Location: San Antonio, Texas
Posts: 1,374
|
Re: 1969 Custom/10 clean up
You might post the question and your pictures over in the "Engine & Drivetrain" section. I'll bet someone over there could tell you pretty quickly.
__________________
1972 C10 LWB, 350/350 Deconstruction began 5/2009, mostly completed restoration, 5/2017 |
|
|
|
|
12-02-2015, 01:53 PM
|
#11 | |
|
Registered User
Join Date: Aug 2010
Location: Hoofddorp, the Netherlands
Posts: 582
|
Re: 1969 Custom/10 clean up
Quote:
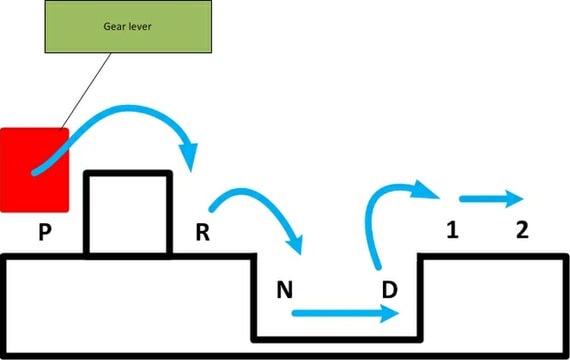 to me this makes sense. from Park you can't pull straight into Reverse, but from reverse you can go to neutral and drive. But from drive you can't pull straight into the lower gears. going back up you can go from the low gears into drive and neutral, put you can't pull straight into reverse. With the transmission in P and my lever in the P position I adjusted the shift rod until it was the correct length 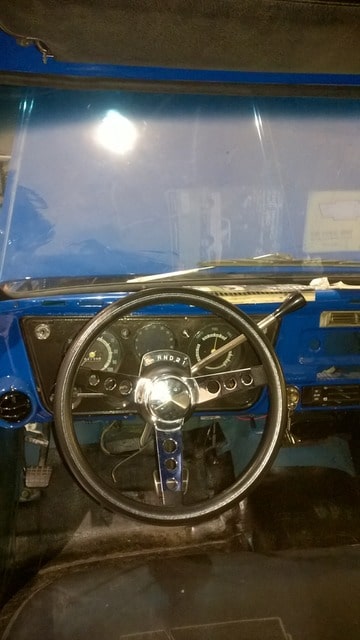
__________________
Feedback is always welcome! projects: 1969 Chevy C10 1950 GMC 100 1958 Chevy C60 Viking ratrod |
|
|
|
|
|
12-13-2015, 07:18 PM
|
#12 |
|
Registered User
Join Date: Aug 2010
Location: Hoofddorp, the Netherlands
Posts: 582
|
Re: 1969 Custom/10 clean up
Last Friday and Saturday night I was in the shop tinkering away and actually got some nice work done. I wasn't happy with the rear transmission mount so I was in a local shop who only do USA cars to pick up some door/window handle retainer clips and asked them about the mount for a TH350. Sure enough they had one laying around so I bought it.
with a new mount, the cross member the PO put it, just could stay anymore, so I decided to make a new one. my pal thought out the design and I welded it together.. which was quite a task for me, but good practice. afterwards I sprayed body protector stuff on it (body soot or something it is called?) 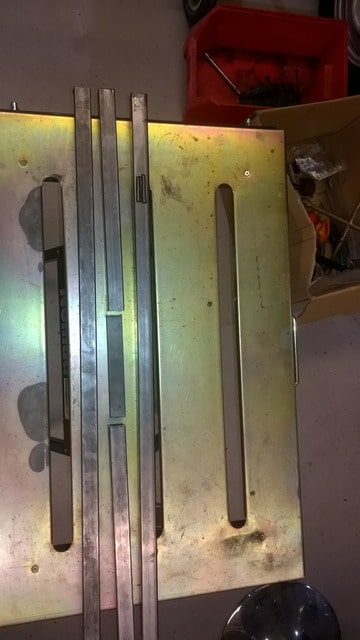  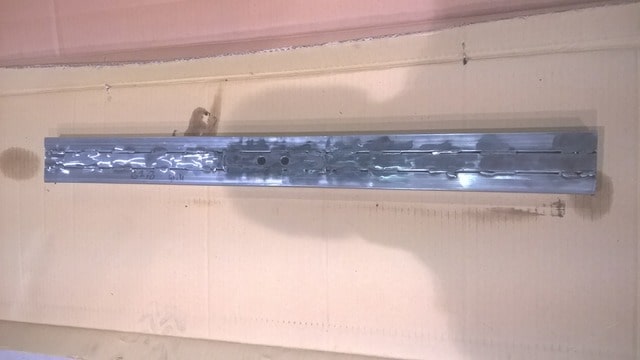 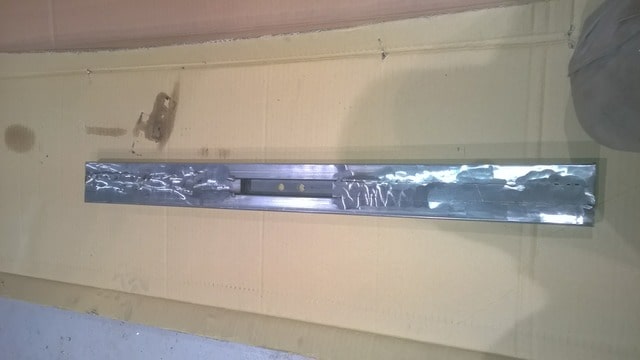 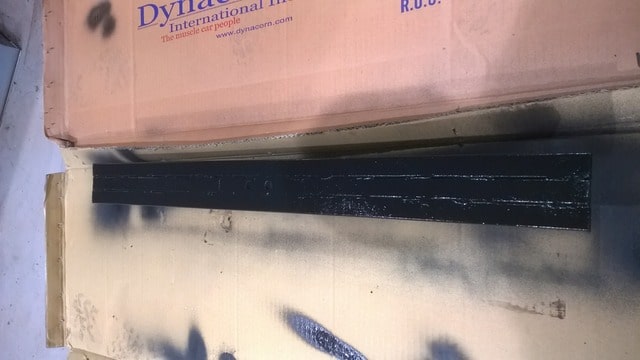 the square tubes are 1" by 1" and about 1/16" in thickness. the center plate is close to 1/8". I'll make sure to take a picture of it mounted.
__________________
Feedback is always welcome! projects: 1969 Chevy C10 1950 GMC 100 1958 Chevy C60 Viking ratrod Last edited by Steve-W; 12-13-2015 at 07:25 PM. |
|
|
|
|
12-14-2015, 11:30 AM
|
#13 |
|
Registered User
Join Date: Jan 2009
Location: San Antonio, Texas
Posts: 1,374
|
Re: 1969 Custom/10 clean up
That turned out really nice! Can't wait to see the installed pictures. By the way, I did actually find my steering column on a shelf in the barn, and looked at it. It's completely disconnected, but when I put it in park, the little button looks like your picture 1 above. I don't know if that helps any.
__________________
1972 C10 LWB, 350/350 Deconstruction began 5/2009, mostly completed restoration, 5/2017 |
|
|
|
|
02-18-2016, 02:54 PM
|
#14 |
|
Registered User
Join Date: Aug 2010
Location: Hoofddorp, the Netherlands
Posts: 582
|
Re: 1969 Custom/10 clean up
It's been a while since my last update, but I've had a major breakthrough!
my truck made it through its bi-yearly roadworthy test. (MOT in the UK, no idea what its called in the US. ! I had it registered as off the road back in 2011, so I didnt have to go for the obligatory MOT checks. 3 weeks ago I just wanted to know where I stood so I drove over to a certified garage who did the test. it failed the test as I expected, but on far less critical points then I thought might cause a problem. - Brakes had sufficient power, but the pedal went all the way to the floor. - left headlight gave of a weird image - Oil leakage on the right exhaust, which wasn't there before, but apparently started on my drive over. - missing high beam indicator in the dash Well the brakes where my main concern, seeing how I have been messing about with them. So we did another round of bleeding them, I then re-adjusted the rear shoes and getting them even tighter into the drums. The problem is that my new aftermarket drums do NOT have a hole on the face side so the drums have to come off to adjust the shoes. But perhaps I can drill a hole in the backing plate? Anyway this did improve the travel of the brake pedal somewhat, but it was still too deep in my opinion. As a last resort..which perhaps should have been my first..I adjusted the brake pedal. The pedal couldnt go any higher, so by making the pushrod longer I put some pre-tension on the Master brake cylinder? I had no idea if this was going to do the trick or would just get my brakes to drag. Well seeing I made the MOT, you can guess the answer my bakes are finally, working properly! I had about 2,5KN (Kilo Newton) of stopping power at every wheel..so Im a happy camper. I havent tried to get it in a 4 wheel lock, but Im sure Ill manage. Then I turned my attention to the oil leakage which I hadnt encountered before, mind you, this 2,5 Mile was the longest drive I had since I started this project It turned out to be the return oil line for the trans. It had been rubbing against a sharp edge and I didnt spot it before, so I guess the drive over to the garage was its waterloo. I put in new lines, re-routed them and now its all hunky-dory. For the High beam indicator we really went out of the box..or perhaps it had to do with having consumed large amounts of beer at that particular hour. We fit a lamp in some 1 tubing and tie-ripped it to the top of the dash MOT approved! I then went for a 50mi testdrive and nothing came off, nothing caught fire, but if was @#$$@!# cold!! Oh yes, my heater still need to be fixed among a 1000 other things, but at least I am now legal to drive it for the coming 2 years!  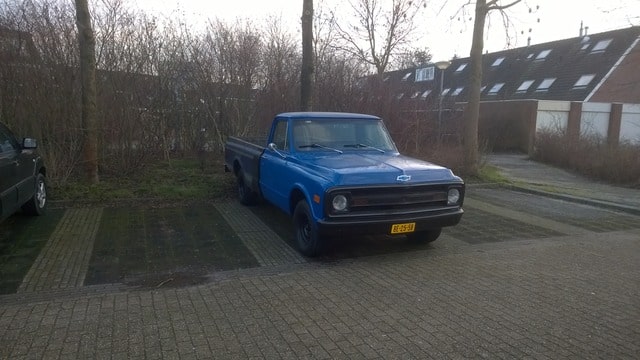 A while ago my old wiper motor just stopped without reason, so after checking the fead and ground I chose to change the motor. I picked up a refurbished one and to my surprise it didnt work. So I pulled it apart and found this: 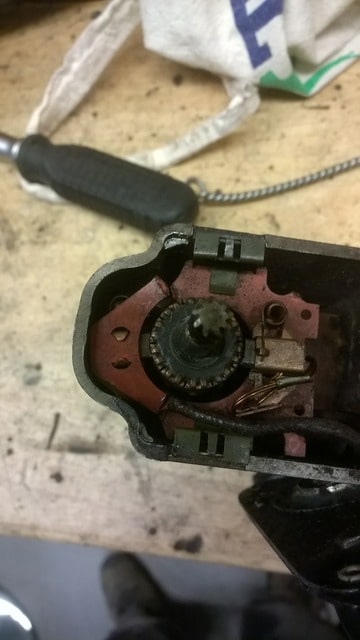 I then made a hybrid out of the old and new one and got it working. All I need now is a washer tank and pump, but Ill order the universal kit from LMC Another thing that was missing was a battery holding bracket and I got creative an build my own from some old shift rods. 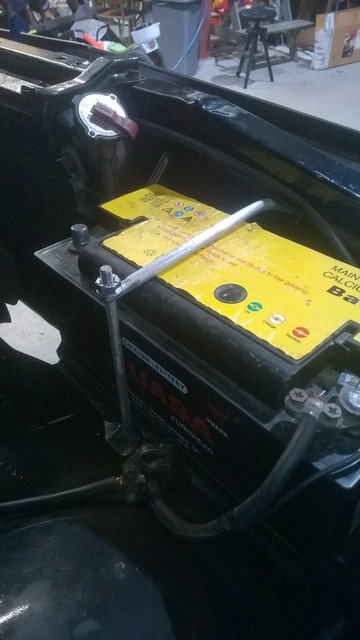 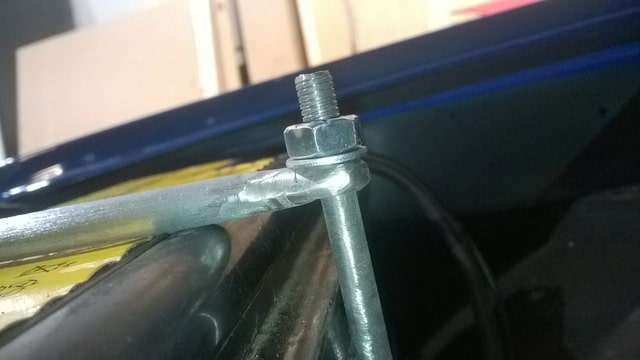 One question I have is about this ridiculous big antenna hole? Its on my cowl on the right side and measures 34mm (1.3 Inch) Is that a normal spot for the antenna? 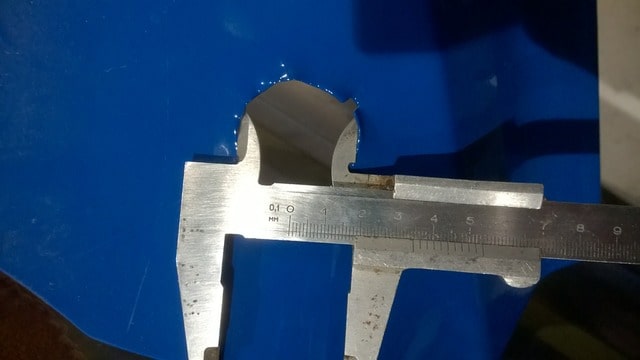 And last but not least, after being declared road legal again we had to celebrate! 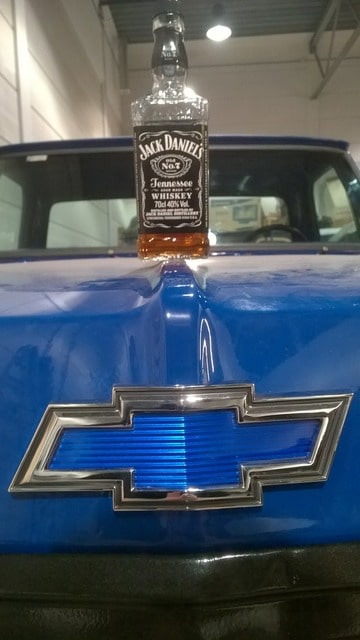 This thread will stay alive, because my list of to-dos is a mile long and I will keep you updated on the progress. Stuff i need to do: Restore the bed, finish the inside of the cab (trim, heater, carpet, seat belts etc), probable a suspension renewal incl swaybar and god knows what else So stay tuned people!
__________________
Feedback is always welcome! projects: 1969 Chevy C10 1950 GMC 100 1958 Chevy C60 Viking ratrod |
|
|
|
|
02-19-2016, 12:05 AM
|
#15 |
|
Registered User
Join Date: Jan 2009
Location: San Antonio, Texas
Posts: 1,374
|
Re: 1969 Custom/10 clean up
Good news! Congratulations on passing the inspection!
The antenna hole looks like the correct factory location and size. The hole should be 1.12 inches in diameter.
__________________
1972 C10 LWB, 350/350 Deconstruction began 5/2009, mostly completed restoration, 5/2017 |
|
|
|
|
02-19-2016, 09:31 AM
|
#16 |
|
Registered User
Join Date: Dec 2013
Location: Purmerend, Netherlands
Posts: 1,657
|
Re: 1969 Custom/10 clean up
Congratz Steve!!!
Another one on the road!! Wishing you many save miles, and I'm sure we'll meet!!
__________________
Cheers!! Kees. 1959 Chevy Fleetside Longbed My build: http://67-72chevytrucks.com/vboard/s...d.php?t=643426 Kool Guyz CC Instagram: _King_Kustom_ |
|
|
|
|
03-04-2016, 12:12 PM
|
#17 |
|
Registered User
Join Date: Aug 2010
Location: Hoofddorp, the Netherlands
Posts: 582
|
Re: 1969 Custom/10 clean up
Now moving along, I could use some guidance: the top of the bedsides are very rotten.
for me this is great practice for my welding skills, but it's double sheeted metal (I hope I described it the right way) so actually, I have no clue where to start. here are some pictures: 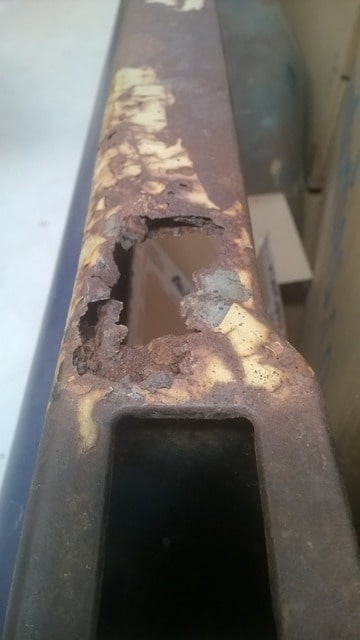 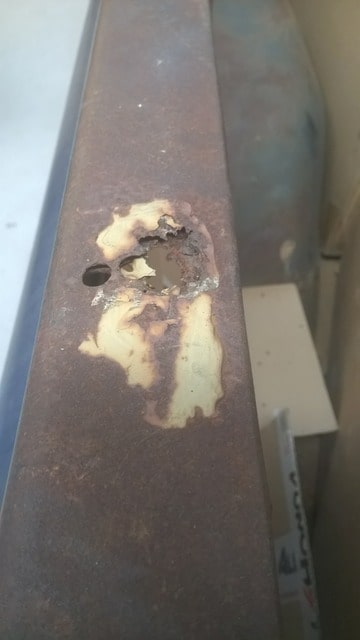 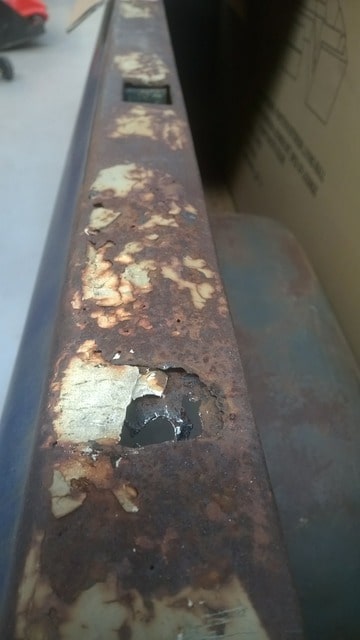 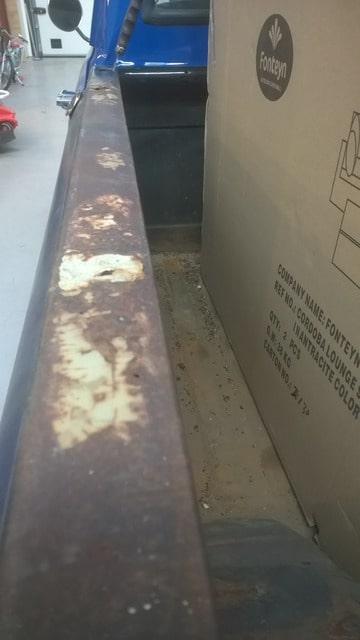 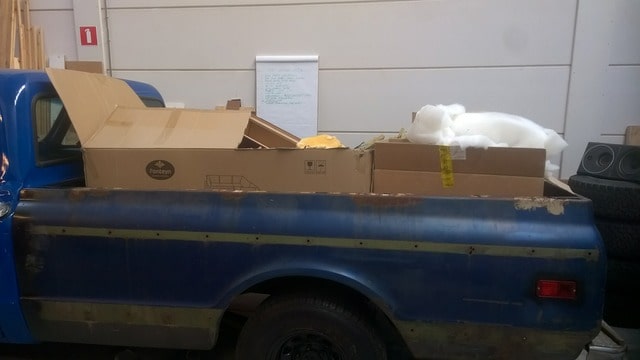 the pockets are all in reasonable shape 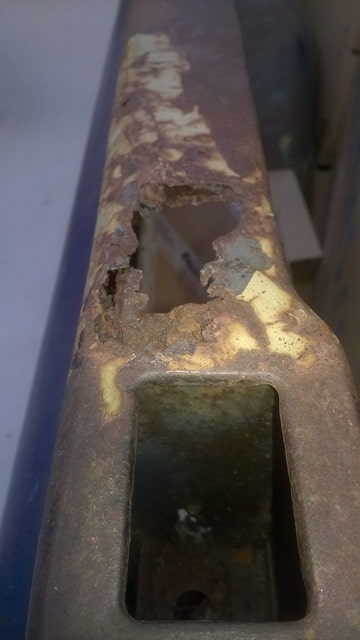 I can buy complete replacement side panels, (I haven't seen any repair sections?) but that's the easy way out, and over budget so I hope you guys can give me some pointers
__________________
Feedback is always welcome! projects: 1969 Chevy C10 1950 GMC 100 1958 Chevy C60 Viking ratrod |
|
|
|
|
03-05-2016, 09:09 AM
|
#18 |
|
Registered User
Join Date: Jan 2009
Location: San Antonio, Texas
Posts: 1,374
|
Re: 1969 Custom/10 clean up
Steve, I don't have any pointers for you. I think if it were me, I'd work on the budget for replacing, lol! I would recommend that you post the question over on the "body and paint" section, where more folks who know this stuff will see it.
__________________
1972 C10 LWB, 350/350 Deconstruction began 5/2009, mostly completed restoration, 5/2017 |
|
|
|
|
03-19-2016, 11:31 AM
|
#19 |
|
Registered User
Join Date: Aug 2010
Location: Hoofddorp, the Netherlands
Posts: 582
|
Re: 1969 Custom/10 clean up
truck has been put on hold for a few weeks because we have a new crew member I need to attend to:
 Emily Marie Westerkamp 7 pounds, 20" and a healthy set of lungs!
__________________
Feedback is always welcome! projects: 1969 Chevy C10 1950 GMC 100 1958 Chevy C60 Viking ratrod |
|
|
|
|
03-19-2016, 12:09 PM
|
#20 |
|
Registered User
Join Date: Dec 2013
Location: Purmerend, Netherlands
Posts: 1,657
|
Re: 1969 Custom/10 clean up
Steve, congratulaions with that little cutie!!!!!
She's a model, already looking straight into the camera   Take your time with Emily and your wife, that's important! Enjoy while you can
__________________
Cheers!! Kees. 1959 Chevy Fleetside Longbed My build: http://67-72chevytrucks.com/vboard/s...d.php?t=643426 Kool Guyz CC Instagram: _King_Kustom_ |
|
|
|
|
03-19-2016, 10:56 PM
|
#21 |
|
Registered User
Join Date: Oct 2007
Location: Spanaway
Posts: 8,451
|
Re: 1969 Custom/10 clean up
Congrats!!
__________________
Mike. Swamp Rat build thread : http://67-72chevytrucks.com/vboard/s...d.php?t=595019 72 3/4T 4X4 4" BDS Lift 33" BFG's |
|
|
|
|
04-13-2016, 09:48 AM
|
#22 |
|
Registered User
Join Date: Aug 2010
Location: Hoofddorp, the Netherlands
Posts: 582
|
Re: 1969 Custom/10 clean up
I hijacked a couple of hours from work to get to work on the truck again. took it for a 40mi test drive and nothing fell off or caught fire, so I guess it's a success. it runs good, the brakes feel reliable..I'm a happy camper.
I drove it to my office building which has an underground parking garage but a problem occurred that I hadn't notices before.the passenger side door will lock from the inside and with the key, the driver side does neither. when I open the door it will lock, but when closed it kinda gets stuck. easy job I thought, just adjust the door latch plate..or whatever it's called. I have had it in every possible position, but either the door won't shut anymore, or I cant get the lock to work.. any ideas?
__________________
Feedback is always welcome! projects: 1969 Chevy C10 1950 GMC 100 1958 Chevy C60 Viking ratrod |
|
|
|
|
04-14-2016, 04:26 PM
|
#23 |
|
Registered User
 Join Date: Feb 2016
Location: Camarillo, CA
Posts: 256
|
Re: 1969 Custom/10 clean up
Interesting read, your perseverance is to be commended.
Congrats on the new little one, put a wrench in her hand... |
|
|
|
|
04-16-2016, 10:55 AM
|
#24 | |
|
Registered User
Join Date: Aug 2010
Location: Hoofddorp, the Netherlands
Posts: 582
|
Re: 1969 Custom/10 clean up
Quote:
.got the door lock problem solved by using the 'shoulder in the door' method. so when closed I push a good deal of my weight into the door and then the key will turn to lock. problem solved.
__________________
Feedback is always welcome! projects: 1969 Chevy C10 1950 GMC 100 1958 Chevy C60 Viking ratrod |
|
|
|
|
|
05-23-2016, 07:59 PM
|
#25 |
|
Registered User
Join Date: Aug 2010
Location: Hoofddorp, the Netherlands
Posts: 582
|
Re: 1969 Custom/10 clean up
last weekend the weather suddenly improved (in Holland that means no rain) so I took out the truck for a real shakedown, after some tinkering on Friday night.
this is what my carb setup looked like before:  a dried up Holley 4 barrel with on top some weird (red) spacer which held the IMPCO 300A mixer for the propane. I took that of, because a while back I bought an IMPCO 425 mixer, which made the Holley dispensable..seeing I don't run on petrol, only propane. the 425 came with a throttle plate, and I only had to buy a new spacer at the bottom, because the old one had cracked. But as always you get that little surprise, the 425 doesn't have any vacuum connectors for my ignition advance, so I had to drill a hole in the bottom spacer and 'McGuyver' a vacuum connection. (yes to mcguyver is actually a verb in Holland) here's the Holley with spacer  this is the IMPCO 300A mixer  this is what a carb looks like after running years and years only on propane  this is my new spacer in which I had to drill a hole and use a threading tap set..or whatever it's called in English. then drilled a hole through a bolt, put in there and sawed off the head... it works like a charm!   and this is what the 425 mixer looks like..much cleaner look.  I then hooked everything up and it started inmediatly! the set came of a running car, so I had to adjust absolutely nothing! here's a movie of me and my son Dawid on our way to the north of Holland during the shakedown. https://youtu.be/tY0x6cXCUaY oh and before I forget..what was the result of the shakedown? the oil pressure line toward the gauge leaks a bit.. so I had some oil in the cab. the right header is rubbing against the chassis, this probably happened when I raised the tail of the transmission to get the left header not to rub against the lower control arm. I have no temperature gauge..so no clue what the operating temp is of the engine. and I hate the 2 separated exhaust sounds.. I'll have to redesign it including a crossmember or and X.
__________________
Feedback is always welcome! projects: 1969 Chevy C10 1950 GMC 100 1958 Chevy C60 Viking ratrod Last edited by Steve-W; 05-23-2016 at 08:33 PM. |
|
|
|
 |
| Bookmarks |
| Tags |
| c10, europe, netherlands, rebuild, swapped |
|
|


 Hybrid Mode
