
|
Register or Log In To remove these advertisements. |
|
|
|
|||||||
 |
|
|
Thread Tools | Display Modes |
 01-03-2007, 10:28 PM
|
#26 |
|
its just $$$$$
Join Date: Jul 2003
Location: OK
Posts: 2,078
|
Re: progress pics
thats going to be a pretty low ride height.
|

|

|
|
01-03-2007, 10:42 PM
|
#27 |
|
Senior Member
Join Date: May 2004
Location: johnstown, NY
Posts: 2,393
|
Re: progress pics
I called slam specialties and asked them what the ride height of the bag I have is. The told me between 5.5 and 7". So I set the ride height up for the bag to be inflated to 6.25" high. Did I do something wrong?
|
|
|
|
|
01-03-2007, 10:51 PM
|
#28 |
|
Registered User
Join Date: May 2005
Location: Beaverton, OR
Posts: 3,728
|
Re: progress pics
That's freakin' low! Guess that's why I'll never run a step notch
 Looks good though. Get that bad boy rolling. |
|
|
|
|
01-03-2007, 11:58 PM
|
#29 |
|
soon to be bagged64sub
Join Date: Feb 2005
Location: DFW-currently phoenix
Posts: 635
|
Re: progress pics
Your problem is that your doing bag over axle which gets 1:1 lift which sucks ass if you want it to ride good because as you can see its pretty low. Id say your doing it right, its just the nature of the stuff. I guess.
__________________
1969 c-10, bagged, Zd, 20" Boyds SOLD! 1964 Suburban COMING SOON  Build threadhttp://67-72chevytrucks.com/vboard/s...d.php?t=304726 Build threadhttp://67-72chevytrucks.com/vboard/s...d.php?t=3047261965 c-10 long bed 1993 Sierra x-cab 1999 tahoe-4/5 on 22s 2005 Chevy work truck |
|
|
|
|
01-04-2007, 12:38 AM
|
#30 |
|
Senior Member
Join Date: May 2004
Location: johnstown, NY
Posts: 2,393
|
Re: progress pics
Should I set it up for 7" bag ride height? That would help out a little in getting the 4 link more parallel with the ground...
|
|
|
|
|
01-04-2007, 01:07 AM
|
#31 |
|
A guy with a truck
Join Date: Sep 2005
Location: Germany, for now
Posts: 5,920
|
Re: progress pics
I agree with everyone else on the VERY low ride height. You will only be a few inches off the ground with the axle that deep in the notch. It will definitely look cool though...
Maybe build a taller mount on the axle to take up some of the 'slack'. My understanding is that you want a tapered style bag on over-the-axle setups. The Slams are better suited to a lever setup. Have you considered mounting the bags on the upper link and to the outside of the frame?
__________________
-Chris Instagram _elgringoloco_ '70 Short-Wide How to: Ruin a perfectly good C10 70 Blazer ConversionHow To: Ruin a Perfectly Good 4wd '72 Highlander How To: Ruin a Perfectly Good K/5 (SOLD) '72 Blazer 2WD How to: Ruin a perfectly good Blazer (SOLD) '05 Yukon Daily Driven (not so stock) Yukon (SOLD) 07 Yukon Denali (daily) Members met list: SCOTI, darkhorse970, 67cheby, 67cheby'sGirl, klmore, porterbuilt, n2billet, Fastrucken, classicchev, Col Clank, GSFMECH, HuggerCST, Spray-Bomb, BACKYARD88, 5150, fine69, fatbass, smbrouss70, 65StreetCruiser, GAc10boy |
|
|
|
|
01-04-2007, 01:24 AM
|
#32 |
|
Senior Member
Join Date: May 2004
Location: johnstown, NY
Posts: 2,393
|
Re: progress pics
yea, I too have heard that the sleeve bag is better suited for over the axle. My plan is to use what I have, and if it is not to my liking, I'm going to switch out the slams for a sleeve type bag.
I just went out and did some measuring. If I go with a ride height of 7" with the slam bags and use a 30" tall tire, my frame under the cab will be 6.25" off the ground. This sounds reasonable, doesn't it? Thanks for all the help fellas! Last edited by jlaird; 01-04-2007 at 01:25 AM. |
|
|
|
|
01-04-2007, 10:14 AM
|
#33 | |
|
Señor Member
Join Date: May 2002
Location: Edge of the world
Posts: 5,367
|
Re: progress pics
Quote:
__________________
|
|
|
|
|
|
01-05-2007, 01:43 PM
|
#34 |
|
Senior Member
Join Date: Oct 2006
Location: central jersey
Posts: 763
|
Re: progress pics
looks a little low... but good.
__________________
69 4wd V6 20k orig miles!!  05 ccsb 2wd Diesel 500hp bagged and soon to be stock floored. 01 rcsb chevy 2wd 6bt cummins :devil:> build xtremediesel.com |
|
|
|
|
01-05-2007, 05:06 PM
|
#35 | |
|
Until Seventy Times Seven
Join Date: Feb 2005
Location: Rocky Mountain Front Range
Posts: 1,301
|
Re: progress pics
Quote:
To get the four bars closer to level, maybe you can swap the front mounts of each side with each other. This would put the front mount tabs angling downward, allowing you to raise the front mounts a couple of inches higher on the frame rail. Instead of airing up the bags to 7" which may increase the firmness of the ride, maybe you can install spacers between the bags and the brackets to get the bars level at ride height. BTW, looking good... 
__________________
boxRODz 1983 C10 SWB Fleetside When two halves is gone, there's nuthin left. Two nothings is nuthin. That's mathematics son. You can argue with me but you can't argue with figures. Two half nothings is a whole nuthin... |
|
|
|
|
|
01-05-2007, 06:05 PM
|
#36 |
|
Senior Member
Join Date: May 2004
Location: johnstown, NY
Posts: 2,393
|
Re: progress pics
I will try flipping the front mounts, but I don't think it is going to make a difference. I'll have to go look.
The only thing that I am concerned about with the spacers is that the spacer is going raise the rear at full dump, correct? |
|
|
|
|
01-06-2007, 01:44 AM
|
#37 | |
|
A guy with a truck
Join Date: Sep 2005
Location: Germany, for now
Posts: 5,920
|
Re: progress pics
Quote:
__________________
-Chris Instagram _elgringoloco_ '70 Short-Wide How to: Ruin a perfectly good C10 70 Blazer ConversionHow To: Ruin a Perfectly Good 4wd '72 Highlander How To: Ruin a Perfectly Good K/5 (SOLD) '72 Blazer 2WD How to: Ruin a perfectly good Blazer (SOLD) '05 Yukon Daily Driven (not so stock) Yukon (SOLD) 07 Yukon Denali (daily) Members met list: SCOTI, darkhorse970, 67cheby, 67cheby'sGirl, klmore, porterbuilt, n2billet, Fastrucken, classicchev, Col Clank, GSFMECH, HuggerCST, Spray-Bomb, BACKYARD88, 5150, fine69, fatbass, smbrouss70, 65StreetCruiser, GAc10boy |
|
|
|
|
|
01-11-2007, 03:33 PM
|
#38 |
|
Senior Member
Join Date: May 2004
Location: johnstown, NY
Posts: 2,393
|
Re: progress pics
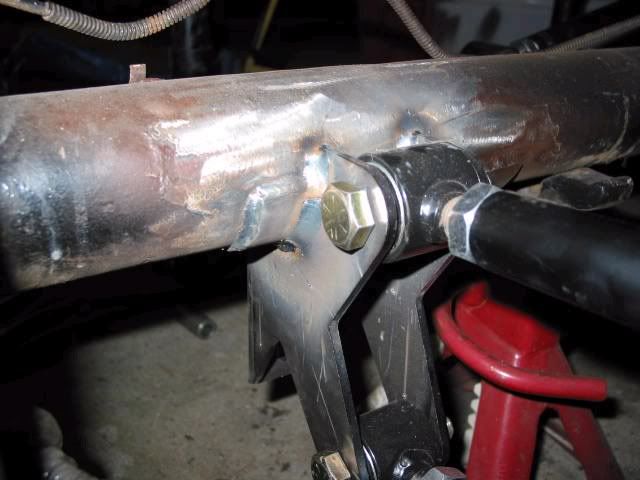
Does anybody have any creative ideas of how to take up the space between the 4link mount and the frame? I basically have to do exactly what is in this pic, but I was trying to think of a more "visually pleasing" way to do it.
|
|
|
|
|
01-11-2007, 04:54 PM
|
#39 |
|
Senior Member
Join Date: Dec 2003
Location: Mesa,Az
Posts: 3,981
|
Re: progress pics
I think a 6.25" ride height (bottom of frame rail to the ground) is plenty of room. I set-up all our stuff to run a 5" ride height. I know you have been discussing the height the bag is designed to ride at, and this is critical to have it function properly. Set the bottom of the frame rail to your desired ride height off the ground and then figure your bag mounts out. I would recommend a tapered sleeve on an over the axle set-up... the ride quality will be much better than a convoluted bag. If you are planning on 'possibly changing over' to the tapered sleeve later and run the convoluted now, keep that in mind when building your mounts.
__________________
www.PorterbuiltFabrication.com Phone: 480-297-2621 E-mail: sales@pbfab.com Find us on FaceBook under Porterbuilt Fabrication Specializing in Chassis and Suspension Components for your Classic Chevrolet Truck. We offer components from the following manufacturers: Porterbuilt Accuair Ridetech (Air Ride Technologies) Air Lift Wilwood Intro Unisteer ECE Gotta Show Air Lift Borgeson CPP Supporting this forum since 2003! |
|
|
|
|
01-11-2007, 05:24 PM
|
#40 | |
|
Señor Member
Join Date: May 2002
Location: Edge of the world
Posts: 5,367
|
Re: progress pics
Quote:
__________________
|
|
|
|
|
|
01-11-2007, 05:57 PM
|
#41 |
|
Senior Member
Join Date: Mar 2006
Location: modesto CA
Posts: 239
|
Re: progress pics
I have done a few trucks and and we always start from the bottom and go up you alredy know that the bag will lift over 7 in so you want to get the truck at the layed out level mount bottom of bag compress bag and then mount top bracket so that bag is compressed when layed out
__________________
http://www.cardomain.com/ride/2461088 |
|
|
|
|
01-11-2007, 06:02 PM
|
#42 |
|
Senior Member
Join Date: May 2004
Location: johnstown, NY
Posts: 2,393
|
Re: progress pics
XXL, heres a bunch of pics. Didnt know which would work the best for ya:
http://67-72chevytrucks.com/vboard/s...ghlight=4-link |
|
|
|
|
01-11-2007, 06:12 PM
|
#43 | |
|
Senior Member
Join Date: May 2004
Location: johnstown, NY
Posts: 2,393
|
Re: progress pics
Quote:
|
|
|
|
|
|
01-11-2007, 06:16 PM
|
#44 |
|
Senior Member
Join Date: Mar 2006
Location: modesto CA
Posts: 239
|
Re: progress pics
the diffrance on that is that vally customs bracket on axel mounts bolth bars lower
__________________
http://www.cardomain.com/ride/2461088 |
|
|
|
|
01-11-2007, 06:30 PM
|
#45 | |
|
Senior Member
Join Date: May 2004
Location: johnstown, NY
Posts: 2,393
|
Re: progress pics
Quote:
|
|
|
|
|
|
01-13-2007, 08:35 PM
|
#46 |
|
Senior Member
Join Date: May 2004
Location: johnstown, NY
Posts: 2,393
|
Re: progress pics
XXL, would love to see what you had in mind for that front mount.
|
|
|
|
|
01-16-2007, 12:54 AM
|
#47 |
|
Registered User
Join Date: Jun 2006
Location: Stockton
Posts: 114
|
Re: progress pics
what 4 link are u running?
|
|
|
|
|
01-16-2007, 01:13 AM
|
#48 | |
|
Senior Member
Join Date: May 2004
Location: johnstown, NY
Posts: 2,393
|
Re: progress pics
Quote:
|
|
|
|
|
|
01-30-2007, 09:00 PM
|
#49 |
|
Senior Member
Join Date: May 2004
Location: johnstown, NY
Posts: 2,393
|
Re: progress pics
Got the 4-link mounted and rear bags on. I changed from going over the axle to in front. Next is the panhard bar. Just ordered it today.
|
|
|
|
|
02-01-2007, 04:33 PM
|
#50 |
|
Registered User
Join Date: Jan 2007
Location: West Texas
Posts: 158
|
Re: progress pics
thats f-ing sweet.
|
|
|
|
|
| Bookmarks |
| Thread Tools | |
| Display Modes | |
|
|


 Linear Mode

