
|
|
|
 04-26-2012, 11:38 AM
|
#1 | ||
|
Registered User
Join Date: May 2011
Location: Anderson SC
Posts: 3,870
|
Re: Project Goldilocks, '66 C10 SWB BBW Build
Quote:
Quote:
Well, I took the worst roadtrip of my life yesterday evening. I found a cheap ($600 bucks!) T56 on craigslist tuesday night, and made a deal to buy it wednesday morning. Only problem was, it was in Cherokee NC, and I've been sick since tuesday with a nasty cold, so I didn't really feel like driving 240 miles round-trip to pick it up. I'm a sucker for a deal though, and sure didn't want anybody else to grab it before I did, so we decided to go ahead and get it last night. It started POURING rain about an hour before we got there, to the point of not being able to see 500 feet infront of the truck. About halfway home the dayquil wore off, making the trip even more miserable, but it was worth it. The scenery sure was nice when it wasn't raining. It's not in the pics, but it came with bellhousing too. It's from a wrecked '94 LT1 Z28 with 58,xxx miles on it.  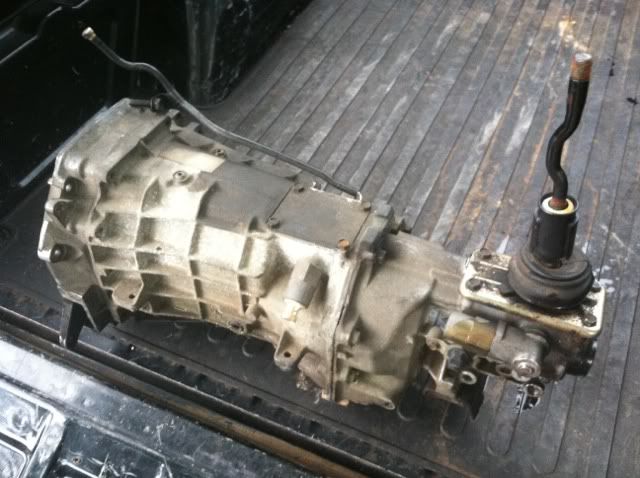 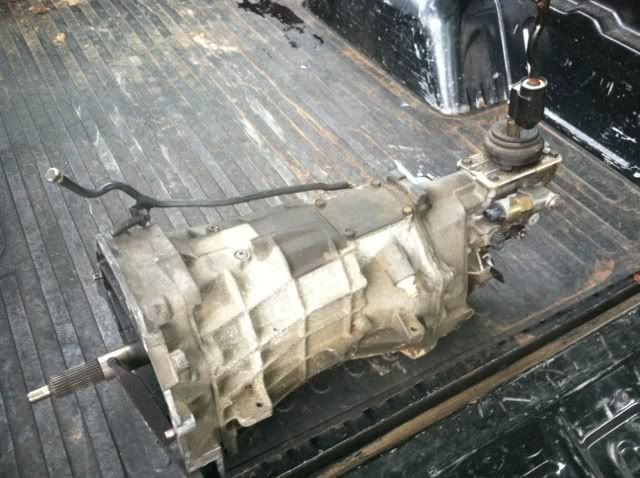
__________________
Project Goldilocks '66 C10 Short Fleet BBW Build '65 C10 Highly Detailed Stock Restoration Thread '78 Camaro Targa Roof Build '55 International Metal/Body/Paint Work '66 F100 Full Rotisserie Restoration '40 Packard 120 Convertible Coupe Restoration How To Restore and Detail an Original Gauge Cluster How To Detail Sand Body Panels, Edges, Corners, Etc |
||

|

|
|
04-26-2012, 12:00 PM
|
#2 |
|
Artist
 Join Date: Jan 2010
Location: Rockwell NC
Posts: 422
|
Re: Project Goldilocks, '66 C10 SWB BBW Build
Like I said!! well worth the drive for a killer score! The deals are out there and you seem to finding some good ones. The direction your truck is going in... its going to get ALOT of well deserved attention!
__________________
66 Chevy C10 283ci~cough~ SBW Fleet Buttercup '66 |
|
|
|
|
04-26-2012, 12:49 PM
|
#3 | |
|
Registered User
Join Date: May 2011
Location: Anderson SC
Posts: 3,870
|
Re: Project Goldilocks, '66 C10 SWB BBW Build
Quote:
I'll buy a set of decals to restore the gauge faces, get a new lens, blast/paint the frame and use it in Goldilocks. I may take the tach out though, use a modern 8k rpm tach and have a new face made that has the original look and fonts, but go to 8k rpm instead of 5k. North Hollywood Speeometer takes old gauges and puts modern guts in them, while keeping the old look so I may use them to redo the tach. The air pressure gauge will be perfect to keep check on the pressure in the air bag's tank. 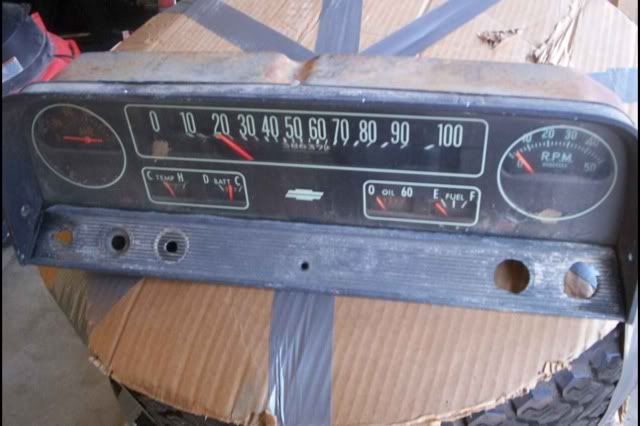
__________________
Project Goldilocks '66 C10 Short Fleet BBW Build '65 C10 Highly Detailed Stock Restoration Thread '78 Camaro Targa Roof Build '55 International Metal/Body/Paint Work '66 F100 Full Rotisserie Restoration '40 Packard 120 Convertible Coupe Restoration How To Restore and Detail an Original Gauge Cluster How To Detail Sand Body Panels, Edges, Corners, Etc |
|
|
|
|
|
04-26-2012, 03:05 PM
|
#4 |
|
Registered User
Join Date: May 2011
Location: Anderson SC
Posts: 3,870
|
Re: Project Goldilocks, '66 C10 SWB BBW Build
I did some digging around and found the gear ratios for the T56 and plugged them into a gear ratio calculator to figure out what r&p ratio I'll need. Looks like a 4.56 will be a good match if I use 29" tall tires. I'm just guessing on the tire size though. I plugged in 1500, 1800, 2000, 3000, and 6500 RPM to see what the speeds would be in each gear.
__________________
Project Goldilocks '66 C10 Short Fleet BBW Build '65 C10 Highly Detailed Stock Restoration Thread '78 Camaro Targa Roof Build '55 International Metal/Body/Paint Work '66 F100 Full Rotisserie Restoration '40 Packard 120 Convertible Coupe Restoration How To Restore and Detail an Original Gauge Cluster How To Detail Sand Body Panels, Edges, Corners, Etc |
|
|
|
|
04-26-2012, 11:00 PM
|
#5 |
|
Registered User
Join Date: May 2007
Location: Deale Md
Posts: 4,663
|
Re: Project Goldilocks, '66 C10 SWB BBW Build
No wonder I can't find any ( tach dash )
 man hope you feel better. man hope you feel better.
__________________
James 63 GMC V6 4speed carryall 65 chevy swb bbw V8 auto 68 K20 327/4 speed, buddy buckets 2002 GMC CC Dually Duramax 64 GMC lwb 3/4 V6 4speed SOLD 66 GMC swb bbw buddy buckets SOLD IG duallyjams The only thing that stays the same is constant change! |
|
|
|
|
04-28-2012, 03:23 PM
|
#6 |
|
Senior Member
Join Date: Mar 2011
Location: Tucson, Arizona
Posts: 2,062
|
Re: Project Goldilocks, '66 C10 SWB BBW Build
A couple of great scores. I'm looking to pick up a t56. I'm a ways off from needing it but I'm always looking. I hope I get as lucky as you did. By the way, the steering wheel is looking great. I picked up a 65 car wheel that I'm restoring. I used the same epoxy and it turned out great. I haven't painted mine yet. Have you decided on what paint to use?
|
|
|
|
|
04-28-2012, 03:43 PM
|
#7 | ||
|
Registered User
Join Date: May 2011
Location: Anderson SC
Posts: 3,870
|
Re: Project Goldilocks, '66 C10 SWB BBW Build
Quote:
Quote:
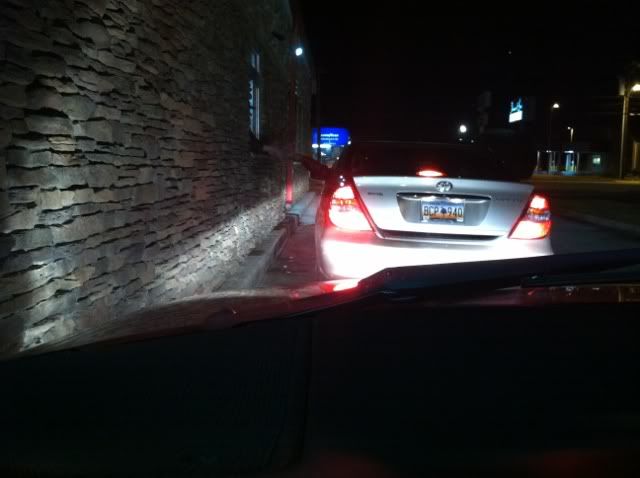
Here's the wheel and column in the '65. 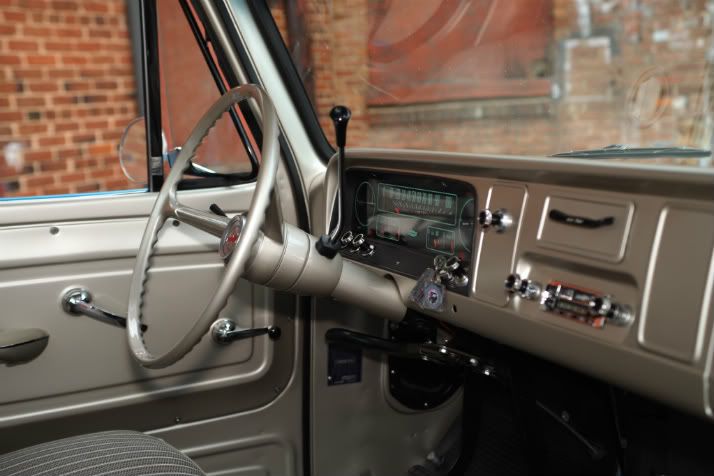
__________________
Project Goldilocks '66 C10 Short Fleet BBW Build '65 C10 Highly Detailed Stock Restoration Thread '78 Camaro Targa Roof Build '55 International Metal/Body/Paint Work '66 F100 Full Rotisserie Restoration '40 Packard 120 Convertible Coupe Restoration How To Restore and Detail an Original Gauge Cluster How To Detail Sand Body Panels, Edges, Corners, Etc |
||
|
|
|
|
04-28-2012, 05:25 PM
|
#8 |
|
Registered User
Join Date: May 2011
Location: Anderson SC
Posts: 3,870
|
Re: Project Goldilocks, '66 C10 SWB BBW Build
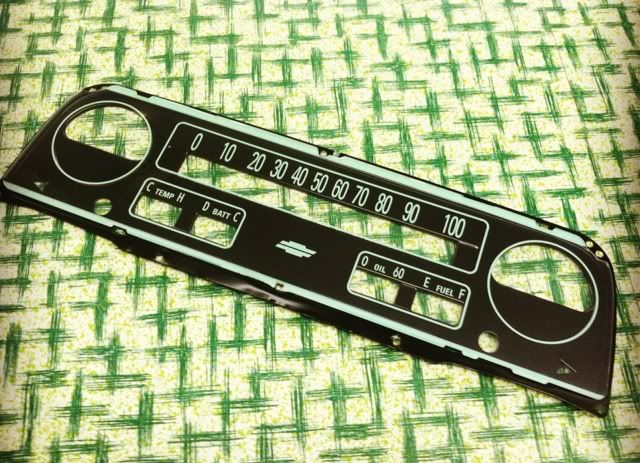
Got some work done on the gauge cluster. I dug around and found a repro lens that was left over from the blue '65 build. It had some pretty rough shelf wear when I recieved it, so the company sent me another one to replace it. I spent some time buffing it out and it actually cleared up all the way- I really wasn't expecting the plastic to buff out that well. The background panel was faded so I scuffed it and resprayed it with low gloss black, and I also masked out the gauge faces and repainted the needles with a pinstriping brush. I've got a set of decals for the gauge faces ordered so the gauges will look 100% new as well. The numbers on the odometer were flaking and peeling off, but I've got two parts gauges that have better odometers in them. I should have it back together later this week when the rest of the parts come in.
  I picked these bulb housings up at a swap meet, they've got a narrow spot beam pattern for long distance visibility and take H3 bulbs. I'll put 100W bulbs in them and wire them up to come on with the high beams. I should be able so see pretty good between these and H4's with 80/100W bulbs! My VW has nearly the same lighting set-up, and I can easily see 1/4 mile down the road. Still gotta find some chrome housings to put them in. The "For Rent" tag was too cheap to pass up; been thinking about running it on the front bumper. 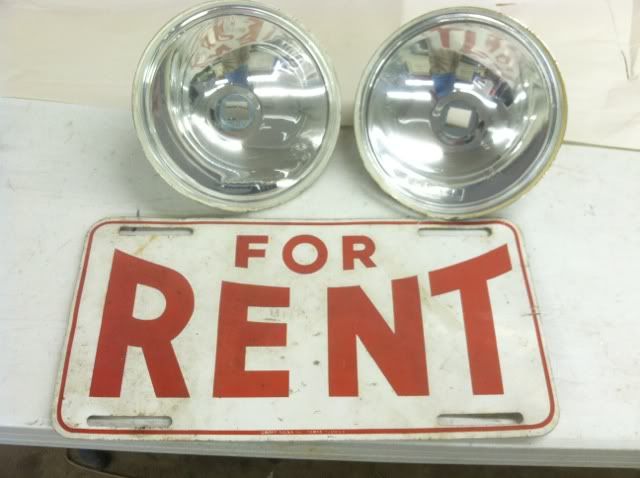 Similar, slighly smaller lights on my VW, with only 70W bulbs in the spot housings. I had them tinted yellow at one point with electrical tape X's over them (rally/road race style) but that blocked alot of the light output, so they're back to clear now. They help out some on the bug, but it's dropped so low (3" ride height) that probably 1/3 of the light is aimed down on the road right in front of the car.  
__________________
Project Goldilocks '66 C10 Short Fleet BBW Build '65 C10 Highly Detailed Stock Restoration Thread '78 Camaro Targa Roof Build '55 International Metal/Body/Paint Work '66 F100 Full Rotisserie Restoration '40 Packard 120 Convertible Coupe Restoration How To Restore and Detail an Original Gauge Cluster How To Detail Sand Body Panels, Edges, Corners, Etc |
|
|
|
|
04-28-2012, 09:45 PM
|
#9 |
|
Registered User
Join Date: May 2007
Location: Deale Md
Posts: 4,663
|
Re: Project Goldilocks, '66 C10 SWB BBW Build
Now I got spots in my eyes.
__________________
James 63 GMC V6 4speed carryall 65 chevy swb bbw V8 auto 68 K20 327/4 speed, buddy buckets 2002 GMC CC Dually Duramax 64 GMC lwb 3/4 V6 4speed SOLD 66 GMC swb bbw buddy buckets SOLD IG duallyjams The only thing that stays the same is constant change! |
|
|
|
|
05-01-2012, 08:18 PM
|
#10 | |
|
Registered User
Join Date: May 2011
Location: Anderson SC
Posts: 3,870
|
Re: Project Goldilocks, '66 C10 SWB BBW Build
Quote:
 Here's an update on the wheel. I finished shaping the wheel repairs and sprayed it with a couple thick coats of Slick Sand. I didn't spray a coat of DP90 over it since I have a wheel resto book that said that polyester primer sticks extremely well to the plastic. I did spray a light coat of Bull Dog adhesion promoter over the wheel first to help make sure the primer sticks. I'm pretty happy with the way it turned out, and can't wait to sand it down to get the shape dead-on and the small imperfections out. I slightly reduced the Slick Sand so it layed out very smooth. 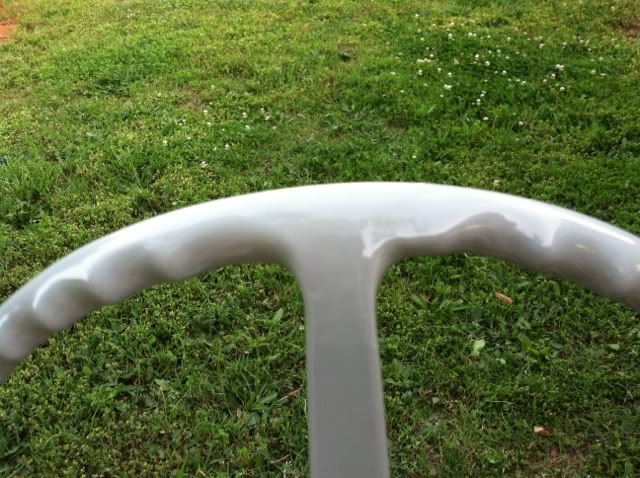 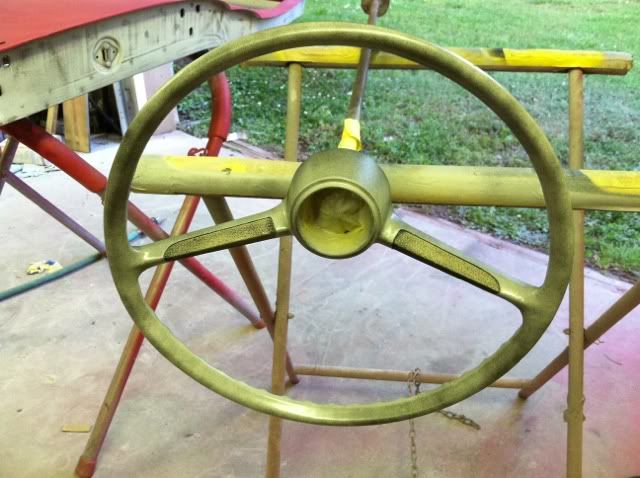 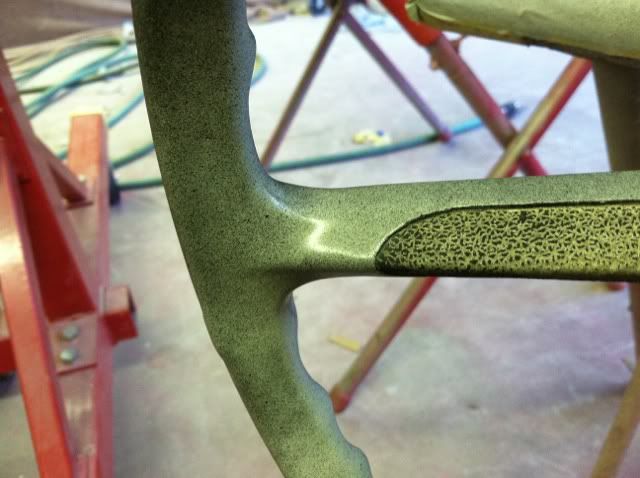 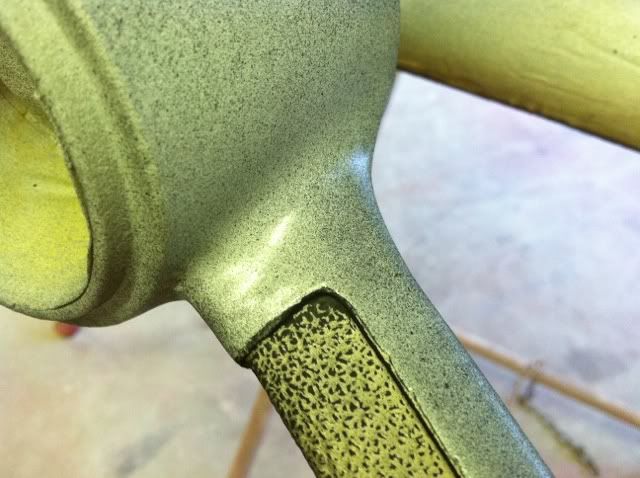 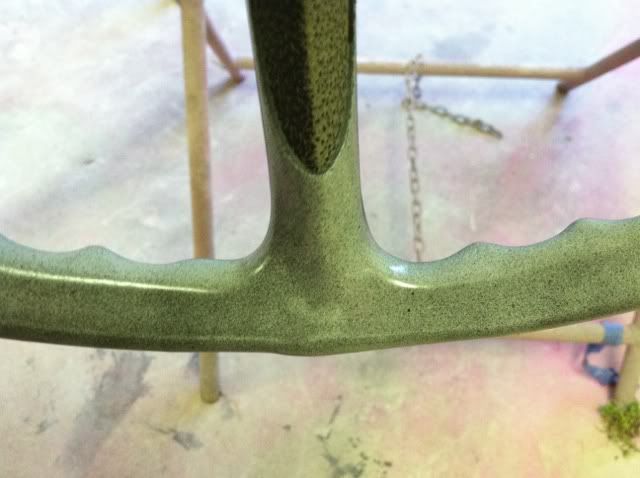
__________________
Project Goldilocks '66 C10 Short Fleet BBW Build '65 C10 Highly Detailed Stock Restoration Thread '78 Camaro Targa Roof Build '55 International Metal/Body/Paint Work '66 F100 Full Rotisserie Restoration '40 Packard 120 Convertible Coupe Restoration How To Restore and Detail an Original Gauge Cluster How To Detail Sand Body Panels, Edges, Corners, Etc |
|
|
|
|
|
05-02-2012, 07:23 PM
|
#11 |
|
Registered User
Join Date: May 2011
Location: Anderson SC
Posts: 3,870
|
Re: Project Goldilocks, '66 C10 SWB BBW Build
First off, big thanks to chevyrestoguy for donating the super hard to find air pressure gauge decal!! Nobody is currently selling decals that include the air pressure or vacuum gauge decals, and chevyrestoguy had the air decal left over from a set he had. Thanks so much!!
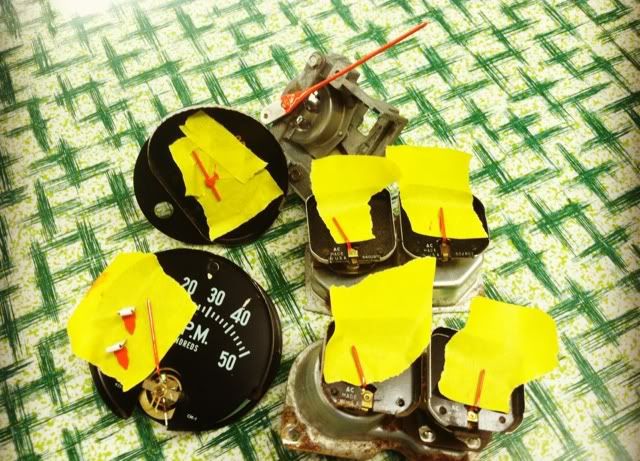
 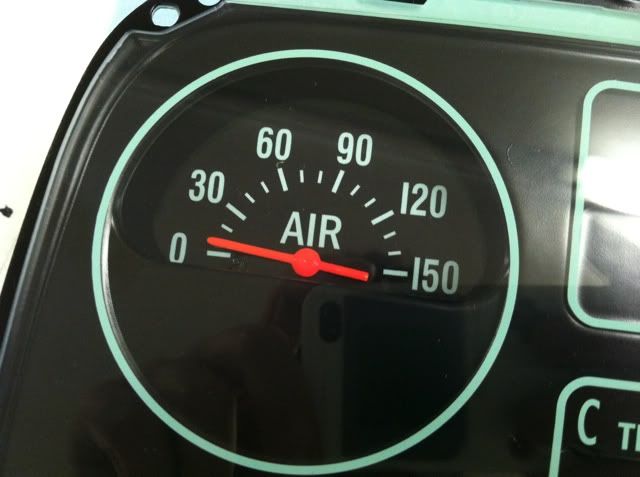 I had a slow day at work after lunch so I got a good start on restoring the gauge cluster. I had already bought a decal set off ebay for the other gauges, and bead blasted the housing and gauge mounts. Krylon makes a green paint that is a very close match for the inside of the housing, and I cleared the outside like the factory did. The wiring cleaned up good with 3M adhesive cleaner, then I wiped it down with Duragloss Vinyl and Rubber dressing to bring the color out and darken the black peices. I've still got to make the "Tand'm Lock" and "Over Speed" lenses and get them installed, and put new bulbs in the bulb holders. The air gauge doesn't sit exactly level in the opening so I've got to straighten that out as well. I'm pretty stoked with how it's turned out so far! 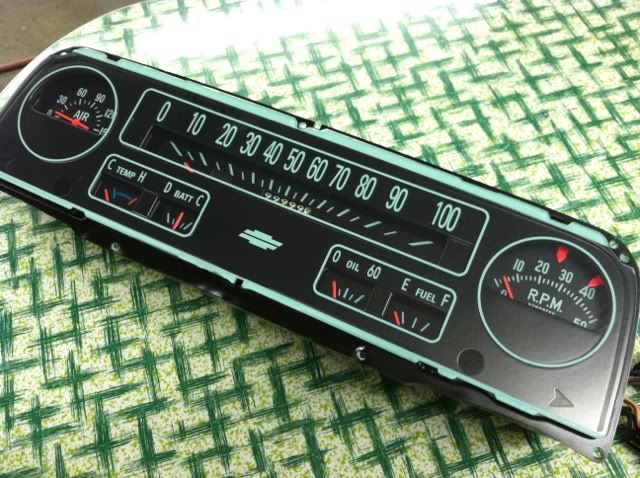 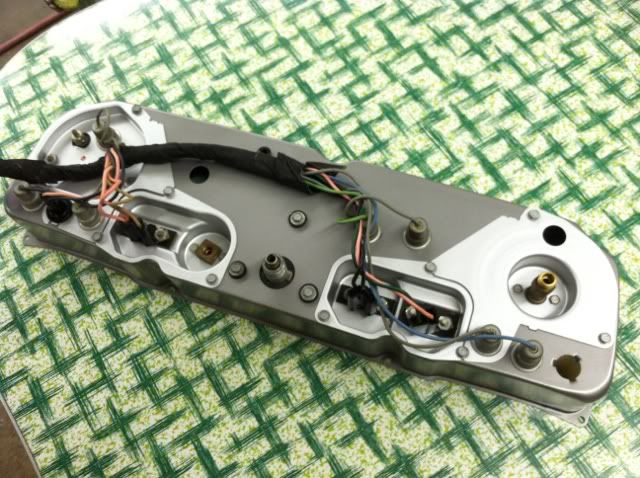
__________________
Project Goldilocks '66 C10 Short Fleet BBW Build '65 C10 Highly Detailed Stock Restoration Thread '78 Camaro Targa Roof Build '55 International Metal/Body/Paint Work '66 F100 Full Rotisserie Restoration '40 Packard 120 Convertible Coupe Restoration How To Restore and Detail an Original Gauge Cluster How To Detail Sand Body Panels, Edges, Corners, Etc |
|
|
|
|
05-02-2012, 07:33 PM
|
#12 |
|
Registered User
Join Date: May 2007
Location: Deale Md
Posts: 4,663
|
Re: Project Goldilocks, '66 C10 SWB BBW Build
sweet
__________________
James 63 GMC V6 4speed carryall 65 chevy swb bbw V8 auto 68 K20 327/4 speed, buddy buckets 2002 GMC CC Dually Duramax 64 GMC lwb 3/4 V6 4speed SOLD 66 GMC swb bbw buddy buckets SOLD IG duallyjams The only thing that stays the same is constant change! |
|
|
|
|
06-24-2012, 07:46 PM
|
#13 | |
|
Registered User
Join Date: Dec 2009
Location: Orlando, FL
Posts: 131
|
Re: Project Goldilocks, '66 C10 SWB BBW Build
Quote:
|
|
|
|
|
|
06-24-2012, 08:26 PM
|
#14 | |
|
Registered User
Join Date: May 2011
Location: Anderson SC
Posts: 3,870
|
Re: Project Goldilocks, '66 C10 SWB BBW Build
Quote:
Posted via Mobile Device
__________________
Project Goldilocks '66 C10 Short Fleet BBW Build '65 C10 Highly Detailed Stock Restoration Thread '78 Camaro Targa Roof Build '55 International Metal/Body/Paint Work '66 F100 Full Rotisserie Restoration '40 Packard 120 Convertible Coupe Restoration How To Restore and Detail an Original Gauge Cluster How To Detail Sand Body Panels, Edges, Corners, Etc |
|
|
|
|
|
06-24-2012, 08:47 PM
|
#15 |
|
Registered User
Join Date: Dec 2009
Location: Orlando, FL
Posts: 131
|
Re: Project Goldilocks, '66 C10 SWB BBW Build
perfect, that makes me feel much better. what about the two rivets protruding at the bottom?
|
|
|
|
|
06-24-2012, 10:15 PM
|
#16 | |
|
Registered User
Join Date: May 2011
Location: Anderson SC
Posts: 3,870
|
Re: Project Goldilocks, '66 C10 SWB BBW Build
Quote:
Posted via Mobile Device
__________________
Project Goldilocks '66 C10 Short Fleet BBW Build '65 C10 Highly Detailed Stock Restoration Thread '78 Camaro Targa Roof Build '55 International Metal/Body/Paint Work '66 F100 Full Rotisserie Restoration '40 Packard 120 Convertible Coupe Restoration How To Restore and Detail an Original Gauge Cluster How To Detail Sand Body Panels, Edges, Corners, Etc |
|
|
|
|
|
05-02-2012, 07:30 PM
|
#17 |
|
PROJECT 7DEUCE
Join Date: Dec 2002
Location: GRANTS PASS OR
Posts: 21,590
|
Re: Project Goldilocks, '66 C10 SWB BBW Build
Wow turned out very clean..
__________________
GO BIG GREEN GO DUCKSMEMBER #6377 72 k-5 daily driver 6'' lift 35'' 350-350-205 slowly getting rust free. Project "7DEUCE" check out my build http://67-72chevytrucks.com/vboard/s...d.php?t=267665 Tim Powell..R.I.P EastSideLowlife..... R.I.P.. |
|
|
|
|
05-02-2012, 09:00 PM
|
#18 |
|
Rollin' Old Skool
Join Date: Jun 2007
Location: Hattiesburg, MS
Posts: 5,371
|
Re: Project Goldilocks, '66 C10 SWB BBW Build
sweet, it cleaned up really nice
__________________
_____________________________________________ Phillip My Build threads: 1966 Chevy C-10 "Black Betty" shortbed, fleetside, BBW, 327 V8/ Powerglide (under construction) http://67-72chevytrucks.com/vboard/s...ighlight=betty 1997 Chevy Tahoe, 2dr/2wd, mild custom (Daily driver) http://67-72chevytrucks.com/vboard/s...d.php?t=601142 Pics: '66 C-10 https://flic.kr/s/aHsjHWD4h9 '97 Tahoe https://flic.kr/s/aHsjGZ7wKP '93 C-1500 https://flic.kr/s/aHskxdpdnQ '88 S-10 Blazer https://flic.kr/s/aHsjYGx4Md Previous Rides: 1993 Chevy S-10 ext. cab, 4.3L, 4/5 drop (Sold) 1993 Chevy C-1500 short/step Retro-Rod (Sold) 1988 S-10 Blazer 2dr/2wd mild custom (Sold) |
|
|
|
|
05-02-2012, 09:04 PM
|
#19 |
|
Senior Member
Join Date: Sep 2011
Location: Hanford, CA
Posts: 1,027
|
Re: Project Goldilocks, '66 C10 SWB BBW Build
That looks amazing! Great work.
__________________
Poor and content is Rich...and Rich enough! - William Shakespeare 1966 C10 Custom Cab "Luigi" Big Window - SWB Fleetside 350 V-8 - Powerglide My not so much a build thread as a "Slow Progression Thread":http://67-72chevytrucks.com/vboard/s...d.php?t=486894 |
|
|
|
|
05-02-2012, 09:57 PM
|
#20 |
|
Registered User
Join Date: Aug 2005
Location: Hillsboro Oregon
Posts: 6,449
|
Re: Project Goldilocks, '66 C10 SWB BBW Build
very nice on all accounts!
|
|
|
|
|
05-02-2012, 11:24 PM
|
#21 |
|
Registered User
Join Date: Jun 2010
Location: Vancouver Island BC
Posts: 652
|
Re: Project Goldilocks, '66 C10 SWB BBW Build
 
__________________
|
|
|
|
|
05-02-2012, 11:59 PM
|
#22 |
|
Senior Member
Join Date: Mar 2011
Location: Tucson, Arizona
Posts: 2,062
|
Re: Project Goldilocks, '66 C10 SWB BBW Build
You do some great work. I love your attention to the smallest details.
|
|
|
|
|
05-03-2012, 08:27 PM
|
#23 |
|
Registered User
Join Date: Mar 2005
Location: apple valley, ca
Posts: 2,670
|
Re: Project Goldilocks, '66 C10 SWB BBW Build
Man, that gauge cluster turned out AWESOME! You are a true pro at what you do, and donating that air gauge overlay was my pleasure. I knew it was going to a good home.....
I always look forward to your progress!
__________________
Check out my latest endeavor: https://roundsixpod.com My build threads: '55 Chevy: http://67-72chevytrucks.com/vboard/s...d.php?t=247512 '64 C-20: http://67-72chevytrucks.com/vboard/s...d.php?t=446527 |
|
|
|
|
05-03-2012, 10:00 PM
|
#24 | |||
|
Registered User
Join Date: May 2011
Location: Anderson SC
Posts: 3,870
|
Re: Project Goldilocks, '66 C10 SWB BBW Build
Quote:
Quote:
Quote:
Tonight I worked on getting the steering wheel sanded and ready for a couple coats of surfacer, and also started on grooving the wheel for the chrome rings. I've got one ring in it, just got to finish the other one and it'll be ready to prime and paint. The column parts will get prepped next so they can be painted the same time the wheel. That way all everything for the column will be finished and ready to install when that time comes. Amazingly enough, the wheel sanded out nearly perfectly the first time with only four small pinholes to spot fix. I figured it would have taken atleast a couple rounds of priming and sanding to get it ready for surfacer. 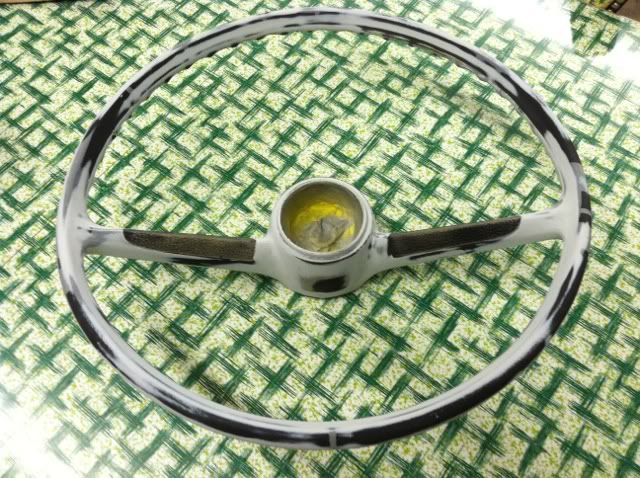 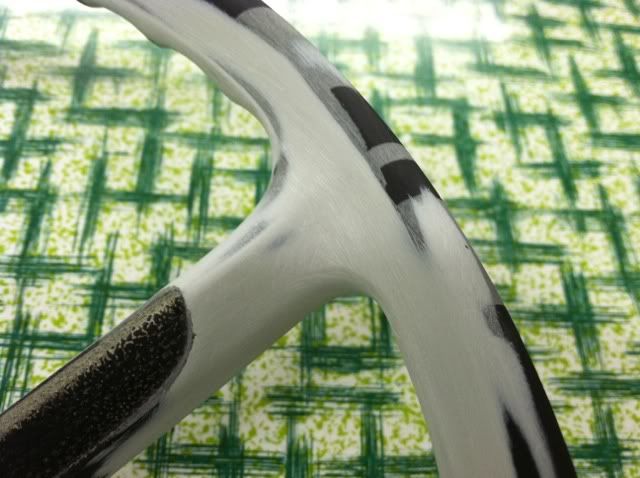 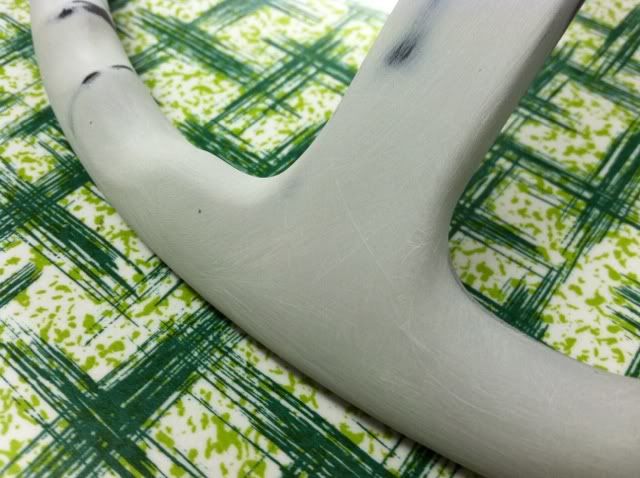 I taped some string across the wheel to get an idea of where the top center was, then laid out fine line tape to make guide lines for the grooves. I've still got to slightly round the edges of the grooves so they're not so sharp, and also make sure there's clearance for the primer and paint, but it's a start. 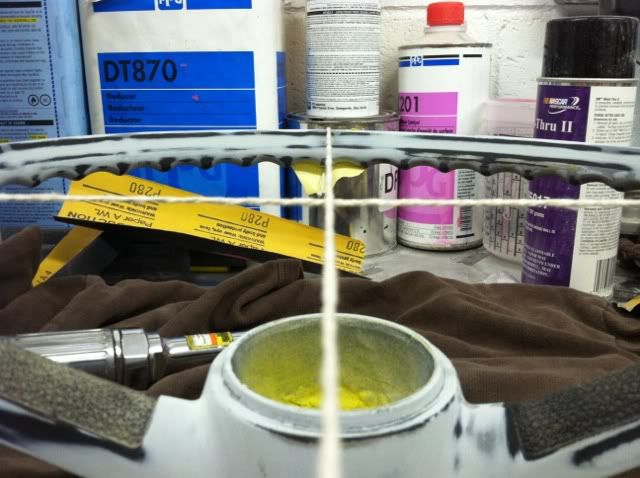 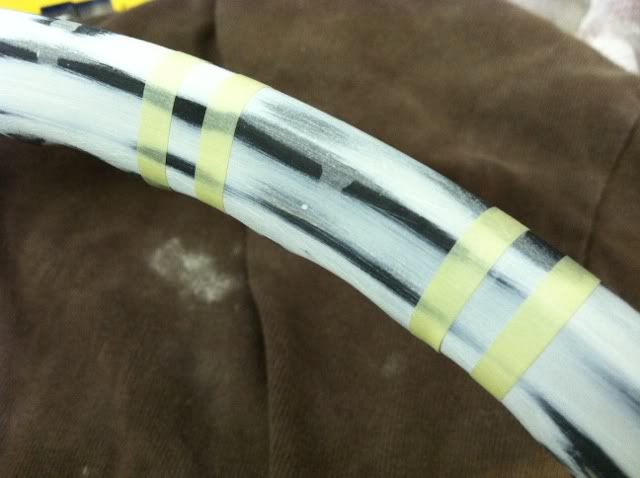 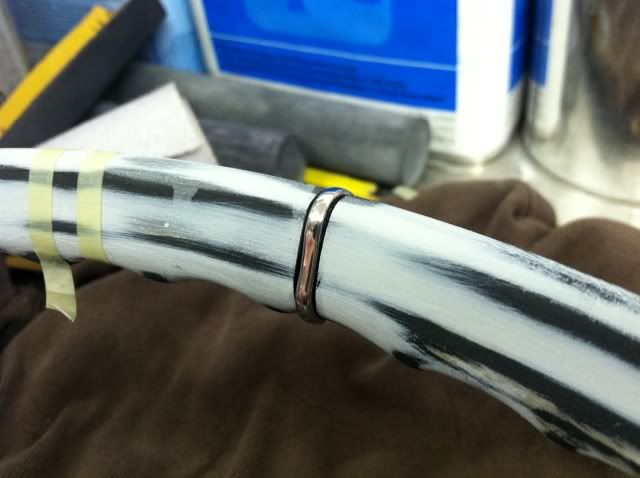
__________________
Project Goldilocks '66 C10 Short Fleet BBW Build '65 C10 Highly Detailed Stock Restoration Thread '78 Camaro Targa Roof Build '55 International Metal/Body/Paint Work '66 F100 Full Rotisserie Restoration '40 Packard 120 Convertible Coupe Restoration How To Restore and Detail an Original Gauge Cluster How To Detail Sand Body Panels, Edges, Corners, Etc |
|||
|
|
|
|
05-05-2012, 10:45 PM
|
#25 |
|
Registered User
Join Date: May 2011
Location: Anderson SC
Posts: 3,870
|
Re: Project Goldilocks, '66 C10 SWB BBW Build
Now that I've got a transmission, I stuck the engine block and T56 together and set them in the frame to get an idea of how much room I'll have for the front X braces. I'm going to talk to a local fab shop about making a tube sleeve around the mid/tail section out of 1/8 plate for the center section of the front X braces. I'm thinking it'll need to be made in two halves, upper and lower so the trans can be dropped out if needed. The tube will let me run the front legs of the X braces farther to the front of the frame rails so any twisting will be more effectively transferred from corner to corner, instead of the frame twisting. The tube shape will also take any torsional loads without twisting or deforming.
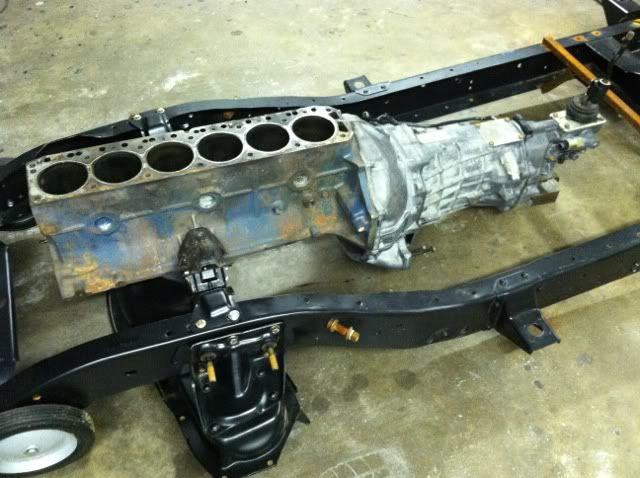  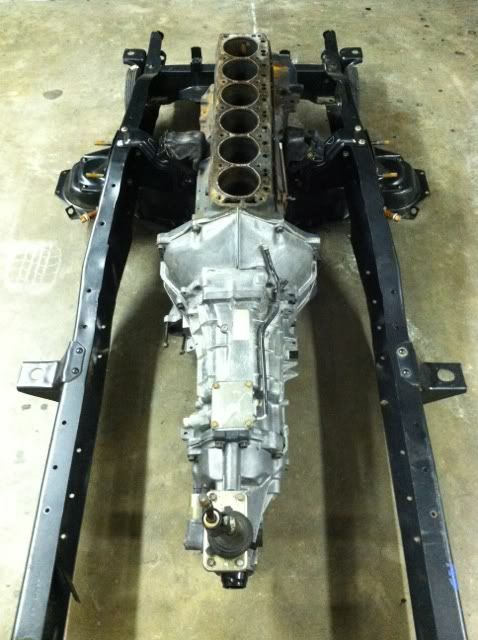 Here's the rough drawing that I originally come up with showing the tube design. As long as the T56 is, the tube will need to be moved up around the transmission compared to where it is in the drawing. 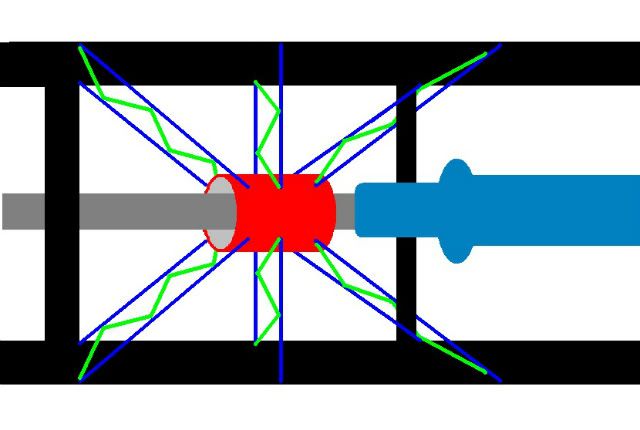 Posted via Mobile Device
__________________
Project Goldilocks '66 C10 Short Fleet BBW Build '65 C10 Highly Detailed Stock Restoration Thread '78 Camaro Targa Roof Build '55 International Metal/Body/Paint Work '66 F100 Full Rotisserie Restoration '40 Packard 120 Convertible Coupe Restoration How To Restore and Detail an Original Gauge Cluster How To Detail Sand Body Panels, Edges, Corners, Etc |
|
|
|
 |
| Bookmarks |
|
|


 Hybrid Mode
