
|
|
|
 02-06-2012, 05:10 PM
|
#1 |
|
VA72C10
 Join Date: Mar 2008
Location: Midlothian, VA
Posts: 25,269
|
Re: Build #2 Crusader!
Nice work on thee seats!
__________________
Looking for a 67-72 swb or blazer project in or around VA. 
|

|

|
|
02-12-2012, 09:00 PM
|
#2 |
|
Account Suspended
Join Date: Aug 2007
Location: USA
Posts: 1,223
|
Re: Build #2 Crusader!
Got the other side put in finally. I also got the center console. mounted in as well. Here are a few pics
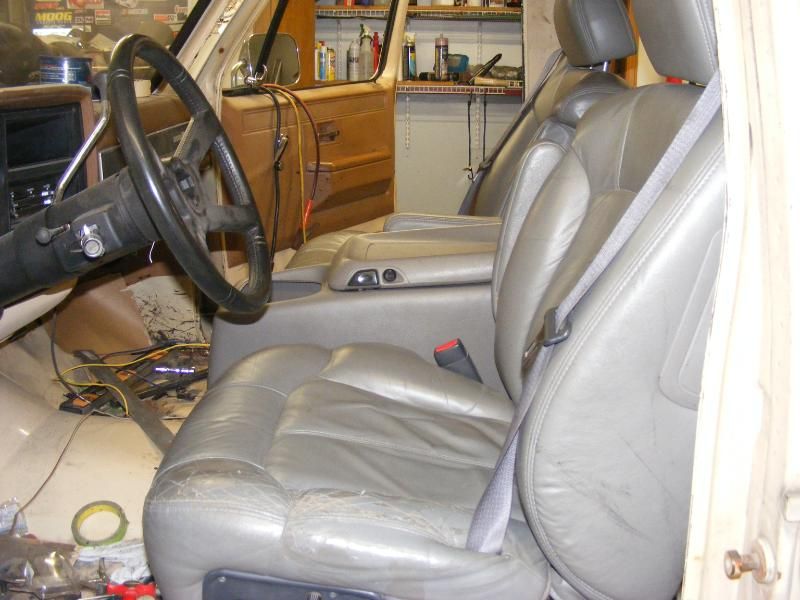  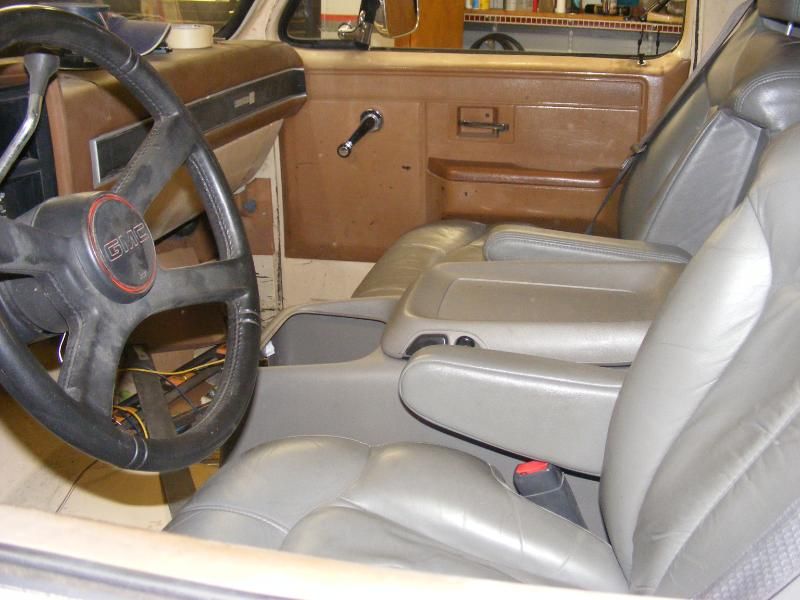   When we got the truck, it had that lift on the back so it never had a bumper or hitch. Last weekend Tyler got the bumper mounted on, along with the hitch. I dont know what the hitch use to fit but after some cutting and drilling it fits this truck now. 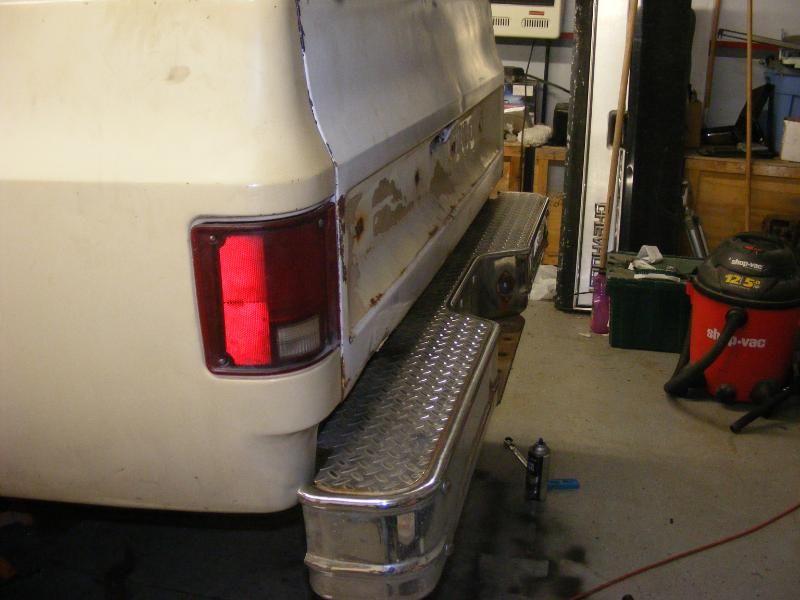 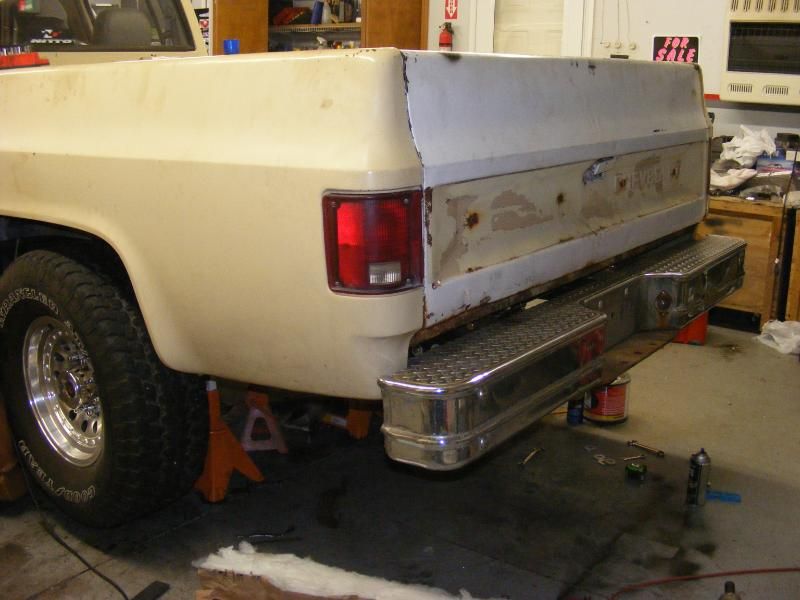 You all think I should weld it?. or would the bolts be enough? there is one more bolt for each side for a total of 4 its just not pictured 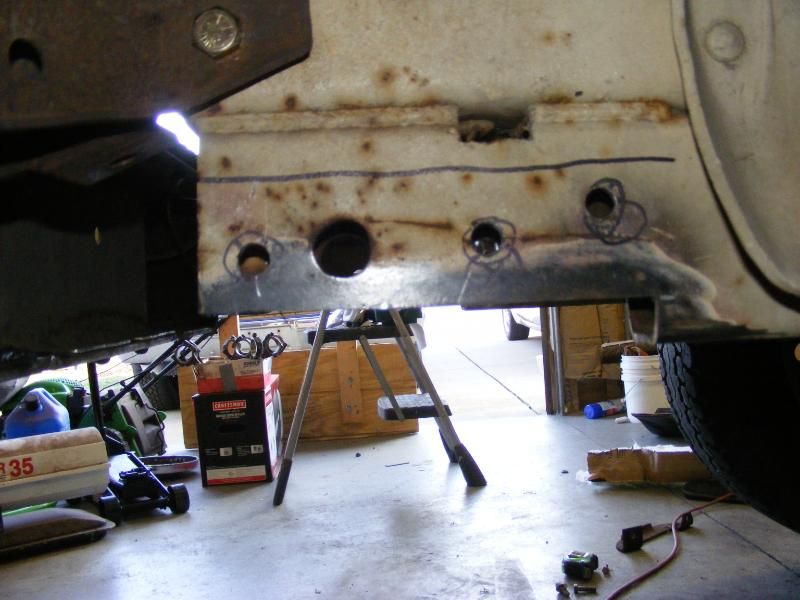 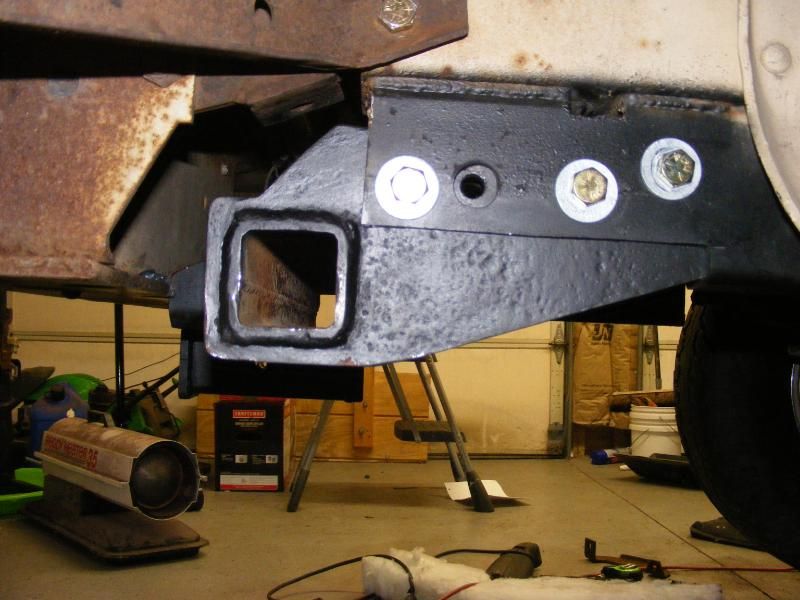 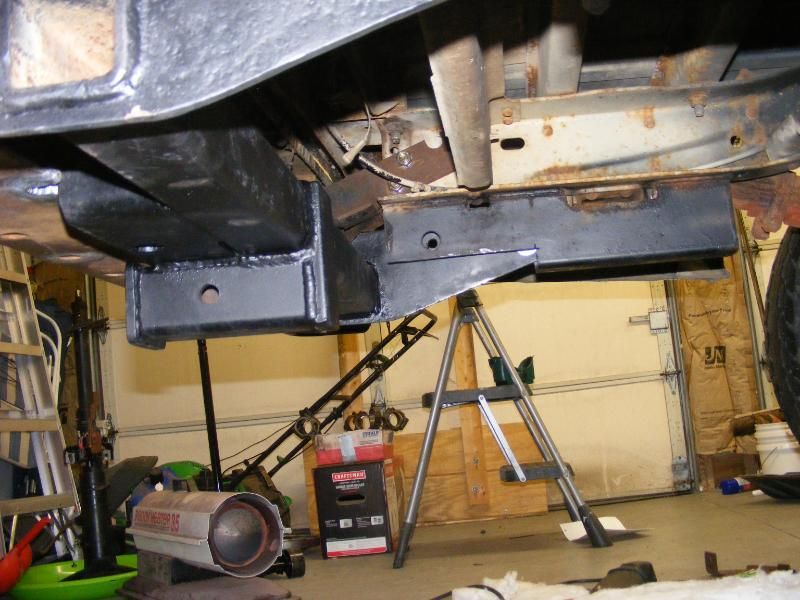
|
|
|
|
|
02-12-2012, 09:49 PM
|
#3 |
|
Registered User
Join Date: Dec 2011
Location: Elkhart, IN
Posts: 1,308
|
Re: Build #2 Crusader!
Good work, are you going to put carpet in it or no?
__________________
1985 Chevrolet K10 Custom Deluxe---SOLD 1997 Ram 2500 5.9 Cummins 1985 Chevrolet Camaro Z28 1987 Chevrolet K10 Silverado "The Beast" build 1987 Silverado http://67-72chevytrucks.com/vboard/s...=1#post6150257 |
|
|
|
|
02-13-2012, 04:23 PM
|
#4 | |
|
Account Suspended
Join Date: Aug 2007
Location: USA
Posts: 1,223
|
Re: Build #2 Crusader!
Quote:
See look at that happy face. 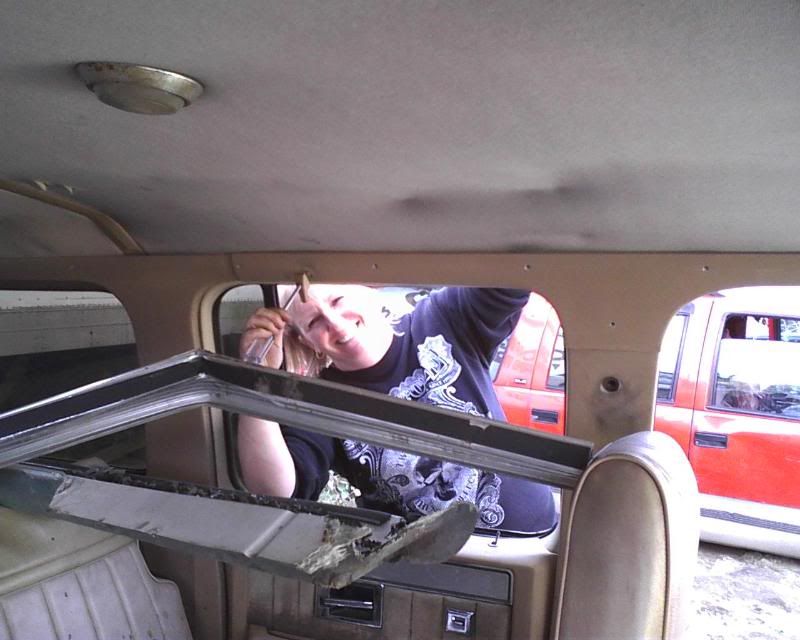 Now I need to get Deb cleaning up all those plastic trim parts so we can to get them ready for paint. Are you listening dear? |
|
|
|
|
|
02-15-2012, 08:29 PM
|
#5 | |
|
Registered User
Join Date: Jul 2011
Location: United States
Posts: 4
|
Quote:
|
|
|
|
|
|
02-17-2012, 08:48 AM
|
#6 | |
|
Account Suspended
Join Date: Aug 2007
Location: USA
Posts: 1,223
|
Re: Build #2 Crusader!
Quote:
Ah your first post. and of coarse you had to bust my balls. but your right! we are also "discussing" what color to paint the truck. we originally decided on white. then she wanted dark gray, then I thought we both agreed on black. I get a text yesterday telling me she wants blue with no metallic. WTF! |
|
|
|
|
|
02-17-2012, 04:39 PM
|
#7 | |
|
Formerly- 1972SuperCheyenne
 Join Date: Oct 2008
Location: Wake Forest NC
Posts: 5,782
|
Re: Build #2 Crusader!
Quote:
__________________
--Josh My Build Thread:http://67-72chevytrucks.com/vboard/s...d.php?t=799218 A good crossthread is better than Loctite any day. Life is not about what you have, but who you have to share it with. |
|
|
|
|
|
02-12-2012, 10:17 PM
|
#8 |
|
Resident of Here
Join Date: May 2008
Location: Wesley Chapel, FL, USA
Posts: 7,716
|
Re: Build #2 Crusader!
Looking at the mounting of the hitch and all of the pitting on it. Buy a new hitch or build one. Make sure it mounts to the frame itself. Dont weld it to the frame. You'll hate yourself later if you do.
__________________
~Bradley~ 2004 Black GTO LS2/T56 too much to list  Miss having a truck 
|
|
|
|
|
02-13-2012, 04:06 PM
|
#9 | |
|
Account Suspended
Join Date: Aug 2007
Location: USA
Posts: 1,223
|
Re: Build #2 Crusader!
Quote:
I didnt even think about the pitting, I never questioned the integrity of the hitch itself. I dont think its as bad as the picture makes it out to be. It is 1/4 thick steel. The hitch is mounted to 3"x 4" 3 1/6 tubing that is welded all the way around to the frame. this is what the lift gate use to be mounted to. I did wonder myself about its strength, but had no reason why it wouldn't work. other than it just looks odd. It sure looks like it is plenty strong enough. |
|
|
|
|
|
02-13-2012, 06:12 PM
|
#10 |
|
Registered User
Join Date: Dec 2011
Location: Elkhart, IN
Posts: 1,308
|
Re: Build #2 Crusader!
Cool look forward to seeing this truck done.
__________________
1985 Chevrolet K10 Custom Deluxe---SOLD 1997 Ram 2500 5.9 Cummins 1985 Chevrolet Camaro Z28 1987 Chevrolet K10 Silverado "The Beast" build 1987 Silverado http://67-72chevytrucks.com/vboard/s...=1#post6150257 |
|
|
|
|
02-13-2012, 11:16 PM
|
#11 |
|
Big Gulps Huh? Whelp...
Join Date: Apr 2010
Location: Reno, NV
Posts: 410
|
Re: Build #2 Crusader!
Looks like a fun project for both of you...I sometimes wish my girlfriend was more into these trucks but then I remember that it's a great "me time" thing to do!
Posted via Mobile Device
__________________
"The Ghost II" - 1987 V30 CC, 14-BFF (2nd Design Heavy Ribbed HD) SRW Conversion, 454/4L80E/205, 6" Springs, 35" Toyo MT's on 17" Classic II's, Full Audio System, Lot of Other Goodies!
|
|
|
|
|
02-14-2012, 07:20 AM
|
#12 | |
|
Account Suspended
Join Date: Aug 2007
Location: USA
Posts: 1,223
|
Re: Build #2 Crusader!
Quote:
|
|
|
|
|
|
02-15-2012, 08:31 PM
|
#13 |
|
Registered User
Join Date: Dec 2007
Location: Palmer, Alaska
Posts: 13,821
|
Re: Build #2 Crusader!
 Busted!!! Posted via Mobile Device
__________________
CHEVY ONLY
|
|
|
|
|
02-15-2012, 08:45 PM
|
#14 |
|
Registered User
Join Date: Dec 2011
Location: Elkhart, IN
Posts: 1,308
|
Re: Build #2 Crusader!
Ha, love her username it's just screaming Mike is in trouble.
__________________
1985 Chevrolet K10 Custom Deluxe---SOLD 1997 Ram 2500 5.9 Cummins 1985 Chevrolet Camaro Z28 1987 Chevrolet K10 Silverado "The Beast" build 1987 Silverado http://67-72chevytrucks.com/vboard/s...=1#post6150257 |
|
|
|
|
02-15-2012, 09:54 PM
|
#15 |
|
Resident of Here
Join Date: May 2008
Location: Wesley Chapel, FL, USA
Posts: 7,716
|
Re: Build #2 Crusader!
OH SNAP!
__________________
~Bradley~ 2004 Black GTO LS2/T56 too much to list Miss having a truck
|
|
|
|
|
02-17-2012, 10:38 AM
|
#16 |
|
Registered User
Join Date: Feb 2011
Location: Lake, Michigan
Posts: 219
|
Re: Build #2 Crusader!
Any colors good as long as you keep your better half happy. At least thats what I have learned over the years. Well except pink or lavender or something like that.
|
|
|
|
|
02-17-2012, 01:47 PM
|
#17 |
|
Registered User
Join Date: Dec 2011
Location: Elkhart, IN
Posts: 1,308
|
Re: Build #2 Crusader!
Anything is better than what it is painted now.
__________________
1985 Chevrolet K10 Custom Deluxe---SOLD 1997 Ram 2500 5.9 Cummins 1985 Chevrolet Camaro Z28 1987 Chevrolet K10 Silverado "The Beast" build 1987 Silverado http://67-72chevytrucks.com/vboard/s...=1#post6150257 |
|
|
|
|
02-18-2012, 09:41 AM
|
#18 |
|
Registered User
Join Date: Feb 2011
Location: Beverly, MA
Posts: 472
|
Re: Build #2 Crusader!
Have you run those rear disk brackets before?
Most of the ones I've seen have spacers for the bracket or bent brackets, since the bolt is designed to provide clamping force, not shear resistance. Especially grade 8 that you have there. Simple pipe cut to fit your space would provide more friction in the "clamp". Better would be a solid surface mount on the entire flange. I am sure that a lot of people have run them this way, but I am also sure GM mounts theirs solidly for a reason after thousands of hours of testing and design modelling. Sort of like this:  My opinion on the hitch: Do you have bolts running vertically into the piece of metal welded to your frame (I assume that's from the lift gate?). If so, I would run it. Plenty of clamp force and each one of those bolts is rated for more than the truck would tow. Bolting in two planes is always stronger as it can resist more lateral force, which is where most trailers cause problems in side to side sway or worst case, flipping. Last edited by Last_Paladin; 02-18-2012 at 09:47 AM. |
|
|
|
|
02-18-2012, 02:27 PM
|
#19 |
|
Account Suspended
Join Date: Aug 2007
Location: USA
Posts: 1,223
|
Re: Build #2 Crusader!
No! this is the first time iv used this kinda bracket, and the first full floater iv worked with. Because its designed differently than others the manufacture has offered this explanation on there ad.
" we no longer using DOM tube spacers and now taking up the space w/ 4 small angles that have been laser cut for a precise fit and welded to your brackets. What does this mean? Well for one it means no more having to use a BFH to try and get a bent bracket to line up, only to have your pads wear at a quick uneven pace. Would the pads not lining up correctly causing bad brake performance? The answer is yes and in the long run more money from your pocket. I have never heard of bolt failure as some claim can happen. Do not be fooled by gimmicks, multiply hole locations for different pinion angles mean nothing. The only thing that matters is that the bleeder needs to be on the upside, so that the brakes can be bled. Increasing pinion angles only means that the bleeder will be higher, which is what you want anyhow! Disc Brake brackets that have been formed (bent in a z - shape) will fail under stress! Forming steel of any kind creates cracks (sometimes very tiny) at the bend areas! This could be very dangerous! The tensile strength on one grade 8 1/2 inch diameter fine thread bolt is 24,000 lbs. This is multiplied by four per bracket. Your rear brakes that contribute 20% of your overall braking on the vehicle will not shear off 96,000 lbs of tensile strength!" 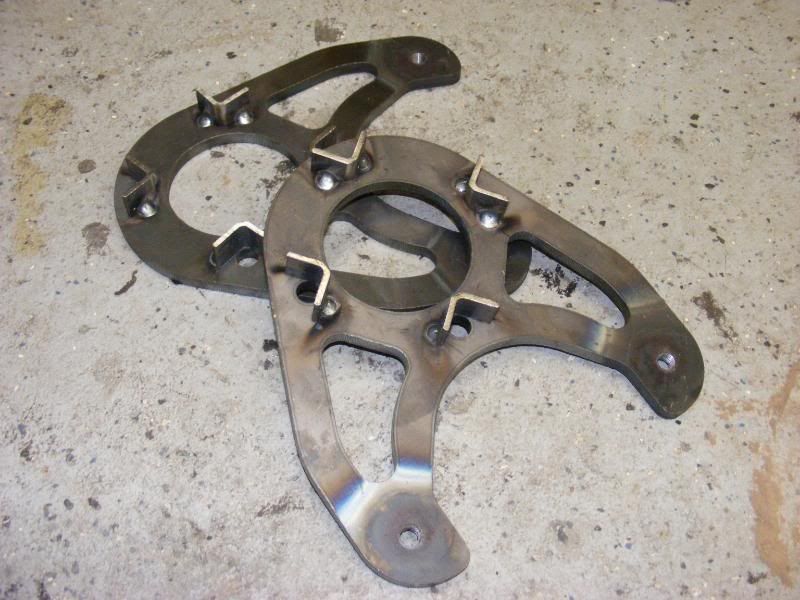 once again That was from there ads. all I can say is I found there product to be exactly what they said and i was pleased with the quality of their work. as far as the hitch I dont believe it is bolted to the frame in the center. Id have to check to be positive but i dont think it is. being welded all the way around, I never gave it a thought. I see what your saying about the back and forth motion a trailer would apply (unlike the lift gate). Prolly would be a good idea to puts some bolts in there. |
|
|
|
|
02-20-2012, 06:37 PM
|
#20 |
|
Account Suspended
Join Date: Aug 2007
Location: USA
Posts: 1,223
|
Re: Build #2 Crusader!
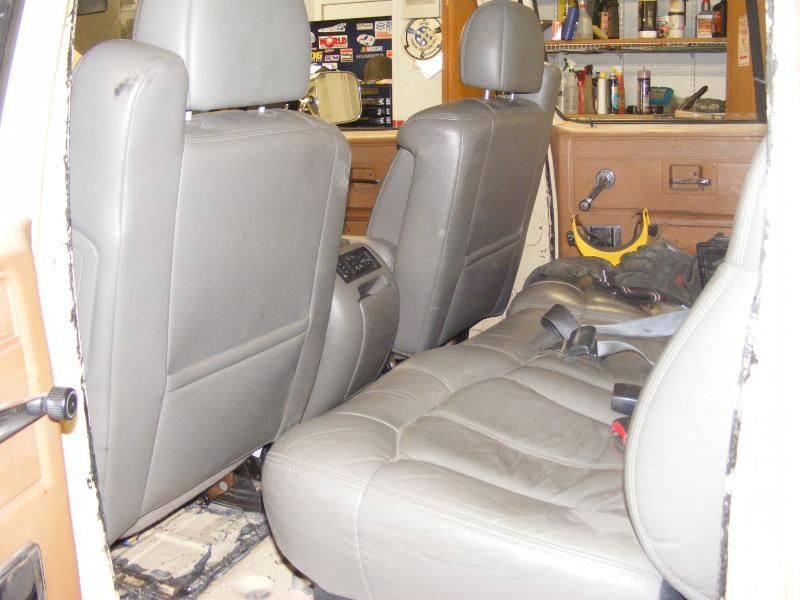
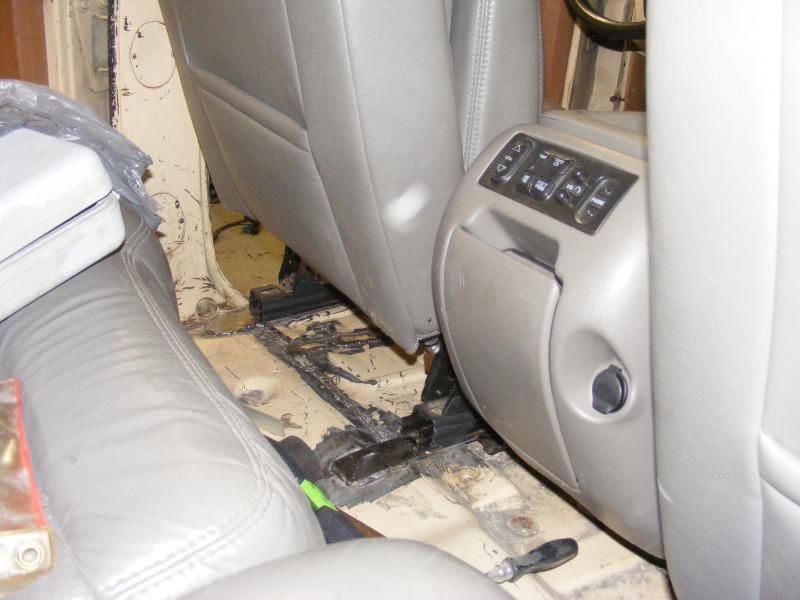
I did the rear seats this past summer and fall. Here is how that process went.
The stock rear seat weren't in too bad of condition. but they have to go. 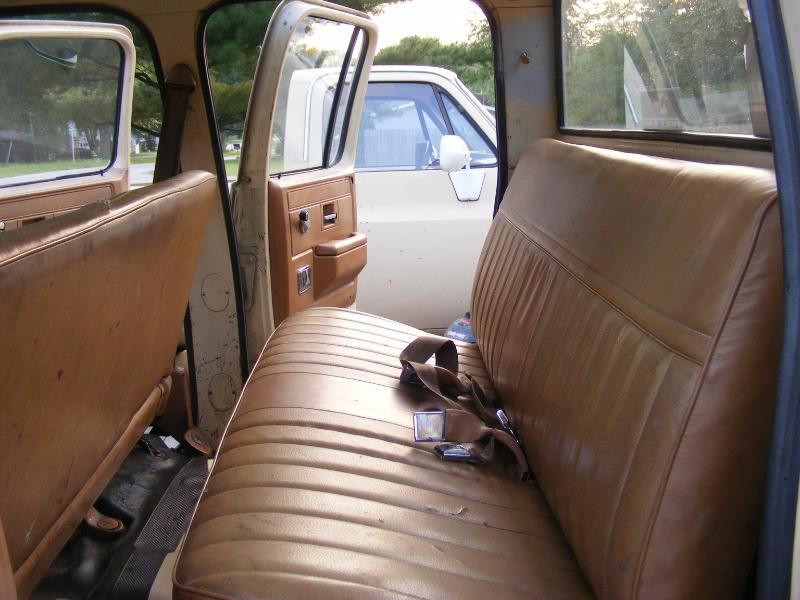 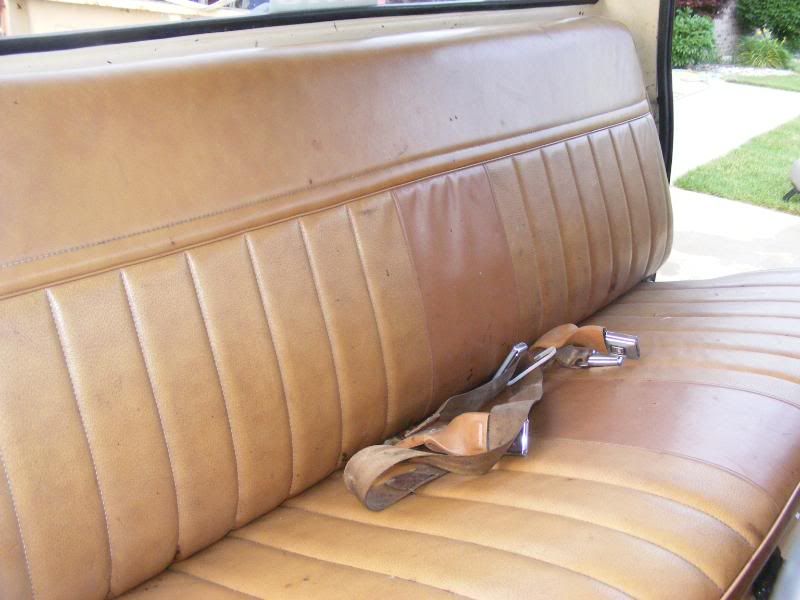 after removing the stock seats me and deb vacumed and scrubbed the floor with dawn and purple cleaner to get all the nasty crap off. Tahoe seats are one piece. meaning the the bottom and back are together on one frame. so the seat will fold up and lay flat. Because of the rear humps this type of set up just wasnt going to work. I cut the seats in two pieces actually 3 different pieces. The left and right bottoms are now two separate pieces. Working on the back first, I figued out how to mount the backs of the seats to the back raised section using a piece of 1/4 angle iron. drilled hole so it would bolt in to the factory seat mounting holes then welded it to the seat back frame. 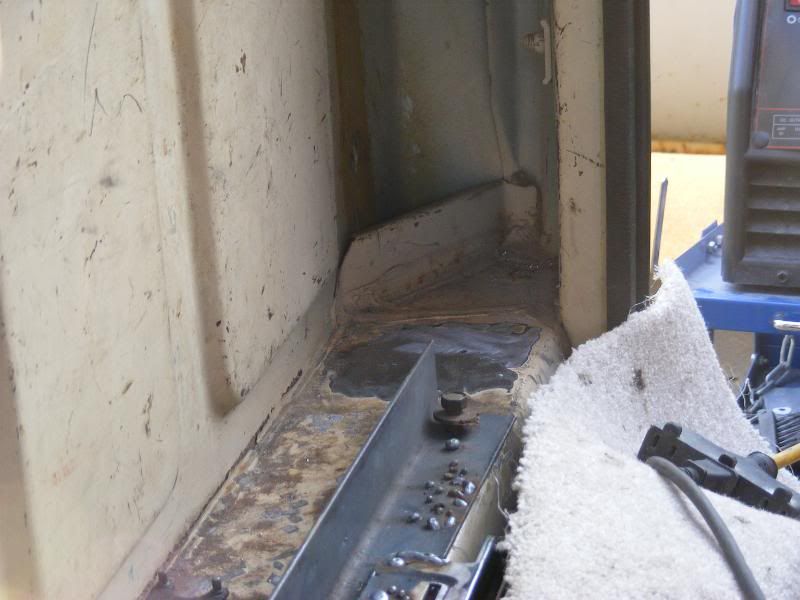 I then made three pedistall mounts for the front part of the backrest. Leveled everything then welded those to the floor. I also welded lock nuts inside the square tubing, so the rear section could be easily bolted and unbolted. 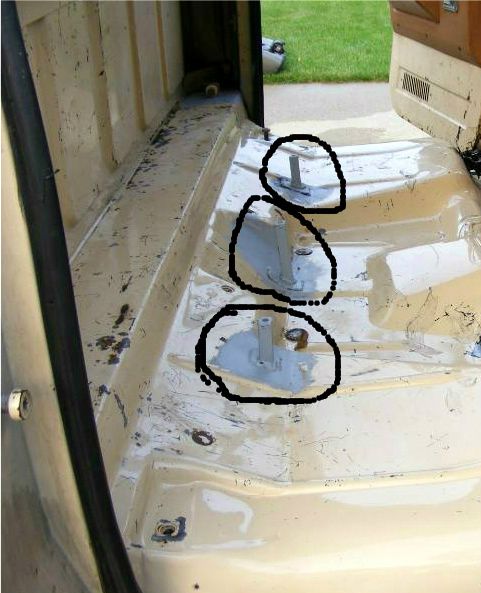  I wanted to try and keep the folding up feature if at all possible. I cut off the piviot points on the seat bottoms and After carefully aligning I welded them to the floor. 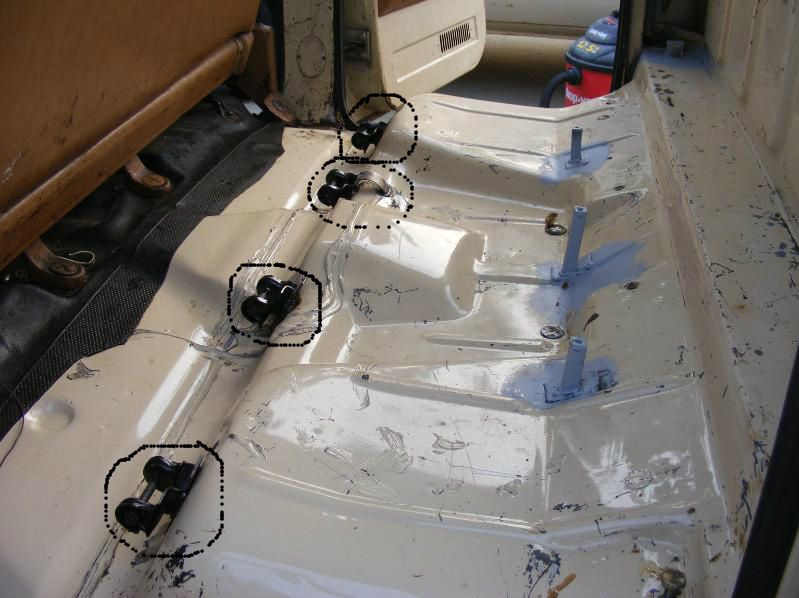  the front piviot points have thru bolts which not only allows them to pivot but they can be removed easly as well. 6 bolts and the whole thing can be removed. here is what it looks like all mounted in. Even the center armrest/cup holder goes up and down  with everything in place the bottom can fold up to either give access to space under the seat bottom.  When you unlatch the seat and pull it forward the cables then pull and releases the latch mecisisim for the backrests so you can get behind the seat or lay it flat for a little bit more cargo space.  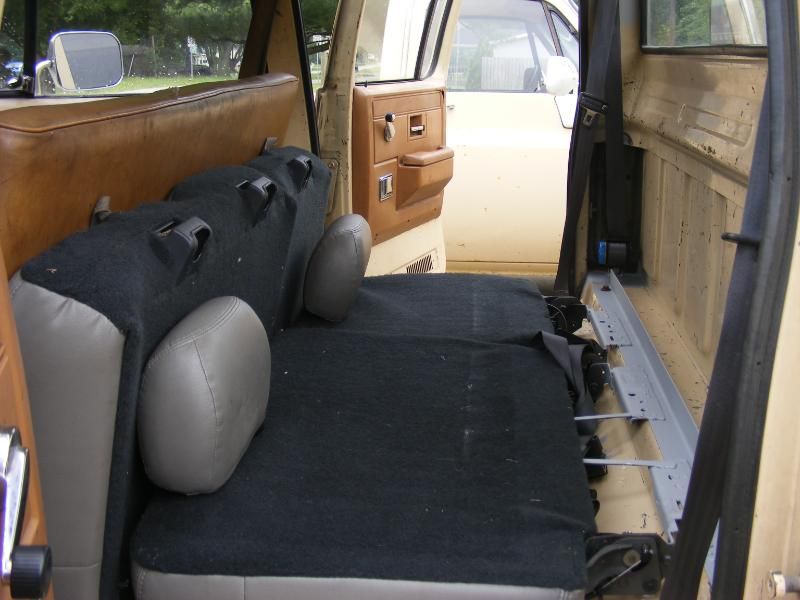 because the seat belts were that tan color and they were for lap belts mad for the bench seat they had to addressed as well. I end pulling some belts out of a dodge caravan at the local salvage yard. The color was a exact match to the center seat belt that was original to the Tahoe. The truck had plugs in the c pillar for what looked like shoulder belt mounting but when I pulled the plug all I found was a hole no threads 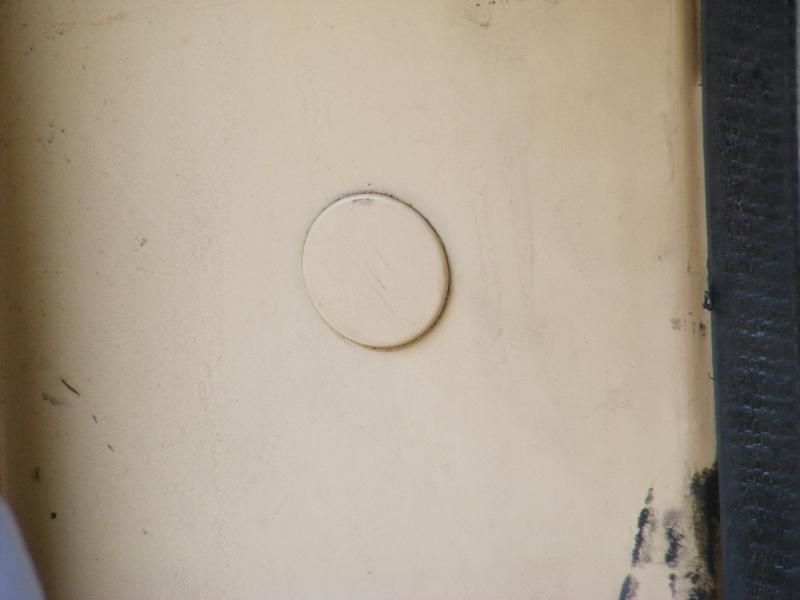 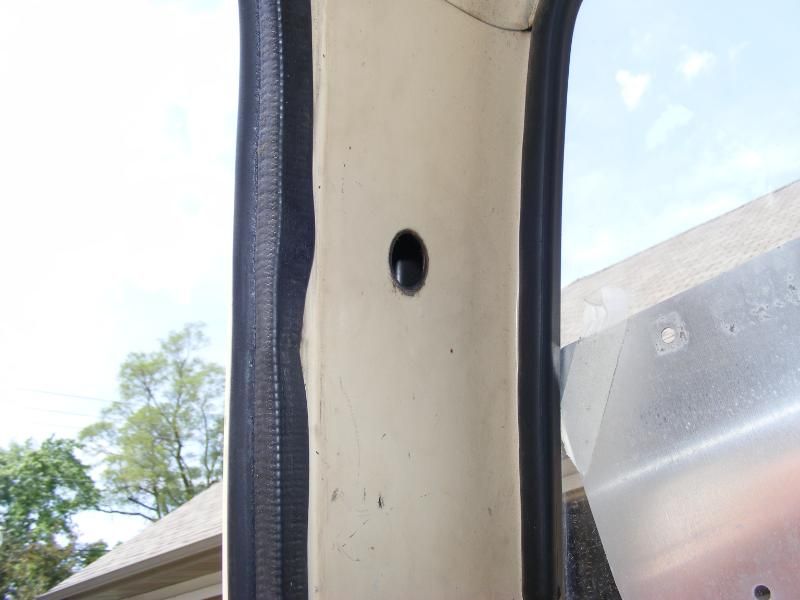 I took a piece of 1/8 plate found center, drilled a hole and welded on a nut. 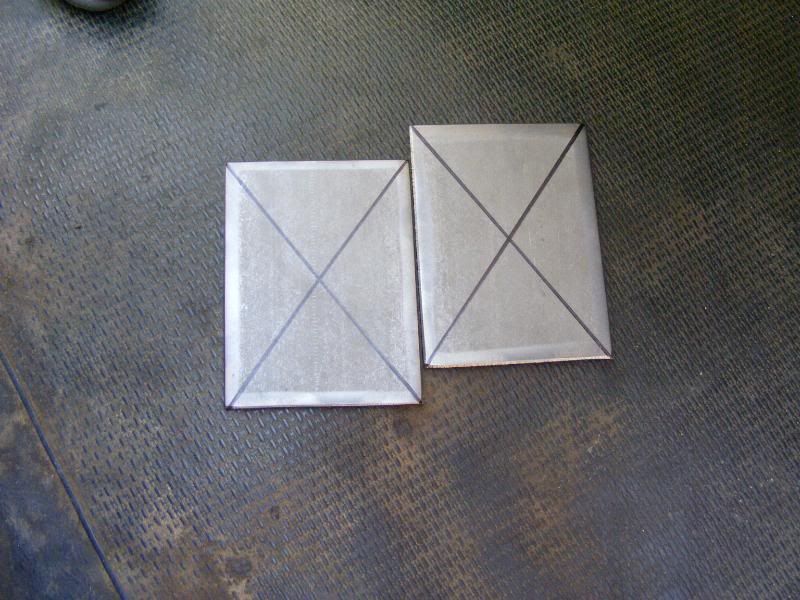  I marked the c pillar and then drilled a bunch of holes. Fed the plate with the nut up the pillar and bolted it in place and then welded each hole. Test fitted the belt, then ground all the welds flush and shot on some primer.     On the bottom I welded a piece of angle iron to the floor and then used the existing seat belt mounting locations to mount the last of the three mounting points 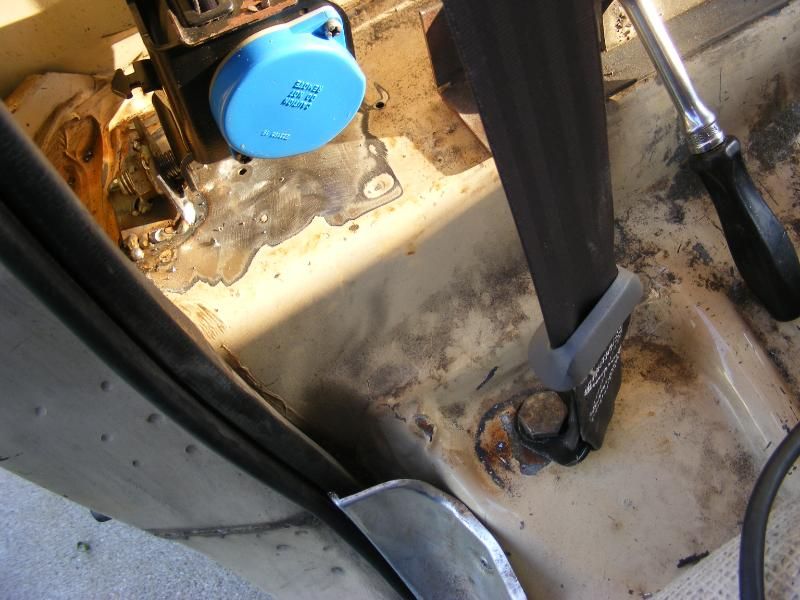
|
|
|
|
|
02-20-2012, 08:06 PM
|
#21 | |
|
Registered User
Join Date: Feb 2011
Location: Beverly, MA
Posts: 472
|
Re: Build #2 Crusader!
Quote:
The spec on a 1/2 bolt by itself is more like 940lbs of shear resistance before it breaks. You can take one, thread it all the way in and break it with a breaker bar applying shock loads like a panic stop. Data from here: Notice in this, how the bolt is completely supported, look around page 27 for shear control, the bolt is complete enveloped. They also talk about using washers to provide greater clamping force via the tensile strength of the bolt: http://www.fastenal.com/content/docu...renceGuide.pdf and http://dodgeram.org/tech/specs/bolts..._strength.html and http://www.derose.net/steve/resource...lts.html#shear Now that angle iron does provide some friction, but I have to wonder why GM (and any other axle or auto manufacturer -the master penny pincher) do complete coverage on all of their brake set ups (sort of like the picture I posted, found on the web). Again, they probably work. He probably has no failures. I'd hate for you to you be his first. Last edited by Last_Paladin; 02-20-2012 at 08:15 PM. |
|
|
|
|
|
02-20-2012, 09:19 PM
|
#22 |
|
Account Suspended
Join Date: Aug 2007
Location: USA
Posts: 1,223
|
Re: Build #2 Crusader!
after reading your first post several times and now the second post I now understand exactly what you mean. If DOM tubbing or the spacer like you posted were used how much more force do you think would be needed to sheer off those same 1/2 bolts? Im not sure but just looking at the set up the weakest link in the whole thing, looks to be the mounting pins. they are 3/8 (if that) and im sure there not hardened plus there just floating in the caliper.
I hope im not the first either. Last edited by mrhino; 02-20-2012 at 09:39 PM. |
|
|
|
|
02-20-2012, 09:38 PM
|
#23 | |
|
Registered User
Join Date: Feb 2011
Location: Beverly, MA
Posts: 472
|
Re: Build #2 Crusader!
Quote:
So, if you have a 1/2" bolt, a 1/2" of material completely around it works. You're then talking tensile strength of the bolt, since it's not the only items resisting the stresses. It's the clamped force of the material. As for the pins, they don't hold the caliper in place. The flat edge of bracket does that and transfers all the rotational force down the bracket and to those bolts. |
|
|
|
|
|
02-20-2012, 06:42 PM
|
#24 |
|
Registered User
Join Date: Dec 2011
Location: Elkhart, IN
Posts: 1,308
|
Re: Build #2 Crusader!
Great work, and great innovating.
__________________
1985 Chevrolet K10 Custom Deluxe---SOLD 1997 Ram 2500 5.9 Cummins 1985 Chevrolet Camaro Z28 1987 Chevrolet K10 Silverado "The Beast" build 1987 Silverado http://67-72chevytrucks.com/vboard/s...=1#post6150257 |
|
|
|
|
03-05-2012, 10:41 PM
|
#25 |
|
Registered User
Join Date: Jul 2011
Location: NY
Posts: 263
|
Re: Build #2 Crusader!
so happy to see this update
keep up bro
__________________
email me @ nasser_060@hotmail.com and Check out my flicker @ http://www.flickr.com/photos/0060/ |
|
|
|
 |
| Bookmarks |
| Tags |
| black, disc, paint, seats, shortbed |
|
|


 Hybrid Mode
