
|
 12-01-2011, 11:05 PM
|
#101 |
|
Registered User
Join Date: Dec 2009
Location: vancouver b.c....is the biggest place most people would know but I am actually out in the valley 45 mins away
Posts: 2,050
|
Re: Project '64 Cheapskate
Hey great to see your making progress ......nice work
__________________
1966 Pro street build http://67-72chevytrucks.com/vboard/s...?t=448089[ 1958 LS 2 build http://67-72chevytrucks.com/vboard/s...d.php?t=527123 1966 SBFS low and go http://67-72chevytrucks.com/vboard/s....php?p=5799909 1966 SBFS street HULK http://67-72chevytrucks.com/vboard/s...=1#post5886625 Poject Low and go gets a 6.2 ltr LSA supercharged with 6 speed automatic Aluinum Radiator Dealer pm for details |

|

|
|
12-02-2011, 02:25 AM
|
#102 |
|
rusty 66
Join Date: Dec 2010
Location: wrightwood ca
Posts: 462
|
Re: Project '64 Cheapskate
Cool build have not seen it till today the new grill look good
__________________
1947 chevy fleetmaster http://www.cbforum.net/forum/ 1966 chevy c10 long bed http://67-72chevytrucks.com/vboard/s...d.php?t=439219 1970 chevy impala custom http://www.layitlow.com/forums/index...pic=349867&hl= |
|
|
|
|
12-02-2011, 11:09 PM
|
#103 |
|
Registered User
Join Date: Aug 2010
Location: louisville, ky
Posts: 13
|
Re: Project '64 Cheapskate
Looking good Alex. Where are you finding the time to work on this thing? I know you work crazy hours at your job then school as well. I think you are the hardest working man I know! :-)
Nate
__________________
In the process of looking for a 60 or newer short bed fleet side. |
|
|
|
|
12-03-2011, 12:18 PM
|
#104 |
|
Registered User
 Join Date: Mar 2005
Location: apple valley, ca
Posts: 2,670
|
Re: Project '64 Cheapskate
^^^I hear ya. I try to take advantage of as much of my free time as I can. Unfortunately, the truck has absorbed my free time that was usually reserved for yard work, washing the cars, and right now, hanging Christmas lights. My current goal to get the '64 as a roller before Christmas, then concentrate on brake lines, fuel lines, and some under-hood detailing. The 350 is about to get torn down and inspected, but I don't want too many things going on at one time. That's how vital stuff gets forgotten and you don't figure it out until late in the build!
I was going to ask you if you were going to watch the UK/UNC game today, but that's a given. GO CATS!!!!!!
__________________
Check out my latest endeavor: https://roundsixpod.com My build threads: '55 Chevy: http://67-72chevytrucks.com/vboard/s...d.php?t=247512 '64 C-20: http://67-72chevytrucks.com/vboard/s...d.php?t=446527 Last edited by chevyrestoguy; 12-03-2011 at 12:26 PM. |
|
|
|
|
12-04-2011, 02:55 PM
|
#105 |
|
Registered User
Join Date: Mar 2005
Location: apple valley, ca
Posts: 2,670
|
Re: Project '64 Cheapskate
I was able to get on the truck for a few hours yesterday. It was really cold and windy, so that kept me from getting a whole lot done. I was able to drive out the lower control arm bushings with the air chisel, and while the lower control arm cross shafts were out, I blasted them clean.
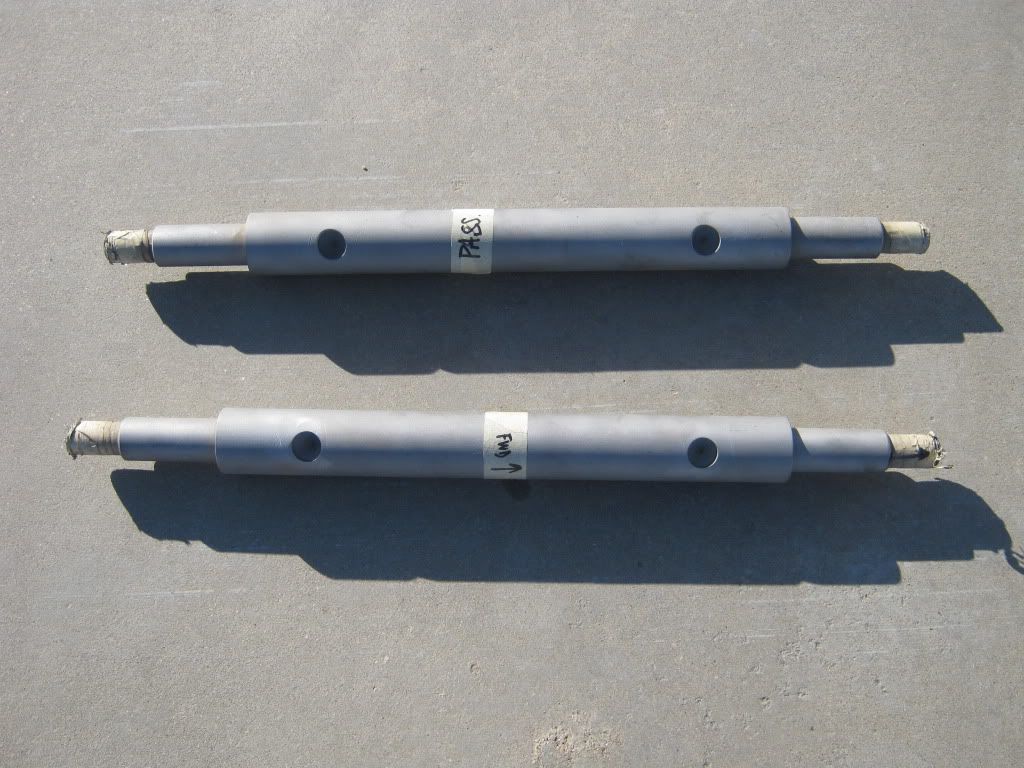 I am working on a mod to increase caster, so these cross shafts are going to a buddy's house so they can be machined. The intent is to move the lower control arm forward .75", thus tilting the spindle back, increasing caster. The machining will be very simple. Here's a quick drawing I did on Powerpoint to show you what I am going to do:  In order to do this mod, you have to remove the saddles that are riveted to the center crossmember. There are four of them, two on each side. These saddles are what keeps the lower control arm in position, and are held in place with u-bolts. They are kept from spinning by a stud that locates itself in the spot-faced holes in the lower control arm shaft. Here, you can see a picture of the front crossmember showing the two bolt holes for the u-bolts and the rivet head for the locating stud I mentioned earlier. The stud side is not visible in this picture. 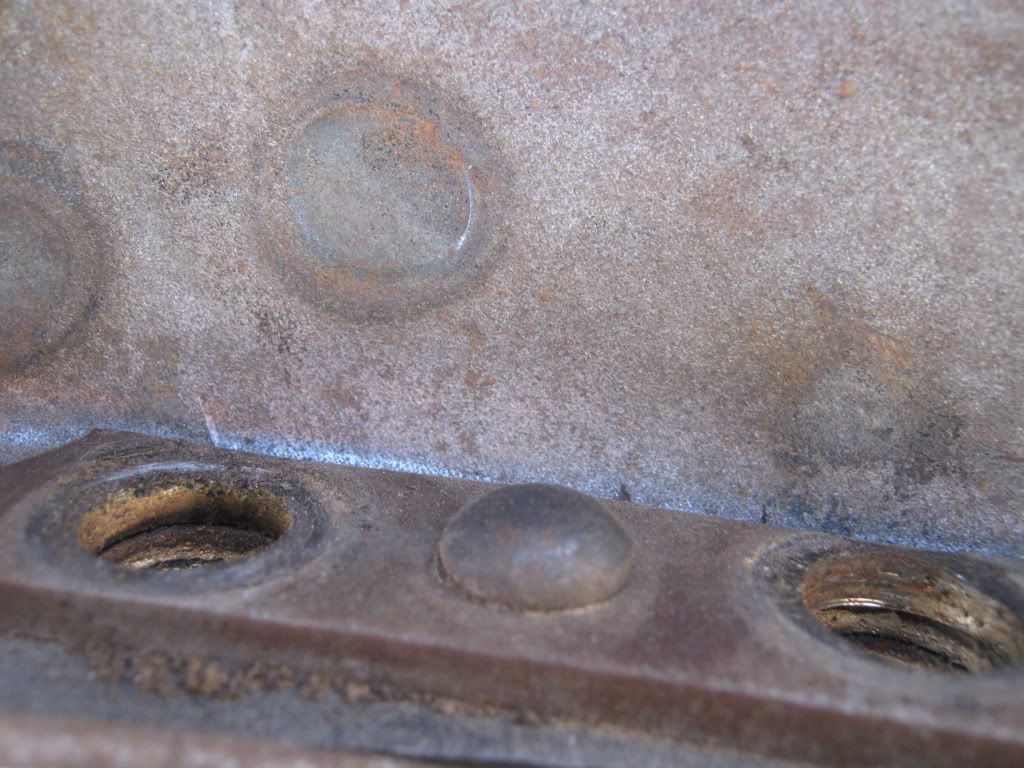 In order to get the saddles removed, you have a few options. You can grind the heads off and drive out the rest of the rivet. Or, you can fire up the torch and melt the rivet heads off, then drive out the rest. I opted for the torch. I learned quickly that even with the head and tail of the rivet melted off, the rivet stems did not come out without a fight. I had to warm up the rivet stem with the torch and shoot them out with an air chisel. The rivets go through 4 layers of steel (doubler plate, saddle, and and 2 layers crossmember). Once you get them out, here's what the pieces look like after a few minutes in the blaster:  Here's what you'll see when the saddles, doubler, and rivets are removed. I decided that I was going to use a 7/16 X 1.25 socket head cap screw as the new locating pin, so the center hole in this picture needed to get opened up to a 7/16 to ensure that bolt would fit nice and tight. The light area in the front is the lip on the crossmember, which will be cut away. Sorry for the dark picture, my lighting was a little goofy yesterday. 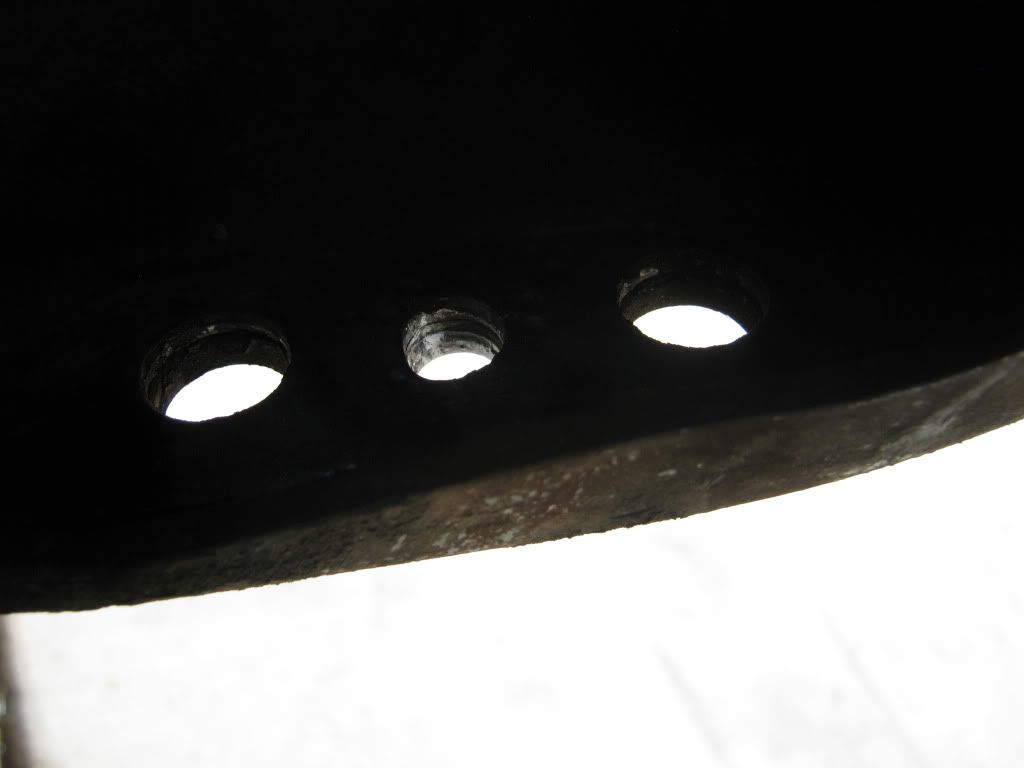 Moving the control arm forward will cause the aft side of the control arm to get really close to the center crossmember, so I removed the lip and blended out the cut to eliminate any sharp edges that could cause a stress riser. You will only need to cut the lip back to where it meets the second metal layer. 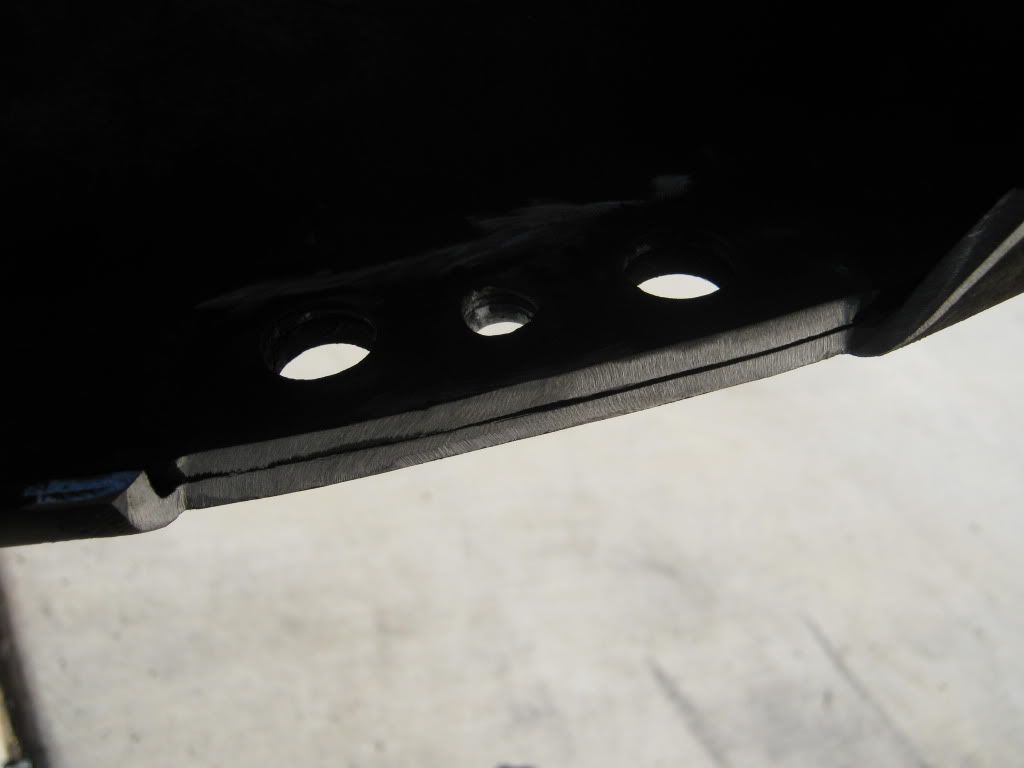 That's all I got done yesterday. After the shafts get machined, I put them in place and show you the difference. I promised earlier to show you a funny picture of the Border Collie, Tori. I was burning out the old control arm bushings and she was right in the smoke path, but she was so focused on wanting to play fetch she was oblivious to what was going on. She lives to play fetch. I'll be working underneath the truck and she'll constantly drop her stick or her ball right on your foot to get your attention. Goofball........ 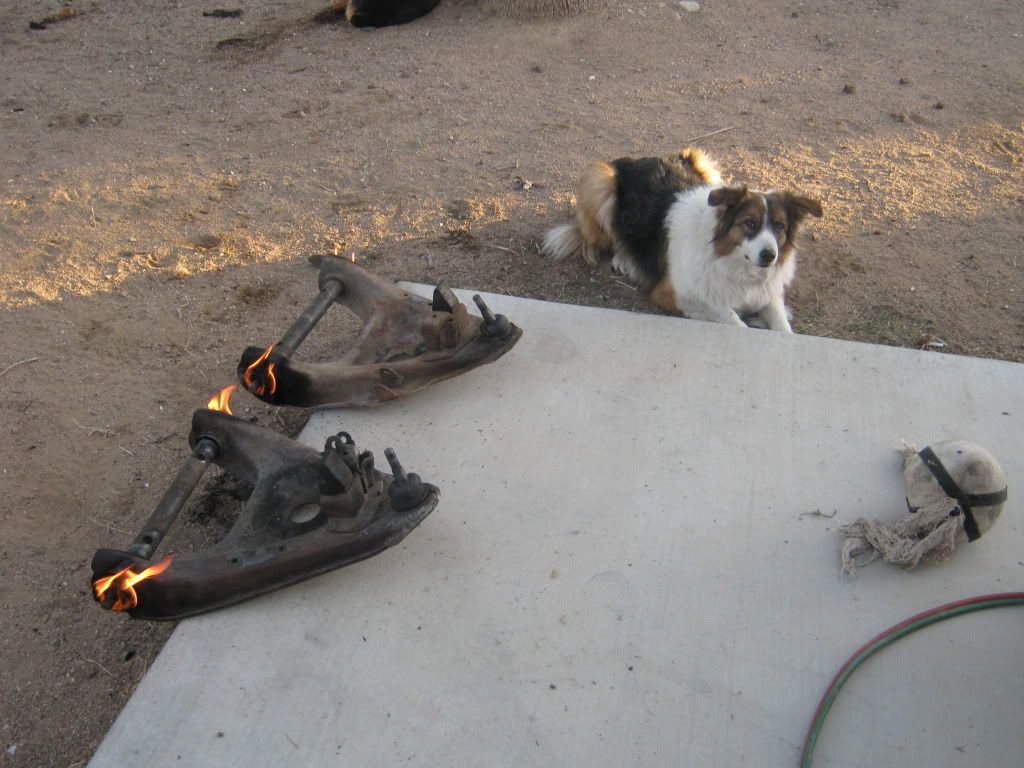 More to come!!!!
__________________
Check out my latest endeavor: https://roundsixpod.com My build threads: '55 Chevy: http://67-72chevytrucks.com/vboard/s...d.php?t=247512 '64 C-20: http://67-72chevytrucks.com/vboard/s...d.php?t=446527 Last edited by chevyrestoguy; 12-04-2011 at 03:12 PM. |
|
|
|
|
12-04-2011, 03:10 PM
|
#106 |
|
Registered User
Join Date: Sep 2011
Location: Tacoma, WA
Posts: 2,425
|
Re: Project '64 Cheapskate
[QUOTE=chevyrestoguy;5047074] I'll be working underneath the truck and she'll constantly drop her stick or her ball right on your foot to get your attention. Goofball........
QUOTE] Heheheh it is hard to say no to pets like that.... We had horses when I was growing up, and we had this one pinto mare that was like that. You could not be anywhere within her reach and she wasnt in your pocket or bucket of fencing nails, whatever.... to get your attention. When we get out of the Army I have promised my wife we will get a dog (or two) My wife was a K9 drug dog handler Military Police for 13 years of her career. We both love dogs but Active Duty military life is too hard I think to be lugging a dog around. The Army wont ship them, so you have to pay for that, there are housing restrictions, and then quarentines to some places we have been as well... Sorry to hijack your build, but I have to admit, what you are doing right now with your suspension is beyond my ability to even grasp! 
__________________
Michael McMurphy My 66 Stepside My 64 Tow Truck My 66 Tempest Table Of Contents Added to Page1 |
|
|
|
|
12-04-2011, 09:28 PM
|
#107 | |
|
1 thing at a time is progress.
Join Date: Jun 2007
Location: Ball Ground GA
Posts: 5,511
|
Re: Project '64 Cheapskate
Quote:
 We have a one year old Border Collie. She is high strung. We have a one year old Border Collie. She is high strung. 
__________________
Alan
Philippians 2:14-16 |
|
|
|
|
|
12-04-2011, 09:53 PM
|
#108 |
|
Registered User
Join Date: May 2007
Location: Deale Md
Posts: 4,663
|
Re: Project '64 Cheapskate
Yea my wife and I only baby sat a border collie for 7 days woo we could not throw any thing enough or play tug of war oh nice cheap build too.
__________________
James 63 GMC V6 4speed carryall 65 chevy swb bbw V8 auto 68 K20 327/4 speed, buddy buckets 2002 GMC CC Dually Duramax 64 GMC lwb 3/4 V6 4speed SOLD 66 GMC swb bbw buddy buckets SOLD IG duallyjams The only thing that stays the same is constant change! |
|
|
|
|
12-31-2011, 09:45 AM
|
#109 |
|
Registered User
Join Date: Dec 2011
Location: Czech Rebublic / Europe
Posts: 165
|
Re: Project '64 Cheapskate
Nice project! And great C10 to start a nice build. Love your progress pics. And your collie Tori is a real cuttie-pie!
 love them dogs. Mine need an attention 24/7 too. love them dogs. Mine need an attention 24/7 too. Keep your pics coming!!! |
|
|
|
|
01-02-2012, 11:22 AM
|
#110 |
|
Registered User
Join Date: Mar 2005
Location: apple valley, ca
Posts: 2,670
|
Re: Project '64 Cheapskate
I had a very productive last couple of days and got a lot done on the '64. I finished the caster mod I posted about earlier, so I'll continue where I left off:
In my earlier post, I showed the portion of the mod where the locating pins (the factory rivets) needed to be removed and replaced with 7/16-20 x 1.5" long socket head cap screws. For added insurance, I used Loctite and a stover nut. Here's a shot of the finished installation: 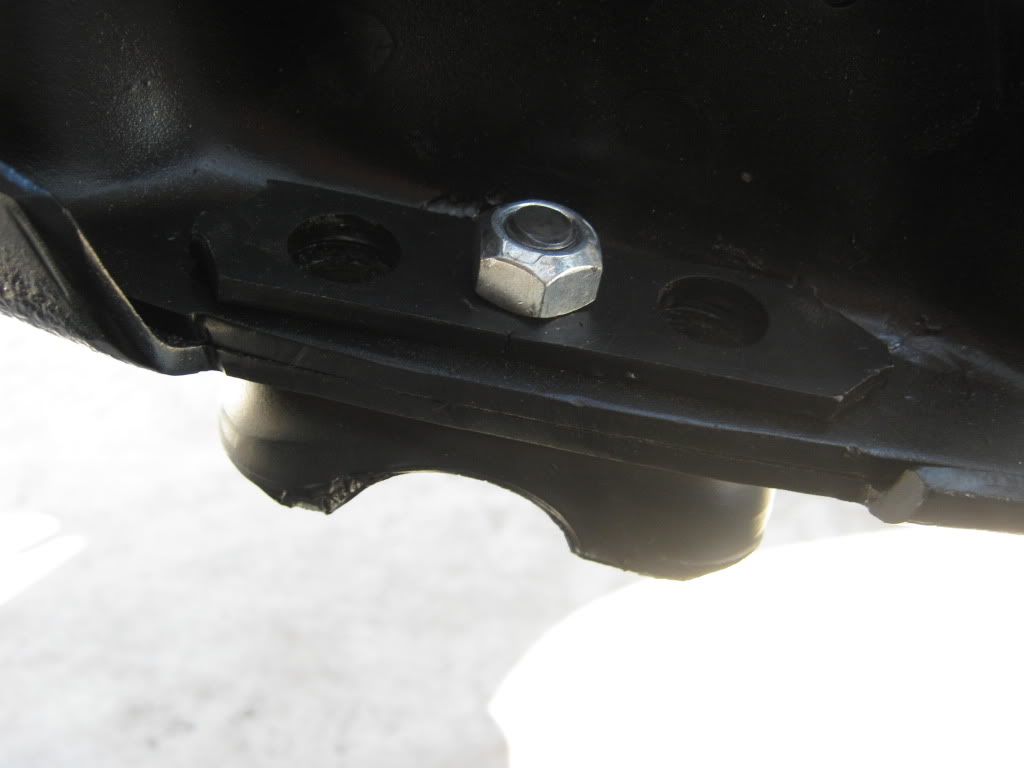 In this shot, you can see the head of the fastener, which will locate perfectly in the new spot face positions in the lower control arm cross bar.  In this picture, you can see the difference between a stock crossbar and a modified crossbar. The upper bar is stock, and the lower bar is the modified bar with the newly-located spot faces. 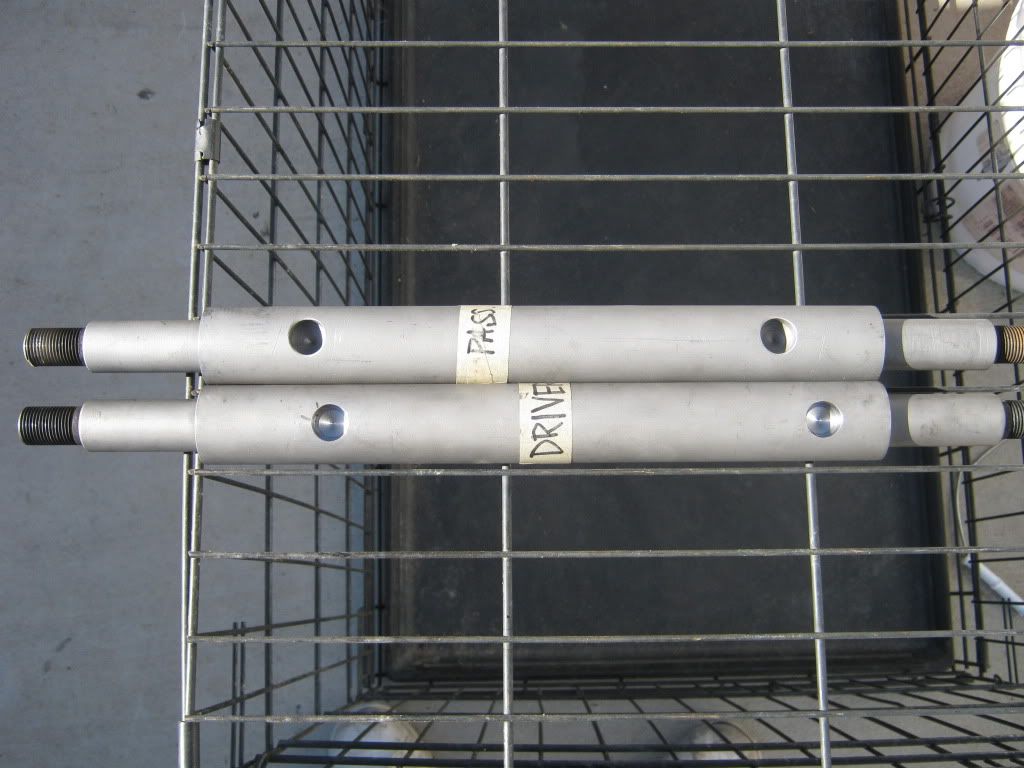 For an added bit of fluff, I primed and painted the front half of the chassis. I gave it a good shot with the steam cleaner and another last blast with the pressure washer, and then primed it. It's not a show vehicle, and the chassis isn't 1000% clean, but it'll suffice. It's a driver and it'll get abused.  While the control arms were out, they got blasted and painted. New Energy Suspension bushings were installed and all the balljoints were replaced with Moog parts. Then the moment of truth arrived, and it was time to install the control arms and see if the caster mod was a success. Everything fit perfect. The clearances were excellent, and the locating pins lined up exactly as planned. Here is a shot of the driver's side control arm. You can see just how much the control arm moved forward. 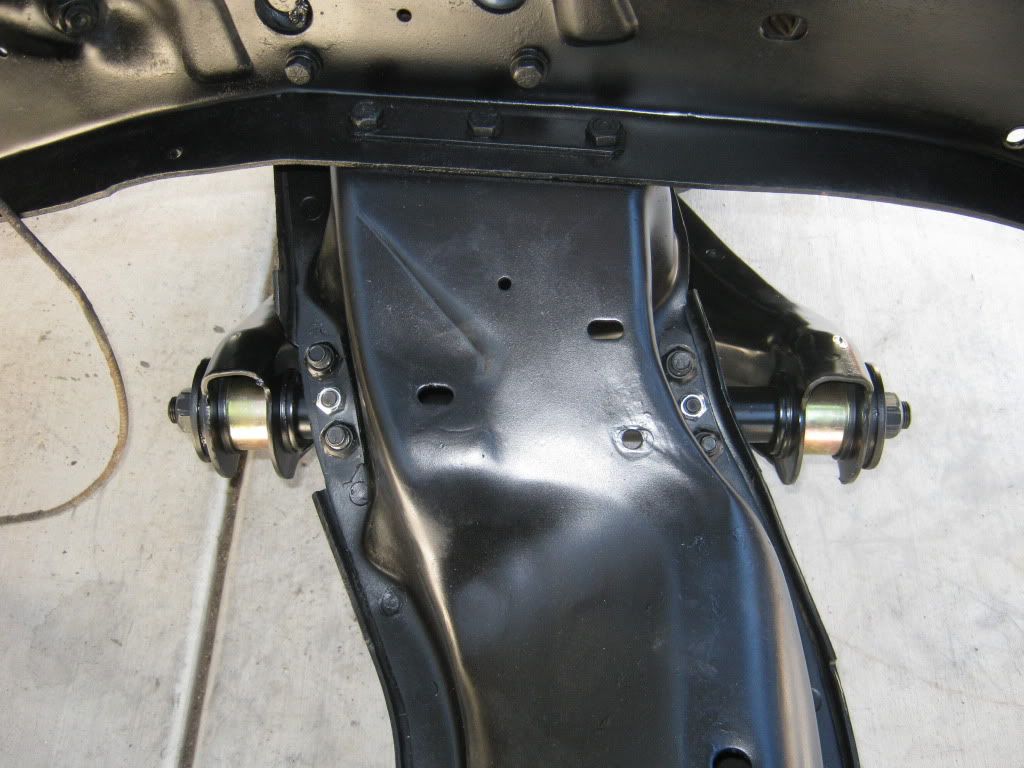 Here's a close-up shot of the back-side. If you recall, I had to clearance the crossmember. I now have plenty of room with the control arm at full up/down. 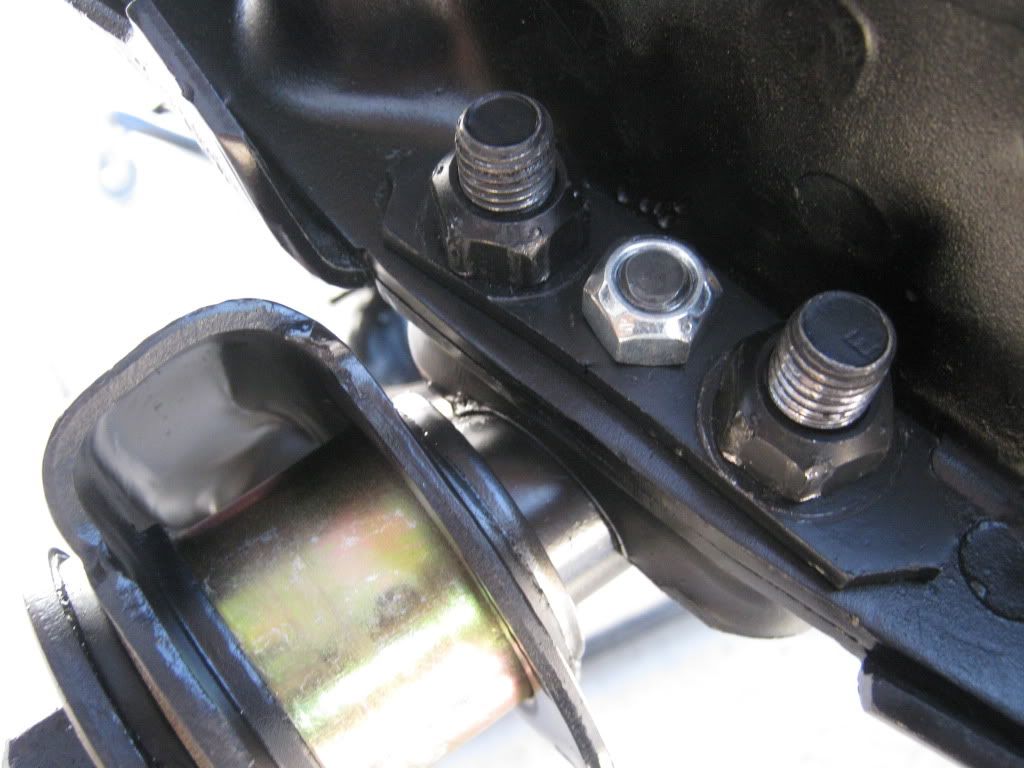 Here's a shot of the front side. You can really the .75" difference in position from stock. 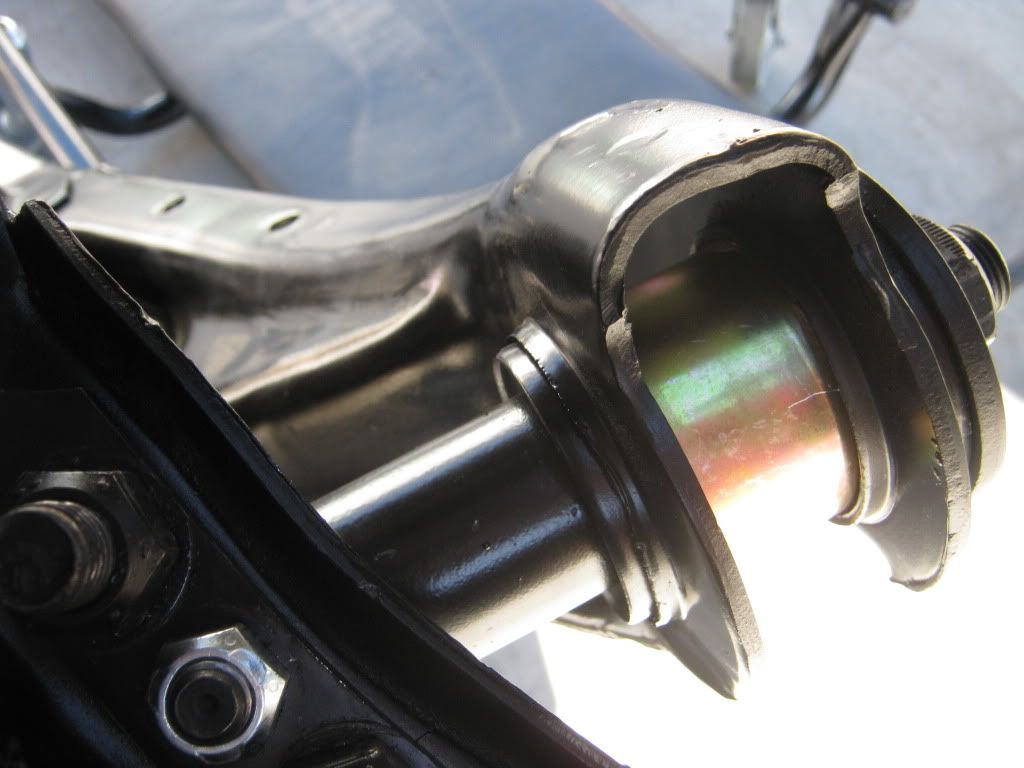 Here's another trick I did to eliminate a huge shim stack in the upper control arm. On the half-tons, GM utilized spacers on the control arm bolts, along with the normal shims. Because I cut a coil from the stock spring, I knew that the alignment shop would have to add more shims to get the camber correct. So, I went to the wrecking yard and grabbed some other spacers(the fat ones) and added them to the mix. The original set-up was: 1 skinny spacer on the forward bolt, and one fat spacer on the rear bolt. The new set-up is: 1 fat spacer on the front, and 1 fat and 1 skinny spacer on the rear. Not much of a difference, but I don't like the look of a huge spacer stack on lowered vehicles. 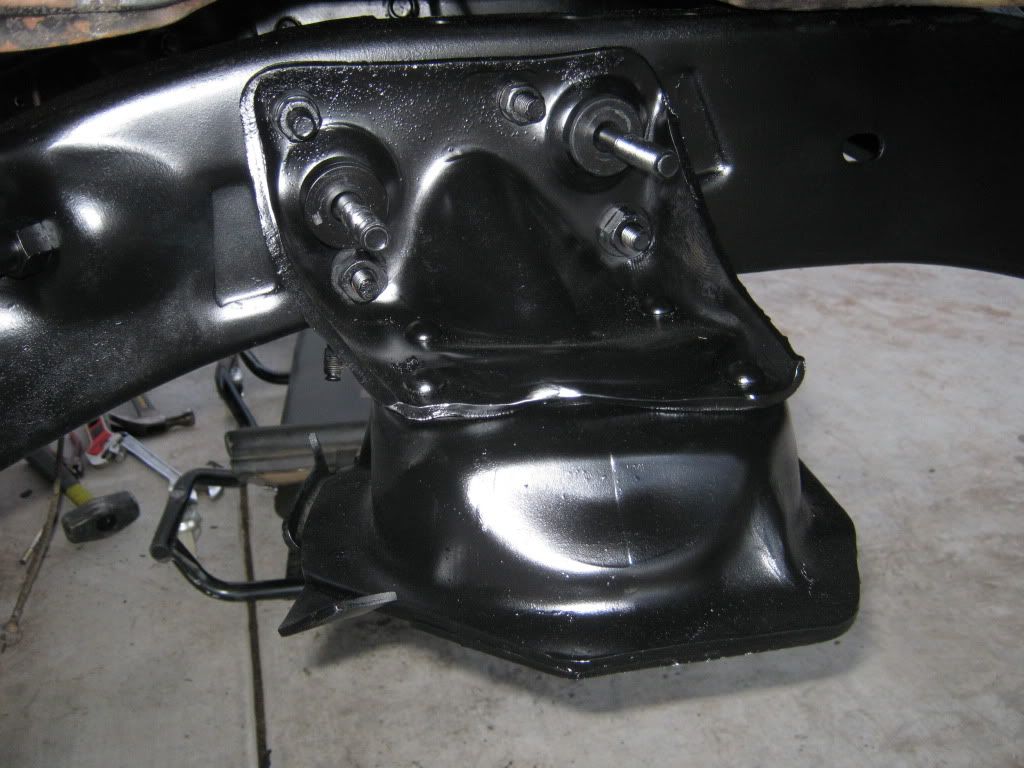 I finally got to set the truck on it's wheels. The engine and trans are not installed, so it'll come down a bunch when they finally get installed. The wheels and tires are from the donor Suburban, and they are NOT going to be what I am going to run. I am going to have a big/little wheel and tire combo, and I'm still trying to decide what I'm going to go with. In this shot, you can also see the rear height after the spring changeout. It's finally getting there! 
__________________
Check out my latest endeavor: https://roundsixpod.com My build threads: '55 Chevy: http://67-72chevytrucks.com/vboard/s...d.php?t=247512 '64 C-20: http://67-72chevytrucks.com/vboard/s...d.php?t=446527 Last edited by chevyrestoguy; 01-02-2012 at 09:00 PM. |
|
|
|
|
01-02-2012, 11:51 AM
|
#111 |
|
Registered User
Join Date: Dec 2006
Location: SLC, UT
Posts: 706
|
Re: Project '64 Cheapskate
Awesome!
thanks for sharing your build. |
|
|
|
|
01-02-2012, 12:50 PM
|
#112 |
|
Registered User
Join Date: Dec 2009
Location: vancouver b.c....is the biggest place most people would know but I am actually out in the valley 45 mins away
Posts: 2,050
|
Re: Project '64 Cheapskate
Got to love the feeling when you get wheels back on the ground....it's one more thing to check off the list....nice to see you back on it and making progress....
__________________
1966 Pro street build http://67-72chevytrucks.com/vboard/s...?t=448089[ 1958 LS 2 build http://67-72chevytrucks.com/vboard/s...d.php?t=527123 1966 SBFS low and go http://67-72chevytrucks.com/vboard/s....php?p=5799909 1966 SBFS street HULK http://67-72chevytrucks.com/vboard/s...=1#post5886625 Poject Low and go gets a 6.2 ltr LSA supercharged with 6 speed automatic Aluinum Radiator Dealer pm for details |
|
|
|
|
01-02-2012, 02:32 PM
|
#113 |
|
Registered User
Join Date: Sep 2011
Location: Tacoma, WA
Posts: 2,425
|
Re: Project '64 Cheapskate
Your detailed explanation and pics are awesome, thanks!
Makes for a really good read and makes me think about stuff... 
__________________
Michael McMurphy My 66 Stepside My 64 Tow Truck My 66 Tempest Table Of Contents Added to Page1 |
|
|
|
|
01-03-2012, 08:21 PM
|
#114 |
|
Registered User
Join Date: Aug 2010
Location: louisville, ky
Posts: 13
|
Re: Project '64 Cheapskate
Looking good Alex. Have you thought anymore about your 83?
Nate
__________________
In the process of looking for a 60 or newer short bed fleet side. |
|
|
|
|
01-03-2012, 09:32 PM
|
#115 |
|
^^who I am^^ what I say>
Join Date: Jun 2009
Location: Murchison, Tx
Posts: 992
|
Re: Project '64 Cheapskate
cool build! i love cheap builds, im doing a budget frame off on an 85 myself. right now i have less in it than what a full tank of gas costs!
__________________
70 chevy LWB 350/TH350 Barn find (AKA the 70) http://www.67-72chevytrucks.com/vboa...d.php?t=406364 East Tx Squares |
|
|
|
|
01-04-2012, 12:22 PM
|
#116 | |
|
Registered User
Join Date: Mar 2005
Location: apple valley, ca
Posts: 2,670
|
Re: Project '64 Cheapskate
Quote:
Right now, you guys have dibs on it, and nobody else.It's a great project truck with a lot of added stuff. The biggest plus is that it's a California desert vehicle with zero rust and a nearly perfect body. How would you transport it back to your place?
__________________
Check out my latest endeavor: https://roundsixpod.com My build threads: '55 Chevy: http://67-72chevytrucks.com/vboard/s...d.php?t=247512 '64 C-20: http://67-72chevytrucks.com/vboard/s...d.php?t=446527 |
|
|
|
|
|
01-04-2012, 03:12 PM
|
#117 |
|
Registered User
Join Date: Jun 2010
Location: Vancouver Island BC
Posts: 652
|
Re: Project '64 Cheapskate
Incredible detail and instruction. Very cool engineering.
__________________

|
|
|
|
|
01-04-2012, 05:11 PM
|
#118 |
|
Registered User
Join Date: Dec 2011
Location: Czech Rebublic / Europe
Posts: 165
|
Re: Project '64 Cheapskate
Wow awesome progress! Thanks for all the pics! Keep it up!!
|
|
|
|
|
01-05-2012, 07:42 AM
|
#119 |
|
Registered User
Join Date: Dec 2011
Location: Alaska
Posts: 405
|
Re: Project '64 Cheapskate
Now this is my type of build....I love your truck and what you are working to accomplish here....I had a friend who built a Firebird once by going into his favorite salvage yard and camping out one week and driving his results out the door when he was done....it had parts from many different GM vehicles in it, but he had a running and driving vehicle when he was done. (His buddies dad owned the place and told him that any car he could put together that week could be his for $500...) So, I love what you are doing here and I love your cheap theme. Keep up the great work and keep us informed of updates!
__________________
C@rnut001 (Owen) Alaskan Members Check In http://67-72chevytrucks.com/vboard/s...22#post5094422 http://67-72chevytrucks.com/vboard/s...18#post6778618 |
|
|
|
|
01-05-2012, 03:26 PM
|
#120 |
|
Registered User
Join Date: Mar 2005
Location: apple valley, ca
Posts: 2,670
|
Re: Project '64 Cheapskate
Thanks, Owen!
I really love hitting the wrecking yards, because to me, it's a treasure hunt. I am always blown away at the stuff people send to the scrap yard. The great thing about GM is that they were very smart about making things interchangeable. You can find great parts and upgrade your vehicle at the same time for dirt cheap. Plus, it makes you use your brain, which is good. Anybody can open up a catalog and just order stuff, but there's a real thrill when you do your homework and research everything and it works perfect and you have almost zero money tied up in it. My '64 has been a blast to build, and I've got some cool stuff planned for it that you guys will definitely like! Cool, cheap, stuff.
__________________
Check out my latest endeavor: https://roundsixpod.com My build threads: '55 Chevy: http://67-72chevytrucks.com/vboard/s...d.php?t=247512 '64 C-20: http://67-72chevytrucks.com/vboard/s...d.php?t=446527 |
|
|
|
|
01-06-2012, 09:15 AM
|
#121 | |
|
Registered User
Join Date: Aug 2010
Location: louisville, ky
Posts: 13
|
Re: Project '64 Cheapskate
Quote:
Also, your 64 is really starting to look awesome. Not bad for a $200 truck and some hard work in your free time and a good donor Burb. Nate
__________________
In the process of looking for a 60 or newer short bed fleet side. |
|
|
|
|
|
01-23-2012, 05:44 PM
|
#122 |
|
Registered User
Join Date: Sep 2011
Location: Indianapolis, Indiana
Posts: 261
|
Re: Project '64 Cheapskate
Yes love your builds, I,ve had a couple of those $200 vehicles that lived in my pocket book for a while also lol.
Posted via Mobile Device |
|
|
|
|
01-27-2012, 12:50 AM
|
#123 |
|
Needs a Big Block
Join Date: Oct 2003
Location: Red Deer , Alberta
Posts: 1,198
|
Re: Project '64 Cheapskate
Hey bud, been kreepin on this build for a while , lovin it so far!!!
My vote for rolling stock, the halibrand knock offs on eBay. They are cheap, and would set this thing off!! Posted via Mobile Device
__________________
1964 Short box On dropmembers and billets 1962 Suburban family cruiser 1972 K10 |
|
|
|
|
01-27-2012, 10:30 AM
|
#124 | ||
|
Registered User
Join Date: Mar 2005
Location: apple valley, ca
Posts: 2,670
|
Re: Project '64 Cheapskate
Quote:
http://67-72chevytrucks.com/vboard/s...d.php?t=320546 You would be blown away at how cheap he built it for. He's driving the wheels off of it and having a blast. That's the way it should be! Brad and I are constantly bouncing ideas off of each other, and we help each other out alot. Quote:
How's the Tall Grass build coming? Love that truck! Makes me want to build a stepper.
__________________
Check out my latest endeavor: https://roundsixpod.com My build threads: '55 Chevy: http://67-72chevytrucks.com/vboard/s...d.php?t=247512 '64 C-20: http://67-72chevytrucks.com/vboard/s...d.php?t=446527 Last edited by chevyrestoguy; 01-27-2012 at 10:38 AM. |
||
|
|
|
|
01-27-2012, 03:24 PM
|
#125 | |
|
Registered User
Join Date: Sep 2009
Location: Albuquerque, NM
Posts: 540
|
Re: Project '64 Cheapskate
Quote:
__________________
FAT MIKE My 59 http://67-72chevytrucks.com/vboard/s...d.php?t=400201 My 47 http://67-72chevytrucks.com/vboard/s...d.php?t=386848 |
|
|
|
|
 |
| Bookmarks |
|
|


 Linear Mode

