
|
Register or Log In To remove these advertisements. |
|
|
|
|||||||
 |
|
|
Thread Tools | Display Modes |
|
|
 03-19-2020, 12:29 PM
|
#1 |
|
Registered User
Join Date: Jan 2013
Location: Leonardtown, MD
Posts: 1,633
|
Butt welds for patch panels
I've always said we should be using butt welds, and trimming panels as tightly as we can get them. Some recent shop work helps to show that process, so hopefully this will help out someone with patch panels.
The owner of the Biederman truck we had done all those rust repairs and fabrications on also has a 51 Ford F7 with a Rollback body. He was driving it down the road a few months back when the Delco Remy voltage regulator on the firewall malfunctioned and resulted in an electrical fire. The heat caused some of the filler on the outside of the hood above the fire to delaminate, showing up as circles in the paint. As we sanded these defects out it was noticed that an abundance of filler (+1/4") had been used. The more we looked, the more filler we found all over the hood. In an effort to yield some weight savings, the entire outside of the hood was stripped.. 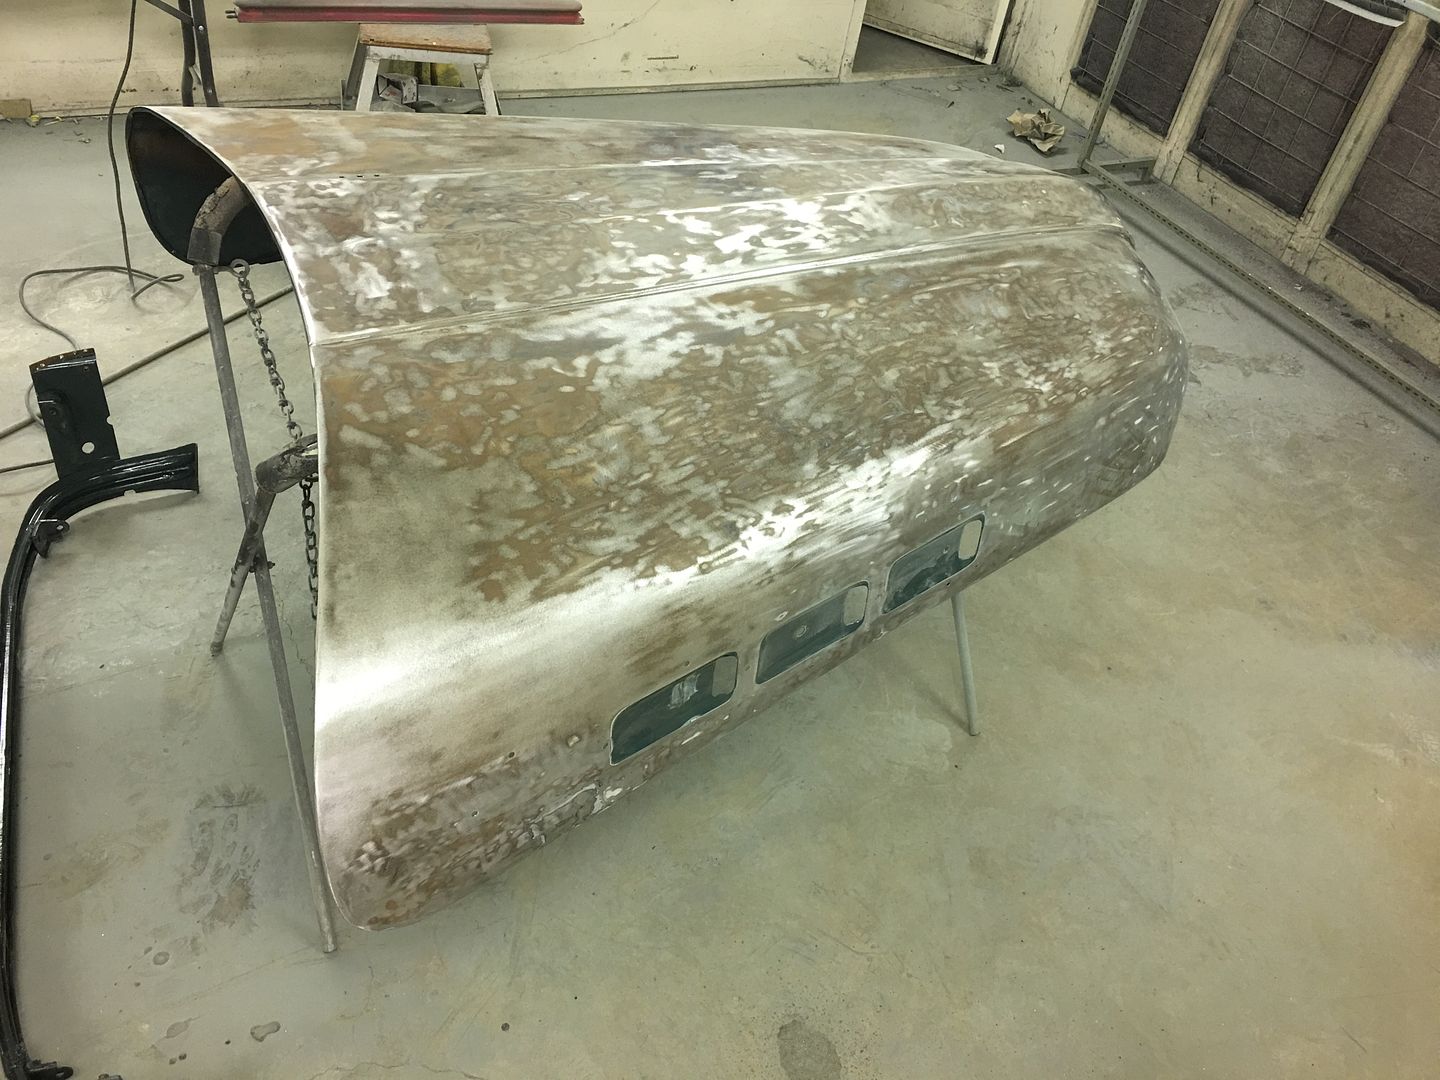 In order to have free access for planishing out the Atlantic Ocean defects, the hood brace was removed from the inside... 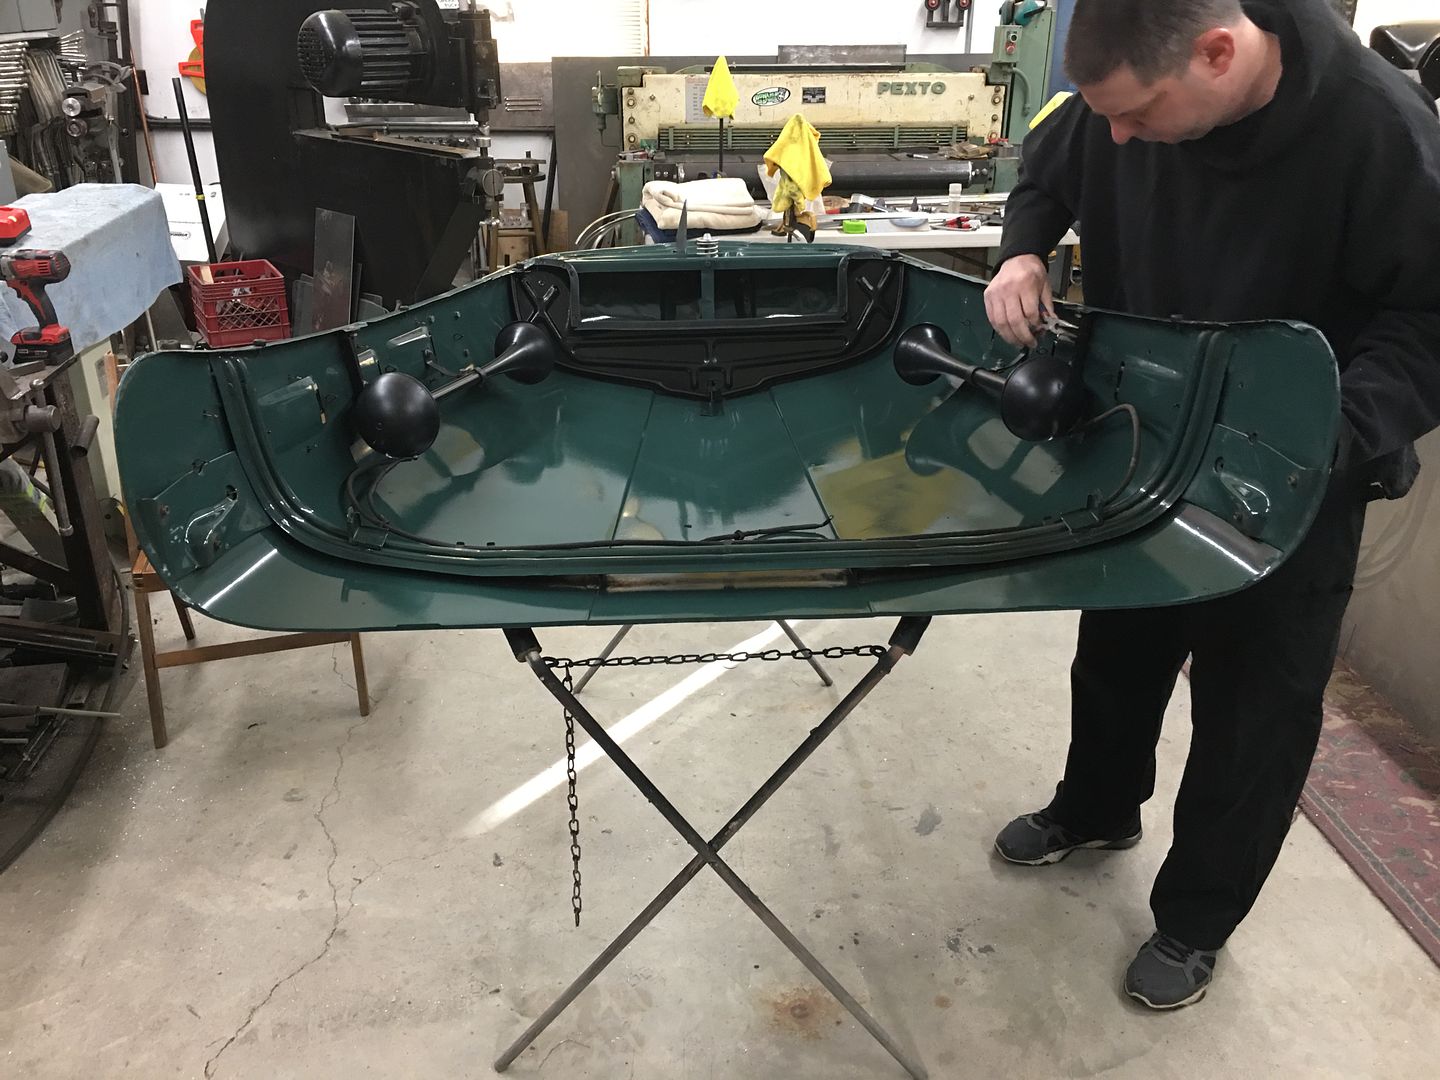 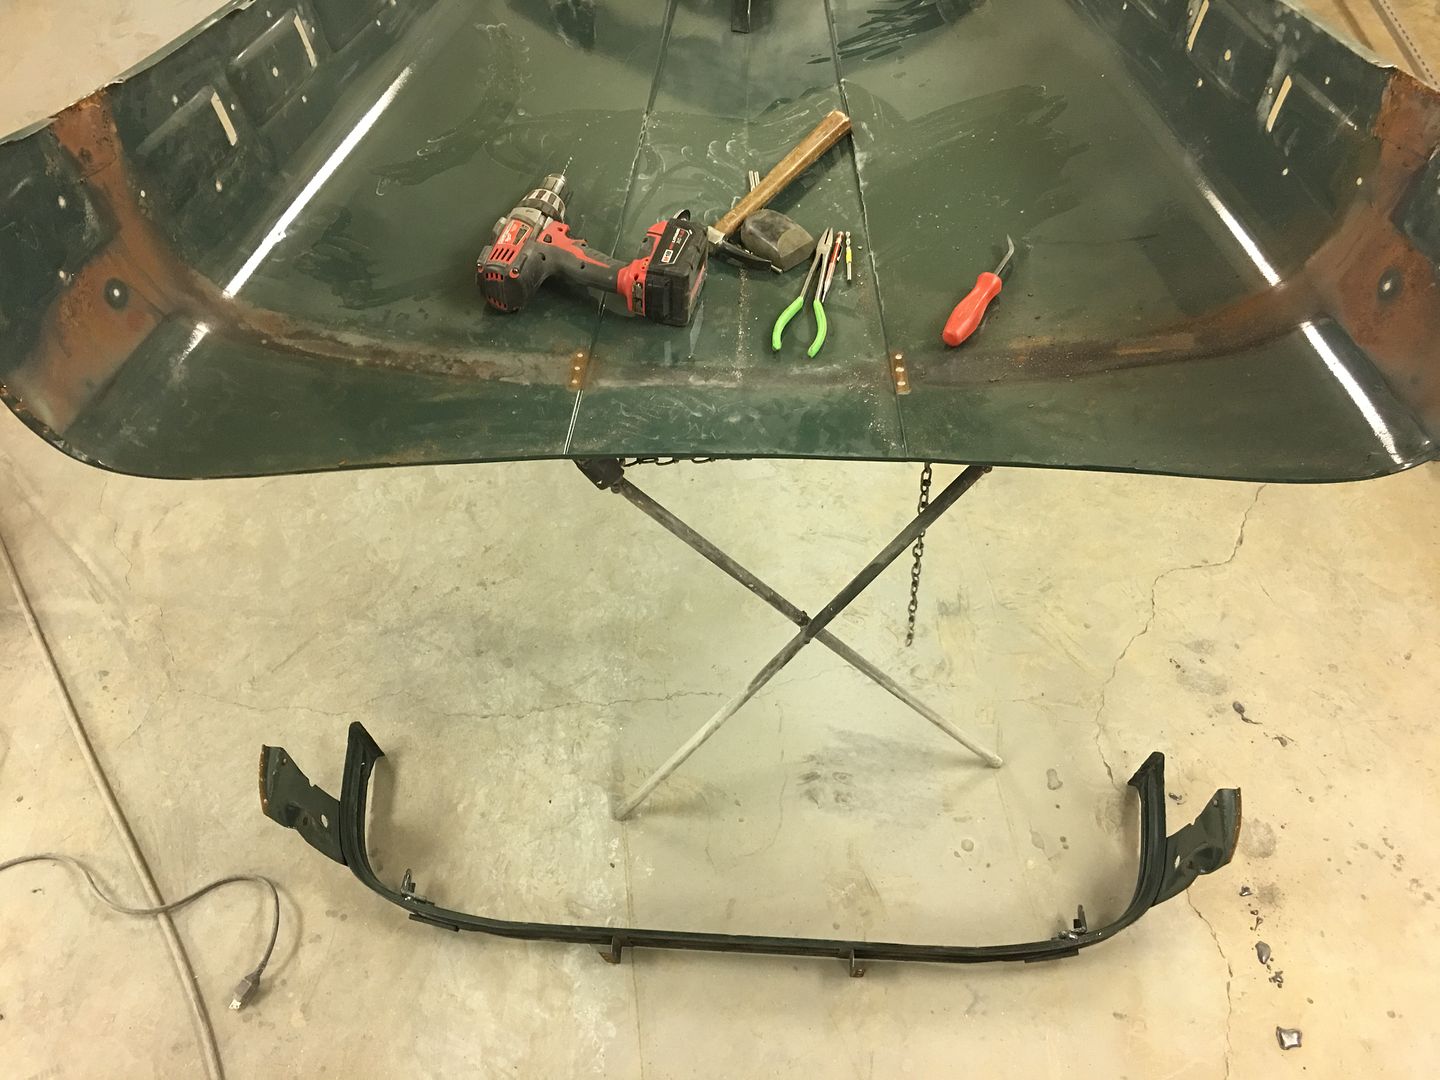 This revealed more defects that the last shop saw as fixes, but they won't leave my shop like that.... Rather than butt weld in the proper thickness metal, a piece of about 16 gauge is slipped behind the rust hole area (from dirt accumulating between brace and hood skin) and MIG welded around the perimeter. I think we can improve on that.. 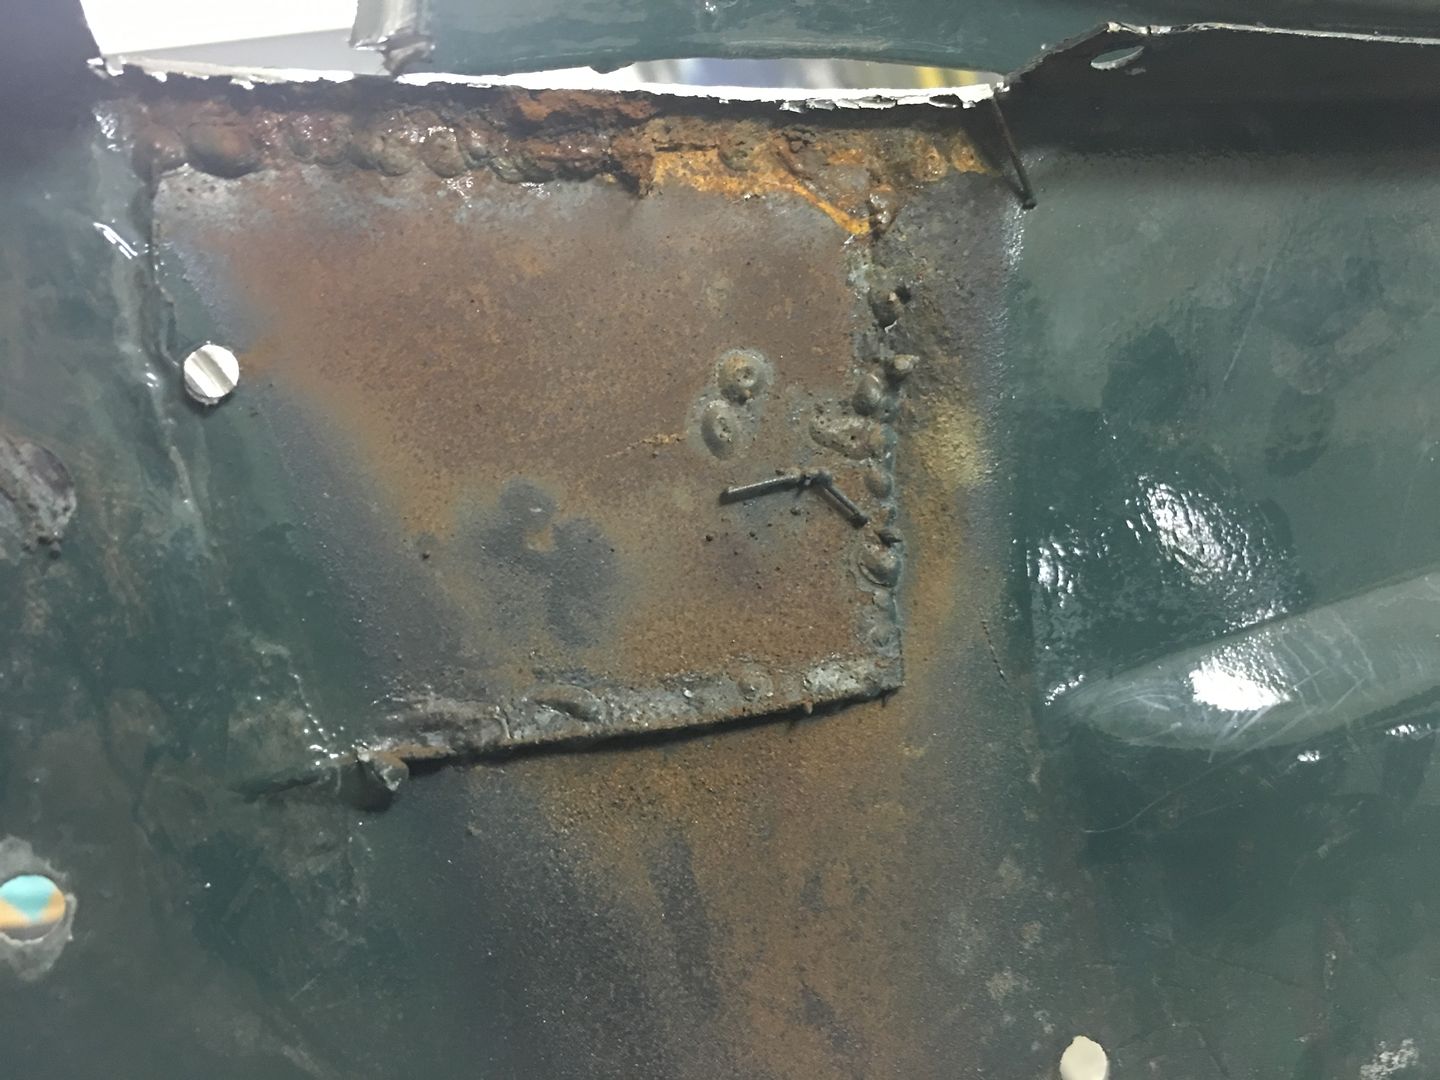 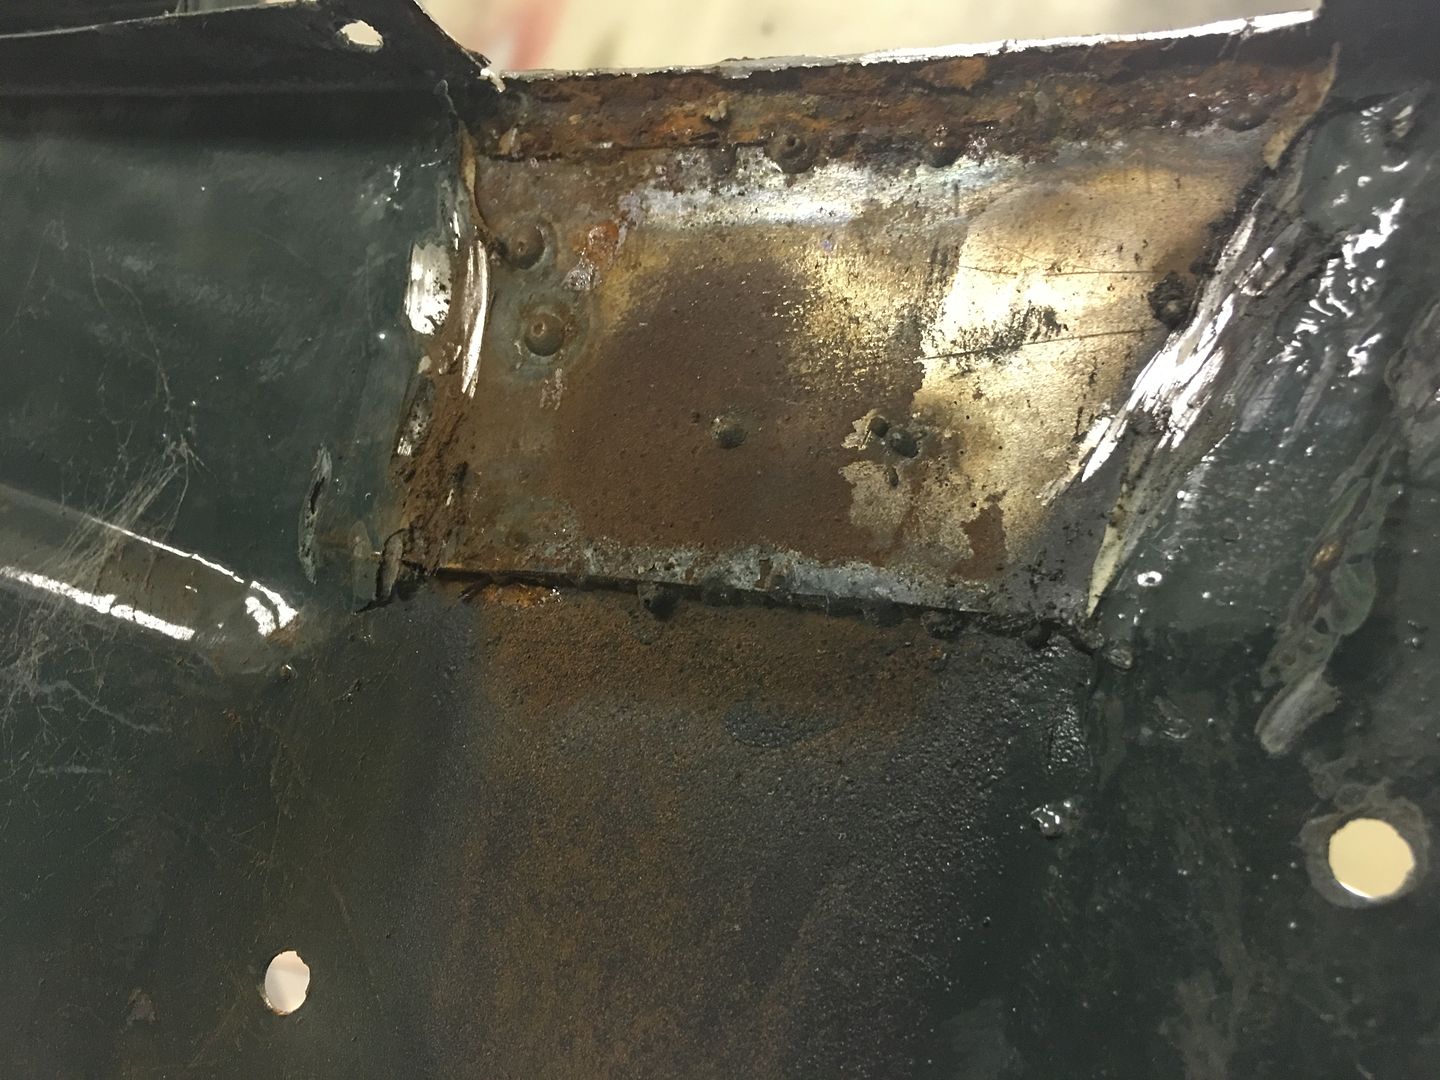 In addition to that, the brace had lost it's structural integrity, so we will remake the ends.. 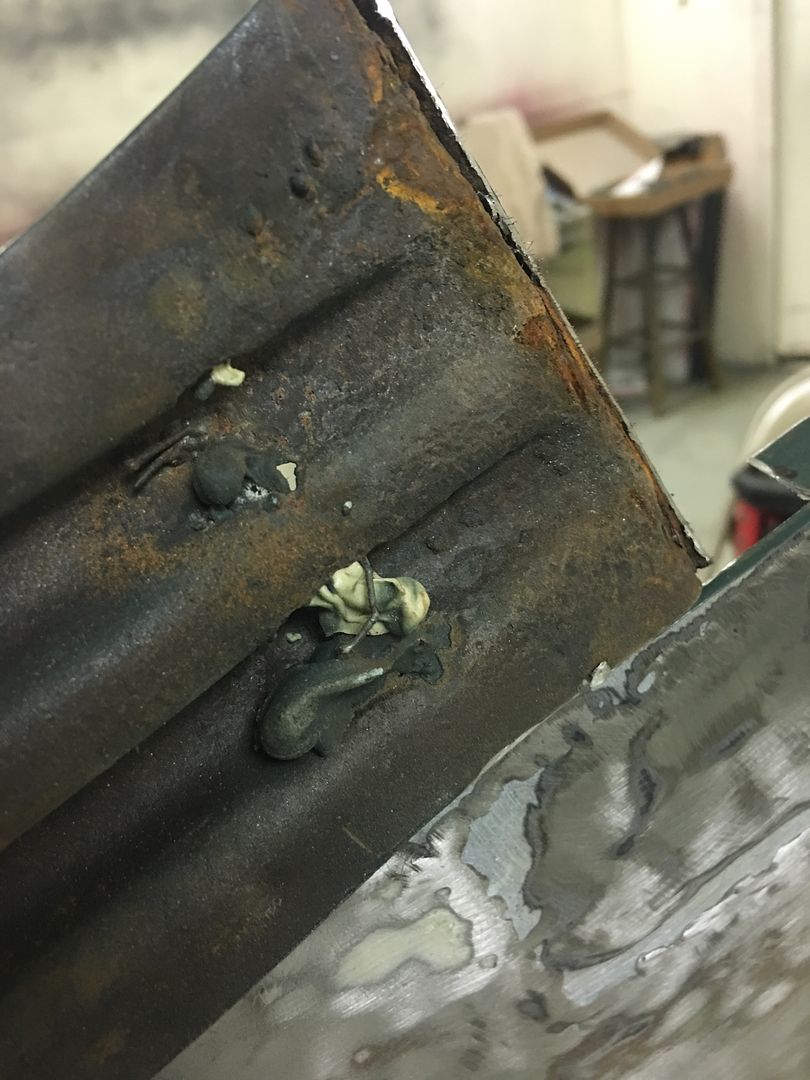 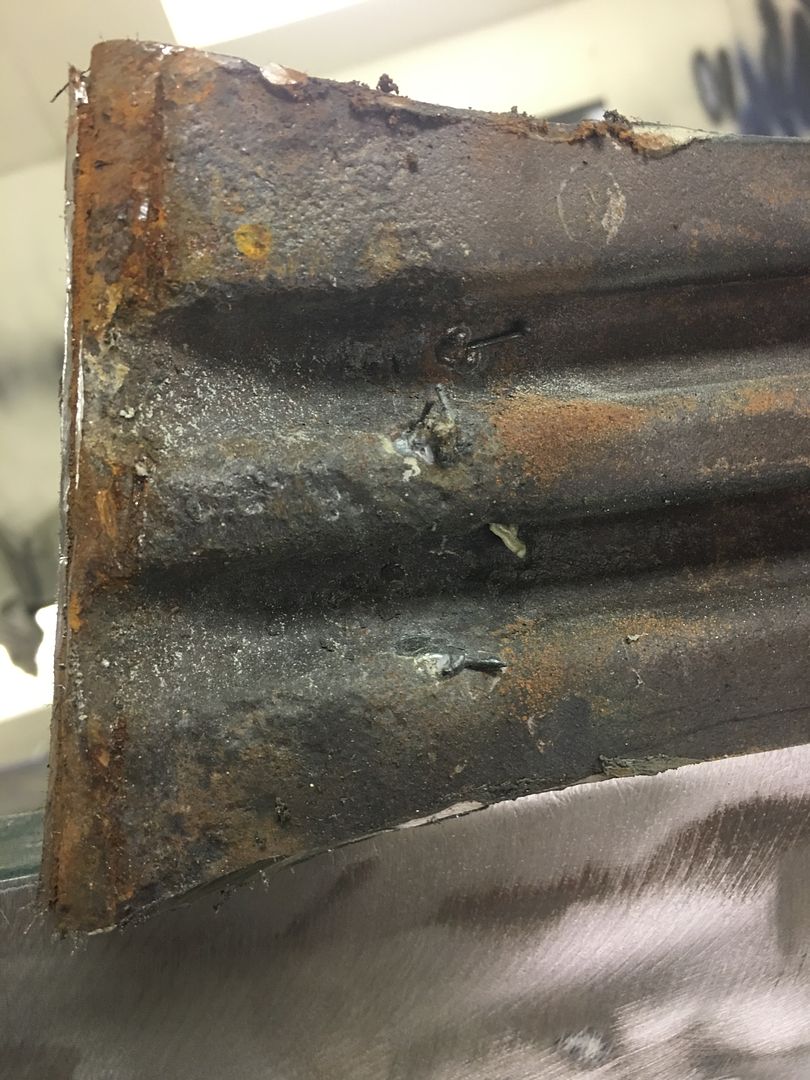 To start our repairs, a body sweep is used to capture the lower flange profile. Note that a profile cut out of construction paper/cardboard works as well.  Verifying the panel thickness. Despite this being an early 50's truck, despite this being a BIG truck, yes, the outer sheet metal here is STILL only 19 gauge. 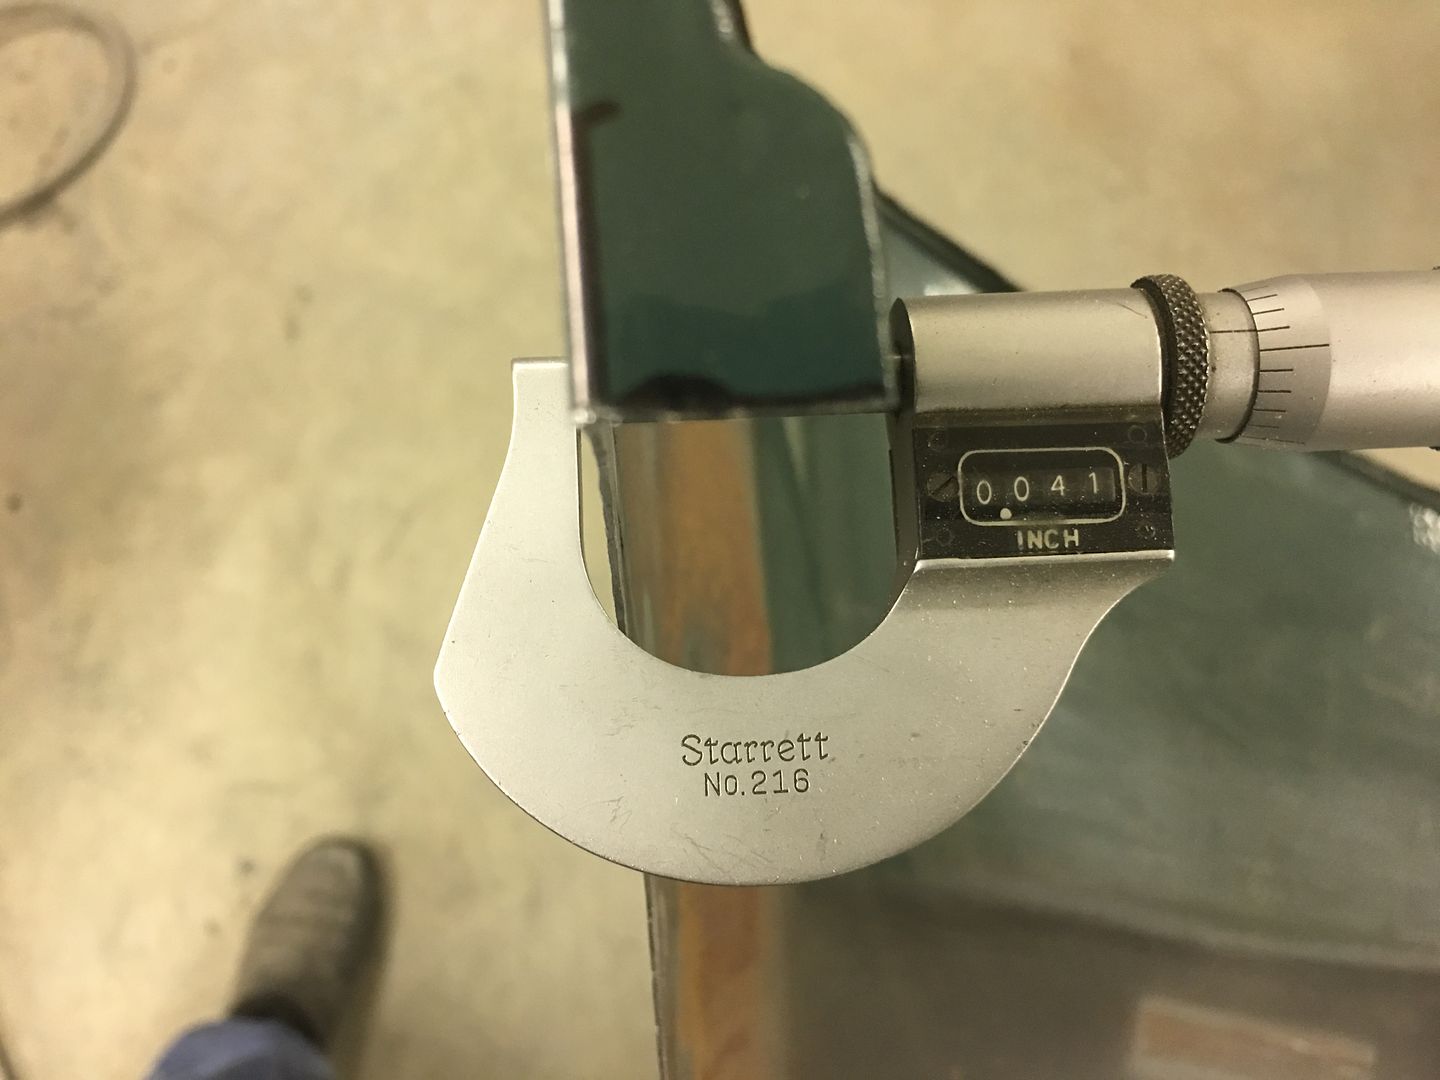 The affected area was cut out using an air body saw, use what you have available. Note we have no corners in the cut to help improve consistency in weld shrinkage on either side. 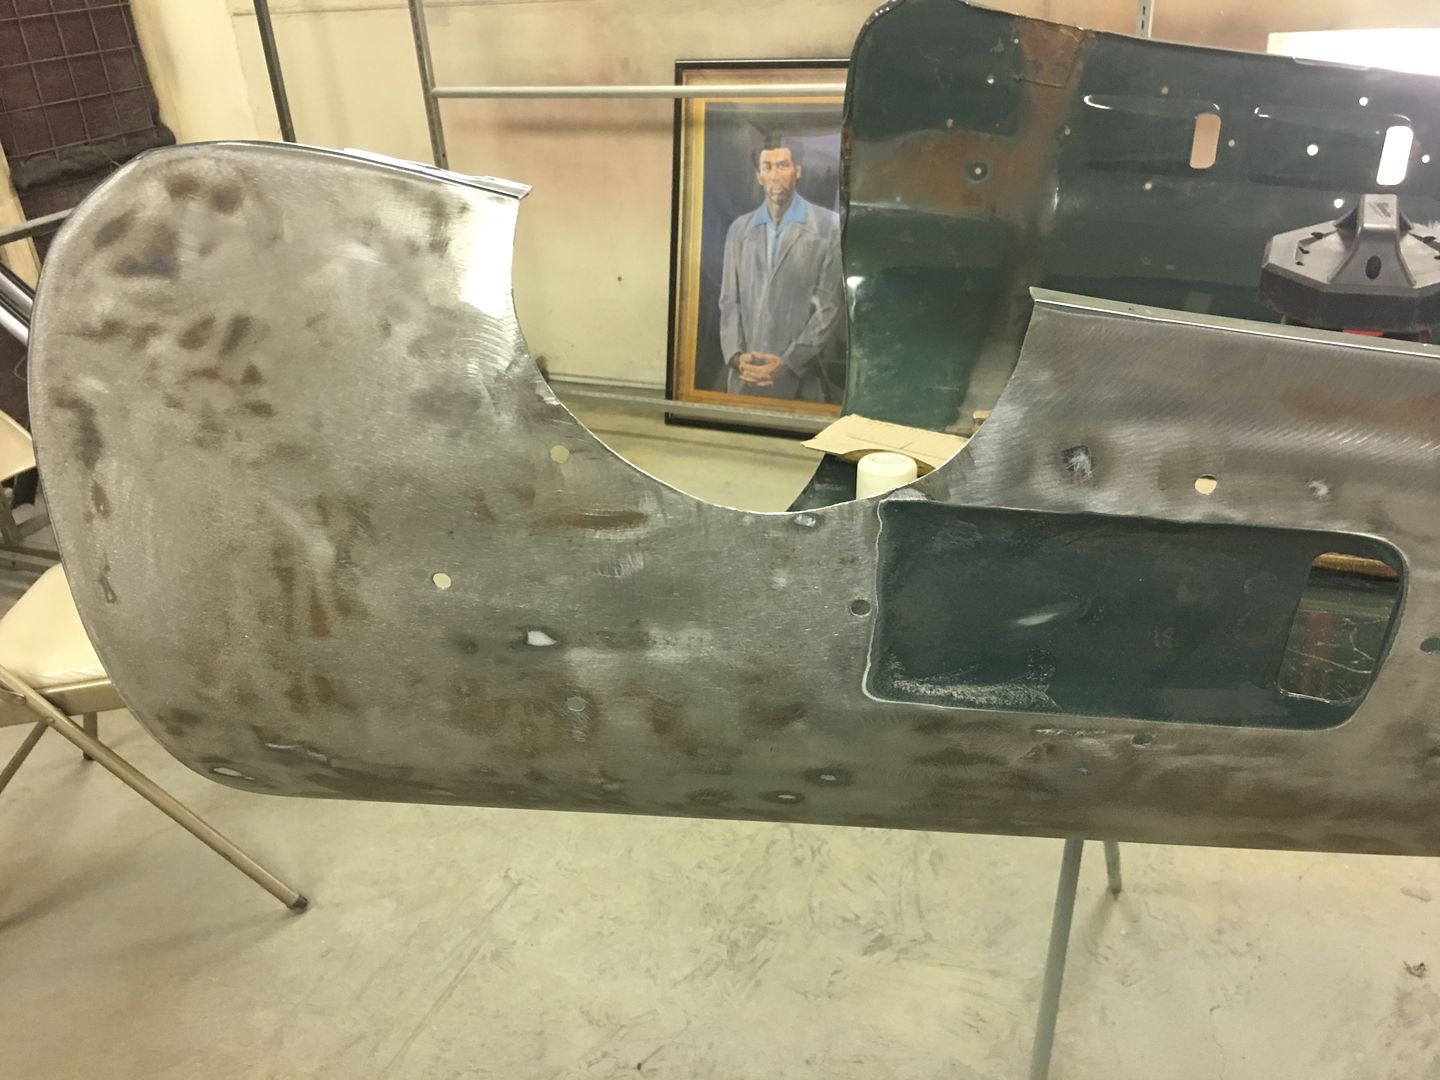 The flange bend line is traced from our profile template/body sweep, and bent using tipping wheel on the bead roller (since it's not a straight bend). Here test fitted to the hood.. 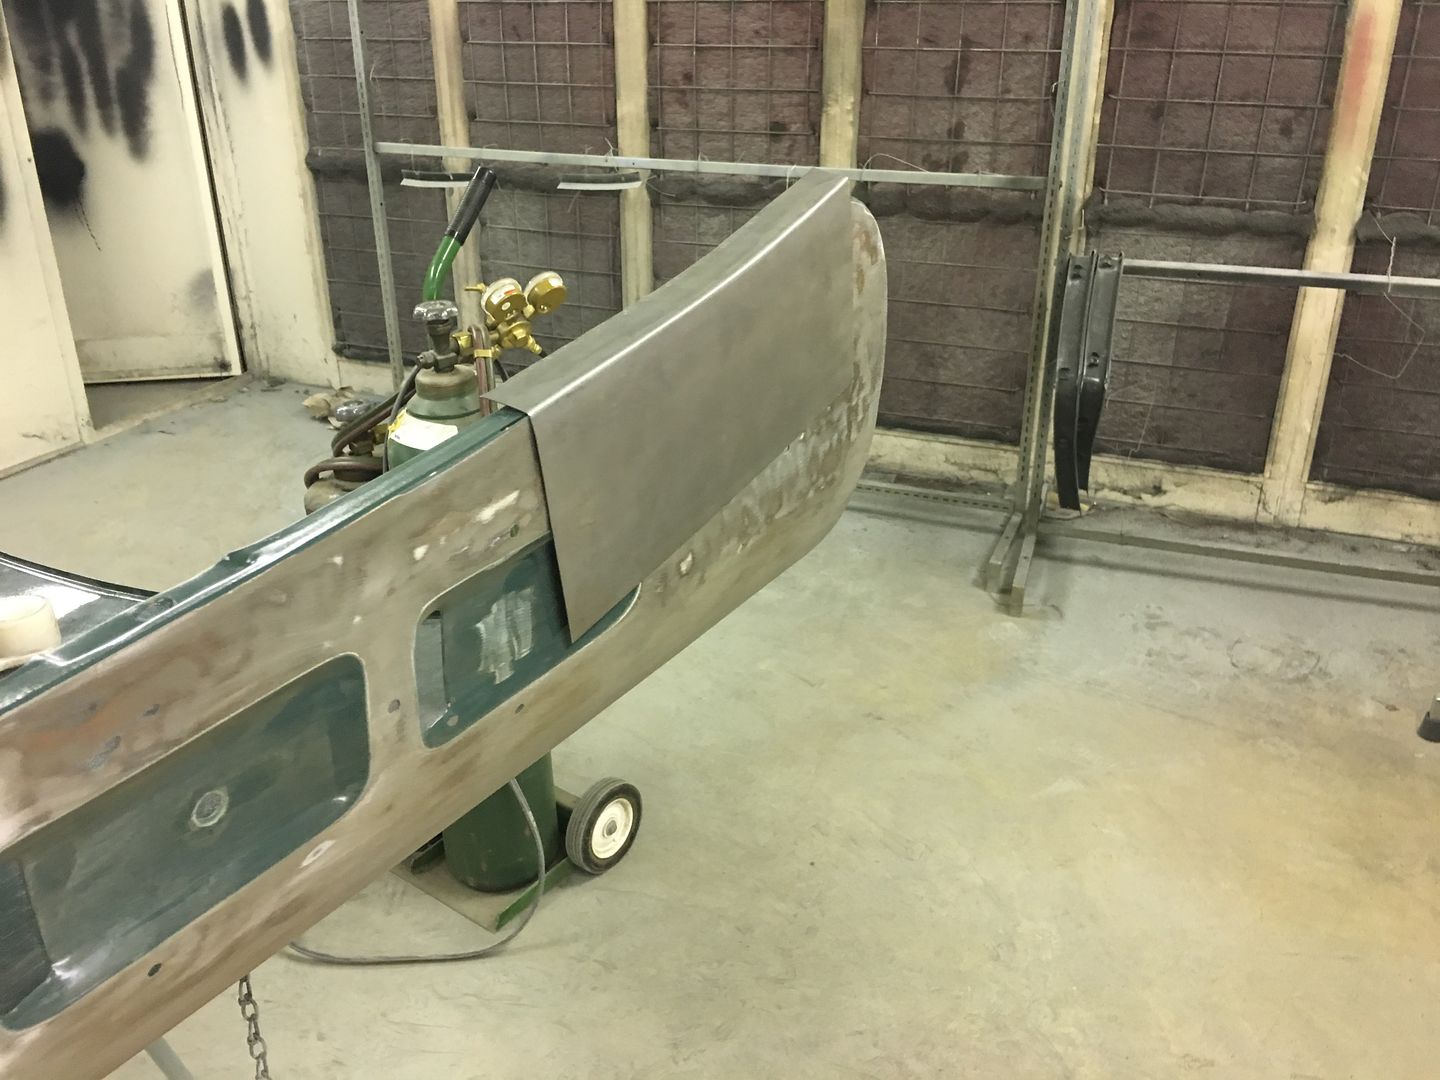 An Ice Pick (something everyone should have if doing this type of work) is used to mark the area of the cut and more importantly, the cuts for the flanges. 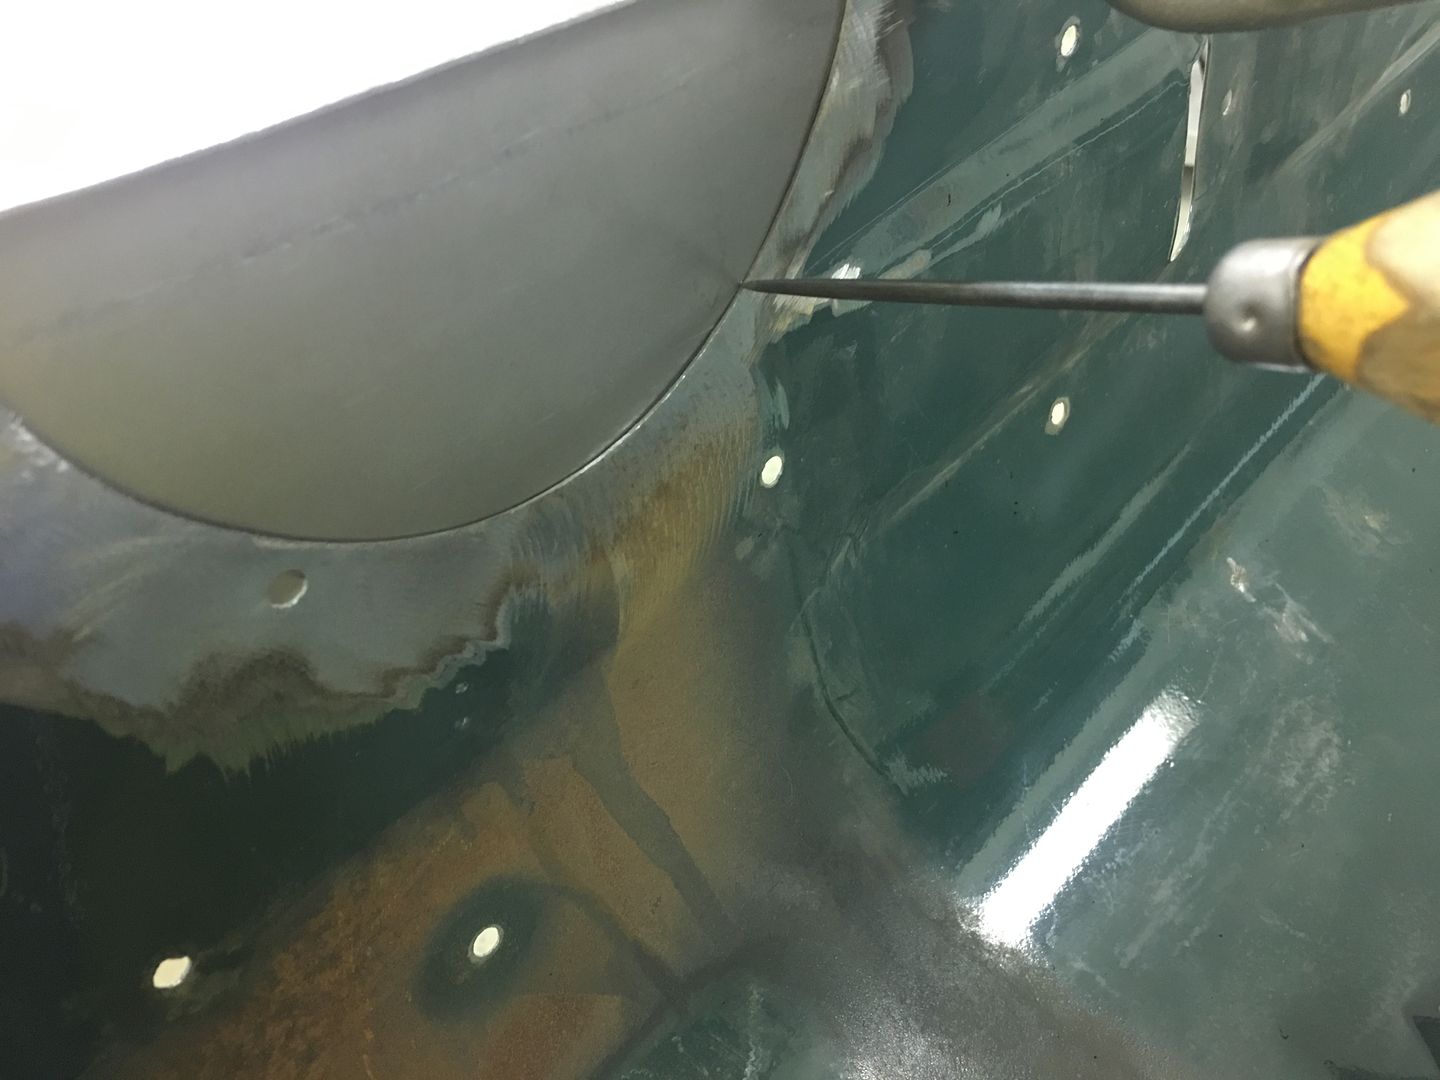 Next we trim the panel on the band saw leaving 1/4" extra around our marks. Next, we use offset snips and trim the flanges to the lines scribed. And ONLY the flanges.. Then the panel is re-fitted with the flanges flush with the original, and RE-scribe the round line, this time with more force to see the mark better. Note the scribe line has moved closer toward the flange as we located the panel correctly with flanges flush.. 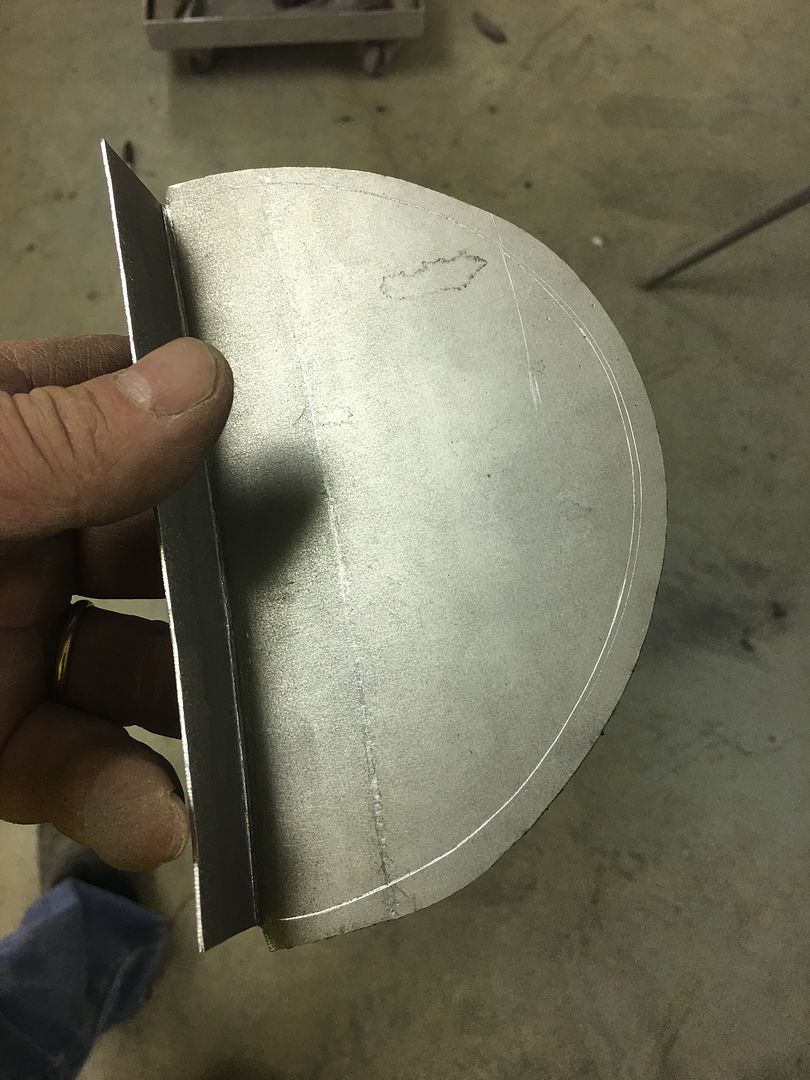 Fitted... panel should be as tight as you can get it to minimize any shrinking/pulling. 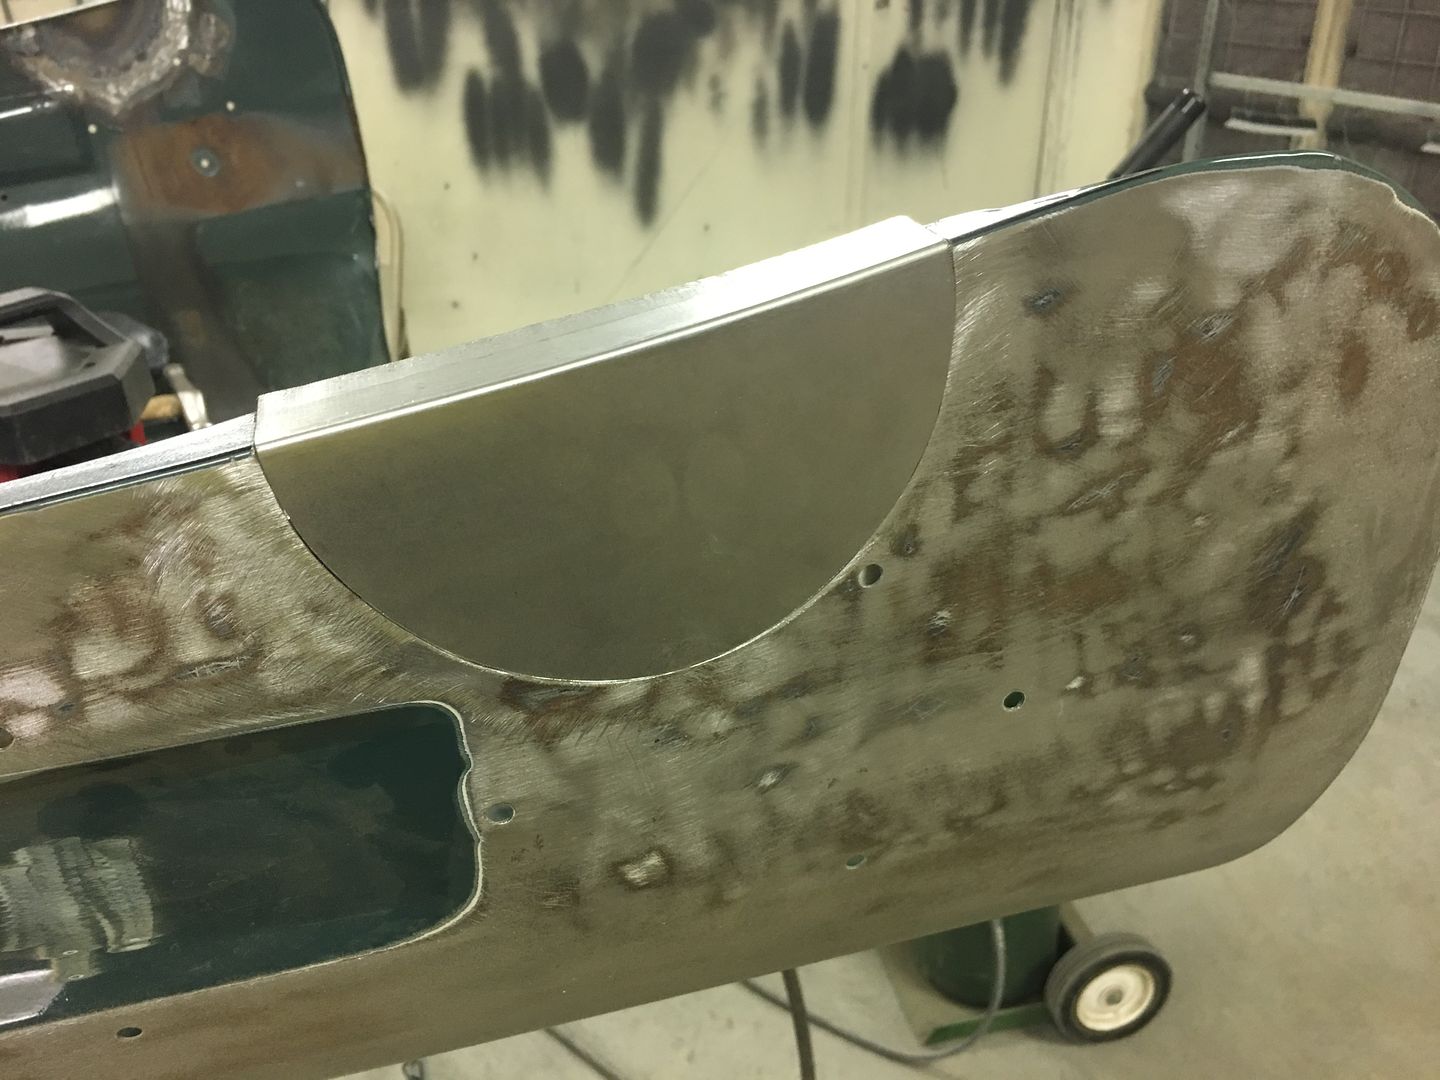 Flanges and outer surface are both aligned to the original first and I use TIG to tack on the exact corner on both ends to maintain this alignment.. Side note.... tacking only one end and working around to the other may shrink as you go, pulling other end down where it no longer aligns. So in this case, align both ends, tack both ends, and then progressively work your tacks side to side toward the bottom of the circle. 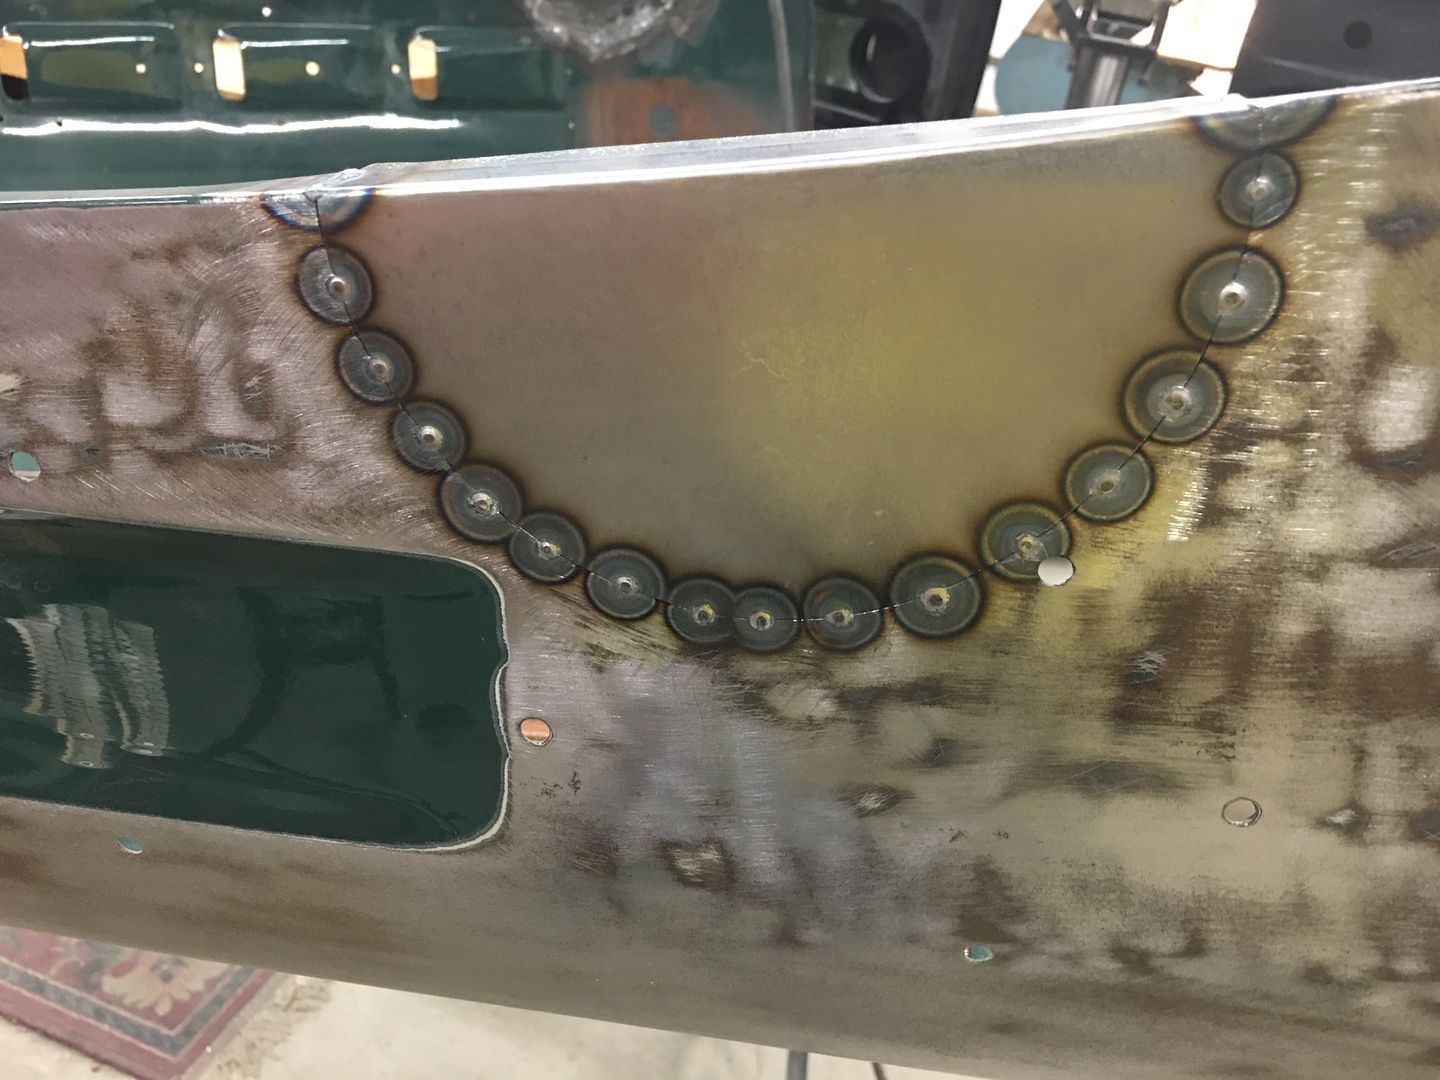 Note here the flange was left long on our replacement. Trying to weld it in place already trimmed to fit will invariably cause the edge to burn back, making it more difficult to weld this seam all the way to the edge. Leaving the flange on our patch long makes the outer part serve as a heat sink where this burn back effect is less of an issue. Once the welds are dressed, trim the excess using offset snips.. 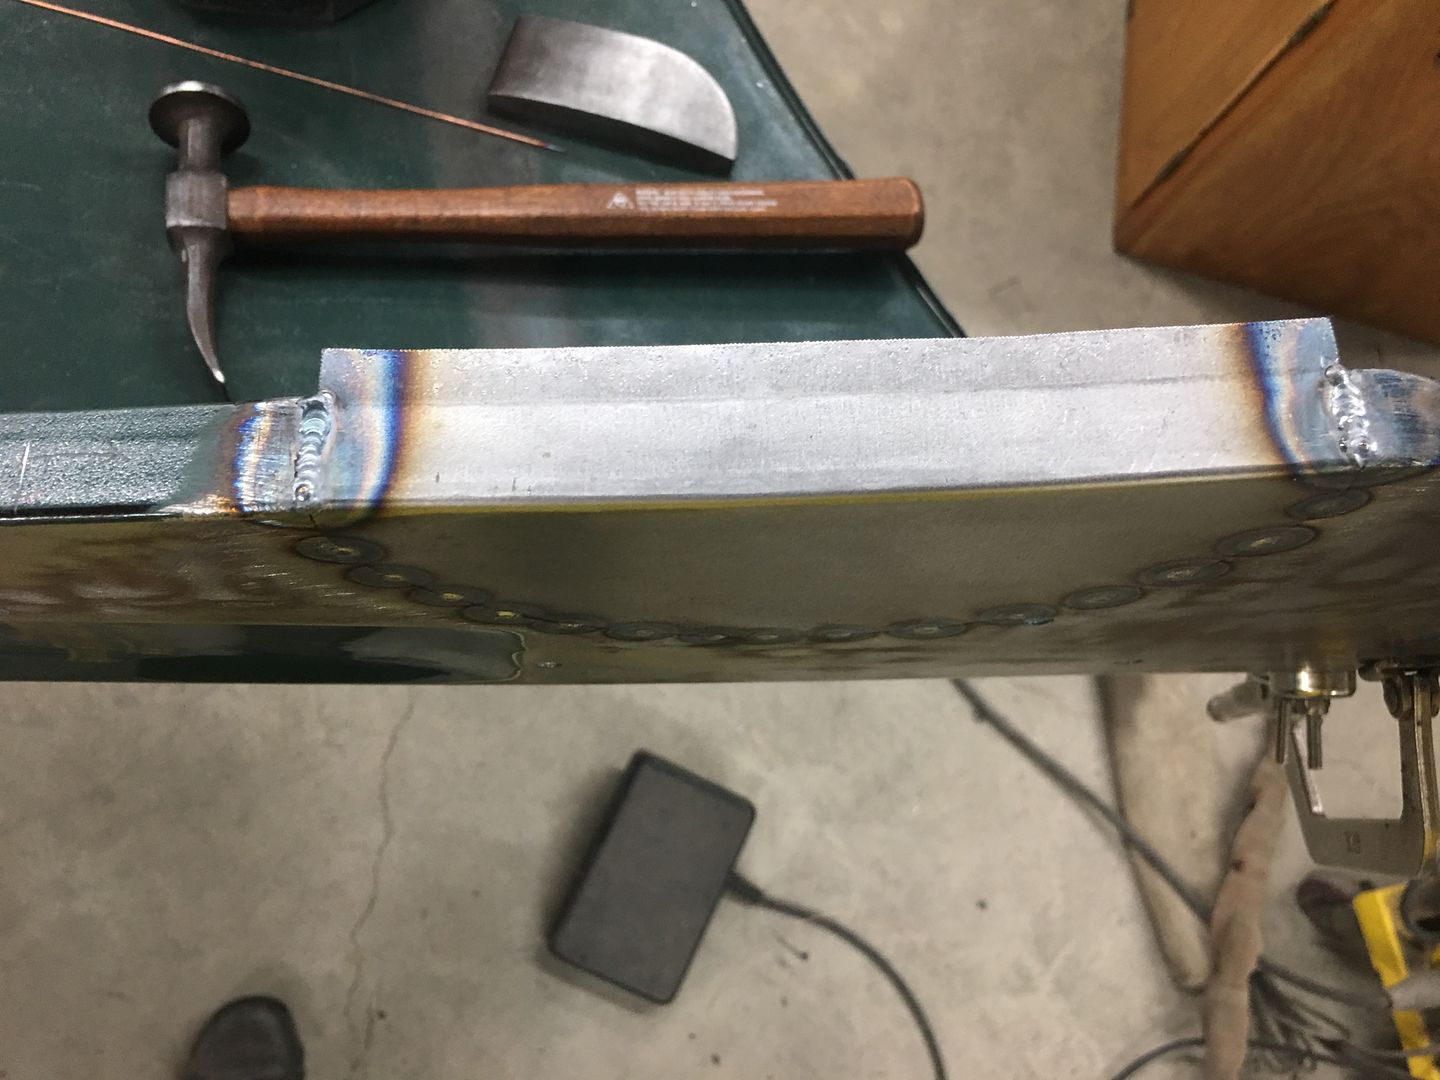
__________________
Robert Last edited by MP&C; 03-19-2020 at 12:43 PM. |

|

|
|
03-19-2020, 02:04 PM
|
#2 |
|
Post Whore
  Join Date: May 2015
Location: Alabama
Posts: 14,581
|
Re: Butt welds for patch panels
As always....great repair Robert..!!
__________________
Mongo...aka Greg RIP Dad RIP Jesse 1981 C30 LQ9 NV4500..http://67-72chevytrucks.com/vboard/s...d.php?t=753598 Mongos AD- LS3 TR6060...http://67-72chevytrucks.com/vboard/s...34#post8522334 Columbus..the 1957 IH 4x4...http://67-72chevytrucks.com/vboard/s...63#post8082563 2023 Chevy Z71..daily driver |
|
|
|
|
03-19-2020, 04:19 PM
|
#3 |
|
Registered User
Join Date: Jul 2019
Location: Beebe, AR
Posts: 2,406
|
Re: Butt welds for patch panels
Cool! I am a terrible welder but even I would not have accepted the welds you found on that hood. I could not repeat the quality of your work but you do inspire me.
About to make a new thread on a similar subject.
__________________
1967 C10 1980 Jeep CJ5 2020 Toyota 4Runner 2020 Toyota CH-R 2020 Acura MDX |
|
|
|
|
03-22-2020, 12:00 PM
|
#4 |
|
Registered User
Join Date: Jan 2013
Location: Leonardtown, MD
Posts: 1,633
|
Re: Butt welds for patch panels
Thanks guys! More progress:
The TIG is used to fully weld the patches in place... Front side: 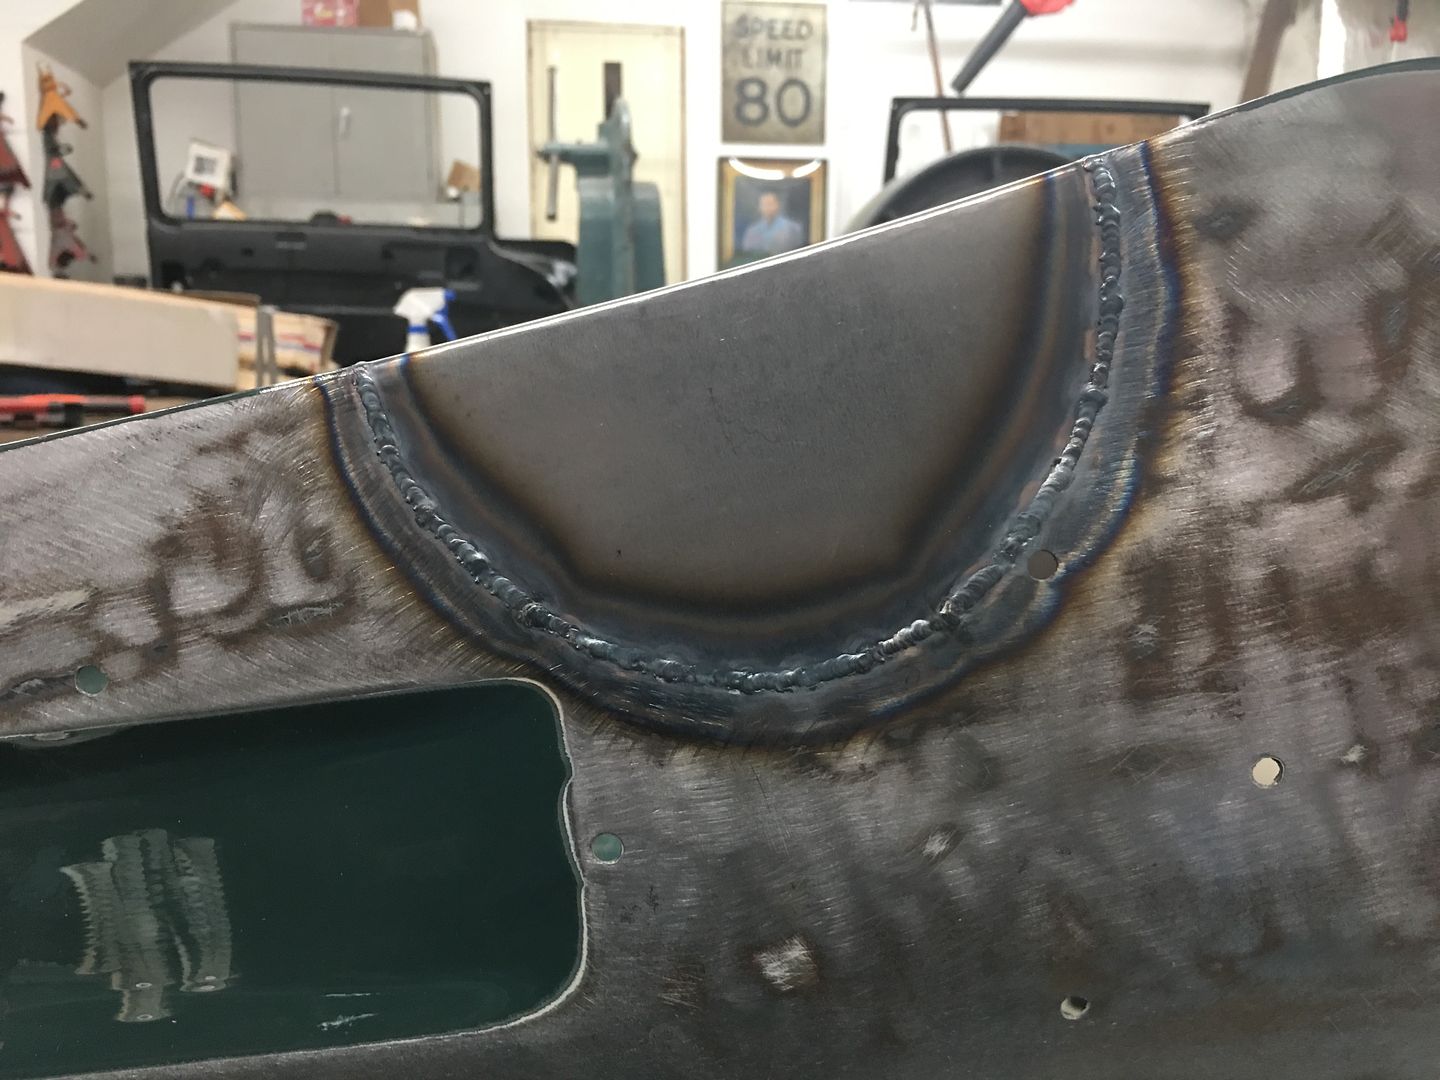 Back side, full penetration on the weld.. 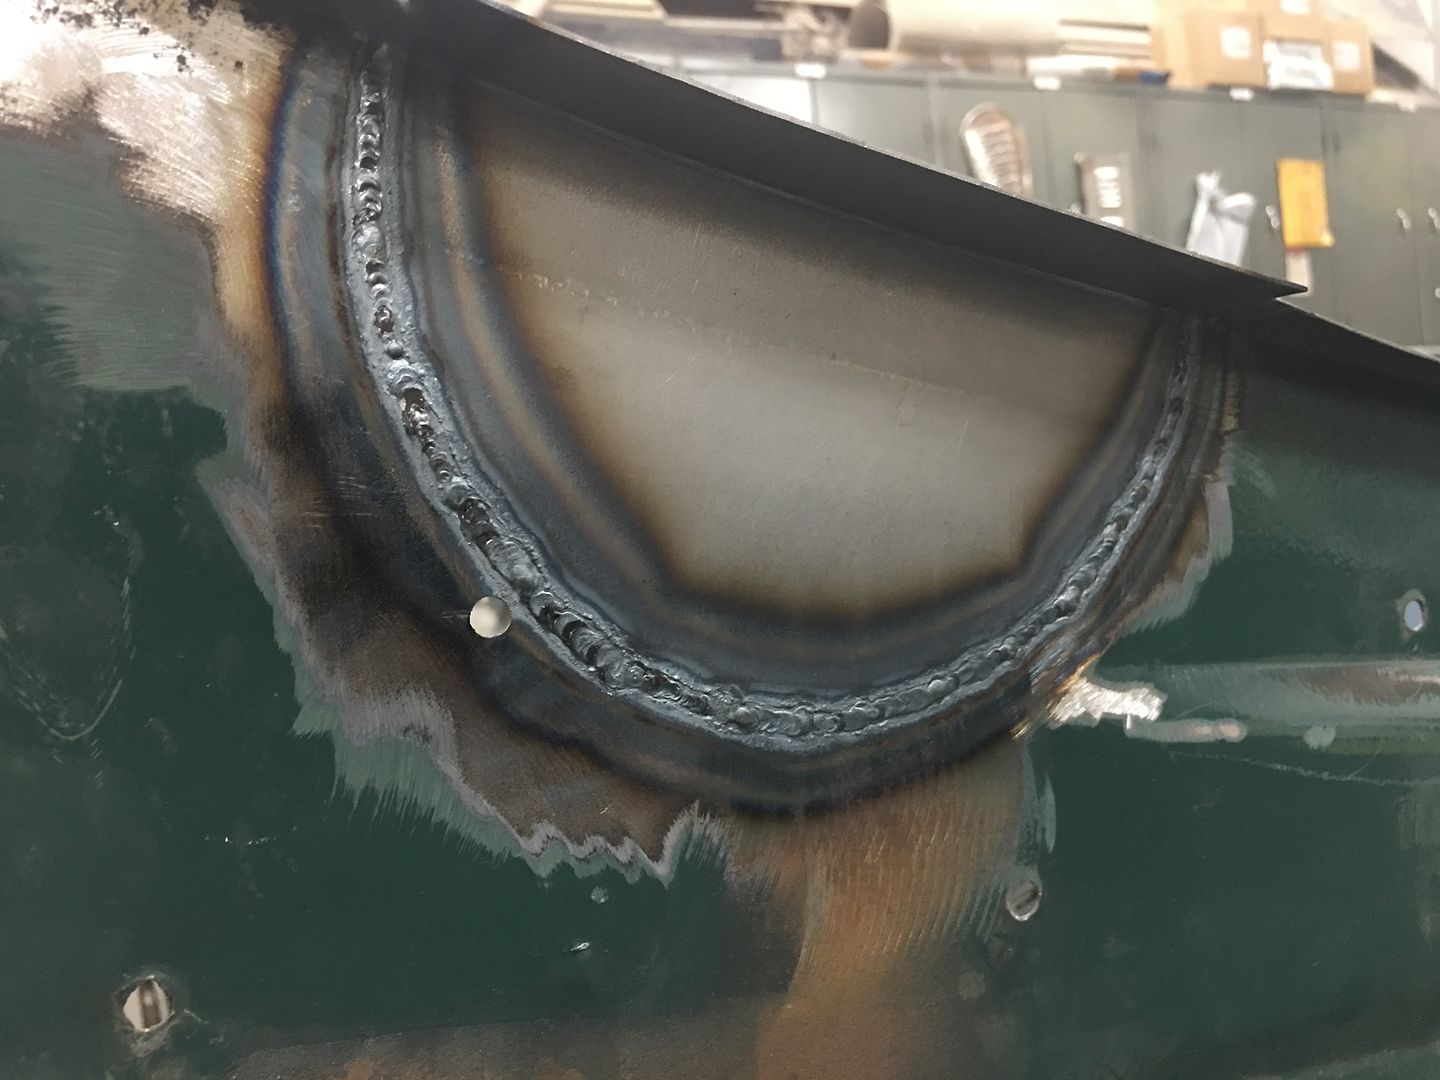 The weld seams are then planished and dressed. Next, the front of the hood had a stress crack adjacent to one of the rubber bumpers. To stabilize the hood prior to cutting out this area, the brace is clamped back in place.. 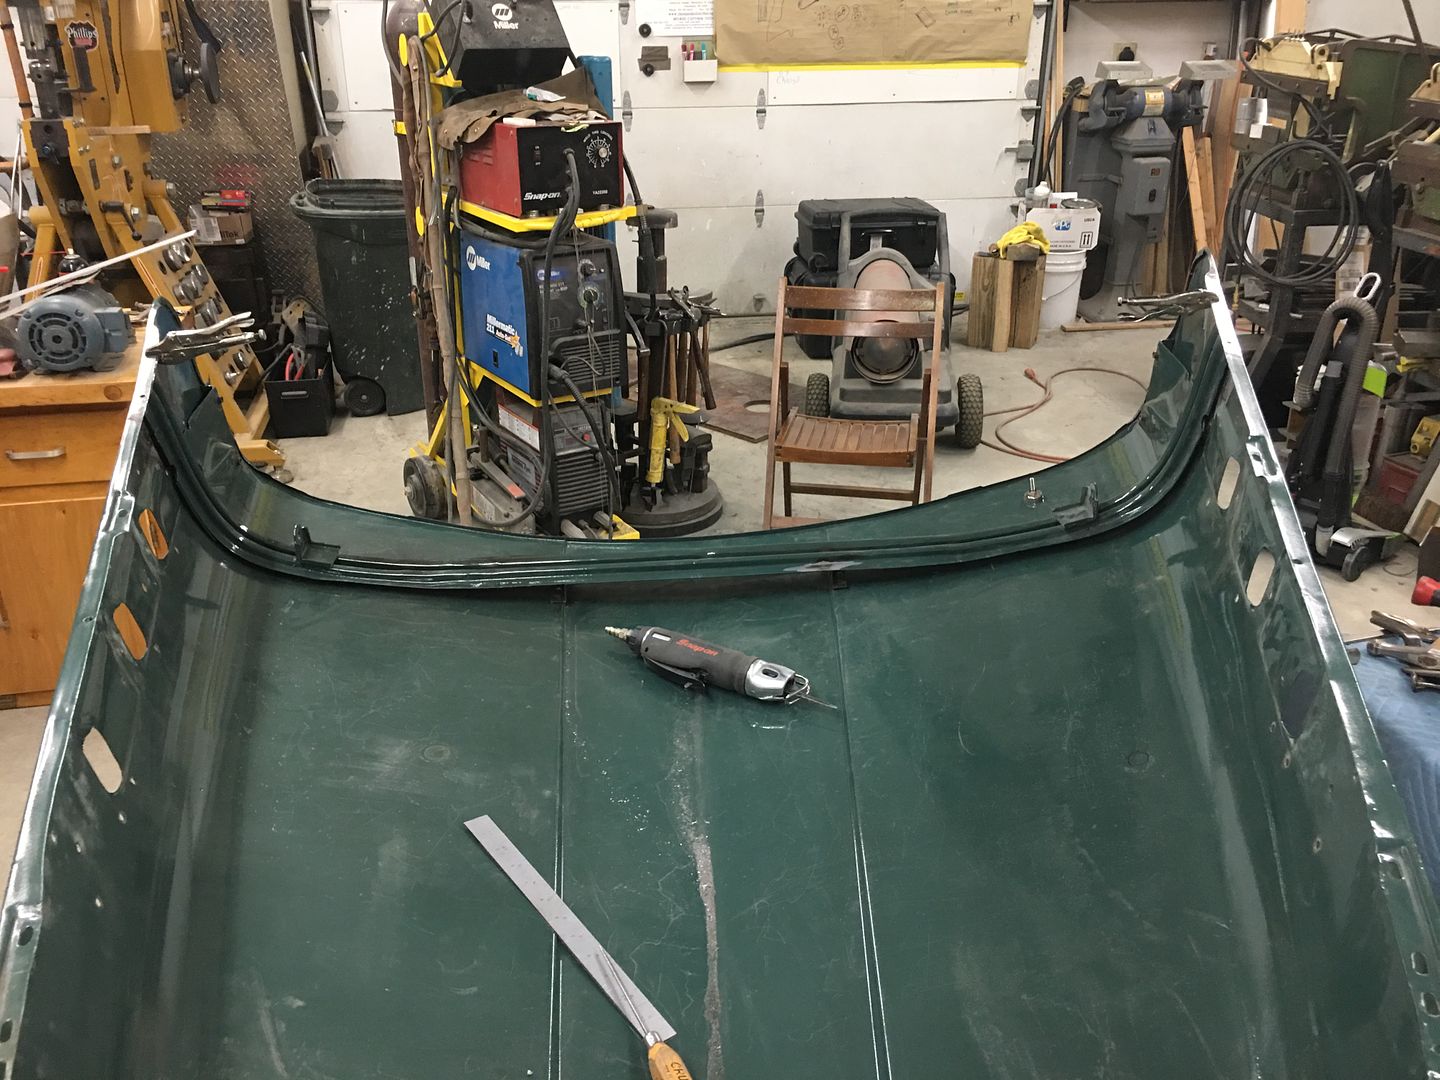 The damaged area is cut out, a "doubler" had been used toward the front to add strength to the area, so care is used to not cut that off.. 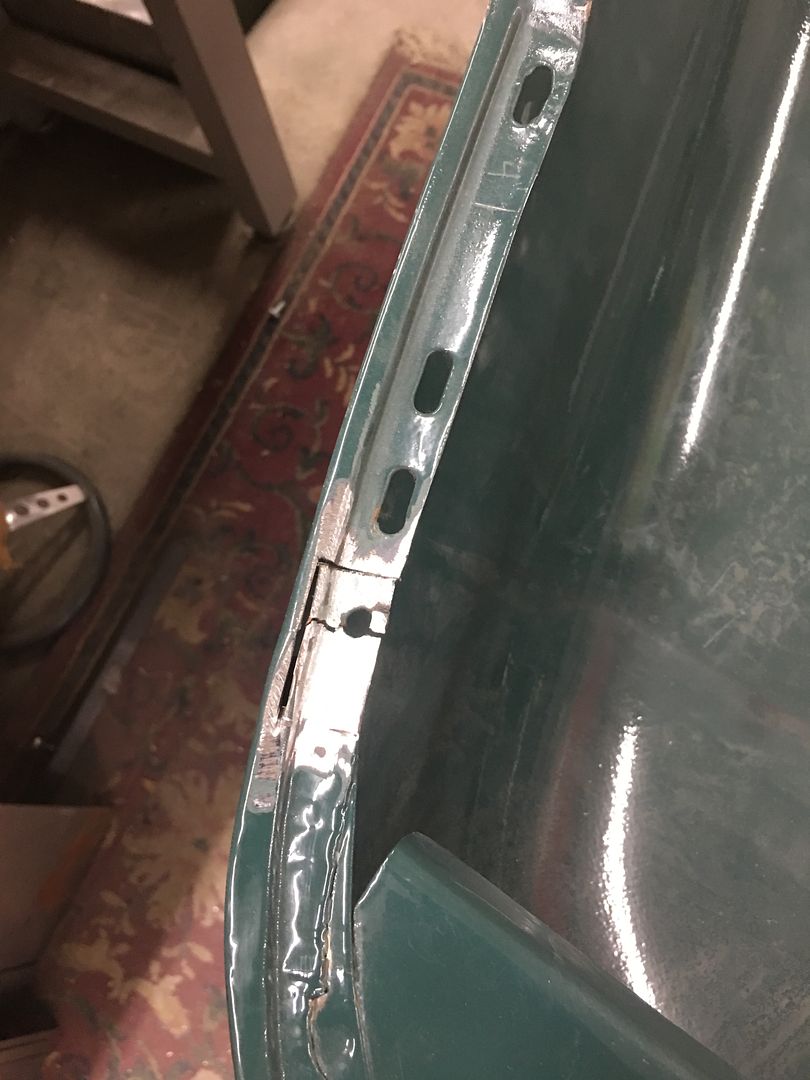 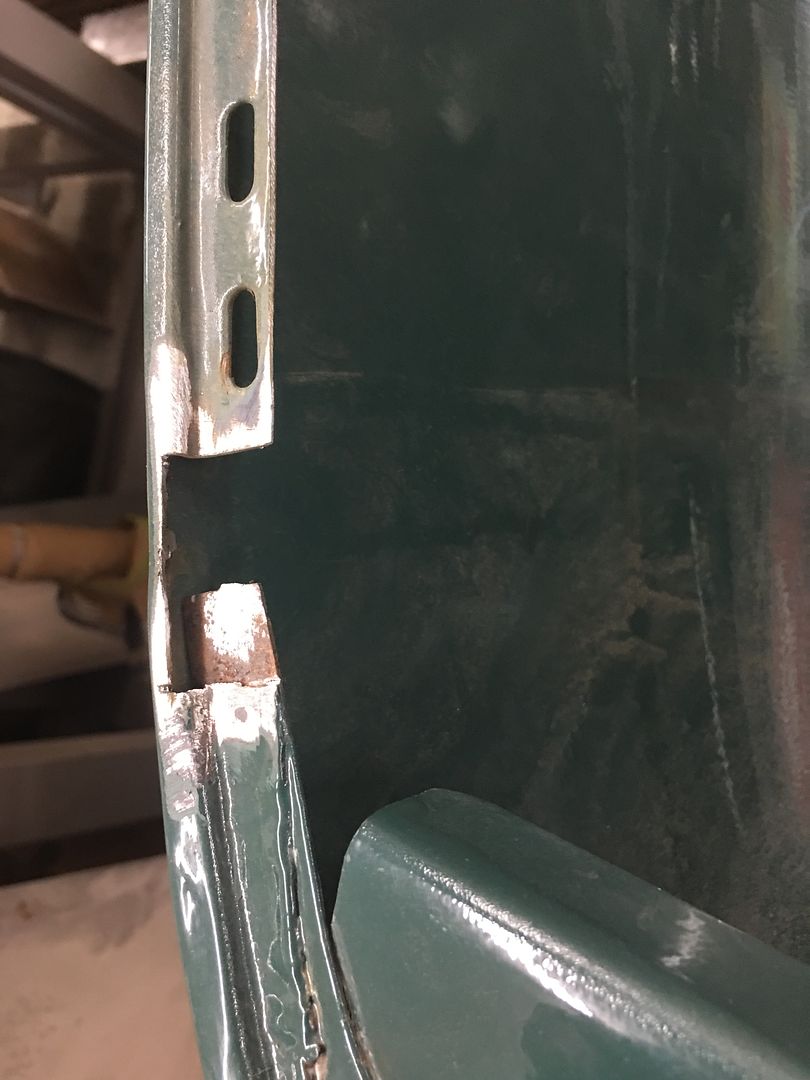 A replacement patch is cut out, bends added, and tacked in place. A plug weld ties this in with the doubler.. 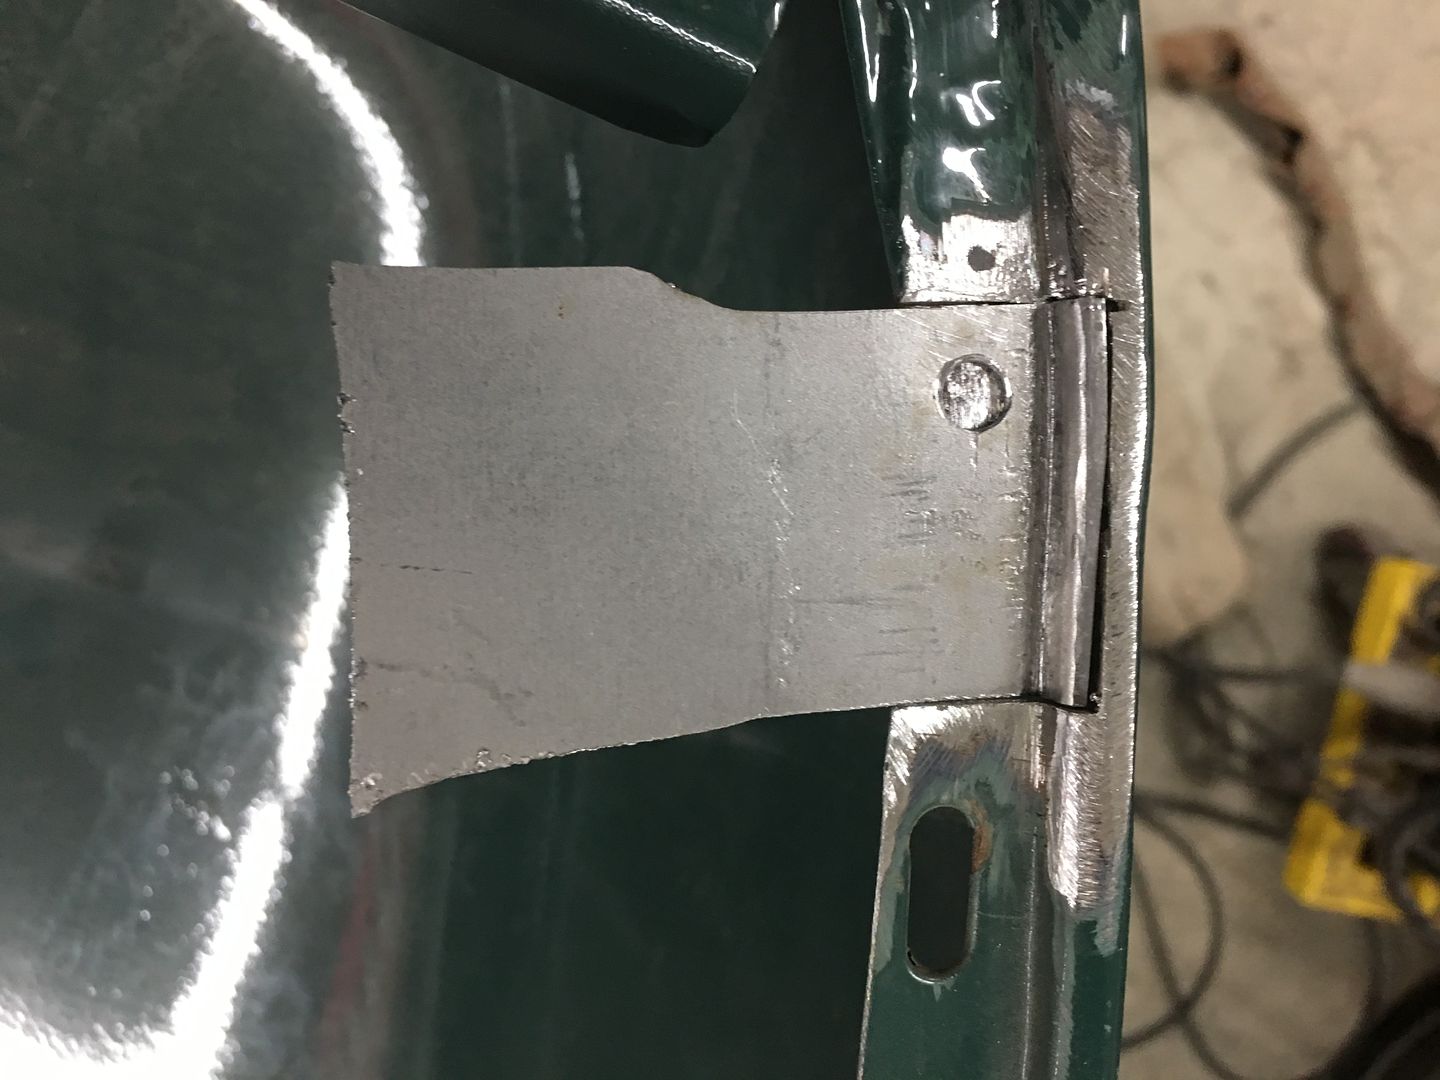  All trimmed and welds dressed, the hood bumper hole is re-drilled in the new patch. Then we notice a bit of filler closer to the nose of the hood (arrow). Let's remove that while we're here to see what carnage lies in wait. 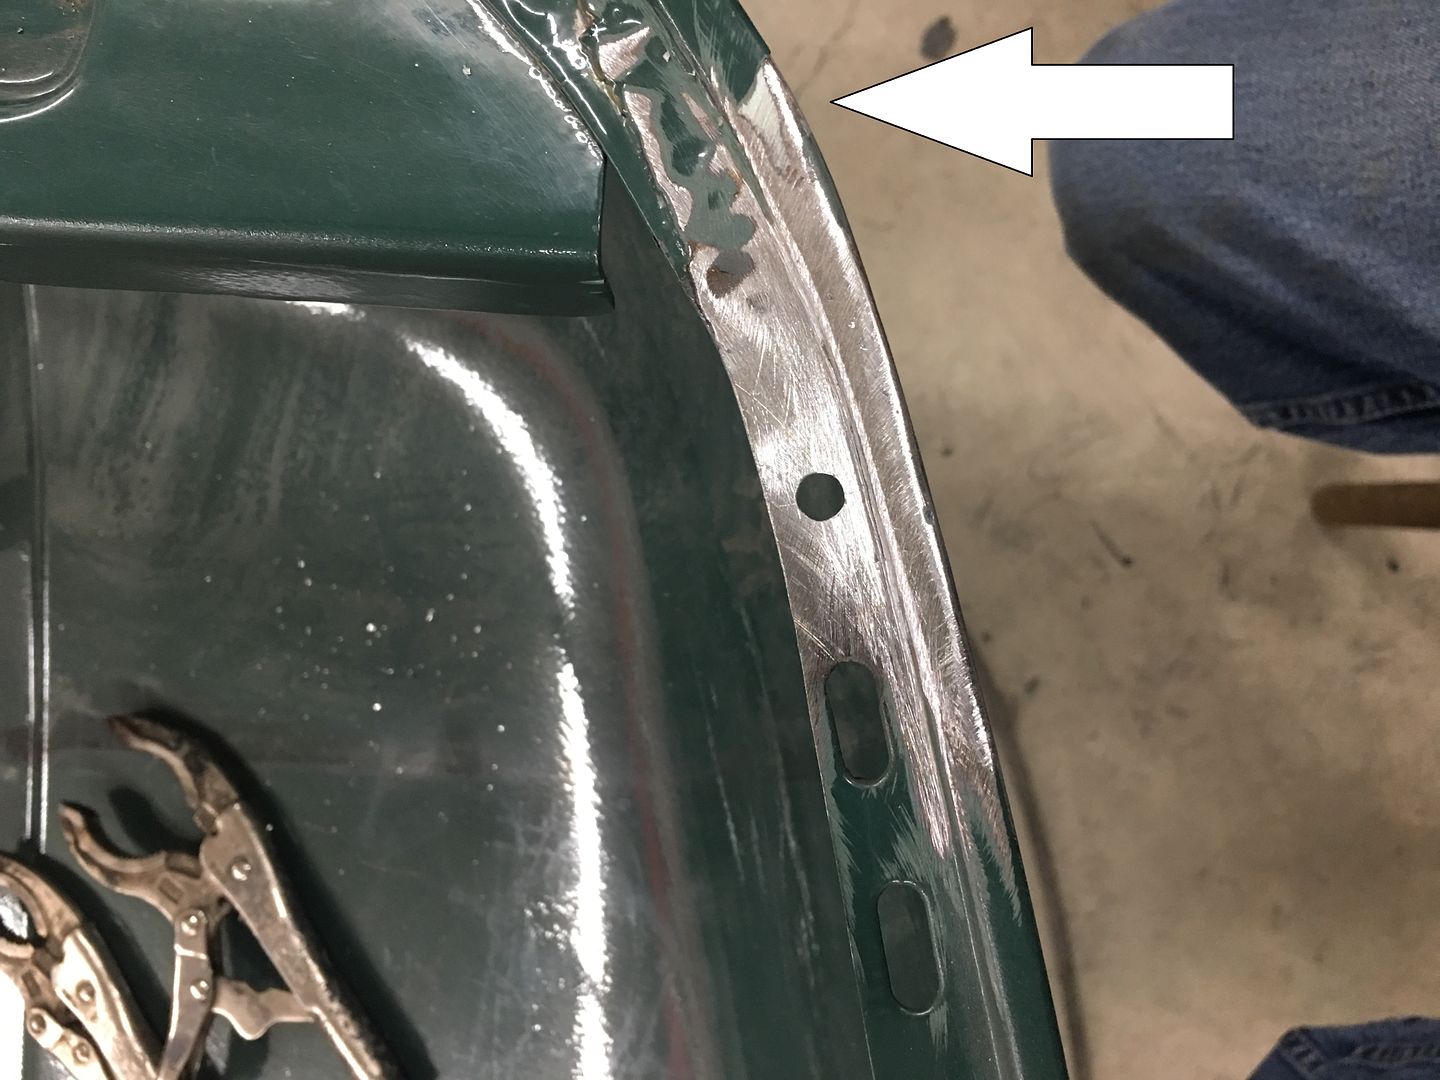 Gotta love this game of dominos..  The low area needs to be bumped up, and with little room for swinging hammers, a new tool is in order. Using the South Bend "milling machine" a die is made for the outer portion.. 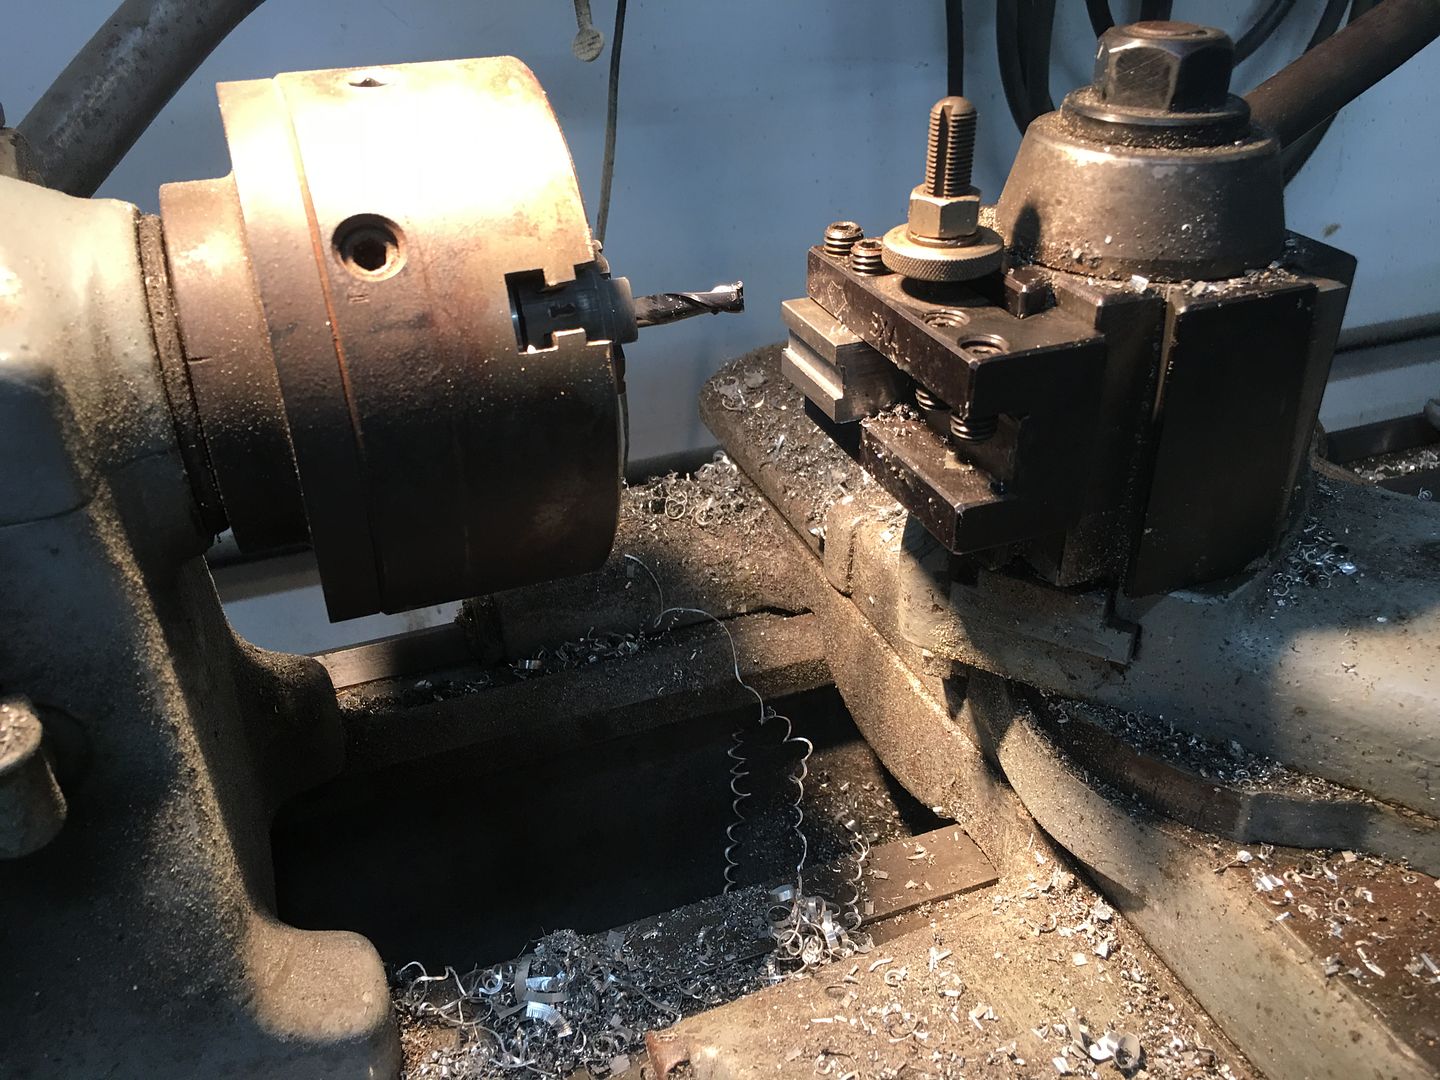 Using a pair of C-clamp vise grips (there goes another pair) the die we made will be welded to one side, the opposite is giving a bit of a trim to better fit in the confines of the slight gap available on the inside.. 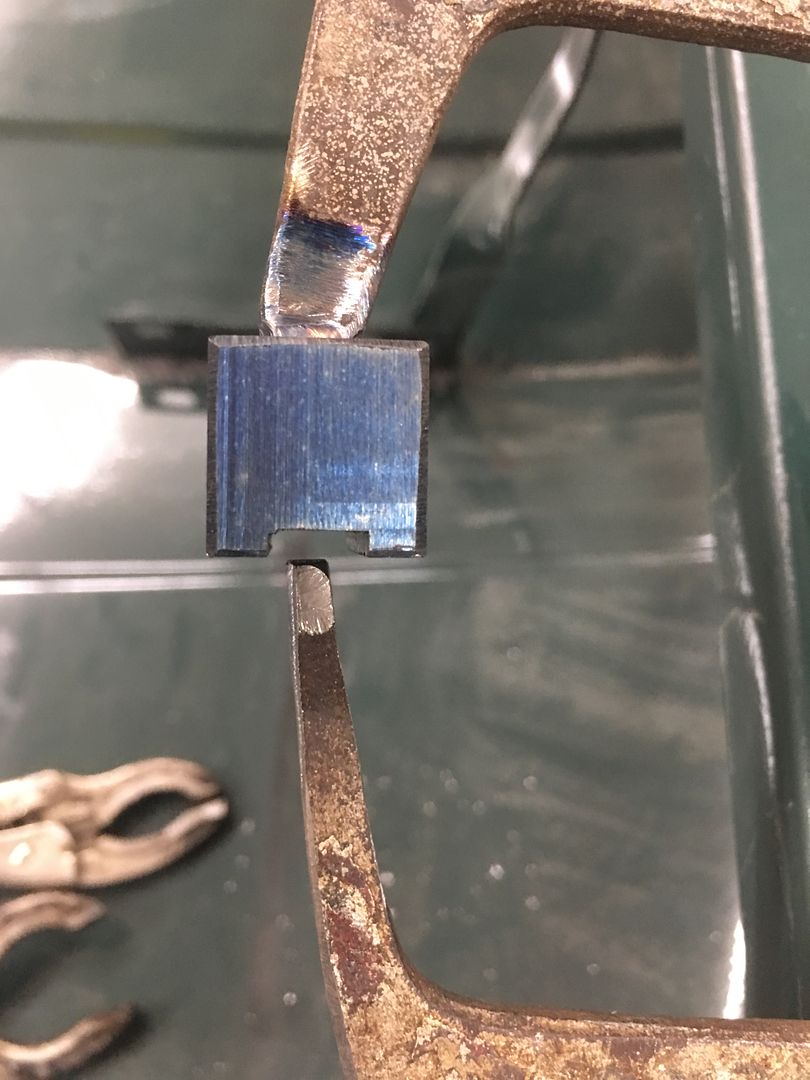 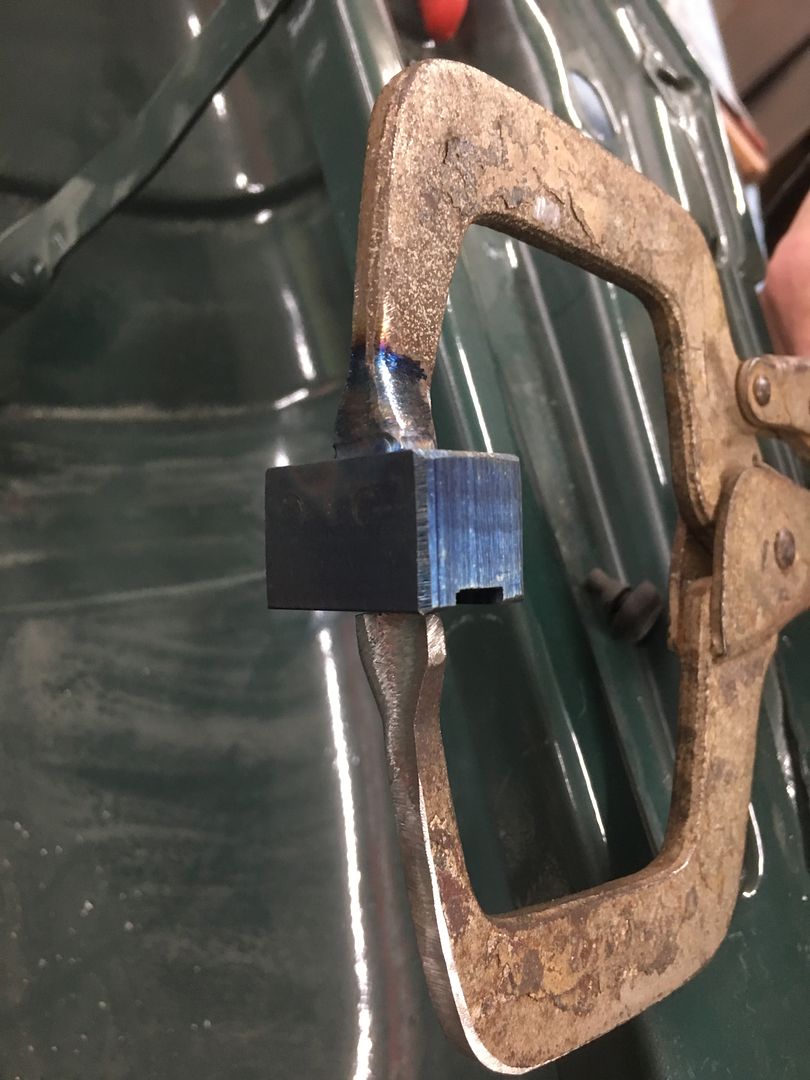 I missed the action shots, but the clamping of the vise grip is used to raise the low areas. Then dressed out for a much better "filler free" lower edge for the hood. 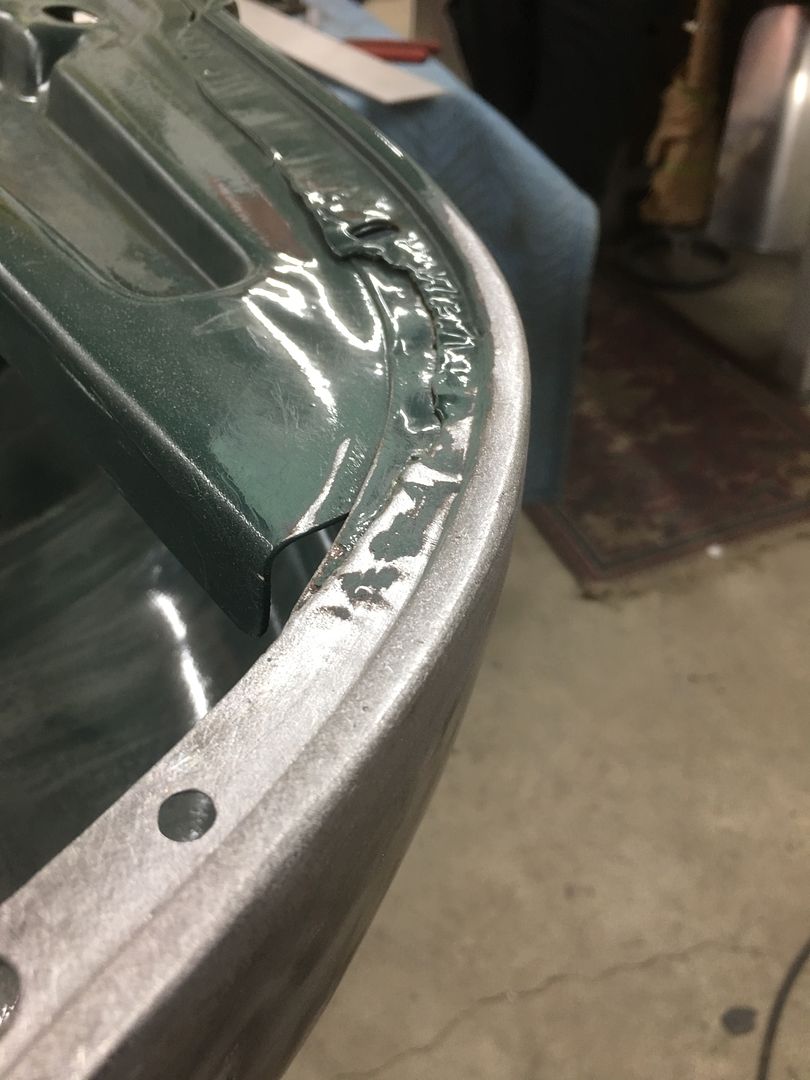 With Mike having completed the dies to duplicate the ribs in the hood brace we did a test run on a piece of 16 Ga cold rolled steel. First upper die addresses middle rib only, way to much drawing going on to expect this out of one set of dies... 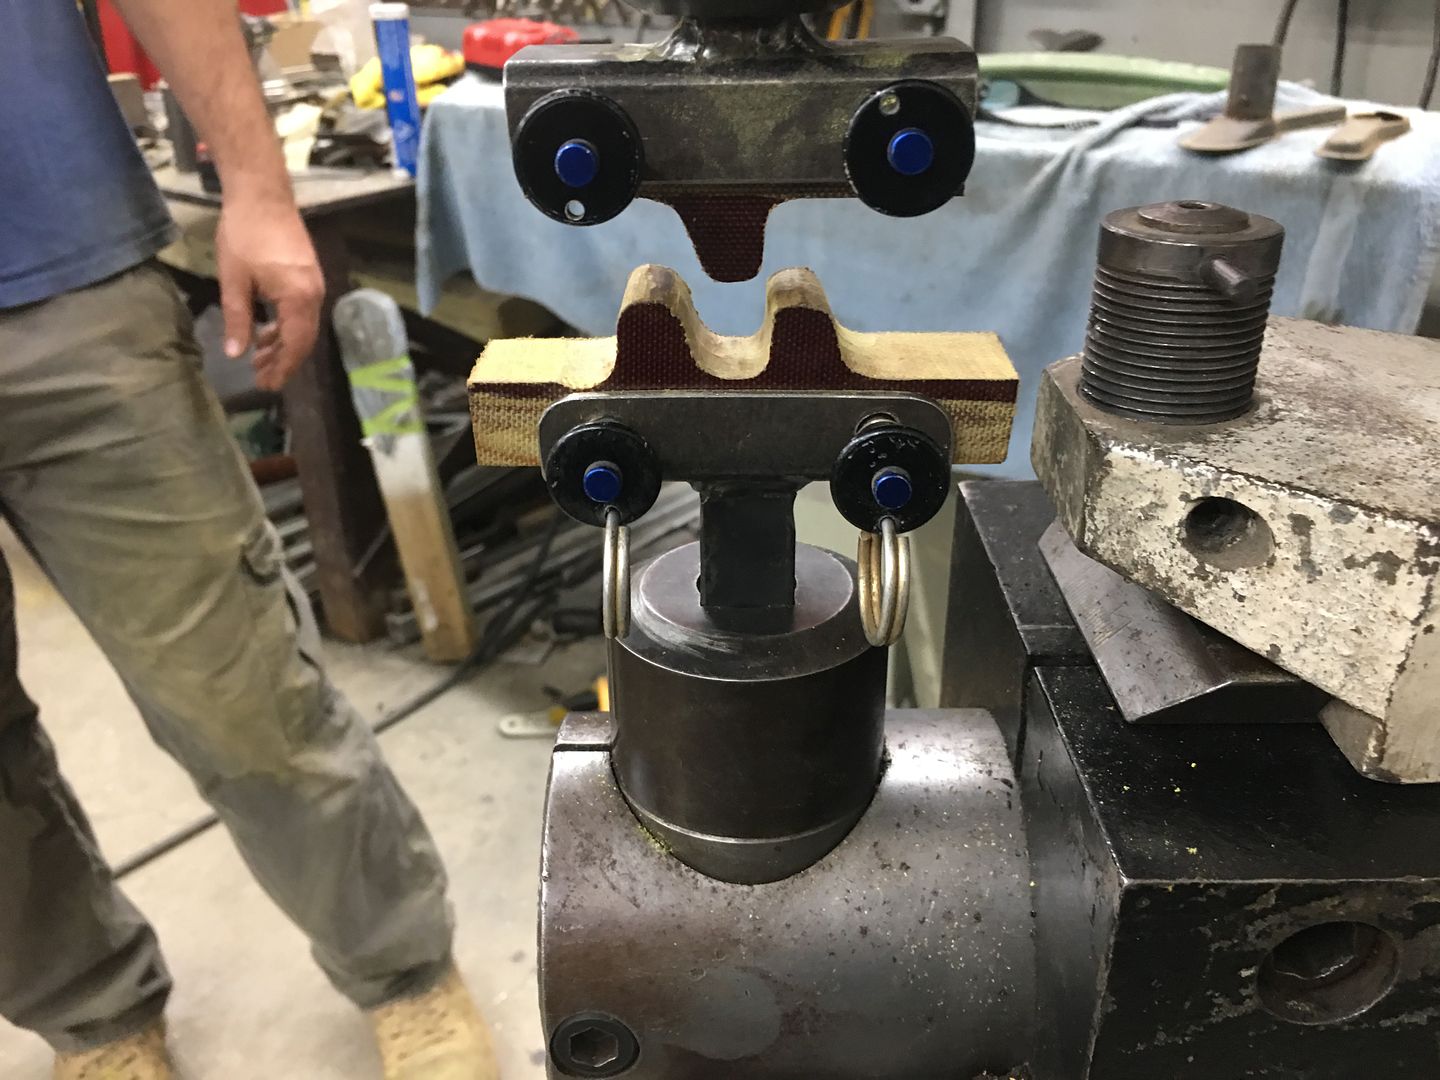 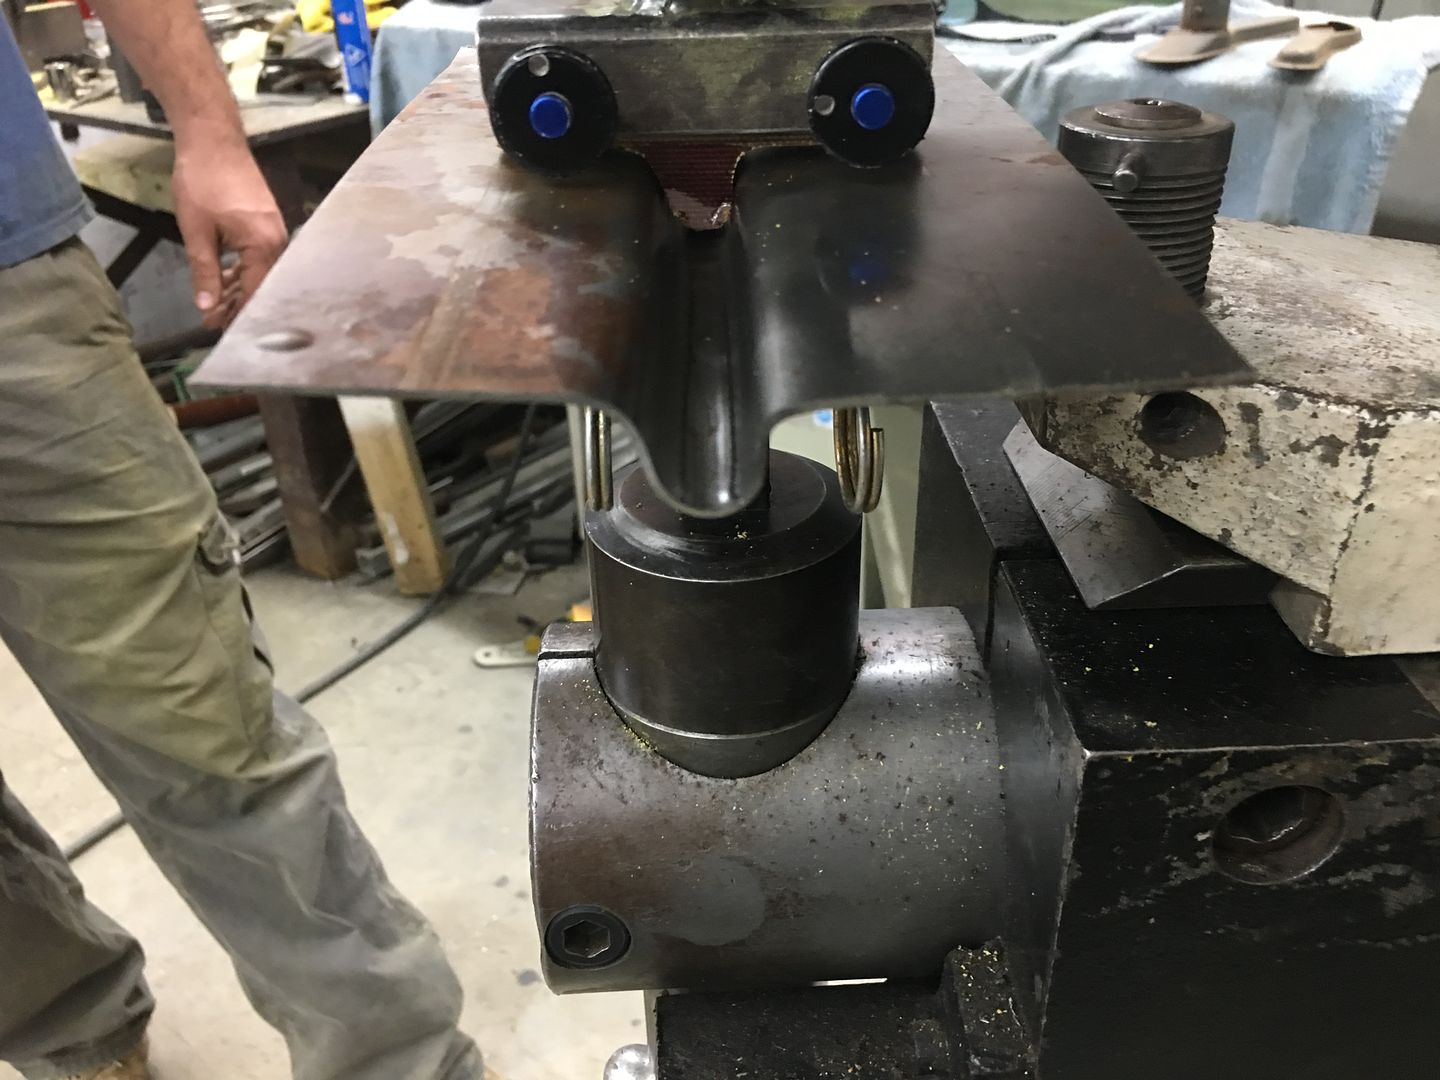 Then top die is changed out for the remainder of the ribs... 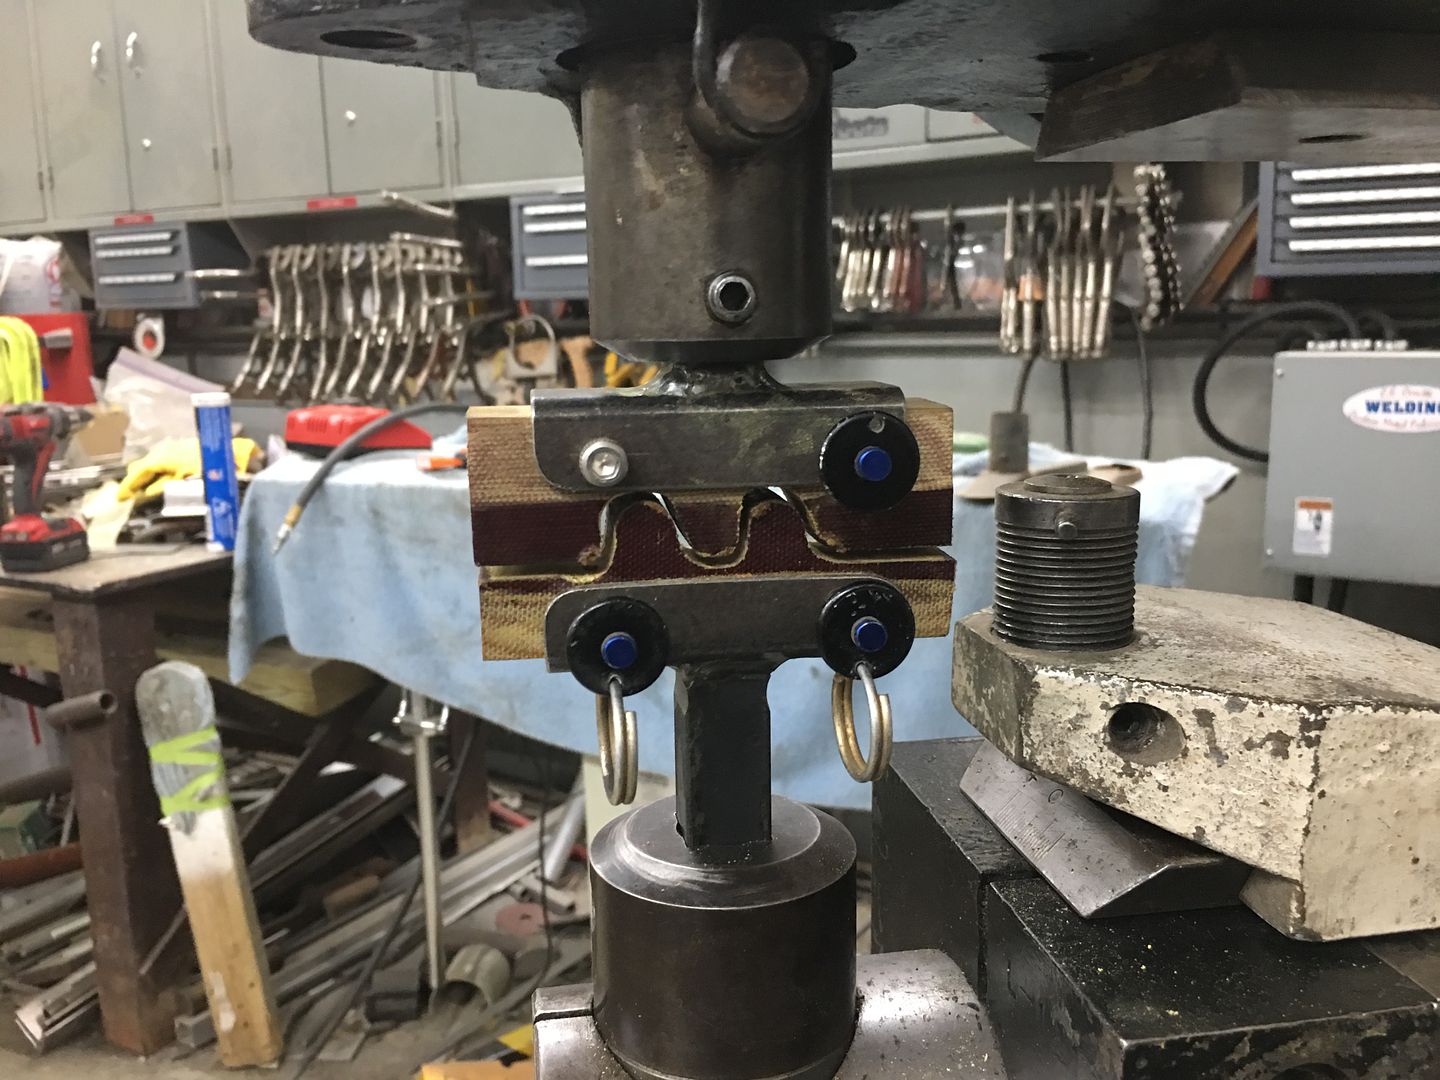 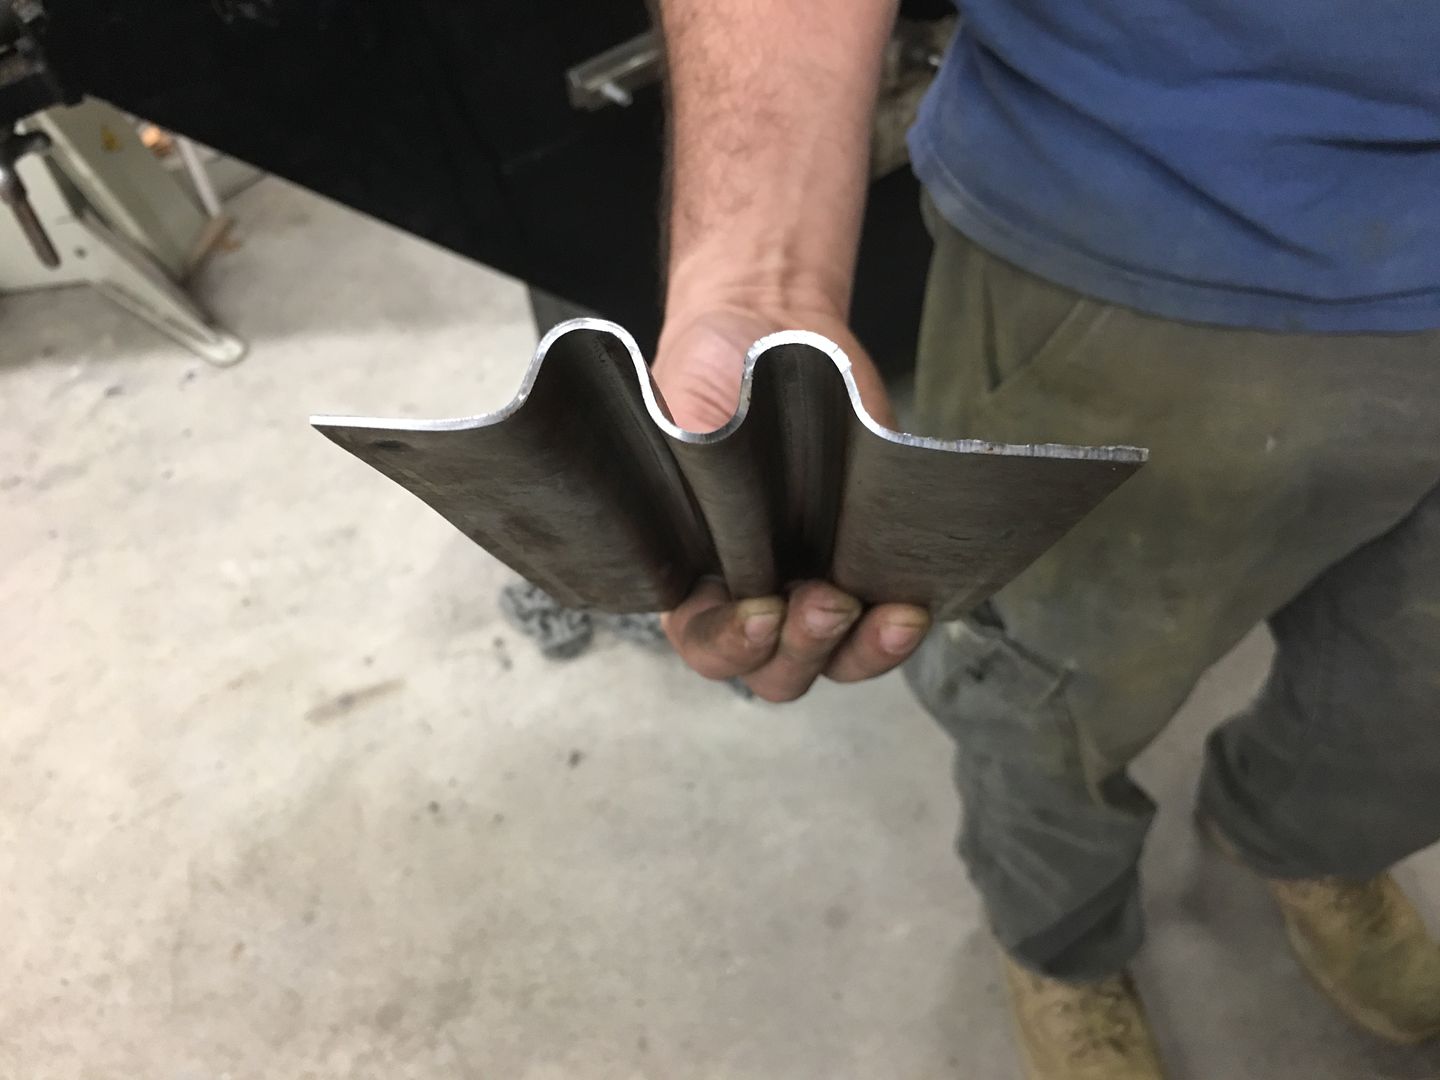 A bit of fine tuning needed, but looks like this process will work to repair the rot in the bottom of the brace ends..
__________________
Robert |
|
|
|
|
03-27-2020, 07:44 AM
|
#5 |
|
Registered User
Join Date: Jan 2013
Location: Leonardtown, MD
Posts: 1,633
|
Re: Butt welds for patch panels
Now to fine tune our dies for the hood brace. Looking at our original profile template, the first upsweep (red arrow) and second upsweep (yellow arrow) are both nearly vertical as compared to the opposite side.
 Our first test run shows the first upsweep spread too wide, not enough vertical... 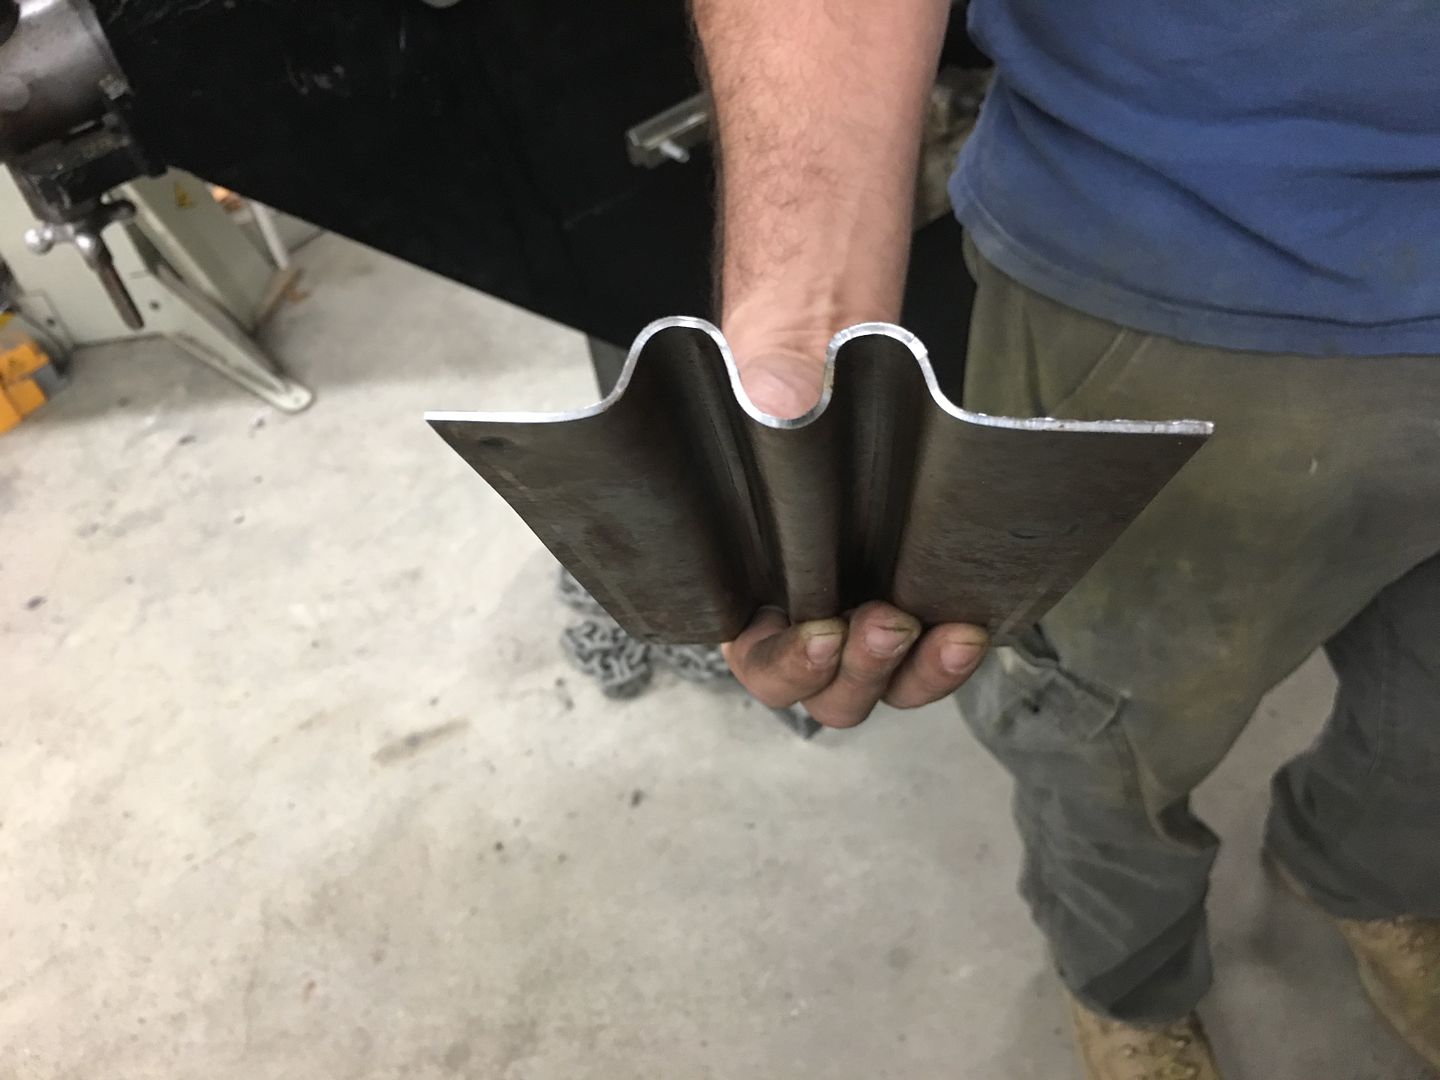 Looking at the die that was made, a bit too much material was removed such that this vertical feature was lost... So a new die was made for the top, this time out of aluminum. The phenolic is somewhat easy to cut out but does have challenges in making crisp bend details, so lets see if the aluminum helps out.. Next run, this time we'll do two panels in case they work... First pass to draw the metal into the center rib... 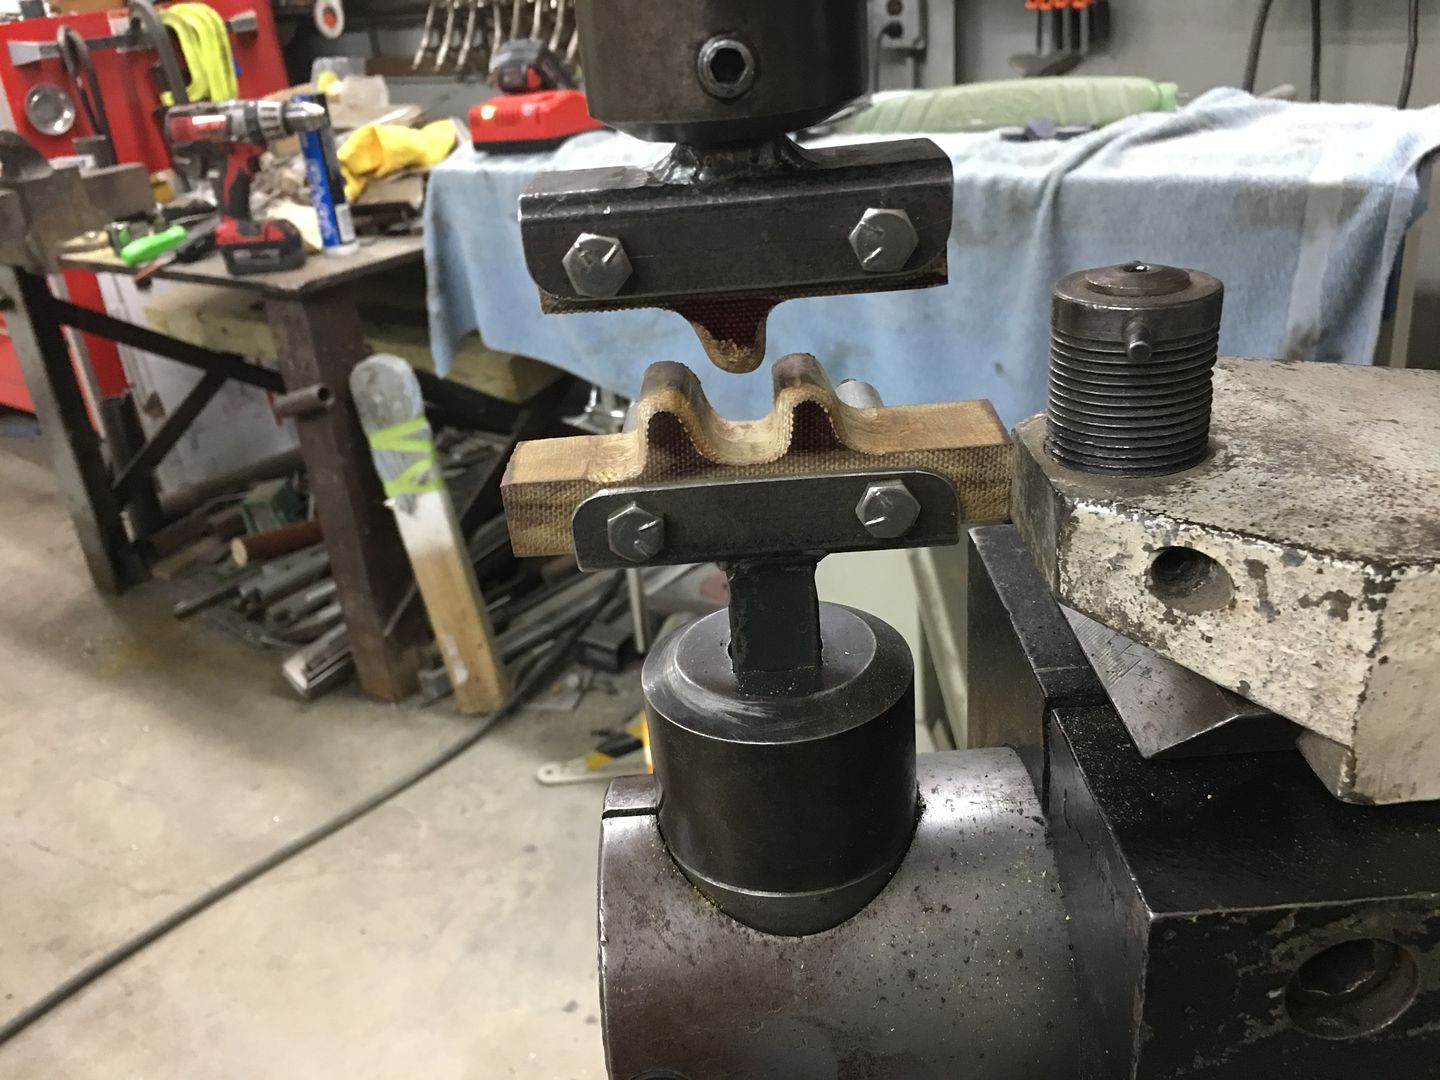 This is about 8 passes, each progressively deeper. The circle fixture to the right in the picture (white base) is used as a back stop to keep our rib centered. 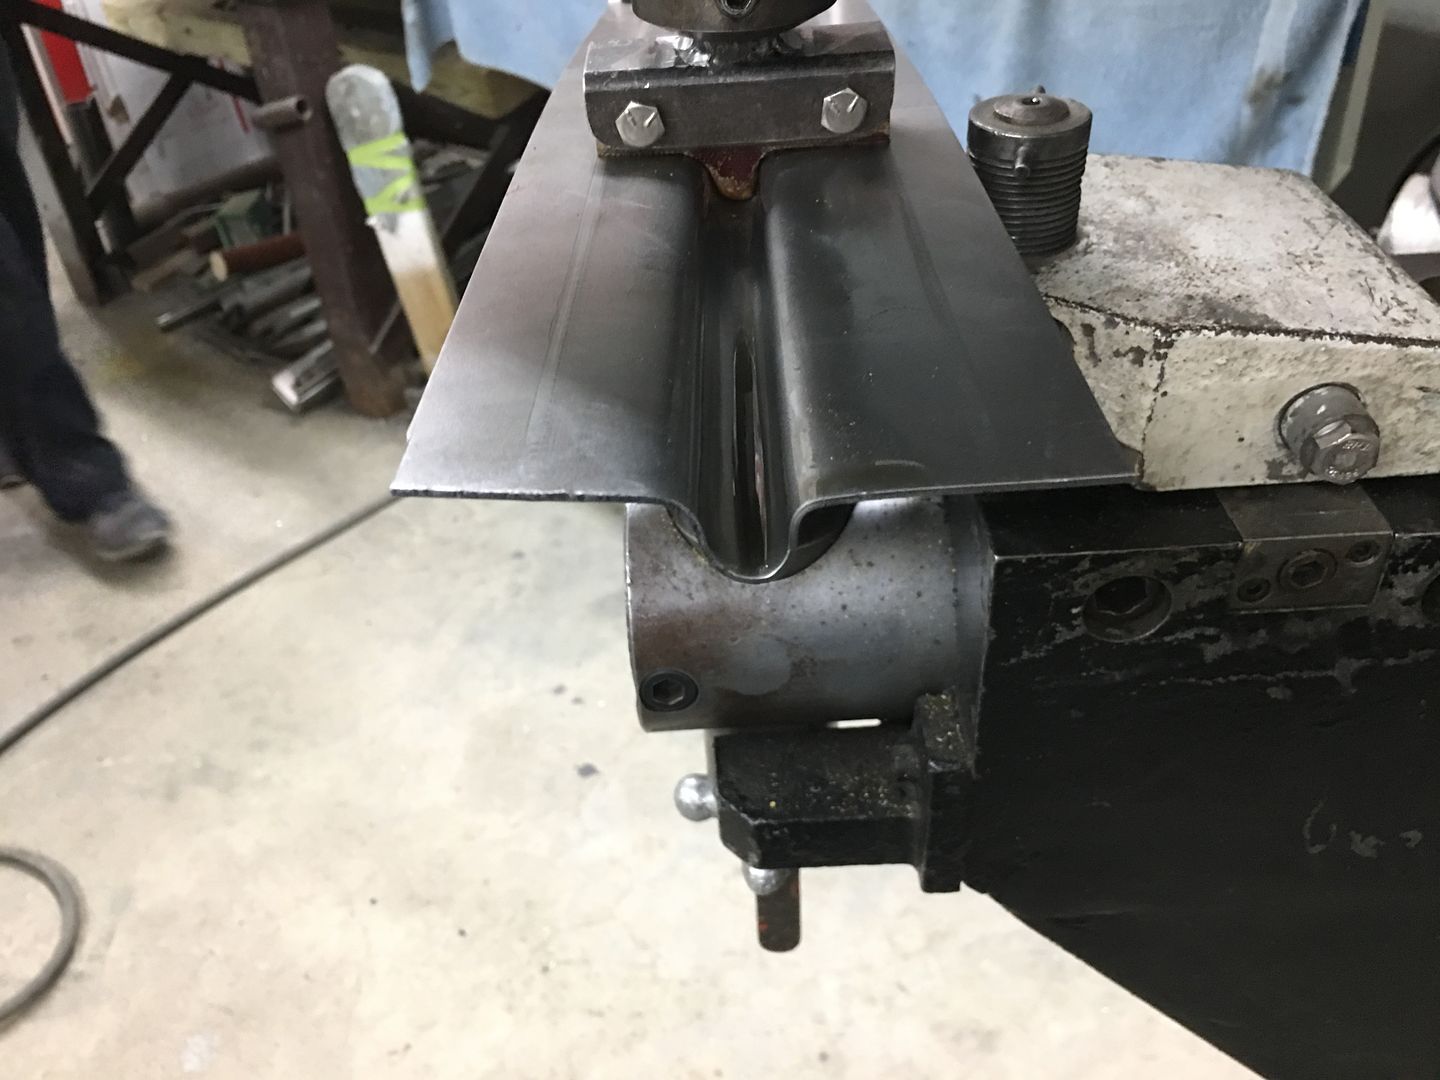 This is about 9/16 of depth, so quite a bit of draw.. Next, the new top die is added and goes through the same 8 progressive passes.. Note in the next picture the vertical upsweeps are both nearly vertical. Success! 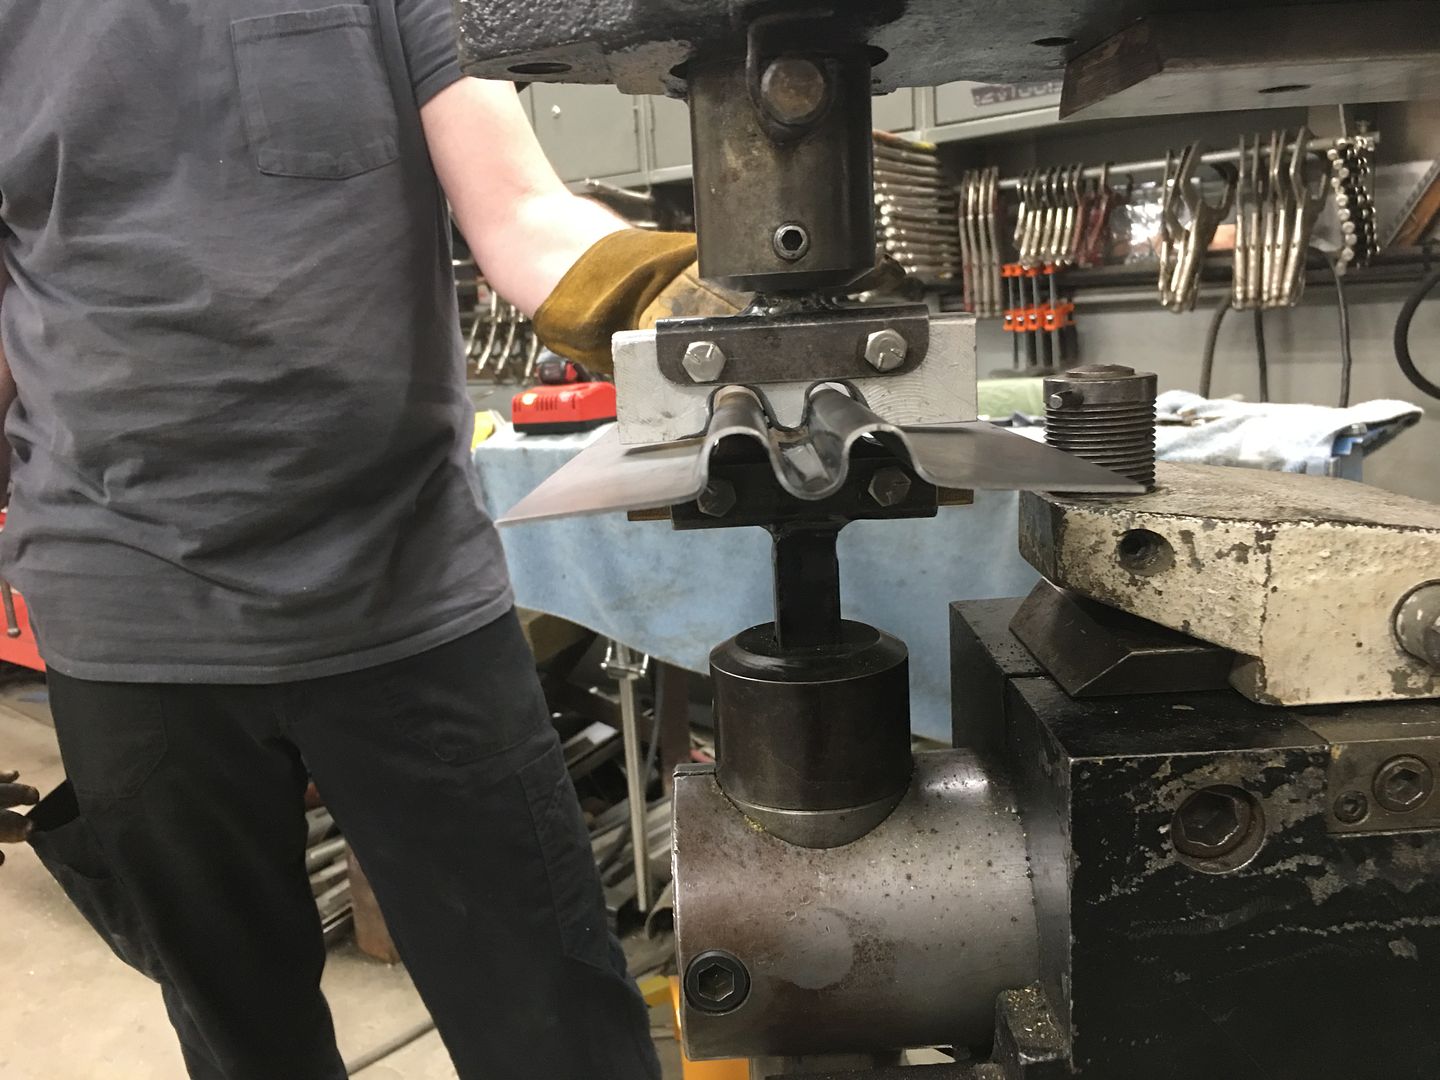 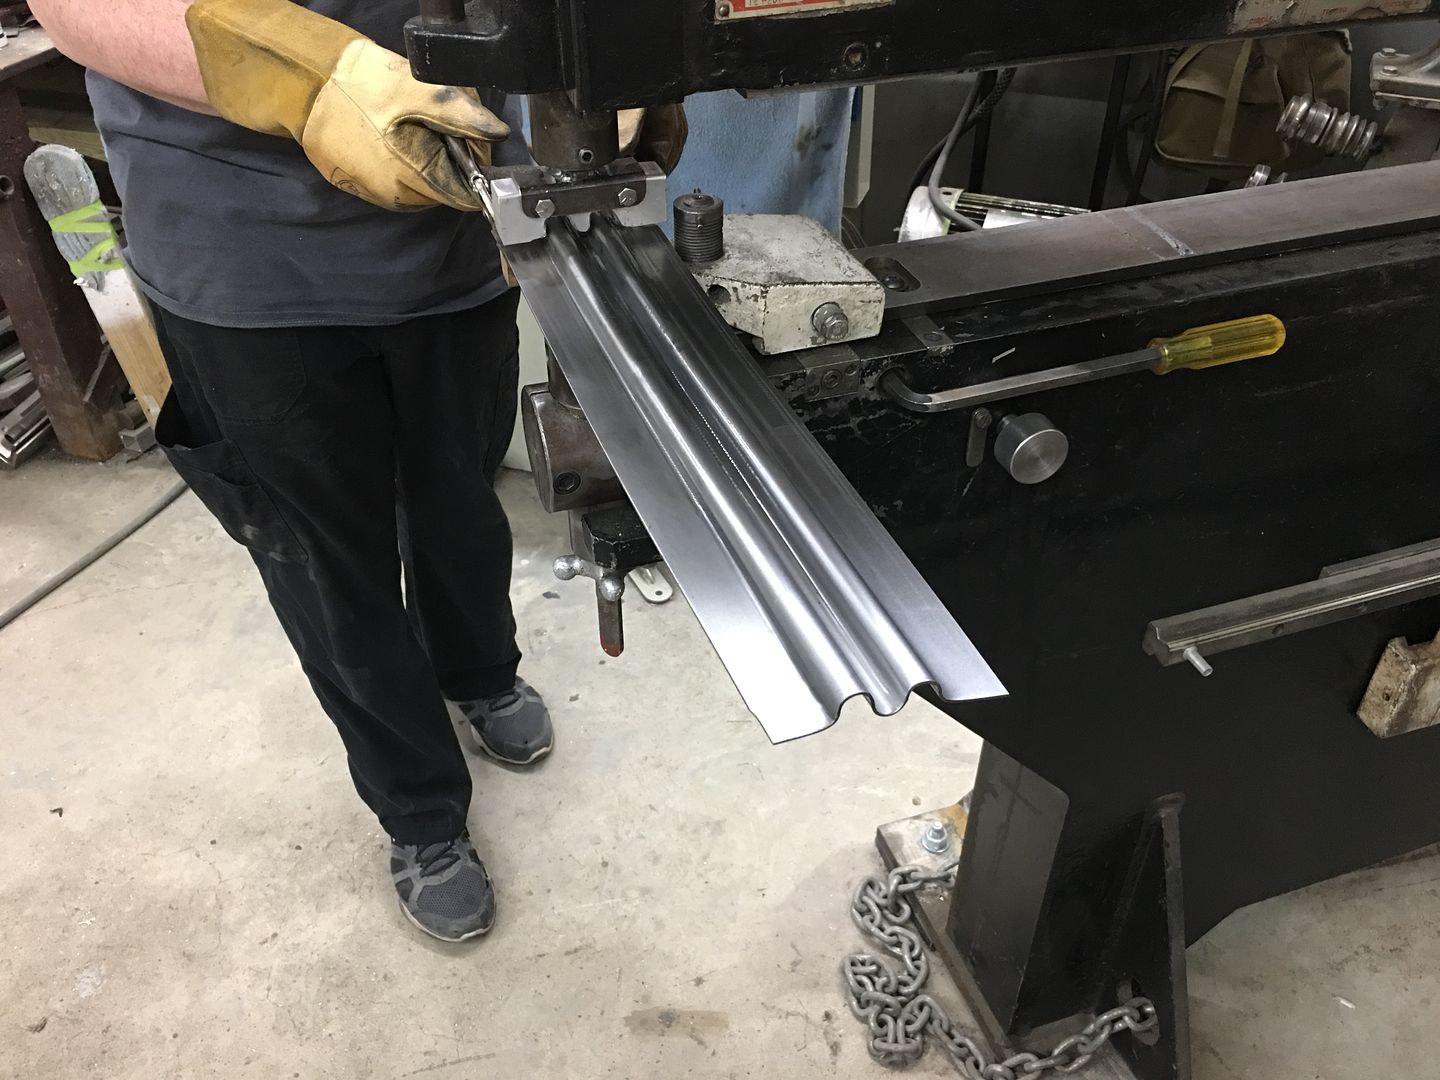 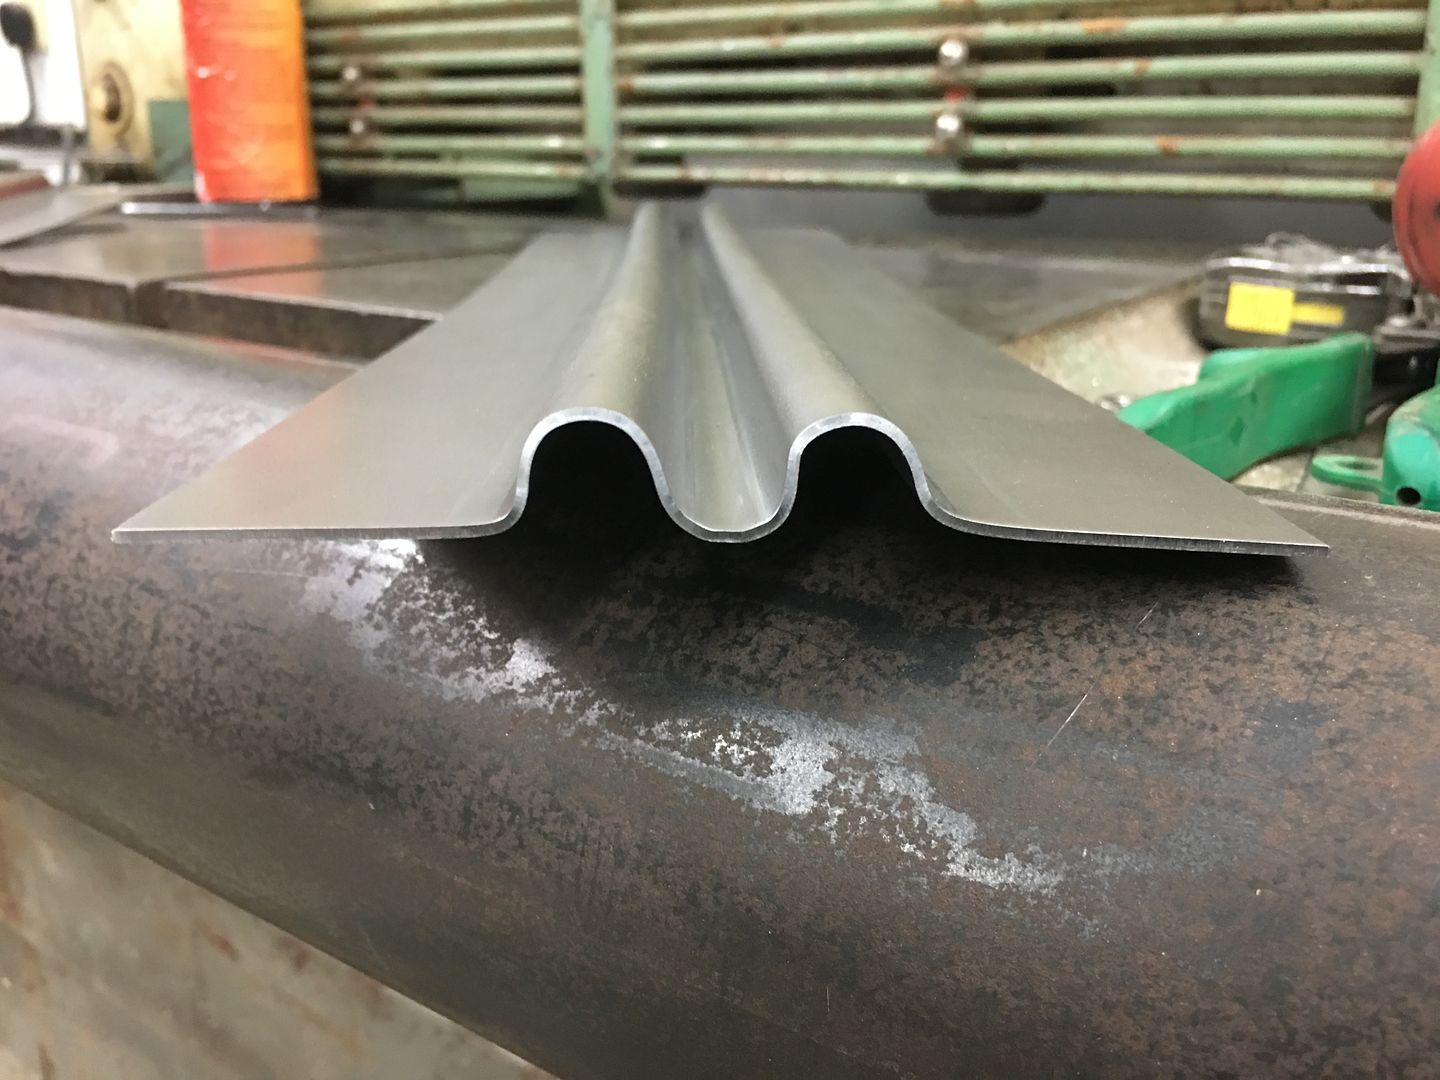 Matching up to the original, this looks like the right replacement. 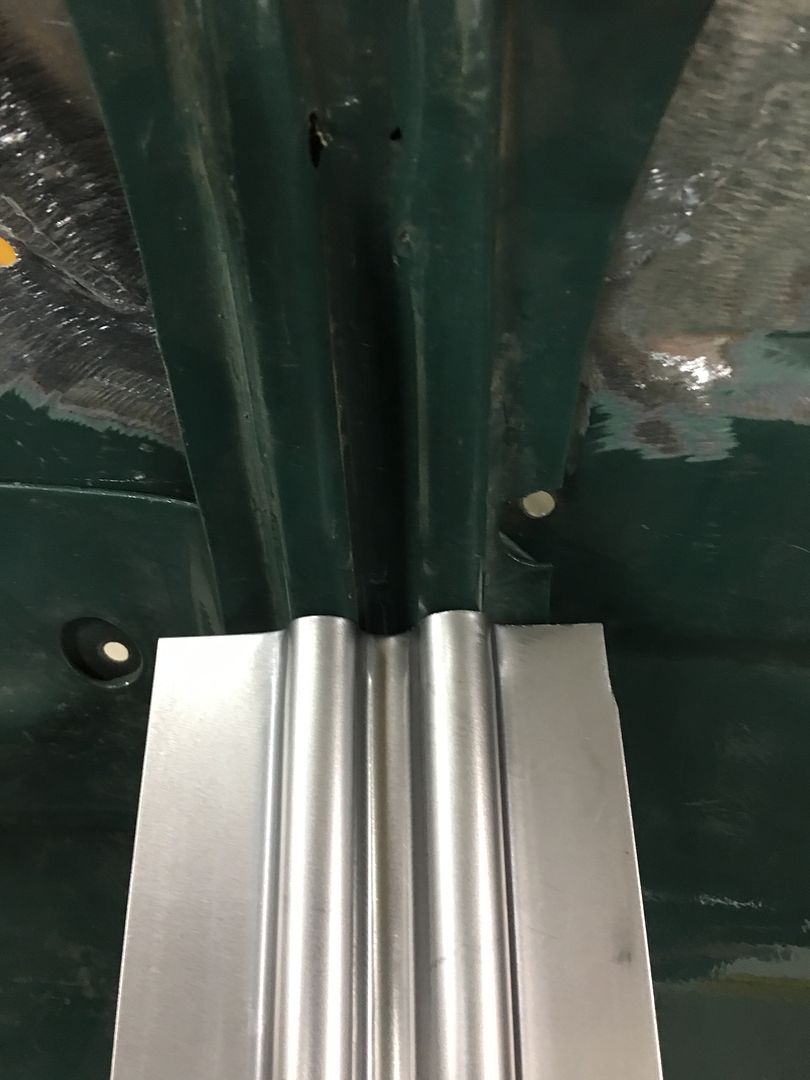 video version: https://www.youtube.com/watch?v=OQgVST8TYgE .
__________________
Robert |
|
|
|
|
03-27-2020, 12:07 PM
|
#6 |
|
Post Whore
Join Date: May 2015
Location: Alabama
Posts: 14,581
|
Re: Butt welds for patch panels
That looks great Robert...
__________________
Mongo...aka Greg RIP Dad RIP Jesse 1981 C30 LQ9 NV4500..http://67-72chevytrucks.com/vboard/s...d.php?t=753598 Mongos AD- LS3 TR6060...http://67-72chevytrucks.com/vboard/s...34#post8522334 Columbus..the 1957 IH 4x4...http://67-72chevytrucks.com/vboard/s...63#post8082563 2023 Chevy Z71..daily driver |
|
|
|
|
03-28-2020, 06:59 PM
|
#7 |
|
Registered User
Join Date: Jan 2013
Location: Leonardtown, MD
Posts: 1,633
|
Re: Butt welds for patch panels
Thanks Greg!
Progress on the hood, the bead details in the brace are offset on the ends to match the hood opening flange. So we use a Vernier protractor to find the angle, and transfer that to our panel. This is where the transition of the taper starts.. 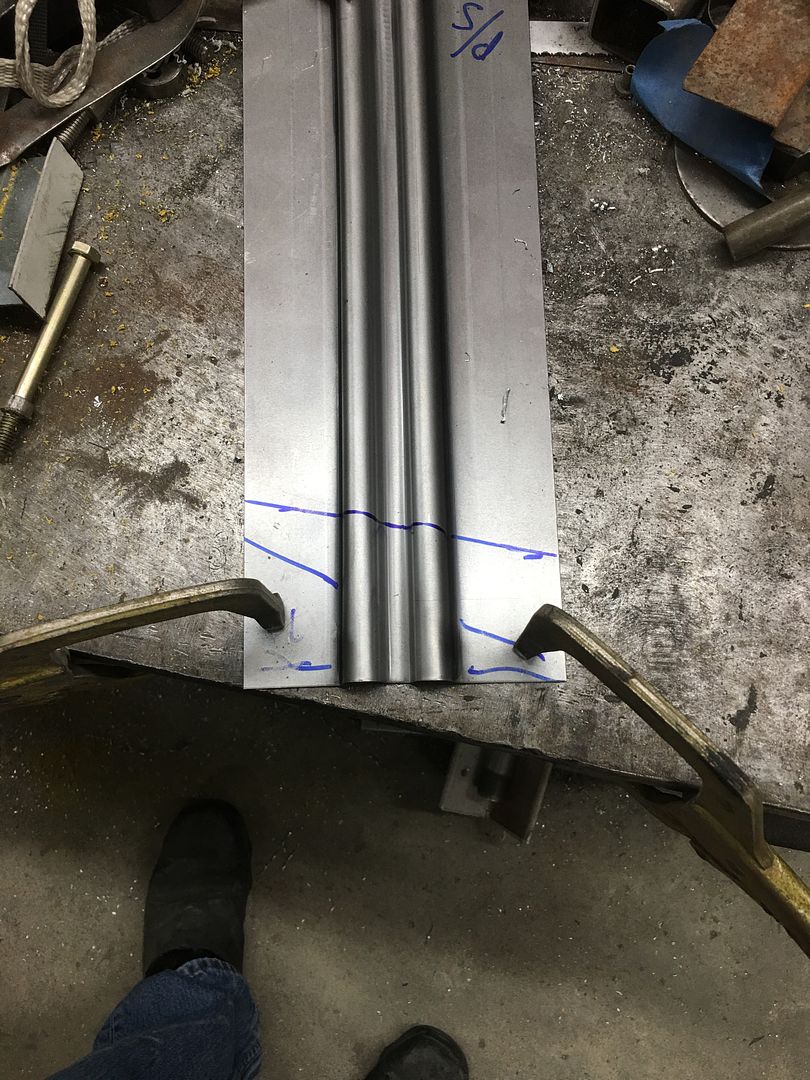 Once tapered, the excess is removed from the bottom side and the outer seams TIG welded in place. 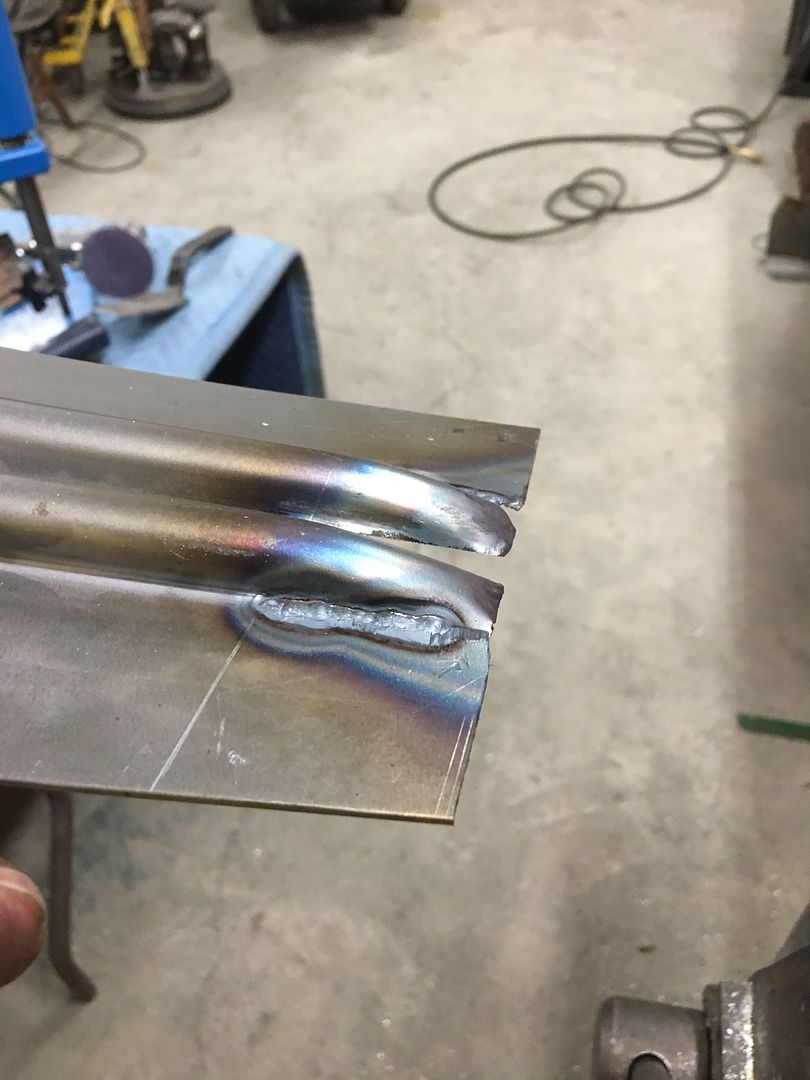 A piece of round stock has a radius added to serve as a hammer form for the beads. They are hammered around and excess removed from the back side.. 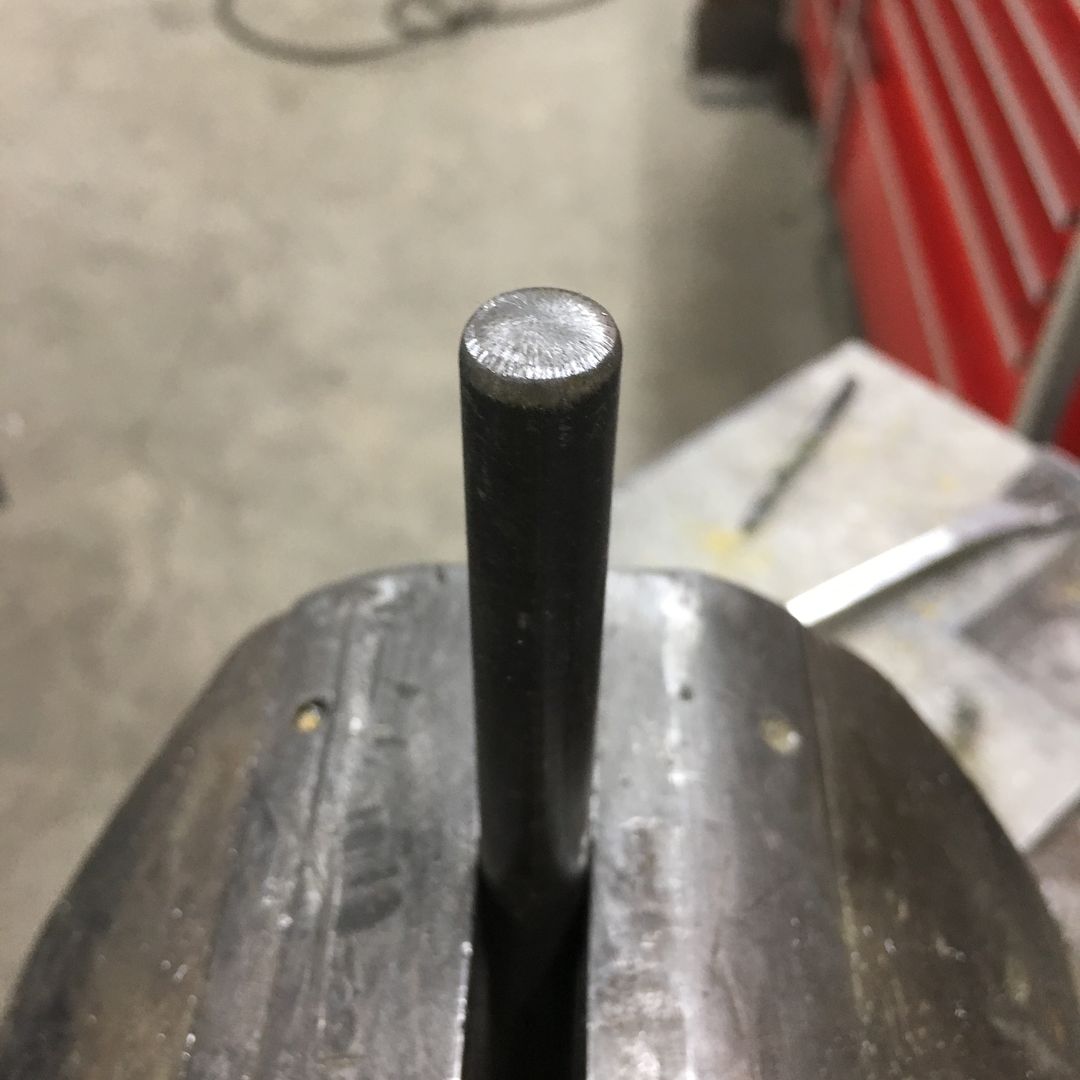 A piece of 16 gauge cold rolled steel is trimmed to fit and TIG welded in place. 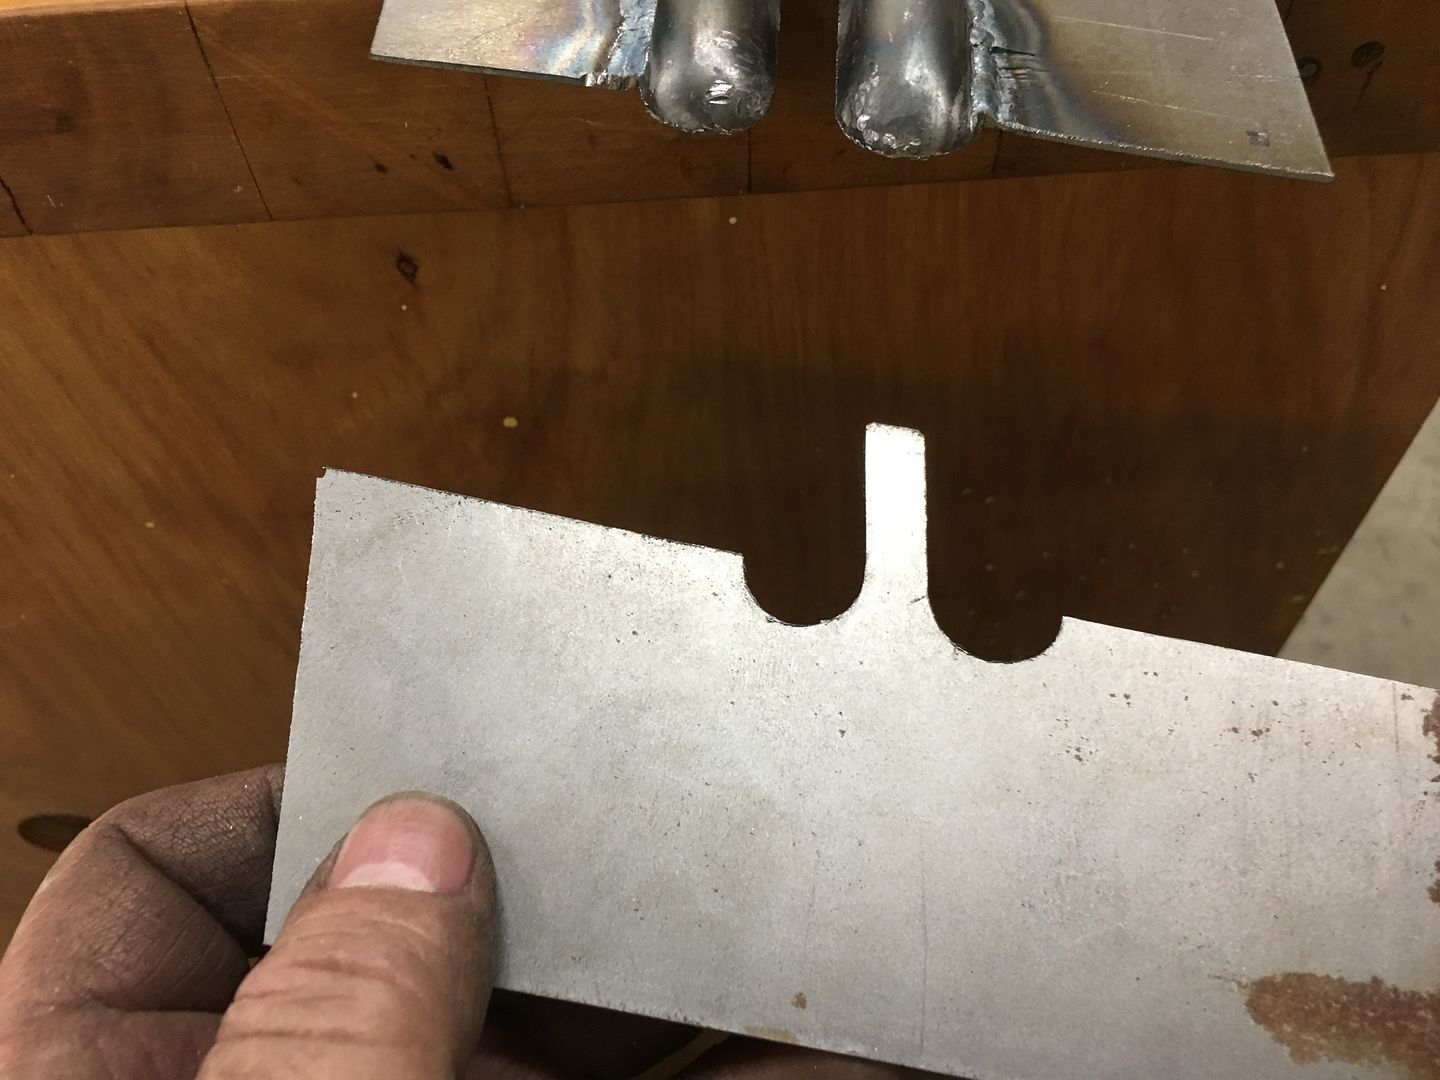 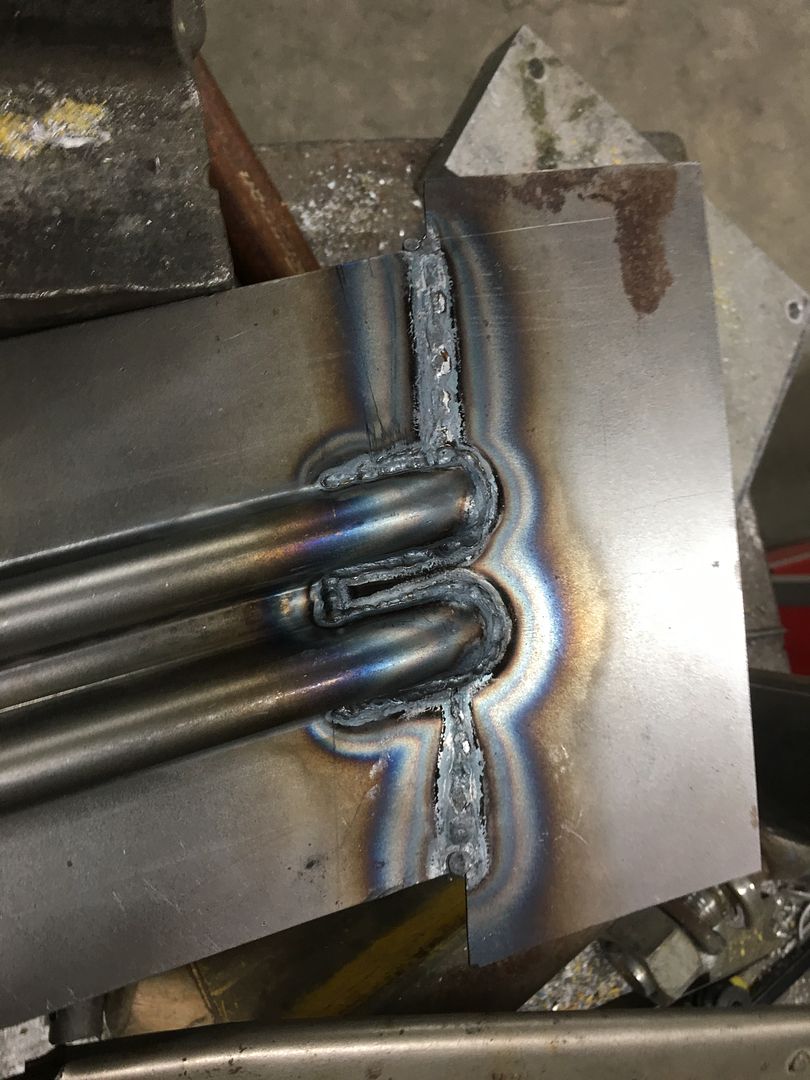 Welds dressed and media blasted.. 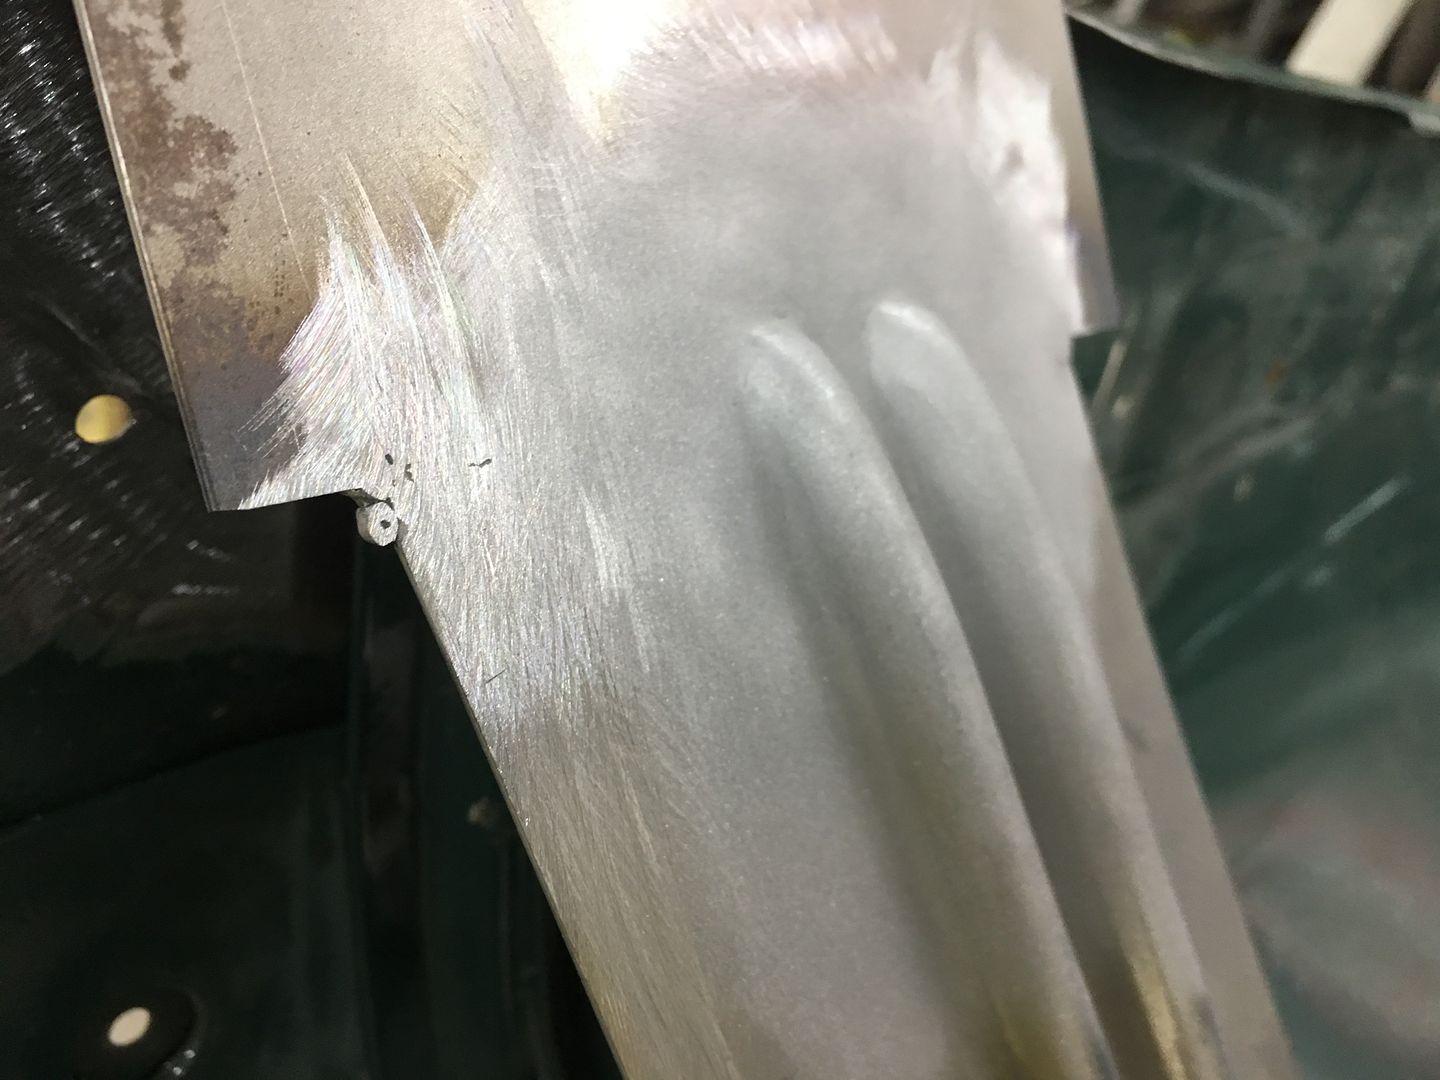 The bend line is transposed from the original. As this bend is slightly convex, it was started using a tipping wheel on the bead roller to a 45* angle, and then finished on the mag brake. 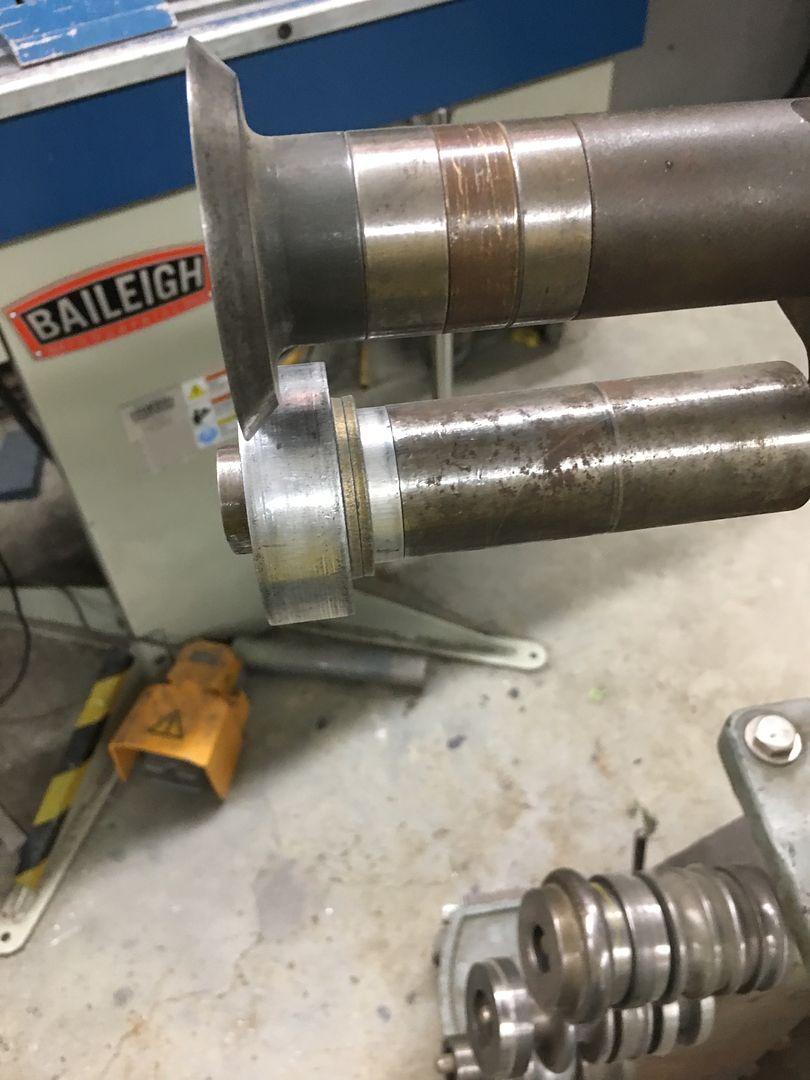 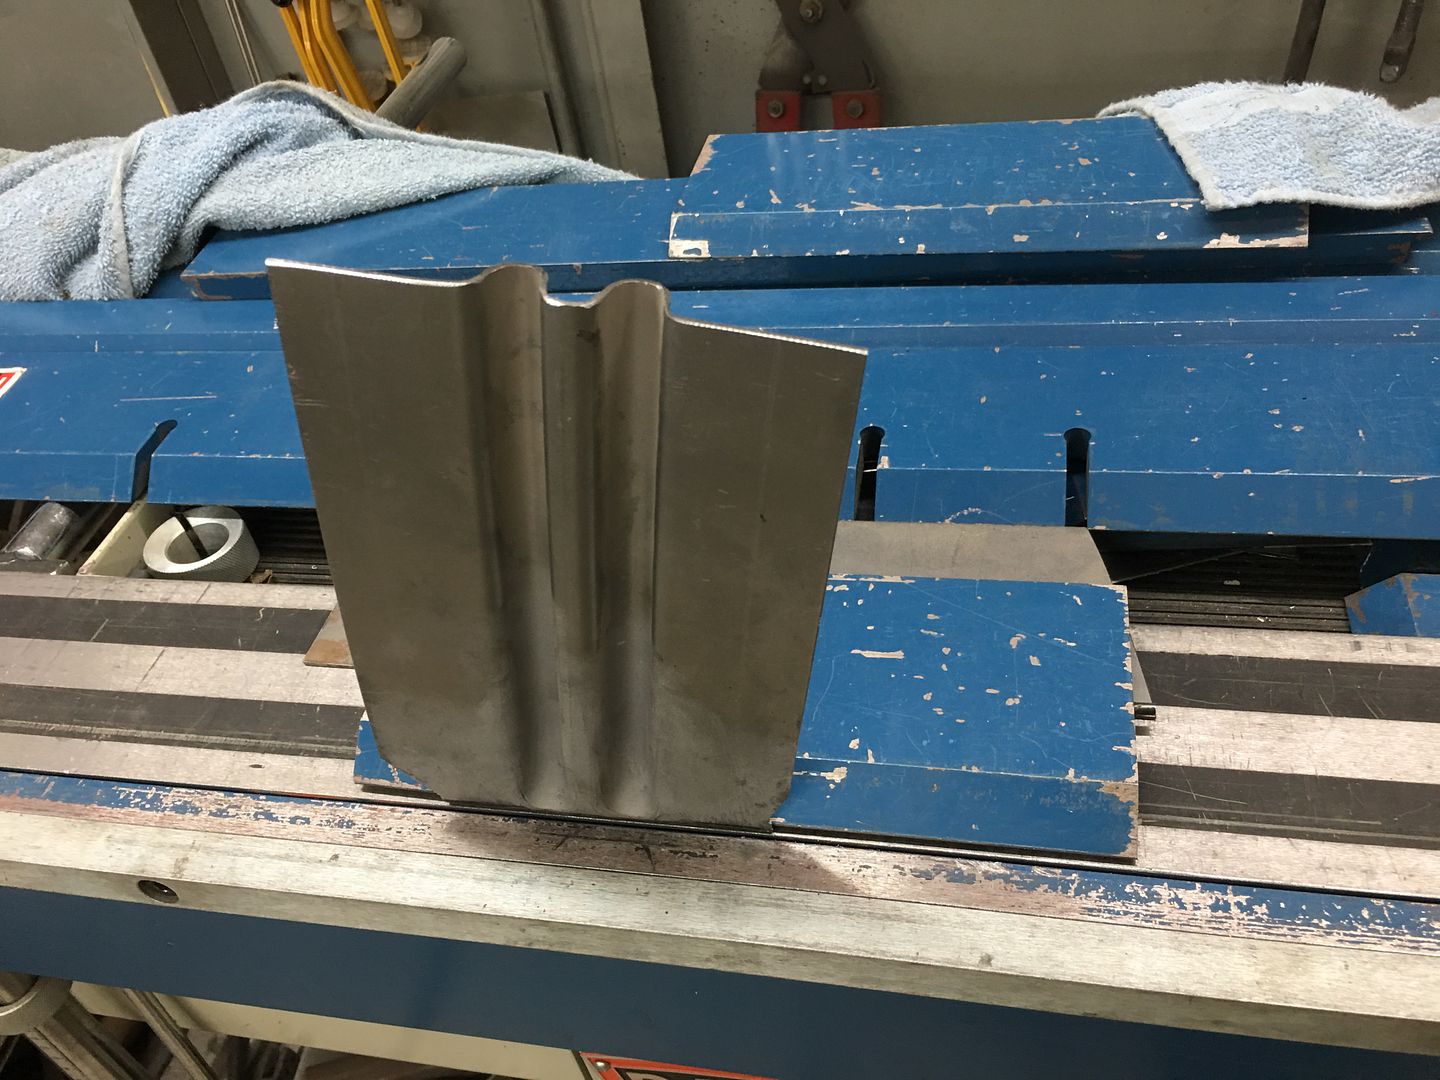 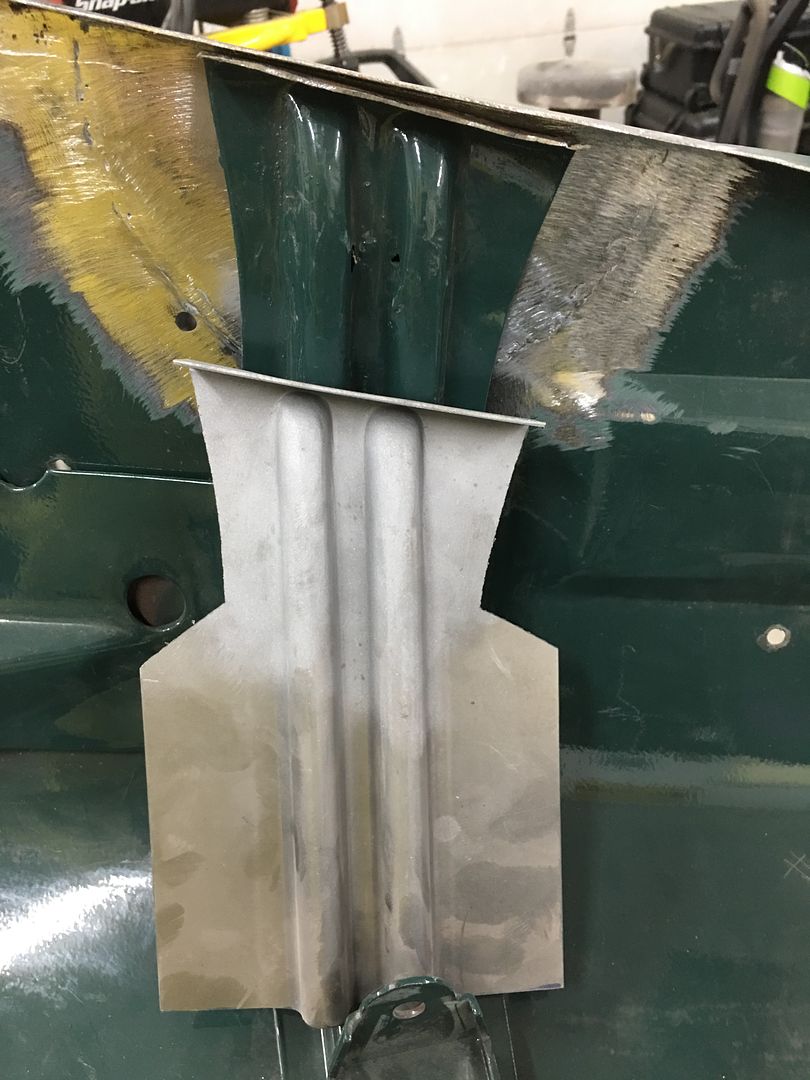 A reminder of the carnage we are repairing: https://www.youtube.com/watch?v=NDZyTTuUGVE A profile template is made prior to cutting out the old.... 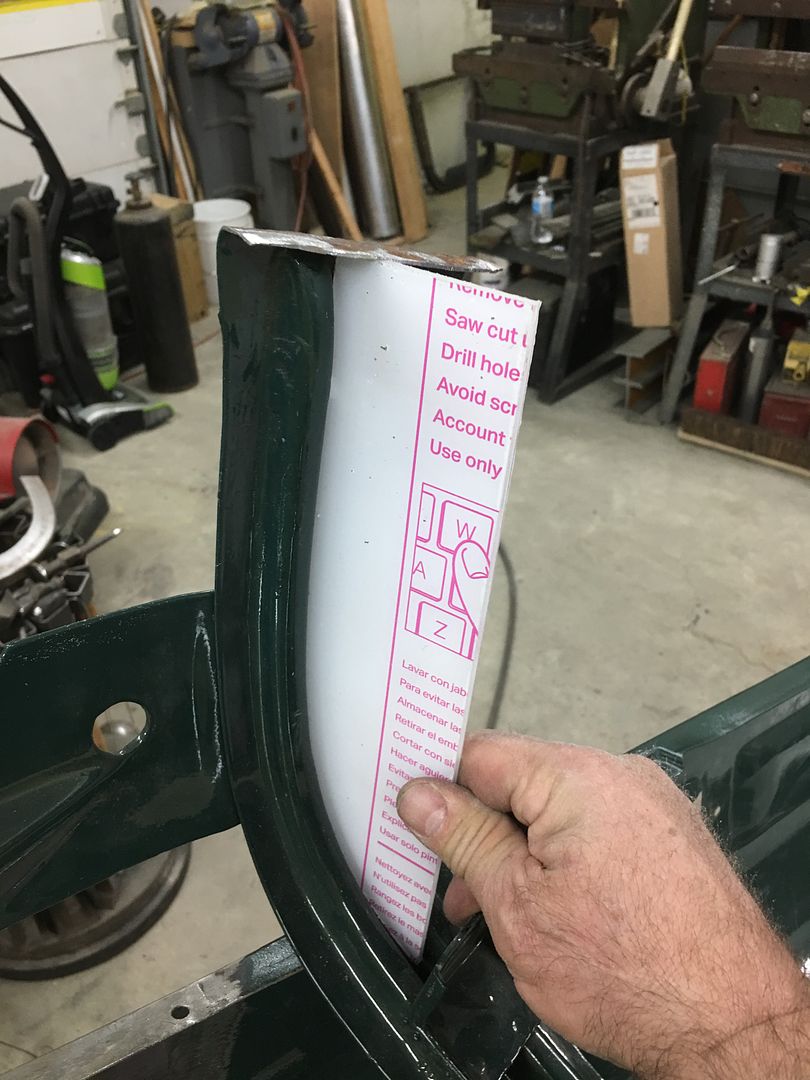  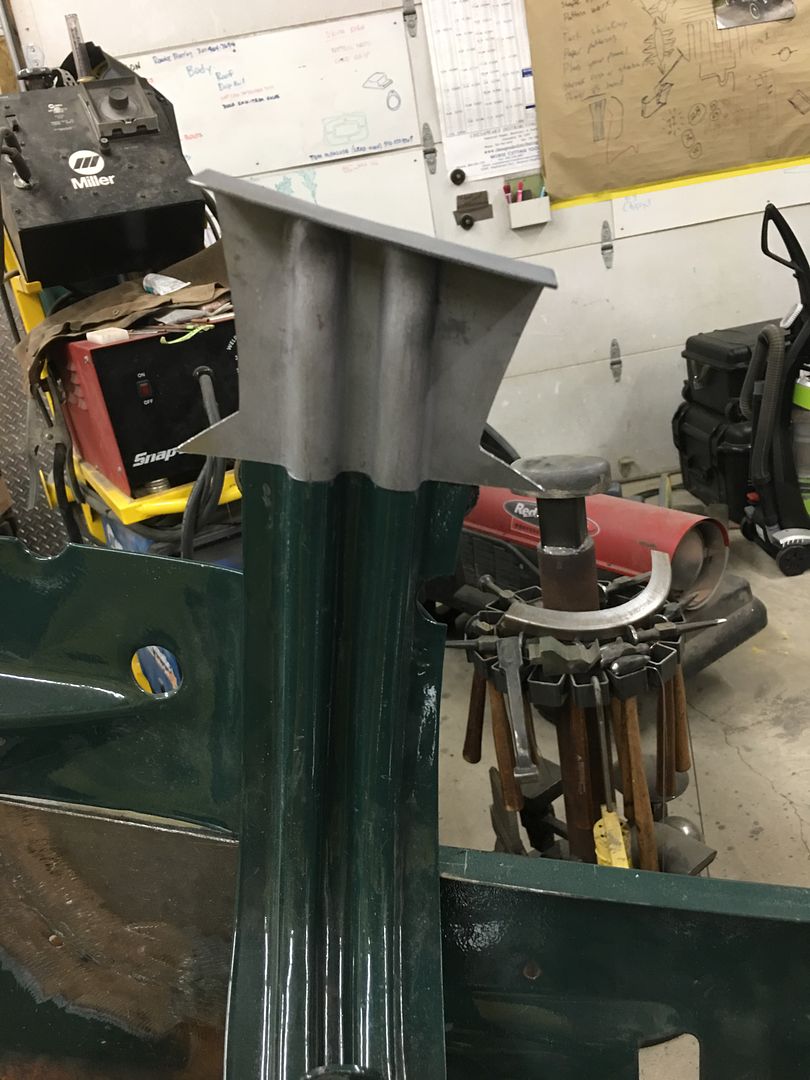
__________________
Robert |
|
|
|
|
03-31-2020, 11:50 PM
|
#8 |
|
Registered User
Join Date: Jan 2013
Location: Leonardtown, MD
Posts: 1,633
|
Re: Butt welds for patch panels
Time to get the hood brace end welded in place. The overall measurement had been taken prior to cutting off the old one, down to the 14 gauge outer plate as a reference. So the new end is trimmed to match this dimension, then held in place with rare earth magnets. The center (inside) rib is aligned and tacked using the TIG....
  Working outward, the panel surfaces are aligned and tacked as we go. Note the "batwings" left on the outside of the new brace end (yellow arrows). This will act as a heat sink when we make the outer tacks. Had these been trimmed to match prior to welding, the edge will have a tendency to burn back from the heat.  The entire seam is TIG welded and then our batwings are trimmed using offset snips, then welds dressed.. 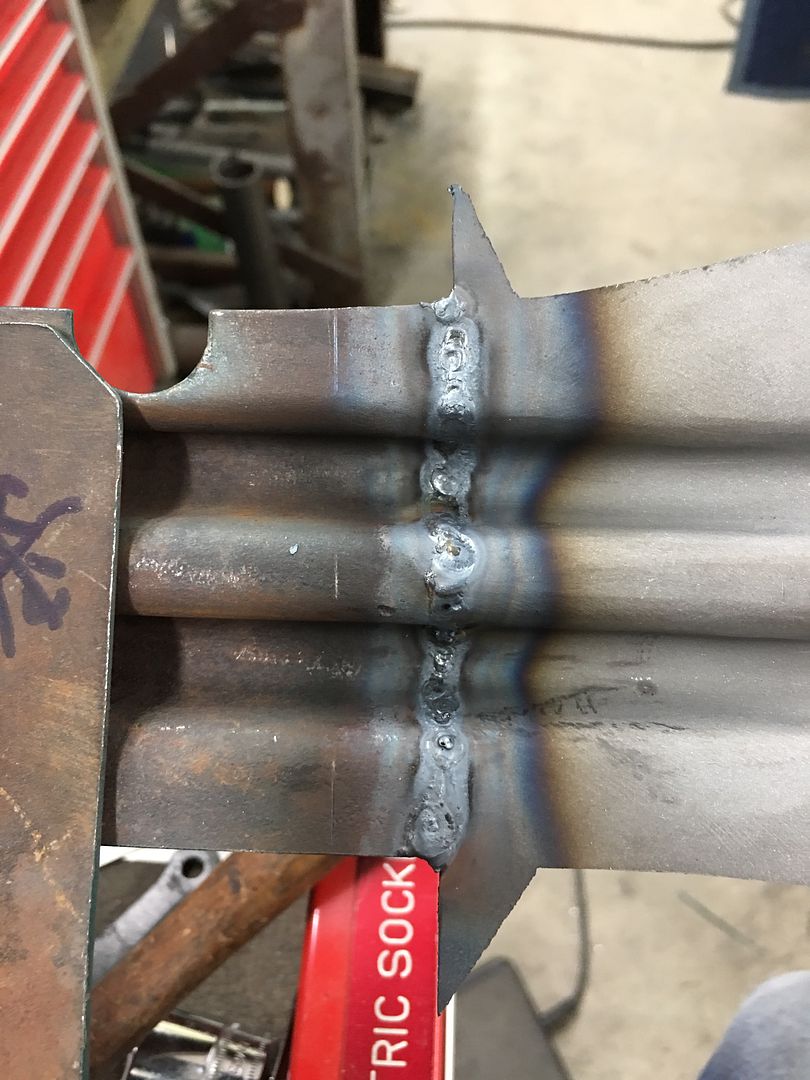 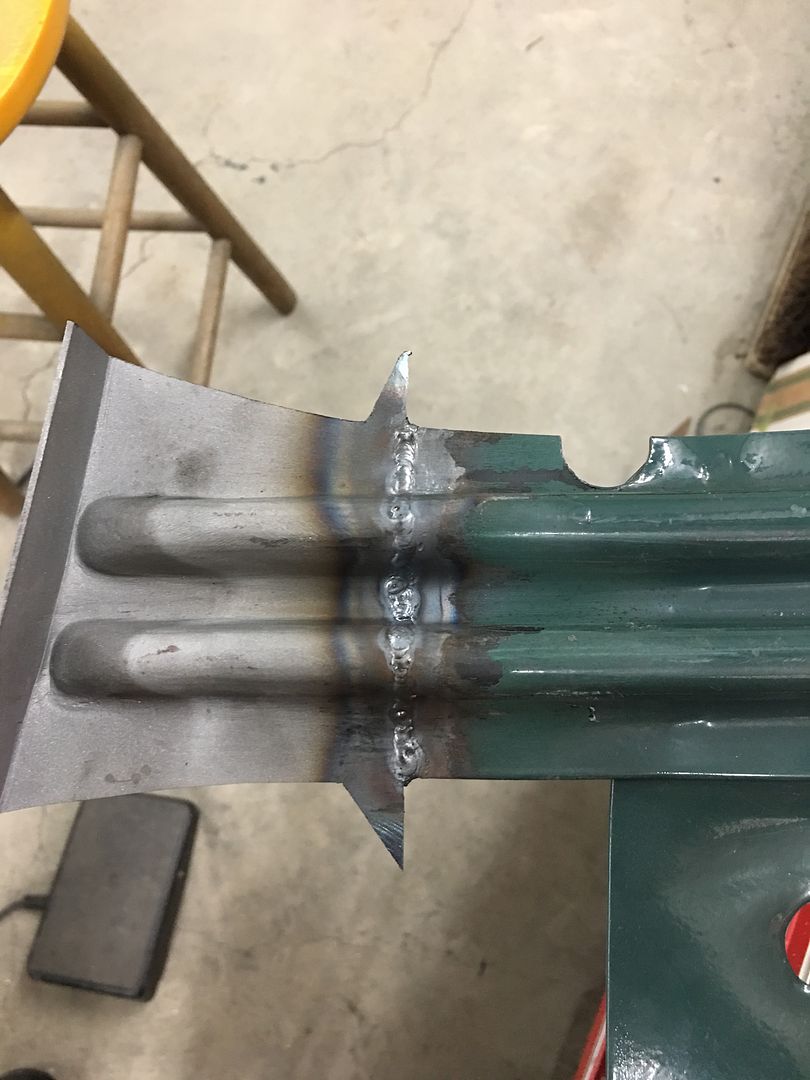 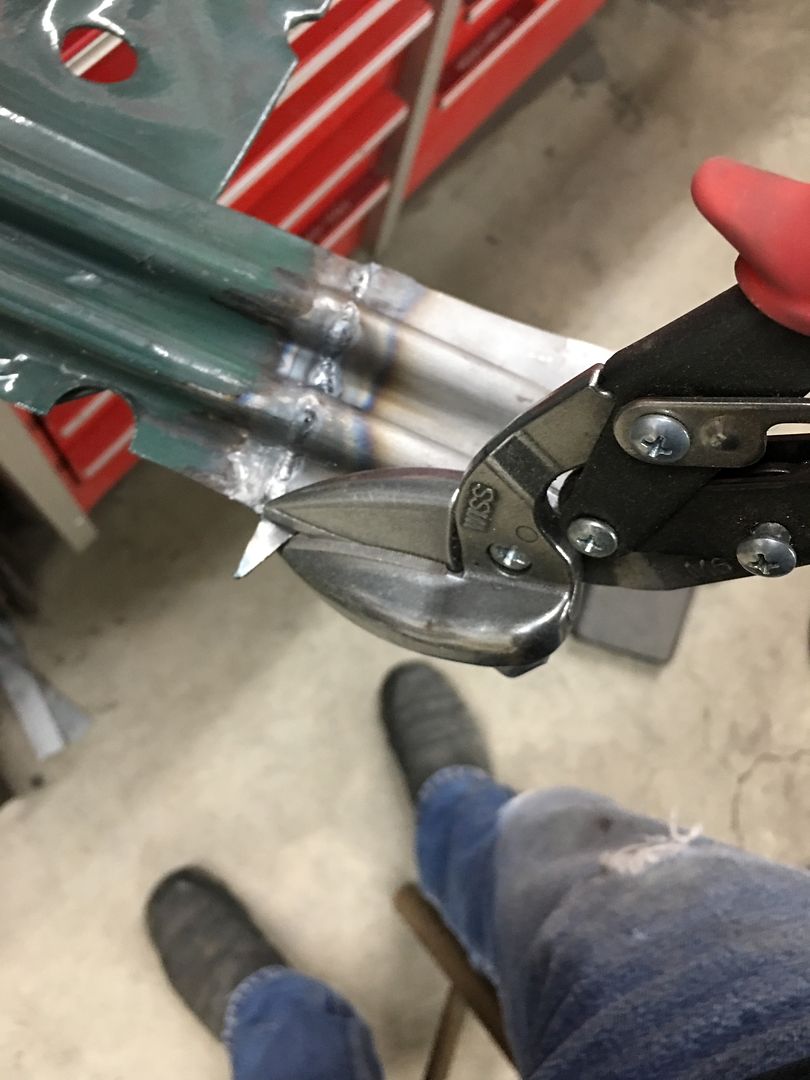 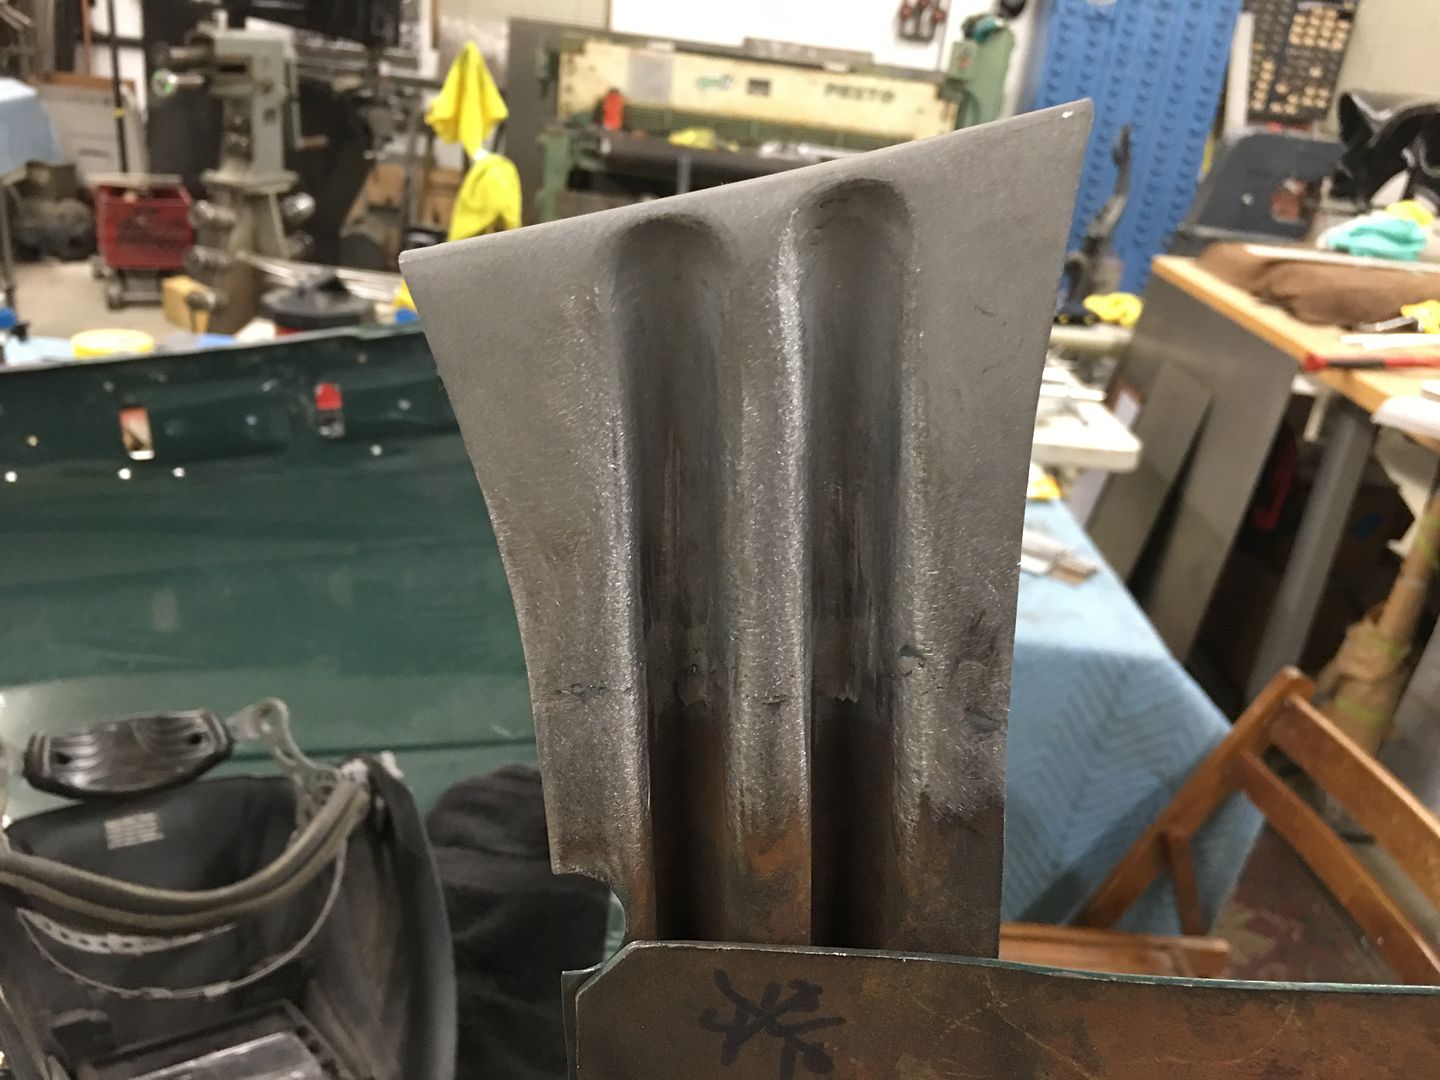 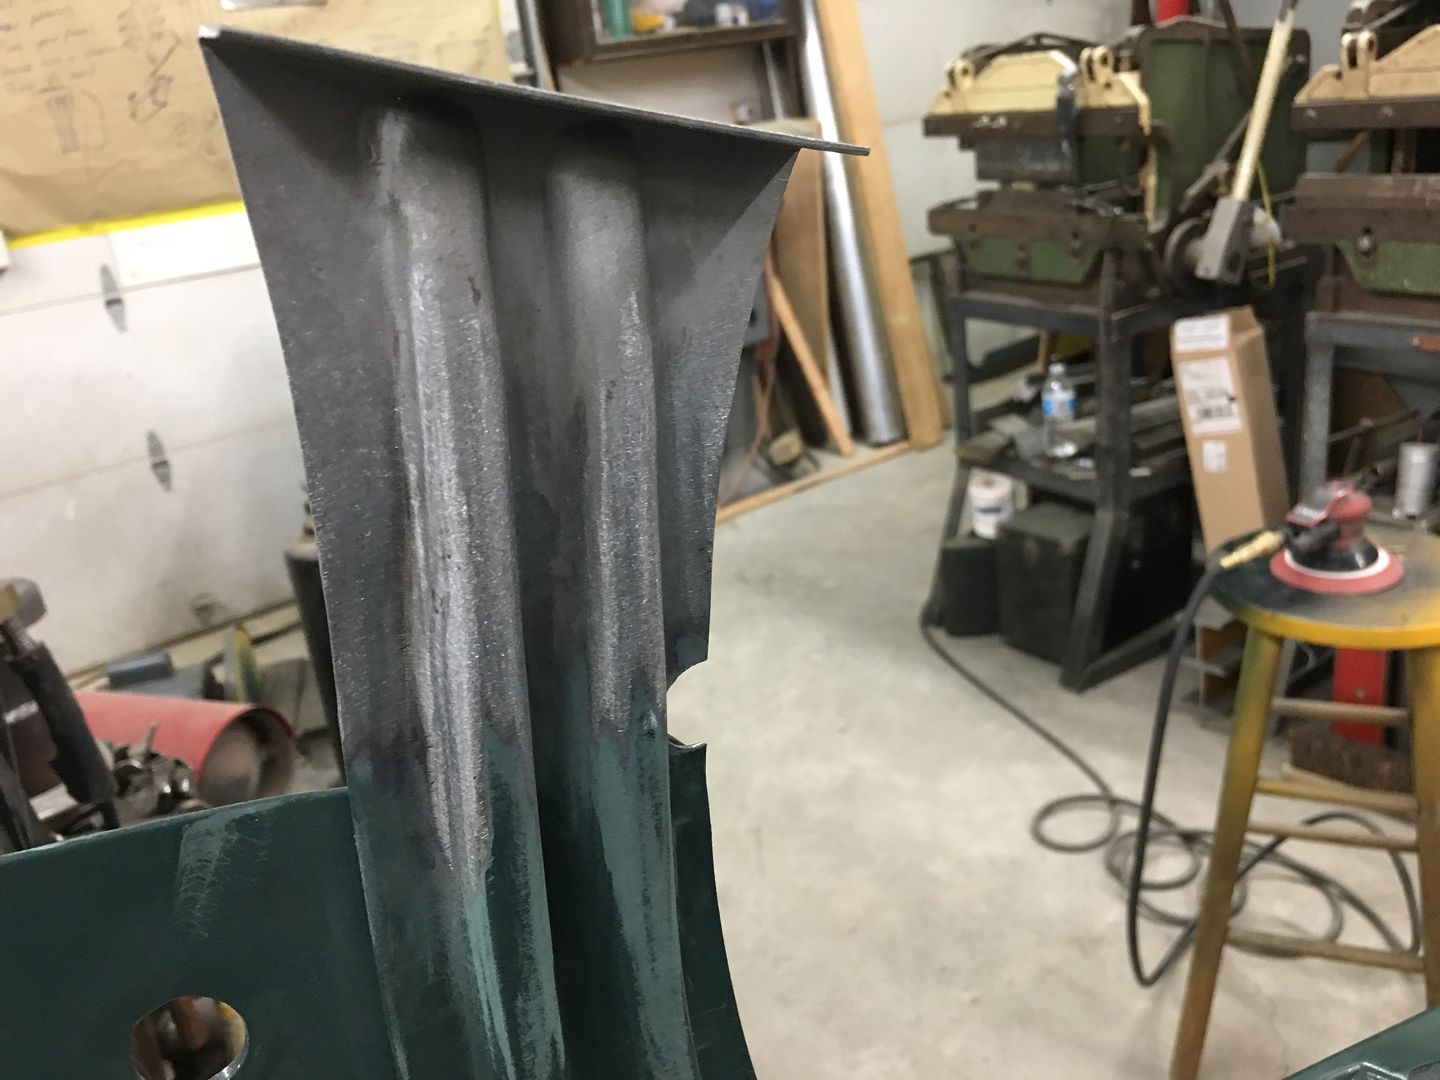 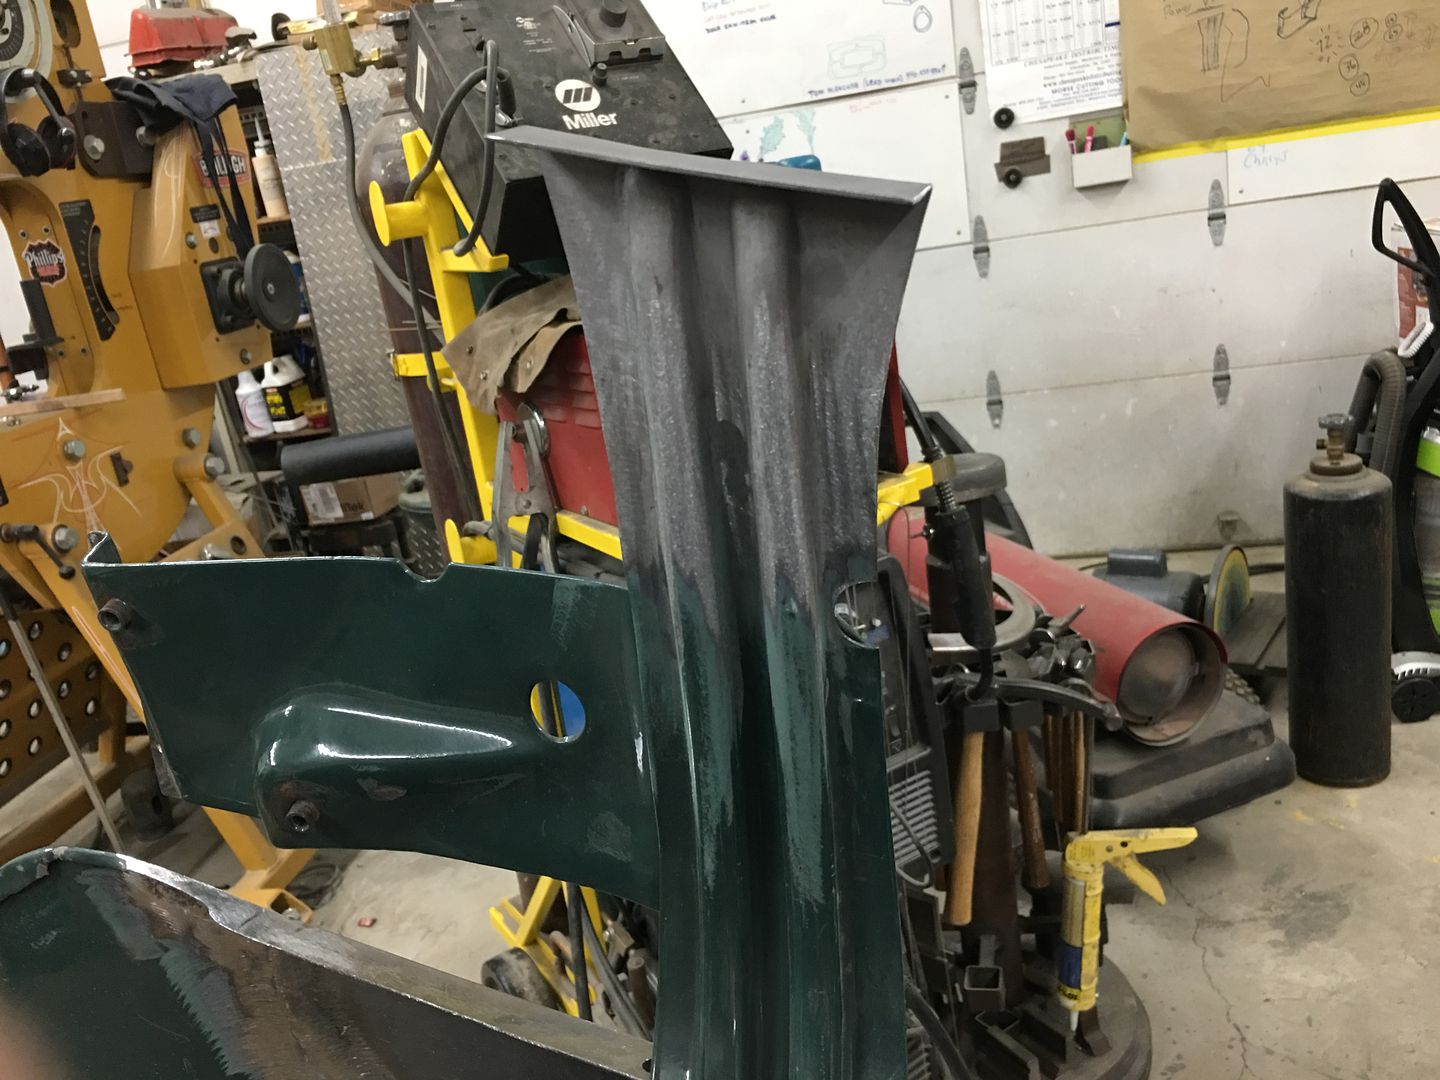 One down......
__________________
Robert |
|
|
|
|
04-01-2020, 12:30 AM
|
#9 |
|
Post Whore
Join Date: Aug 2014
Location: Sacramento, CA
Posts: 10,803
|
Re: Butt welds for patch panels
you're simply doing God's work !!! LOL incredible skills
|

|
|
|
04-02-2020, 11:24 AM
|
#10 |
|
Senior Member
Join Date: Jun 2002
Location: Murray, Kentucky
Posts: 3,361
|
Re: Butt welds for patch panels
I just realized what a hack I am... Great work!
Rg
__________________
Roger '68 Short step - https://67-72chevytrucks.com/vboard/...d.php?t=849675 '69 ('70?) 2wd Blazer '70 GMC Jimmy 2wd |
|
|
|
|
04-02-2020, 12:56 PM
|
#11 |
|
Registered User
Join Date: Jan 2013
Location: Leonardtown, MD
Posts: 1,633
|
Re: Butt welds for patch panels
Thanks for the comments guys! Roger, we all start somewhere. Id be embarrassed to show some of my stuff from 25 years ago.

__________________
Robert |
|
|
|
|
04-02-2020, 11:35 PM
|
#12 |
|
Registered User
Join Date: Jan 2013
Location: Leonardtown, MD
Posts: 1,633
|
Re: Butt welds for patch panels
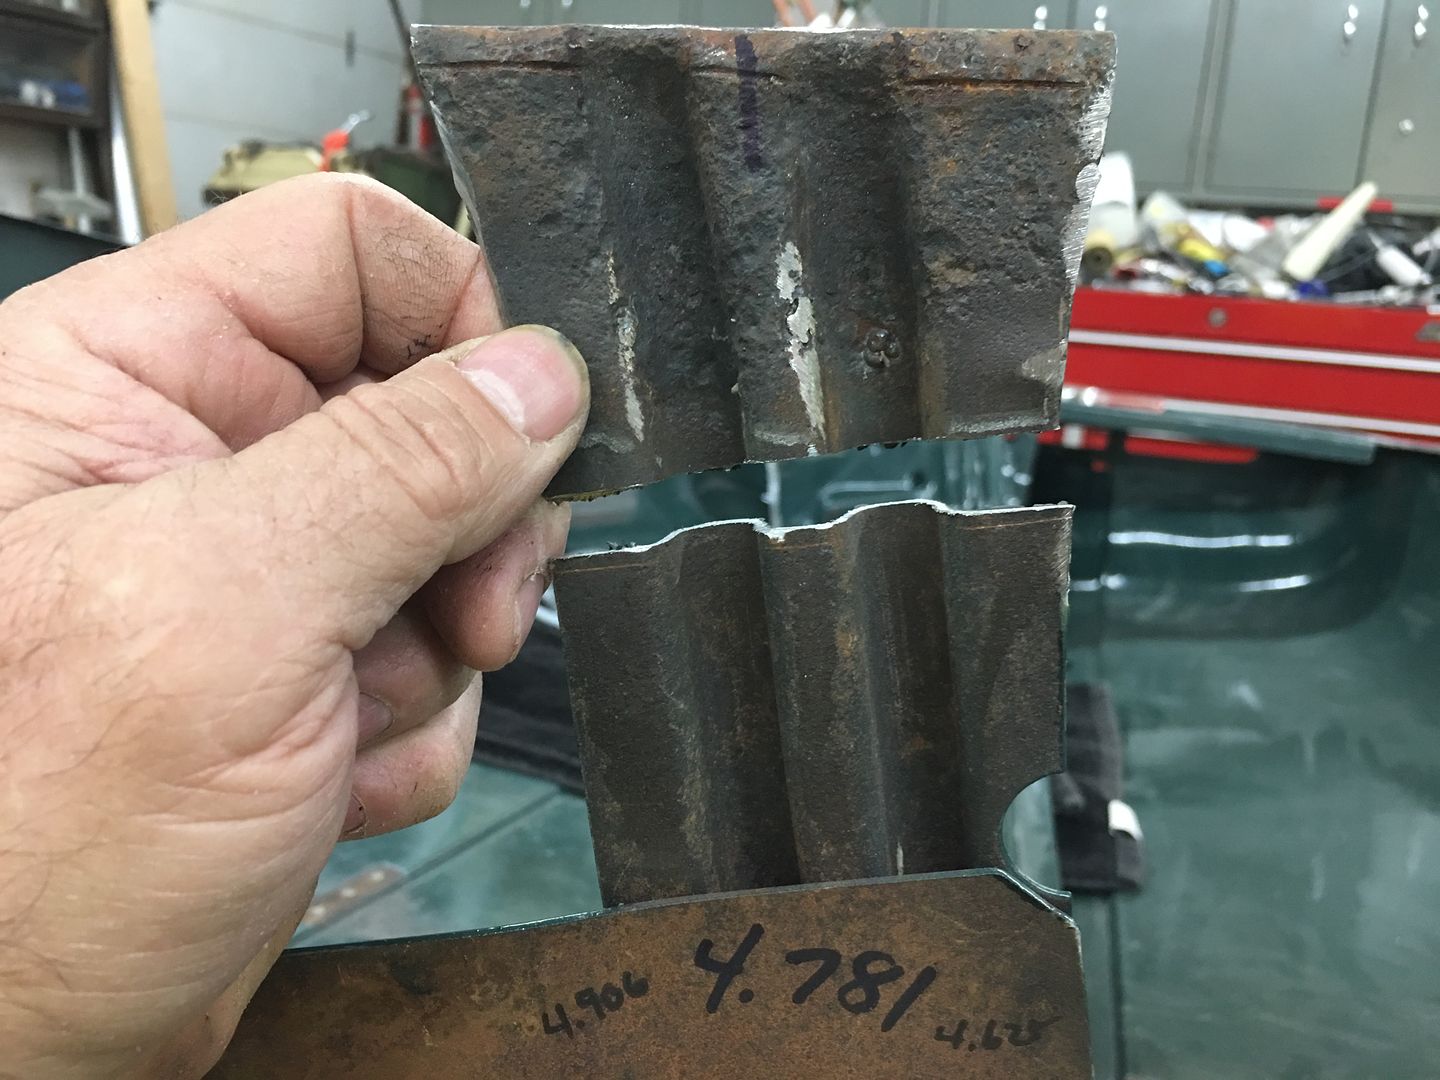
Starting on the other end of the hood brace, this one not as rotted as the other but has issues just the same. One of those "while we're here" things....
The ribs are trimmed and ends rounded.. A piece of flat 16 gauge is trimmed to fit.. 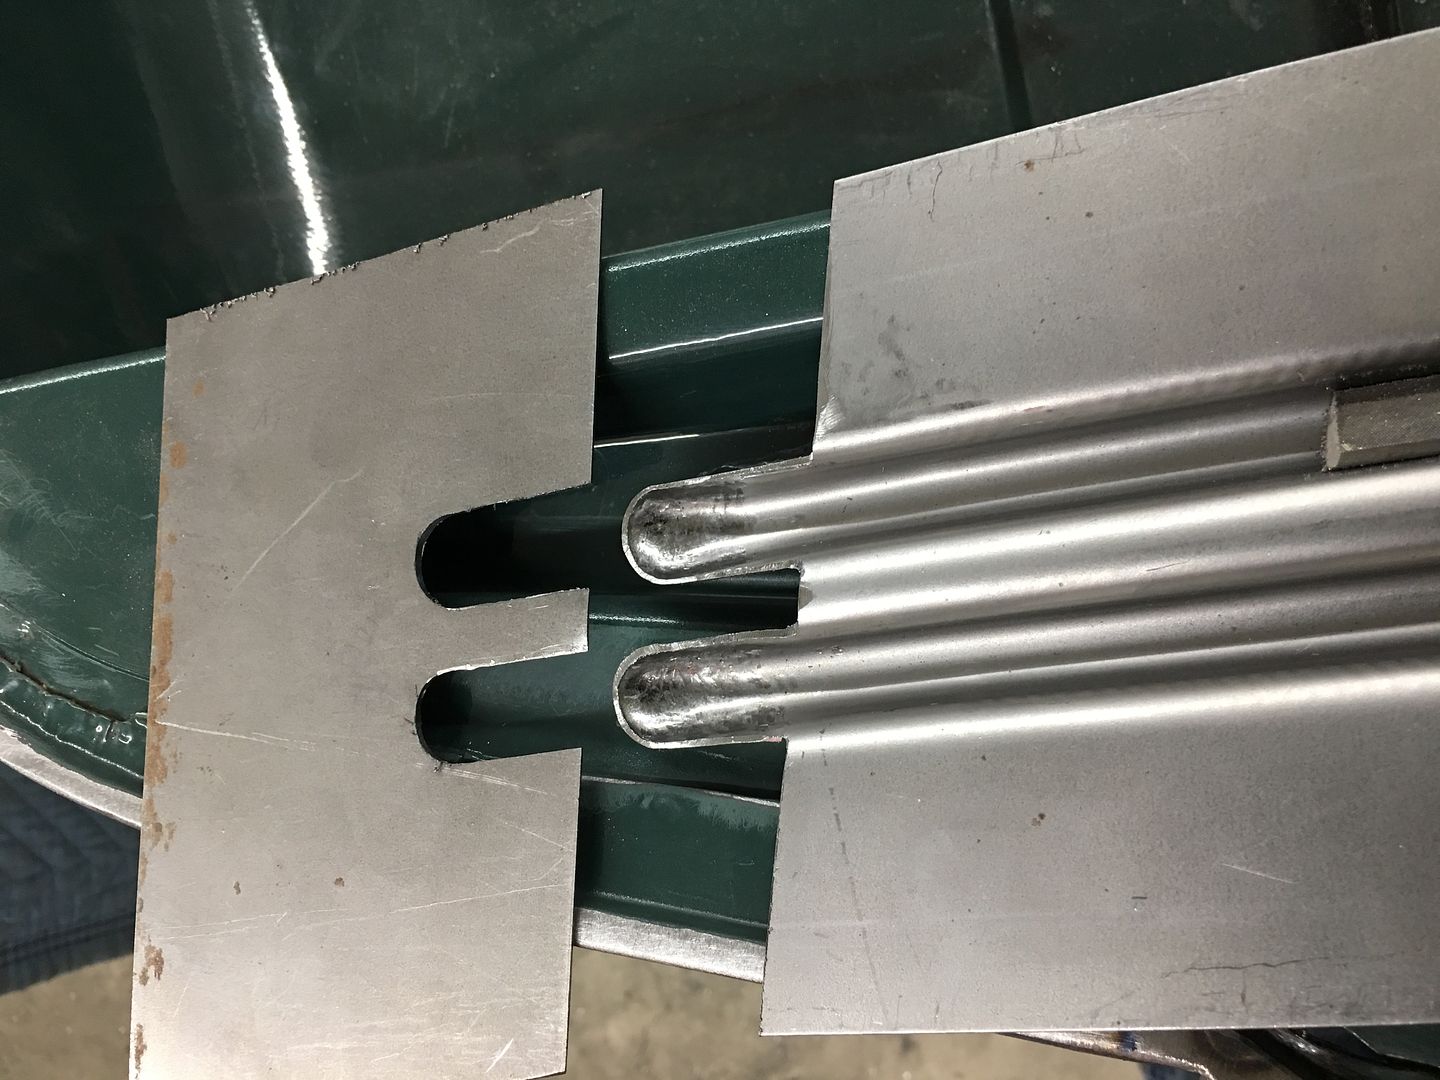 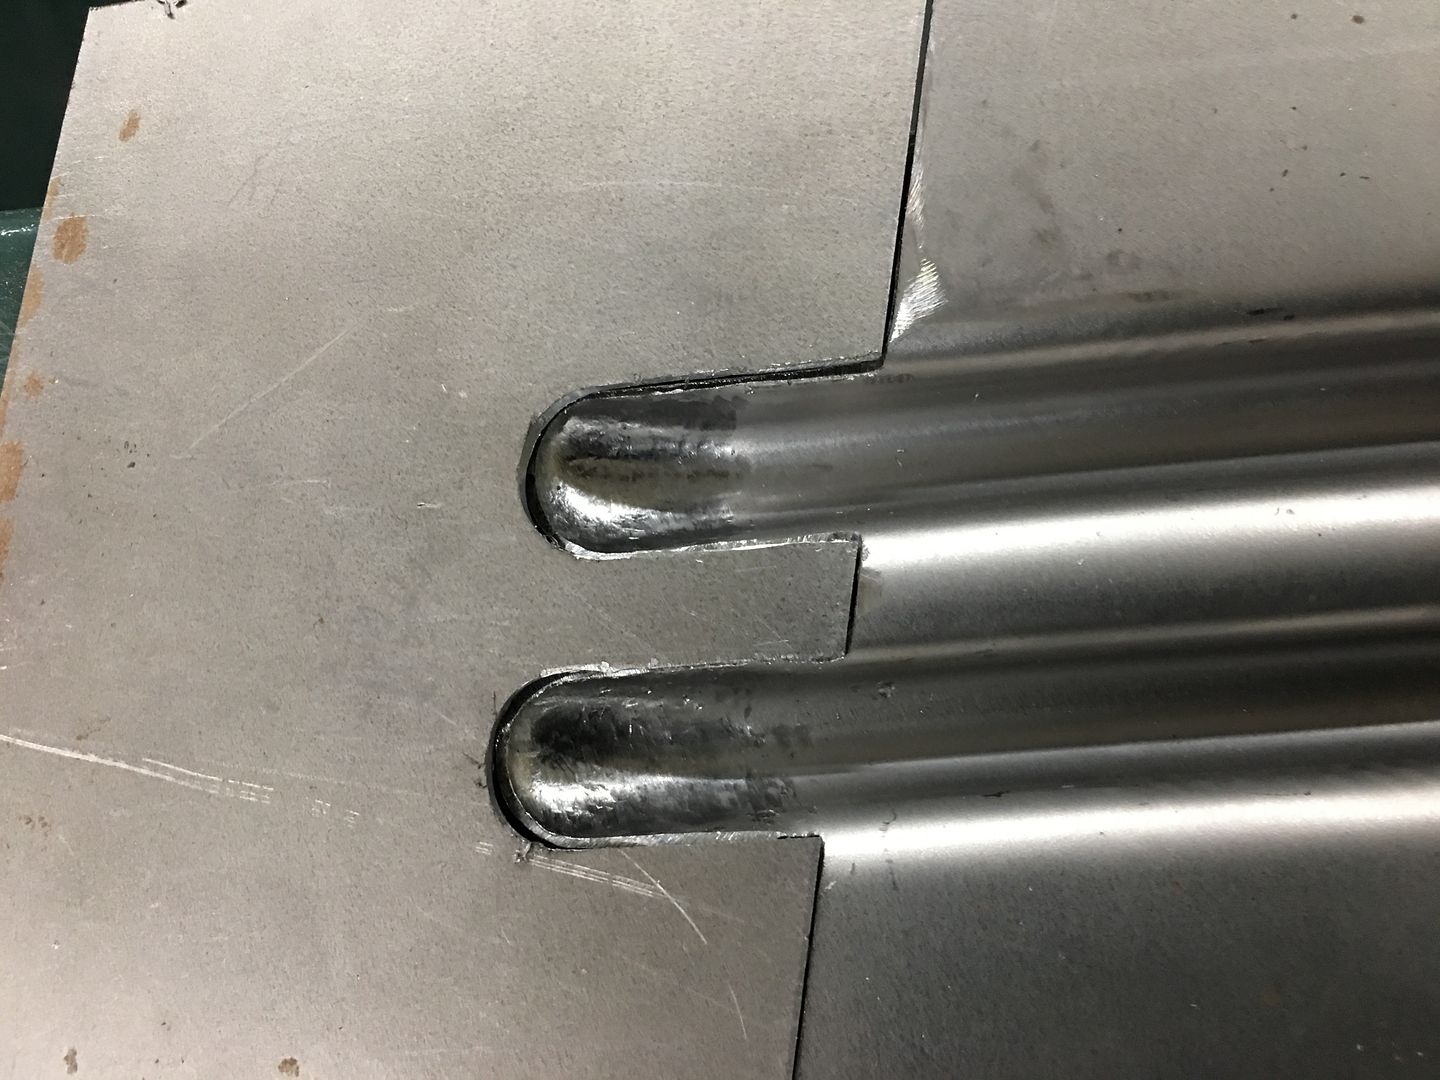 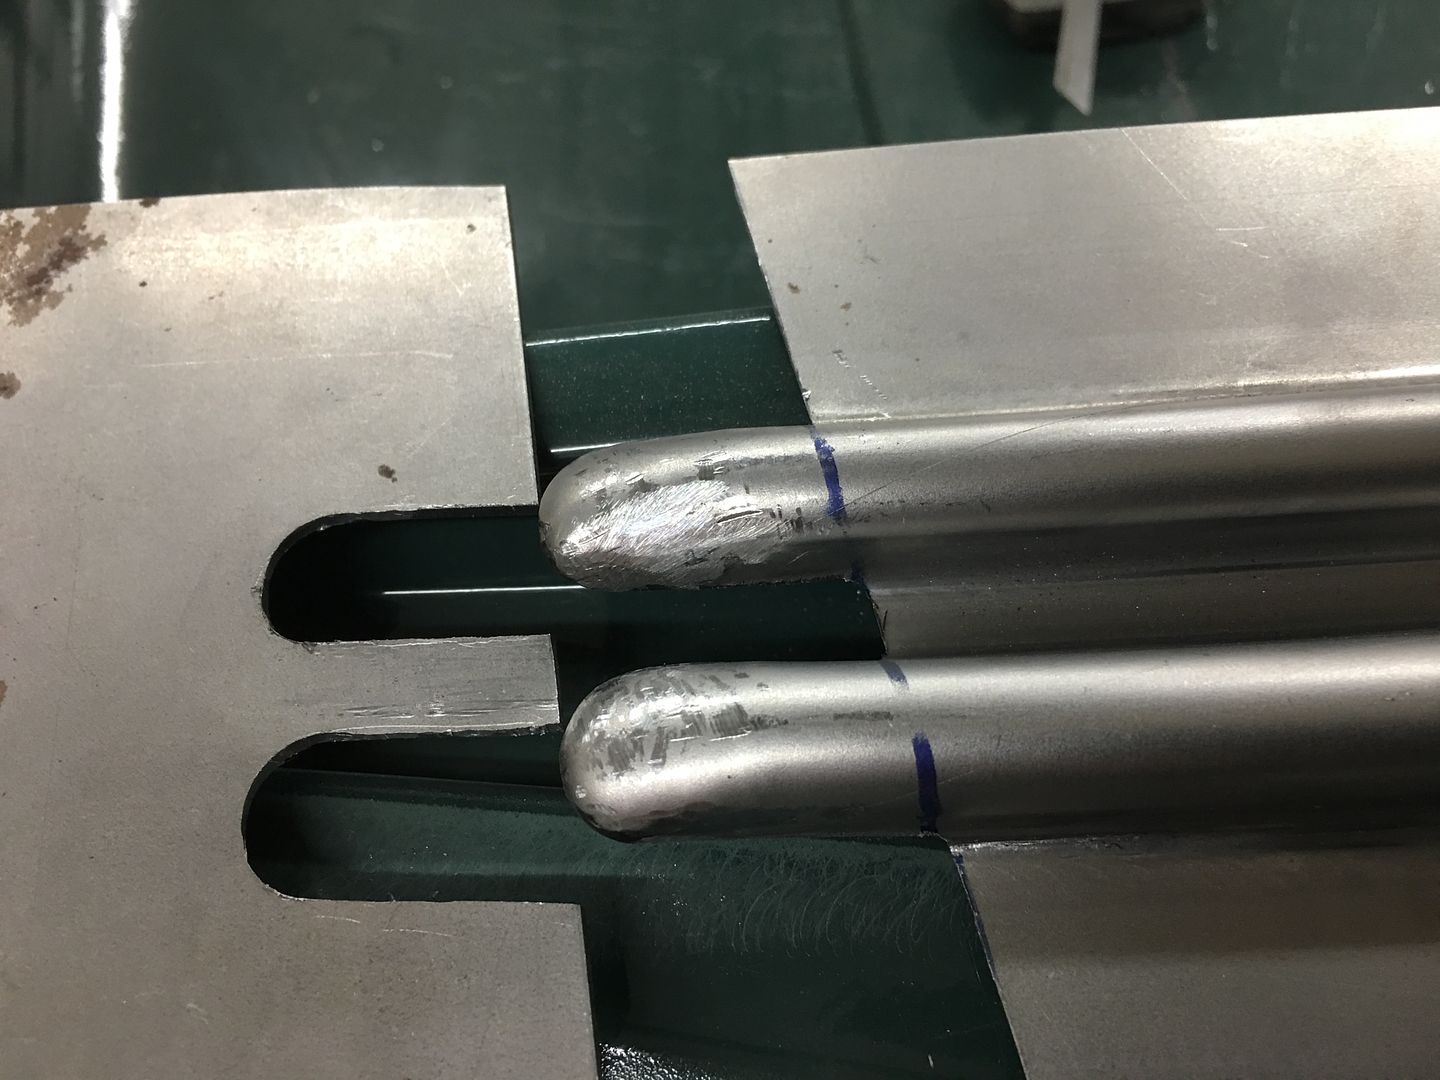 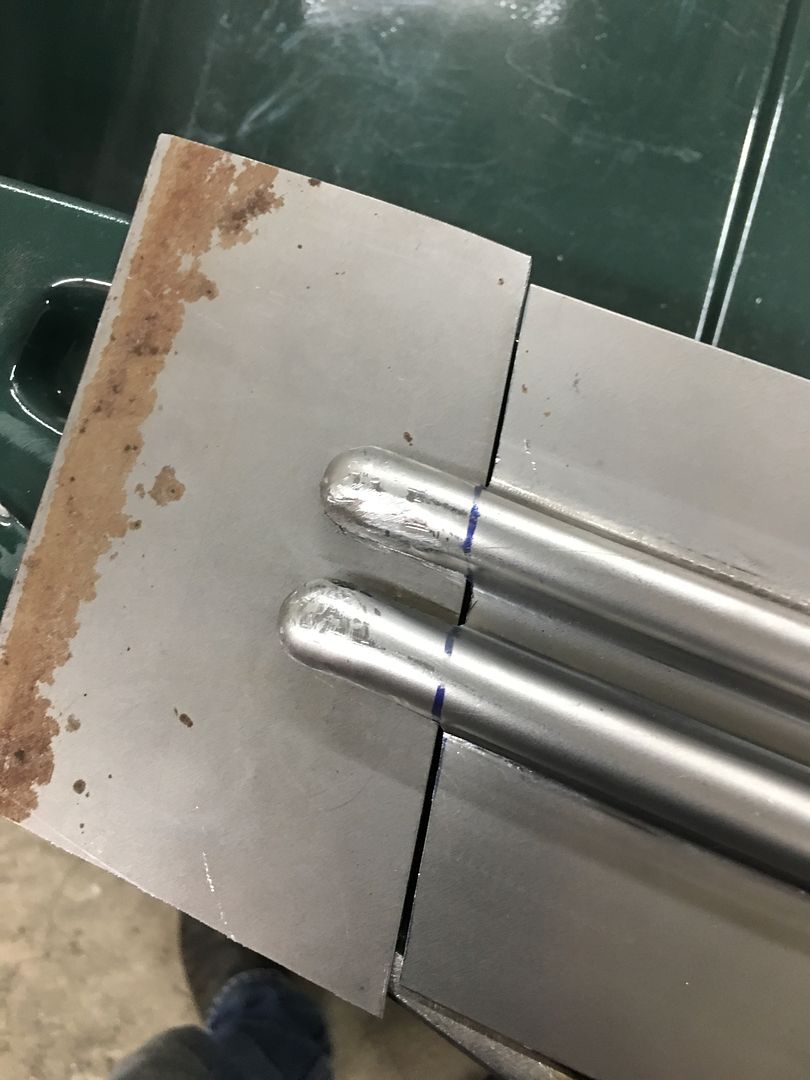 tacked together.... 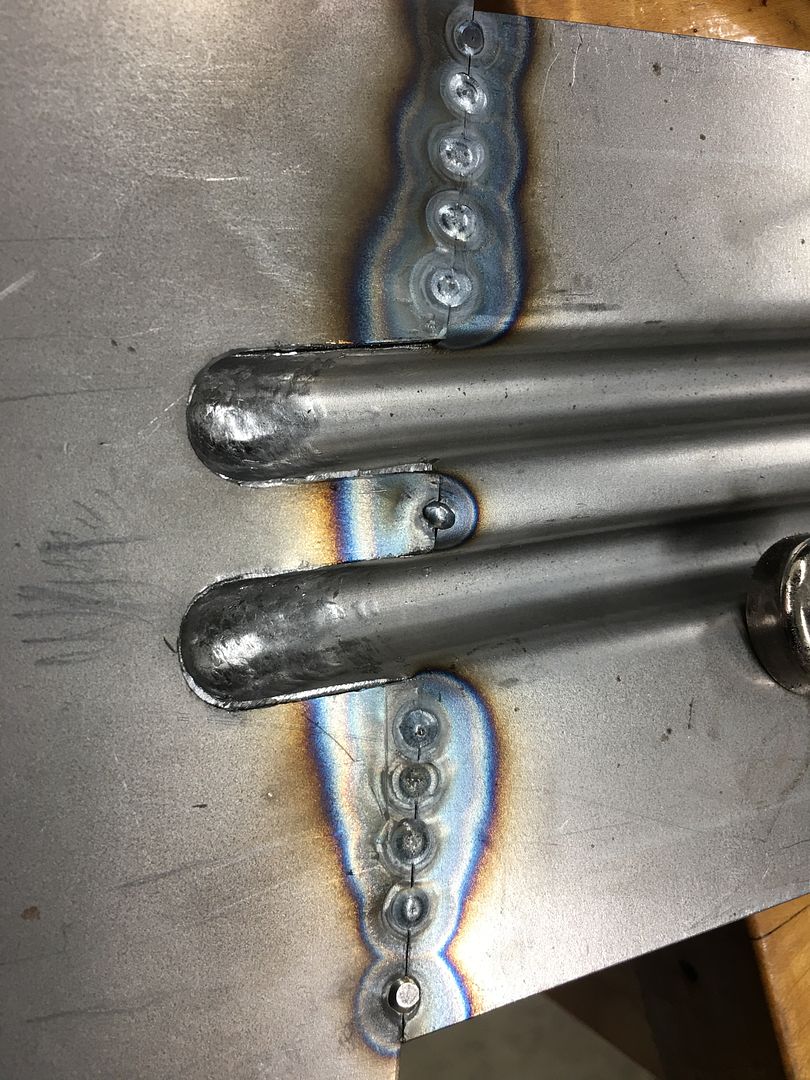 .then the photographer went on strike until we got to this... 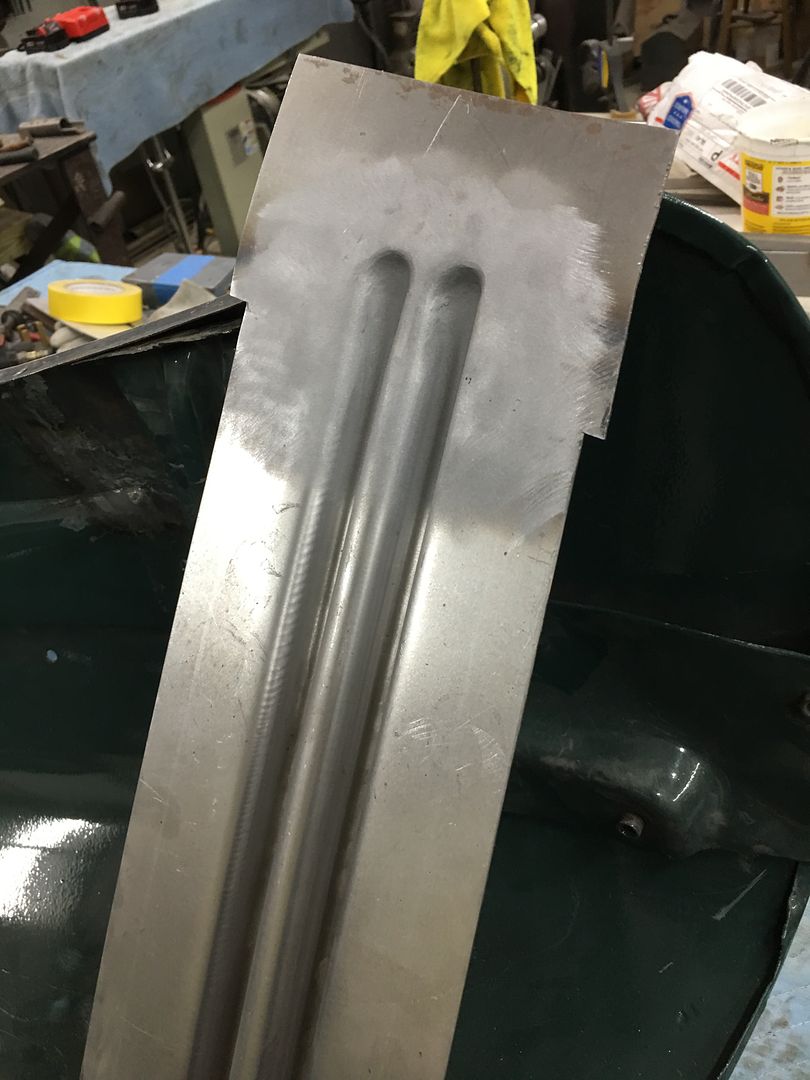 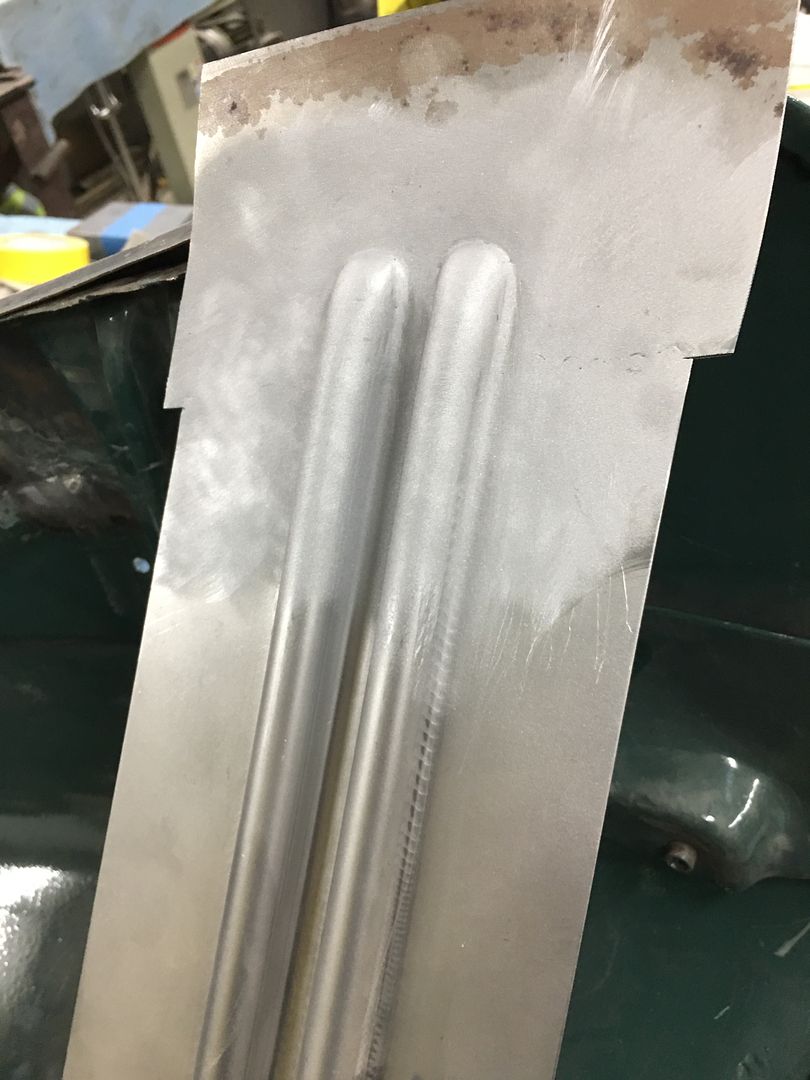 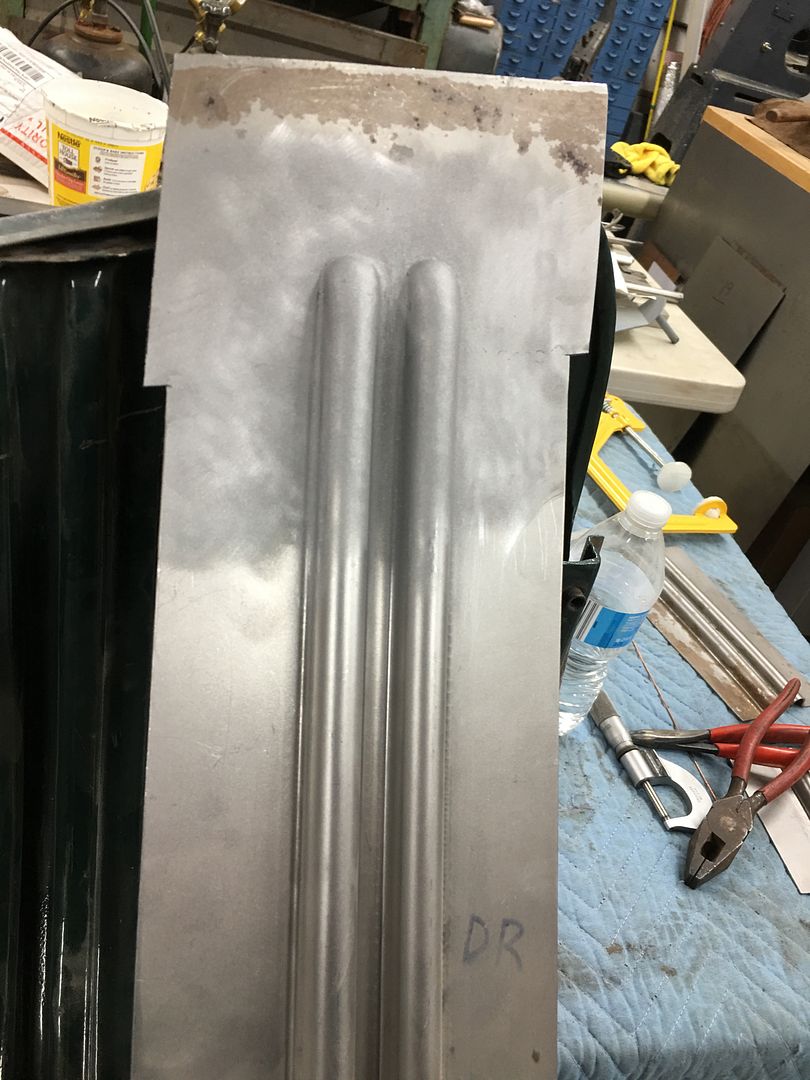 We'll get this trimmed and installed tomorrow..
__________________
Robert |
|
|
|
|
04-07-2020, 01:17 PM
|
#13 |
|
Registered User
Join Date: Jan 2013
Location: Leonardtown, MD
Posts: 1,633
|
Re: Butt welds for patch panels
More progress on the hood, here is the other end of the hood brace.
 Looking at the back side, you can see where a few holes were welded closed the last time it was painted, and the severe pitting and new holes that we have. A testament to the fact that what shows is always the tip of the iceberg. Although better than the passenger side, this is definitely one of those "while we are here" things. Do it right, do it once. (grinder marks were mine)  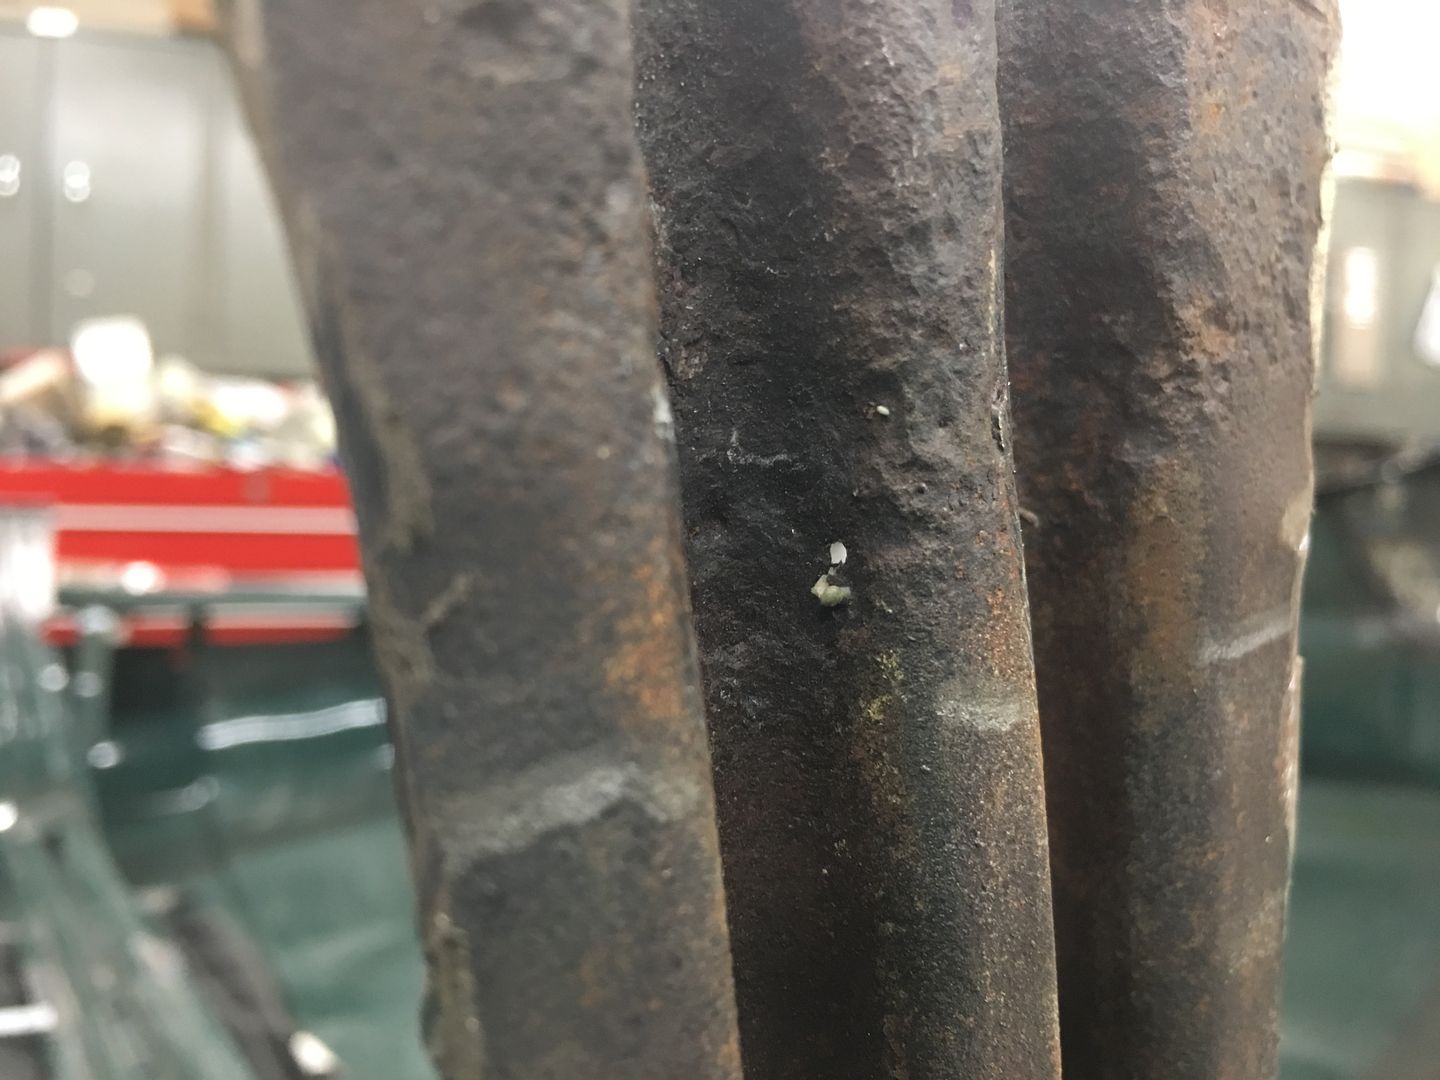 With our new replacement all one piece, the next step is to bend the flange that spot welds to the hood skin. A tipping wheel in the Fasti-werks bead roller makes quick work of it. The bend line was transposed from the original and an initial pass under the tipping die marks the crease line a bit better, Then successive passes are made, lifting slightly with each pass. This is done until the beads interfere with the tipping die. 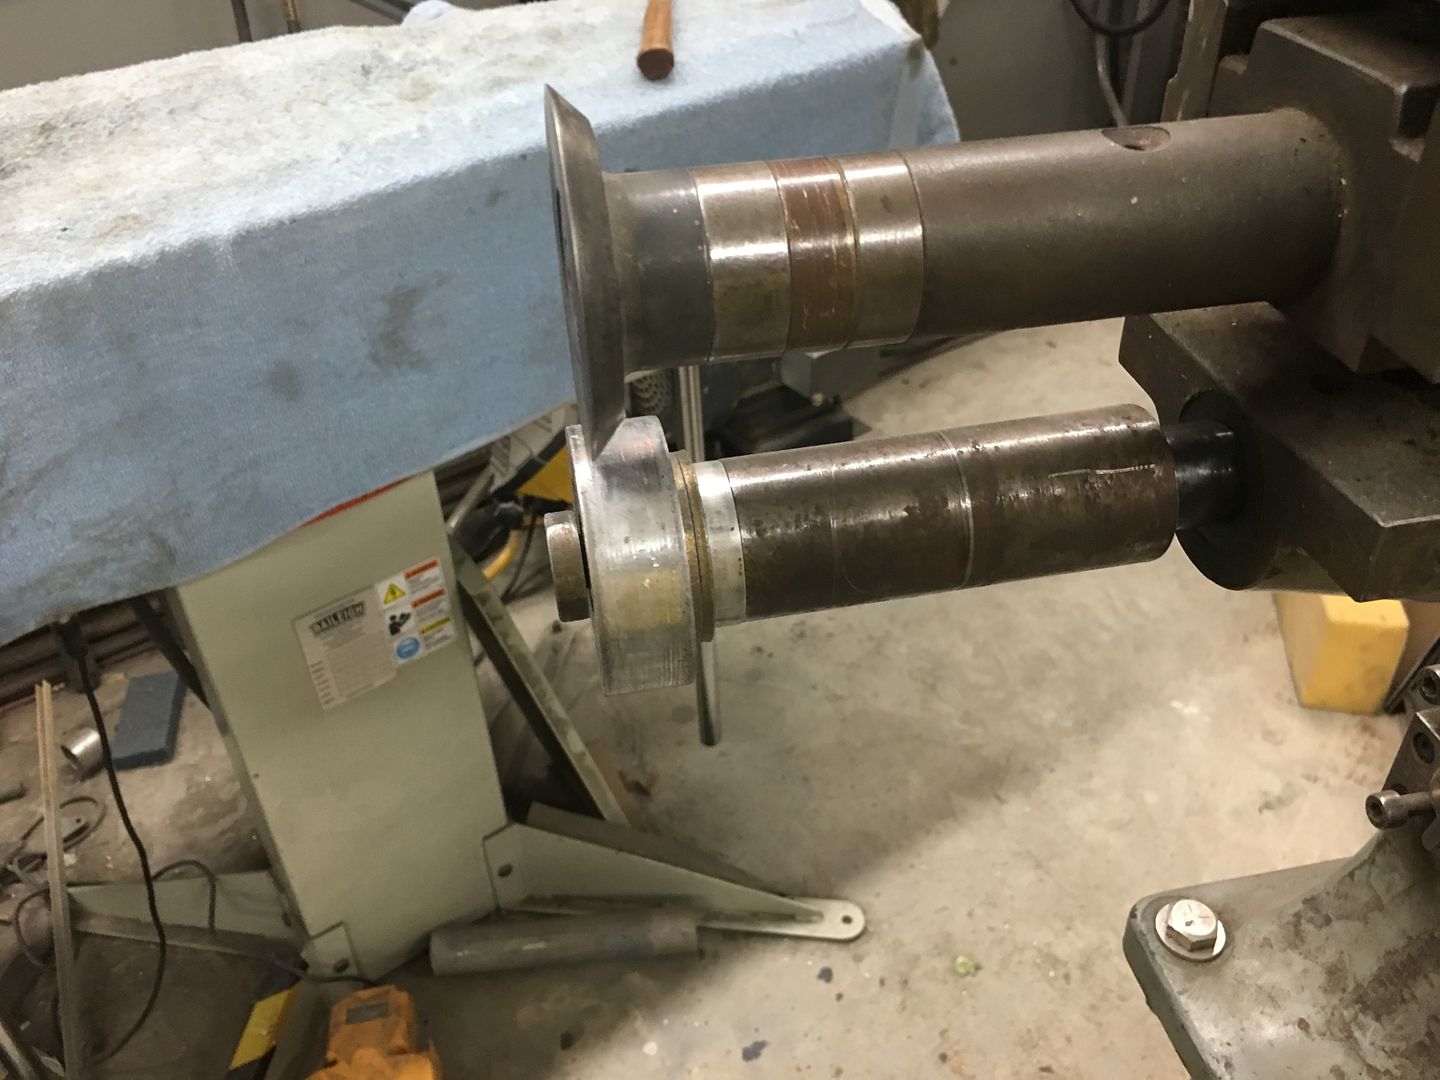 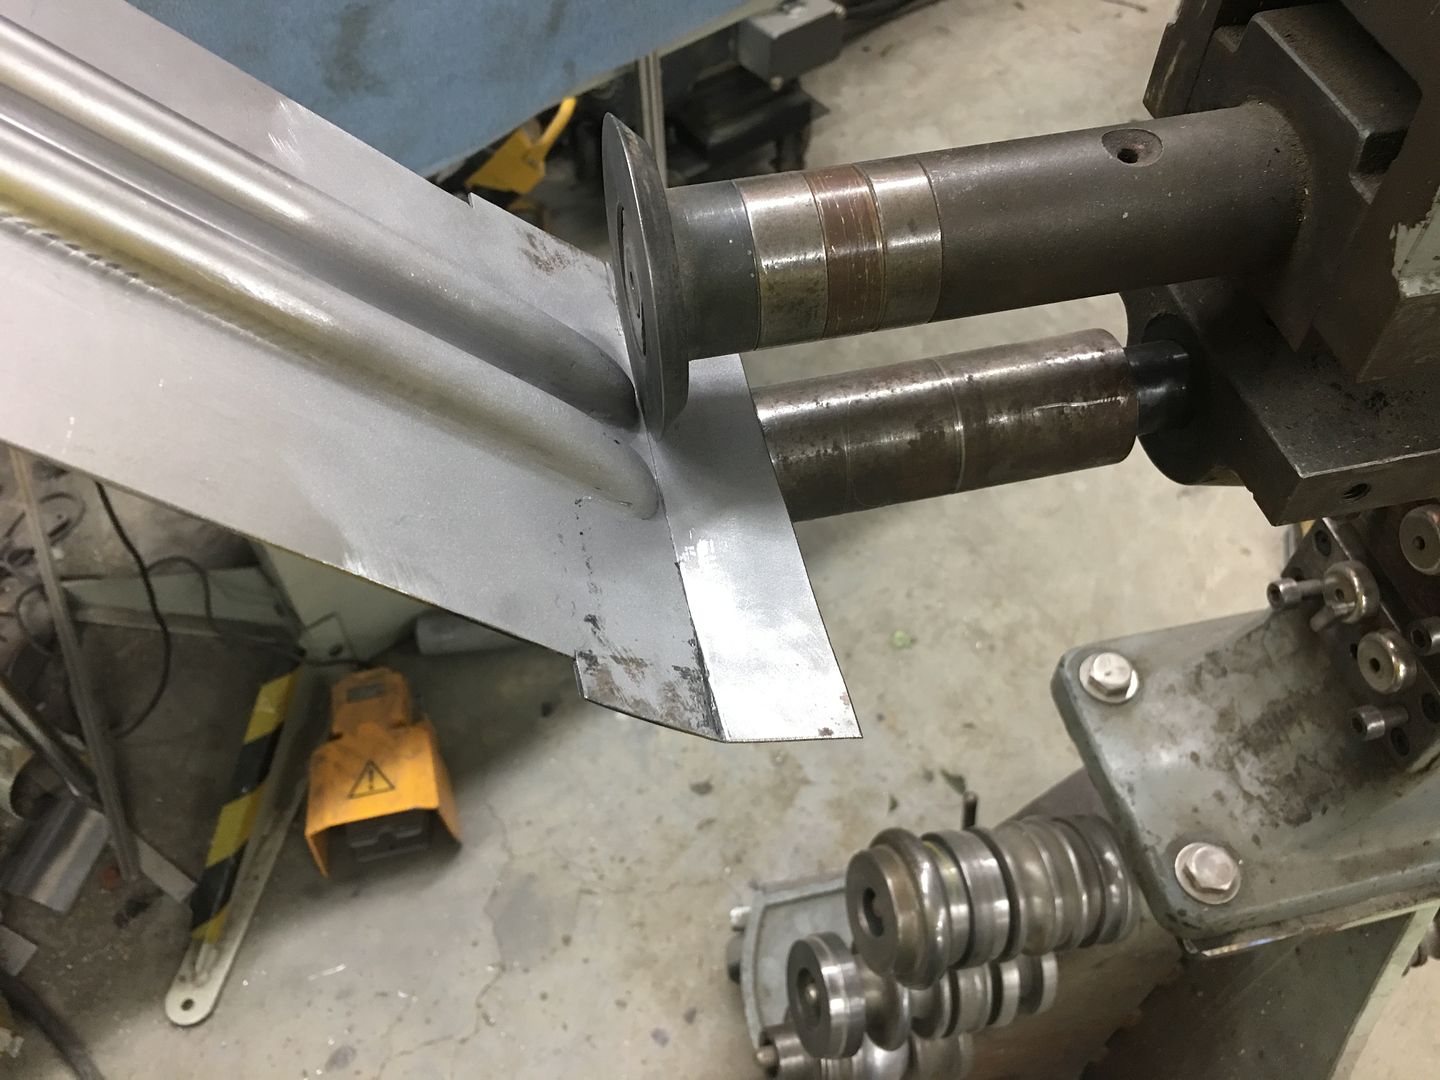 Then the partial bent flange is clamped in the magnetic brake for the remainder of the fold. This brake allows us to use a die on either side of the bead details, where a full die may inadvertently push in on the beads. 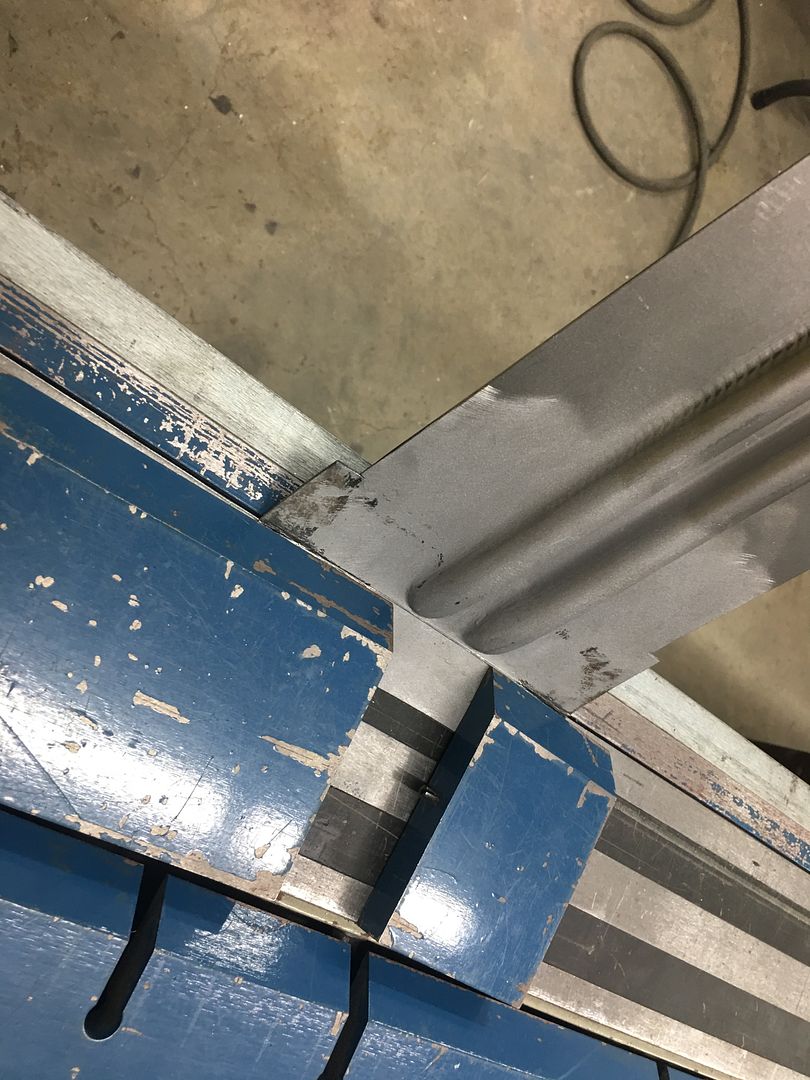  End gets cut to length and marked for initial trimming 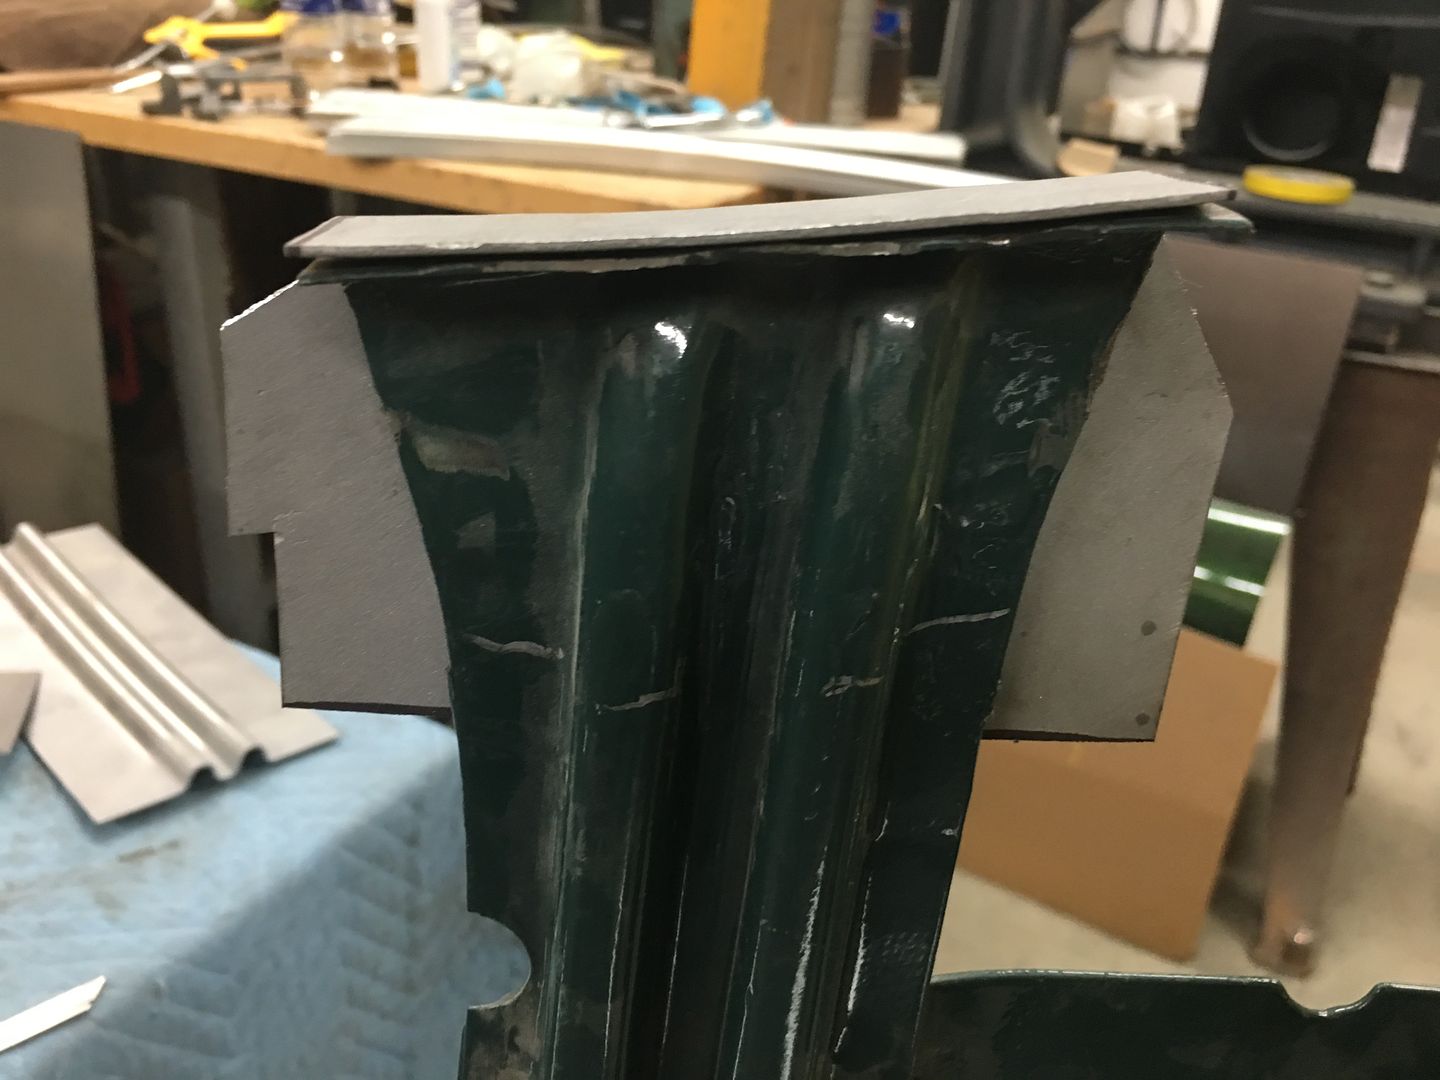 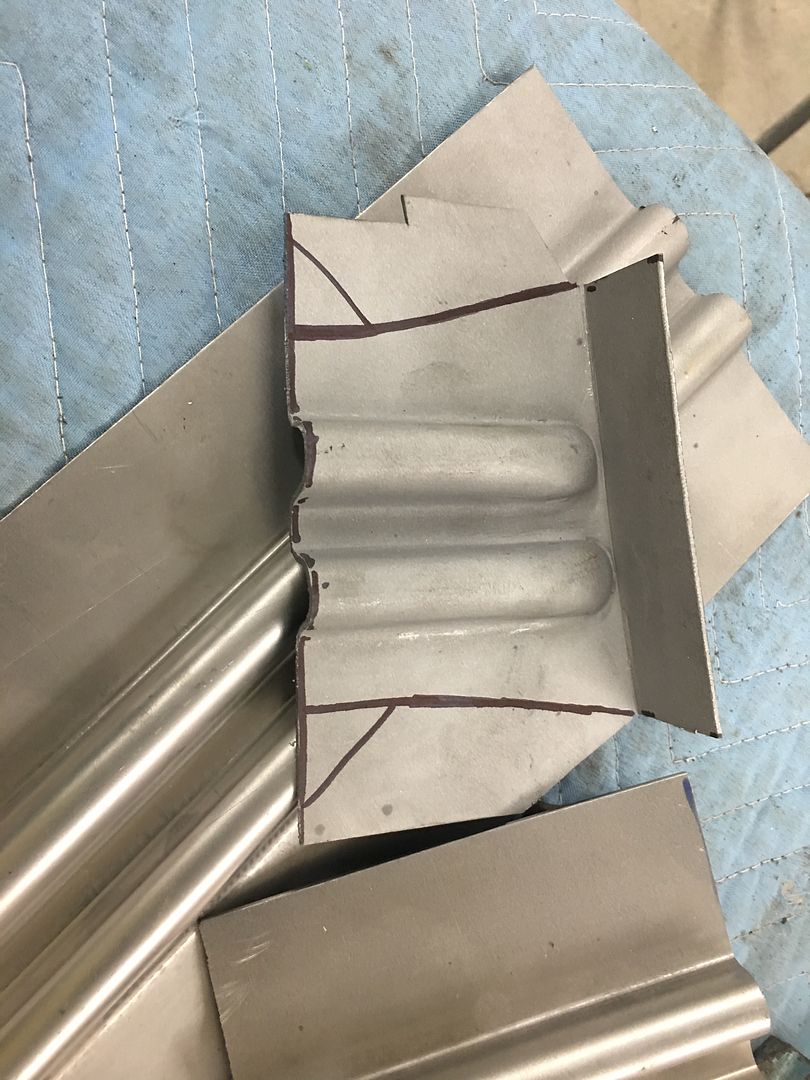 Looks like we may have enough bead stock left for another couple of ends. 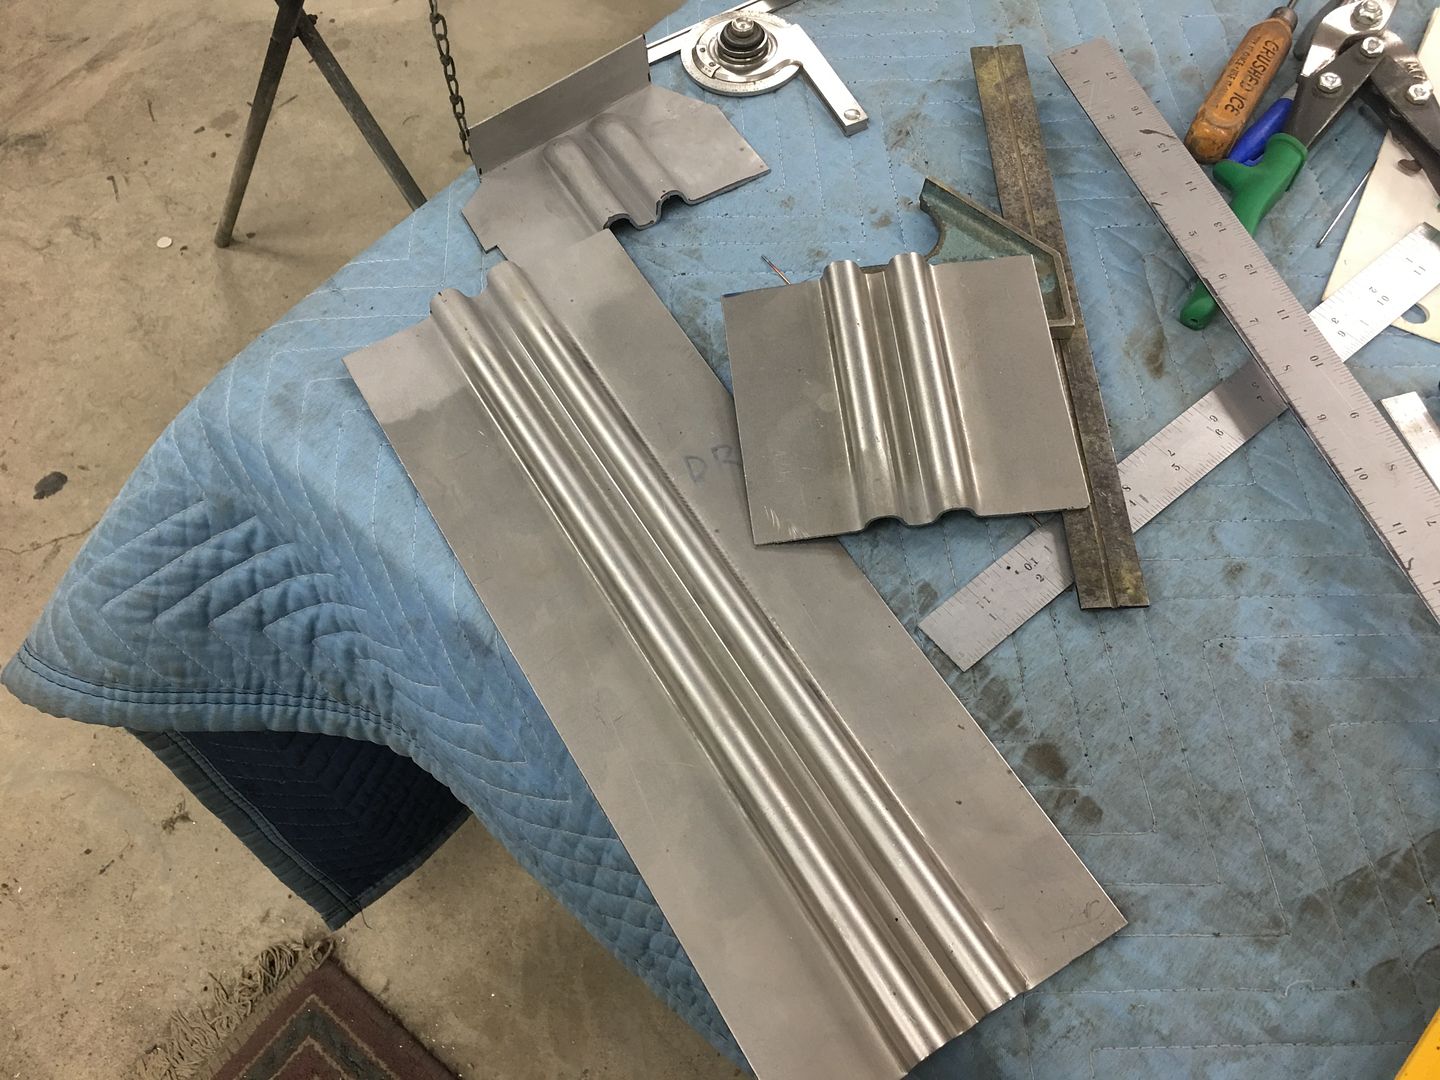 That's where we left off yesterday, we'll see about welding the new end on today.. .
__________________
Robert |
|
|
|
|
04-08-2020, 09:13 PM
|
#14 |
|
Registered User
Join Date: Jan 2013
Location: Leonardtown, MD
Posts: 1,633
|
Re: Butt welds for patch panels
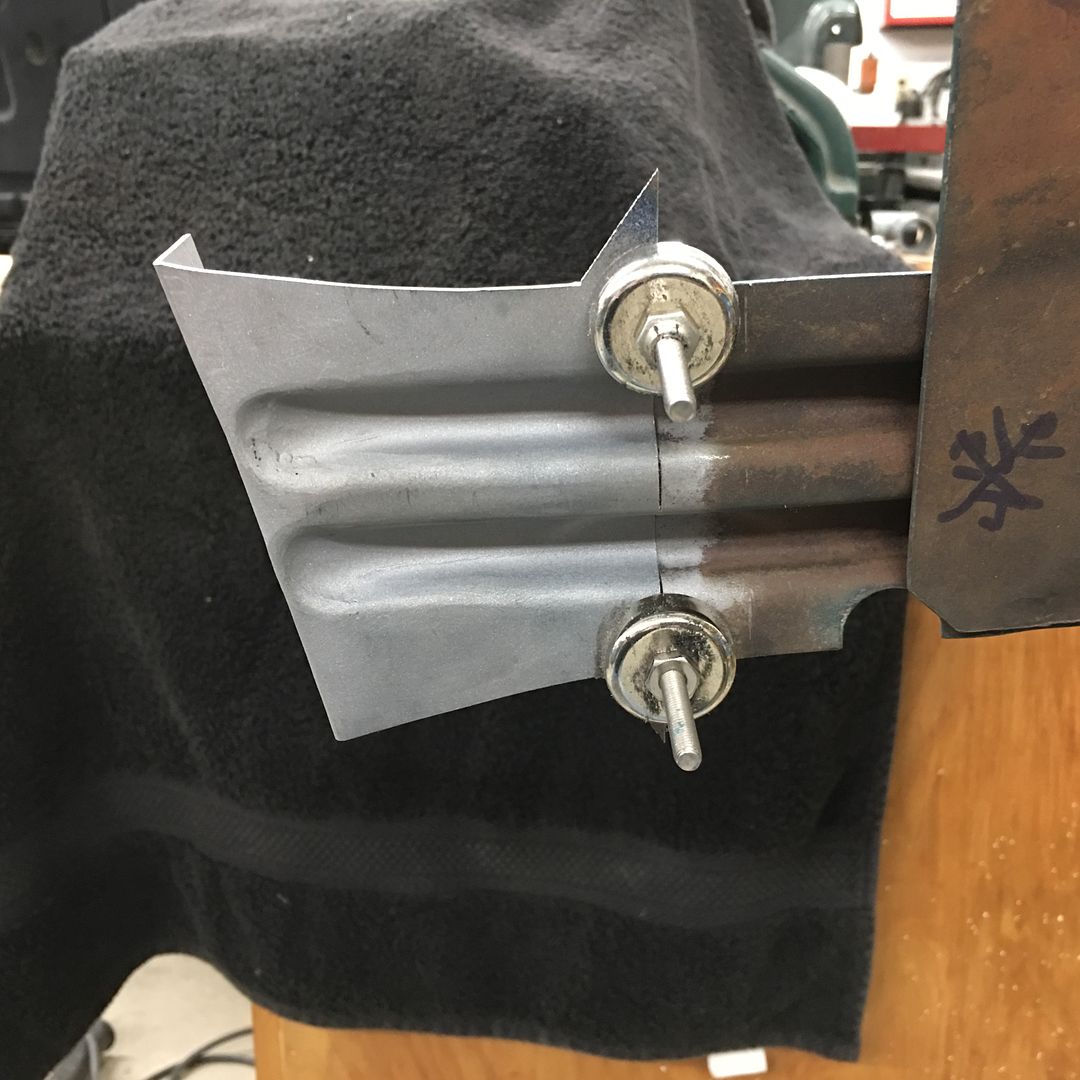
Our last end for the hood brace. Off with the old.....
 Then it gets trimmed to our scribe line and the end media blasted in prep for welding. Our new end is test fit and trimmed until we get the right distance to our reference marks. The "batwings" give us a heat sink at the edge for less chance of burning back the edge at the weld. 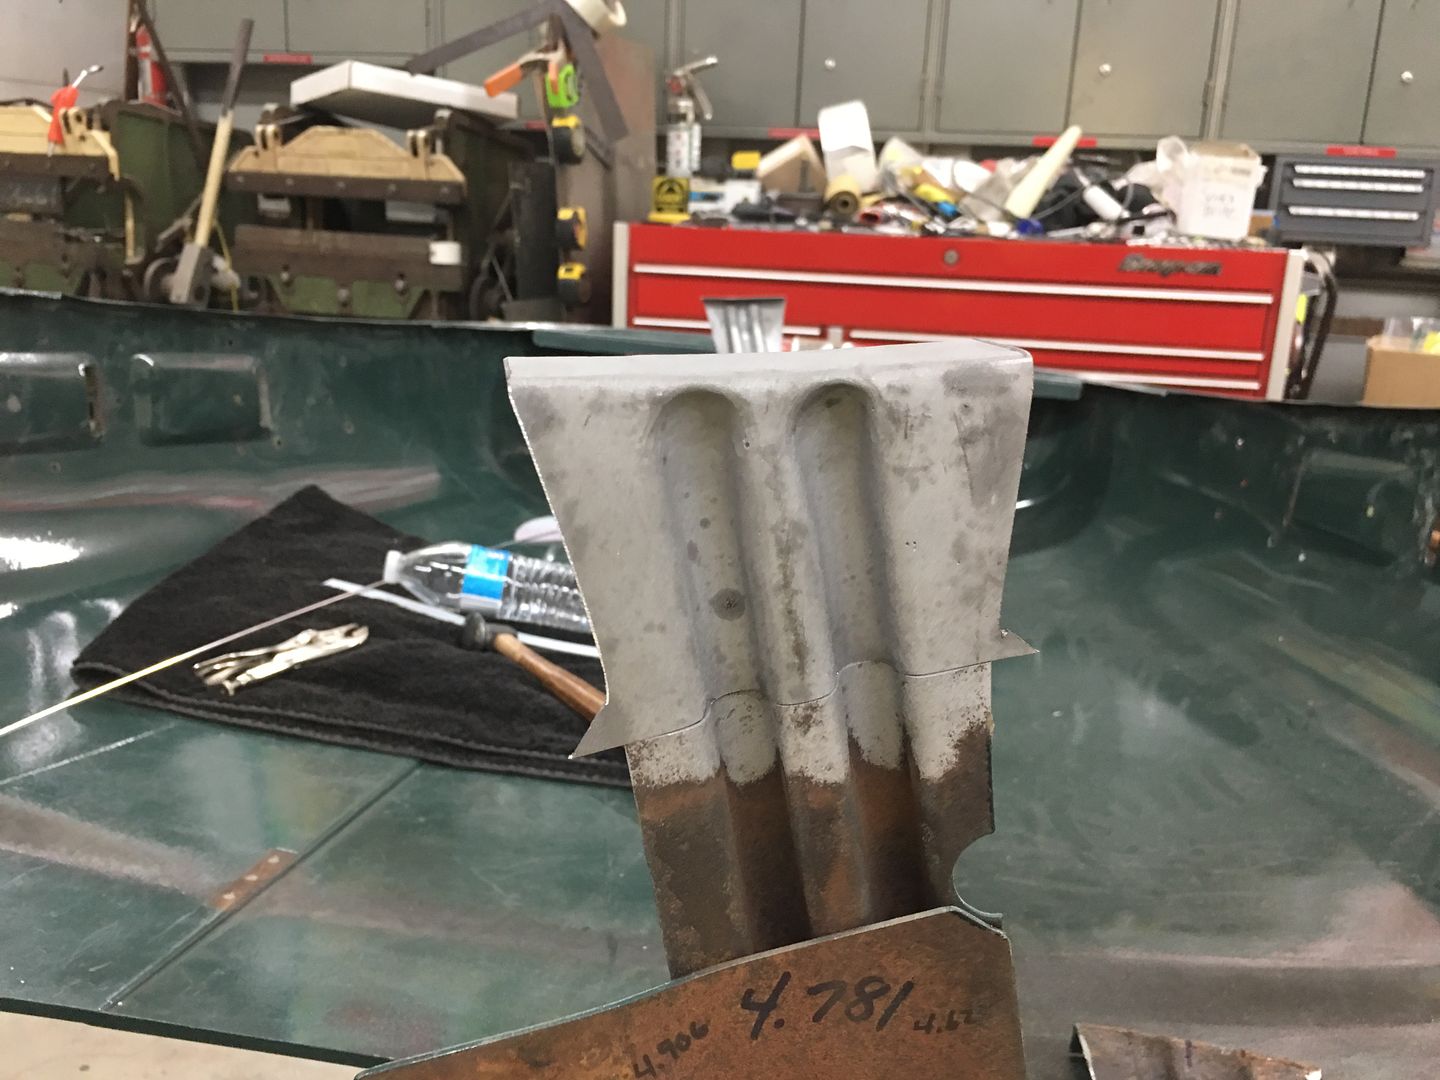 The center rib is aligned both on the sides and the face, and tacked in position using the TIG. 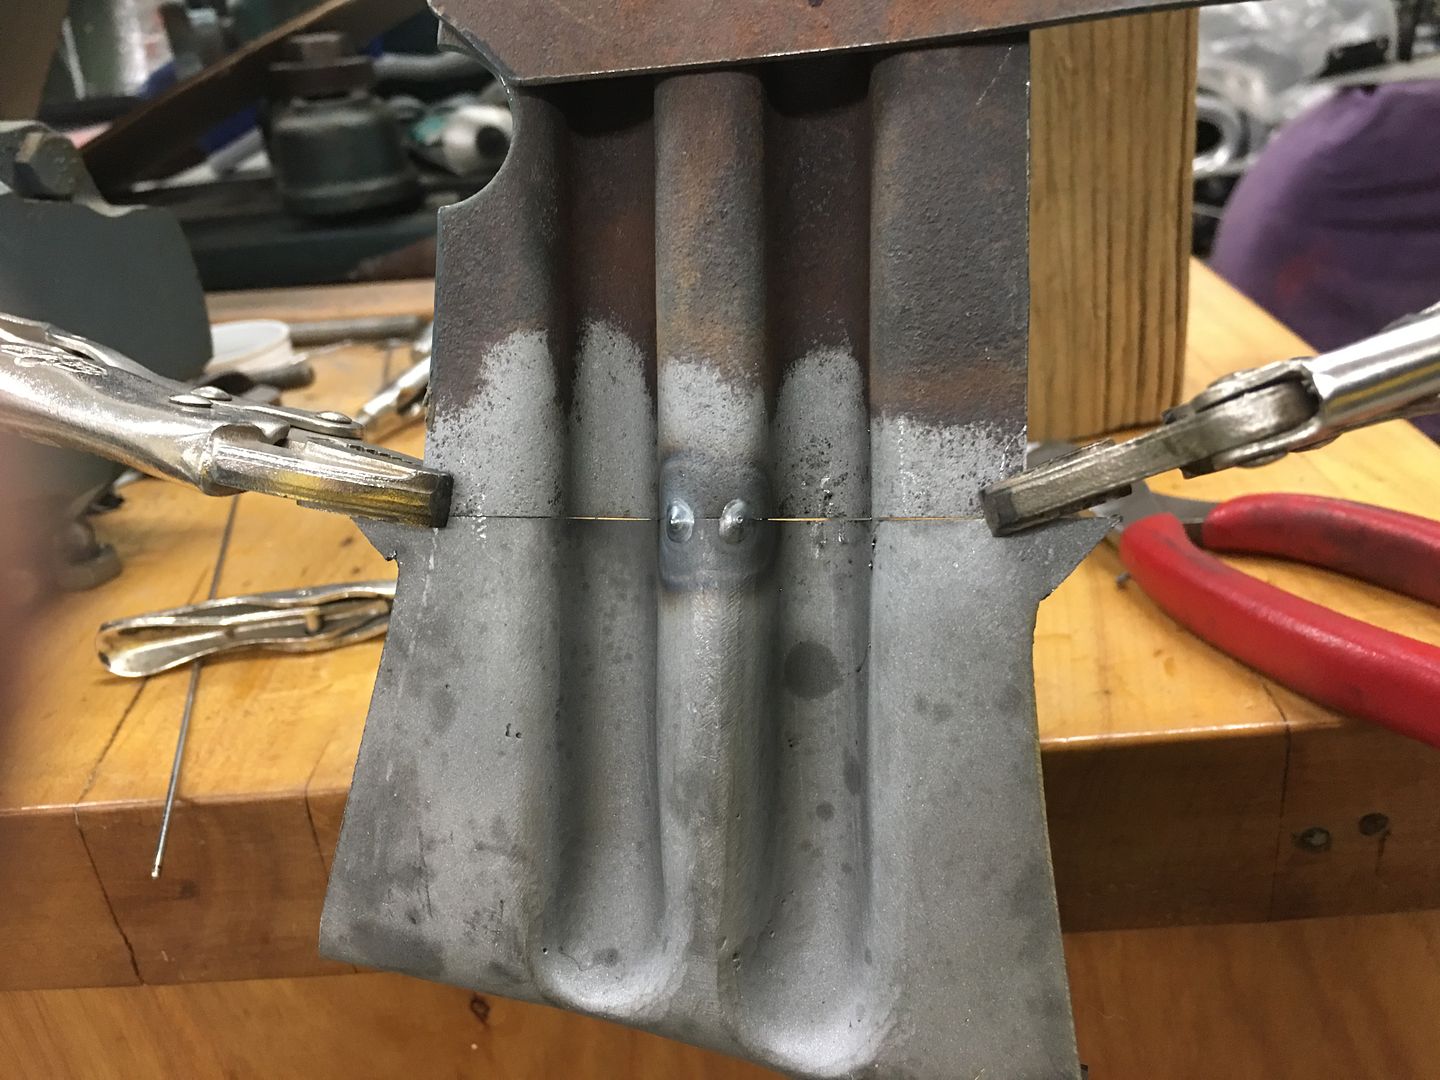 The pieces are aligned as we work outward, tacking as we go. A "corking tool" is used as a dolly where any bumping may be needed for alignment.  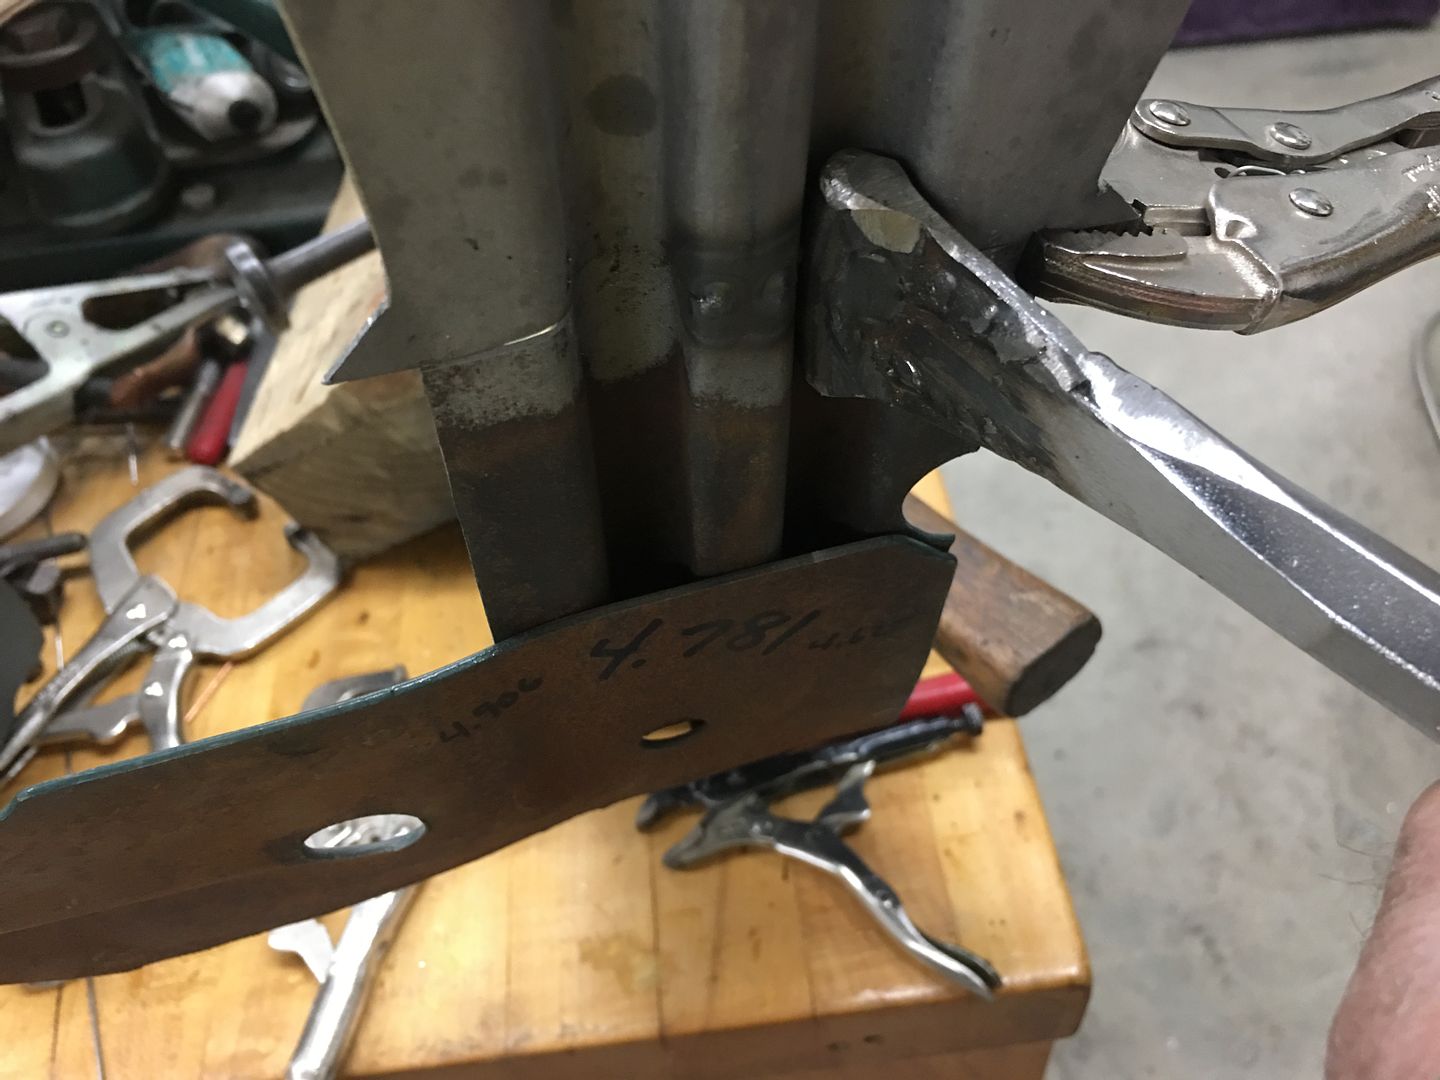 Tacked... 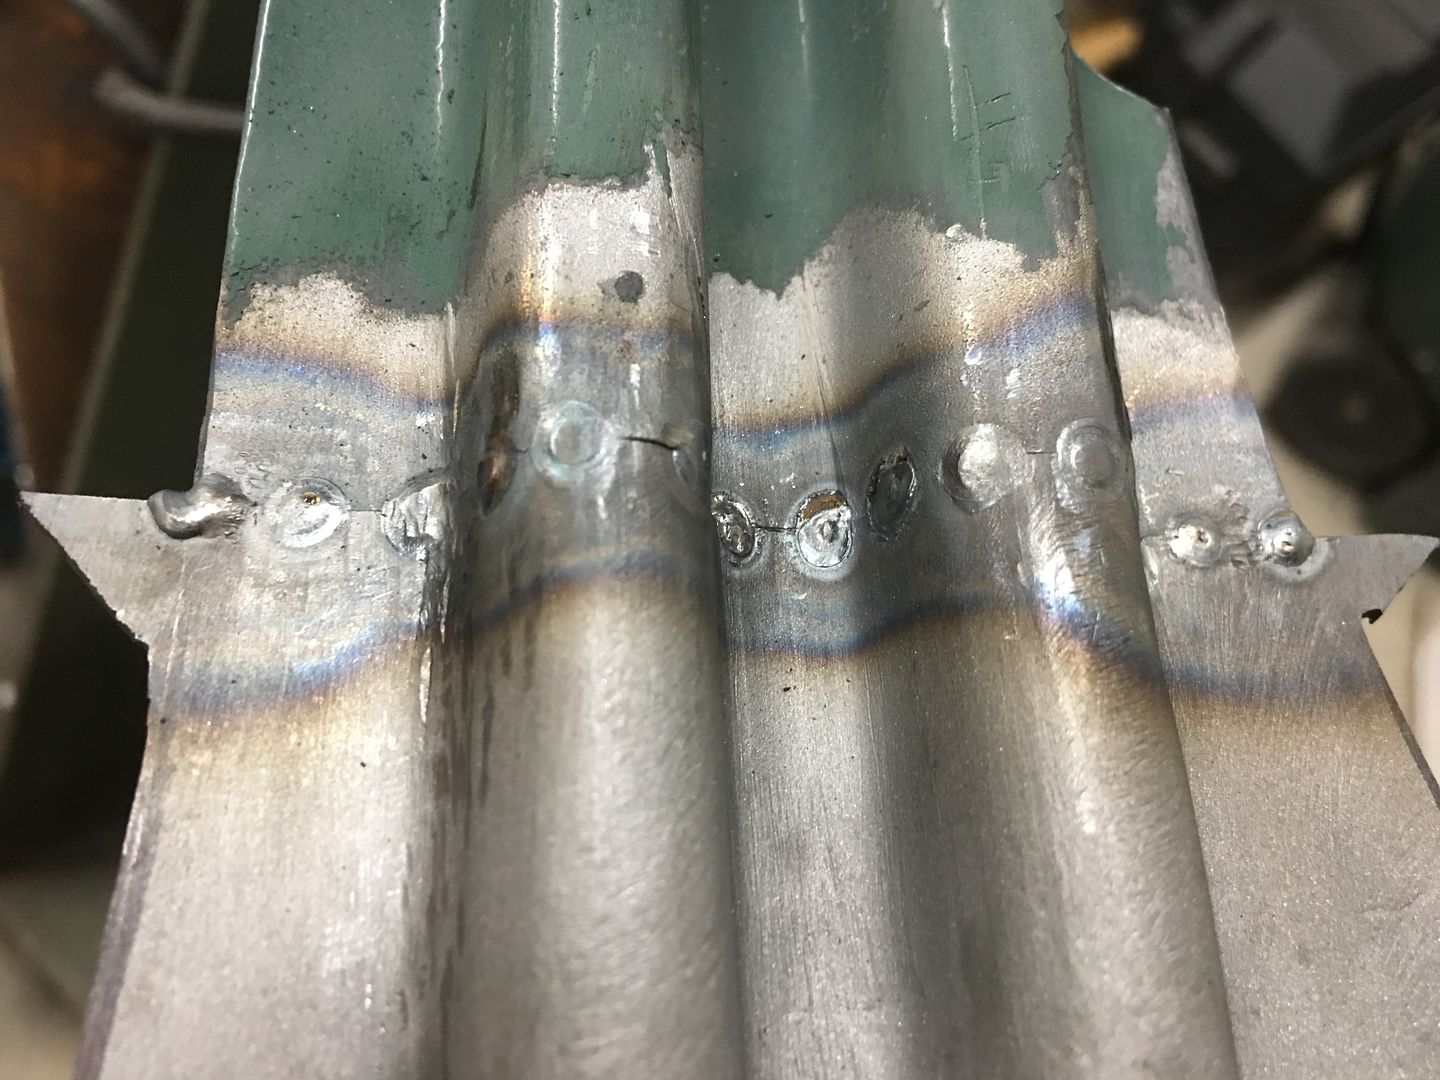 Welded.... 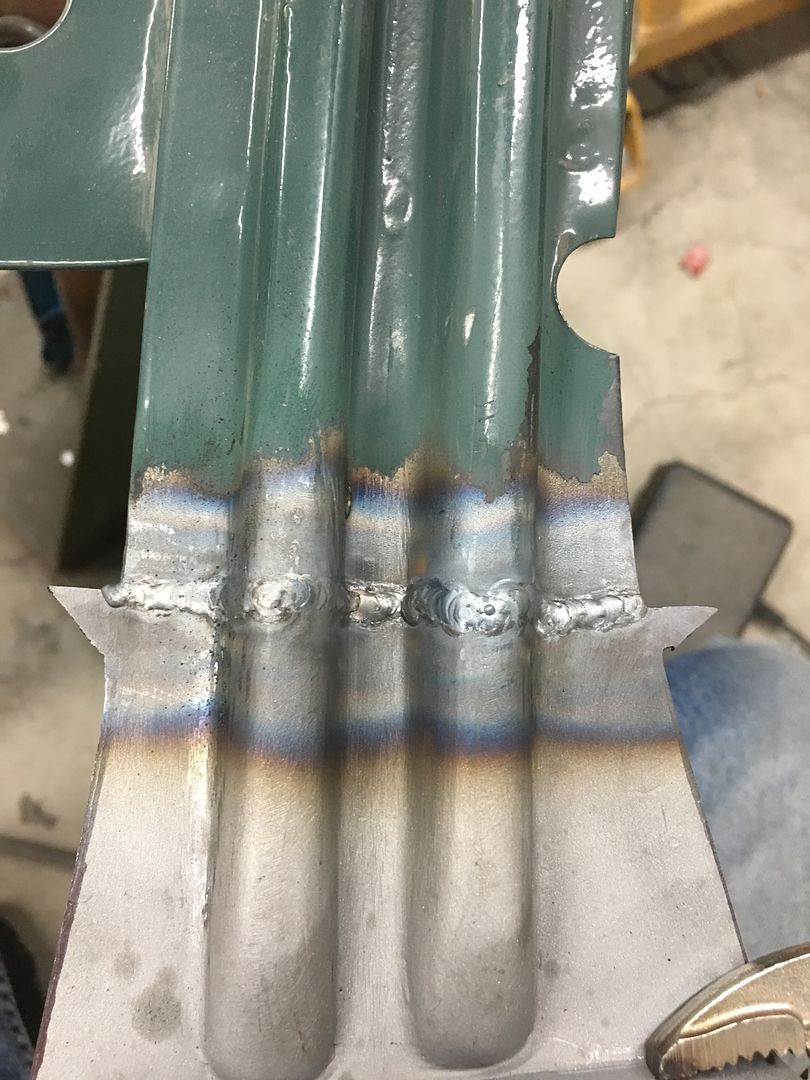 Welds cleaned up and end angles compared.. 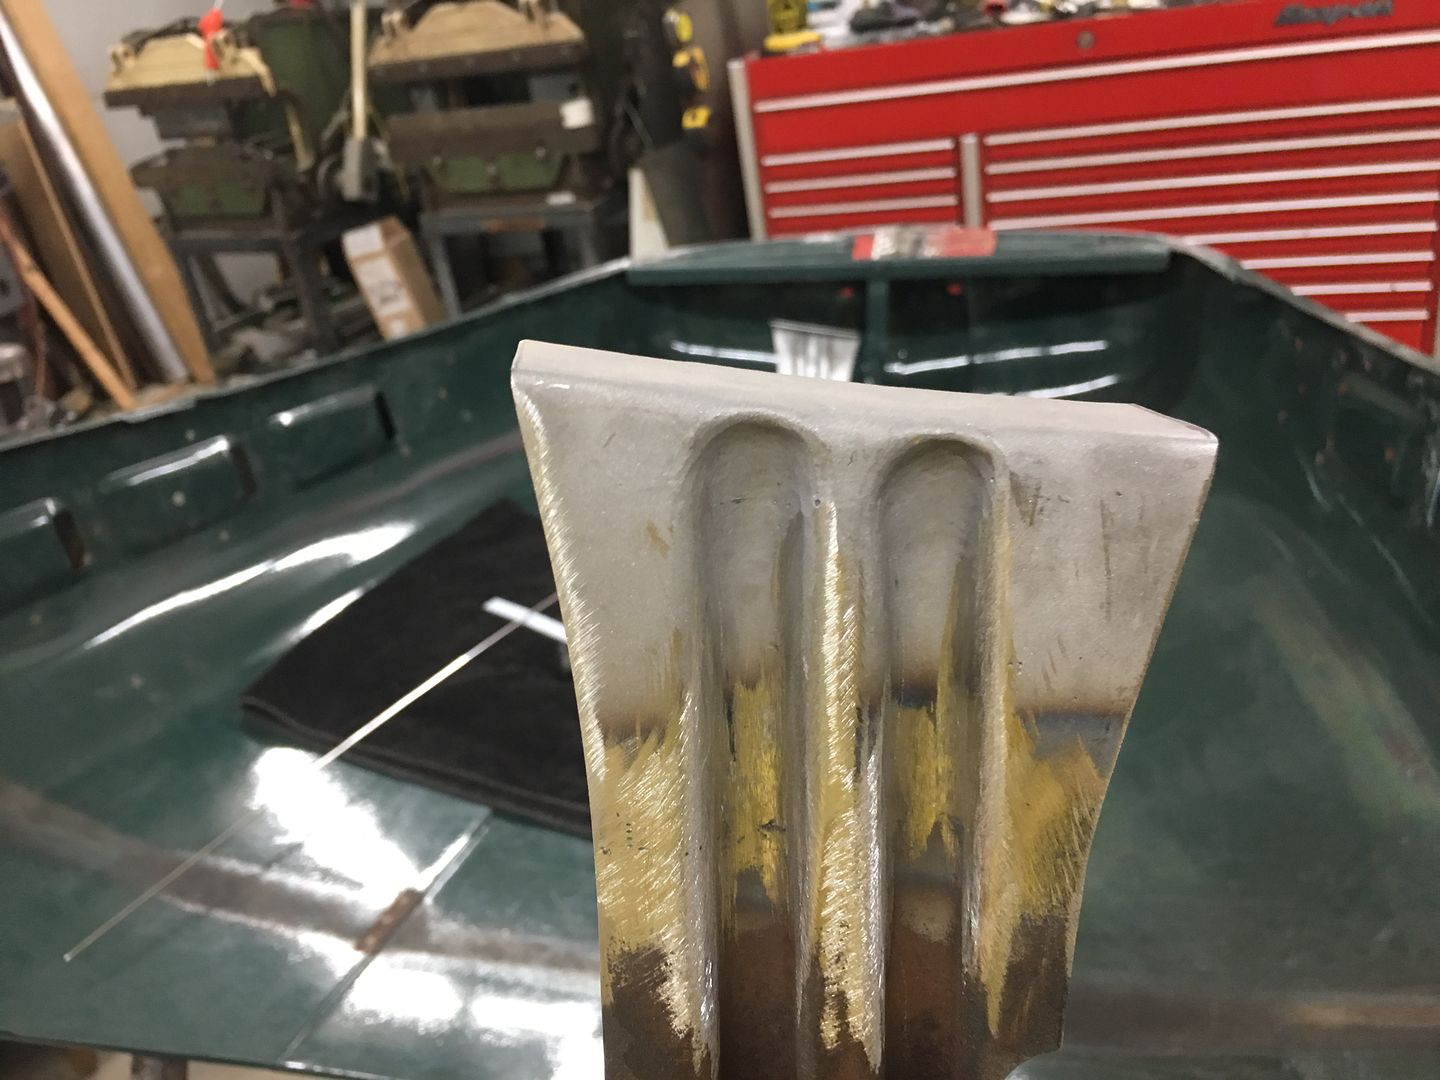 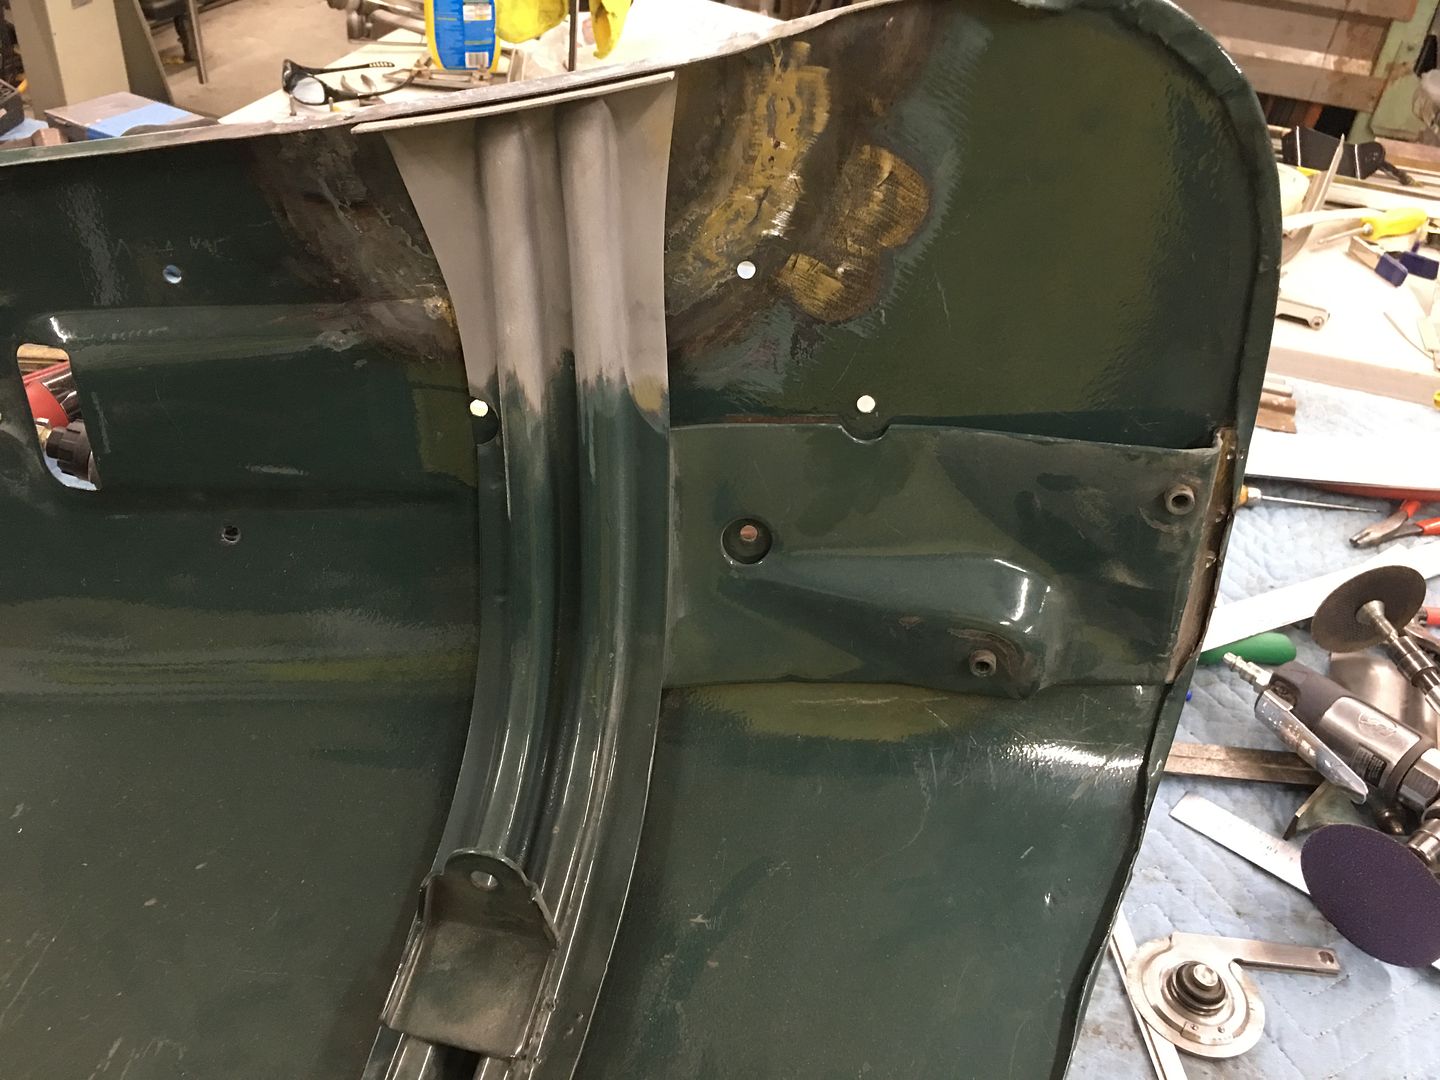 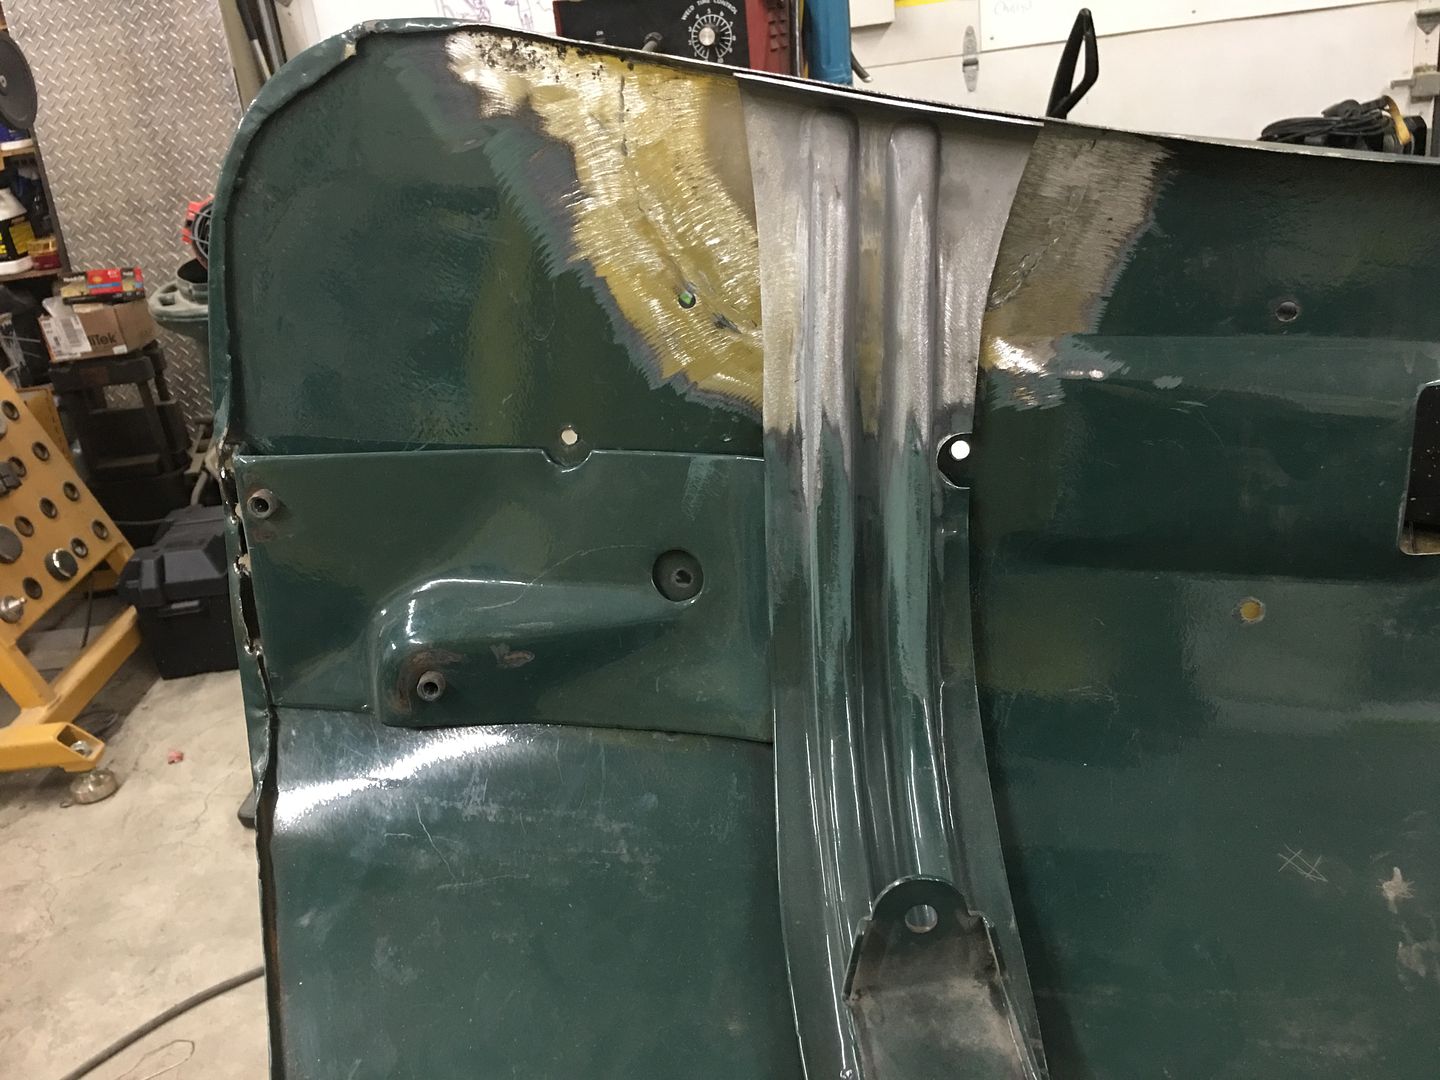 Now we can get back to straightening sheet metal..
__________________
Robert |
|
|
|
|
04-08-2020, 11:36 PM
|
#15 |
|
Post Whore
Join Date: May 2015
Location: Alabama
Posts: 14,581
|
Re: Butt welds for patch panels
I had to look up corking tool...now I see ...and it turned out great..!!
__________________
Mongo...aka Greg RIP Dad RIP Jesse 1981 C30 LQ9 NV4500..http://67-72chevytrucks.com/vboard/s...d.php?t=753598 Mongos AD- LS3 TR6060...http://67-72chevytrucks.com/vboard/s...34#post8522334 Columbus..the 1957 IH 4x4...http://67-72chevytrucks.com/vboard/s...63#post8082563 2023 Chevy Z71..daily driver |
|
|
|
|
04-10-2020, 08:16 PM
|
#16 | |
|
Senior Member
 Join Date: Feb 2014
Location: new smyrna beach fl / 29 palms cal
Posts: 1,727
|
Re: Butt welds for patch panels
Quote:
__________________
Hand made A/C vent manifolds for 64-66 trucks adapts any aftermarket A/C to OEM vent |
|
|
|
|
|
04-10-2020, 10:57 AM
|
#17 |
|
Registered User
Join Date: Oct 2003
Location: Chesapeake, VA
Posts: 724
|
Re: Butt welds for patch panels
Impressive!
__________________
Semper Paratus |
|
|
|
|
04-16-2020, 08:08 AM
|
#18 |
|
Registered User
Join Date: Nov 2019
Location: LA - Lower Alabama
Posts: 57
|
Re: Butt welds for patch panels
That's amazing work!
I've always read and been told to leave a gap between sheet metal about as wide as my MIG wire when but welding panels. You are butting the panels together tightly. Is there a tradeoff in the amount of grinding needed (or some other tradeoff)? Or do you feel it's just better to fit panels tightly? |
|
|
|
|
04-16-2020, 01:22 PM
|
#19 |
|
Registered User
Join Date: Jan 2013
Location: Leonardtown, MD
Posts: 1,633
|
Re: Butt welds for patch panels
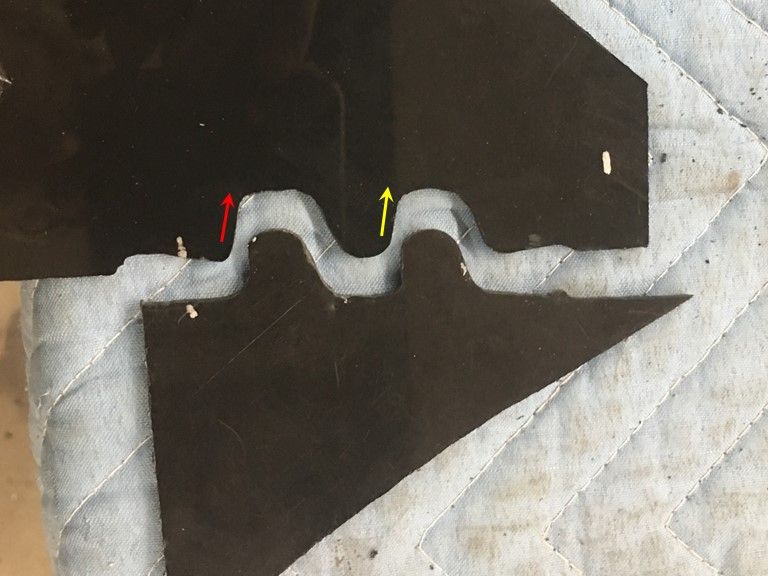
Part of the reason we use butt welds is to duplicate the original metal "flavor and feel" so that when someone looks in the trunk or under the floor pans, they don't see a flange repair, or have to contend with ghost lines on exterior painted panels. We can effectively cut out damaged (rusty) metal, butt weld in a new section, planish/metal finish/filler as needed, and we can have an invisible repair that for all practical purposes should be a permanent repair. The patch is normally already shaped to match (in the case of repops) so that the crown of the patch matches the existing panel. (NORMALLY) Part of the reason you see recommendation to use TIGHT butt welds, is that it eliminates open area that allows any panel movement, ie: as the weld shrinks, the panel pulls together. If the crown of our patch used to match prior to welding, weld shrinking along with the panel's pulling closer together (due to the gap) is going to pull in some of the crown. If it is a flatter crown, such as the middle of a quarter panel or top of a roof/hood, it is more noticeable as the crown in these areas is normally minimal/just enough to maintain the shape, and may result in oil canning. If it is a concave crown, such as a reverse where the wheel opening flare comes outward, then the weld seam has a tendency to pull outward as it shrinks. The following pictorial shows an exaggerated crown and gap primarily so you can see it in such a small area. But it shows what happens as weld shrinkage and panel movement pull at the surrounding area. In the bottom view, the red line depicts where the crown was originally.
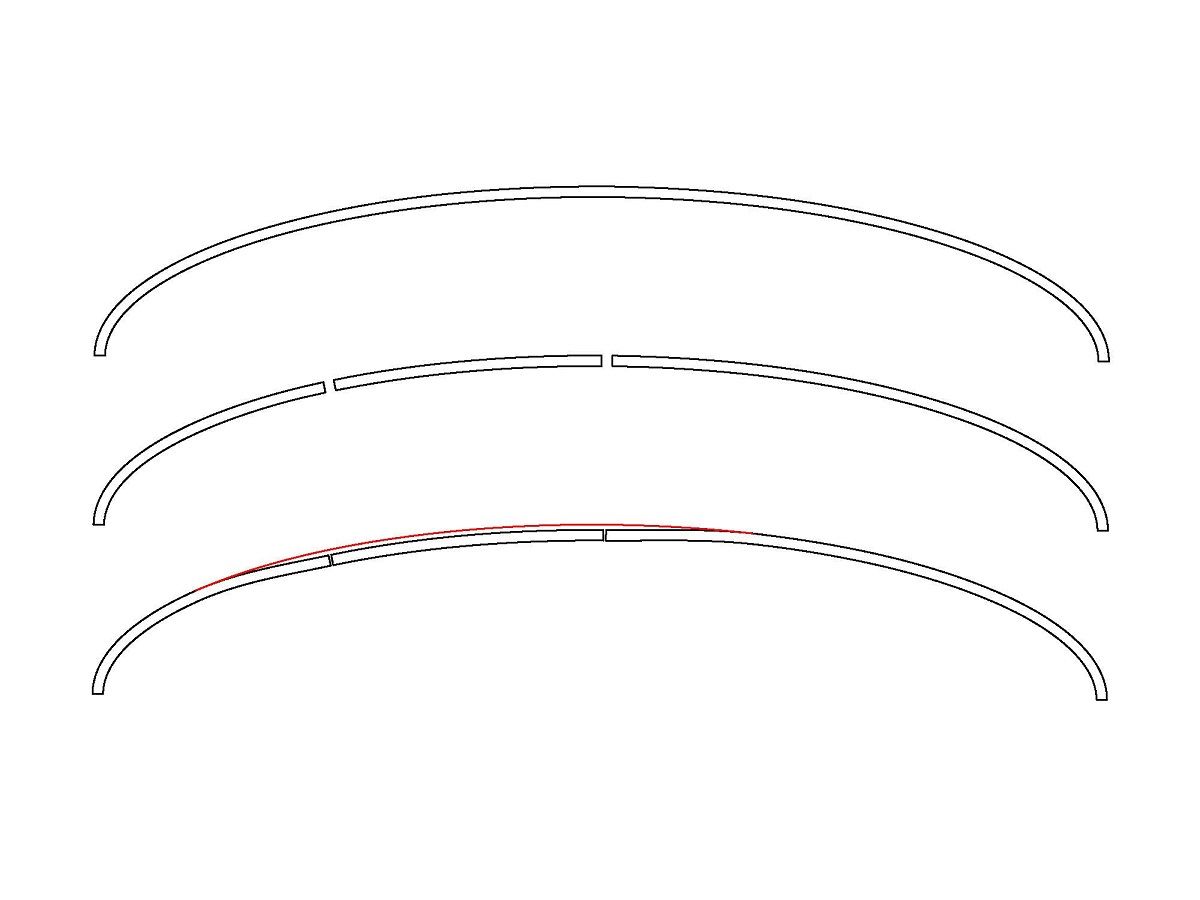 With tight butt welds we do need to planish in order to remove any deformation caused by shrinking, and add some stretch back into the area. This should be the extent of our planishing effort, as the tightly fitting panels prevent the panel pull from adjacent areas (that a gap allows, resulting in loss of crown). In the case of any gappage around a patch, we would need to planish even more to add enough stretch to overcome this loss of crown, or add filler as needed.
__________________
Robert |
|
|
|
|
04-16-2020, 01:29 PM
|
#20 |
|
Registered User
Join Date: Nov 2019
Location: LA - Lower Alabama
Posts: 57
|
Re: Butt welds for patch panels
Awesome! Thanks for the detailed explanation. Makes perfect sense. I just wish it was as easy as you make it sound! Well, I suppose with a couple decades experience it might be. But it's almost black magic for someone like me!
|
|
|
|
|
04-16-2020, 02:34 PM
|
#21 |
|
Registered User
Join Date: Oct 2013
Location: Alabama
Posts: 1,206
|
Re: Butt welds for patch panels
AU Doc -D.V.M?
WDE! 
Last edited by Willie Makeit; 04-16-2020 at 02:45 PM. |
|
|
|
|
04-16-2020, 08:59 PM
|
#22 | |
|
Registered User
Join Date: Nov 2019
Location: LA - Lower Alabama
Posts: 57
|
Re: Butt welds for patch panels
Quote:
 WDE! |
|
|
|
|
|
04-16-2020, 04:07 PM
|
#23 |
|
Registered User
Join Date: Jul 2009
Location: San Jose Ca
Posts: 2,871
|
Re: Butt welds for patch panels
Such a great idea with the batwings. So much skill and information in your posts. I learn something from everyone of them.
__________________
David Used parts build: http://67-72chevytrucks.com/vboard/s...d.php?t=638991 My brother's Nova: http://www.67-72chevytrucks.com/vboa...d.php?t=727985 Rear suspension rework: http://www.67-72chevytrucks.com/vboa...d.php?t=750557 Instagram: myfabguy |
|
|
|
|
04-16-2020, 04:44 PM
|
#24 |
|
Post Whore
Join Date: May 2015
Location: Alabama
Posts: 14,581
|
Re: Butt welds for patch panels
Wow Robert...great explanation of butt vs gap...I've almost always used a gap on the stuff I've done
__________________
Mongo...aka Greg RIP Dad RIP Jesse 1981 C30 LQ9 NV4500..http://67-72chevytrucks.com/vboard/s...d.php?t=753598 Mongos AD- LS3 TR6060...http://67-72chevytrucks.com/vboard/s...34#post8522334 Columbus..the 1957 IH 4x4...http://67-72chevytrucks.com/vboard/s...63#post8082563 2023 Chevy Z71..daily driver |
|
|
|
|
04-16-2020, 05:12 PM
|
#25 |
|
Registered User
Join Date: Jun 2018
Location: Washington, DC
Posts: 637
|
Re: Butt welds for patch panels
Robert...........do you have a body shop in Leonardtown?
|
|
|
|
|
| Bookmarks |
|
|


 Hybrid Mode
