
|
 11-09-2010, 12:42 AM
|
#276 |
|
I had a V-8
Join Date: May 2003
Location: Phoenix AZ
Posts: 1,116
|
Re: The Story Of A Cummins Suburban (Lots Of Pics)
A few weeks back when the hail hit, my sister's Accord got damaged in a different storm at the same time. Their hail wasn't quite as large as the hail we got at work, but it was still large enough to dent her car up pretty good. The insurance company totalled it out, so she decided it was time to get a new Accord. I was over there last week and I found the window sticker with the EPA estimated mileages on it and noticed the city mileage on this four cylinder, super-aerodynamic economy car is 21 mpg. I pointed this out to her and then mentioned that the city mileage on that super-aerodynamic, economy Suburban sitting there in the driveway is ALSO 21 mpg.
Yeah, hers waxes mine on the highway mileage, but I thought it was pretty funny that a small econo-car like that gets the same city mileage as my orange truck.
__________________
1972 K20 Suburban, 5.9L Cummins, Banks Power Pack, NV4500HD, NP205, H.A.D., D60/14FF ARB Link To Build: HERE. |

|

|
|
11-09-2010, 01:00 AM
|
#277 |
|
Chevy Enthusiast
Join Date: Jul 2009
Location: Canyon Lake Texas
Posts: 2,024
|
Re: The Story Of A Cummins Suburban (Lots Of Pics)
Haha that's great! And the burb is probably 4 times the weight of the accord.

__________________
Tony 1985 GMC K2500 restoration Project: Rust, White & Blue 1989 Chevy R3500 CC Cummins & 4X4 swap some day... 1989 Burb (D60, 14BFF, 12V, NV4500, NP205, 37" tires in progress) |
|
|
|
|
11-11-2010, 05:08 PM
|
#278 |
|
Registered User
Join Date: Feb 2010
Location: Dayton, OH
Posts: 255
|
Re: The Story Of A Cummins Suburban (Lots Of Pics)
hey moses, ive been following your thread lately over on ck5 and didnt realize that you had it up over here as well.
im stuffing a 6bt/4500/205 in my 71 and came across a question (and im sure there will be more) about your choice of radiator and shroud. i saw that you use a tall radiator and matching big block shroud from a 73-87. what was your reason for going this route and not using an aluminum replacement and bb shroud for a 67-72? i am thinking about using one of the aluminum replacements from ebay but i am not sure if my fan would fit into a 67-72 bb shroud as it is from a 94 6bt. i believe that you said something about the non intercooled fans being smaller in diameter than the intercooled fans. Also, do you have any advice when fitting the drivetrain for its final location? ive got the entire drivetrain sitting between the framerails right now. i am going to put some important items in place(coresupport, radiator, hydroboost, steering box) before making mounts and crossmembers to make sure i dont have any interferences. |
|
|
|
|
11-11-2010, 09:55 PM
|
#279 | ||
|
I had a V-8
Join Date: May 2003
Location: Phoenix AZ
Posts: 1,116
|
Re: The Story Of A Cummins Suburban (Lots Of Pics)
Quote:
Go back and re-read the fan mount part of the story. You are going to have to deal with your fan mount being the same as my original one. It offsets the fan to the driver side and also drops it down a bit. I think that is going to prevent you from using a GM shroud in your conversion. You may be able to swap it out (very expensive) or make your own shroud. It has been so long that I don't recall fan diameters, but I do believe your fan will be too large for the opening in a big block shroud. You might want to post up a question in the general truck forum about the ID of a BBC shroud then determine if yours will work. Keep in mind that you want a minimum of one inch aroud the fan for clearance. I had that spacer made to run the big lblock chevy fan, but I have since swapped the big block fan out for a small block fan and that is more than enough to keep this thing cool in summer with front and rear a/c cranked while idling in traffic. As far as replacement aluminum radiators go, just make sure you get one with two, one inch rows of tubes. None of that three row or four row crap that is so abundant on ebay. The width of the tube is what makes an aluminum radiator transfer heat better than a copper/brass unit. Copper/brass is a better conductor of heat, but the tubes can not be made as wide as an aluminum tube, so that is why copper/brass radiators get three and four rows of (typically) half inch tubes. Aluminum can be made larger giving more tube to fin contact area, thus the tube can more efficiently transfer heat from itself to the fin and ultimately the air. Quote:
__________________
1972 K20 Suburban, 5.9L Cummins, Banks Power Pack, NV4500HD, NP205, H.A.D., D60/14FF ARB Link To Build: HERE. |
||
|
|
|
|
11-12-2010, 12:56 AM
|
#280 |
|
6>8 Plugless........
 Join Date: Sep 2007
Location: Prairie City, Ia
Posts: 17,133
|
Re: The Story Of A Cummins Suburban (Lots Of Pics)
The biggest problem I have had with placing them high in the frame is, bell housing to floor pan clearance. It can be a real PITA to remove trans mounting bolts, and try to route the down pipe through the opening in between the trans and frame rail. I try to place them where everything works the best. Sometimes that isn't an option like in my Corvette.
__________________
Ryan 1972 Chevy Longhorn K30 Cheyenne Super, 359 Inline 6 cylinder, Auto Trans, Tilt, Diesel Tach/Vach, Buckets, Rare Rear 4-link and air ride option Build Thread 1972 GMC Sierra Grande Longhorn 4x4 1972 Chevy Cheyenne Super K20 Long Step side tilt, tach, tow hooks, AC, 350 4 speed 1972 C10 Suburban Custom Deluxe 1969 Chevy milk truck 1971 Camaro RS 5.3 BTR STG3 Cam Super T10 1940 Ford 354 Hemi 46RH Ford 9" on air ride huge project Tired of spark plugs? Check this out. |
|
|
|
|
11-12-2010, 11:16 AM
|
#281 |
|
Registered User
Join Date: Feb 2010
Location: Dayton, OH
Posts: 255
|
Re: The Story Of A Cummins Suburban (Lots Of Pics)
I was just looking at the radiator situation last night and what to do with it. I have a 94 donor truck and contemplated using the radiator and intercooler out of it. It would just not look as clean as a direct replacement as it is about 40+ inches long and thats at the bottom where it indents in for the intercooler ducts coming through the core support and I would also have to modify the core support bracing. I would like to use the intercooler from the 94 but it is going to be really close height wise. It is 16 inches tall and I have about 18 inches between the hood latch and the frame rails but this is with the 2 inch body lift threw in that was with the truck(I think I am set on running a 1 inch body lift, although I do not want to, to help with clearances like you mentioned) so I will end up with 17 inches between the hood latch and the frame rails. If it will work out i think my best bet is to run an aluminum replacement radiator and the 94 intercooler.
I threw the core support and radiator in the truck last night to get a feel where the drive train needs to end up, front to back anyway. It looks like where I have it currently front to back is about right as my fan clutch is about 2-2.5 inches from the radiator and the rear of the head is about 1-1.5 inches from the recess in the cab. I can't do much about side to side as I am using the 2nd gen Dodge mounts and it gives me about 3/16 of an inch between the mount and the boxed frame on each side. Now I think that I am just stuck on the top to bottom location. Last night was one of those nights where I just stood around and stared at everything and I felt stuck or maybe overwhelmed trying to get everything to work in such a tight space. How did your bracket for the a/c work for you? I will go this route as well if I can figure out what to do with the water inlet as it seems to run into the frame and the belt routing. Since I am boxing the entire frame I might just take out a recess in the rail and box it all up so that it looks clean and smooth. Then comes that extra idler pulley. Any advice or work around for not having to custom make some bushings and brackets for it? I've already made many custom brackets and plan to make many more but I'm not sure this is one I want to tango with. Did you use the mounting point on the side of the 205 to help support it? If its in your thread I must have missed it after reading it the past 10 times!! Thanks for the help! You're saving me a lot of money and stress with your thread and your help. I might try to make my own build thread if I can find the time to give all of the info of my work to this point. Last edited by dfairchild19; 11-12-2010 at 11:26 AM. |
|
|
|
|
11-14-2010, 02:07 AM
|
#282 | |||||||||
|
I had a V-8
Join Date: May 2003
Location: Phoenix AZ
Posts: 1,116
|
Re: The Story Of A Cummins Suburban (Lots Of Pics)
Quote:
Quote:
Quote:
Quote:
Quote:
Quote:
Quote:
Quote:
Quote:
__________________
1972 K20 Suburban, 5.9L Cummins, Banks Power Pack, NV4500HD, NP205, H.A.D., D60/14FF ARB Link To Build: HERE. |
|||||||||
|
|
|
|
11-16-2010, 02:39 AM
|
#283 | |||||||||
|
Registered User
Join Date: Feb 2010
Location: Dayton, OH
Posts: 255
|
Re: The Story Of A Cummins Suburban (Lots Of Pics)
mmm
Quote:
My original thoughts were to use the radiator and intercooler from the Dodge to make things simple and because I already have it from the donor truck. My fan shroud is cracked but the cost of it over a new aluminum radiator and intercooler would be pocket change. I am not sure that I will need to use his idea for the radiator cap because i believe that the radiator is thin enough to fit between the main structure of the core support and it is possibly too tall to fit between the top rail and the bottom tray of the core support. Before bouncing these ideas off of you I thought I had decided to order a new aluminum radiator that would fit the 71 core support. I see that his build was a body swap but that thing is clean!!! Quote:
Quote:
Quote:
Quote:
Quote:
Quote:
Quote:
Quote:
Im sorry for taking up all of this room on your thread! I'll try to make my own asap. Thanks for all of your help once again!! Do you have any updates for your build btw? |
|||||||||
|
|
|
|
11-16-2010, 11:51 PM
|
#284 | |||||||||||
|
I had a V-8
Join Date: May 2003
Location: Phoenix AZ
Posts: 1,116
|
Re: The Story Of A Cummins Suburban (Lots Of Pics)
Quote:
Quote:
Quote:
Quote:
Quote:
My rear trans housing is aluminum as I used a GM trans and converted the front to the HD input. The only iron housing that I have seen in the aftermarket is for the Dodge units. I realize the rear housings were not designed for a 205, but I think just supporting the weight of the 205 is better than using the 205 as a giant breaker bar on the housing. I have thought about making a rod from the holes to a bellhousing bolt, but that is about as far as I have gotten. Quote:
Quote:
Quote:
Quote:
Quote:
Quote:
__________________
1972 K20 Suburban, 5.9L Cummins, Banks Power Pack, NV4500HD, NP205, H.A.D., D60/14FF ARB Link To Build: HERE. |
|||||||||||
|
|
|
|
11-17-2010, 02:54 AM
|
#285 |
|
Registered User
Join Date: Feb 2010
Location: Dayton, OH
Posts: 255
|
Re: The Story Of A Cummins Suburban (Lots Of Pics)
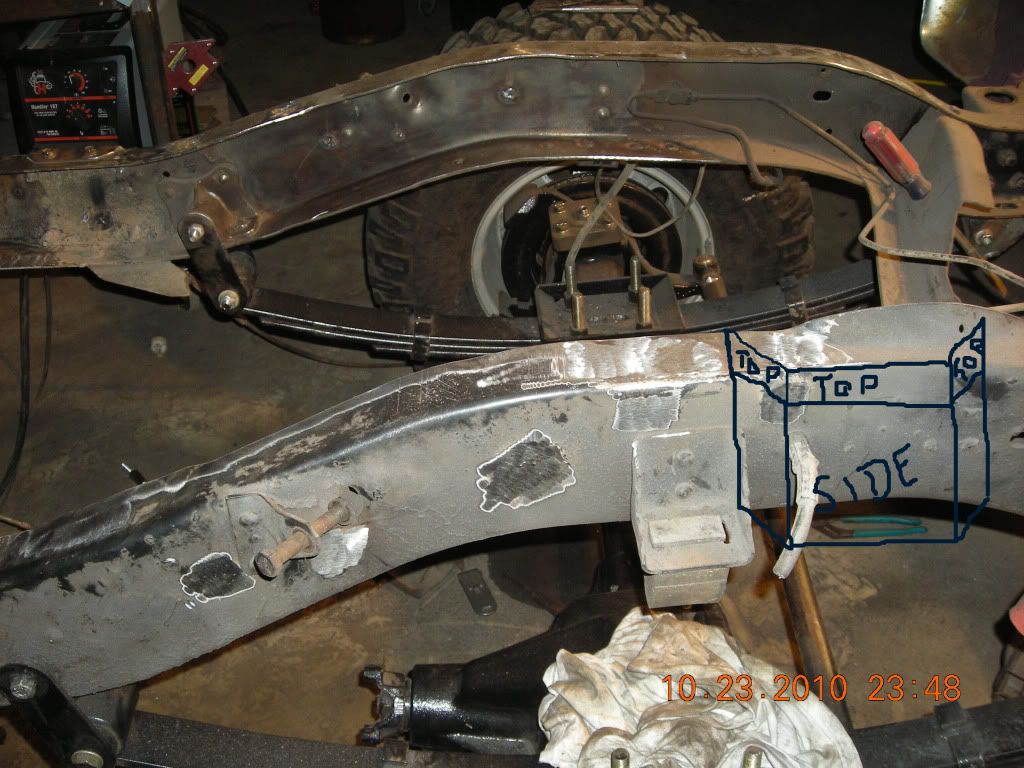 I noticed this and figured i would post up real quick and comment on the rest tomorrow. Hopefully you can put my kindergarten drawing into perspective here. This is what I was trying to explain by saying offsetting this section of the frame by creating a "C" in the boxed frame for the compressor to lay in. Like I said, I am not sure this is the best option. I know I can do it and make it stronger than the original frame but I am afraid there is a better option out there. |
|
|
|
|
11-17-2010, 09:15 PM
|
#286 |
|
Chevy Enthusiast
Join Date: Jul 2009
Location: Canyon Lake Texas
Posts: 2,024
|
Re: The Story Of A Cummins Suburban (Lots Of Pics)
Have you looked into getting the other style compressor mount that raises the compressor up? http://www.4btswaps.com/forum/showth...34-a-c-bracket
__________________
Tony 1985 GMC K2500 restoration Project: Rust, White & Blue 1989 Chevy R3500 CC Cummins & 4X4 swap some day... 1989 Burb (D60, 14BFF, 12V, NV4500, NP205, 37" tires in progress) Last edited by 1985-GMC; 11-17-2010 at 09:19 PM. |
|
|
|
|
11-17-2010, 09:27 PM
|
#287 | |
|
Registered User
Join Date: Feb 2010
Location: Dayton, OH
Posts: 255
|
Re: The Story Of A Cummins Suburban (Lots Of Pics)
Quote:
I have the tools and know-how to modify the frame, I just want to get some input on it before I actually do it. Thanks for the suggestion though. |
|
|
|
|
|
11-18-2010, 01:35 AM
|
#288 |
|
Registered User
Join Date: Feb 2010
Location: Dayton, OH
Posts: 255
|
Re: The Story Of A Cummins Suburban (Lots Of Pics)
Hey mosesburb,
Just lettin you know that I started my build thread in the 4x4 section. Berthas Build I'll get it caught up as much as I can at a time til its finally caught up to now. Feel free to comment on anything you feel necessary. |
|
|
|
|
11-18-2010, 03:11 AM
|
#289 | |
|
I had a V-8
Join Date: May 2003
Location: Phoenix AZ
Posts: 1,116
|
Re: The Story Of A Cummins Suburban (Lots Of Pics)
Quote:
Check out the possibilities of a rail notch (possibly move the motor up or down a bit--you can still do this at this point...) and let me know what you think. What's up with the cut up forward crossmember??
__________________
1972 K20 Suburban, 5.9L Cummins, Banks Power Pack, NV4500HD, NP205, H.A.D., D60/14FF ARB Link To Build: HERE. |
|
|
|
|
|
11-18-2010, 11:05 AM
|
#290 | |
|
Registered User
Join Date: Feb 2010
Location: Dayton, OH
Posts: 255
|
Re: The Story Of A Cummins Suburban (Lots Of Pics)
Quote:
Here is a picture of the clearance that I currently have between the frame rail and the bracket itself. If you look further you can see the partial box that I have made for the frame to mock up the motor mounts and crossmember and how close the stock 94 motor side mounts are to the new boxed portion of the frame. 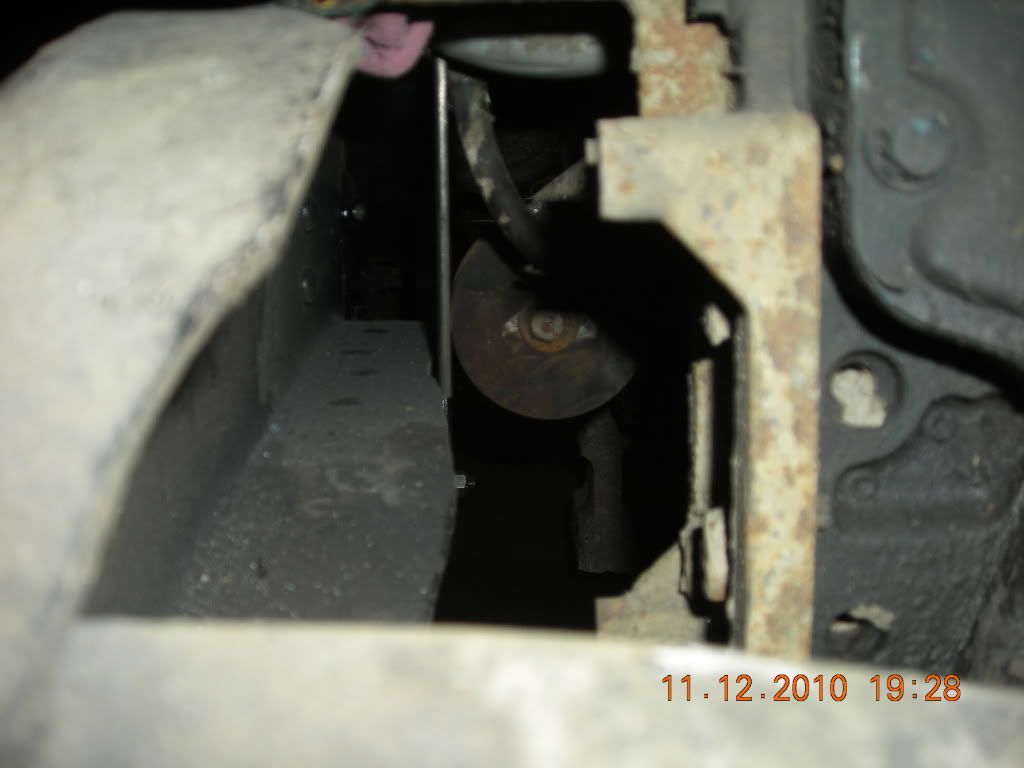 The crossmember was hacked on by the PO apparently. I am going to run a piece of 2x4 3/16 wall tube in its place but I didnt want to remove the original until I got my drive line in place so that I would have as little movement in the frame as possible. Since it doesnt appear that notching the frame is an option any more, I believe my last resource is to start shelling out the cash for the bracket, compressor, alternator, water inlet, tensioner, belt, and all of the headaches that go along with running the f800 setup..... |
|
|
|
|
|
11-18-2010, 05:48 PM
|
#291 |
|
6>8 Plugless........
Join Date: Sep 2007
Location: Prairie City, Ia
Posts: 17,133
|
Re: The Story Of A Cummins Suburban (Lots Of Pics)
OK, you guys need to check this out. Not only is it a bad a** build, but this guy modified the frame to retain the dodge A/C compressor. He used to be a member here but got pissed off by a few members and deleted all his stuff and has disappeared. I won't clutter your thread mosesburb, but I want to atleast post these 2 pics for future use in case the other thread gets deleted or something crazy.
http://heartlanddiesels.com/forum/showthread.php?t=1131
__________________
Ryan 1972 Chevy Longhorn K30 Cheyenne Super, 359 Inline 6 cylinder, Auto Trans, Tilt, Diesel Tach/Vach, Buckets, Rare Rear 4-link and air ride option Build Thread 1972 GMC Sierra Grande Longhorn 4x4 1972 Chevy Cheyenne Super K20 Long Step side tilt, tach, tow hooks, AC, 350 4 speed 1972 C10 Suburban Custom Deluxe 1969 Chevy milk truck 1971 Camaro RS 5.3 BTR STG3 Cam Super T10 1940 Ford 354 Hemi 46RH Ford 9" on air ride huge project Tired of spark plugs? Check this out. Last edited by Dieselwrencher; 11-18-2010 at 06:17 PM. Reason: Spelling |
|
|
|
|
11-18-2010, 06:05 PM
|
#292 |
|
Registered User
Join Date: Feb 2010
Location: Dayton, OH
Posts: 255
|
Re: The Story Of A Cummins Suburban (Lots Of Pics)
Wow dieselwrencher, that was exactly my vision when I was thinking of notching my fully boxed frame. It would be so nice to be able to do that to retain the original Dodge a/c and serpentine setup. How do you think it will hold up strength wise on a 4x4 yourself?
Thanks for the pictures, that put my words into pictures perfectly. |
|
|
|
|
11-18-2010, 06:20 PM
|
#293 |
|
6>8 Plugless........
Join Date: Sep 2007
Location: Prairie City, Ia
Posts: 17,133
|
Re: The Story Of A Cummins Suburban (Lots Of Pics)
Honestly I think it would hold up ok, but I might do the rear portion a little bit different to make sure it is strong enough.
__________________
Ryan 1972 Chevy Longhorn K30 Cheyenne Super, 359 Inline 6 cylinder, Auto Trans, Tilt, Diesel Tach/Vach, Buckets, Rare Rear 4-link and air ride option Build Thread 1972 GMC Sierra Grande Longhorn 4x4 1972 Chevy Cheyenne Super K20 Long Step side tilt, tach, tow hooks, AC, 350 4 speed 1972 C10 Suburban Custom Deluxe 1969 Chevy milk truck 1971 Camaro RS 5.3 BTR STG3 Cam Super T10 1940 Ford 354 Hemi 46RH Ford 9" on air ride huge project Tired of spark plugs? Check this out. |
|
|
|
|
11-18-2010, 06:30 PM
|
#294 | |
|
Registered User
Join Date: Feb 2010
Location: Dayton, OH
Posts: 255
|
Re: The Story Of A Cummins Suburban (Lots Of Pics)
Quote:
My thought was to basically make the boxed frame jog out and then back in. Then add some material bent to the shape of the joints of the jog as to not rely completely on the welds of the joints. Posted via Mobile Device |
|
|
|
|
|
11-18-2010, 07:08 PM
|
#295 |
|
6>8 Plugless........
Join Date: Sep 2007
Location: Prairie City, Ia
Posts: 17,133
|
Re: The Story Of A Cummins Suburban (Lots Of Pics)
If I were to do this I think I would over lap the stock frame a little farther in the rear to ensure proper strength, but that's just me. I would remove the factory bump stop, and proceed farther back that way I know that frame is strong enough for my worrying mind.
__________________
Ryan 1972 Chevy Longhorn K30 Cheyenne Super, 359 Inline 6 cylinder, Auto Trans, Tilt, Diesel Tach/Vach, Buckets, Rare Rear 4-link and air ride option Build Thread 1972 GMC Sierra Grande Longhorn 4x4 1972 Chevy Cheyenne Super K20 Long Step side tilt, tach, tow hooks, AC, 350 4 speed 1972 C10 Suburban Custom Deluxe 1969 Chevy milk truck 1971 Camaro RS 5.3 BTR STG3 Cam Super T10 1940 Ford 354 Hemi 46RH Ford 9" on air ride huge project Tired of spark plugs? Check this out. |
|
|
|
|
11-18-2010, 07:18 PM
|
#296 |
|
Registered User
Join Date: Feb 2010
Location: Dayton, OH
Posts: 255
|
Re: The Story Of A Cummins Suburban (Lots Of Pics)
I know its going to be a lot of work but I wonder why he said that he would never do the frame notch again??
And yeah, that sounds similar to what I was saying by taking material that tied into the existing frame rail so that you are not relying only on the butt welds to support the weight of the truck, not to mention any abuse it will see. |
|
|
|
|
11-18-2010, 07:26 PM
|
#297 | |
|
6>8 Plugless........
Join Date: Sep 2007
Location: Prairie City, Ia
Posts: 17,133
|
Re: The Story Of A Cummins Suburban (Lots Of Pics)
Quote:
__________________
Ryan 1972 Chevy Longhorn K30 Cheyenne Super, 359 Inline 6 cylinder, Auto Trans, Tilt, Diesel Tach/Vach, Buckets, Rare Rear 4-link and air ride option Build Thread 1972 GMC Sierra Grande Longhorn 4x4 1972 Chevy Cheyenne Super K20 Long Step side tilt, tach, tow hooks, AC, 350 4 speed 1972 C10 Suburban Custom Deluxe 1969 Chevy milk truck 1971 Camaro RS 5.3 BTR STG3 Cam Super T10 1940 Ford 354 Hemi 46RH Ford 9" on air ride huge project Tired of spark plugs? Check this out. |
|
|
|
|
|
11-19-2010, 12:33 AM
|
#298 |
|
Registered User
 Join Date: Nov 2007
Location: Turlock California 95380
Posts: 2,075
|
Re: The Story Of A Cummins Suburban (Lots Of Pics)
mosesburb,
I read this entire thread the other night, and I just went over it again. I am loving the Cummins swap, and your attention to detail ! This build is awesome 
__________________
72 C20 Longbed 05 1500 Z71 |
|
|
|
|
11-22-2010, 12:18 AM
|
#299 |
|
Registered User
 Join Date: Feb 2003
Location: Burbank CA
Posts: 1,226
|
Re: The Story Of A Cummins Suburban (Lots Of Pics)
Great to meet you this weekend man and thanks for the tour of your truck. That thing is truley amazing.
|
|
|
|
|
11-22-2010, 12:41 AM
|
#300 |
|
Junk Yartist
Join Date: Jul 2009
Location: Greeley, CO
Posts: 2,203
|
Re: The Story Of A Cummins Suburban (Lots Of Pics)
Gary Puls up at Wyotech notched the frame of his chevy for his 8.1L swap... He also boxed the whole frame
__________________
-Jeremy YOU ONLY FAIL IF YOU STOP TRYING 70 Crew Cab Build Link 70 GMC Suburban 4X4 build thread 95 Yukon Daily Driver Rebuilding an NP205 |
|
|
|
 |
| Bookmarks |
|
|


 Linear Mode

