
|
 11-12-2009, 11:55 AM
|
#126 |
|
PITbut
Join Date: Sep 2007
Location: monroe washington
Posts: 3,041
|
Re: The Story Of A Suburban (Lots Of Pics)
Forgot about this thread.
Im in.
__________________
New project. 1971 Twin Turbo blazer http://67-72chevytrucks.com/vboard/s...d.php?t=676047 My new YOUTUBE channel.. Videos of my truck and a current walk around. Lyrikz74 Youtube channel DONE! SOLD!  My 1971 stepside build thread My Build Thread UPDATED 6/11. DONE and sold. |

|

|
|
11-12-2009, 09:20 PM
|
#127 |
|
Registered User
Join Date: Oct 2009
Location: Charleston, SC
Posts: 21
|
Re: The Story Of A Suburban (Lots Of Pics)
That is a badass truck, but the color combination on the firewall and outside confuses and scares me a little.
|
|
|
|
|
11-18-2009, 06:00 AM
|
#128 | ||||
|
I had a V-8
Join Date: May 2003
Location: Phoenix AZ
Posts: 1,116
|
Re: The Story Of A Suburban (Lots Of Pics)
Quote:
 Quote:
Quote:
__________________
1972 K20 Suburban, 5.9L Cummins, Banks Power Pack, NV4500HD, NP205, H.A.D., D60/14FF ARB Link To Build: HERE. |
||||
|
|
|
|
11-22-2009, 11:22 PM
|
#129 |
|
Senior Member
 Join Date: Apr 2009
Location: Lawrence KS
Posts: 821
|
Re: The Story Of A Suburban (Lots Of Pics)
subscribed. makes me feel worthless w/ mine little pansy projects

__________________
1981 Chevy C30 440 Holmes 42K one owner miles |
|
|
|
|
11-23-2009, 11:50 AM
|
#130 |
|
Registered User
Join Date: Jun 2003
Location: West Valley City, Ut
Posts: 311
|
Re: The Story Of A Suburban (Lots Of Pics)
Now that you fixed the pump and turned it up. What is you mpg? I'm looking at doing the same swap in mine. For the gears, i was thinking of keeping my 4:10, just for the fact i run 18x39.5x16.5's. That might off set the rpm's.
__________________
72' GMC Suburban 10 1/2" of Lift, 40" Tires! Waiting for restoration  67' Chevy, What to do??? And Bad Ass American Bulldogs! |
|
|
|
|
11-23-2009, 12:31 PM
|
#131 | |
|
Future TOTM Winner
Join Date: Aug 2006
Location: Bulverde, TX
Posts: 2,692
|
Re: The Story Of A Suburban (Lots Of Pics)
Quote:
__________________
72 Chevy CST K5 HIGHLANDER BLAZER Getting a 6.0,NV4500,NP205,14BFF (Currently laying all over the place in little pieces) 72 Chevy swb step-side "LS" 6.0 Here's a build thread of sorts 2002 HD2500 Crew Cab, 8.1L Allison 4x4 Daily Driver Check it out www.lsdyno.com |
|
|
|
|
|
11-23-2009, 05:25 PM
|
#132 |
|
Registered User
Join Date: Nov 2009
Location: Beavercreek, OH
Posts: 12
|
Re: The Story Of A Suburban (Lots Of Pics)
Very cool story and truck. I've actually been watching Trucks on Powerblock TV lately as they are putting a similar Cummins in a late 70s Ford Crew Cab. Different truck but same problems with the manifold and turbo fitment etc..
Anyhow I've been looking for a 3/4 or 1 Ton Longbed 4x4 to do the same with so great to learn from your notes. If you haven't made your mind up yet on wheels I saw a 72 longbed 3/4 ton 4x4 truck the other day with a set of factory OEM Hummer Wheels on it that looked pretty tough. I attached a picture of the style. the basically ran these with the factory 8 lug center caps from a late 80s style truck and it looked pretty nice. Like it was made to be that way. |
|
|
|
|
11-24-2009, 04:24 AM
|
#133 | |||||||
|
I had a V-8
Join Date: May 2003
Location: Phoenix AZ
Posts: 1,116
|
Re: The Story Of A Suburban (Lots Of Pics)
Quote:
Quote:
As far as the gears go, yes the tires will offset the gears nicely. The tires I have are only 32" tall, so I am at a disadvantage there. Quote:
Quote:
Quote:
Quote:
Quote:
Yeah, a buddy of mine had those on his Sub and they look real nice. I like them, and probably would have gone that way if I did not have so many of these tires hanging around. But being that I went this way, I have really grown to like the stockers I have on there now. Nothing flashy, but cool just the same--kind of unique anymore as everyone has put something "cooler" on their trucks. I am actually picking up a set of tall skinny mud tires to go on another set of these wheels, so I can have the off-road tires and keep my old-man hubcaps.
__________________
1972 K20 Suburban, 5.9L Cummins, Banks Power Pack, NV4500HD, NP205, H.A.D., D60/14FF ARB Link To Build: HERE. |
|||||||
|
|
|
|
11-28-2009, 03:51 AM
|
#134 |
|
I had a V-8
Join Date: May 2003
Location: Phoenix AZ
Posts: 1,116
|
Re: The Story Of A Suburban (Lots Of Pics)
I have had a couple request for information about my windshield wiper wet arms. I was never a fan of the piston pump and metal nozzles that must be aimed, but require a different adjustment for no/low/high speed travel. I have adjusted the nozzles before and had decent success, but I really like wet arms (washer nozzles on the wiper arm).
I started looking around for vehicles that have the wet arms from the factory and came to the realization that GM trucks from '85-'91 came equipped with them. Being these are easy to find in wrecking yards, I chose to use most of this setup. Here are the major components (less reservoir, pump and hose): 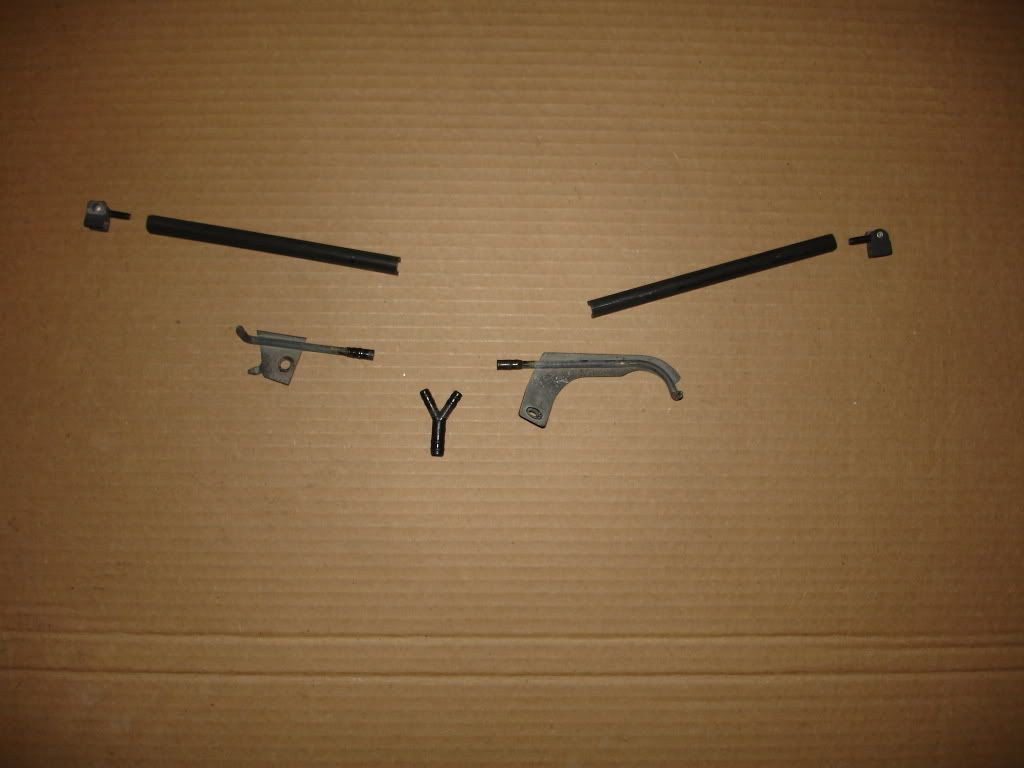 The "Y" fitting in the middle takes the 7/32" id hose from the pump and splits it to two 5/32" id hoses that go to the metal tubes that have the brackets on them. These tubes serve two purposes: one is they reduce the hose from 5/32" id hose to 3/32" id hose (this is specific hose made for wet arms), the other purpose is to have a fixed point for the arm-hose to attach. The two long black plastic things are hose supports that attach the hose to the underside of the arm. The two little things on the ends are the actual nozzles. They do not look like anything special, but these things flow some serious liquid. One of the problems of converting to wet arms is the original arms do not lend themselves well to nozzle attachment or aim. The factory we arms have a different blade attachment style than the original blades: 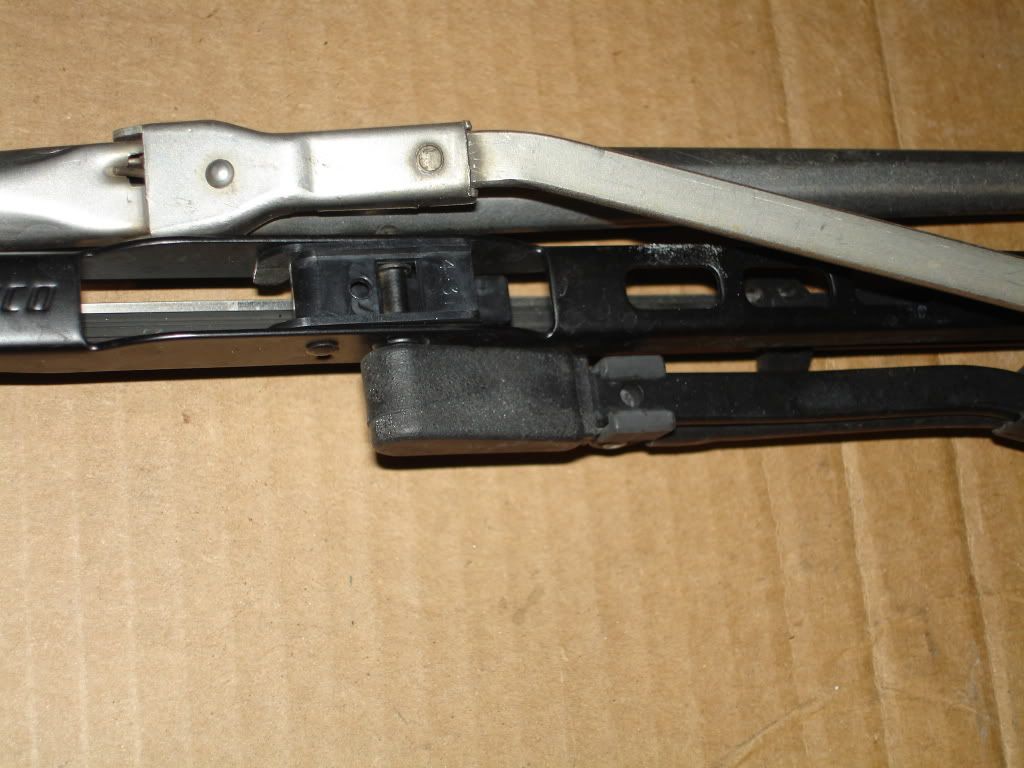 The original arms have the blades attaching inline with the arm. The factory wet arm has the blade offset just above the arm with the nozzle right below it. The nozzle sprays liquid parallel with the blade. This is where the biggest problem arises in the conversion. If the nozzle was to be put on the original arm, it would have to be placed further down the arm so it would be at an angle to the blade instead of parallel with it. I debated quite a bit on this and finally decided to make a hybrid of the two arms. I took the base of an original arm and removed the blade end from it. Then, I took a factory wet arm and removed the blade end to use with the base of the original arm. I had to shorten the blade end of the factory wet arm, drill a couple holes to match up with the base of the original arm and bend the end for the spring to attach to. I then used standard pop rivets and put the arms together: (Original top, hybrid arm middle, OE wet arm asm bottom) 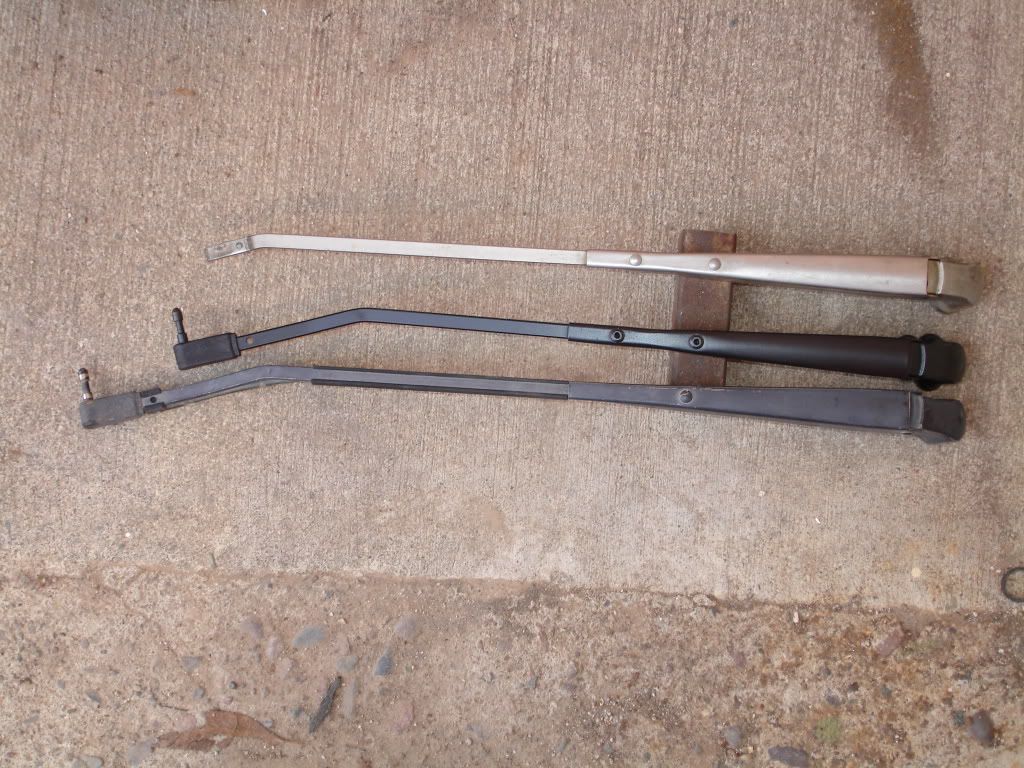 After the arms are made, the hose must be run up the underside of the arm. My local mom and pop parts house was able to acquire the wet arm hose for this purpose. Fishing it up through the spring was not too much fun, but I was able to get it through. After it exits the spring it goes into the black plastic channel that supports it until it gets to the nozzle (channel gets shortened about one inch). 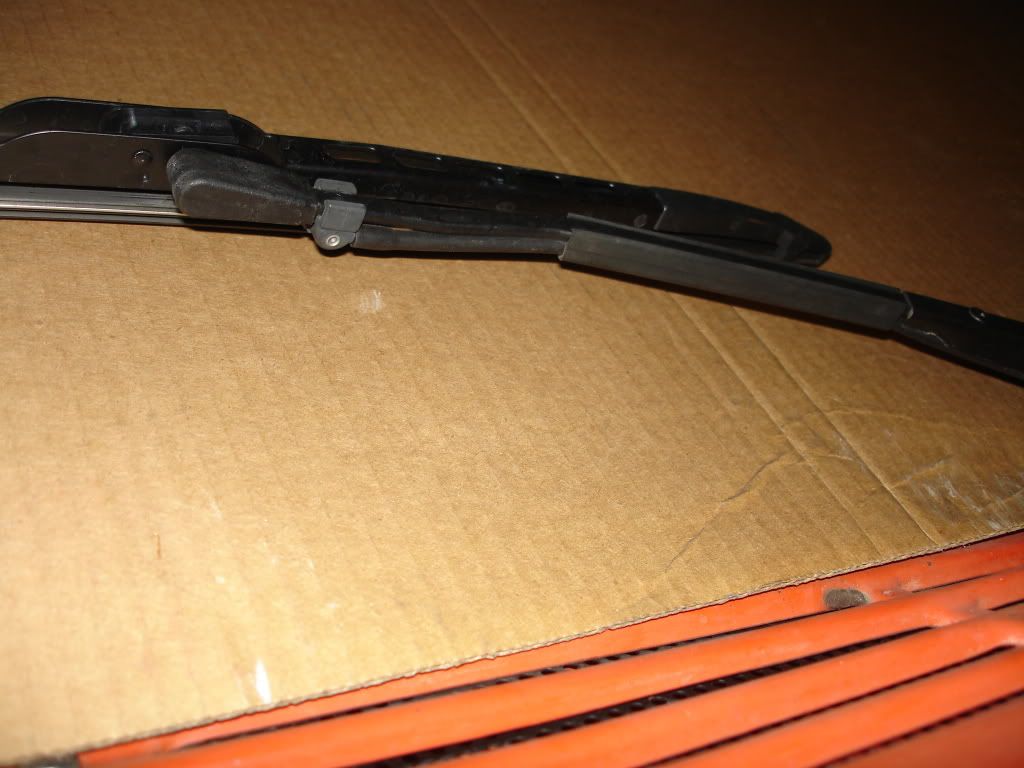 The hole in the arm is a locating hole for the nozzle: 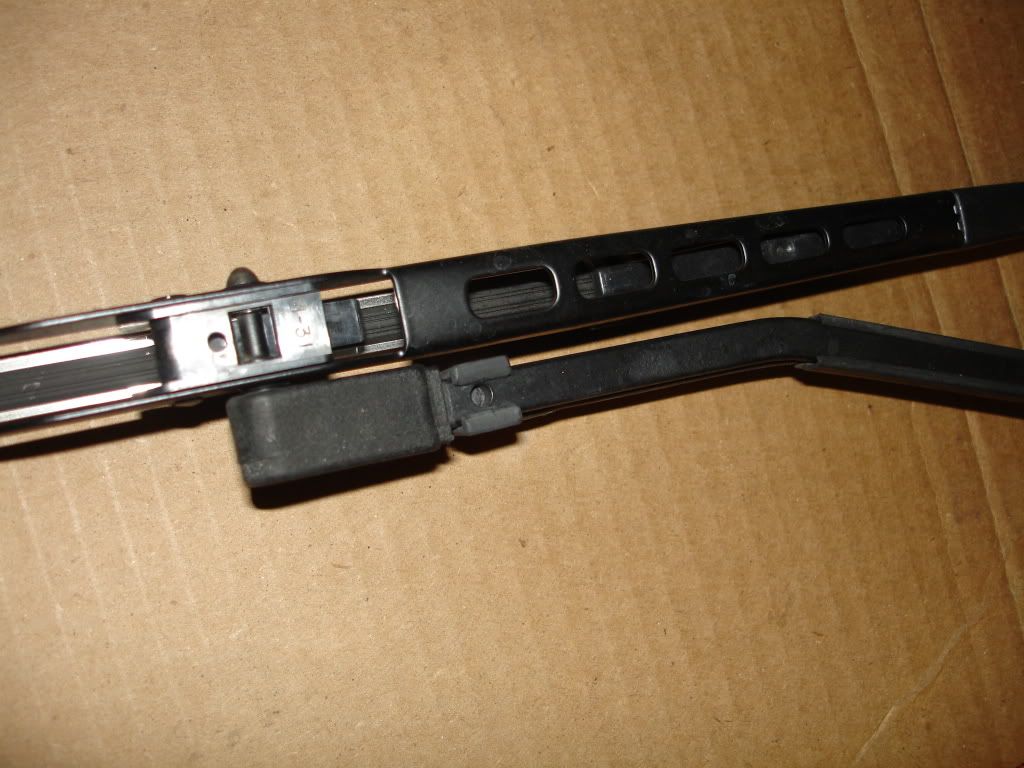 In all of my shopping I ended up using an '85-'91 reservoir. It had to fit in a very undesireable location (but the only location it would fit), and that reservoir fit perfectly. Normally, white plastic is cheap from GM, but this reservoir was not--in fact it was something like forty bones. That being the case, I purchased a used one. I like the reservoir because it has an integral pump that is hidden behind the reservoir itself. I bought a new pump kit for it: (Old parts pictured) 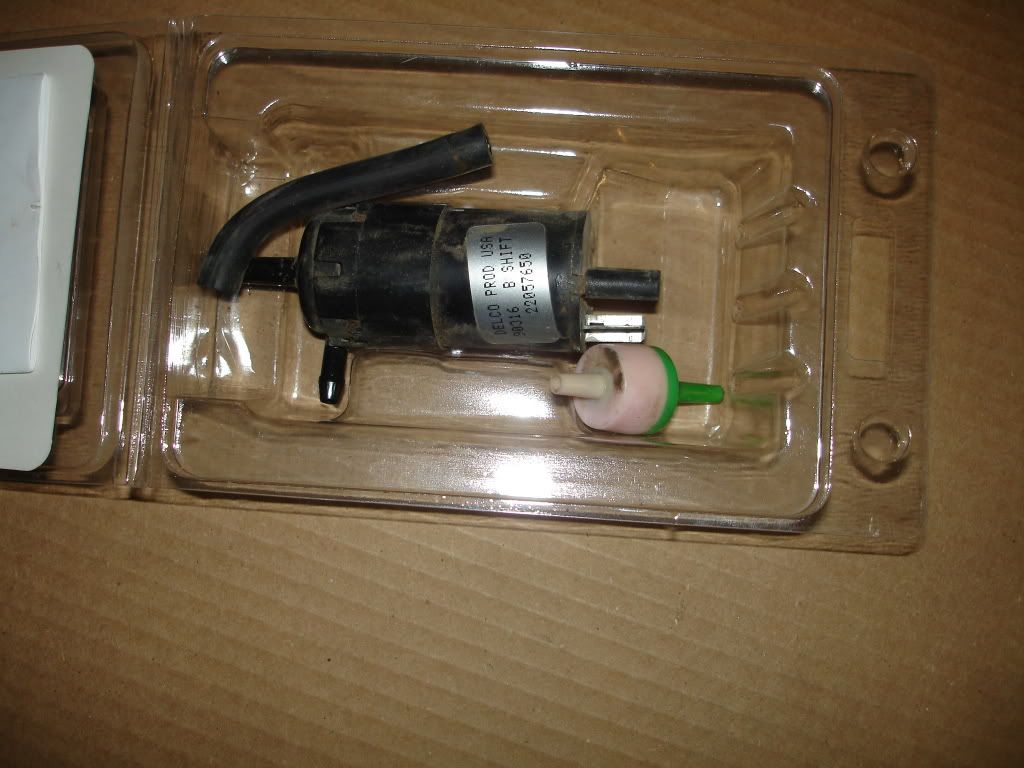 Normally, I only buy Delco parts for my rides, but this Anco kit has the same pump as a Delco kit as they probably were the original supplier for it to GM. The little white thing is a check valve so the lines will stay full of fluid and decrease the amount of time for the spray to occur. Installation of the arms was the same as original, but there is a hose to deal with now. This is no big issue other than there is not quite enough room for the hose to squeeze through the hole with the wiper trunion and the cowl screen. I ground a small amount out of the id of the hole and made enough room for the hose to coexist with the trunion: 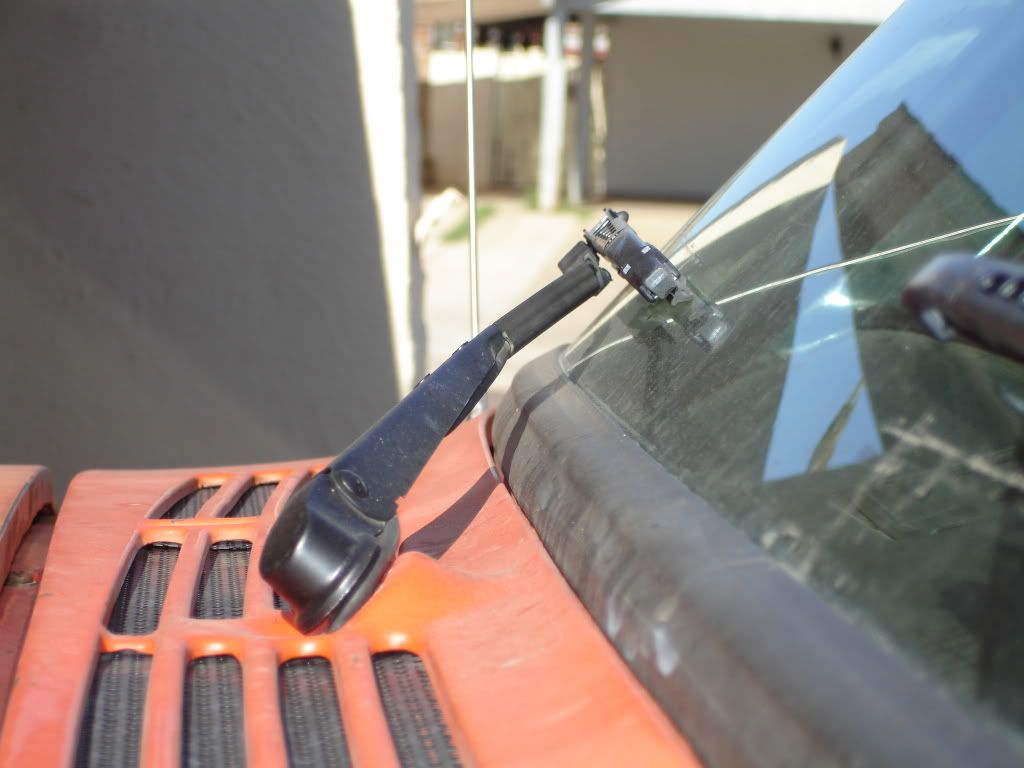 The only part from the C/K system that I did not use was the steel tubes with the tabs on them. I could not figure out a way to make either of them work on either side. Also to use them would have required a large amount of material to be removed from the cowl screen. I figured another system must use something different. I found that the Astro/Safari vans have wet arms also and use a simple plastic reducer/connector at the base of the arms. It can be removed without removing the arm or the cowl screen from the van. Work it out of hiding with a pair of needle nose pliers, then cut it off with a knife--do not try to pull it out of the hose or it will probably break. I used all GM components from the same vehicle type (except for the aforementioned pieces from the Astro/Safari, but the diameters were the same as the C/K stuff) so that I would be dealing with a whole engineered system--not trying to reinvent it myself. So, with all of this work, I sure hoped it would work. Holy cow, does it ever. I do NOT use it in heavy traffic because so much water comes out that I can not see through the water until the wiper blade clears it off. No piston pump washer/wiper setup I have ever used worked half as well as this setup does. It was a fantastic mod that I am very glad that I took the time to do.
__________________
1972 K20 Suburban, 5.9L Cummins, Banks Power Pack, NV4500HD, NP205, H.A.D., D60/14FF ARB Link To Build: HERE. |
|
|
|
|
11-28-2009, 10:57 AM
|
#135 |
|
PROJECT 7DEUCE
Join Date: Dec 2002
Location: GRANTS PASS OR
Posts: 21,589
|
Re: The Story Of A Suburban (Lots Of Pics)
This should be put in to the f a q section this is a great write up..
__________________
GO BIG GREEN GO DUCKSMEMBER #6377 72 k-5 daily driver 6'' lift 35'' 350-350-205 slowly getting rust free. Project "7DEUCE" check out my build http://67-72chevytrucks.com/vboard/s...d.php?t=267665 Tim Powell..R.I.P EastSideLowlife..... R.I.P.. |
|
|
|
|
12-01-2009, 05:24 PM
|
#136 |
|
I'M TRUCK CRAZY!
Join Date: Oct 2006
Location: Sachse, TEXAS
Posts: 1,737
|
Re: The Story Of A Suburban (Lots Of Pics)
That wiper setup is awesome. I will have to remember this so I can do it. were did you put your reservoir? Do you have a pic of it? I also want to see the tall skiny mud tires on it.
|
|
|
|
|
12-01-2009, 06:27 PM
|
#137 | |
|
Future TOTM Winner
Join Date: Aug 2006
Location: Bulverde, TX
Posts: 2,692
|
Re: The Story Of A Suburban (Lots Of Pics)
Quote:
 
__________________
72 Chevy CST K5 HIGHLANDER BLAZER Getting a 6.0,NV4500,NP205,14BFF (Currently laying all over the place in little pieces) 72 Chevy swb step-side "LS" 6.0 Here's a build thread of sorts 2002 HD2500 Crew Cab, 8.1L Allison 4x4 Daily Driver Check it out www.lsdyno.com |
|
|
|
|
|
12-02-2009, 05:34 AM
|
#138 | |
|
I had a V-8
Join Date: May 2003
Location: Phoenix AZ
Posts: 1,116
|
Re: The Story Of A Suburban (Lots Of Pics)
Quote:
From post #23 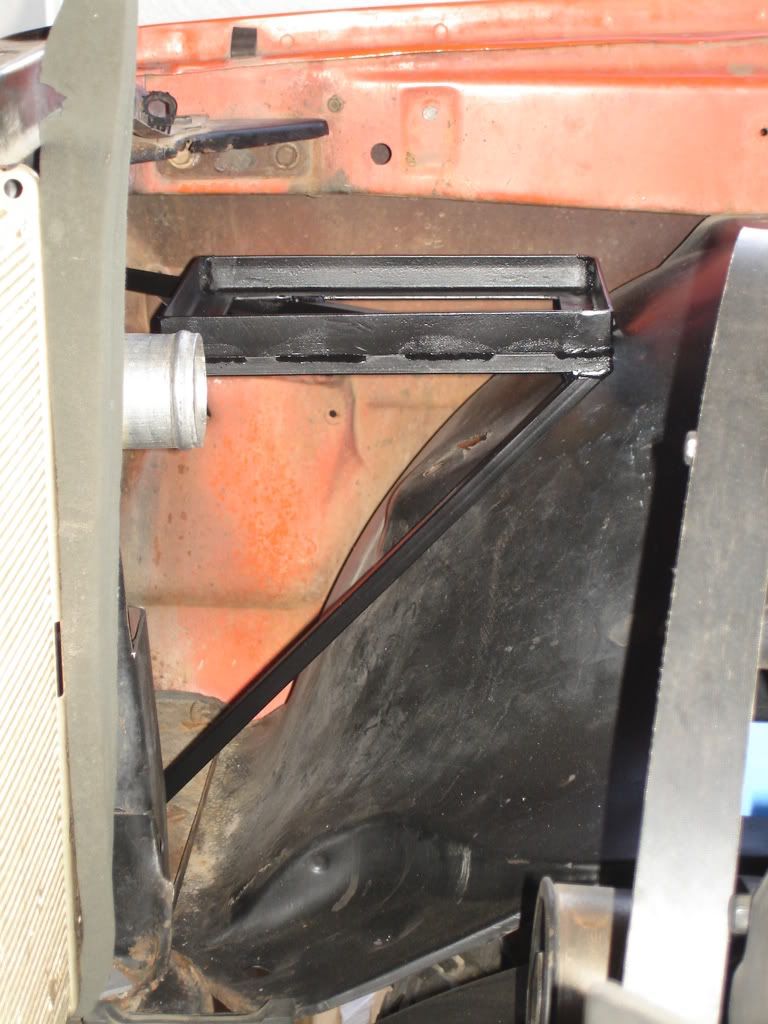 It is not an ideal mounting spot, but hey, it is all there was. In all reality, it does not need to be readily available, but where mine is, I need a transmission funnel to fill it. Luckily, the reservoir is fairly decent sized so refills do not occur too often. As for a pic of the reservoir, no, I do not have one. Speaking of reservoirs, I used that particular one because it HAD to fit under that battery tray. From the pic, it looks like there is a lot of room, but in actuallity, it is very crampt right there. While shopping the wrecking yards I found several that would have looked nice enough to put in a visible place, but would not work for me because of that damn intercooler. Older S10 trucks and some GM passenger cars have nice reservoirs with integral pumps in them. If a reservoir change is not desireable to you, an inline electric pump can be added in an inconspicuous place to reap the benefits of a motor driven pump instead of a piston pump, but still use the original reservoir. The tall skinny mud tires have not happened yet. I am having difficulty putting together another set of the stock wheels of all things. I can find one or two but it seems like whenever I try to set something up everything goes awry. I will post pics as soon as I get them on.
__________________
1972 K20 Suburban, 5.9L Cummins, Banks Power Pack, NV4500HD, NP205, H.A.D., D60/14FF ARB Link To Build: HERE. |
|
|
|
|
|
12-27-2009, 05:28 AM
|
#139 |
|
I had a V-8
Join Date: May 2003
Location: Phoenix AZ
Posts: 1,116
|
Re: The Story Of A Suburban (Lots Of Pics)
Well, I finally got around to loading my interior pics. I had to convert my truck to bucket seats because where my motor got placed put the transmission shifter so far back that I had to widen the hole for the transfer case shifter for the transmission shifter to come through. That still would have worked with a bench seat, but the transfer case shifter was going to end up even farther back than that thus preventing the use of a bench seat.
So I started searching around and I found a full-factory-pimped '94 GMC Safari SLE van in a U-Steal-It yard down by work. This is no small task as I am guessing the price of the full-pimp factory unit was probably fairly close to the conversion van price because this was the only loaded factory-stock one that I found in a sea of conversion vans. This particular van had a power driver's bucket seat, manual passenger bucket, manual bucket seats for the second row (both have adjustment levers for fore/aft seat position, recline, and integral armrests), and a bench seat for the thrid row (this also has an adjustment lever for fore/aft seat position, the left and right side of the seat have integral armrests and recline with the center of the seat folding down to become a cup holder/armrest type apparatus). Now, I did not want power seats. I do not move the seat around enough to ever want to deal with a non-functioning power seat ever again, and the front seats were pretty worn/sun faded. I got to looking at the second row seats (buckets) and really liked what I saw. They were very dirty and had typical kid type bio-hazards going on, but I thought they would clean up enough to use. I grabbed the two second row seats to use as my front seats. I got them home and started checking them out and started liking them even more. Did I mention it was half off day and I got them for less than $35.00 for the pair?? Yeah it was a sweet deal that day. Anyways I got to thinking that my second row seat was just as bad as my front seat and I should have grabbed the third row seat out of the Safari van to use as my second row seat. I waited a week and went back and it was still there and nobody had used it as a rag to clean their hands on. I got it and the integral seatbelts for under forty bones. I wanted to use the quick release mechanism for my second row seat, but it was not going to work with the frame rail spacing of the Sub. Oh well, I sawed the "hooks" off of the bottom and welded some flat plate to the brackets and converted it to a bolt-in seat. Here are some pics: 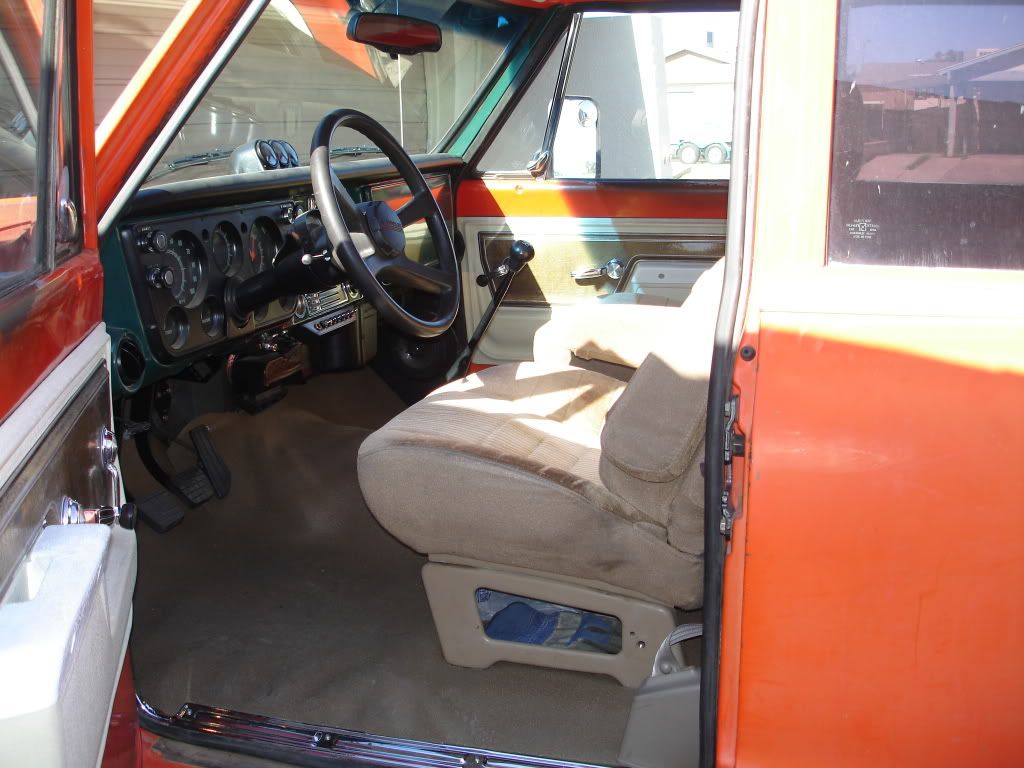 I have a manual trans column to go in it now. 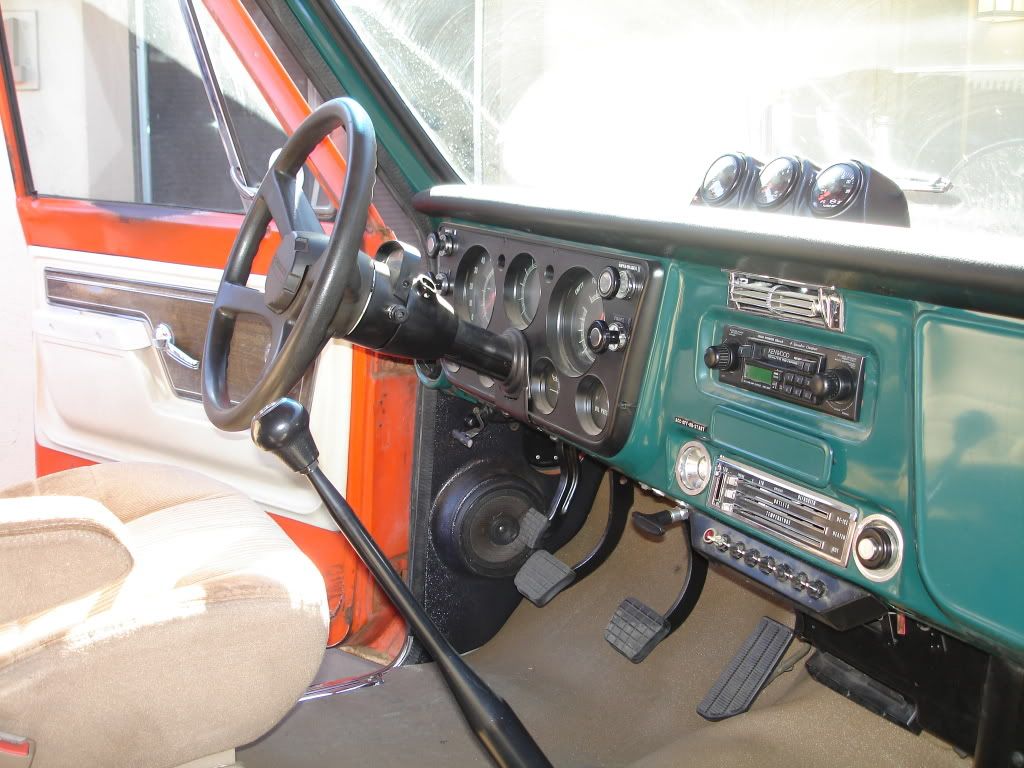 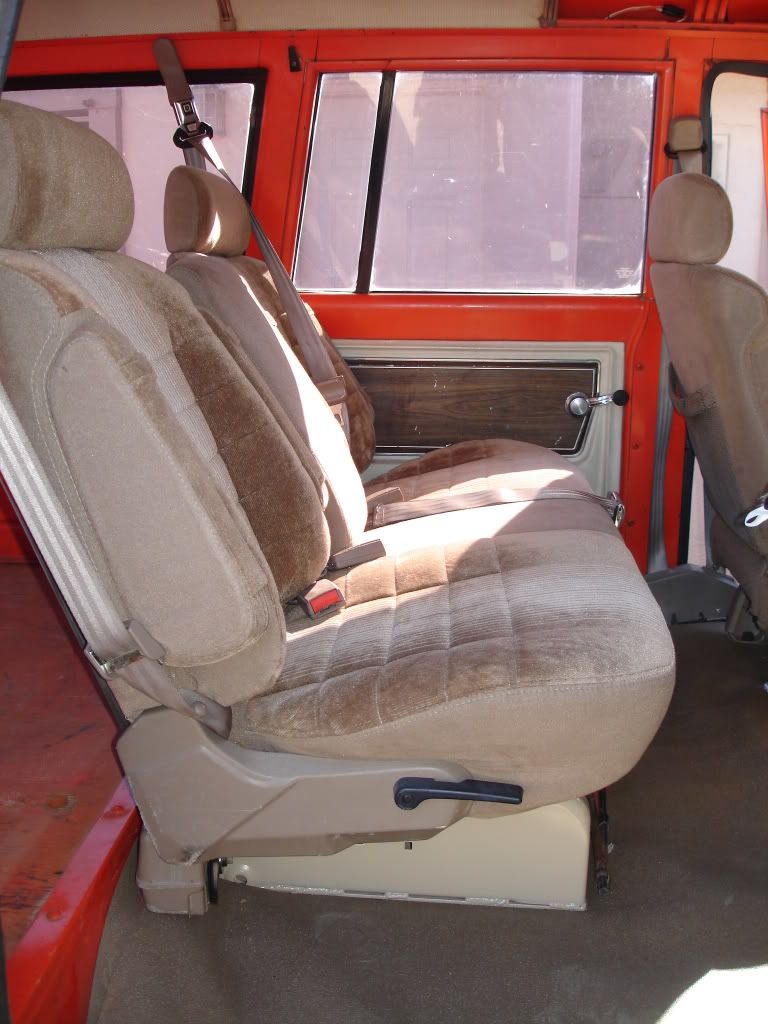 For the front seat belts I used assemblies out of a '97 Chevy regular cab truck. I wanted to use assembliles out of a Tahoe or Suburban, but all of the ones I found were crap. 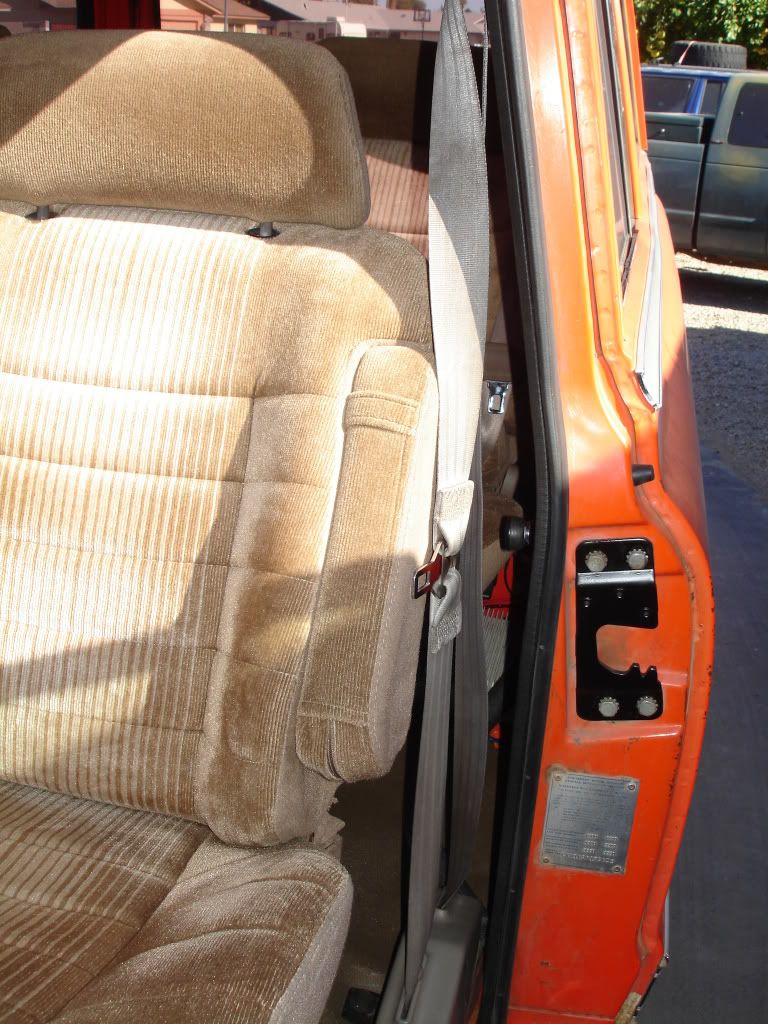 Now, the only difference between regular cab and Tahoe/Suburban seatbelt assemblies is the black tab has a plastic covering with the Tahoe/Suburban units. These belts I got were like brand new. They were in pristine condition and definitely were not being worn when the truck they came from got crashed. 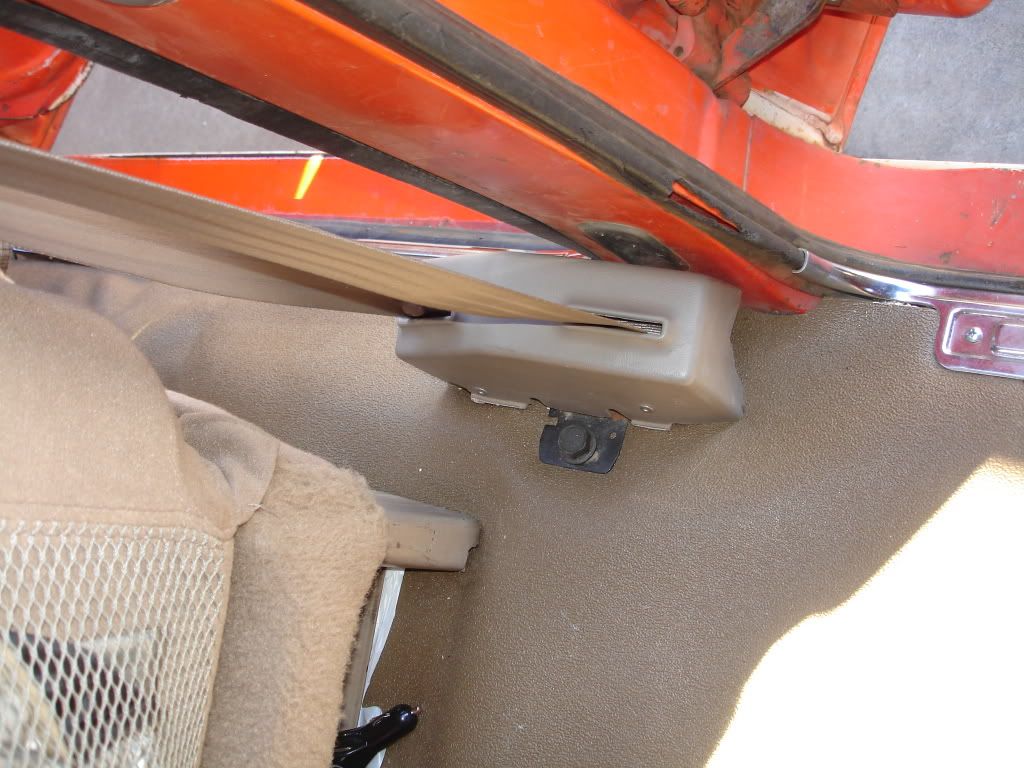 Now, I have seatbelts with shoulder harnesses for every position in the truck and Generous Motors was kind enough to give provisions to bolt up the shoulder straps, but the hole they gave was not typical compared to late-model vehicles. Instead of being 1/2-13(ish) or metric, they are 7/16-20. Swell. The shoulder belts all attached with a shouldered bolt in their original application, but they are all larger than 7/16". Hmm, what to do. I measured the hole in the rear shoulder belt mountings and found it to be about .625". Ok, for a mock-up I need a bushing with a 7/16" bore and a 5/8" od. I must have something that will work around here...I did. The caliper mounting bolt sleeve from 1/2-3/4T trucks (and a bazillion GM passenger cars also) just happens to have the needed specs. Sweet, I get them mocked up and decide I want something a bit stouter than the caliper guide pin sleeve. I call Russ's 24hr Machine Svc and describe this "top-hat" looking thing with x diameter for the brim and y diameter for the cylinder above the brim and a 7/16 hole through it (I love it when something can be accurately described over the phone). He whips up several of them and they work out perfectly. My theory was the sleeve could use some stability by adding a shoulder to it: 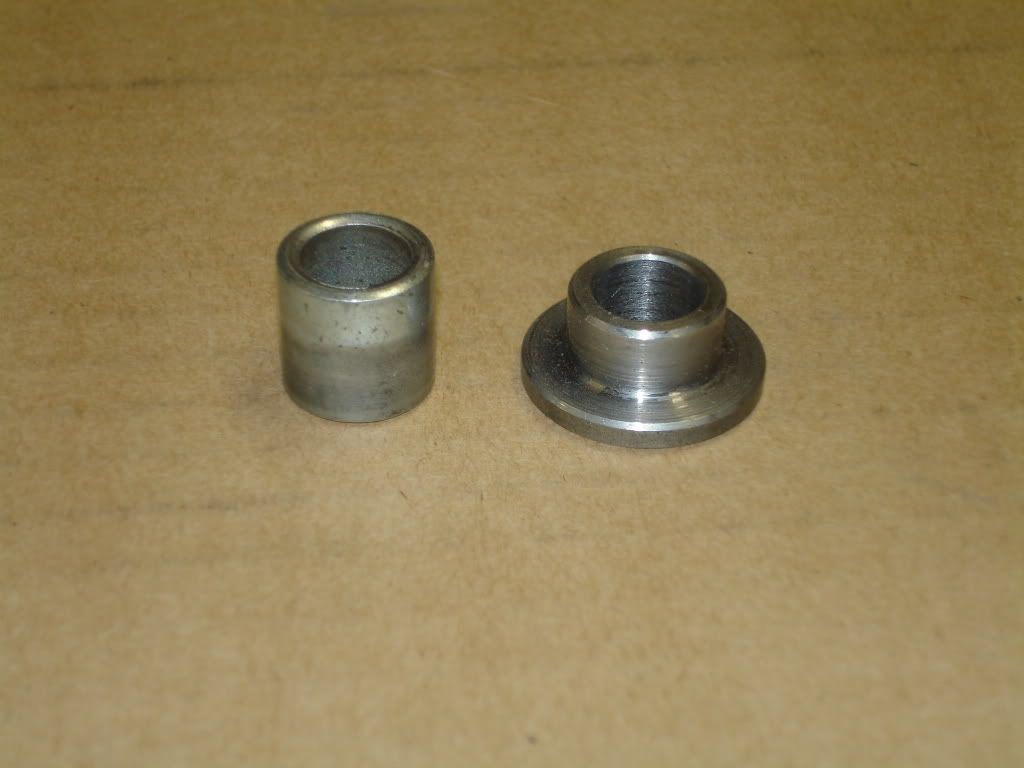 Ok, so I have some stout bushings to mount the shoulder harnesses to the body, now I just need some bolts. Hmm, 7/16-20 about an inch long with as thin of a head as possible.....exactly my thought as well--flywheel bolts for a Mark IV big block/first gen SBC!! They worked out perfect!! Thin head that the covers fit nicely over and long enough to engage all of the provided threads in the body. 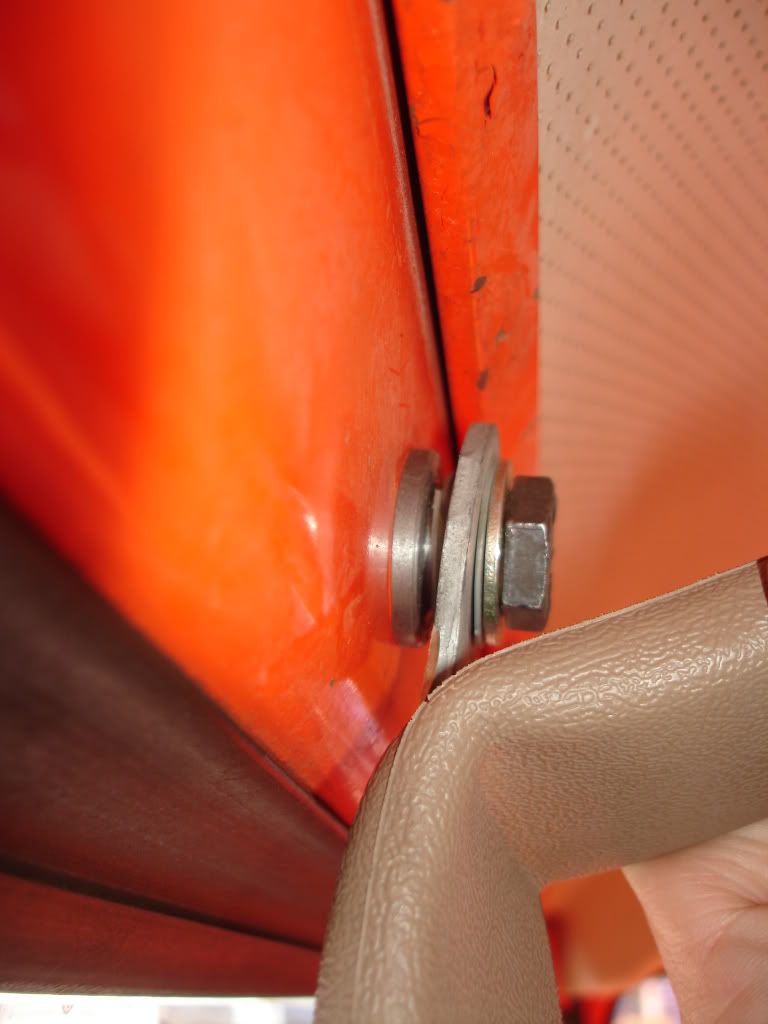 The flooring I used was the Auto Custom Carpet heavy duty molded vinyl kit. I followed their instructions about laying it out before working with it. I put it in the truck and it looked good until I started trying to fit it to the truck. It went to hell in a handbasket real quick. What looked good to start with ended up looking horrid once I got it "fitted" if it can be described like that. Now, I have installed several factory GM rubber floor coverings and I thought those fit bad---nooo, those fit like gloves compared to this clump of crap. I was thouroughly dissappointed. I was working with this stuff in summer when the ambient temp is just a fuzz under the surface temp of the sun and I still couldn't get this thing to lay out right. I ended up trying to fit it with a heat gun and glue, but it undid everything I did in a matter of 24hrs. I finally said screw it (literally) and made a couple strategic relief cuts, then glued and screwed the pieces together. It looks sorta ok at best, but I would not use one again, that is for sure. Anyways, this is just my opinion and I am sure someone somewhere had good luck with their product, just not me. That is all for today. There is more to come, so stay tuned.
__________________
1972 K20 Suburban, 5.9L Cummins, Banks Power Pack, NV4500HD, NP205, H.A.D., D60/14FF ARB Link To Build: HERE. |
|
|
|
|
12-27-2009, 10:42 AM
|
#140 |
|
PROJECT 7DEUCE
Join Date: Dec 2002
Location: GRANTS PASS OR
Posts: 21,589
|
Re: The Story Of A Suburban (Lots Of Pics)
Totally awesome man sucks that the rubber mat did not fit but even then it looks pretty good in the pics..
__________________
GO BIG GREEN GO DUCKSMEMBER #6377 72 k-5 daily driver 6'' lift 35'' 350-350-205 slowly getting rust free. Project "7DEUCE" check out my build http://67-72chevytrucks.com/vboard/s...d.php?t=267665 Tim Powell..R.I.P EastSideLowlife..... R.I.P.. |
|
|
|
|
01-01-2010, 04:59 PM
|
#141 |
|
Registered User
Join Date: Feb 2008
Location: Albuquerque
Posts: 359
|
Re: The Story Of A Suburban (Lots Of Pics)
I know this a lame question, but I'm looking for an easy answer and I'm acting lazy...How did you wire the washer pump? and I assume you kept the factory switch? I'm just mounted my external washer bottle with internal pump (GM) and now I need to finish the wiring connections. Any Help?
Mick Love the Burb, would like to check it out next this spring when I'm back in Phoenix... |
|
|
|
|
01-03-2010, 09:36 PM
|
#142 | |||
|
I had a V-8
Join Date: May 2003
Location: Phoenix AZ
Posts: 1,116
|
Re: The Story Of A Suburban (Lots Of Pics)
Quote:
Quote:
Quote:
__________________
1972 K20 Suburban, 5.9L Cummins, Banks Power Pack, NV4500HD, NP205, H.A.D., D60/14FF ARB Link To Build: HERE. |
|||
|
|
|
|
01-04-2010, 12:10 AM
|
#143 |
|
Registered User
Join Date: Feb 2008
Location: Albuquerque
Posts: 359
|
Re: The Story Of A Suburban (Lots Of Pics)
OK
Of the three wire which run the pump? How did you actually wire it? I'll let you know when I'm going to be in town, usually spring, first week of May. Mick |
|
|
|
|
01-04-2010, 03:40 AM
|
#144 | |||
|
I had a V-8
Join Date: May 2003
Location: Phoenix AZ
Posts: 1,116
|
Re: The Story Of A Suburban (Lots Of Pics)
Quote:
Quote:
Quote:
__________________
1972 K20 Suburban, 5.9L Cummins, Banks Power Pack, NV4500HD, NP205, H.A.D., D60/14FF ARB Link To Build: HERE. |
|||
|
|
|
|
01-07-2010, 05:34 AM
|
#145 |
|
I had a V-8
Join Date: May 2003
Location: Phoenix AZ
Posts: 1,116
|
Re: The Story Of A Suburban (Lots Of Pics)
A little story about my favorite piece of engineering/fabrication on this project.
None of my vehicles have a cupholder. Living in AZ, this is an issue as operating without liquids in summer means quick death. Since my boy has been around, I have been scamming his cupholder in his car seats then and booster seats now. It worked out great in my S10 p/u as it is small and *basically* a two person vehicle. I was using the same technique in the Suburban and it worked well when it is just me and him, but when my wife comes with, he goes in the back seat along with MY cup holder. This makes the consumption of liquids a potentially dangerous event. I finally gave up and figured if I can fab a huge-ass diesel motor into this thing, I should be able to make a friggin' cup holder. Simple, right?? Well, it must have certain design features of course and must hold vessels of various capacities and configurations, be easy to reach, and can not be too ugly as it must go inside the vehicle--not hidden under the hood. Ok, so where to start. I guess I should figure out what size vessels and what configurations to start with. I decided it must me able to hold a can with the foam sleeve around it. I also figured it needed to be able to hold the two most common size cups from the local Kwik-E-Mart as I have a bunch of these cups in inventory and I do stop and buy a soda once in a while. So here they are: 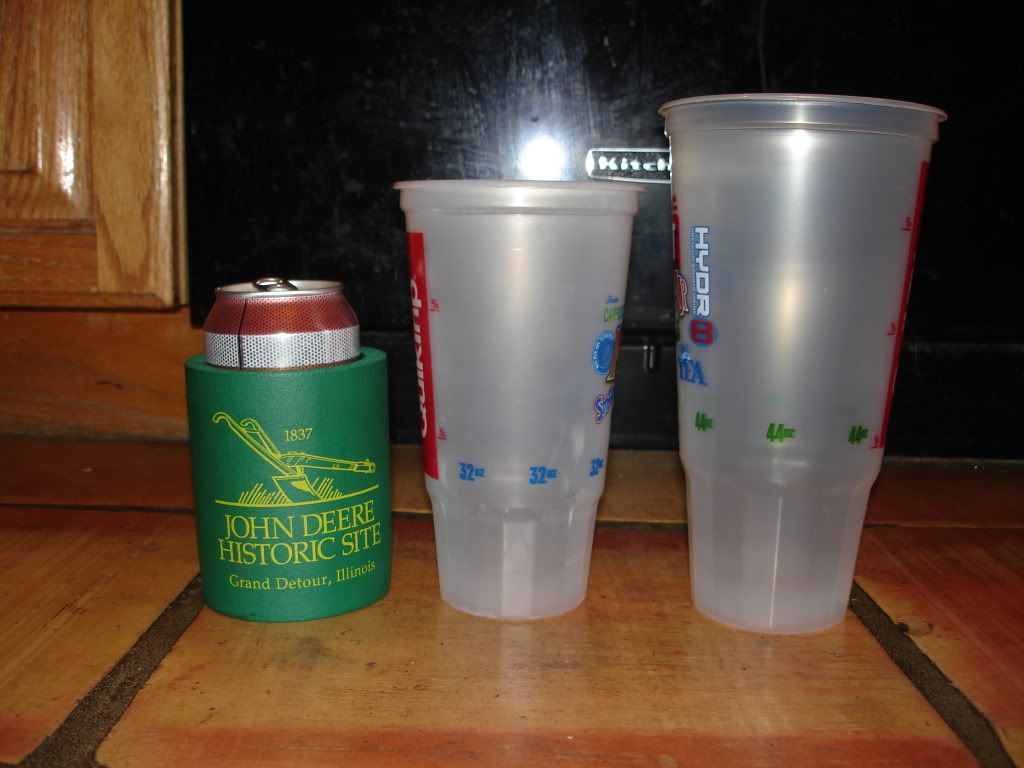 You can see that the difference in diameter is fairly substantial. I started with the can/foam sleeve. The foam sleeve measures 3.25" o.d.. The cups are obviously smaller diameter at the base but taper to a larger diameter as you go up toward the top. Ok, 3.25, 3.25, 3.25. Ah, I got it!! 3.5" o.d. exhaust pipe. Perfect fit on the can!! Ok, now to figure out how to make the cups that are going to be VERY top heavy remain seated in the pipe without assistance from the driver. With some water in the cups and some EXTREMELY scientific shaking and leaning of the pipe, I found the perfect depth that will keep both upright. I welded a piece of 1 x .187 flat stock to the inside of the pipe at the bottom to make a place for the cup/can to sit on while also providing drainage for the inevitable drip/leak etc. Now what to do with this piece of pipe. Ah, I can mount it to the side of the seat frame. Ok, it must be spaced out so much to clear the side of the seat bottom. Ok, what to use. Well, heavy wall exhaust pipe seems a bit excessive, so I should probably go with something more reasonable. 5/8" grade 8 round bar--perfect!! Nice and light, not overkill, excellent. Now to mount it. Another chunk of the .187, 1" flat stock welded to the end of the round stock, drill two holes, add a couple grade 8 bolts to the seat frame mount it about an inch above the floor and BOOM!! There it is, one perfect, lightweight (haha), cupholder. 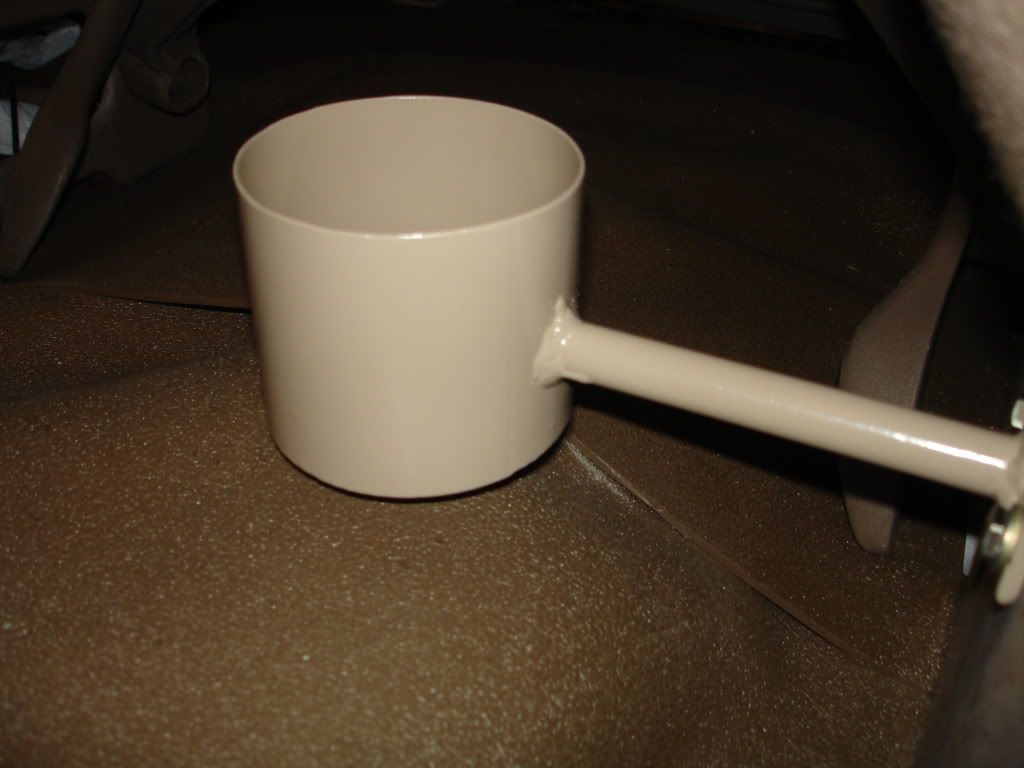
__________________
1972 K20 Suburban, 5.9L Cummins, Banks Power Pack, NV4500HD, NP205, H.A.D., D60/14FF ARB Link To Build: HERE. |
|
|
|
|
01-12-2010, 06:07 AM
|
#146 |
|
I had a V-8
Join Date: May 2003
Location: Phoenix AZ
Posts: 1,116
|
Re: The Story Of A Suburban (Lots Of Pics)
I accomplished a milestone feat this weekend. I got my D60 front axle assembly installed. It went pretty well. I did have to have my boy help maneuver the end that was on the furniture dolly. He probably weighs 50lbs soaking wet, but he did a good job doing what I told him to do and getting the heavy chunk of iron positioned where it needed to be.
As far as the 60 goes, it is really nothing too special. It was in very good shape when I got it (unbeknownst to me), but I tore it down and found all kinds of nice parts that did not need replacing. I replaced all of the seals in the diff and king pins, one lower king pin cap and the spindle seals and bushings, but other than that, all of the bearings, king pins and diff components were in good shape. I did replace all of the brake components though. I bought new GM hub/rotor assemblies, new wheel bearings and seals, new Bendix Fleet/MetLok brake pads, new GM caliper assemblies (yes brand new--ouch) and new DOT approved braided brake lines. The cool feature of this 60 is the tie rod assembly that was created for it. I am not a fan of the four foot long tie rod end that the 60's come with from GM. I like shorter ends with a long connecting tie "tube". GM never had this setup on a 60. They did it on a 10B in a 3/4T application, but never on a 1T. Well, I guess I am on my own again. I started checking diameters and found that the Dodge 1T 60's use a very short end that should be adaptable to my setup. They use a goofy 7/8-18 RH or LH thread. That left me a few options for a connecting tube. The lightest I wanted to go was 1.250" .250 wall, but then I called my steel supplier and they had 1.50" .375 wall 1026 DOM in stock. Well that made the decision real easy. I bought a chunk of it and a couple tie rod ends and headed over to Russ's 24hr Machine Shop. I brought the old tie rod as a guide for length and left the tube and ends for machining. It turned out great. The ends do not have a whole bunch of length to them, especially when you add a jam nut, but going off of the original tie rod spec, he faced the tube to a length that has only one thread showing on each side. Not so good if you have to toe it in a bunch, but I have it set a bit farther in than it was and still have the one thread. This keeps most of the threads on the tie rod end in the tube where they will do the most good. There are way more threads engaged than are required for maximum strength which is just the way I like it. New tie rod on left, original on right. New one weighs 6.3lbs more than the original: 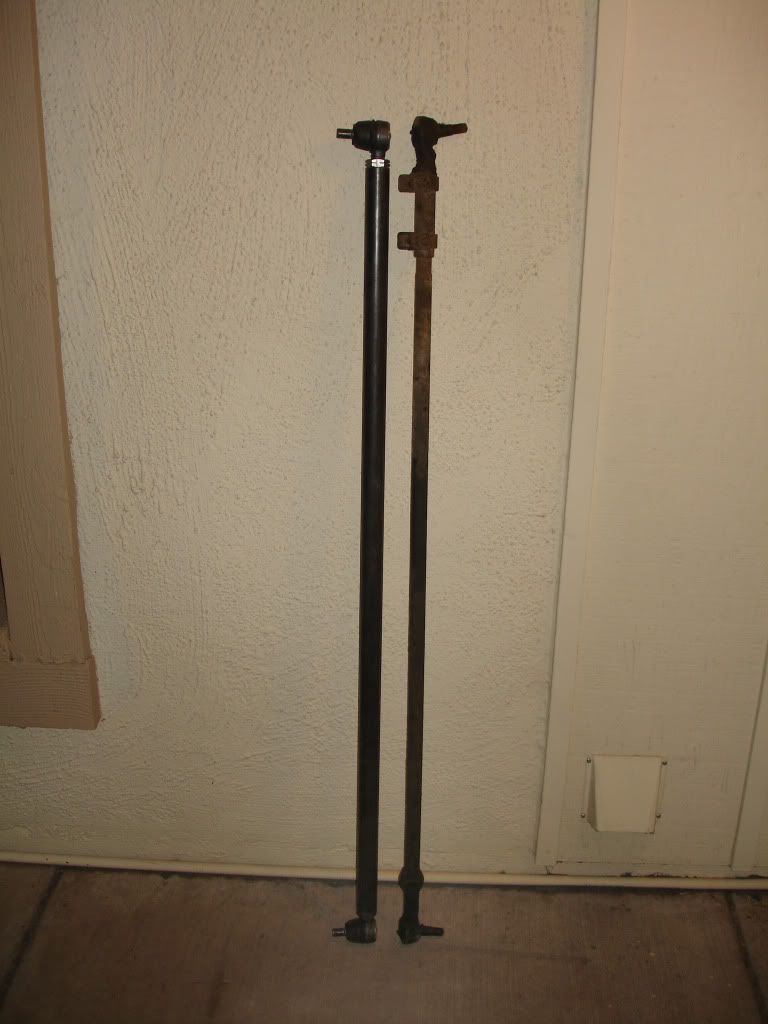 So, now that this big *****in' tie rod is made, there needs to be a way to attach a steering damper to it. I am not a fan of the u-bolt type mounting of the aftermarket stabillizer units, so Russ came up with a great idea to make a fully functional (and fully cool looking) mount. It started as a piece of 1.75" 1.20 wall tubing that I cut lengthwise with a cutoff wheel. Then I took the piece of .375 x 1 flat stock that Russ had machined a notch into and welded it above the cut. I took a piece of .250 x 1 flat stock and welded that below the cut making a big pinch clamp out of it. On the back side I used .250 x 1.250 flat stock to make two tabs to mount the steering stabilizer end in a double shear configuration. It worked out great. Minimal torque is required to keep the clamp from rotating/moving. This pic shows how the two pieces of flat stock fit together. The upper one has the milled slot in it. It is kind of hard to see, but the front of the piece has about a 1/8" lip on it that contacts the lower plate first then will pull the backside of the joint together if more torque is applied to the bolts: 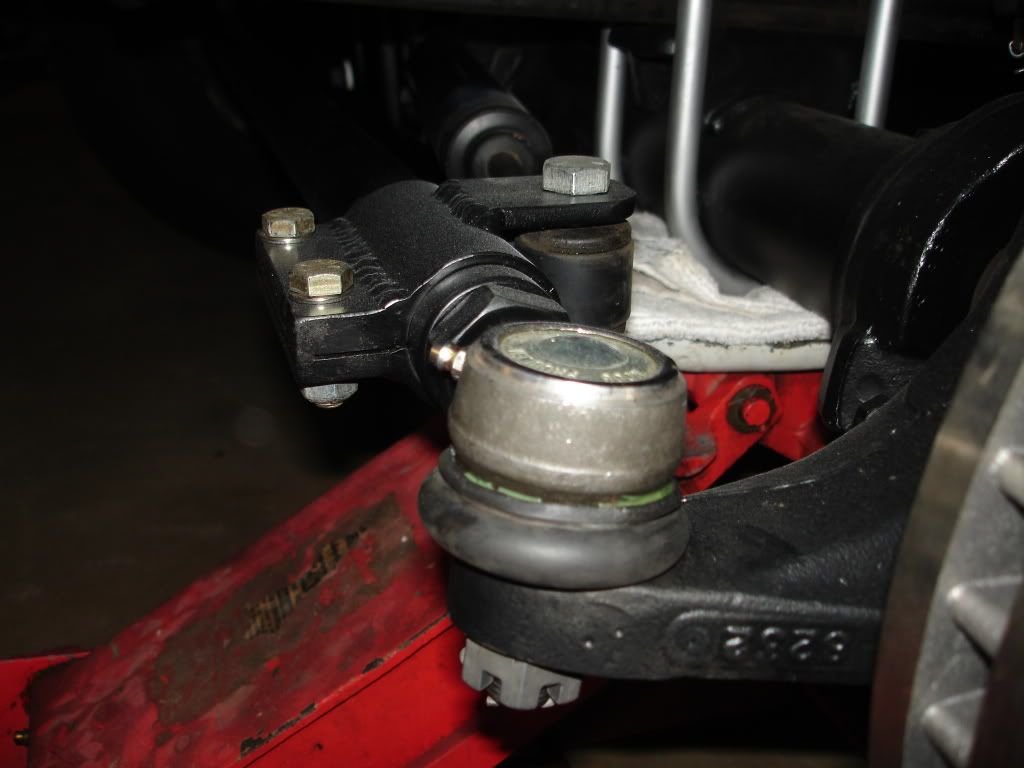 This pic shows the double shear mounting on the stabilizer end: (and the ever-present AZ dust) 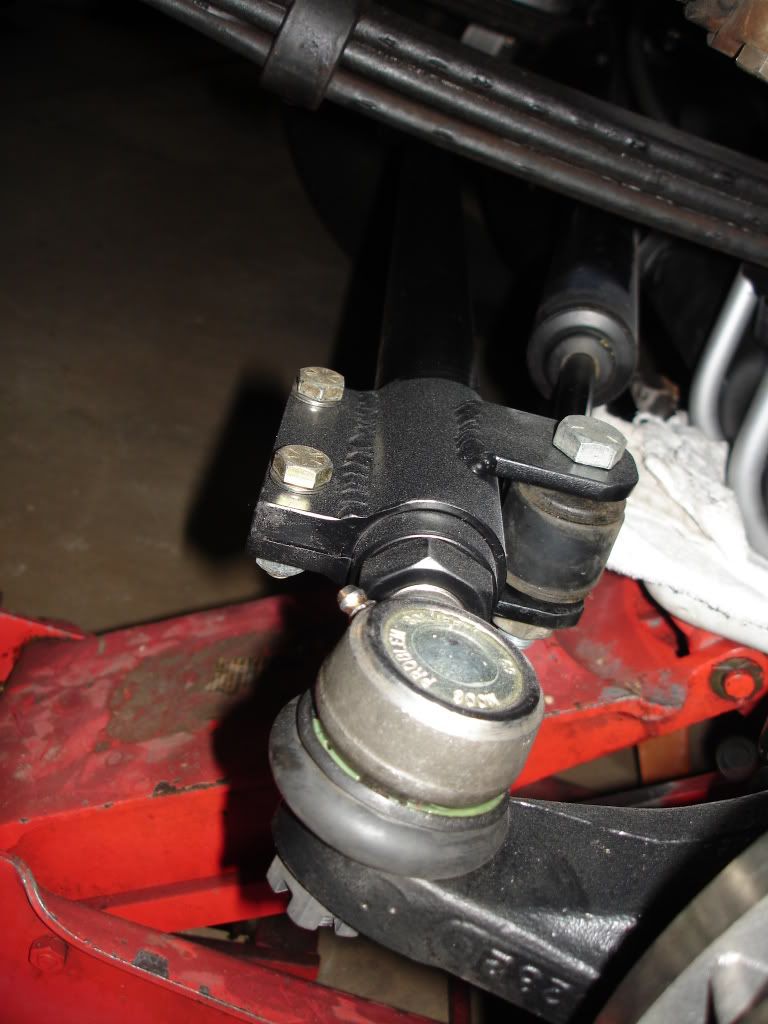 This pic shows the new hubs, rotors, calipers, and brake hoses: 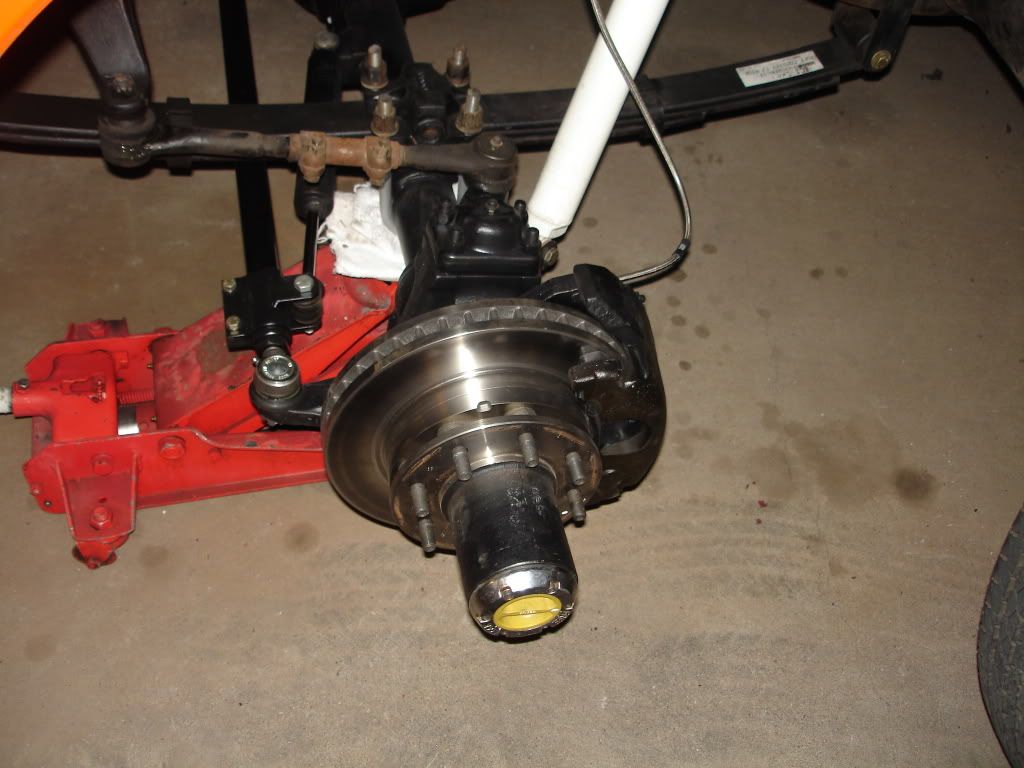 I finally have a set of Spicer hubs hanging out of my hub caps:  So all is good on the front end now. One problem (or benefit) with converting to a D60 front axle is that you gain one inch of height due to taller spring pad mounts and a larger tube diameter. My Sub already sits a fuzz lower than level in the back, so one inch is an issue for me. I picked up a set of Zero Rates awhile back and figured this would be the perfect application of them. I have a probelm though. I have a vibration at 60-65 that is pretty noticable and it continues through 82 when the motor lays down. I measured the angles of the transfer case and rear diff and came up with the pinion needing to come down 2.3 degrees to match the transfer case. I took the Zero Rates over to Russ and he cut them at 2.5 degrees to try to keep the pinion at a zero more often than it would at 2.3 degrees. I threw them in the back and went for a drive. Well, the vibration between 60-65 went from bad to worse--wow. But, the vibration at 65 and above is barely noticable if it exists at all. Sweet. I think the easy fix for this problem is not to drive between 60 and 65. For the time being, that is what I am going to do. So, all in all, I could not have been more pleased with the whole ordeal. There were a few small issues here and there, but nothing that was too difficult to deal with.
__________________
1972 K20 Suburban, 5.9L Cummins, Banks Power Pack, NV4500HD, NP205, H.A.D., D60/14FF ARB Link To Build: HERE. |
|
|
|
|
01-12-2010, 01:50 PM
|
#147 |
|
Registered User
Join Date: Feb 2008
Location: Albuquerque
Posts: 359
|
Re: The Story Of A Suburban (Lots Of Pics)
Thanks.
Now you got me thinkin about changing my 60 tie rod... Add one more project to the list. Mick |
|
|
|
|
01-23-2010, 03:22 AM
|
#148 |
|
Senior Member
Join Date: Aug 2002
Location: Valley Center KS
Posts: 3,525
|
Re: The Story Of A Suburban (Lots Of Pics)
Wow man, WOW! Just finished reading this whole build thread.
I've been talking to my wife about building a cummins powered suburban after I finish my 68, and tonight before we went out to eat I told her I was reading about my "burb. Makes me want one so bad now. I think I'd do a few things slightly different (just personal taste) but you've defiantly done a top quality build. Also reading this, I kinda see what I'm in for and also makes me consider the Duramax a little more (assuming fitment is easier) the other bonus is the 6 speed alison tranny that I'd like to have. Again awesome build! |
|
|
|
|
01-24-2010, 01:37 AM
|
#149 |
|
high-Tech Red Neck
Join Date: Feb 2008
Location: Livingston, MT/On my boat WA/BC/AK
Posts: 2,294
|
Re: The Story Of A Suburban (Lots Of Pics)
I am impressed with your setup, that tie rod is nice and beefy, just curious though why didnt you go for a high steer setup?
__________________
"He used to be a pretty nice feller, now he's a welder!" |
|
|
|
|
01-25-2010, 02:10 AM
|
#150 | ||
|
I had a V-8
Join Date: May 2003
Location: Phoenix AZ
Posts: 1,116
|
Re: The Story Of A Suburban (Lots Of Pics)
Quote:
Quote:
__________________
1972 K20 Suburban, 5.9L Cummins, Banks Power Pack, NV4500HD, NP205, H.A.D., D60/14FF ARB Link To Build: HERE. |
||
|
|
|
 |
| Bookmarks |
|
|


 Linear Mode

