
|
 11-09-2012, 01:12 PM
|
#126 |
|
Registered User
Join Date: Oct 2009
Location: canton ga
Posts: 12,728
|
Re: '55 International Metal/Body/Paint Work
One of your posts above you say you are not very good at painting but I completely Disagree with you on that as it looks great to me .I cant wait to see this beauty finished ,what craftsmanship you have put into this truck .I wish I had your talents .
|

|

|
|
11-09-2012, 01:45 PM
|
#127 | |
|
Registered User
Join Date: May 2011
Location: Anderson SC
Posts: 3,869
|
Re: '55 International Metal/Body/Paint Work
Quote:
Posted via Mobile Device
__________________
Project Goldilocks '66 C10 Short Fleet BBW Build '65 C10 Highly Detailed Stock Restoration Thread '78 Camaro Targa Roof Build '55 International Metal/Body/Paint Work '66 F100 Full Rotisserie Restoration '40 Packard 120 Convertible Coupe Restoration How To Restore and Detail an Original Gauge Cluster How To Detail Sand Body Panels, Edges, Corners, Etc |
|
|
|
|
|
11-09-2012, 05:27 PM
|
#128 |
|
Registered User
Join Date: Apr 2012
Location: Beaver, Pa.
Posts: 197
|
Re: '55 International Metal/Body/Paint Work
Great progress, really enjoy reading about your in depth tips. I did collision at one point, but never got into this type of detail. Thanks for the lessons. Fantastic!
|
|
|
|
|
11-10-2012, 12:43 PM
|
#129 |
|
Registered User
 Join Date: Mar 2005
Location: apple valley, ca
Posts: 2,670
|
Re: '55 International Metal/Body/Paint Work
John, I'm speechless. It looks amazing!!
__________________
Check out my latest endeavor: https://roundsixpod.com My build threads: '55 Chevy: http://67-72chevytrucks.com/vboard/s...d.php?t=247512 '64 C-20: http://67-72chevytrucks.com/vboard/s...d.php?t=446527 |
|
|
|
|
11-10-2012, 11:31 PM
|
#130 |
|
Tot Roddin'
Join Date: Apr 2005
Location: Mid-MO
Posts: 24,461
|
Re: '55 International Metal/Body/Paint Work
Amazing work and attention to detail.
__________________
-Nate  1969 CST SWB - Project Blank Slate (4.5/6" ECE Static Drop, 6-lug disc brake upgrade (manual), Billet Specialties Vintec 20x8.5 255/40 (F) 20x10 295/40 (R), 250 I-6) 1960 AMF Skylark - Tot Roddin' (Lowered with custom frame; soon to include custom push bar and interior) 2008 Silverado CrewCab 1LT (5.3L, 3:73, 4x4, LT1, Z-71, Towing Package) |
|
|
|
|
11-23-2012, 08:42 PM
|
#131 |
|
Registered User
Join Date: Aug 2011
Location: N.E. OH
Posts: 214
|
Re: '55 International Metal/Body/Paint Work
Wow! You've done a beautiful job on this truck. Thanks for taking the time to explain all your steps and capture them with pictures.
__________________
Success is not final, failure is not fatal: it is the courage to continue that counts. Winston Churchill DD 2000 Chevy Suburban 4x4/5.3 Vortec/4L60E/4:10s, 18" Escalade rims, Electric fans Project Dooley One-Ton 4x4 on 38.5s Corn-binder build |
|
|
|
|
11-30-2012, 12:26 PM
|
#132 | ||||
|
Registered User
Join Date: May 2011
Location: Anderson SC
Posts: 3,869
|
Re: '55 International Metal/Body/Paint Work
Quote:
Quote:
Quote:
Quote:
To finish the cab I undercoated it and stuck the dash back in before the owner brought the frame over. We mounted the cab and he hauled it back to a shop at his friends place. 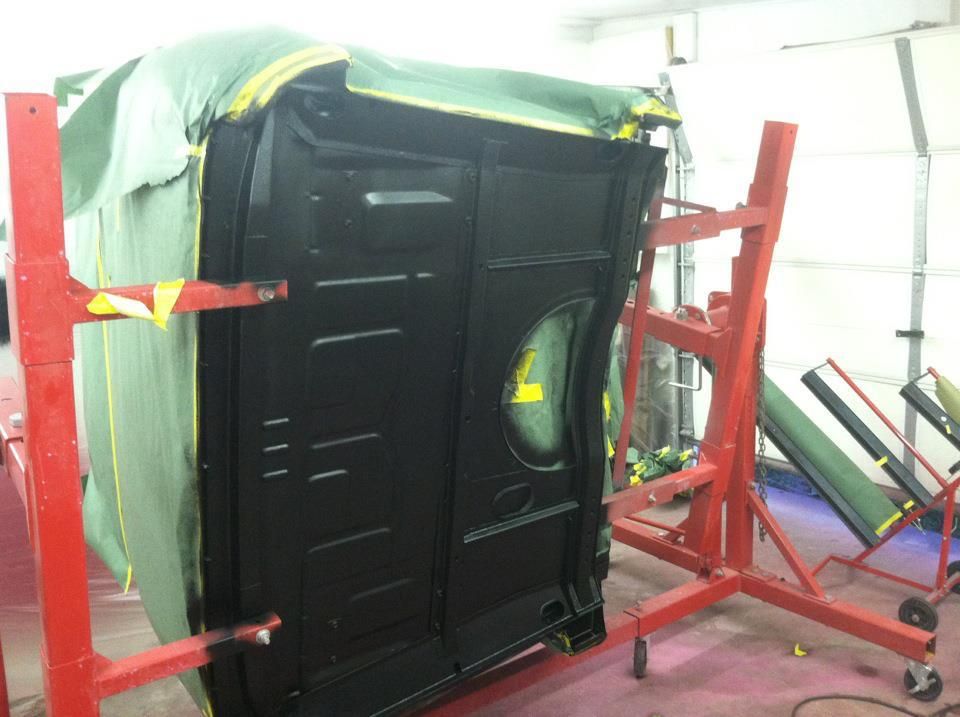 I masked the top of the dash and shot gloss clear over it, then wetsanded and buffed it before installing the dash panel with new stainless screws. I also installed the glove box and radio delete plate. The delete plate was originally held in with spring loaded clips and I was able to find new clips and paint them to match. 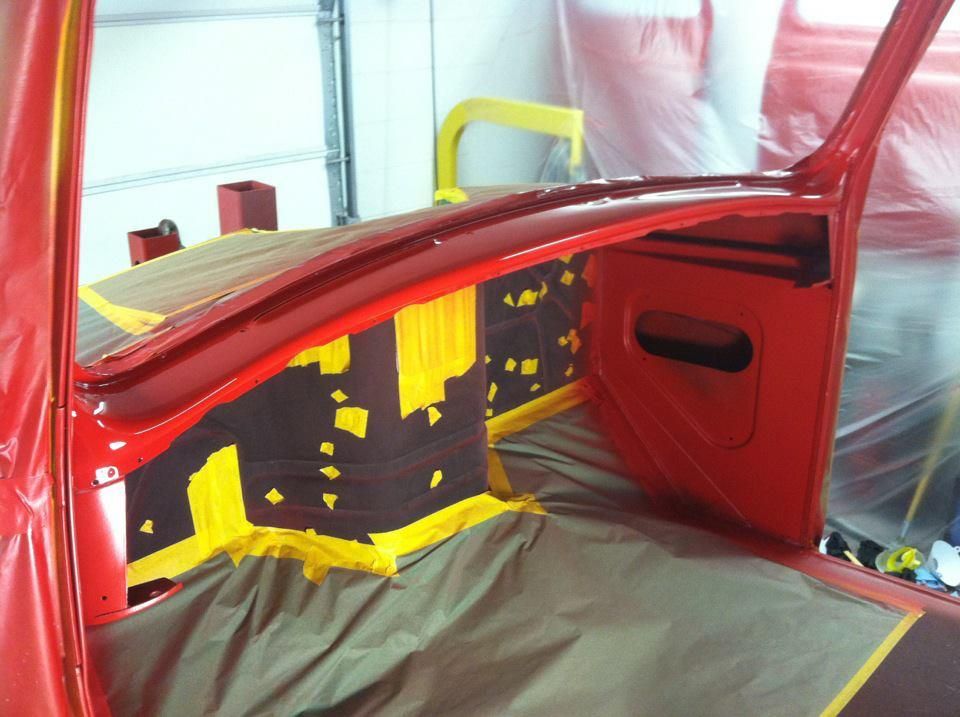 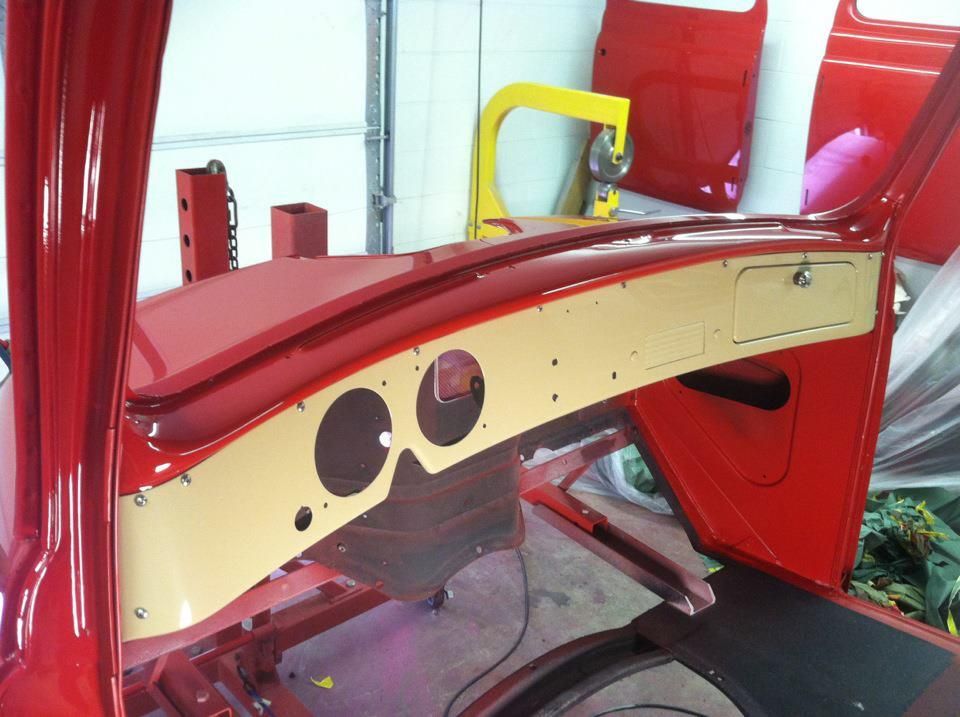 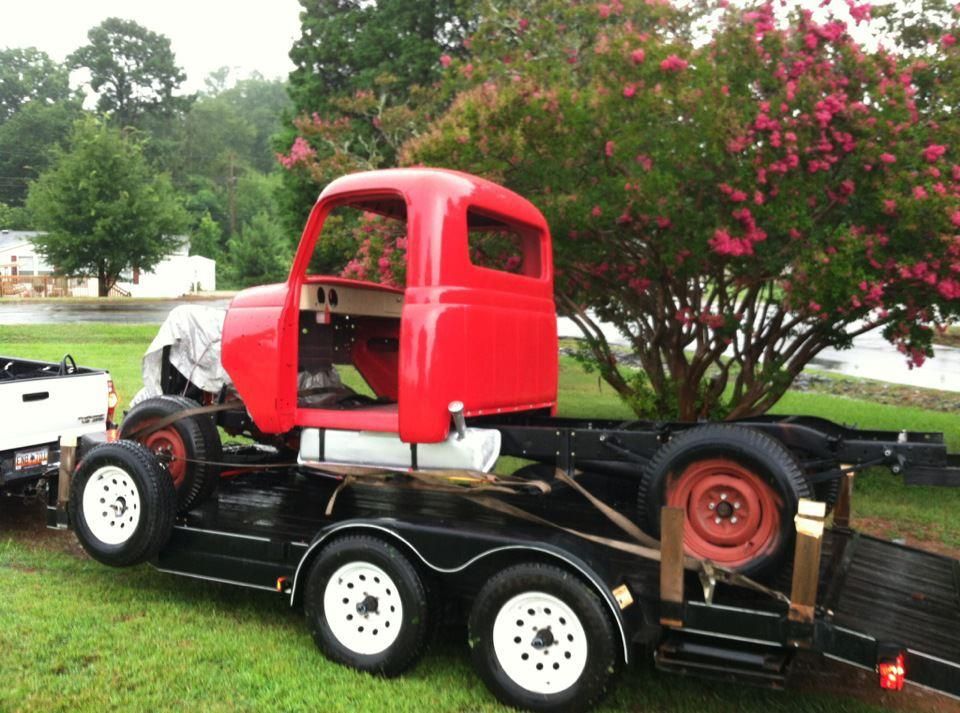 With the doors painted I bought new stainless hardware to bolt up the door components. 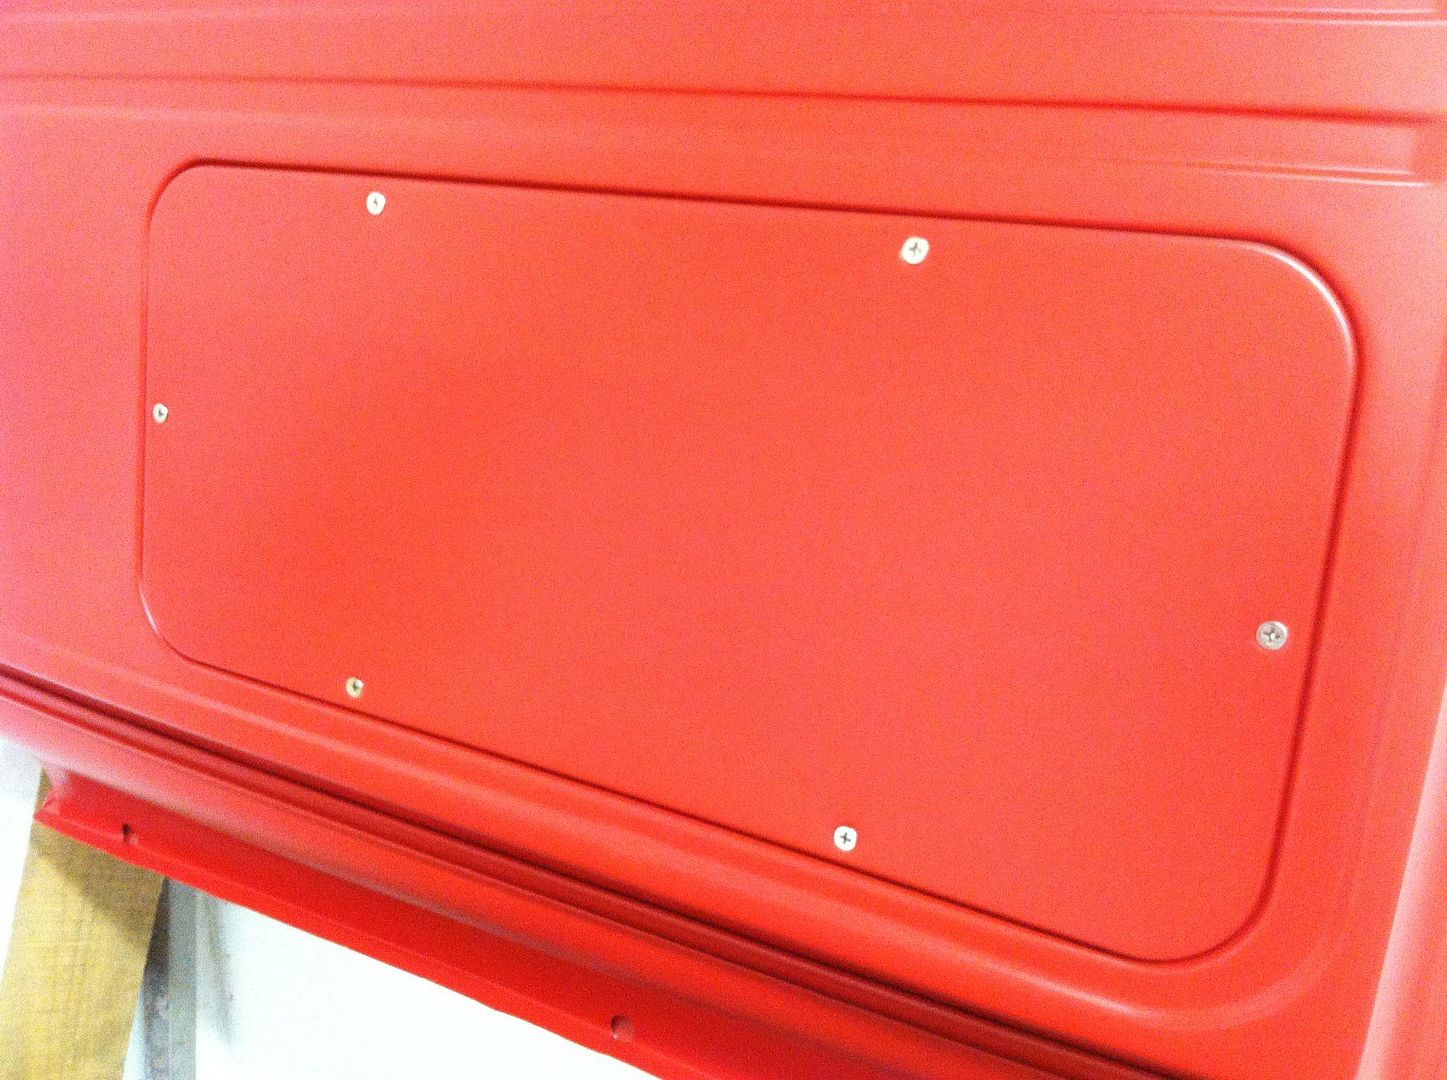 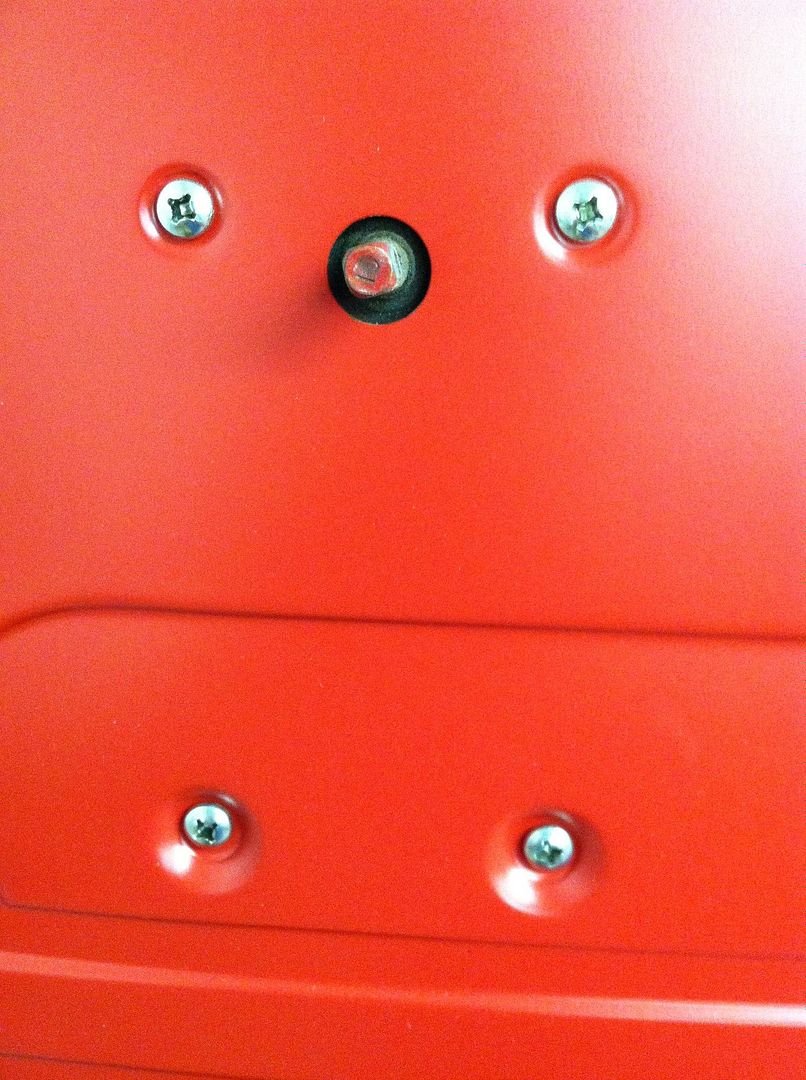 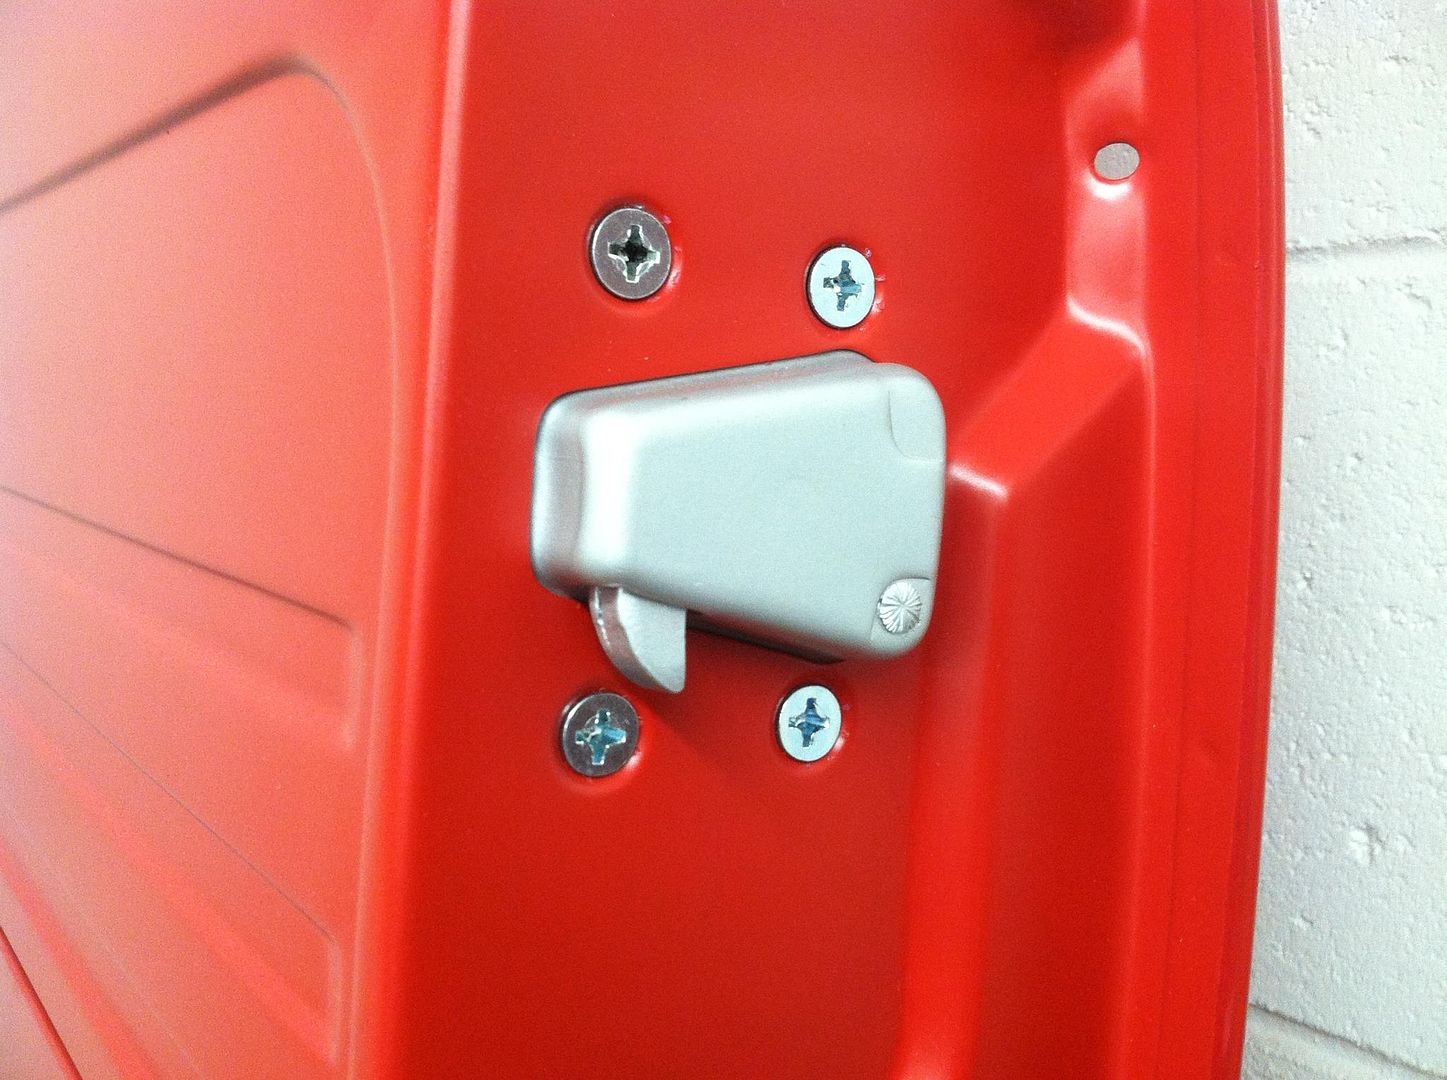 Sound deadener was applied to the inside of the door skin and the bolt on panel. 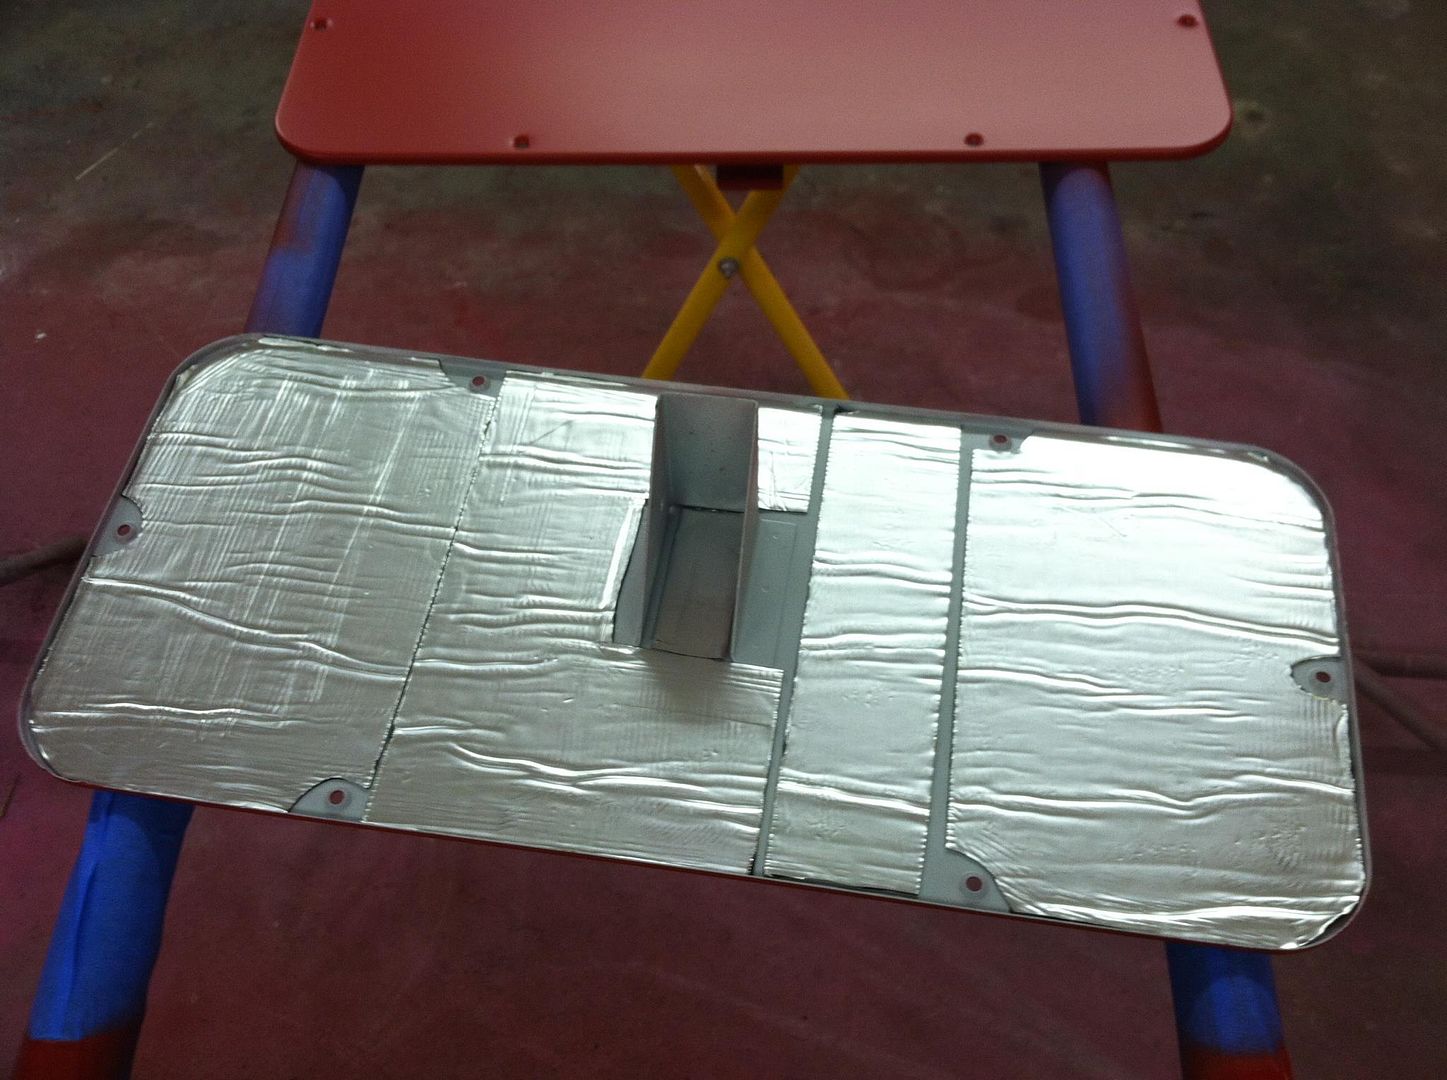
__________________
Project Goldilocks '66 C10 Short Fleet BBW Build '65 C10 Highly Detailed Stock Restoration Thread '78 Camaro Targa Roof Build '55 International Metal/Body/Paint Work '66 F100 Full Rotisserie Restoration '40 Packard 120 Convertible Coupe Restoration How To Restore and Detail an Original Gauge Cluster How To Detail Sand Body Panels, Edges, Corners, Etc |
||||
|
|
|
|
11-30-2012, 12:37 PM
|
#133 |
|
Registered User
Join Date: May 2011
Location: Anderson SC
Posts: 3,869
|
Re: '55 International Metal/Body/Paint Work
Before sending the cab home I mixed up a batch of cavity wax and soaked the cab corners and front kick panel pockets a couple times to seal the metal and seams from the inside out.
I used a gallon of mineral spirits, two pounds of paraffin wax, and a quart of thin sewing machine oil. I grated the wax so it would dissolve faster. 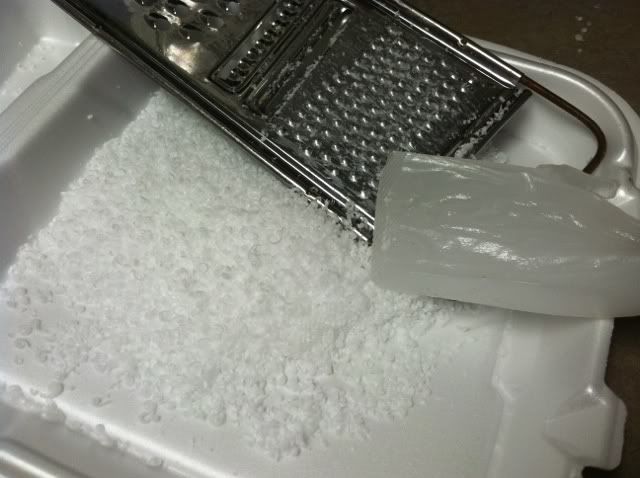 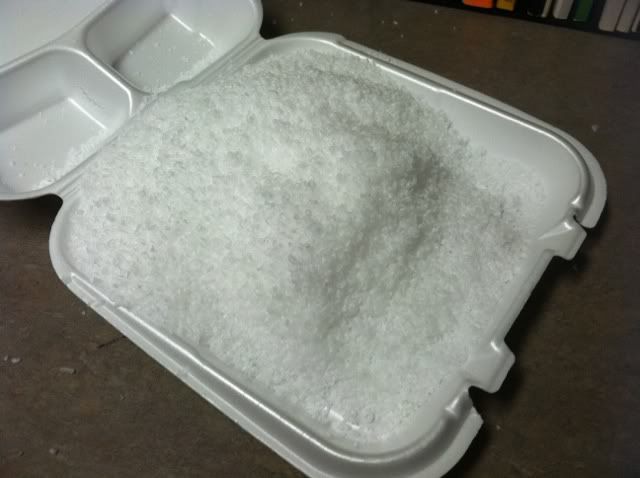 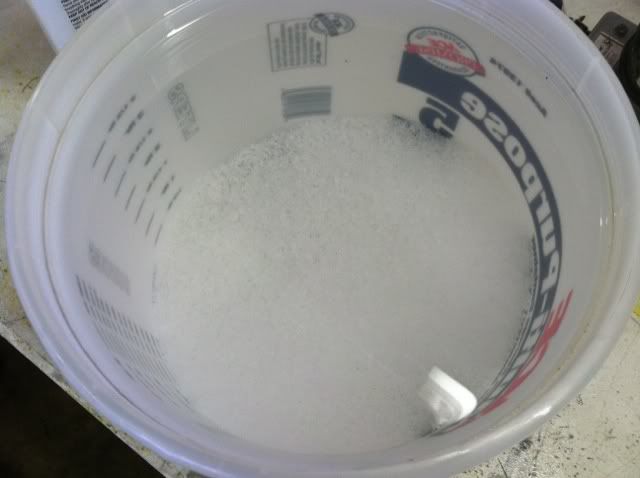 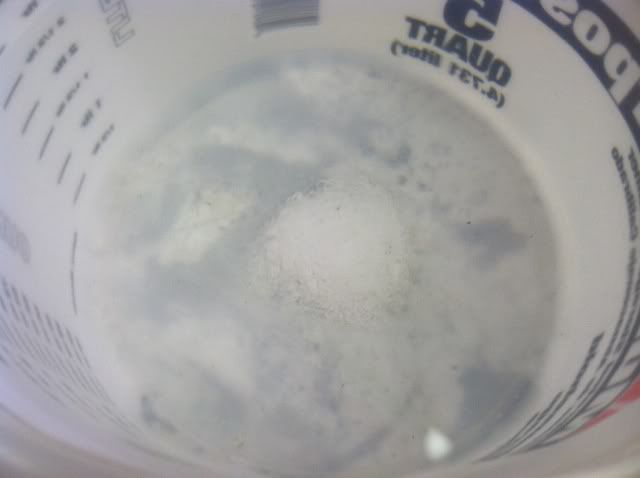 I tested this stuff on a piece of bare metal and it held up pretty good out in the weather so it should do great in a cavity. 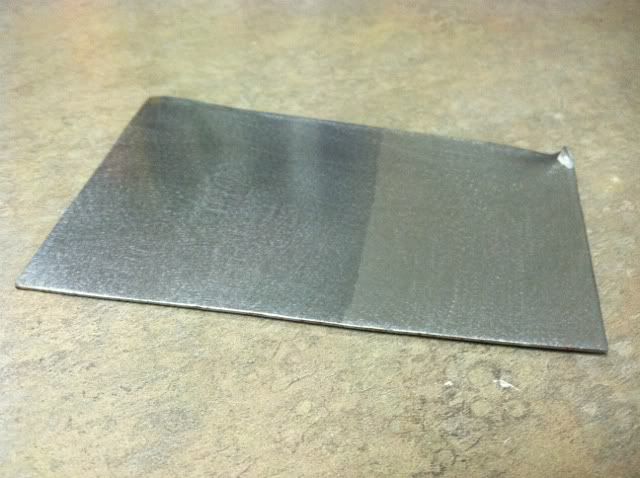 Water beading up on the treated side. 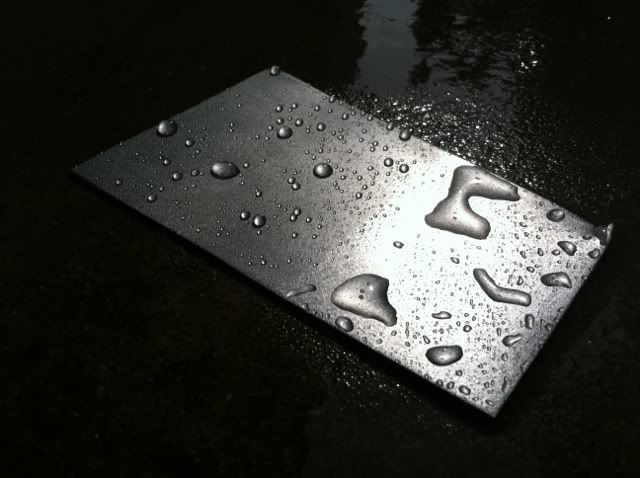 To apply it I used a cheap $10 buck weed sprayer which had a decent wide/fan pattern, and soaked each area a couple times until I felt like I had completely coated the inner panels. I kept a bucket under the drains since it was running out the bottom. 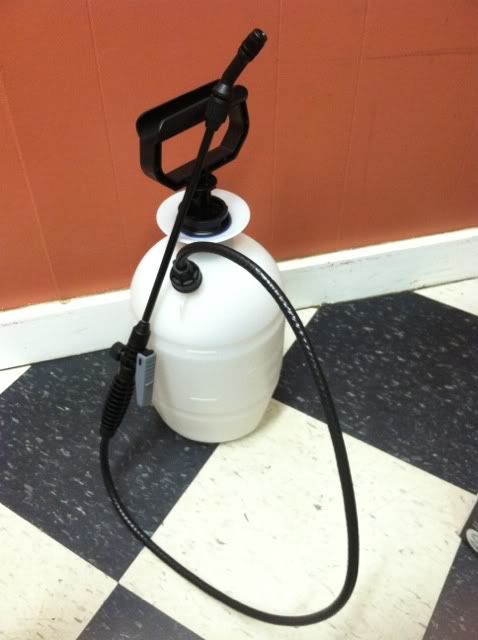
__________________
Project Goldilocks '66 C10 Short Fleet BBW Build '65 C10 Highly Detailed Stock Restoration Thread '78 Camaro Targa Roof Build '55 International Metal/Body/Paint Work '66 F100 Full Rotisserie Restoration '40 Packard 120 Convertible Coupe Restoration How To Restore and Detail an Original Gauge Cluster How To Detail Sand Body Panels, Edges, Corners, Etc |
|
|
|
|
01-18-2013, 08:23 PM
|
#134 |
|
Registered User
Join Date: May 2011
Location: Anderson SC
Posts: 3,869
|
Re: '55 International Metal/Body/Paint Work
Didn't realize it had been so long since I updated this thread. Photobucket it uploading (well, supposed to be...) about 175 pictures of metalwork on the bed. I'll start posting them once they're up.
Here's a few straight from facebook until photobucket finishes the import.       
__________________
Project Goldilocks '66 C10 Short Fleet BBW Build '65 C10 Highly Detailed Stock Restoration Thread '78 Camaro Targa Roof Build '55 International Metal/Body/Paint Work '66 F100 Full Rotisserie Restoration '40 Packard 120 Convertible Coupe Restoration How To Restore and Detail an Original Gauge Cluster How To Detail Sand Body Panels, Edges, Corners, Etc |
|
|
|
|
01-18-2013, 09:53 PM
|
#135 |
|
Registered User
Join Date: May 2007
Location: Deale Md
Posts: 4,663
|
Re: '55 International Metal/Body/Paint Work
oooooooh that's ruff
__________________
James 63 GMC V6 4speed carryall 65 chevy swb bbw V8 auto 68 K20 327/4 speed, buddy buckets 2002 GMC CC Dually Duramax 64 GMC lwb 3/4 V6 4speed SOLD 66 GMC swb bbw buddy buckets SOLD IG duallyjams The only thing that stays the same is constant change! |
|
|
|
|
01-18-2013, 10:22 PM
|
#136 |
|
Registered User
Join Date: Oct 2009
Location: canton ga
Posts: 12,728
|
Re: '55 International Metal/Body/Paint Work
Cant wait to see more impressive improvements .
|
|
|
|
|
01-18-2013, 11:25 PM
|
#137 |
|
Hittin E-Z Street on Mud Tires
Join Date: Nov 2004
Location: Greenville, SC
Posts: 23,090
|
Re: '55 International Metal/Body/Paint Work
I NEVER noticed your location before... your right down the road from me!
The cab and clip came out incredible!
__________________
Jesse James 1967 C10 SWB Stepside: 350/700R4/3.73 1965 Ford Mustang: 289/T5-5spd/3.25 Trac-Loc 1968 Pontiac Firebird: Project Fire Chicken! 2015 Silverado Double Cab 5.3L Z71 2001 Jeep Wrangler Sport 4.0L 5spd 2020 Chevrolet Equinox Premium 2.0L Turbo 2011 Mustang V6 ~ Wife's ride  American Born, Country by the Grace of God  1967 CST Shop Truck Rebuild! My 1967 C-10 Build Thread My Vintage Air A/C Install Project "On a Dime" Trying my hand at Home Renovation! 1965 Mustang Modifications! |
|
|
|
|
01-19-2013, 01:57 PM
|
#138 |
|
Registered User
Join Date: Apr 2012
Location: Beaver, Pa.
Posts: 197
|
Re: '55 International Metal/Body/Paint Work
Glad to see you're back at it, looks like that bed led a hard life. Any idea of the history of the truck?
|
|
|
|
|
01-19-2013, 04:02 PM
|
#139 | ||||
|
Registered User
Join Date: May 2011
Location: Anderson SC
Posts: 3,869
|
Re: '55 International Metal/Body/Paint Work
Quote:
 Quote:
Quote:
__________________
Project Goldilocks '66 C10 Short Fleet BBW Build '65 C10 Highly Detailed Stock Restoration Thread '78 Camaro Targa Roof Build '55 International Metal/Body/Paint Work '66 F100 Full Rotisserie Restoration '40 Packard 120 Convertible Coupe Restoration How To Restore and Detail an Original Gauge Cluster How To Detail Sand Body Panels, Edges, Corners, Etc |
||||
|
|
|
|
01-19-2013, 04:08 PM
|
#140 |
|
Registered User
Join Date: May 2011
Location: Anderson SC
Posts: 3,869
|
Re: '55 International Metal/Body/Paint Work
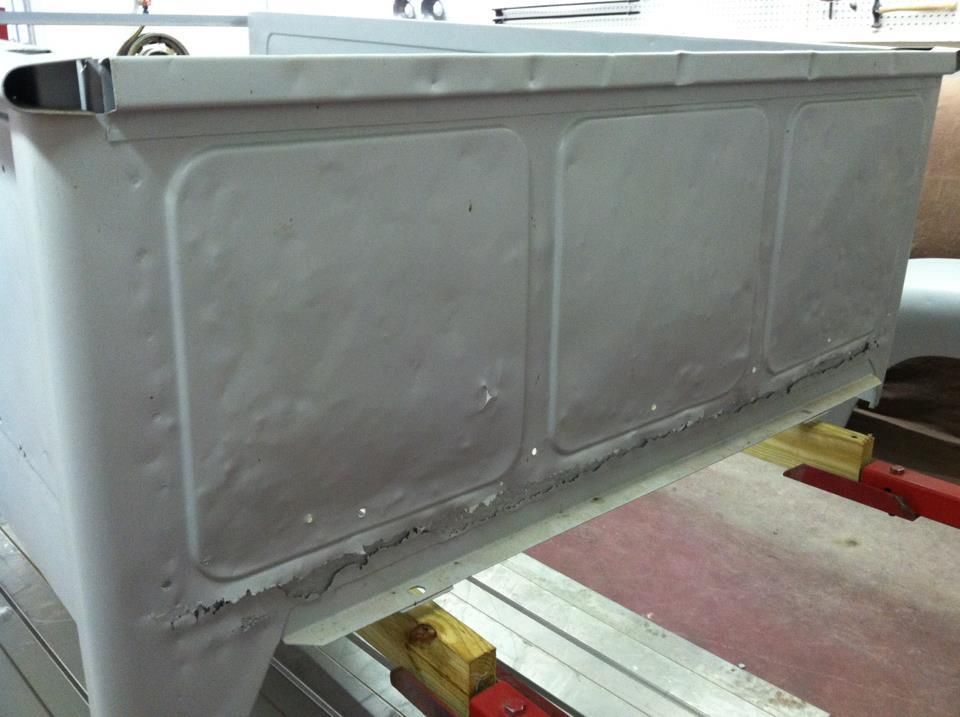
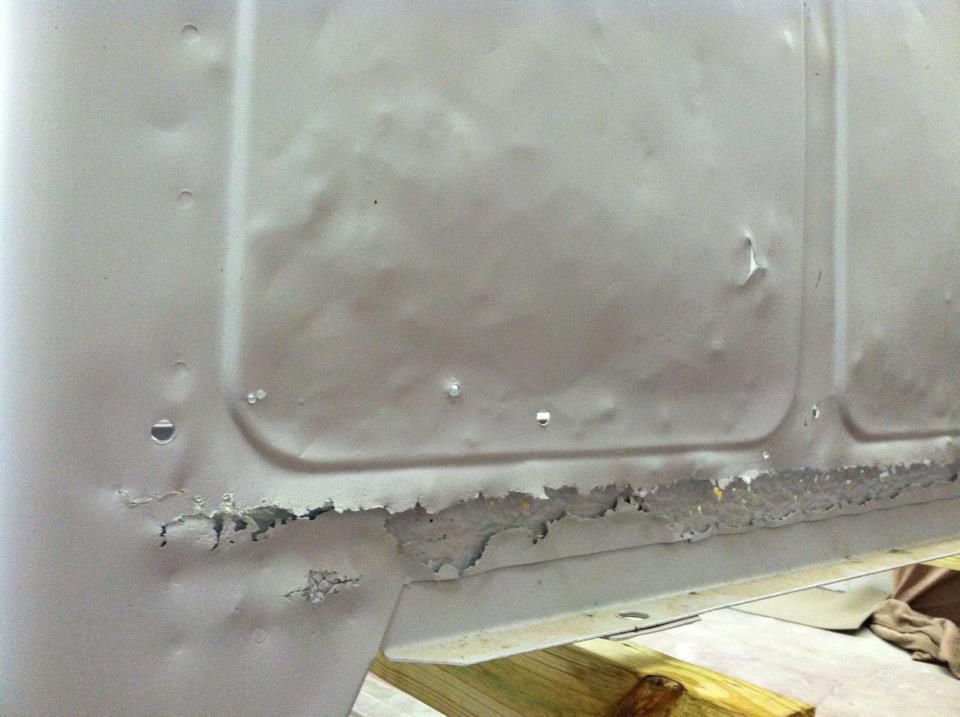
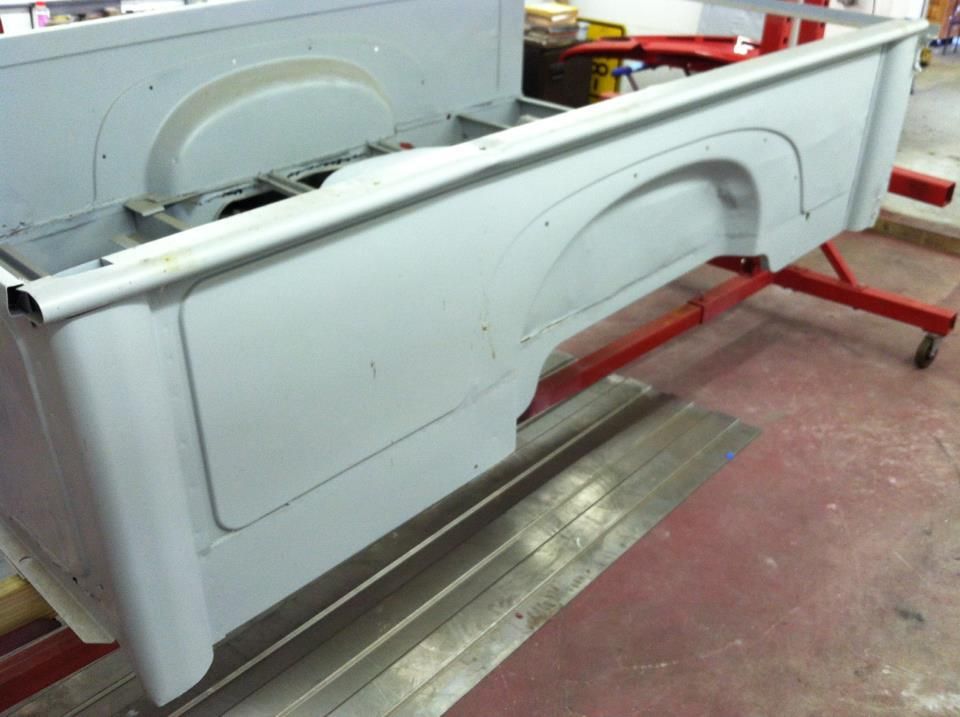
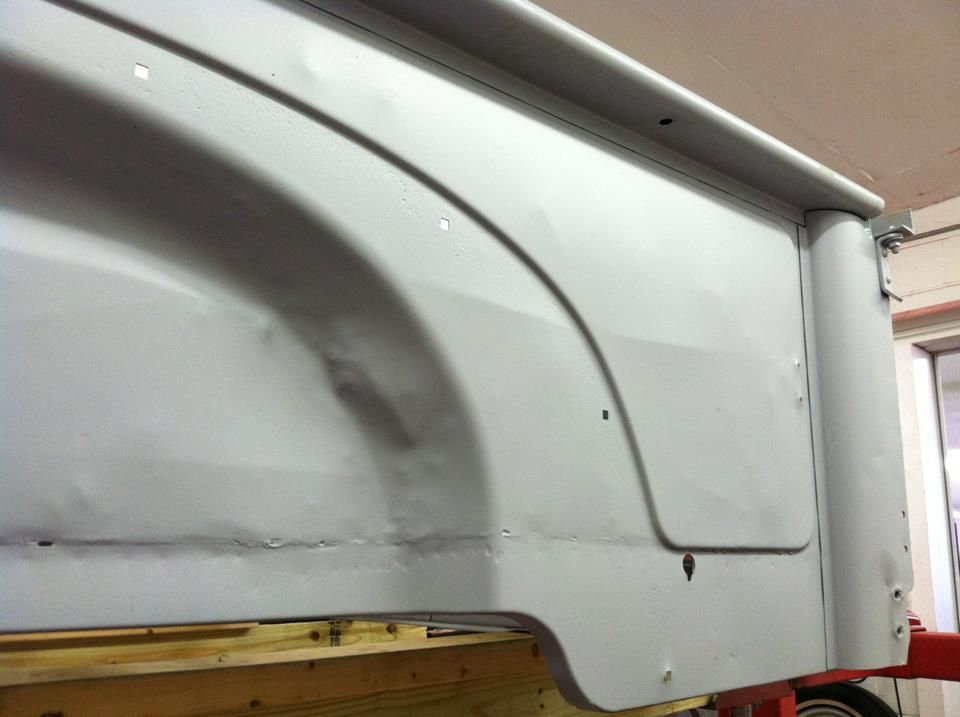
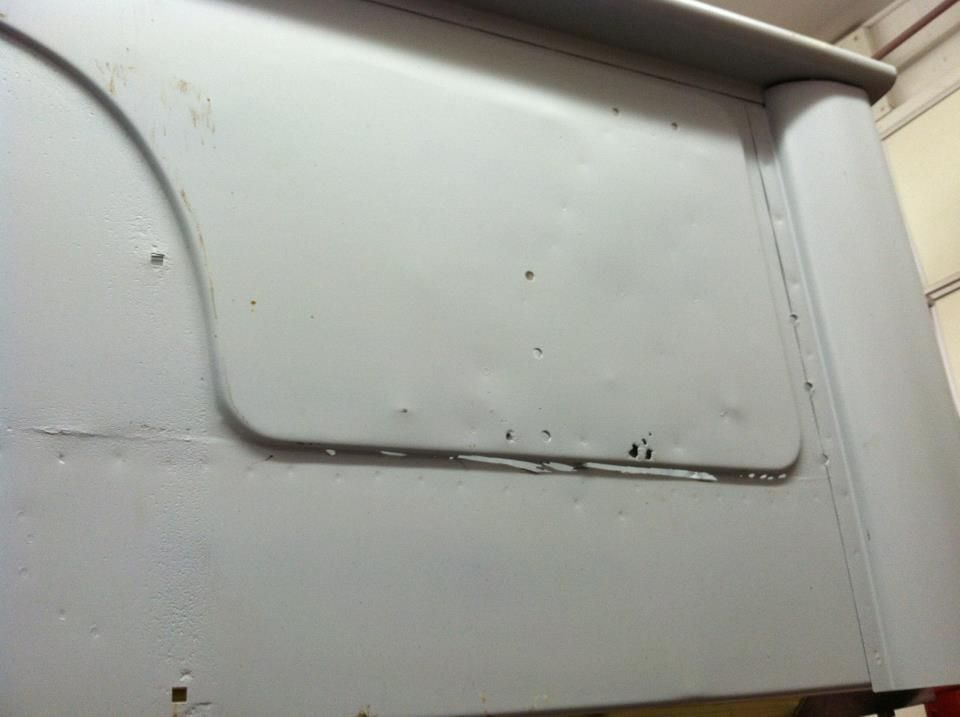
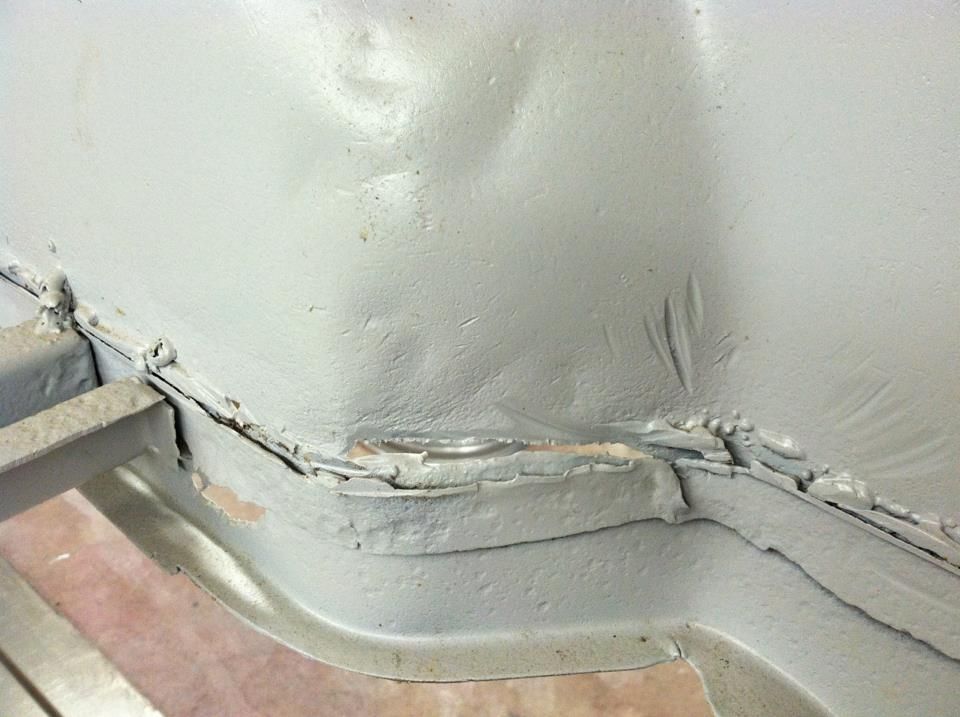
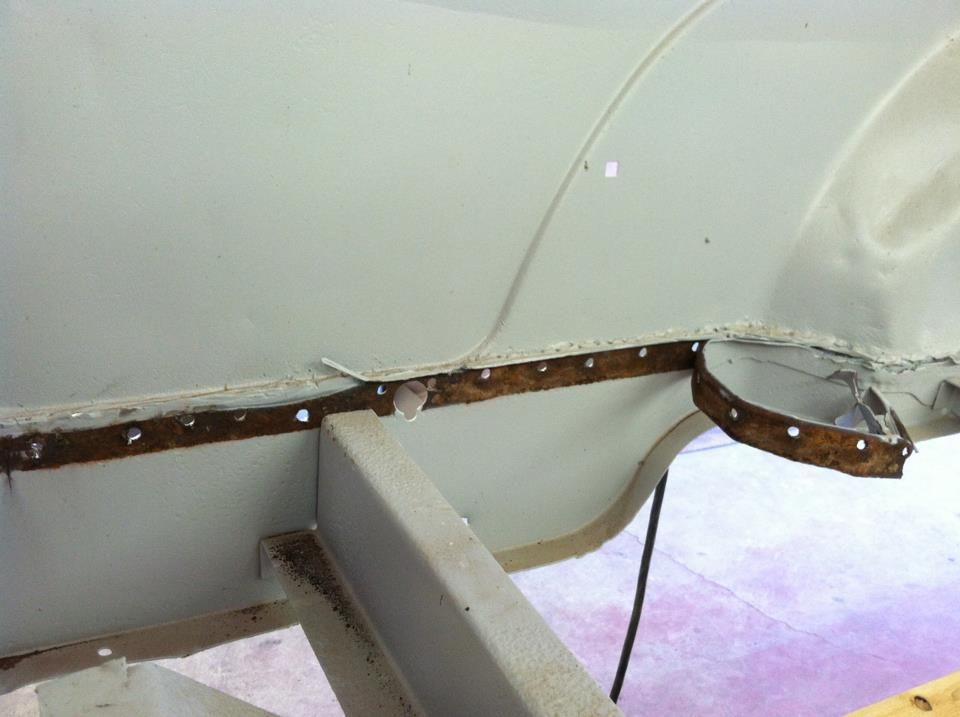
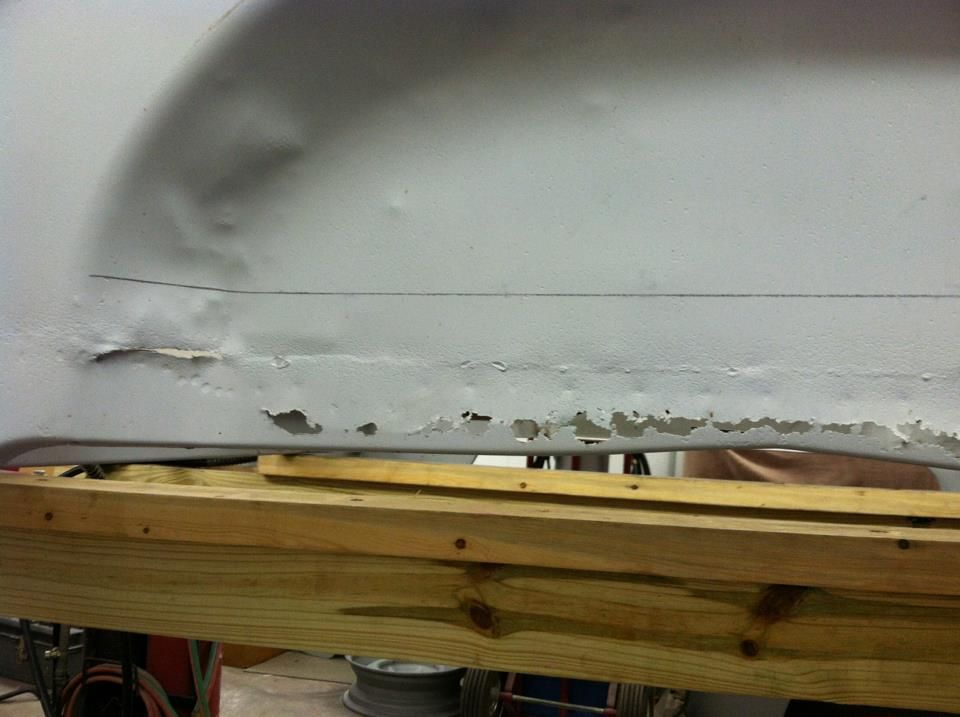
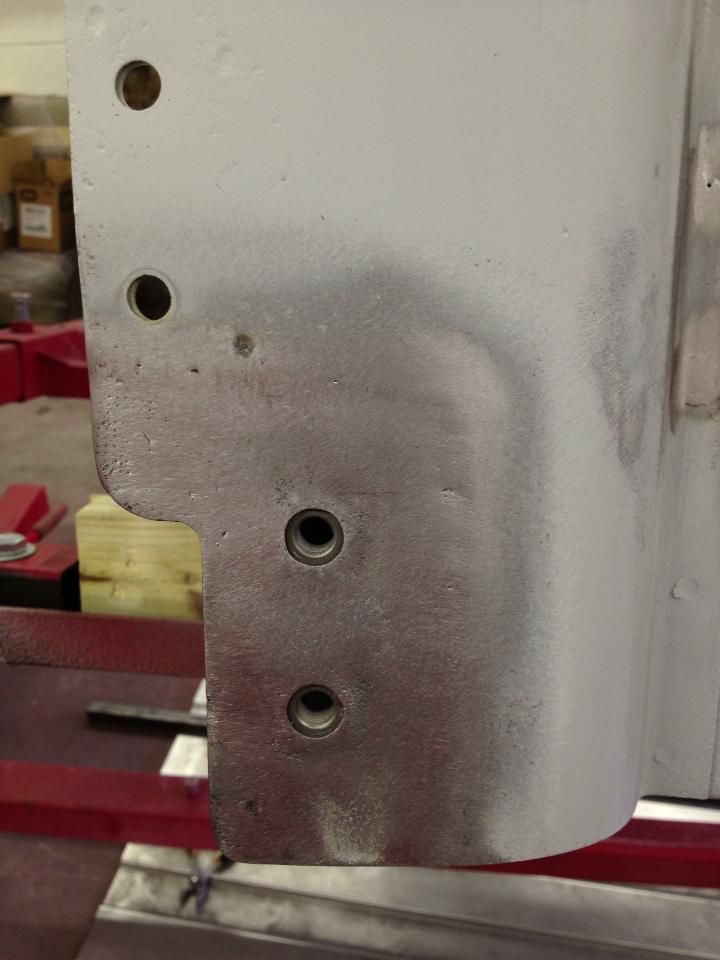
So here's how it looked when it was delivered to me. It originally had a steel floor that was spot welded in. They had welded another floor on top of that one. When they started the restoration they cut the old floors out, leaving the flange from the original floor and the welds from the new floor. They also cut through the bed sides, leaving huge gashes. Rust had eaten through a few spots around the flange area. You can also see just how much the fenderwells were bulged out above the bed floor flange- it's had a very hard life!
__________________
Project Goldilocks '66 C10 Short Fleet BBW Build '65 C10 Highly Detailed Stock Restoration Thread '78 Camaro Targa Roof Build '55 International Metal/Body/Paint Work '66 F100 Full Rotisserie Restoration '40 Packard 120 Convertible Coupe Restoration How To Restore and Detail an Original Gauge Cluster How To Detail Sand Body Panels, Edges, Corners, Etc |
|
|
|
|
01-19-2013, 04:16 PM
|
#141 |
|
Registered User
Join Date: May 2011
Location: Anderson SC
Posts: 3,869
|
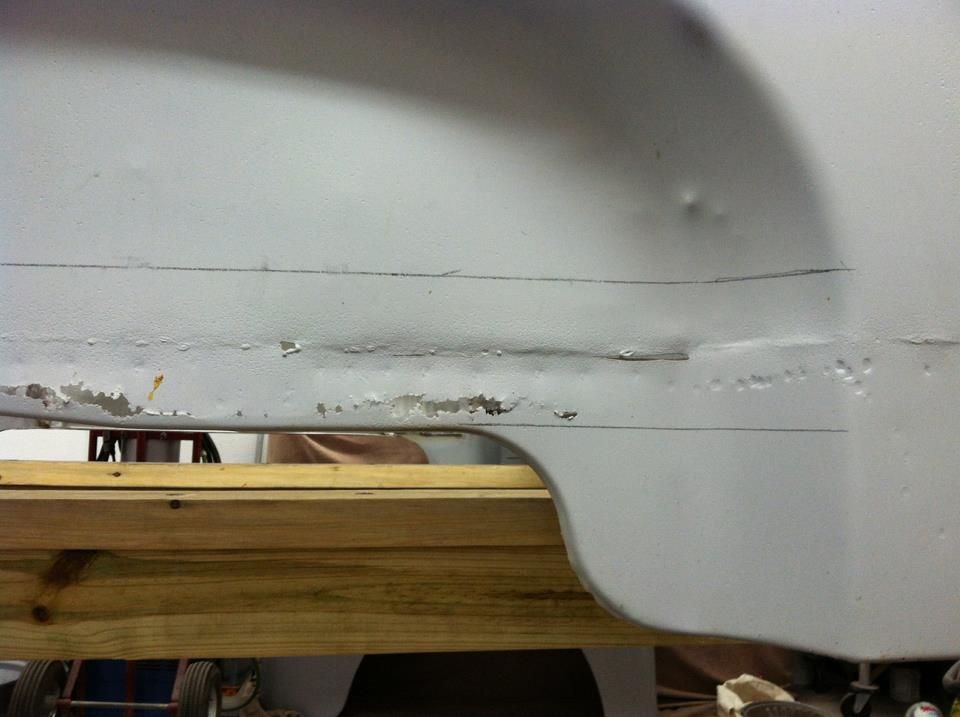
Re: '55 International Metal/Body/Paint Work
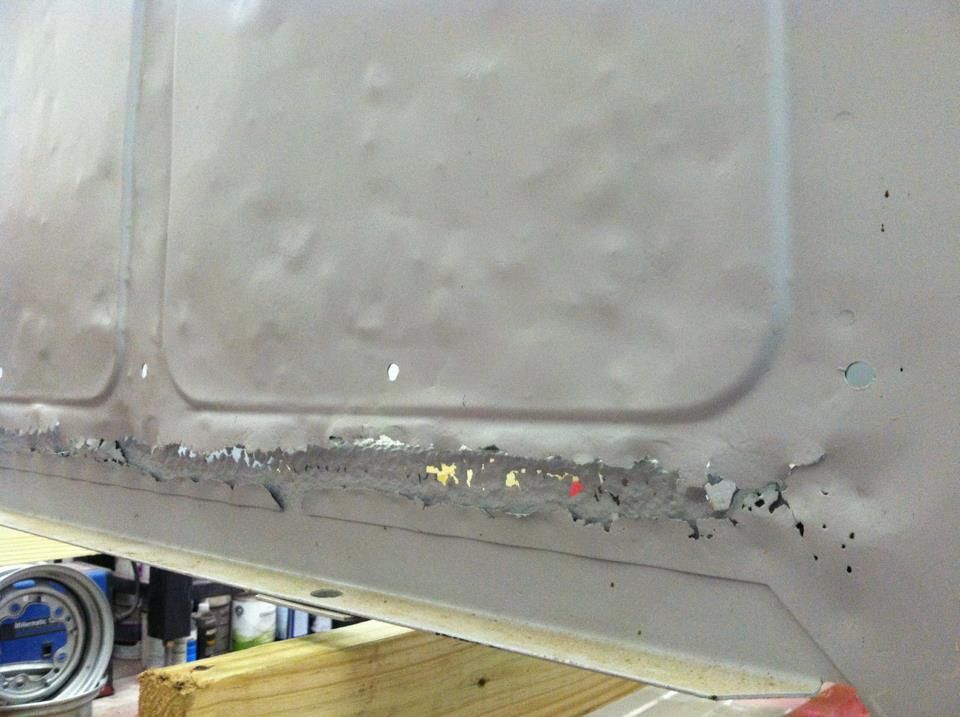
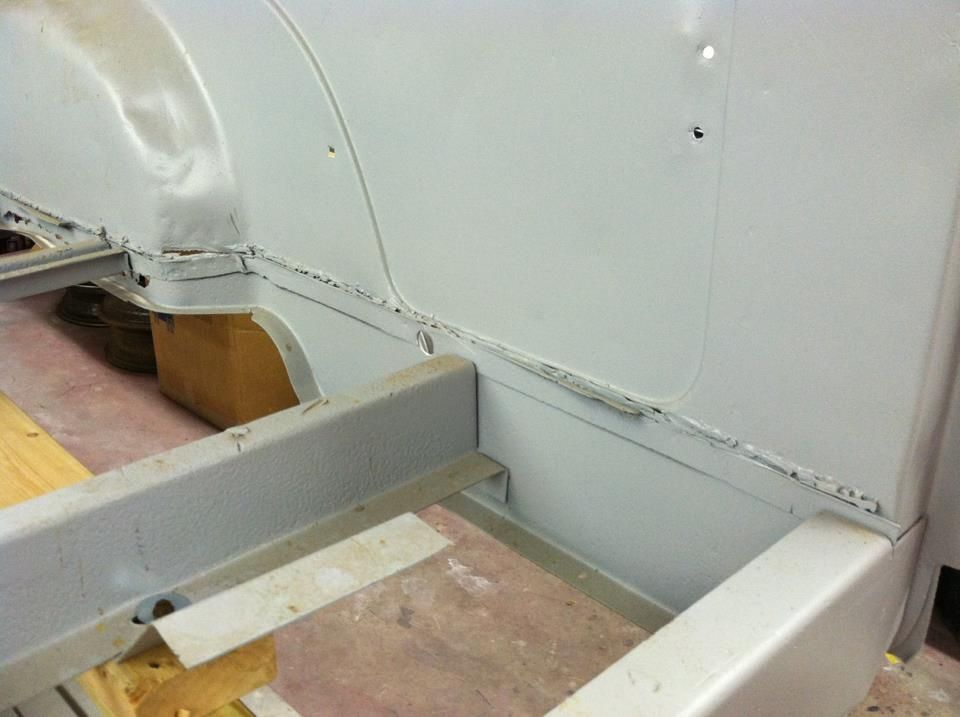
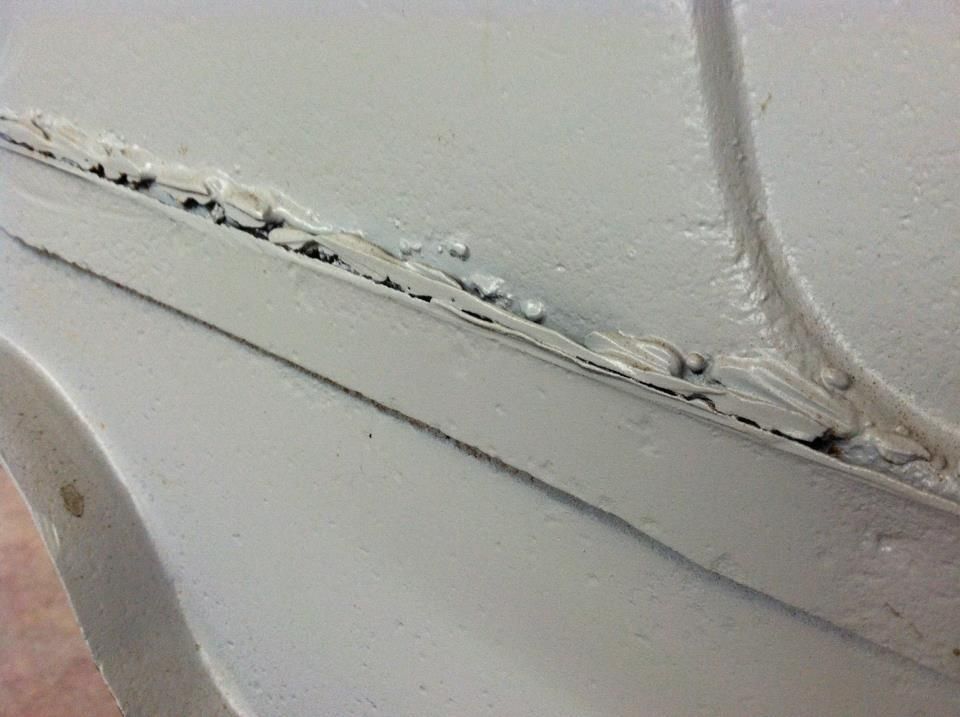
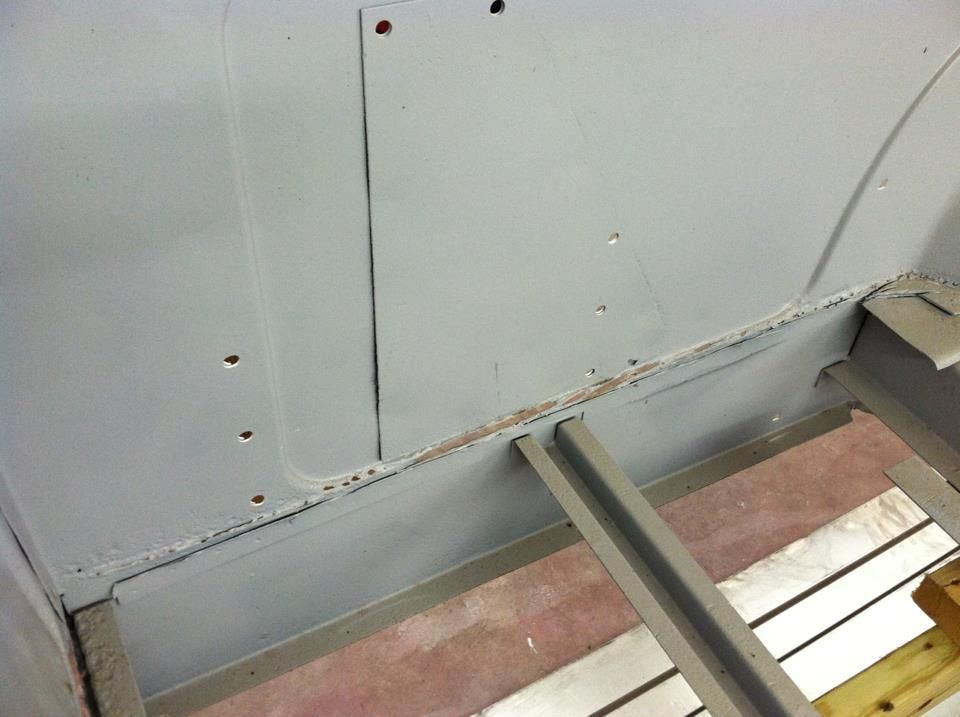
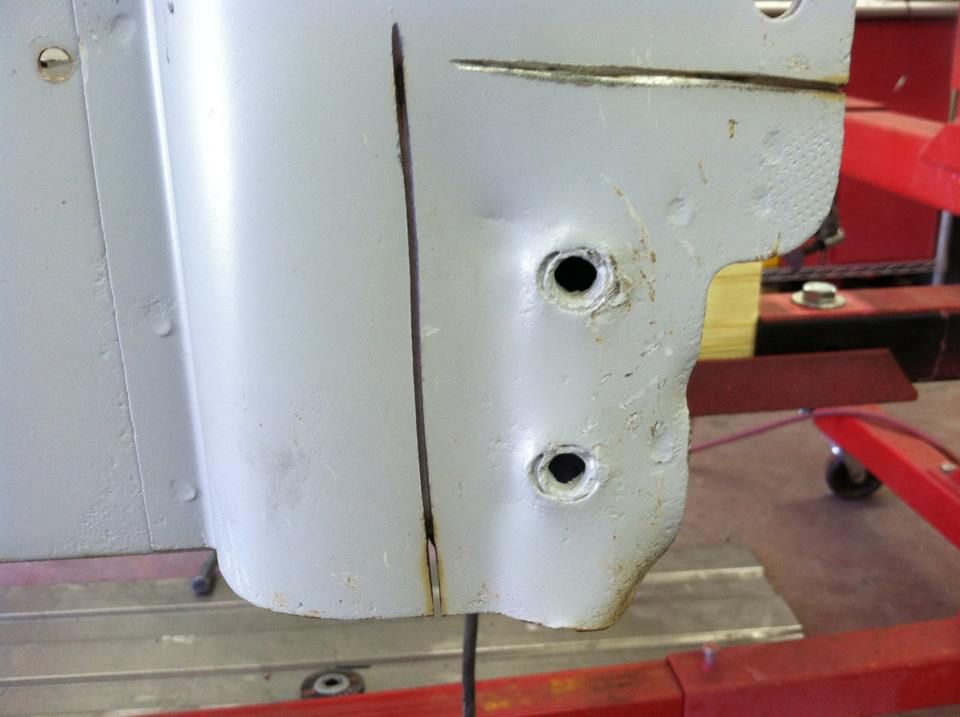
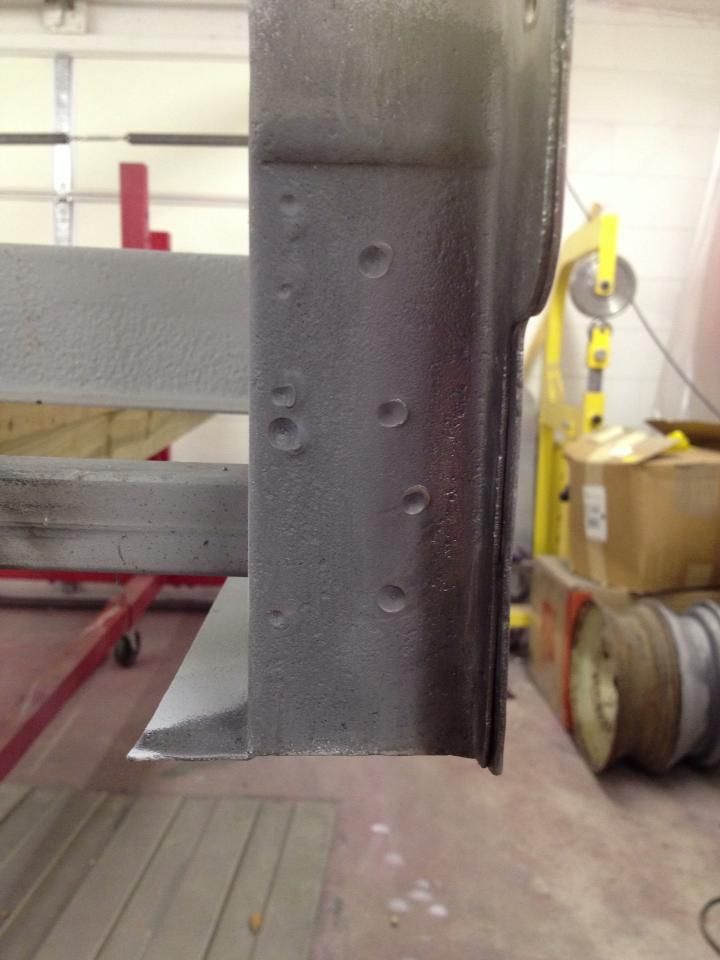
The first thing I started on was separating the old bed floor flange from the bed sides by drilling the spot welds. Also had to grind down the old welds from the replacement bed floor. The left rear corner was just about the only spot that I didn't have to completely cut out and remake, more on that later. The rust that was under the flange was sandblasted.
 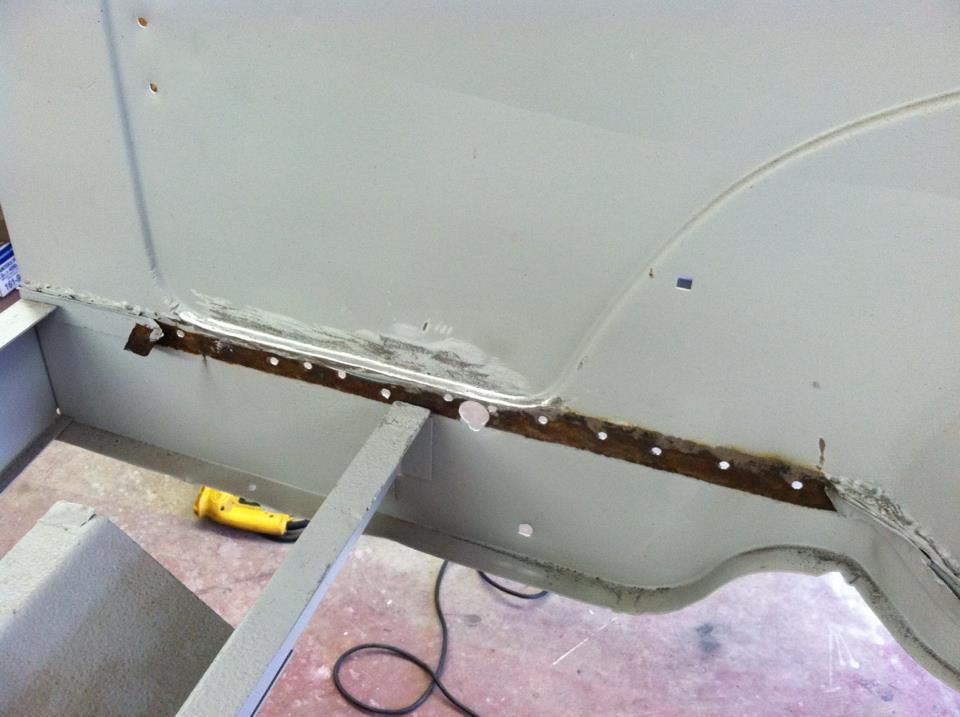 Easier to see the old bed floor flange, and the welds and edges of the replacement floor here. It's an 8' bed so there was 16 feet of this to fix. This was the easiest spot, the rest had to be completely cut out and replaced. 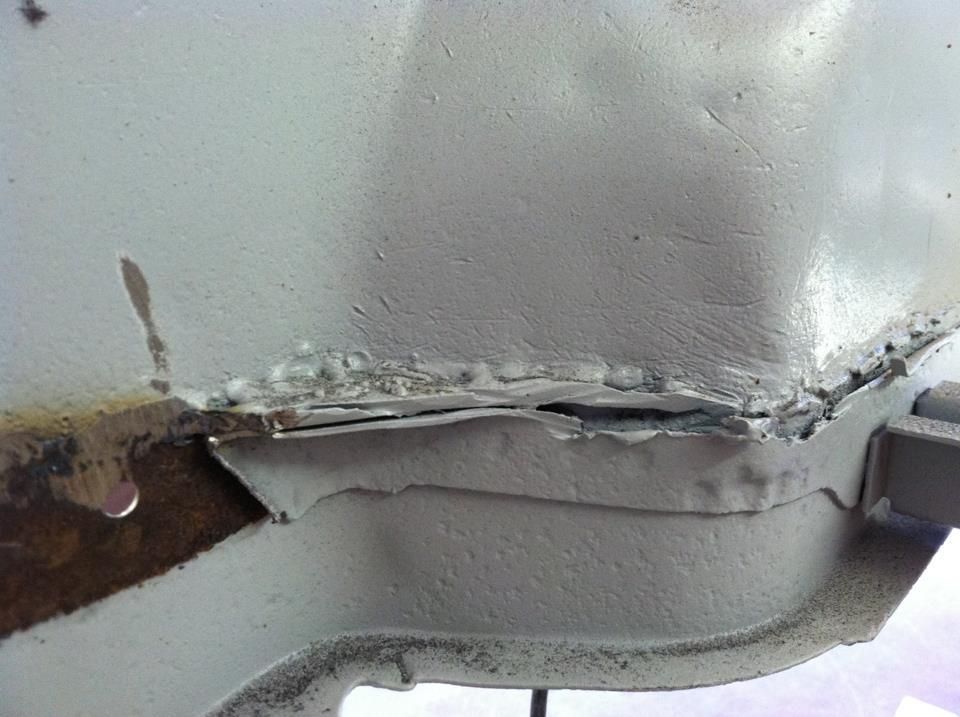 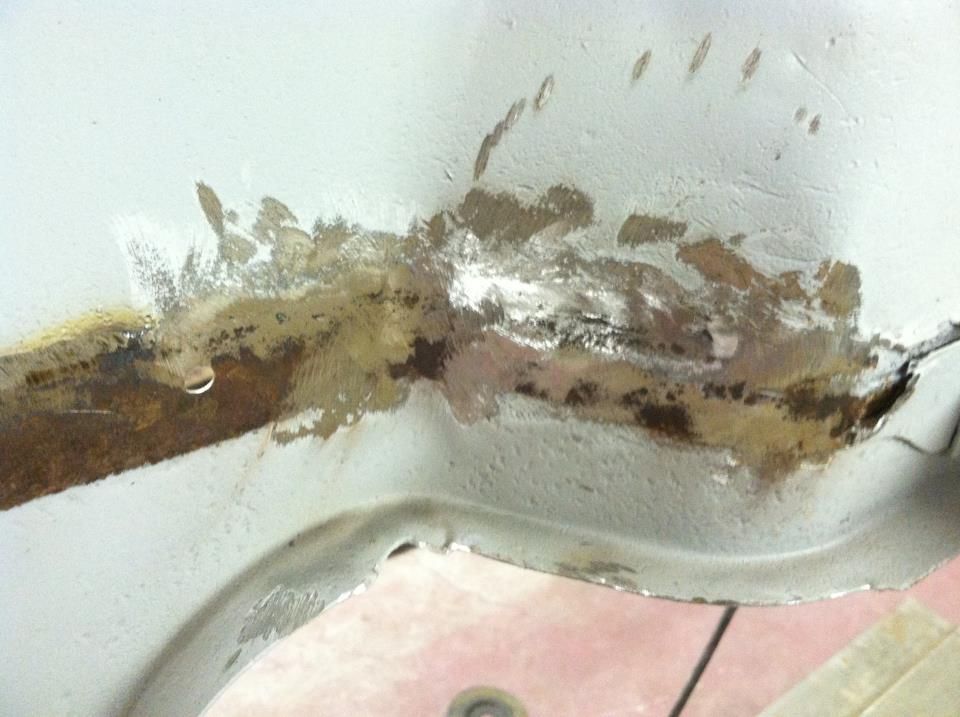 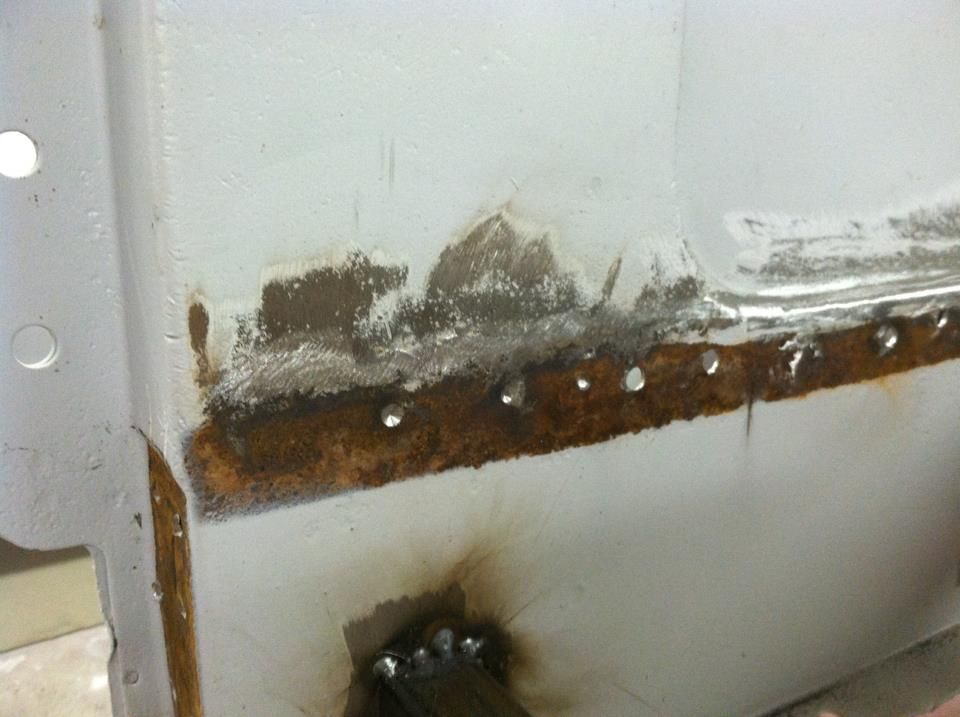 Cleaned up the body line on the outside of the panel. 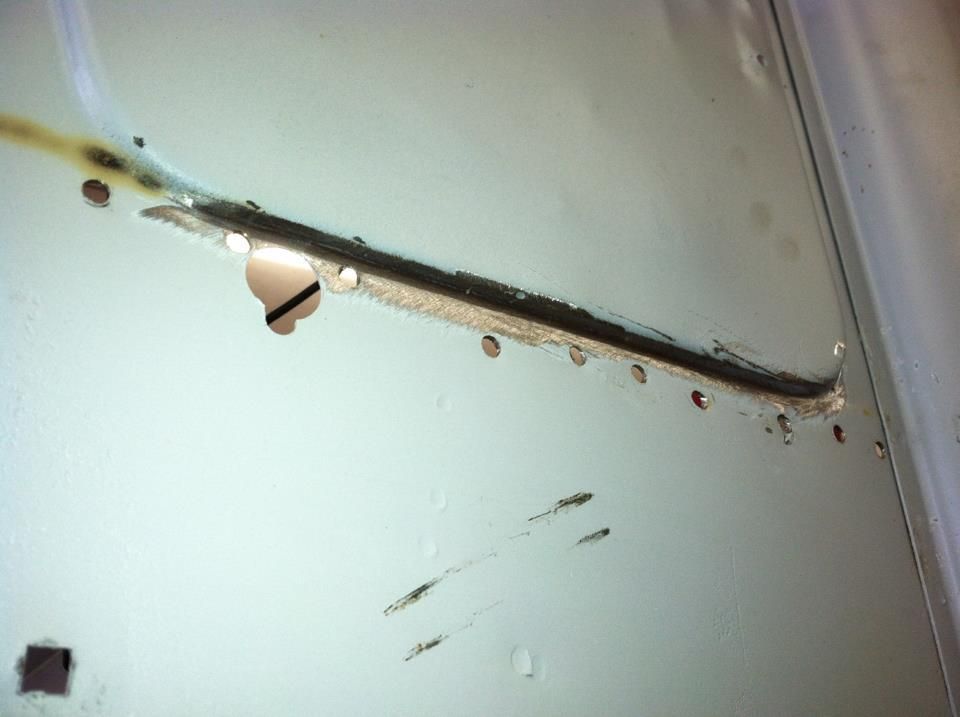
__________________
Project Goldilocks '66 C10 Short Fleet BBW Build '65 C10 Highly Detailed Stock Restoration Thread '78 Camaro Targa Roof Build '55 International Metal/Body/Paint Work '66 F100 Full Rotisserie Restoration '40 Packard 120 Convertible Coupe Restoration How To Restore and Detail an Original Gauge Cluster How To Detail Sand Body Panels, Edges, Corners, Etc |
|
|
|
|
01-19-2013, 04:19 PM
|
#142 |
|
Registered User
Join Date: May 2011
Location: Anderson SC
Posts: 3,869
|
Re: '55 International Metal/Body/Paint Work
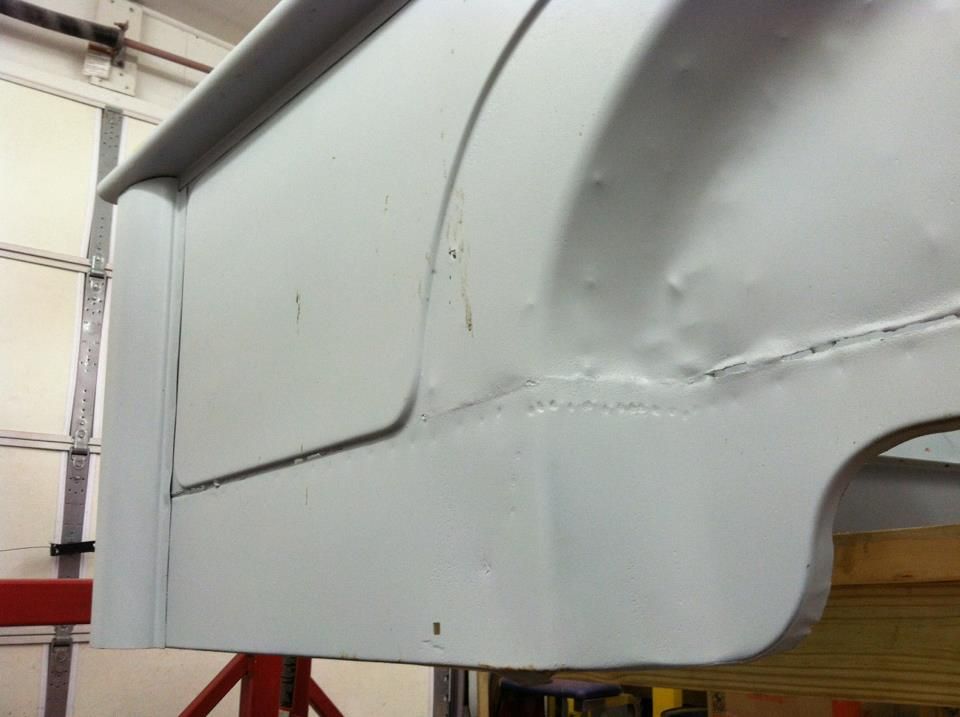
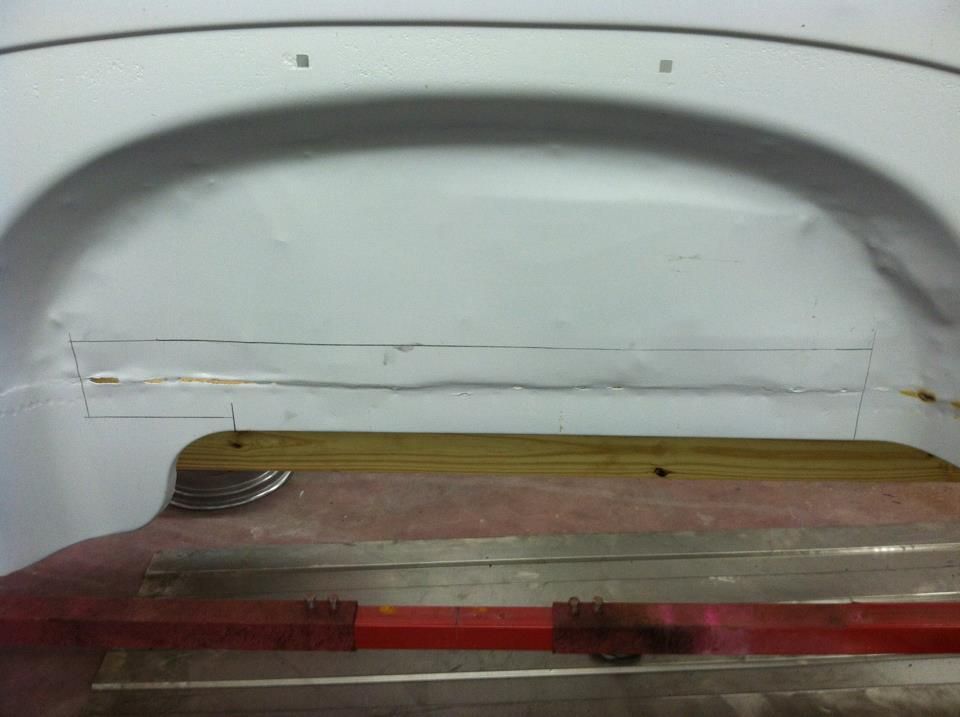
The top rail of the left bedside was badly kinked. I had to cut the area out and use a porta-power to straighten it.
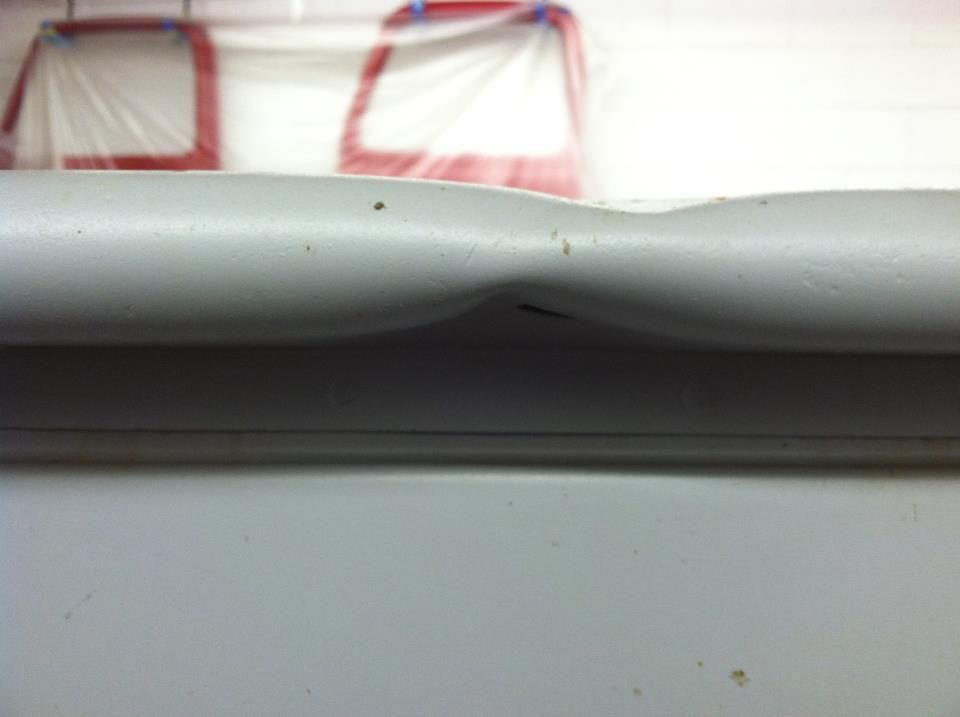 Damage cut out to relieve the tension. 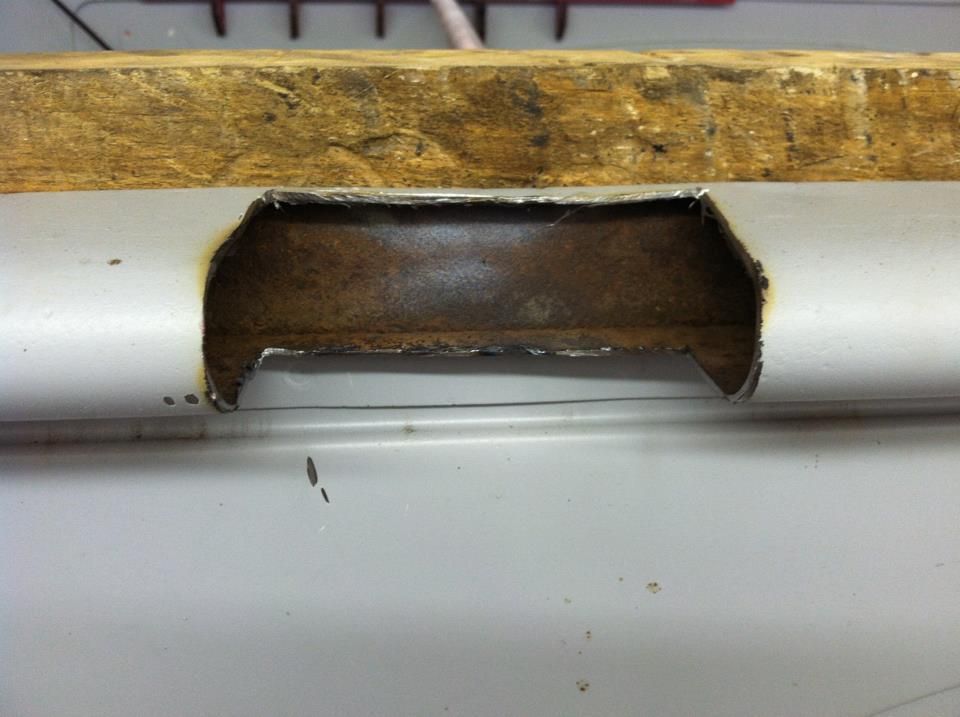 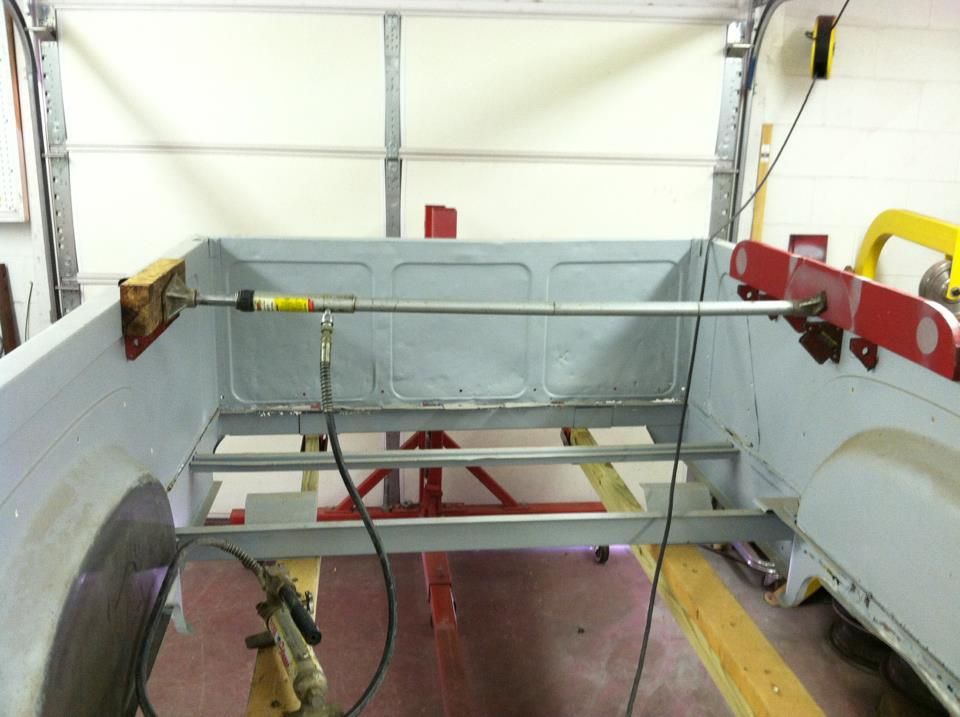 I over-straightened the rail, knowing the metal has "memory" and spring back some once I removed pressure from the porta-power. 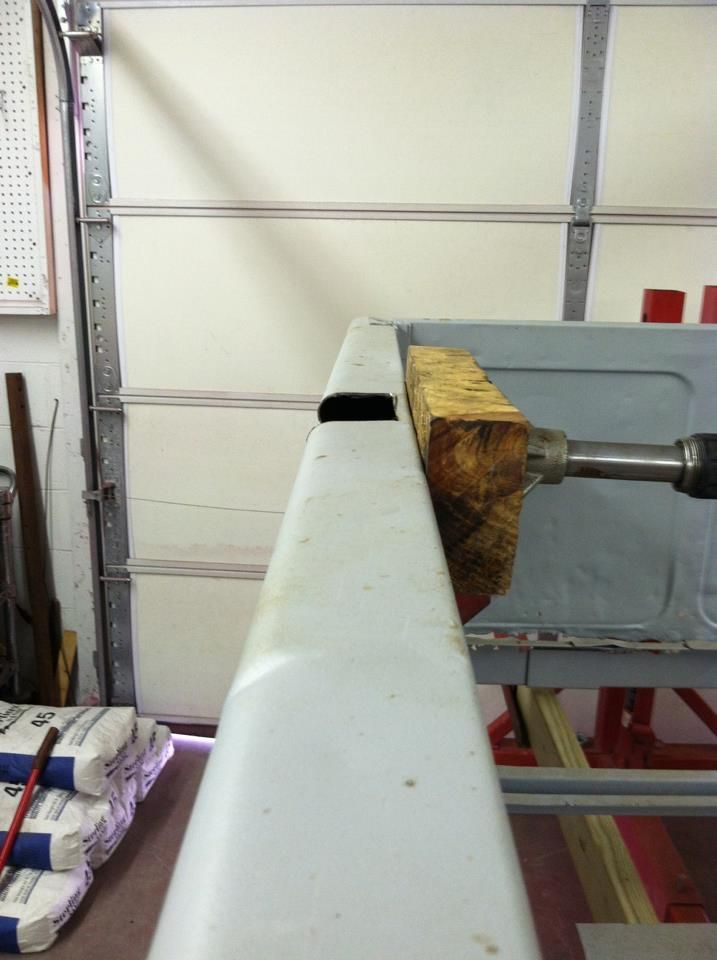 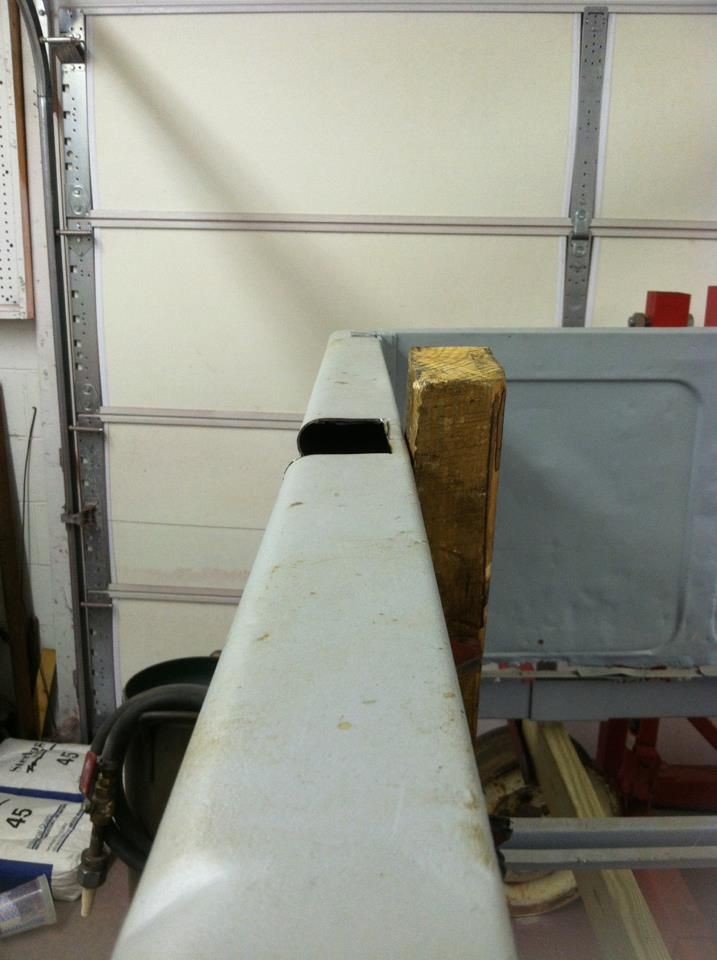
__________________
Project Goldilocks '66 C10 Short Fleet BBW Build '65 C10 Highly Detailed Stock Restoration Thread '78 Camaro Targa Roof Build '55 International Metal/Body/Paint Work '66 F100 Full Rotisserie Restoration '40 Packard 120 Convertible Coupe Restoration How To Restore and Detail an Original Gauge Cluster How To Detail Sand Body Panels, Edges, Corners, Etc |
|
|
|
|
01-19-2013, 06:28 PM
|
#143 |
|
Registered User
Join Date: May 2007
Location: Deale Md
Posts: 4,663
|
Re: '55 International Metal/Body/Paint Work
You got skills but you already know that.
__________________
James 63 GMC V6 4speed carryall 65 chevy swb bbw V8 auto 68 K20 327/4 speed, buddy buckets 2002 GMC CC Dually Duramax 64 GMC lwb 3/4 V6 4speed SOLD 66 GMC swb bbw buddy buckets SOLD IG duallyjams The only thing that stays the same is constant change! |
|
|
|
|
01-22-2013, 11:21 AM
|
#144 | |
|
Registered User
Join Date: May 2011
Location: Anderson SC
Posts: 3,869
|
Re: '55 International Metal/Body/Paint Work
Quote:
Here's more of the deconstruction. I drilled out the spot welds and removed the rear cross brace, then welded 1"x1" tubing with turnbuckles welded in the middle to adjust the width. 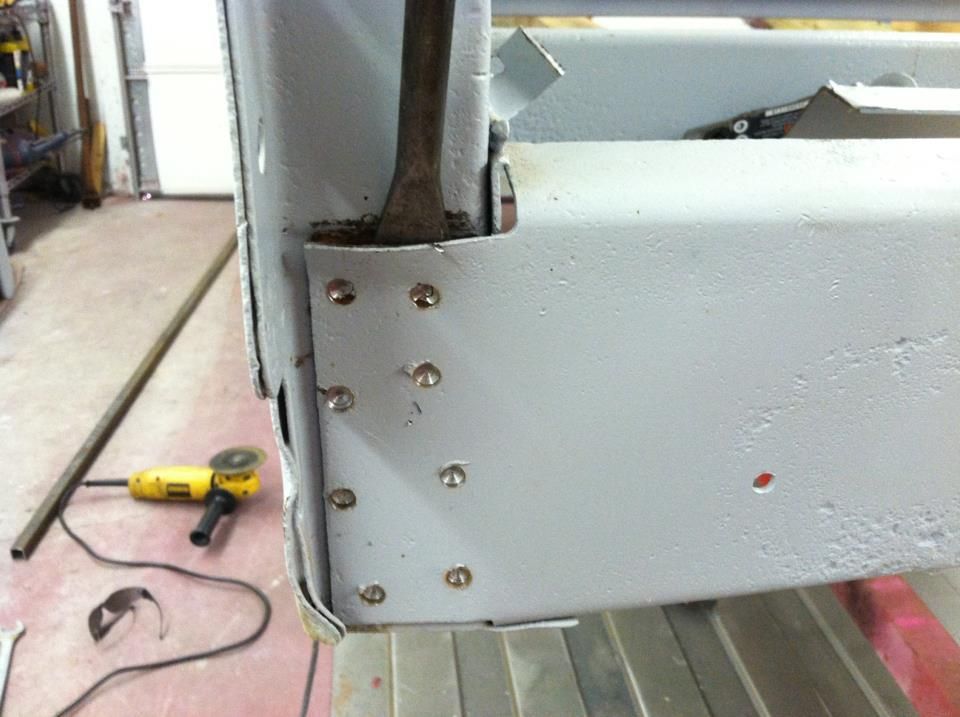 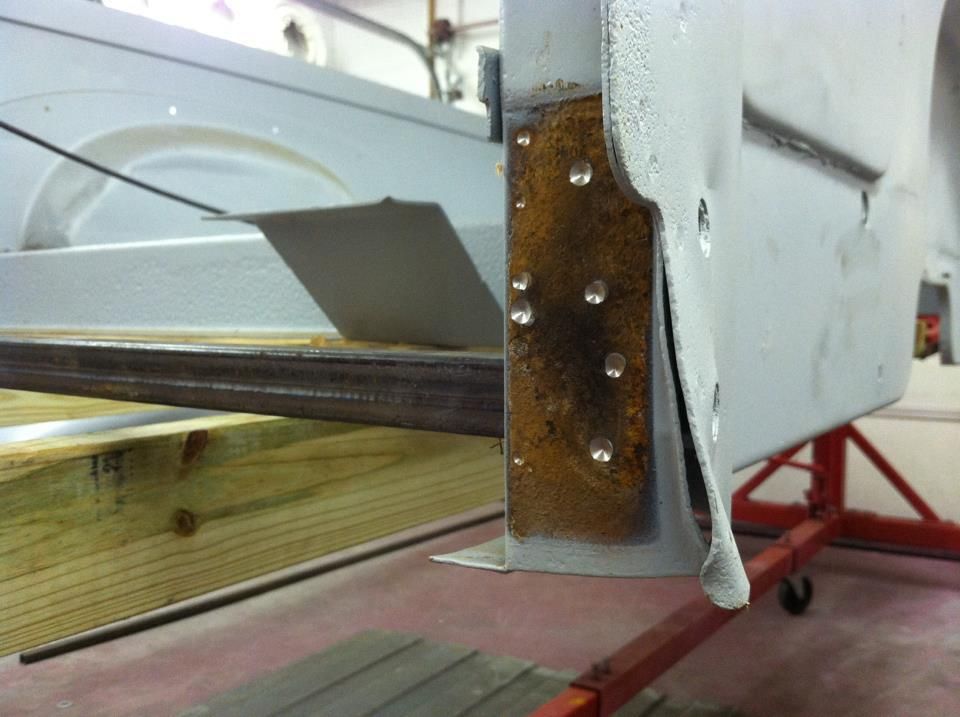 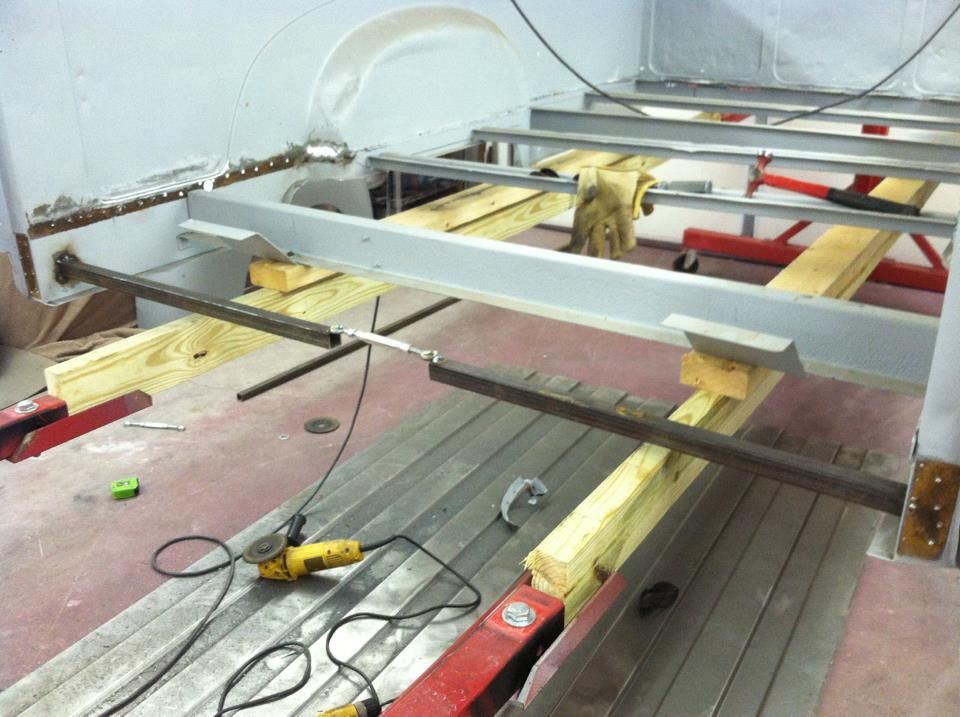 Drilled out the welds and removed the front header panel. I didn't have to do anything to the bottom, the rust had separated it already! 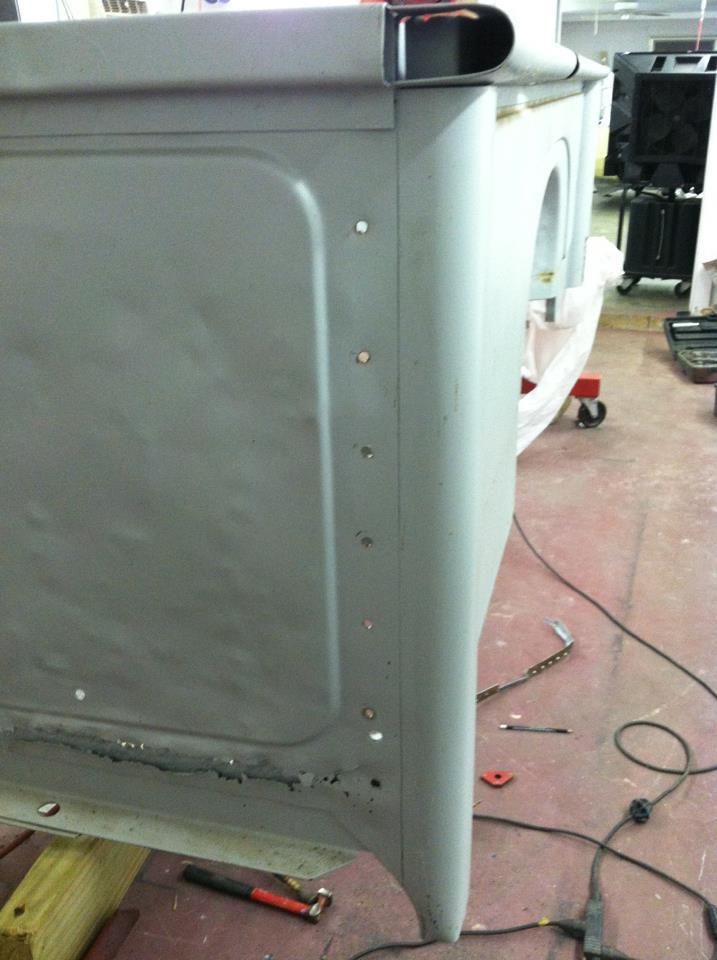 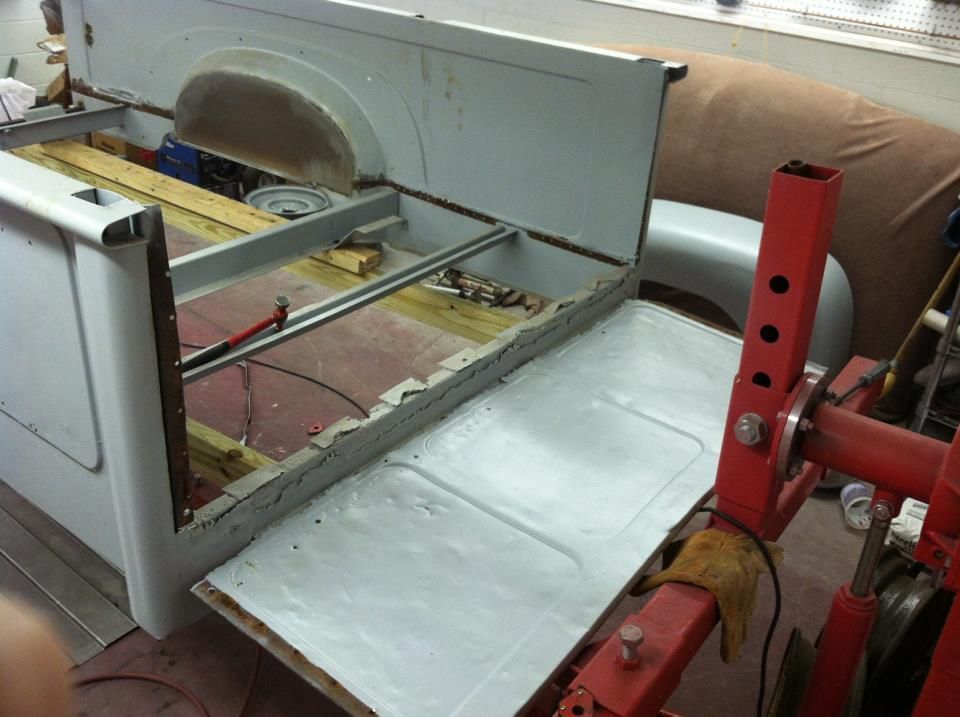 It has a side mount spare tire and the reinforcing plate had rusted through. 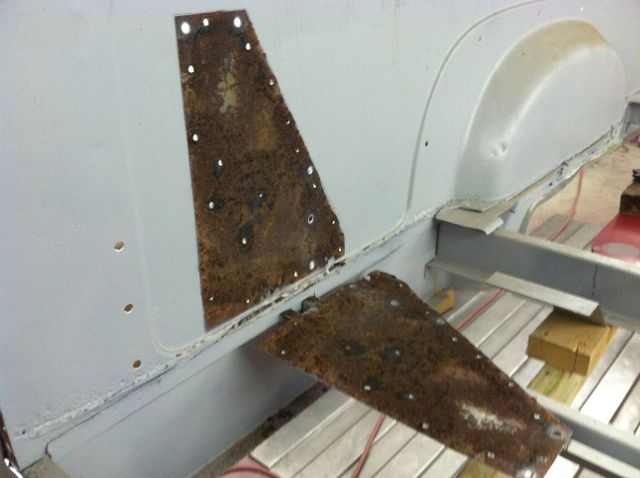
__________________
Project Goldilocks '66 C10 Short Fleet BBW Build '65 C10 Highly Detailed Stock Restoration Thread '78 Camaro Targa Roof Build '55 International Metal/Body/Paint Work '66 F100 Full Rotisserie Restoration '40 Packard 120 Convertible Coupe Restoration How To Restore and Detail an Original Gauge Cluster How To Detail Sand Body Panels, Edges, Corners, Etc Last edited by theastronaut; 01-22-2013 at 12:00 PM. |
|
|
|
|
|
01-22-2013, 11:26 AM
|
#145 |
|
Registered User
Join Date: May 2011
Location: Anderson SC
Posts: 3,869
|
Re: '55 International Metal/Body/Paint Work
The lower edges of the fenderwells were trashed so I cut them out and made new pieces to weld in. On the driver side, I cut the whole fenderwell out since it needed alot of straightening and welding a whole new piece in wouldn't be that much more welding.
 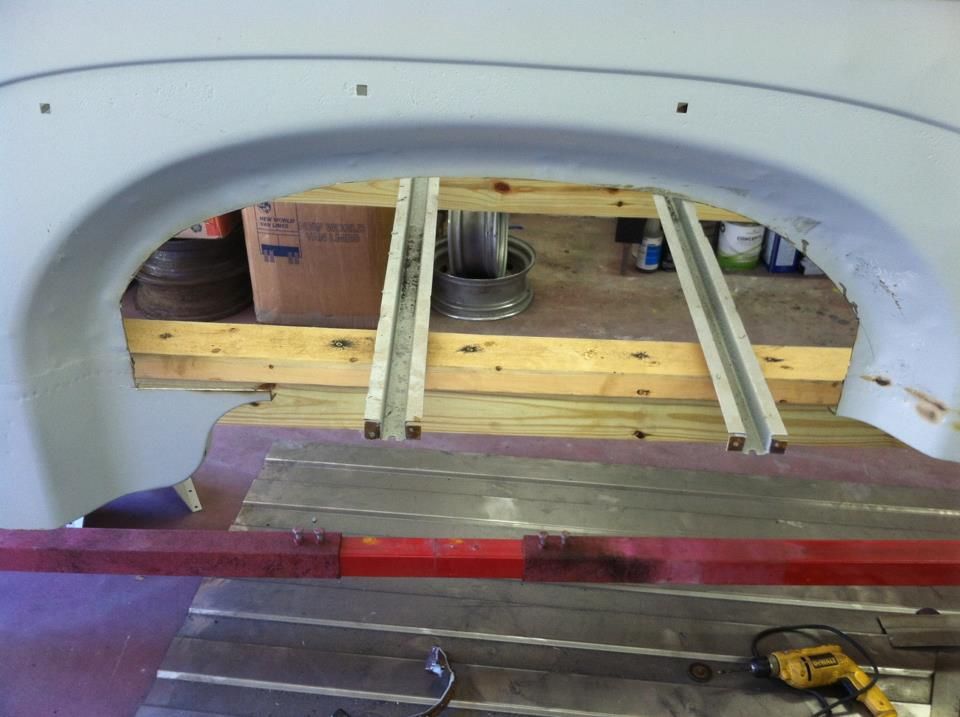 Cut a new piece of metal and bent the bottom edge 90 degrees like the original. 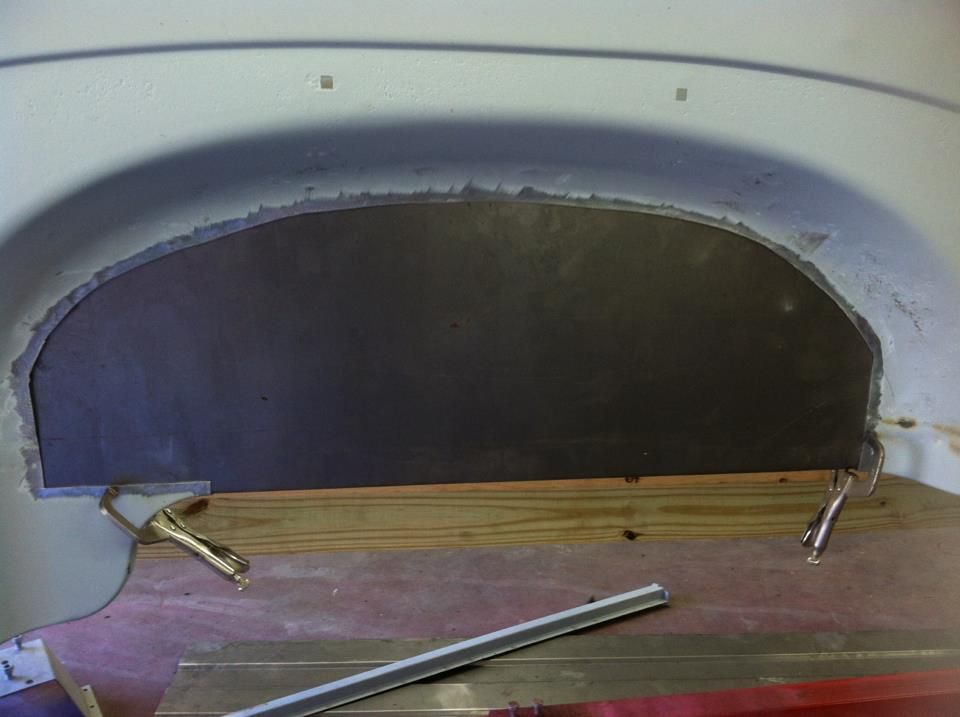 Clamped it in place then scribed the cut line. I like to scribe the line instead of using a marker since the scribe is more accurate. 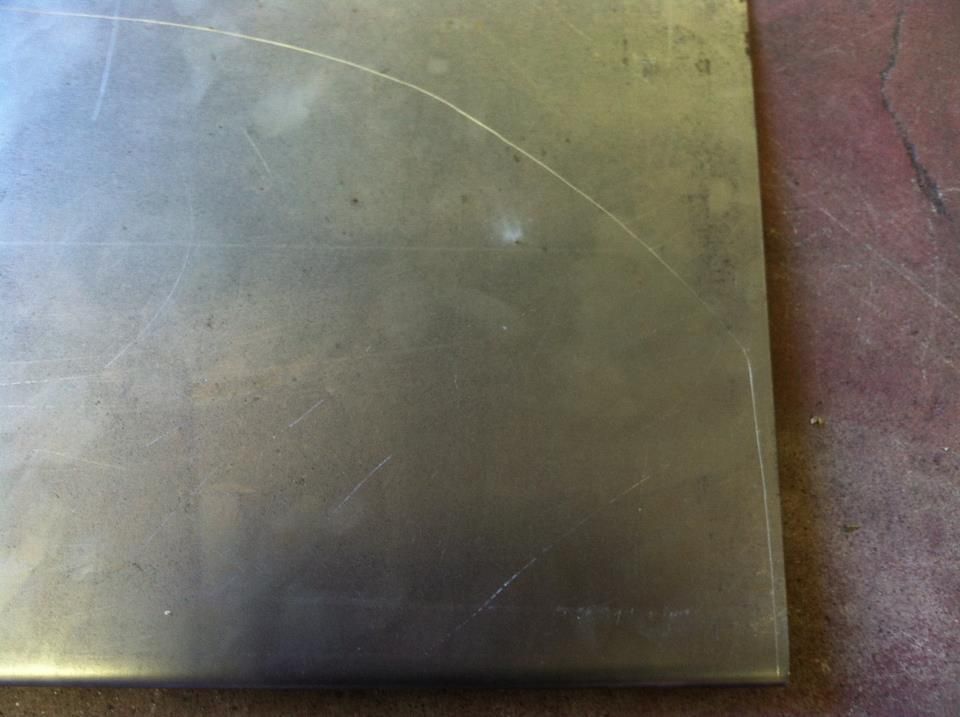 Trimmed and fitted, ready for welding. 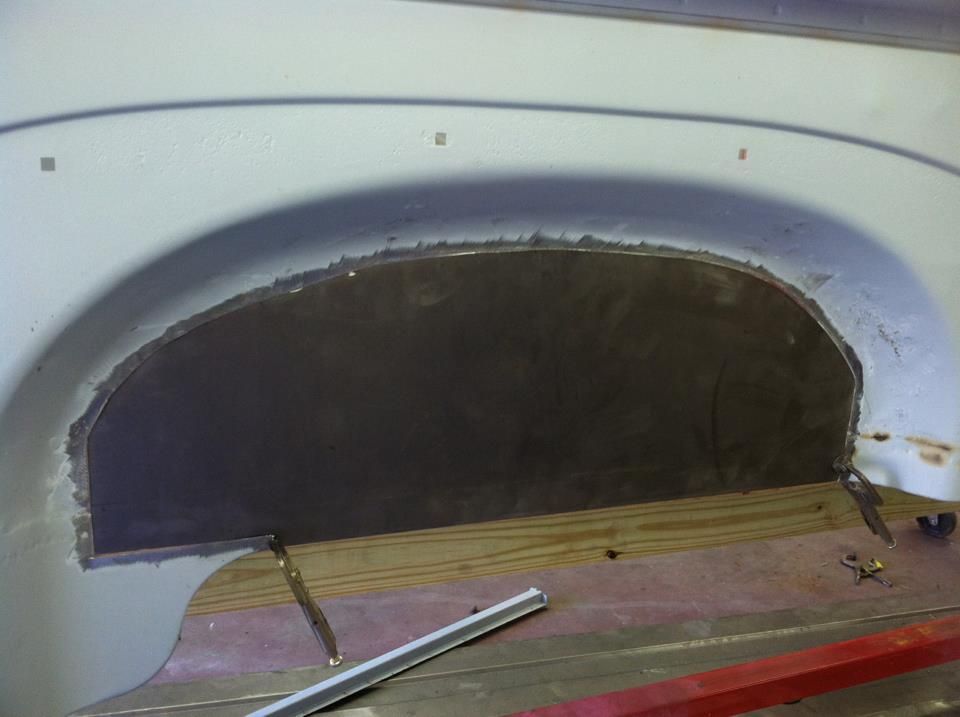 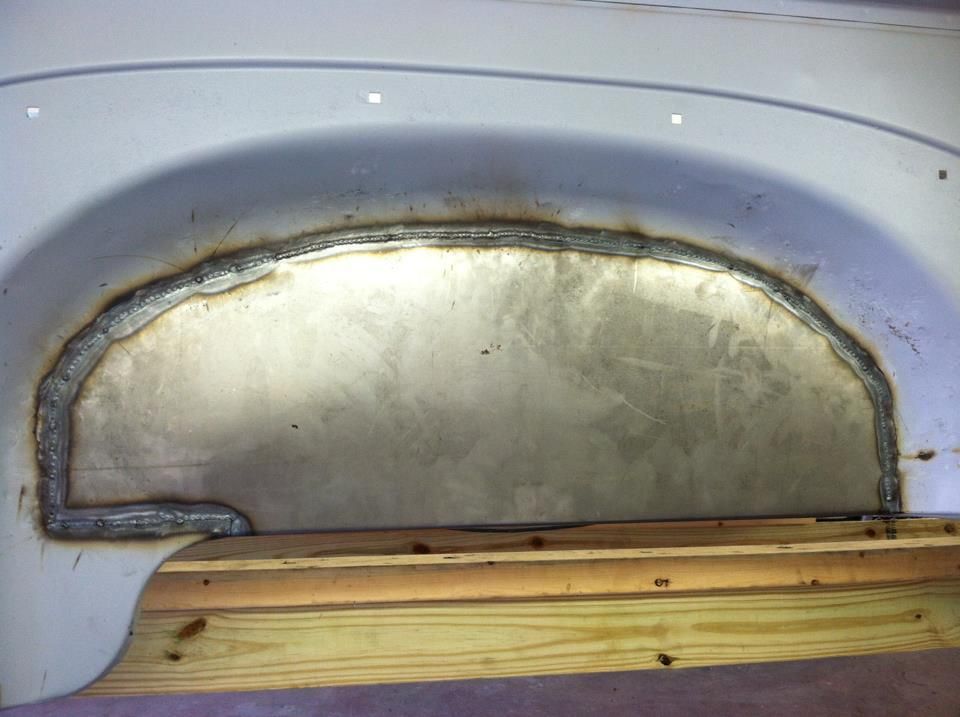 Welds ground down inside and out. 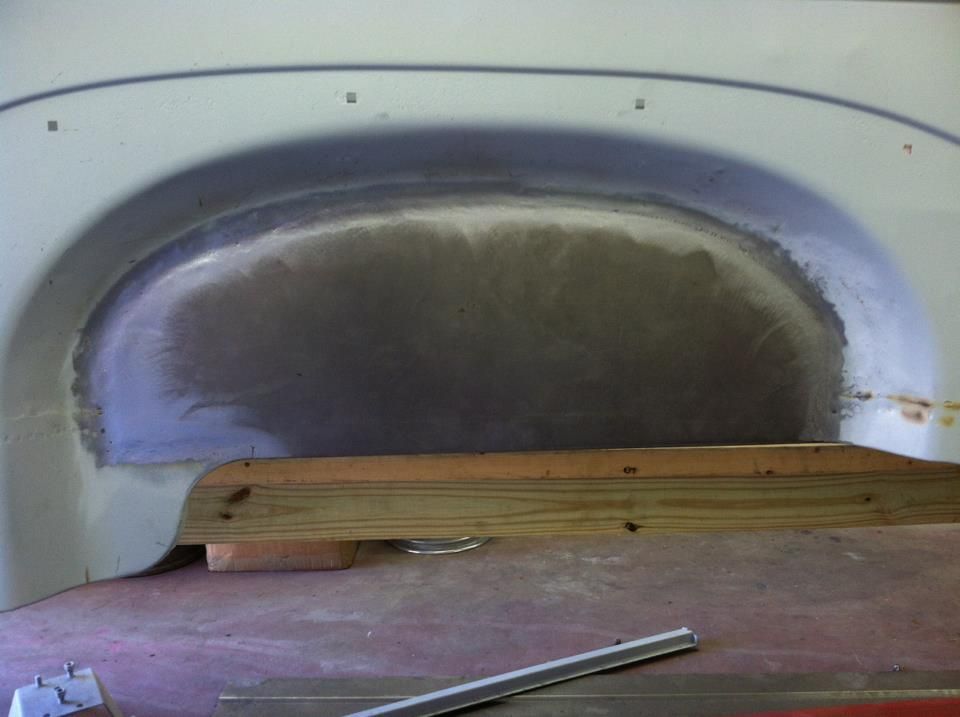 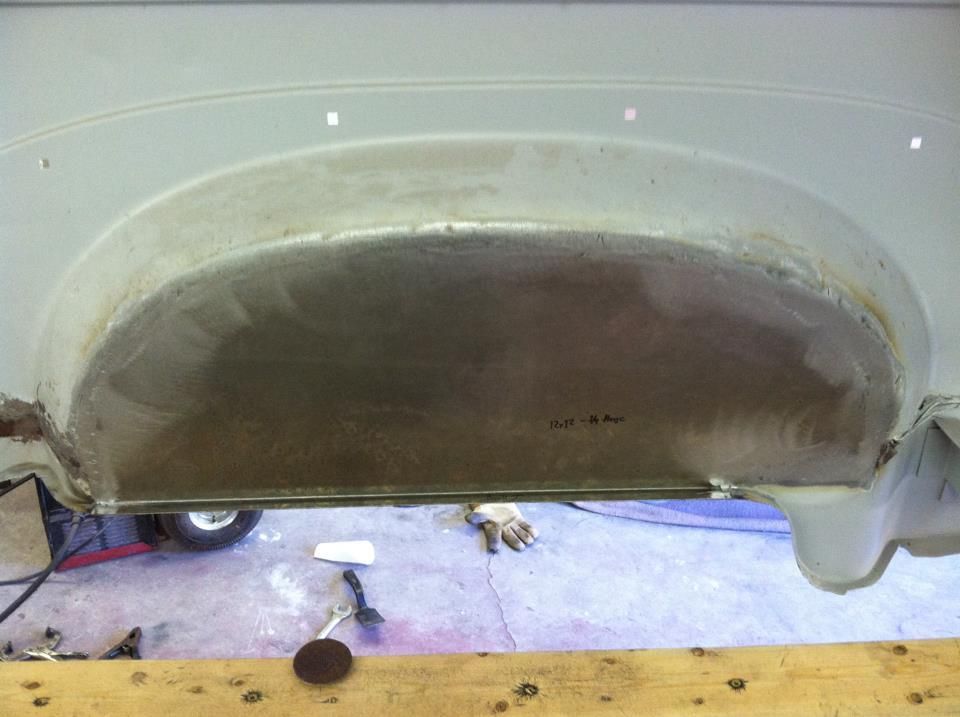
__________________
Project Goldilocks '66 C10 Short Fleet BBW Build '65 C10 Highly Detailed Stock Restoration Thread '78 Camaro Targa Roof Build '55 International Metal/Body/Paint Work '66 F100 Full Rotisserie Restoration '40 Packard 120 Convertible Coupe Restoration How To Restore and Detail an Original Gauge Cluster How To Detail Sand Body Panels, Edges, Corners, Etc |
|
|
|
|
01-22-2013, 11:43 AM
|
#146 |
|
Registered User
Join Date: May 2011
Location: Anderson SC
Posts: 3,869
|
Re: '55 International Metal/Body/Paint Work
The other side wasn't as bad so I just replaced the bottom.
  Same process- new piece cut, edge scribed, trimmed and fitted. 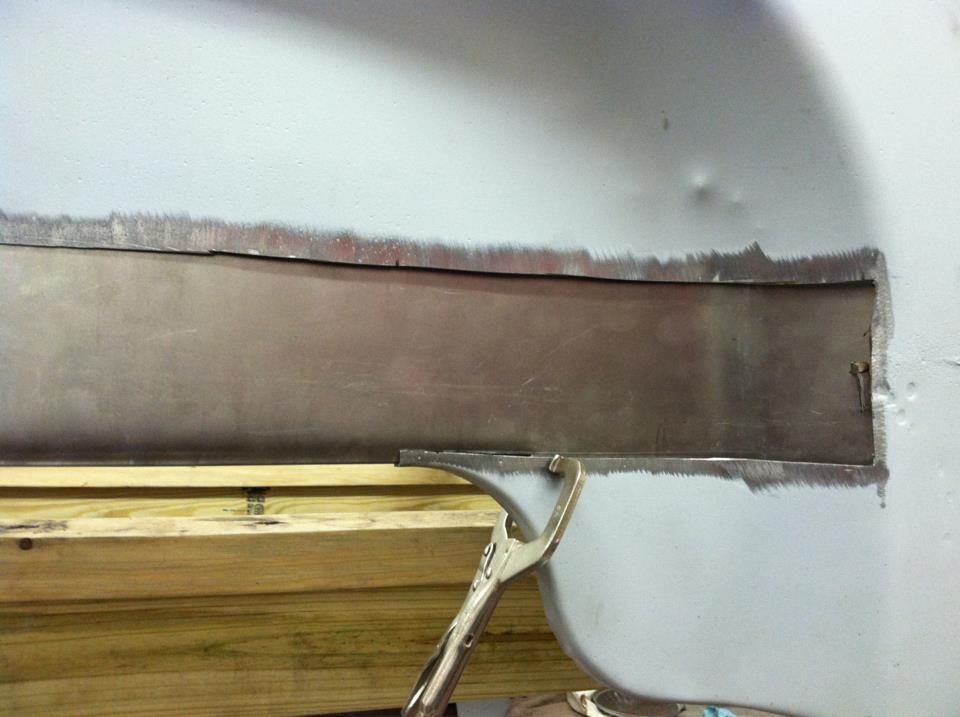 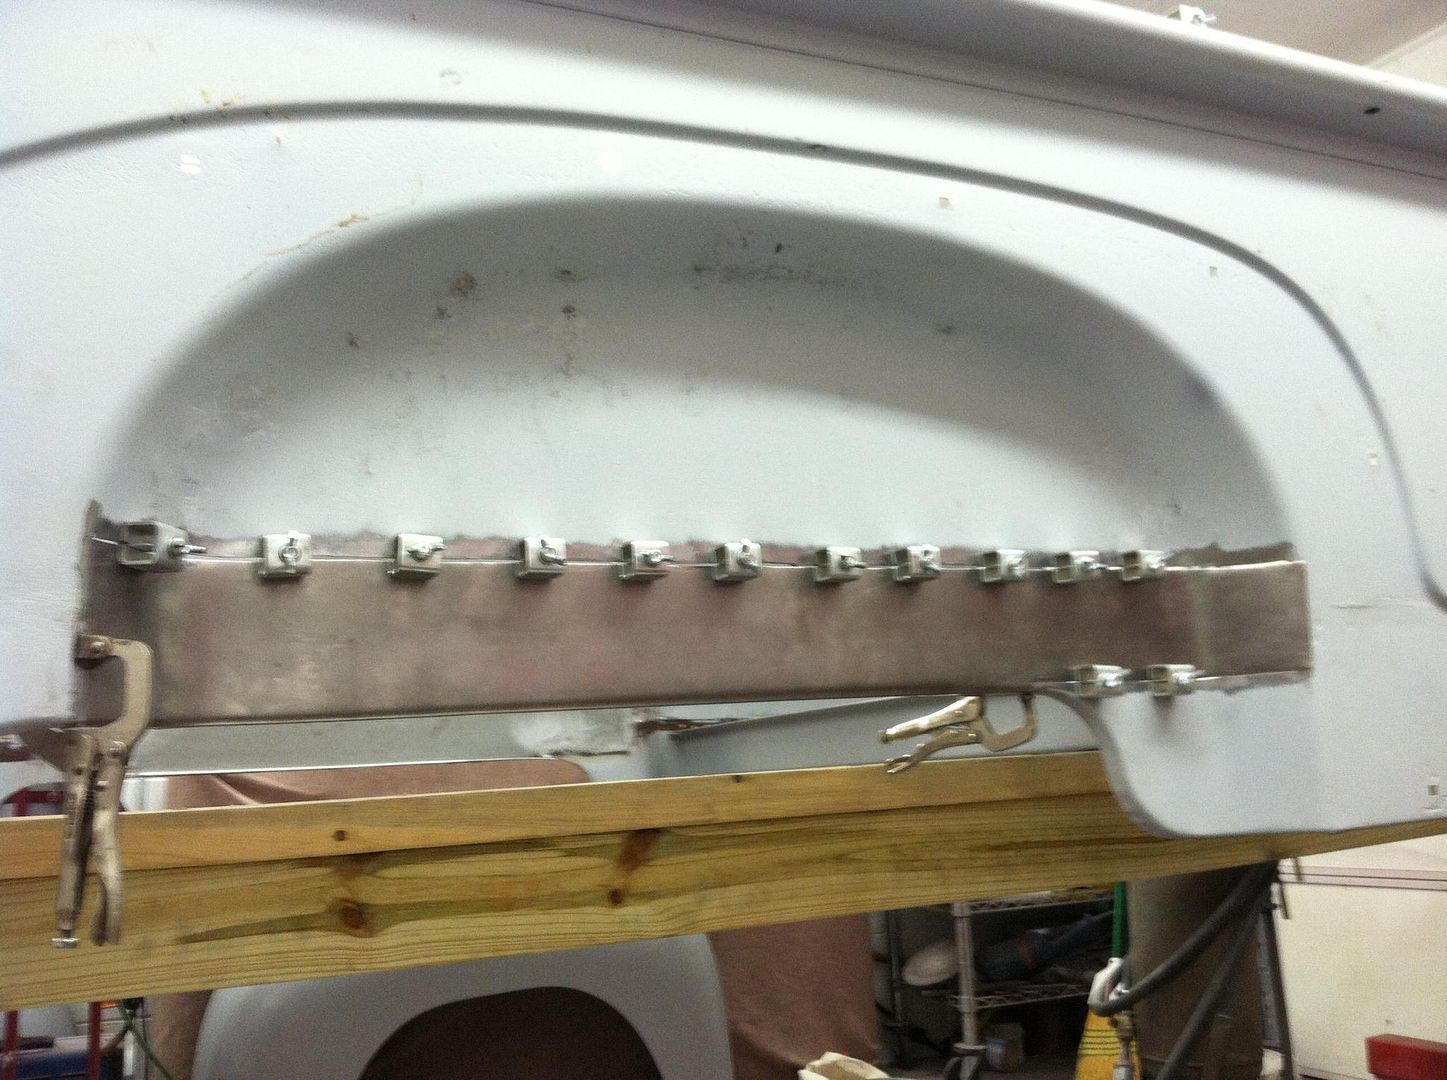 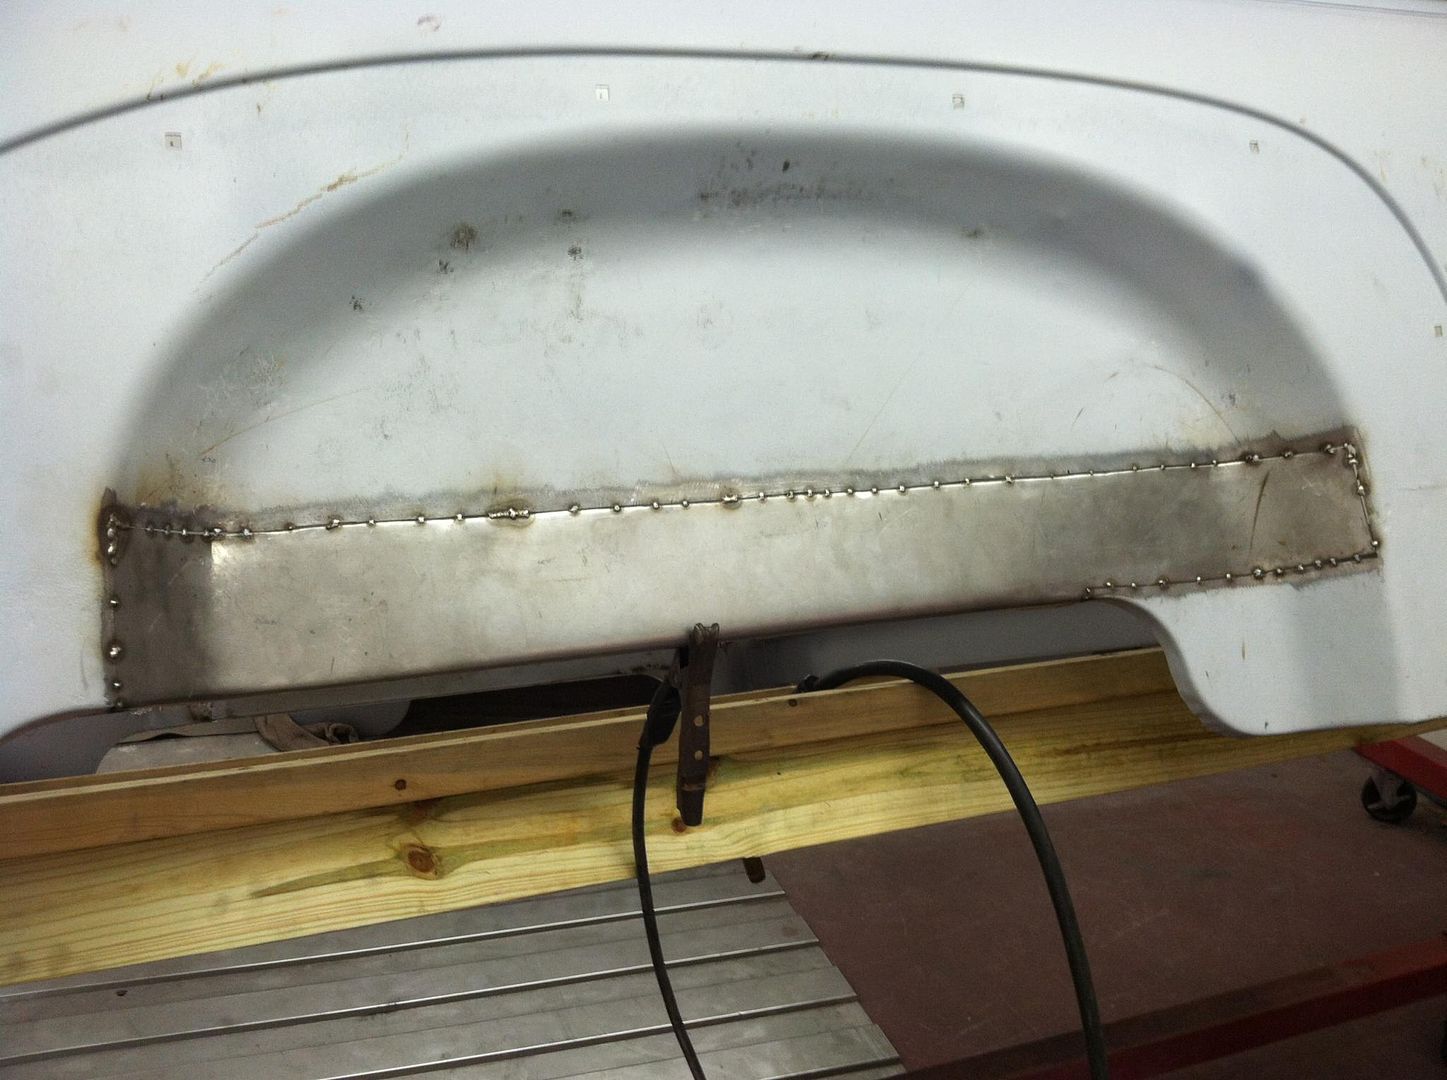 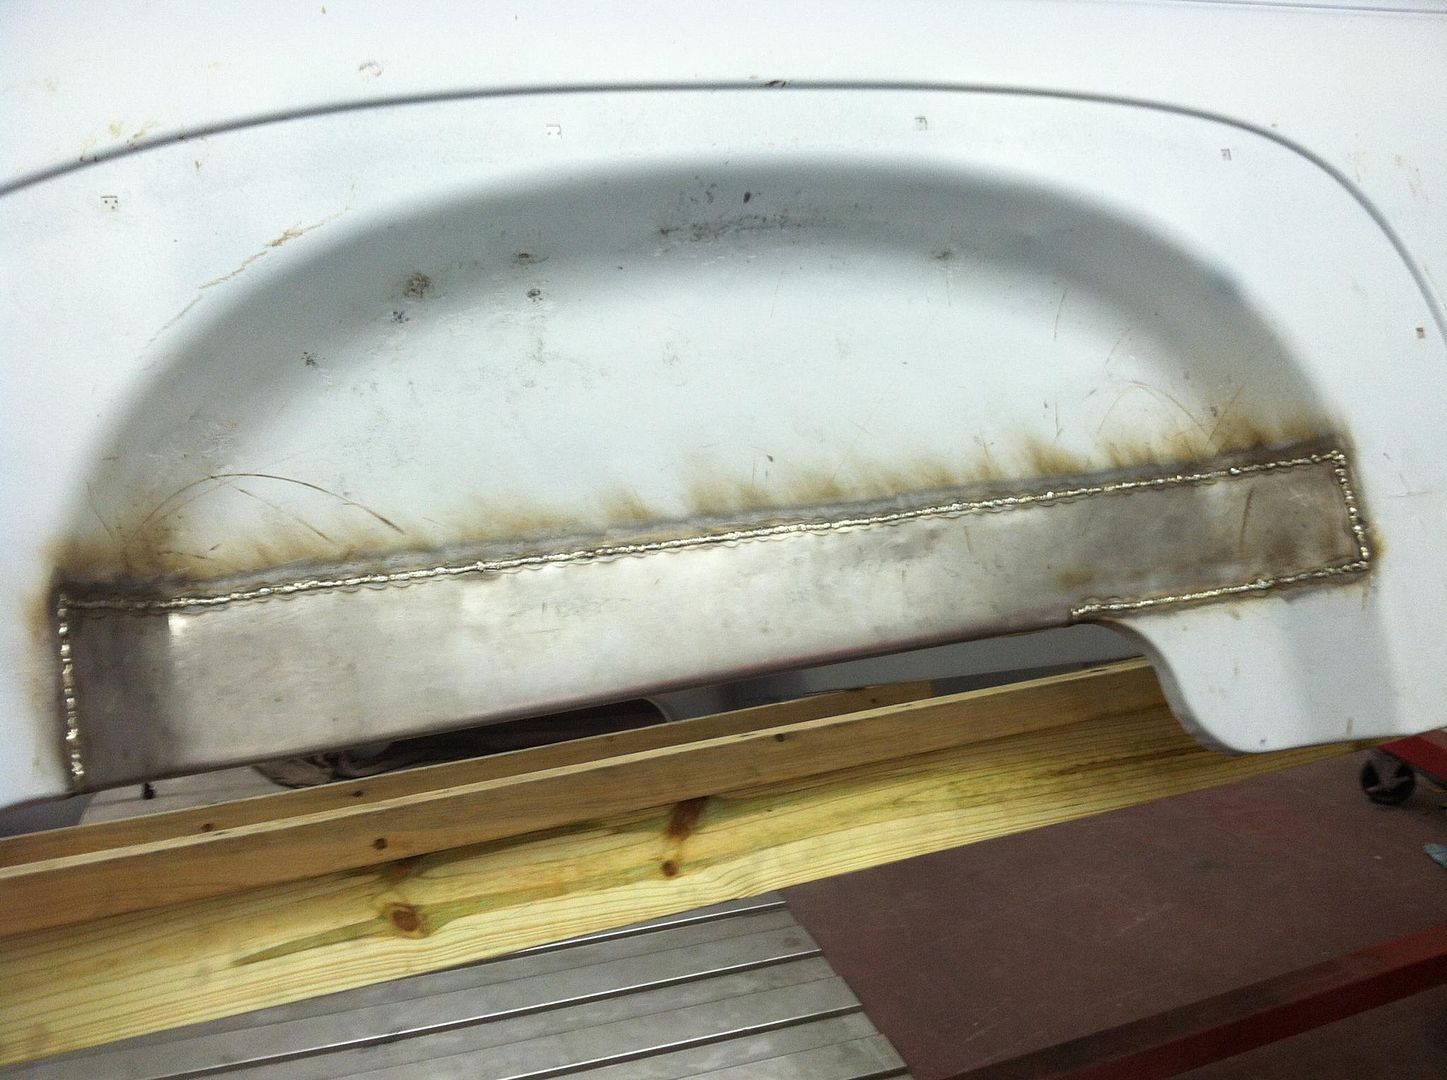 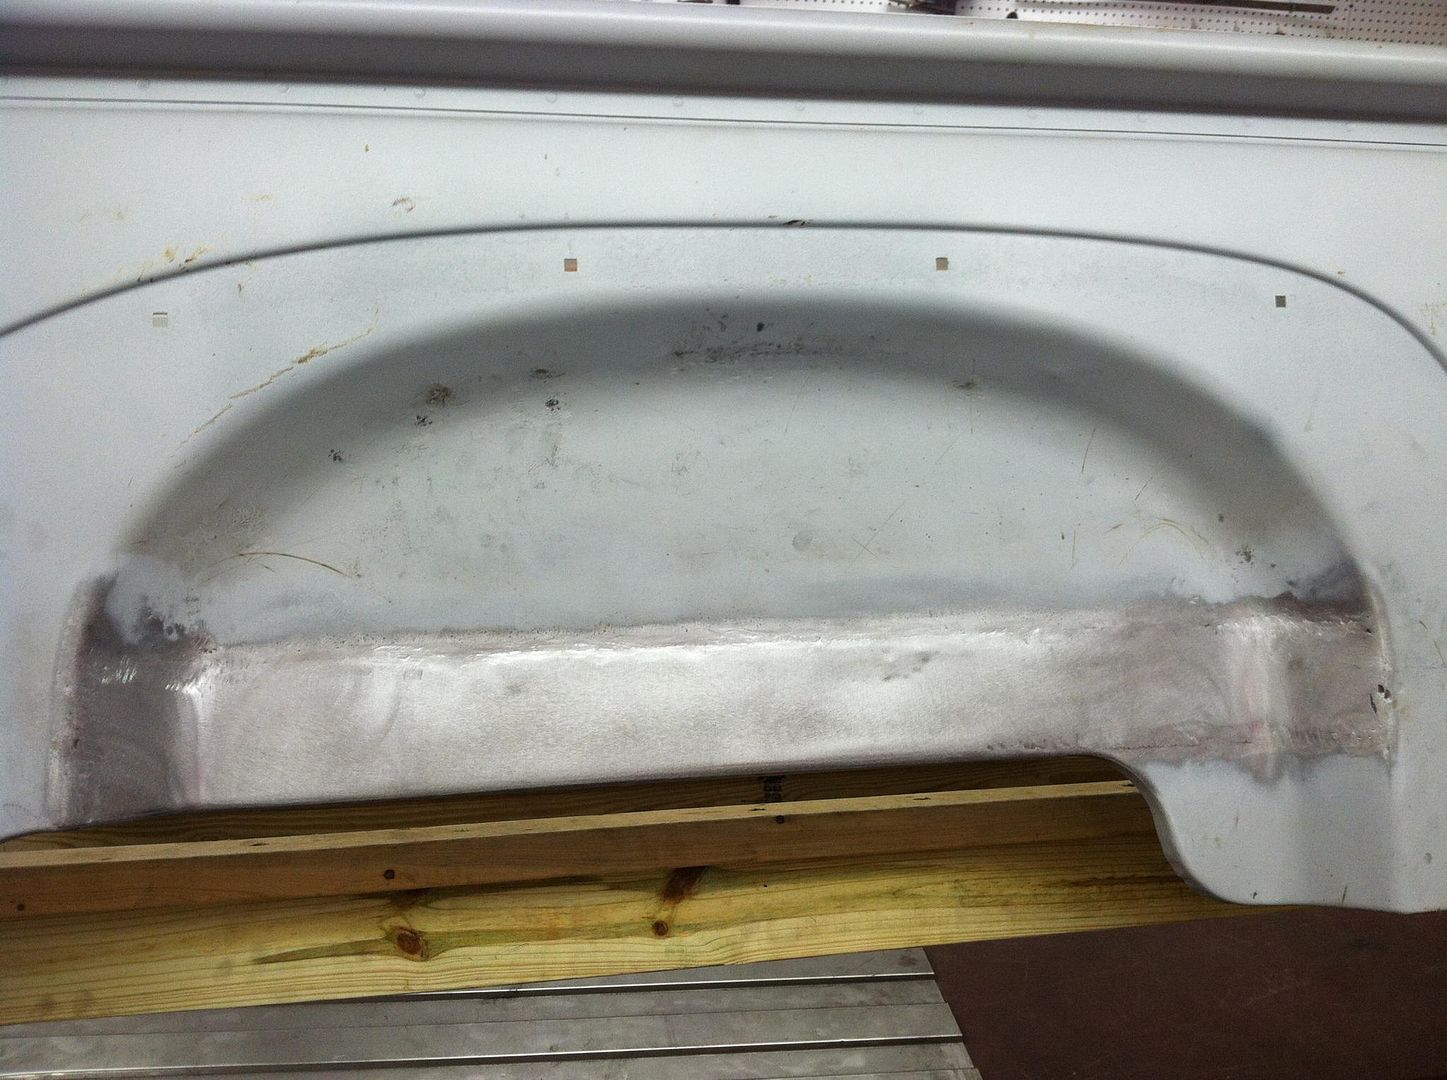 There were alot of dents in the fenderwells too so I straightened those out. 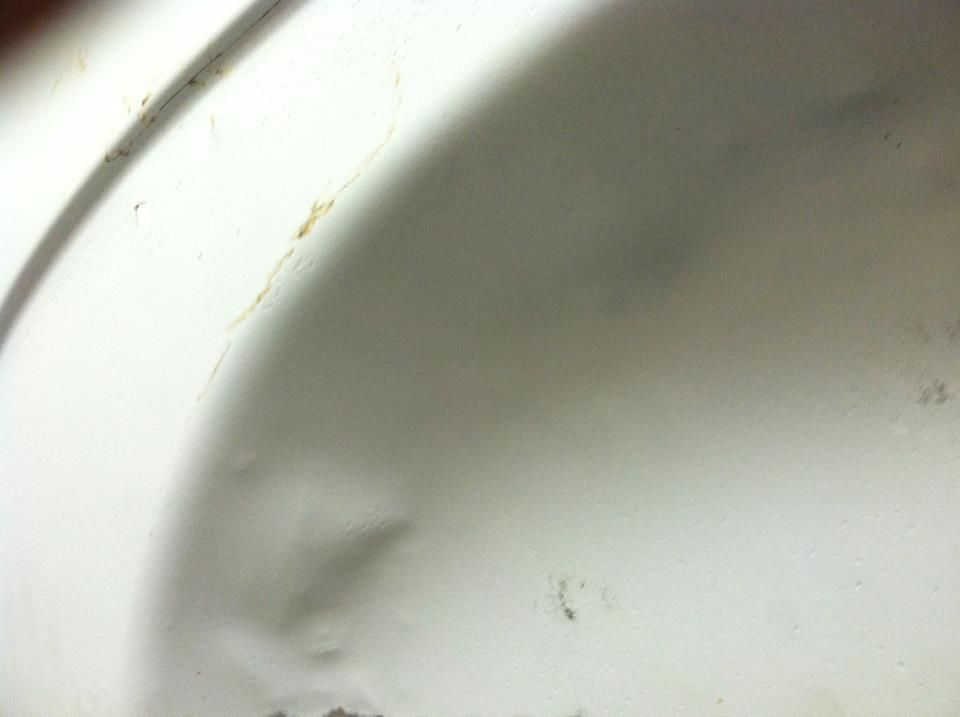   After straightening. 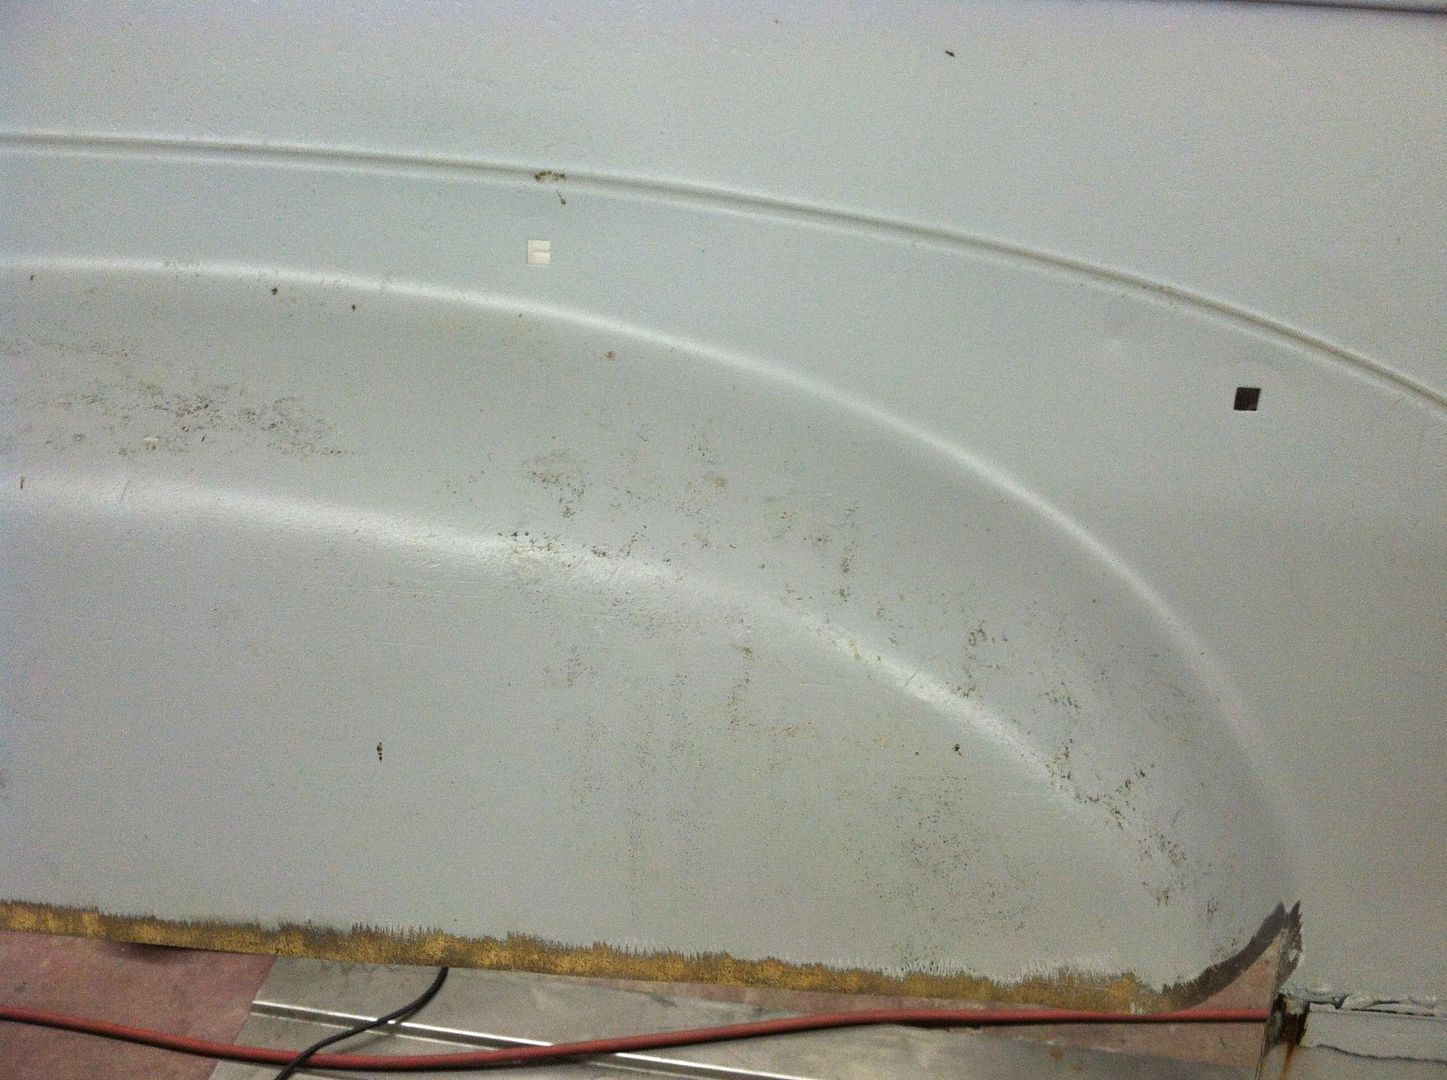 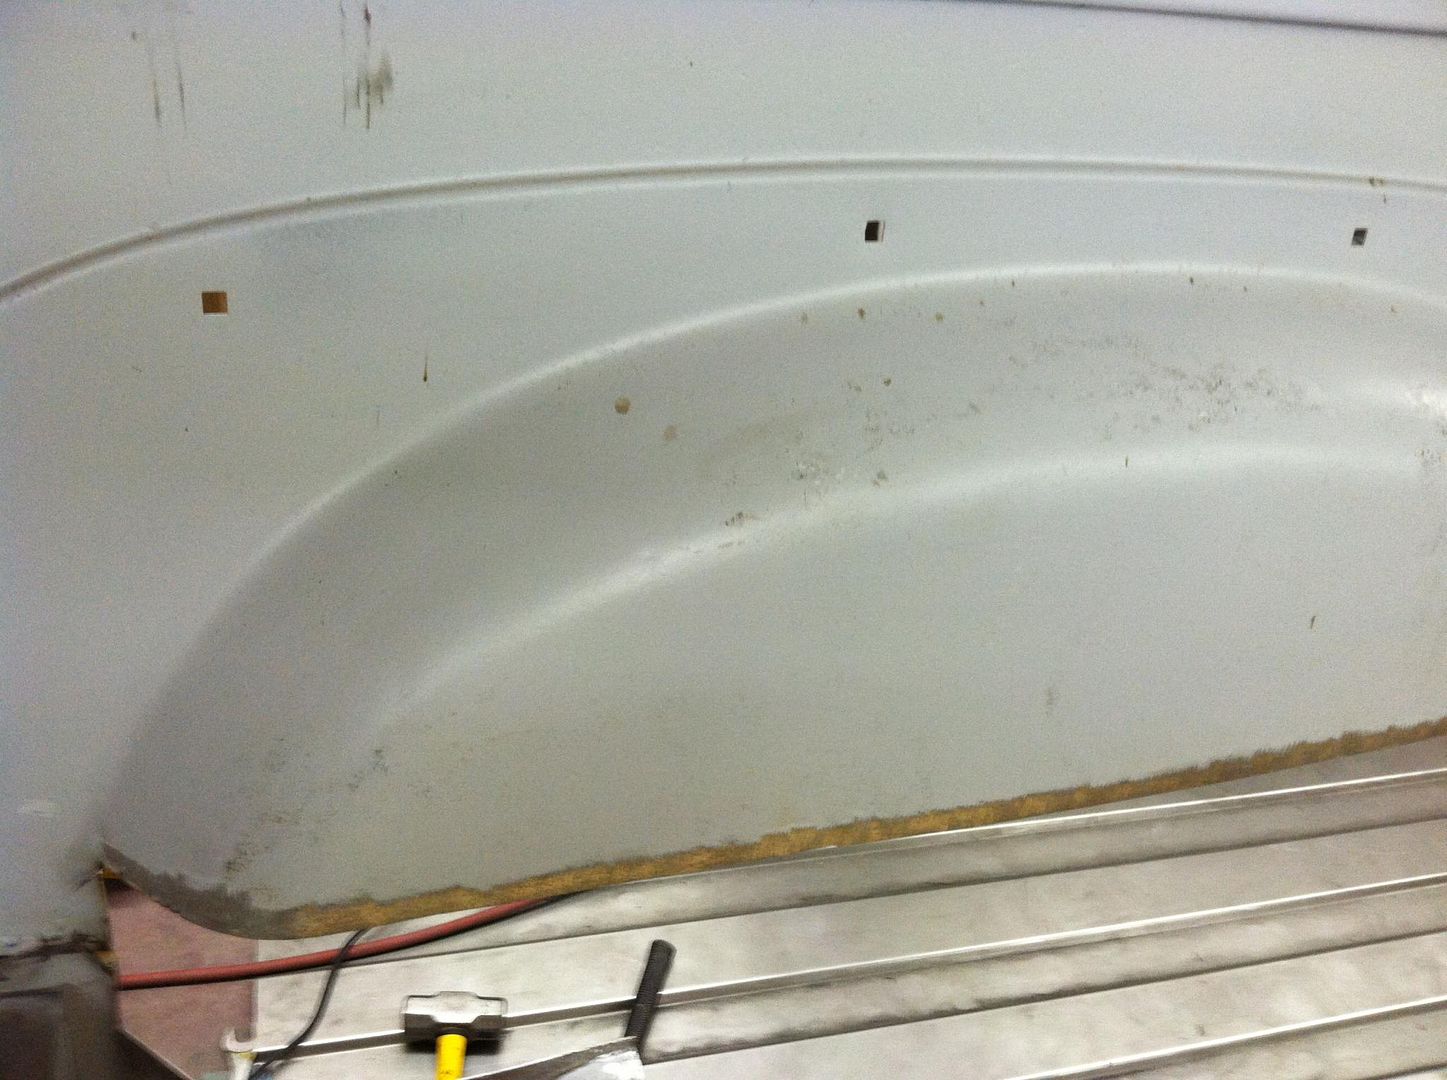
__________________
Project Goldilocks '66 C10 Short Fleet BBW Build '65 C10 Highly Detailed Stock Restoration Thread '78 Camaro Targa Roof Build '55 International Metal/Body/Paint Work '66 F100 Full Rotisserie Restoration '40 Packard 120 Convertible Coupe Restoration How To Restore and Detail an Original Gauge Cluster How To Detail Sand Body Panels, Edges, Corners, Etc |
|
|
|
|
01-22-2013, 12:08 PM
|
#147 |
|
Junior Member
Join Date: Dec 2006
Location: Guymon, Oklahoma
Posts: 2,040
|
Re: '55 International Metal/Body/Paint Work
Great work!!!
Are you a body man, or metal worker by trade? Maybe a tech. school teacher? Cayoterun
__________________
Cayoterun Okla. Panhandle I think I'll do it myself and pay the extra $500. |
|
|
|
|
01-29-2013, 11:39 AM
|
#148 | |
|
Registered User
Join Date: May 2011
Location: Anderson SC
Posts: 3,869
|
Re: '55 International Metal/Body/Paint Work
Quote:
__________________
Project Goldilocks '66 C10 Short Fleet BBW Build '65 C10 Highly Detailed Stock Restoration Thread '78 Camaro Targa Roof Build '55 International Metal/Body/Paint Work '66 F100 Full Rotisserie Restoration '40 Packard 120 Convertible Coupe Restoration How To Restore and Detail an Original Gauge Cluster How To Detail Sand Body Panels, Edges, Corners, Etc |
|
|
|
|
|
01-29-2013, 11:48 AM
|
#149 |
|
Registered User
Join Date: May 2011
Location: Anderson SC
Posts: 3,869
|
Re: '55 International Metal/Body/Paint Work
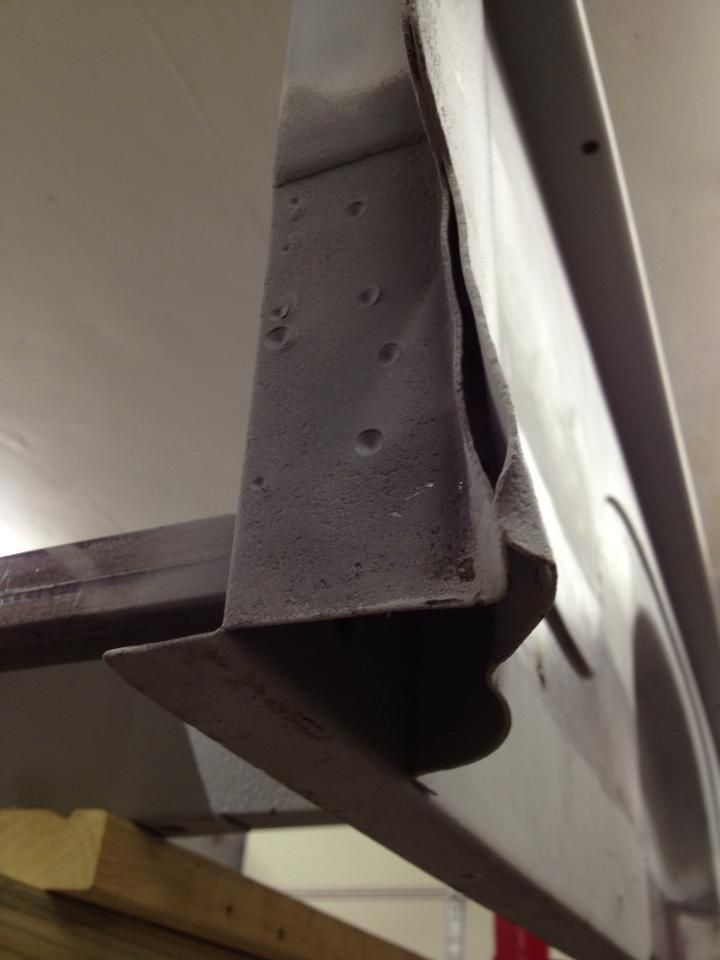
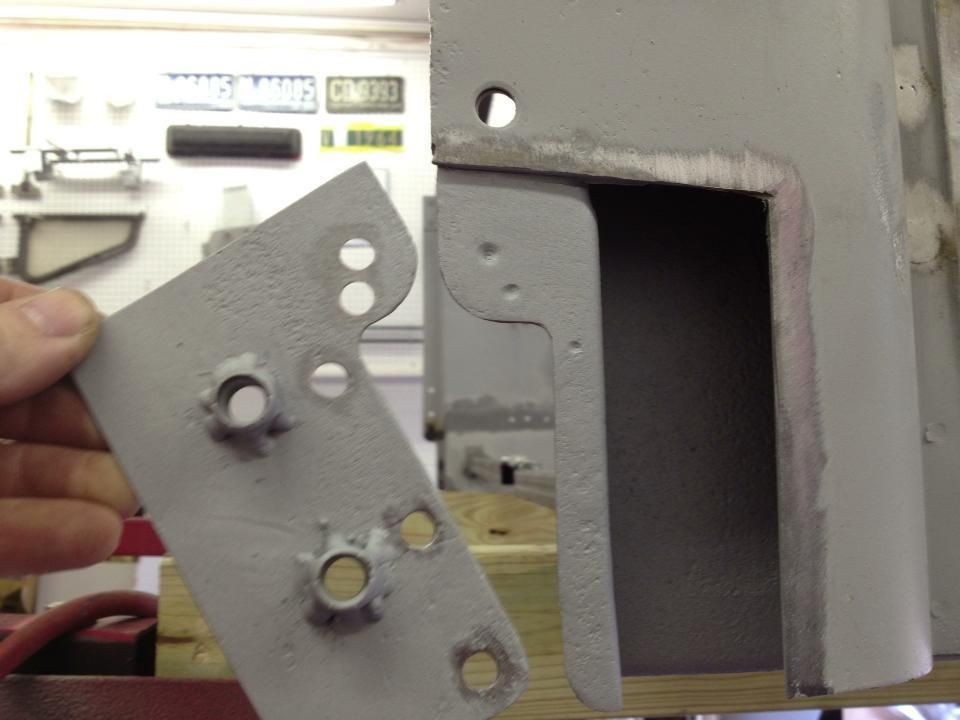
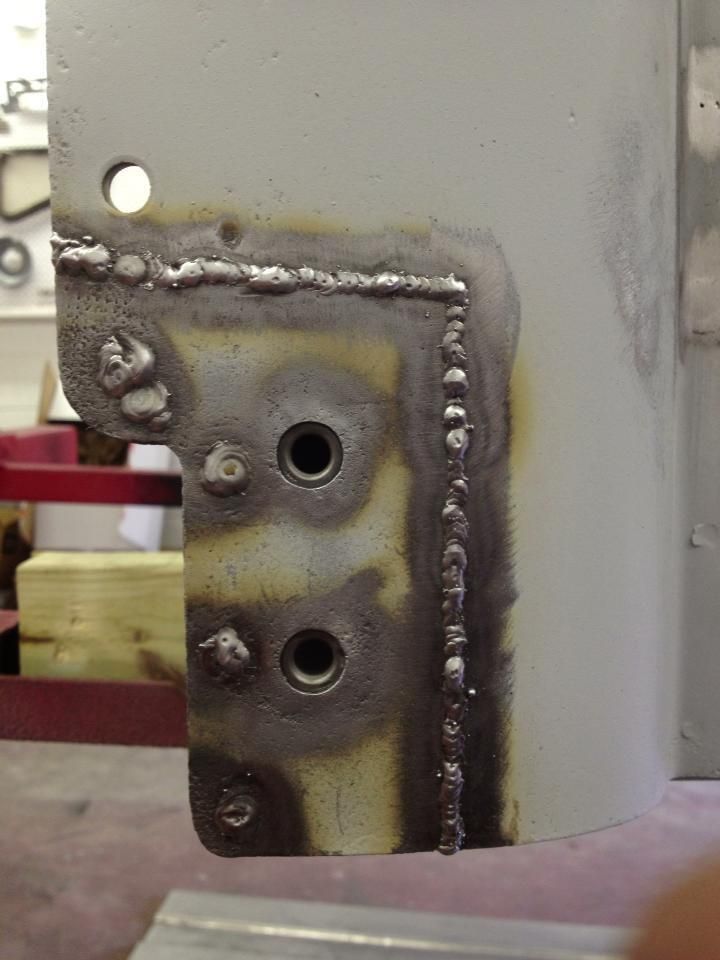
Both rear corners were mangled and the welded in nuts for the tailgate hinges were rusted and cross threaded.
 Blasted and straightened, and new stainless nuts welded in place. 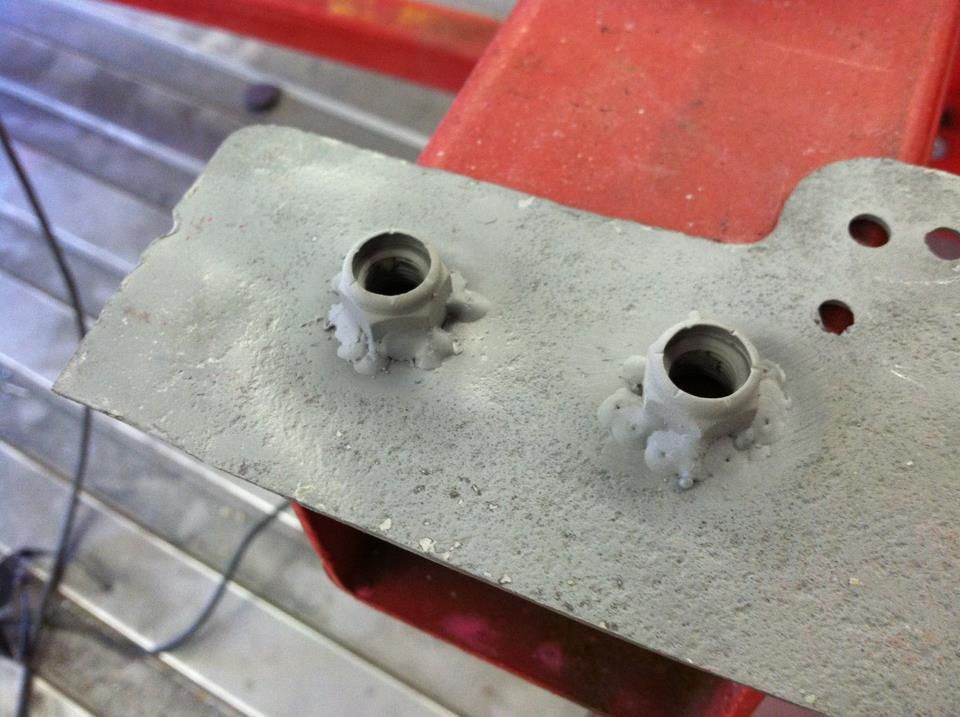 Inside channel blasted and sprayed with weld-thru primer, ready to weld back in. 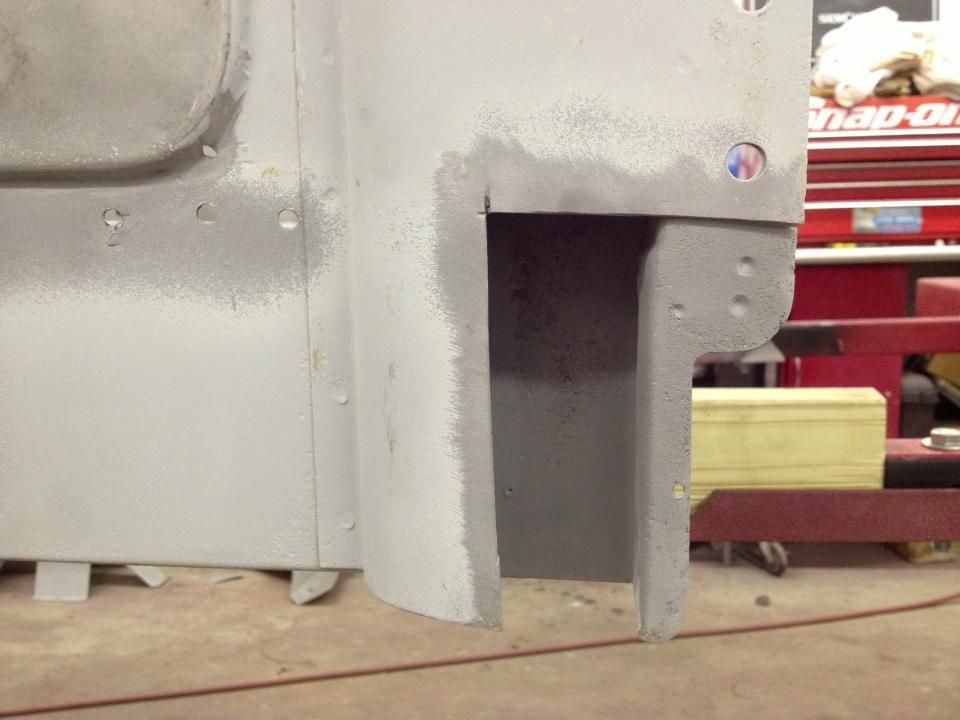   Welded in and welds ground down. 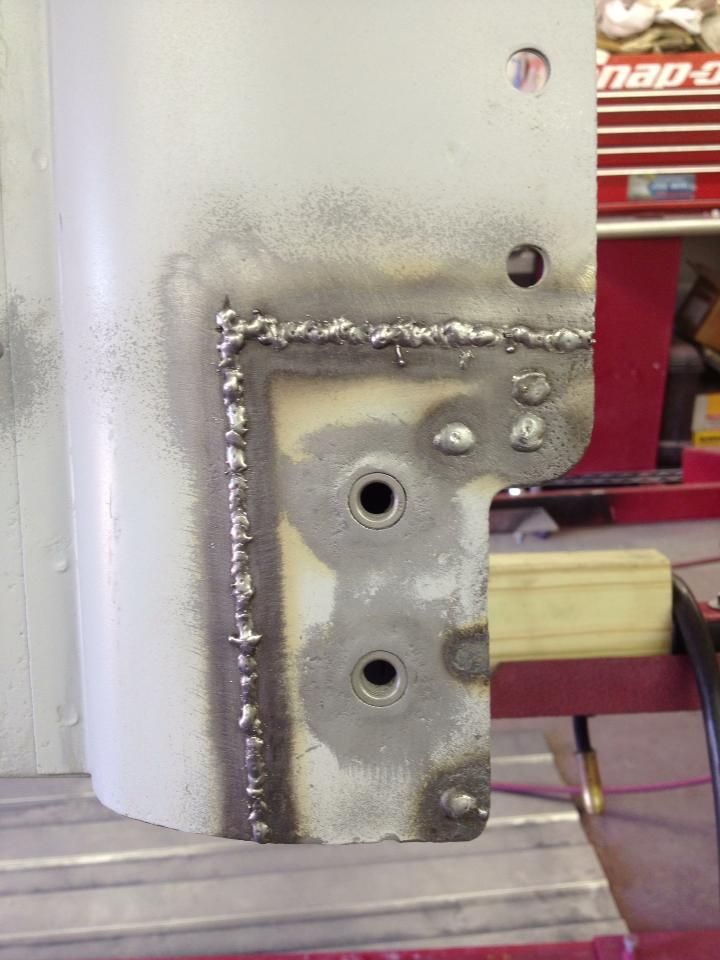 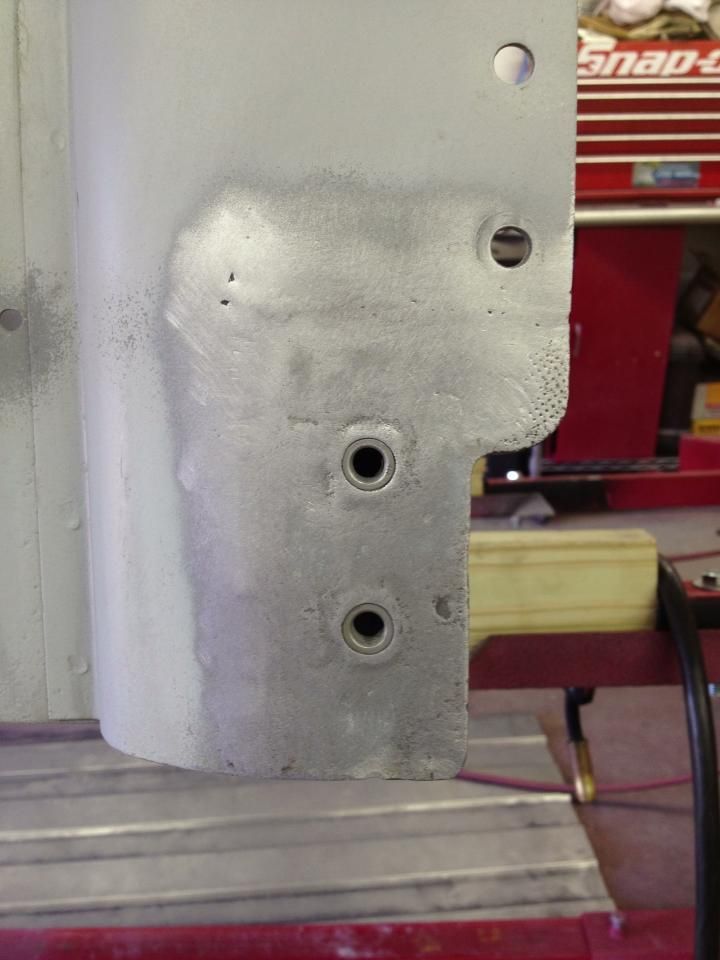
__________________
Project Goldilocks '66 C10 Short Fleet BBW Build '65 C10 Highly Detailed Stock Restoration Thread '78 Camaro Targa Roof Build '55 International Metal/Body/Paint Work '66 F100 Full Rotisserie Restoration '40 Packard 120 Convertible Coupe Restoration How To Restore and Detail an Original Gauge Cluster How To Detail Sand Body Panels, Edges, Corners, Etc |
|
|
|
|
01-29-2013, 11:50 AM
|
#150 |
|
Registered User
Join Date: May 2011
Location: Anderson SC
Posts: 3,869
|
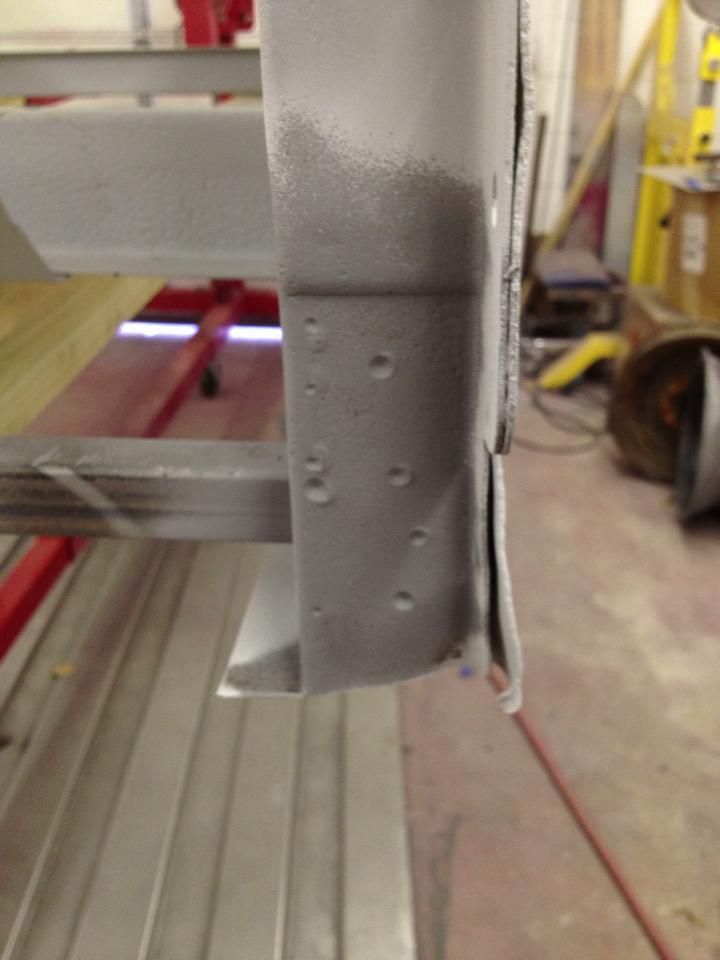
Re: '55 International Metal/Body/Paint Work
Right side corner repair.
__________________
Project Goldilocks '66 C10 Short Fleet BBW Build '65 C10 Highly Detailed Stock Restoration Thread '78 Camaro Targa Roof Build '55 International Metal/Body/Paint Work '66 F100 Full Rotisserie Restoration '40 Packard 120 Convertible Coupe Restoration How To Restore and Detail an Original Gauge Cluster How To Detail Sand Body Panels, Edges, Corners, Etc |
|
|
|
 |
| Bookmarks |
|
|


 Linear Mode

