
|
 05-26-2014, 10:38 PM
|
#76 | |
|
Senior Member
 Join Date: Mar 2013
Location: Ann Arbor, MI
Posts: 1,021
|
Re: My Luxurious late model truck (not so much)
Quote:
|
|

|

|
|
05-27-2014, 06:07 PM
|
#77 |
|
Watch out for your cornhole !
Join Date: Jun 2003
Location: Azle, Texas
Posts: 14,162
|
Re: My Luxurious late model truck (not so much)
Further updatage....
Today I did a very unpleasant task on the truck. I pulled the transmission out and put it back in. All because of the throwout bearing. Remember, I spoke much earlier in the thread that the truck had a bad throwout bearing when I got it. Well, when I replaced it, I installed it the same way as the original one was. In my reading on the interwebs I ran across a picture that showed mine (and the previous guy who installed the last one's) mistake. 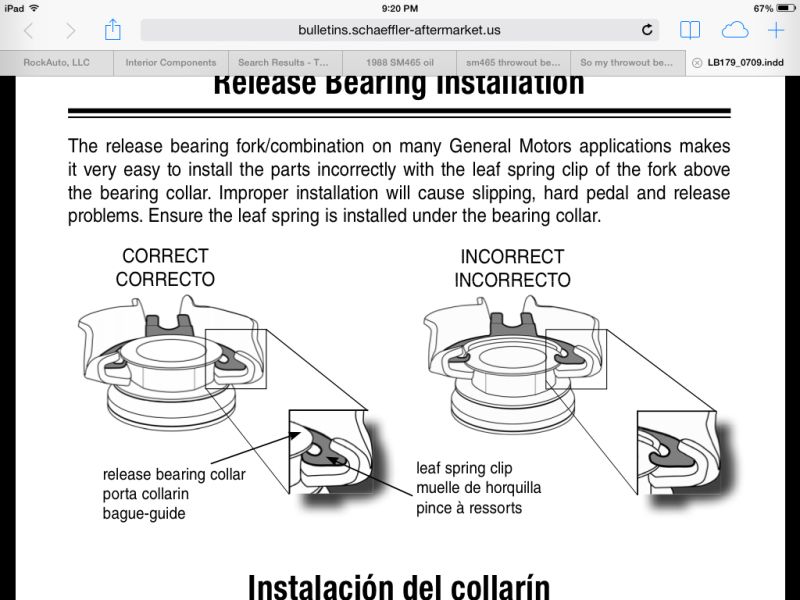 The clutch worked and felt fine, but knowing the T/O bearing was installed incorrectly just wasn't something I could live with. Besides, I already have the transfer case off of the truck so it would never be any easier to R&R the transmission than right now. All told, maybe 30 minutes of work involved, so just a minor speedbump overall. I just hate using my crappy Northern Tool floor jack to pull these big cast iron finger mashers. If I had a lift and a proper transmission jack, it wouldn't be any issue I'm sure. Now, with the transmission permanently installed, I could do some fun stuff. I have been waiting on the interior install until I was finished with removing the transmission cover part of the floorboard. 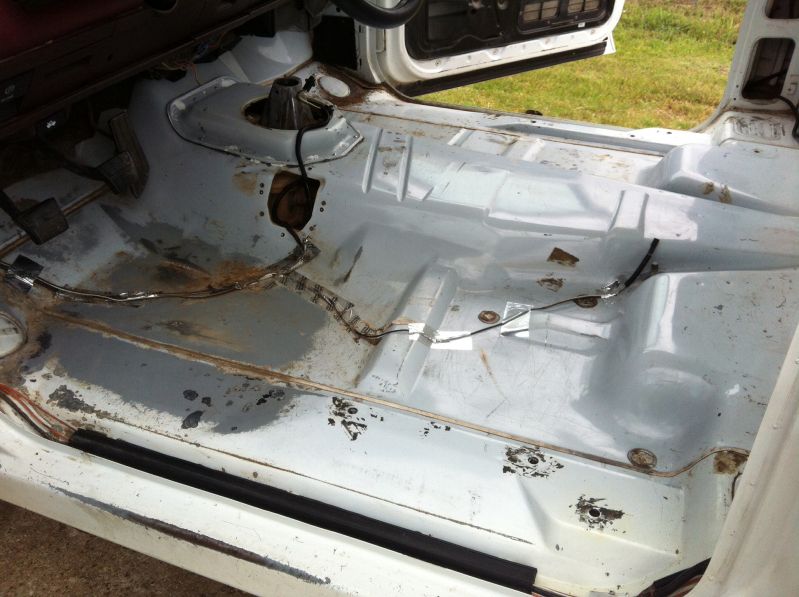 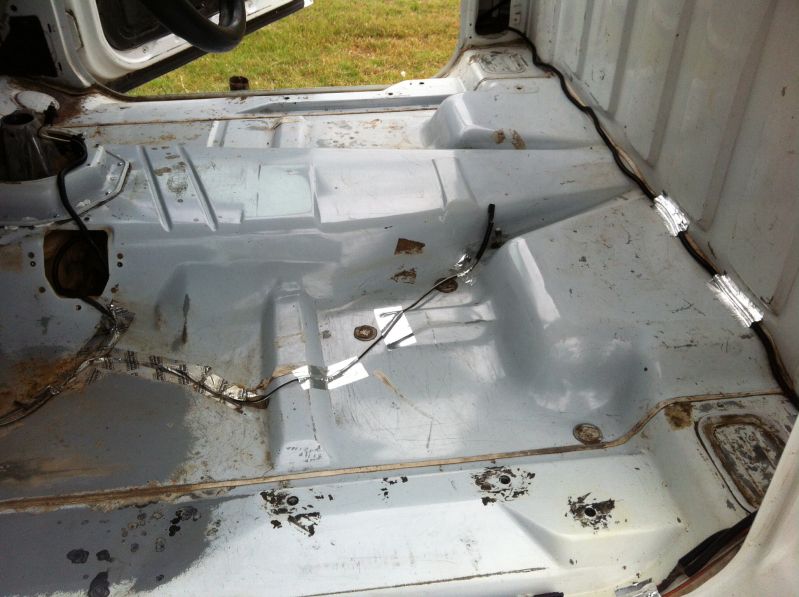 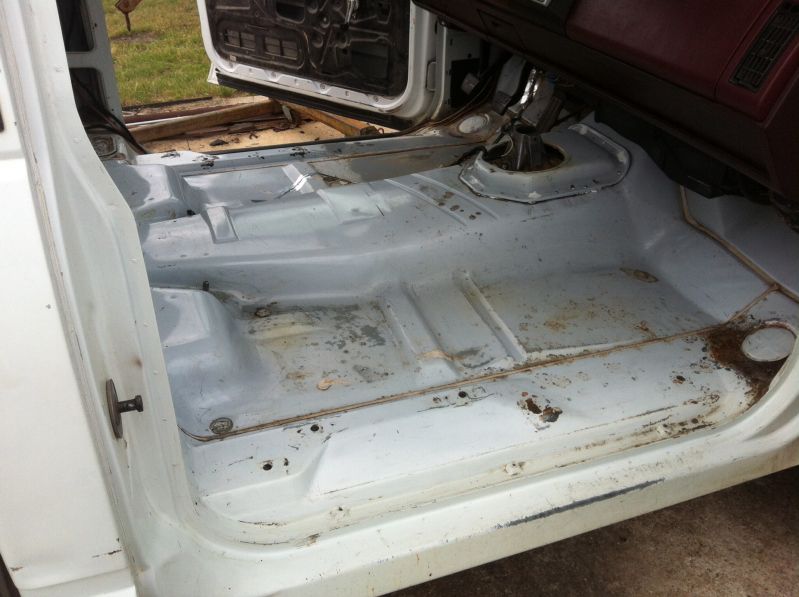 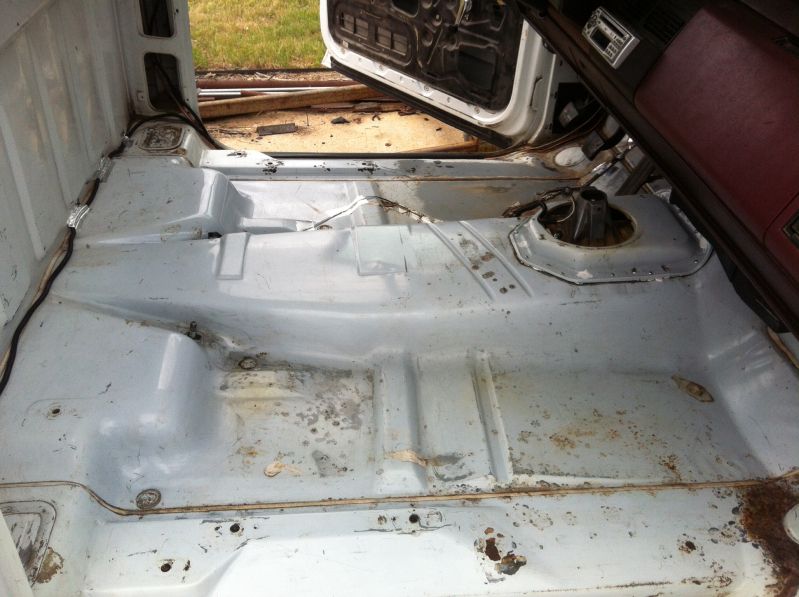 Remember my 20 dollar Craiglsist carpet and pad score from last weekend. 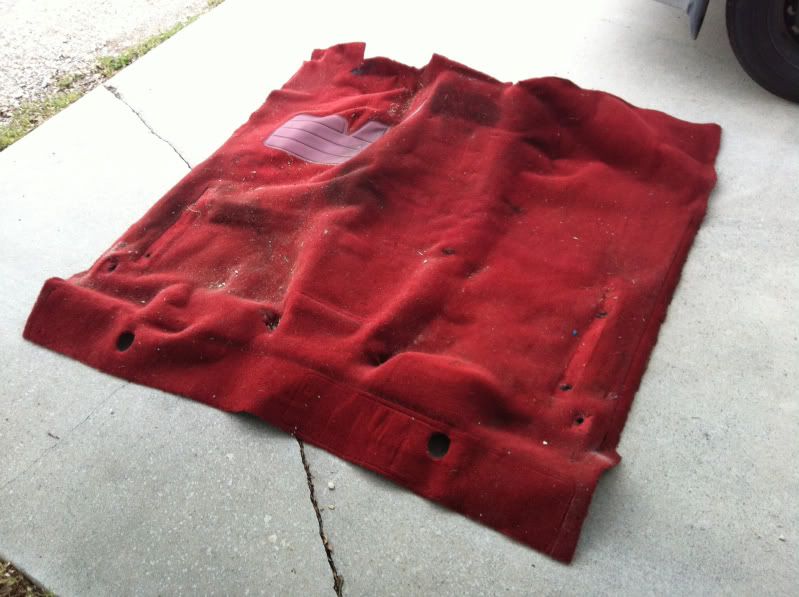 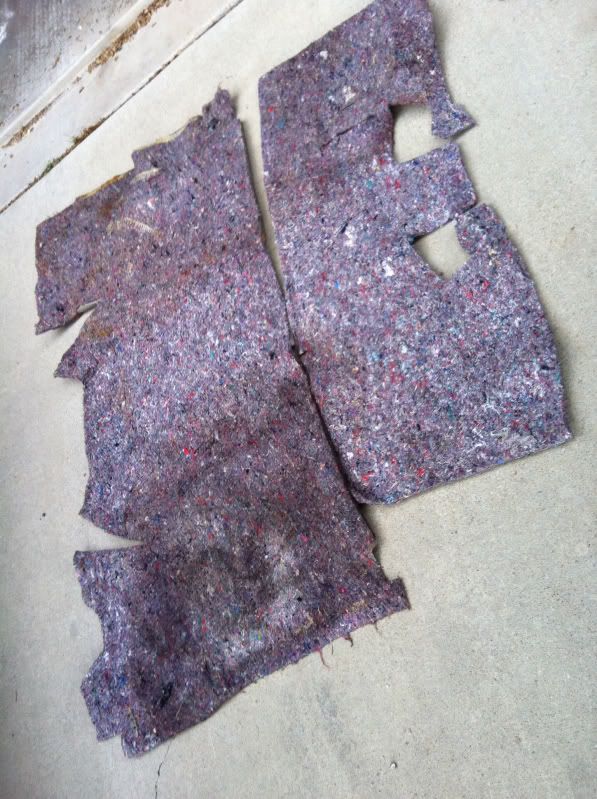 I spent some quality time cleaning it all up before installation. 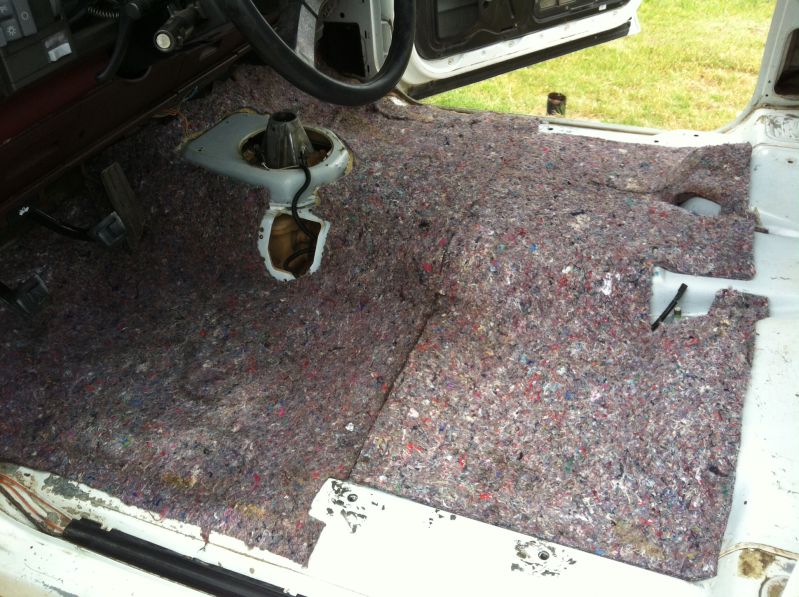 Cutting the jute and heat shield stuff for the standard transmission stuff was a real pain.  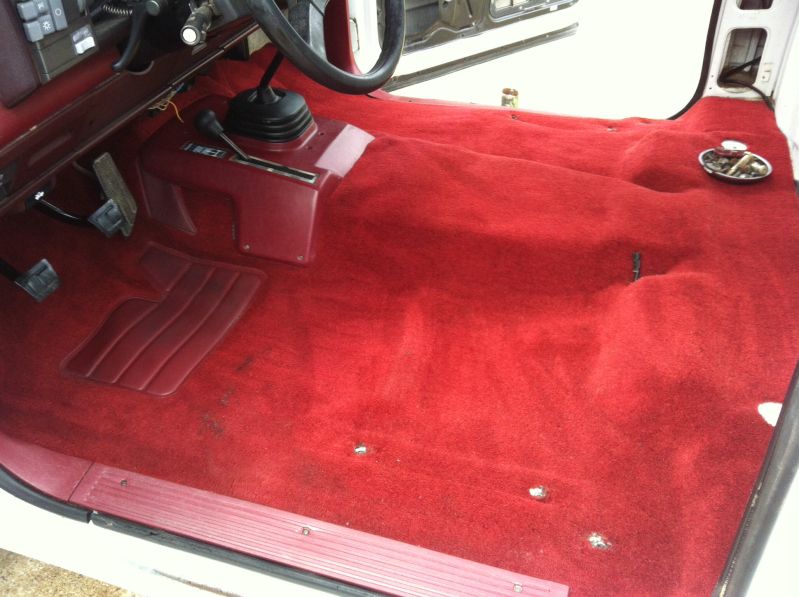 Yes, that's an annoying stain on the driver side just behind the rubber pad deal. It defied all efforts to remove it. Needless to say, a pair of floor mats is in this truck's future. I tend to use Huskyliners in my stuff anyway. That stain will be well hidden under them. 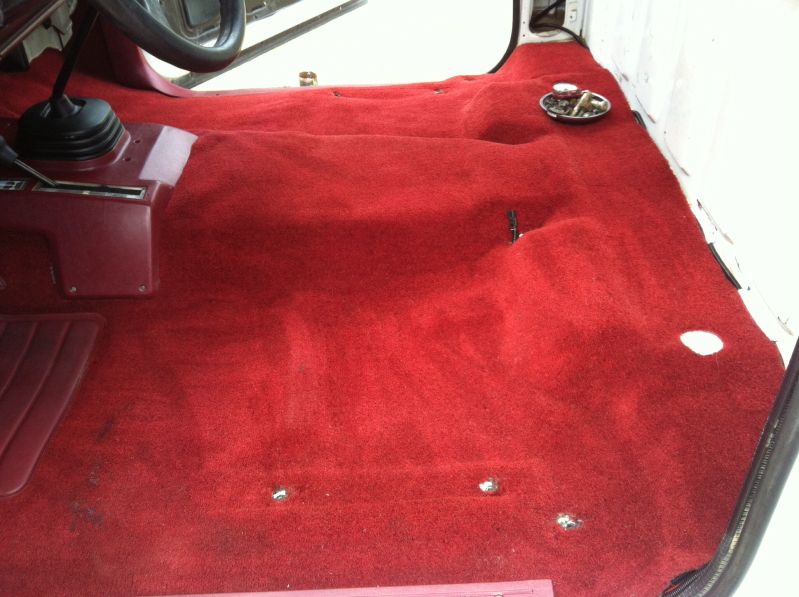 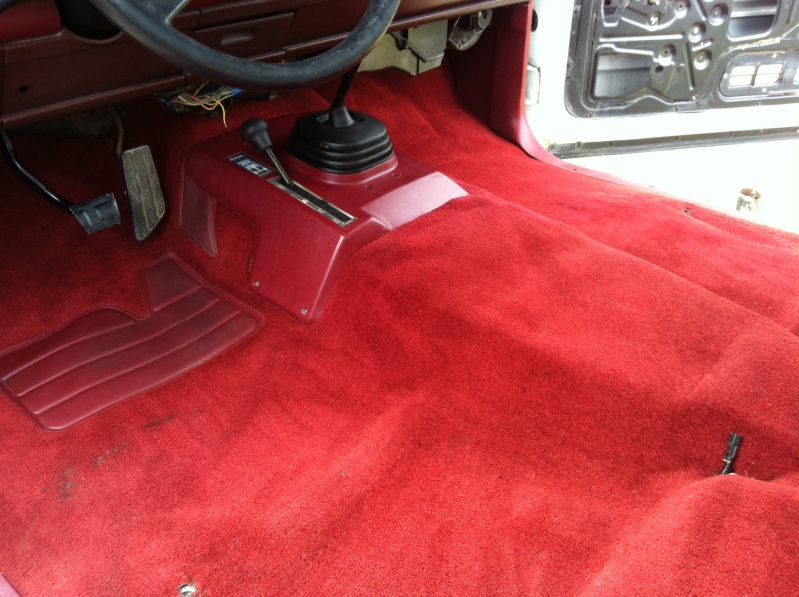 I also cleaned up the door rubbers best I could and installed the Craigslist kick panels and sill plates. 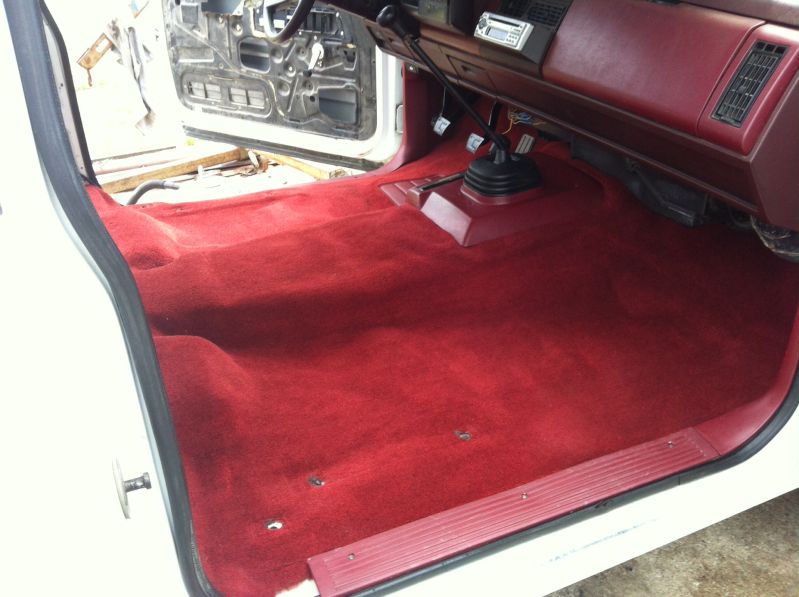 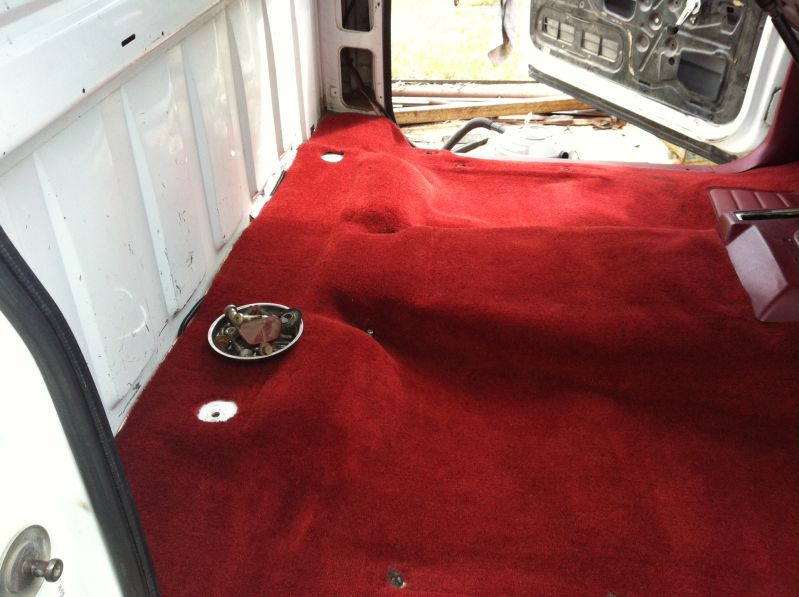 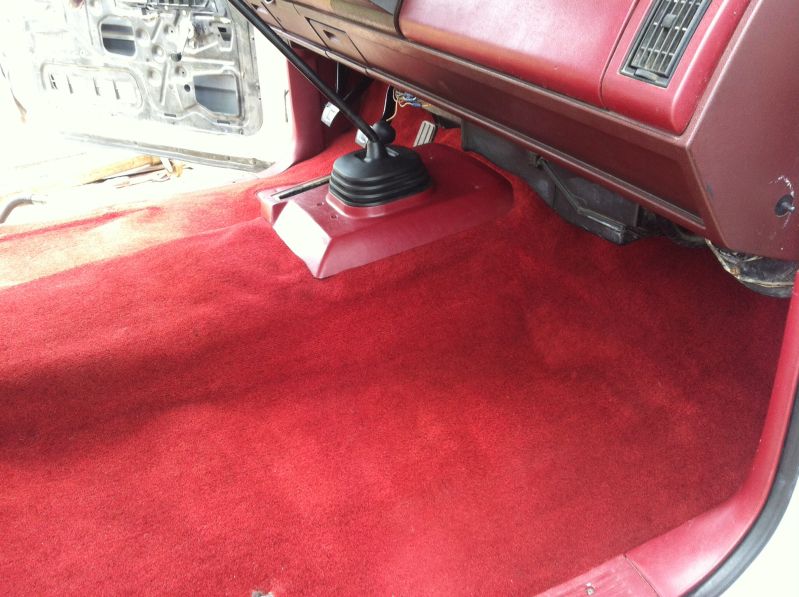 I'm currently stalled out on the interior for a little while until I can come up with some money for stereo speakers. Remember these trucks use 4x6 speakers in the cab back pillars. I currently have no speakers at all and need to get a pair so I can install them since they must be installed prior to installing the rear trim pieces and seatbelts.
__________________
I'm on the Instagram- @Gearhead_Kevin |
|
|
|
|
05-27-2014, 06:24 PM
|
#78 |
|
Registered User
Join Date: Sep 2012
Location: Midway, NC
Posts: 3,275
|
Re: My Luxurious late model truck (not so much)
The interior is going to look great. I can already tell.
__________________
http://67-72chevytrucks.com/vboard/s...d.php?t=581873 The low buck build threads. Check'em out! http://67-72chevytrucks.com/vboard/s...d.php?t=666022 My build thread Crossmembers CC |
|
|
|
|
05-27-2014, 06:29 PM
|
#79 |
|
Watch out for your cornhole !
Join Date: Jun 2003
Location: Azle, Texas
Posts: 14,162
|
Re: My Luxurious late model truck (not so much)
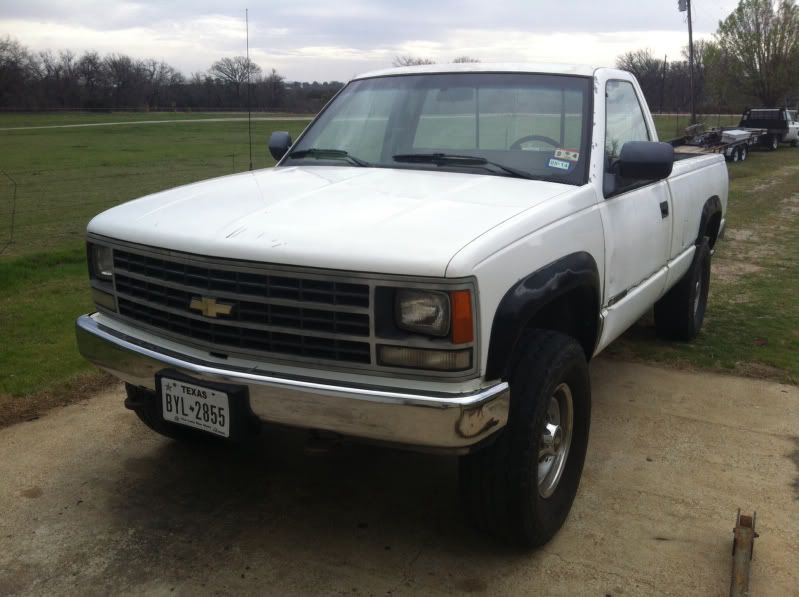
One other thing on this truck that's wearing on me is the ugly mug it has.
 I remembered that I had these little jewels sitting up on a shelf in my shop. 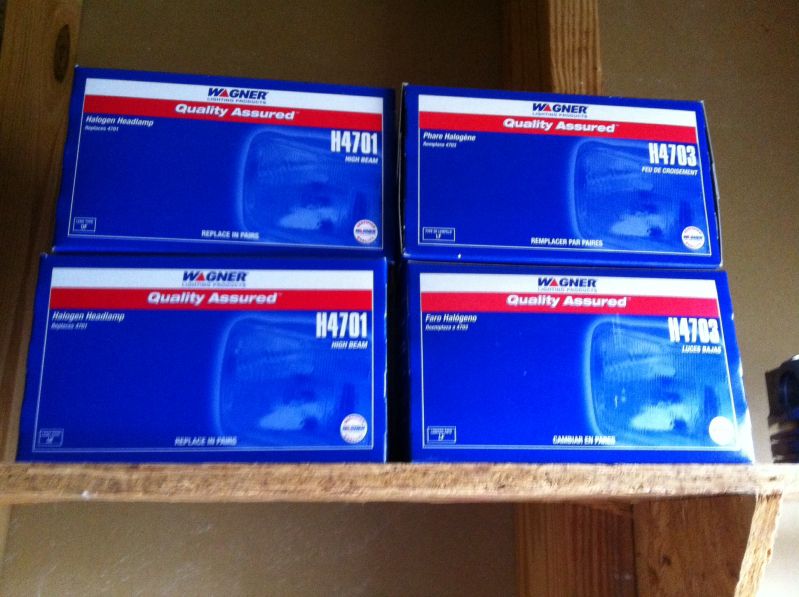 Those are the 88-89 type of sealed beam headlight bulbs. All brand new in the box. I think I'm gonna keep an eye open for a pair of bucket/adjuster assemblies off of an 88/89 truck and do a grille swap down the road. Stuff like this is important because having it in the back of your mind really pays off someday when you come across deals unexpectedly.
__________________
I'm on the Instagram- @Gearhead_Kevin |
|
|
|
|
05-27-2014, 06:32 PM
|
#80 | |
|
Watch out for your cornhole !
Join Date: Jun 2003
Location: Azle, Texas
Posts: 14,162
|
Re: My Luxurious late model truck (not so much)
Quote:
__________________
I'm on the Instagram- @Gearhead_Kevin |
|
|
|
|
|
05-27-2014, 08:26 PM
|
#81 |
|
Registered User
Join Date: Oct 2009
Location: canton ga
Posts: 12,729
|
Re: My Luxurious late model truck (not so much)
Interior is looking great ,cant wait to see more .
|
|
|
|
|
05-27-2014, 09:36 PM
|
#82 |
|
Senior Member
Join Date: Mar 2013
Location: Ann Arbor, MI
Posts: 1,021
|
Re: My Luxurious late model truck (not so much)
Is that a new or refurbished shifter boot? Looks nice!
|
|
|
|
|
05-27-2014, 09:41 PM
|
#83 |
|
Watch out for your cornhole !
Join Date: Jun 2003
Location: Azle, Texas
Posts: 14,162
|
Re: My Luxurious late model truck (not so much)
I just cleaned it up with my magic rubber cleaning potion.
(Goop hand soap)
__________________
I'm on the Instagram- @Gearhead_Kevin |
|
|
|
|
05-27-2014, 11:10 PM
|
#84 |
|
Spear and magic helmet!
Join Date: Oct 2006
Location: Nashville, TN
Posts: 1,226
|
Re: My Luxurious late model truck (not so much)
Wow, nice thread. Where did you get your heater hose disconnect? I'm smelling coolant in my Tahoe and based on my old Suburban, that's probably where it's coming from?
|
|
|
|
|
05-28-2014, 06:18 AM
|
#85 | |
|
Watch out for your cornhole !
Join Date: Jun 2003
Location: Azle, Texas
Posts: 14,162
|
Re: My Luxurious late model truck (not so much)
Quote:
__________________
I'm on the Instagram- @Gearhead_Kevin |
|
|
|
|
|
05-28-2014, 10:33 AM
|
#86 |
|
Spear and magic helmet!
Join Date: Oct 2006
Location: Nashville, TN
Posts: 1,226
|
Re: My Luxurious late model truck (not so much)
Thanks
|
|
|
|
|
05-28-2014, 11:52 AM
|
#87 |
|
I'm just glad to be here!
Join Date: Jan 2008
Location: Longview, TX
Posts: 4,788
|
Re: My Luxurious late model truck (not so much)
Carpet turned out great! Looking better with each post!
__________________
Karl  1965 Chevy Stepside(Grandpa's Old Blue) and (July 2015 Shop Build!)(2020, the Saga Continues) http://67-72chevytrucks.com/vboard/s...d.php?t=372424 The LST Challenge: http://67-72chevytrucks.com/vboard/s...=1#post7812257 Korbin's 1st Square: "Sunburn" http://67-72chevytrucks.com/vboard/s...d.php?t=418618 1985 GMC Sierra: "White Trash", Korbin's 2nd now... http://67-72chevytrucks.com/vboard/s...d.php?t=632305 Henry - 1984 Chevrolet, Owen's 1st Square |
|
|
|
|
05-28-2014, 01:20 PM
|
#88 |
|
Registered User
Join Date: Apr 2003
Location: Indep, MO
Posts: 5,893
|
Re: My Luxurious late model truck (not so much)
Just keeps gettin' better!
__________________
Boppa's Old Yeller Truck Build, Old Yeller's New Heart! Project Buzz Bomb Flyin' Low! |
|
|
|
|
05-29-2014, 04:19 PM
|
#89 |
|
Watch out for your cornhole !
Join Date: Jun 2003
Location: Azle, Texas
Posts: 14,162
|
Re: My Luxurious late model truck (not so much)
The title to this post should be "Best day at work ever".
Why ? Because I took a day of vacation from work and spent it doing what I love, building trucks. I have to say right up front, I know nothing of any depth about transfer cases. Mine was leaky and the odometer shows 222k miles so I decided to dive in. It was definitely a learn-as-you-go project. 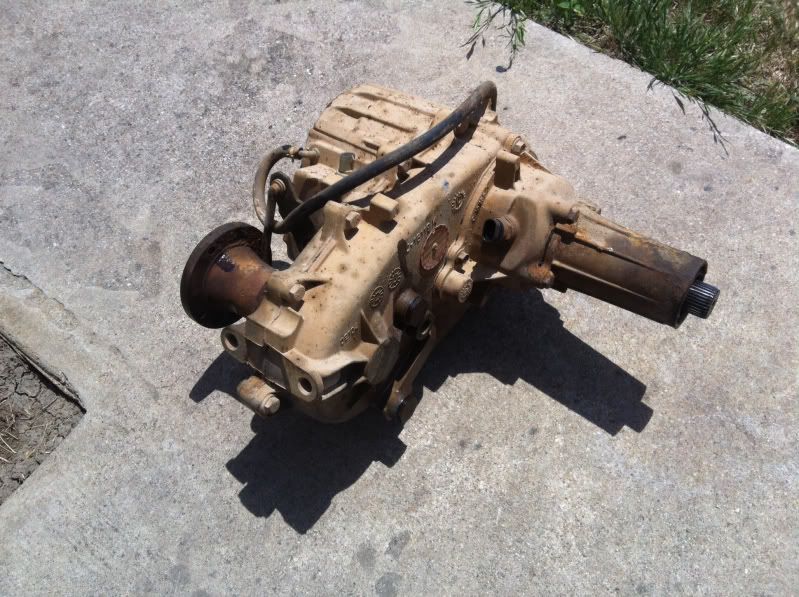 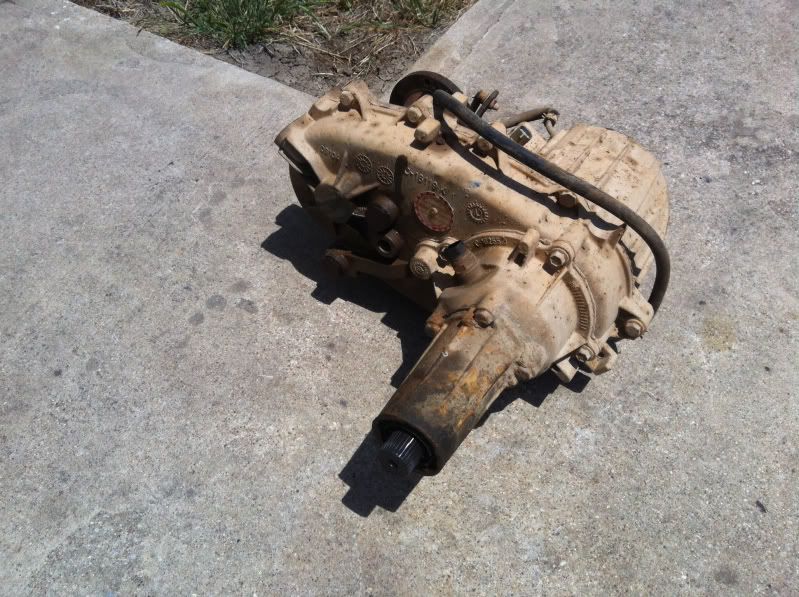 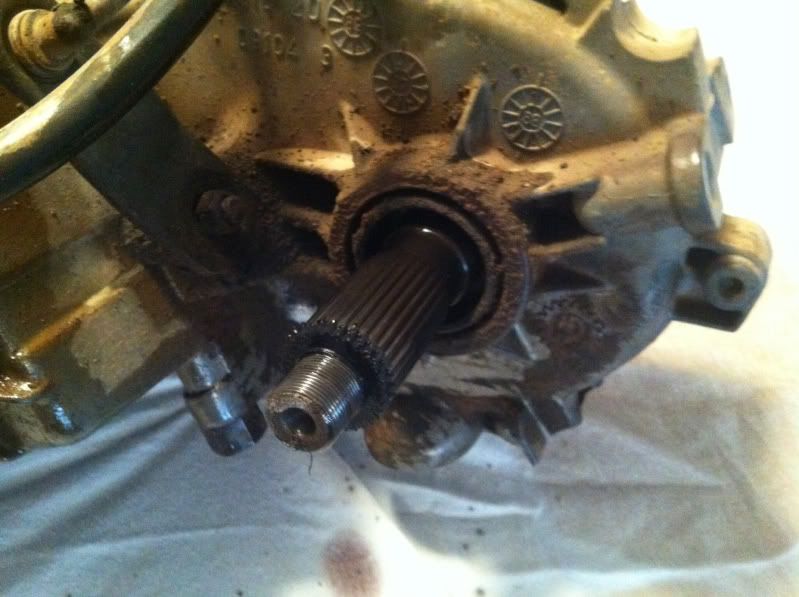 Take it all apart. 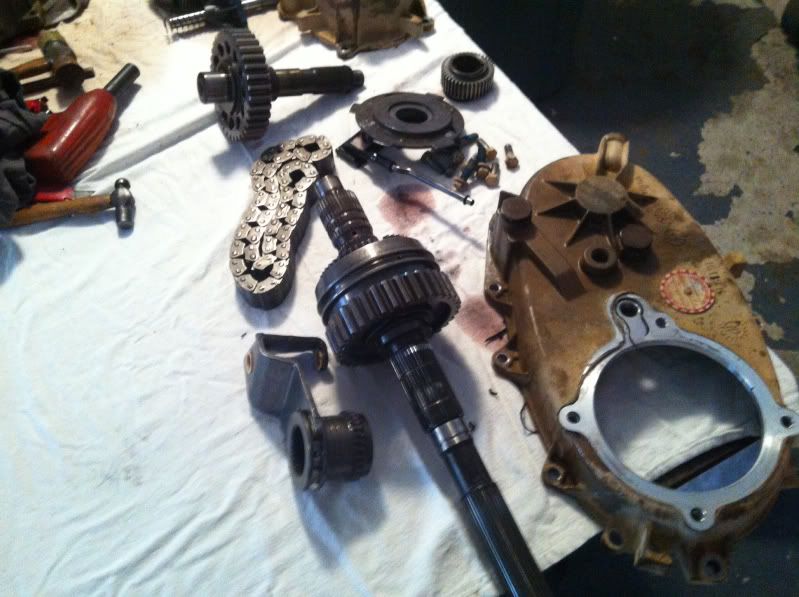 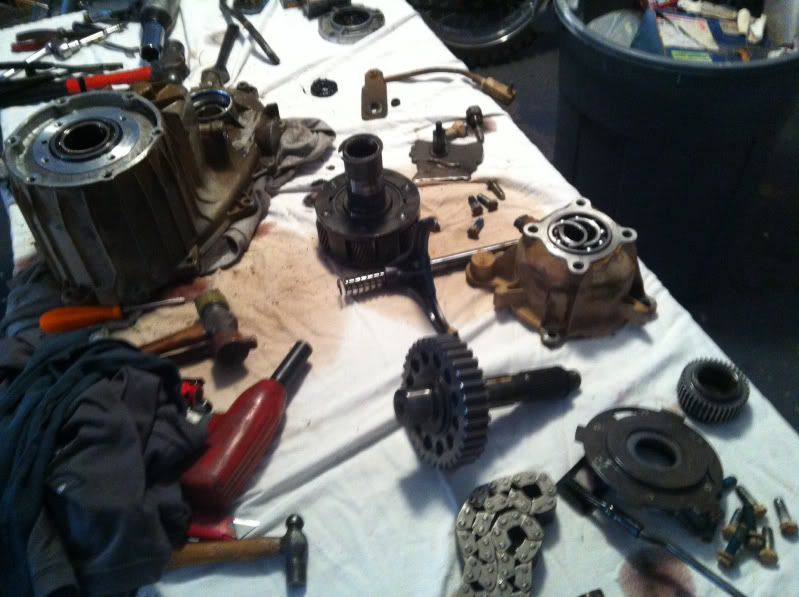 This bearing was a tough one to remove. It fits in a blind hole so there's no pressing it out. I wound up using my pilot bearing puller to remove it. Don't think I have super tools here, this is a 15 dollar puller. The trick is to pull tension against the bearing with the puller and heat the aluminum case with a propane torch till it lets loose. Notice I had to use a couple of small sockets to space the puller up enough to work. Finesse is definitely the order of the day here. If I'd have horsed down on the puller too much it would have surely broken the aluminum case or the puller. A steady pressure and heat till it releases saves you having to go all hulk on it and wind up searching Craigslist for another aluminum case to replace the one you broke. 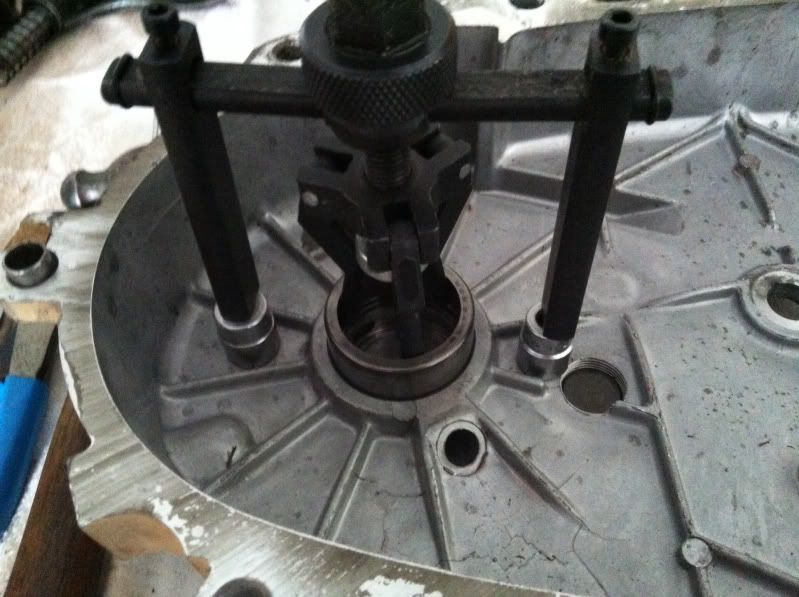 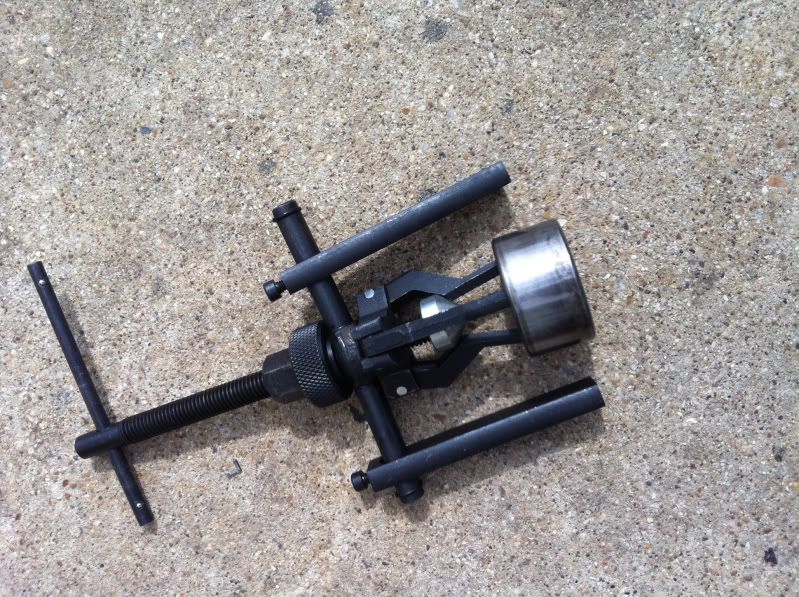 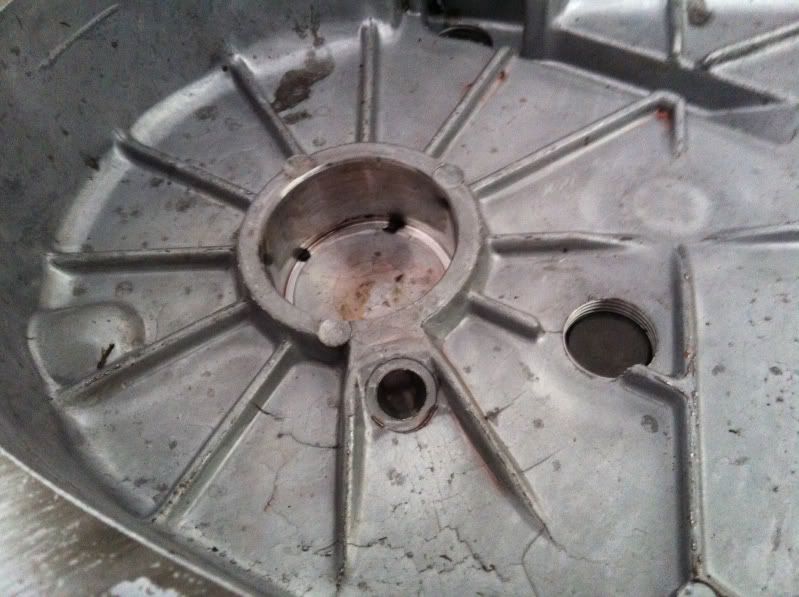 Now, get it all clean. I used my 79 dollar soda blaster to clean it up initially, then the garden hose and spray cleaner to do the final clean to remove any soda residue. Yes, I work ghetto. The parts are just set onto a 5 gallon bucket next to my shop for blasting. 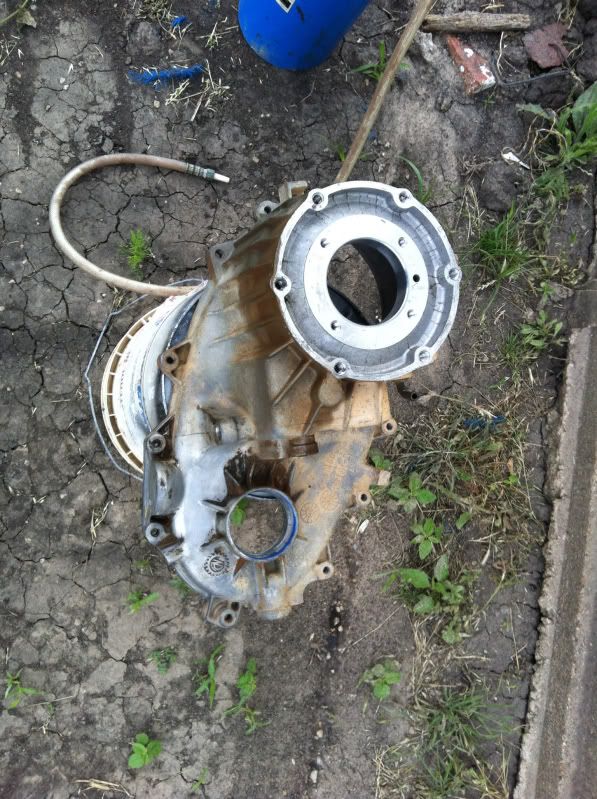 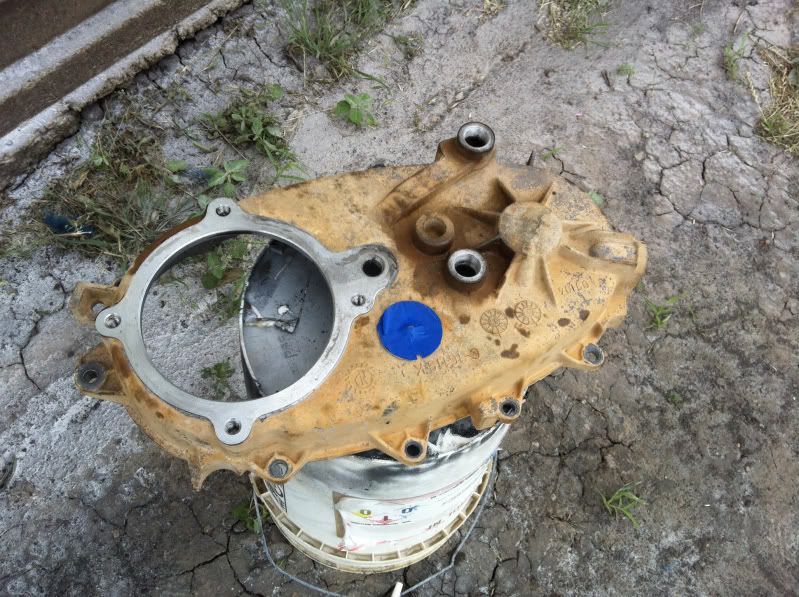 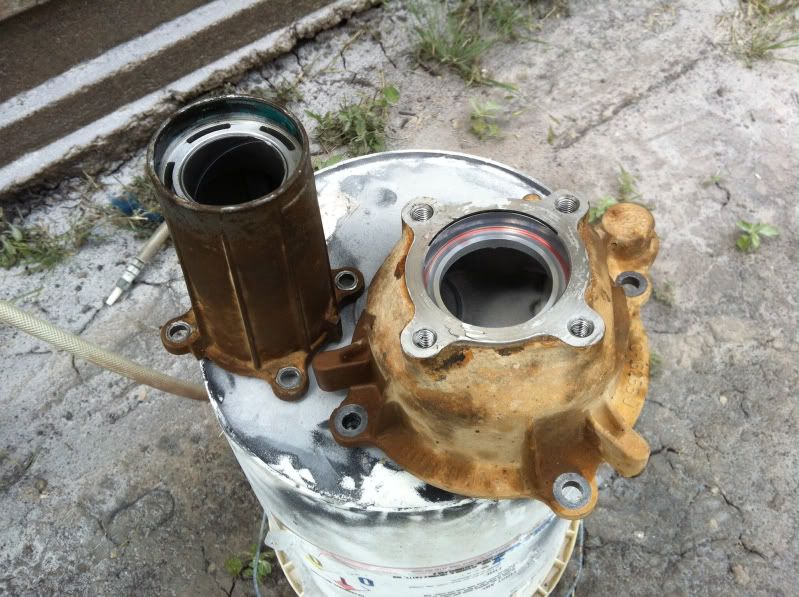 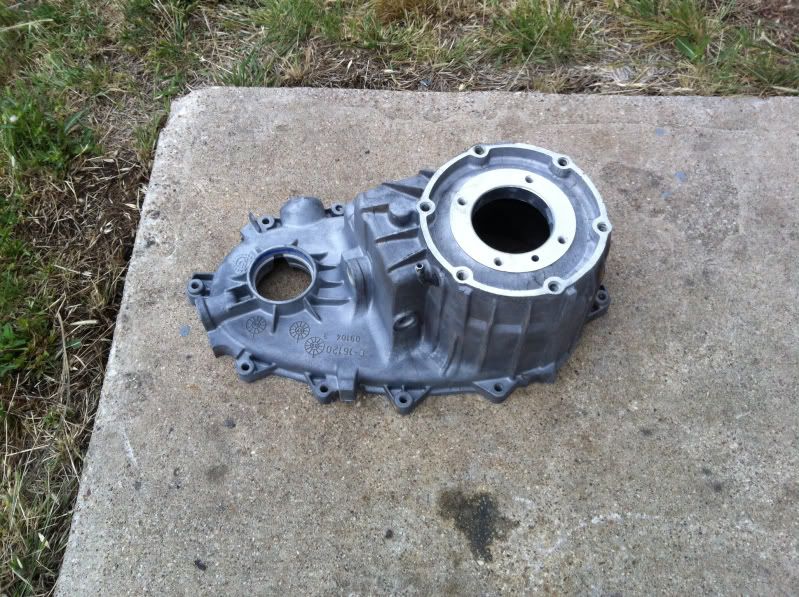 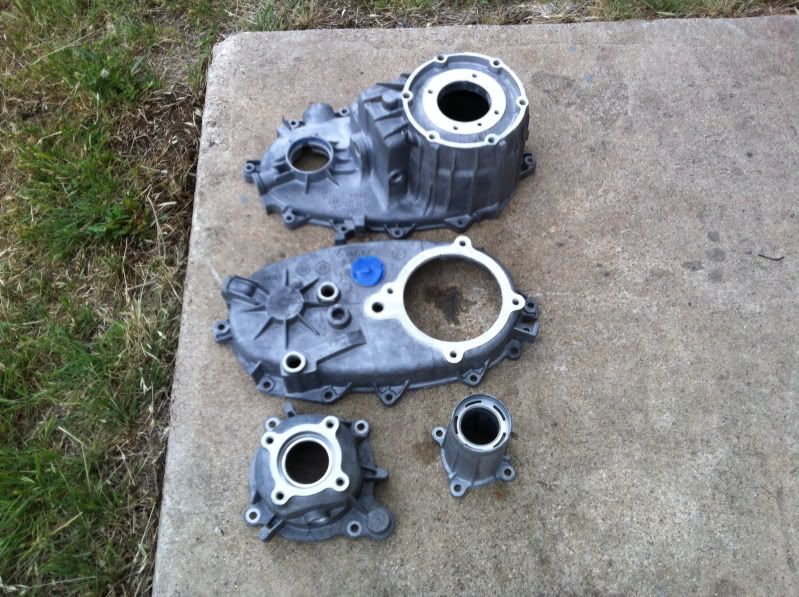 Studying before engaging in battle. 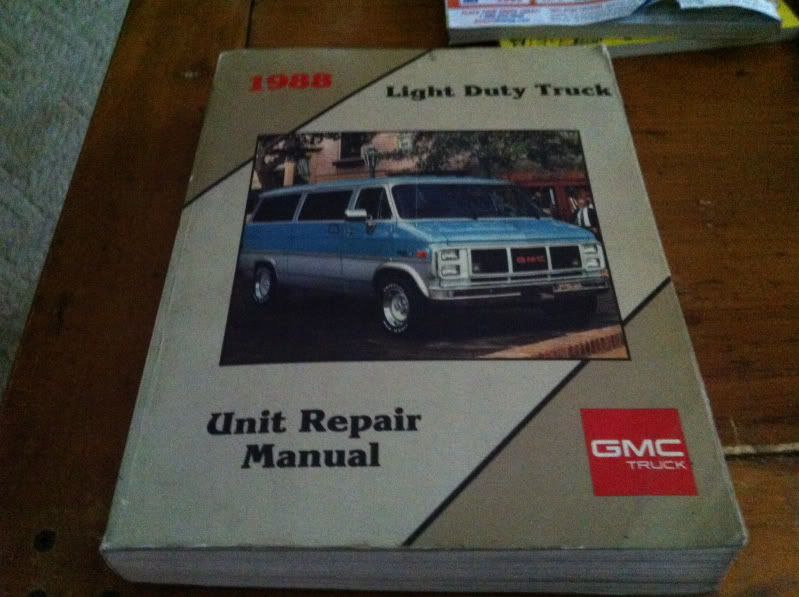 I gave 40 bucks for a stack of factory service manuals right here on the parts board. It's been money very well spent. Even if they aren't the exact manual for the vehicle, the components are usually pretty much the same. 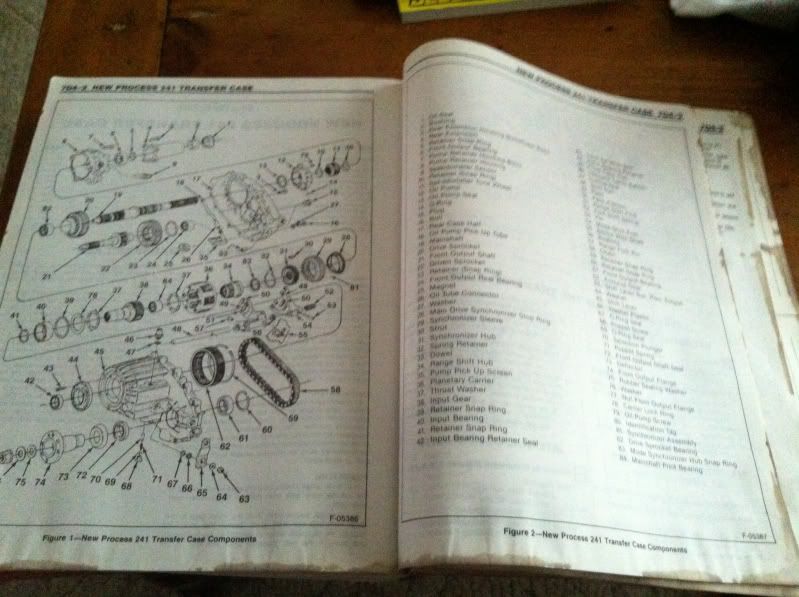 More in next post...
__________________
I'm on the Instagram- @Gearhead_Kevin Last edited by Tx Firefighter; 05-29-2014 at 06:29 PM. |
|
|
|
|
05-29-2014, 04:25 PM
|
#90 |
|
I'm just glad to be here!
Join Date: Jan 2008
Location: Longview, TX
Posts: 4,788
|
Re: My Luxurious late model truck (not so much)
Are you going to powder coat the case?
__________________
Karl 1965 Chevy Stepside(Grandpa's Old Blue) and (July 2015 Shop Build!)(2020, the Saga Continues) http://67-72chevytrucks.com/vboard/s...d.php?t=372424 The LST Challenge: http://67-72chevytrucks.com/vboard/s...=1#post7812257 Korbin's 1st Square: "Sunburn" http://67-72chevytrucks.com/vboard/s...d.php?t=418618 1985 GMC Sierra: "White Trash", Korbin's 2nd now... http://67-72chevytrucks.com/vboard/s...d.php?t=632305 Henry - 1984 Chevrolet, Owen's 1st Square |
|
|
|
|
05-29-2014, 04:40 PM
|
#91 |
|
Watch out for your cornhole !
Join Date: Jun 2003
Location: Azle, Texas
Posts: 14,162
|
Re: My Luxurious late model truck (not so much)
My local transmission shop stocks the parts I needed for the rebuild.
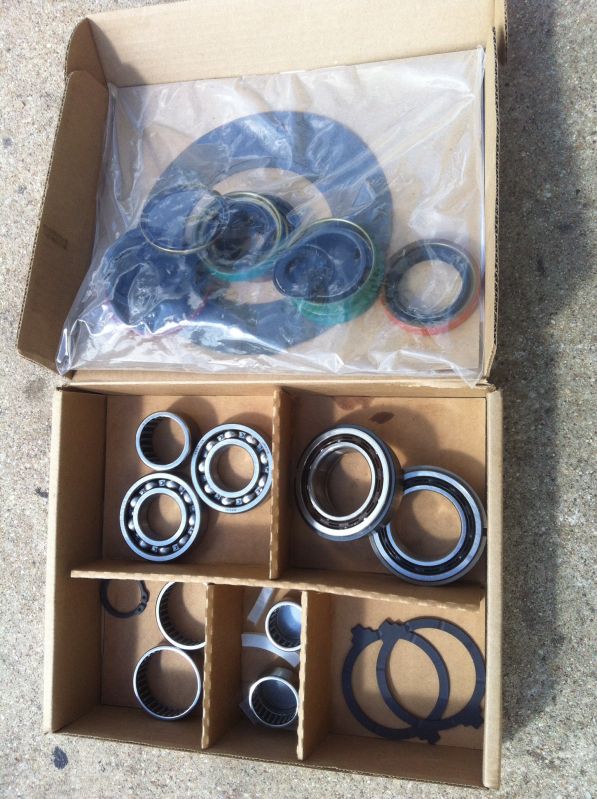 This little snap ring is critical. They tend to fail on these transfer cases (according to my research). When they let loose, the main shaft moves forward and the transfer case becomes a grinder, eating itself up. My transmission shop keeps an upgraded one that only costs a couple of bucks and doesn't fail like the stock one. 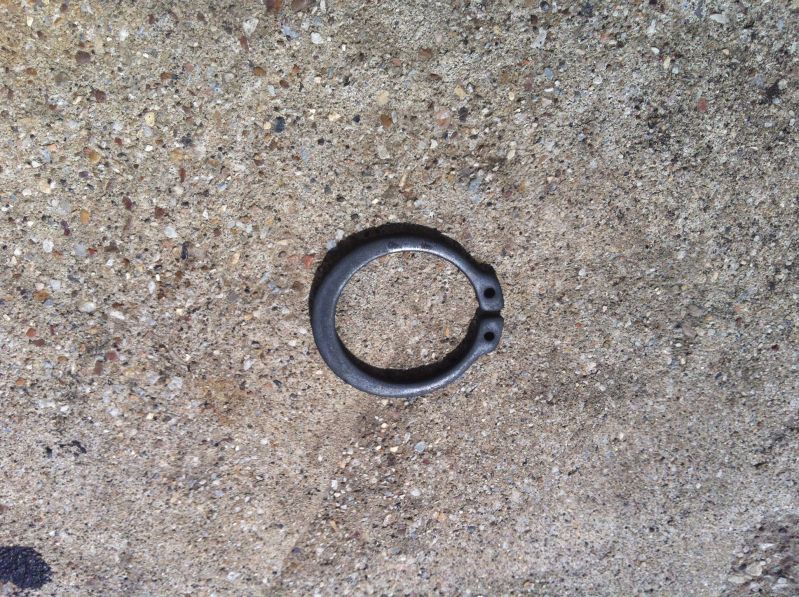 I needed a bearing driver but didn't have one large enough so I improvised with some big washers. Worked just fine. I like to heat any aluminum cases before installing bearings so they basically just sneak right in without having to get crazy with the hammer. 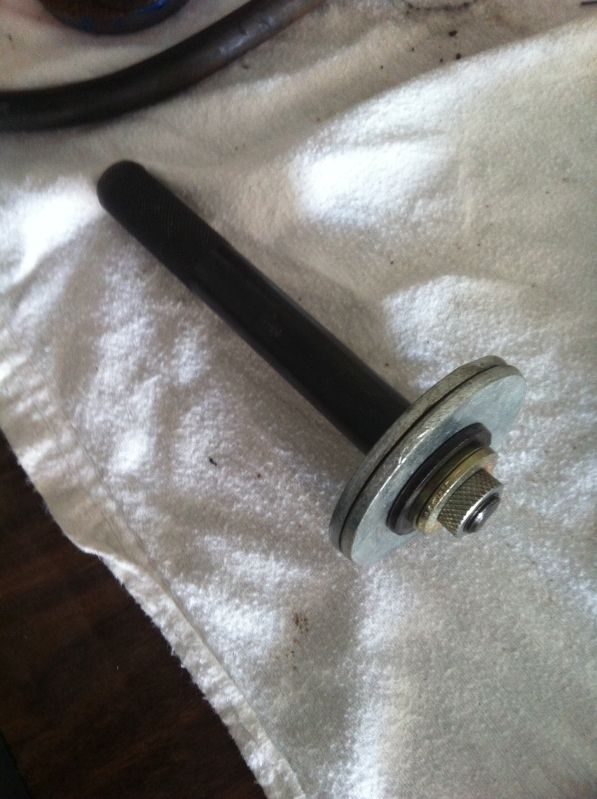 This picture doesn't show it well, but there is an o ring down inside that hole. It's the seal for the shift shaft. Mine was leaking originally, so I paid special attention to this one to make sure the new o ring was installed properly. 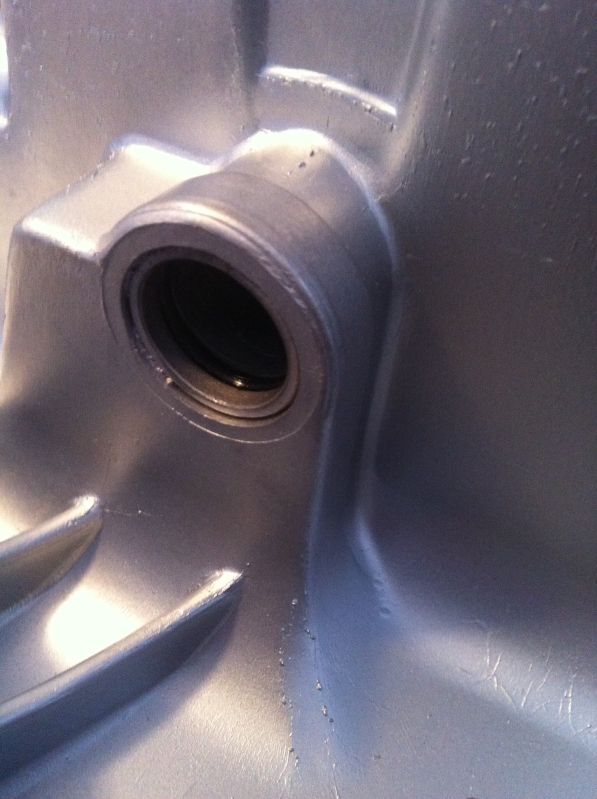 The NP241 has six planetaries. I'm told that makes it heavier duty than its smaller siblings which only have three. You can see the six gears around the assembly. They're called planetaries because the little gears orbit around the outside of the big gear in the middle just like planets in the solar system. In these pictures, I'm disassembling the planetaries and replacing the thrust washers. Its all straightforward. Just remove snap ring, take it apart, swap new washers in place of the old ones and reassemble. The only tool needed was a flat blade screwdriver for the snap ring. You can see the snap ring around the top there. 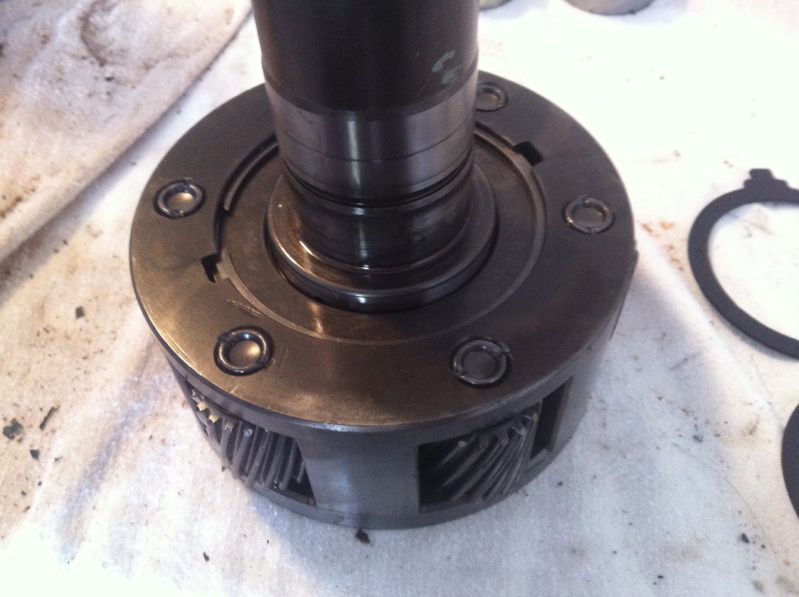 The new thrust washers we are installing.  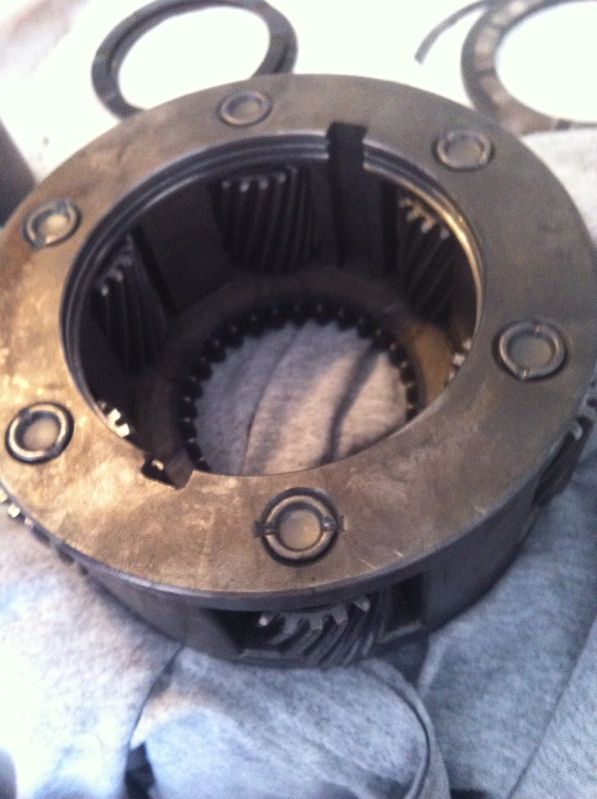 The is the center piece of the planetaries. It's also the splined part that sticks out of the front of the transfer case and interfaces with the transmission's splined output shaft. 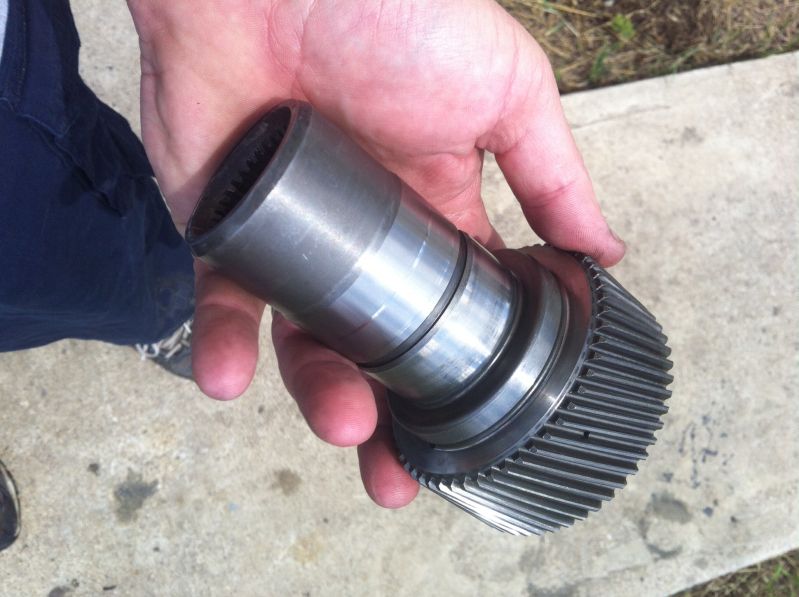 There is a bearing down inside the center that you change out too. Nothing fancy to the job. I used an old wrist pin and a mallet to drive it out and my rigged bearing driver shown above to knock the new one in. 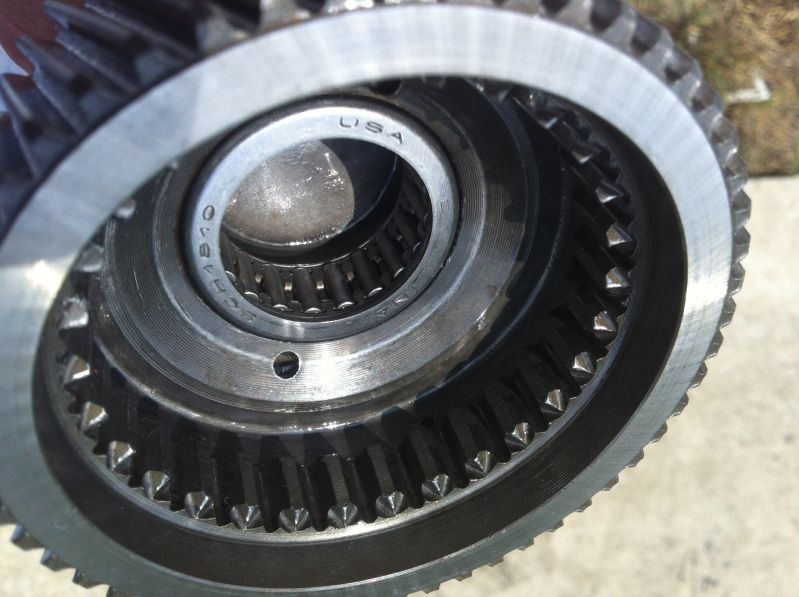 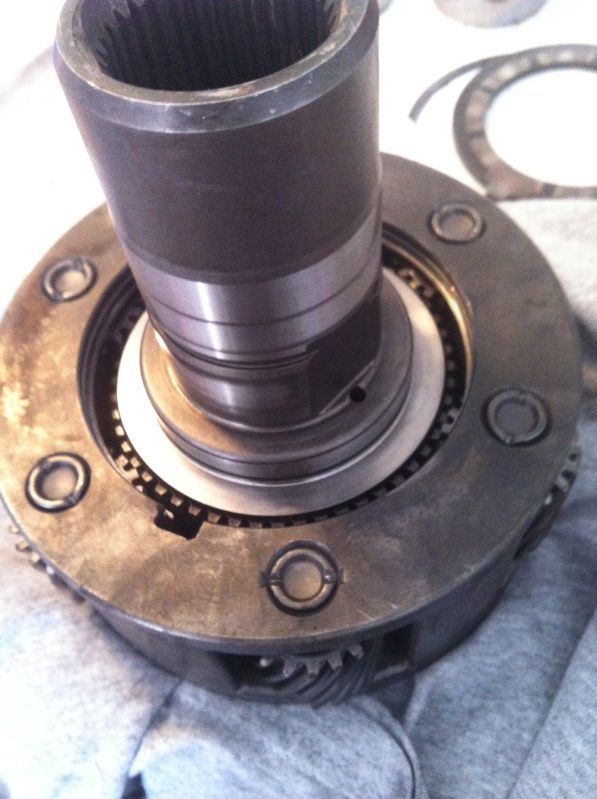 Thrust washer in place. 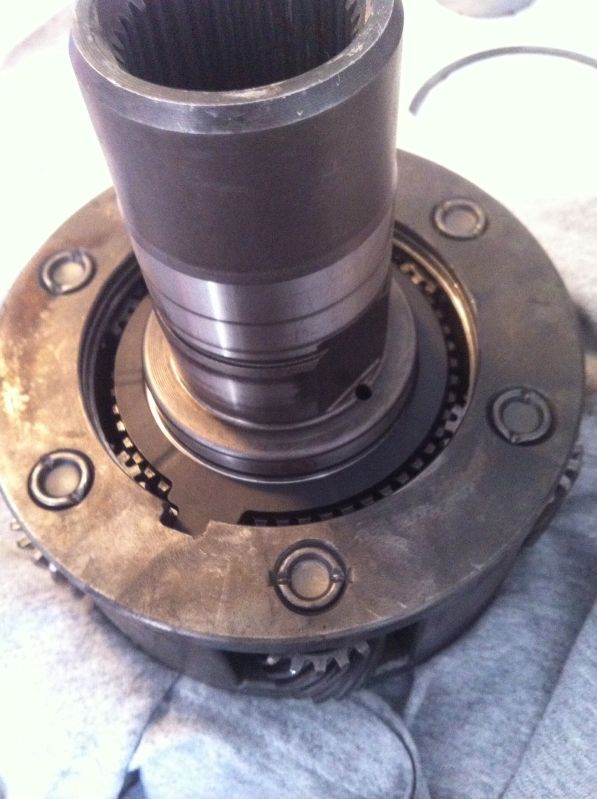 All back together. 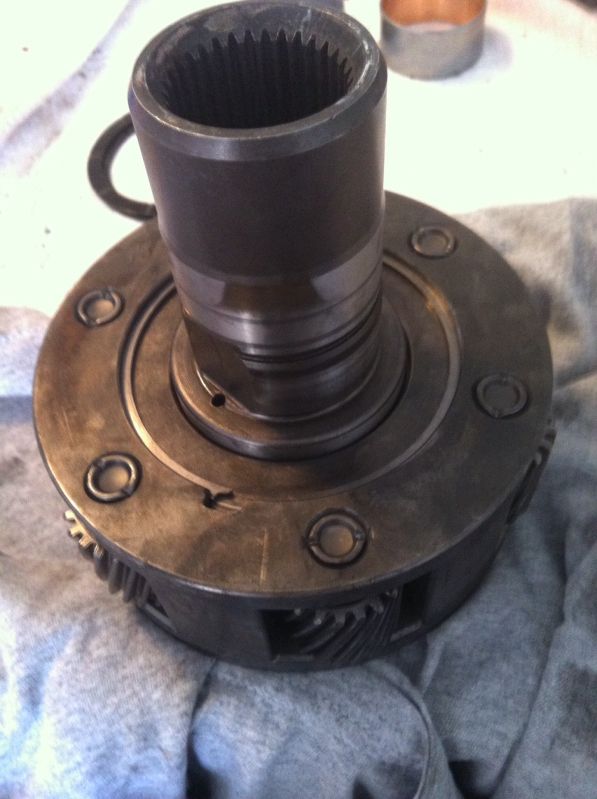 The input/planetary assembly back in the case. Notice the front bearing has a built in snap ring to keep it from going in too far, and the input shaft had a snap ring on it to keep it pulled up into the bearing. What you're seeing in this picture is the front of the transfer case that bolts to the transmission adapter. 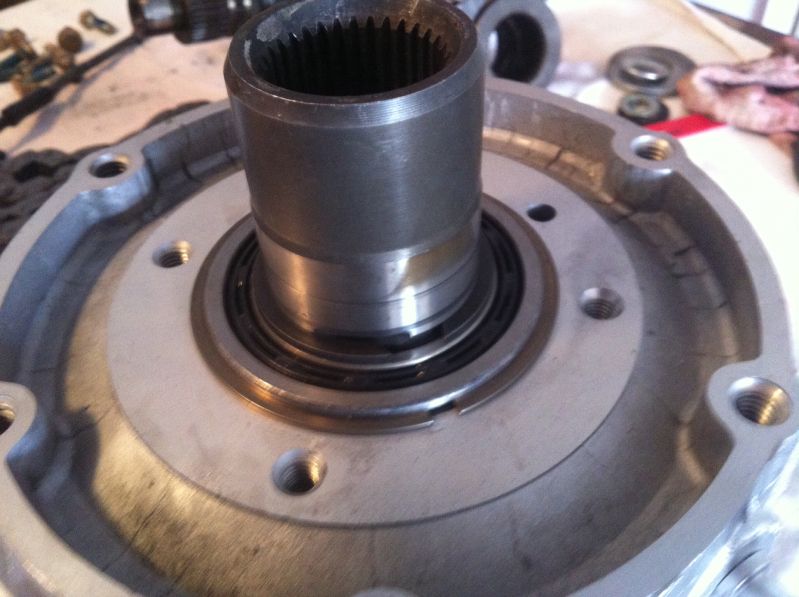 This is the place where so many transfer cases have troubles, the shift forks. There are two shift forks inside of this case. Each has three plastic pads that you replace during overhaul. The kit comes with them. No tools needed, just pull them off and put the new ones on. When these get too worn, the transfer case will jump out of gear. If yours jumps out of gear, you're looking at the likely cause in this picture. 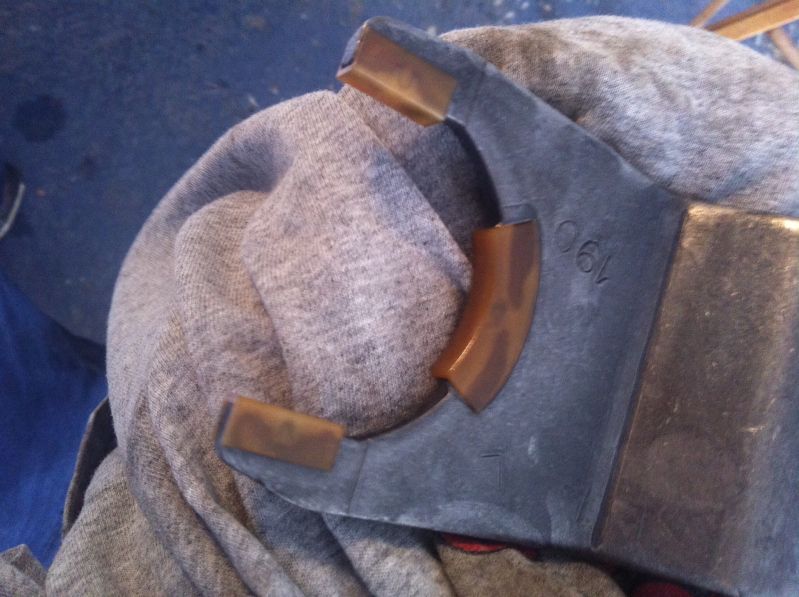 More in next post....
__________________
I'm on the Instagram- @Gearhead_Kevin Last edited by Tx Firefighter; 05-29-2014 at 06:43 PM. |
|
|
|
|
05-29-2014, 04:55 PM
|
#92 |
|
Watch out for your cornhole !
Join Date: Jun 2003
Location: Azle, Texas
Posts: 14,162
|
Re: My Luxurious late model truck (not so much)
Now on to the main shaft. This stuff is like rocket surgery to me so I like to lay things out in order that they go. The reason to disassemble this is to replace the bearings down inside that gear in the bottom of the picture. It's just a basic press out and press in procedure.
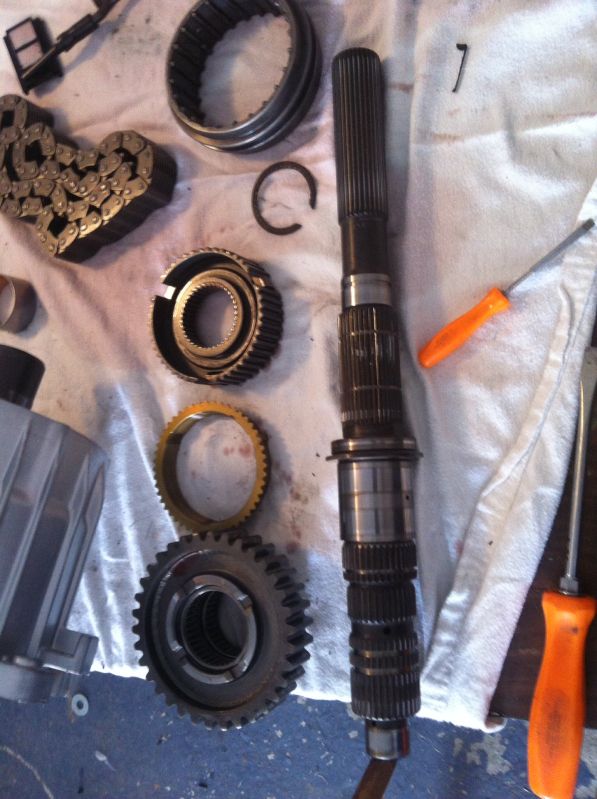 My phone battery got low so there's a gap in pictures right here. The shafts, shift forks, and chain installed back into the case.  My transfer case shifter was sloppy so I had my buddy at the dealership order me new bushings. Three bucks each. Worth it to me to not have a rattly shifter down by my feet. 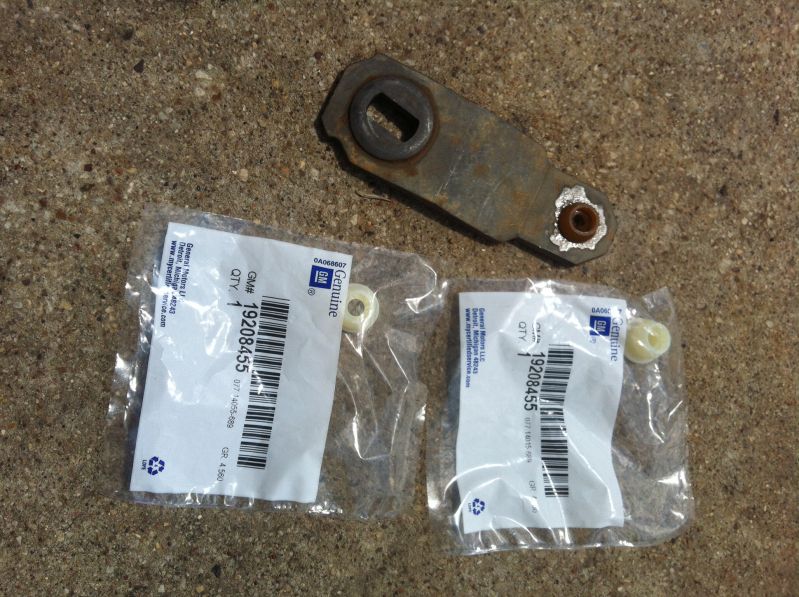 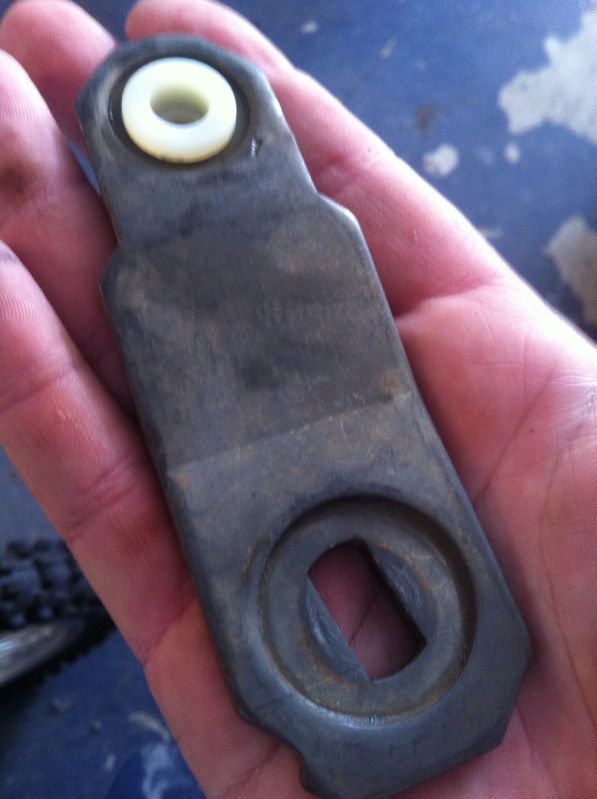 This is the detent assembly that screws into the bottom of the case. It pushes up against the shift pawl to give positive clicks when moving the shift lever. Notice new o ring, which was included in the kit. 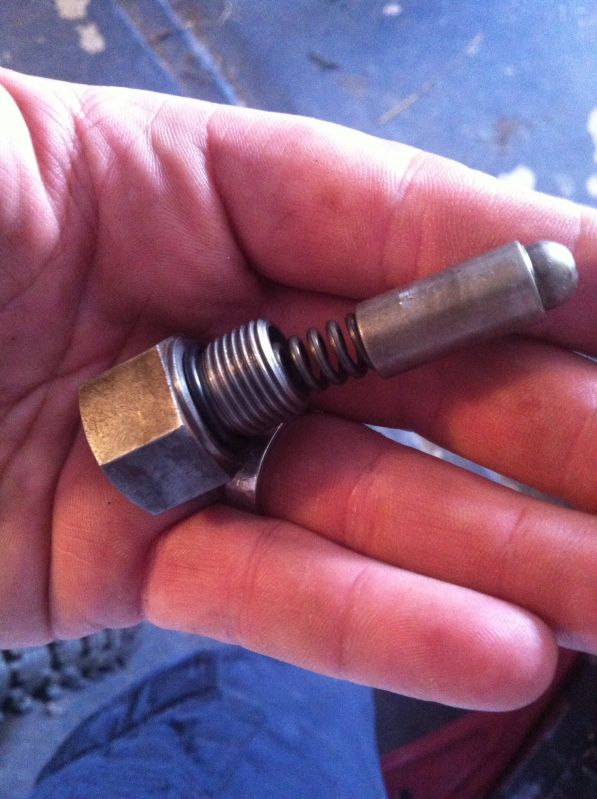 You guys know how I can't take leaks, seeps, or drips, so I bought a tube of the GM sealant that the guys in the dealership use when they rebuild them. I'm pretty damn sure it's just re-labeled Loctite brand anaerobic sealer. 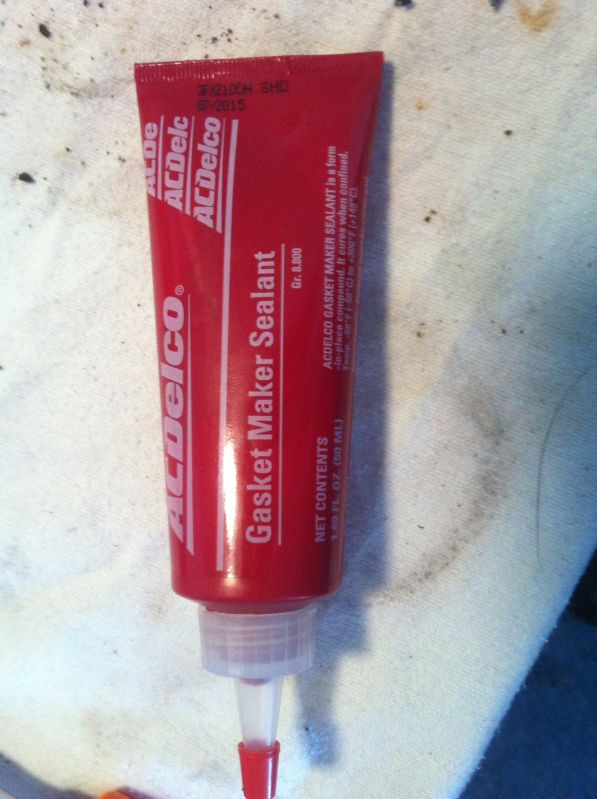 Getting ready to marry the case back together. Notice the oil pump is in place along with the oil pump pickup tube. I swapped new o ring into the pickup tube and new seal into the pump. All included in the rebuild kit. Sealant applied. 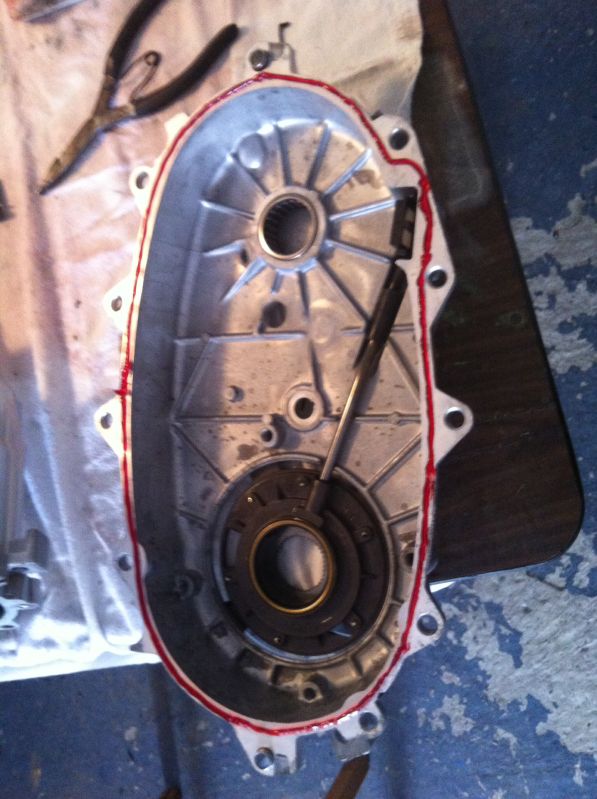 Case halves married together. Torqued according to manual specs. Notice I've also installed the speedometer VSS star wheel thingy onto the shaft in this picture too. 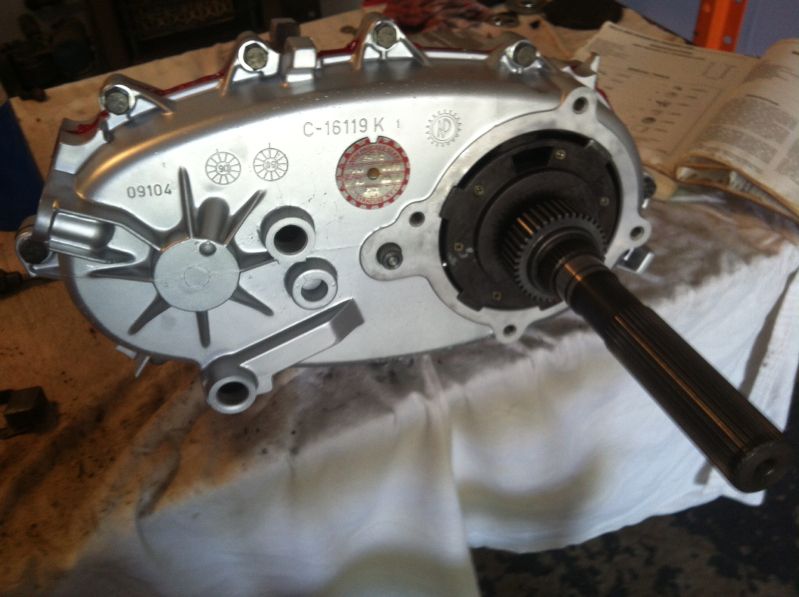 More sealant and getting ready to bolt on the rear bearing housing. 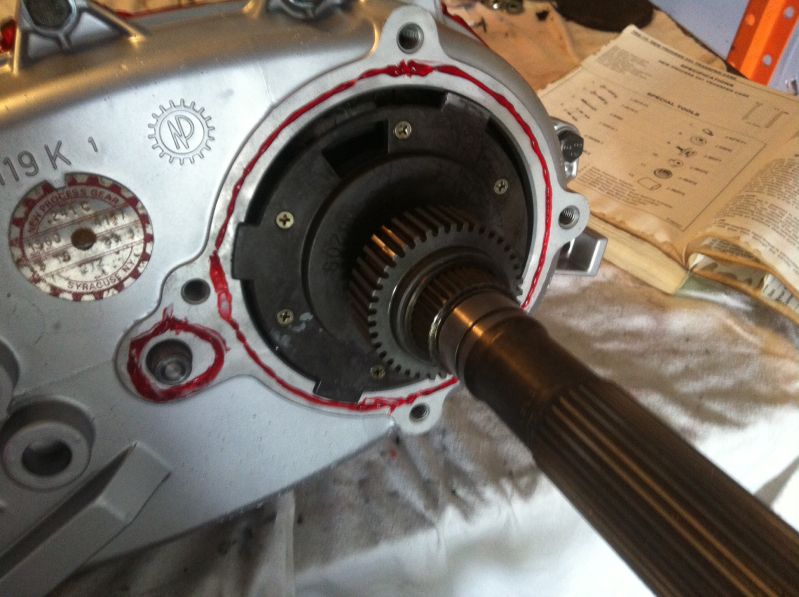 I'm not proud of this picture. Too much coffee I guess. This is a little rubber seal that goes onto the splined shaft where the front driveshaft bolts on. The seal keeps that front yoke from leaking. Also included in the kit. 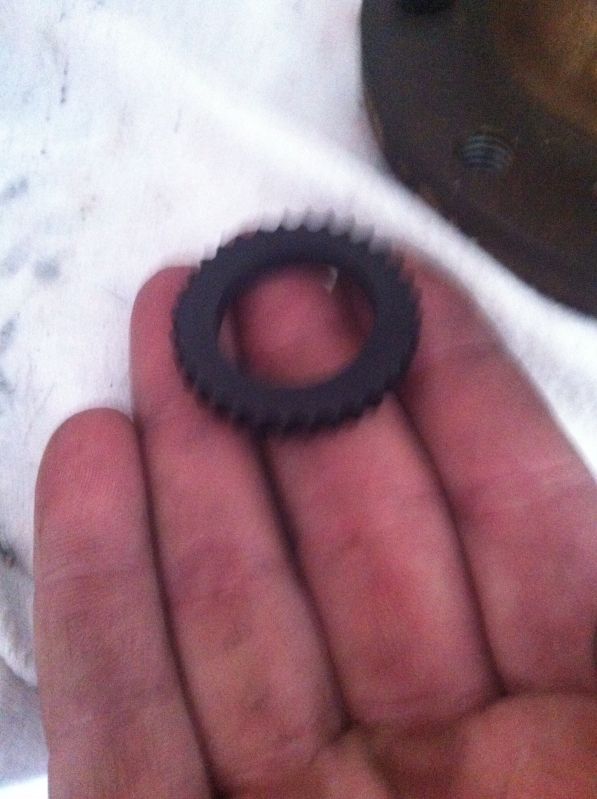 Installed onto the shaft. 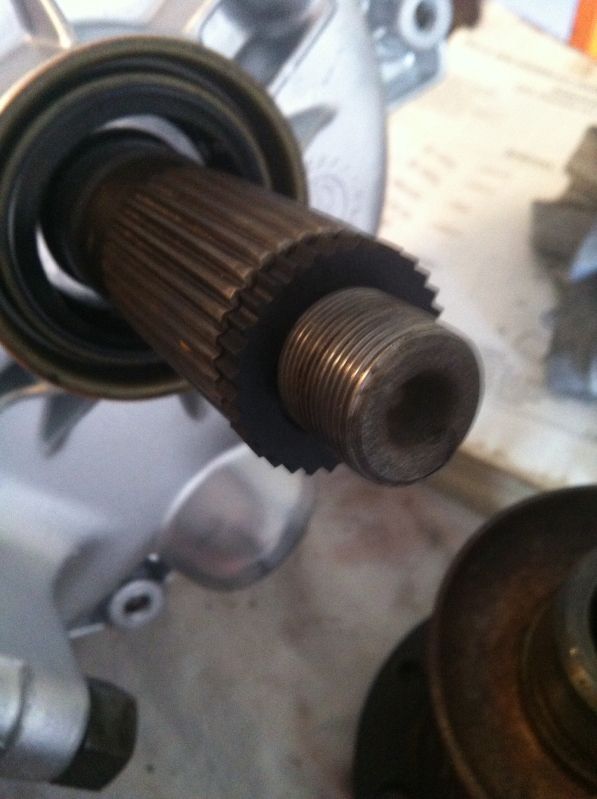 Done deal. 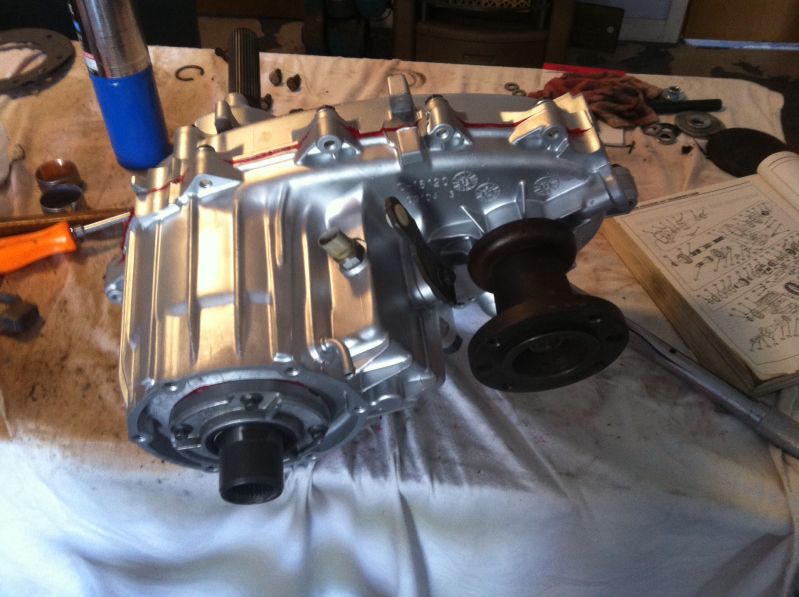 Always right on the bench next to where I'm working. 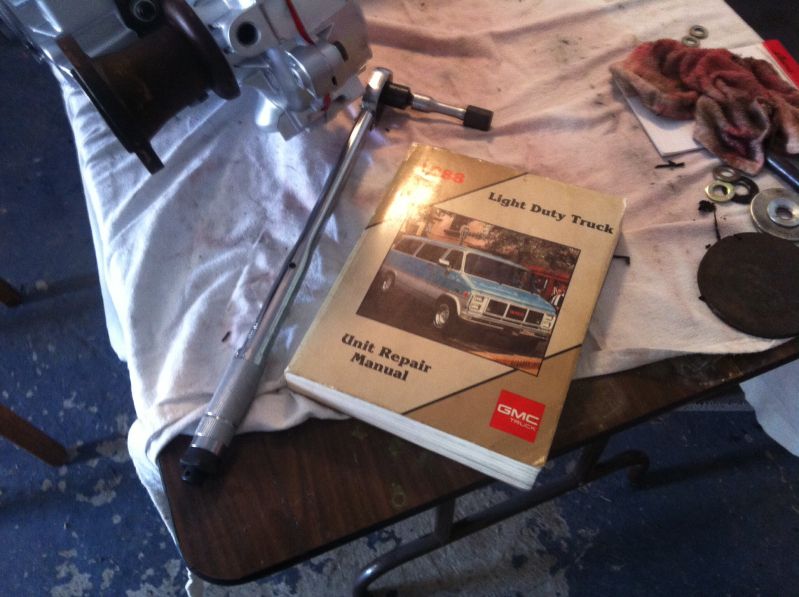 Notice the gasket glued into place that goes between the transfer case and transmission adapter. Most guys use silicone here, but the kit came with a gasket so I'll use it. It's not very critical anyway as the cavity is dry since both the transfer case and the transmission have seals to keep their respective fluids inside them. 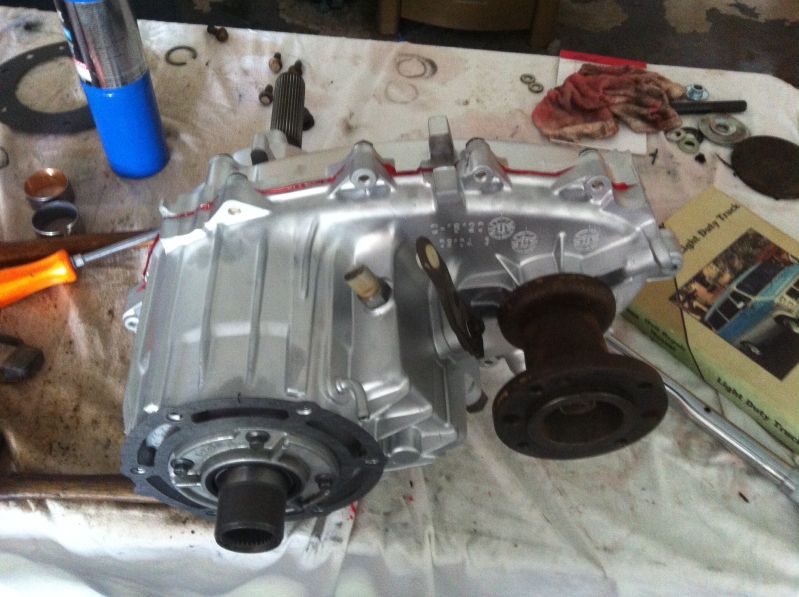 The job is finished other than bolting on the rearmost extension housing. I'm having trouble finding the proper bushing that the rear driveshaft slip yoke rides in. Still working on sourcing one of those.
__________________
I'm on the Instagram- @Gearhead_Kevin |
|
|
|
|
05-29-2014, 05:03 PM
|
#93 | |
|
Watch out for your cornhole !
Join Date: Jun 2003
Location: Azle, Texas
Posts: 14,162
|
Re: My Luxurious late model truck (not so much)
Quote:
__________________
I'm on the Instagram- @Gearhead_Kevin |
|
|
|
|
|
05-29-2014, 05:56 PM
|
#94 |
|
Registered User
Join Date: Feb 2008
Location: Tacoma Washington
Posts: 890
|
Re: My Luxurious late model truck (not so much)
I could be mistaken, but it seems like that rear bushing is the same as a 2 WD output shaft bushing. Great build thread! Thank you.
__________________
I know a guy who's addicted to brake fluid. He says he can stop any time. 72 K10 396 75 Cj5 MPI 350 Chev 67 Chevelle 396, 4 speed 74 FXE 08 Tahoe |
|
|
|
|
05-29-2014, 06:22 PM
|
#95 | |
|
Watch out for your cornhole !
Join Date: Jun 2003
Location: Azle, Texas
Posts: 14,162
|
Re: My Luxurious late model truck (not so much)
Quote:
I just noticed I forgot to show pictures of the rear bearing housing installed. 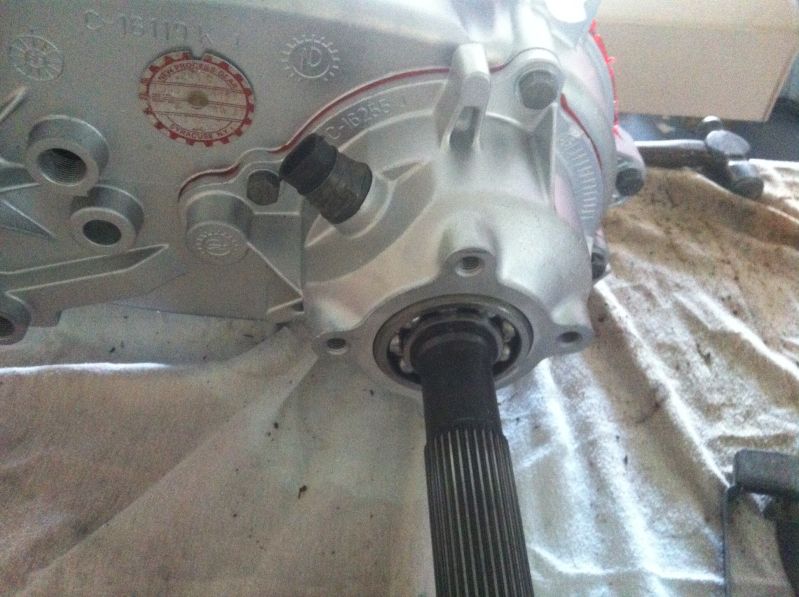 This is the fail prone snap ring spot and the updated no-fail snap ring installed. 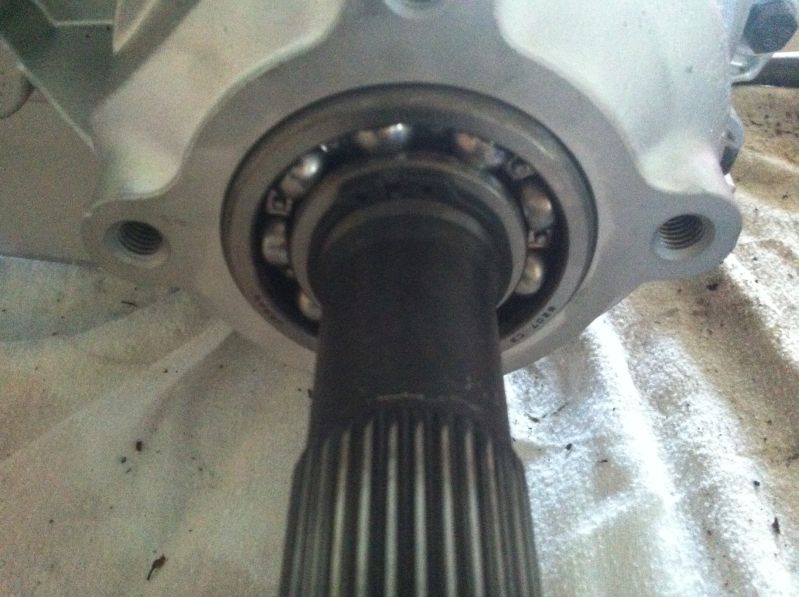 Now I just need to get that last bushing and install it into the tail housing, install the rear seal, and bolt the tail housing on and the entire unit will be ready to install. The last thing I did this afternoon was to tidy up all of the transfer case wiring harness under the truck and degrease and clean the crossmember. I'm not really in too big of a rush since I'm gonna have to buy about 100 dollars worth of u-joints for the two driveshafts. That will have to wait till next payday.
__________________
I'm on the Instagram- @Gearhead_Kevin Last edited by Tx Firefighter; 05-29-2014 at 06:40 PM. |
|
|
|
|
|
05-29-2014, 06:55 PM
|
#96 |
|
Registered User
Join Date: Dec 2011
Location: Creighton Sask. Canada
Posts: 4,121
|
Re: My Luxurious late model truck (not so much)
Nice job on the t case, great pictures too, truck is coming along nicely, man you will be cruisin soon.
__________________
1987 Green n Green machine. 5.0 4spd std. 7" lift w 35's. |
|
|
|
|
05-29-2014, 07:05 PM
|
#97 |
|
Registered User
Join Date: Sep 2009
Location: Beaverton, OR from WA State
Posts: 1,515
|
Re: My Luxurious late model truck (not so much)
Yay! NP241 rebuild pictures!
 I have one for my '83 to do one of these days. I guess they haven't changed the design much, a couple weeks ago I rebuilt the NVG-263XHD in our neighbors 2007 Classic Silverado K2500HD (Duramax/Allison truck). It suffered from a pump rub failure and I had to replace the rear case half as well as the installing a bearing and seal kit and new chain. It looks almost identical on the inside as the 241 does. One difference I see is those shift forks, the pads are one piece on the range fork and NOT replaceable on the mode fork, I did have to replace the mode fork. I have one for my '83 to do one of these days. I guess they haven't changed the design much, a couple weeks ago I rebuilt the NVG-263XHD in our neighbors 2007 Classic Silverado K2500HD (Duramax/Allison truck). It suffered from a pump rub failure and I had to replace the rear case half as well as the installing a bearing and seal kit and new chain. It looks almost identical on the inside as the 241 does. One difference I see is those shift forks, the pads are one piece on the range fork and NOT replaceable on the mode fork, I did have to replace the mode fork.Loving the updates, your interior is looking great! I like that shift bezel/tunnel cover a LOT that those SM-465 trucks got. I've had really good results with http://www.tbtrans.com/, they're more local to me, but they had everything I needed to rebuild my early NV-4500. EDIT: Mentioned as possible source for bushing if you are still in need.
__________________
Devin 1983 GMC High Sierra 2500, 4x4, RC/LB, 400 S.B., SM-465, NP-208, Corporate 10 bolt & 9.5" 14 bolt 1996 GMC Sierra SLE 3500 DRW, 4x4, EC/LB, Vortec 454, NV-4500, BW-4401, AAM 925 & AAM 1050 1997 GMC Sierra SLT 1500 4x4, Z71/F44, EC/SB, Vortec 350 My Introduction with my '83s History New Daily, the '96 Last edited by 83GMCK2500; 05-29-2014 at 08:52 PM. |
|
|
|
|
05-30-2014, 09:53 AM
|
#98 |
|
I'm just glad to be here!
Join Date: Jan 2008
Location: Longview, TX
Posts: 4,788
|
Re: My Luxurious late model truck (not so much)
Nice documentation for the rebuild. I fully understand the need to keep the momentum up. Looks good!
__________________
Karl 1965 Chevy Stepside(Grandpa's Old Blue) and (July 2015 Shop Build!)(2020, the Saga Continues) http://67-72chevytrucks.com/vboard/s...d.php?t=372424 The LST Challenge: http://67-72chevytrucks.com/vboard/s...=1#post7812257 Korbin's 1st Square: "Sunburn" http://67-72chevytrucks.com/vboard/s...d.php?t=418618 1985 GMC Sierra: "White Trash", Korbin's 2nd now... http://67-72chevytrucks.com/vboard/s...d.php?t=632305 Henry - 1984 Chevrolet, Owen's 1st Square |
|
|
|
|
05-30-2014, 10:39 AM
|
#99 |
|
Watch out for your cornhole !
Join Date: Jun 2003
Location: Azle, Texas
Posts: 14,162
|
Re: My Luxurious late model truck (not so much)
Internet research shows that Napa is the only parts store that can reliably get the proper bushing that I need for the transfer case. I called the Napa in the next town over and he said he'd have it by 11 this morning. At lunch time I'll run over there and see if I hit pay dirt or not.
My speakers for the rear pillars are showing delivery via the mailman this morning so I decided to go ahead and start fitment of the headliner and interior trim. Keep in mind my truck never had a headliner best as I can tell. None of the holes for the B post trim are there. I'll have to drill them as I go. A final bit of news for the morning update is that I got a message from the guy parting out the red stepside which I got my carpet and interior stuff from. We got a deal on the seat. I'm set to have one of my "Craigslist adventures" as Valerie calls them tomorrow morning to go get it. The adventure will be seeing if I can get a full size Chevy conversion truck bench seat in the back of my little Honda toaster thingy. Its a pretty fair drive up there and back so I don't want to take my stepside due to gas mileage. Its liable to look like some Beverly Hillbillies crap me carrying that big seat back there. Adventure indeed. As a reminder, this is the seat.... 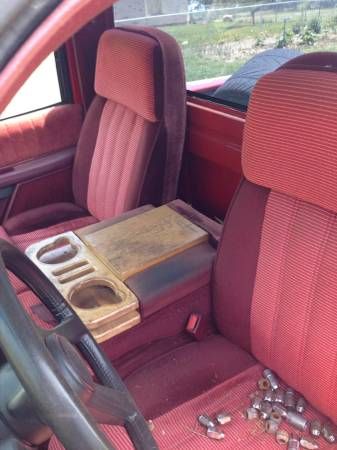 Valerie is going to ride up there with me to get it. I told her if she'd pull out all of the stops with her carpet cleaner and make the seat as clean as possible that I'd take her to town and go out to eat and grocery shopping tomorrow night. Yes, we are old married people. Dinner and grocery shopping is a night out on the town.
__________________
I'm on the Instagram- @Gearhead_Kevin |
|
|
|
|
05-30-2014, 12:24 PM
|
#100 | |
|
I'm just glad to be here!
Join Date: Jan 2008
Location: Longview, TX
Posts: 4,788
|
Re: My Luxurious late model truck (not so much)
Quote:

__________________
Karl 1965 Chevy Stepside(Grandpa's Old Blue) and (July 2015 Shop Build!)(2020, the Saga Continues) http://67-72chevytrucks.com/vboard/s...d.php?t=372424 The LST Challenge: http://67-72chevytrucks.com/vboard/s...=1#post7812257 Korbin's 1st Square: "Sunburn" http://67-72chevytrucks.com/vboard/s...d.php?t=418618 1985 GMC Sierra: "White Trash", Korbin's 2nd now... http://67-72chevytrucks.com/vboard/s...d.php?t=632305 Henry - 1984 Chevrolet, Owen's 1st Square |
|
|
|
|
 |
| Bookmarks |
| Thread Tools | |
| Display Modes | |
|
|


 Linear Mode

