
|
 01-17-2014, 12:02 AM
|
#1201 |
|
Registered User
Join Date: Apr 2011
Location: .
Posts: 3,104
|
Re: Markeb01 Build Thread
Glad you're safe and no major damage occurred.
You'll make it totally better and way more user friendly. |

|

|
|
01-17-2014, 05:03 AM
|
#1202 |
|
Senior Enthusiast
Join Date: Feb 2007
Location: Spokane Valley, WA
Posts: 8,356
|
Re: Markeb01 Build Thread
Thanks guys for all the input and supportive comments. I pulled out the newly installed heater harness and found no damage at all. I haven’t found whatever is fried yet, but the dead short is still in place. As mentioned earlier I’m confident the problem will become obvious when found. I’m hoping it’s not my Powermaster alternator again. Five years ago I had a chrome version. After 5 years of service it went berserk, creating weeks of differing issues before determining it was the problem.
I’ve given up on any further attempts to determine the failure point, and ordered a Ron Francis kit through Summit Racing. It is scheduled to arrive this Saturday, at a savings of over $40 compared to buying it direct from RF. There may be better or cheaper solutions, but I’m going with what I’m familiar with. I spent the day planning the layout of every individual wire for each lamp, switch, etc. Since so many circuits have been added, removed, and modified over the last 2 decades, under the dash looks like one of those “before” spaghetti pictures. There are dozens of interwoven zip looms, single, and groups of wires, tie wrapped into assorted bundles. I’m putting some time into what has to go where before the kit arrives so I can hopefully bundle everything into one properly routed loom that stays that way (?) from now on. Same thing with the Hotronics remote battery disconnect. It has wires all over it feeding the various relays. Now there will be one main jumper wire feeding a junction block so everything remains neat and easy to trace. Tomorrow the grille comes off for replacement of the headlamp harness and relays (when they arrive). I went ahead and splurged on the RF four headlamp relay harness. Since that area generated the most smoke outside the cab, replacing all of it seemed like a smart investment. And I think I might have gotten really lucky with the cab stink. Ventilating it for 24 hours with the doors open seems to have eliminated 99% of the burned car smell. Washing down the interior surfaces should eliminate the faint trace remaining. I wasn’t really looking for a project of this type right now, but I’m so grateful my guardian angel remains on the job after all these years, I can’t help but be pleased. Last night I was pondering the universe, considering this may have been caused by a component failure. If that turns out to be true, the short could have happened in freeway traffic, or in a multi-level parking garage, or who knows where. The results could have been ugly. The possibilities caused me to think back to a runway incident back in Chu Lai, 1969. Long story somewhat short, I was called out to an inactive runway that hadn’t been used in almost a year. I knew there was work going on to restore the Morest gear, but I wasn’t informed they were actually testing it. As I approached the runway, I saw the service crew near the arresting gear, so I swung out and started to turn right. For no reason I could think of at the time, I whipped my head to the left and observed an A4 Skyhawk on short final with the gear and hook down. He was about 10 feet off the ground and maybe 100 feet away. From what seemed like about 30 miles an hour, I effortlessly picked out reverse and backed off the runway as the plane slammed down in front of me with the right wing passing over the hood of the M151. At the arresting gear there was a heated exchange with the OIC, which ended in a draw. He was upset I almost wrecked a jet fighter and I was pissed they almost got me killed by omission of critical information. The point of the story being, I was too busy being angry at the time to be scared. But later that night when I found myself reliving the event, my knees were knocking so hard I never did get any sleep. I’ve long since given up wondering why (for no apparent reason) I looked to the left with enough time remaining to do something about it. I’ve had dozens of similar experiences. Either I’m just incredibly lucky, or some poor angel nominee has really been put through the wringer trying to earn his or her wings! Their promotion might have been achieved much easier had they picked someone else to watch over! 
__________________
My Build Thread: http://67-72chevytrucks.com/vboard/s...d.php?t=444502 |
|
|
|
|
01-17-2014, 11:01 AM
|
#1203 |
|
Registered User
Join Date: Apr 2012
Location: Searcy, AR
Posts: 4,203
|
Re: Markeb01 Build Thread
Guardian Angels are truly God-sent!!!
Mine has had more than his fair share of work over the years! 
__________________
DON Proverbs 27:17  US Air Force Retarded errr Retired My '65 Stepper Build:http://67-72chevytrucks.com/vboard/s...d.php?t=533920 My '60 Rusty Patina Build:http://67-72chevytrucks.com/vboard/s...66#post7402266 My '72 http://67-72chevytrucks.com/vboard/s...59#post7204359 SOLD |
|
|
|
|
01-17-2014, 10:03 PM
|
#1204 |
|
Registered User
Join Date: Jun 2012
Location: Selkirk Ontario Canada
Posts: 1,141
|
Re: Markeb01 Build Thread
glad you safed it from becoming something ugly ...
__________________
My 63 GMC Panel Slow Build http://67-72chevytrucks.com/vboard/s...=1#post5457281 63 
|
|
|
|
|
01-17-2014, 11:10 PM
|
#1205 |
|
Senior Enthusiast
Join Date: Feb 2007
Location: Spokane Valley, WA
Posts: 8,356
|
Re: Markeb01 Build Thread
Oh man, me too! It could have been so much worse. Most of the day was spent disassembling the dashboard and beginning the removal of wiring from there to the front of the truck. I finally discovered what burned up, but havent figured out why it happened yet.
This is the culprit. It is the constant power line from the hot side of the battery disconnect switch to the clock:  When I replaced the electric airplane clock with a mechanical version, the wire was repurposed to the camera. Connected to a double pole/double throw switch, one setting connected the camera to ignition power, killing the camera when the ignition is turned off. The opposite setting kept the camera running continuously, even when the truck was electrically dead. The entire length of the main wire from the battery to the switch was completely fried. But true to the promises, the crosslink wire and burn resistant zip loom did not melt, drip, and start a fire. Most of the insulation charred in place and either fell off or stuck to the other wires in the loom. Since all of this was contained in a loom that also didnt burn or melt/drip, and the power was shut off so quickly, no current found a path to ground. Whats really crazy is this last piece that connected to the camera switch:  The fried part at the bottom was coming from the power source. The undamaged part was connected to the camera switch. Im thinking this must have remained intact because the undamaged piece is a larger gauge and didnt reach the same temperature as quickly. The switch and camera appear to work perfectly. Even though most of the other wires in the loom survived, they will all have to be replaced as the insulation may have been compromised where the charred wire stuck to it. The new kit is still scheduled for delivery tomorrow, so Im hopeful to make some serious progress over the weekend.
__________________
My Build Thread: http://67-72chevytrucks.com/vboard/s...d.php?t=444502 |
|
|
|
|
01-18-2014, 01:52 AM
|
#1206 |
|
Registered User
Join Date: Apr 2012
Location: Searcy, AR
Posts: 4,203
|
Re: Markeb01 Build Thread
Glad you found the culprit!
__________________
DON Proverbs 27:17 US Air Force Retarded errr Retired My '65 Stepper Build:http://67-72chevytrucks.com/vboard/s...d.php?t=533920 My '60 Rusty Patina Build:http://67-72chevytrucks.com/vboard/s...66#post7402266 My '72 http://67-72chevytrucks.com/vboard/s...59#post7204359 SOLD |
|
|
|
|
01-18-2014, 09:17 PM
|
#1207 |
|
Registered User
 Join Date: Sep 2009
Location: menifee california
Posts: 788
|
Re: Markeb01 Build Thread
glad you and the truck are OK. I hope that when you redo the wiring that you document the install for us. when you do write ups you explain everything well and I have no problem following along. wiring is not my thing and a good write-up from you will help a lot of us planning to do this
|
|
|
|
|
01-18-2014, 11:43 PM
|
#1208 |
|
Registered User
Join Date: Nov 2009
Location: Galt, Calif
Posts: 2,437
|
Re: Markeb01 Build Thread
Mark sorry for your meltdown, at least its contained to right there...
__________________
`64 C10 vortec 350/350/373 posi `69 RS/SS 350/350/308 `37 Ford 406/350/324 traclock `68 Dart 370/904/323 suregrip |
|
|
|
|
01-19-2014, 02:12 AM
|
#1209 |
|
Senior Enthusiast
Join Date: Feb 2007
Location: Spokane Valley, WA
Posts: 8,356
|
Re: Markeb01 Build Thread
Thanks for continuing to check in guys, even though activity is rather boring at the moment. Things progressed slowly today. The new wiring kit showed up around noon, and I spent almost all day determining where and how to mount the fuse panel. I’ve been wanting it located in the glove box area for years, so there was no question where it was getting mounted. Before it became permanent I wanted to double check that all the wires would reach where they’re going. In addition I needed to determine which side of the truck they will be routed, and through which hole in the firewall.
I came to realize I needed a mounting bracket to set the panel where I wanted it, at the correct angle, and allowing for maximum clearance around the heater. Fabricating the bracket was easy, but figuring out where and how to attach it took several hours. With Ruthann supplying a second pair of hands, it’s finally in place, attached to the firewall with steel pop rivets. I’ll attempt to get some better photos tomorrow. Here’s the best I could do for tonight. This is the view from the passenger seat with the glove box door removed:  And here’s more of an overview showing orientation of the heater and proximity to the main firewall grommet. The circle on the left approximates the location of that grommet, so wires heading to the starter are going to have a nice short run: 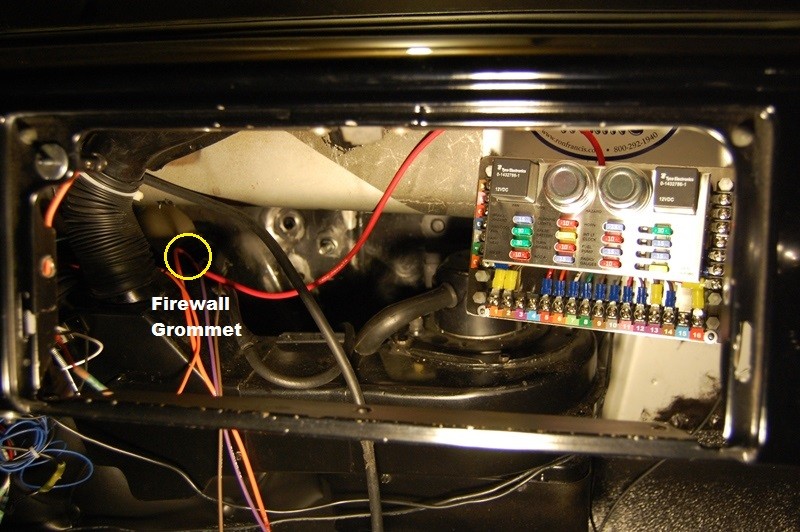 The kit included a Ron Francis decal, so I thought it would clever to stick it on the bracket above the fuse panel. A lot of the engine compartment wiring is being reversed, so I’m having to stop and think frequently. Starter, alternator, and distributor wires will be routed through the firewall hole above the distributor on the passenger side, and the harness jumping from the driver side inner fender to the alternator will be eliminated. The engine wires actually started on the passenger side when the first Ron Francis kit was installed back in 1992. Over the years, the addition and removal of radios, air conditioning, cruise control, various heaters, gauges, and other accessories required wiring additions and deletions, leaving a cosmetic mess under the dash. Relays will now be consolidated, headlight wiring will run forward under what remains of the driver side inner fender, while tail lights and electric fuel pump will run down the passenger side. Before connecting anything to the panel I’m trying to take into consideration every single wire, such as the interior light door switches, spotlight wires, battery disconnect switch, etc. I’m trying to avoid splices or adding something forgotten at the last moment. Tomorrow begins with wiring up the starter and then moving on to the ignition. I’ll try and remember to take some decent photos as I go in case this turns out to be worth documenting.
__________________
My Build Thread: http://67-72chevytrucks.com/vboard/s...d.php?t=444502 Last edited by markeb01; 01-19-2014 at 07:28 PM. |
|
|
|
|
01-19-2014, 06:37 AM
|
#1210 |
|
Senior Member
Join Date: Mar 2011
Location: Tucson, Arizona
Posts: 2,063
|
Re: Markeb01 Build Thread
I'm very sorry to hear about your wiring mess but it looks like you went out and bought a great replacement. I hope you will be giving a play by play as the rewiring takes place. I really enjoy the great thought that you put into your projects and the details show it. I'll be doing wiring on mine some day and value some ideas along the way.

__________________
Sanity'66 http://67-72chevytrucks.com/vboard/s...d.php?t=515110 Long bed, Fleetside, Small back window I've Done So Much, With So Little, For So Long, That Now I Can Do Anything With Nothing.
|
|
|
|
|
01-19-2014, 11:18 AM
|
#1211 | |
|
Registered User
Join Date: Apr 2012
Location: Searcy, AR
Posts: 4,203
|
Re: Markeb01 Build Thread
Quote:

__________________
DON Proverbs 27:17 US Air Force Retarded errr Retired My '65 Stepper Build:http://67-72chevytrucks.com/vboard/s...d.php?t=533920 My '60 Rusty Patina Build:http://67-72chevytrucks.com/vboard/s...66#post7402266 My '72 http://67-72chevytrucks.com/vboard/s...59#post7204359 SOLD |
|
|
|
|
|
01-19-2014, 11:43 AM
|
#1212 |
|
Registered User
Join Date: Sep 2011
Location: Tacoma, WA
Posts: 2,425
|
Re: Markeb01 Build Thread
Photos are good, video may be better...
You know, just sayin
__________________
Michael McMurphy My 66 Stepside My 64 Tow Truck My 66 Tempest Table Of Contents Added to Page1 |
|
|
|
|
01-19-2014, 12:47 PM
|
#1213 |
|
Registered User
Join Date: Apr 2011
Location: .
Posts: 3,104
|
Re: Markeb01 Build Thread
Colored wiring diagram (map) would be the Tops along with a routing diagram.
Cause when it comes time for me to string some wire this is where I plan on getting my info. Looking forward to the wiring layout. |
|
|
|
|
01-20-2014, 02:00 AM
|
#1214 |
|
Senior Enthusiast
Join Date: Feb 2007
Location: Spokane Valley, WA
Posts: 8,356
|
Re: Markeb01 Build Thread
Its good to know I can always count on my forum buddies to keep the pressure up!
 I will be putting together a separate thread on this adventure after its completed. Ill include all the pertinent photos, descriptions, copies of all the Ron Francis paperwork, and a video overview showing the major features. Two nice upgrades included in the kit that didnt exist 20 years ago a complete color wiring diagram, and a chart showing which terminals supply which fuses. The lack of these two pieces of documentation having driven me nuts on many occasions in the past. I will be putting together a separate thread on this adventure after its completed. Ill include all the pertinent photos, descriptions, copies of all the Ron Francis paperwork, and a video overview showing the major features. Two nice upgrades included in the kit that didnt exist 20 years ago a complete color wiring diagram, and a chart showing which terminals supply which fuses. The lack of these two pieces of documentation having driven me nuts on many occasions in the past.Today was spent removing 99% of the dash wiring. This was half way through the day. What a nightmare, clipping/cutting and trying not to damage anything. Don't you just hate "previous owners"!  Oh wait, I am the previous owner! Oh wait, I am the previous owner!   Eventually all of the switches and gauges had to be removed to finalize the de-wiring. The few wires showing at this point are either part of the new kit, or other new wires for the spotlights, courtesy lights, etc. The oil pressure line and vacuum lines also remain:   I also removed all of the random relays, circuit breakers, and headlight wiring:    This is about half of what came out from behind the dash:  This is what happens when wiring is reworked over 20 years instead of starting over. Heaven forbid anything ever went wrong it would have been hard to find all these hidden inline fuses.  I'm hoping to get started on the new wiring tomorrow.
__________________
My Build Thread: http://67-72chevytrucks.com/vboard/s...d.php?t=444502 |
|
|
|
|
01-20-2014, 08:43 AM
|
#1215 |
|
Registered User
Join Date: Sep 2012
Location: Leander, TX
Posts: 969
|
Re: Markeb01 Build Thread
Mark the fuse panel is sexy! Looks like it belongs in an airplane or something.
Bret
__________________
64' Build Thread http://67-72chevytrucks.com/vboard/s...d.php?t=586955 |
|
|
|
|
01-20-2014, 08:55 AM
|
#1216 |
|
Senior Member
Join Date: Oct 2009
Location: Fayetteville, Arkansas
Posts: 1,923
|
Re: Markeb01 Build Thread
looks like you've got it under control. man, what a snake tangle... if it were up to me, i'd farm out the electrical part. cuddos to you mark, as far as i remember, theres been nothing on your truck that you didn't do yourself. and at a very high level.
|
|
|
|
|
01-20-2014, 10:36 AM
|
#1217 |
|
Registered User
Join Date: Apr 2012
Location: Searcy, AR
Posts: 4,203
|
Re: Markeb01 Build Thread
A mere Thank You can't quite relate how thankful I am that I get to watch and learn as you undertake this procedure
My spaghetti, or 49 year old stock harness
, now resides on a workbench
Now I need to look into the Ron Francis kit...Thank You Very Much for the Detailed write-ups... 
__________________
DON Proverbs 27:17 US Air Force Retarded errr Retired My '65 Stepper Build:http://67-72chevytrucks.com/vboard/s...d.php?t=533920 My '60 Rusty Patina Build:http://67-72chevytrucks.com/vboard/s...66#post7402266 My '72 http://67-72chevytrucks.com/vboard/s...59#post7204359 SOLD |
|
|
|
|
01-20-2014, 06:28 PM
|
#1218 |
|
Senior Enthusiast
Join Date: Feb 2007
Location: Spokane Valley, WA
Posts: 8,356
|
Re: Markeb01 Build Thread
Thanks as always for the comments guys. Got started on bag C (ignition switch) this morning. My switch is a combination of parts. I think the switch is either 57 or 64 Chevy. I wanted the newer style with the housing around the key. I bought it so long ago I dont remember what it is for sure. To make it fit the dash I used the 1960 bezel and then fit the late style locking bezel on top:
 In any event, it didnt come with the compatible one piece latching receptacle on the back. The Ron Francis kit provide pre-terminated wires and matching connectors, but unfortunately they dont latch to the terminals. A simple tug (or miles of vibration) and they will detach, something I learned the hard way years ago. To avoid this inevitability, I created a simple tether out of 4 tie wraps to prevent separation:  One zip tie goes around the barrel of the switch, one around the wires, and two more (one on each side) connecting the two. Ugly but effective. Im now ready to start cutting and attaching wires. To make sure the wires dont get moved or pulled out of position during this phase, I used long white uncut zip ties to temporarily hold the partial harnesses in place. They will be easy to spot and remove when everything is complete and ready for zip loom.   Break is over. Back to work.
__________________
My Build Thread: http://67-72chevytrucks.com/vboard/s...d.php?t=444502 |
|
|
|
|
01-20-2014, 06:33 PM
|
#1219 |
|
Registered User
Join Date: Sep 2011
Location: Tacoma, WA
Posts: 2,425
|
Re: Markeb01 Build Thread
I am watching this with mixed emotions:
Awe of the concept of dismantling everything with a wire attached. Envy that I did not get a replacement harness to do mine up 100% new from the get-go. Relief in that I have not yet fried a wire in my truck (I do have a test lead wire that got toasted, but I was testing my headlight actuators at the time and it was dangling too near an exposed negative wire) I am jazzed you are going to fully document this, I am sure Woogeroo will be thrilled to add it to the How To section !! As always I am in for the full ride on this one too
__________________
Michael McMurphy My 66 Stepside My 64 Tow Truck My 66 Tempest Table Of Contents Added to Page1 |
|
|
|
|
01-20-2014, 09:00 PM
|
#1220 |
|
Registered User
Join Date: Apr 2012
Location: Searcy, AR
Posts: 4,203
|
Re: Markeb01 Build Thread
Watching in Awe!!!
__________________
DON Proverbs 27:17 US Air Force Retarded errr Retired My '65 Stepper Build:http://67-72chevytrucks.com/vboard/s...d.php?t=533920 My '60 Rusty Patina Build:http://67-72chevytrucks.com/vboard/s...66#post7402266 My '72 http://67-72chevytrucks.com/vboard/s...59#post7204359 SOLD |
|
|
|
|
01-21-2014, 02:18 AM
|
#1221 |
|
Senior Enthusiast
Join Date: Feb 2007
Location: Spokane Valley, WA
Posts: 8,356
|
Re: Markeb01 Build Thread
It doesn’t look like much but this was a milestone for me. I finally started connecting wires to the new fuse panel. There are 6 wires on 4 terminals, and this represents all the connections to the ignition switch, starter, and alternator. Before hooking up the first wire, I attached a 1” nylon loop clamp to the back of the panel bracket to give the wires some containment and a means of support other than hanging from the terminal screws:
 One significant change in the instructions since 20 years ago deals with the neutral safety switch. When I first installed the system in 1992 my truck had a Turbo 350 transmission, so I wired up the neutral safety switch. When I swapped back to a manual transmission, I simply jumped the two terminals as noted in the directions. The new instructions require use of a neutral safety switch on both auto and stick transmissions (presumably for liability reasons). This is an extra expense feature I don’t really want, as I often start my truck in neutral with the clutch pedal out. After a bit of figuring, I discovered this can still be achieved by adding a jumper wire between terminals 3 & 4. Wanting to keep the appearance as clean as possible, I remembered a small part that fell off the old fuse panel when pulling the wires. It was this connector that made 5 terminals common:  It was sliced in two pieces with a Dremel cut off wheel, yielding a 2 terminal connector:  And changed terminals 3 & 4 from this:  To this, without the addition of a jumper wire and two more terminal ends:  I am so thankful the inner fenders are gone. It makes access to the starter super easy with the wheel removed:  Hoping to make a lot more progress tomorrow.
__________________
My Build Thread: http://67-72chevytrucks.com/vboard/s...d.php?t=444502 Last edited by markeb01; 01-21-2014 at 02:26 AM. |
|
|
|
|
01-21-2014, 11:18 AM
|
#1222 |
|
Registered User
Join Date: Jun 2012
Location: Selkirk Ontario Canada
Posts: 1,141
|
Re: Markeb01 Build Thread
stay at it ..looking good
__________________
My 63 GMC Panel Slow Build http://67-72chevytrucks.com/vboard/s...=1#post5457281 63
|
|
|
|
|
01-22-2014, 03:16 AM
|
#1223 |
|
Senior Enthusiast
Join Date: Feb 2007
Location: Spokane Valley, WA
Posts: 8,356
|
Re: Markeb01 Build Thread
Other than firing up the propane heater, I never made it out to the garage today. Instead most of the day was spent at my living room bench wiring up the instrument panels with quick disconnects. In the future the main instrument panel can be completely removed by unplugging two connectors, and the under dash panel by separating one:
    All wiring is included in the disconnects grounds, power feeds, gauge senders, and instrument lights. And all the wires except for the Autometer black and white light wires, use correctly printed wire for each application (dash lights, ground, gas sender, turn indicator, gauge feed, etc.). If a gauge ever needs replacing, Ill just pull the panel and make the change in the comfort of the living room. Previously I routed a 10 gauge wire from the engine block where the battery cable connects, to a bolt on the dimmer switch side of the pedal support. All instrument and lighting grounds fastened to that bolt. Over time it became cluttered with too many wires tangling over each other, or I grounded to other spots because it became too painful to access. This morning I located a ground bus I bought many years ago but never used. As part of the makeover, this grounding strip will be mounted near the fuse panel:  The 10 gauge wire from the engine will connect to this, and all dash grounds will connect here. It should be much cleaner and easier, and like the fuse panel I wont have to turn upside down in the doorway ever again to access it. More to follow.
__________________
My Build Thread: http://67-72chevytrucks.com/vboard/s...d.php?t=444502 |
|
|
|
|
01-22-2014, 11:30 AM
|
#1224 |
|
Registered User
Join Date: Apr 2012
Location: Searcy, AR
Posts: 4,203
|
Re: Markeb01 Build Thread
Seriously bookmarking this...
As for never having to get upside down in the doorway to access wiring... 
__________________
DON Proverbs 27:17 US Air Force Retarded errr Retired My '65 Stepper Build:http://67-72chevytrucks.com/vboard/s...d.php?t=533920 My '60 Rusty Patina Build:http://67-72chevytrucks.com/vboard/s...66#post7402266 My '72 http://67-72chevytrucks.com/vboard/s...59#post7204359 SOLD |
|
|
|
|
01-22-2014, 01:09 PM
|
#1225 |
|
Registered User
Join Date: Jun 2012
Location: Selkirk Ontario Canada
Posts: 1,141
|
Re: Markeb01 Build Thread
that is thinking outside of the box mark
__________________
My 63 GMC Panel Slow Build http://67-72chevytrucks.com/vboard/s...=1#post5457281 63
|
|
|
|
 |
| Bookmarks |
|
|


 Linear Mode

