
 |
|
|
#1001 |
|
The 60-66 GMC/Pontiac guy....
Join Date: Oct 2010
Location: Apache Junction, Arizona
Posts: 1,306
|
Re: Markeb01 Build Thread
OK Mark,
 Rather than dig through the thread, I'll just ask the question. Where did you get the 33 gallon tank?  I am building a 62 for a friend, chassis up deal and he wants as much fuel on board as possible.  
__________________
 Building Genuine Pontiac Firepowered cars and trucks for several decades.  Why Pontiac?? That's just me daring to be different.  Projects.. 63 C10 Short Wheel Base fleetside (The Pro-Street) currently under reconstruction. 440CID 2X4 Pontiac 
|
|
|

|
|
|
#1002 |
|
Senior Enthusiast
Join Date: Feb 2007
Location: Spokane Valley, WA
Posts: 8,356
|
Re: Markeb01 Build Thread
It was custom made by Rock Valley Tanks of stainless steel.
http://www.rockvalleyantiqueautopart..._tanks_all.pdf They were very easy to work with. At the time I ordered the tank the truck was a long distance commuter (72 miles round trip daily) so I also wanted the biggest tank that would fit. I measured the open area at the back of the truck and drew up these simple plans on quad paper: 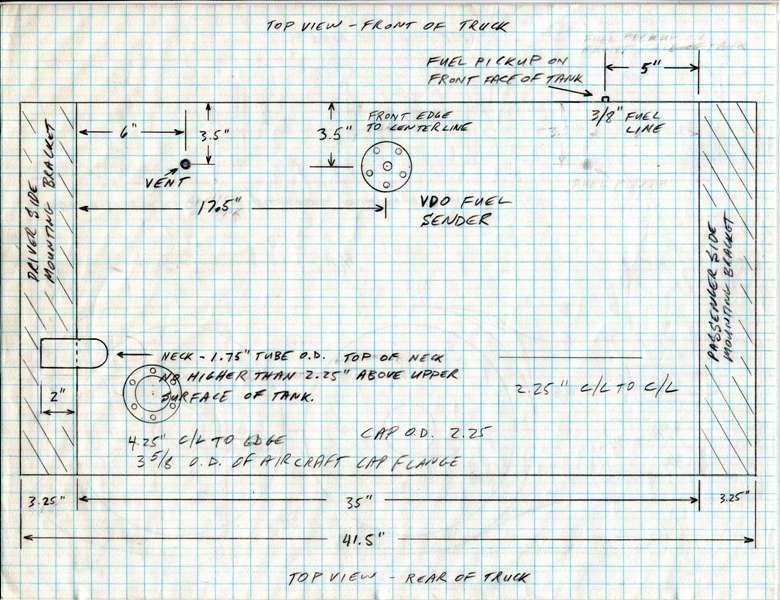  A sales engineer called me as soon as the drawings arrived and confirmed my capacity calculations. He also mentioned the weight with fuel would be somewhere around 250-300 pounds and stated heavier end walls and brackets would be required, which I approved. That was it. The tank arrived a few days later and the dimensions were exact in every detail. For an extra charge it could have arrived fully polished, but I knew I’d never take care of it so it arrived in a smooth mill finish. Note – in the drawings the aircraft cap on top was not part of the original plan. I added that later when I discovered the fill elbow I specified was inadequate. It was too small and too severe a turn and caused gas to kick back up the fill pipe. This required filling 33 gallons of fuel to be done by hand at dead slow, which got old real fast. Had I specified a baloney slice fill pipe across the top it would have worked perfectly. Even at 10” deep very little of the tank shows from the rear:  And by the way the tank is baffled inside to whatever their standard specifications require.
__________________
My Build Thread: http://67-72chevytrucks.com/vboard/s...d.php?t=444502 Last edited by markeb01; 09-29-2013 at 01:54 PM. |
|
|

|
|
|
#1003 |
|
Registered User
Join Date: Nov 2011
Location: Omaha, Nebraska
Posts: 431
|
Re: Markeb01 Build Thread
I have been completely captivated for over a week with the reading of your entire build thread! I only wish I lived closer to you as I'd love the opportunity to increase my own skills by assisting you with your projects. Awesome job and thank you so very much for the great pains you've taken to detail your work so that we may all benefit from it!
P.S. My truck will likely resemble yours to no small degree as I am in 100% agreement with the mechanical and cosmetic changes you've made to your vehicle... I will certainly cite you as the originator of any ideas I gratuitously steal from you... 
__________________
Travis' Tribute Truck - 65 C10 Frame Up Restoration http://67-72chevytrucks.com/vboard/s...d.php?t=495073 |
|
|

|
|
|
#1004 |
|
Registered User
Join Date: Nov 2011
Location: fayetteville nc
Posts: 10,338
|
Re: Markeb01 Build Thread
Nice job on the garage Mark. Im fixing to start the build on my "truck barn" which will be 25x50ft. Looking forward to a nice indoor area to work on and store my other projects. Haven't gotten around to the interior layout yet...but your gives me lots of ideas. I have knocked down a handful of 60ft hickory trees and will be building a serious solid hickory workbench. Probably will mill 8" solid hickory beams and bolt them together. They will be held up on telephone phone logs....I want a real solid bench.
__________________
1963 Short bed step side SBW 427 big block and borg warner T-16 HD 3 speed manual http://67-72chevytrucks.com/vboard/s...d.php?t=519869 1963 Short bed fleetside BBW 348 1st gen big block w/Powerglide http://67-72chevytrucks.com/vboard/s...d.php?t=619024 1964 Short bed trailer |
|
|

|
|
|
#1005 | ||
|
Senior Enthusiast
Join Date: Feb 2007
Location: Spokane Valley, WA
Posts: 8,356
|
Re: Markeb01 Build Thread
Quote:
Thanks for the kind words and interest in the build. I’ve been around long enough to have learned a few things. I’m hopeful that sharing my successes and failures can help others avoid some expensive detours. There are so many little tips and tricks I’ve picked up over the years, I’d like to share everything I can before I’m too old to do (or remember) this stuff anymore. I’m looking forward to seeing your build progress. I’ve certainly swiped my share of ideas from what I’ve seen on this forum, and other members have provided input on where to find things I couldn’t locate. Good luck with your build! Quote:
I think the single biggest improvement I made in my garage was the copper piping system for the air compressor. At the time I put it in the cost was only about $100. When painting it prevents water from getting in the paint, and although I don’t paint much anymore, it is also very handy having compressed air outlets on every wall. I have a total of 5 drops in the garage, and 2 or 3 in the basement. It’s a very simple layout. All the copper pipes run up hill away from the compressor, so any moisture squeezed out of the air will run back downhill into the tank: 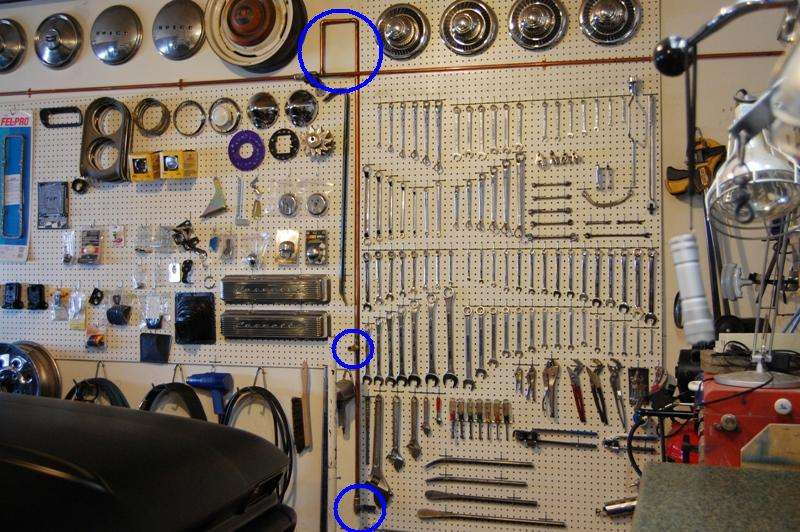 At each drop I installed a riser (top circle), which prevents almost all moisture from entering the drop. Gravity causes it to run back to the compressor tank instead. If any moisture makes it to the drop, it falls past the outlet (middle circle) and lands on the ball valve at the bottom (lowest circle). Before painting I just crack each ball valve to make sure there isn’t any water in the system. The final addition was removal of the factory petcock under the bottom of the tank. It was replaced with an elbow and another ball valve allowing the tank to be drained easily without hosing myself down:  Until recently I had a much bigger compressor that was soldered into the wall piping. To keep vibration out of the system, the compressor connected via the braided compressor flex hose shown below:  With the new smaller compressor, I simply added a quick disconnect and hooked it up with a hose. It’s amazingly convenient never having to trip over hoses piled up on the floor. Just something you might want to consider. If I could have the ultimate tool it would be a vehicle lift, but unfortunately my ceiling is too low to accommodate one. Looking forward to seeing your new barn!
__________________
My Build Thread: http://67-72chevytrucks.com/vboard/s...d.php?t=444502 Last edited by markeb01; 10-04-2013 at 05:21 PM. |
||
|
|

|
|
|
#1006 |
|
Registered User
Join Date: Apr 2012
Location: Searcy, AR
Posts: 4,203
|
Re: Markeb01 Build Thread
That Piping system is Spot-On... Cataloging that for my garage, or as JMo puts it, Guyrage!!!

__________________
DON Proverbs 27:17  US Air Force Retarded errr Retired My '65 Stepper Build:http://67-72chevytrucks.com/vboard/s...d.php?t=533920 My '60 Rusty Patina Build:http://67-72chevytrucks.com/vboard/s...66#post7402266 My '72 http://67-72chevytrucks.com/vboard/s...59#post7204359 SOLD |
|
|

|
|
|
#1007 |
|
Senior Enthusiast
Join Date: Feb 2007
Location: Spokane Valley, WA
Posts: 8,356
|
Re: Markeb01 Build Thread
As a model building kid during the golden age of model cars (1958-63) I fell in love with the 1939-40 Ford coupe when it first appeared in the Trophy Series kits from AMT. Subsequently I found two near perfect examples of actual cars that reflected what my real car was going to look like when I got old enough to drive (in retrospect I never managed to own a 39/40 Ford):
This photo was the earliest published. I had to borrow the 35 cents to buy the magazine it was in. Although I had the article when new, I’ve never been able to find the magazine it was published in again:  The car had everything. Black paint, mag wheels, a Sun tach, chrome window frames, and tuck and roll upholstery. Much later a similar example came along. It also wore brilliant black paint and mag wheels.  And it had one additional feature. The ultimate in upholstery, black diamond tufted Naugahyde.  Looking back on it the upholstery wasn’t even that well done, but it left a lasting impression on me. I wanted a full diamond tufted interior ever since. When my career suddenly came to an end I needed something to do, so I taught myself how to diamond tuft, and did a bunch of my interior  The biggest disappointment was not being able to do full door panels. I couldn’t figure out a way to deal with the profile of the upper panel, so I settled for upholstering just the lower portion. That all changed today by stumbling on the handy work of another forum member – 1966chevy. He resolved the problem of the upper section by building out the sides: 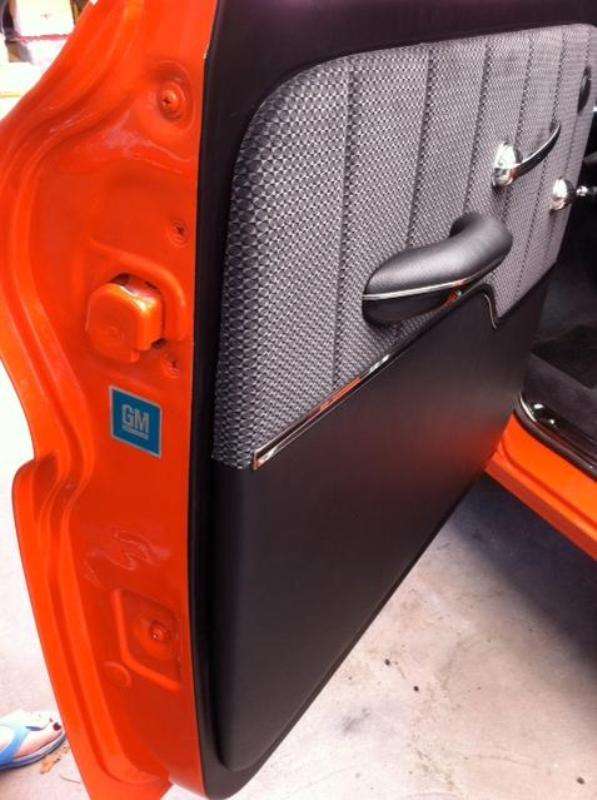  So just when I thought I was done with the truck, now I have to tear out the existing panels and start over again! I’m not sure if they’ll be needed, but I did a frantic search looking for the window crank and inside door handle extensions that were available back in the 70’s, and actually found an NOS set on Ebay:  As soon as the yard projects are wrapped up before winter I’ll be plunging into the new door panel project. A special thanks to 1966chevy for the inspiration. Once again this forum has come to the rescue!
__________________
My Build Thread: http://67-72chevytrucks.com/vboard/s...d.php?t=444502 |
|
|

|
|
|
#1008 |
|
Registered User
Join Date: Apr 2012
Location: Searcy, AR
Posts: 4,203
|
Re: Markeb01 Build Thread
Those are Awesome, and I will be watching your project...
 Speaking of loving this forum... Off to Clemdaddy's today for a get-together with other members... 
__________________
DON Proverbs 27:17  US Air Force Retarded errr Retired My '65 Stepper Build:http://67-72chevytrucks.com/vboard/s...d.php?t=533920 My '60 Rusty Patina Build:http://67-72chevytrucks.com/vboard/s...66#post7402266 My '72 http://67-72chevytrucks.com/vboard/s...59#post7204359 SOLD Last edited by Ta2Don; 10-19-2013 at 08:02 AM. Reason: add on |
|
|

|
|
|
#1009 |
|
Rollin' Old Skool
Join Date: Jun 2007
Location: Hattiesburg, MS
Posts: 5,371
|
Re: Markeb01 Build Thread
Always a pleasure watching you come up with new additions to your truck. And to think I thought you were pretty much out of options once the new engine was in place. Like they say, there's always something you can do. Never done! (unless you just quit
 ) )
__________________
_____________________________________________ Phillip My Build threads: 1966 Chevy C-10 "Black Betty" shortbed, fleetside, BBW, 327 V8/ Powerglide (under construction) http://67-72chevytrucks.com/vboard/s...ighlight=betty 1997 Chevy Tahoe, 2dr/2wd, mild custom (Daily driver) http://67-72chevytrucks.com/vboard/s...d.php?t=601142 Pics: '66 C-10 https://flic.kr/s/aHsjHWD4h9 '97 Tahoe https://flic.kr/s/aHsjGZ7wKP '93 C-1500 https://flic.kr/s/aHskxdpdnQ '88 S-10 Blazer https://flic.kr/s/aHsjYGx4Md Previous Rides: 1993 Chevy S-10 ext. cab, 4.3L, 4/5 drop (Sold) 1993 Chevy C-1500 short/step Retro-Rod (Sold) 1988 S-10 Blazer 2dr/2wd mild custom (Sold) |
|
|

|
|
|
#1010 | ||
|
Senior Enthusiast
Join Date: Feb 2007
Location: Spokane Valley, WA
Posts: 8,356
|
Re: Markeb01 Build Thread
Quote:
Quote:
But since the door panel epiphany, I confirmed 4 yards of matching marine vinyl remain stored in perfect condition, along with more than enough of the same foam used to construct the short door panels. I also have more than enough buttons, and questionably enough of the “Christmas Tree” attaching fasteners. It looks like the only thing lacking is the ABS plastic for the panels, which will be picked up Monday morning. This should be a busy week. I’m hoping my hands will hold up long enough to complete both sides. Folding all the pleats, managing the buttons, and forming uniform diamonds in the fabric are murder on the hands and fingers. And being the size of a full door panel is killer for a bad back as well since it requires a lot of reaching, stretching, and flipping it back and forth. But then again it’s all worth it if it comes out nice!
__________________
My Build Thread: http://67-72chevytrucks.com/vboard/s...d.php?t=444502 |
||
|
|

|
|
|
#1011 |
|
Registered User
Join Date: Aug 2013
Location: Ma.
Posts: 169
|
Re: Markeb01 Build Thread
Good find on the extensions. Looks to be a good mod. I'll see how yours come out, maybe once you're a professional at it I'll let you do mine
 My grandfather has been talking about buying a 40 ford all his life, I kept trying to talk him into it because I knew the day would come when he'd be letting them go and I can't fit in anything else he has. He's got cars from 1911,1917, 1923, 1929, 1932, 1953, 1967...then he got silly and went out and bought a bunch of random newer sport-convertables. I can't fit in anything he owns...at least the 40 if he had bought it I could have moved the seat back. My uncle had a 38 chevy coupe... that was and still is my dream car..diamond tufted interior Gasser style 427 tri-power...someday.. My grandfather has been talking about buying a 40 ford all his life, I kept trying to talk him into it because I knew the day would come when he'd be letting them go and I can't fit in anything else he has. He's got cars from 1911,1917, 1923, 1929, 1932, 1953, 1967...then he got silly and went out and bought a bunch of random newer sport-convertables. I can't fit in anything he owns...at least the 40 if he had bought it I could have moved the seat back. My uncle had a 38 chevy coupe... that was and still is my dream car..diamond tufted interior Gasser style 427 tri-power...someday.. 
__________________
Nice EASY project, no problem....until I get home  why is that? My build: http://67-72chevytrucks.com/vboard/s...d.php?t=595078 why is that? My build: http://67-72chevytrucks.com/vboard/s...d.php?t=595078
Last edited by BOXER957; 10-20-2013 at 06:14 AM. Reason: forgot att. |
|
|

|
|
|
#1012 |
|
Senior Enthusiast
Join Date: Feb 2007
Location: Spokane Valley, WA
Posts: 8,356
|
Re: Markeb01 Build Thread
Yep most of those early cars are pretty small even for a regular sized guy.
The 37-38 is one of my top dream cars as well. I pulled this example out of a magazine back in the 70’s or 80’s which was built close to what I would have done:  I tried to buy one back in 1965, but every time I went to the house the guy wasn’t home. The grille was missing but the car was dent and rust free, and dead stock on the outside. I knew something underneath must have been upgraded as the rear wheels were 5 lug. It was eventually sold to someone else at my high school, and that’s when I learned “the rest of the story”. Turned out the owner installed a complete 1957 Olds J2 engine (3 deuces) and driveline, and shortly after got both drafted and married. The car sat in his front yard untouched from then on. I was always disappointed that one got away! It would have been an easy build for a kid on a budget.
__________________
My Build Thread: http://67-72chevytrucks.com/vboard/s...d.php?t=444502 |
|
|

|
|
|
#1013 |
|
Senior Enthusiast
Join Date: Feb 2007
Location: Spokane Valley, WA
Posts: 8,356
|
Re: Markeb01 Build Thread
Well we had a little unwelcome excitement this morning. Our next door neighbor came over pounding on the door advising the house kitty corner behind us was on fire. We ran outside, grabbed all of our hoses, hooked them up and started hosing down the fences, shed, and trees in the neighbors yard. It was really crackling. According to witnesses it seems a propane tank may have exploded:
 Our hoses reached the tree on the left and the first couple of hedges on the right: 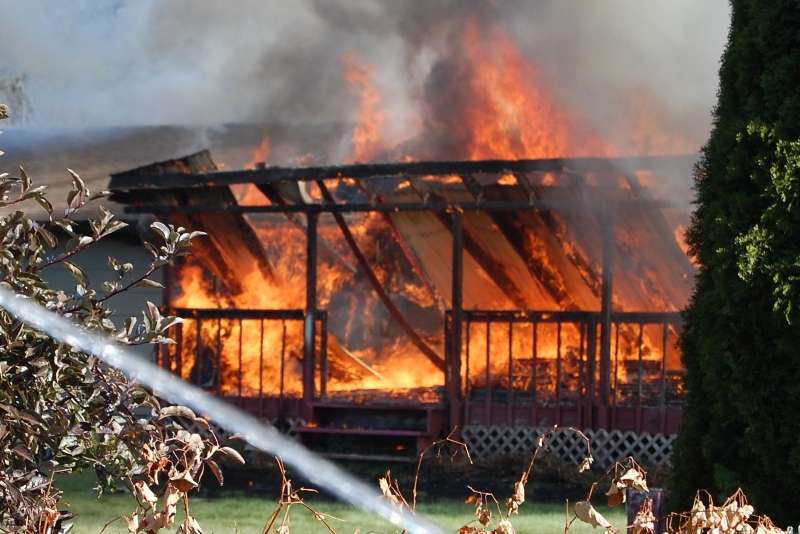 The neighbors on the other side got their hoses and started on the fence behind their pole building. 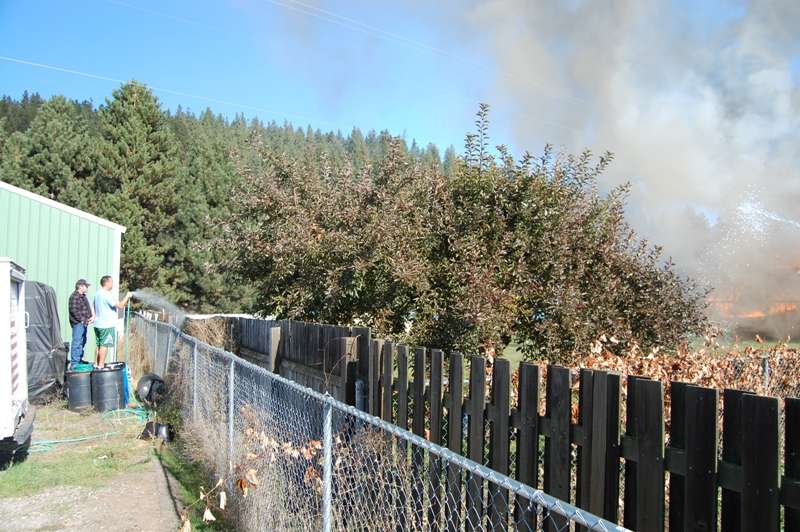 The patio roof and structure soon collapsed and the fire spread into the house roof. The garage must have become involved because there were a lot of small explosions that sounded like paint or spray cans bursting. 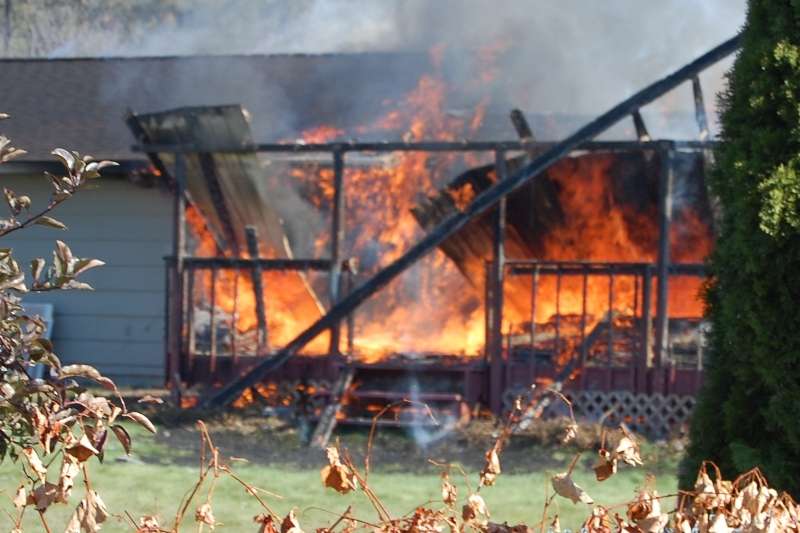 By the time the fire department made it around back the flames had reached the peak of the house roof: 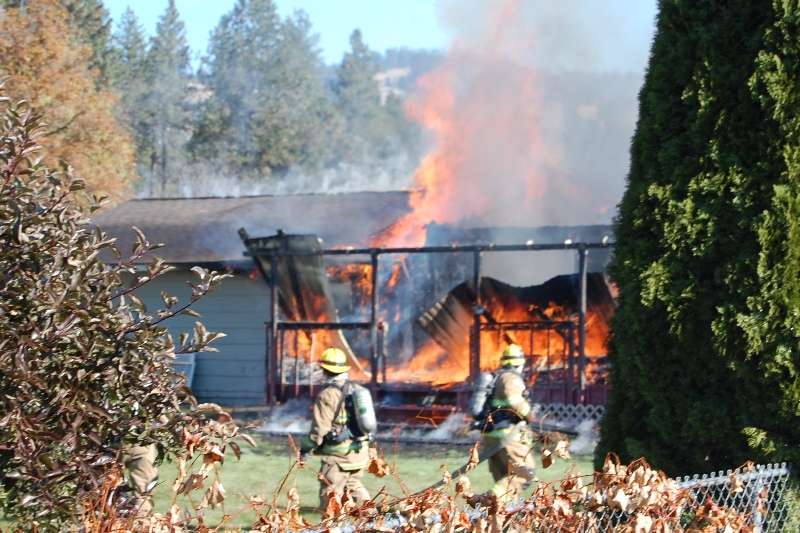 The flames flared up reaching the power wires above:  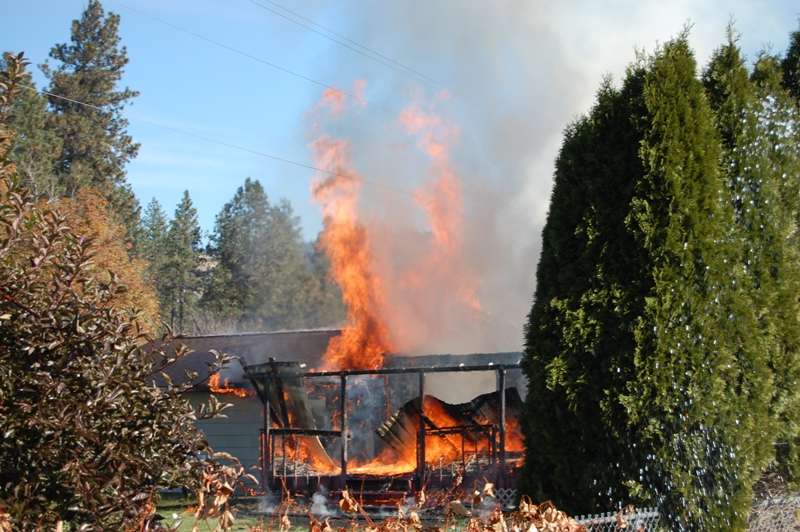 I yelled to our neighbor he should get out of there as I was sure the wire(s) were going to burn through. Just as he jumped off the back of the truck, a wire popped landing on the truck and the fence right where he had just been standing. Assuming it was still live we all backed away a good distance away from the cyclone fencing.  So now the street is blocked off until the fire is completely out and the power guys can come get the line up off the ground: 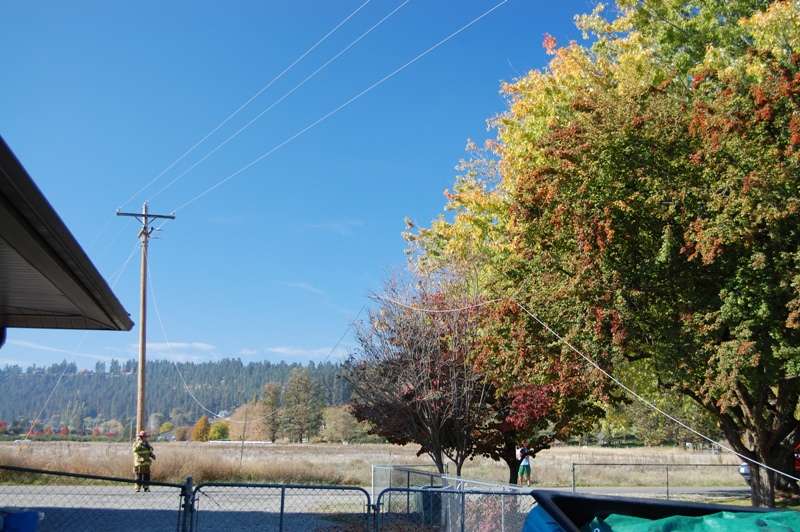 I feel really bad for the people that live there. There’s few things more devastating than a house fire.
__________________
My Build Thread: http://67-72chevytrucks.com/vboard/s...d.php?t=444502 |
|
|

|
|
|
#1014 |
|
Registered User
Join Date: Apr 2012
Location: Searcy, AR
Posts: 4,203
|
Re: Markeb01 Build Thread
Sorry to see the loss your neighbors suffered, but glad you and the surrounding neighbors were spared loss. Praying for the family affected.
__________________
DON Proverbs 27:17  US Air Force Retarded errr Retired My '65 Stepper Build:http://67-72chevytrucks.com/vboard/s...d.php?t=533920 My '60 Rusty Patina Build:http://67-72chevytrucks.com/vboard/s...66#post7402266 My '72 http://67-72chevytrucks.com/vboard/s...59#post7204359 SOLD |
|
|

|
|
|
#1015 |
|
Rollin' Old Skool
Join Date: Jun 2007
Location: Hattiesburg, MS
Posts: 5,371
|
Re: Markeb01 Build Thread
Hate to hear/see that! Wishing the best for that family. Thankfully nobody was hurt, & glad no one else was affected. My mom's house burned down in either 2002 or 2003, so I know the feeling too well.
__________________
_____________________________________________ Phillip My Build threads: 1966 Chevy C-10 "Black Betty" shortbed, fleetside, BBW, 327 V8/ Powerglide (under construction) http://67-72chevytrucks.com/vboard/s...ighlight=betty 1997 Chevy Tahoe, 2dr/2wd, mild custom (Daily driver) http://67-72chevytrucks.com/vboard/s...d.php?t=601142 Pics: '66 C-10 https://flic.kr/s/aHsjHWD4h9 '97 Tahoe https://flic.kr/s/aHsjGZ7wKP '93 C-1500 https://flic.kr/s/aHskxdpdnQ '88 S-10 Blazer https://flic.kr/s/aHsjYGx4Md Previous Rides: 1993 Chevy S-10 ext. cab, 4.3L, 4/5 drop (Sold) 1993 Chevy C-1500 short/step Retro-Rod (Sold) 1988 S-10 Blazer 2dr/2wd mild custom (Sold) |
|
|

|
|
|
#1016 |
|
Post Whore
 Join Date: Mar 2013
Location: Southern Oregon
Posts: 10,384
|
Re: Markeb01 Build Thread
Darn shame. Dad works for the Fire Department so I hear all the calls. It's amazing what goes on and you don't even know it!
__________________
1966 Chevy C10 "Project Two Tone" http://67-72chevytrucks.com/vboard/s...d.php?t=596643 1964 GMC "Crustine" semi-build:http://67-72chevytrucks.com/vboard/s...d.php?t=665056 My youtube channel. Username "Military Chevy": https://www.youtube.com/channel/UC_h...fzpcUXyK_5-uiw |
|
|

|
|
|
#1017 |
|
Senior Enthusiast
Join Date: Feb 2007
Location: Spokane Valley, WA
Posts: 8,356
|
Re: Markeb01 Build Thread
It turned out to be a pretty productive day after all. I measured up the doors to order the ABS panels and began confirming inventory on the buttons and attaching probes. My focus drifted to the seats again. I just can’t get beyond the belief they should be diamond tufted for everything else in the cab to “work”. In my opinion having the seats tufted makes the whole interior look “diamond tufted”. With non-matched seats, the rest of the diamond upholstery looks somewhat superfluous. So I decided to plunge in and see what happens.
I have a spare seat available, which years ago turned the other two into a full bench seat (3 buckets in front). So it was dusted off, brought upstairs, and disassembled. I took a ton of detail photos in case I have trouble remembering how to put it back together. It was then reduced to 6 basic pieces – two frames, two cushions, and two seat covers. I’m so impressed with these seats. They’re inexpensive, but very well built and designed with simple engineering. Everything came apart easily with no damage to any component. The seat covers could easily be reinstalled, or used to refurbish a different seat. 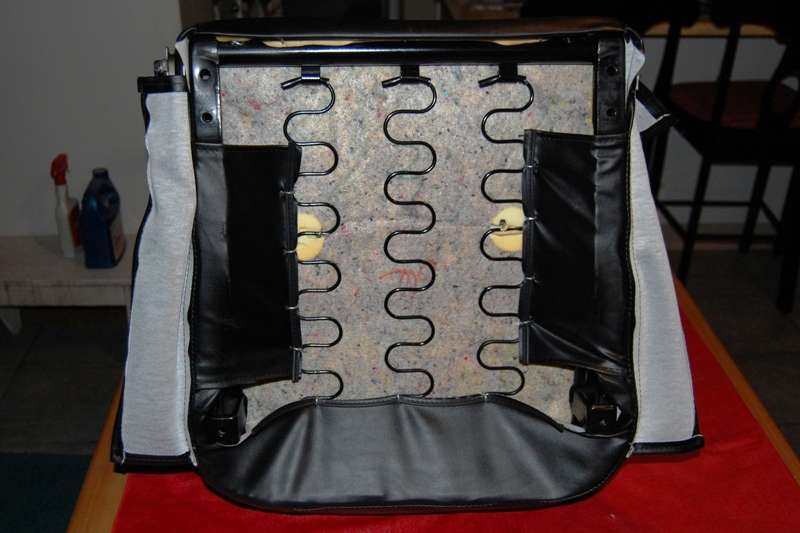  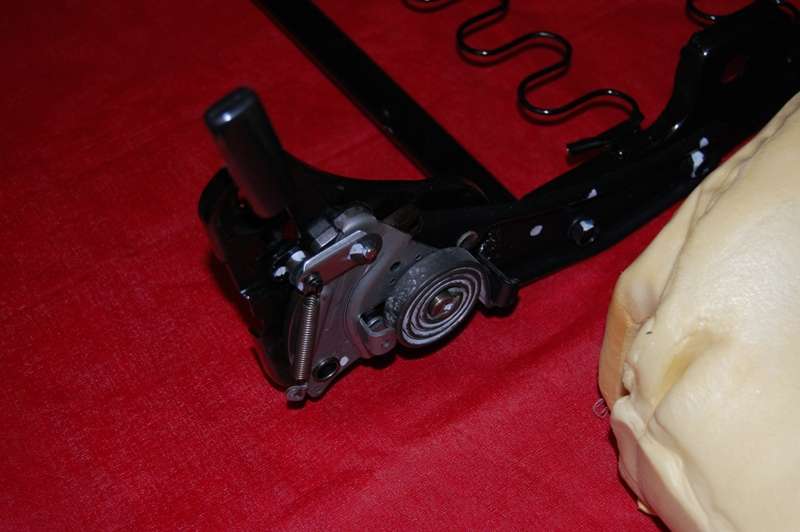 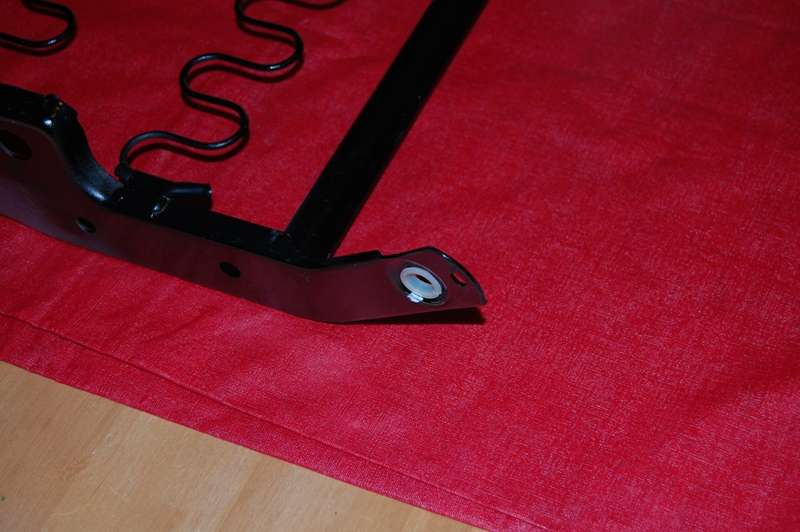 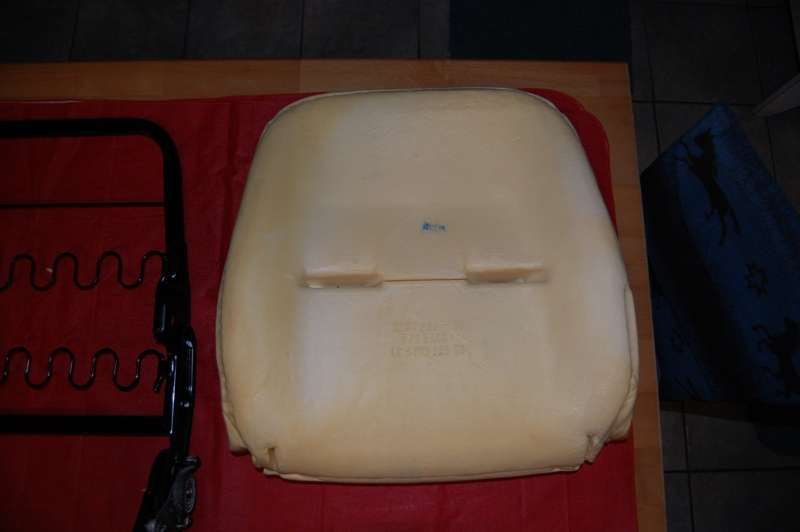 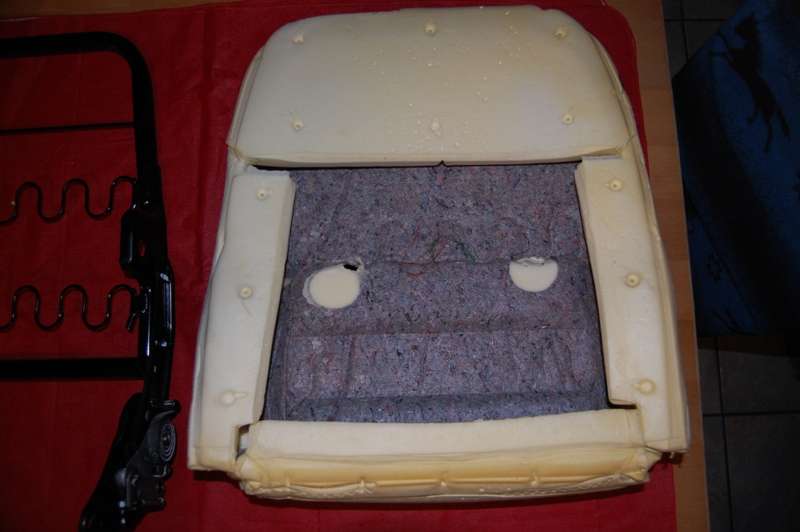  With everything apart I’m now convinced they can be successfully tufted. Now the fun begins. There are multiple options on the best way to form the upholstery, so I’ll have to try all of them to determine which works best. The tufting can be done directly through the factory seat foam, or through thin, thick, soft, or dense foam, and applied on top of the stock foam cushions. This phase is called “tuft testing”, attempting to determine which combination produces the most attractive results, and which will last the longest surviving a hefty driver wiggling around on it. Now that the fever has struck again, I’ll be working on the seats first and the door panels immediately after.
__________________
My Build Thread: http://67-72chevytrucks.com/vboard/s...d.php?t=444502 |
|
|

|
|
|
#1018 |
|
Registered User
Join Date: Apr 2012
Location: Searcy, AR
Posts: 4,203
|
Re: Markeb01 Build Thread
 I know you will Nail this... I know you will Nail this... You continue to impress every step of the way!  any pics of your neighbors truck???
__________________
DON Proverbs 27:17  US Air Force Retarded errr Retired My '65 Stepper Build:http://67-72chevytrucks.com/vboard/s...d.php?t=533920 My '60 Rusty Patina Build:http://67-72chevytrucks.com/vboard/s...66#post7402266 My '72 http://67-72chevytrucks.com/vboard/s...59#post7204359 SOLD Last edited by Ta2Don; 10-21-2013 at 08:36 AM. Reason: add-on |
|
|

|
|
|
#1019 |
|
Registered User
Join Date: Jun 2012
Location: Selkirk Ontario Canada
Posts: 1,141
|
Re: Markeb01 Build Thread
ah cool ...just to putting this out there since you have them apart maybe heated seats?
__________________
My 63 GMC Panel Slow Build http://67-72chevytrucks.com/vboard/s...=1#post5457281 63 
|
|
|

|
|
|
#1020 |
|
Senior Enthusiast
Join Date: Feb 2007
Location: Spokane Valley, WA
Posts: 8,356
|
Re: Markeb01 Build Thread
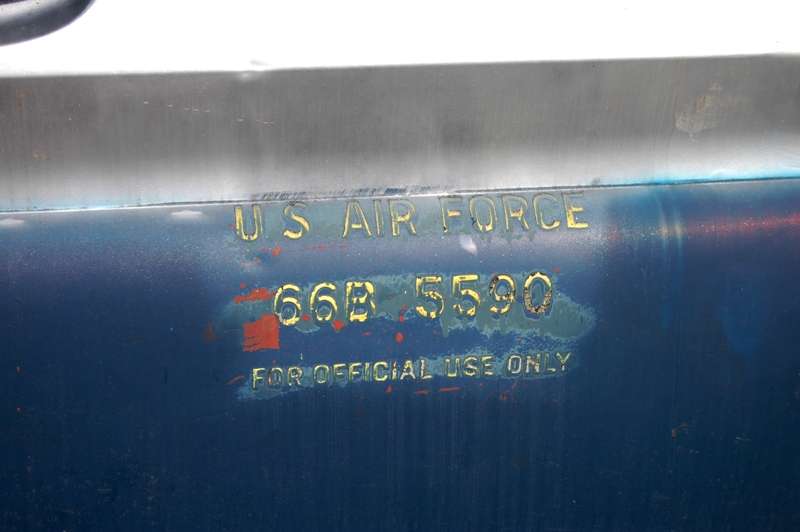
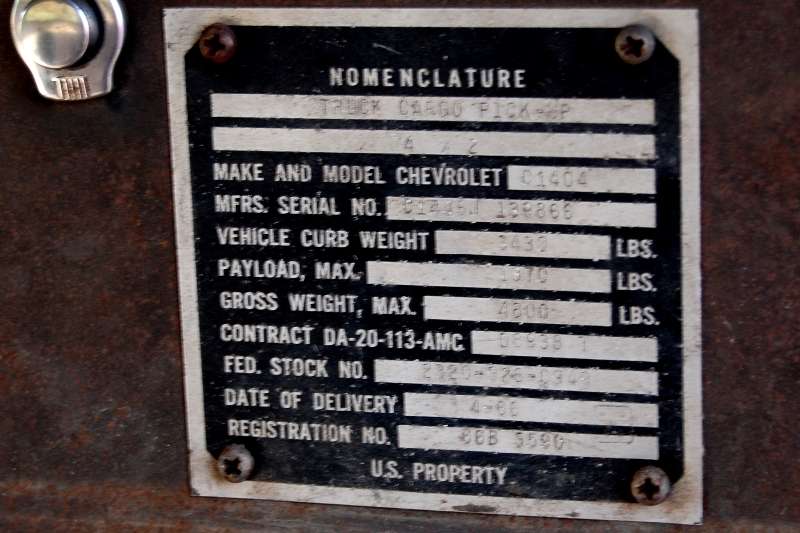
It's an authentic US Air Force truck, and the owner met one of the Air Force guys that used to work on it when it was still in service. He intends to keep the military identity. It’s pretty rough, but it was his daily driver until recently. Not sure what’s going on with it now:
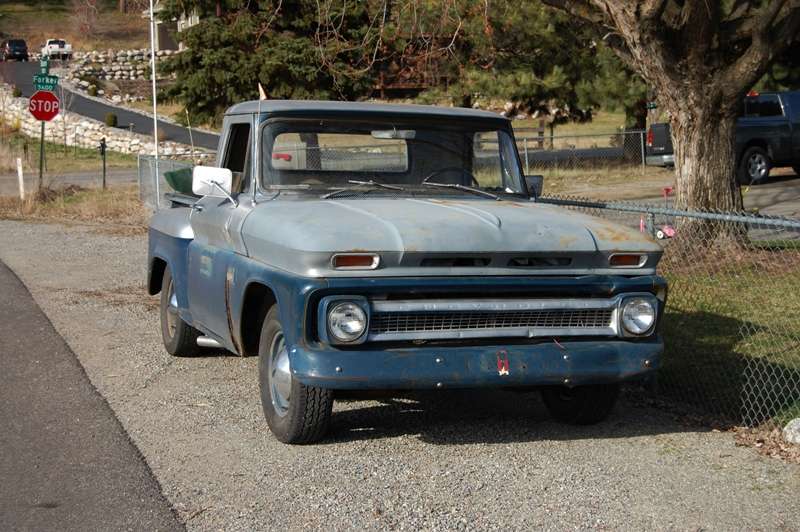     I thought about doing this, but I’m concerned it might complicate the tufting process, or the button prongs might be a threat to the heaters. The truck lives in a garage, and during the winter months has a space heater in the cab to eliminate moisture, so I’ve decided to let that upgrade go.
__________________
My Build Thread: http://67-72chevytrucks.com/vboard/s...d.php?t=444502 |
|
|

|
|
|
#1021 |
|
Registered User
Join Date: Sep 2011
Location: Tacoma, WA
Posts: 2,425
|
Re: Markeb01 Build Thread
Your neighbor's truck is awesome!
Mine started life as an Airforce service rig too .... cool.
__________________
Michael McMurphy My 66 Stepside My 64 Tow Truck My 66 Tempest Table Of Contents Added to Page1 |
|
|

|
|
|
#1022 |
|
Registered User
Join Date: Apr 2012
Location: Searcy, AR
Posts: 4,203
|
Re: Markeb01 Build Thread
I spent my Air Force career in Vehicle Maintenance and, just for giggles, the number on the tailgate and door 66B5590 is the USAF way of identifying the vehicle...
66 = 1966 Model B = General Purpose Vehicle, i.e. pickups, staff cars, buses, bread trucks, utility trucks, just to name a few... 5590 = USAF serial # for that vehicle... My first duty station was Keesler AFB, Biloxi Mississippi... Our oldest p/u in that fleet was a 71 Dodge d100 with a 225 slant six and 3 speed... It was our shop truck and someone changed it to a floor shift, Hurst shifter, when the column shifter went bad...  just for some general info... 
__________________
DON Proverbs 27:17  US Air Force Retarded errr Retired My '65 Stepper Build:http://67-72chevytrucks.com/vboard/s...d.php?t=533920 My '60 Rusty Patina Build:http://67-72chevytrucks.com/vboard/s...66#post7402266 My '72 http://67-72chevytrucks.com/vboard/s...59#post7204359 SOLD |
|
|

|
|
|
#1023 |
|
Senior Enthusiast
Join Date: Feb 2007
Location: Spokane Valley, WA
Posts: 8,356
|
Re: Markeb01 Build Thread
Thanks for the input. I’ll share that information with the owner the next time I see him.
After an hour or so searching my computer files, I came to realize I lost all my dimensional drawings and specifications on the earlier diamond tufting work in the hard drive crash a few years ago. Fortunately I recovered the foam and backer dimensions by removing one of the small end panels behind the seats and measuring the diamonds on the back side. I was equally lucky finding a piece of trimmed scrap that had the full markings showing the exact dimensions of the fabric, which provides for the tuft allowance:  All those dimensions are now loaded in a new file on my hard drive, as well as the back up drive, along with a hard copy print out (just in case). I also determined which direction the fabric stretches and which orientation is required to have it stretch correctly on the seats and door panels. In my case the vinyl fabric stretches across the width of the roll, so the length direction of the fabric must be laid out from left to right across the door panel, so the stretch provides for the correct vertical dimension of the diamonds. For anyone interested, my tufts will be 4 ˝” high x 3” wide on the foam and backing, and 5 1/8” x 4” on the fabric. They are much smaller than most traditional diamond tufting, but this smaller pattern was very popular in the late 60’s, and I like how busy it looks. It’s also about a hundred times more work than larger diamonds. If I didn’t already have so much of it finished that would have to be done over, I’d probably switch to larger diamonds just to make it easier. I then laid the pattern out on the seat foam to determine where and how many diamonds and buttons to apply. I can now visualize the seats being finished:  Between yesterday and today I picked up the foam for the seat tufting, and the ABS sheets and glue for the door panels. Luckily I located my commercial quality hog ring pliers & hog rings. I think the only thing left to pick up is a few more yards of matching marine vinyl. If everything goes well that will be in hand by tomorrow afternoon, and I can get started on the actual tufting process in the next day or two.
__________________
My Build Thread: http://67-72chevytrucks.com/vboard/s...d.php?t=444502 |
|
|

|
|
|
#1024 |
|
Registered User
Join Date: Apr 2012
Location: Searcy, AR
Posts: 4,203
|
Re: Markeb01 Build Thread
I've always liked the look of the diamond tufts, watching this is way cool, thank you for documenting this!

__________________
DON Proverbs 27:17  US Air Force Retarded errr Retired My '65 Stepper Build:http://67-72chevytrucks.com/vboard/s...d.php?t=533920 My '60 Rusty Patina Build:http://67-72chevytrucks.com/vboard/s...66#post7402266 My '72 http://67-72chevytrucks.com/vboard/s...59#post7204359 SOLD |
|
|

|
|
|
#1025 | |
|
Registered User
Join Date: Sep 2011
Location: Tacoma, WA
Posts: 2,425
|
Re: Markeb01 Build Thread
Quote:
My best advice is what I do, once a file gets to be 4 gigs I burn it to a DVD-R disc. Once burned and proplerly stored, this data will last thru the apocolypse. The nice thing about these discs now is that they are manipulatable, they did not always used to be so, as in you can take files off, and put new ones on, like a hard drive or thumb drive. I find this is particularly important for photo albums and important documents that are created and stored digitally. If your computer does not have a CD burner that can perform these functions, it is ridiculously easy to buy one and install it. Once in your machine you just update the drivers and no matter what make, model, or year of your computer it should run just fine. I disavowed offsite hosting for storage of personal stuff back in the days of Geocities, which in their fine print clause stated that anything posted to their servers was their property and could be used by them in any means they wanted. I didnt want my face on a Viagra ad, so I took down that site and never posted anything to the internet I cared about as far as copyright. Just a bit of FYI. Oh, and I cannot wait to see these seats !!!
__________________
Michael McMurphy My 66 Stepside My 64 Tow Truck My 66 Tempest Table Of Contents Added to Page1 |
|
|
|

|
 |
| Bookmarks |
|
|