
|
 09-26-2011, 09:29 PM
|
#51 |
|
Senior Member
 Join Date: May 2011
Location: Cypress, Tx.
Posts: 1,504
|
Working on seat frame
I removed the seats from their frame, then worked on fabricatiing a framework to support the rear about 4-6" and will be "adjustable" or a one time adjustment. This frame is still on my welding table, so I hope to get it together tomorrow!
 Posted via Mobile Device Posted via Mobile Device |

|

|
|
09-26-2011, 09:41 PM
|
#52 |
|
Registered User
Join Date: Jul 2011
Location: Auburn ca.
Posts: 2,886
|
Re: My '59 Apache
 Kind hard to tell what is what in that light. abut from what I can see it looks good Kind hard to tell what is what in that light. abut from what I can see it looks goodwe are having fun now! |
|
|
|
|
09-27-2011, 08:17 AM
|
#53 |
|
Senior Member
Join Date: May 2011
Location: Cypress, Tx.
Posts: 1,504
|
Re: My '59 Apache
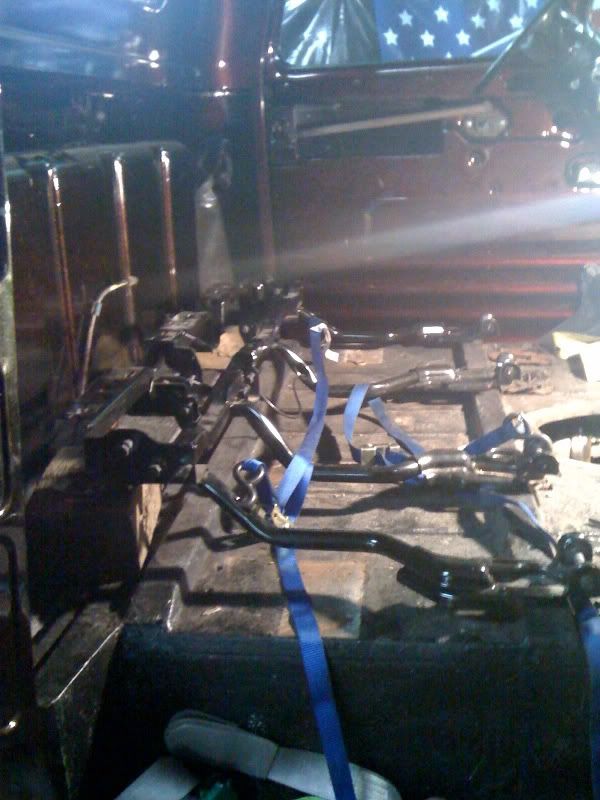
Sorry about that poor photo , I shouldn't have posted it. I just took this photo while it's only welding table. It's a difficult thing to take a photo of! The all thread will be cut and put into 4 holes that already exist, shouldn't take me long to do this. Then I'll mig the althread in their each designated spot. I'll be back!
 Posted via Mobile Device |
|
|
|
|
09-28-2011, 12:36 AM
|
#54 |
|
Registered User
Join Date: Jun 2006
Location: Idaho
Posts: 8,800
|
Re: My '59 Apache
Photo looked fine to me but then I have spent many a night looking at the inside of my cab figuring out stuff in poor light. You are doing what I think is the most fun, figuring out and fabricating. Engineering term is "elegant" design, finding the simplest and most efficient solution for the problem. Can't wait to see how it comes together.
__________________
1959 Chevy Short Fleetside w/ 74 4WD drive train (current project) OrrieG Build Thread 1964 Chevelle Malibu w/ 355-350TH (daily driver) Helpful AD and TF Manual Site Old Car Manual Project |
|
|
|
|
10-03-2011, 08:15 PM
|
#55 |
|
Senior Member
Join Date: May 2011
Location: Cypress, Tx.
Posts: 1,504
|
Re: My '59 Apache
Ok, Mike came through with getting me the floor pans, so today I got to work on the passenger side and almost got it welded in, just a few more stitches ; ) it wasn't too bad, however the drivers side looks a little more involved. The new metal looks really nice !!!
 Posted via Mobile Device Posted via Mobile Device |
|
|
|
|
11-07-2011, 08:53 AM
|
#56 |
|
Senior Member
Join Date: May 2011
Location: Cypress, Tx.
Posts: 1,504
|
Re: My '59 Apache
I let Sid@droppedaxles refurbish my axle,upgrade to tie rods,sandblasted all parts,etc. The parts look new! Also bought the 2 leaf Posie slider springs too. Only problem I ran into was the length of the tie rods, to me, not enough threads for a safe ride, but Sid asked me to tell him the length I need.
I'll put the front wheels on and check toe-in, then I can be more accurate how long they need to be. I found that putting the lower shock on the rear of the axle interferes with the steering, so have to figure that out. Otherwise I think I can go ahead and put the truck on the ground, put it outside to clean up my garage!! 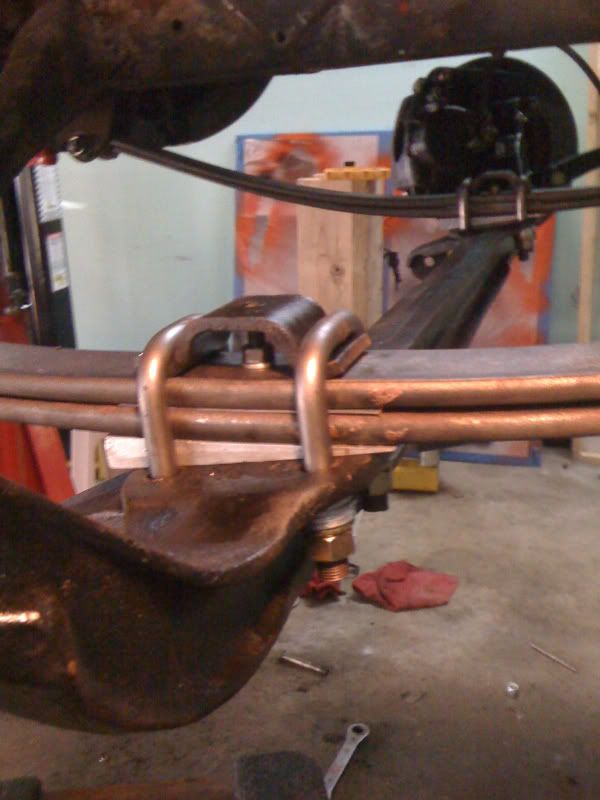 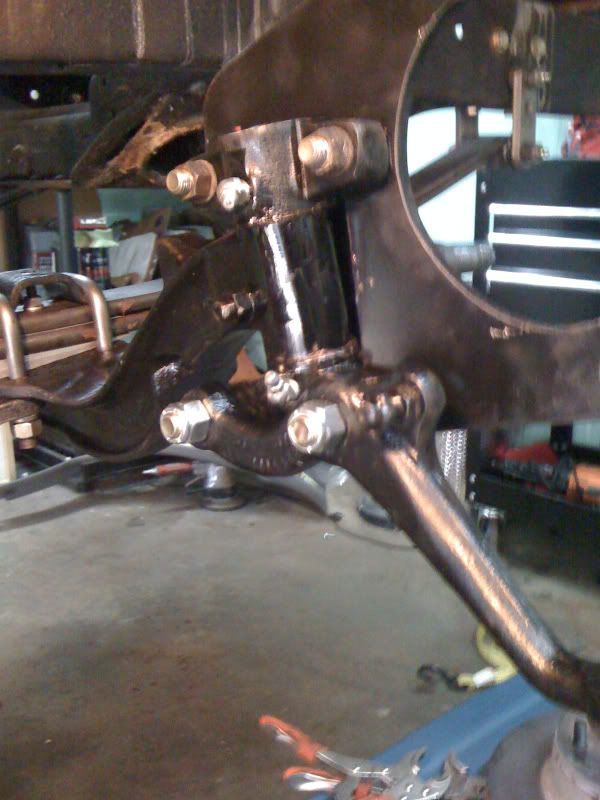 Posted via Mobile Device Posted via Mobile Device Posted via Mobile Device Last edited by Denee007; 11-07-2011 at 09:08 AM. Reason: Photo error |
|
|
|
|
11-08-2011, 01:44 PM
|
#57 |
|
Senior Member
 Join Date: Aug 2010
Location: Shasta Lake, CA.
Posts: 1,619
|
Re: My '59 Apache
Tahoe rear seat, humm. Does that make you a back seat driver ?

|
|
|
|
|
11-15-2011, 04:16 PM
|
#58 | |
|
Senior Member
Join Date: May 2011
Location: Cypress, Tx.
Posts: 1,504
|
On the ground for little bit
I just couldn't stand my truck being the air for so long! So the 2 leaf Posie's are installed and enough stuff to put it on the ground! No engine nor tranny, so that's how it sits right now. It's very bouncy and very quiet! I hope the truck doesnt go really low when the engine/tranny are installed! I'm goingnto move truck on the other side of the garage so I can install the other floor pan, then while welding it in, figure out how to make plugs to start closing up holes in the firewall, just need to also figure which holes are needed!
  Quote:
Posted via Mobile Device |
|
|
|
|
|
11-15-2011, 06:04 PM
|
#59 |
|
Registered User
Join Date: Aug 2007
Location: Corona, California
Posts: 7,998
|
Re: My '59 Apache
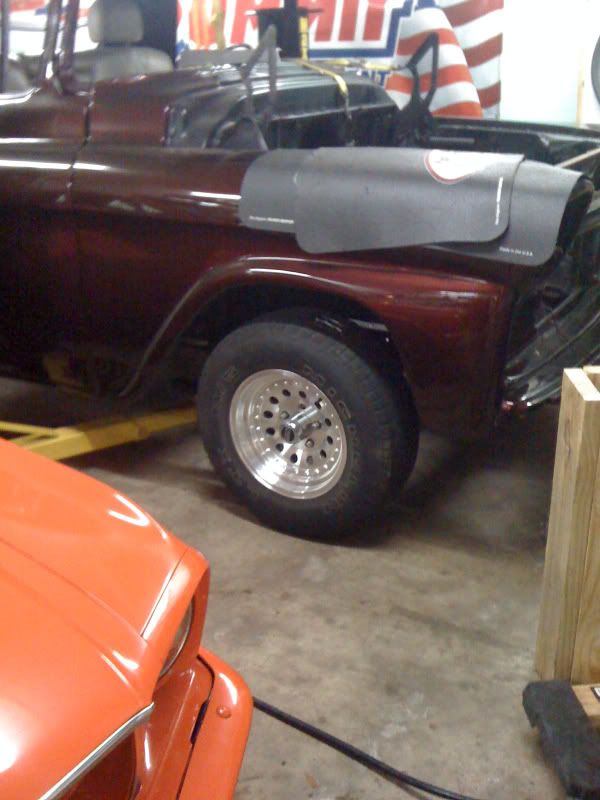
Looking good. I like the wheels.
Kim |
|
|
|
|
02-23-2012, 06:31 PM
|
#60 |
|
Senior Member
Join Date: May 2011
Location: Cypress, Tx.
Posts: 1,504
|
Re: My '59 Apache
Finally got to do a little work today. My focus was on the frame in welding in a patch where the old steering gear used to be. Welding up a few other frame holes too. Then maybe kind of soon I'll work on fitting up the panels Dave Chapman had made for me a while back, should look pretty good. Plus while in the engine compartment for who knows how long, I'll start welding up firewall holes. Once I get after it, I do make a little progress; ).
 Posted via Mobile Device |
|
|
|
|
02-24-2012, 05:53 AM
|
#61 |
|
Registered User
Join Date: Dec 2009
Location: Melbourne Australia
Posts: 549
|
Re: My '59 Apache
Keep up the good work, I'm also dreading filling the firewall holes.
__________________
RIP John (Lambis), my beloved Father & best Friend. My Build 56 GMC http://67-72chevytrucks.com/vboard/s...d.php?t=486721 |
|
|
|
|
02-24-2012, 09:11 AM
|
#62 |
|
Registered User
Join Date: Aug 2007
Location: Corona, California
Posts: 7,998
|
Re: My '59 Apache
Good to see you back at it.
Kim |
|
|
|
|
02-24-2012, 09:54 AM
|
#63 | |
|
Registered User
Join Date: Dec 2011
Location: NE Oklahoma
Posts: 64
|
Re: My '59 Apache
Quote:
|
|
|
|
|
|
04-09-2012, 01:49 PM
|
#64 |
|
Senior Member
Join Date: May 2011
Location: Cypress, Tx.
Posts: 1,504
|
finally tackling the firewall
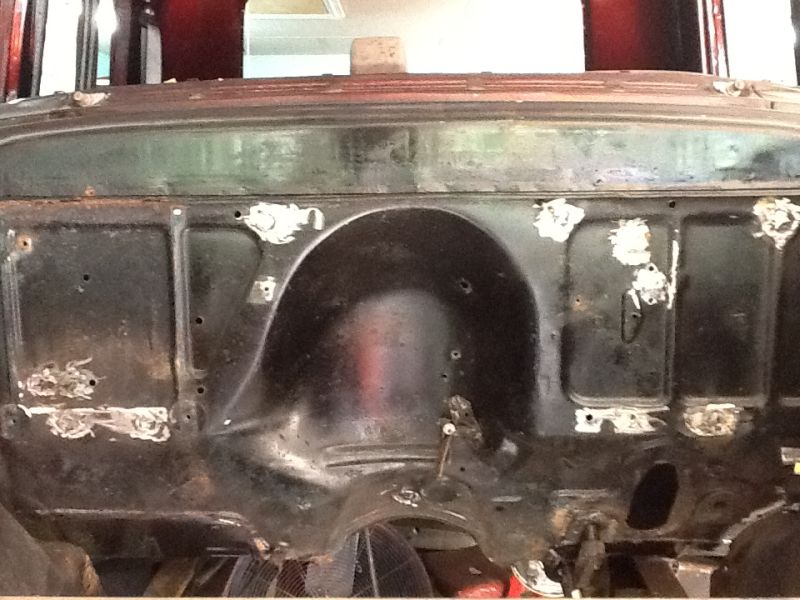
This hasn't been the most fun part of my truck, but is necessary. I got the larger holes welded in and the welds roughly grounded. Now for the smaller peckier holes~ theres about 30ish holes~ goodness, I can't get over how many holes there are~! I know some of you had many more holes than I. I'll be eliminating the throttle linkage and going with an aftermarket linkage, I think. The steering column oblong hole? not sure what to do there, but maybe when I purchase a steering column, then I can make a decision.
; ) 
|
|
|
|
|
04-09-2012, 09:43 PM
|
#65 |
|
Registered User
Join Date: Aug 2007
Location: Corona, California
Posts: 7,998
|
Re: My '59 Apache
It's tedious work but well worth it when done.
Kim |
|
|
|
|
04-09-2012, 10:08 PM
|
#66 |
|
Senior Member
Join Date: May 2011
Location: Cypress, Tx.
Posts: 1,504
|
Re: My '59 Apache
Thanks Kim! I filled a few of the smaller holes(about 20), I'll knock out the rest in the morning, but have to wait for grinding later in the day so as not to piss off my next door neighbor : (. Sometimes I close my garage door, put on my ear muffs( I do this anyway) and grind away hoping I won't get a knock on my door.
Posted via Mobile Device |
|
|
|
|
04-11-2012, 01:51 AM
|
#67 |
|
Registered User
Join Date: Apr 2011
Location: Tucson, Arizona
Posts: 151
|
Re: My '59 Apache
Nice work you have going here. Like the idea of the 2nd row seats. They look nice in there
|
|
|
|
|
04-11-2012, 09:20 AM
|
#68 |
|
Senior Member
Join Date: May 2011
Location: Cypress, Tx.
Posts: 1,504
|
A full day to get things done; )
Today, I'd like to accomplish welding in the rest of the engine compartment holes, then remove the brake power booster/mc/bracket(looks horrible)and clean/repaint. My husband will be at a meeting ALL day, so I shouldn't be disturbed!
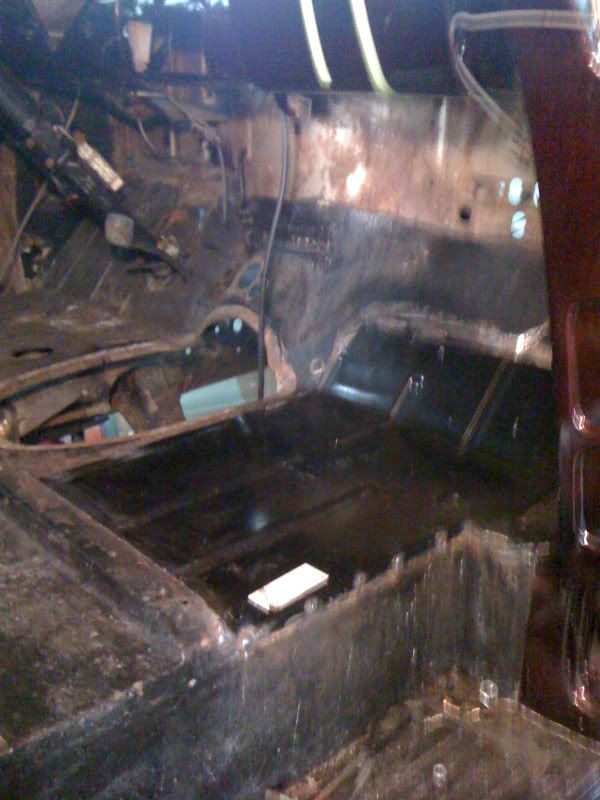
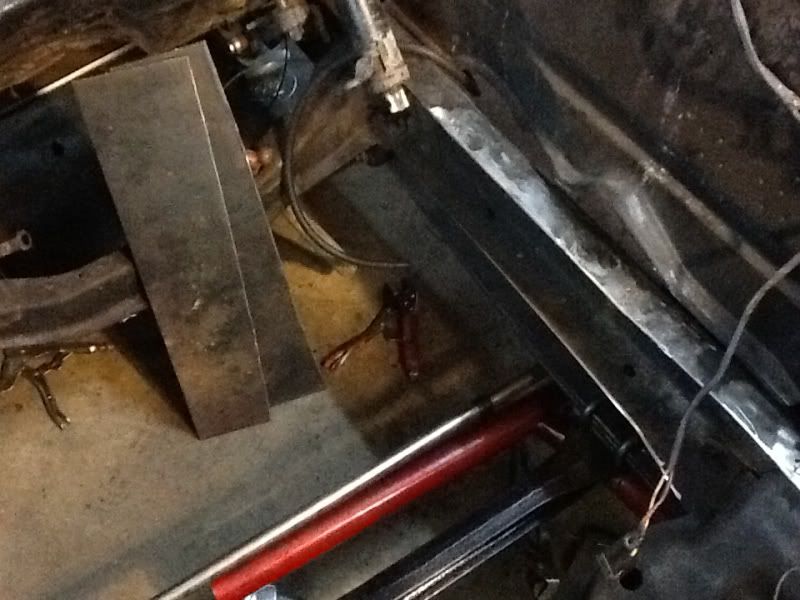
However, Gary bought a new canon camera, so I should be posting some nice pics ; ). One thing I'm concerned about regarding my master cylinder( underneath the floor), I really need it to be moved back another 5-6"'s. my new seat frame will be directly over the access plate for mc. So if I can make an extension bracket to move the booster/mc, that would be good. I'll post a pic in a little while. ; ) Posted via Mobile Device Posted via Mobile Device Posted via Mobile Device |
|
|
|
|
04-11-2012, 02:48 PM
|
#69 |
|
Registered User
Join Date: Jan 2012
Location: Motown
Posts: 7,667
|
Re: My '59 Apache
just read thru your build, nice truck.
orrieg has a linkage set up to move his mc back, check out his build. the other option is to do a remote reservoir like i did it all depends if you can adapt to a remote reservoir. while your patching all those holes, might as well shave that standing seam on the firewall makes the firewall look nice shaved seam and remote reservoir on my 58 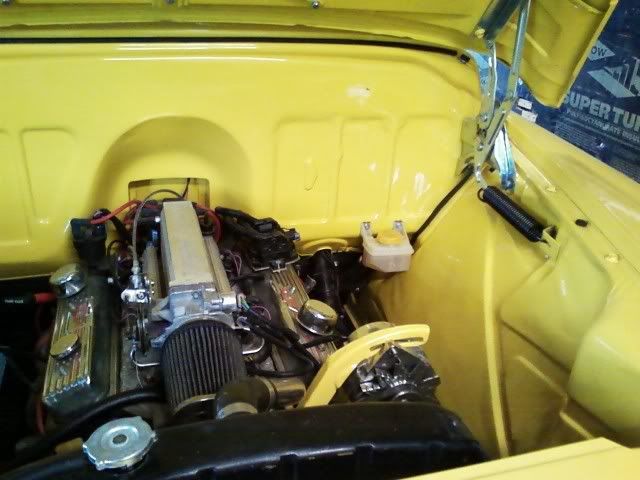
__________________
cool, an ogre smiley  Ogre's 58 Truk build Ogre's 58 Truk buildhow to put your truck year and build thread into your signature shop air compressor timer |
|
|
|
|
04-11-2012, 02:51 PM
|
#70 |
|
Registered User
Join Date: Aug 2007
Location: Corona, California
Posts: 7,998
|
Re: My '59 Apache
Denee
I moved my MC back behind my cab. I used some DOM as the push rod. IMHO this is not going to be a problem as tube will not flex like a solid rod will. Kim |
|
|
|
|
04-11-2012, 08:32 PM
|
#71 |
|
Senior Member
Join Date: May 2011
Location: Cypress, Tx.
Posts: 1,504
|
some pics of my problems
I have a new camera, and not sure of how to make the files smaller. bear with me on the size of my post for a bit. ; )
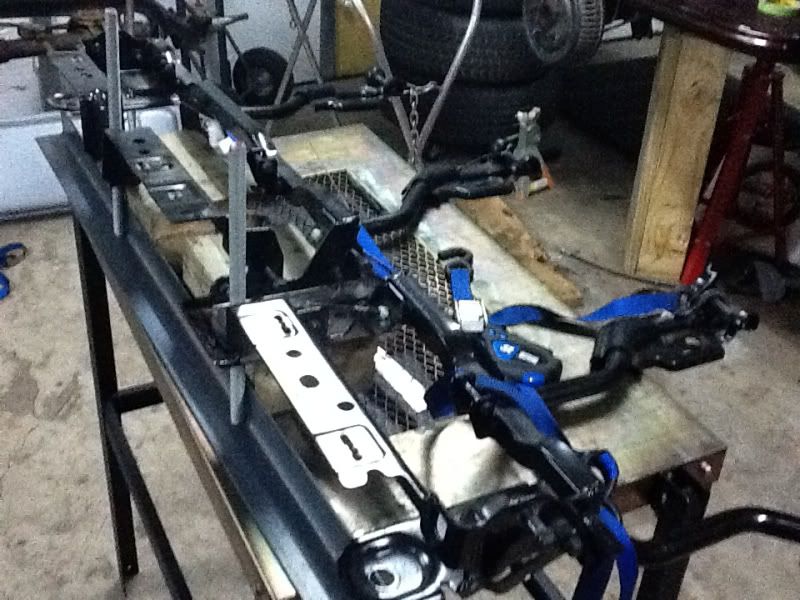
Ogre and Kim~ you guys are the Yoda's! Ogre, the firewall looks Wonderful and I'd like to do that, but right now, let's figure out what I can do here. I do have a couple beefs with this tranny support from Kimbridge. One is the problem I'm dealingg with right now, but I didn't realize that If I were to have to pull my tranny, I don't know how I'd get this support out of the way without having to pull my engine! it's a nice looking support, but it may have to be replaced with something else? what do ya'll think? oh, I don't have the tranny support exactly where it's supposed to be, it's close,but I don't have a mock up tranny(turbo 350). I contacted MGbMike, I know he has one, but haven't heard from him. I just can't afford to buy a mock up tranny at this time. I do have a mock up engine and set it in today, but not exactly sure where to put the engine in relation to the engine compartment : ( 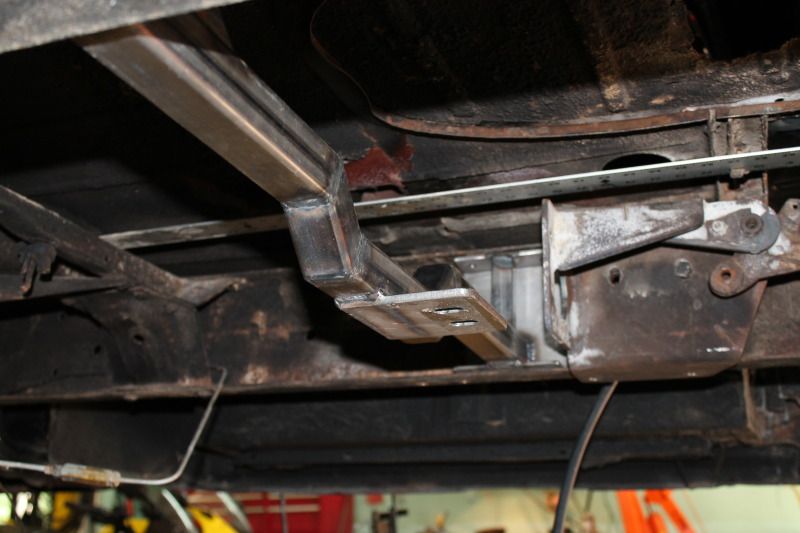 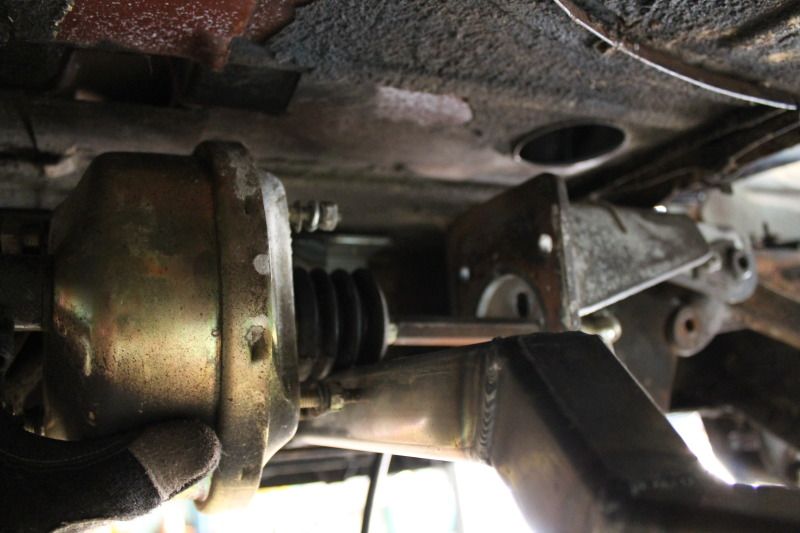 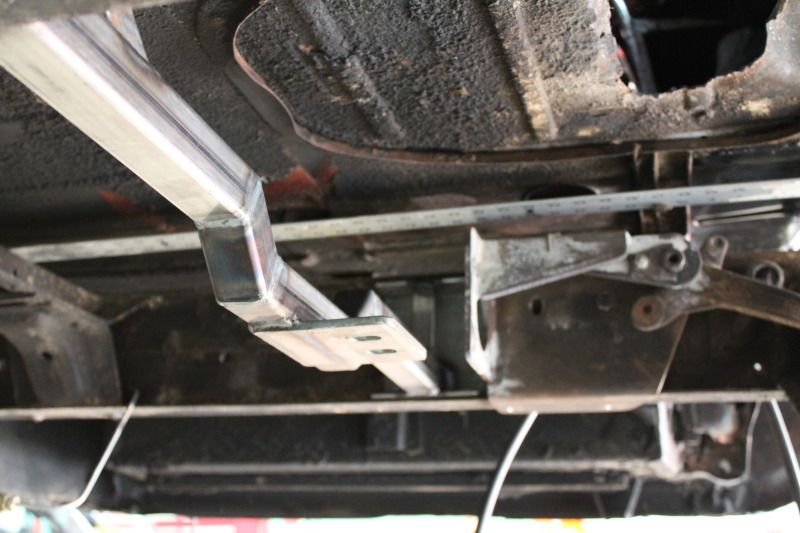 my mock up engine is being supported by the engine supports from Kimbridge. They are bolt it, but I was going to weld them in, but not sure whether they go on top of the frame like I have it here, or below the frame. I think would look better below as the metal wouldn't show, and when I box in the remaining areas(front and rear of the supports), it should look continuous(I hope). The distributor is about 3/4" from the firewall, but unsure of the tilt of the engine. 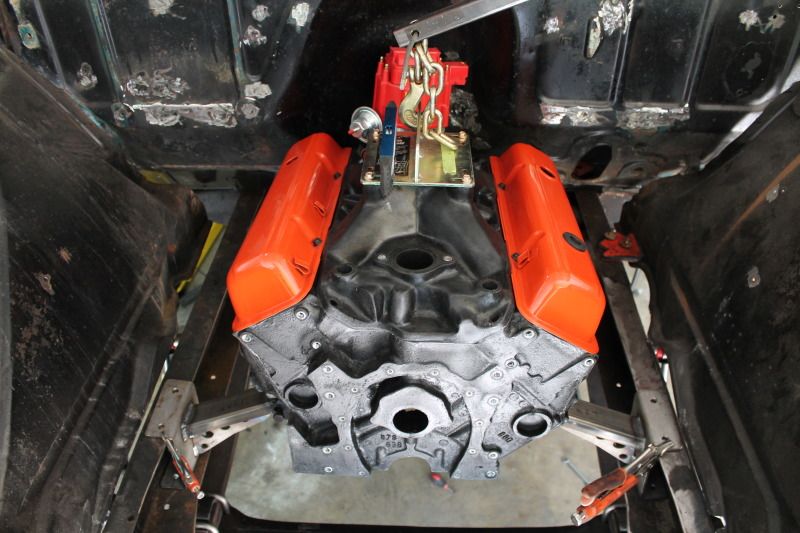
|
|
|
|
|
04-11-2012, 08:45 PM
|
#72 |
|
Senior Member
Join Date: May 2011
Location: Cypress, Tx.
Posts: 1,504
|
Re: My '59 Apache
  I'd like to shave that rail you're talking about Ogre, just have to get with you to find out how to make it happen. A little guidance and I can do anything! lol 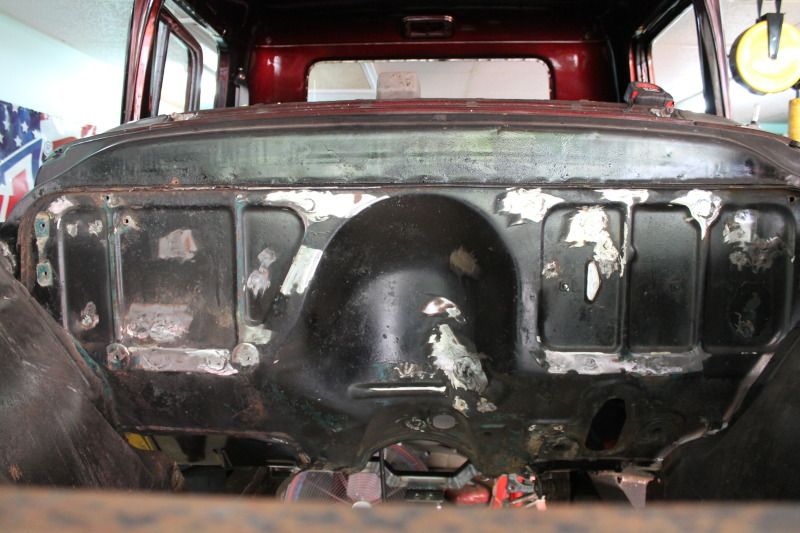 sure is a lot of clearance in the front of the engine. I still need to mount the water pump and the fan(fan clutch/fan off of the Impala I got it from). 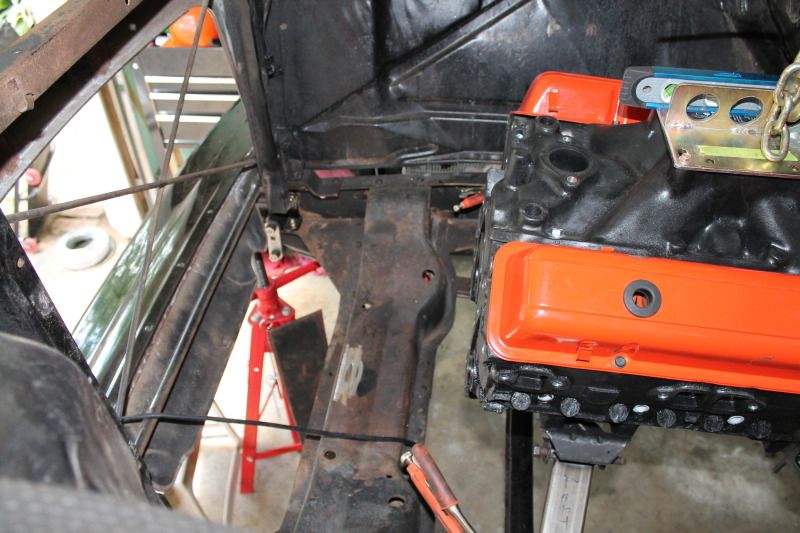 pic taken from below looking up at the back of the HEI distrubutor clearance. is this adequate if the angle of the engine is correct? 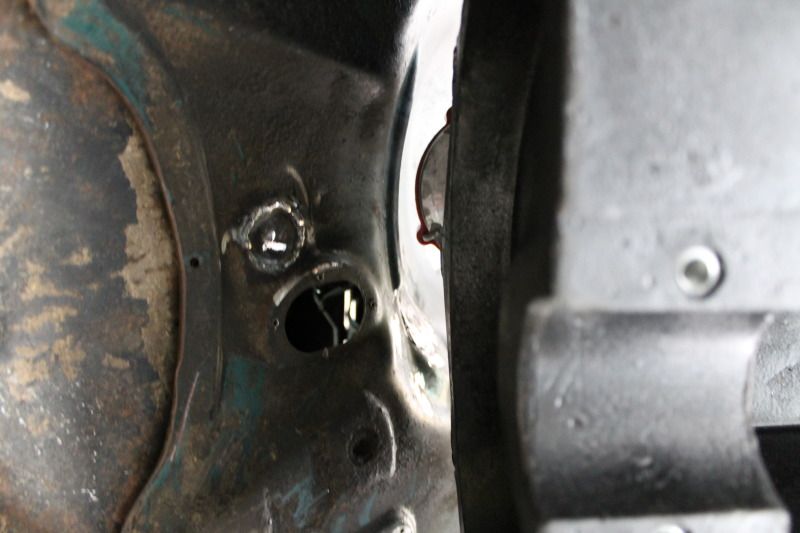 I have the slider 2 leaf springs from Sid at dropped axles. I temporarily bolted the top of the shock in a convenient location. is this enough travel? 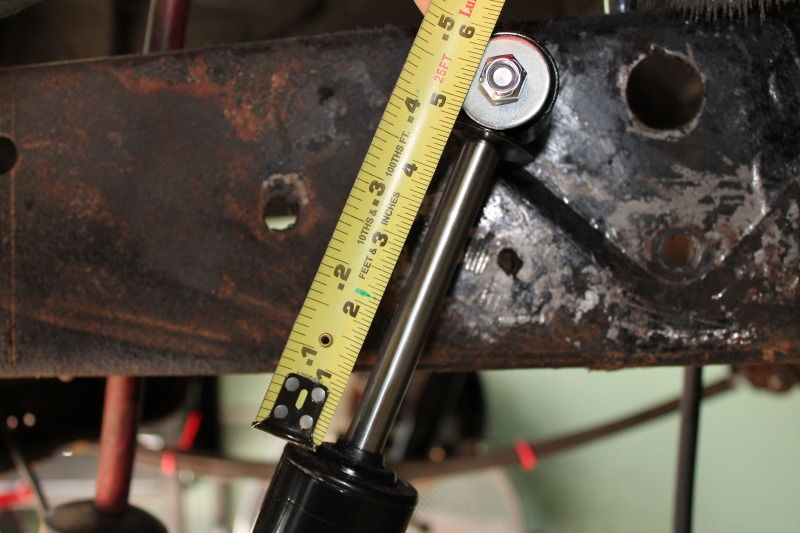
|
|
|
|
|
04-11-2012, 09:00 PM
|
#73 |
|
Registered User
Join Date: Jun 2006
Location: Idaho
Posts: 8,800
|
Re: My '59 Apache
Because of the 4wd my tranny mount is 4-6" lower. If MC was not an issue you could just set up the trans mount to slide back inside the frame if you needed to remove the trans. If you build a supplemental bracket for the mc and move it back, you can build an adjustible rod from the brake lever to mc, I used heavy wall 1/2" EMT, welded in a nut on one end for adjustment and made a clevis end for the other. Some one here did one that looked like it was 2' plus long! Worst case is you would have to remove the MC and bleed the brakes after reinstall or maybe use flex lines from the MC to the proportioning valve or brake line block so you could drop it? I have never seen flex in that application and do not know if it would compromise braking, but if you can use it on the other end at the calipers, pressure is the same, if does not seen like it would be an issue.
Clearance to firewall looks good with the HEI you are using. Engine should be set with the intake manifold level, that puts the engine down 4 degrees in the back. Radiator clearance depends on if you use the stock 6 location or v8 location that was shrouded back about 4-5". I kept mine in 6 location and used a shroud, makes it easier to set the radiator and installing other junk on the front of the engine. Most shocks are mounted in the center of the total travel at static weighted height. Make sure the upper mount bolt center line is the same ans the lower or it will not move as the suspension moves. I got to build my brackets twice because of that brain fart on my part, could not figure out why nothing moved when I put in the engine!
__________________
1959 Chevy Short Fleetside w/ 74 4WD drive train (current project) OrrieG Build Thread 1964 Chevelle Malibu w/ 355-350TH (daily driver) Helpful AD and TF Manual Site Old Car Manual Project |
|
|
|
|
04-11-2012, 10:04 PM
|
#74 | |
|
Senior Member
Join Date: May 2011
Location: Cypress, Tx.
Posts: 1,504
|
Re: My '59 Apache
I missed your compliment! thank you so much! The second row seats are pretty nice, but they are a bit wide and the driver's side is just a tad to the door, kind of off center, but I'm able to put my little butt towards the center console, not much, to compensate. They're my seats now and I'm not going to look for anything else at this stage as far as seats go. ; ) But they're definietly comfy!!!
dne' Quote:
|
|
|
|
|
|
04-11-2012, 10:18 PM
|
#75 | |
|
Senior Member
Join Date: May 2011
Location: Cypress, Tx.
Posts: 1,504
|
Thanks Orrie ;)
Hi Orrie! I have to read stuff over and over again to get into my head! takes a while sometime! lol
*The idea of a supplemental bracket for the MC and power booster sounds good! I do want the MC towards the middle of beneath the seat with a more accessible trap door. I just need to sit under the truck for a while and stare at it for a while and visulize how it's going to work. You're right, if I need to pull the tranny in the future, breaking the brake lines and even disassembly of the mc/power booster wouldn't be that much more work. Hopefully the tranny will last a little while(a fresh rebuild on the Turbo 350). **Regarding the engine leveling? How does one know what level is? The tranny and new engine supports kind of set that? There is no adjustment on the supports I've installed? *** 6 location, 8 location? a 6 vs 8 cylinder? So this will depend on what radiator I purchase? I haven't gotten that far yet, but will be on the lookout for what I SHOULD put for a radiator. I am installing vintage AC, so I don't want any overheating! I put a Griffin in my '67Mustang, but I can't afford that again. **** I guess as far at the shocks go(angle and length), I'll just have to try it. In the photo, the suspension is hanging and I put the upper shock attachments at their full extended position, leaving the 5" of travel. I have no clue have low my truck will sit until that fateful day when it's back on the ground with engine and tranny installed. ; ) Someday! ; ) dne' ********************************************************* Quote:
|
|
|
|
|
 |
| Bookmarks |
|
|


 Linear Mode

