
|
Register or Log In To remove these advertisements. |
|
|
|
|||||||
 |
|
|
Thread Tools | Display Modes |
 10-19-2008, 09:35 PM
|
#1 |
|
Senior Member
Join Date: May 2004
Location: johnstown, NY
Posts: 2,393
|
HOW TO: One piece floor pan install
This is going to be a thread I update periodically, so try to be patient with me
 So...I bought this BEAUTY of a cab up here in the northeast where it like finding a needle in a haystack. Every bit of this cab is mint except the cab supports, and the usual rockers, cab corners, etc. Same ol song and dance. I thought this was a great opportunity to purchase Tri-pros new one piece floor. I ordered the floor, both sets of A and B pillar patches, kickpanel patches, rockers, and cab corners. The cab is a 68 C-30. 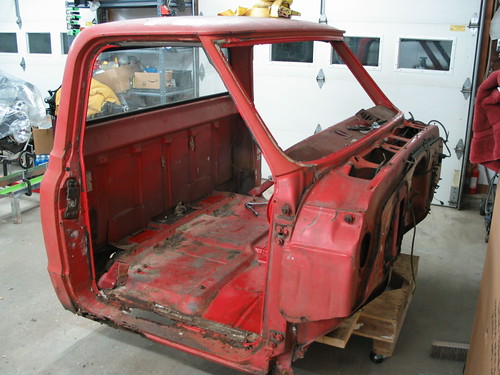 Here are some closeups of the carnage:   I know what your thinking, " that floor looks pretty nice!" Yes, it was, but all the cab supports are gone, so instead of screwing with replacing all those, I got this: 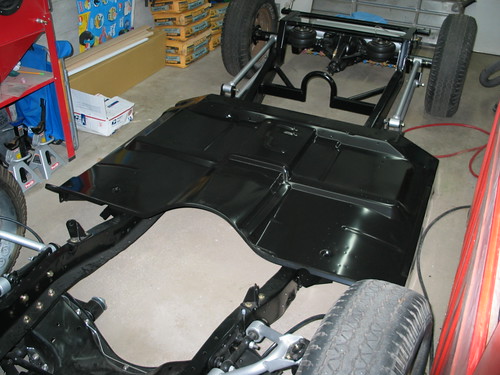  OHHH, isn't she purdy! So the first step I took was to brace this bad boy up. The more the better I believe. So I put two braces from the rear wall to the firewall, and then tied those together. Then I ran some across the door openings, and tied those together. Lastly, I ran two vertical braces to tie the upper and lower together. Hopefully this will do the trick. Other people I have seen do the floor swap only put the first two braces in from rear wall to firewall and they did not report any issues with movement, so I think I am all set.   After the cab was braced, the first thing I did was remove the rockers. This is the first time I've done any sheet metal work, so I was expecting this was going to be a....well you know. Anyway, the rockers came out real easy! I was pleasantly surprised. The first thing I did was clean off the area to find the spot welds, then I center punched them. |

|

|
|
10-19-2008, 09:36 PM
|
#2 |
|
Senior Member
Join Date: May 2004
Location: johnstown, NY
Posts: 2,393
|
Re: HOW TO: One piece floor pan install
I got this spot weld remover from harbor freight and was expecting it to be junk, but it actually worked really well.
  It popped right off with a little chisel work:  Here it is removed:  After I got both rockers off, I drilled out the spot weld on the firewall lip.  Sometimes it may be hard to find the spot welds. I found that if you take a angle die grinder and lightly hit the area, the spot weld will show up for ya. Also, a little soap and water helps too.  After I got the spot welds drilled out on the firewall, I went in the cab and cleaned out all the factory seam sealer and started to separate the floor and the firewall. I made a slice with an angle grinder about an inch away from the seam. Then removed the remaining piece between the cut and the seam.  Again, this came out really easy. I hope Im not jinxing myself  
|
|
|
|
|
10-19-2008, 09:36 PM
|
#3 |
|
Senior Member
Join Date: May 2004
Location: johnstown, NY
Posts: 2,393
|
Re: HOW TO: One piece floor pan install
Ok, time to do the rear seam. I drilled out the spot welds on the rear of the cab.
 So this is as far as I got this weekend. Until next weekend... |
|
|
|
|
10-19-2008, 09:46 PM
|
#4 |
|
Senior Member
Join Date: Jul 2005
Location: Winters Ca. 95694
Posts: 4,843
|
Re: HOW TO: One piece floor pan install
No I don't think so, get you lazy butt back out their and give us more!
Looks great so far. I take it the new floor has all the mounts and bracing built in to it? I have thought about doing this same thing on my 70 2WD Blazer but I think by the time it is all done their will not be much factory floor left. But once the DropMember is installed and I see what is going to need to come out for the 5.3 and 4L60E I will keep the idea out their. I found if you use some form of cutting fluid with those spot weld drillers they will last quite awhile. Kevin LFD Inc. |
|
|
|
|
10-20-2008, 09:19 AM
|
#5 |
|
Senior Member
Join Date: Aug 2005
Location: tulsa OK
Posts: 3,070
|
Re: HOW TO: One piece floor pan install
looking really good......
|
|
|
|
|
10-20-2008, 09:40 AM
|
#6 |
|
Registered User
Join Date: May 2006
Location: Philadelphia, Pa. 19454
Posts: 9,427
|
Re: HOW TO: One piece floor pan install
Nice work, that A post doesn't look to bad, compaired to some of them. Good bracing, the more the better. Thanks for showing that spot weld remover, I thought they cut a big hole thru both pieces of metal, now I gotta get one. Plus Rok's idea of the cutting fluid
Frame looks great, any more pics of it when your post up your progress would be cool I think that's a steal for 360, compaired to all the work you will save...Subscibed
__________________
Semper Fi...Uncle Sam, you da man All parts offered to help are free, unless otherwise noted Dont try this stuff in my build thread, unless you have 55 years of mechanical OTJ training SAFETY FIRST AS usual, off topic They say your mind goes second, can't remember the first Jim |
|
|
|
|
10-20-2008, 10:21 AM
|
#7 | |
|
Hittin E-Z Street on Mud Tires
 Join Date: Nov 2004
Location: Greenville, SC
Posts: 23,090
|
Re: HOW TO: One piece floor pan install
Quote:
Looks GREAT! For some reason I like threads like this more than the "trucks all done, here it is" threads.
__________________
Jesse James 1967 C10 SWB Stepside: 350/700R4/3.73 1965 Ford Mustang: 289/T5-5spd/3.25 Trac-Loc 1968 Pontiac Firebird: Project Fire Chicken! 2015 Silverado Double Cab 5.3L Z71 2001 Jeep Wrangler Sport 4.0L 5spd 2020 Chevrolet Equinox Premium 2.0L Turbo 2011 Mustang V6 ~ Wife's ride  American Born, Country by the Grace of God  1967 CST Shop Truck Rebuild! My 1967 C-10 Build Thread My Vintage Air A/C Install Project "On a Dime" Trying my hand at Home Renovation! 1965 Mustang Modifications! |
|
|
|
|
|
10-20-2008, 10:48 AM
|
#8 |
|
Senior Member
Join Date: Feb 2005
Location: Maynardville, Tn
Posts: 3,030
|
Re: HOW TO: One piece floor pan install
Yeah, that's right, just leave us hanging.
__________________
SEMA Network- Protect our Hobby! 71 C30 in pieces, starting to come together. Click here for A Place For Tennessee Truck Enthusiest To Meet |
|
|
|
|
10-20-2008, 12:19 PM
|
#9 |
|
Registered User
Join Date: Jul 2005
Location: east longmeadow, MA
Posts: 540
|
Re: HOW TO: One piece floor pan install
i will definitely be checking back with this...i live in the northeast and i have 2 cabs, and one will need a new floor so i was thinking of using the triplus floor panel...looking good so far though!
__________________
67 small windowed,shortbed,fleetside, sbc 327, th350,12 bolt :under the knife: 71 cab for sale in parts classifieds! 2004 black chevy 1500 "finish your beer, theres sober kids in india!" 
|
|
|
|
|
10-20-2008, 01:41 PM
|
#10 |
|
Damn Yankee
Join Date: Feb 2007
Location: Lynchburg, VA
Posts: 2,261
|
Re: HOW TO: One piece floor pan install
Did Chris buy your other cab?
|
|
|
|
|
10-20-2008, 01:51 PM
|
#11 | |
|
Senior Member
Join Date: May 2004
Location: johnstown, NY
Posts: 2,393
|
Re: HOW TO: One piece floor pan install
Quote:
Hey Jon, when will those two pieces on backorder arrive? Josh Last edited by jlaird; 10-20-2008 at 01:52 PM. |
|
|
|
|
|
10-20-2008, 01:53 PM
|
#12 | |
|
Senior Member
Join Date: May 2004
Location: johnstown, NY
Posts: 2,393
|
Re: HOW TO: One piece floor pan install
Quote:
Josh |
|
|
|
|
|
10-20-2008, 02:21 PM
|
#13 | |
|
Damn Yankee
Join Date: Feb 2007
Location: Lynchburg, VA
Posts: 2,261
|
Re: HOW TO: One piece floor pan install
Quote:
Did Chris mention what he planned on doing with it? If you see him tell him to come down and do some more bodywork...LOL |
|
|
|
|
|
10-25-2008, 09:48 PM
|
#14 |
|
Senior Member
Join Date: May 2004
Location: johnstown, NY
Posts: 2,393
|
Re: HOW TO: One piece floor pan install
Got a chance to do some more work today. The first thing I did was get the cab on its back. Then I decided to add more bracing. Fore anybody doing this, i would recommend additional bracing as close to the floor as possible. After I got the floor out, the cab is a bit flimsy, but honestly, I think this is going to happen no matter how much bracing you put in. In this pic, you can also see the slice I put in the floor near the rear wall.
 Here is the additional bracing I put in the cab from the firewall to the center supports:  I also made use of the threaded holes in these cab supports:  The only thing left to do was remove the spot welds where the outrigger meets the firewall supports:   And shes OUT!  Anybody need a patch?  Thats it for today. Hopefully I will be able to work on it tomorrow. Last edited by jlaird; 10-25-2008 at 09:49 PM. |
|
|
|
|
10-29-2008, 08:37 PM
|
#15 |
|
Tot Roddin'
Join Date: Apr 2005
Location: Mid-MO
Posts: 24,461
|
Re: HOW TO: One piece floor pan install
That thing is coming right along, keep up the good work.
Great idea for a thread too.
__________________
-Nate  1969 CST SWB - Project Blank Slate (4.5/6" ECE Static Drop, 6-lug disc brake upgrade (manual), Billet Specialties Vintec 20x8.5 255/40 (F) 20x10 295/40 (R), 250 I-6) 1960 AMF Skylark - Tot Roddin' (Lowered with custom frame; soon to include custom push bar and interior) 2008 Silverado CrewCab 1LT (5.3L, 3:73, 4x4, LT1, Z-71, Towing Package) |
|
|
|
|
10-29-2008, 10:08 PM
|
#16 |
|
Registered User
Join Date: Dec 2007
Location: Palmer, Alaska
Posts: 13,821
|
Re: HOW TO: One piece floor pan install
that is cool!
looks like an entire floor is the way to go! any one know if there any plans for a '63-'66 floor?
__________________
 CHEVY ONLY CHEVY ONLY
Last edited by joe231; 10-29-2008 at 10:16 PM. |
|
|
|
|
10-29-2008, 10:26 PM
|
#17 |
|
Registered User
Join Date: May 2006
Location: Philadelphia, Pa. 19454
Posts: 9,427
|
Re: HOW TO: One piece floor pan install
Nice work, keep it going...I'll try to check out your build thread when I get a minute, kinda busy right now, but thanks for the link
__________________
Semper Fi...Uncle Sam, you da man All parts offered to help are free, unless otherwise noted Dont try this stuff in my build thread, unless you have 55 years of mechanical OTJ training SAFETY FIRST AS usual, off topic They say your mind goes second, can't remember the first Jim Last edited by jaros44sr; 10-29-2008 at 10:29 PM. |
|
|
|
|
10-30-2008, 04:32 AM
|
#18 |
|
Registered User
Join Date: Jun 2006
Location: Indiana
Posts: 4,859
|
Re: HOW TO: One piece floor pan install
Watching closely. I have 2 trucks with bad floors.
__________________
'70 GMC C1500 LWB Power disc brakes. WooHoo! Posi 6 Lug Dana 60 |
|
|
|
|
10-30-2008, 09:10 AM
|
#19 | |
|
Hittin E-Z Street on Mud Tires
Join Date: Nov 2004
Location: Greenville, SC
Posts: 23,090
|
Re: HOW TO: One piece floor pan install
Quote:
As long as shipping isn't to $$$ I'd like to get the low hump. I think I need the whole thing, the PO of my truck cut about 3 different holes for shifters in the floor, and the majority of them go all the way to the left of the hump and one is at the top  Let me know, I'm in no hurry, probably won't even get around to it for a couple years, but it would be nice to have it
__________________
Jesse James 1967 C10 SWB Stepside: 350/700R4/3.73 1965 Ford Mustang: 289/T5-5spd/3.25 Trac-Loc 1968 Pontiac Firebird: Project Fire Chicken! 2015 Silverado Double Cab 5.3L Z71 2001 Jeep Wrangler Sport 4.0L 5spd 2020 Chevrolet Equinox Premium 2.0L Turbo 2011 Mustang V6 ~ Wife's ride American Born, Country by the Grace of God 1967 CST Shop Truck Rebuild! My 1967 C-10 Build Thread My Vintage Air A/C Install Project "On a Dime" Trying my hand at Home Renovation! 1965 Mustang Modifications! |
|
|
|
|
|
11-02-2008, 09:05 PM
|
#20 |
|
Registered User
Join Date: Dec 2007
Location: Cove City NC
Posts: 40
|
Re: HOW TO: One piece floor pan install
Im liking this one peice floor install and I cant wait to see the finished product. I didnt know a one peice floor was available until just recently. Are the inner rockers part of the assembly? Does it come with the seat mounting holes already in it or do you have to drill your own?
__________________
71 Cheyenne 55 Chevy hardtop 53 Farmall Super A 92 Chevy Silverado daily driver (284k on the original clutch and still counting) |
|
|
|
|
11-05-2008, 10:31 PM
|
#21 |
|
Registered User
Join Date: Dec 2003
Location: Thomasville, NC
Posts: 1,877
|
Re: HOW TO: One piece floor pan install
looking good, keep up the hard work, like to see it done, tri pro has a site were they put a floor pan in, not to many picture's of the installation. Keep the pictures coming.
|
|
|
|
|
11-07-2008, 01:29 PM
|
#22 |
|
Registered User
Join Date: Jun 2006
Location: Indiana
Posts: 4,859
|
Re: HOW TO: One piece floor pan install
TTT. I don't want lose track of this one.
__________________
'70 GMC C1500 LWB Power disc brakes. WooHoo! Posi 6 Lug Dana 60 |
|
|
|
|
11-07-2008, 02:27 PM
|
#23 | |
|
Damn Yankee
Join Date: Feb 2007
Location: Lynchburg, VA
Posts: 2,261
|
Re: HOW TO: One piece floor pan install
Quote:
|
|
|
|
|
|
11-08-2008, 12:15 AM
|
#24 |
|
Senior Member
Join Date: May 2004
Location: johnstown, NY
Posts: 2,393
|
Re: HOW TO: One piece floor pan install
The floor will be in this weekend. Unfortunately, i am having some problems with the fit of the floor flange at the firewall, particularly at the tranny hump. Theres about a 1/2 gap at the hump. Its too large to hammer. I'm going to have to cut it out and make a new piece. It sucks to have to cut that new floor, but its got to be done. I was thinking about the other people that documented the floor install on this board that didn't have this problem, but there might be a reason for that. msgross has a high hump so he didn't have to match the hump up with the firewall. The other, Tri-Pro, used their new firewall replacement, so again, didn't match up a stock firewall hump to the floor.
Here is the gap: |
|
|
|
|
11-08-2008, 10:07 AM
|
#25 |
|
Registered User
Join Date: Jul 2006
Location: Central PA
Posts: 12,201
|
Re: HOW TO: One piece floor pan install
Nice thread, I didn't document mine that well... Glad to see that you added extra bracing to the bottom of the firewall... Mine had some flex in the A-pillar area since I had to pull off the door frame bracing to hang doors before final welding...
I found it easier to drill out the spotwelds on the back and front lip so it was ready for plug welding with the new floor... I did just pick up on of those cutters though since I pulled off my firewall braces and found that drilling those out wasn't such a good idea. I had a lot of rust hiding behind them though so i'm glad I did, it also helped me get the floor in... Looking good, Hope I don't spoil the ending but here's the "high hump" mod...
__________________
The Garage: 1968 K-10 SWB - "Project Money Pit" 1996 Z-71 - "huntin rig" 1969 C-10 LWB (SOLD) "Project flip that truck or else" 1993 Passport, F@rd 1-ton (SOLD)"Project Cousin Eddie" My Garage Build "The 1,000 footer" Last edited by msgross; 11-08-2008 at 10:09 AM. |
|
|
|
|
| Bookmarks |
|
|


 Linear Mode

