
|
Register or Log In To remove these advertisements. |
|
|
|
|||||||
 |
|
|
Thread Tools | Display Modes |
 07-25-2013, 01:22 PM
|
#1 |
|
Registered User
Join Date: Jul 2013
Location: Canton, TX
Posts: 245
|
1980 Chevy K10 LWB Project
A friend of mine told me about this forum and suggested that I start a build thread to document this truck, even though this one is pretty much stock and not a lot needs to be done to it.
I recently acquired a 1980 K10, and am the third owner. The original owner bought the truck from the dealer, drove it daily as a "farm" truck, and then parked it several years ago. The second owner purchased it from him and when he went to get it, the original owner had it parked in a barn and covered with a tarp. It has a lot of nice options, and the second owner said that he had put over 9k into the truck getting the drivetrain back to where he felt was reliable. This was a daily driver for the second owner, and although it will not be for me, I wanted a truck that I didn't have to do too much to in getting it roadworthy. Here's what I know about it so far: I love this truck. The truck has 161k original miles. All original interior I love this truck. All original exterior chrome and trim New crate motor - 350 4bbl Edelbrock carb (this motor has about 10k miles on it) Rear axle rebuilt 2012-2013 Did I mention that I love this truck? Here are the things I know will need to be done to restore to it's original glory. Interior: Missing the factory 4x6 speaker covers (speakers are still there, along with what's left of the speaker covers that were attached, they just disintegrated) Door panels need repaired/replaced Dash pad needs replaced Clock needs fixed/replaced Dashboard bezel needs replaced. Radio needs replaced (It was cut out for a single DIN unit) Wiper switch needs button or cover (it works, just doesn't have the plastic on it) Fuel selector switch needs new bezel on dash Glove box needs replaced, hinge is broken. Driver's side window motor needs replaced (works, but is REAL slow). Trim covers for door strap need replaced (both doors) Door strap on passenger side needs replaced Chrome trim between upper panel and lower carpeted door panel needs reinstalled on both doors (I have the trim) Seat belts need to be replaced Rear speaker covers need replaced New arm rests for both doors Exterior: The truck will need to be repainted, the clear coat is peeling Lower trim under grill needs replaced Front passenger orange sidemarker lens needs replaced, chrome is missing Windshield needs replaced Front turn signal lenses need replaced (clear ones) Small rust spot behind back tire on drivers side needs repair (rust is not all the way through) Rust on inner bed wheel well; needs fixed/replaced Rust on passenger side inner bed rail needs fixed (caused by old toolbox) Under the hood: A/C needs new clutch and either charged with R12 or converted to R134. Needs correct radiator (that's my fault, had to get a radiator to get home) Washer fluid motor needs troubleshooting to figure out what's wrong with it. Fuel selector does not work on Driver's side tank, needs troubleshooting. Need jack and components (hardware to secure jack is present) Needs a good cleaning, maybe dressing it up a bit too. Now for the pictures! 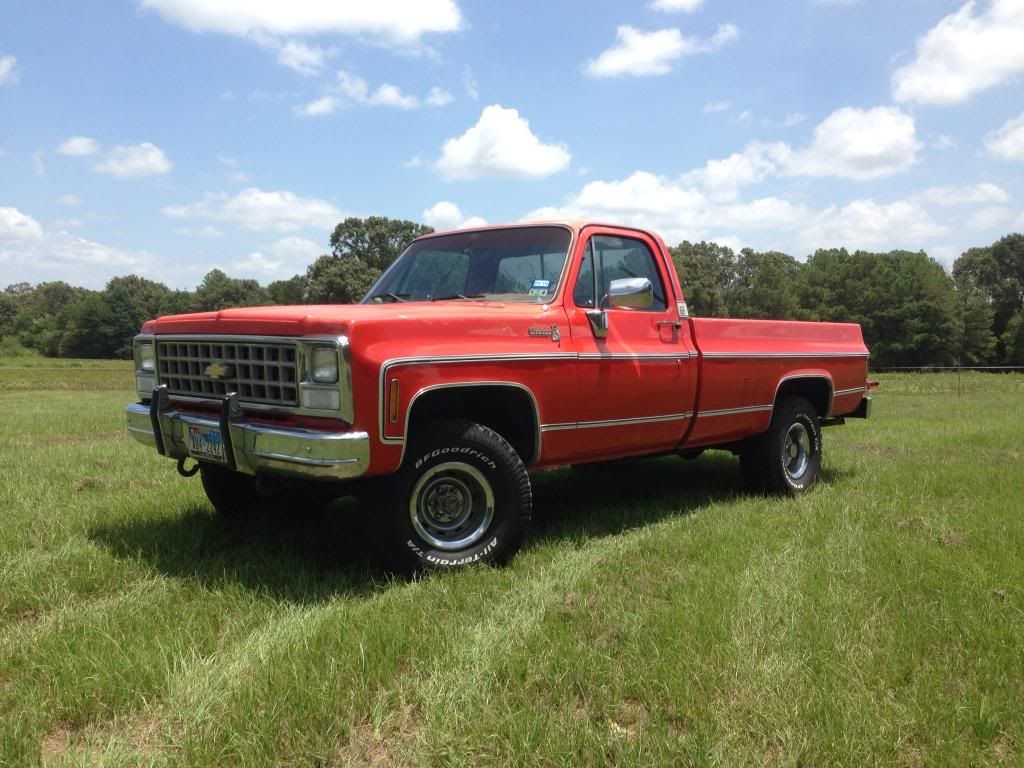 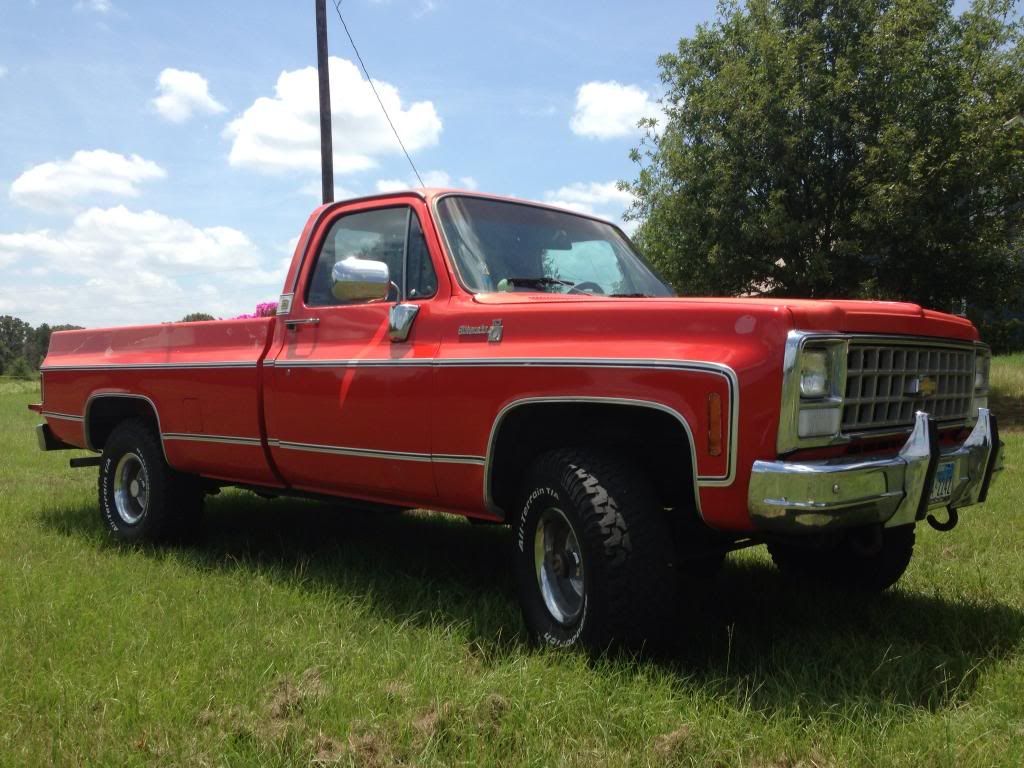 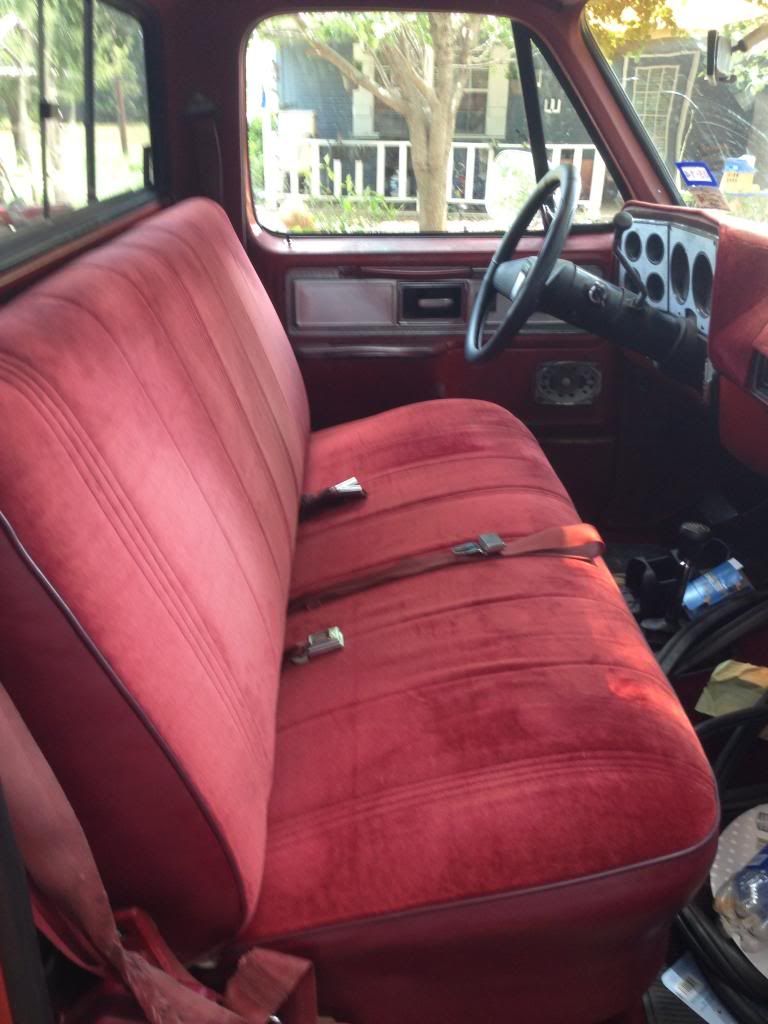 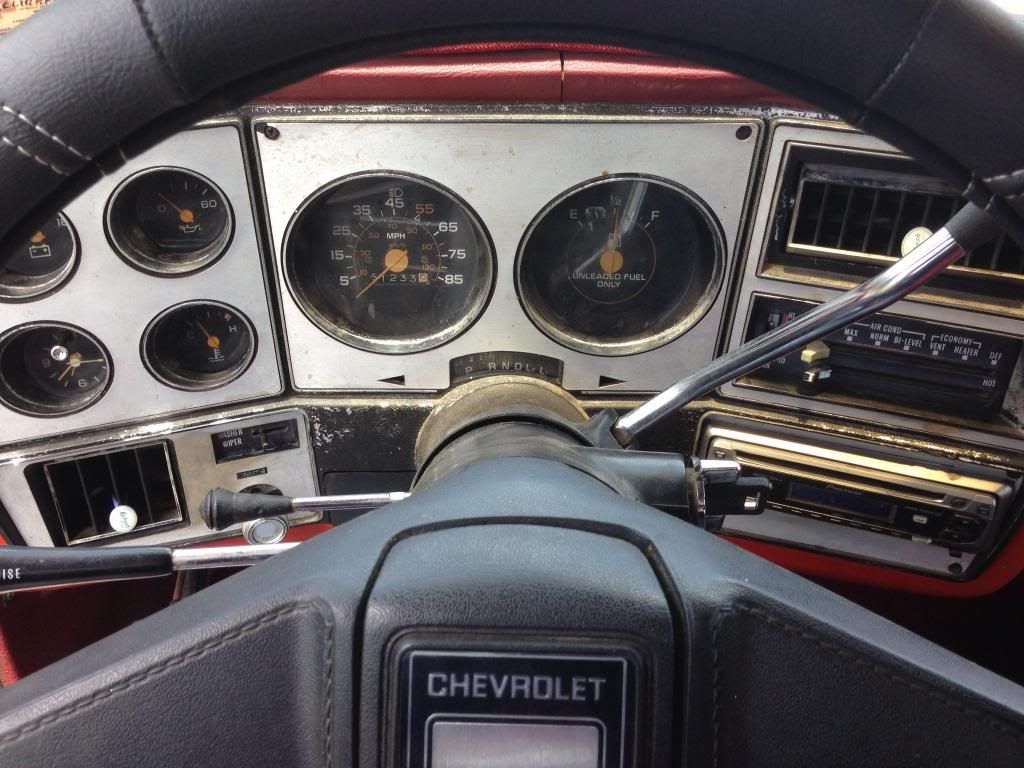 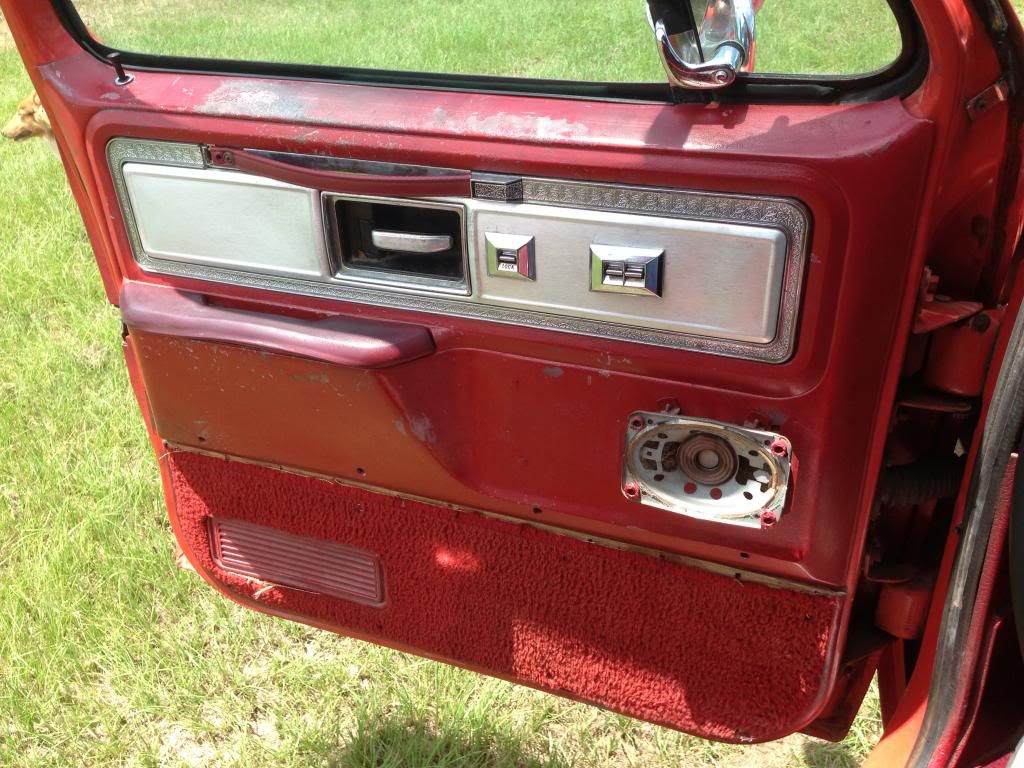 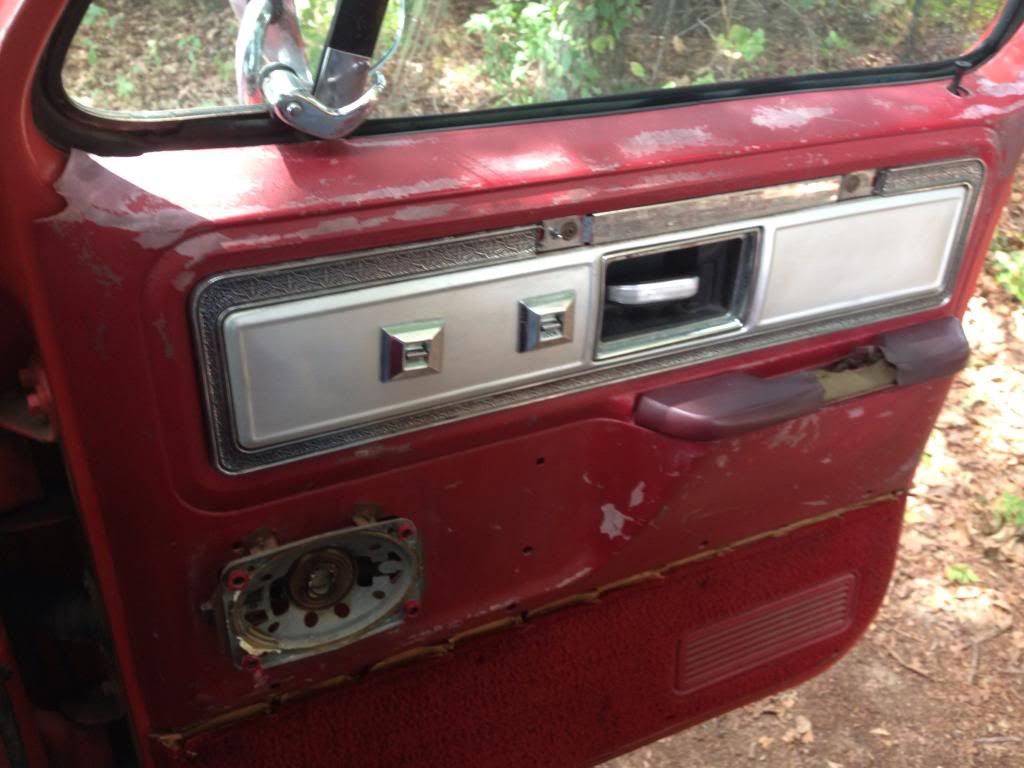 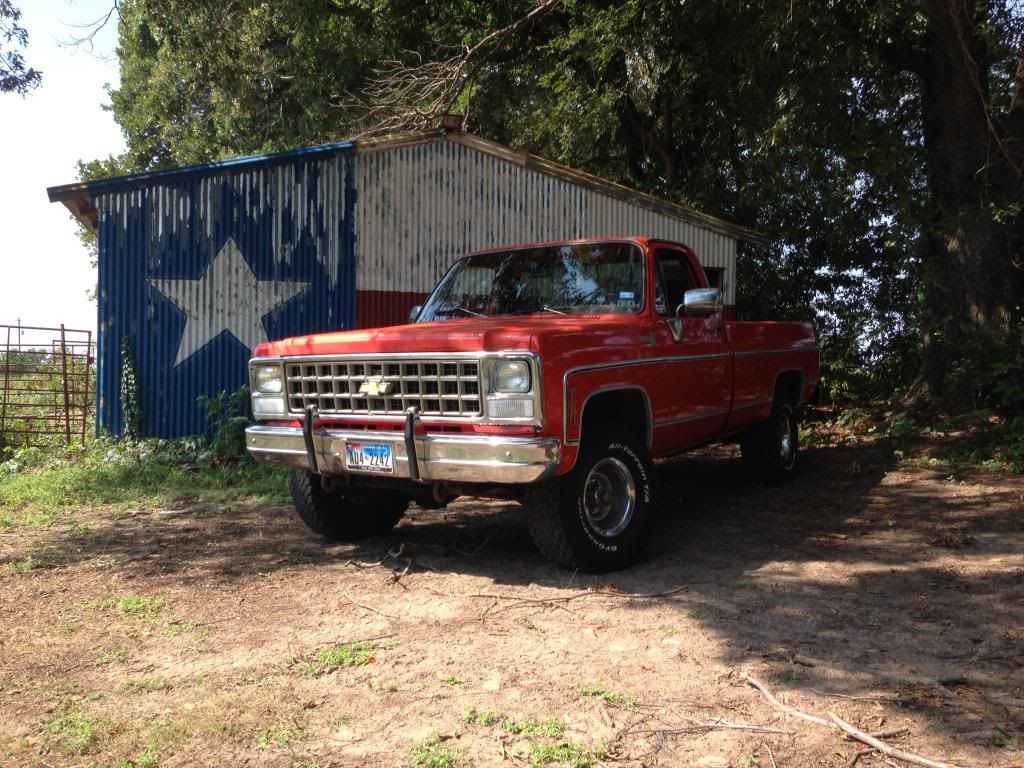 I am taking them with my iPhone, so all pictures also will be stored in my public photostream on iCloud. https://www.icloud.com/photostream/#A7JtdOXmJfegPd
__________________
1980 Chevy K10 Silverado --> Build Page My wife told me I spent too much time on Facebook. So I bought an old truck. Now she wishes I was on Facebook, it was cheaper. 
|

|

|
|
07-25-2013, 01:37 PM
|
#2 |
|
Slots go on anything!
Join Date: May 2003
Location: Richardson, TX
Posts: 5,957
|
Re: 1980 Chevy K10 LWB Project
Looks like a great start. Most of the small stuff in your "needs" column are pretty easy to come by. Luckily, a lot of the parts cover most years of these trucks.
__________________
1974 Jimmy- 5.3/4L80e/NP241 |
|
|
|
|
07-25-2013, 01:43 PM
|
#3 |
|
Registered User
Join Date: Jul 2013
Location: Canton, TX
Posts: 245
|
Re: 1980 Chevy K10 LWB Project
Thanks! The most elusive thing on the list so far is the factory door speaker covers. They are pretty hard to find. Everything else will be on a "time and money allows when I don't have other things that wife or kid's need" basis :-)
__________________
1980 Chevy K10 Silverado --> Build Page My wife told me I spent too much time on Facebook. So I bought an old truck. Now she wishes I was on Facebook, it was cheaper.
|
|
|
|
|
07-25-2013, 01:50 PM
|
#4 |
|
Slots go on anything!
Join Date: May 2003
Location: Richardson, TX
Posts: 5,957
|
Re: 1980 Chevy K10 LWB Project
That's how my truck is getting done, too. The speaker covers are late '79 and '80 only. Worst case, you may have to find a set of 4x6's with a nice looking grille and run those.
__________________
1974 Jimmy- 5.3/4L80e/NP241 |
|
|
|
|
07-25-2013, 04:54 PM
|
#5 |
|
Registered User
Join Date: Jul 2013
Location: Canton, TX
Posts: 245
|
Re: 1980 Chevy K10 LWB Project
I found a set on the Classic Industries web site (made by RetroSound), 4x6 with the grills, but they don't look a thing like the stock ones. I talked to one of their support people today, and passed along a picture of the original ones (from another post on the forum by bigblock73) along with pictures of the speakers in my doors. We'll see what they come up with. It looks to me that the original covers were tilted a little, these don't seem to be tilted at all.
Here is the link to the parts on Classic Industries
__________________
1980 Chevy K10 Silverado --> Build Page My wife told me I spent too much time on Facebook. So I bought an old truck. Now she wishes I was on Facebook, it was cheaper.
Last edited by 8lugnutz; 07-26-2013 at 03:28 PM. |
|
|
|
|
07-26-2013, 03:32 PM
|
#6 |
|
Registered User
Join Date: Jul 2013
Location: Canton, TX
Posts: 245
|
Re: 1980 Chevy K10 LWB Project
Well, I got a call from the Classic Industries folks today, they say they might fit, but they aren't sure. I would hate to drop $80 on speakers and go through the hassle of returning them if they weren't right. I guess I will keep looking for a set of the originals.
__________________
1980 Chevy K10 Silverado --> Build Page My wife told me I spent too much time on Facebook. So I bought an old truck. Now she wishes I was on Facebook, it was cheaper.
|
|
|
|
|
07-30-2013, 10:42 PM
|
#7 |
|
Registered User
Join Date: Jul 2013
Location: Canton, TX
Posts: 245
|
Re: 1980 Chevy K10 LWB Project
Took the truck out on the interstate today, an interesting thing happened with the speedo. It jumps about 5 mph either way of the speed every now and then. I got a video of it, if I can figure out how to post it. I'm thinking speedometer cable?
__________________
1980 Chevy K10 Silverado --> Build Page My wife told me I spent too much time on Facebook. So I bought an old truck. Now she wishes I was on Facebook, it was cheaper.
|
|
|
|
|
07-30-2013, 11:26 PM
|
#8 |
|
Registered User
Join Date: Jun 2004
Location: El Lago, TX
Posts: 1,668
|
Re: 1980 Chevy K10 LWB Project
Sounds like the cable to me also. Nice looking truck!
Posted via Mobile Device |
|
|
|
|
07-31-2013, 05:17 PM
|
#9 |
|
Registered User
Join Date: Jul 2013
Location: Canton, TX
Posts: 245
|
Re: 1980 Chevy K10 LWB Project
__________________
1980 Chevy K10 Silverado --> Build Page My wife told me I spent too much time on Facebook. So I bought an old truck. Now she wishes I was on Facebook, it was cheaper.
|
|
|
|
|
07-31-2013, 05:40 PM
|
#10 |
|
Registered User
Join Date: Jul 2013
Location: Prairieville Louisiana
Posts: 35
|
Re: 1980 Chevy K10 LWB Project
Man I bet you "love that truck"!
__________________
Help!!!! My Chevy has a Ford stuck in it's intake manifold! 
|
|
|
|
|
07-31-2013, 06:48 PM
|
#11 |
|
Registered User
Join Date: Jul 2013
Location: Canton, TX
Posts: 245
|
Re: 1980 Chevy K10 LWB Project
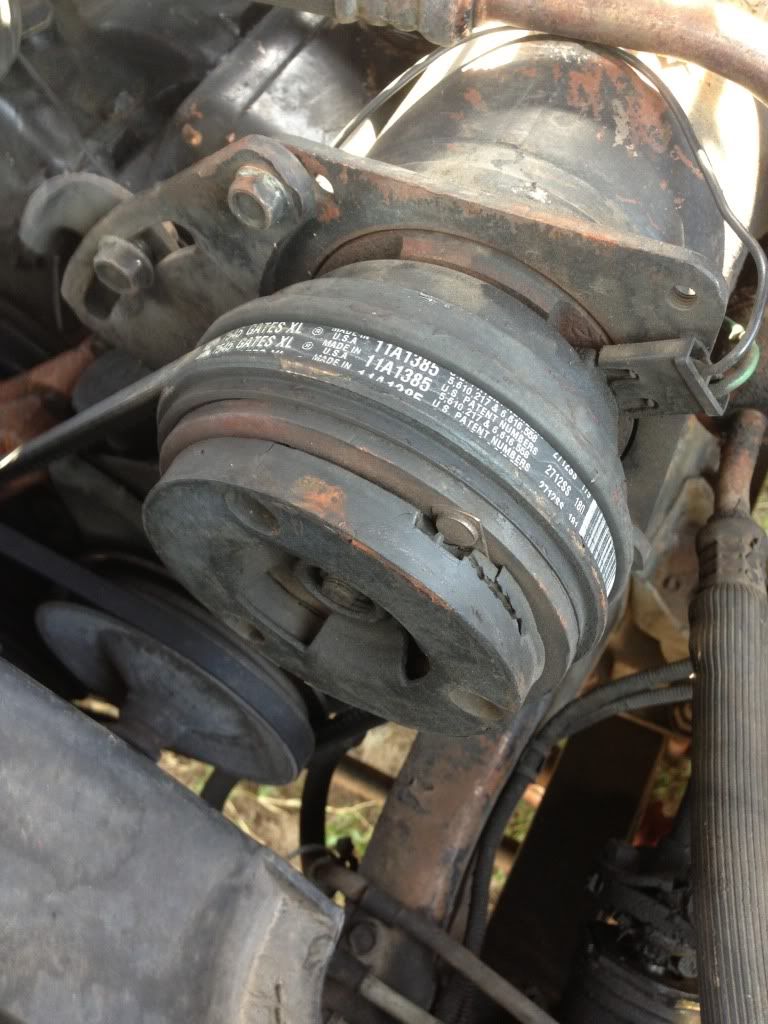
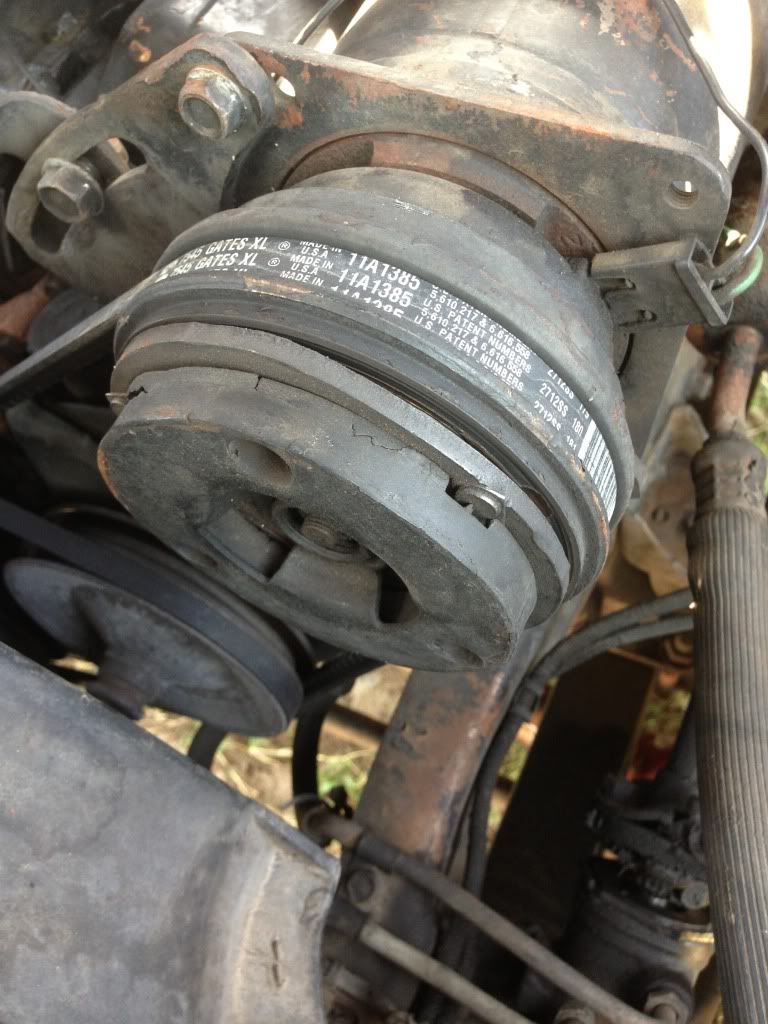
Yes, I do, but after driving yesterday in the heat with no A/C, I have decided that a good place to start on this truck is going to be under the hood, and the A/C specifically! Here's a pic from under the hood:
 When I looked at the clutch on the compressor, I noticed that there are a couple of things that concern me. Evidently the PO dinged/bent the clutch that's attached to the compressor. I have absolutely no experience with A/C components, I am thinking it should be replaced. I'll post some pics of that later, gotta get ready for church!
__________________
1980 Chevy K10 Silverado --> Build Page My wife told me I spent too much time on Facebook. So I bought an old truck. Now she wishes I was on Facebook, it was cheaper.
|
|
|
|
|
07-31-2013, 06:58 PM
|
#12 |
|
Registered User
Join Date: Jul 2013
Location: Canton, TX
Posts: 245
|
Re: 1980 Chevy K10 LWB Project
Well, since my wife is getting ready, here are the pics:
  Posted via Mobile Device
__________________
1980 Chevy K10 Silverado --> Build Page My wife told me I spent too much time on Facebook. So I bought an old truck. Now she wishes I was on Facebook, it was cheaper.
|
|
|
|
|
07-31-2013, 07:08 PM
|
#13 |
|
Registered User
Join Date: Jul 2013
Location: Prairieville Louisiana
Posts: 35
|
Re: 1980 Chevy K10 LWB Project
WOW! Did they play football with that compressor?
I would be soooo happy to just be able to pull out on the street with mine at this point. A/C or not. lol You forgot to add, "I love this truck!" To the bottom of your post. LOL!
__________________
Help!!!! My Chevy has a Ford stuck in it's intake manifold!
|
|
|
|
|
07-31-2013, 07:08 PM
|
#14 |
|
Registered User
Join Date: Jul 2013
Location: Prairieville Louisiana
Posts: 35
|
Re: 1980 Chevy K10 LWB Project
WOW! Did they play football with that compressor?
I would be soooo happy to just be able to pull out on the street with mine at this point. A/C or not. lol You forgot to add, "I love this truck!" To the bottom of your post. LOL! Oops! Refresh hung up on me! Sorry about the double post.
__________________
Help!!!! My Chevy has a Ford stuck in it's intake manifold!
|
|
|
|
|
07-31-2013, 07:55 PM
|
#15 |
|
Registered User
Join Date: Jul 2013
Location: Canton, TX
Posts: 245
|
Re: 1980 Chevy K10 LWB Project
It's ok, my wife says I repeat myself too. Hehe
Posted via Mobile Device
__________________
1980 Chevy K10 Silverado --> Build Page My wife told me I spent too much time on Facebook. So I bought an old truck. Now she wishes I was on Facebook, it was cheaper.
|
|
|
|
|
08-12-2013, 02:54 PM
|
#16 |
|
Registered User
Join Date: Jul 2013
Location: Canton, TX
Posts: 245
|
Re: 1980 Chevy K10 LWB Project
Drove the truck this weekend to do some hauling and then parked it in the shop because I didn't want to unload it. Came in this morning and......
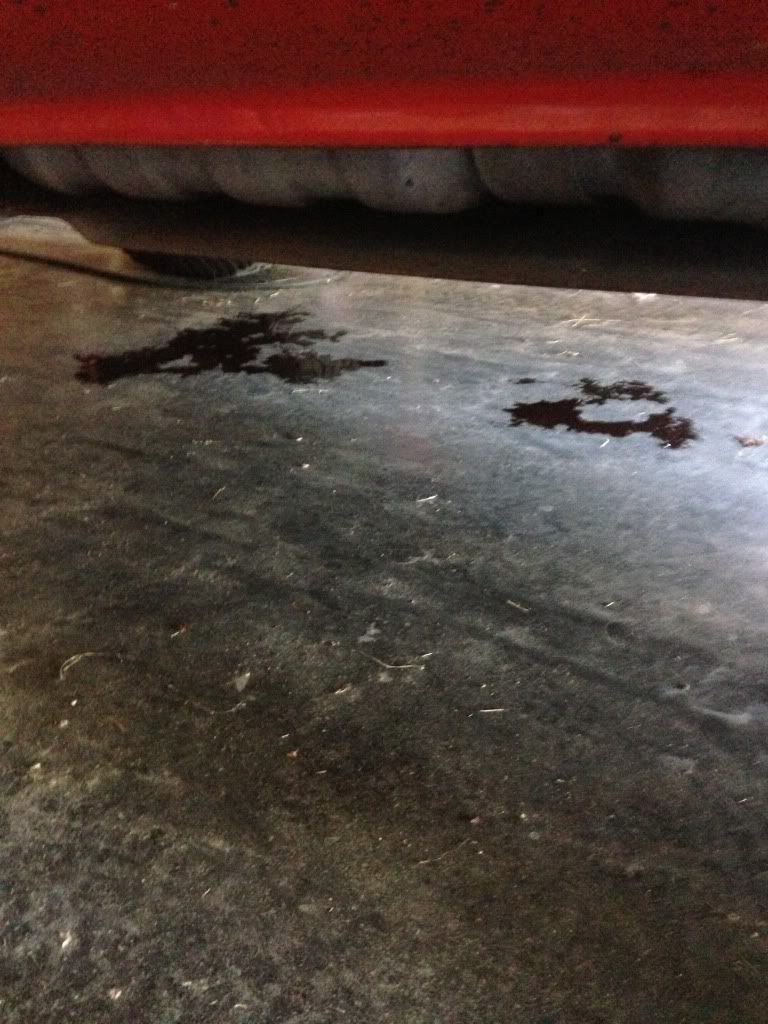 Looks like she sprung a leak, that there's tranny fluid. Crawled underneath, and found: 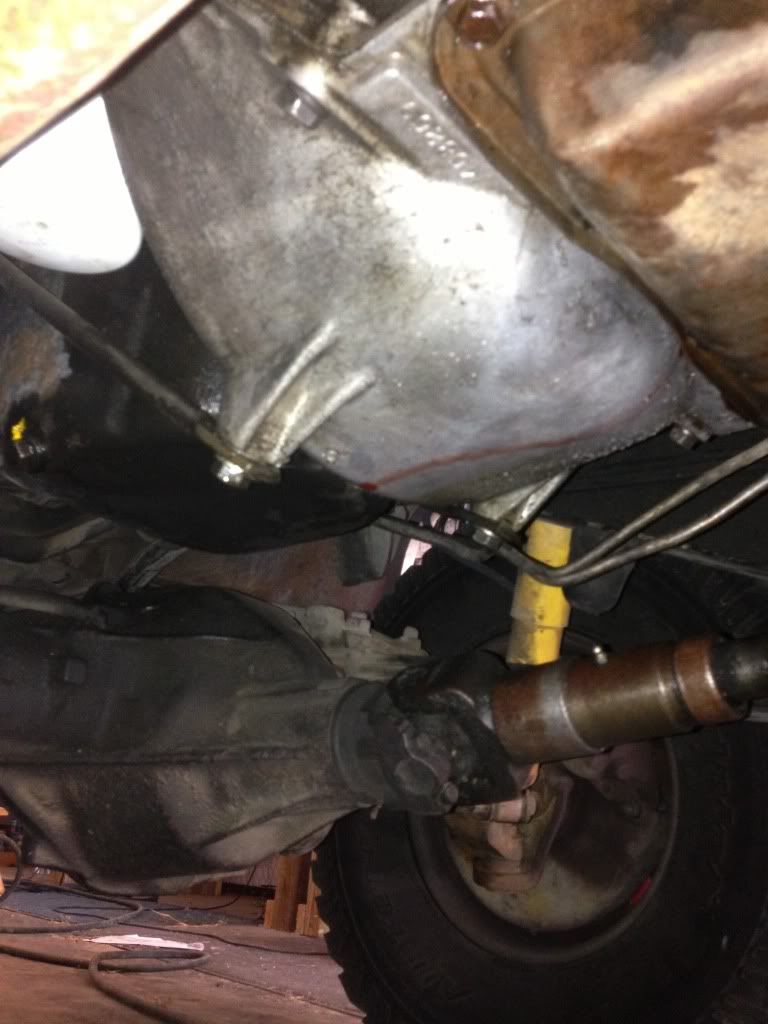 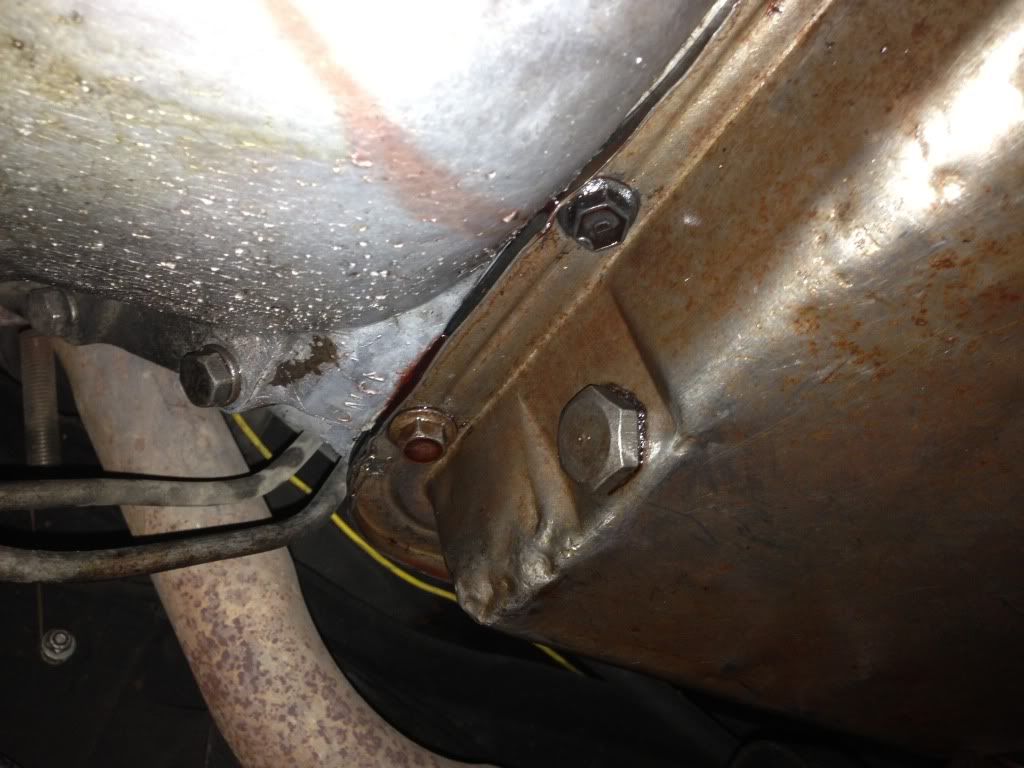 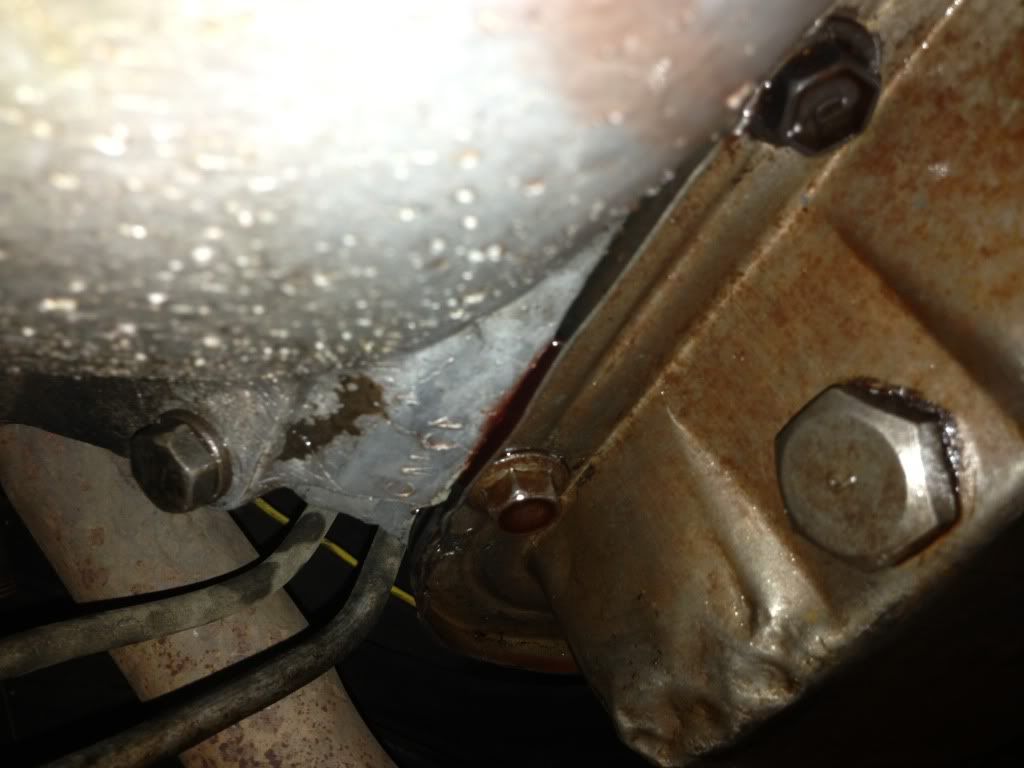 From the passenger side: 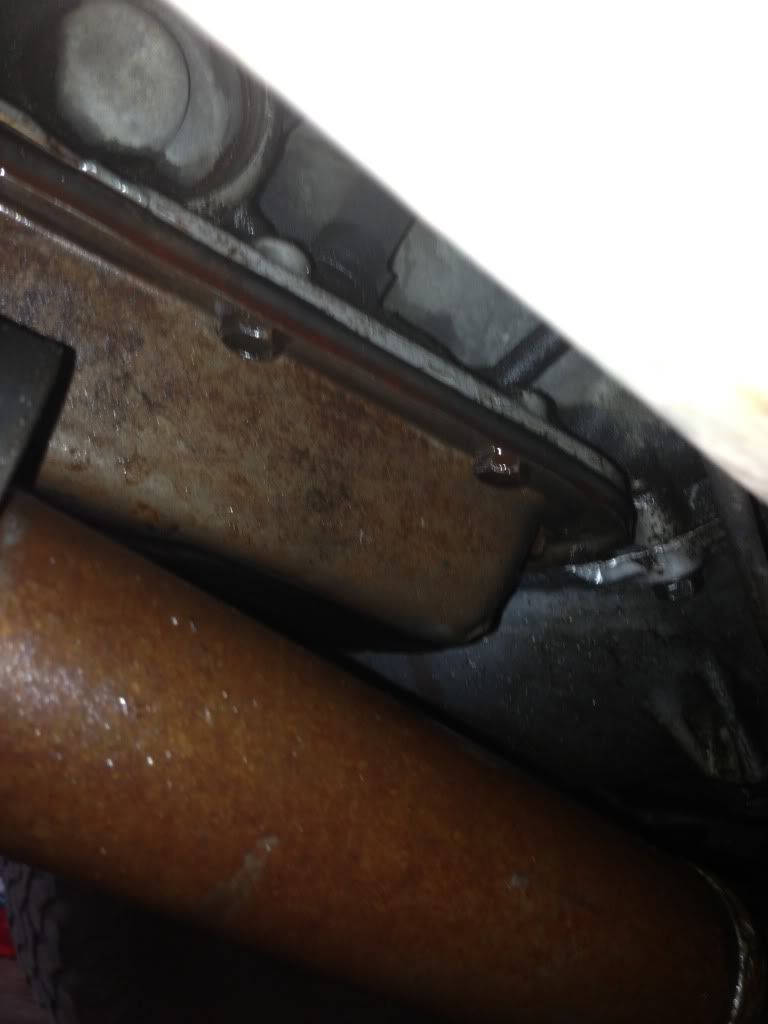 Looks like I have some work to do on what I was told was a recent overhaul...
__________________
1980 Chevy K10 Silverado --> Build Page My wife told me I spent too much time on Facebook. So I bought an old truck. Now she wishes I was on Facebook, it was cheaper.
|
|
|
|
|
09-08-2013, 10:29 PM
|
#17 |
|
Registered User
Join Date: Jul 2013
Location: Canton, TX
Posts: 245
|
Re: 1980 Chevy K10 LWB Project
Haven't had the opportunity to do much lately, have been busy with my daughter starting Pre-K classes at school (how do they grow up so fast?), and some other stuff going on.
Finally got to work on the truck today, pulled in a pretty good score this weekend! A friend of mine gave me some a jack, all I had to do was go get it, so I fueled up the truck and drove the 100 miles or so to his house to pick it up. Ended up bringing a ton more stuff home that he gave me just because he was tired of looking at it. Gray brand air jack and jack stands 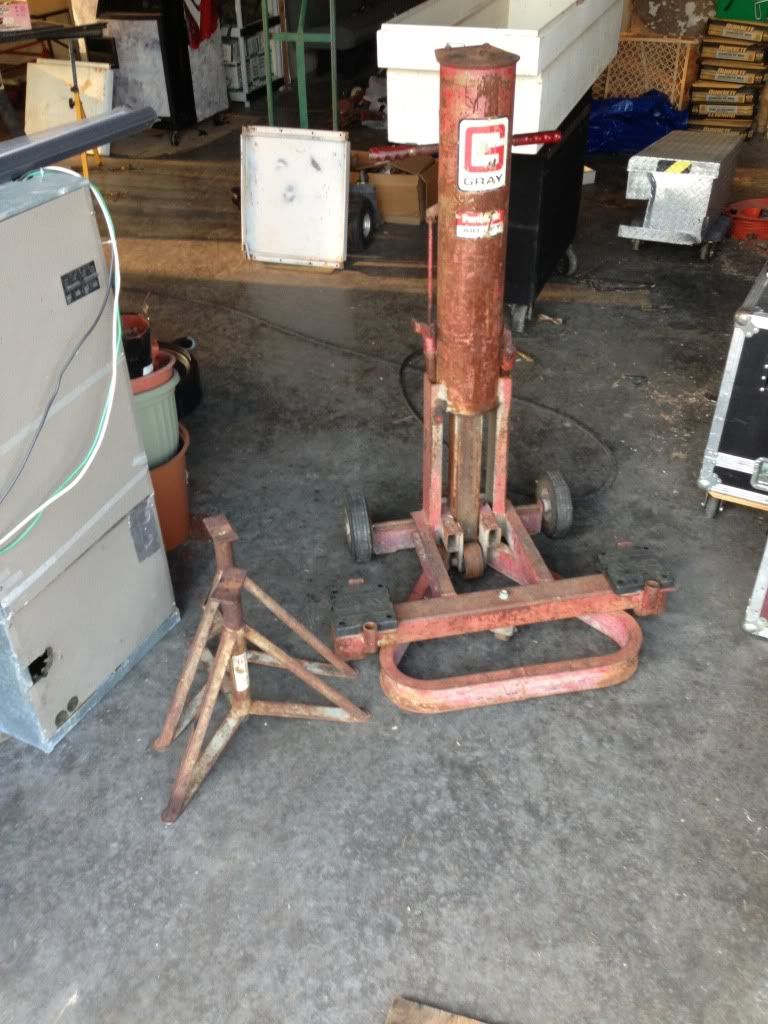 Small aluminum toolbox (stuffed with a bunch of misc stuff, none of which I will probably use) 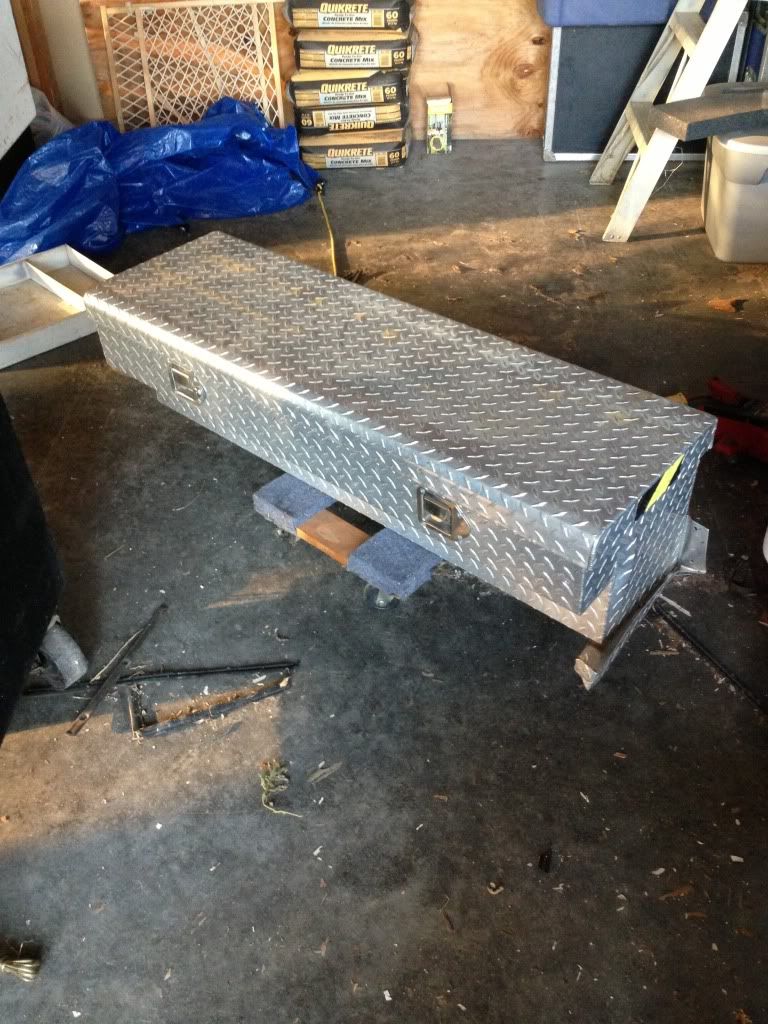 While I was on my way back from his house, I stopped at a gas station to get something to drink and noticed another square that had stopped for fuel. So, I pulled the truck over by them and introduced myself. Really nice folks, a man and his son are rebuilding. I told them about the forum and noticed that he had an old radio in the back. After some conversation about me searching for one, he offered it to me for $10! I gave him $15 and went merrily on my way. Checked it out today and it works perfectly! 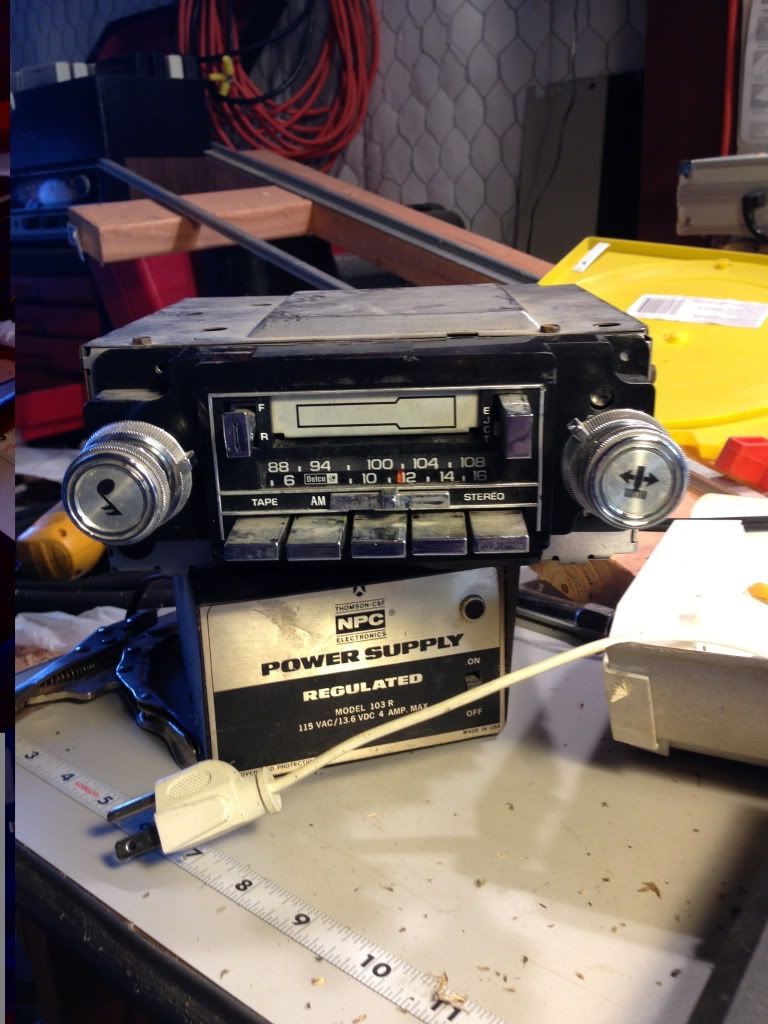 So after checking it out, I got the bug to see if I could install it into the truck, so I started pulling the dash. It has an aftermarket CD player in it, so I knew that they had probably cut the dash, but I had to see for myself. After pulling it all apart, it is in fact cut, so the stock radio will have to wait for another day.  Put all of that back together and noticed that the quadrant had broken, so I'll also have to fix that. Ugh. Put all of that back together and noticed that the quadrant had broken, so I'll also have to fix that. Ugh.I had bought some 4x6 speakers to replace the factory door speakers, even though I don't have covers yet (anyone got a line on these?). So I figured since I was working on it, I might as well tackle that too. Wasn't too bad, but man there was some major confusion going on. When I was working on the driver's side door speaker, I pulled the speaker off and was able to find the wires. Here comes the confusion. Light blue and Dark blue wires. Which is (+) and which one is (-)? After scratching my head for a while, I remembered that I had a stock radio (duh) and referenced it for the wiring diagram. 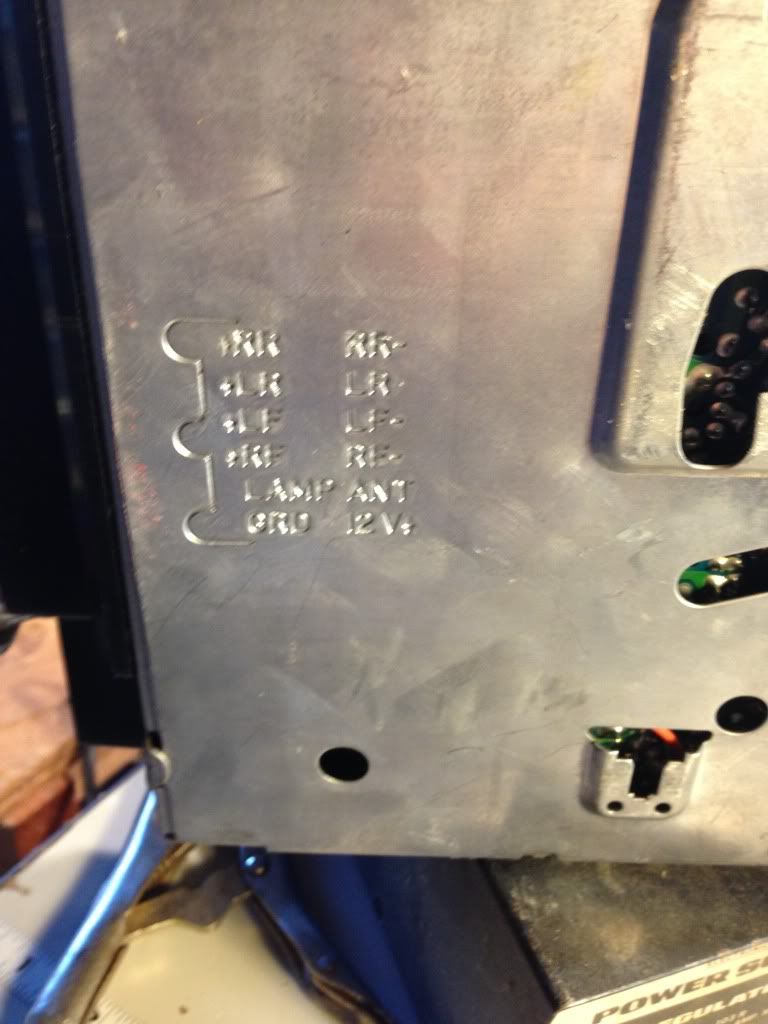 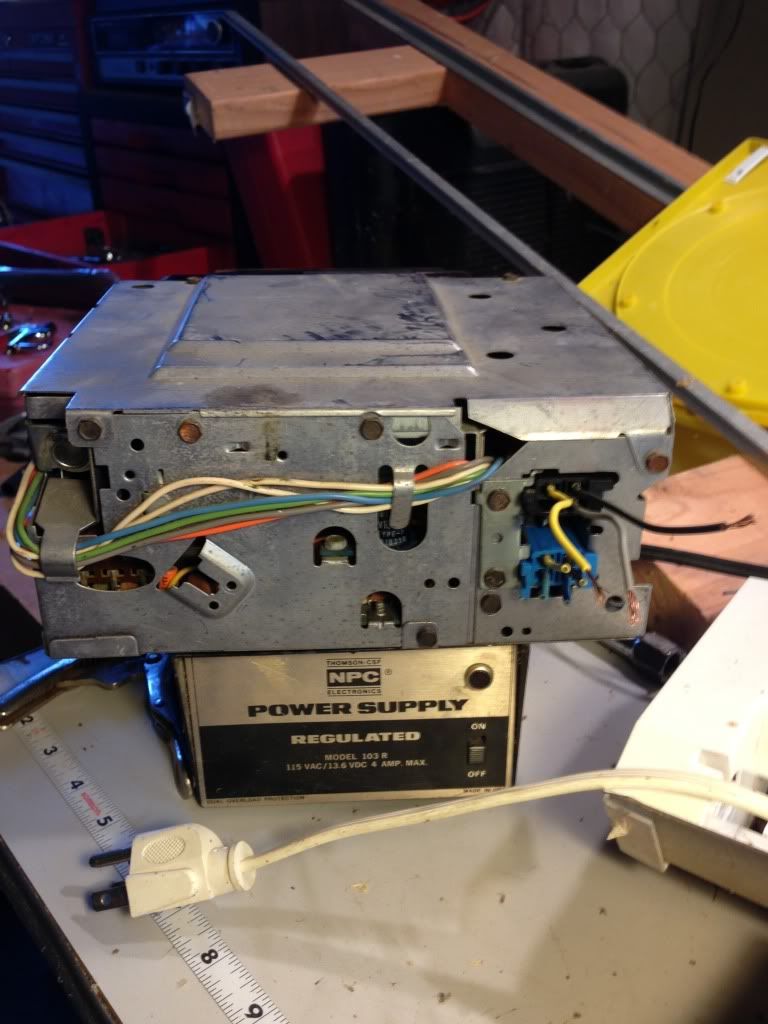 Ok, now we have a connector with light blue/dark blue wires.... but they are right rear? Scratched my head again, and then remembered that I had downloaded pdfs of the wiring diagrams I figured out that the left front speaker is tan/grey and that there is a small 3-4" connector that goes from the speaker to the actual speaker wiring harness. Soldered some new wires to the 4" connector (the original wires from this connector actually went to the cone), and installed the speakers. Repeated the process for the passenger side, and now have sound in three speakers. The right rear isn't working at all. I'll have to troubleshoot that one another day.Driver side before 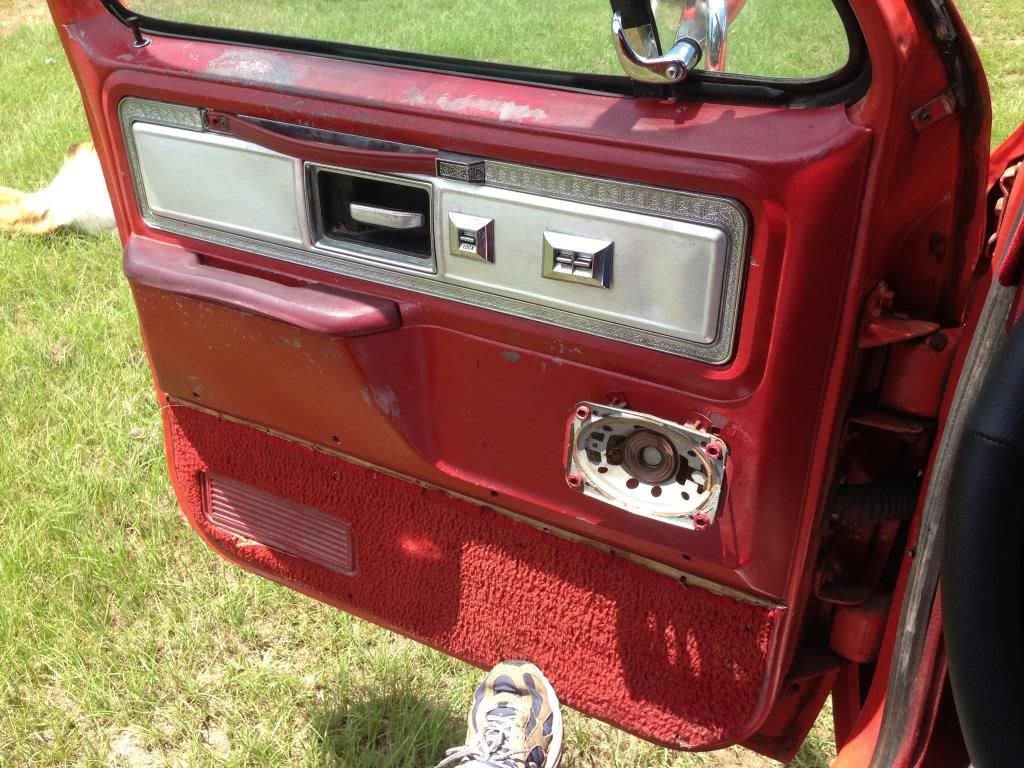 Driver side after 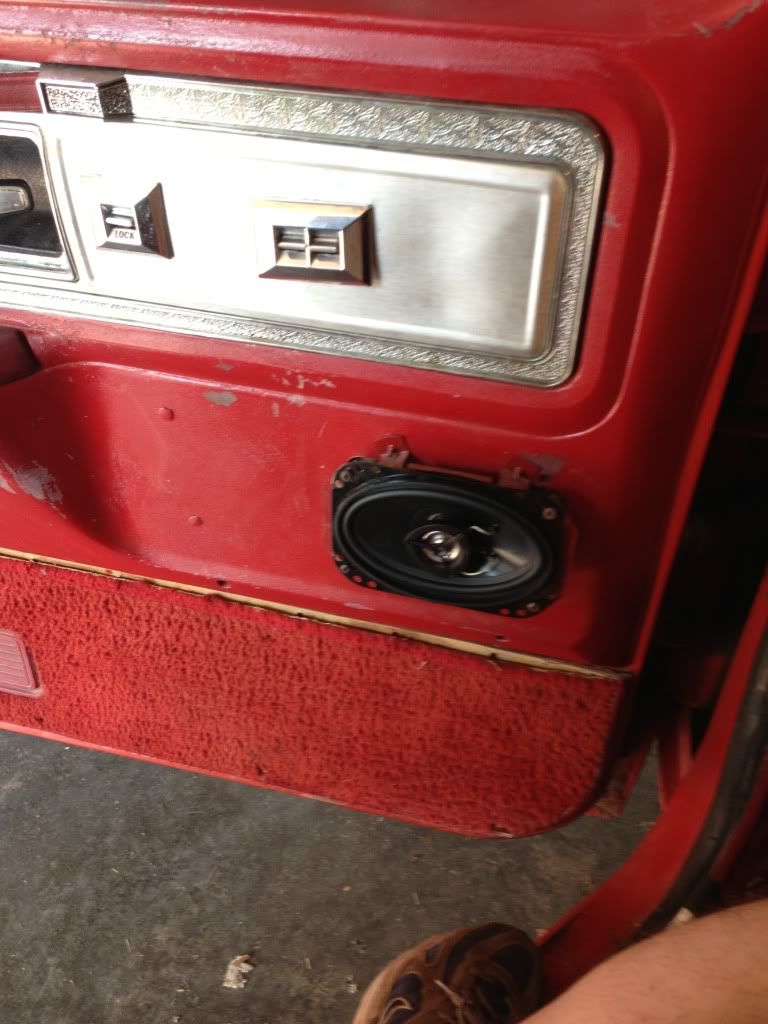 Passenger side before Passenger side after 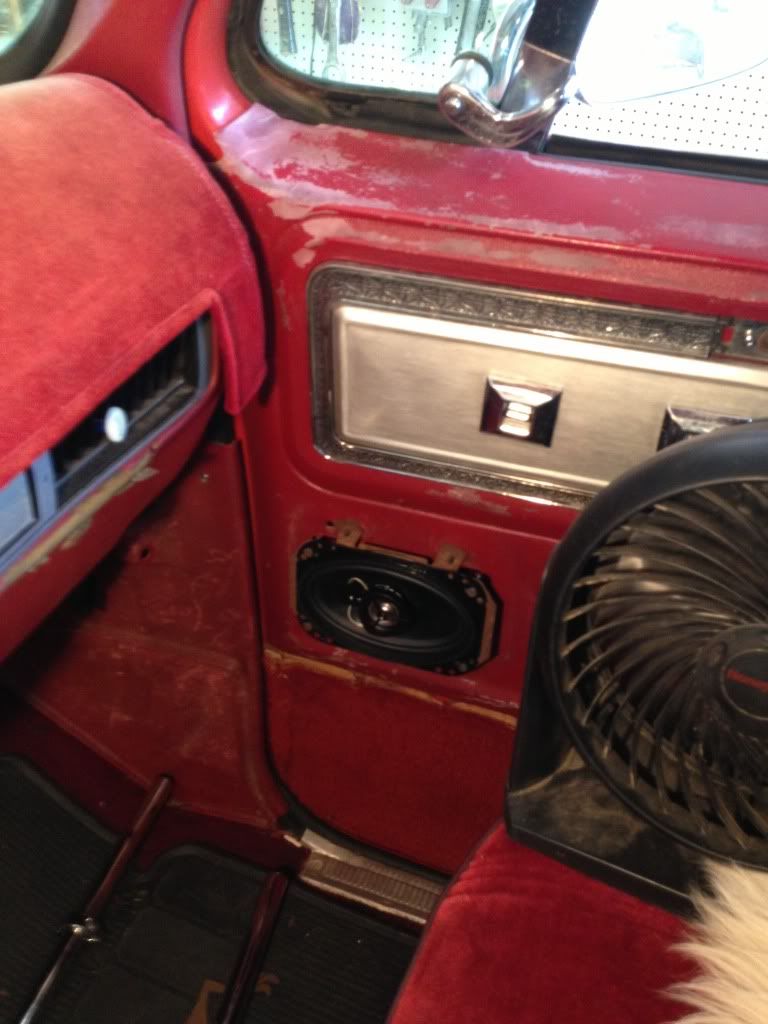 Had some help from my buddy Bentley... 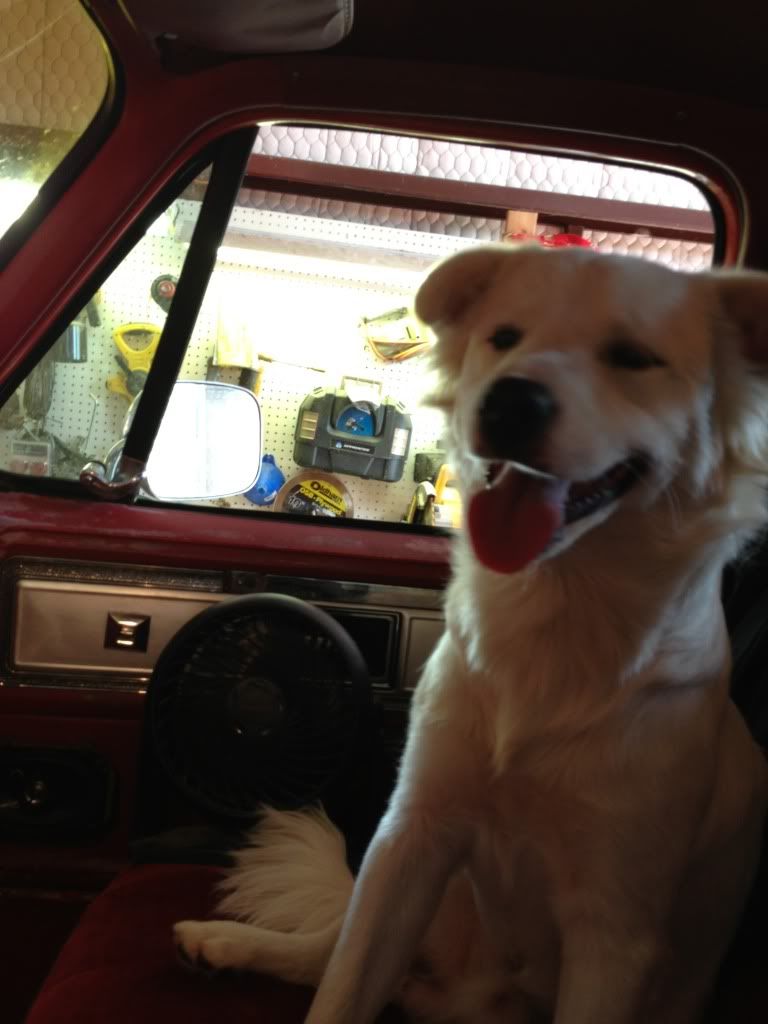 Parked his butt right in front of my fan.  Yeah, it was HOT today. While I had the dash partially disassembled, I took a look at the ducting. Previously I had noted that the vent with the most volume was the center vent, both vents in the driver's side dash (bottom left and top right) were pretty weak. Found that the bottom left had come apart and had shifted to the right (no screw holding it in place at all), so I connected it back the way that it was supposed to go. I didn't have a meter to measure the flow, but it seemed to increase the bottom left vent a bit. Top right is still not where it should be when the fan is on high. Planning on tackling the A/C this week, these 100+ days are getting almost unbearable. Yeah, it was HOT today. While I had the dash partially disassembled, I took a look at the ducting. Previously I had noted that the vent with the most volume was the center vent, both vents in the driver's side dash (bottom left and top right) were pretty weak. Found that the bottom left had come apart and had shifted to the right (no screw holding it in place at all), so I connected it back the way that it was supposed to go. I didn't have a meter to measure the flow, but it seemed to increase the bottom left vent a bit. Top right is still not where it should be when the fan is on high. Planning on tackling the A/C this week, these 100+ days are getting almost unbearable.Started looking at A/C components under the hood and found a broken wire under the hood that had come loose from a barrel connector (dark blue going to brake booster), so I fixed that and then added some split loom to protect all the wires with it. Not a bad weekend, but still lots of things to do!
__________________
1980 Chevy K10 Silverado --> Build Page My wife told me I spent too much time on Facebook. So I bought an old truck. Now she wishes I was on Facebook, it was cheaper.
|
|
|
|
|
09-10-2013, 11:29 PM
|
#18 |
|
Registered User
Join Date: Jul 2013
Location: Canton, TX
Posts: 245
|
Re: 1980 Chevy K10 LWB Project
Finally got to take a look at the A/C tonight with my buddy on the phone to assist. Well, as it turns out R12 gauges don't fit on a system that has already been converted to R134!
Yay me! Posted via Mobile Device
__________________
1980 Chevy K10 Silverado --> Build Page My wife told me I spent too much time on Facebook. So I bought an old truck. Now she wishes I was on Facebook, it was cheaper.
|
|
|
|
|
09-11-2013, 09:45 AM
|
#19 |
|
Registered User
Join Date: Jul 2013
Location: Canton, TX
Posts: 245
|
Re: 1980 Chevy K10 LWB Project
Pulled a vacuum on the A/C system last night after the previous post, and let it sit all night. Got up at 6AM this morning to see what it read:
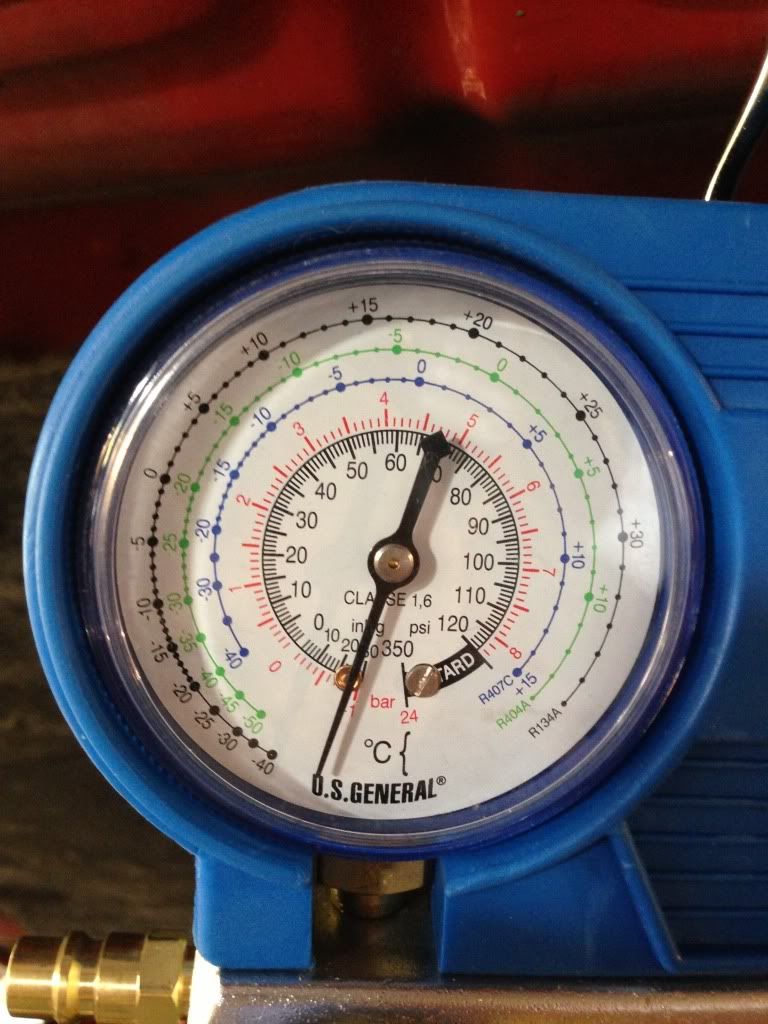 I think that's a good reading for a 6 hour test. Been searching here on the forum for some other A/C builds, and ran across this: http://67-72chevytrucks.com/vboard/s...d.php?t=588504 Pretty good information.
__________________
1980 Chevy K10 Silverado --> Build Page My wife told me I spent too much time on Facebook. So I bought an old truck. Now she wishes I was on Facebook, it was cheaper.
|
|
|
|
|
09-11-2013, 09:56 AM
|
#20 |
|
Slots go on anything!
Join Date: May 2003
Location: Richardson, TX
Posts: 5,957
|
Re: 1980 Chevy K10 LWB Project
Give it some juice! It's still hot outside!!!!
__________________
1974 Jimmy- 5.3/4L80e/NP241 |
|
|
|
|
09-11-2013, 09:12 PM
|
#21 |
|
Registered User
Join Date: Jul 2013
Location: Canton, TX
Posts: 245
|
Re: 1980 Chevy K10 LWB Project
Yeah, this thing is getting juice, but I am hesitant. I've read threads from this board and others and opinions are all over the map.
It looks like its converted, yet there is no sticker stating so. Did the PO finish the conversion, start it and not complete it? I have no idea what was last in it, do I throw some PAG46 in it and charge it? Do I pull the compressor, flush, blow it out, and refil with Ester oil? All of these are from different threads I found today. I just don't want to blow the compressor or anything else up! What do you guys think? Posted via Mobile Device
__________________
1980 Chevy K10 Silverado --> Build Page My wife told me I spent too much time on Facebook. So I bought an old truck. Now she wishes I was on Facebook, it was cheaper.
|
|
|
|
|
09-13-2013, 01:03 AM
|
#22 |
|
Registered User
Join Date: Jul 2013
Location: Canton, TX
Posts: 245
|
Re: 1980 Chevy K10 LWB Project
After some further research I bit the bullet and started with filling the truck with 6 oz. of PAG46. Once the system built up enough pressure, the compressor kicked on and engaged, but not enough to actually run the compressor. My suspicion about the compressor clutch was confirmed, it was worn out, and sparks were flying from the clutch disk! Shut it down and went off the parts store looking for either a new clutch or new compressor. Found a clutch for the A6 style compressor for $65, so got that and ran back to the house to install, but ran out of time tonight, 6am comes early. Tomorrow night I will replace the clutch and continue on with the refrigerant charge and hopefully have some cool air this weekend!
Posted via Mobile Device
__________________
1980 Chevy K10 Silverado --> Build Page My wife told me I spent too much time on Facebook. So I bought an old truck. Now she wishes I was on Facebook, it was cheaper.
|
|
|
|
|
09-14-2013, 02:38 AM
|
#23 |
|
Registered User
Join Date: Jul 2013
Location: Canton, TX
Posts: 245
|
Re: 1980 Chevy K10 LWB Project
It looks like I have A/C! Started by pulling the clutch and replacing it, which wasn't really a big deal, but was time consuming. Whole thing took about 4 hours with charging the system being last and taking around 20-30 mins.
I have read a few threads of late of people needing to change clutch or compressor, here is how I changed my clutch on my A6 compressor. The docs on the thread below were a BIG help. Hatzie has put a TON of time into collecting and scanning in docs, service manuals, etc in searchable PDF format. This stuff is absolute GOLD. I used the ST_333_80_1980_Chevrolet_Passenger_Car_and_Light_Truck_Unit_Repair_Manual.pdf because it has a section just for overhauling this type of compressor. Go check out the thread below and see if a manual for your square is there. PDF of Square Schematics & GM Training Manuals Now for the actual surgical procedure... Start by loosening the four bolts that hold the compressor in place, two on the upper brackets and two on the lower, then remove the belt from the clutch pulley. Continue by pulling the nut off of the clutch and use the puller to pull the clutch disk first. NOTE that there is a key in there, save it and put it in a SAFE place you will need it later when you re-install the new clutch. 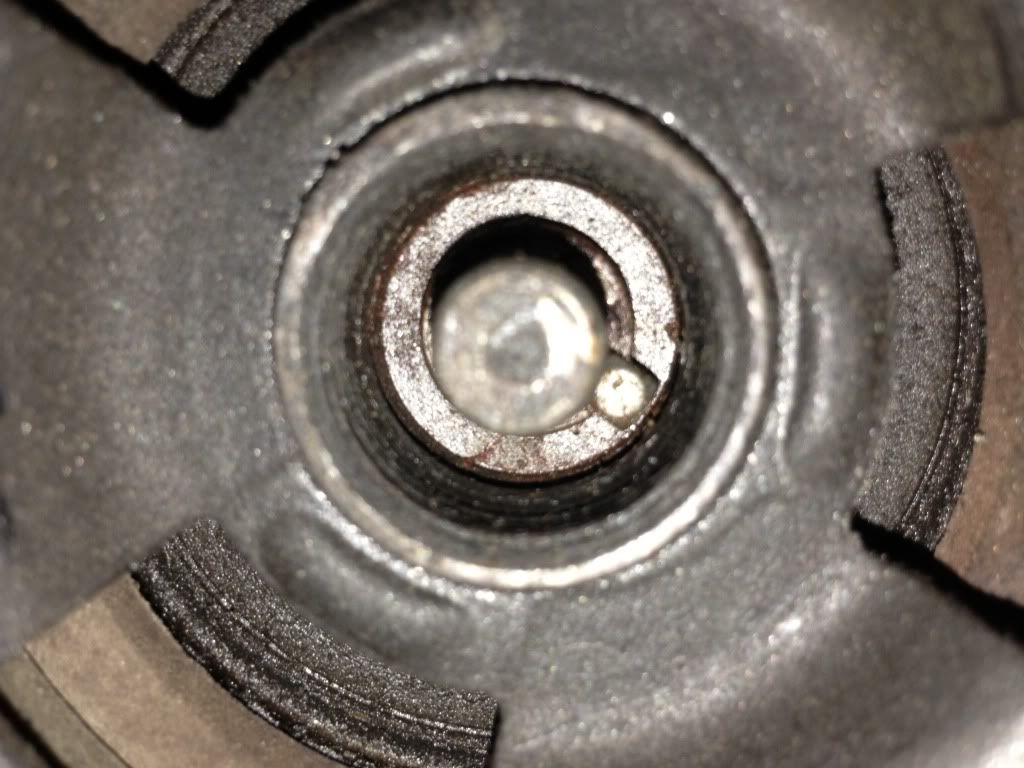 Then pull the snap ring for the actual pulley, which is on the outside of the bearing, and use the puller to remove the pulley. I neglected to take a picture of that one, but it's right there in plain view, you can't miss it after you pull the clutch disk. After that, note the orientation of the electrical connector. Make a mental note of it, or better yet take a picture, you will need to put the new coil on the same way. To pull the old coil, there is another snap ring holding it on. 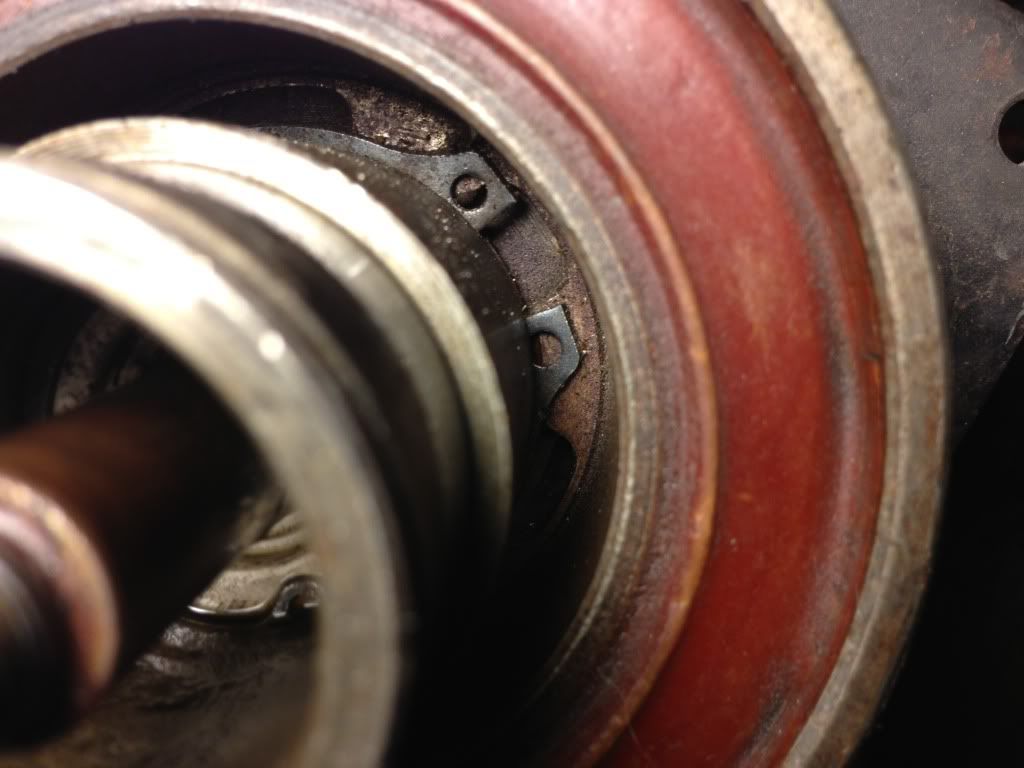 After you pull that snap ring, the coil should just come right off. Install the new coil ensuring the orientation of the electrical connector is the same (mine was at 2 o'clock), there are indents that will help line it up. Then install the snap ring, making sure it's seated. Next install the pulley, but be careful putting it on! There is a bearing pressed in to the pulley and held with a ring. The inside of the bearing is what goes on the shaft, and it is tight fit. If you're not careful, the bearing will move and pop the ring off that holds it in the pulley, and you will have to press it back in and re-install the ring where it belongs. I extracted the bearing out of the old pulley and used that and a block of wood with a rubber mallet to drive the new pulley on the shaft. Next, you must line up the key way on the clutch with the shaft. If you don't get it lined up perfect, it's ok. It can be a LITTLE off (I mean at most 1/32), the pulley will align with the shaft when you reinstall the key, but try to get it as close as you can. If you don't get it lined up right, you will have to pull it and try again. Once the clutch is aligned and on the shaft, reinstall the key. Remember where you put it?  After that, reinstall the nut on the shaft and tighten to the appropriate spec. Put the belt back on and get it tensioned properly, then lock it down. 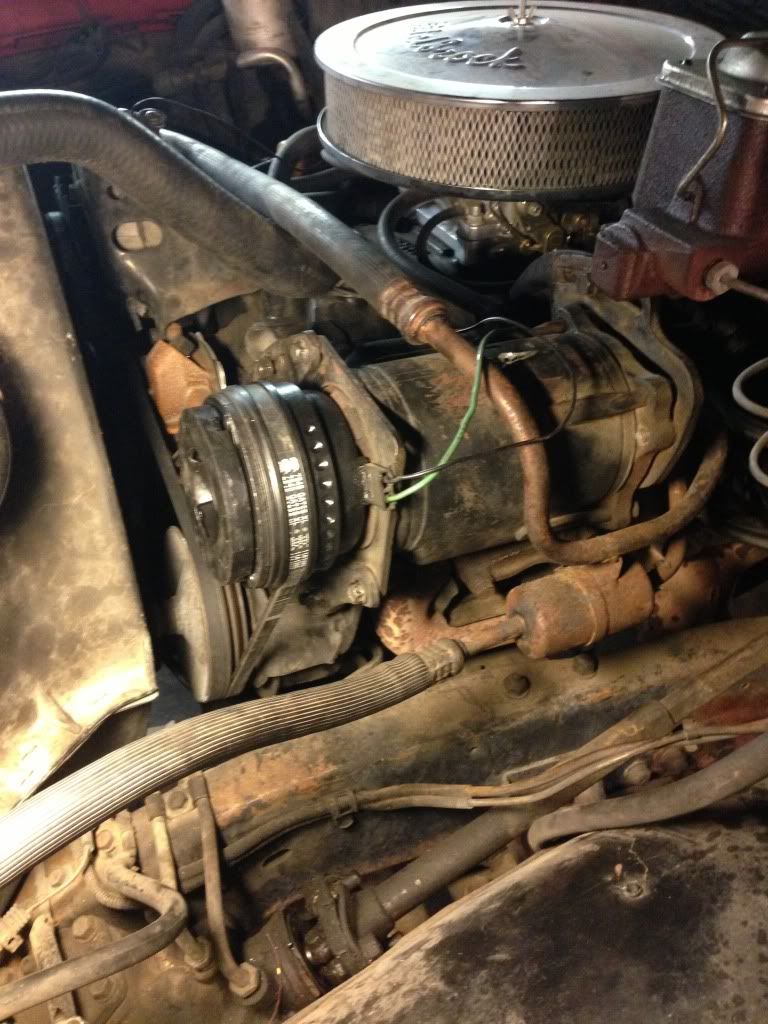 Charged with four 12 oz cans of R134a (not quite enough) and got the A/C in the truck down to ~65-70. I'll have to add another tomorrow, but by golly I have cooler air in it than I had on the drive home! Before:  After: 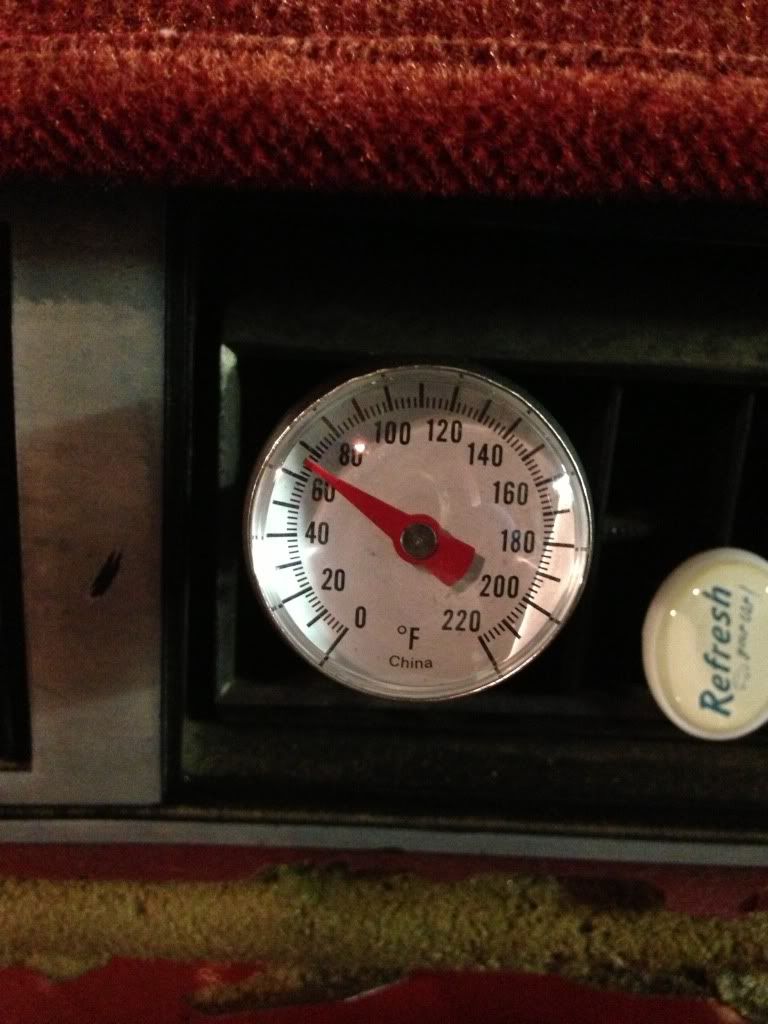 One more thing to check off the list!
__________________
1980 Chevy K10 Silverado --> Build Page My wife told me I spent too much time on Facebook. So I bought an old truck. Now she wishes I was on Facebook, it was cheaper.
|
|
|
|
|
09-16-2013, 01:36 PM
|
#24 |
|
Registered User
Join Date: Jul 2013
Location: Canton, TX
Posts: 245
|
Re: 1980 Chevy K10 LWB Project
First road test of the A/C yesterday. The temp coming out of the vents was around 50 degrees, outside temps were near 100 yesterday. Drove the entire trip in the comfort of knowing I had A/C :-)
One issue I noted is that the clutch would kick off and on in rapid succession when the truck was under load (uphill, acceleration, etc.), but when cruising at a consistent throttle and lower RPM's there no issues. I am wondering if I have a pressure switch that is going bad, going to check on that today.
__________________
1980 Chevy K10 Silverado --> Build Page My wife told me I spent too much time on Facebook. So I bought an old truck. Now she wishes I was on Facebook, it was cheaper.
|
|
|
|
|
09-17-2013, 01:24 PM
|
#25 |
|
Registered User
Join Date: Jul 2013
Location: Canton, TX
Posts: 245
|
Re: 1980 Chevy K10 LWB Project
Now that the A/C is running, it is a lot quieter in the cab, although I did notice that there is a lot of noise from the wing vents now. Since I had new rubber for them, decided that I would go ahead and change them out. Boy did I open a can of worms there....
Pulled the drivers door panel off to replace the inside window gasket first, that wasn't too difficult. Then pulled the wing vent out of the door so that I could replace the gasket. That was a bit of a challenge with the window still in there, but I eventually got it out. I have the gasket for all edges around the wing vent, but noticed that some of the original rubber is held in by little rivets, and the new rubber doesn't have holes for it. I had to drill them out to pull the old rubber, but that's about as far as I got before I had to quit. Will be picking it back up this evening and posting with some pictures.
__________________
1980 Chevy K10 Silverado --> Build Page My wife told me I spent too much time on Facebook. So I bought an old truck. Now she wishes I was on Facebook, it was cheaper.
|
|
|
|
|
| Bookmarks |
|
|


 Linear Mode

