
|
 03-19-2016, 12:09 PM
|
#226 |
|
Registered User
Join Date: Dec 2013
Location: Purmerend, Netherlands
Posts: 1,657
|
Re: 1969 Custom/10 clean up
Steve, congratulaions with that little cutie!!!!!
She's a model, already looking straight into the camera   Take your time with Emily and your wife, that's important! Enjoy while you can 
__________________
Cheers!! Kees. 1959 Chevy Fleetside Longbed My build: http://67-72chevytrucks.com/vboard/s...d.php?t=643426 Kool Guyz CC Instagram: _King_Kustom_ |

|

|
|
03-19-2016, 10:56 PM
|
#227 |
|
Registered User
Join Date: Oct 2007
Location: Spanaway
Posts: 8,451
|
Re: 1969 Custom/10 clean up
Congrats!!
__________________
Mike. Swamp Rat build thread : http://67-72chevytrucks.com/vboard/s...d.php?t=595019 72 3/4T 4X4 4" BDS Lift 33" BFG's |
|
|
|
|
04-13-2016, 09:48 AM
|
#228 |
|
Registered User
Join Date: Aug 2010
Location: Hoofddorp, the Netherlands
Posts: 582
|
Re: 1969 Custom/10 clean up
I hijacked a couple of hours from work to get to work on the truck again. took it for a 40mi test drive and nothing fell off or caught fire, so I guess it's a success. it runs good, the brakes feel reliable..I'm a happy camper.
I drove it to my office building which has an underground parking garage but a problem occurred that I hadn't notices before.the passenger side door will lock from the inside and with the key, the driver side does neither. when I open the door it will lock, but when closed it kinda gets stuck. easy job I thought, just adjust the door latch plate..or whatever it's called. I have had it in every possible position, but either the door won't shut anymore, or I cant get the lock to work.. any ideas?
__________________
Feedback is always welcome! projects: 1969 Chevy C10 1950 GMC 100 1958 Chevy C60 Viking ratrod |
|
|
|
|
04-14-2016, 04:26 PM
|
#229 |
|
Registered User
 Join Date: Feb 2016
Location: Camarillo, CA
Posts: 256
|
Re: 1969 Custom/10 clean up
Interesting read, your perseverance is to be commended.
Congrats on the new little one, put a wrench in her hand... |
|
|
|
|
04-16-2016, 10:55 AM
|
#230 | |
|
Registered User
Join Date: Aug 2010
Location: Hoofddorp, the Netherlands
Posts: 582
|
Re: 1969 Custom/10 clean up
Quote:
 . .got the door lock problem solved by using the 'shoulder in the door' method. so when closed I push a good deal of my weight into the door and then the key will turn to lock. problem solved.
__________________
Feedback is always welcome! projects: 1969 Chevy C10 1950 GMC 100 1958 Chevy C60 Viking ratrod |
|
|
|
|
|
05-23-2016, 07:59 PM
|
#231 |
|
Registered User
Join Date: Aug 2010
Location: Hoofddorp, the Netherlands
Posts: 582
|
Re: 1969 Custom/10 clean up
last weekend the weather suddenly improved (in Holland that means no rain) so I took out the truck for a real shakedown, after some tinkering on Friday night.
this is what my carb setup looked like before:  a dried up Holley 4 barrel with on top some weird (red) spacer which held the IMPCO 300A mixer for the propane. I took that of, because a while back I bought an IMPCO 425 mixer, which made the Holley dispensable..seeing I don't run on petrol, only propane. the 425 came with a throttle plate, and I only had to buy a new spacer at the bottom, because the old one had cracked. But as always you get that little surprise, the 425 doesn't have any vacuum connectors for my ignition advance, so I had to drill a hole in the bottom spacer and 'McGuyver' a vacuum connection. (yes to mcguyver is actually a verb in Holland) here's the Holley with spacer  this is the IMPCO 300A mixer  this is what a carb looks like after running years and years only on propane  this is my new spacer in which I had to drill a hole and use a threading tap set..or whatever it's called in English. then drilled a hole through a bolt, put in there and sawed off the head... it works like a charm!   and this is what the 425 mixer looks like..much cleaner look.  I then hooked everything up and it started inmediatly! the set came of a running car, so I had to adjust absolutely nothing! here's a movie of me and my son Dawid on our way to the north of Holland during the shakedown. https://youtu.be/tY0x6cXCUaY oh and before I forget..what was the result of the shakedown? the oil pressure line toward the gauge leaks a bit.. so I had some oil in the cab. the right header is rubbing against the chassis, this probably happened when I raised the tail of the transmission to get the left header not to rub against the lower control arm. I have no temperature gauge..so no clue what the operating temp is of the engine. and I hate the 2 separated exhaust sounds.. I'll have to redesign it including a crossmember or and X.
__________________
Feedback is always welcome! projects: 1969 Chevy C10 1950 GMC 100 1958 Chevy C60 Viking ratrod Last edited by Steve-W; 05-23-2016 at 08:33 PM. |
|
|
|
|
05-23-2016, 11:31 PM
|
#232 |
|
Registered User
Join Date: Jan 2009
Location: San Antonio, Texas
Posts: 1,374
|
Re: 1969 Custom/10 clean up
That looks very nice! I am pretty sure "McGuivering" is verb here too, lol!
__________________
1972 C10 LWB, 350/350 Deconstruction began 5/2009, mostly completed restoration, 5/2017 |
|
|
|
|
03-11-2017, 08:59 AM
|
#233 |
|
Registered User
Join Date: Aug 2010
Location: Hoofddorp, the Netherlands
Posts: 582
|
Re: 1969 Custom/10 clean up
Time flies when you have kids..close to a year since my last update!
Well where to start? I had fixed the oil pressure gauge from leaking and made sure the exhaust stopped rubbing against the frame. But on my next outing a new problem occurd; while picking up my son from a friend, the engine would hardly crank over, so we put some jumper cables on it and barely got it to fire. Your first thought is the battery, even though my battery has an indicator which was bright green, telling me the battery is 100%.. So I put the battery on a charger overnight and as suspected, the engine wouldn’t crank over in the morning. The next suspect if the battery is ok, is the starter motor and at that moment I had an epiphany and realized why there was a piece of 2x4 wedged between my oil pan and starter..yes you’re reading it correctly, there was a piece of wood holding my starter in place. I never felt indulged to investigate why it was there and figured that as long as it worked, it needed no attention. this must make some of you cringe or at least shake your head in disbelief, but I’m a true fan of the KISS principle, Keep It Simple, Stupid.  Anyway I pulled the starter and found that the engine blok has been mutilated by the PO. Hence the wooden blok. As you can see on the next picture there is a piece missing and the thread had been raped, so they just put a wire end (if that’s what it’s called in English) through it, with 2 nuts on top.  I pulled out the wire end and it looks like there’s some kind of tube inside the whole? I don’t know these engines well enough so now clue if it’s supposed to be there?  Looking from the top, I had to go against my belief and grind off some part of the engine, so I would be able to have the bolt from the bottom up fastened with a nut that sits straight. 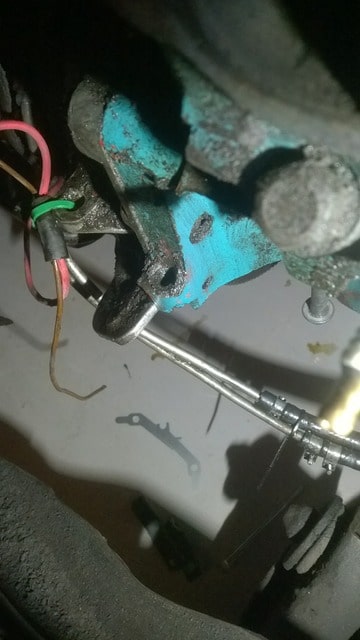 Here’s the new high torque starter mounted. The old one isn’t broken, but I had already bought the new one, so why not use it. It’s lighter, stronger and less prone to failure..unless my mounting construction fails.  Thinking that would be the last of my engine troubles for a while, I decided to change my oil and filter. When unscrewing the filter I noticed that not the filter came loose, but the filter bolt? 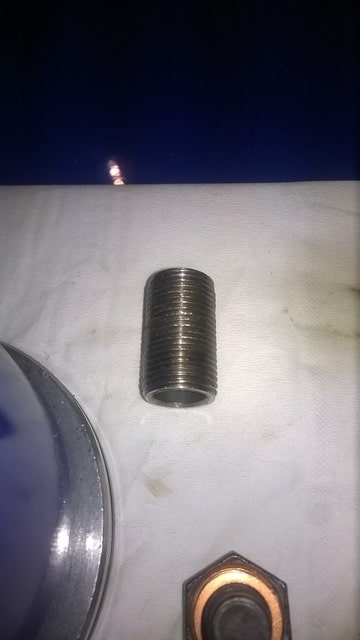  That was an easy fix, I just put a tiny weld on the thread so It would fasten at a certain depth, after which you can screw on the filter. The PO left me a box of goodies including 2 oil filters, guess my surprise when both filters weren’t the correct ones. The PO had told me the engine is a 350 and seeing that’s a common engine, I had no reason not to believe him. (There’s no engine nr on the Dutch title as it wasn’t required at the time that they imported it) So I trotted off to the Dutch version of Pepboys and got an oil filter for a GM 350…. Which of course was the same as the other 2 I had laying around. Time to have a look at the engine number 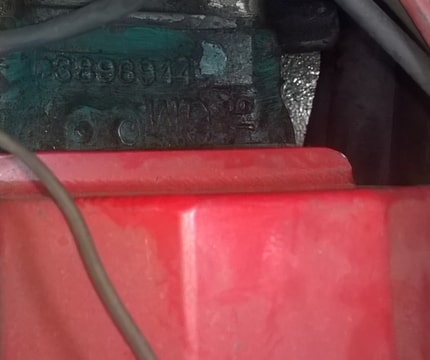 OMG.. I have a 283, a 1967 Chevelle engine to be precise. So guess my truck ain’t matching number then At least I was able to get the right filter and everything is hunky-dory.
__________________
Feedback is always welcome! projects: 1969 Chevy C10 1950 GMC 100 1958 Chevy C60 Viking ratrod Last edited by Steve-W; 03-11-2017 at 09:09 AM. |
|
|
|
|
03-12-2017, 09:25 AM
|
#234 |
|
Registered User
Join Date: Aug 2010
Location: Hoofddorp, the Netherlands
Posts: 582
|
Re: 1969 Custom/10 clean up
There were 2 more things that I wanted to take care of now, which was the exhaust and the bad shape of the bedsides. But with lifting the bed came another problem and that’s that my propane tanks were bolted to the underside of the bedfloor, so that meant I had to fix that as well.
 Of course every bolt was rusted so badly that I had to grind of every single one of them! And now for some advice, when your local supermarket has grinding and cutting discs on discount offer, stay far from it!  Luckily I was wearing protective gear, so no harm done except a bruised ego. Eventually all the bolts were gone and it was time for lift-off. Always handy to have a winch, to save you from heavy lifting.   Here are some pictures of a rusty tailgate  More rust  Apparently I am inside the circle of rust  Here’s my new RH Bedside panel, got one for the left as wel  I then started mocking up a new frame to hold my propane tanks and the more I thought about it, the simpler I wanted it to be. Seeing that the bed sits 3” above the frame, I took a square 2” tube and made it to sit on top of the frame. They sit between the cross sills, so if I measured correctly, the bed should go on without any hassle (famous last words…)   With the bed off, I also tackeled another hurdle and that was the exhausts. I had to side pipes without a cross exiting just in front of the back wheels. In a tunnel it sounded great, but on a normal road the 4 cilinder thump on my left annoyed me and I didn’t like the noice it made, plus I thought it was to loud. Knowing I only have a 283 engine, I made an executive descision and concluded that a single 2,5” exhaust would be sufficient. So with some stock bends and pipes I went to work. The front part (I need to make some more pictures) is stainless, but seeing it’s all a mock-up it will all be cleaned up  Temperary bracket, I’ll see what I make of it, with the bed on.  Years ago I had gotten a box with 6 metal dice in it. I never used them until I suddenly had a moment of clarity. Look at my new light and windscreen wiper knob 
__________________
Feedback is always welcome! projects: 1969 Chevy C10 1950 GMC 100 1958 Chevy C60 Viking ratrod |
|
|
|
|
03-12-2017, 12:58 PM
|
#235 |
|
Registered User
Join Date: Dec 2013
Location: Purmerend, Netherlands
Posts: 1,657
|
Re: 1969 Custom/10 clean up
Good to see you're back at it!!
Sometimes life gets in the way.... But every step forward is one. Did you bought the truck here in Holland?
__________________
Cheers!! Kees. 1959 Chevy Fleetside Longbed My build: http://67-72chevytrucks.com/vboard/s...d.php?t=643426 Kool Guyz CC Instagram: _King_Kustom_ |
|
|
|
|
03-12-2017, 04:07 PM
|
#236 |
|
Registered User
Join Date: Aug 2010
Location: Hoofddorp, the Netherlands
Posts: 582
|
Re: 1969 Custom/10 clean up
Kids are never in the way Kees
but they are time consuming. My son wants to play soccer, so suddenly there is practice and matches we have to attend to. But I'll manage. I bought the truck in Holland near you actually.
__________________
Feedback is always welcome! projects: 1969 Chevy C10 1950 GMC 100 1958 Chevy C60 Viking ratrod |
|
|
|
|
03-12-2017, 06:30 PM
|
#237 |
|
Registered User
Join Date: Dec 2013
Location: Purmerend, Netherlands
Posts: 1,657
|
Re: 1969 Custom/10 clean up
I didn't meant kids in general ;-) I have a couple
My boy played tennis, I'm glad, I hate soccer.... Nowadays there's no room for sports, college you know, for both of my kids And that takes a lot of time from them (and me, reading all their stuff before they send it in) I hope your truck isn't sold by some one I know, I think I would be a bit off, or you must have bought it cheap or as a basket case? I mean, you came across so many things that aren't correct or good or Well made, well, I think you know what I mean?? I bought mine of off Six pictures of craigslist, and a few phonecalls. It was a gamble and a risk, but it turned out very good! I was lucky!! But keep at it, you do good work!!
__________________
Cheers!! Kees. 1959 Chevy Fleetside Longbed My build: http://67-72chevytrucks.com/vboard/s...d.php?t=643426 Kool Guyz CC Instagram: _King_Kustom_ |
|
|
|
|
03-14-2017, 09:37 AM
|
#238 | |
|
Registered User
Join Date: Aug 2010
Location: Hoofddorp, the Netherlands
Posts: 582
|
Re: 1969 Custom/10 clean up
Quote:
I bought the truck from a guy called Jaap, who was living on a trailerpark near 'de Rijp' or maybe 'Limmen, I don't remember anymore. he was going though a divorce, so the truck only cost me 2 grand. Apart from all the weird stuff, the engine, tranny and div are in good working order, so no complaint from my side..and I'm learning a ****-load of stuff! So for my next 67-72 project I have a head start and know exactly what to look for, or so I like to think
__________________
Feedback is always welcome! projects: 1969 Chevy C10 1950 GMC 100 1958 Chevy C60 Viking ratrod |
|
|
|
|
|
03-14-2017, 09:41 AM
|
#239 |
|
Registered User
Join Date: Aug 2010
Location: Hoofddorp, the Netherlands
Posts: 582
|
Re: 1969 Custom/10 clean up
Having new side panels for the bed, I took another look at the bed floor and decided that it’s not too bad. Actually there is only 1 cross sill that is in really bad shape, another has some rot, but both can be fixed up and it’ll give me good welding practice. I know I said that before, because my plan was to repair my side panels..but I failed and gave up, yes just like that and went over budget to buy new panels. The repair that has to be done to the bed floor though, is not quite visible and I’ll be hauling stuff around anyway, so dents and bruises in the floor aren’t my concern.
Here’s a pic of the most corroded cross-sill    And here’s the second one which is in slightly better shape 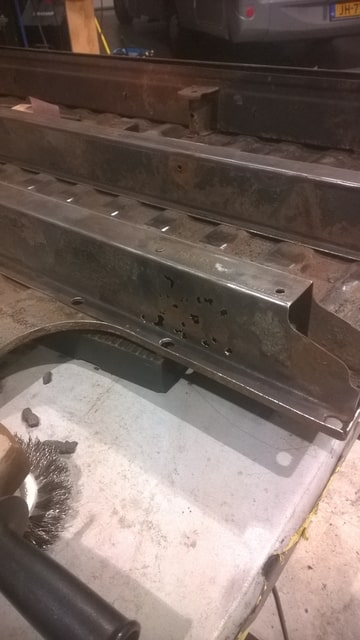 There is some rot on the floor itself, because somebody had already welded in a repair panel, butcher-style.. I’ll have to see how I’m going to fix that.  Ok..and here’s my repair plan; 6ft long metal strips, 3”wide and 5/64” thick  Curious to hear whether this is the right way to go.
__________________
Feedback is always welcome! projects: 1969 Chevy C10 1950 GMC 100 1958 Chevy C60 Viking ratrod |
|
|
|
|
03-15-2017, 04:35 PM
|
#240 |
|
GEARHEAD
Join Date: Aug 2003
Location: MN
Posts: 6,107
|
Re: 1969 Custom/10 clean up
Cross sills can be formed fairly easy and won't require welding. Just find a shop with a sheetmetal brake and have new ones formed. The labor saved on the repair should be well worth it. The other option is to just use rectangular tubing the same height. It's overkill but simple. You just need to drill holes for the bed bolts and on the ends to bolt to the floor and sides.
Also, I know this is a bit late coming, but it's a fairly common practice to tighten those bed bolts until they snap, rather than cut them. They are not that big or strong and with the rust they usually snap off pretty quick. I've got a 283 in my 71. Pretty good engine. I'm going to replace it with a 350 I'm building now. Should be swapped this spring.
__________________
If no one knows what you're doing, they can't tell you you're doing it wrong HG's Dream Car Build - Shelby Cobra Kit Build your own adjustable track bar 71  Long Fleet C/10 Long Fleet C/10 72  Jimmy 4x4 (Junkyard Jimmy) Jimmy 4x4 (Junkyard Jimmy)HG's Plow Truck '78  K35 Dually K35 DuallyBigass Farm Truck HG's thread of miscellaneous stuff |
|
|
|
|
03-15-2017, 05:01 PM
|
#241 |
|
Registered User
Join Date: Dec 2013
Location: Purmerend, Netherlands
Posts: 1,657
|
Re: 1969 Custom/10 clean up
Personally, I wouldn't do the repair this way.
Cut out the bad pieces and weld in new parts. Or as hgs notes said, make new ones. Luckily I know someone here in Purmerend who, most likely, can make these for you. If you will, I can ask for an invoice? But you have to give me some measurements then... Did you check Prins Trucks? Maybe they sell new ones?
__________________
Cheers!! Kees. 1959 Chevy Fleetside Longbed My build: http://67-72chevytrucks.com/vboard/s...d.php?t=643426 Kool Guyz CC Instagram: _King_Kustom_ |
|
|
|
|
03-16-2017, 05:35 AM
|
#242 | ||
|
Registered User
Join Date: Aug 2010
Location: Hoofddorp, the Netherlands
Posts: 582
|
Re: 1969 Custom/10 clean up
Quote:
Quote:
I did have a quick look at LMC to see what a new cross-sill would cost, but is it me, or is there something weird in the picture? Is seems that the cross-sill is mounted the other way around compared to my bed? It seems on the LMC picture, the open end is facing down, as with my bed it’s facing up. (remember my bed is laying upside down) 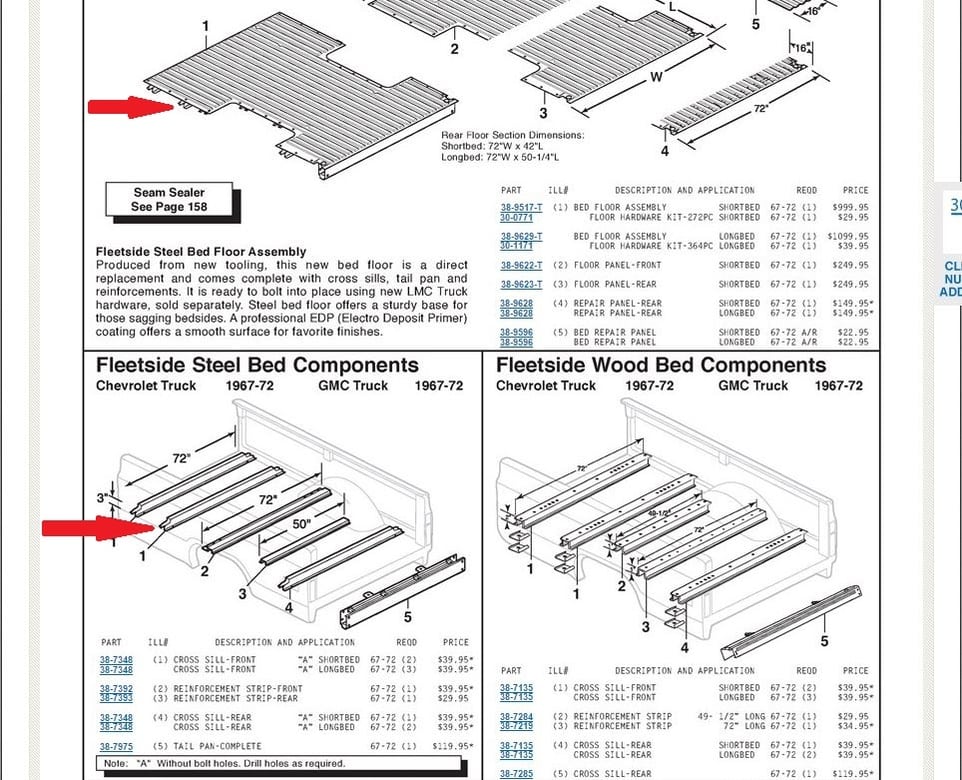
__________________
Feedback is always welcome! projects: 1969 Chevy C10 1950 GMC 100 1958 Chevy C60 Viking ratrod Last edited by Steve-W; 03-16-2017 at 05:42 AM. |
||
|
|
|
|
03-16-2017, 09:46 AM
|
#243 |
|
GEARHEAD
Join Date: Aug 2003
Location: MN
Posts: 6,107
|
Re: 1969 Custom/10 clean up
They are on your bed floor correctly...
__________________
If no one knows what you're doing, they can't tell you you're doing it wrong HG's Dream Car Build - Shelby Cobra Kit Build your own adjustable track bar 71 Long Fleet C/10 72 Jimmy 4x4 (Junkyard Jimmy)HG's Plow Truck '78 K35 DuallyBigass Farm Truck HG's thread of miscellaneous stuff |
|
|
|
|
03-16-2017, 02:17 PM
|
#244 | |
|
Registered User
Join Date: Aug 2010
Location: Hoofddorp, the Netherlands
Posts: 582
|
Re: 1969 Custom/10 clean up
Quote:
__________________
Feedback is always welcome! projects: 1969 Chevy C10 1950 GMC 100 1958 Chevy C60 Viking ratrod |
|
|
|
|
|
03-16-2017, 02:50 PM
|
#245 |
|
Registered User
Join Date: Dec 2013
Location: Purmerend, Netherlands
Posts: 1,657
|
Re: 1969 Custom/10 clean up
They do that to make you confused 🤣🤣😂
__________________
Cheers!! Kees. 1959 Chevy Fleetside Longbed My build: http://67-72chevytrucks.com/vboard/s...d.php?t=643426 Kool Guyz CC Instagram: _King_Kustom_ |
|
|
|
|
03-21-2017, 12:57 PM
|
#246 |
|
Registered User
Join Date: Aug 2010
Location: Hoofddorp, the Netherlands
Posts: 582
|
Re: 1969 Custom/10 clean up
So.. HGS and Kees, I know what you told me and I’m normally not going against good advice.
Friday night when I arrived in the garage I saw my mate Ferry had brought the metal strips which I had already ordered. Don’t be haters guys, but I just had to see what it would look like with the strips next to the cross sill.   Then I thought, well I can just tack it in a couple of spots to see what it looks like, and against better judgement I proceeded. I did treat the metal underneath and I’m going to put some kit on the seams, but this should be adding some structural integrity, or are you again slapping your foreheads and mumbling profanities towards me?    We then turned it over and put on the back of the truck, because we needed to space on the lift, but this gave me a good opportunity to see if my tank frame caused any trouble.. and it doesn’t! As you can see by the shiny square, it sits perfectly.   With the bed sitting right way up, I turned my attention to the rough corner patches , which have already been repaired once, probable a couple of owners ago.. This is the left side, but the one on the right is just as bad  When I starter cleaning it up, I could see the material underneath from the tail pan was gone as well. So now I have to figure out how fix that.  If I lived in the States I’d just order it all new, but the shipping cost and then the tax authorities triple the price, which in my opinion is not worth it. What I did do, is buy a complete bed floor of an 74 model, for less than buying 2 repair panels from LMC. It’s very rough, but it has enough good material to cut out repair panels. Whatever stays leftm will get scrapped.   the bed will have to come off, because I still want to treat the underside fully and the loose wiring and exhaust bracket are easier to fix when removed.
__________________
Feedback is always welcome! projects: 1969 Chevy C10 1950 GMC 100 1958 Chevy C60 Viking ratrod Last edited by Steve-W; 03-21-2017 at 01:15 PM. |
|
|
|
|
03-21-2017, 01:22 PM
|
#247 |
|
Registered User
Join Date: Dec 2013
Location: Purmerend, Netherlands
Posts: 1,657
|
Re: 1969 Custom/10 clean up
Well, you have to do what you have to do
Who are we to tell YOU what to do?? I only told you what I Personally should do, nothing more. You asked If you can hold the water out of between the two pieces, no problems! You can almost make all the patches with a hammer, a vice and a piece of wood. I think you're creative, so I don't see a problem for you to make all those patches yourself!!
__________________
Cheers!! Kees. 1959 Chevy Fleetside Longbed My build: http://67-72chevytrucks.com/vboard/s...d.php?t=643426 Kool Guyz CC Instagram: _King_Kustom_ |
|
|
|
|
03-30-2017, 04:51 PM
|
#248 | |
|
Registered User
Join Date: Aug 2010
Location: Hoofddorp, the Netherlands
Posts: 582
|
Re: 1969 Custom/10 clean up
Quote:
here we go; got some more repairs done to the bed. Not my cleanest job ever, but its only the bed, so I'm not to fussy about it. When I removed the old repair patch a big hole underneath showed up, so I first wanted to ad some structural strength to it. So I welded a 0.08" plate in there 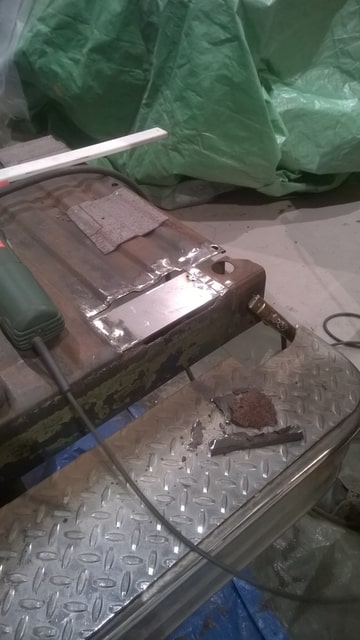 Then I cut out a piece from the '74 Bed and came to the conclusion that the shape of the humps are not the same as my '69 bed, there not as high and they're slightly closer together..bummer, but I had to make do. So I ligned them up as good as I could and welded them in.   Here is the left side open  And repaired  Then I turned my attention to the front mounting bolt holes, which were al rotten. I took two fat body rings and welded those in. again not the most esthetic looking, but its solid an gets the job done.   More holes to close, but gotta pick up a new MIG bottle as I have depleted the current one
__________________
Feedback is always welcome! projects: 1969 Chevy C10 1950 GMC 100 1958 Chevy C60 Viking ratrod |
|
|
|
|
|
04-01-2017, 01:08 PM
|
#249 |
|
Registered User
Join Date: Aug 2010
Location: Hoofddorp, the Netherlands
Posts: 582
|
Re: 1969 Custom/10 clean up
Seeing my bed was laying back on the truck for the time being, I figured we might fit the side panels.
Just to see how it lines up etc., so here’s the right side fitted  Left side  Pretty stoked about the alignment, even though it says “made in Taiwan” on the box Only the right panel had a ding in it, right at the bottom end below the tail light. This caused the tailgate hinge not to fit correctly and I had to remove some material to get it in. Strangely enough the left side hinge also wouldn’t go in without a fight.  On that right side I even had to cut away more because even the bolt got caught behind the edge.  Still needs some alignment, but it’s in   Now I’m going to make my own bumper, have some ideas so I’ll put something together and see if it turns out as good as it looks in my mind . those propane tanks sticking out at the bottom are really ugly
__________________
Feedback is always welcome! projects: 1969 Chevy C10 1950 GMC 100 1958 Chevy C60 Viking ratrod |
|
|
|
|
04-03-2017, 10:50 AM
|
#250 |
|
Registered User
Join Date: Aug 2010
Location: Hoofddorp, the Netherlands
Posts: 582
|
Re: 1969 Custom/10 clean up
As promised I welded together some metal, which in my head would look good...but it's like Internet dates, the real deal can be horrifying!
I had 4 pieces lying around with about a 35 degrees bent in them and along strip of 2" wide. I welded it on the inside  here the ouside  and then I test fitted it. at this stage I still thought it kinda looked ok, but I still had to fill the gaps   I had a choice, just continue and think about fitment and making corners later, or immediately start molding and bending. I decided for the first option...  yugh! I was hoping to get rid of the whole clunky look..but at this stage I'm ready to scrap it. But I'll see it though, I still have to make space in the middle for the license plate and make the ends. I was thinking about letting the bottom edge curve up towards the ends. Friday my mate will be there to help and he's pretty creative, so i'll ask for his opinion as well.
__________________
Feedback is always welcome! projects: 1969 Chevy C10 1950 GMC 100 1958 Chevy C60 Viking ratrod |
|
|
|
 |
| Bookmarks |
| Tags |
| c10, europe, netherlands, rebuild, swapped |
|
|


 Linear Mode

