
|
 04-24-2019, 07:54 AM
|
#1051 |
|
Registered User
Join Date: Jan 2013
Location: Leonardtown, MD
Posts: 1,633
|
Re: 55 Wagon Progress
Thanks for the comments fellas! On these grills, to clarify, the smaller (tweeters) use a smaller opening pattern (more holes per inch) than the midrange speaker next to them, so they would appear the same proportionally. McMaster Carr sells a sample kit of the mesh to help in picking out the size, p/n is 9231T11. For the sub we used 5 x 5 mesh (5 openings per inch) p/n 85385T31. For the midrange, 8 x 8 mesh, p/n 85385T42. For the tweeters, 10 x 10 mesh, p/n 85385T48. The grill for the sub will have multiple pressings, one to include a recessed crest emblem. That one will be the test..
__________________
Robert |

|

|
|
04-28-2019, 01:21 AM
|
#1052 |
|
Registered User
Join Date: Nov 2016
Location: OP Kansas
Posts: 1
|
Re: 55 Wagon Progress
Hey Robert, I somehow lost track of you after I left CT and was wanting to see the results of the '55. It looks like you've made some excellent progress and as usual taught scores of people how it's done. Glad I found this post again and can follow you and your crew as you complete the most amazing build I've seen. Your attention to detail is unmatched.
|
|
|
|
|
04-28-2019, 09:58 PM
|
#1053 |
|
Registered User
Join Date: Jan 2013
Location: Leonardtown, MD
Posts: 1,633
|
Re: 55 Wagon Progress
John, thanks for checking in on our progress. Getting down to the nitty gritty now and should be doing some paint here in the coming weeks!!
__________________
Robert |
|
|
|
|
04-30-2019, 10:34 AM
|
#1054 |
|
Registered User
Join Date: Jan 2013
Location: Leonardtown, MD
Posts: 1,633
|
Re: 55 Wagon Progress
Had a busy weekend but didn't get anything done.
Saturday I went to the 15th annual Jalopyrama, this year it was held at the Talbot County Community Center in Easton, MD. I didn't get many pictures this year as there are far too many people taking pictures with much better cameras than I had (iPhone). This year's theme was a focus on vintage race cars, and the indoor arena was filled with dragsters, gassers, etc, as well as some of the nicest hot rods to be found on the East Coast. I did get a shot of my buddy Dirty Dave's gasser, which is basically his daily driver. Odd to see it indoors as much as he drives the wheels off it! haha.. 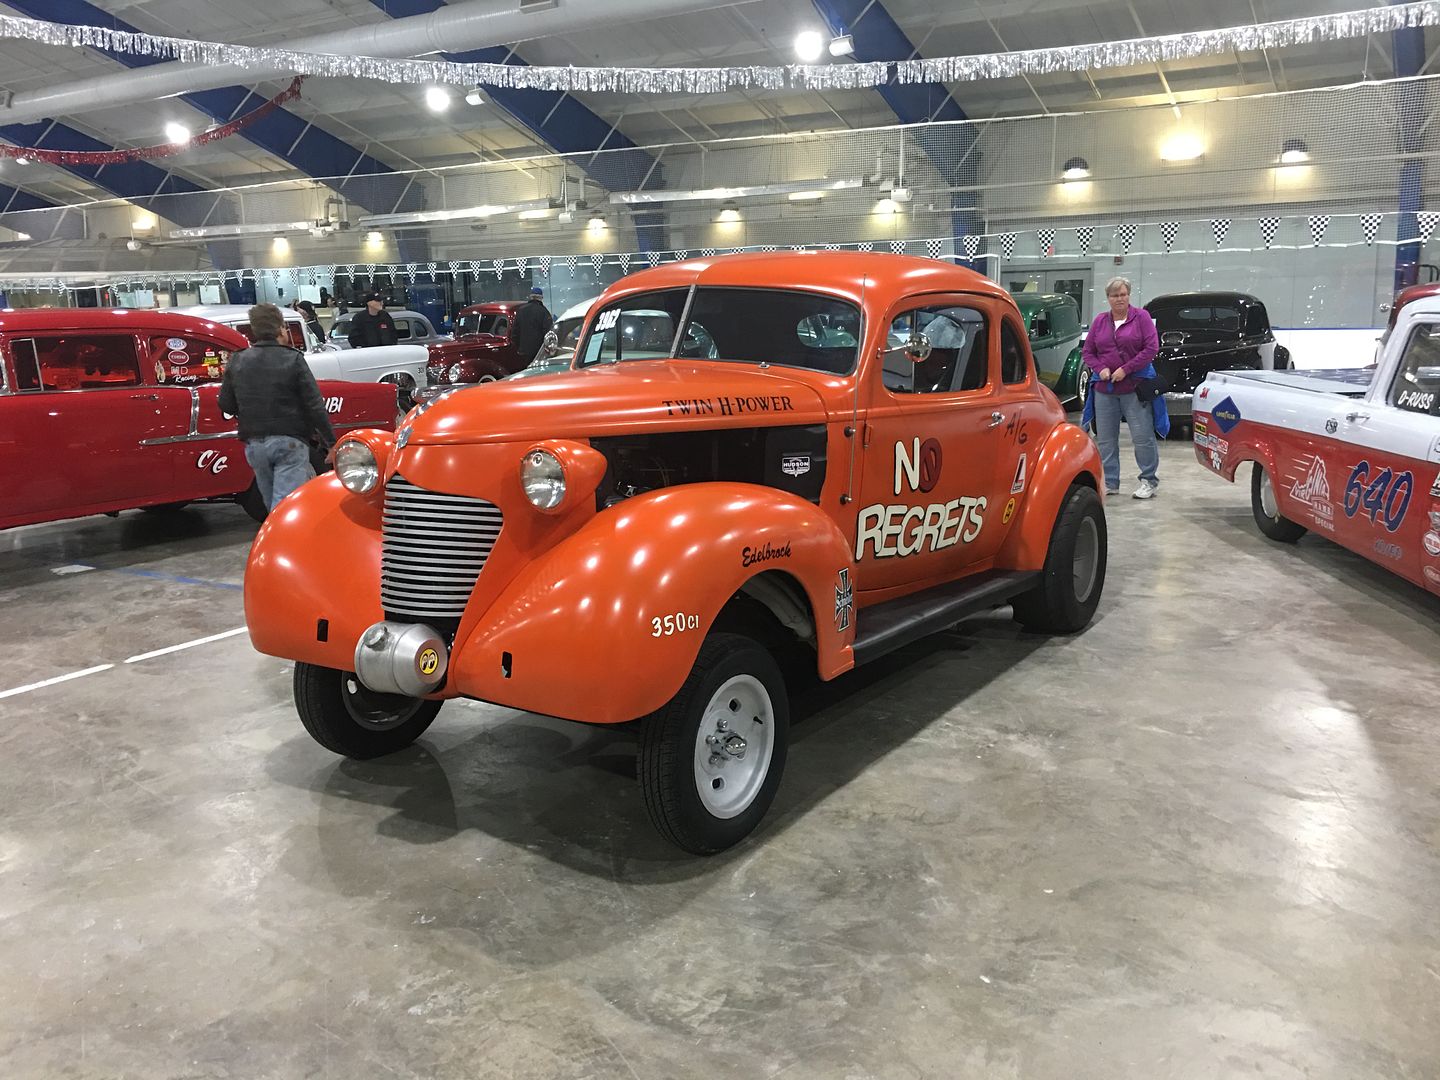 Next to it was the "Hamb Special", a vintage pickup classed race truck built for Bonneville, making it's debut on the salt last year. Owned by John Mullen of Lanexa VA, built by John and many of the members of the VA Hamb. My buddy Dave Russell gets the piloting duties on the salt, and we caught up at the show and talked shop. 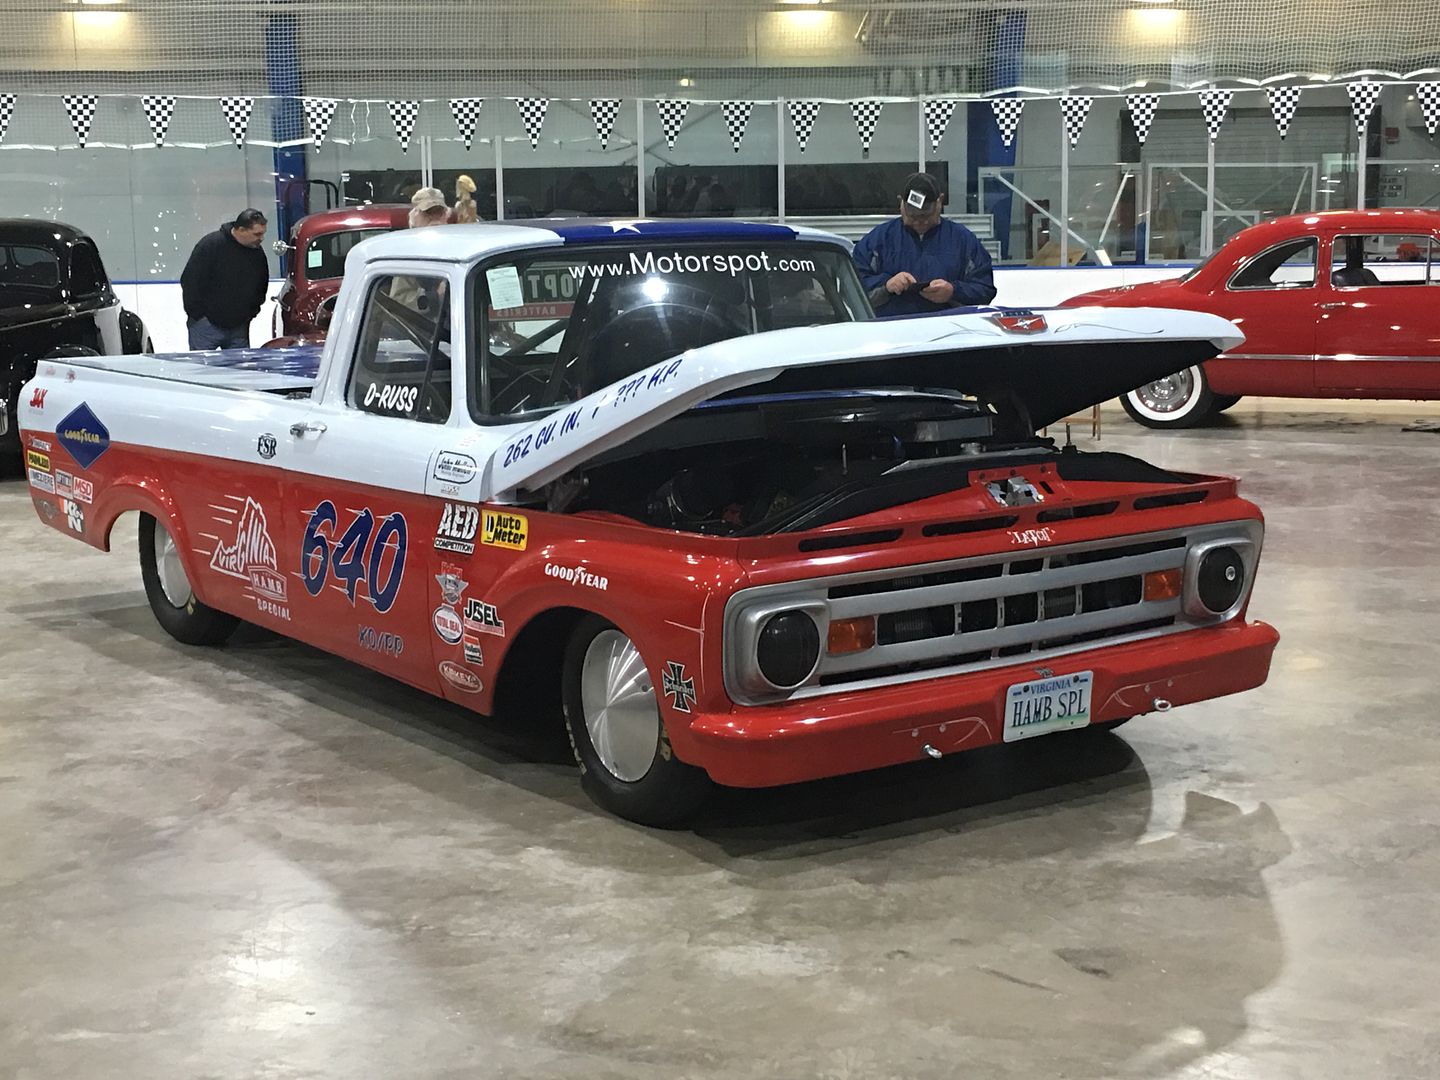 It has a 262 Ford 6 cylinder, but caught the attention of many of the racer's inside the building when it was being brought in. That idle didn't sound much like any 6 cylinder I've heard: https://www.youtube.com/watch?v=1ot0UTIhtv4 ….and I did get a picture for Joe Unger. This truck would look awesome in front of his Sinclair station in Perry..  Sunday was another car show, this one a bit more local for me, put on in downtown Leonardtown by the St. Mary's Rod and Classic Car Club to benefit Hospice and many other charitable organizations. We set up in front of John's shop, along with his Biederman truck, and a couple tables of our fabrications. Got a bit too much Sun, but really enjoyed getting out and talking to everyone about their projects. 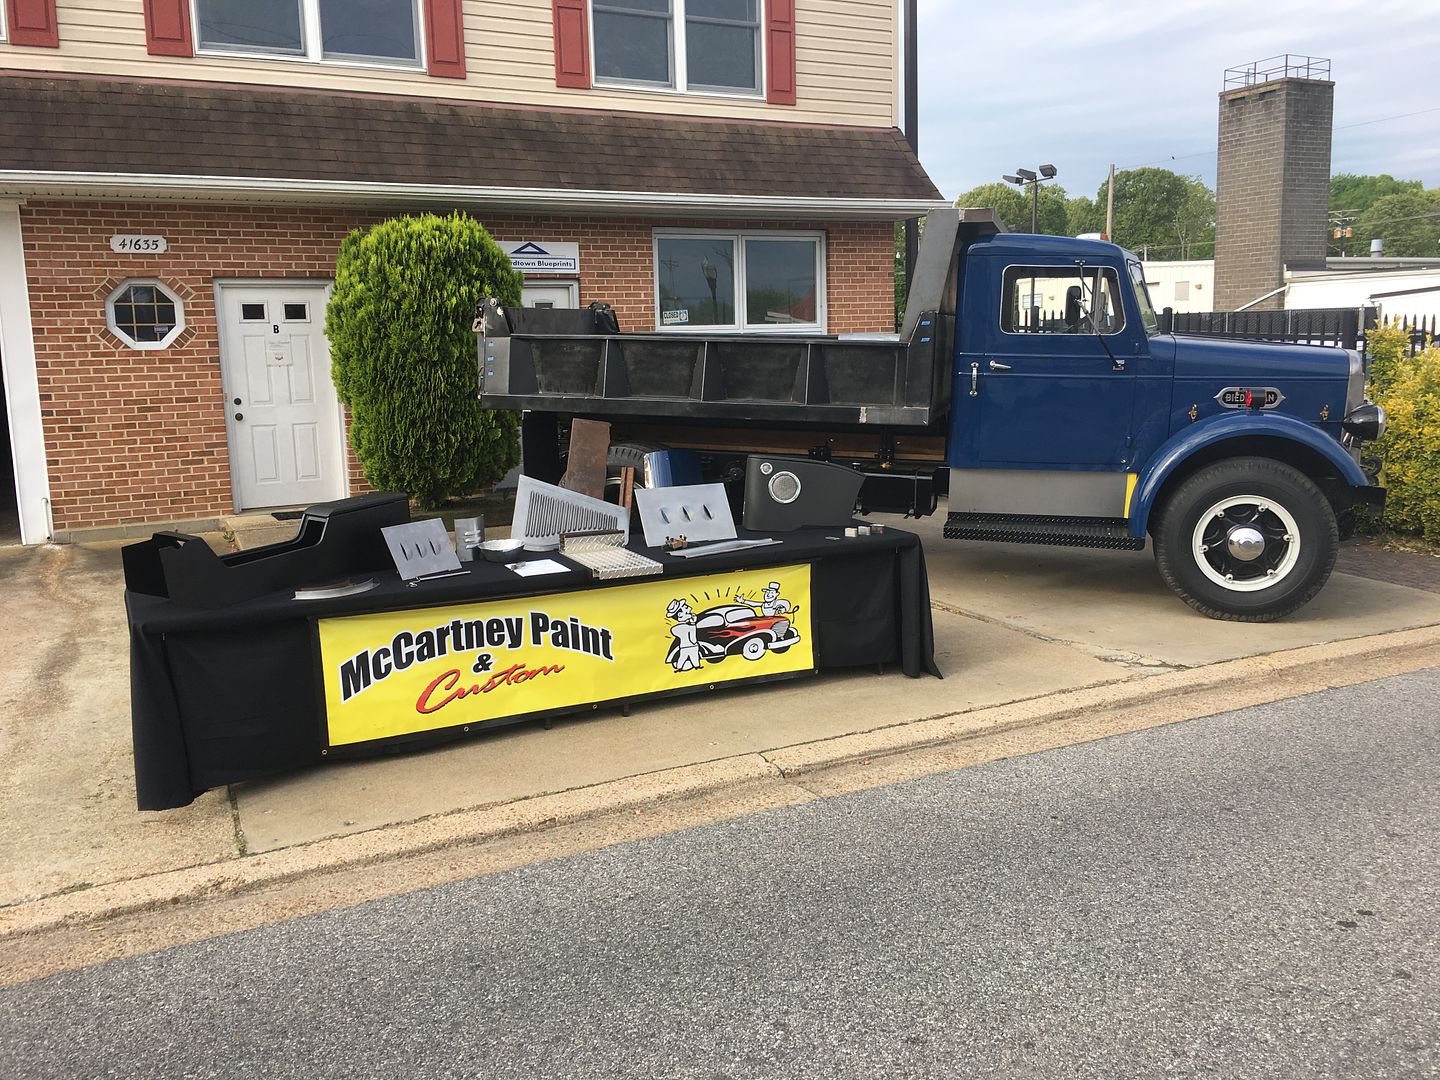 Last night was repair time for a dirt car. We had a severe fold/wrinkle to remove to get ready for next weekend, and with little in the means to "pull", we resorted to some MacGyver action on some Vise Grips... 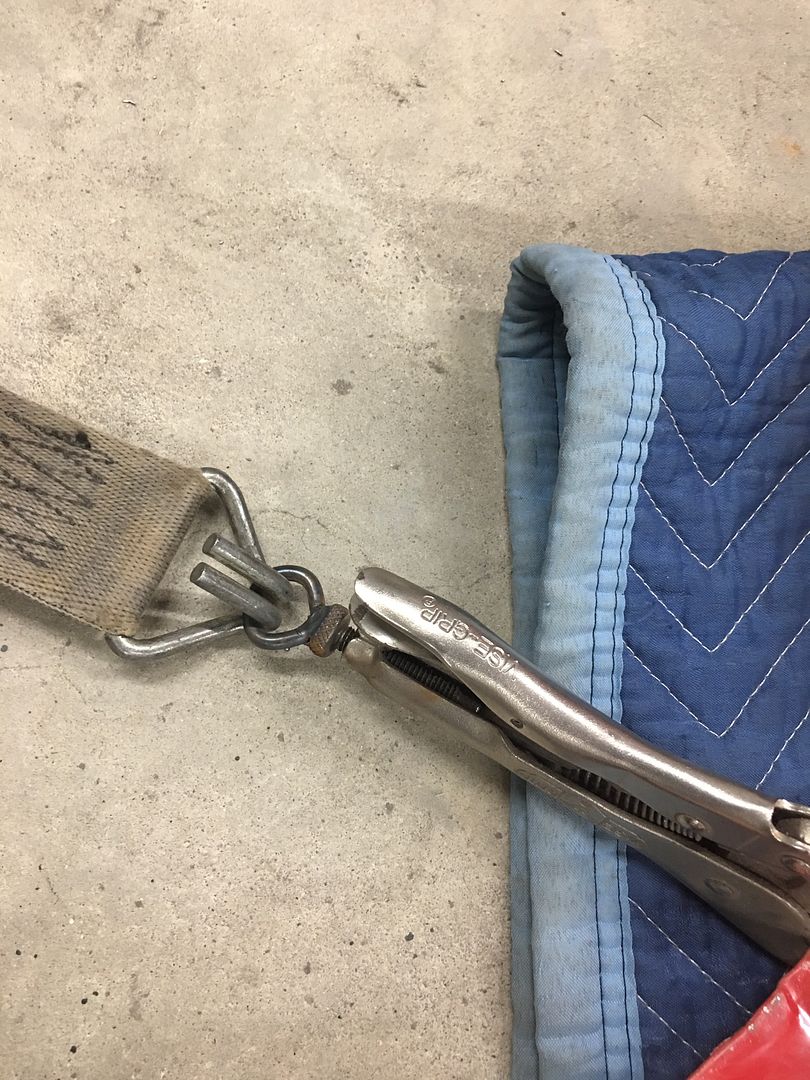 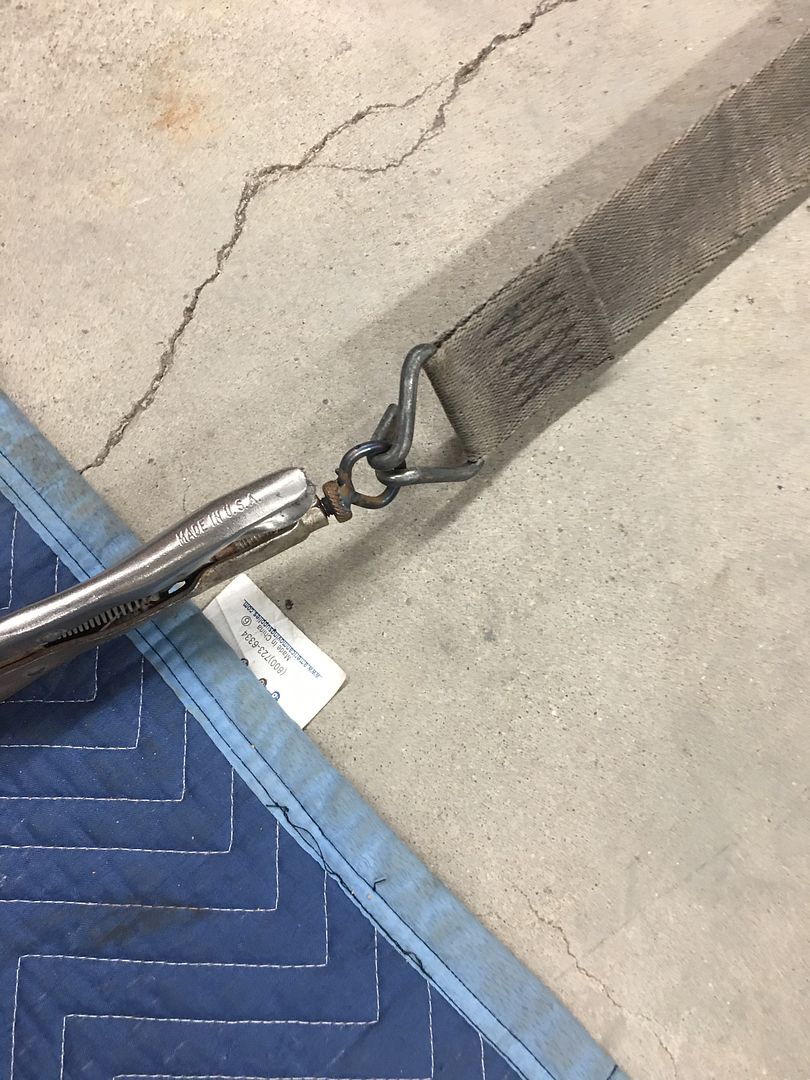  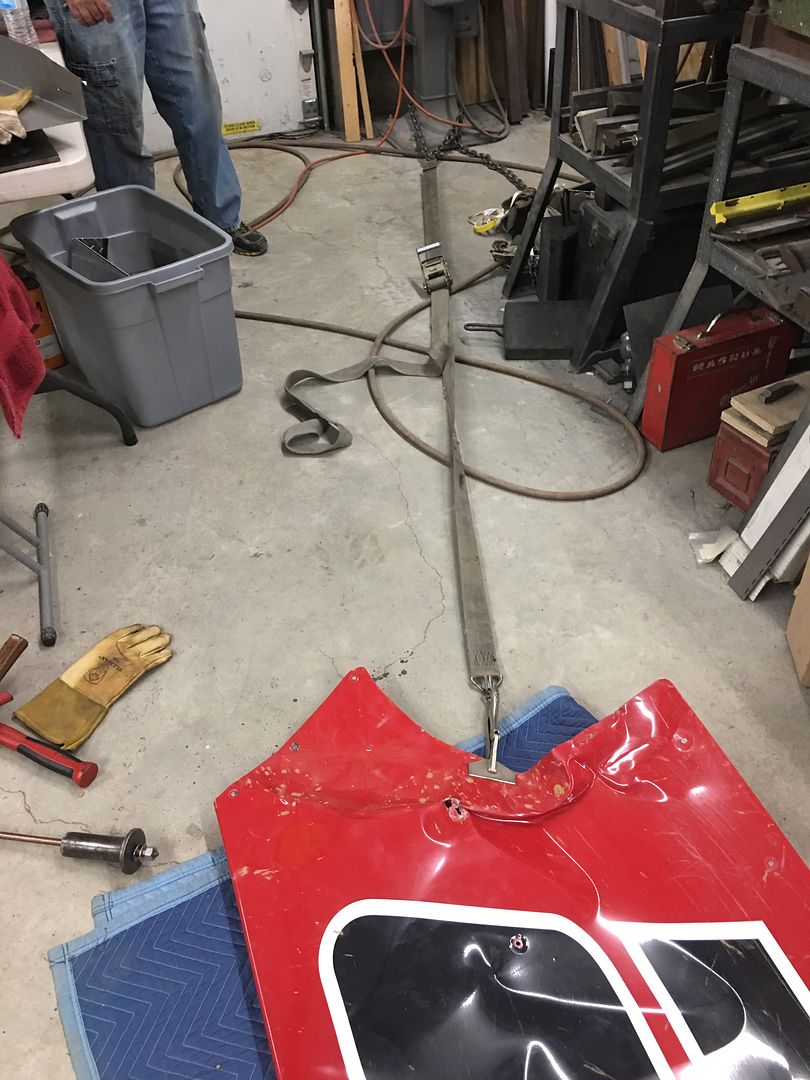 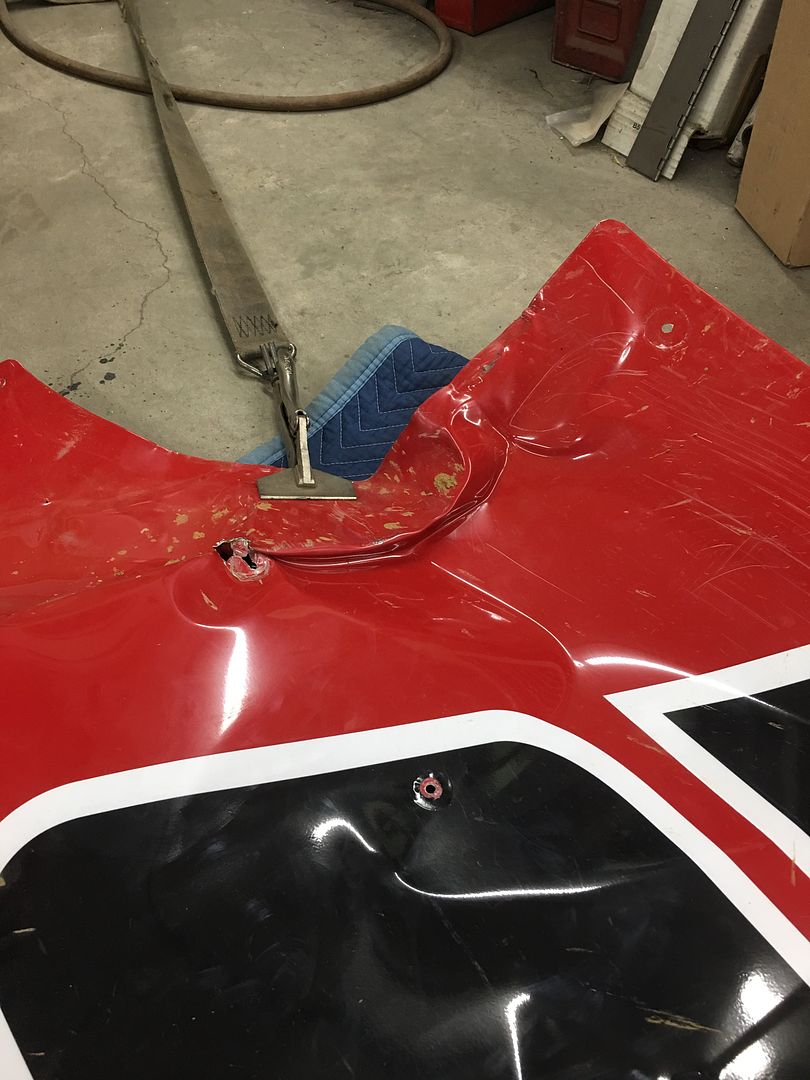 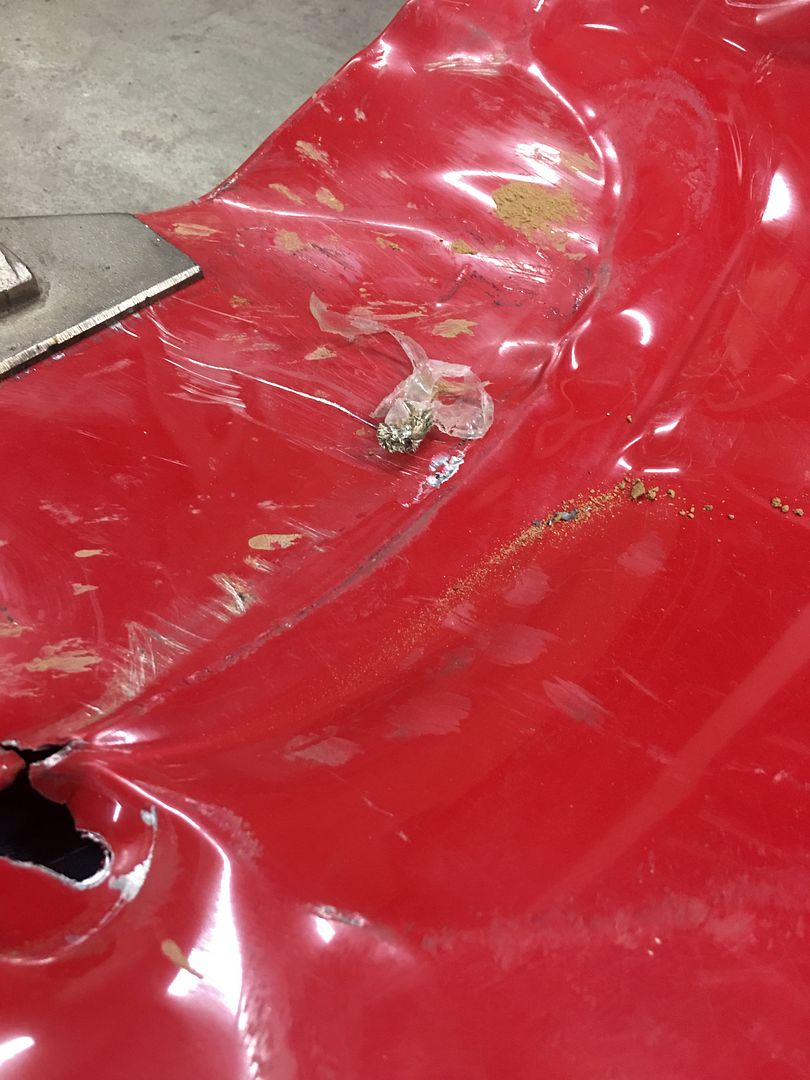 That should hold it for this weekend. 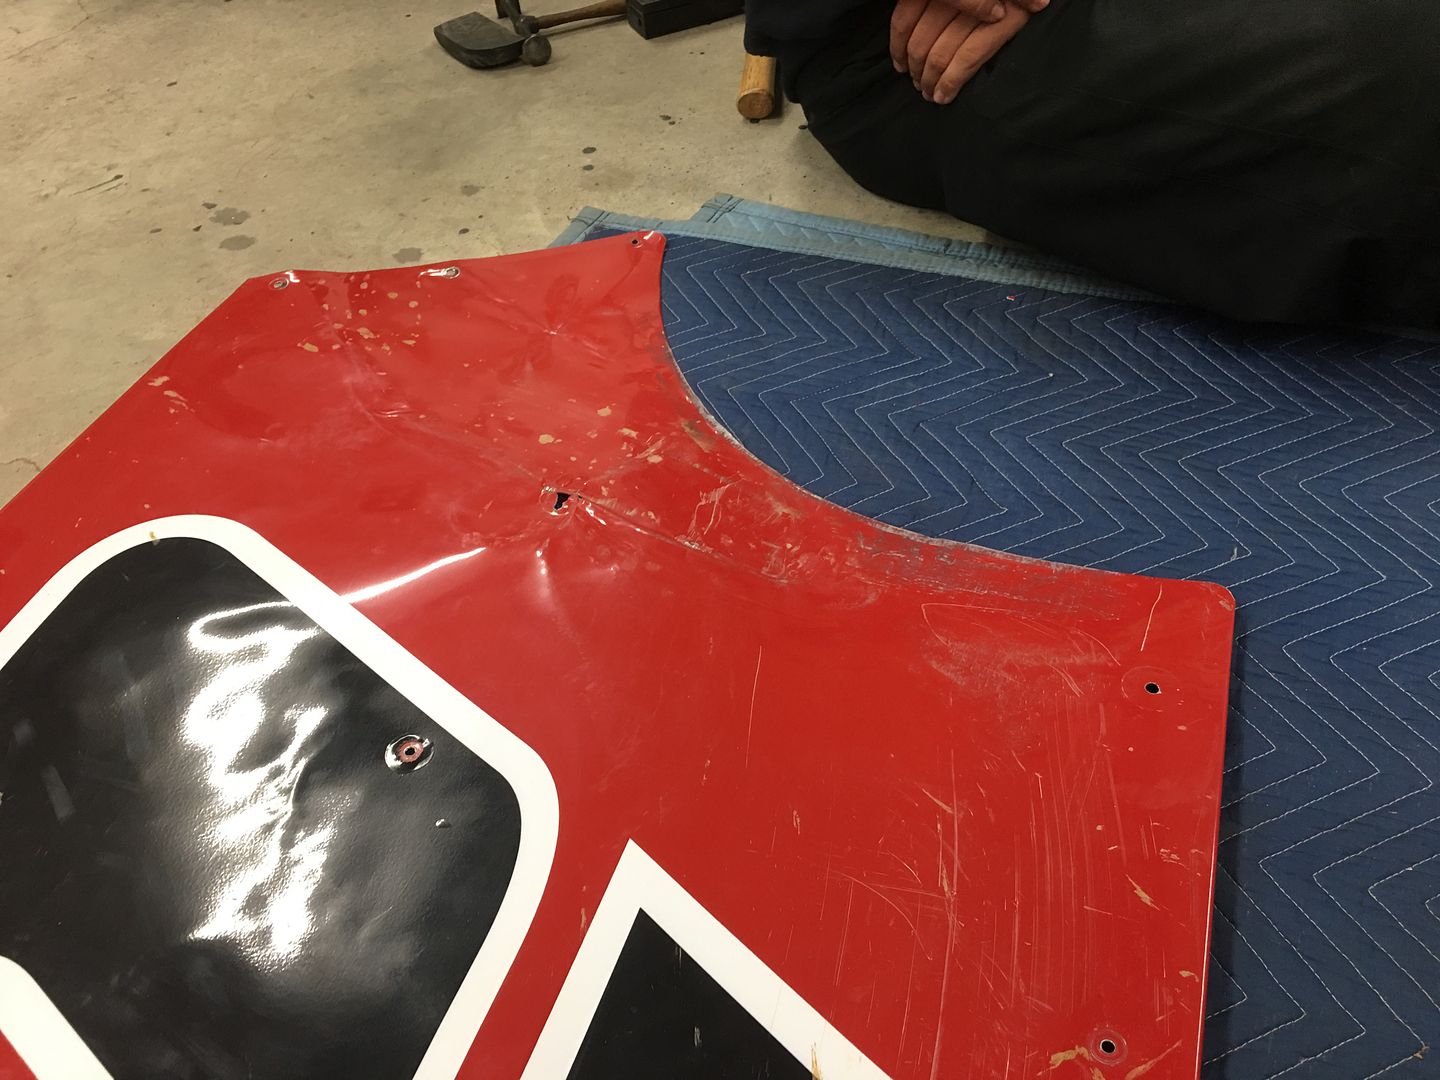 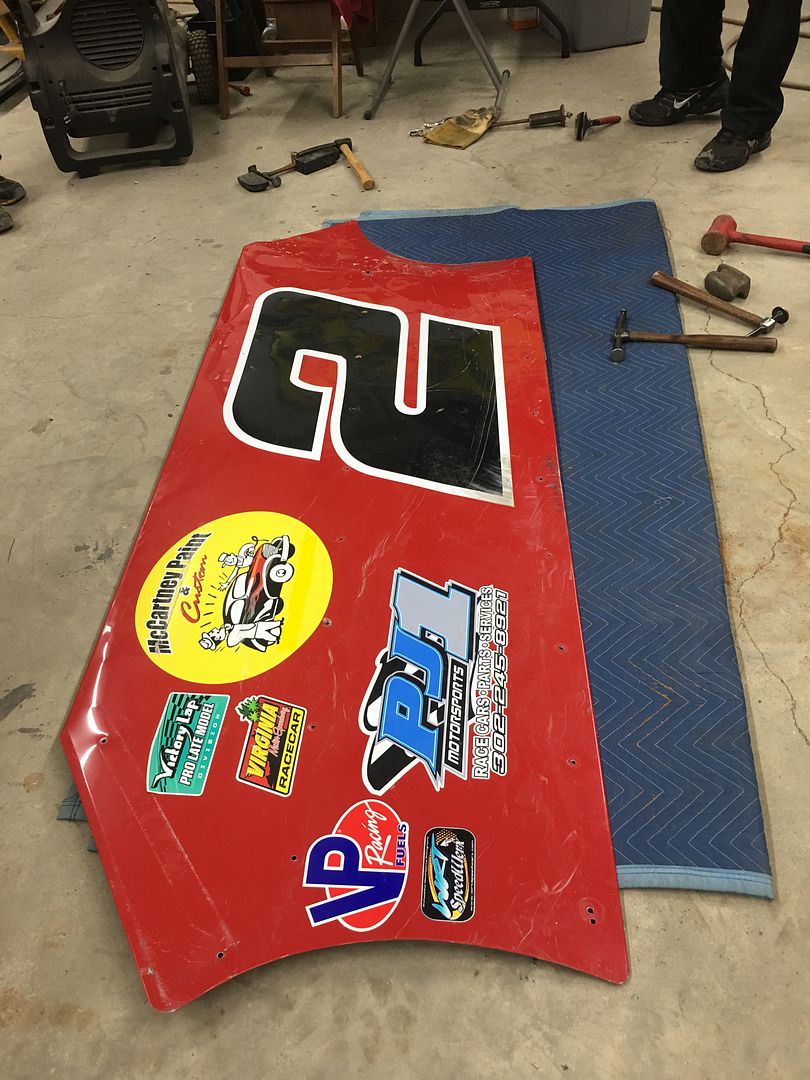
__________________
Robert |
|
|
|
|
04-30-2019, 10:53 AM
|
#1055 | |
|
Registered User
Join Date: Nov 2013
Location: Antioch, Ca.
Posts: 442
|
Re: 55 Wagon Progress
Quote:
__________________
Take Care Troy |
|
|
|
|
|
04-30-2019, 10:55 AM
|
#1056 |
|
Registered User
Join Date: Jan 2013
Location: Leonardtown, MD
Posts: 1,633
|
Re: 55 Wagon Progress
I believe those are for all the sponsors, yes.....from all over.
__________________
Robert |
|
|
|
|
04-30-2019, 02:22 PM
|
#1057 |
|
Post Whore
  Join Date: May 2015
Location: Alabama
Posts: 14,581
|
Re: 55 Wagon Progress
Sounds like you had a full weekend Robert....that salt truck looks great!...
__________________
Mongo...aka Greg RIP Dad RIP Jesse 1981 C30 LQ9 NV4500..http://67-72chevytrucks.com/vboard/s...d.php?t=753598 Mongos AD- LS3 TR6060...http://67-72chevytrucks.com/vboard/s...34#post8522334 Columbus..the 1957 IH 4x4...http://67-72chevytrucks.com/vboard/s...63#post8082563 2023 Chevy Z71..daily driver |
|
|
|
|
05-12-2019, 01:04 AM
|
#1058 |
|
Registered User
Join Date: Jan 2013
Location: Leonardtown, MD
Posts: 1,633
|
Re: 55 Wagon Progress
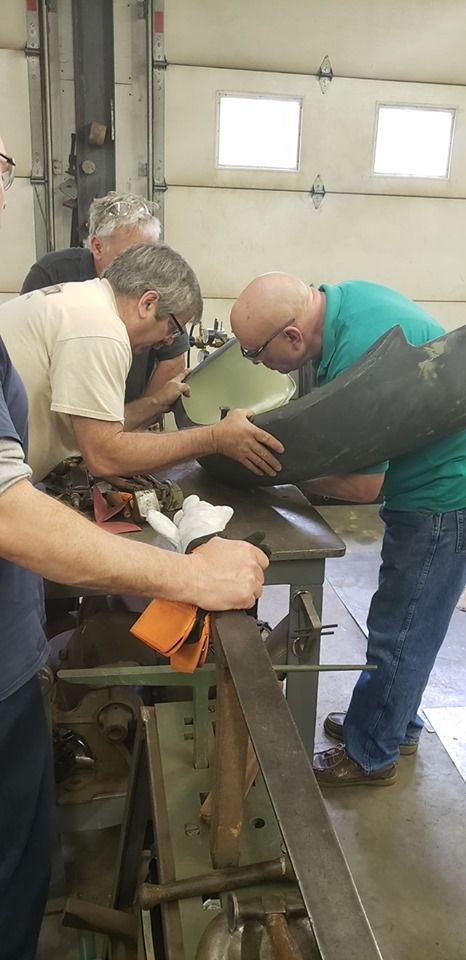
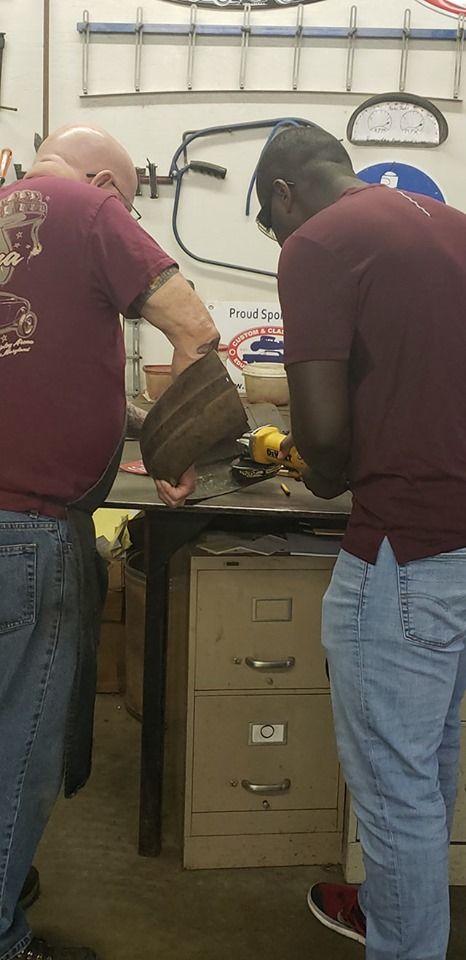
So last weekend I went to Ron Yeager's shop in Kingsville, MD for a metalshaping workshop. Reconnected with some old friends and made some new ones.. Thanks to Ron for opening his shop so we could all learn some new tricks and methods..
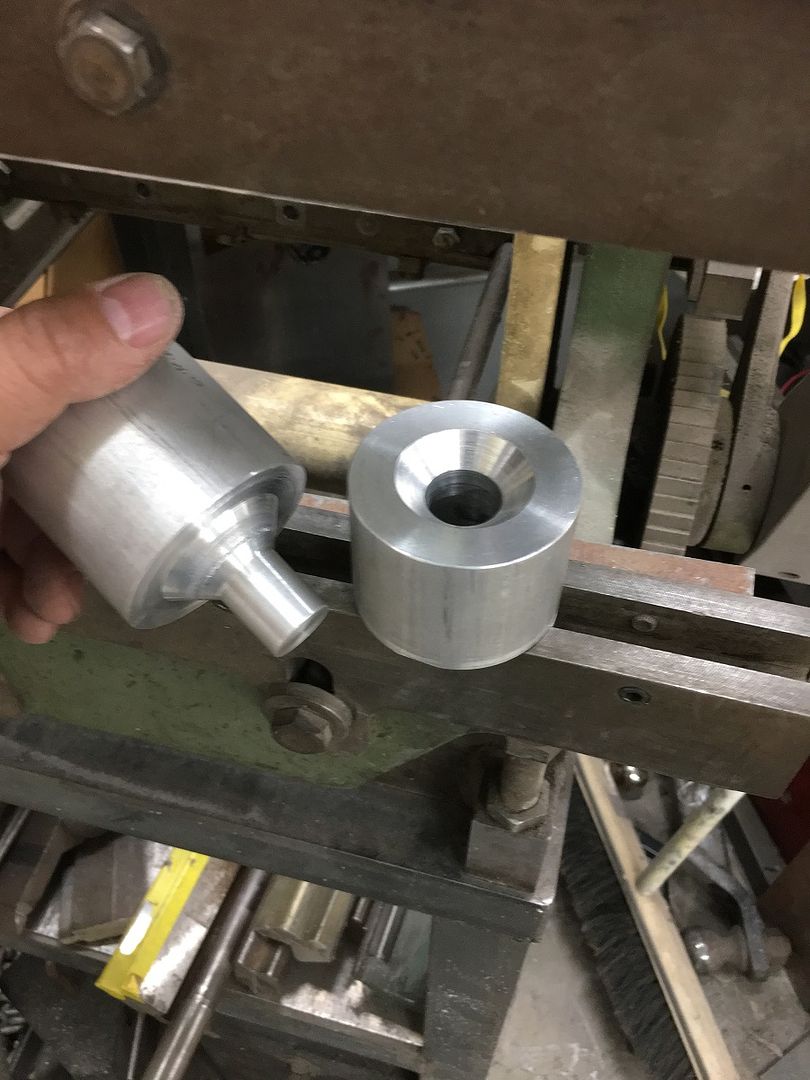
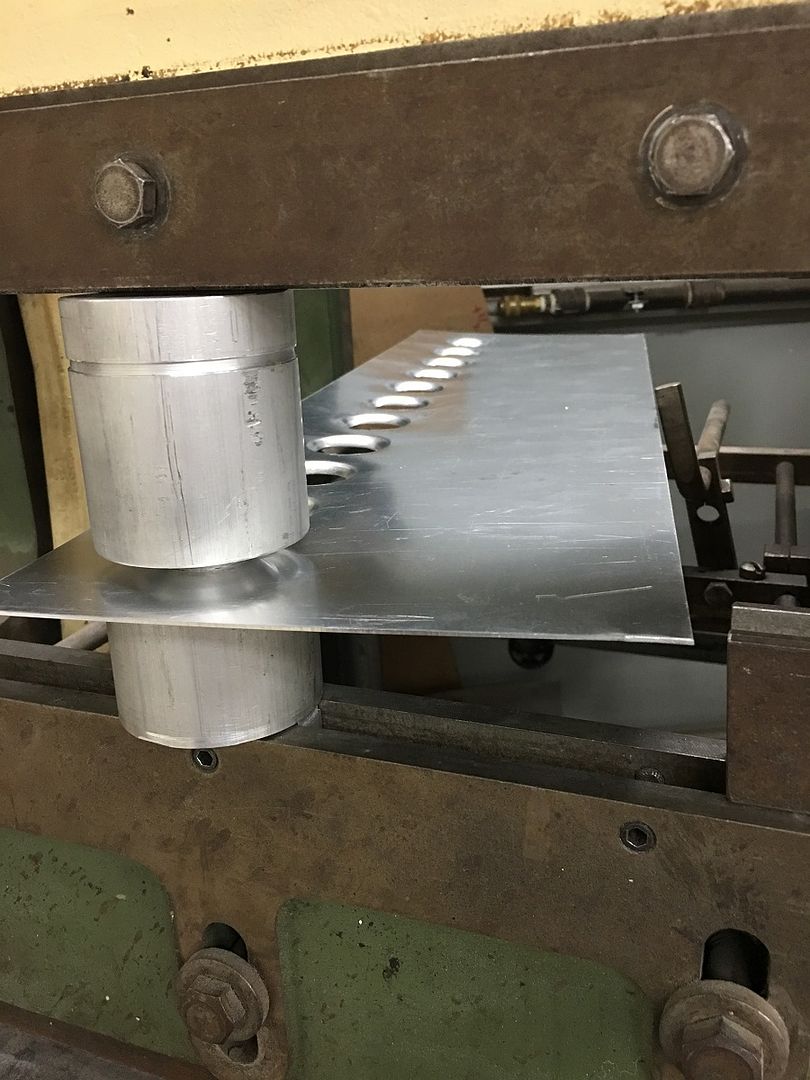
      Today I got another speaker trim ring put together.....this one for the sub in the cargo area of the wagon. We planned on a recessed crest in the stainless mesh, so the mesh was aligned in our aluminum plates and pressed in the Diacro press brake using flattening dies. 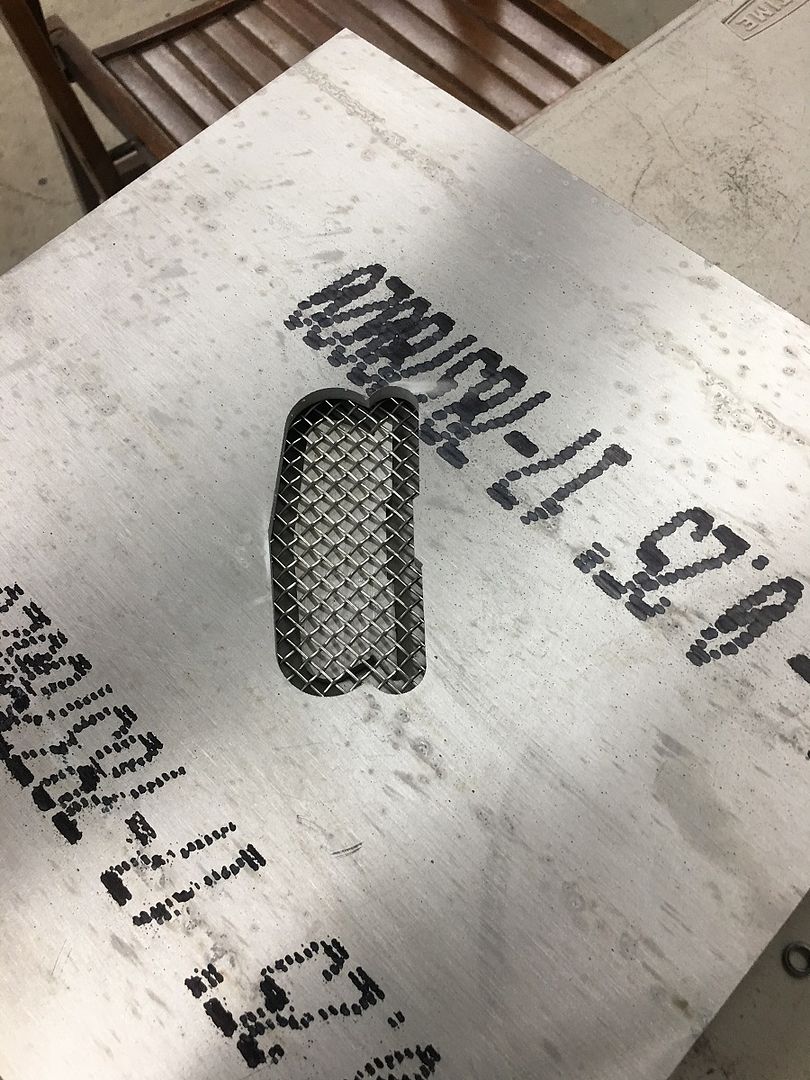 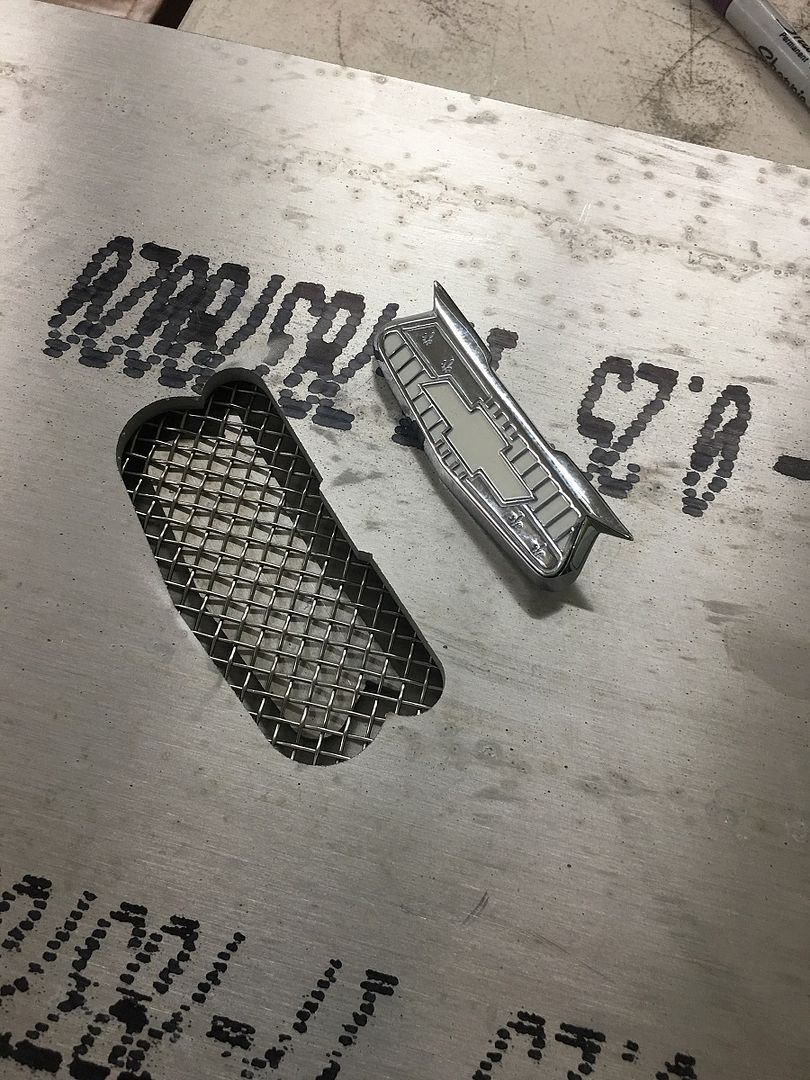 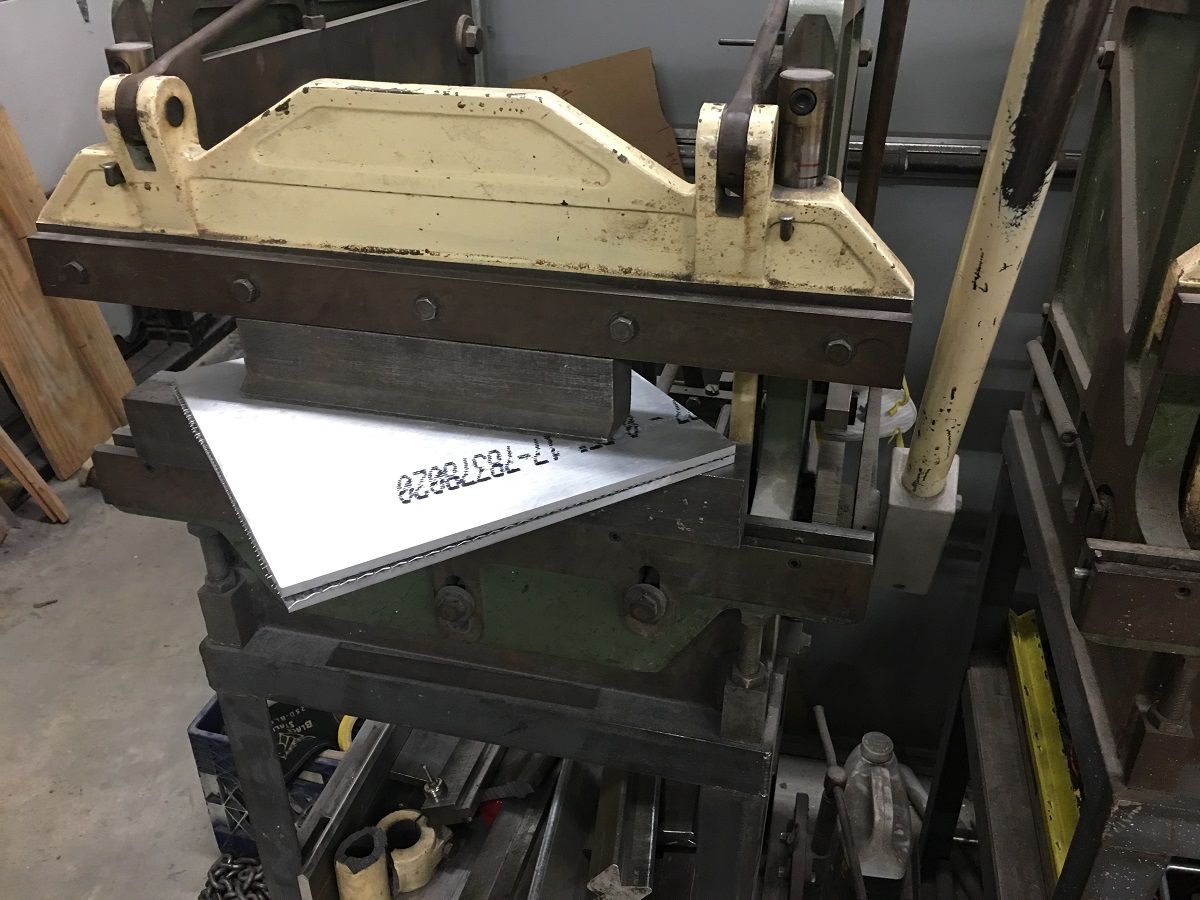 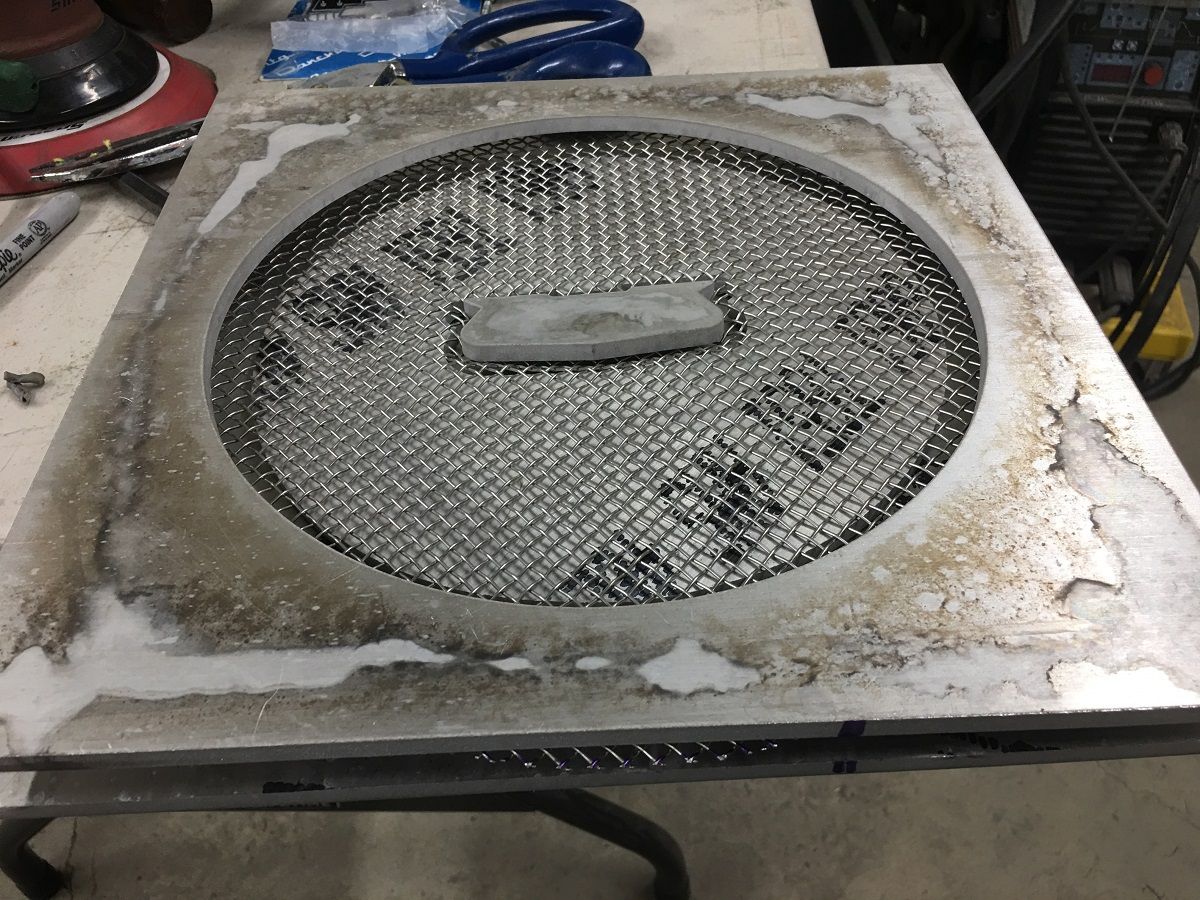 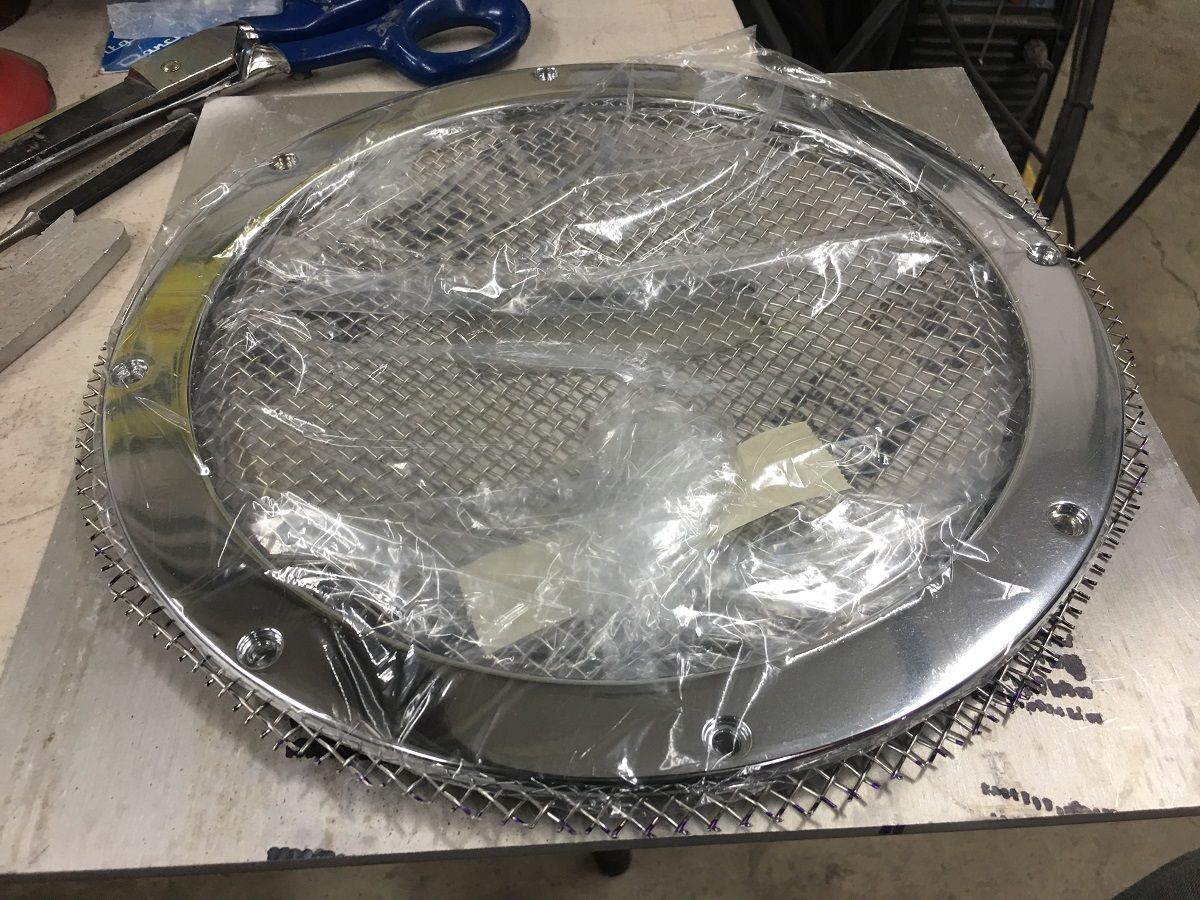 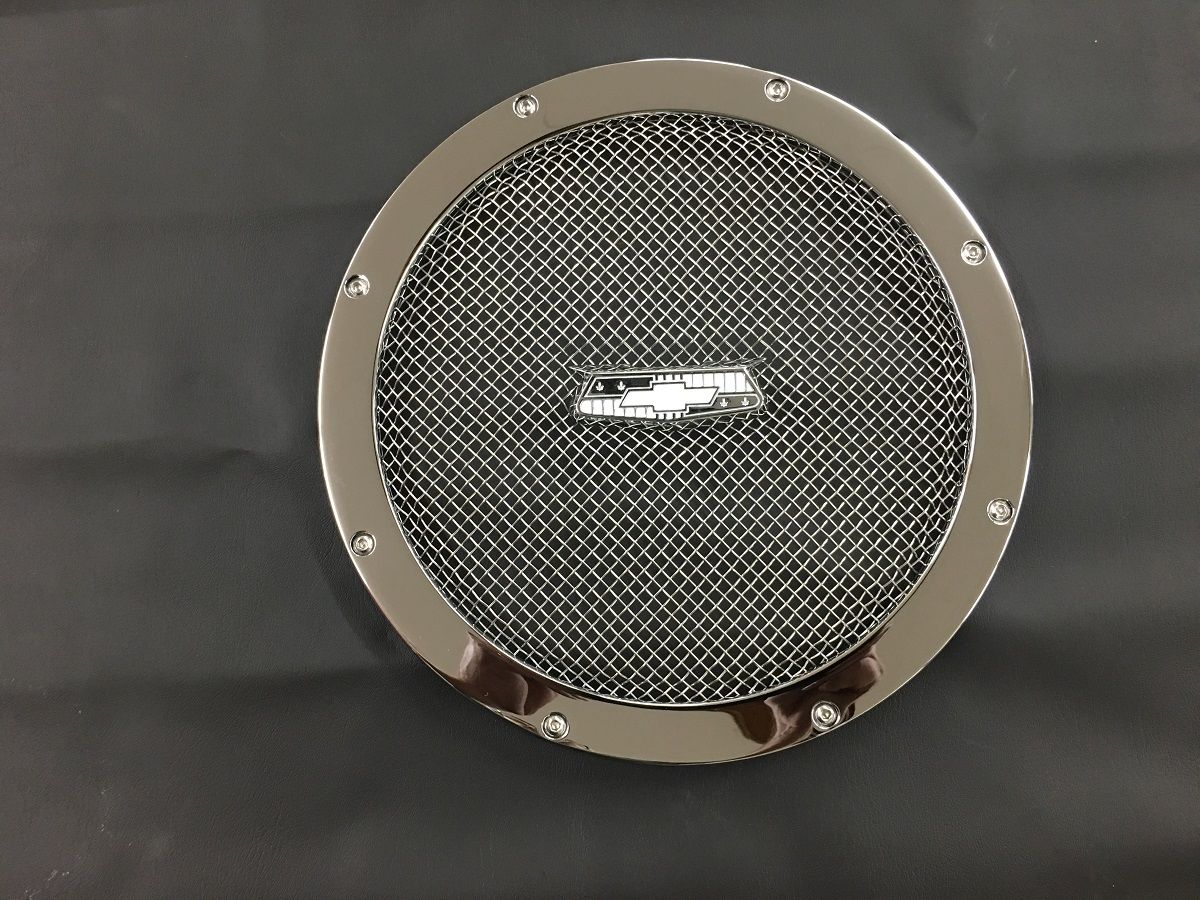 Video Version.... https://www.youtube.com/watch?v=IWMT...ature=youtu.be .
__________________
Robert |
|
|
|
|
05-12-2019, 07:00 AM
|
#1059 |
|
Post Whore
Join Date: May 2015
Location: Alabama
Posts: 14,581
|
Re: 55 Wagon Progress
outstanding detail work on the speaker Robert!!!!!....
__________________
Mongo...aka Greg RIP Dad RIP Jesse 1981 C30 LQ9 NV4500..http://67-72chevytrucks.com/vboard/s...d.php?t=753598 Mongos AD- LS3 TR6060...http://67-72chevytrucks.com/vboard/s...34#post8522334 Columbus..the 1957 IH 4x4...http://67-72chevytrucks.com/vboard/s...63#post8082563 2023 Chevy Z71..daily driver |
|
|
|
|
05-12-2019, 09:25 AM
|
#1060 |
|
Senior Member
Join Date: Mar 2011
Location: West Plains, Missouri
Posts: 7,553
|
Re: 55 Wagon Progress
Robert, beautiful work...Jim
__________________
my build thread: http://67-72chevytrucks.com/vboard/s...d.php?t=459839 Jimbo's long bed step build:http://67-72chevytrucks.com/vboard/s...t=464626<br /> |
|
|
|
|
05-17-2019, 01:15 PM
|
#1061 |
|
Registered User
Join Date: Jan 2013
Location: Leonardtown, MD
Posts: 1,633
|
Re: 55 Wagon Progress
Thanks for all the comments guys!
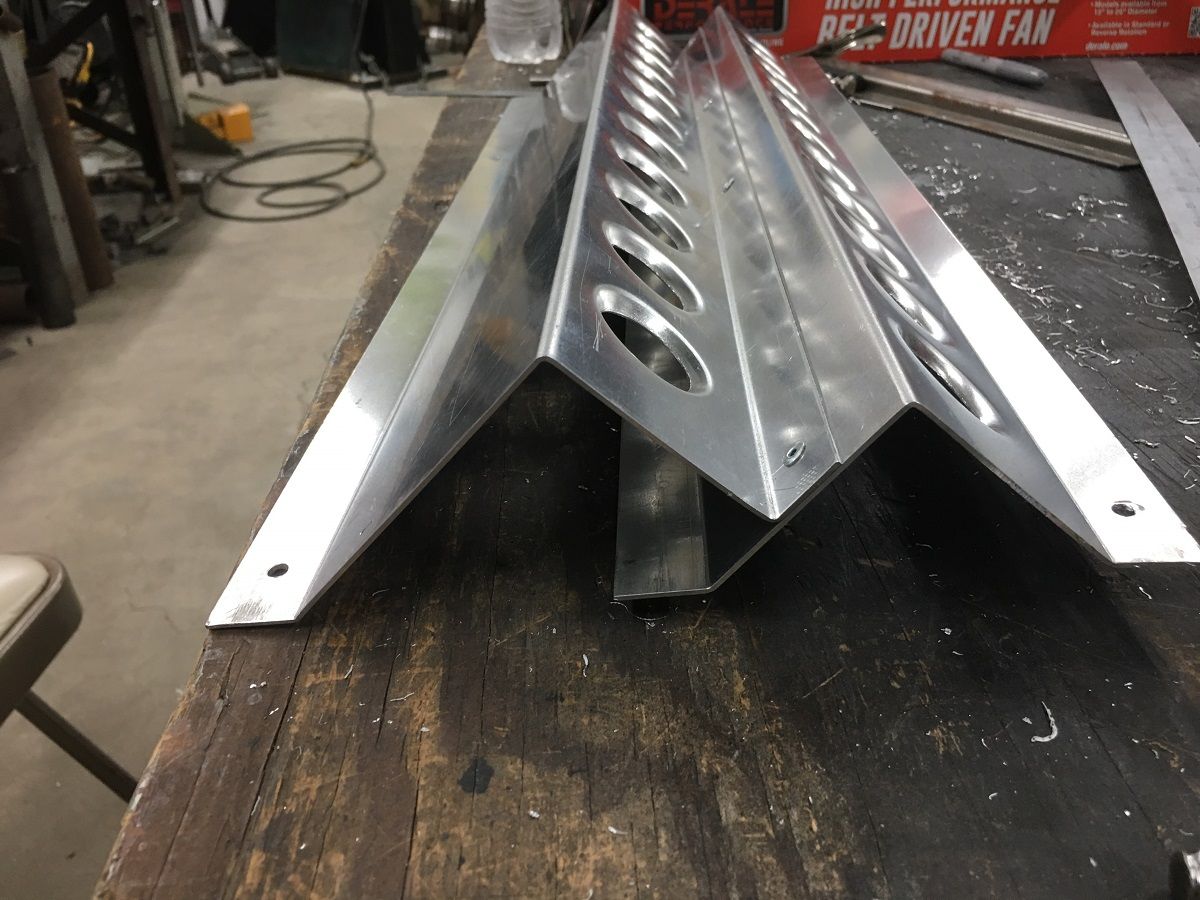
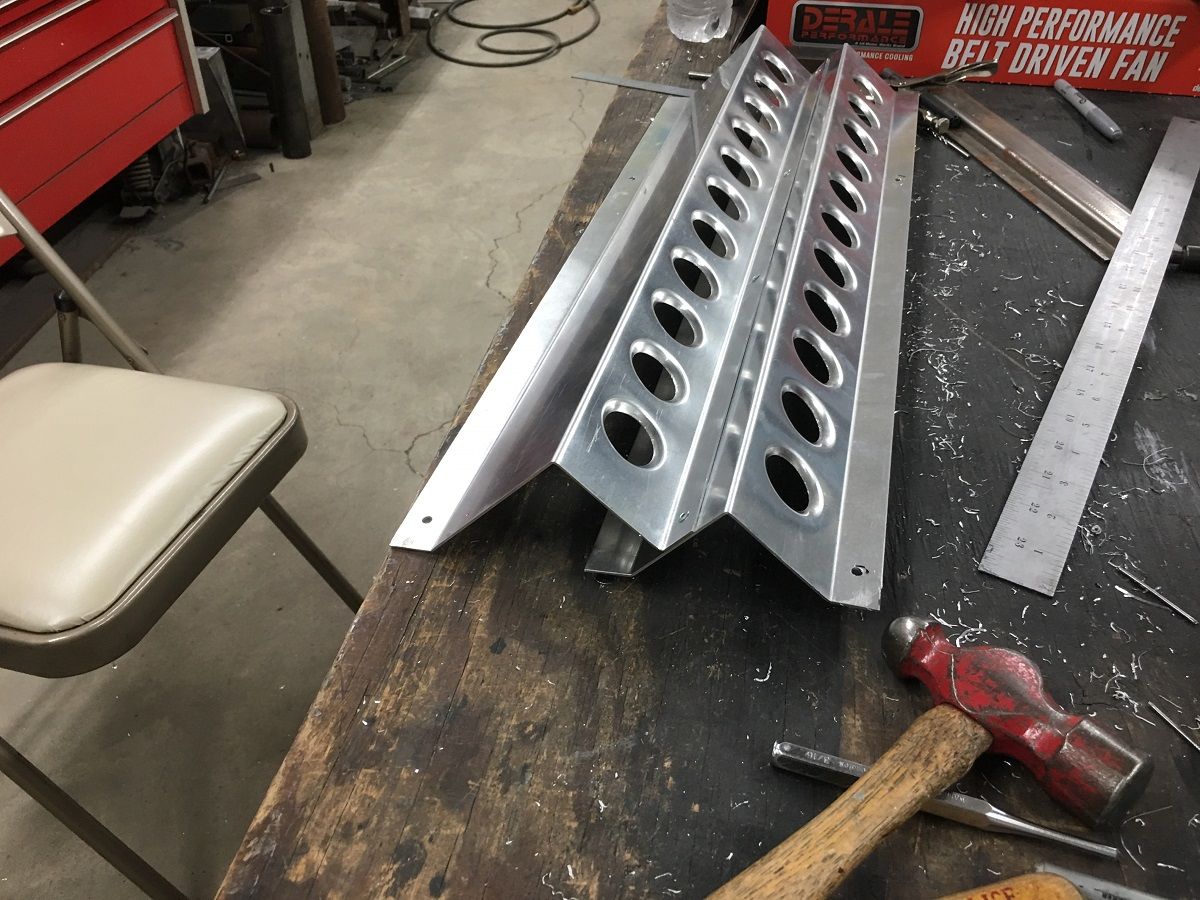
Spent last night getting an assembly line going to get the rest of the speaker grills assembled. Just say no to plastic speaker grills! 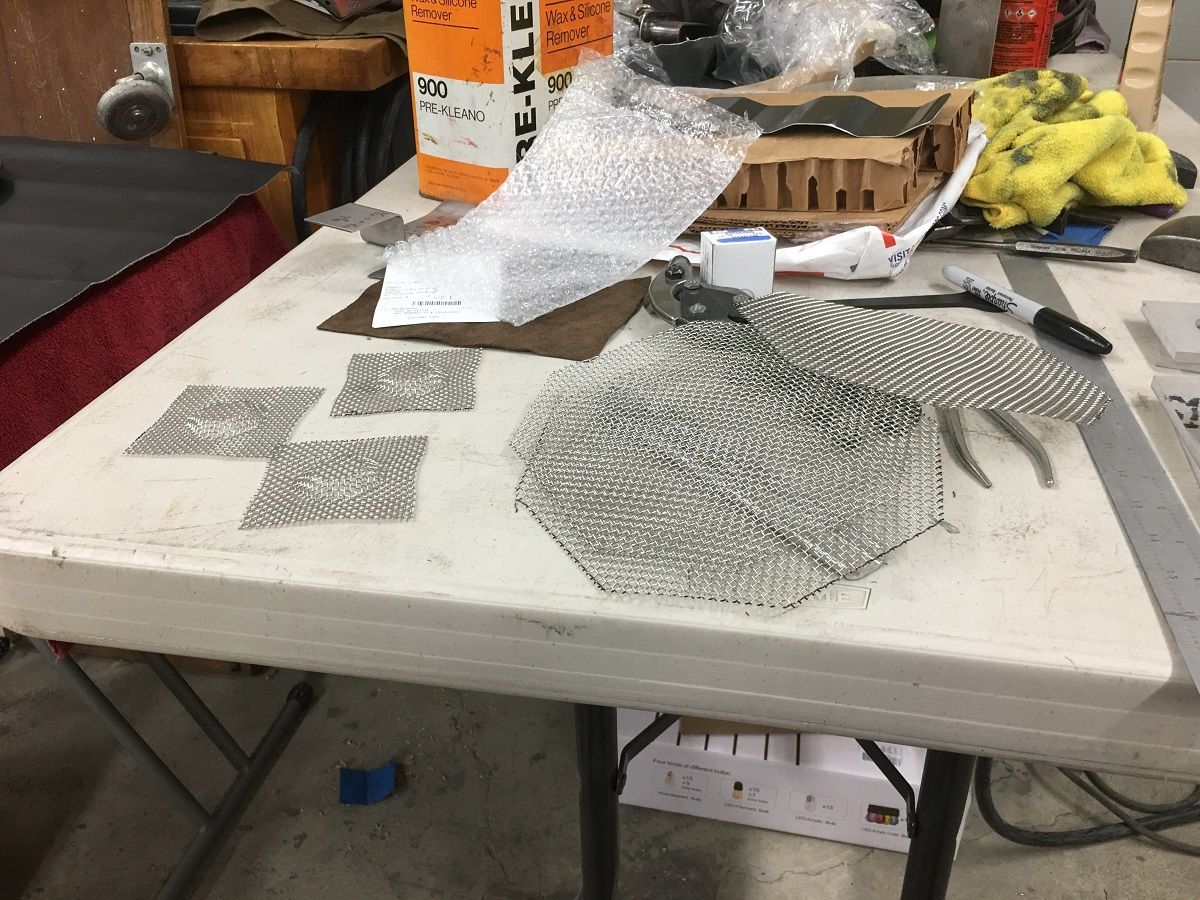 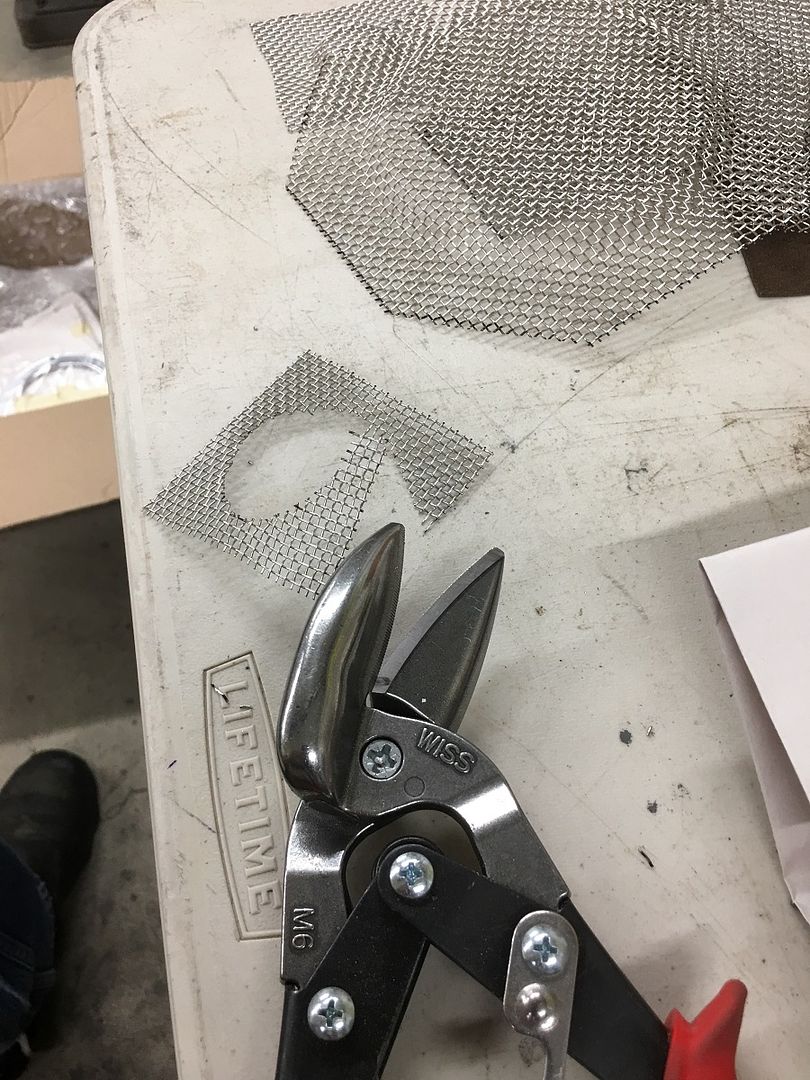 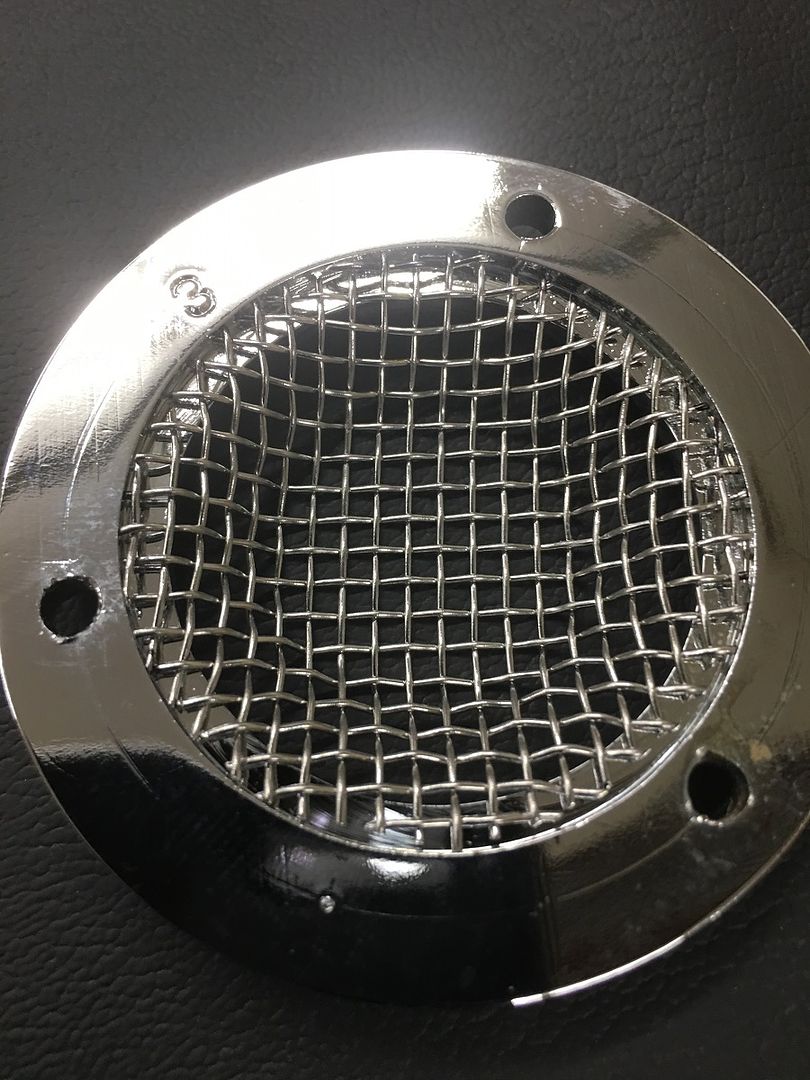 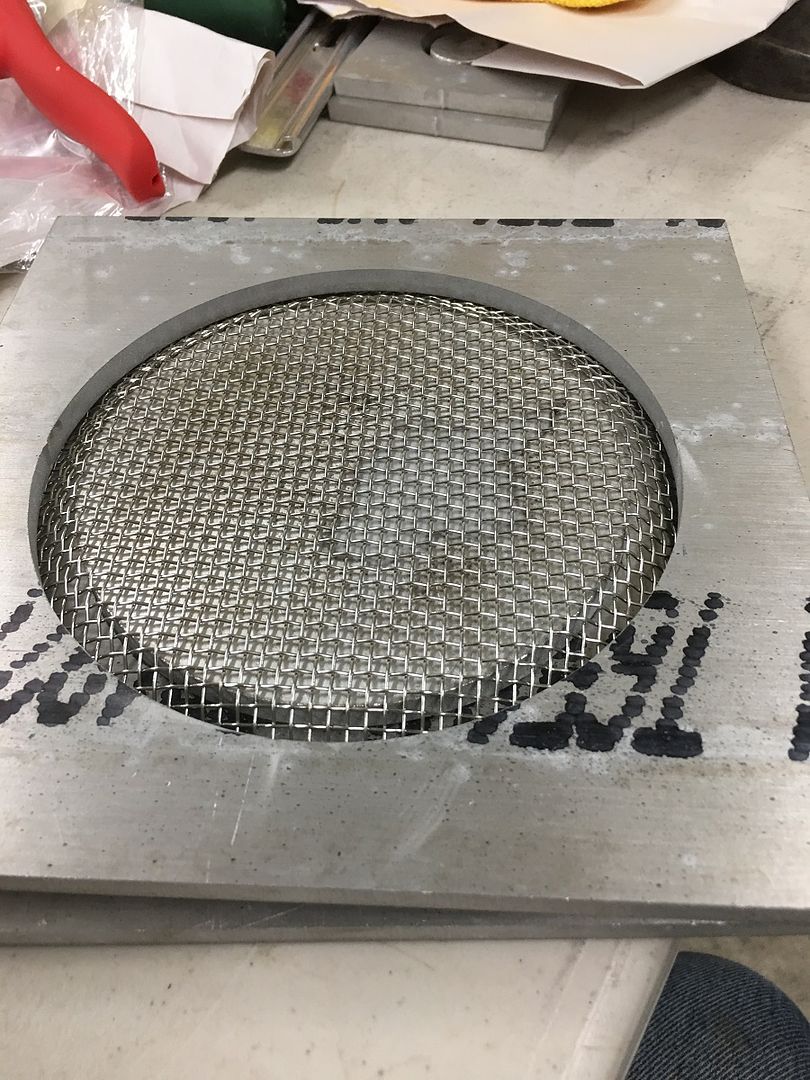 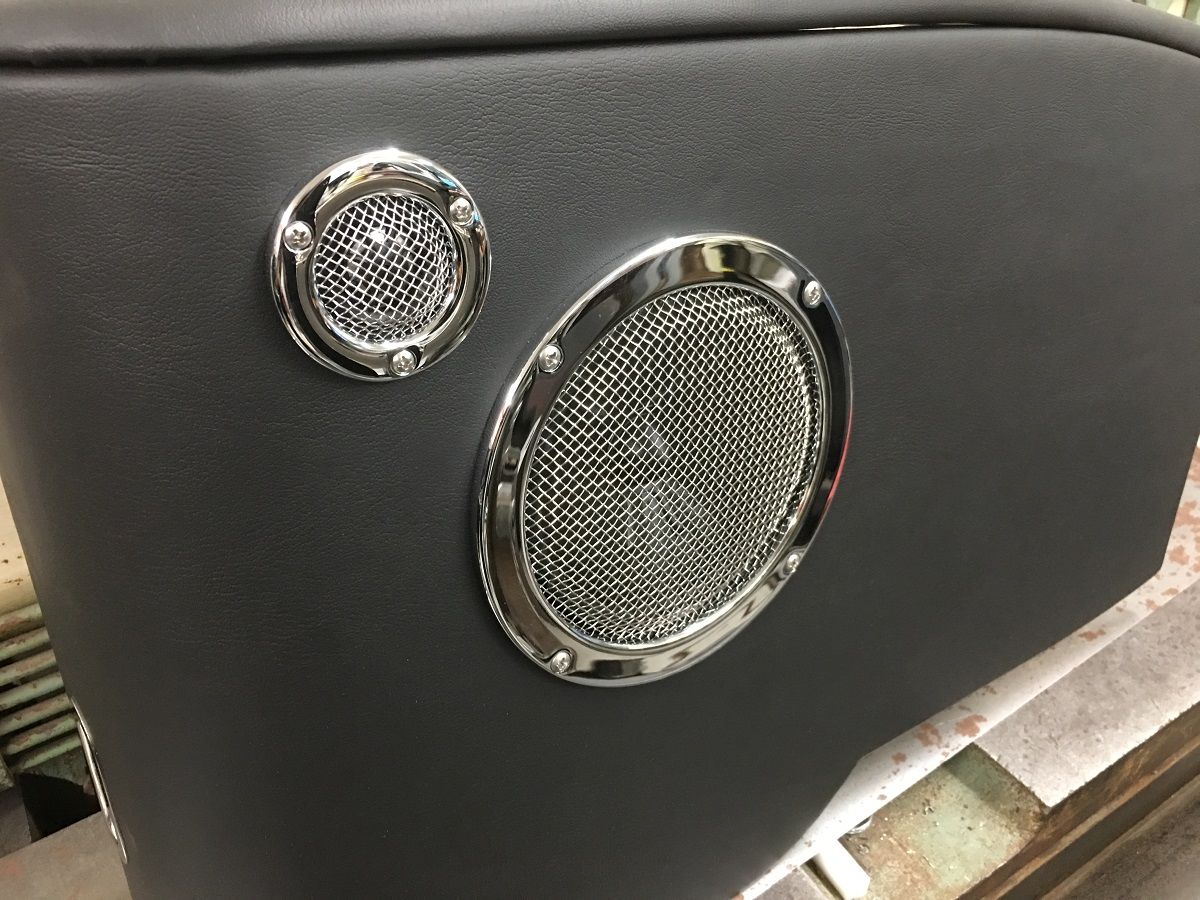 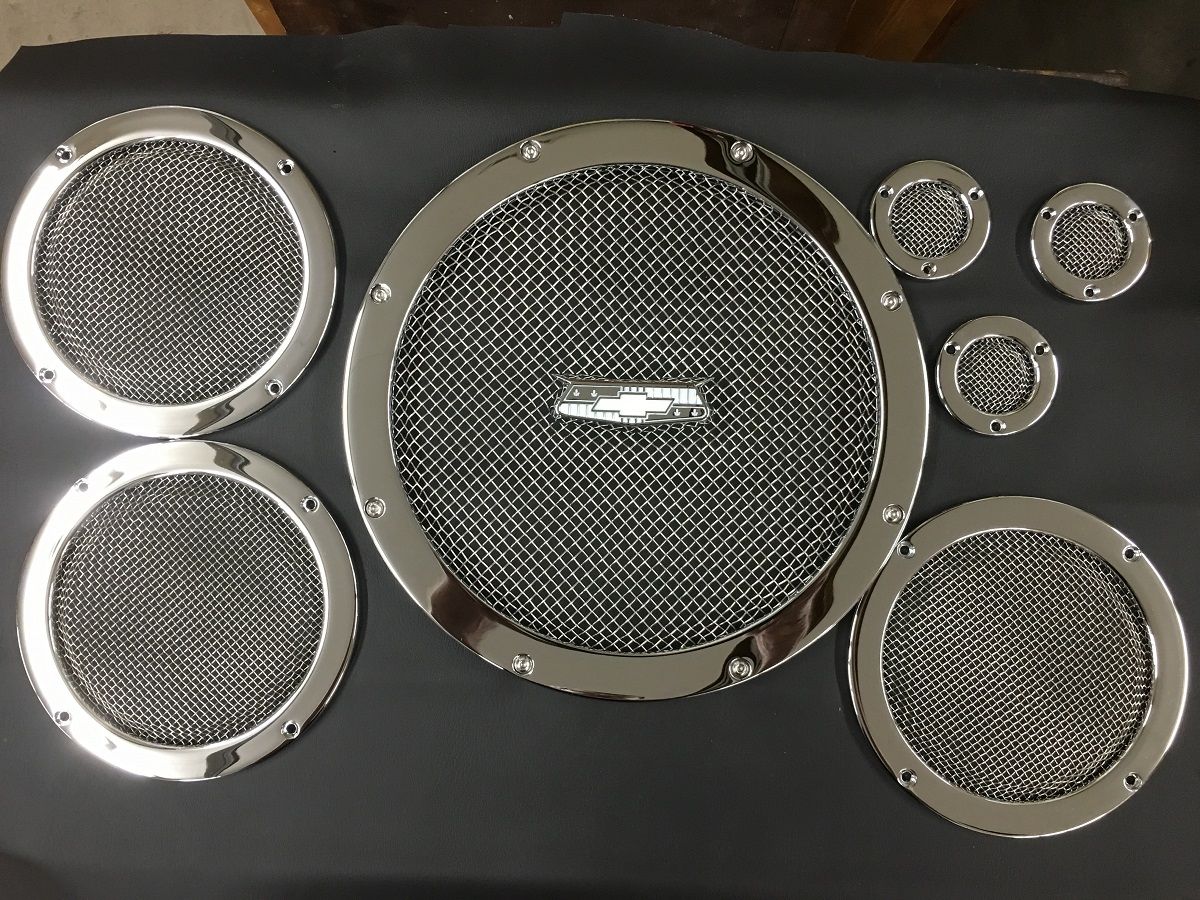
__________________
Robert |
|
|
|
|
05-28-2019, 01:52 PM
|
#1062 |
|
Registered User
Join Date: Jan 2013
Location: Leonardtown, MD
Posts: 1,633
|
Re: 55 Wagon Progress
Well it's been rather hectic around the home front as E is nearing graduation. Seems like yesterday she was showing me how to properly wet sand bare foot..
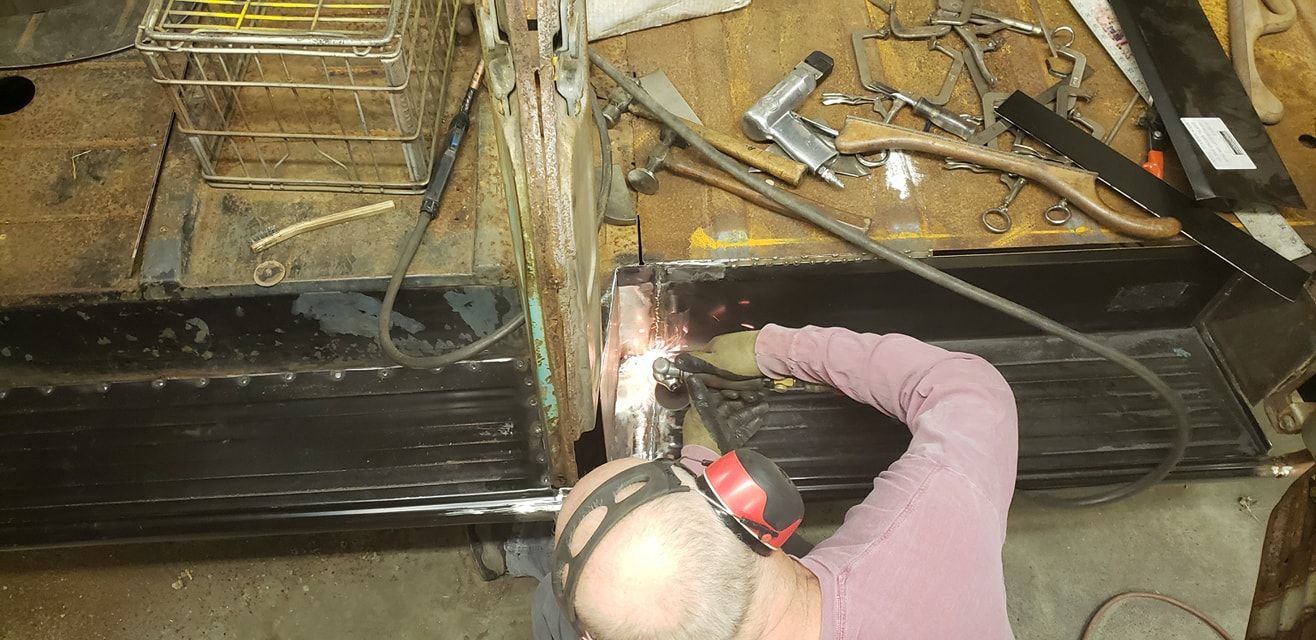
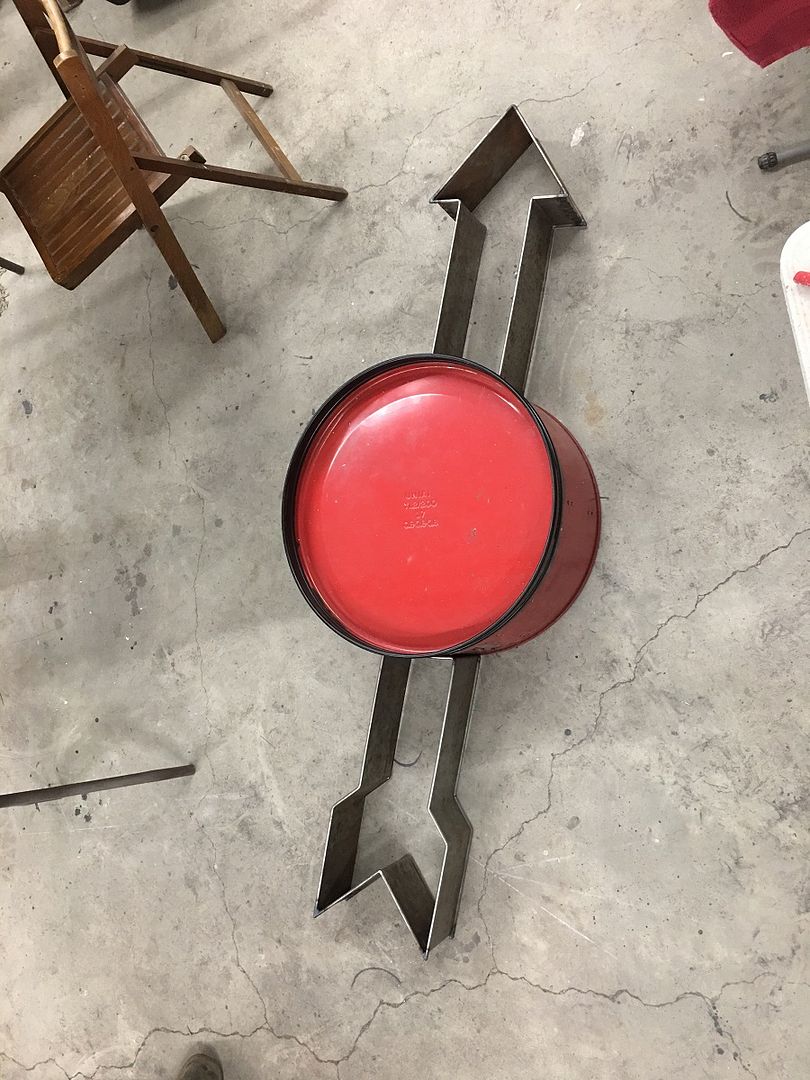
 For shop activity, Mike has been working on a sign for a "Drummer's Lounge", since we had the wire edging tool already made up for the Biederman, he used that to give the outside bands of the arrow the beaded look... 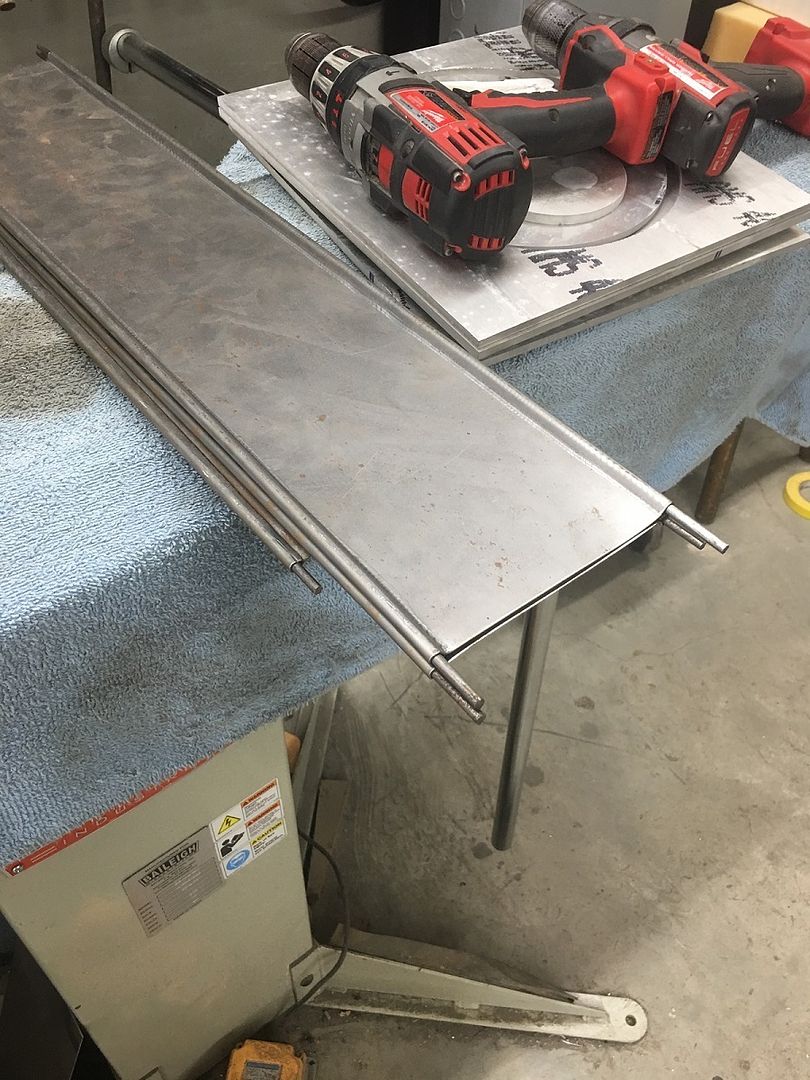 CAD drawing: 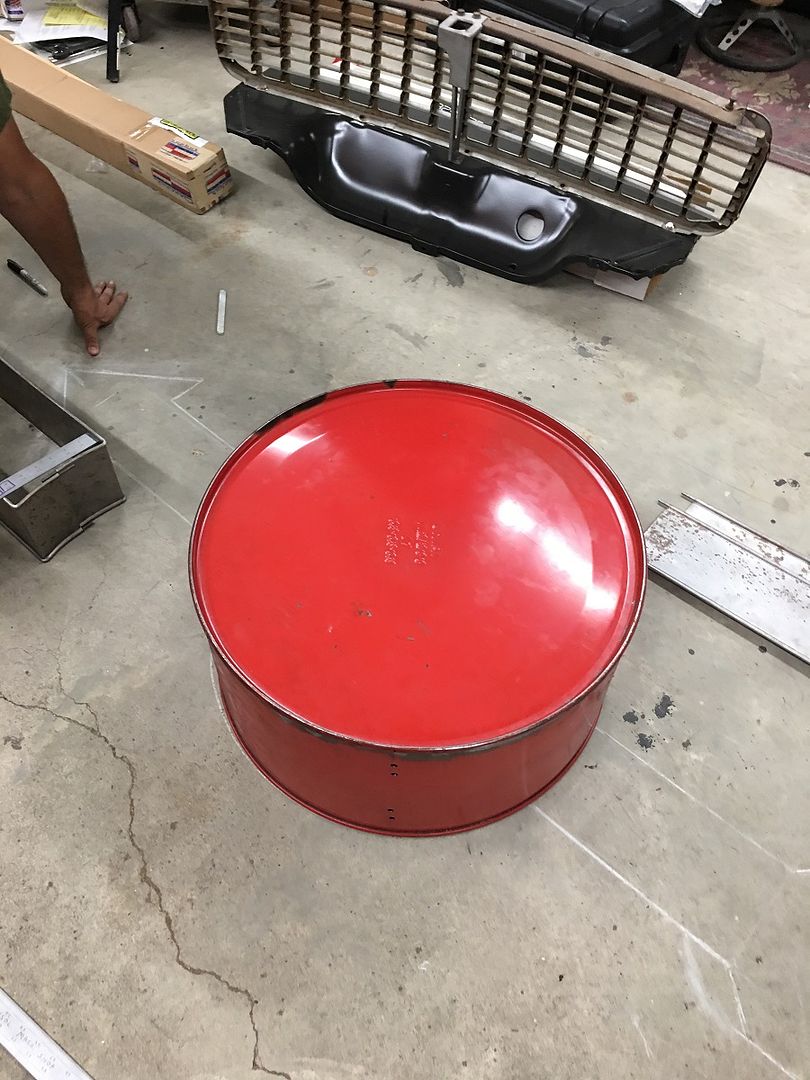 Parts is parts:  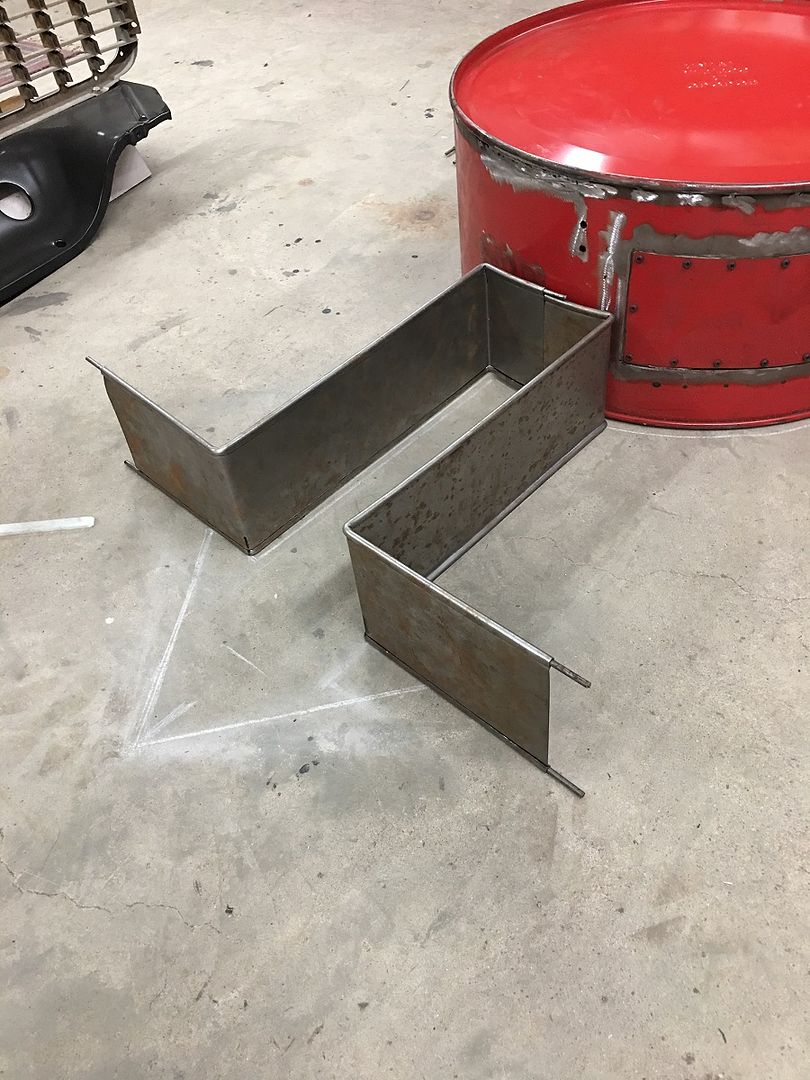 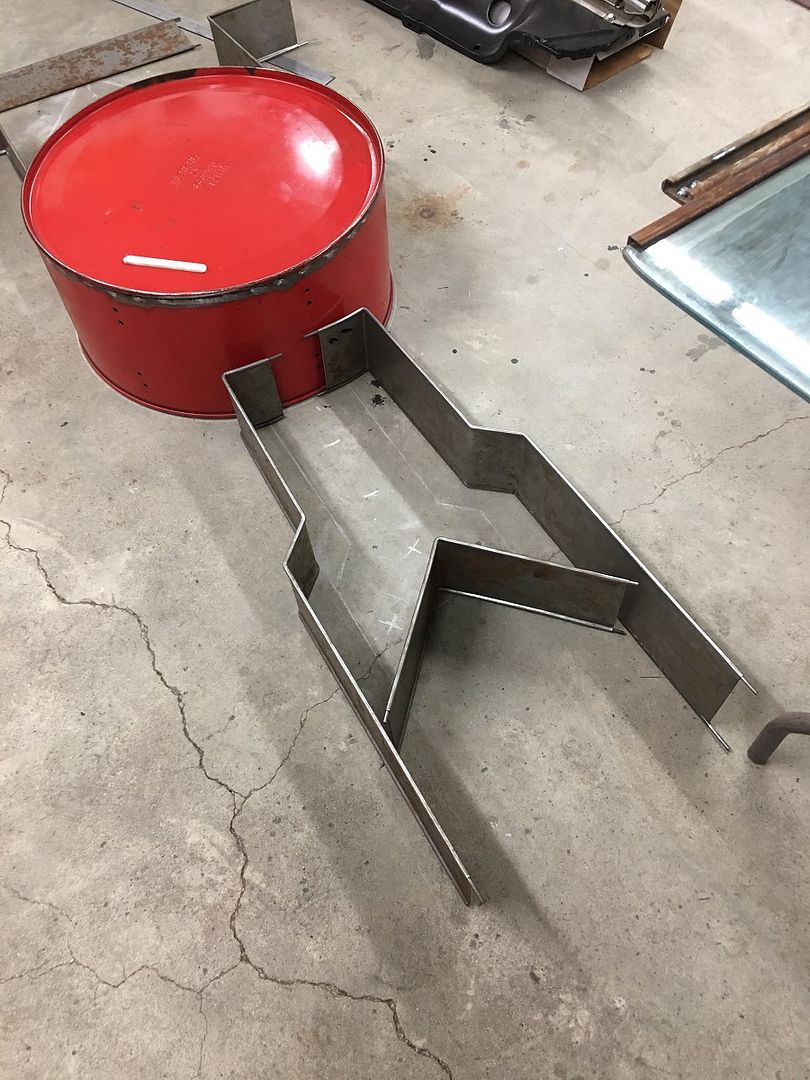 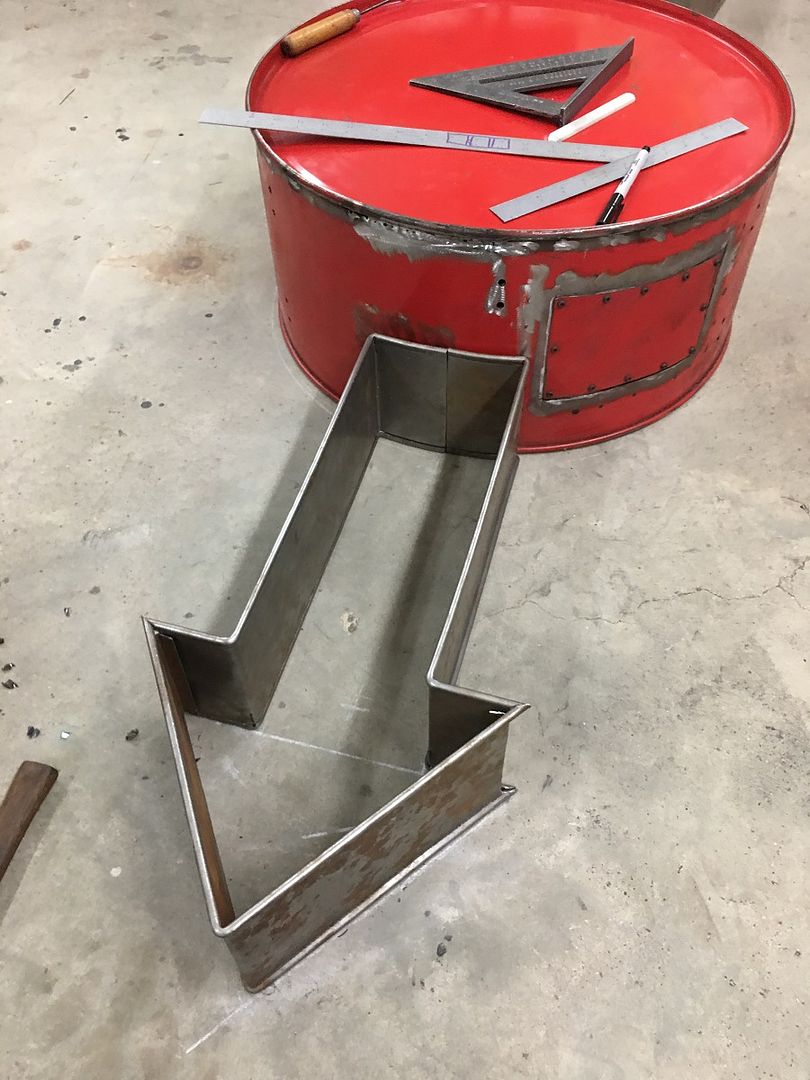 Video: https://www.youtube.com/watch?v=Y47I...ature=youtu.be Meanwhile, I've been block sanding, and priming.... here the rear kick panels are now ready for upholstery...  I did break out the Meco torch again the other day to get the dust off.... 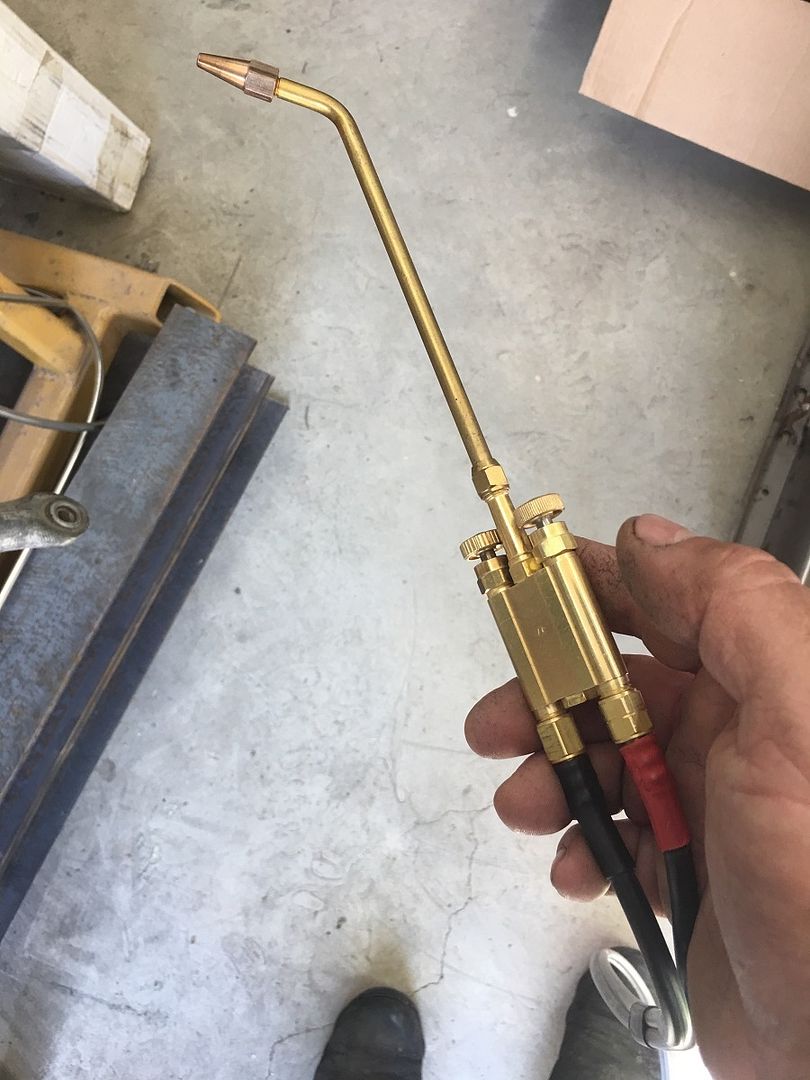 This first coupon shows how Peter Tommasini teaches tacking in gas welding. Tack a spot, then the next is placed where the HAZ (blue ring) touches the seam between the halves. And repeat. Note how this method leaves an almost perfect HAZ for minimal distortion.. 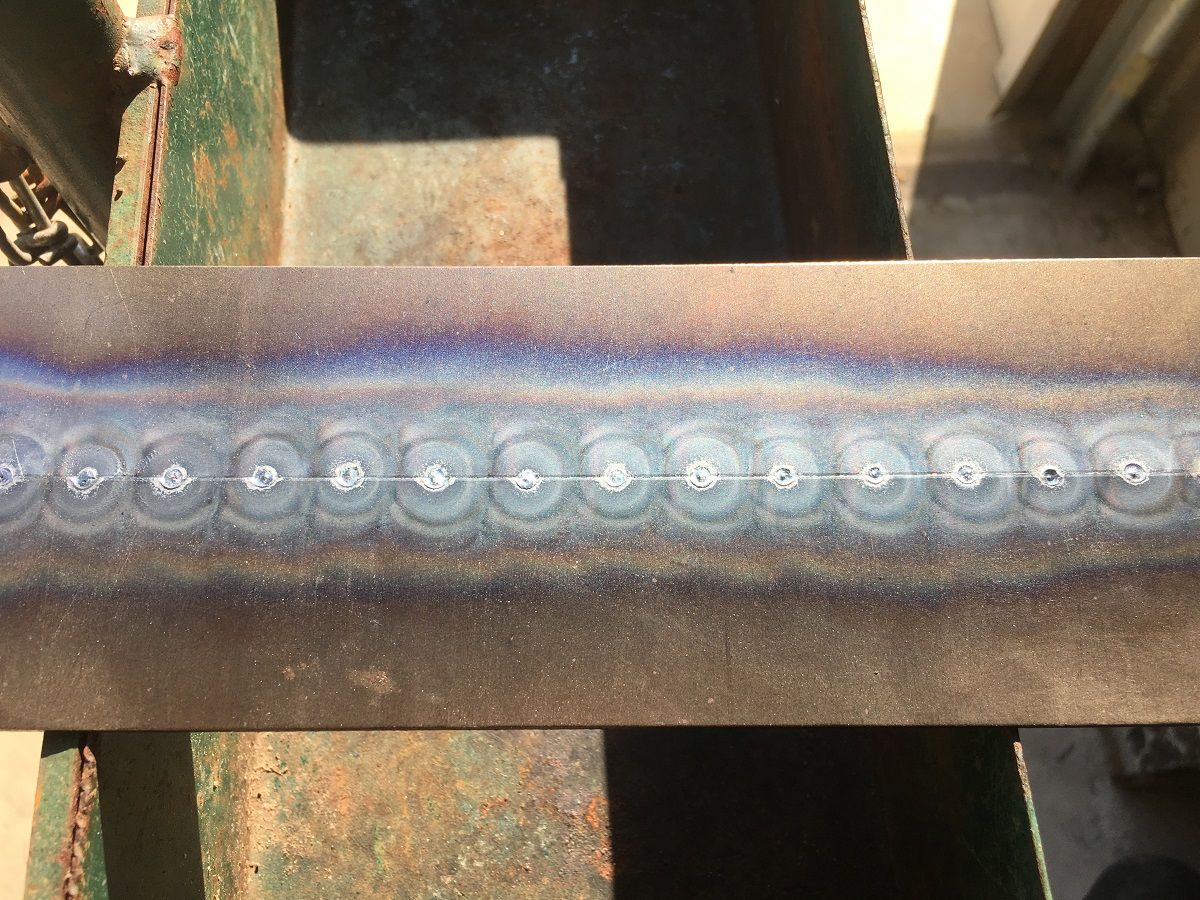 And we had a blowout. Don't stop, keep going and come back to it.. This is fusion welded, no filler, front side shown first, then back side 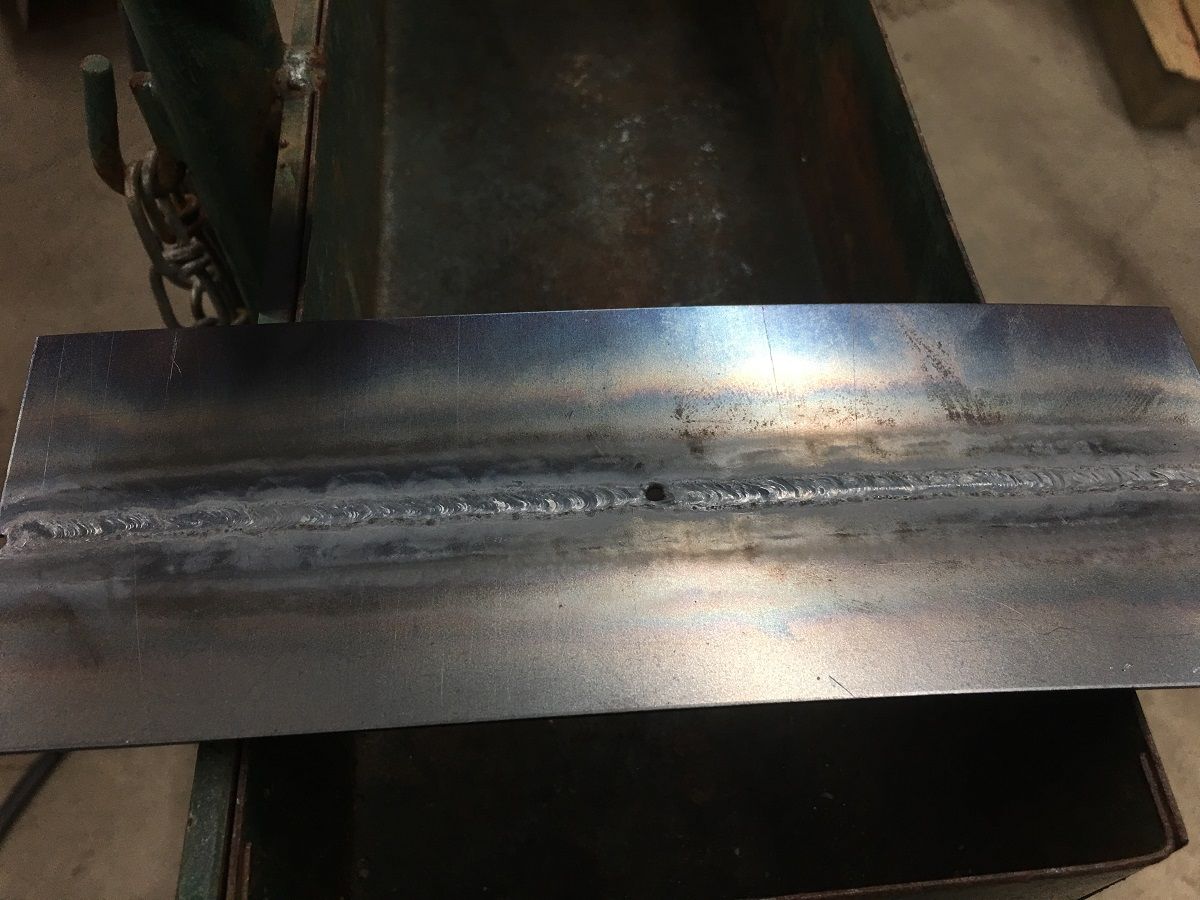 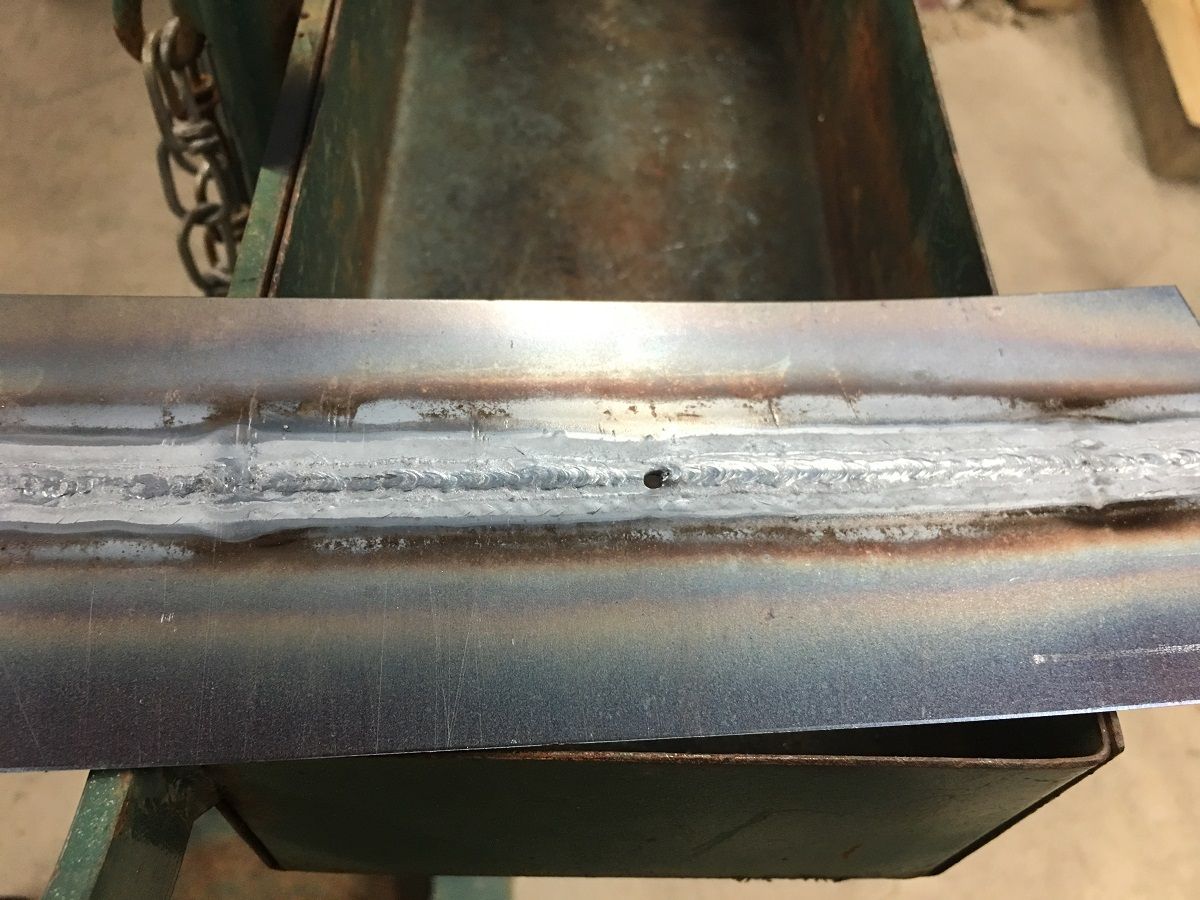 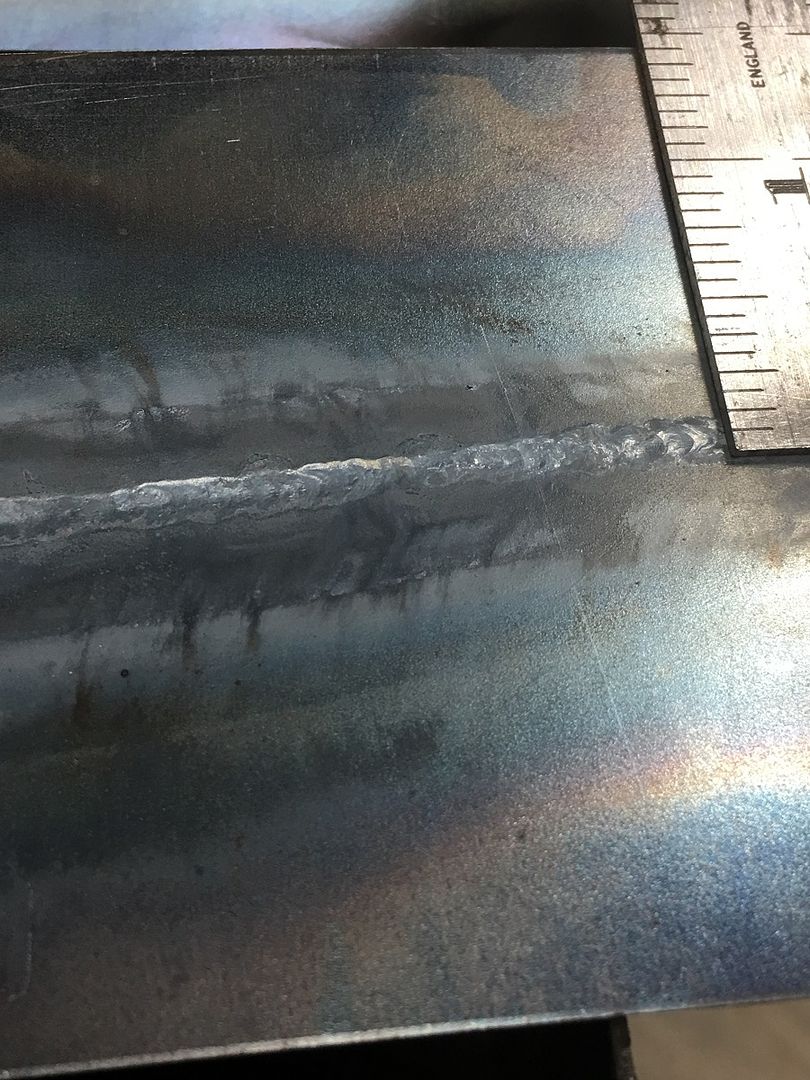 Stephen has been mocking up the power windows in the front doors so we can side step all the components and find a good location for our speakers. No pictures yet, I'll get some this week...
__________________
Robert |
|
|
|
|
05-28-2019, 02:33 PM
|
#1063 |
|
Post Whore
Join Date: May 2015
Location: Alabama
Posts: 14,581
|
Re: 55 Wagon Progress
Sweet work as usual...
question on the fusion weld..how do you fix the blowout?...will it heal itself with more torch work or do you have to add filler?
__________________
Mongo...aka Greg RIP Dad RIP Jesse 1981 C30 LQ9 NV4500..http://67-72chevytrucks.com/vboard/s...d.php?t=753598 Mongos AD- LS3 TR6060...http://67-72chevytrucks.com/vboard/s...34#post8522334 Columbus..the 1957 IH 4x4...http://67-72chevytrucks.com/vboard/s...63#post8082563 2023 Chevy Z71..daily driver |
|
|
|
|
05-28-2019, 02:38 PM
|
#1064 |
|
Registered User
Join Date: Jan 2013
Location: Leonardtown, MD
Posts: 1,633
|
Re: 55 Wagon Progress
Some go back afterward and add filler, some keep a TIG rod handy to attack the issue as it happens..
__________________
Robert Last edited by MP&C; 05-28-2019 at 02:54 PM. |
|
|
|
|
06-13-2019, 12:45 PM
|
#1065 |
|
Registered User
Join Date: Jan 2013
Location: Leonardtown, MD
Posts: 1,633
|
Re: 55 Wagon Progress
We're making some speaker "adapter" rings to be able to mount the speakers in the door. We used some 18 ga CRS to form rings, the seam was gas welded.
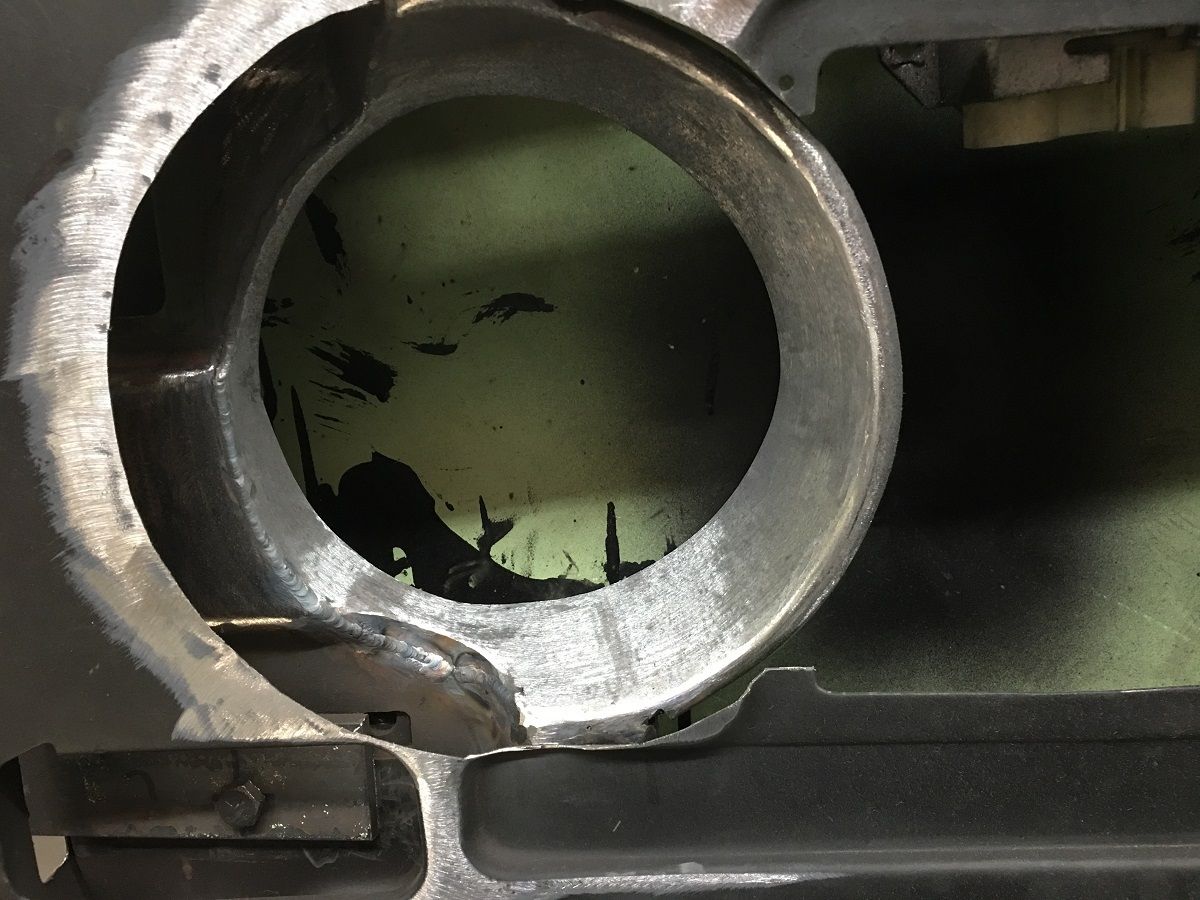
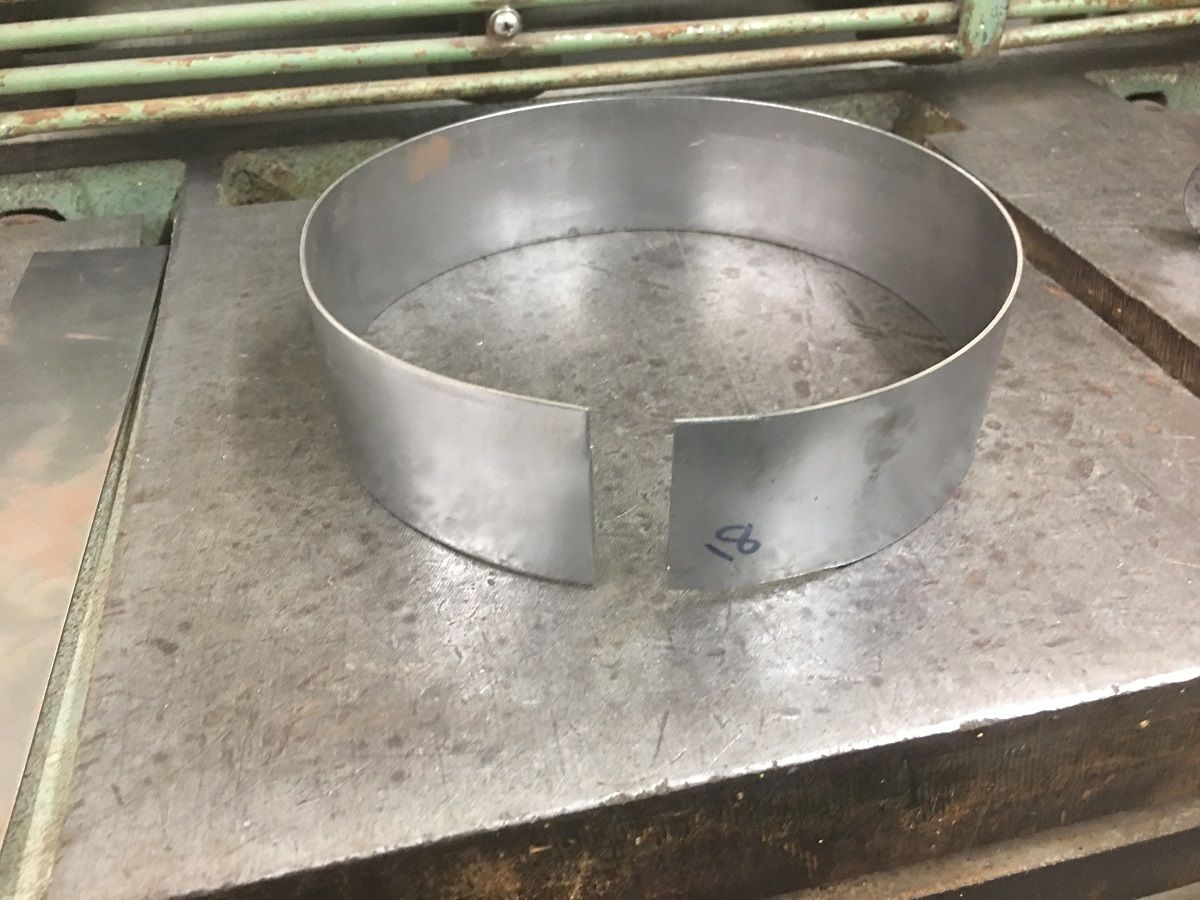 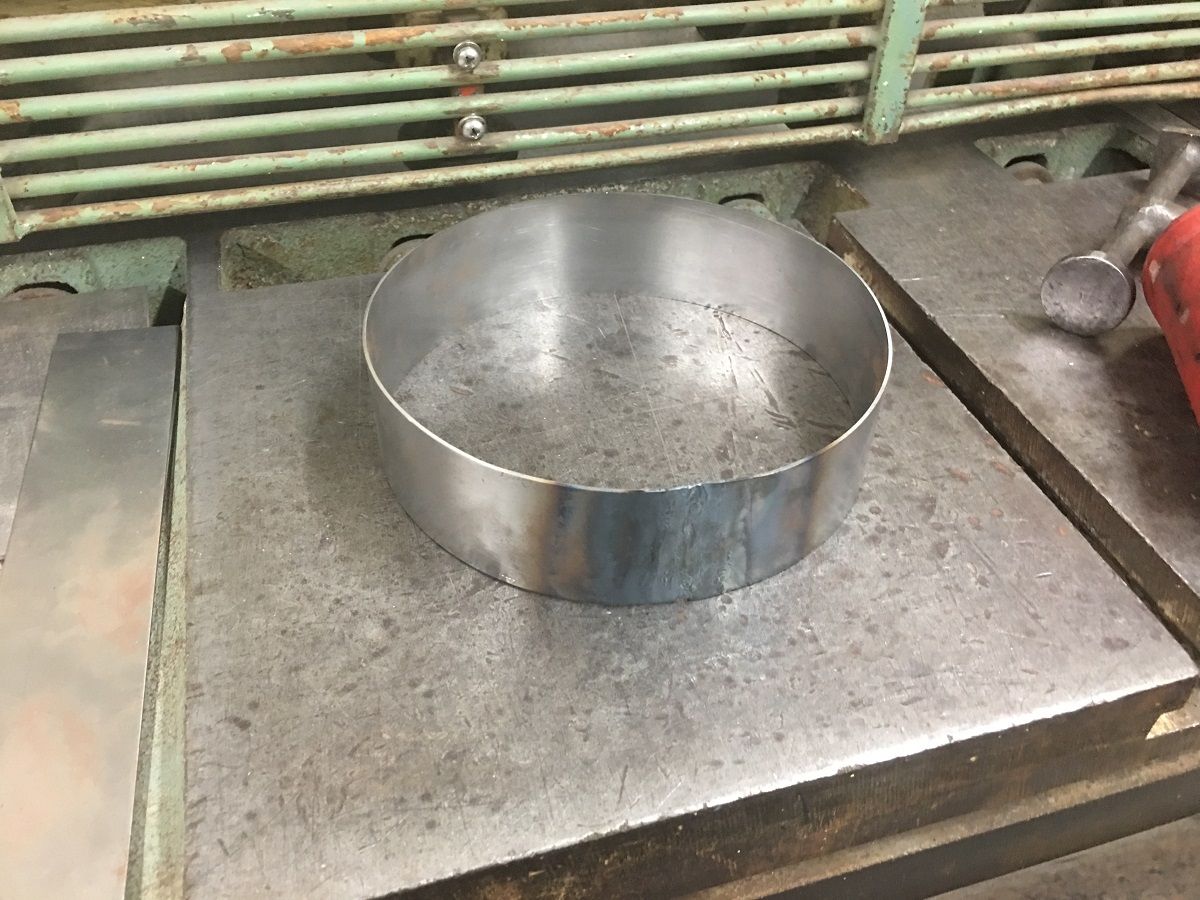  The outer flange is started on the Fasti-werks bead roller using the tipping die and the lower die we made last week.   Once it started to resist the tipping (needs stretching of the flange) we changed to using the linear stretch dies in the Lennox TE250 https://www.youtube.com/watch?v=bX0gzPlqXEw https://www.youtube.com/watch?v=ATRYXZ-I3CU https://www.youtube.com/watch?v=9KRturFOdHA  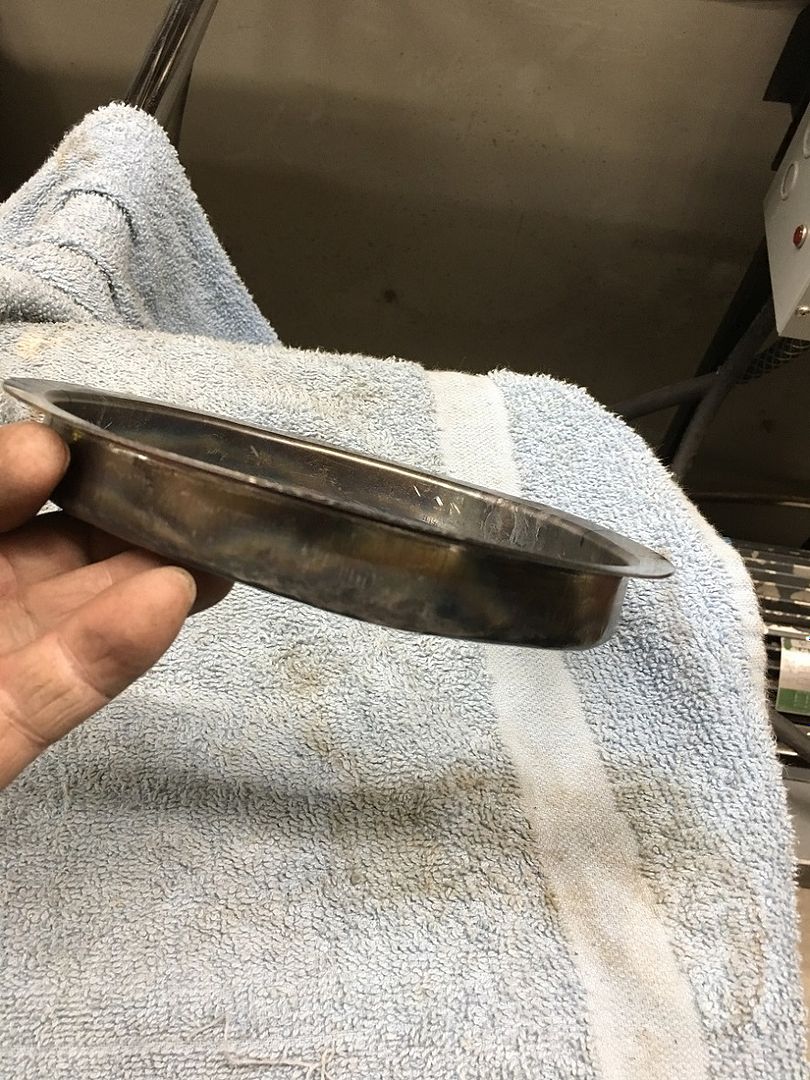 Originally we were looking at using the area below the power window motor, but in order to clear the power connector it would be too close to the bottom of the door... 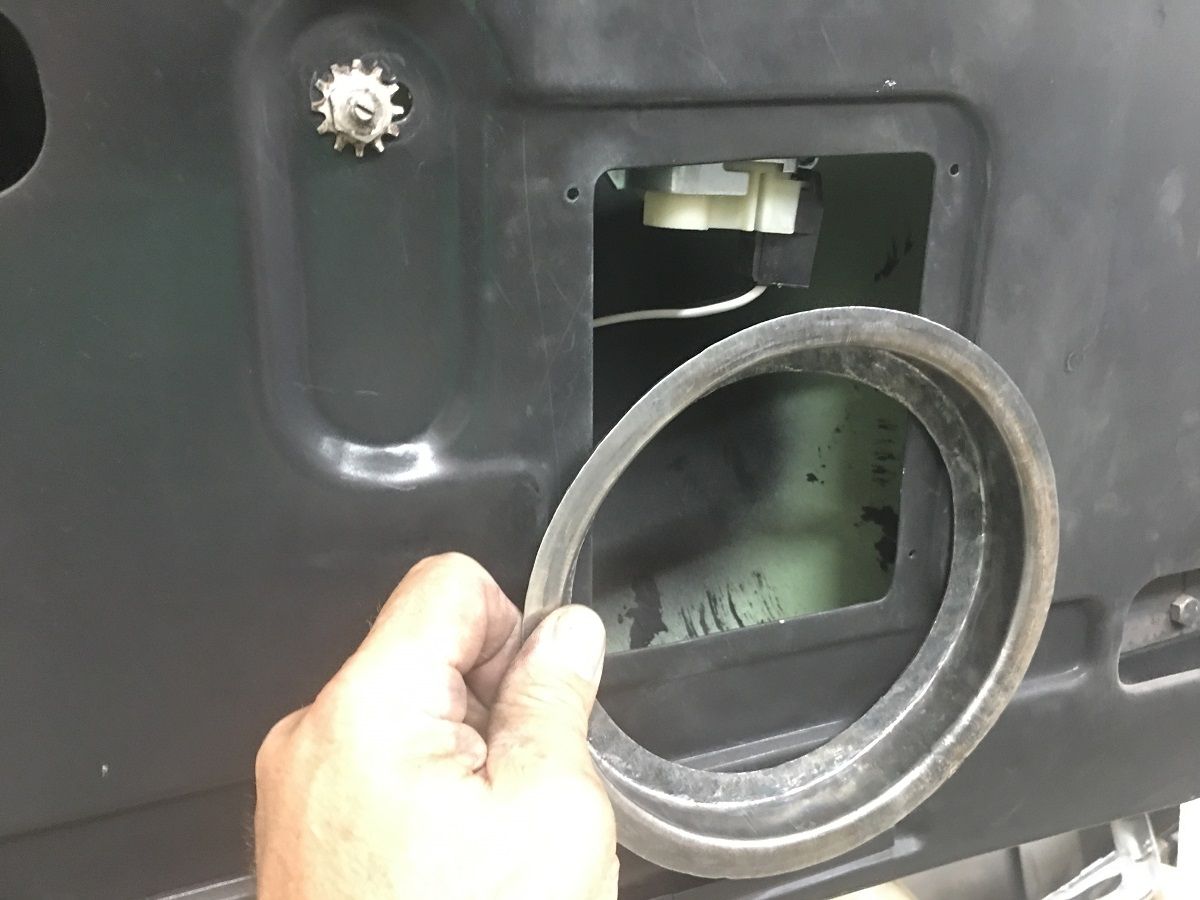 With not much else for room in the door, we opted to open a hole at the rear area of the inner hinge brace. 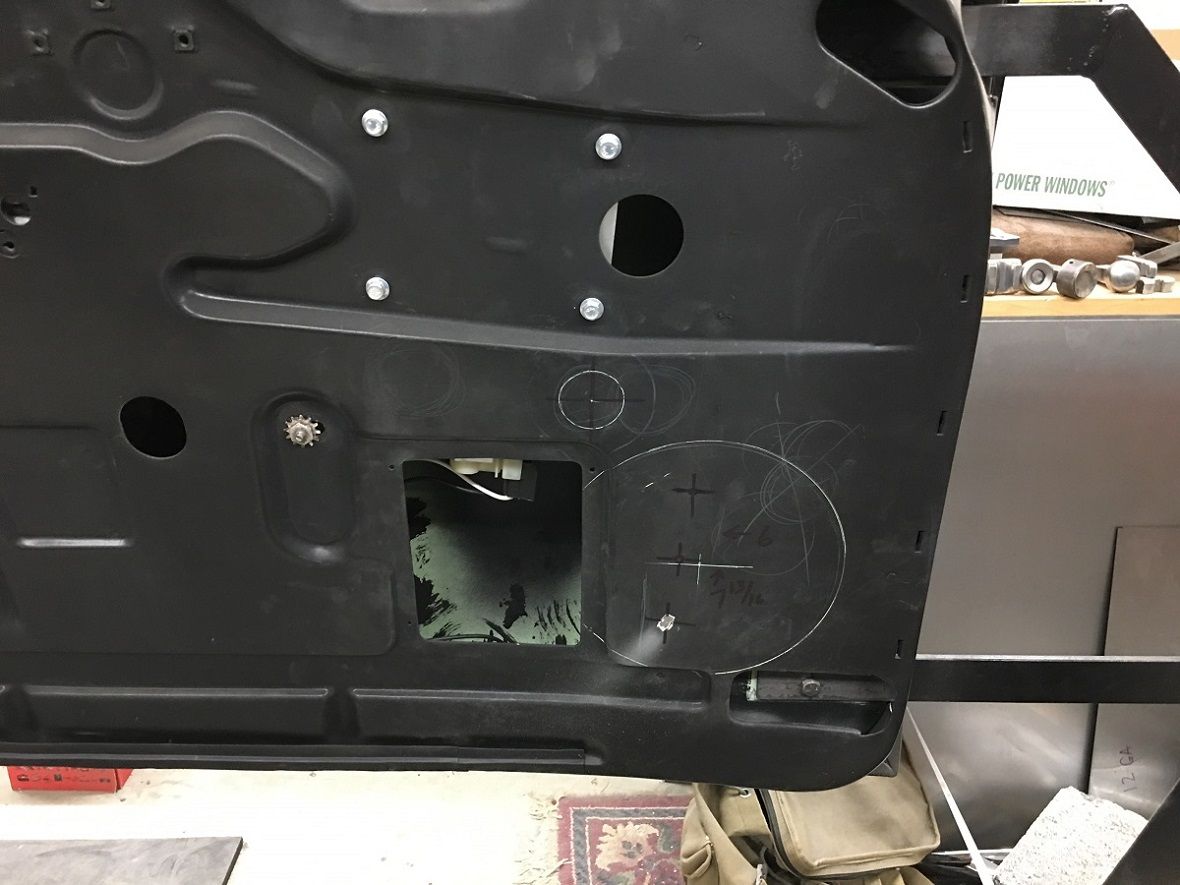 With space above for the tweeter, this will closely mimic what we have in the rear kick panels.. 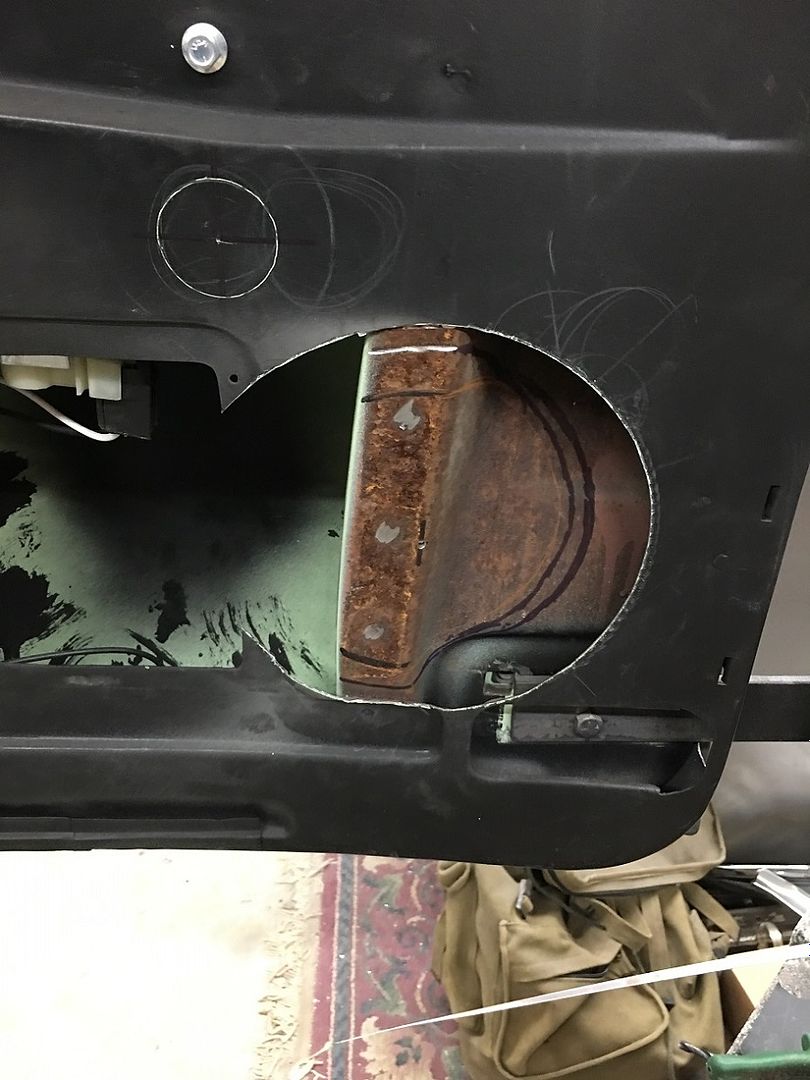 The rings will get TIG welded in place, but before that we'll add a bit of structure back in the hinge brace. 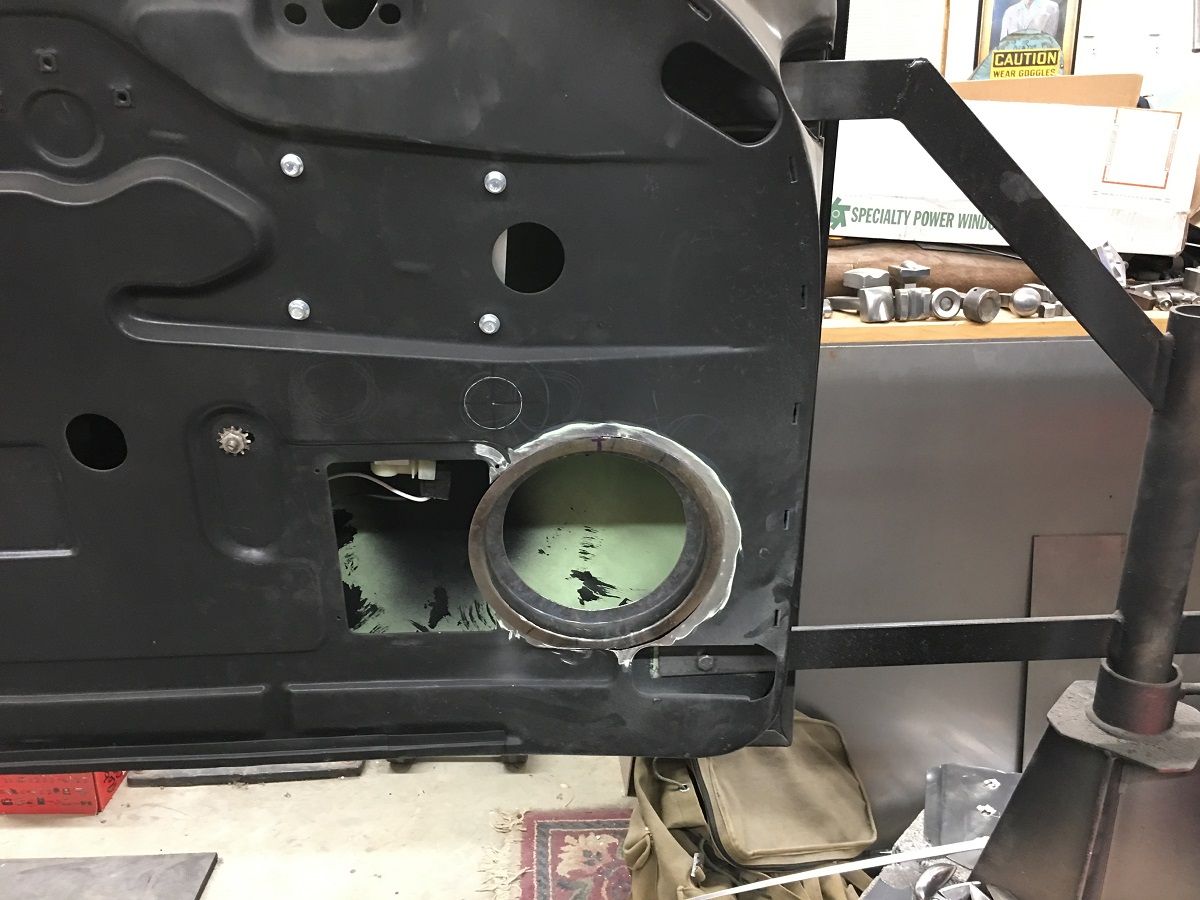
__________________
Robert |
|
|
|
|
06-17-2019, 09:50 AM
|
#1066 |
|
Registered User
Join Date: Jan 2013
Location: Leonardtown, MD
Posts: 1,633
|
Re: 55 Wagon Progress
Mike is still plugging away on the Drummer's Lounge sign.
 Saturday he started fabrication of the insert panels. One side will be plug welded in place, the other will be removeable to access the wiring for the flashing lights. Tracing the first pattern onto some 19 ga crs, and adding mounting flanges. 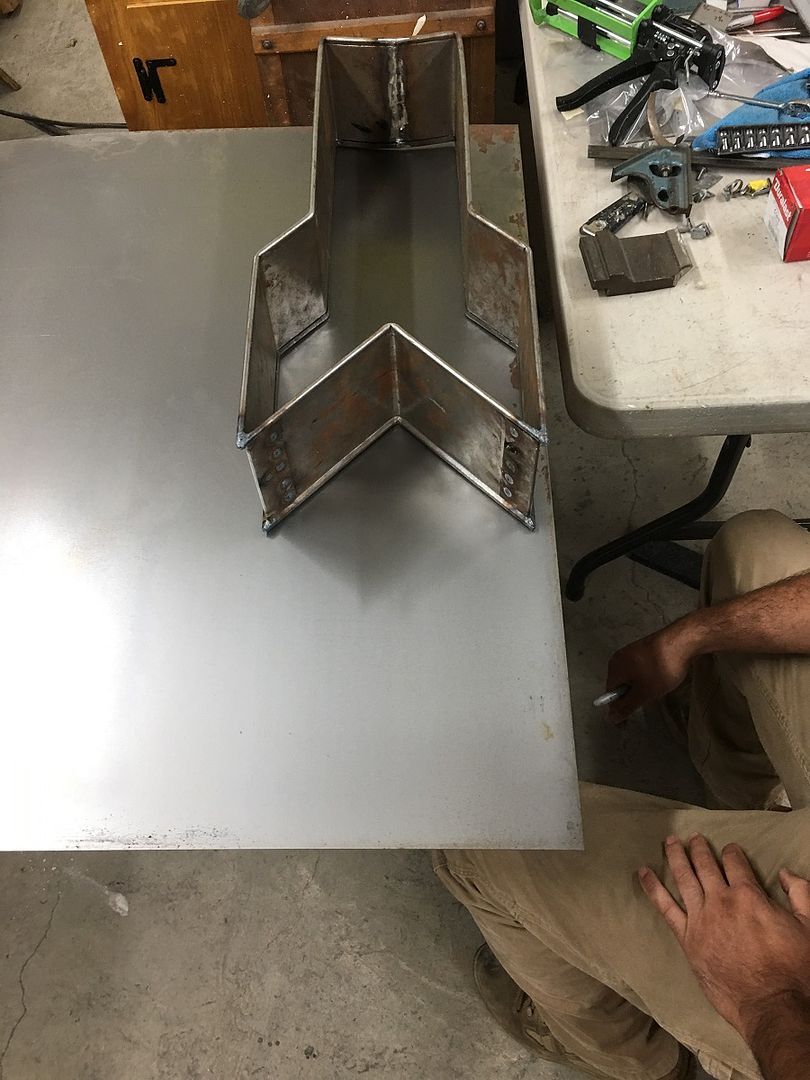 The bend lines are run through the bead roller with a tipping die into the skate board wheel to better mark the bend location. Makes it easier to locate the upper press brake die as it will fall into the indent. 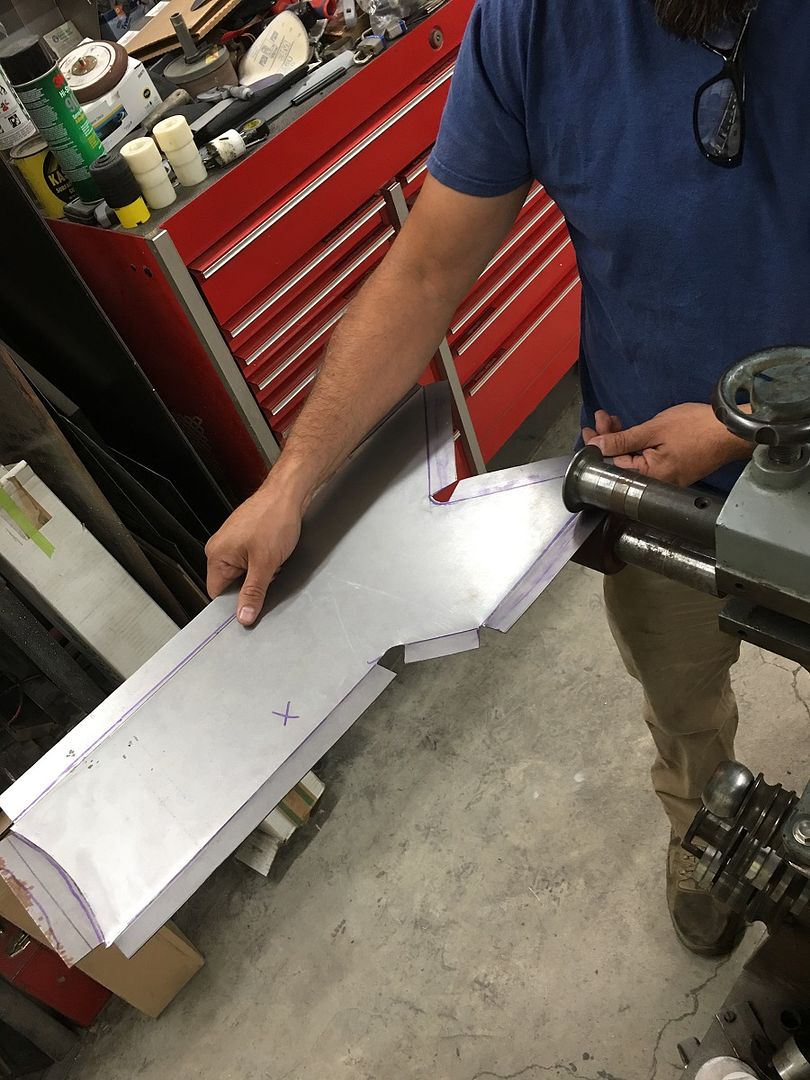 Since everything is a tool, and we needed to fold down a bit of metal in the inside corner, a piece of angle is chosen for it's inside radius match and a body hammer with a nice barrel roll on it does the trick...  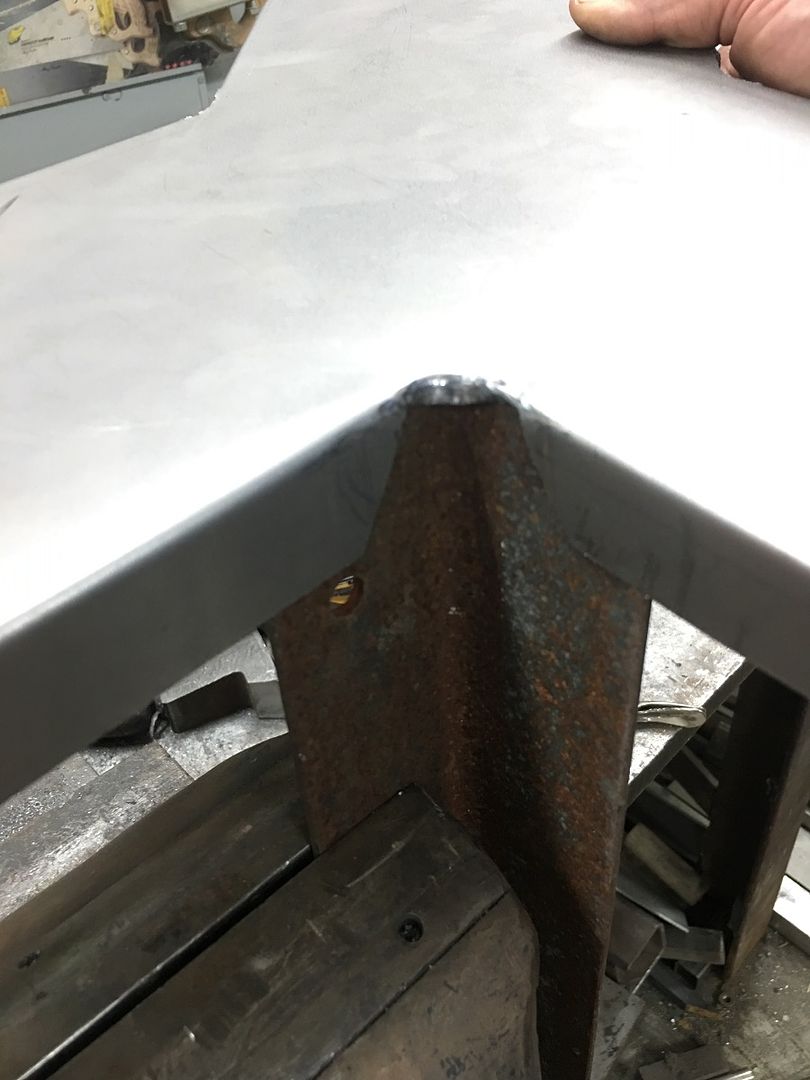 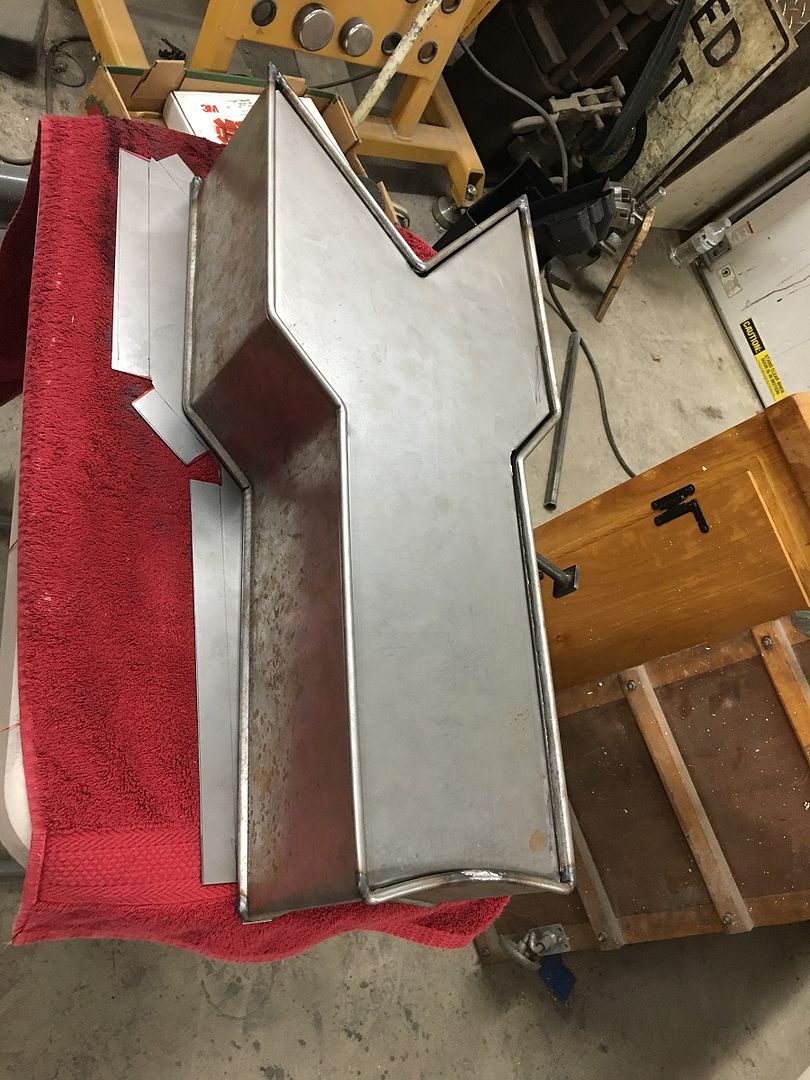 Side #2.... 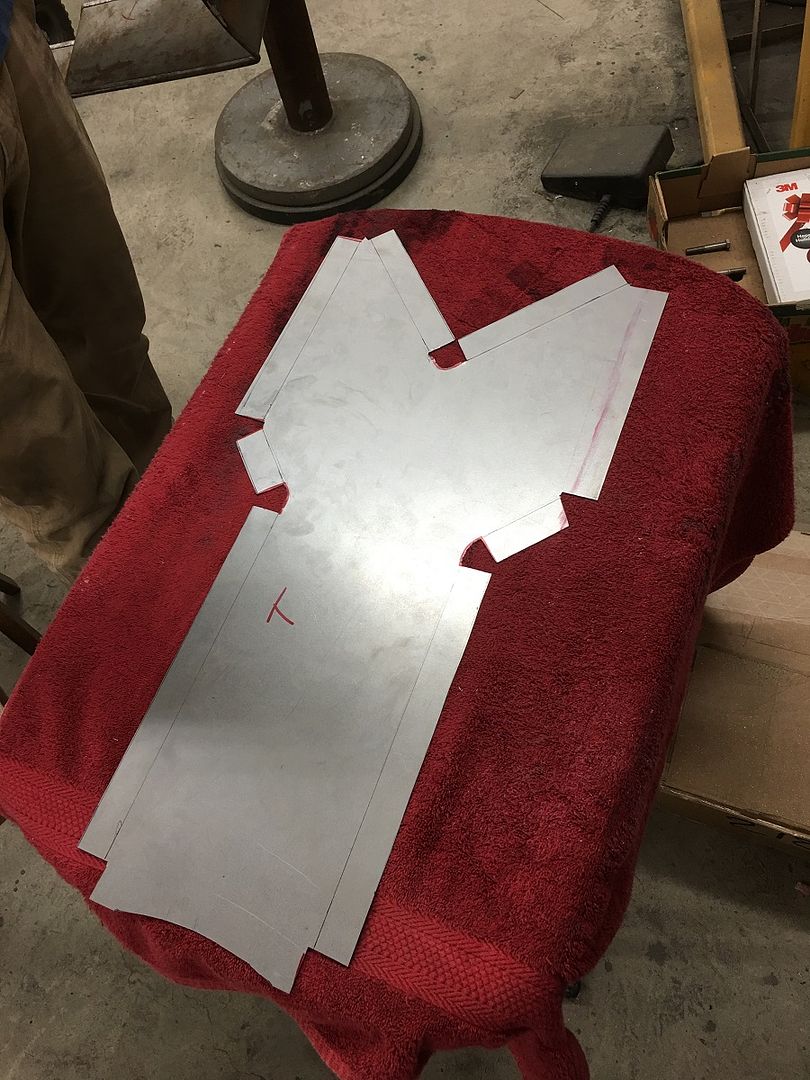 While he was busy with that, I continued on our speaker mount modification to the doors. Since we had cut away at the hinge mounting structure, we needed to add strength back in that surrounded the speaker. We chose a cone shape over cylindrical as we thought that would have less chance of collapse under stress. Our pattern is cut out and transferred to some 14 gauge cold rolled, the same thickness as the hinge structure.  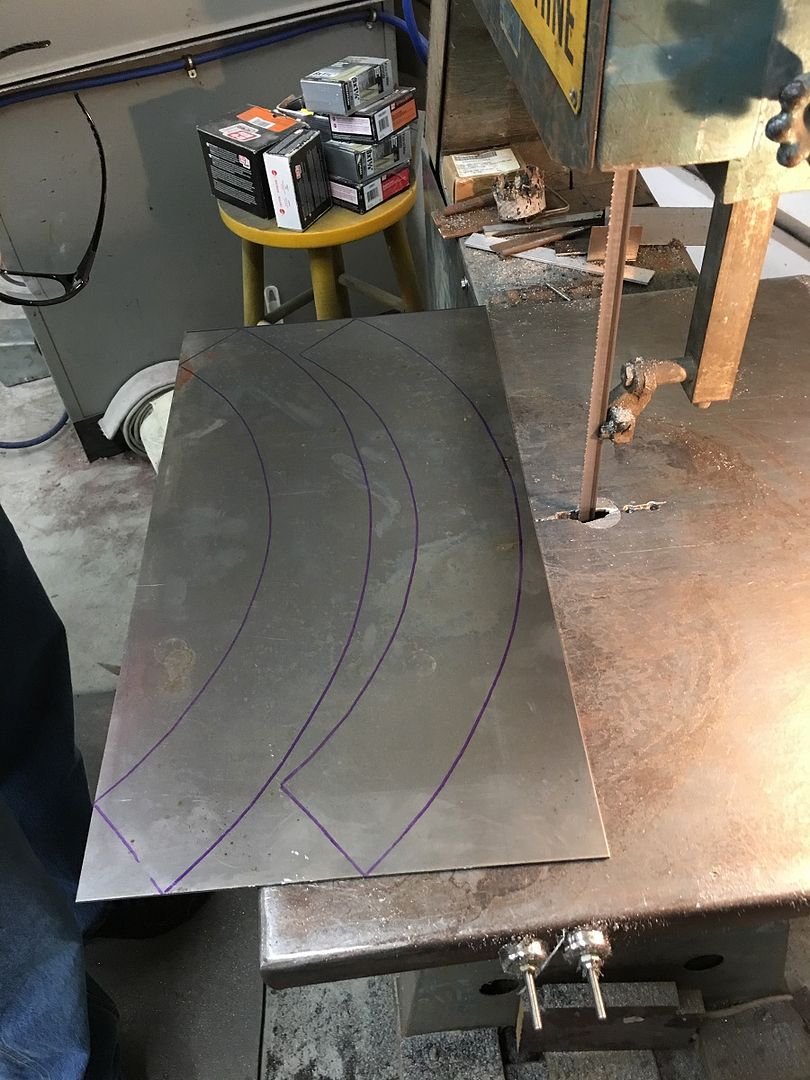 I forgot to get pictures of us rolling the cones, but basically as shown here with the pattern, the bend line was kept aligned with the vertex of the outer angle cuts, and slightly pressed, move and repeat, and continued until we have a good roll where the ends met up. 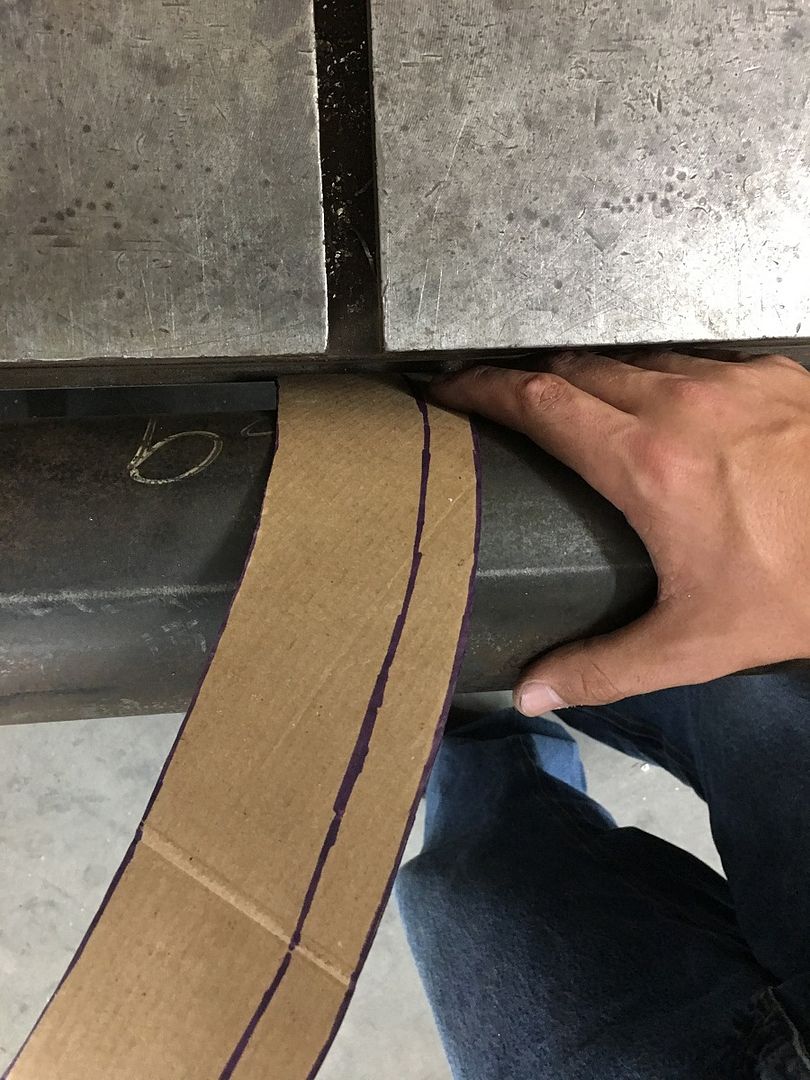 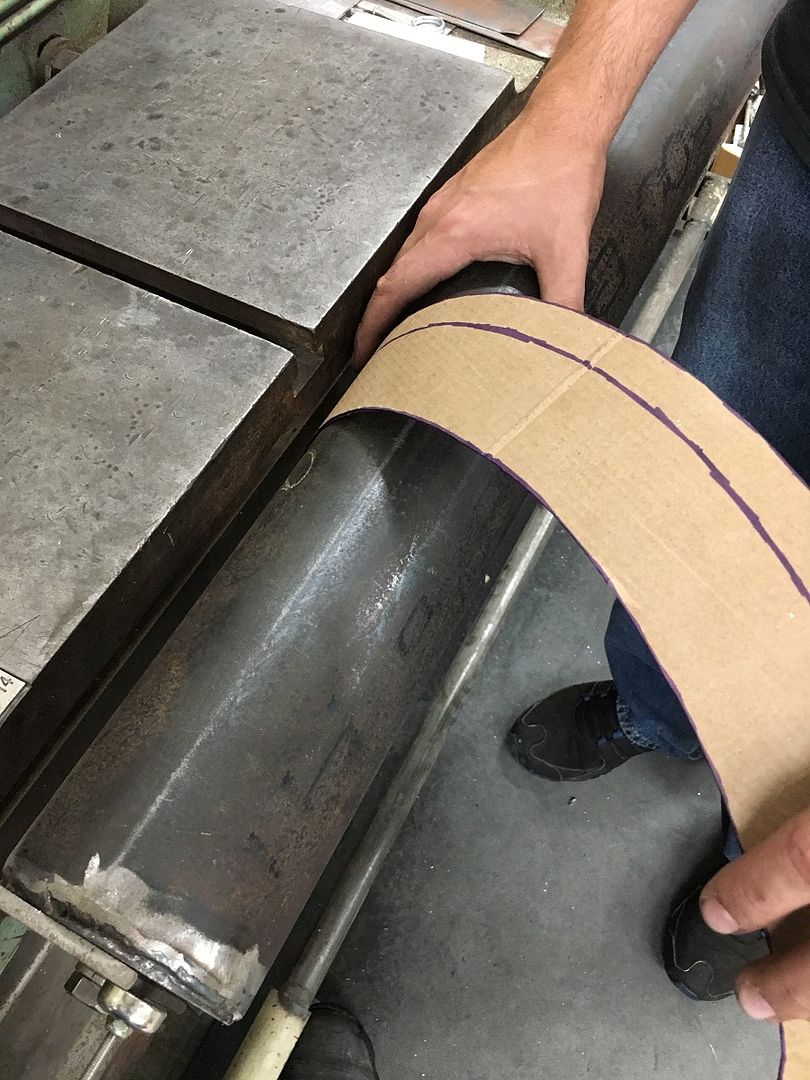 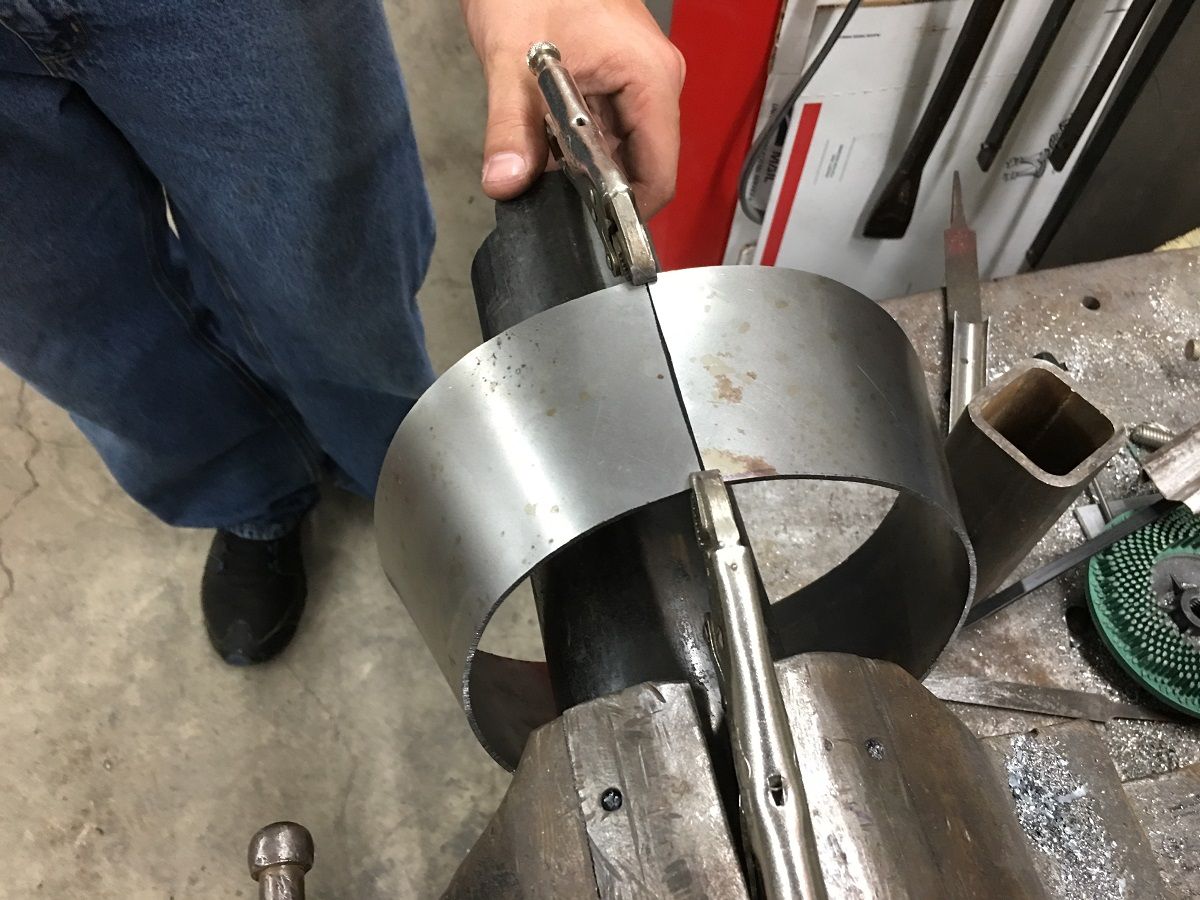 We plan on wire edge on the edge inside the square opening, so let's use gas welding for a more pliable weld area. 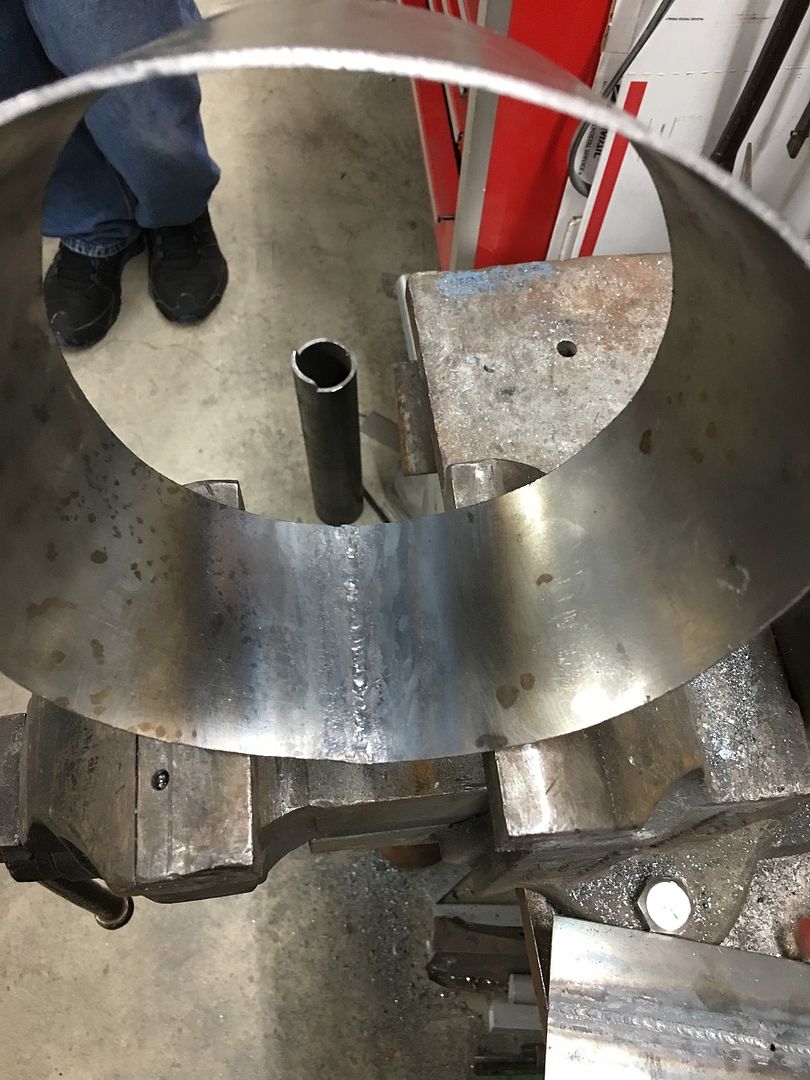 https://www.youtube.com/watch?v=hEWXNOFgSas The cone is then trimmed to fit the structure profile... 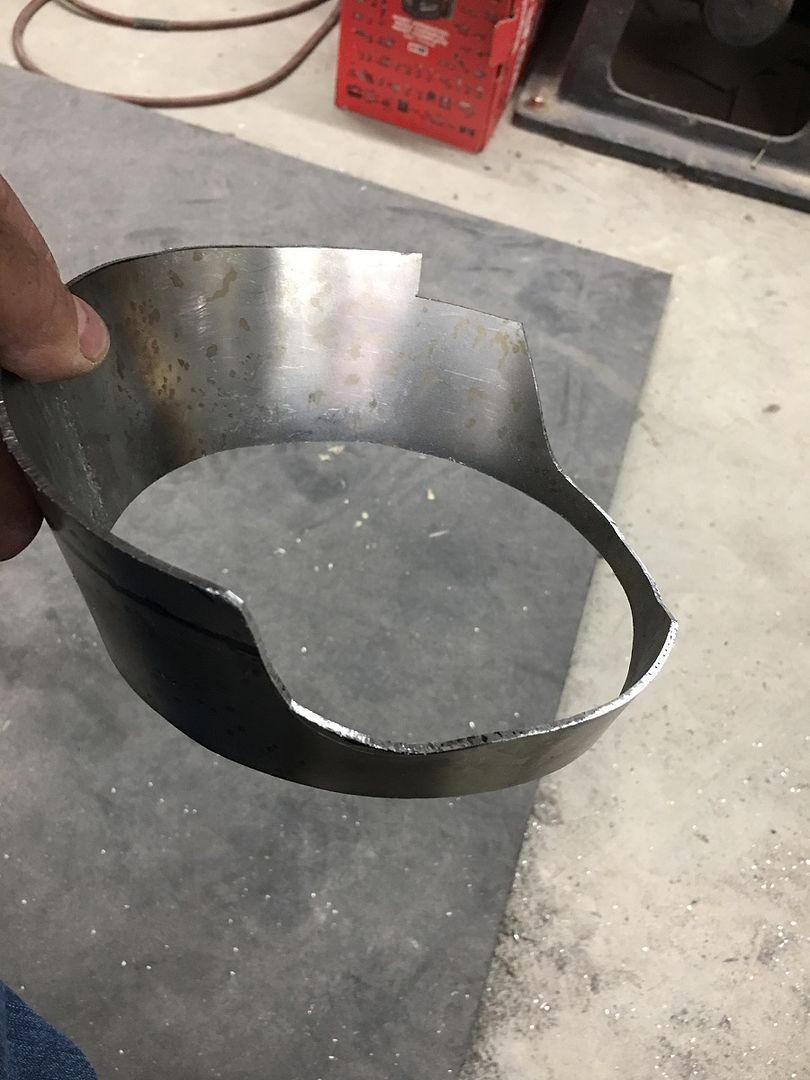 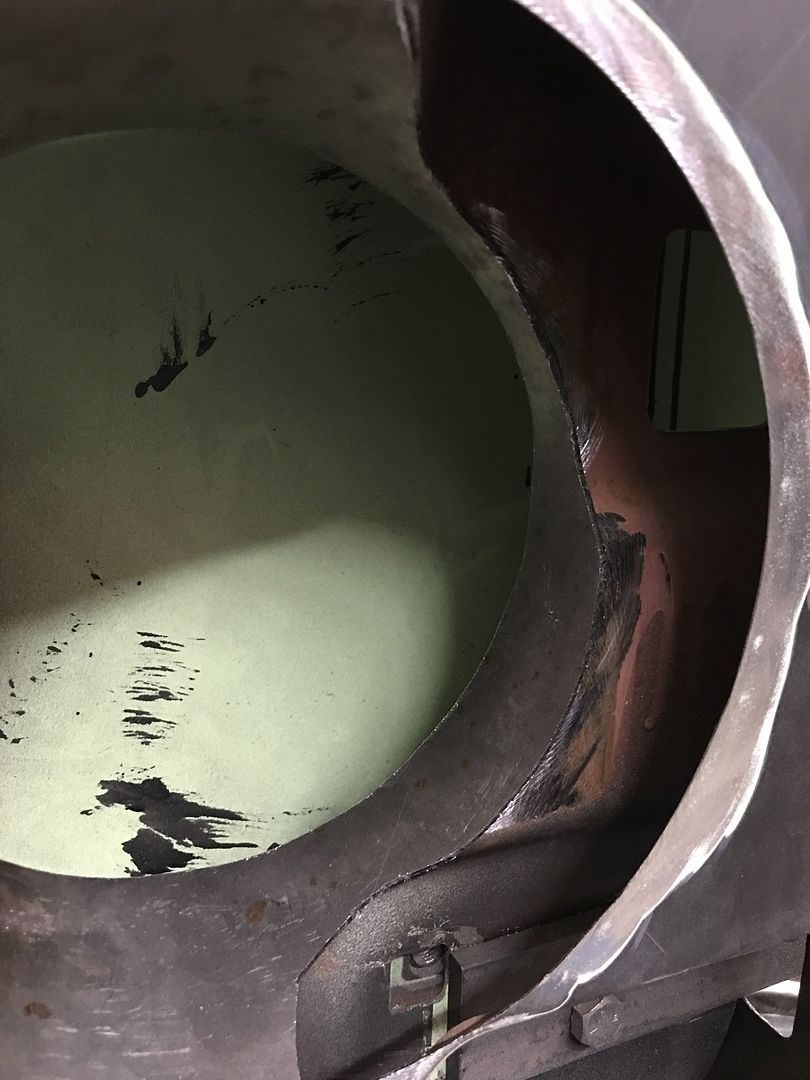 Flange is left for our wire edging of the open area...  The flange is tipped on the bead roller and then used the linear stretch dies in the Lennox to both stretch and tip the flange over to flat. 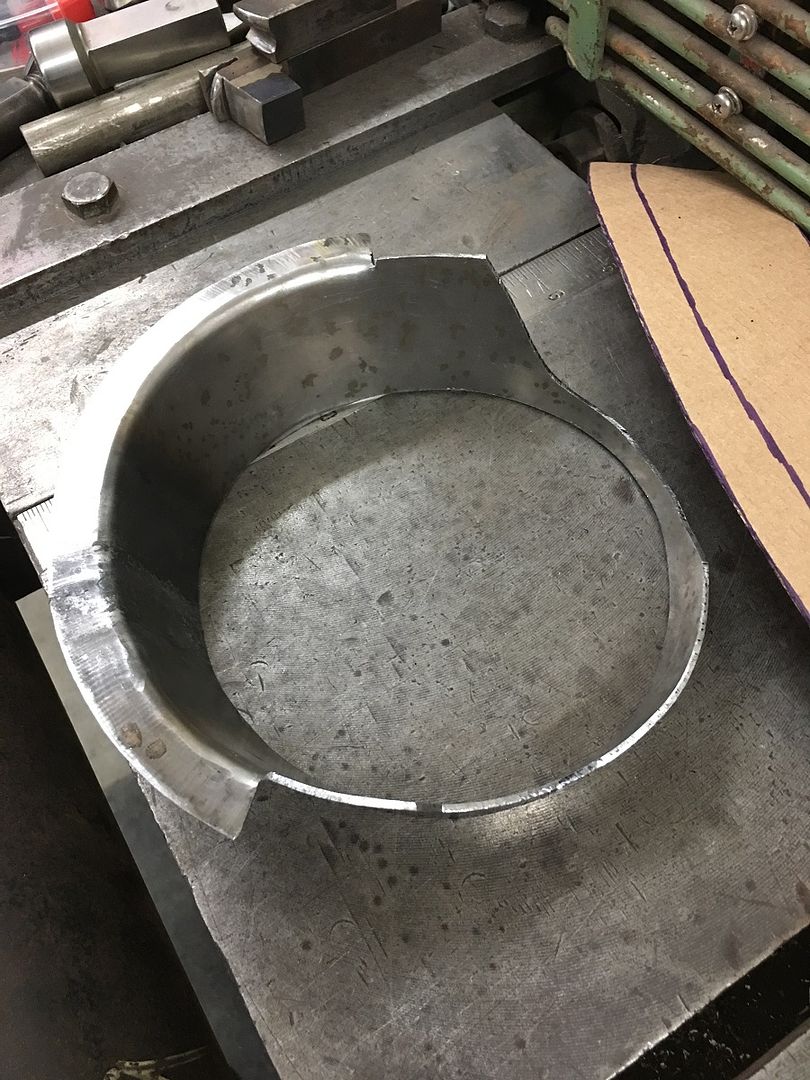 Then we use this modified Craftsman punch to hammer over a rounded void for the 3/16 wire to lay in..  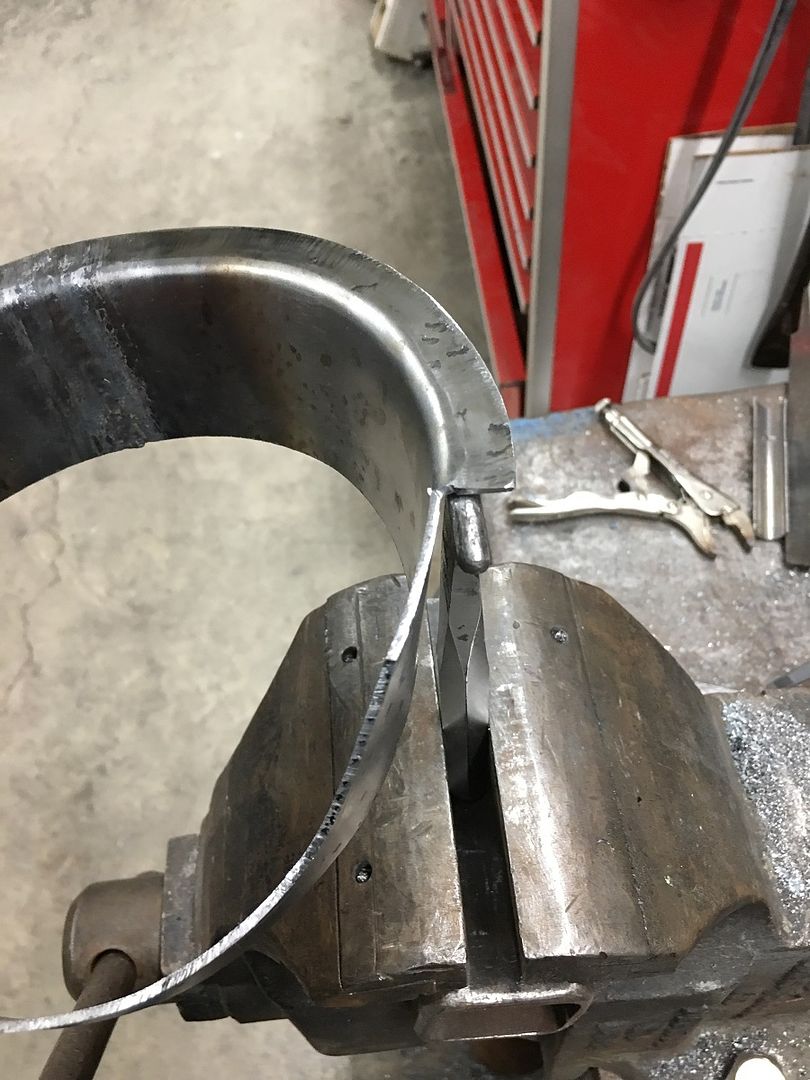 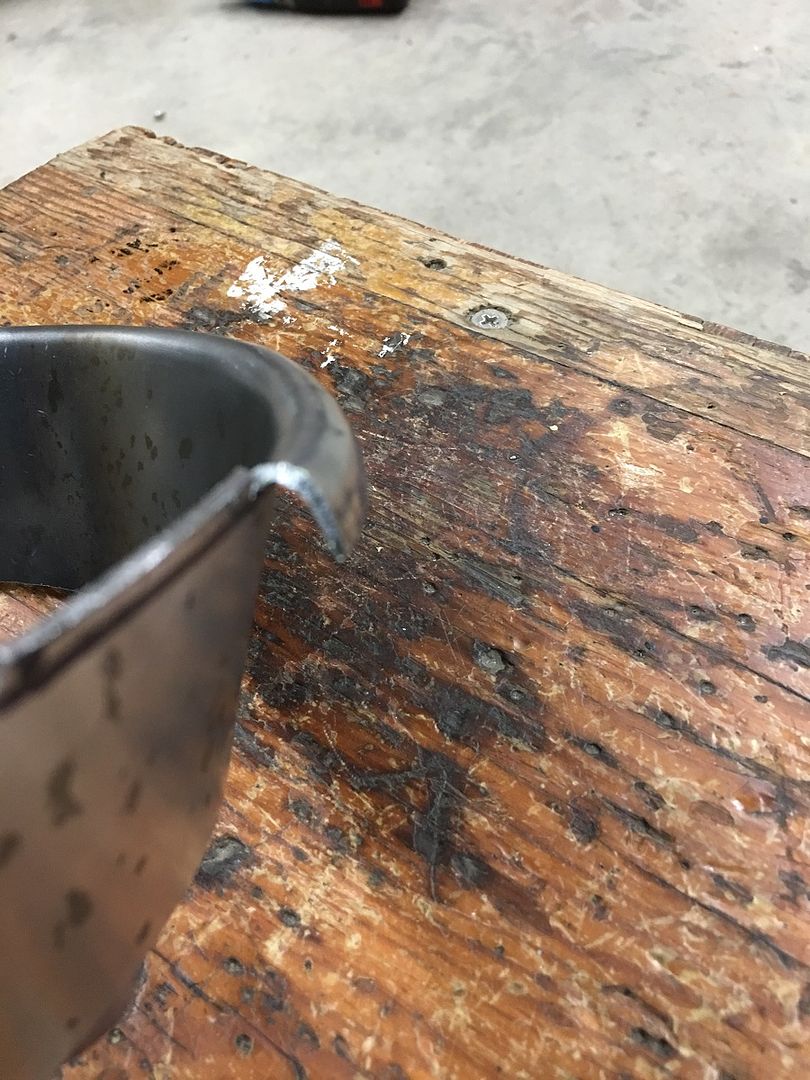 Then we have some modified vise grips that have a relief cut into the top so it won't slip off the wire when clamped. 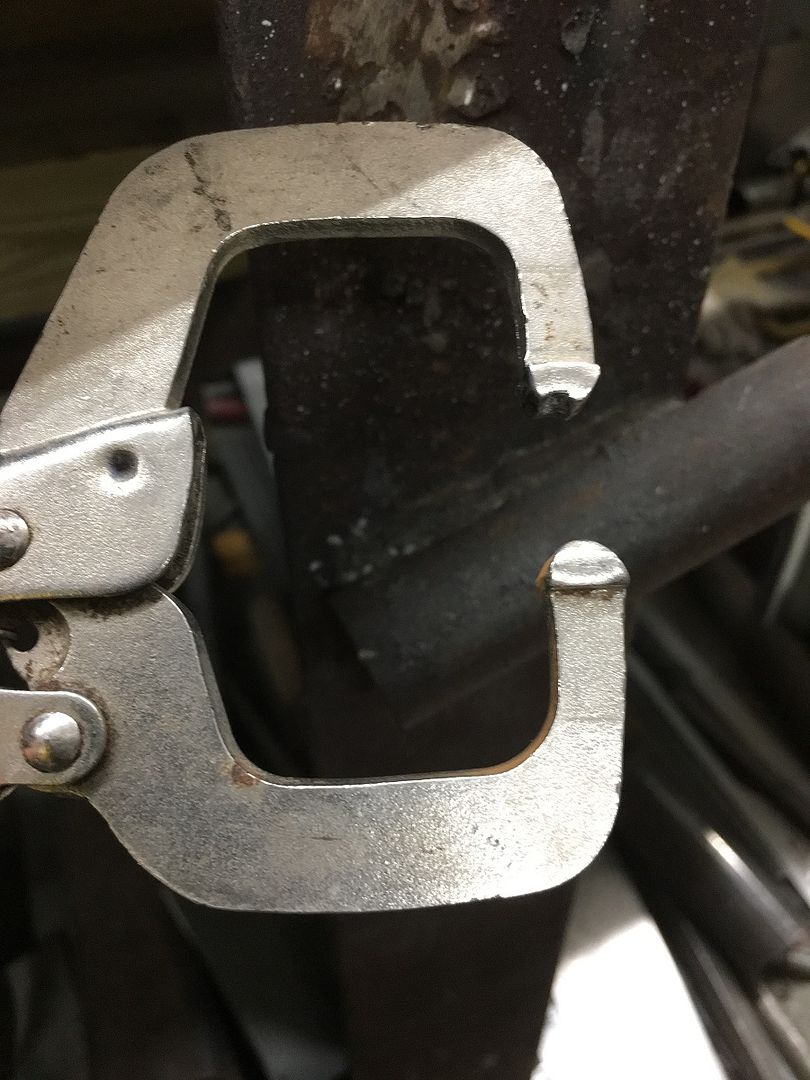 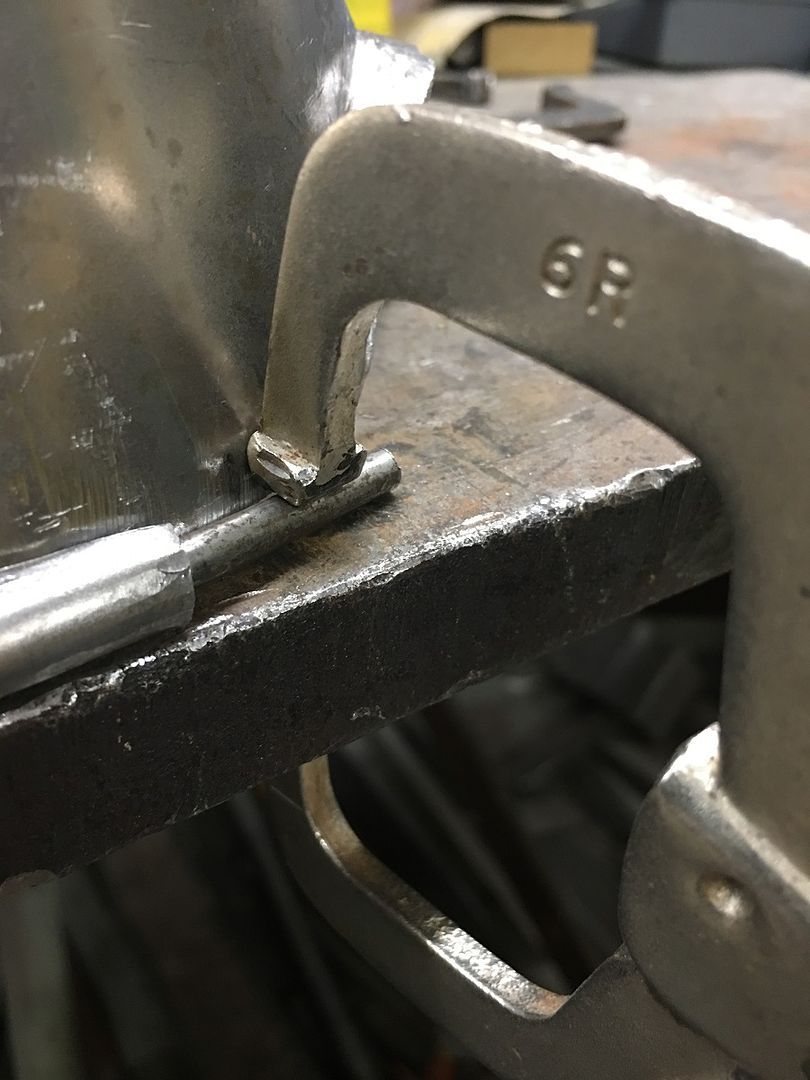 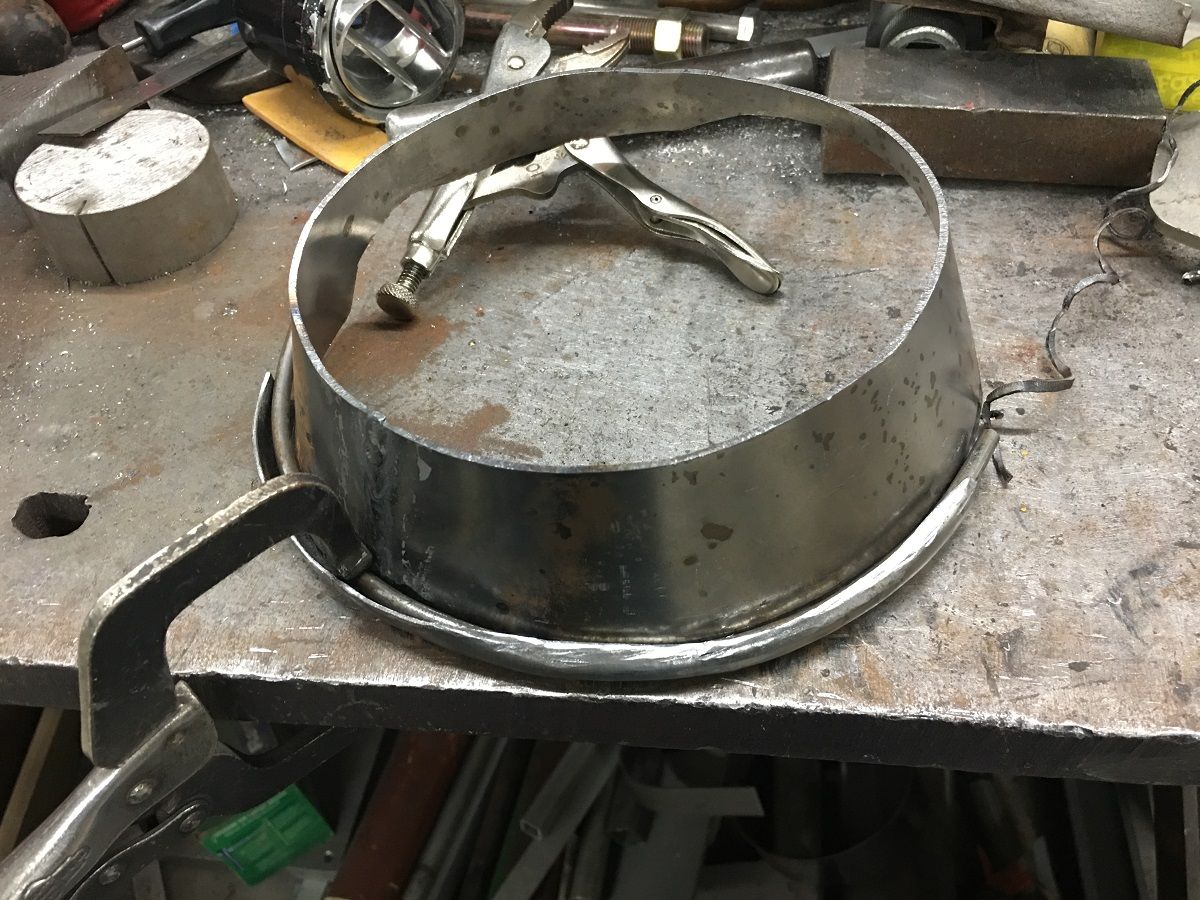 The wires were left long so they could better tie into the hinge structure, here the VEE relief is where the wire will weld to that structure. https://www.youtube.com/watch?v=mEVDpRCER54 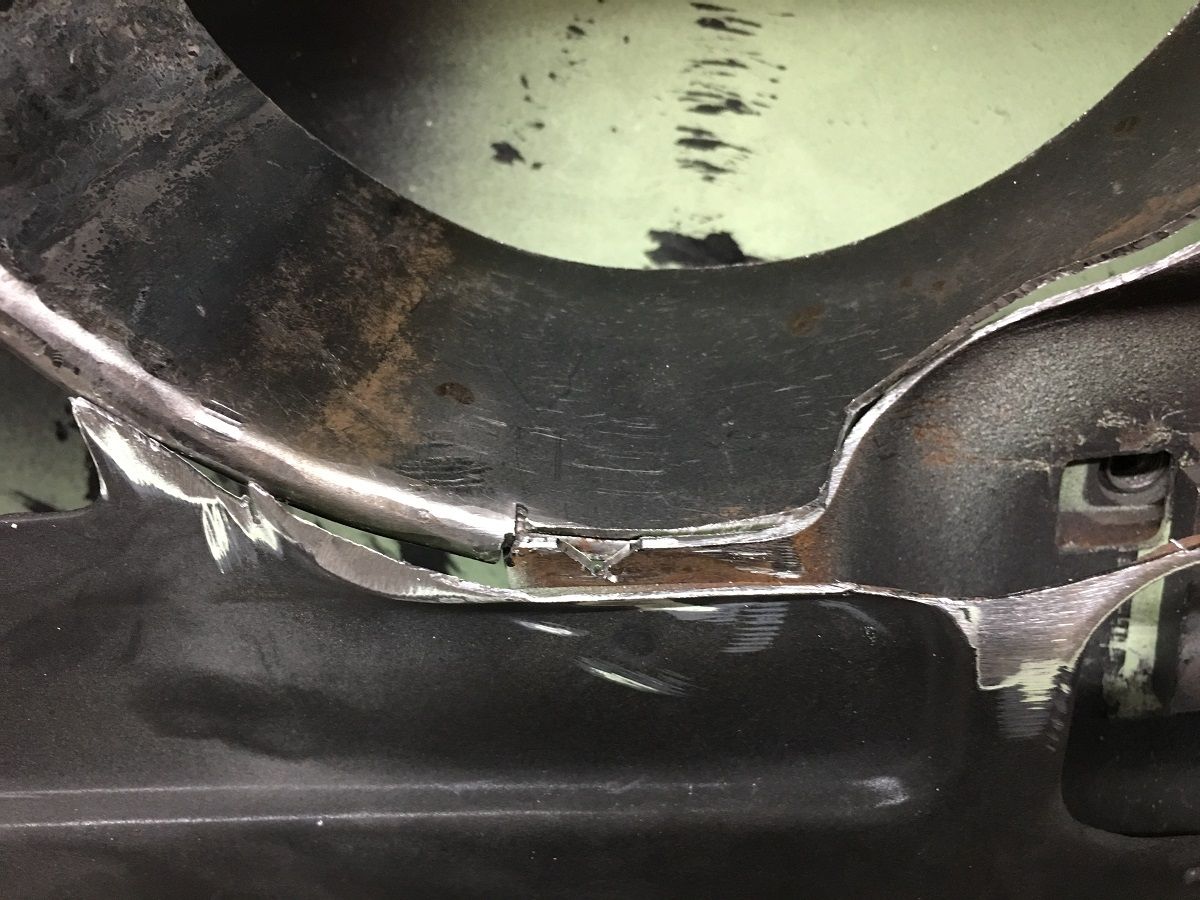 Tacked in place with the MIG, then TIG welded.... 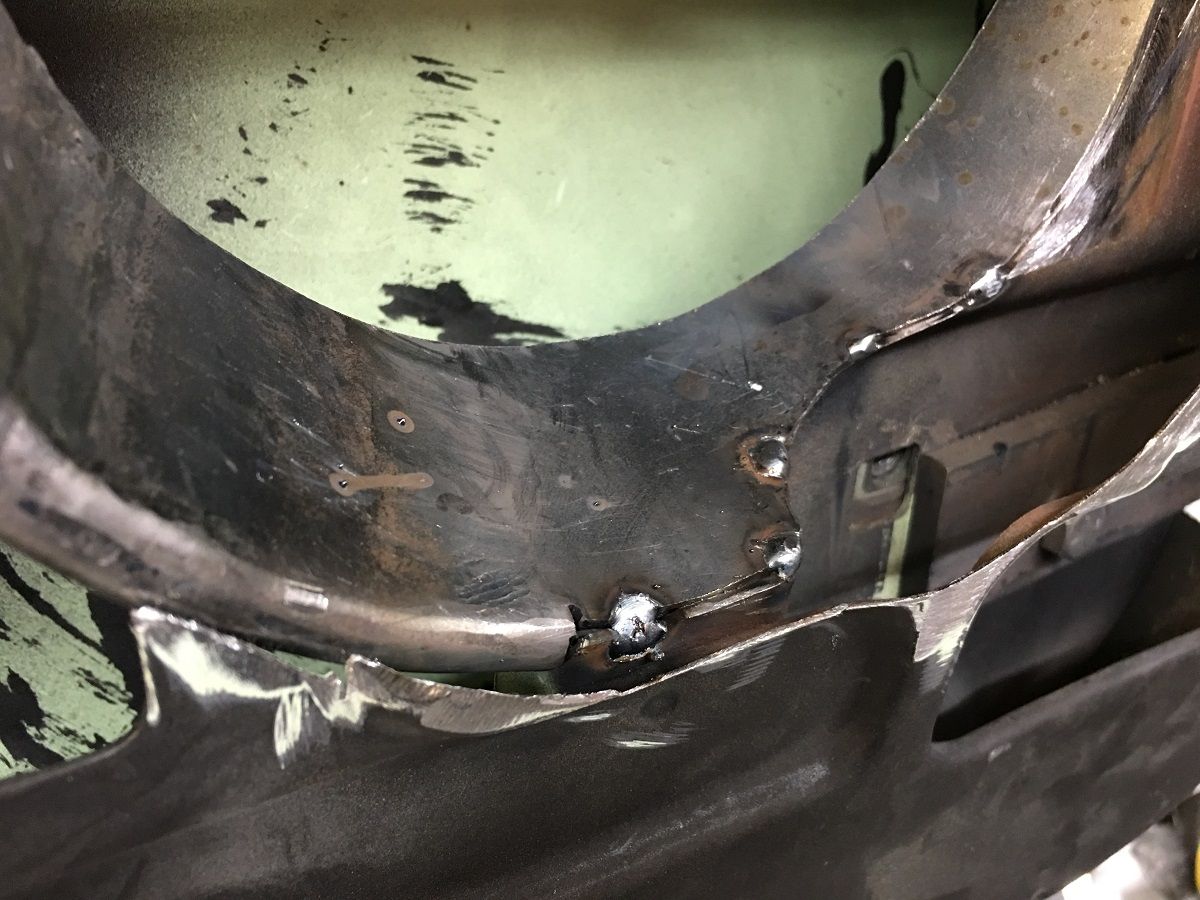 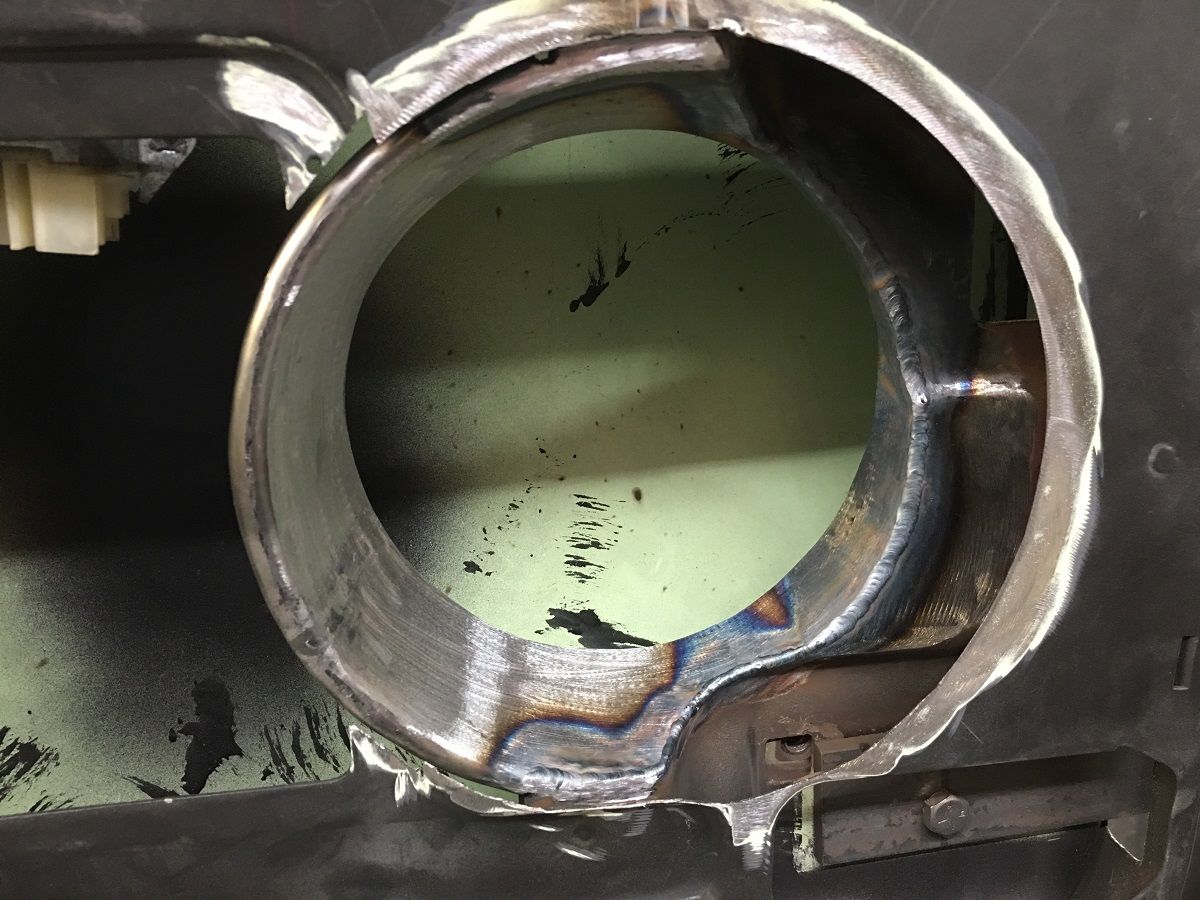 All cleaned up and then primed with some epoxy primer before we weld the speaker mounting ring in place. 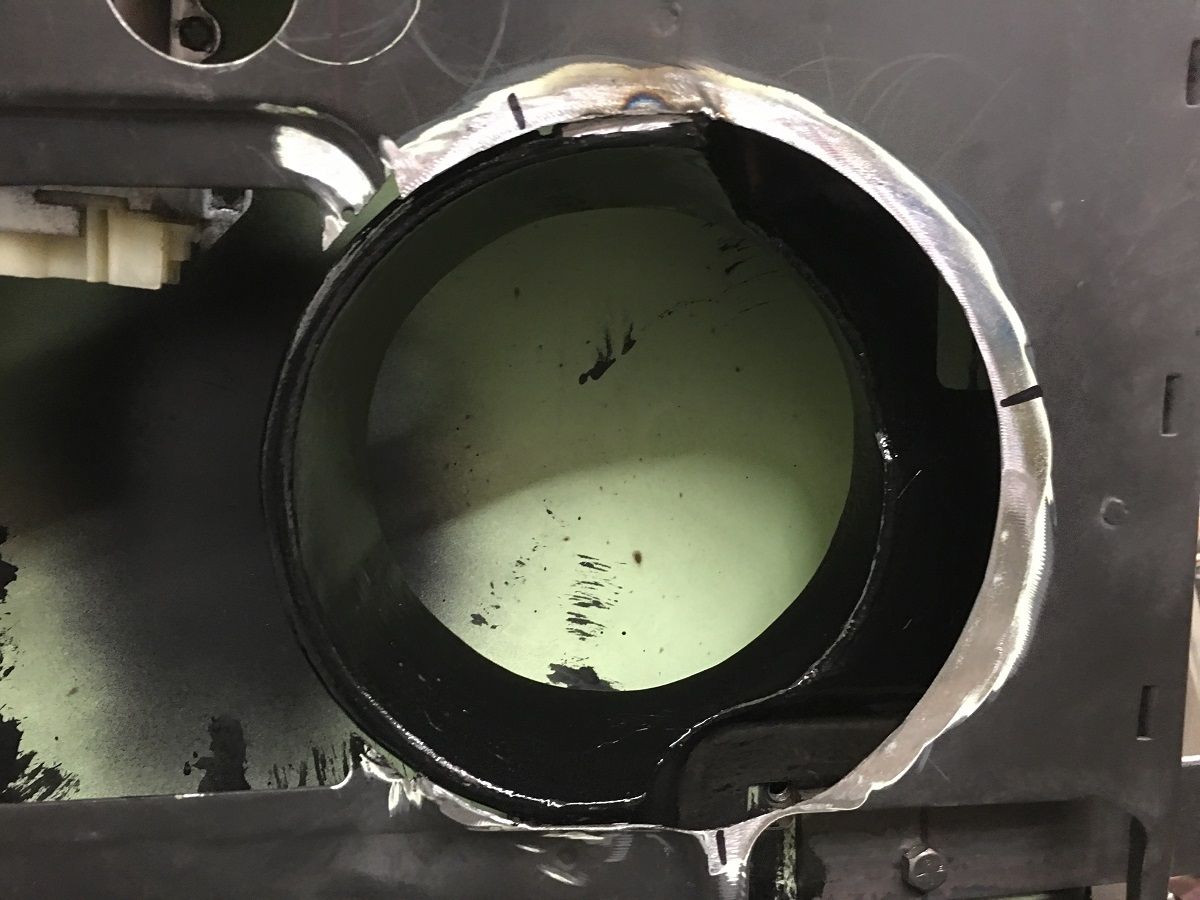
__________________
Robert |
|
|
|
|
06-18-2019, 10:47 PM
|
#1067 |
|
Registered User
Join Date: Jan 2013
Location: Leonardtown, MD
Posts: 1,633
|
Re: 55 Wagon Progress
Back on our speaker mounting ring, we welded on some 8-32 hex nuts on the back side....
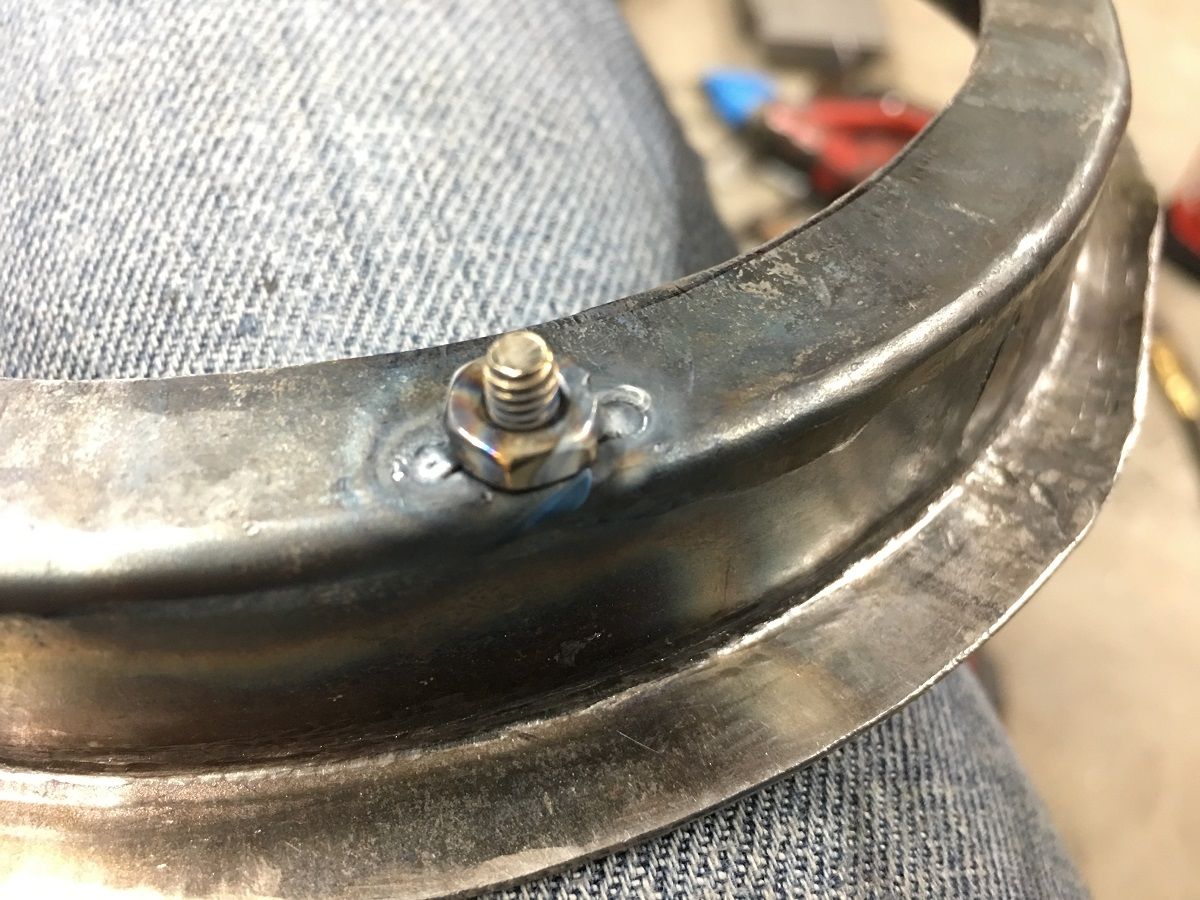 Then the ring is TIG welded in the door... 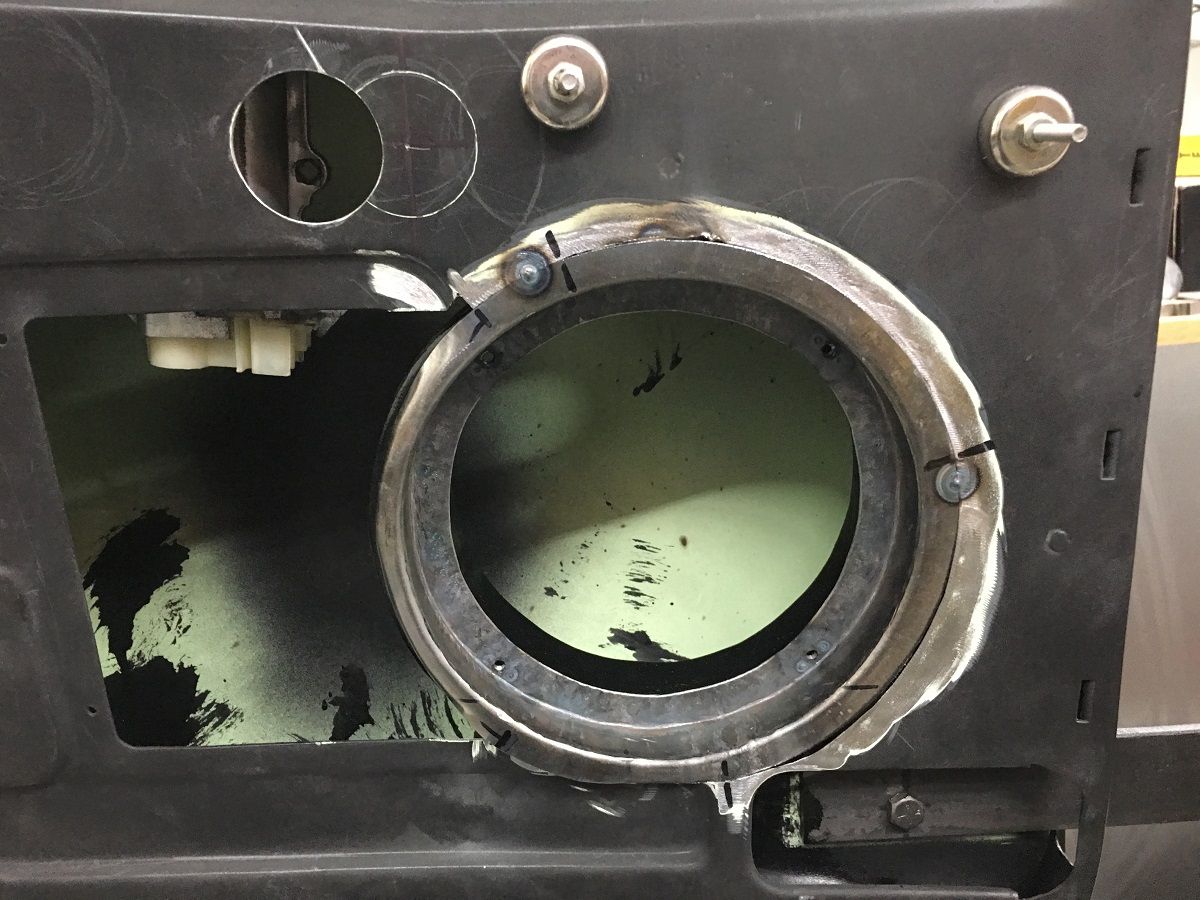 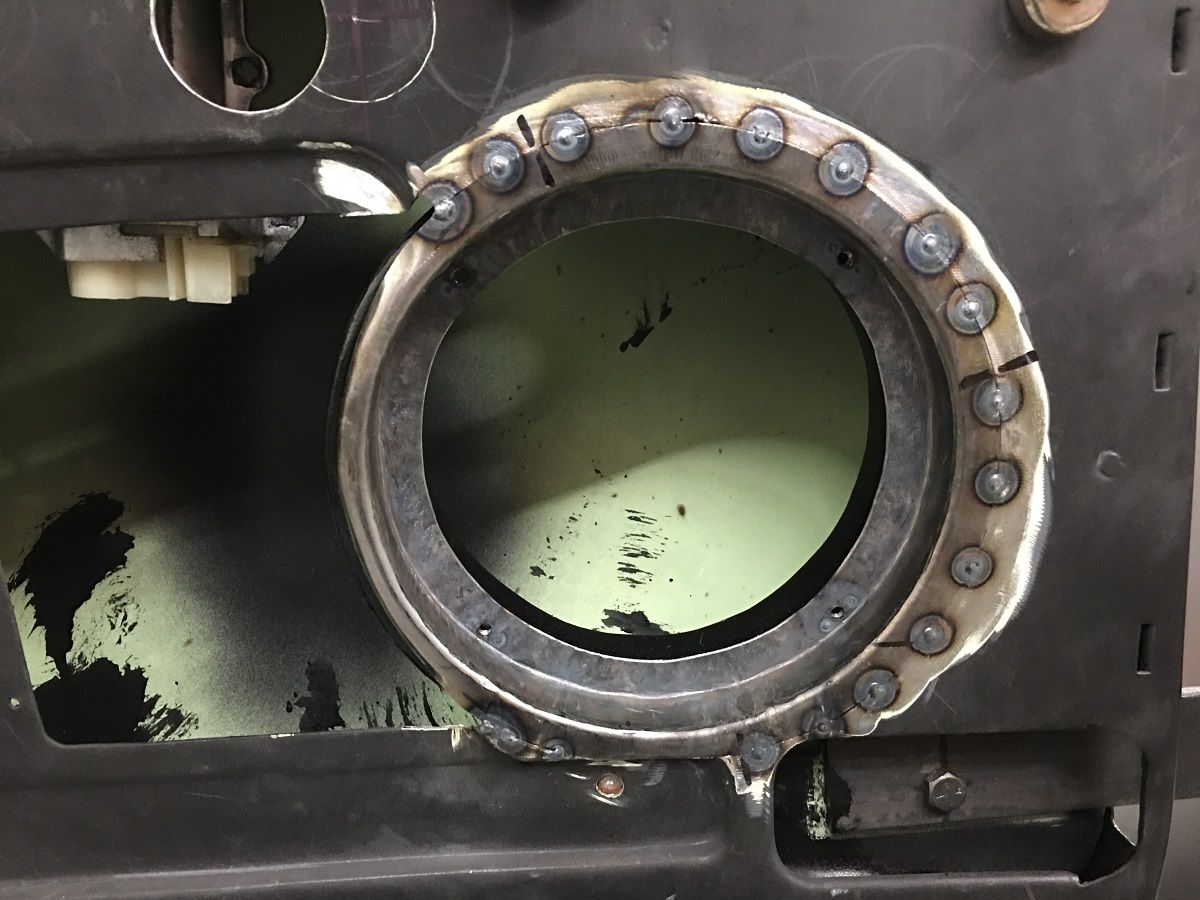 After welding, the area is scuffed and brush painted using SPI epoxy primer. 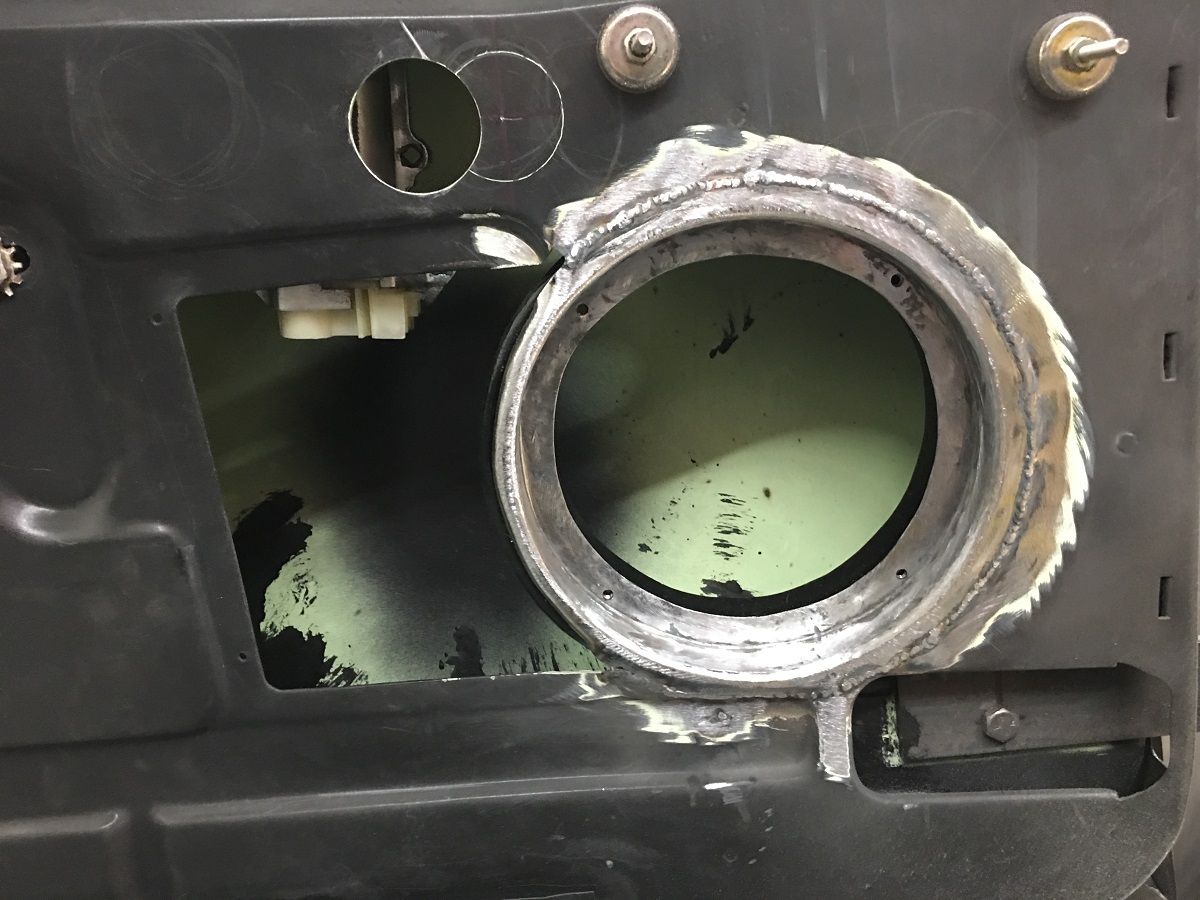 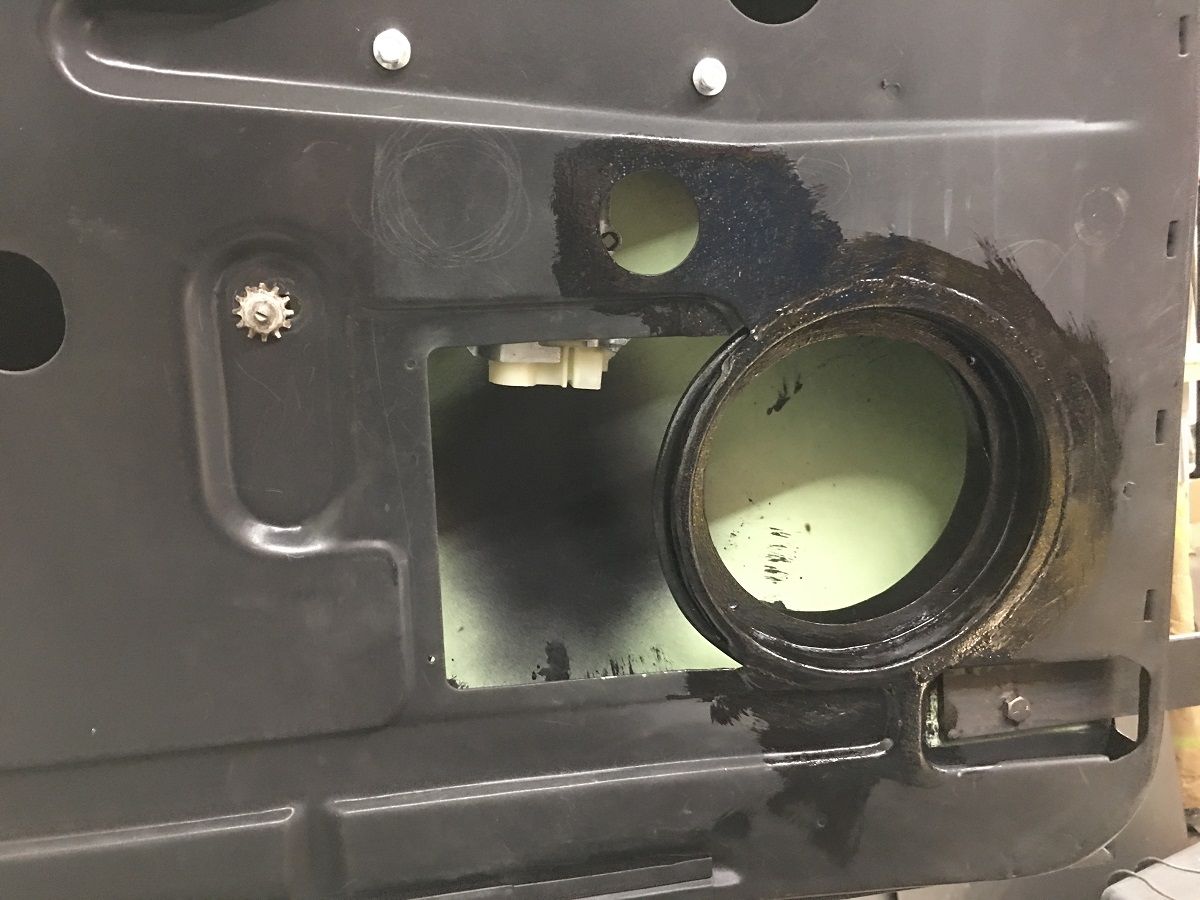 https://youtu.be/ywadRNLIywA 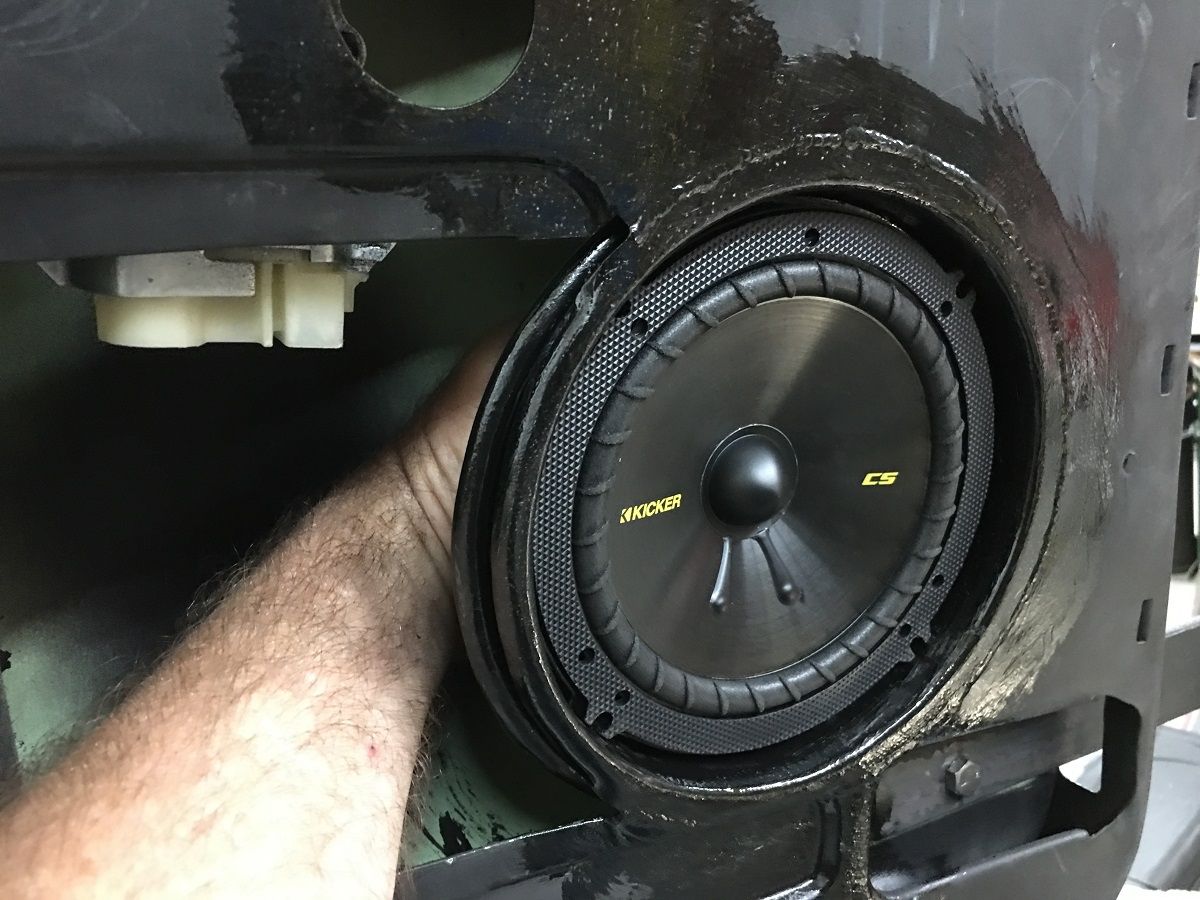 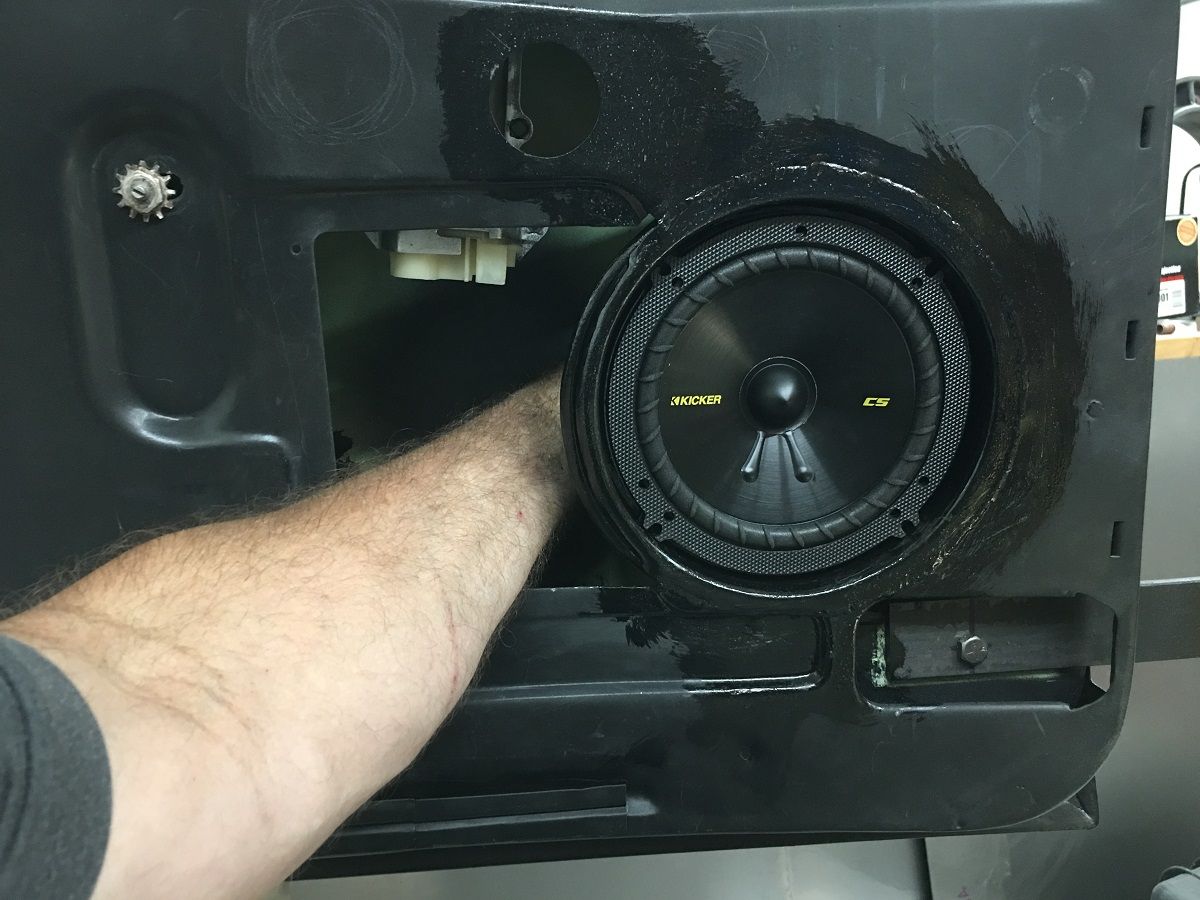
__________________
Robert |
|
|
|
|
07-01-2019, 10:32 PM
|
#1068 |
|
Registered User
Join Date: Jan 2013
Location: Leonardtown, MD
Posts: 1,633
|
Re: 55 Wagon Progress
Passenger door modifications, inner structure added...
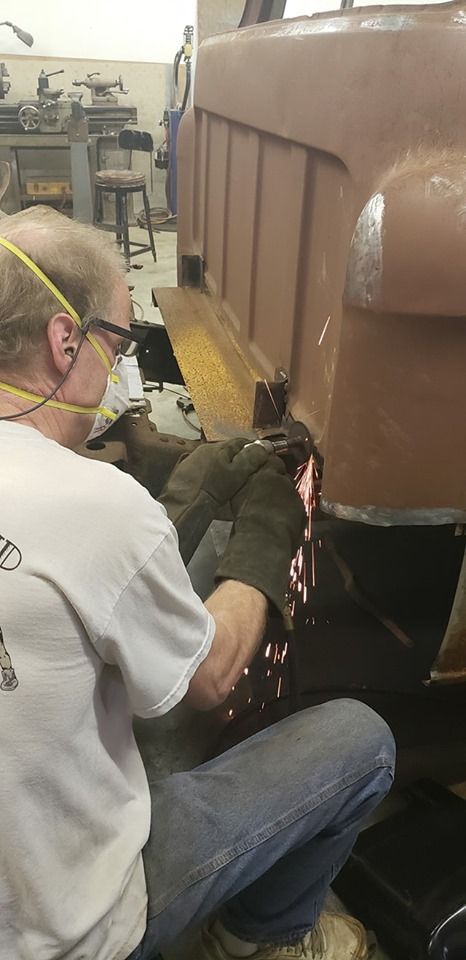
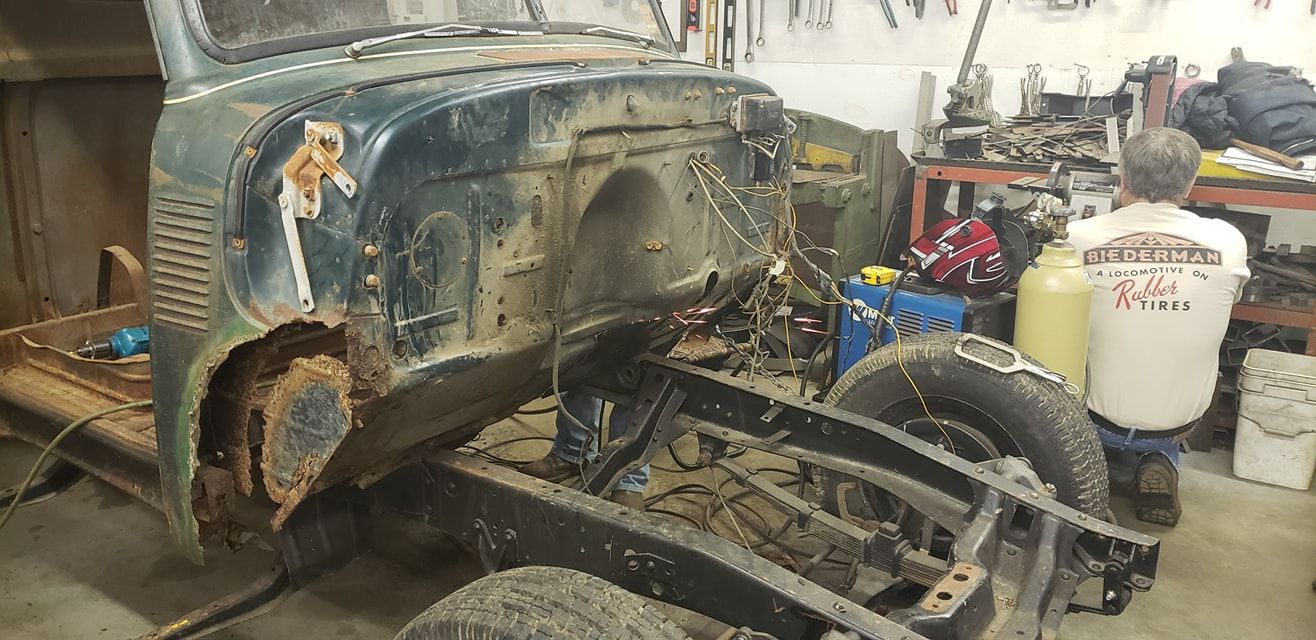
 …..speaker mounting ring welded in place and brush painted using SPI epoxy primer.. 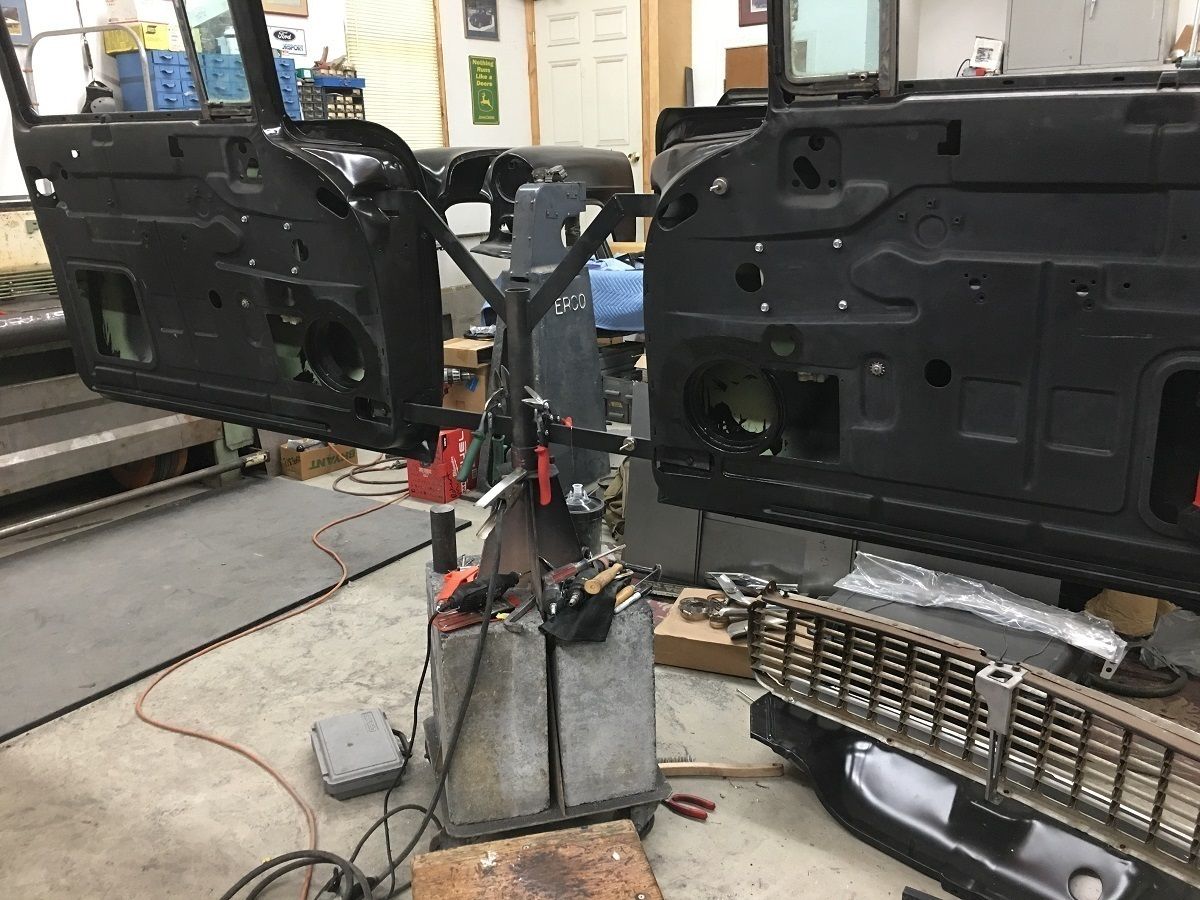 In our attempt to finalize all the needed fabrications before getting deep into paint mode, we had some clearance issues to deal with on the Vintage Air bracket for the AC compressor. The initial mockup showed that the upper mounting tab was too close to the tall valve covers we have on the 383 stroker. A half inch spacer under the intake mounting tab gives us about 1/4" clearance, and shows how much we need to modify the water pump mounting tab. 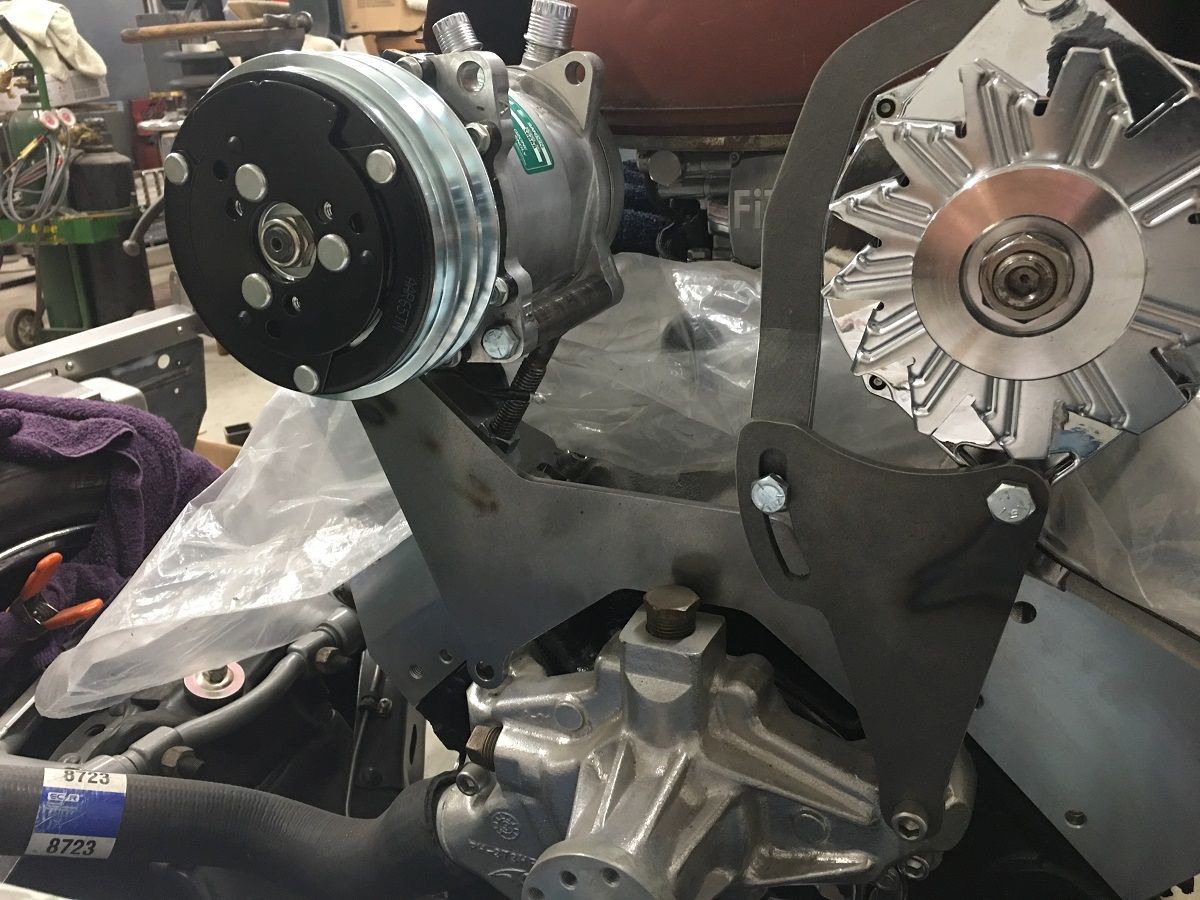 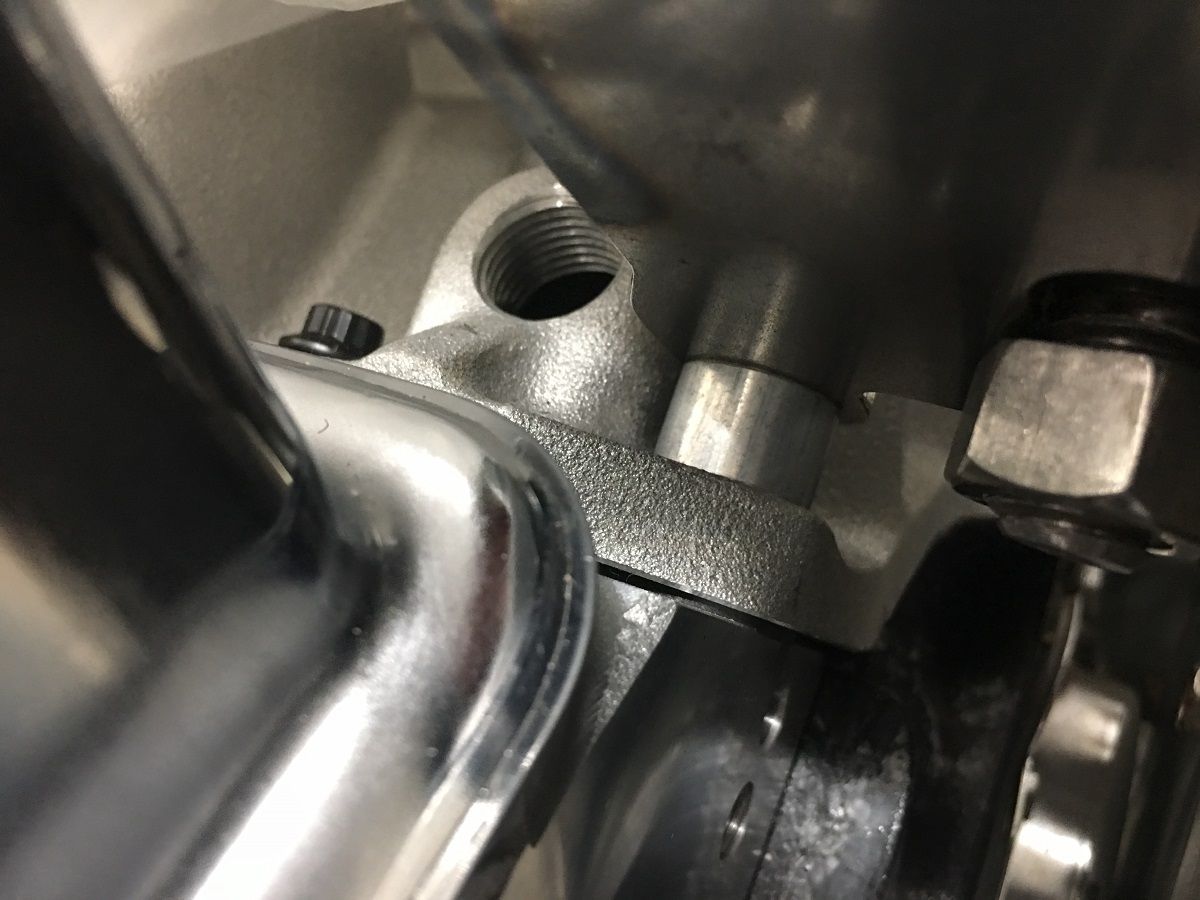 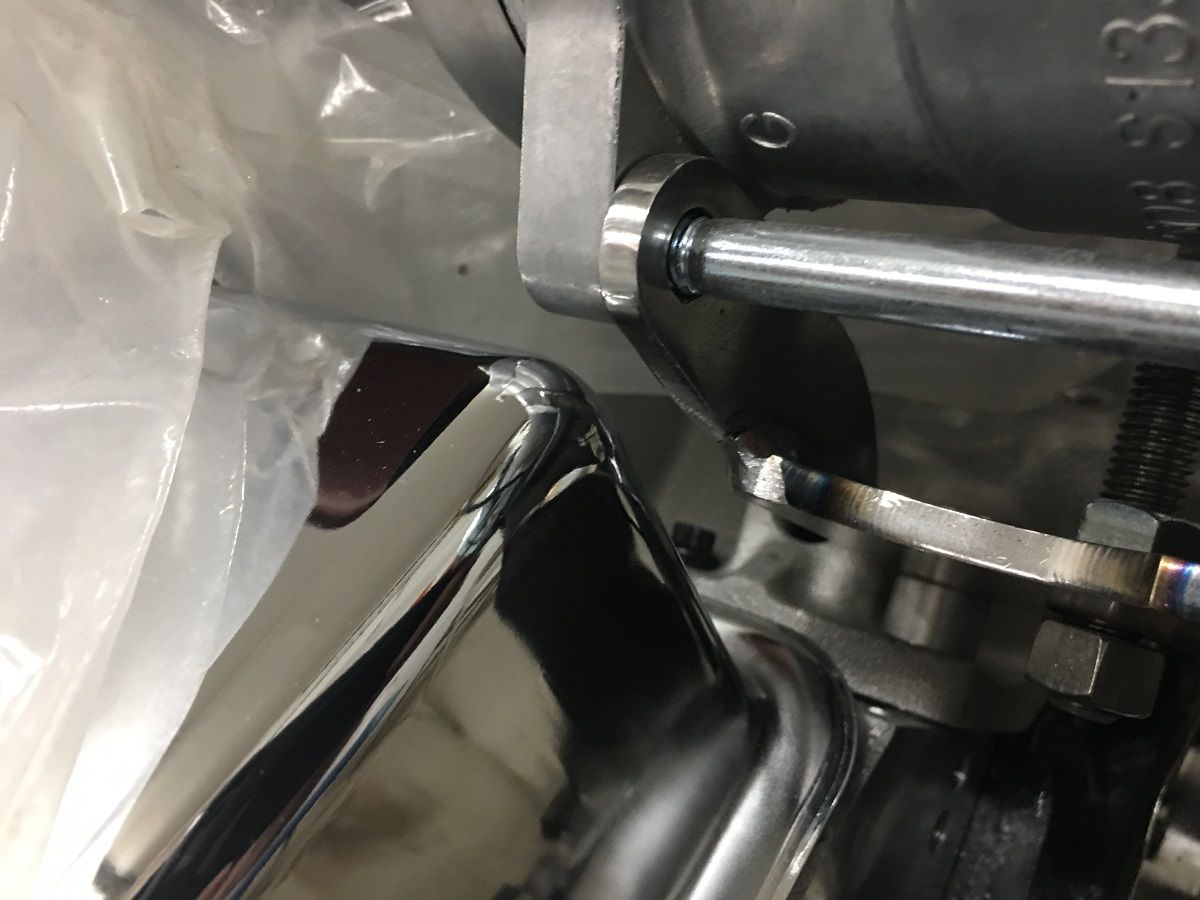 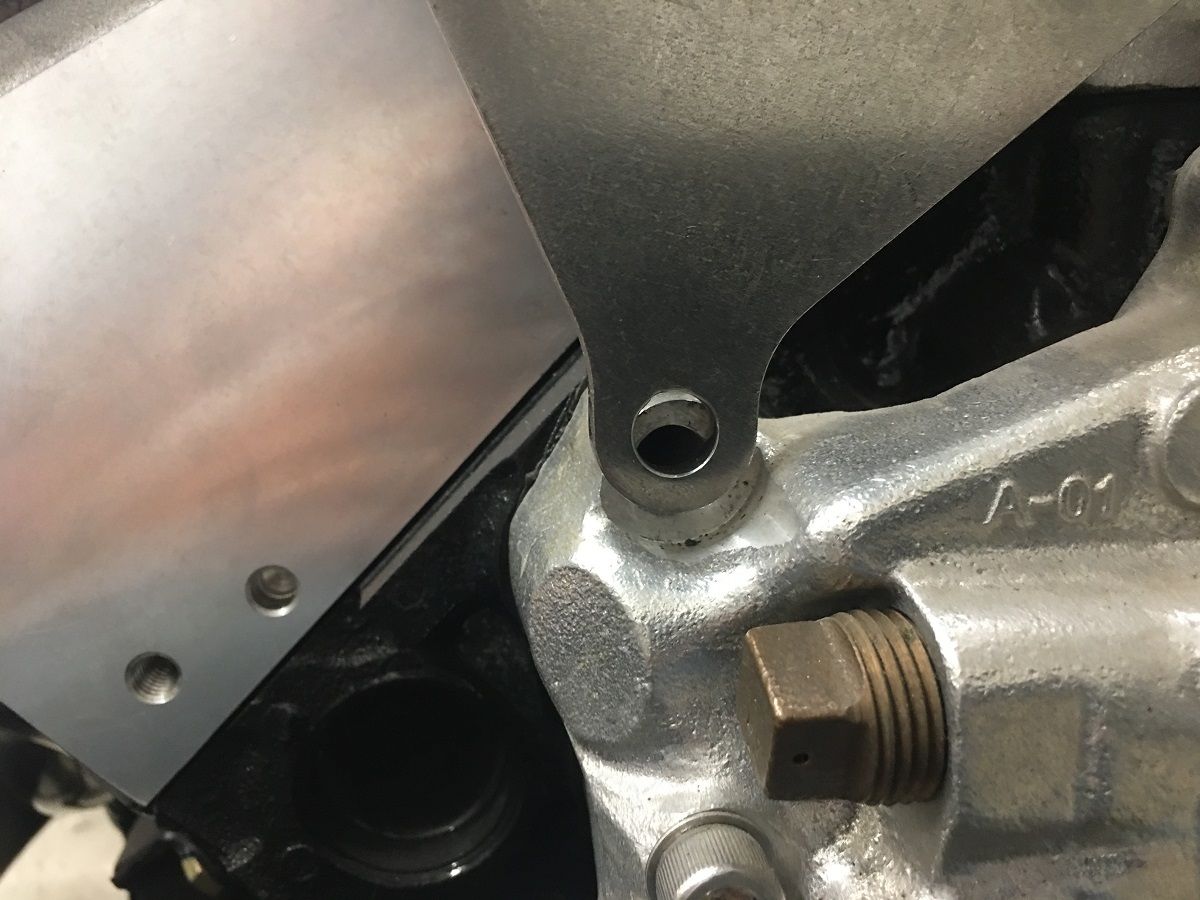 I didn't have much in the selection of 1/4" flat stock, so the shoulder of a 5/16 bolt was used, first the root pass and then a filler pass. 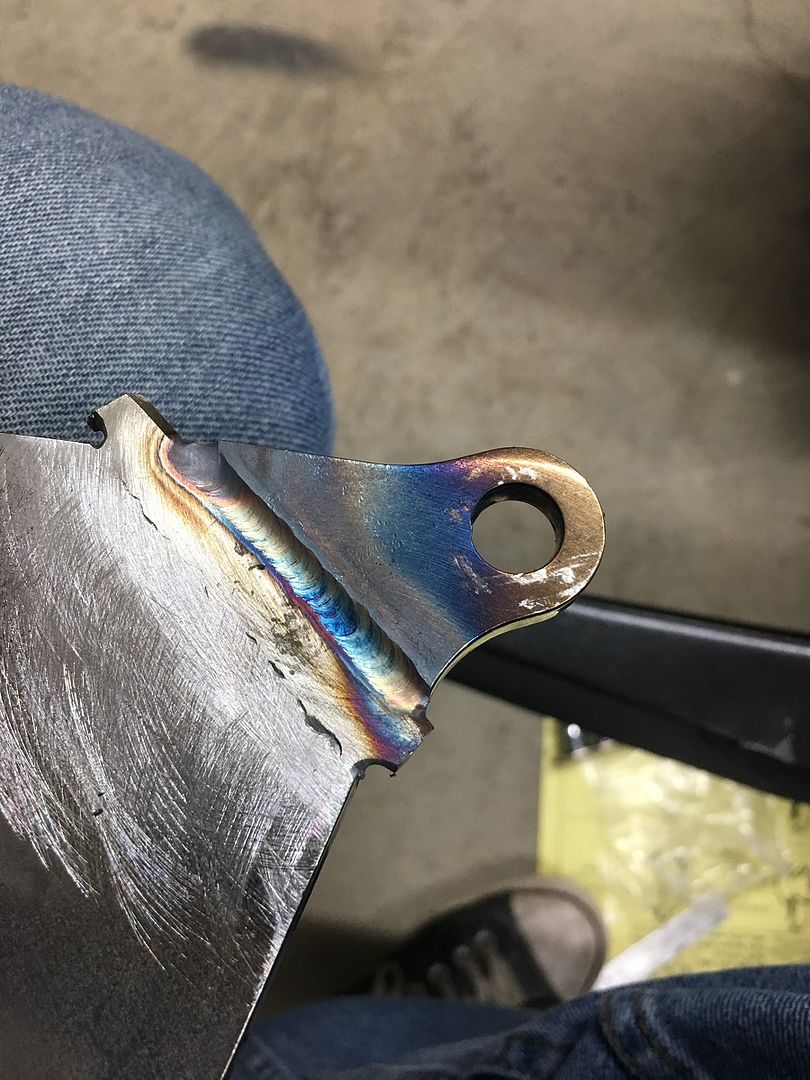 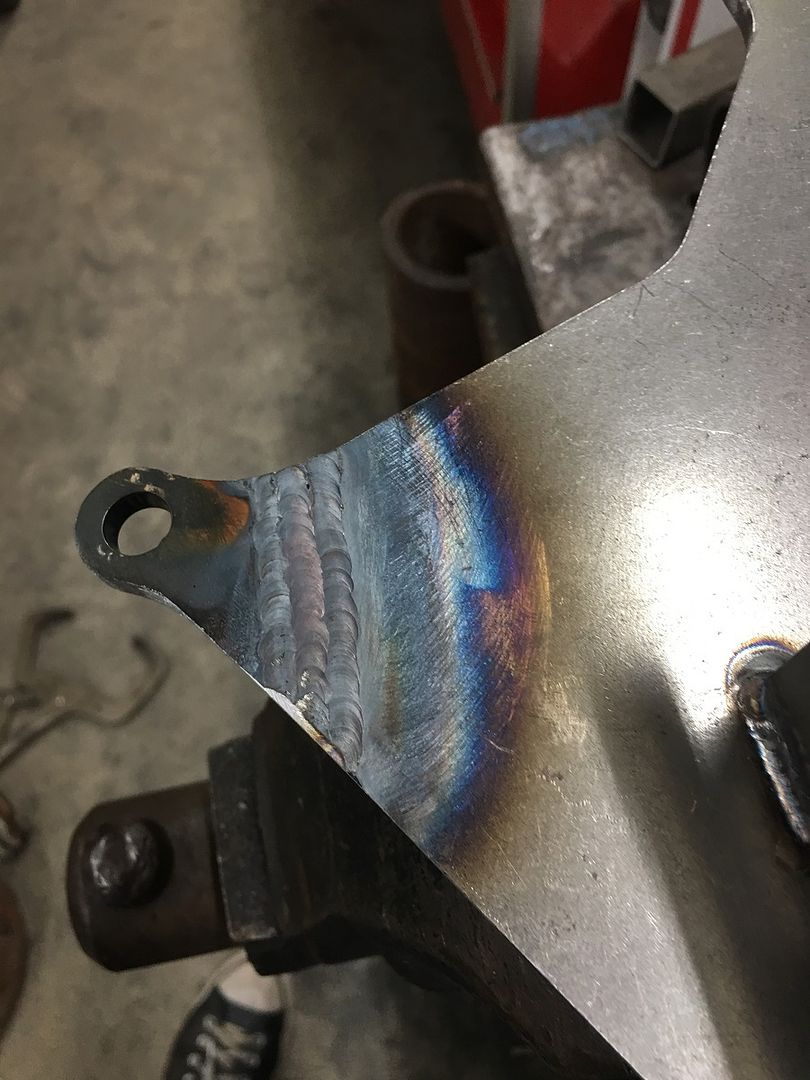 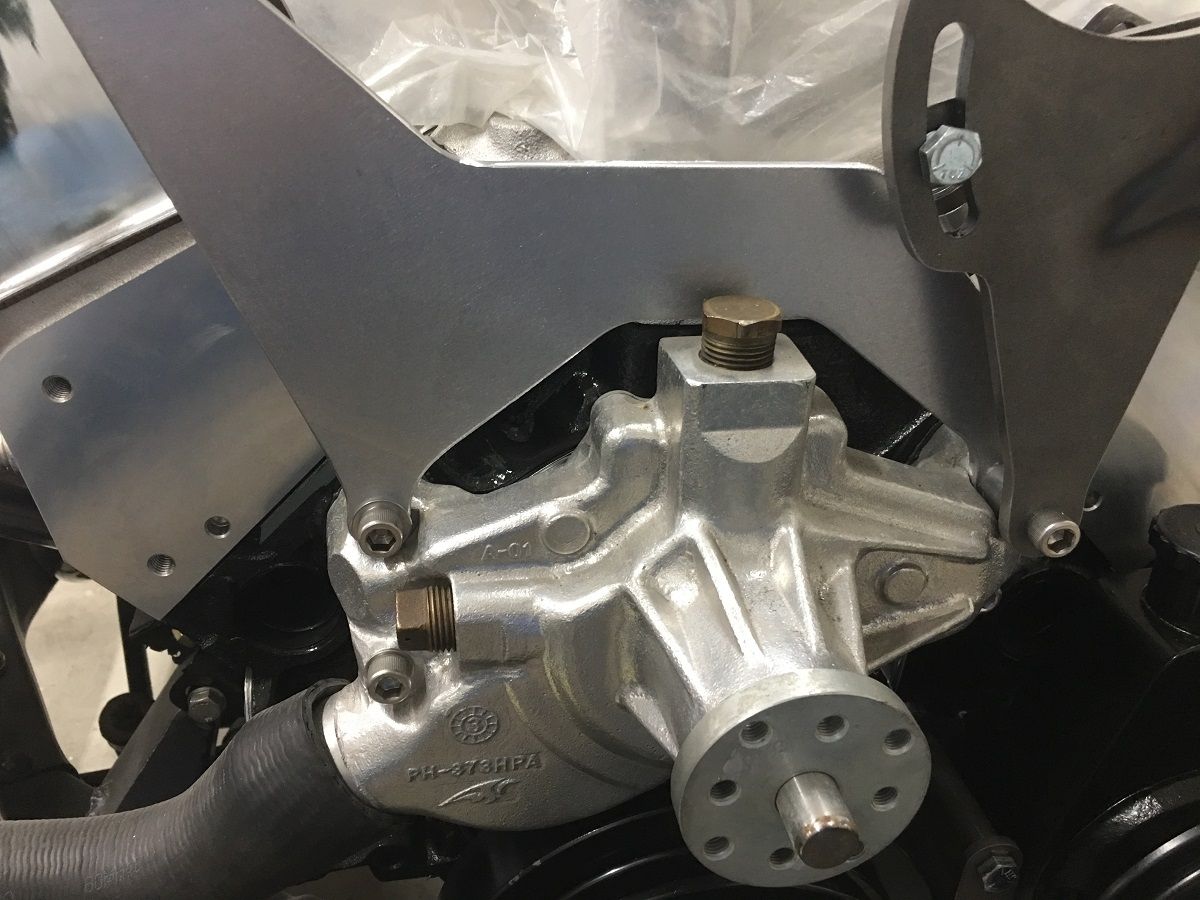 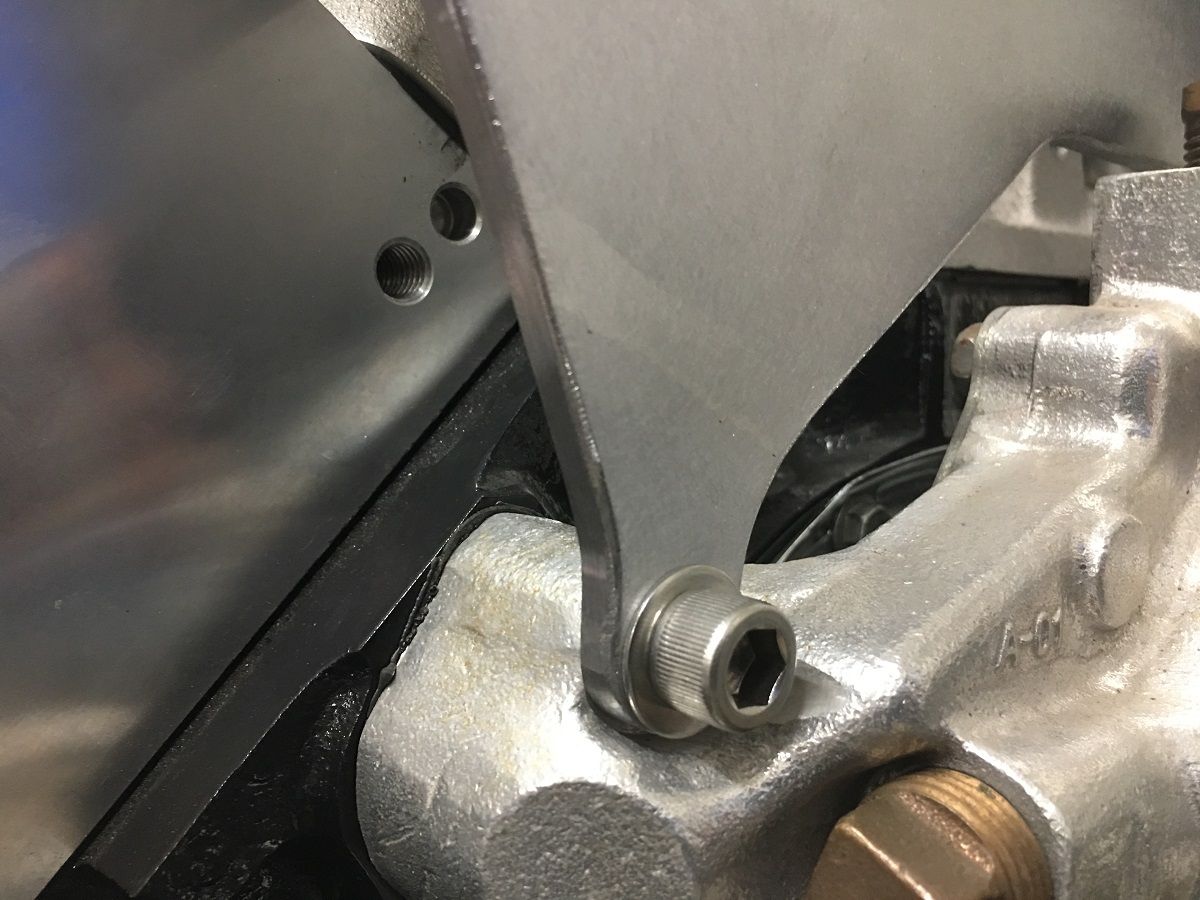 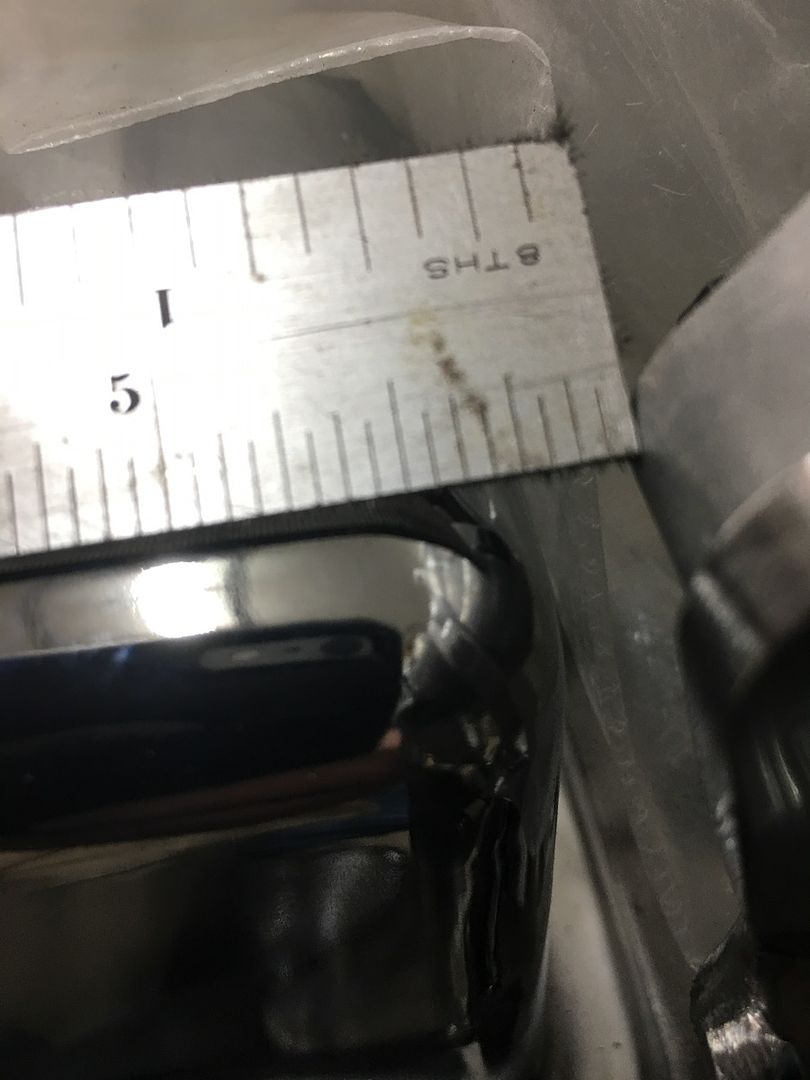 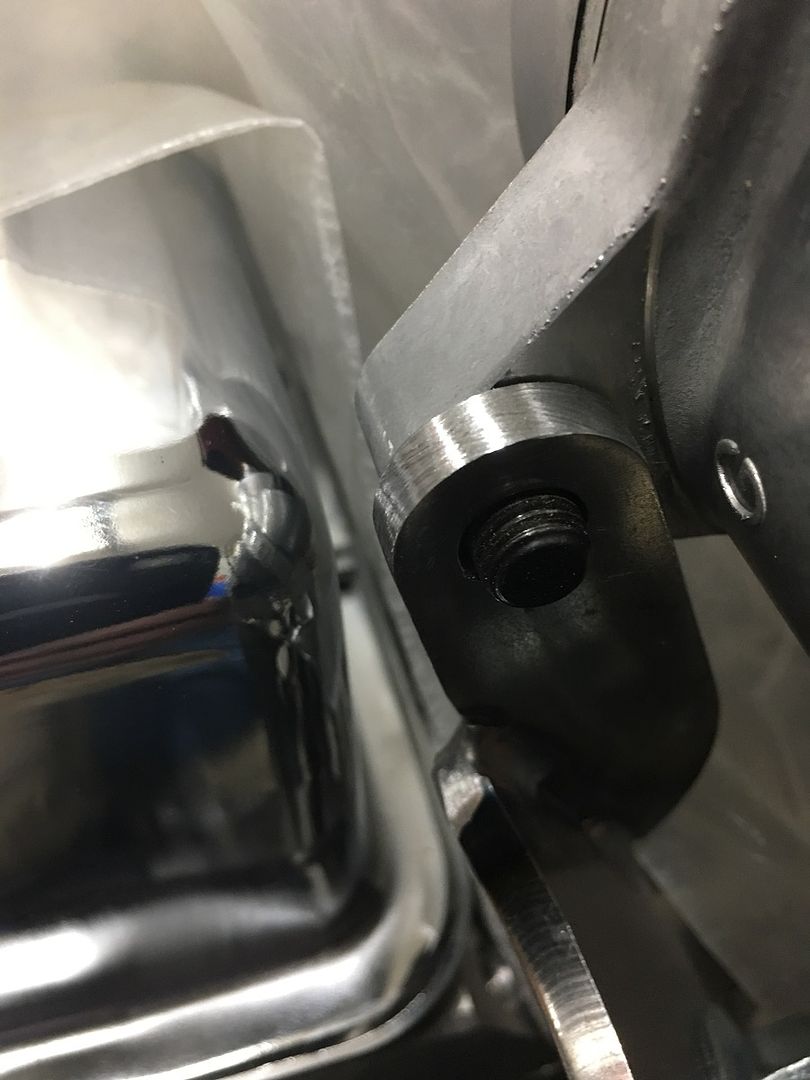  Another part checked off the list....
__________________
Robert |
|
|
|
|
07-01-2019, 11:17 PM
|
#1069 |
|
Senior Member
Join Date: Mar 2011
Location: West Plains, Missouri
Posts: 7,553
|
Re: 55 Wagon Progress
Robert, nice work...Jim
__________________
my build thread: http://67-72chevytrucks.com/vboard/s...d.php?t=459839 Jimbo's long bed step build:http://67-72chevytrucks.com/vboard/s...t=464626<br /> |
|
|
|
|
07-01-2019, 11:53 PM
|
#1070 |
|
Post Whore
Join Date: May 2015
Location: Alabama
Posts: 14,581
|
Re: 55 Wagon Progress
Great fix...!
__________________
Mongo...aka Greg RIP Dad RIP Jesse 1981 C30 LQ9 NV4500..http://67-72chevytrucks.com/vboard/s...d.php?t=753598 Mongos AD- LS3 TR6060...http://67-72chevytrucks.com/vboard/s...34#post8522334 Columbus..the 1957 IH 4x4...http://67-72chevytrucks.com/vboard/s...63#post8082563 2023 Chevy Z71..daily driver |
|
|
|
|
07-19-2019, 02:04 PM
|
#1071 |
|
Registered User
Join Date: Jan 2013
Location: Leonardtown, MD
Posts: 1,633
|
Re: 55 Wagon Progress
Thanks!
Time to play catch-up, had a short hiatus in Upstate NY on the St Lawrence river. Daytime and sunset: 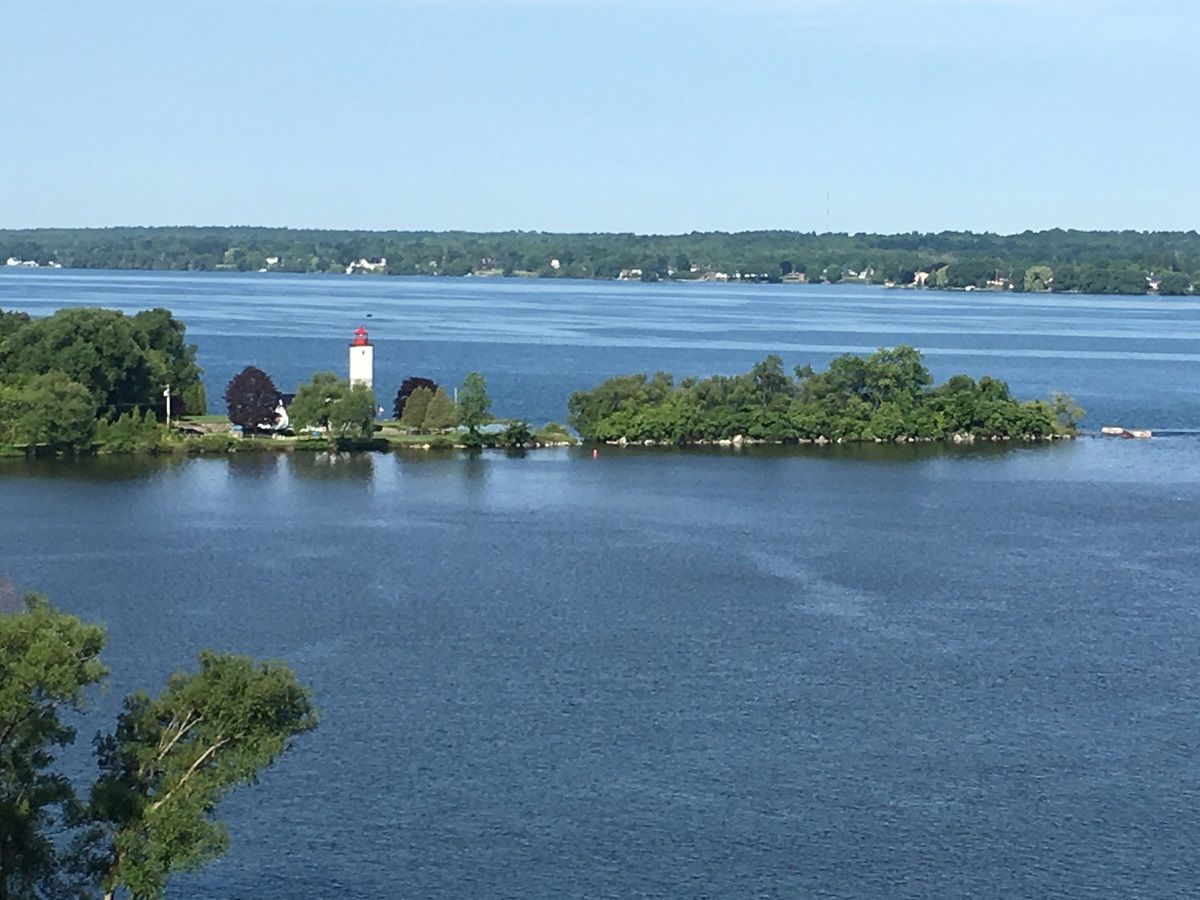 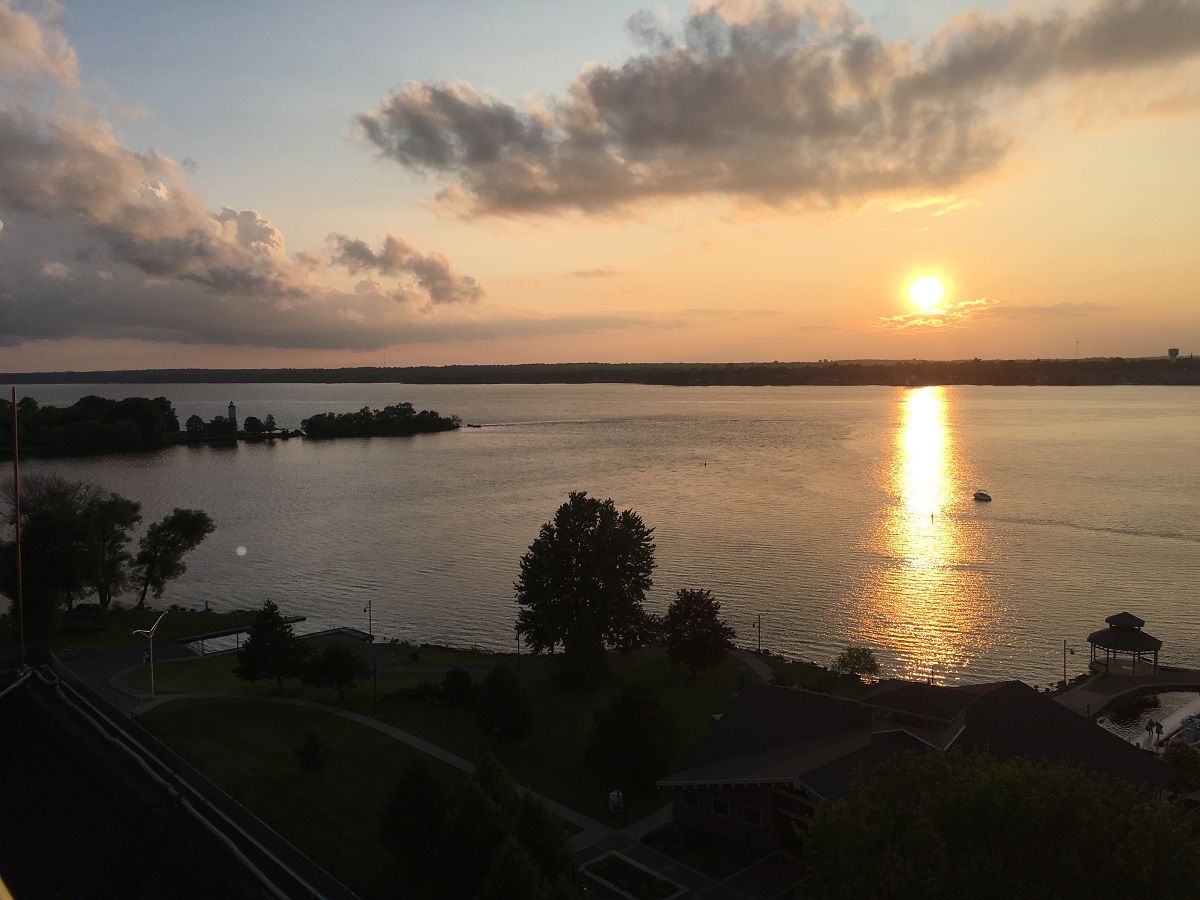 I picked up some louver dies that are set up for the press brake but should be the start of a louver press eventually... got both 2" and 3" dies. 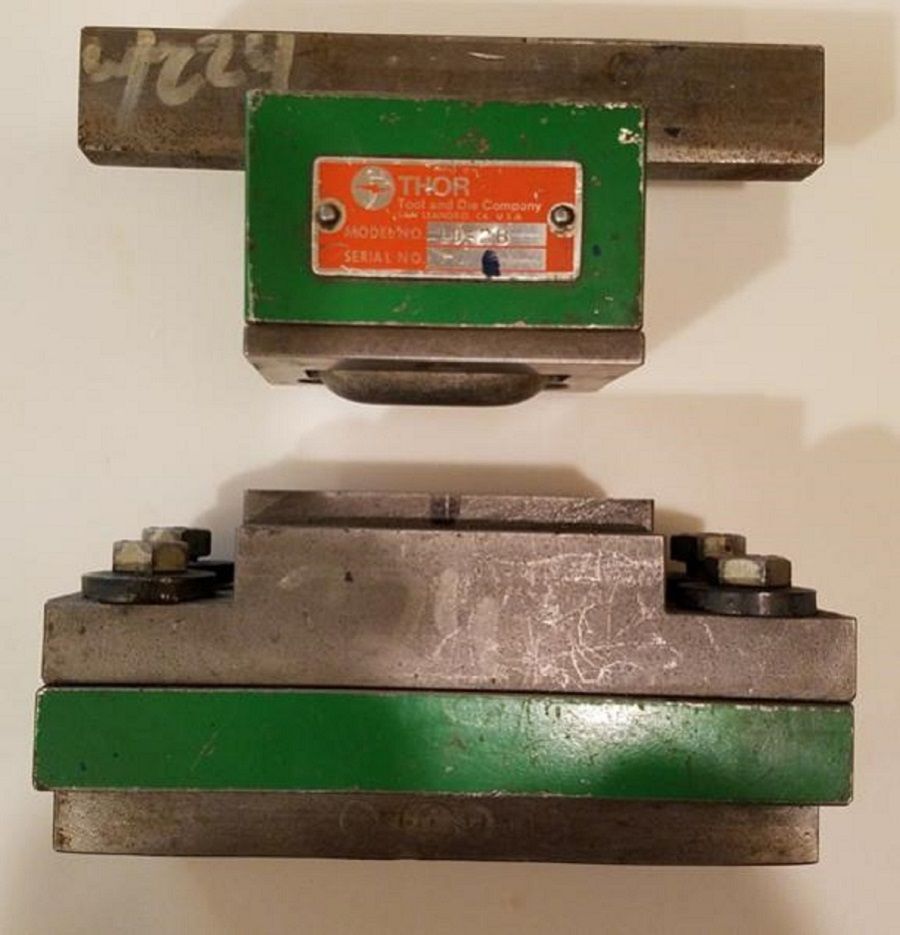 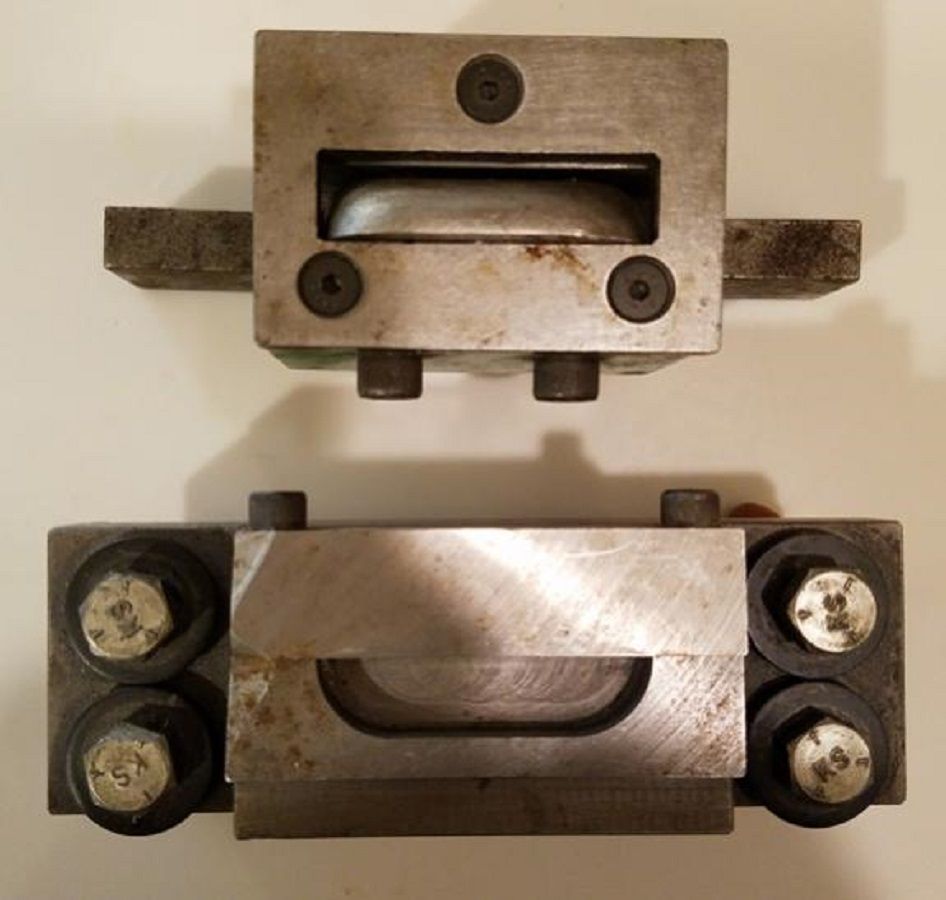 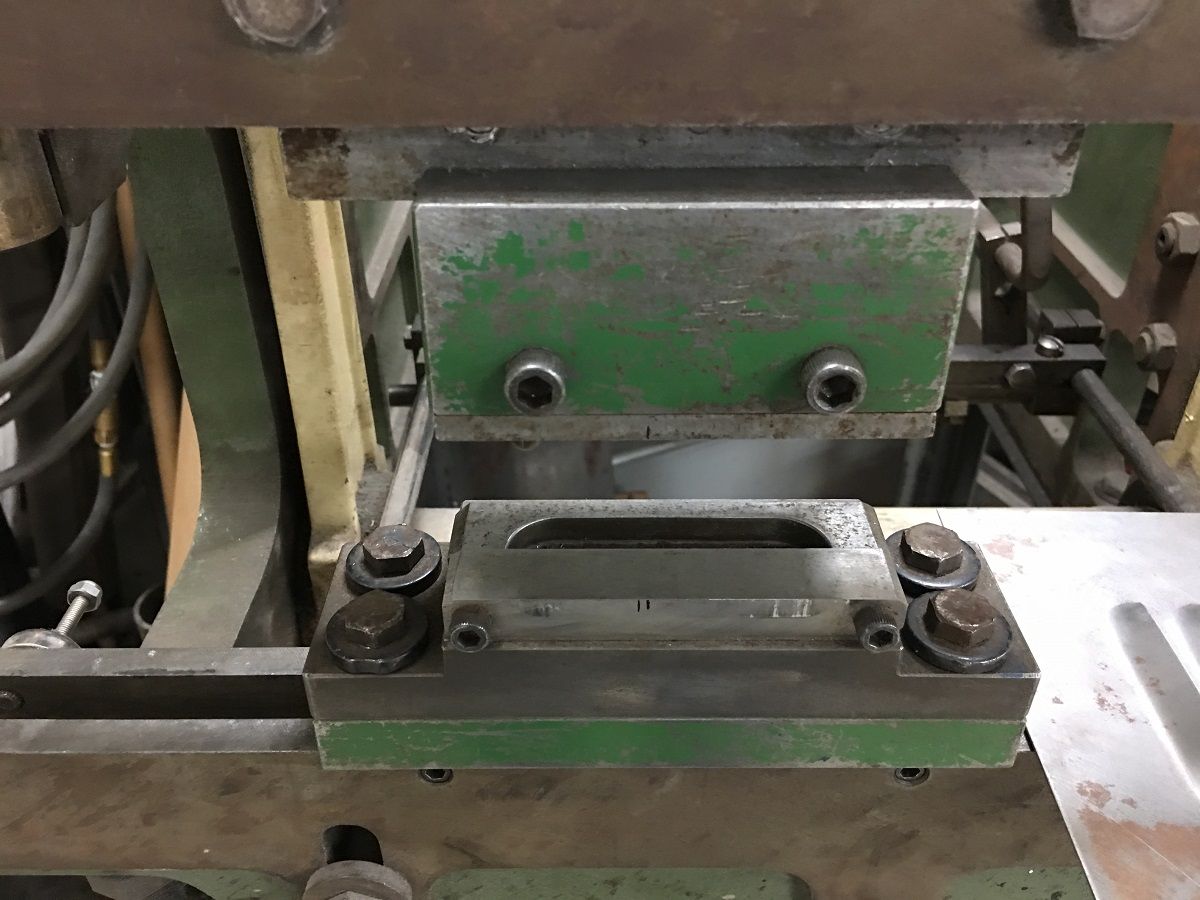 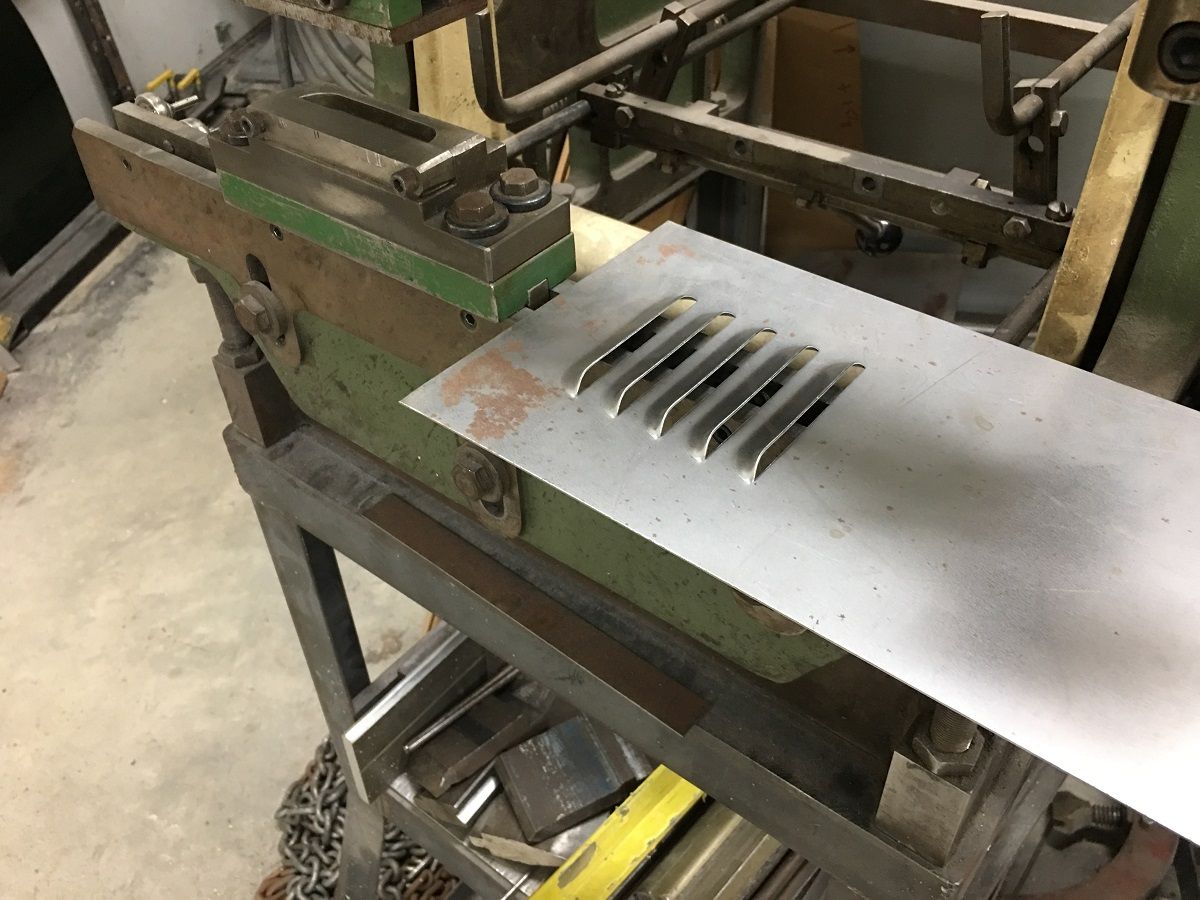 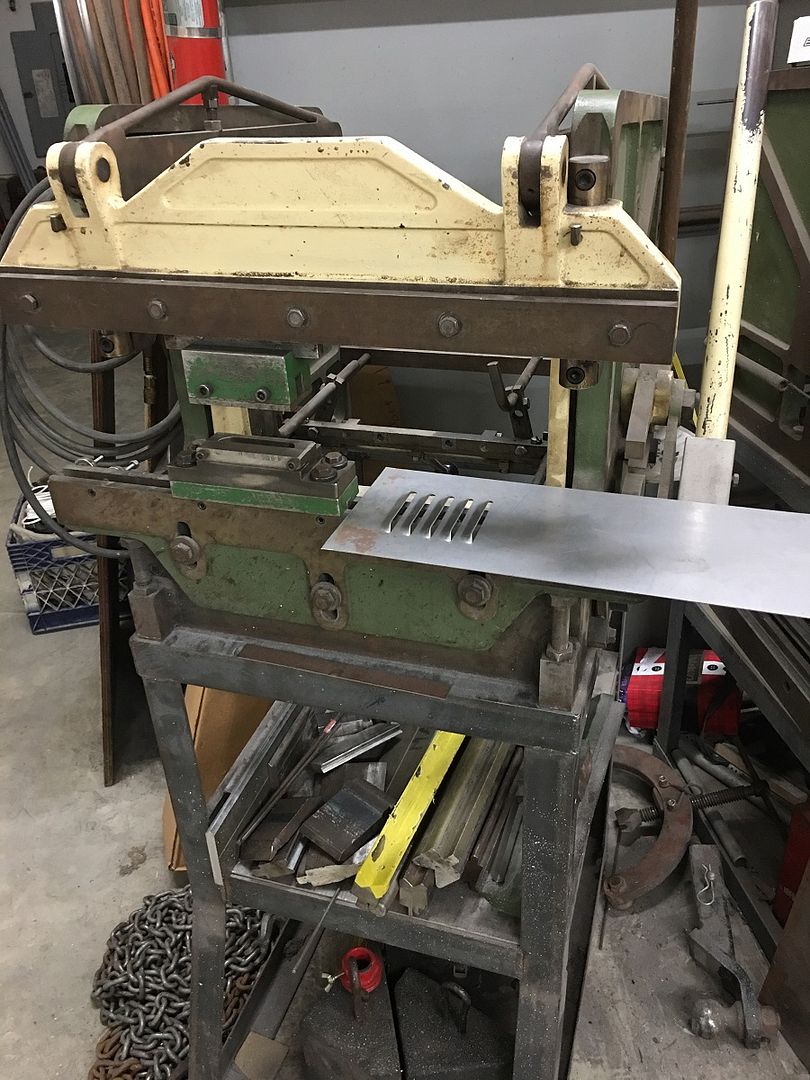 I also have a couple good friends that understand my tool addiction that both sent me a link to an ad for body tools, especially for the Vise Grips. Here's what I picked up from a retired bodyman, now to keep these quality tools going. VG collection is now over 130.. never enough. 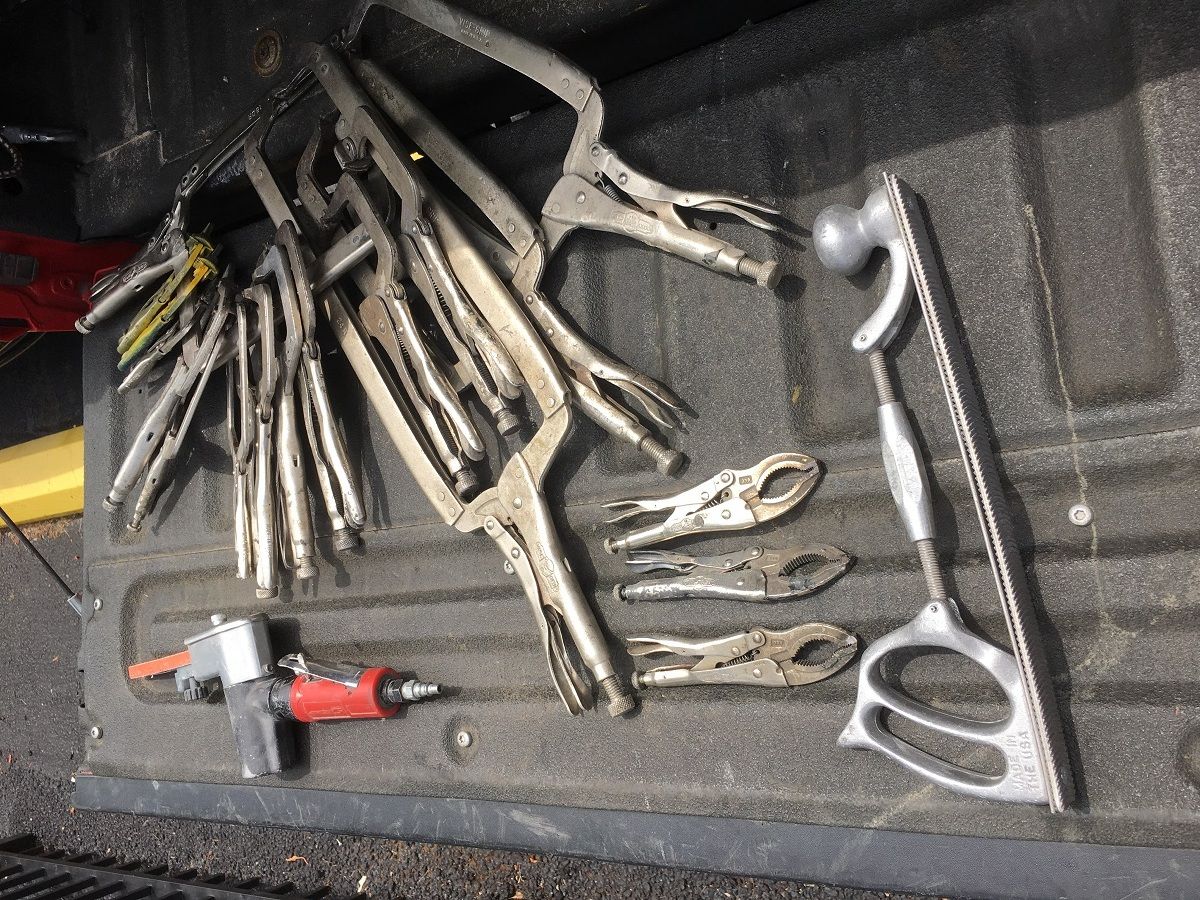 ...and with the engine brackets back from powder coating, and our new 45* water neck arrived, we were able to get the belts and upper hose all mocked up. The hose we used was a Dayco 72384, made as a lower hose for a V6 Ford Explorer, but it fits this application like a glove... 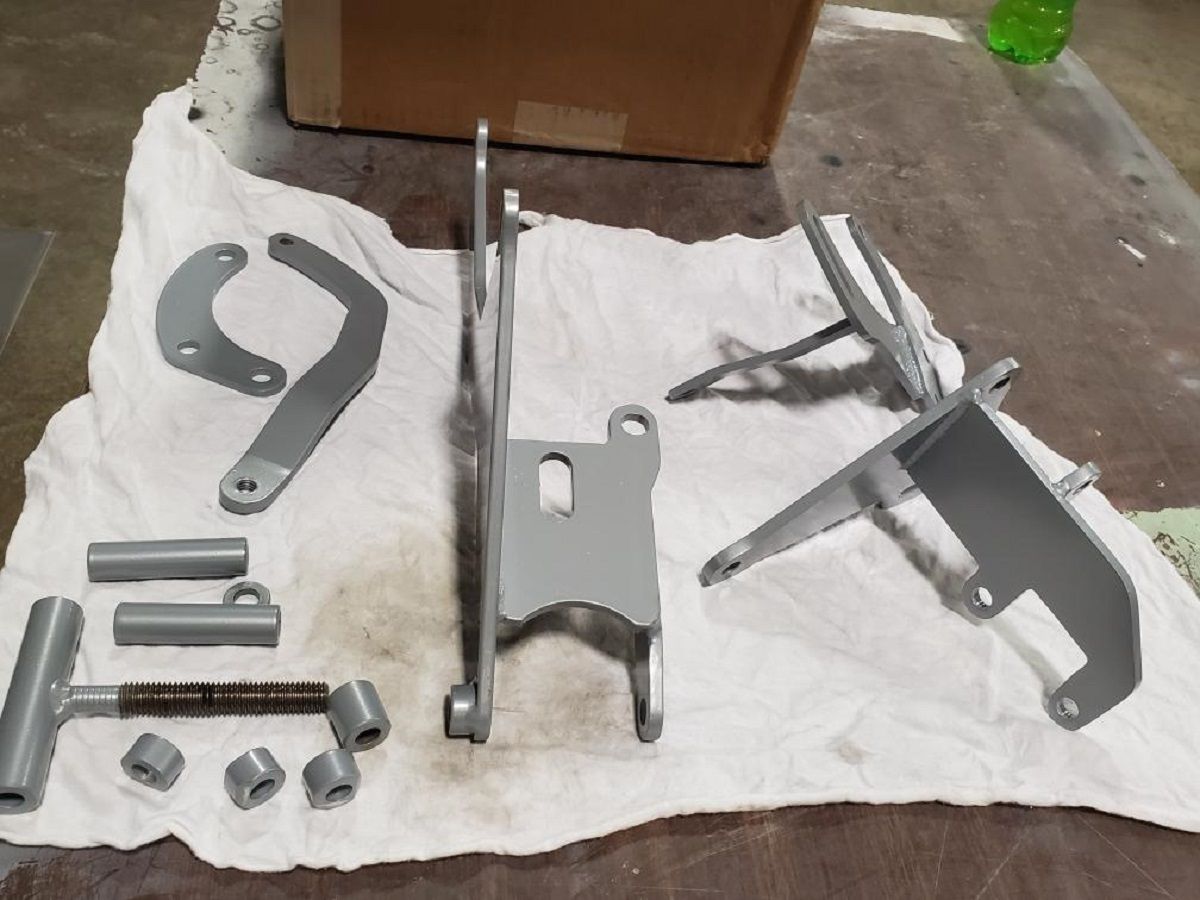 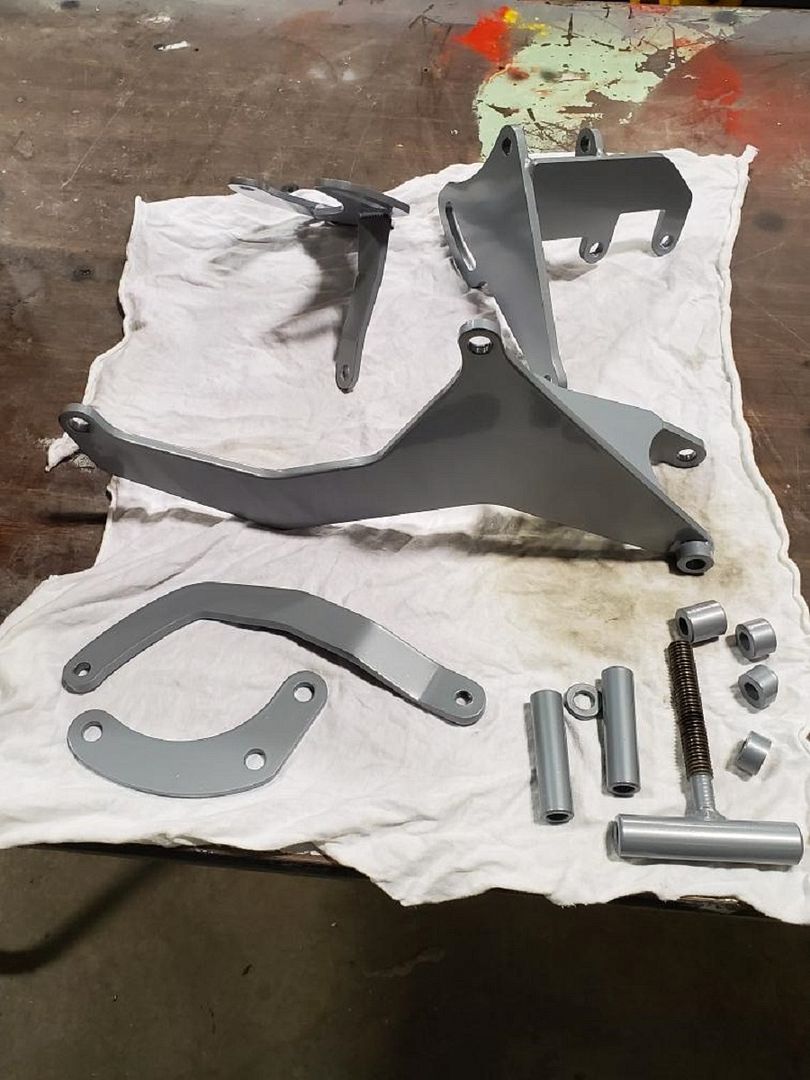 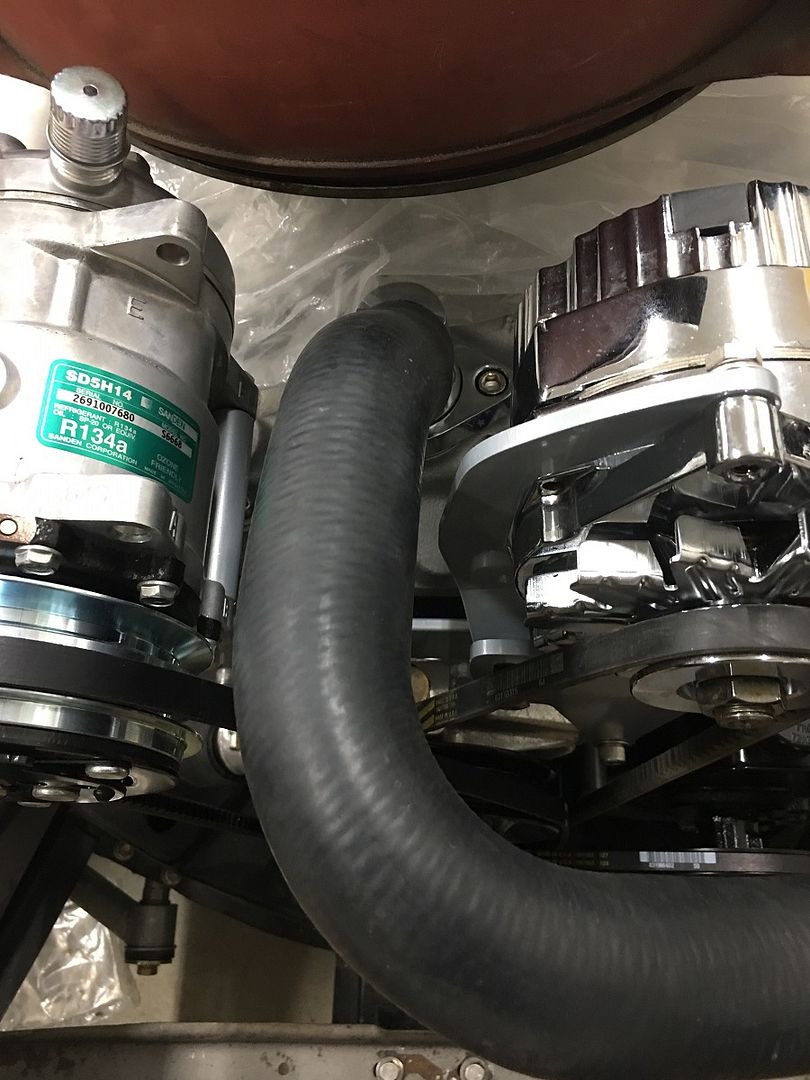 Video version: https://www.youtube.com/watch?v=5TvMKp_9VH4 .
__________________
Robert |
|
|
|
|
07-21-2019, 11:01 PM
|
#1072 |
|
Registered User
Join Date: Jan 2013
Location: Leonardtown, MD
Posts: 1,633
|
Re: 55 Wagon Progress
Spent some time organizing, needed some racks for all the Lennox dies..
     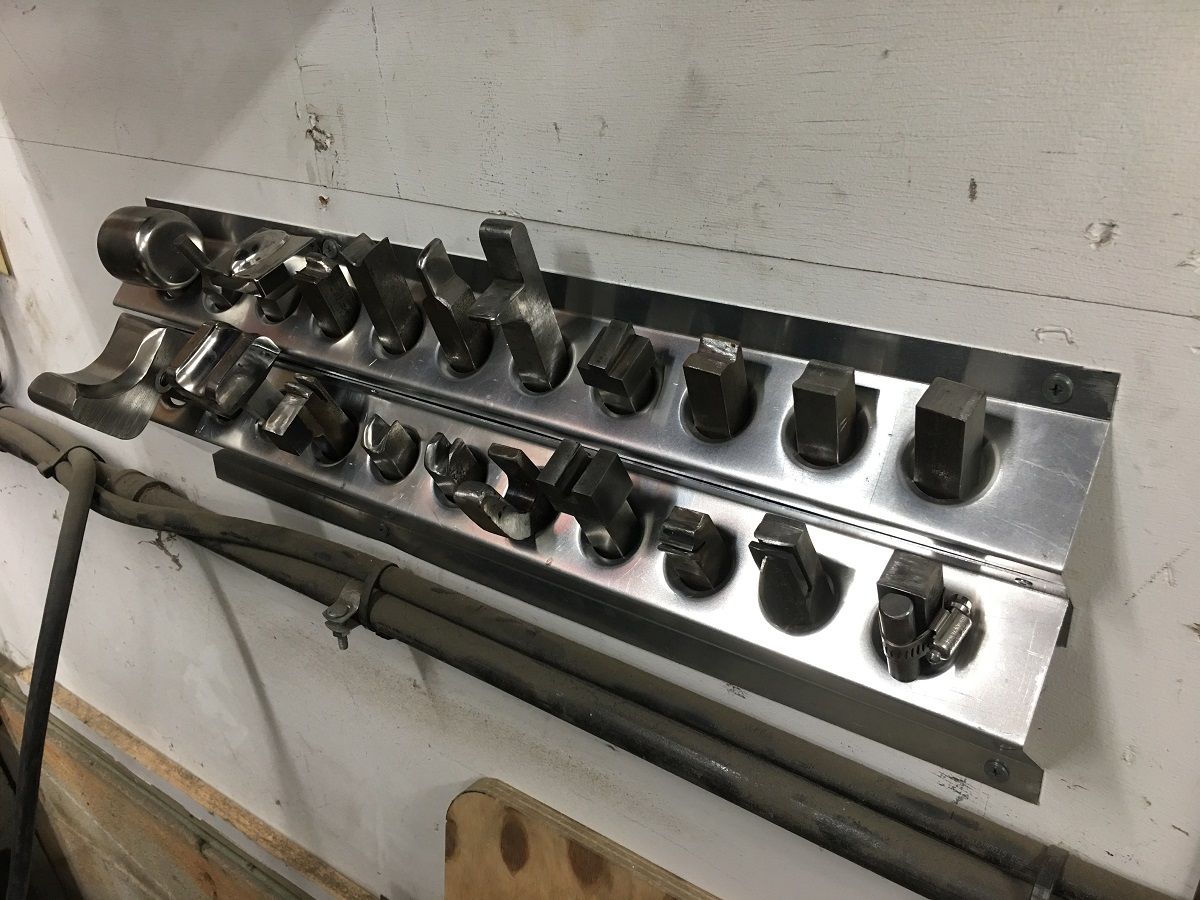 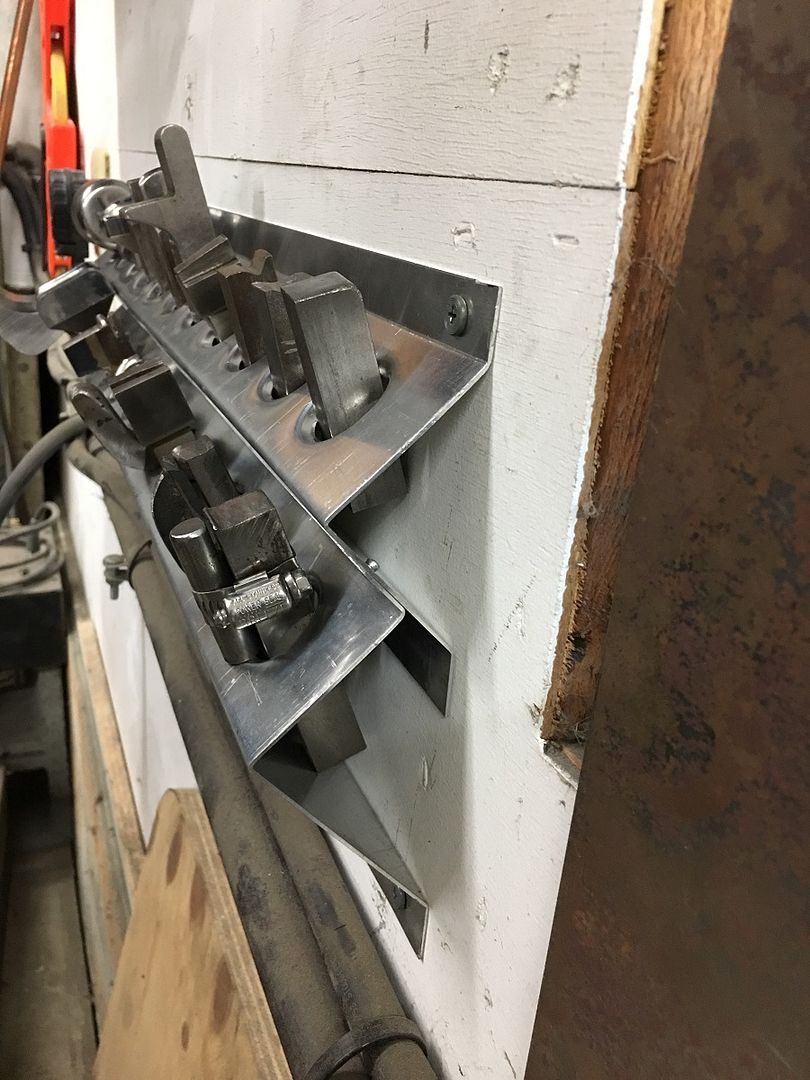 One set down, two more to go....
__________________
Robert |
|
|
|
|
07-22-2019, 12:12 AM
|
#1073 |
|
Post Whore
Join Date: May 2015
Location: Alabama
Posts: 14,581
|
Re: 55 Wagon Progress
those look great Robert...now you need to dream up someway to store clamps...ive got a piece of angle iron that I clamp em to but its aggervating to get to em when theyre close together...and there's no good way to hang em either
__________________
Mongo...aka Greg RIP Dad RIP Jesse 1981 C30 LQ9 NV4500..http://67-72chevytrucks.com/vboard/s...d.php?t=753598 Mongos AD- LS3 TR6060...http://67-72chevytrucks.com/vboard/s...34#post8522334 Columbus..the 1957 IH 4x4...http://67-72chevytrucks.com/vboard/s...63#post8082563 2023 Chevy Z71..daily driver |
|
|
|
|
07-28-2019, 11:31 PM
|
#1074 |
|
Registered User
Join Date: Jan 2013
Location: Leonardtown, MD
Posts: 1,633
|
Re: 55 Wagon Progress
Greg...I need to get pics of the vise grip racks for you... Maybe next weekend...
So while I'm blocking primer (think I shoulda swapped jobs with her) E worked on the next two tooling racks. Here using the Diacro press brake to add some dimples.... 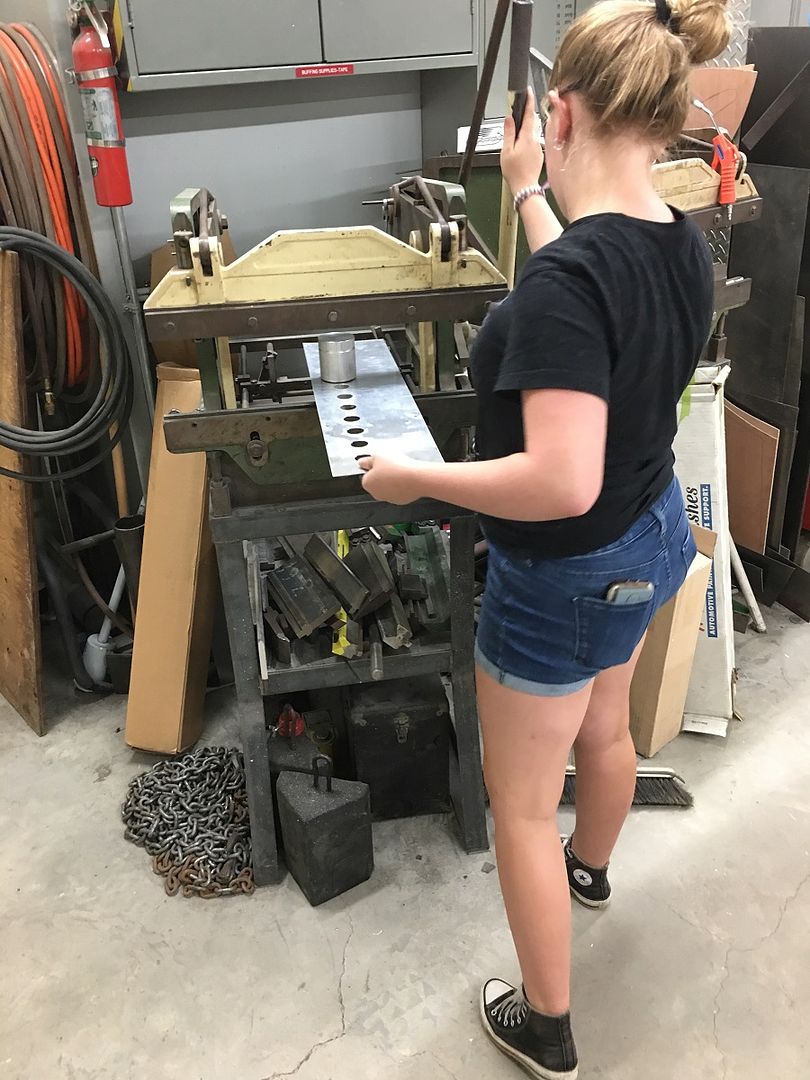  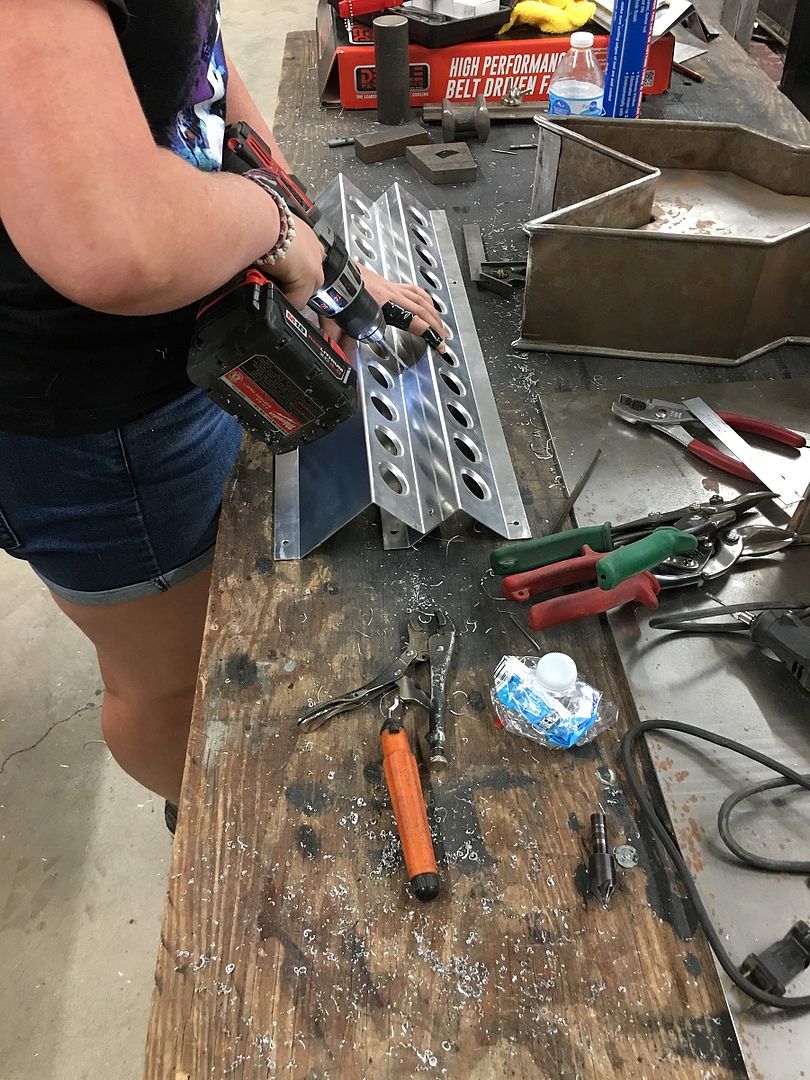 Note here she is also skilled in applying the electric tape bandage.... 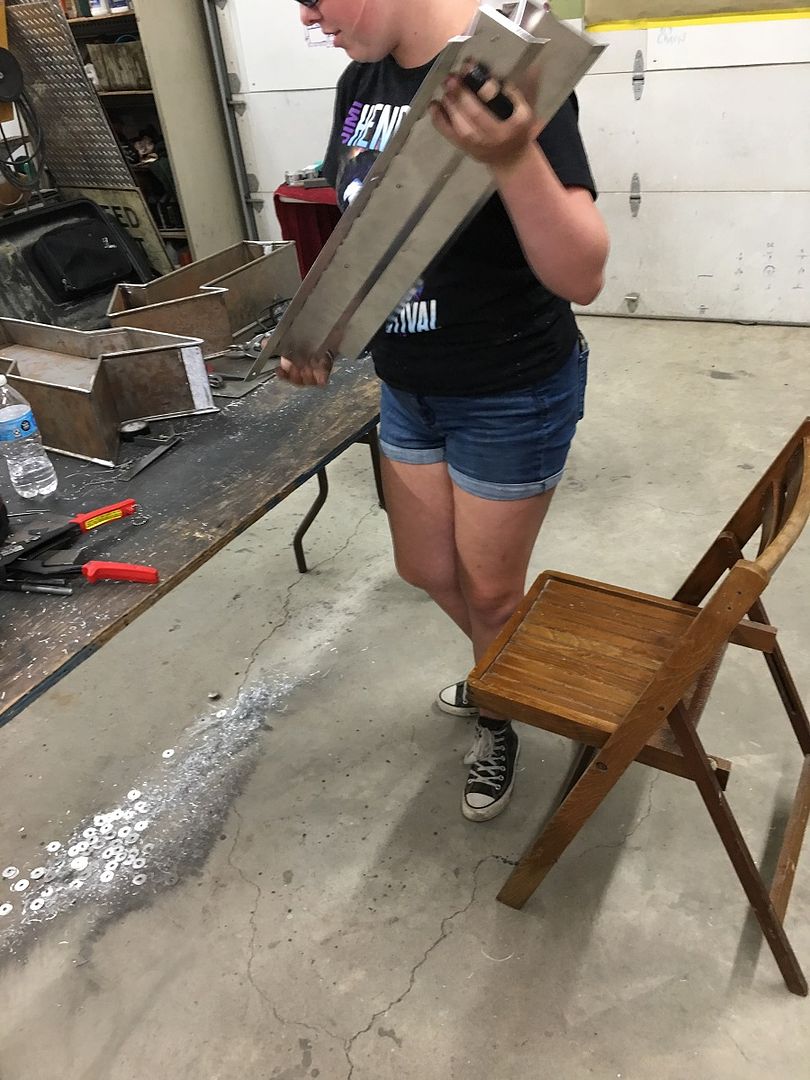 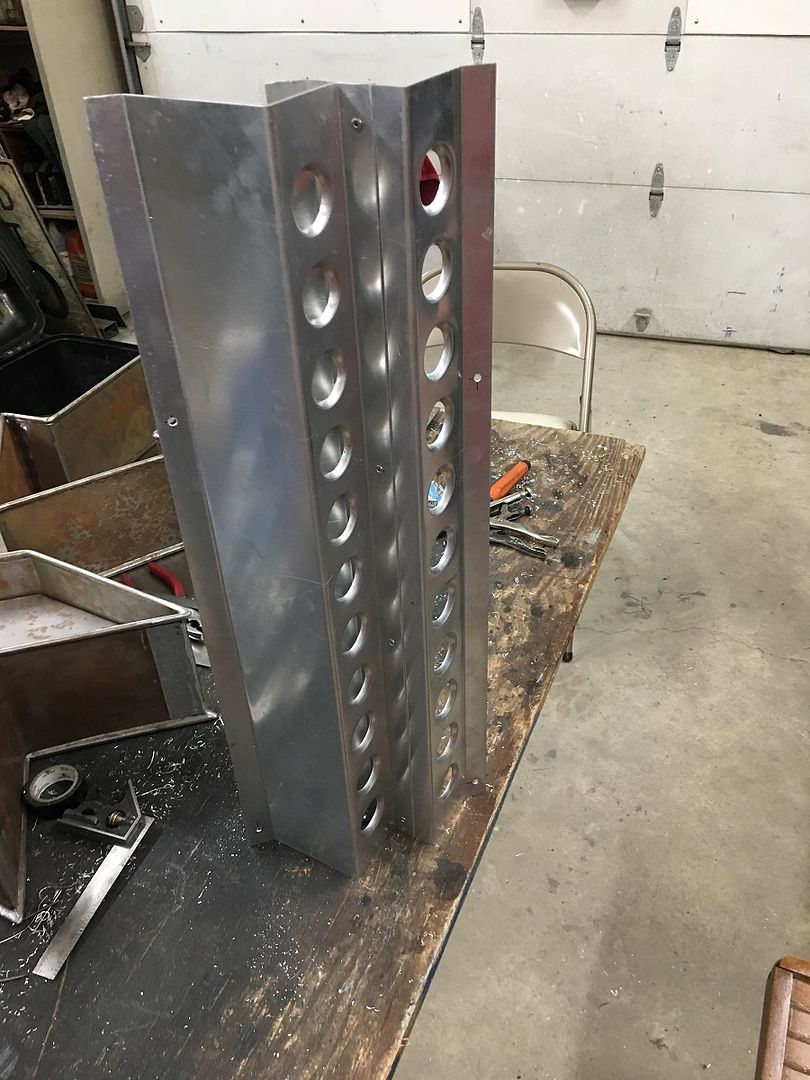 ….for some reason I don't think three sets is gonna be enough....  https://www.youtube.com/watch?v=u832gcW_lbM .
__________________
Robert |
|
|
|
|
07-30-2019, 11:20 PM
|
#1075 |
|
Registered User
Join Date: Jan 2013
Location: Leonardtown, MD
Posts: 1,633
|
Re: 55 Wagon Progress
Next job for E was to add some sound deadening to the inside of the door skins...
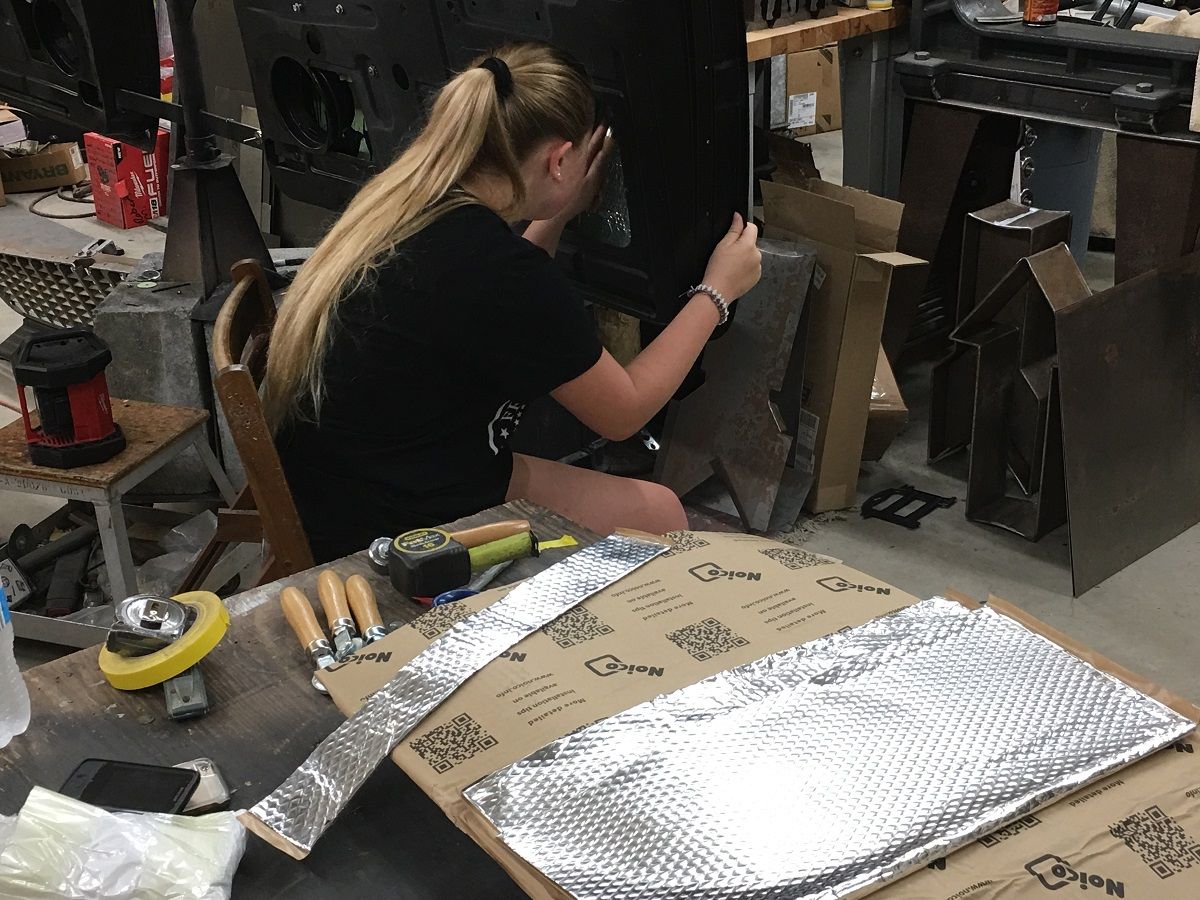 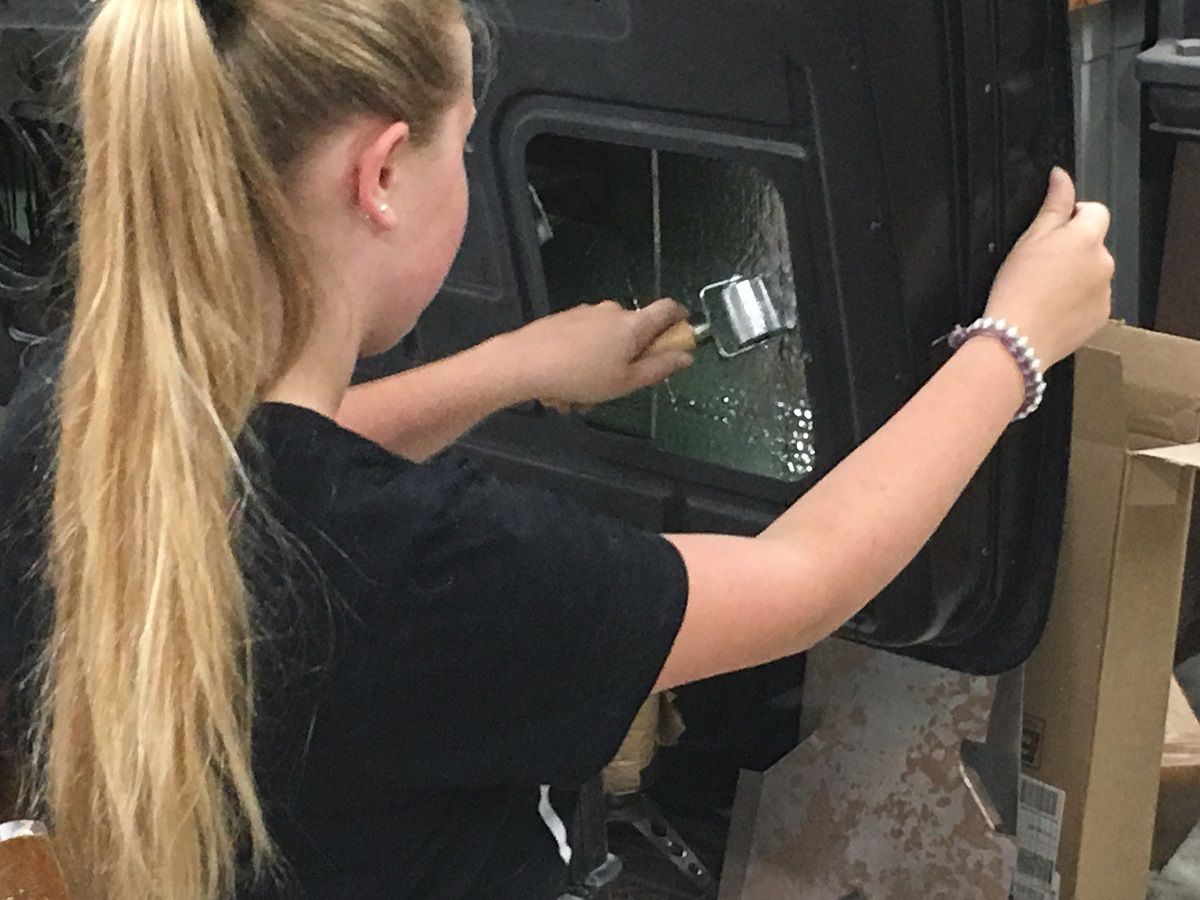 Behind each of the speaker mounts we added a section of Dynaliner… 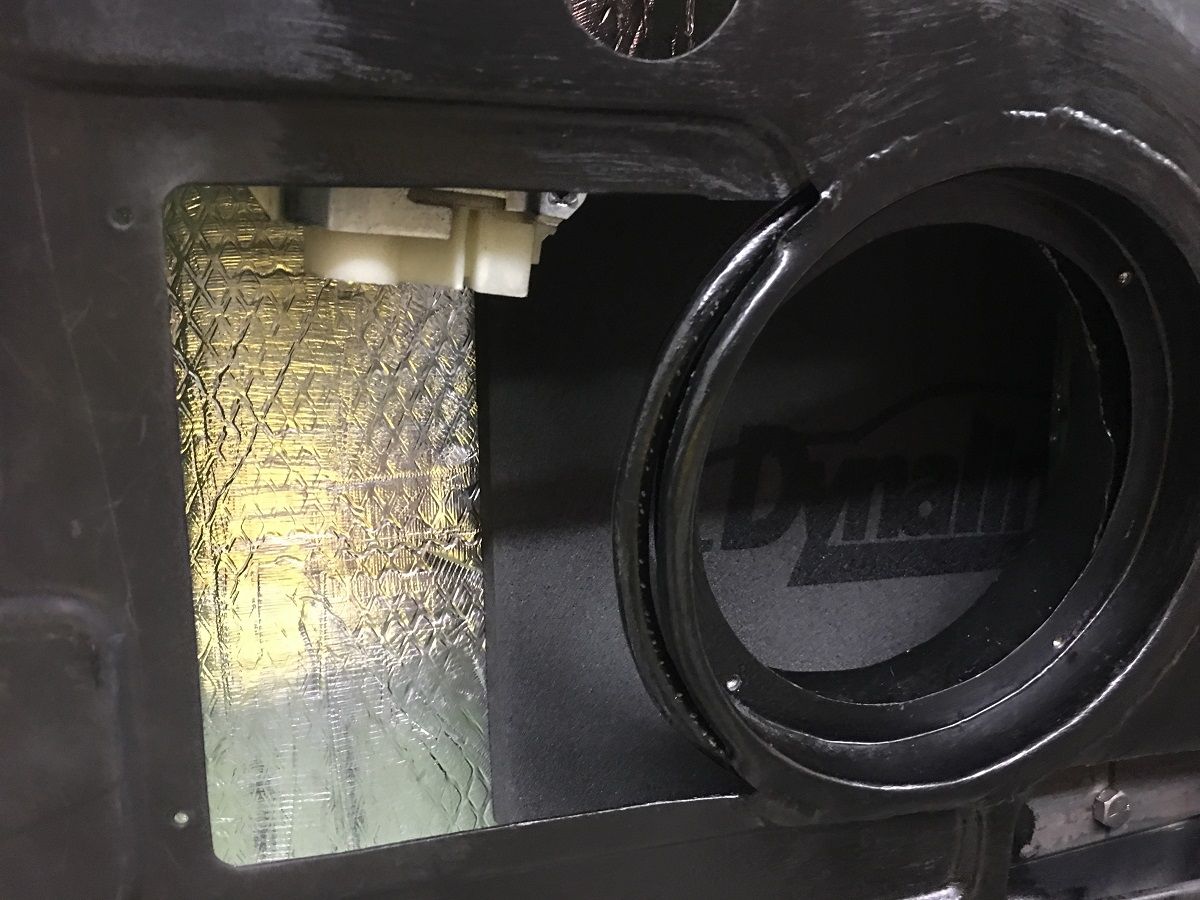 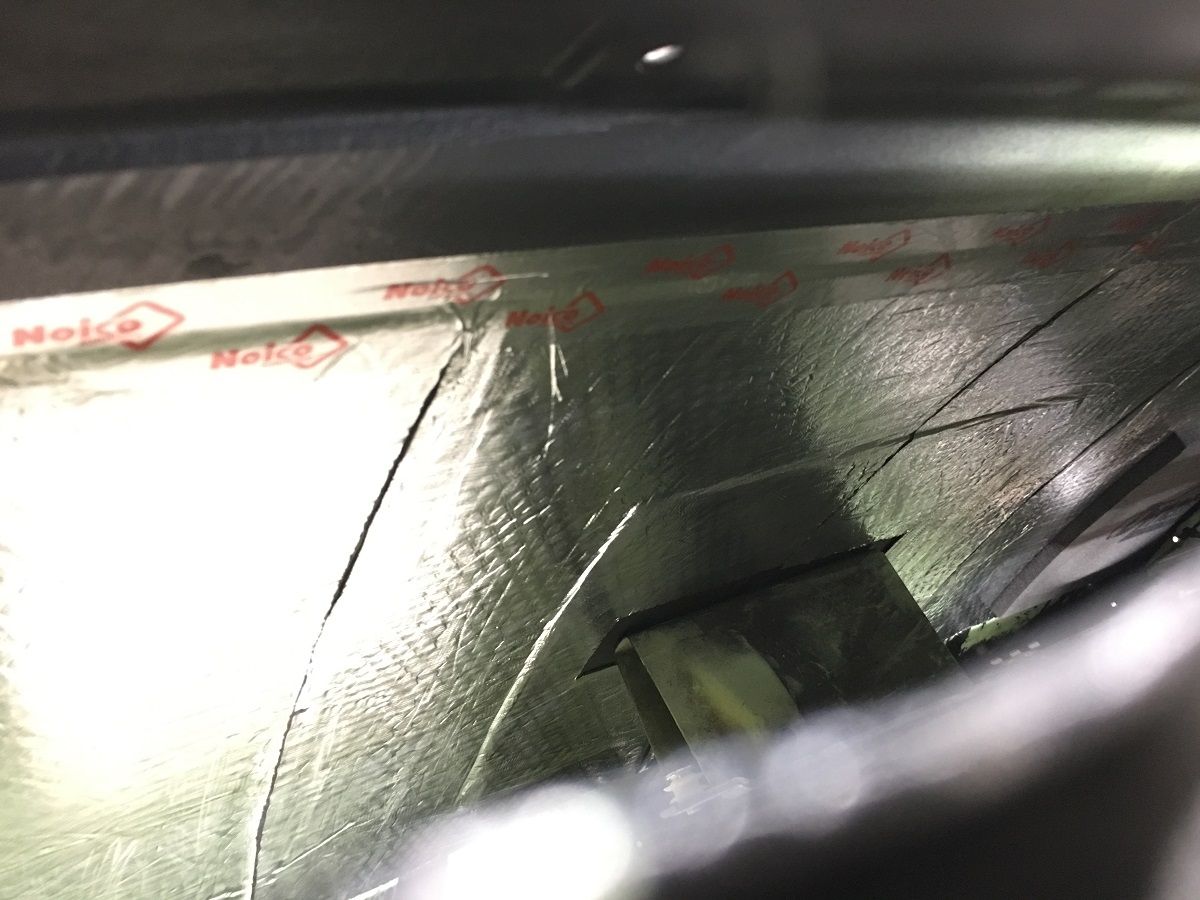 She did a good job of that, wait until she sees how much more we have to go!
__________________
Robert |
|
|
|
 |
| Bookmarks |
|
|


 Linear Mode

