
|
 04-05-2020, 07:40 PM
|
#1126 |
|
Senior Member
 Join Date: Mar 2011
Location: West Plains, Missouri
Posts: 7,553
|
Re: 55 Wagon Progress
Looks good...Jim
__________________
my build thread: http://67-72chevytrucks.com/vboard/s...d.php?t=459839 Jimbo's long bed step build:http://67-72chevytrucks.com/vboard/s...t=464626<br /> |

|

|
|
04-11-2020, 06:35 PM
|
#1127 |
|
Registered User
Join Date: Jan 2013
Location: Leonardtown, MD
Posts: 1,633
|
Re: 55 Wagon Progress
Thanks for following along with our progress guys!
Today I was block sanding some core support parts for one more spray. Making black powder out of black epoxy primer. Not all that exciting, so I didn't take any pictures.. But wait... it gets better! Brandon and Richard have been sanding as well, only they put some color on the roof today:  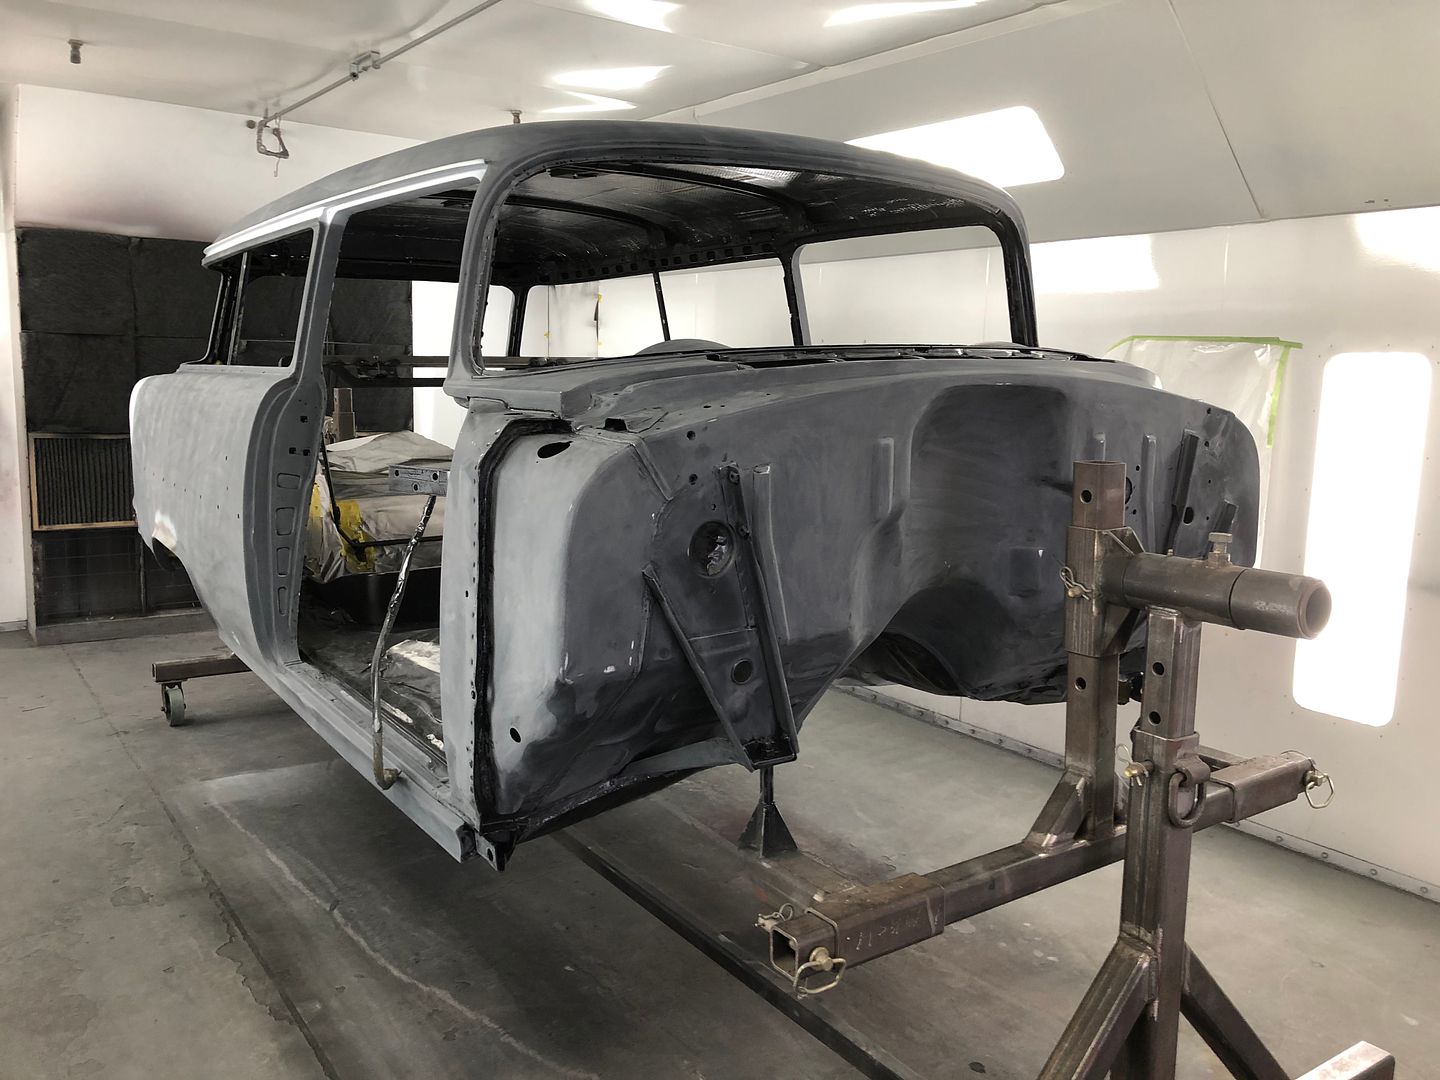 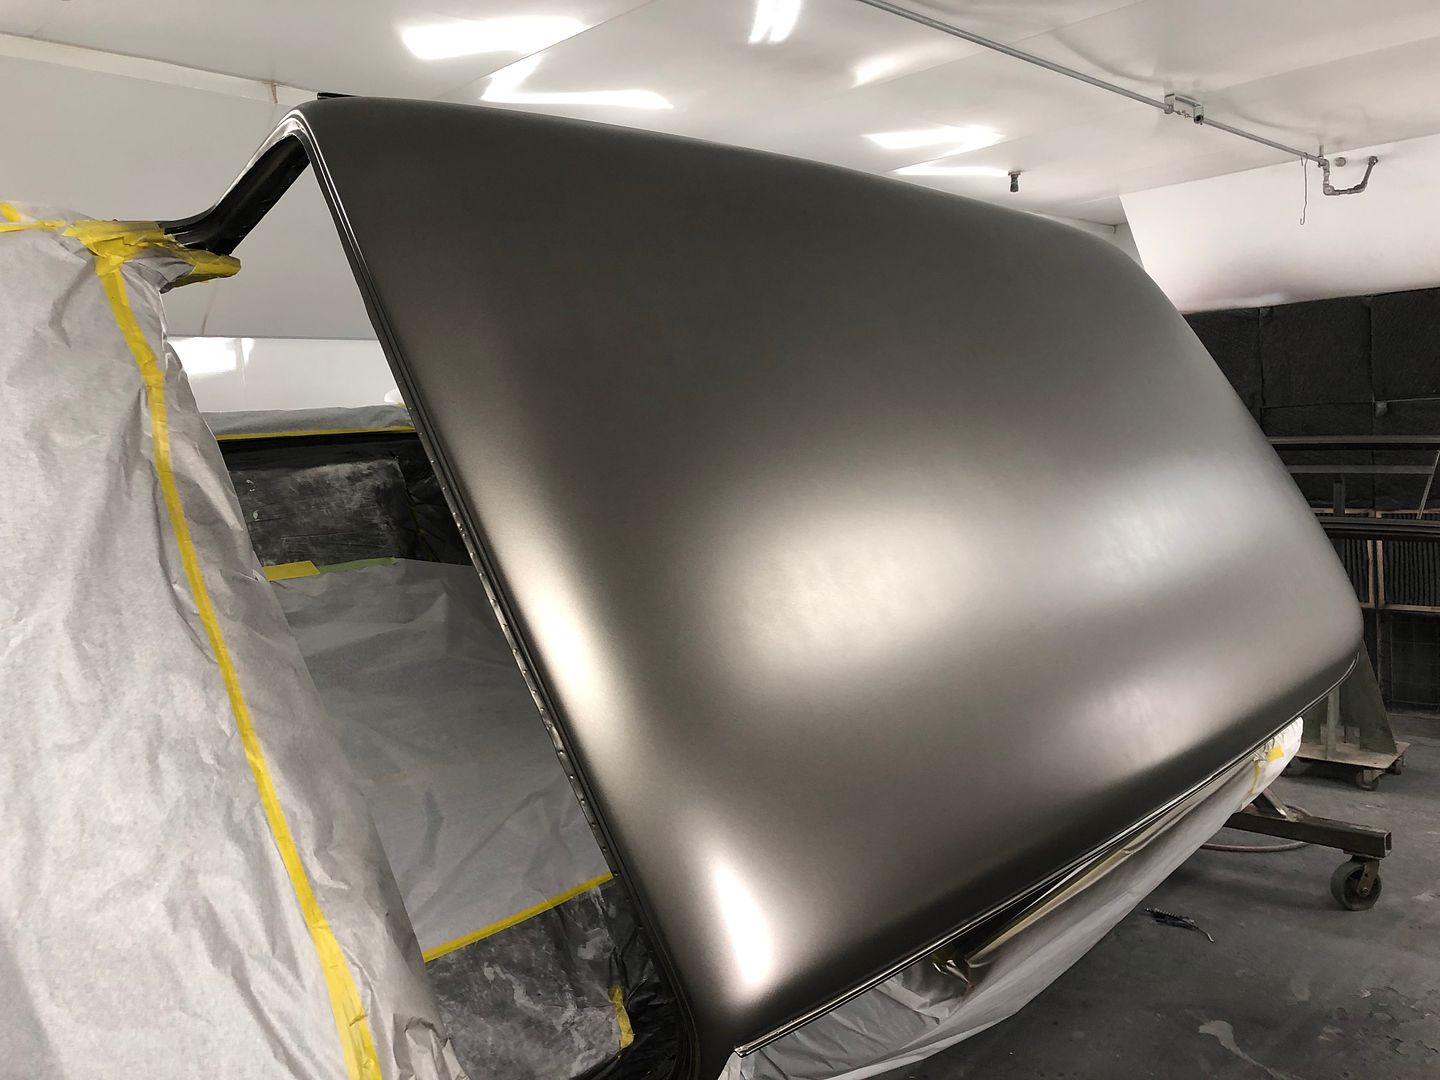 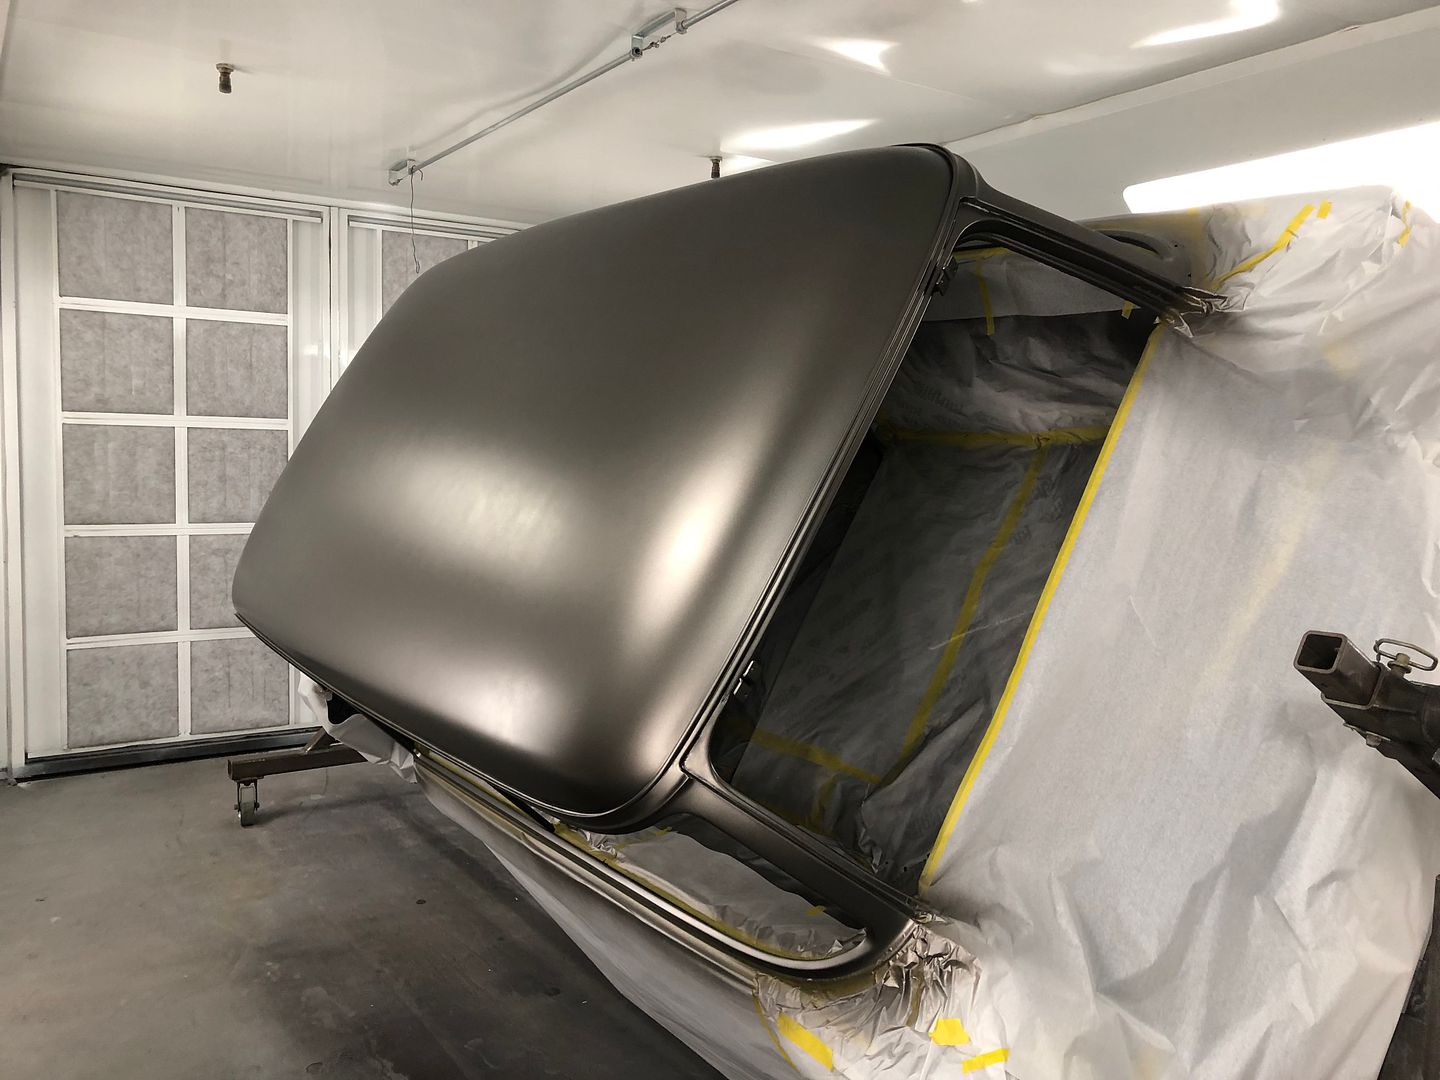 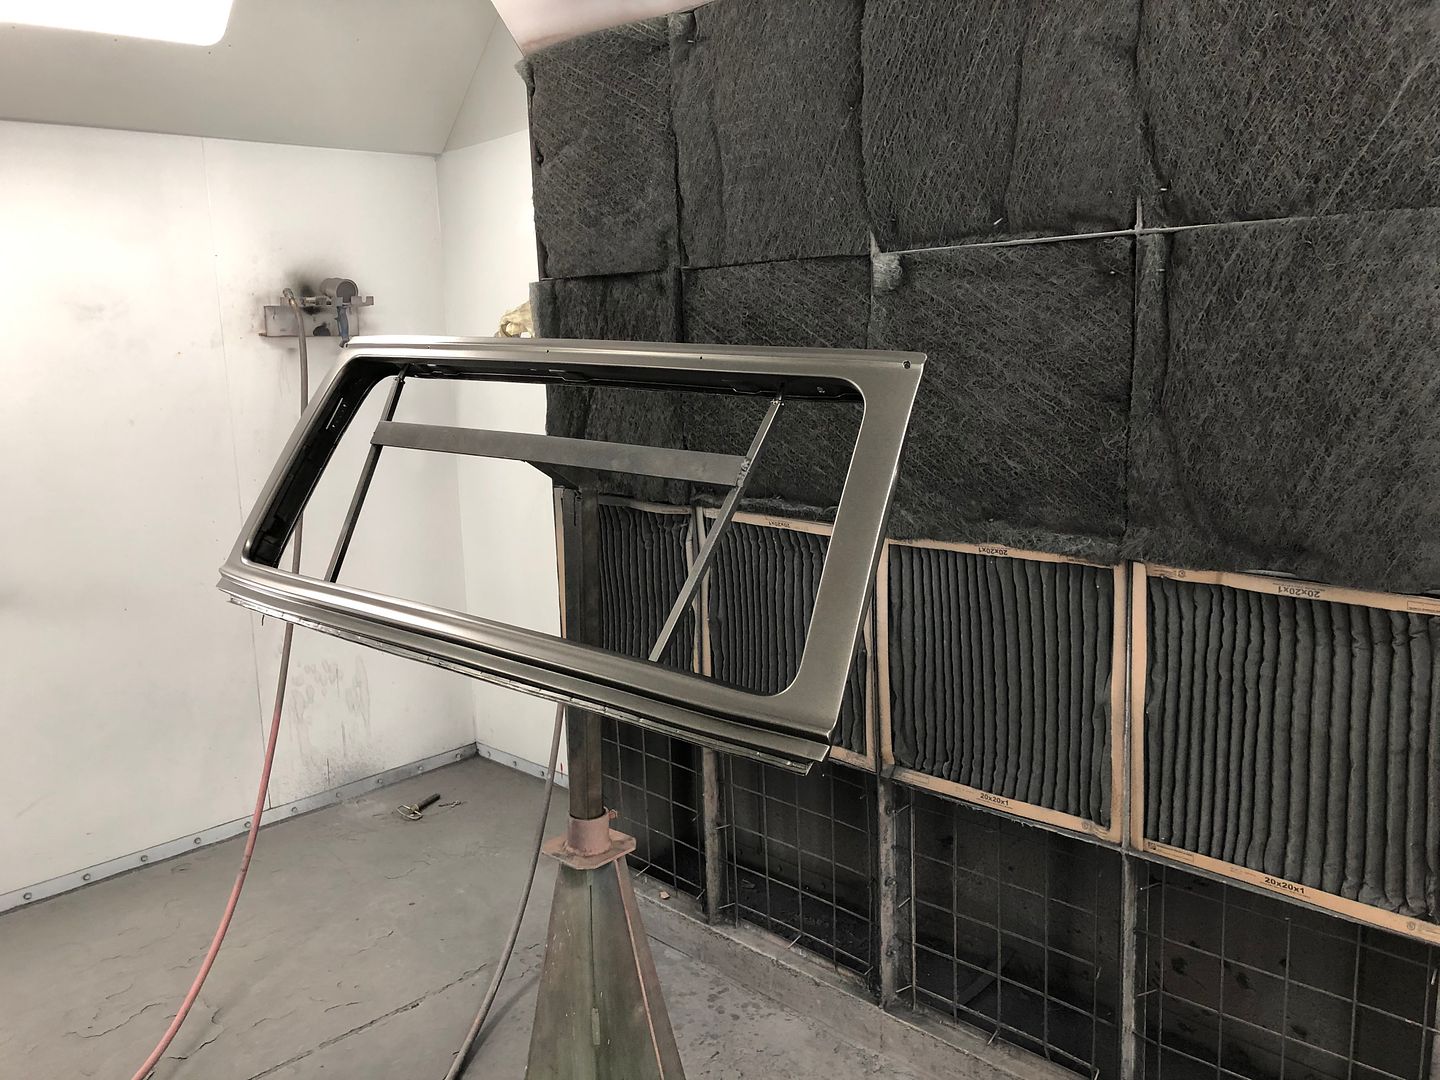 Clear: 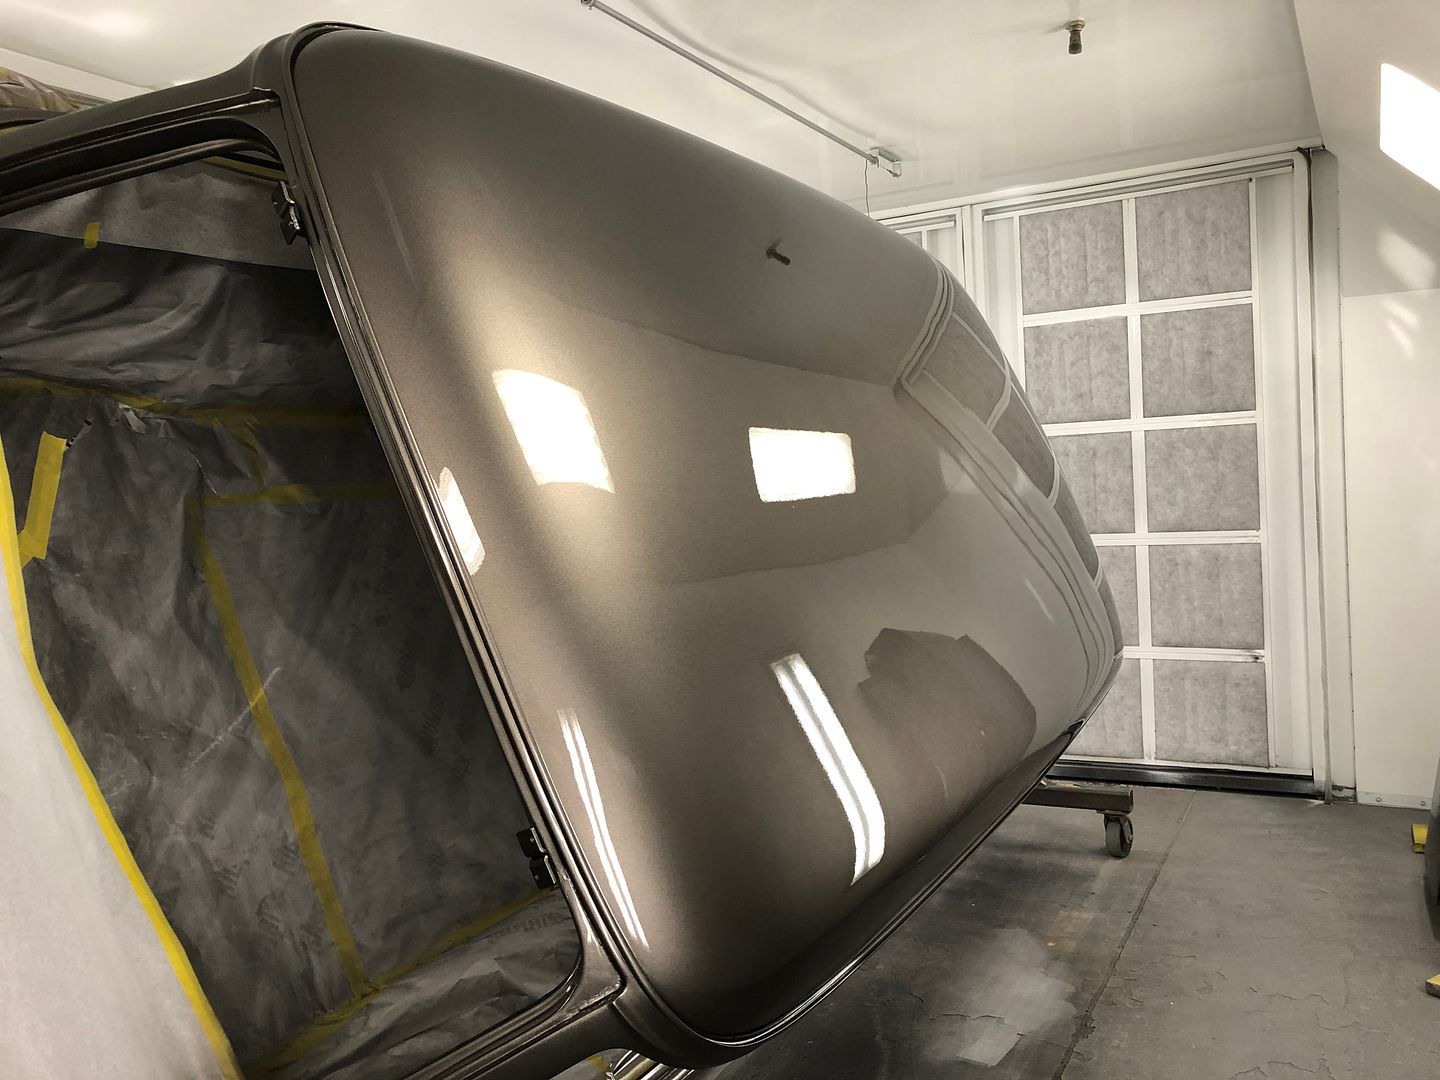 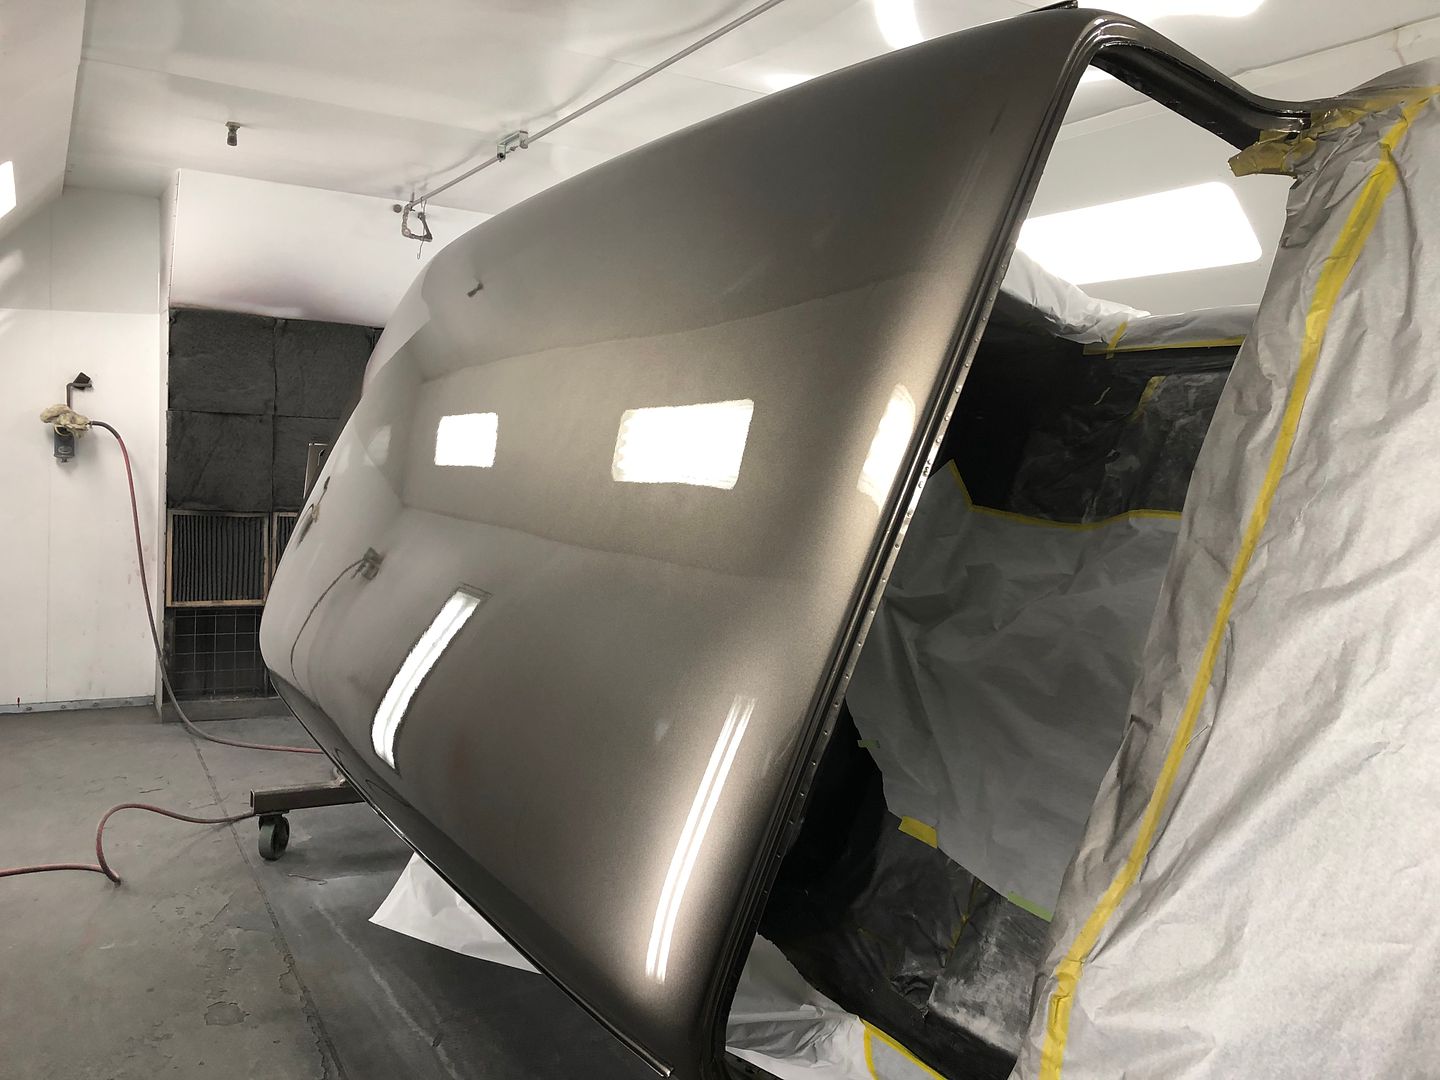 Can't wait for the green and some sunlight.... .
__________________
Robert Last edited by MP&C; 04-11-2020 at 07:04 PM. |
|
|
|
|
04-11-2020, 08:08 PM
|
#1128 |
|
Post Whore
 Join Date: May 2015
Location: Alabama
Posts: 14,578
|
Re: 55 Wagon Progress
That looks great..!!...ready for more...
__________________
Mongo...aka Greg RIP Dad RIP Jesse 1981 C30 LQ9 NV4500..http://67-72chevytrucks.com/vboard/s...d.php?t=753598 Mongos AD- LS3 TR6060...http://67-72chevytrucks.com/vboard/s...34#post8522334 Columbus..the 1957 IH 4x4...http://67-72chevytrucks.com/vboard/s...63#post8082563 2023 Chevy Z71..daily driver |
|
|
|
|
04-11-2020, 11:47 PM
|
#1129 |
|
Senior Member
Join Date: Mar 2011
Location: West Plains, Missouri
Posts: 7,553
|
Re: 55 Wagon Progress
Looks super...Jim
__________________
my build thread: http://67-72chevytrucks.com/vboard/s...d.php?t=459839 Jimbo's long bed step build:http://67-72chevytrucks.com/vboard/s...t=464626<br /> |
|
|
|
|
04-15-2020, 07:43 AM
|
#1130 |
|
Registered User
Join Date: Jan 2013
Location: Leonardtown, MD
Posts: 1,633
|
Re: 55 Wagon Progress
Thanks guys! Long while getting here..
__________________
Robert |
|
|
|
|
04-17-2020, 08:37 PM
|
#1131 |
|
Registered User
Join Date: Jan 2013
Location: Leonardtown, MD
Posts: 1,633
|
Re: 55 Wagon Progress
Some spring cleaning.... Picked up a 12" disc sander quite a few months back, and Mike has been using this on the floor.. So I decided to help the guy out and put it at a more useable height... Added a "bolting framework" to the top of one of the paint tripods, already set up with casters so you can push it in the corner....
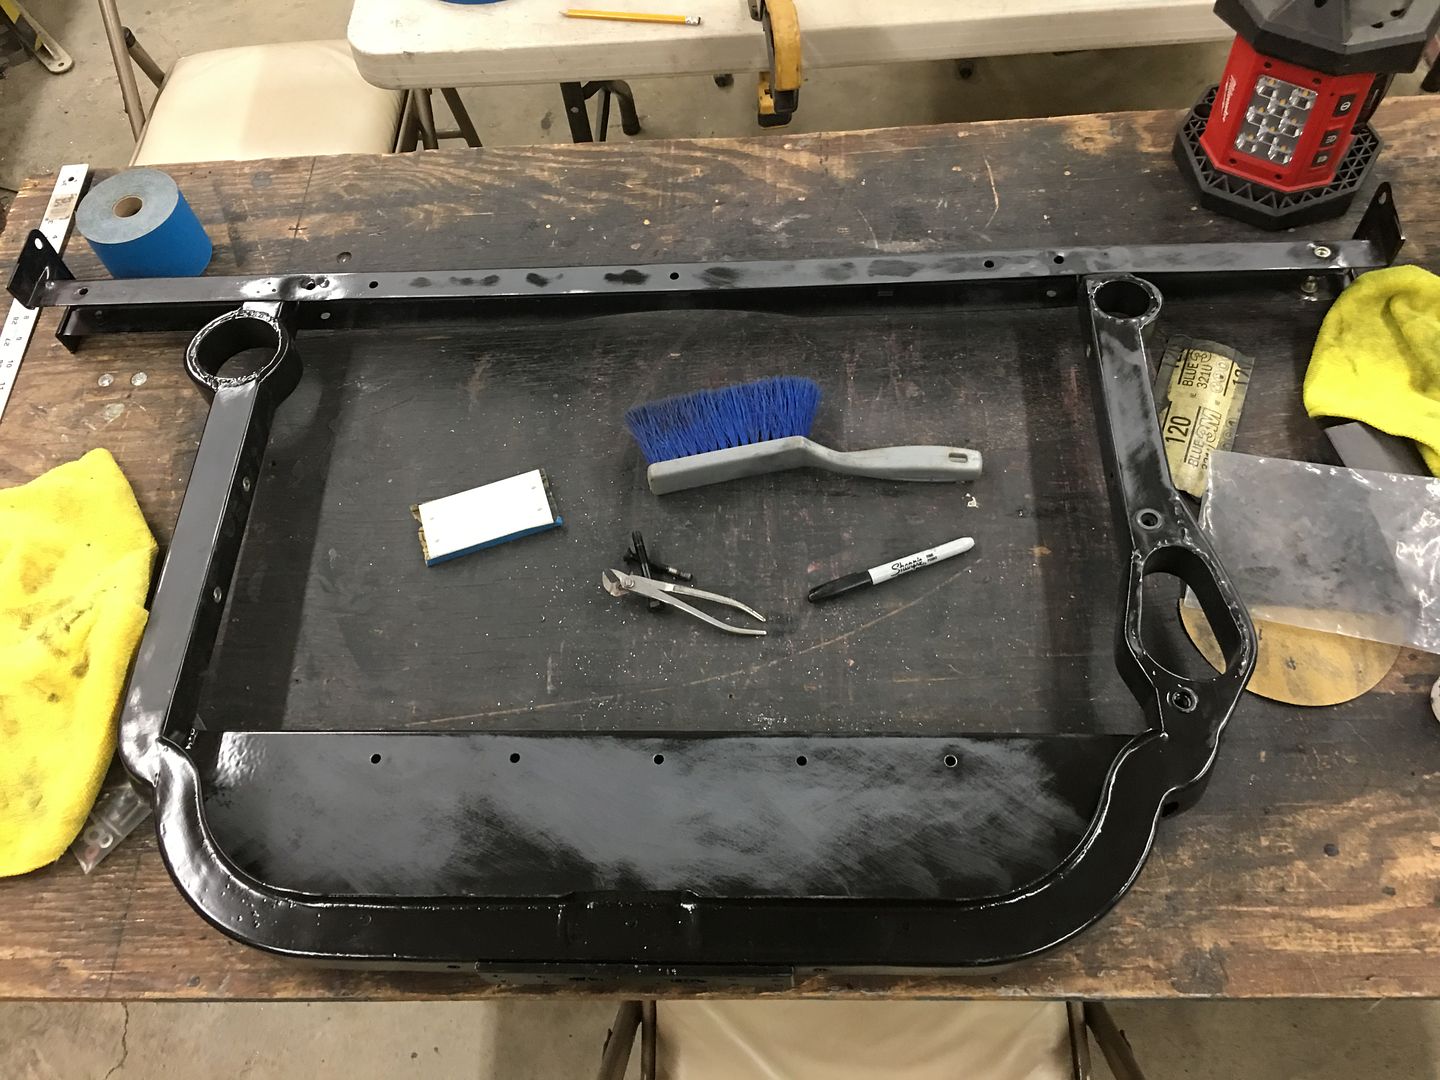
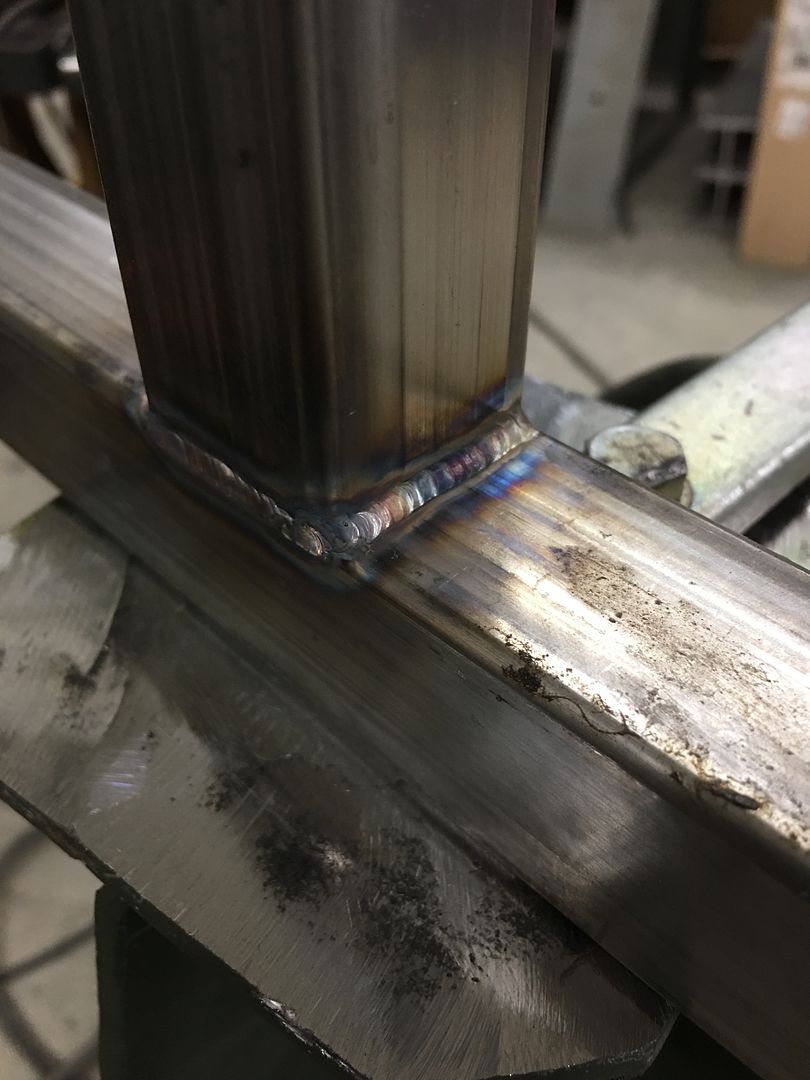   Rivnuts installed since I didn't have bolts in stock long enough to go all the way through.. 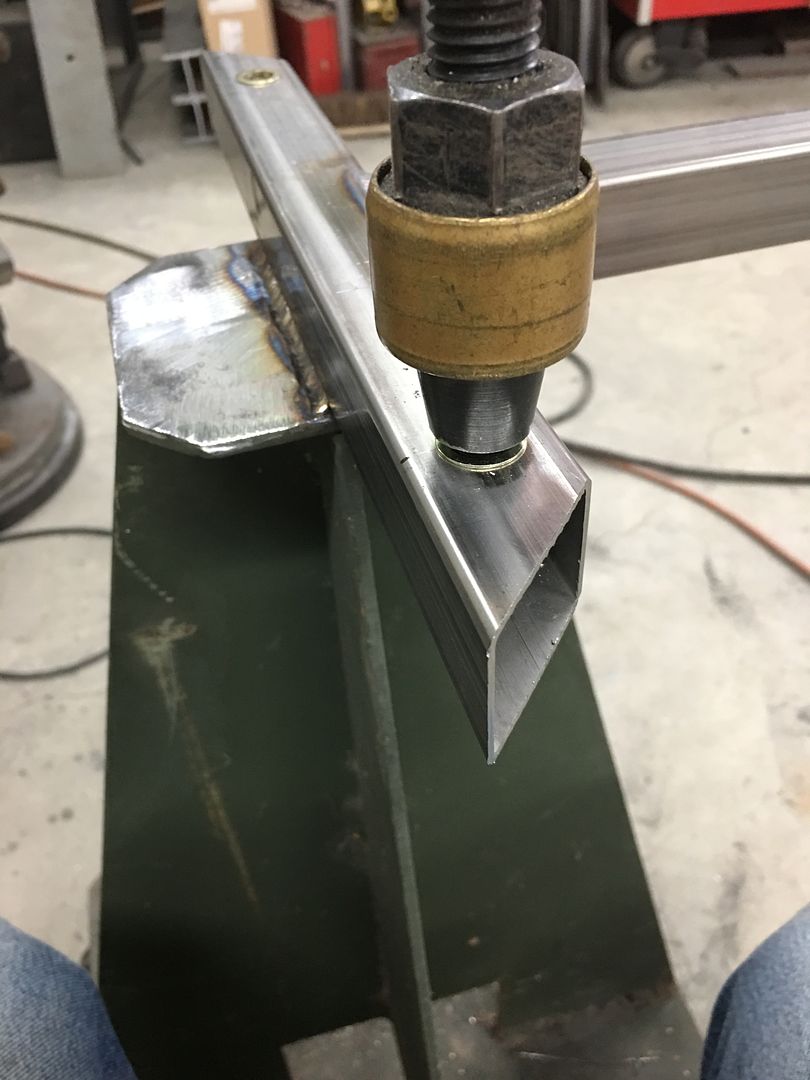 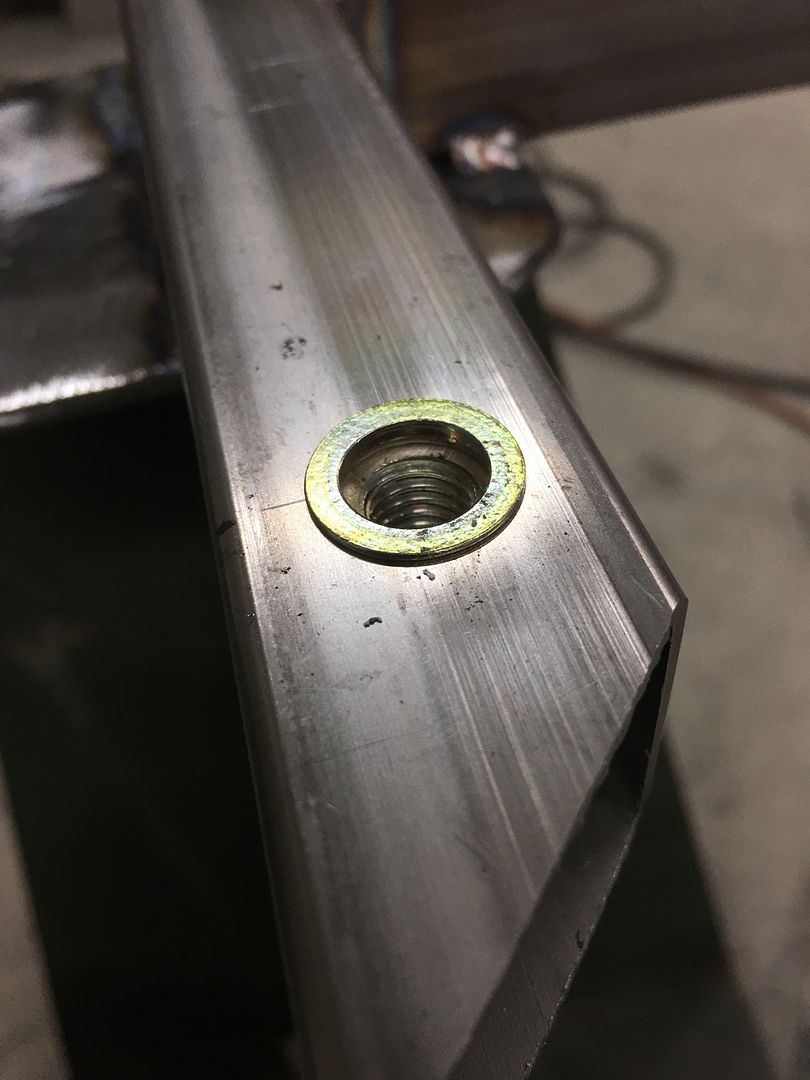 Ready for some sanding... 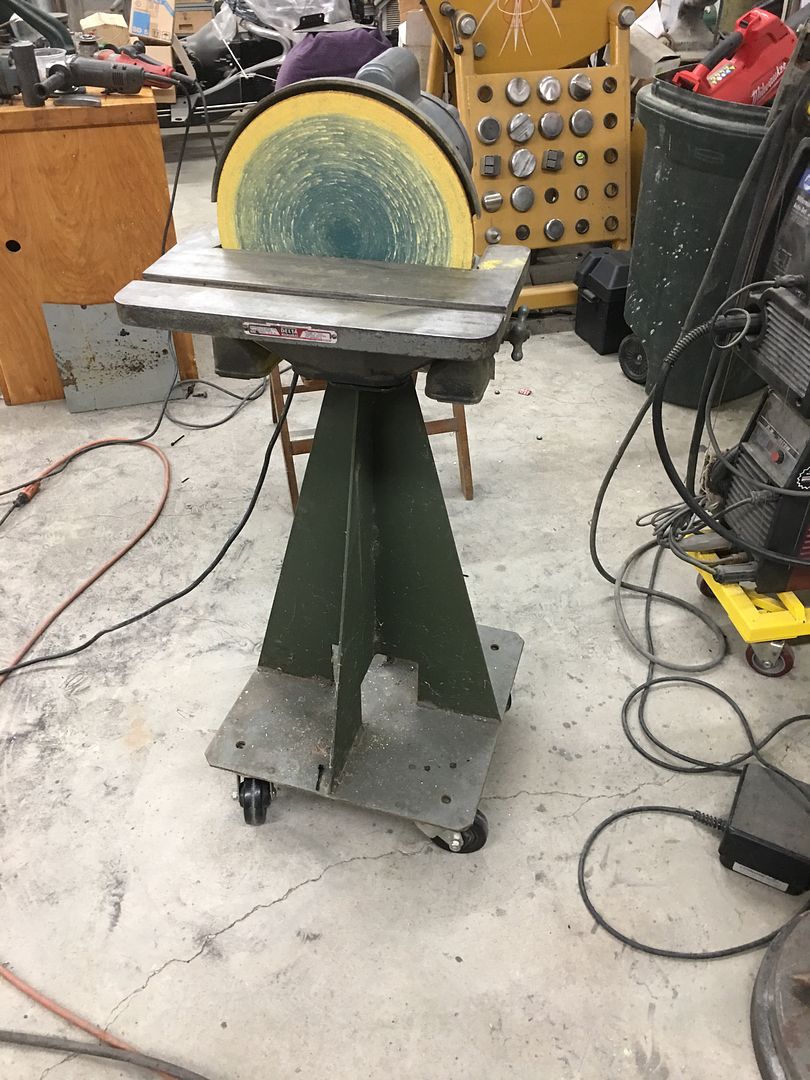 Dana dropped off the new brake cables for the wagon the other day. The single cable that attaches to the pedal has a shouldered ferrule that sits in the bottom of the parking brake bracket. Only this shoulder was much too small for the factory hole, the Hex portion almost pulled through the hole. 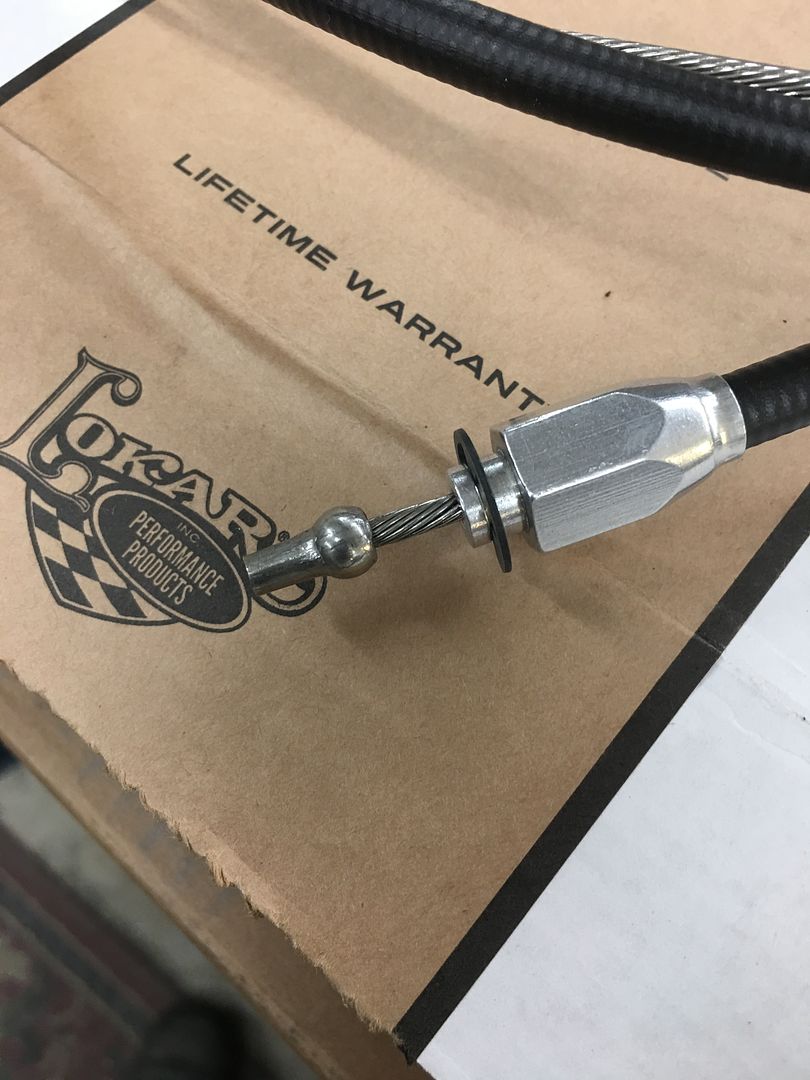 I considered making an adapter sleeve on the lathe, but the figured resizing the hole would be quicker. Found a nice thick 3/8 flat washer in stock that fit the ferrule shoulder perfectly and matched the thickness of the parking brake bracket. In order to get the weld heat farther from the 3/8 hole, the bracket opening was oversized up to 7/8" (largest step drill that I could find) and the washer slightly downsized to fit.. Some 3/8 standoffs made a quick arbor for the drill, and the die grinder does the rest. we had our correct size in about a minute.. 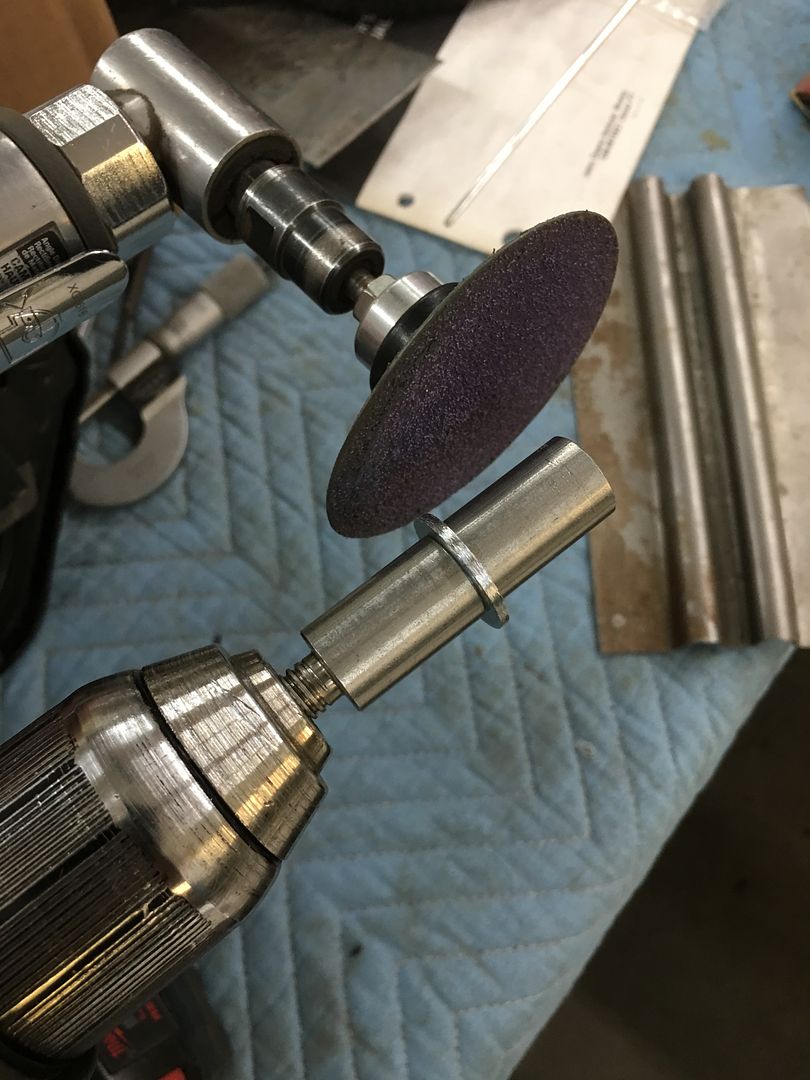 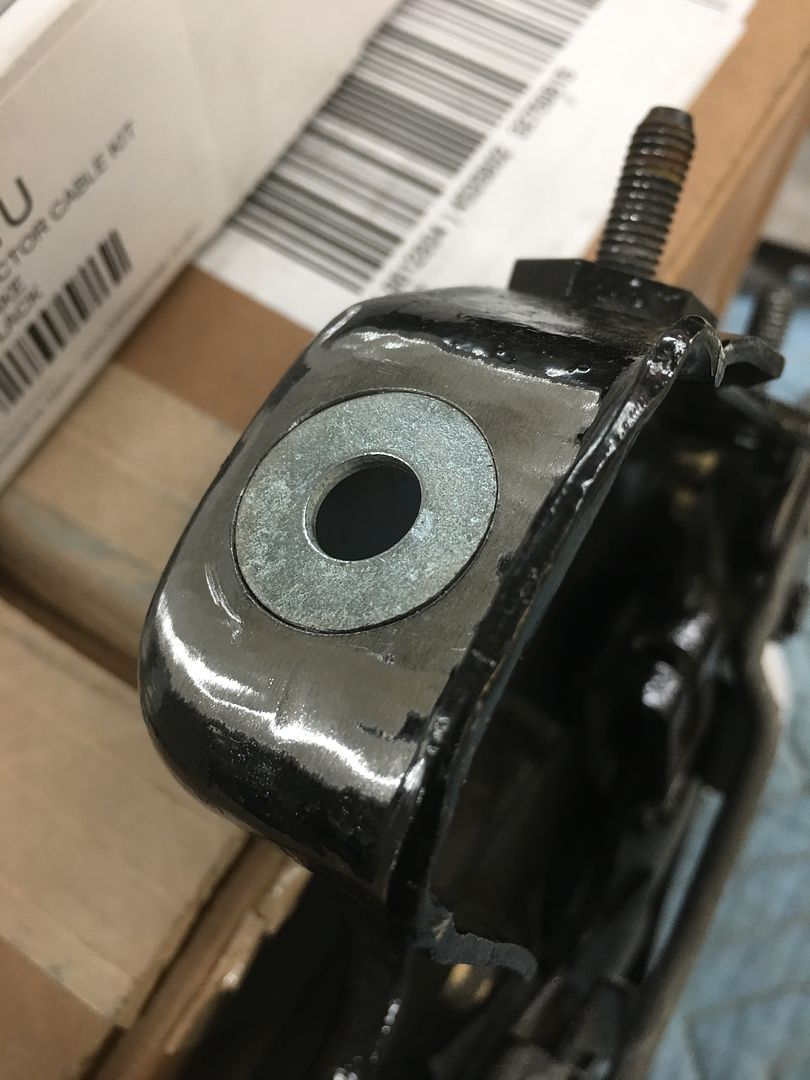 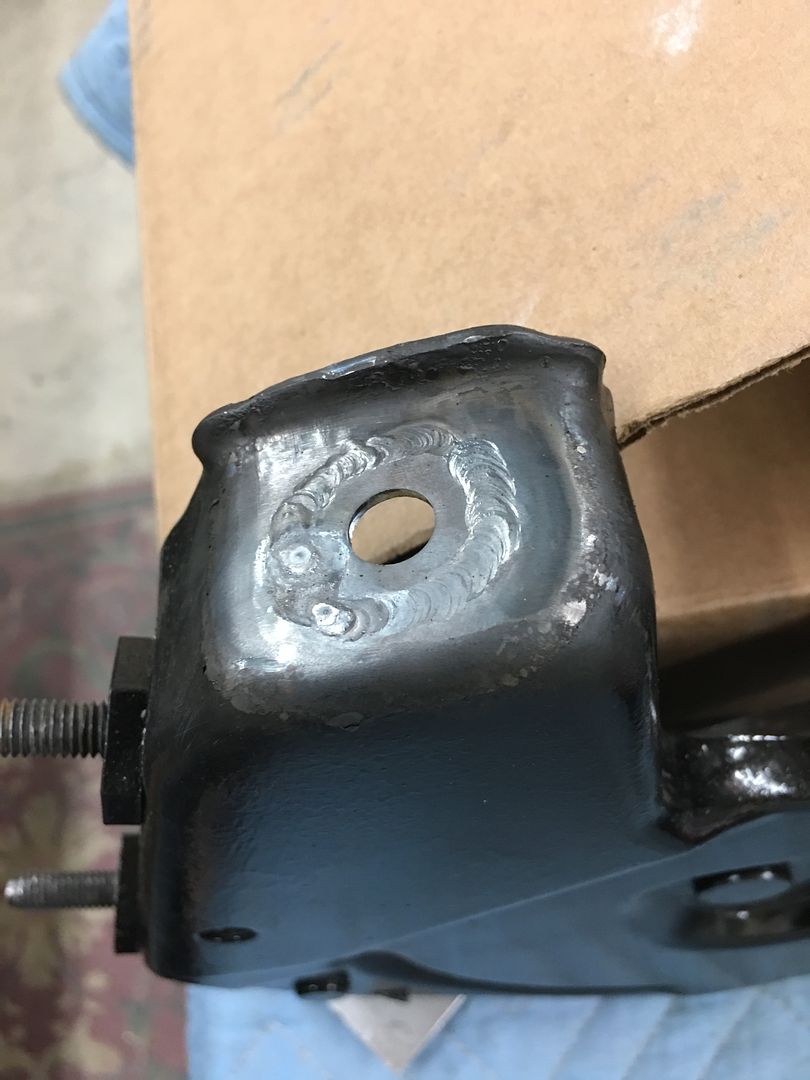 Installed, much better fit... Now Vince needs to do some touch up on the paint! 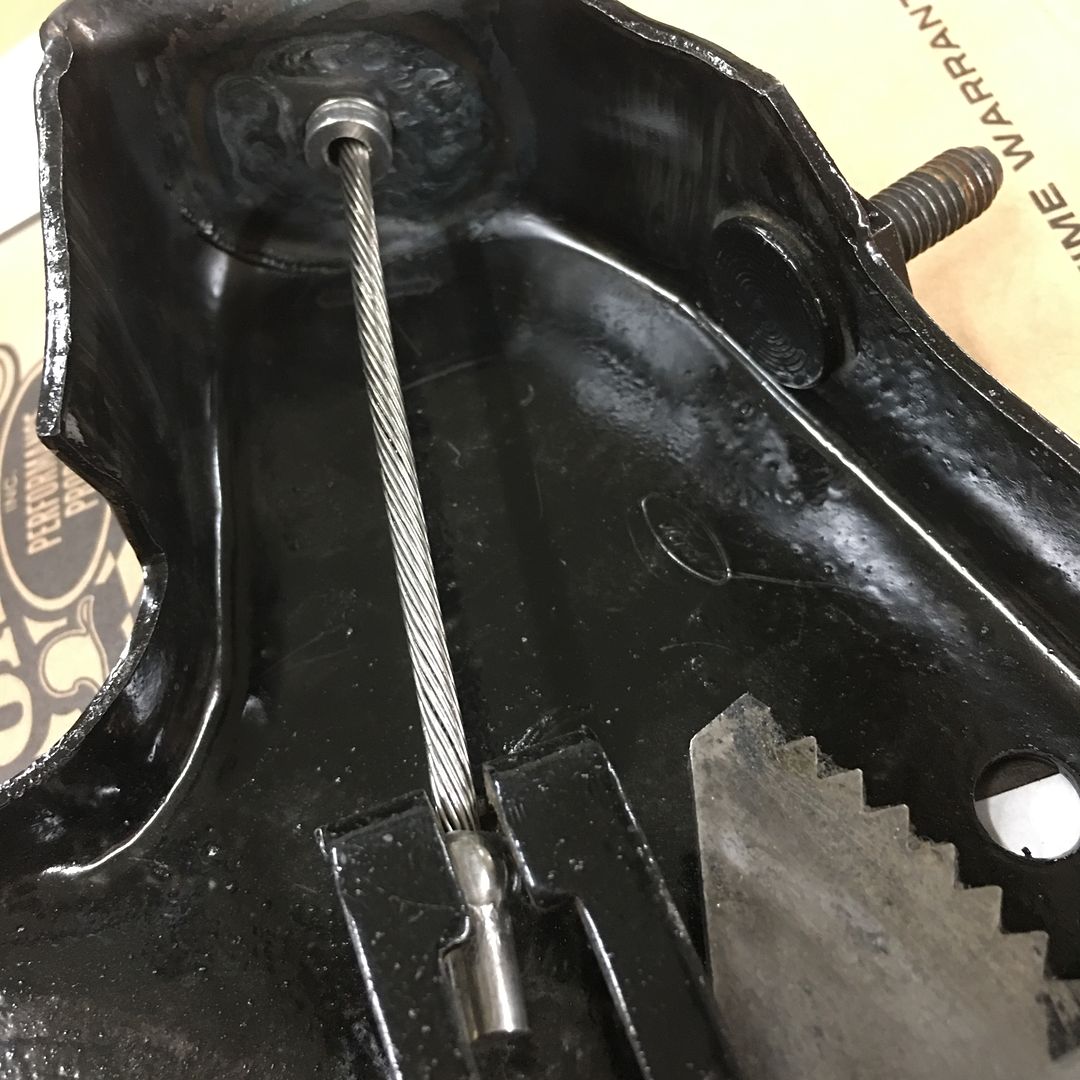
__________________
Robert |
|
|
|
|
04-18-2020, 09:23 PM
|
#1132 |
|
Registered User
Join Date: Jan 2013
Location: Leonardtown, MD
Posts: 1,633
|
Re: 55 Wagon Progress
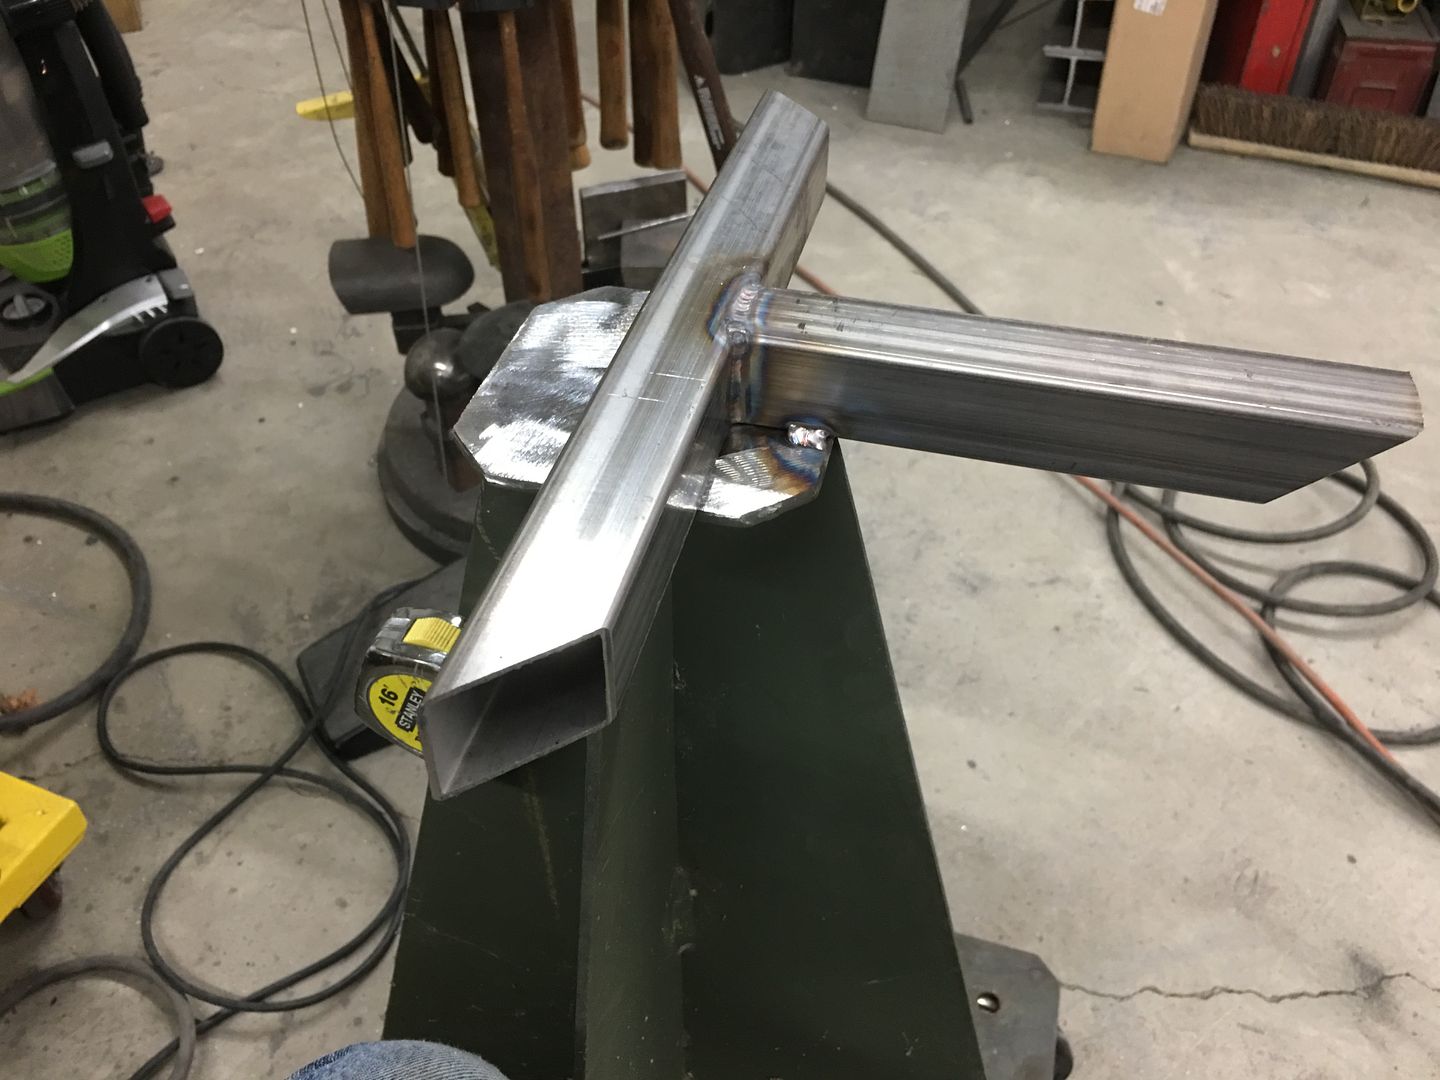
We're in the middle of blocking paint today on the core support and happened to notice someone forgot to add the holes in the new vertical uprights for the light wires to go across above the radiator.
 We have some rotary cutters that would do the trick but they are a bit short to reach from the outside (to keep things perpendicular) so lets make an extension. The set screw for the spring loaded center point is a 5/16-24 and we happened to have some in stock. So we used a piece of stainless fuel line and plug welded a stud in one end and a plug in the other for tightening in the drill chuck.. 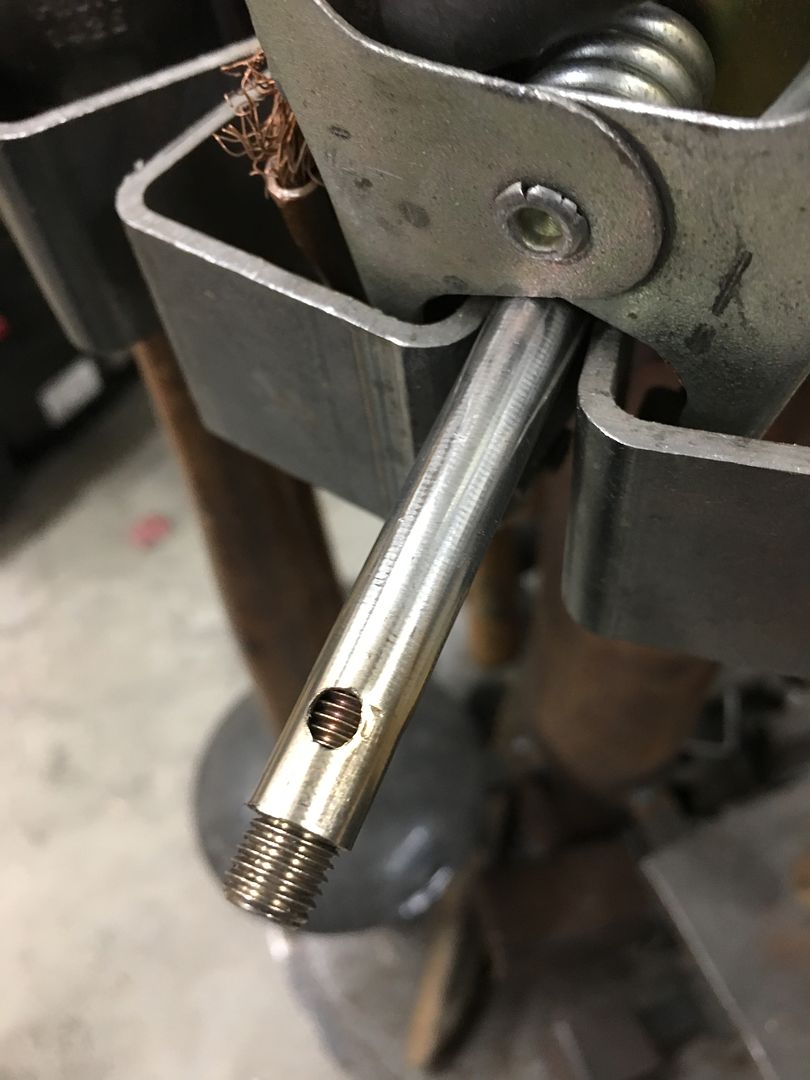 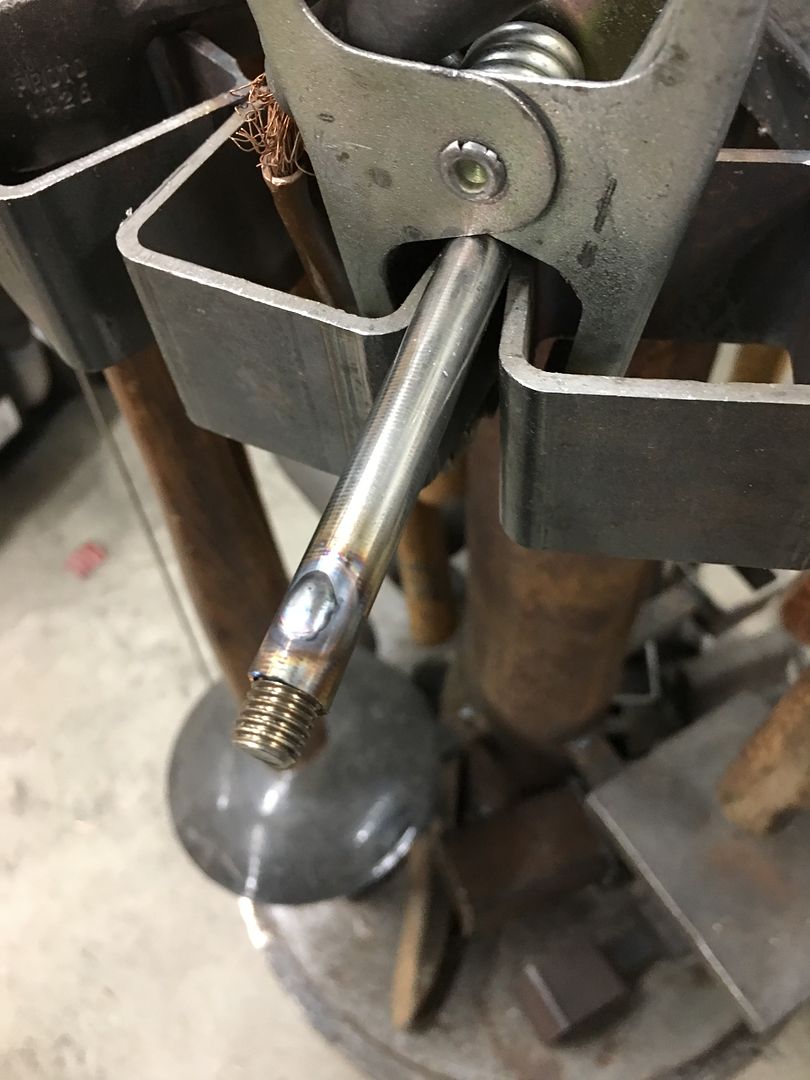 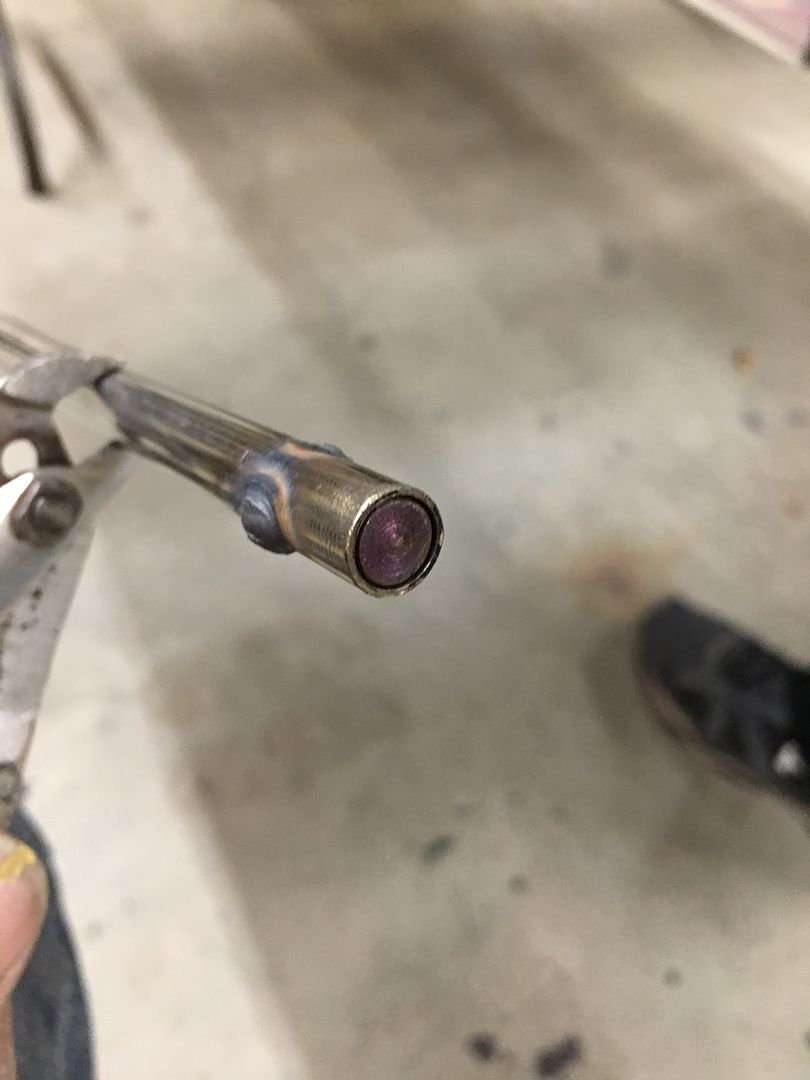 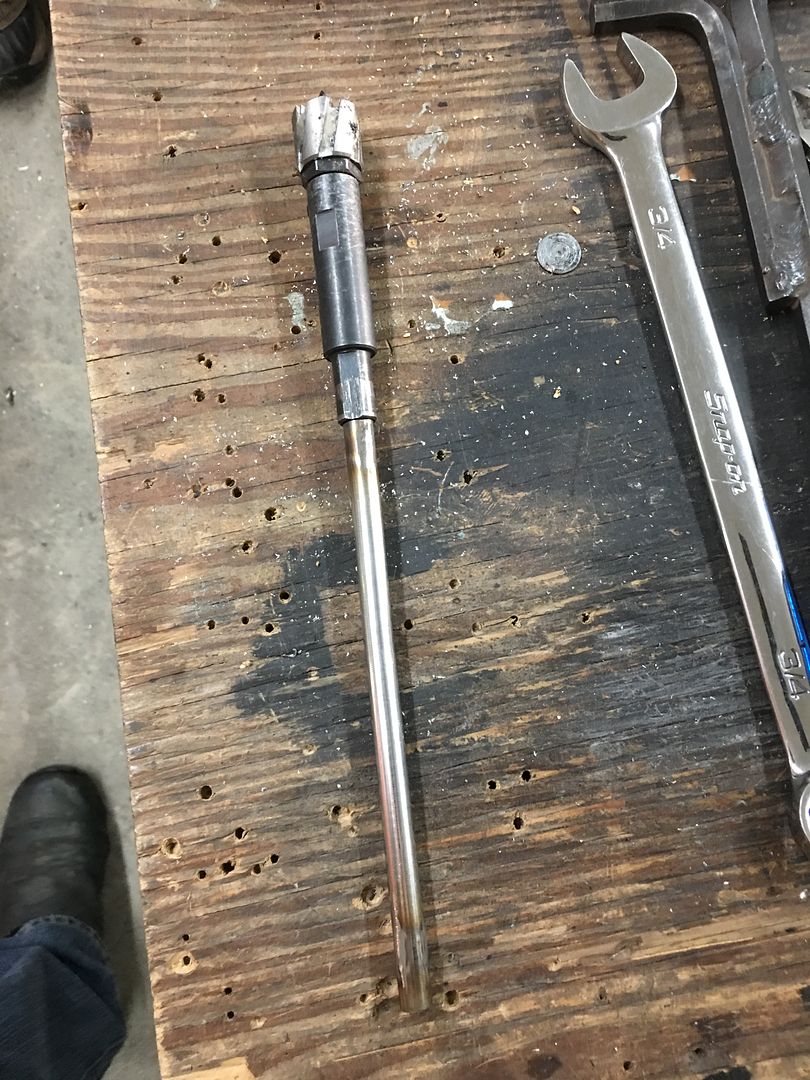 Holes drilled, deburred, and grommet test fitted.. 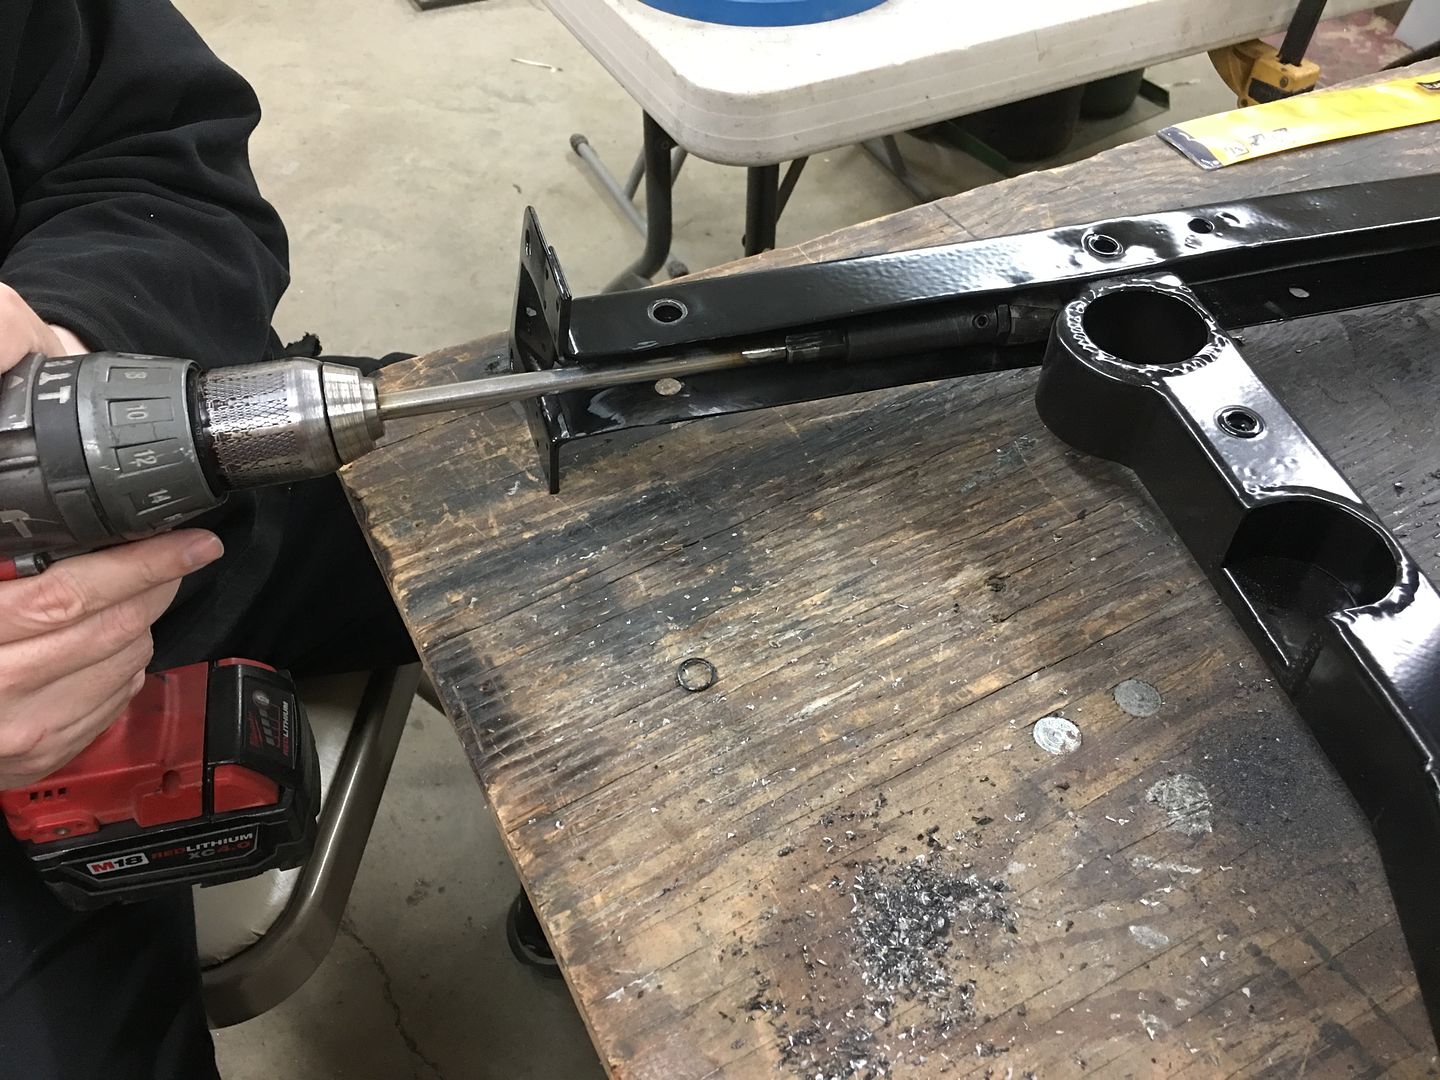 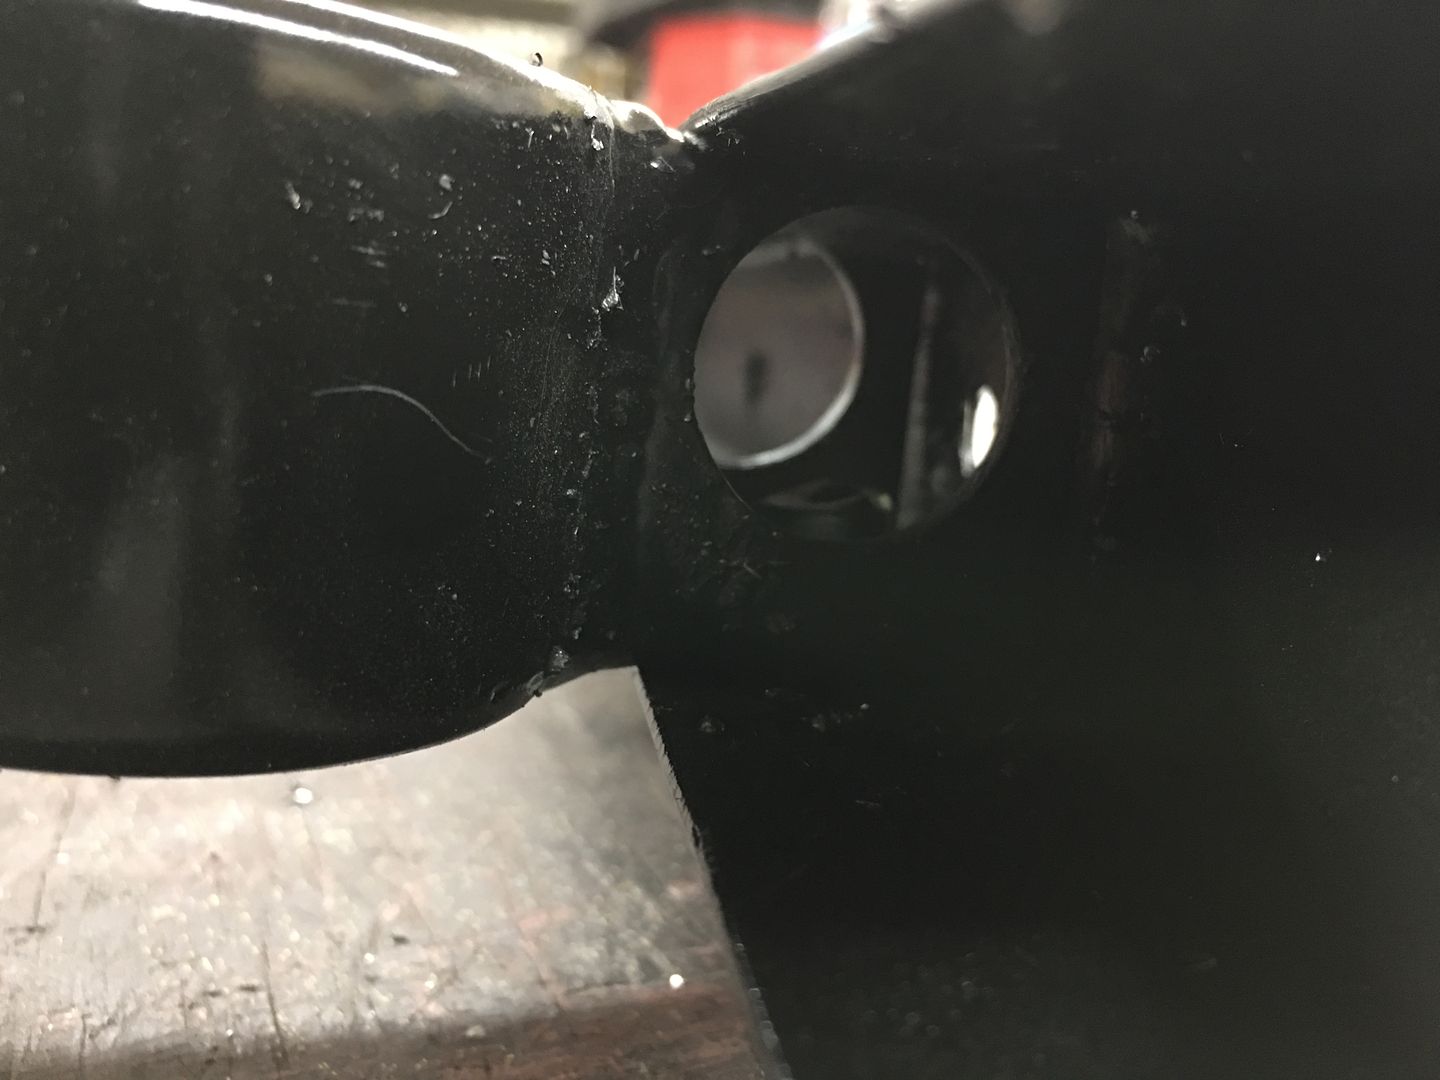 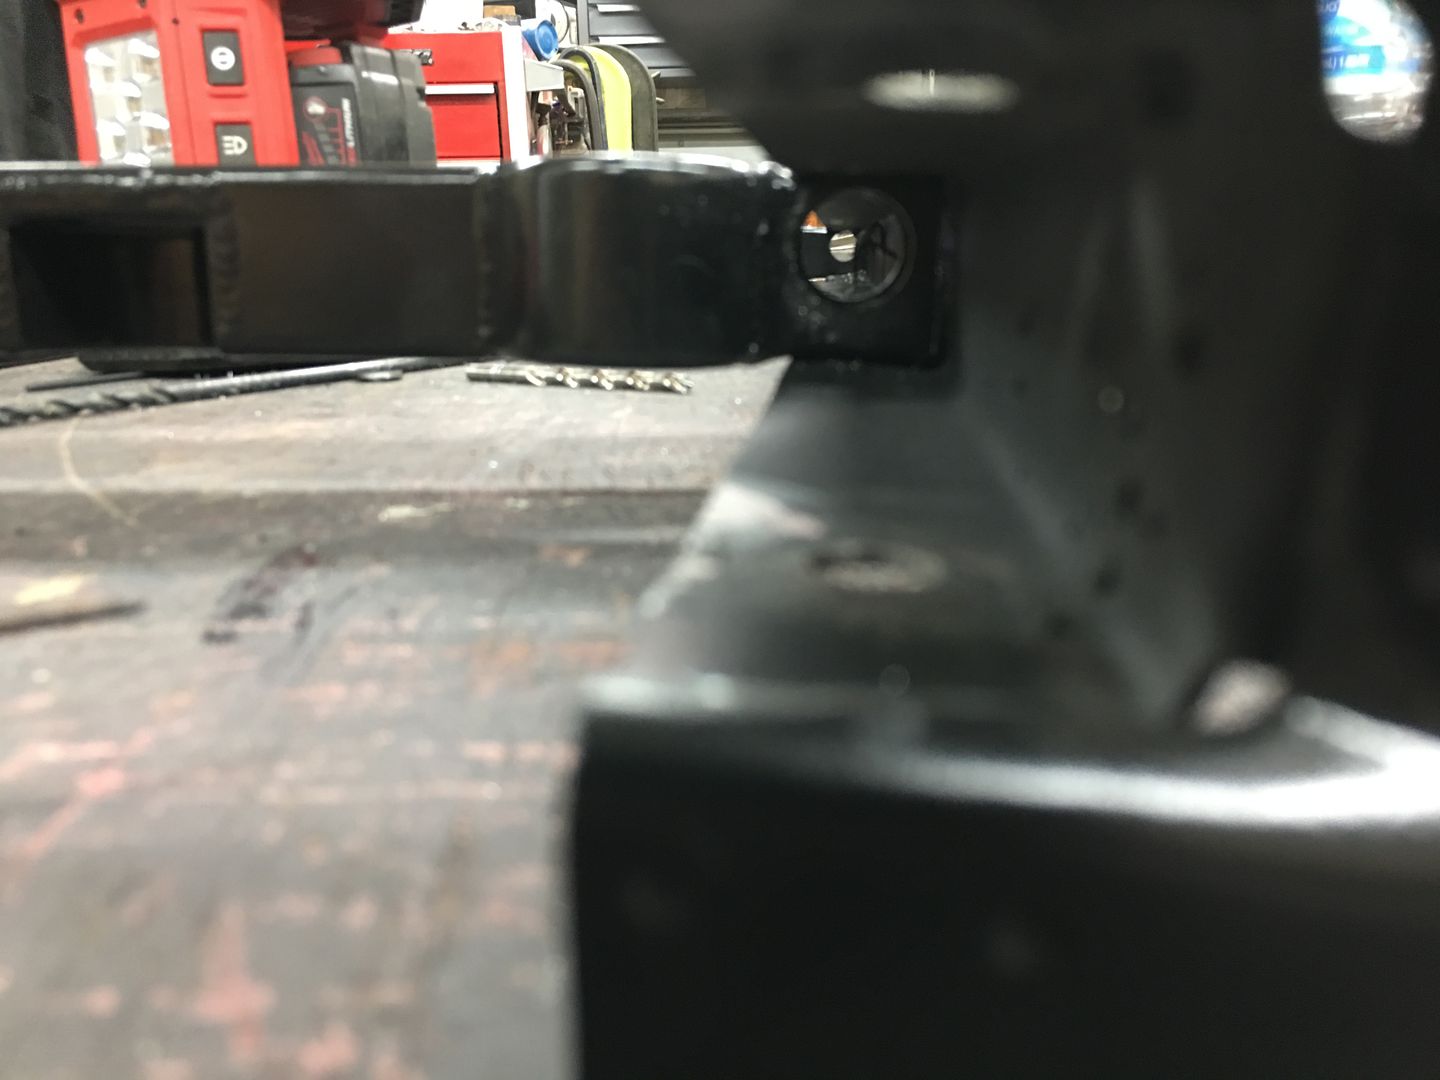 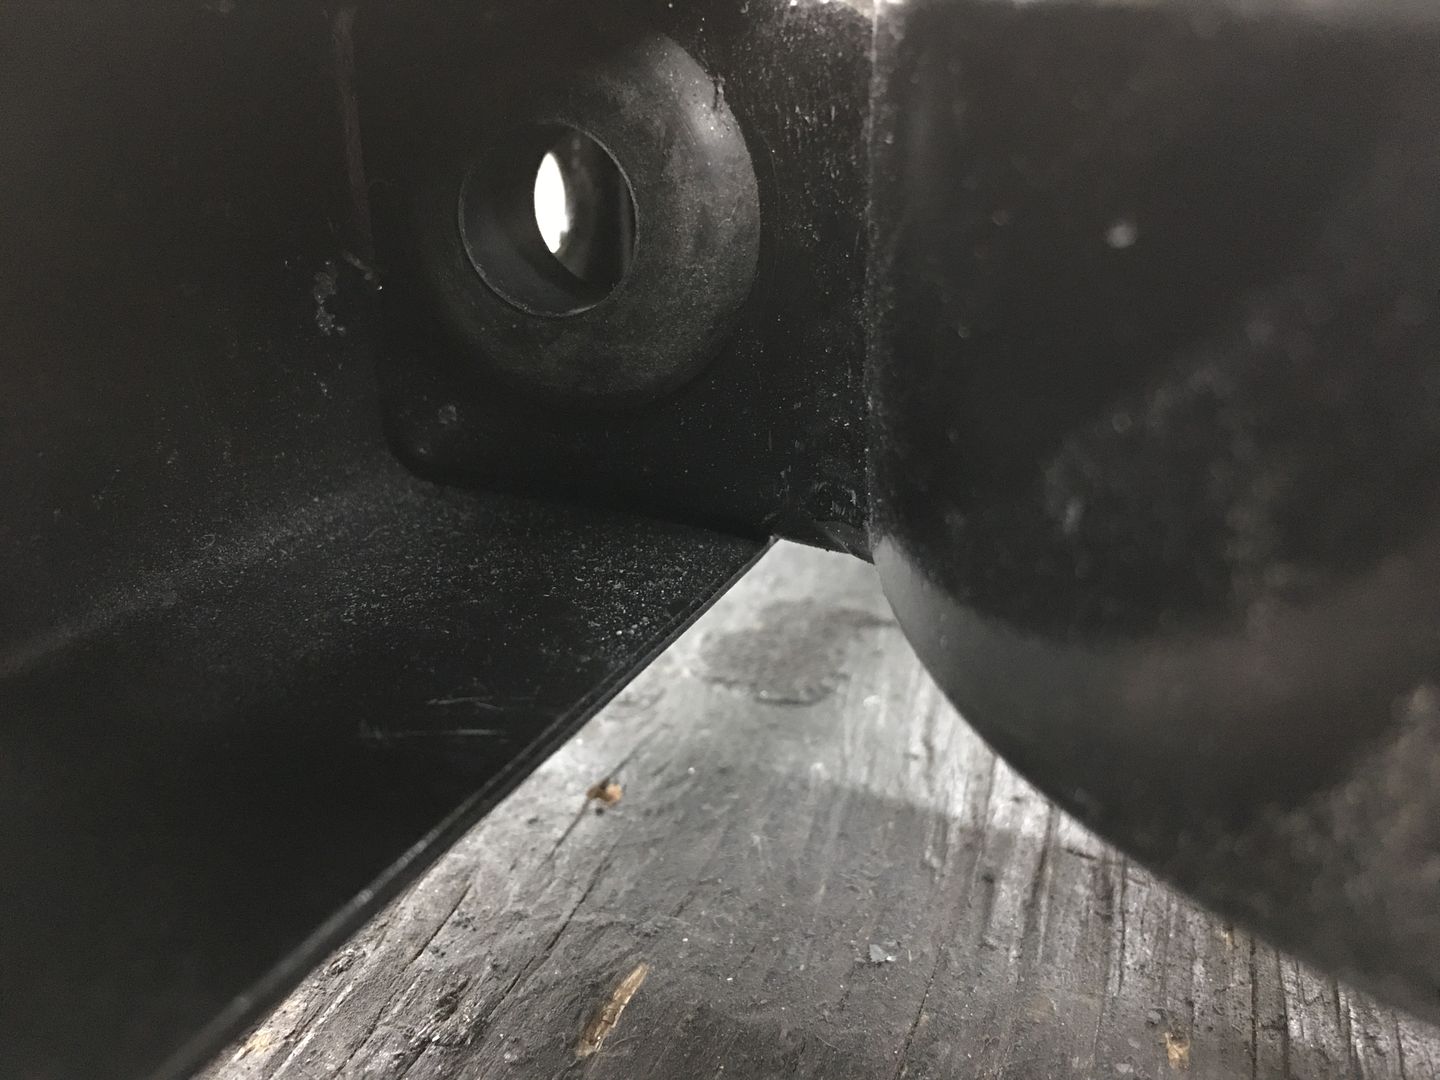 Now for a test fit of our Parking brake lines to mock up the routing prior to adding rivet nuts and adel clamps... 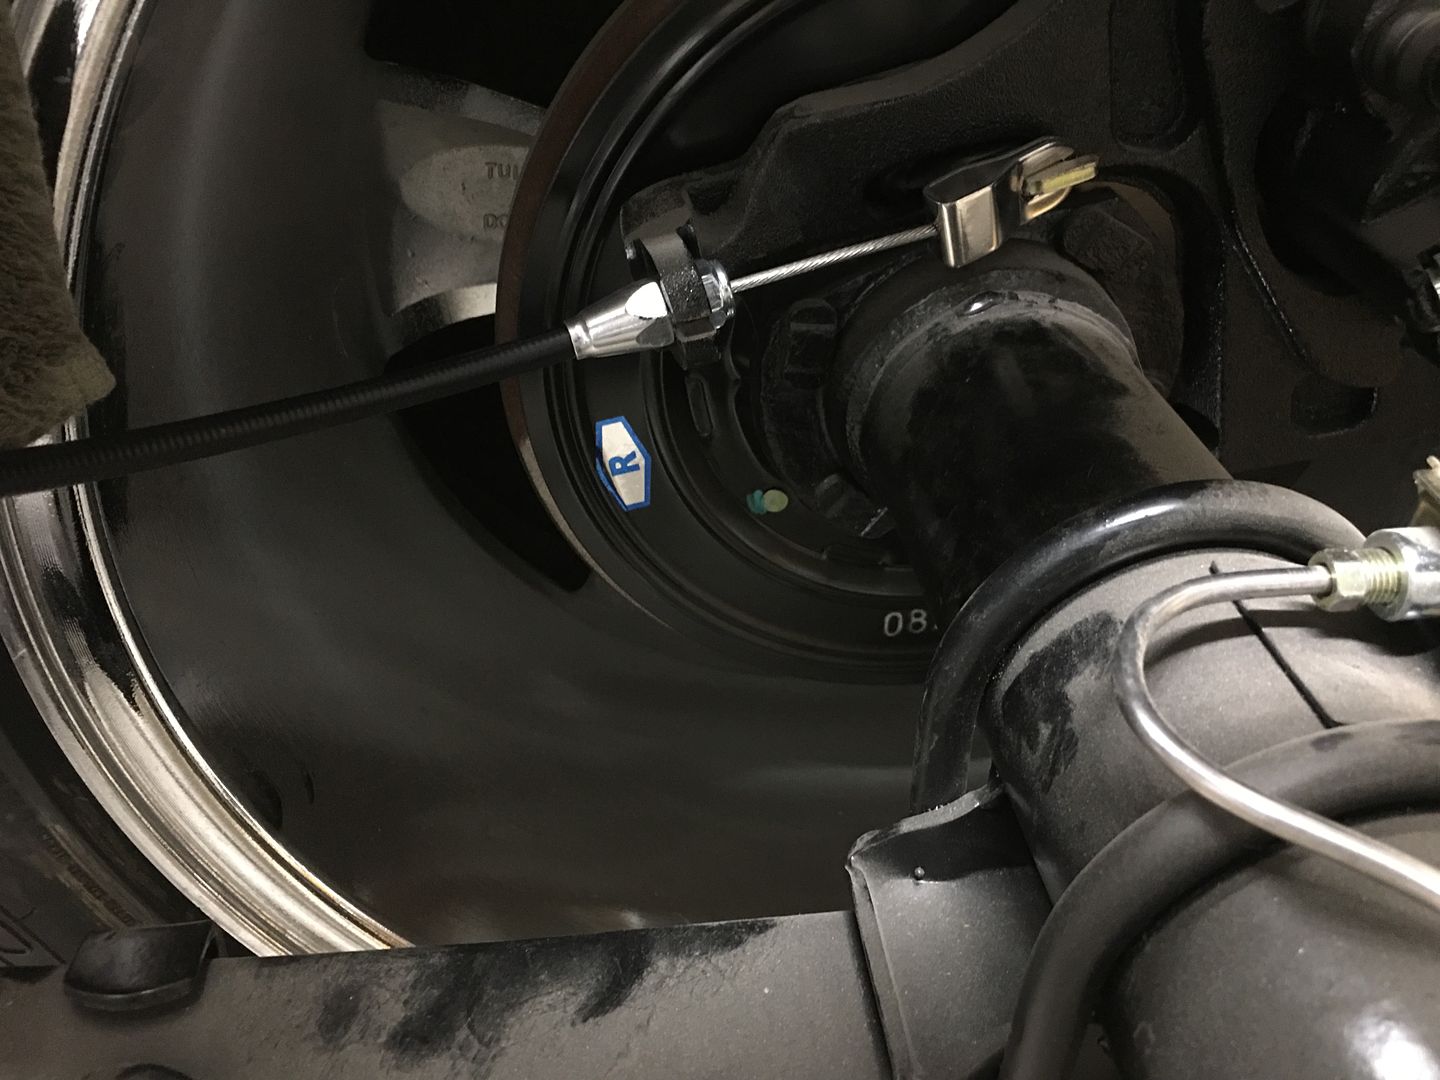 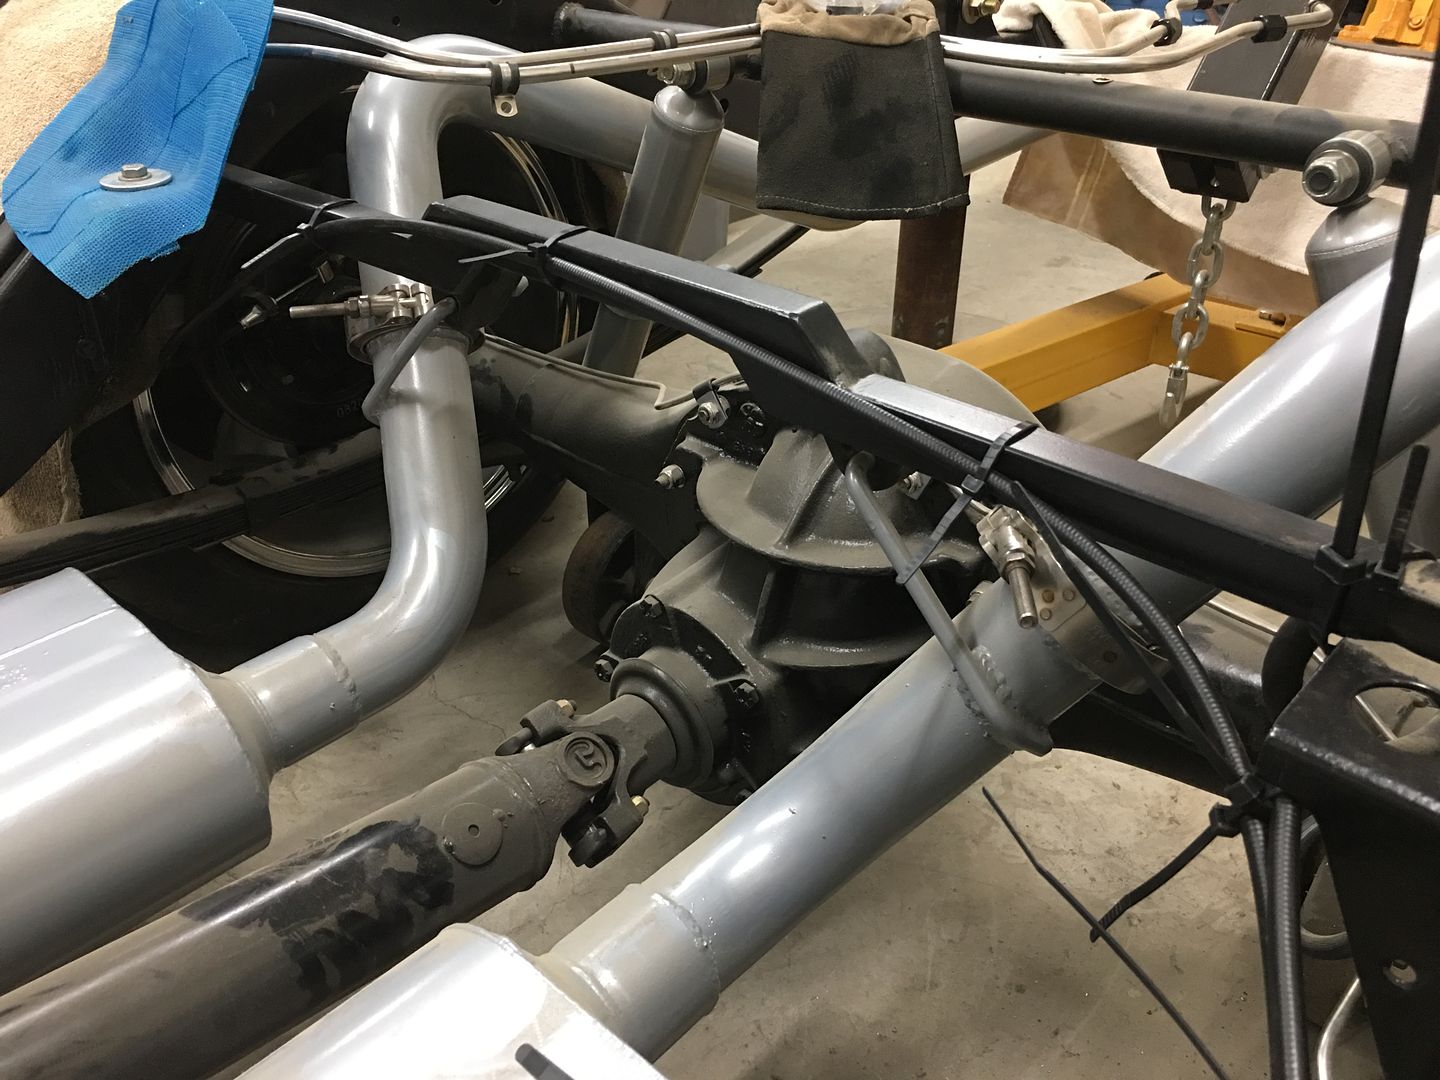 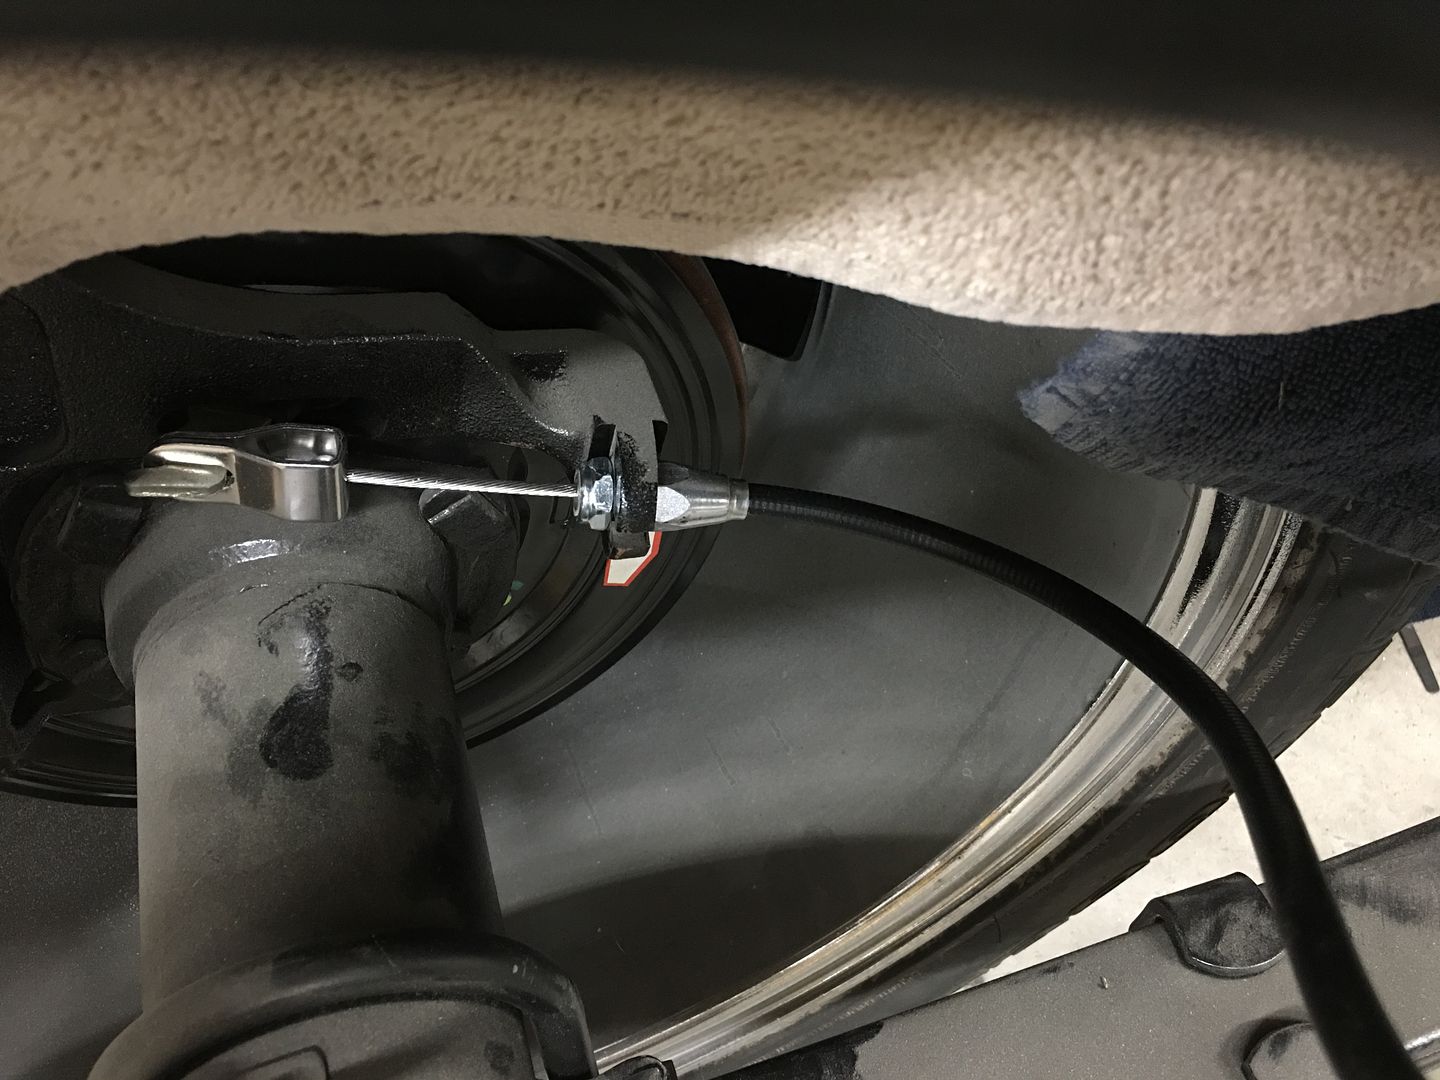  And here's our one cable to two parts layout.. 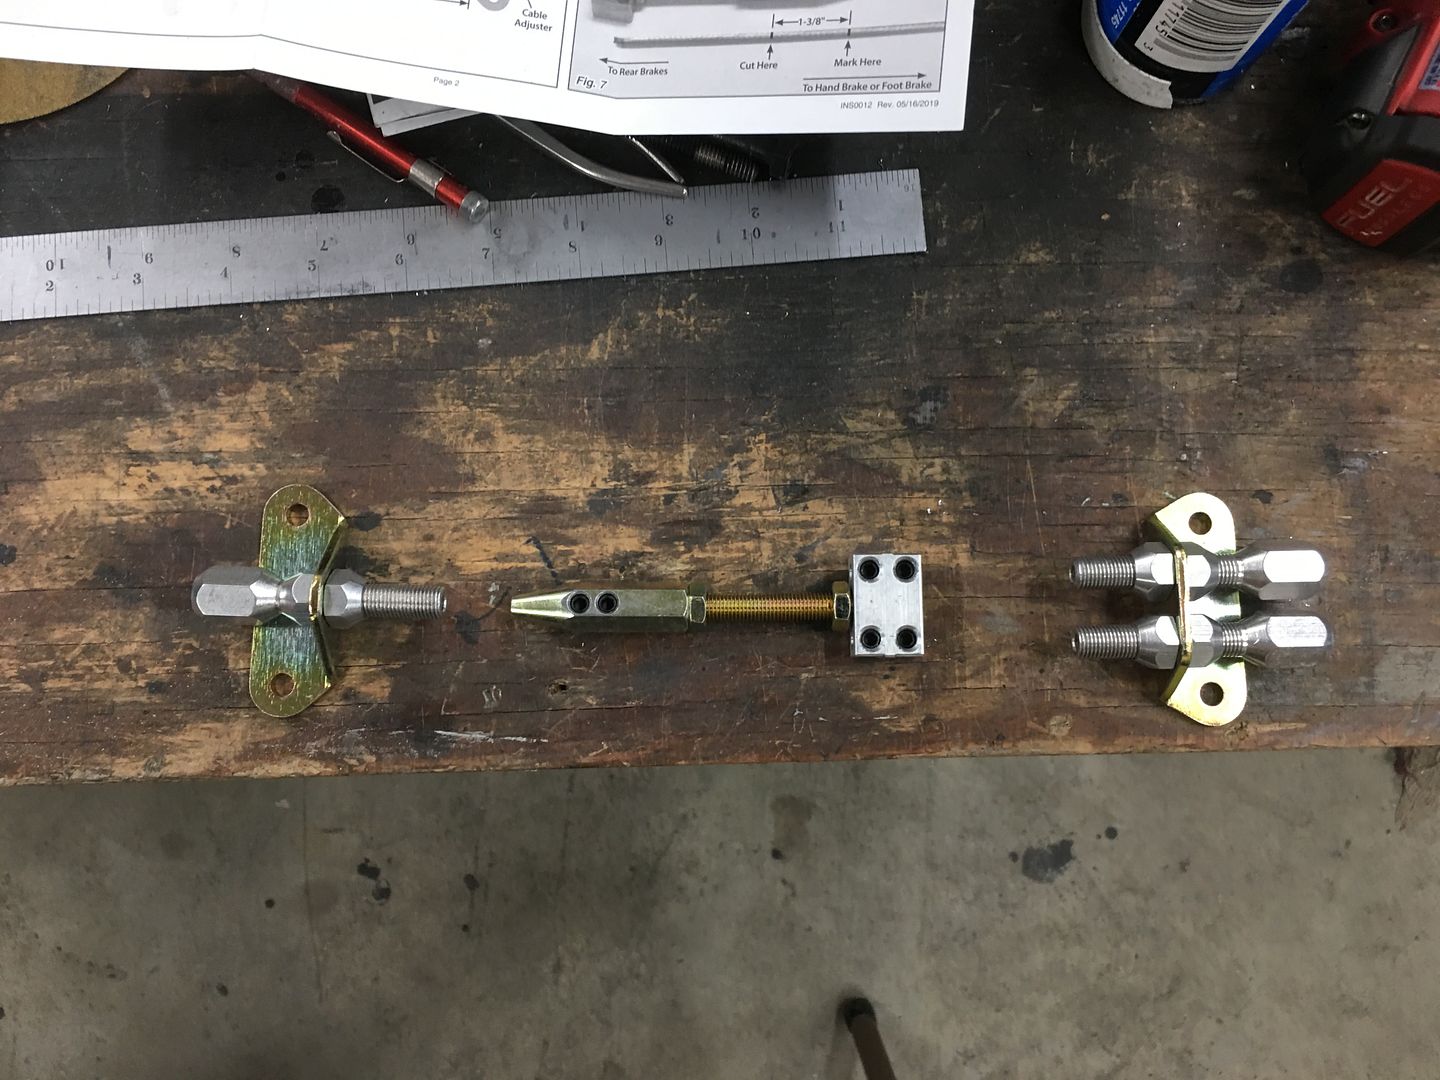
__________________
Robert |
|
|
|
|
04-26-2020, 02:28 PM
|
#1133 |
|
Registered User
Join Date: Jan 2013
Location: Leonardtown, MD
Posts: 1,633
|
Re: 55 Wagon Progress
With our adel clamps arrived, Mike and I worked on the brake cables while Vince was prepping things for paint...
.JPG) .JPG) I think he's having too much fun... We had to wait for -5 clamps as these were snug enough to hold the cable from moving. This allows us to set the length to the backing plate such that it clears the frame during suspension travel.. 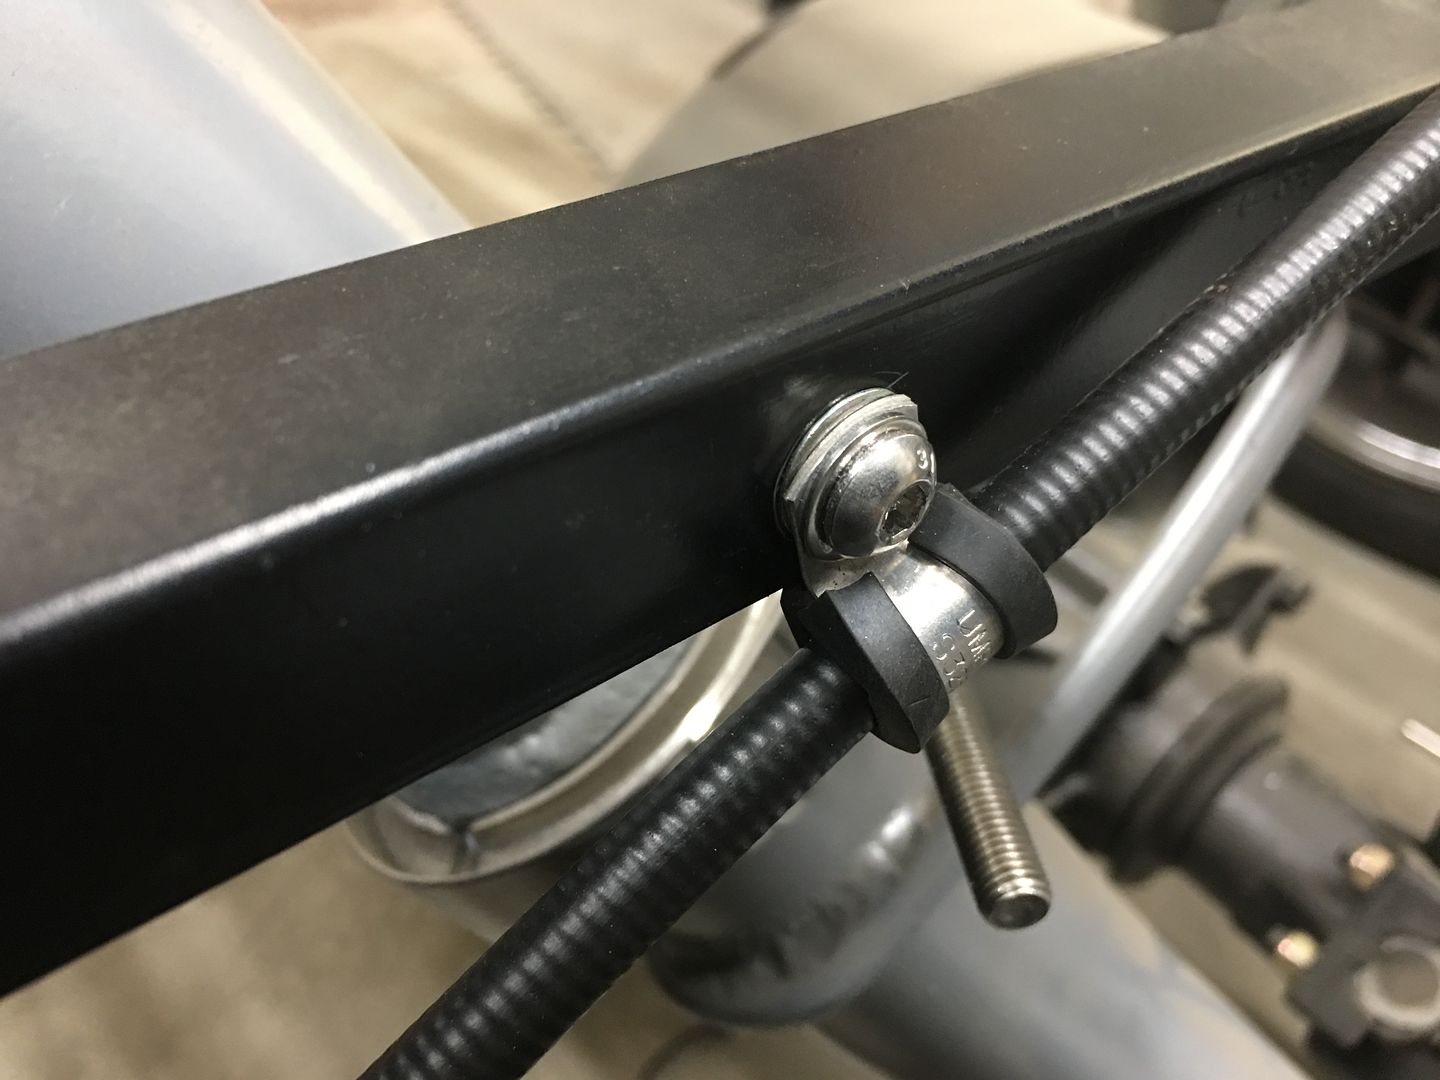 The clamps were held in place using rivet nuts installed into the frame. Here is a video showing rivet nuts and the proper installation: https://www.youtube.com/watch?v=3jrrf_VbTsc 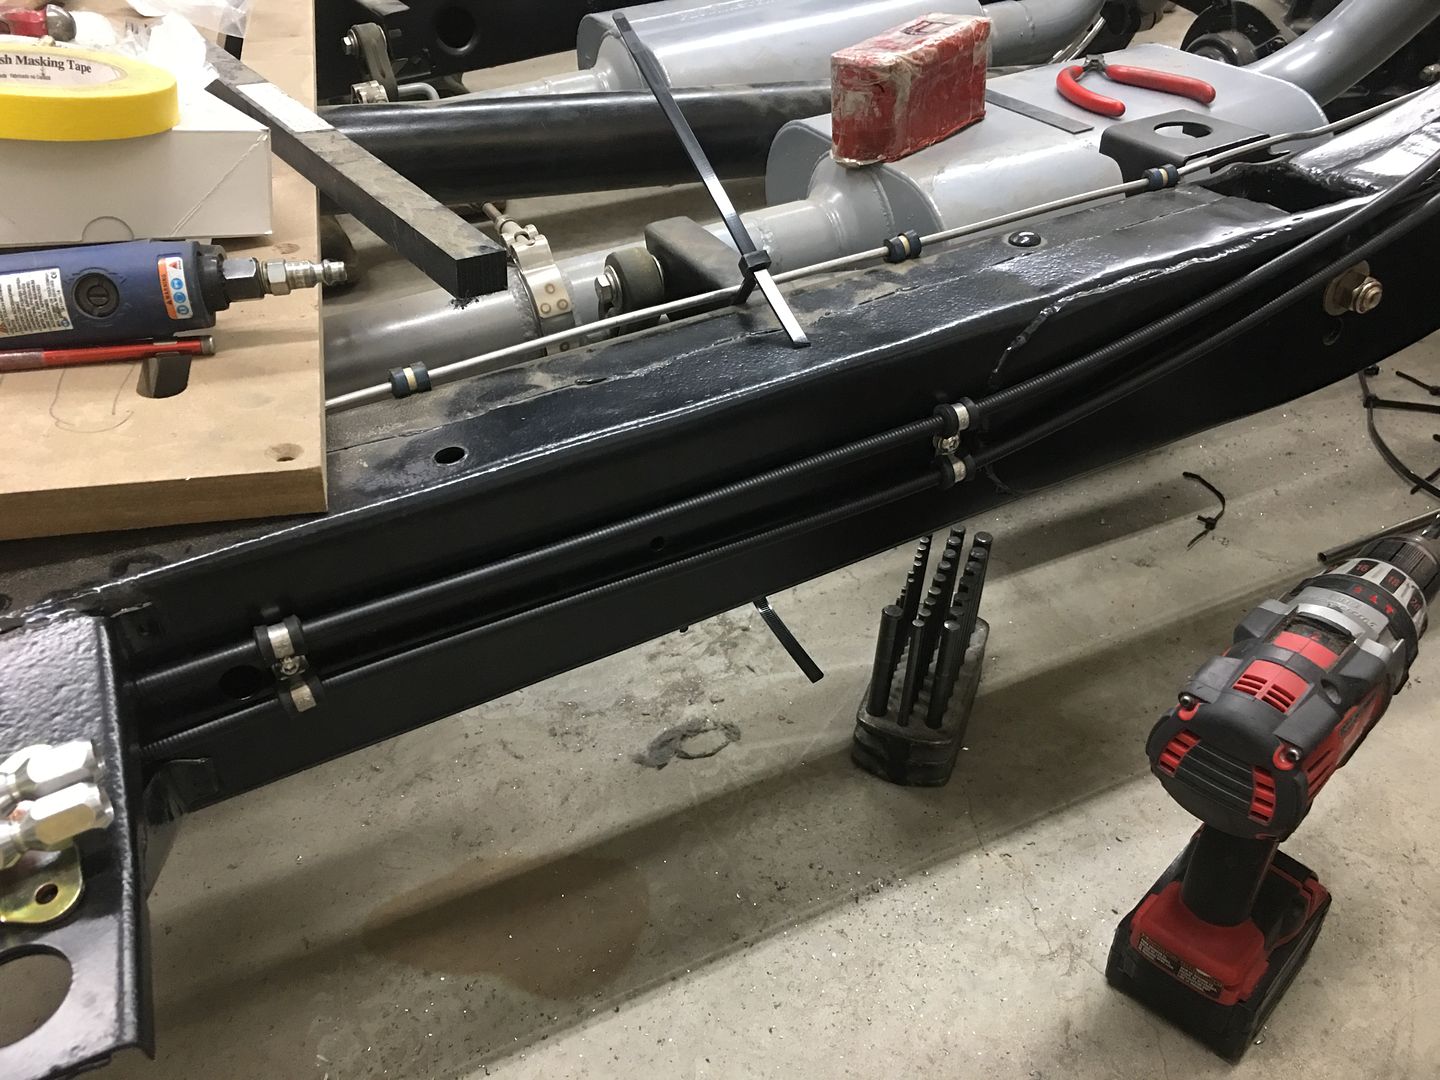 Outer sheaths are marked for trimming.. 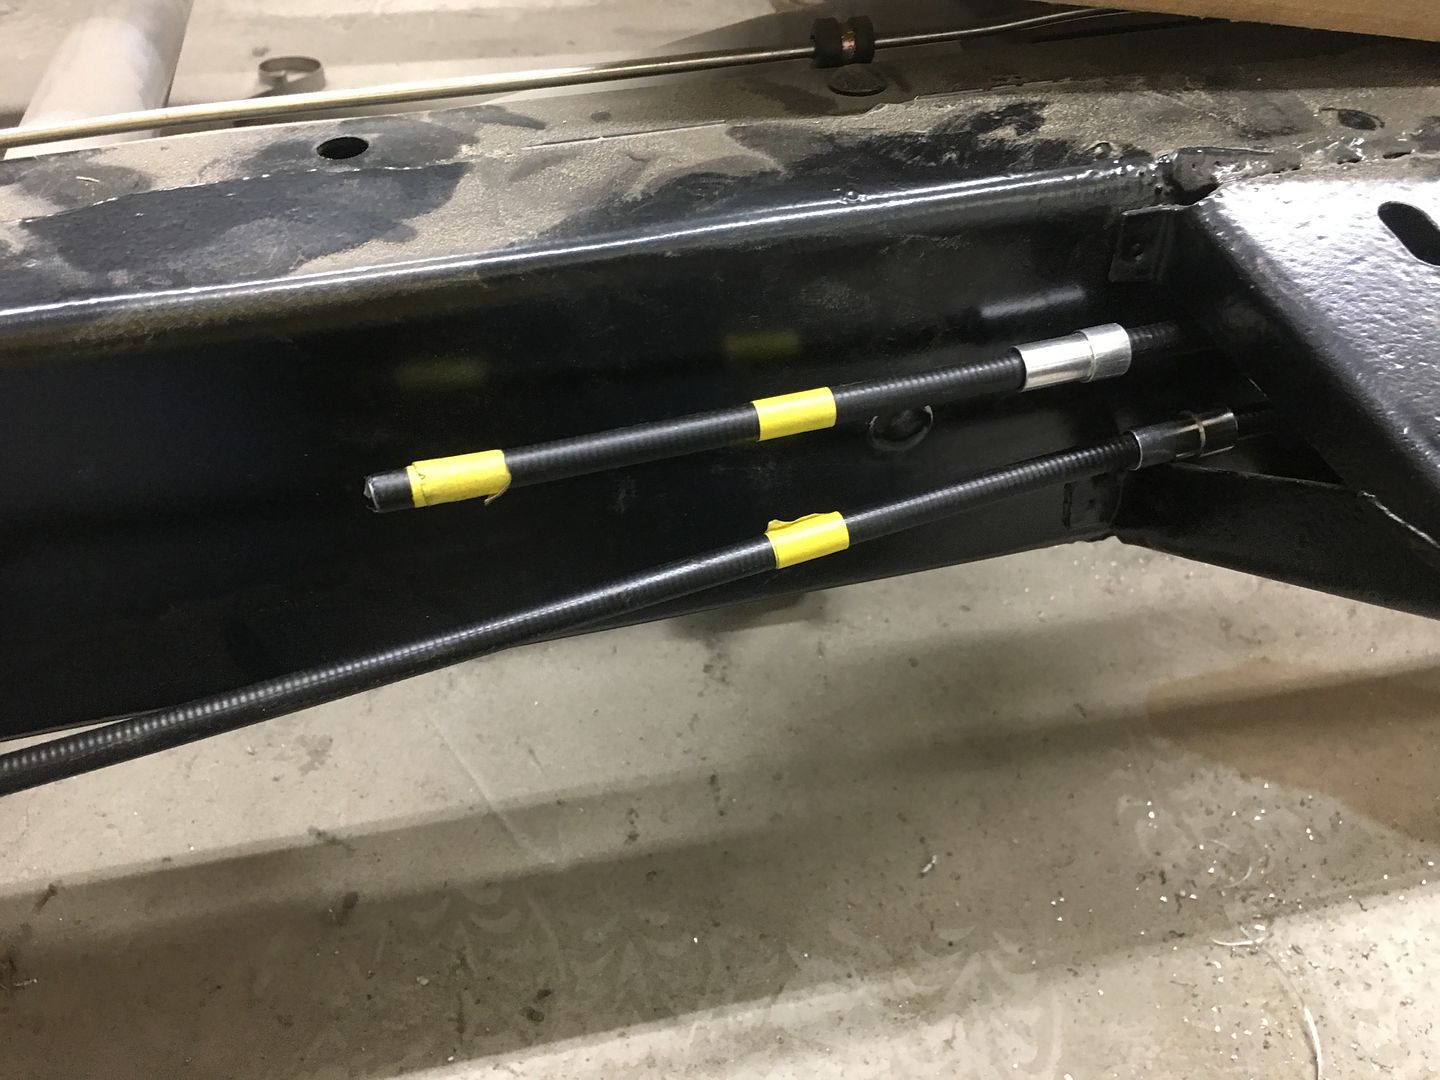 Be sure to pull cables out of the way prior to cutting... 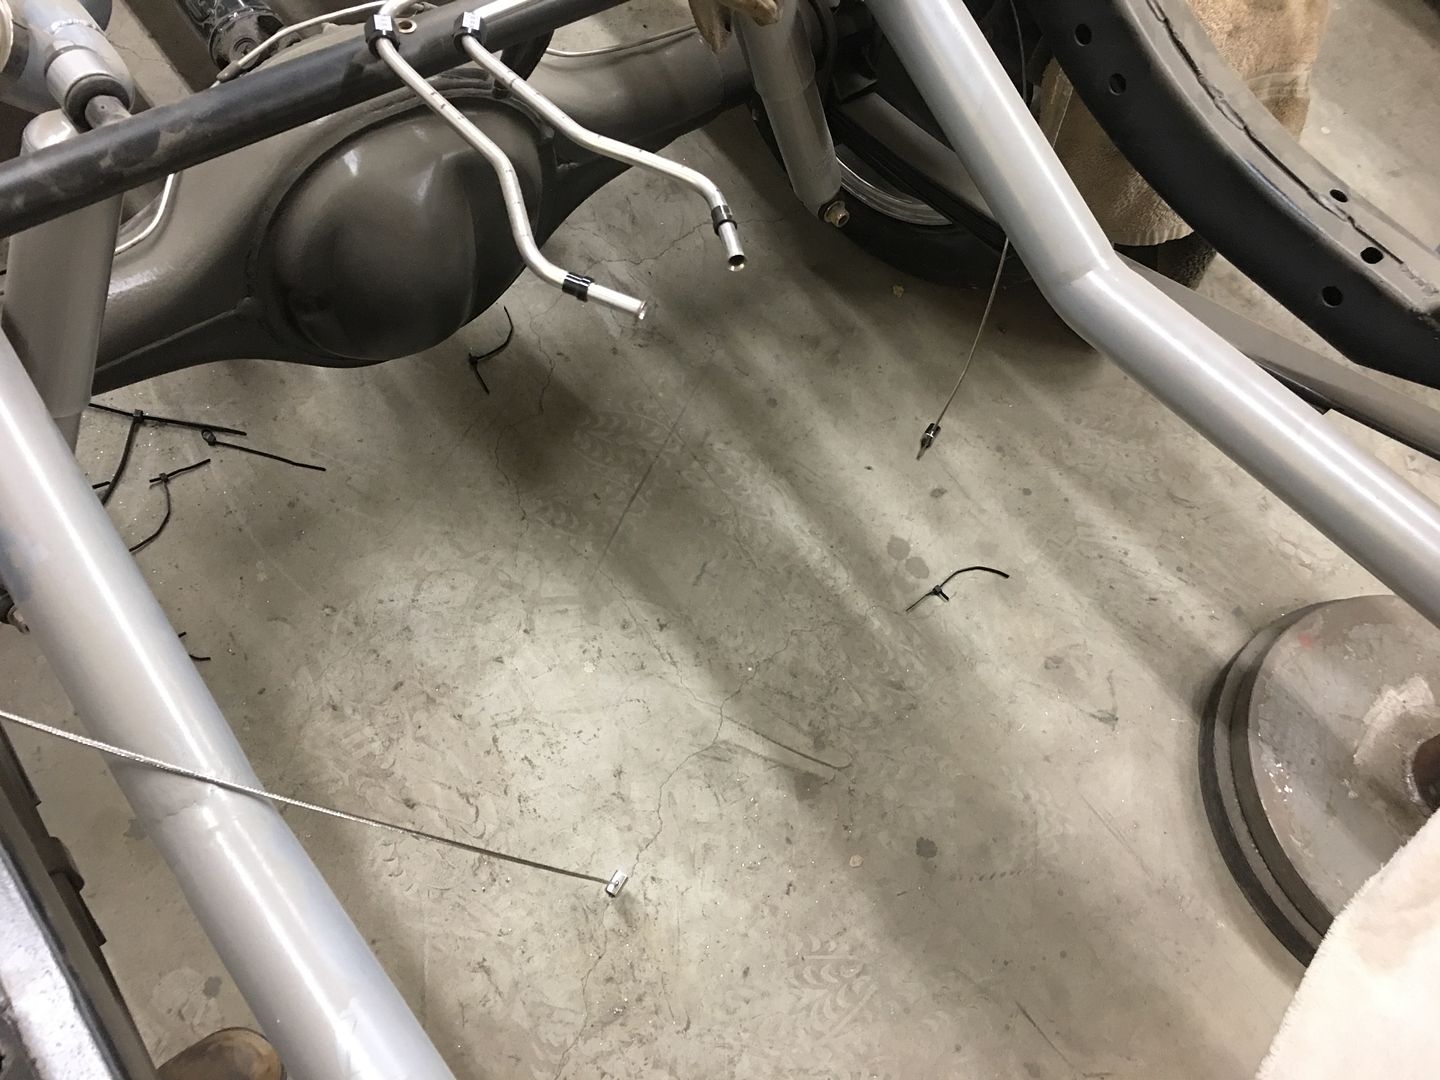 Our implement of destruction... 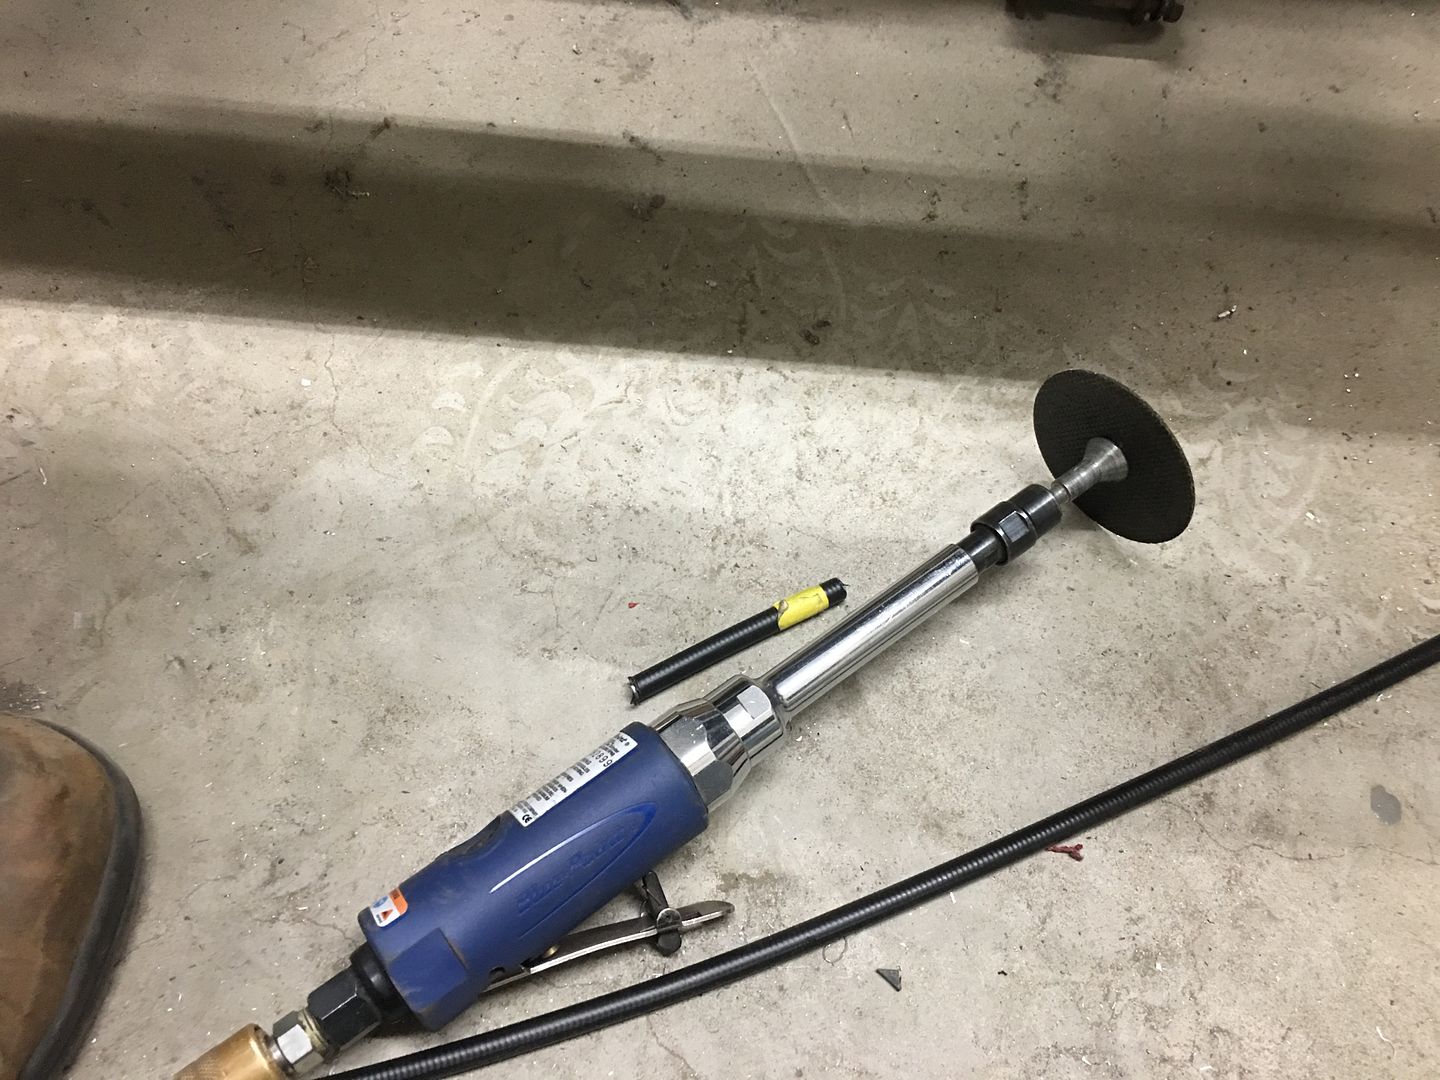 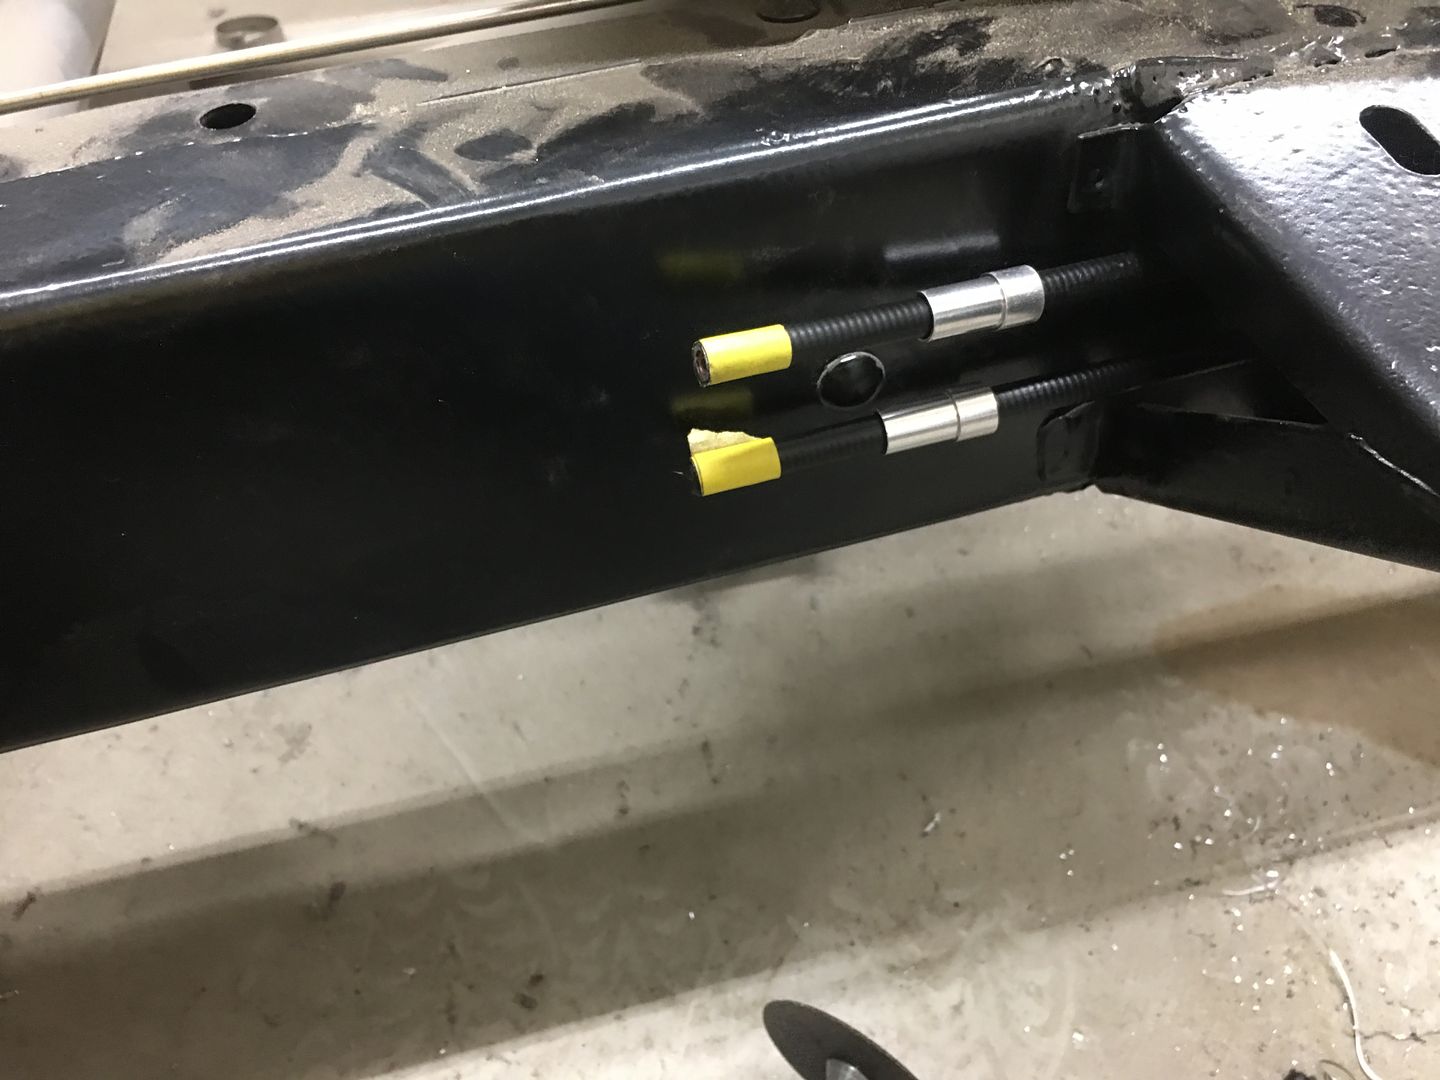 Using Gripple cutters to cut the cable... Also made by Knip-ex, both are designed for cutting steel wire rope.. https://www.youtube.com/watch?v=kWrpry0XgAU Our parking brake assembly used an integral "return spring" to pull the pedal back upwards when the brake is released, so that part is saved for this installation as well. To keep the end of the spring from rubbing against the cable in one spot, we machine a landing in the adjuster. We will also use some Teflon heat shrink over the cable to help prevent wear. 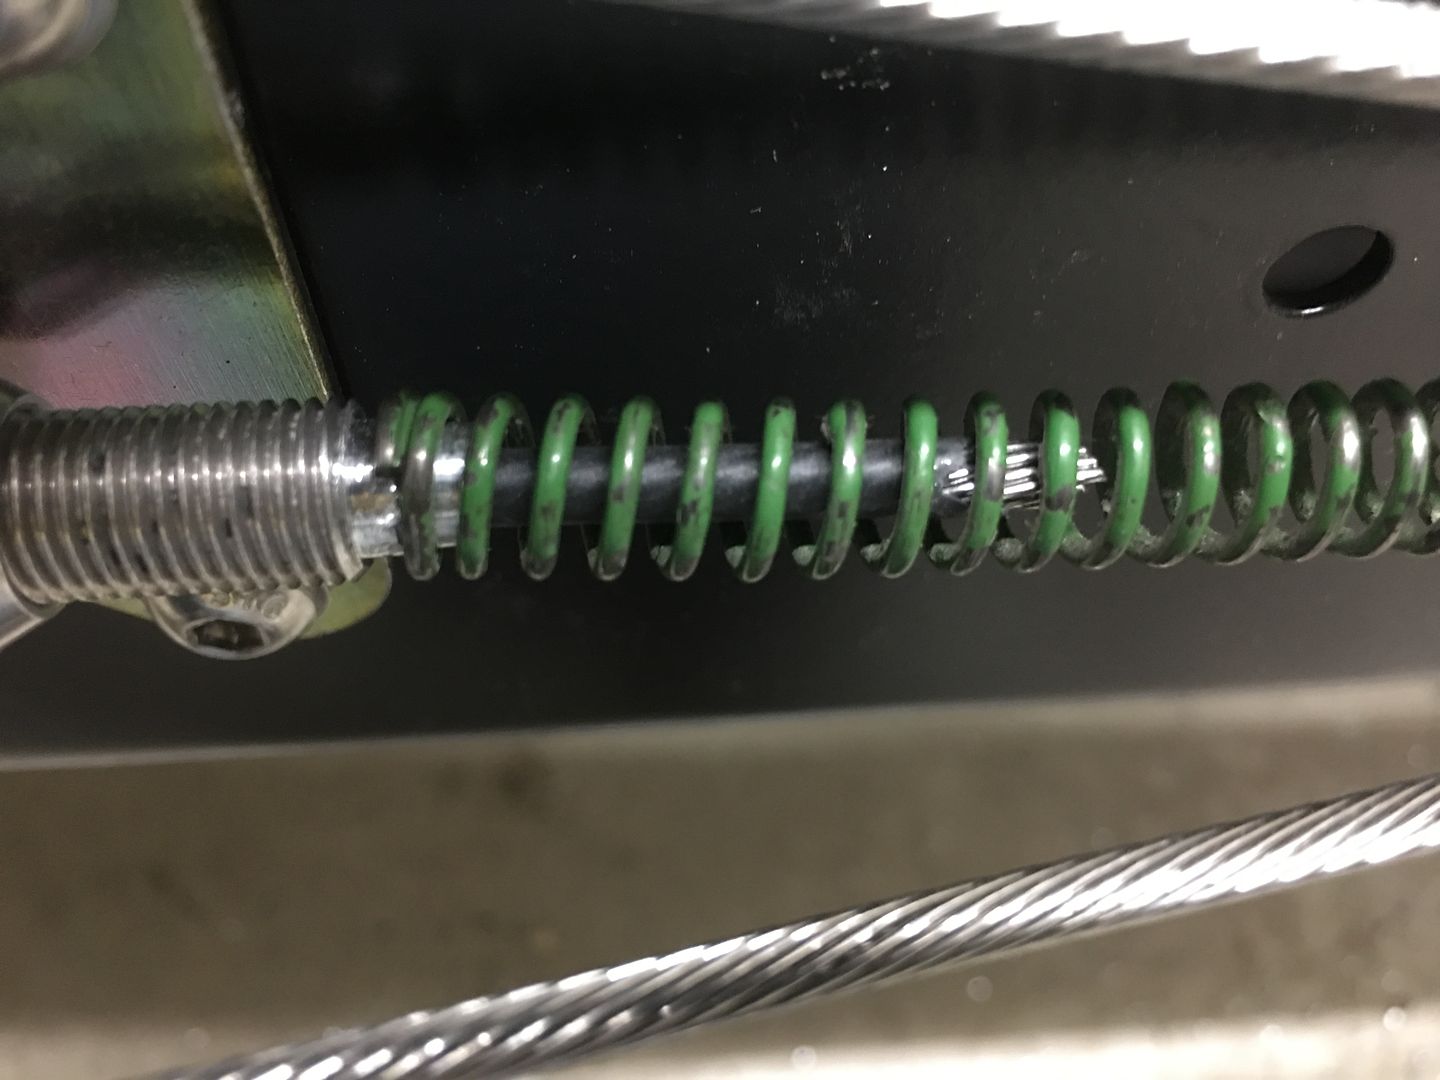 Final trim on the rear cables will come when we drop the body back on the frame for proper fitment to the brake pedal assembly. 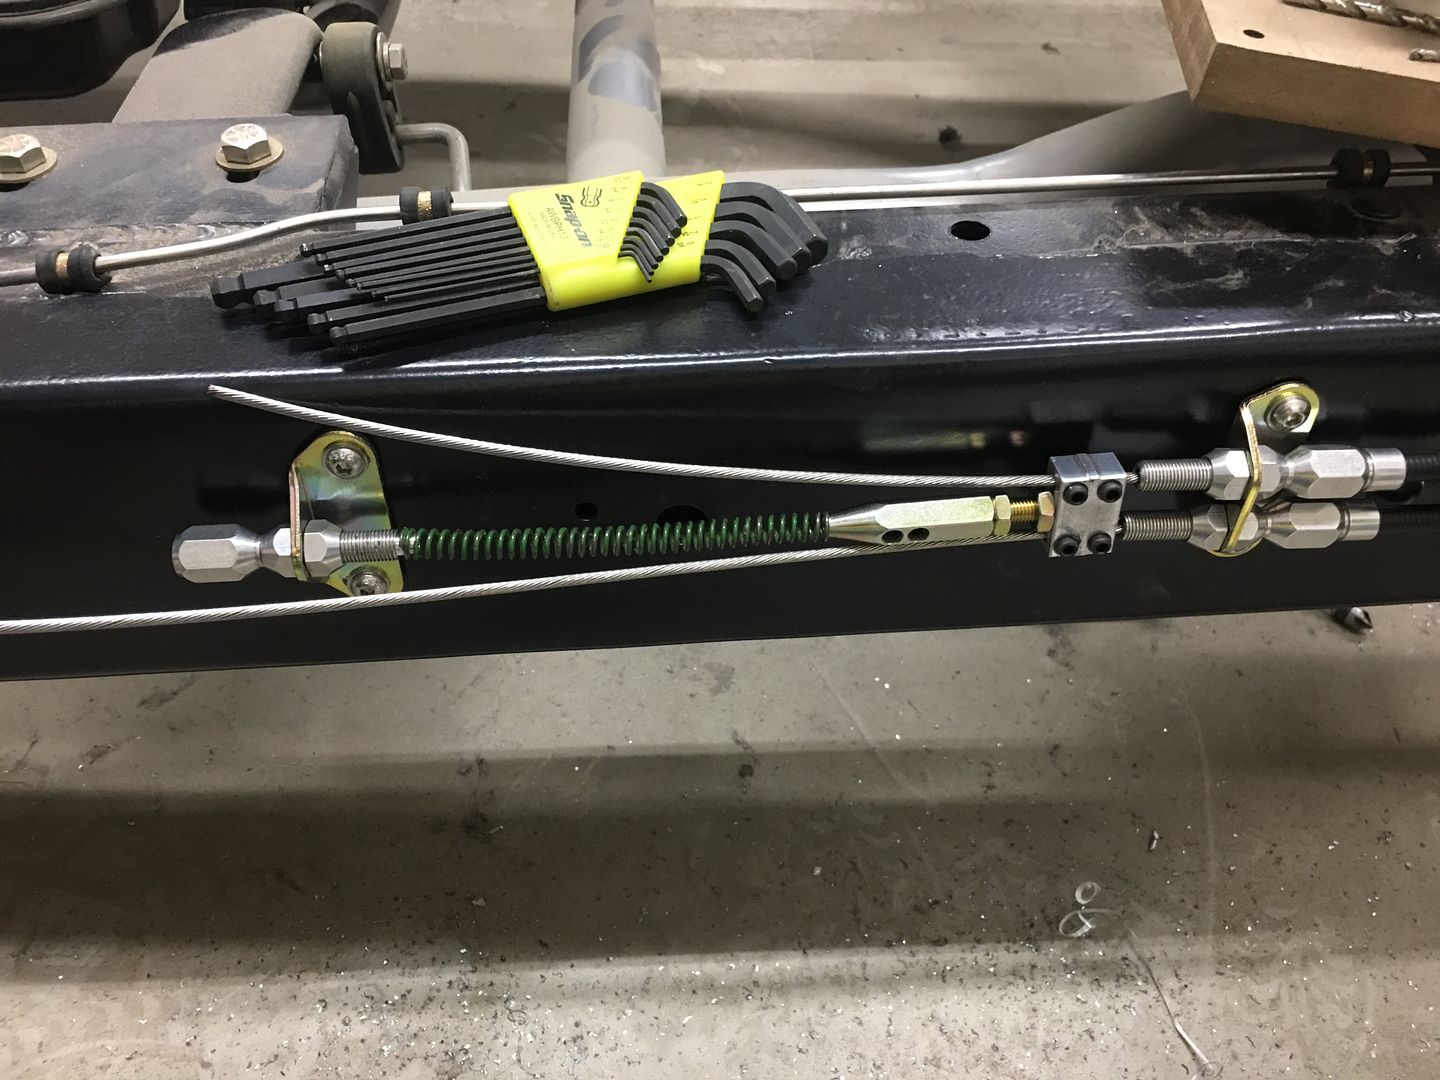 .
__________________
Robert Last edited by MP&C; 04-26-2020 at 02:35 PM. |
|
|
|
|
04-27-2020, 12:50 AM
|
#1134 |
|
Registered User
Join Date: Jan 2003
Location: Safford,AZ
Posts: 3,613
|
Re: 55 Wagon Progress
Nice! Getting Closer!
|
|
|
|
|
04-27-2020, 09:21 AM
|
#1135 |
|
Registered User
Join Date: Jul 2019
Location: Beebe, AR
Posts: 2,392
|
Re: 55 Wagon Progress
That's a football field of sheet metal to work with right there! Looks superb.
Going to be beyond great and cannot wait to see it together.
__________________
1967 C10 1980 Jeep CJ5 2020 Toyota 4Runner 2020 Toyota CH-R 2020 Acura MDX |
|
|
|
|
04-27-2020, 12:43 PM
|
#1136 |
|
Registered User
Join Date: Jan 2013
Location: Leonardtown, MD
Posts: 1,633
|
Re: 55 Wagon Progress
Guys, thanks for the comments and following along with our progress!
__________________
Robert |
|
|
|
|
05-04-2020, 12:13 PM
|
#1137 |
|
Registered User
Join Date: Jan 2013
Location: Leonardtown, MD
Posts: 1,633
|
Re: 55 Wagon Progress
So yeah, we work on just about anything. File this one away under "everything's a tool". You need to be able to look at the problem, and figure out what you have readily available as a solution (especially when working weekends)
Vince is still milking the media blast job.. 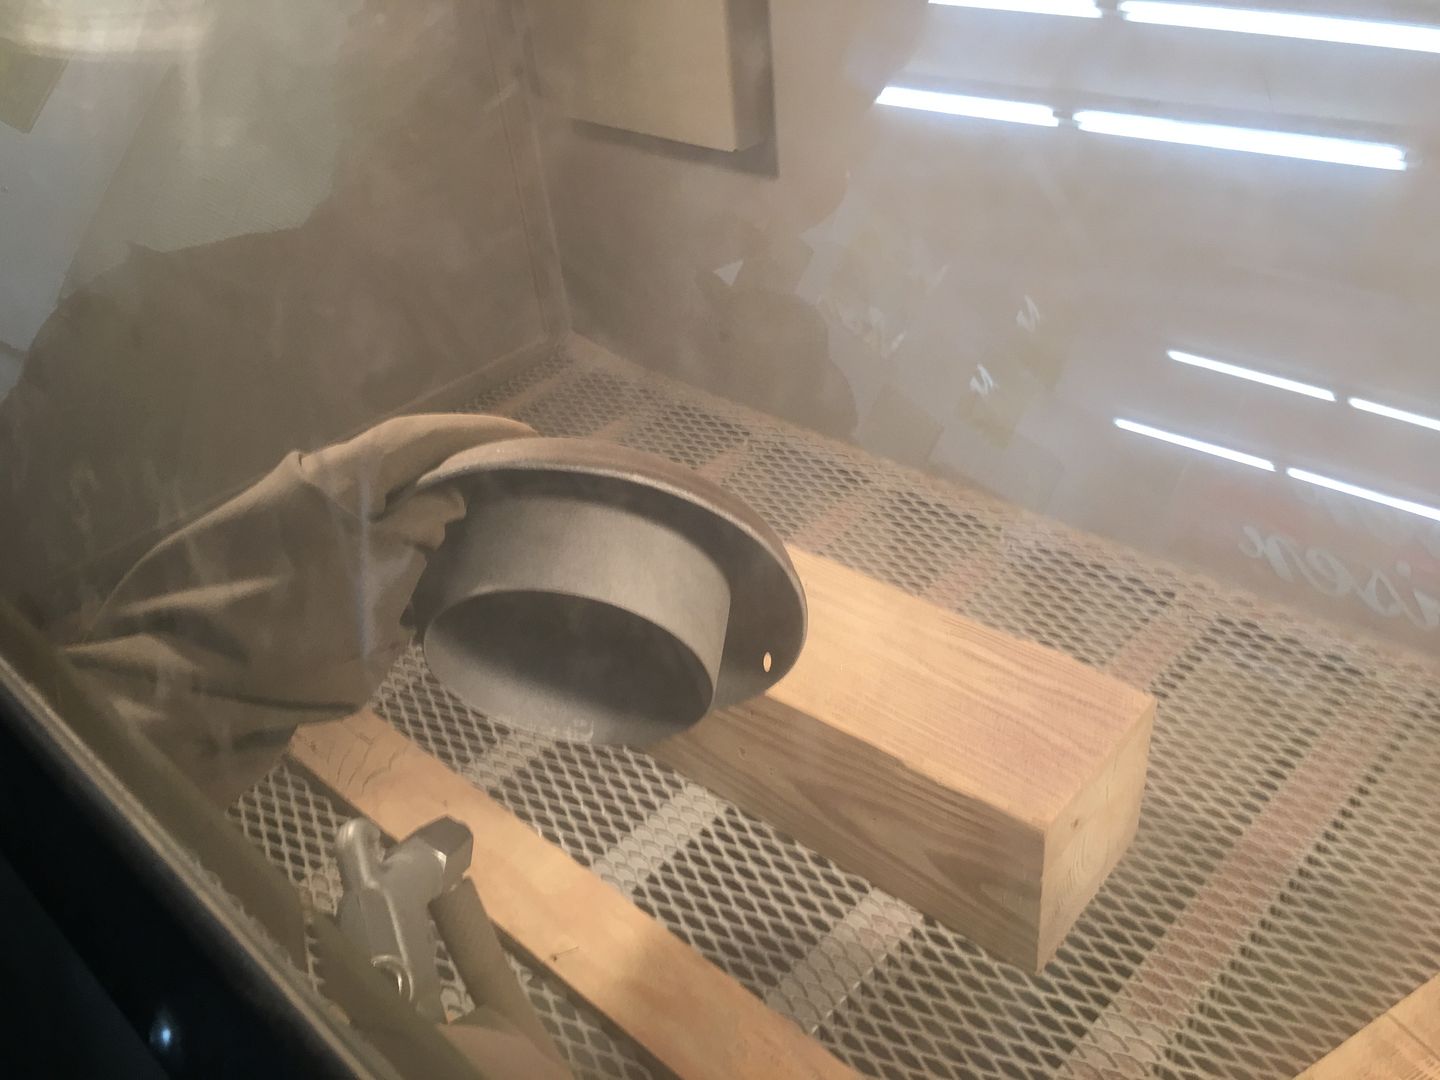 Another of the lids had been used and abused with a hammer over it's life, the center was concaved inward, the outer rim had several flat spots. So while Vince was busy, I came up with a dent removal tool to help straighten out the next lid. 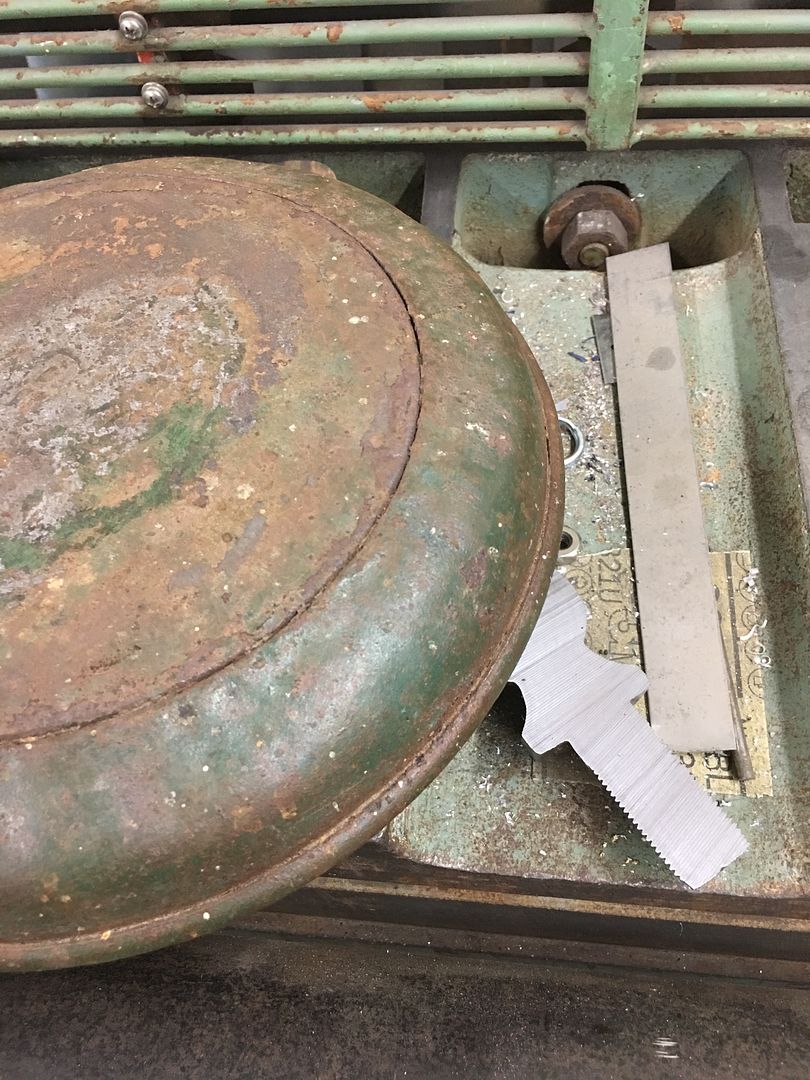 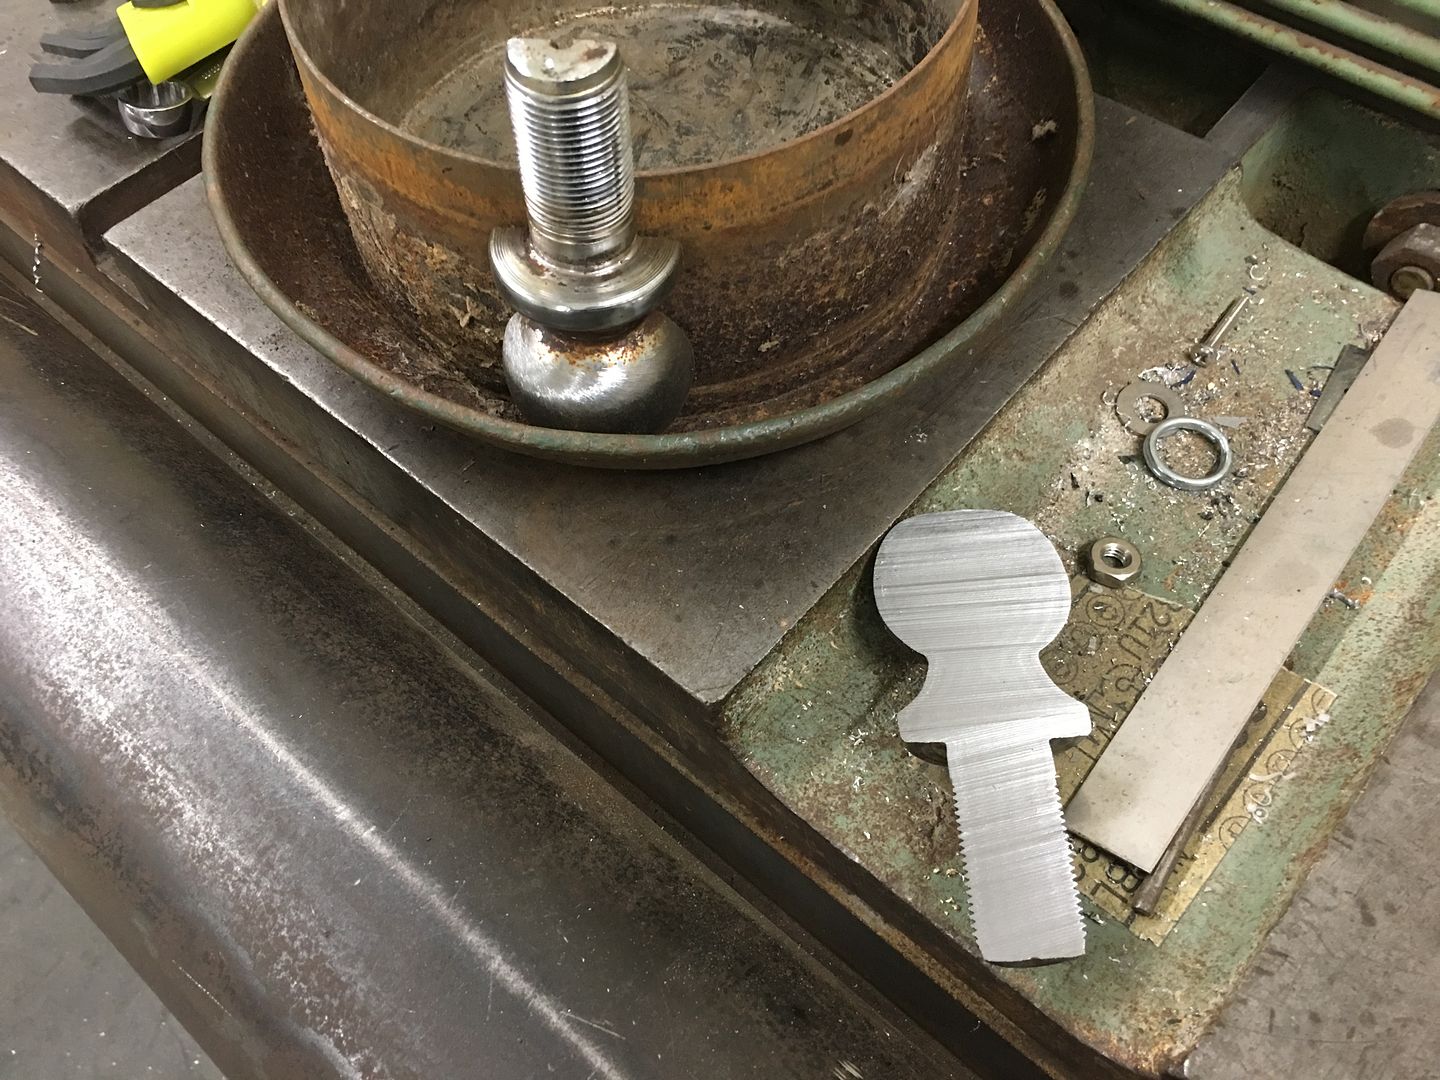  The half hitch ball was used as a punch straight down into the lid to add a consistent shape back to the outer ring. Some hammer and dolly work straightened the center concave, giving it a slight crown. A deep dent was heated to make it more pliable, the punch pushed to the bottom and used as fulcrum to push the dent outward (heated spot) 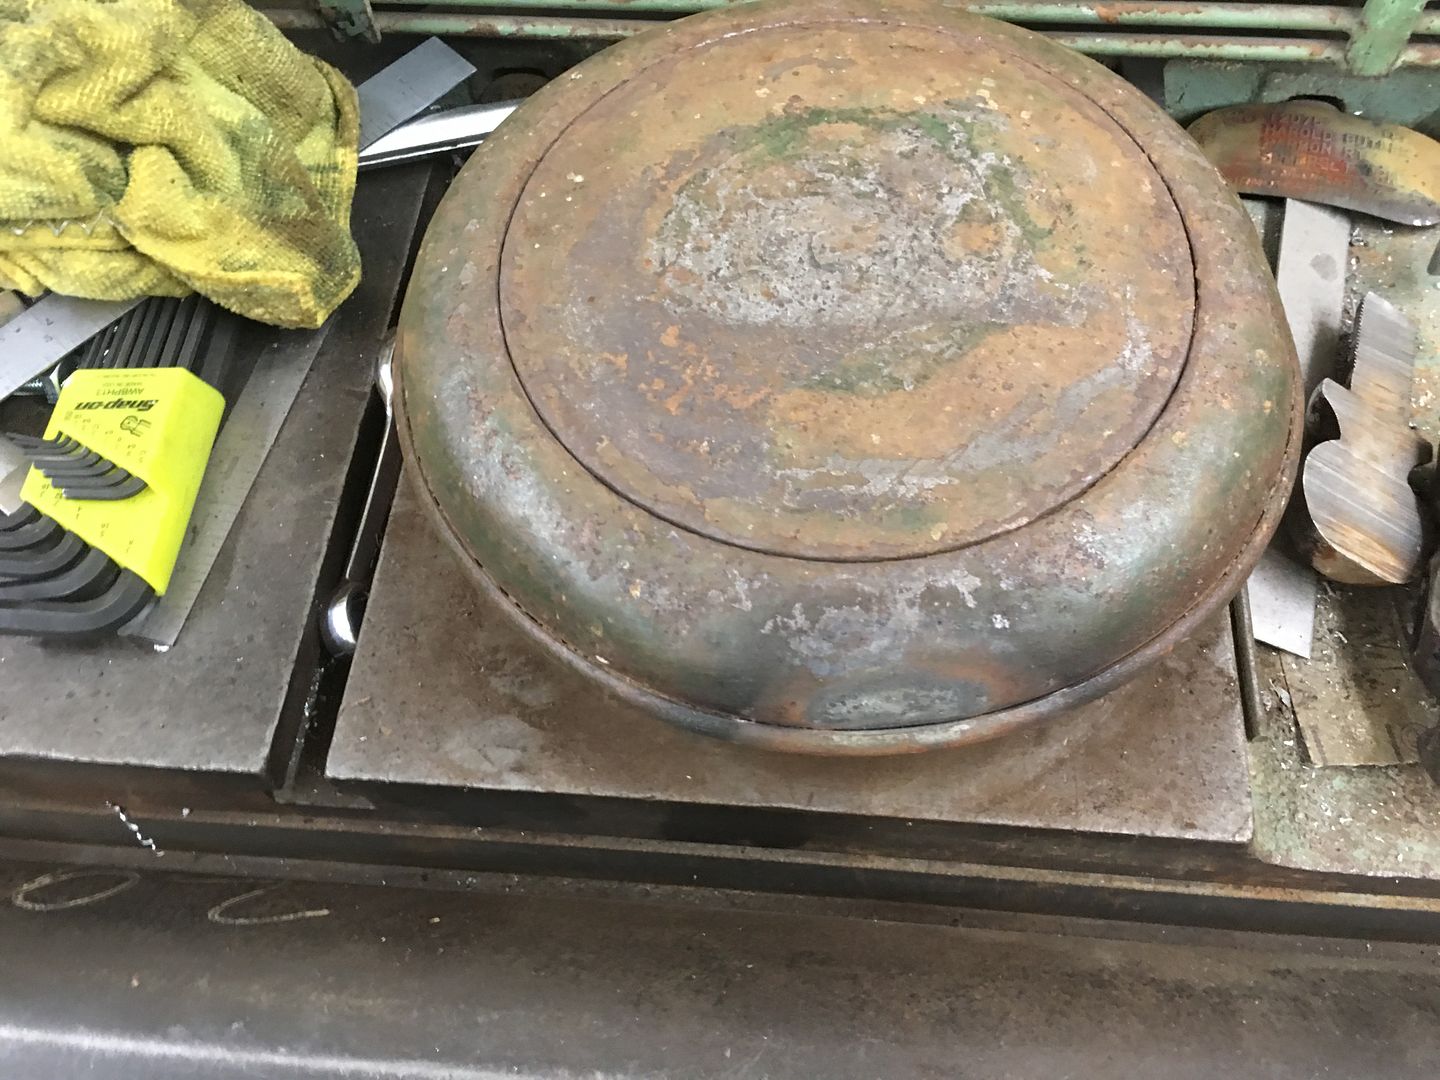 Then our "punch" was clamped in the vise to use as a post dolly. The lid was positioned where any low spots were placed against the "dolly" and hammering around the perimeter of the dent raised it outwards.. 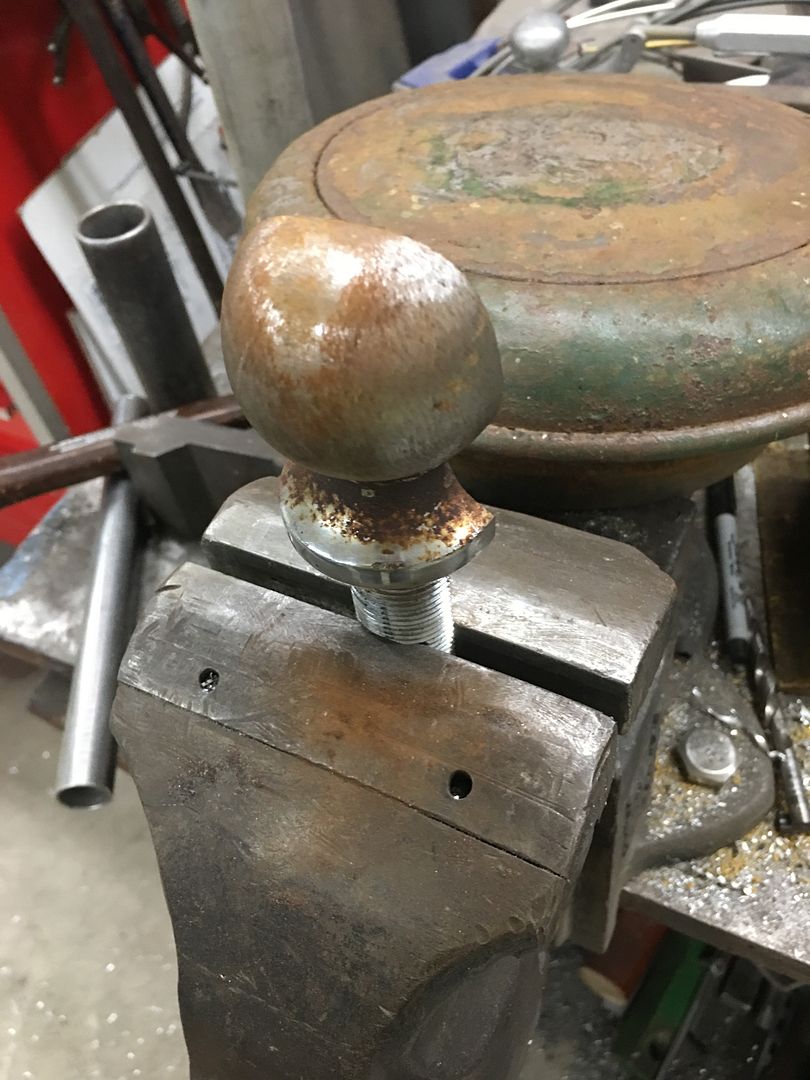 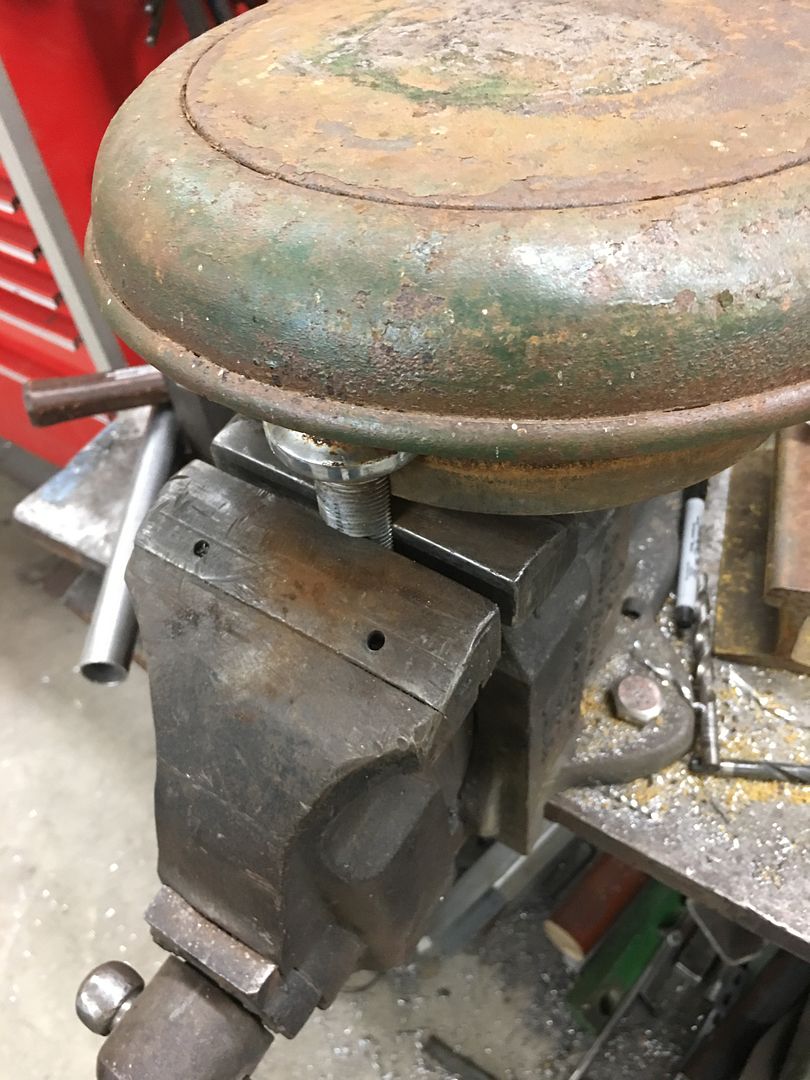 Some fine tuning left, but this is much better than where we started: https://www.youtube.com/watch?v=80YGom51gc0 .
__________________
Robert |
|
|
|
|
05-04-2020, 02:07 PM
|
#1138 |
|
Post Whore
Join Date: May 2015
Location: Alabama
Posts: 14,578
|
Re: 55 Wagon Progress
Innovative solution....I would have thought a trailer ball would be to hard to saw...but I never tried..
__________________
Mongo...aka Greg RIP Dad RIP Jesse 1981 C30 LQ9 NV4500..http://67-72chevytrucks.com/vboard/s...d.php?t=753598 Mongos AD- LS3 TR6060...http://67-72chevytrucks.com/vboard/s...34#post8522334 Columbus..the 1957 IH 4x4...http://67-72chevytrucks.com/vboard/s...63#post8082563 2023 Chevy Z71..daily driver |
|
|
|
|
05-27-2020, 06:42 AM
|
#1139 |
|
Registered User
Join Date: Jan 2013
Location: Leonardtown, MD
Posts: 1,633
|
Re: 55 Wagon Progress
Time to play catch up here..
Vince got two of the milk cans media blasted and worked on the third while I sprayed some SPI epoxy primer on the first two. 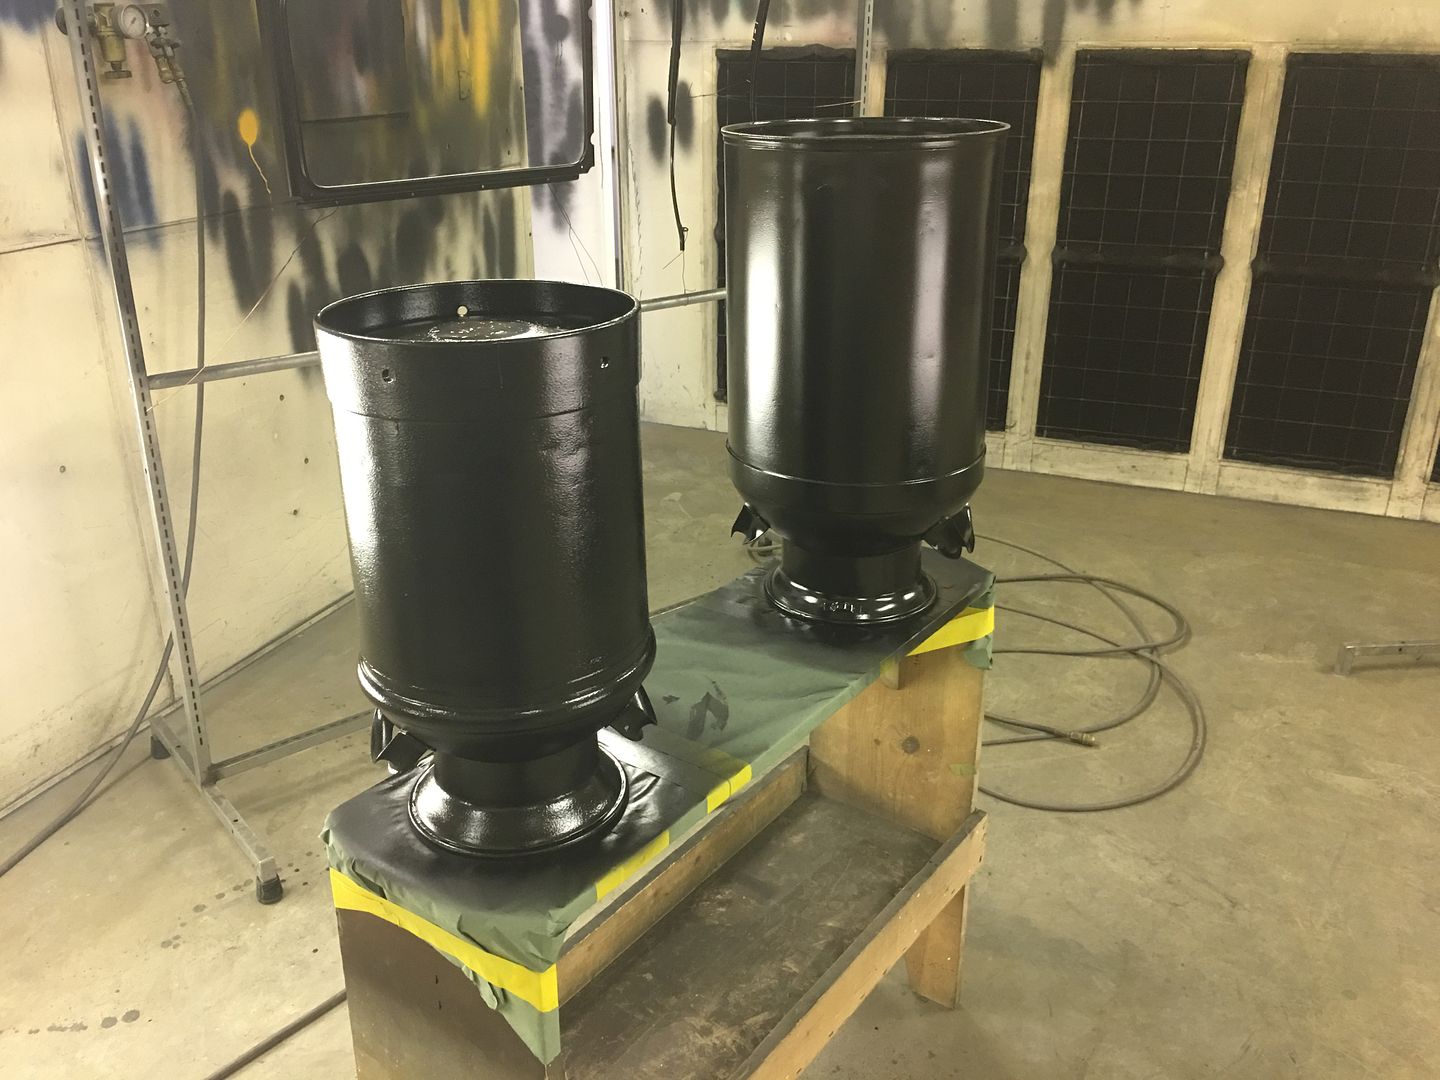 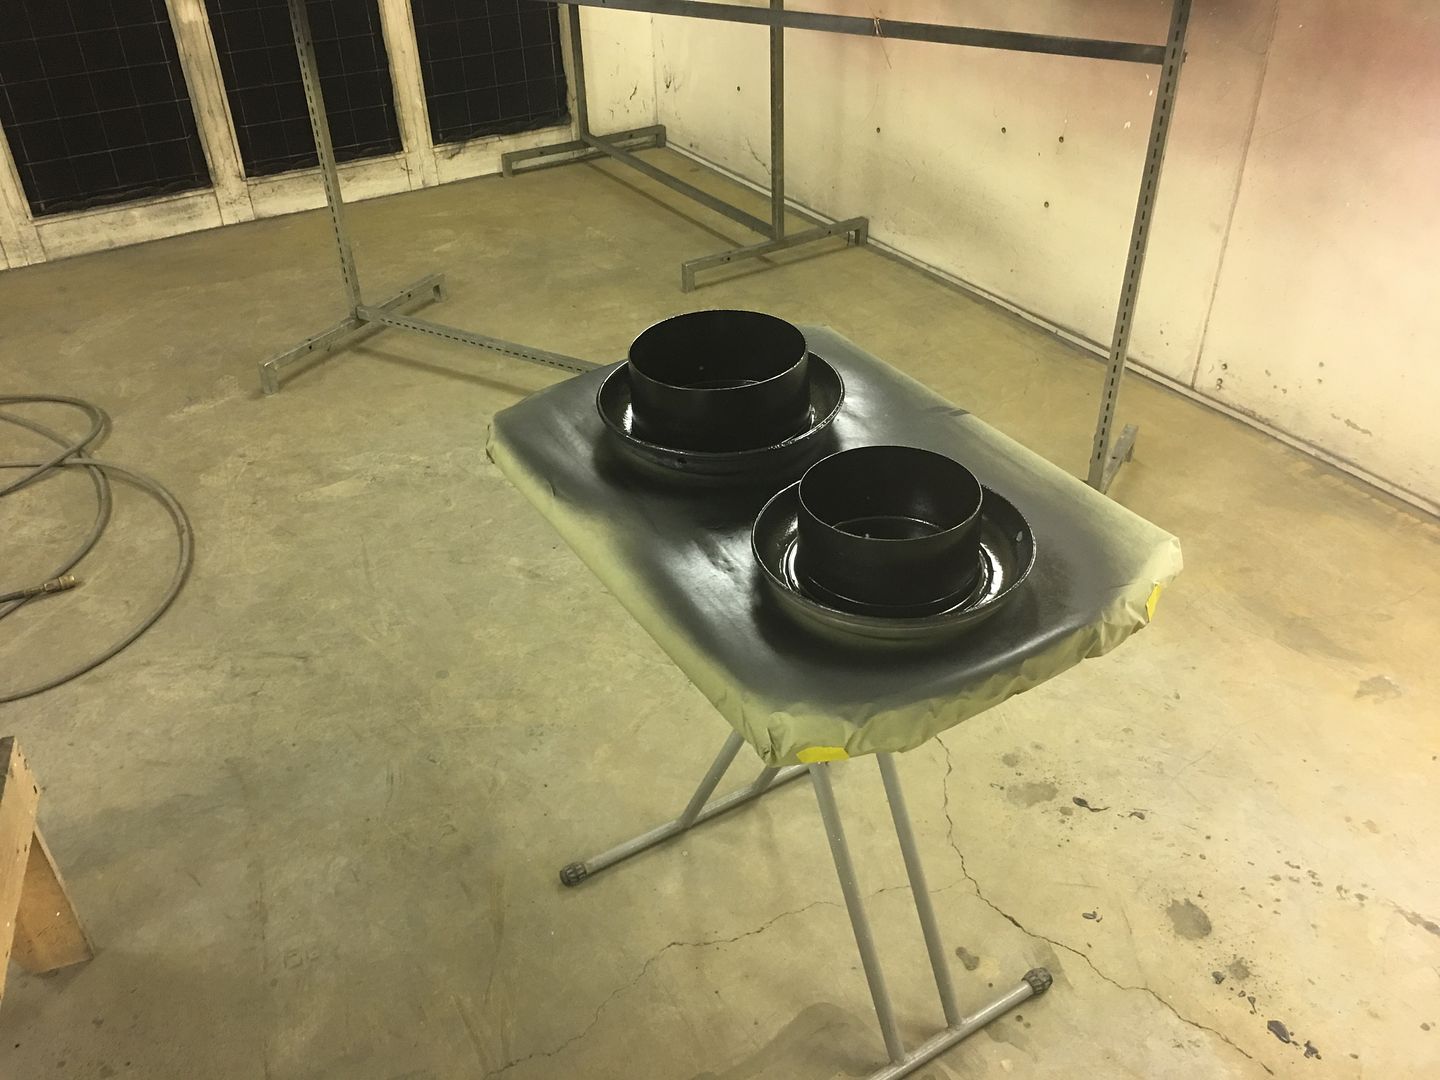 Also got some epoxy on the hood brace... 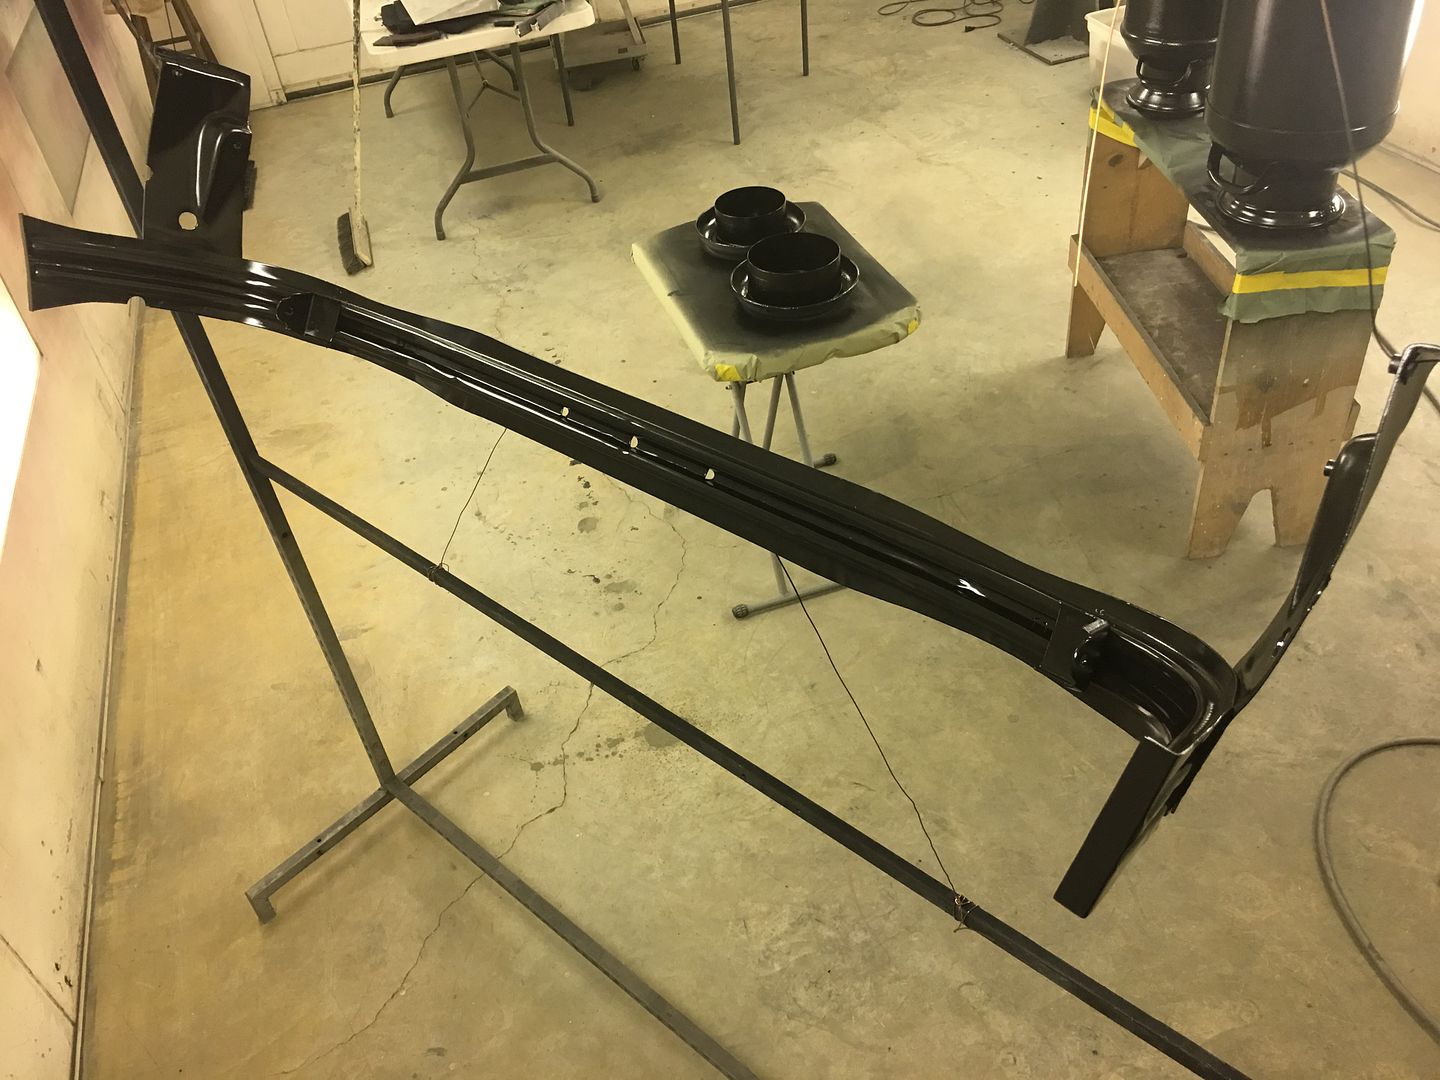 Ends are quite a bit better than before.. 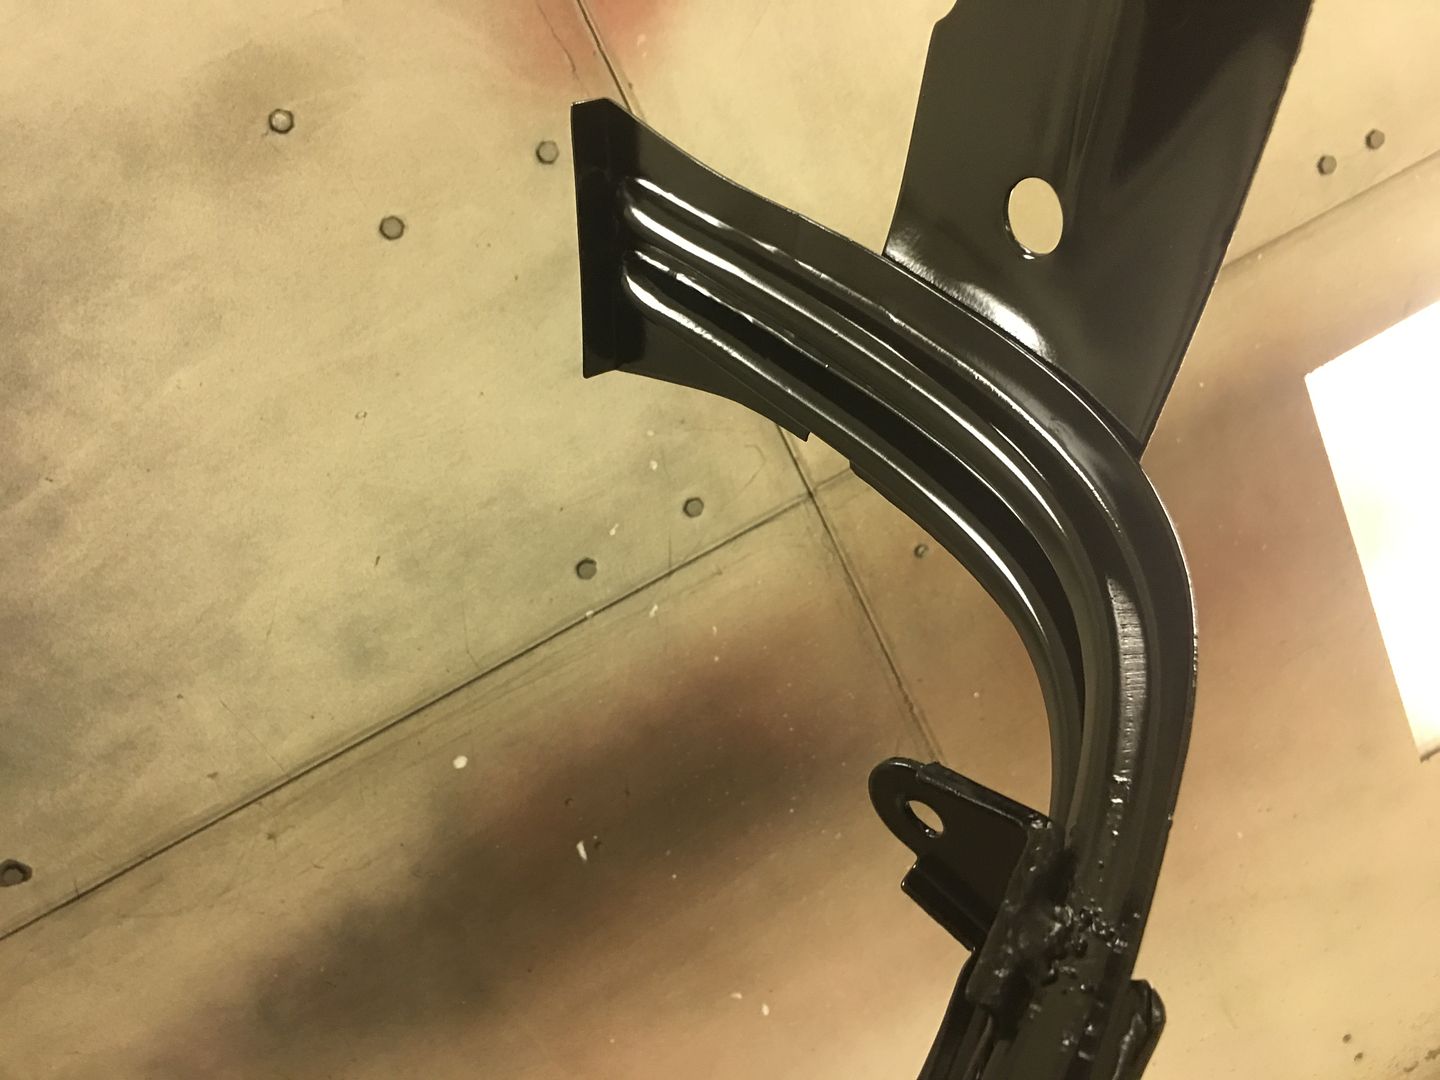 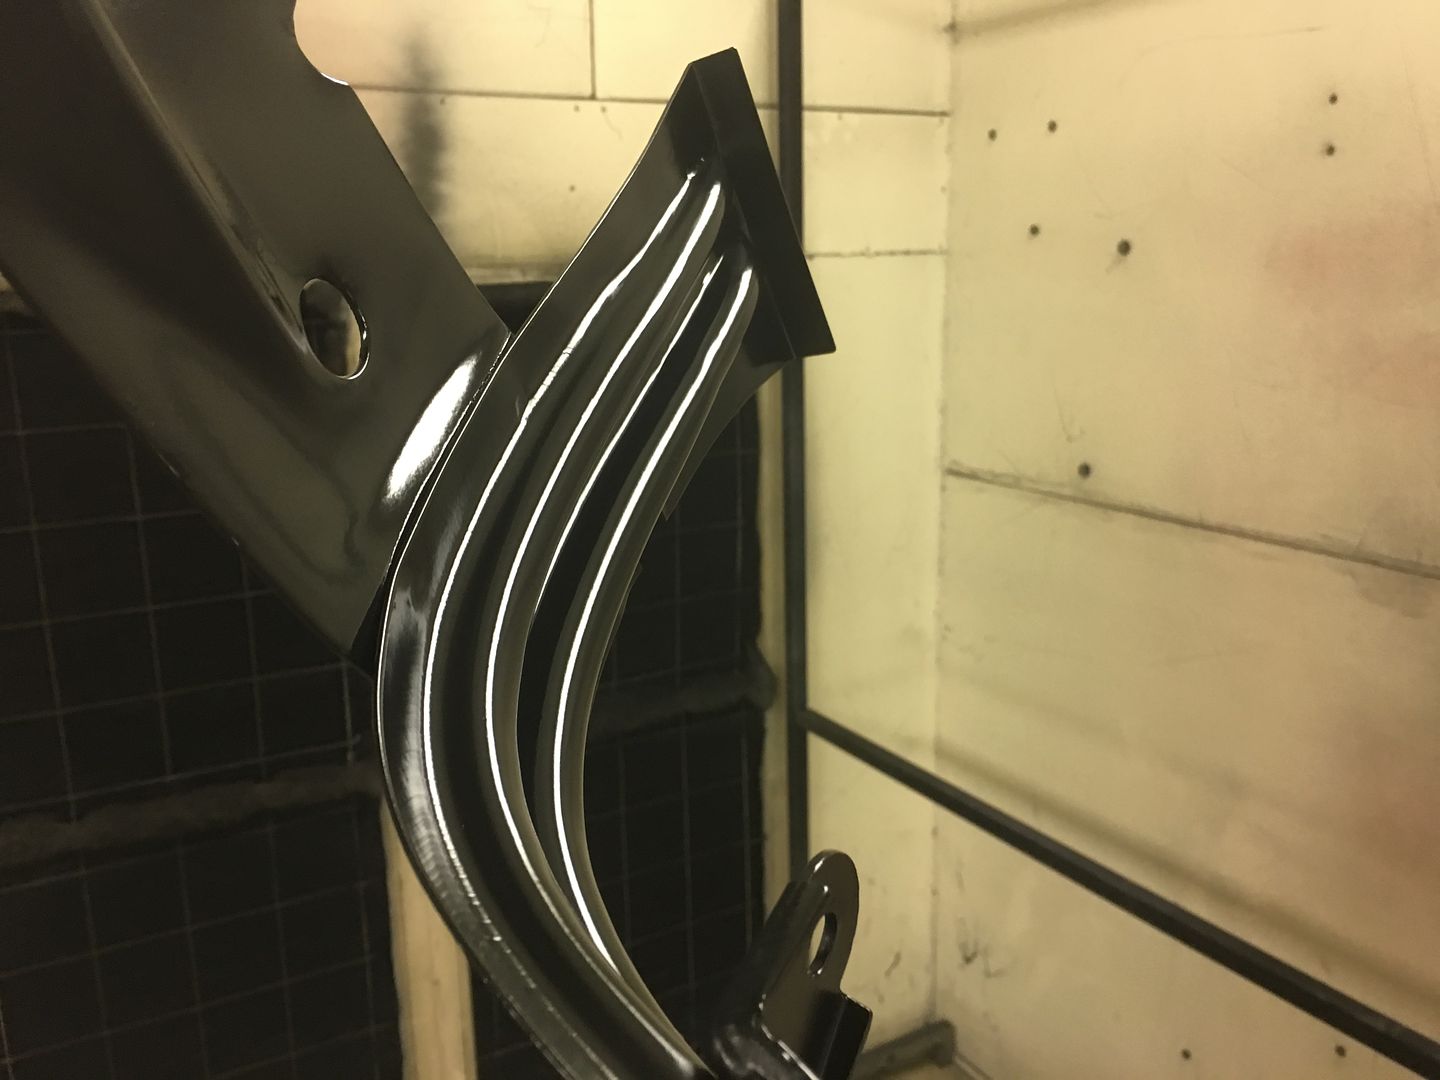 I received a state of the art drawing the other day, and was asked if we could duplicate the 1/16 offset shown... 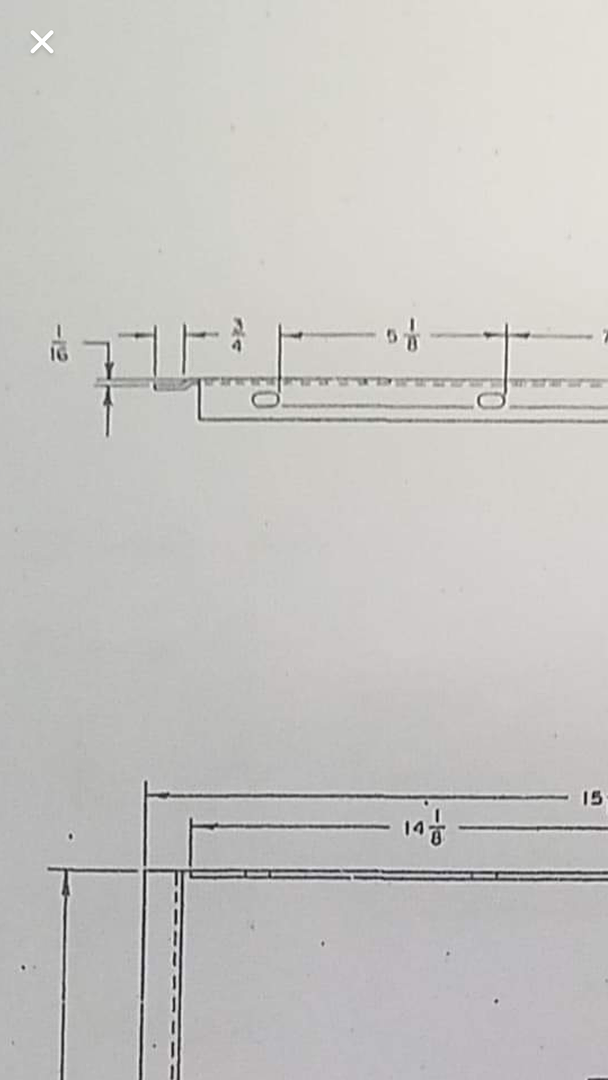 Of course this meant we needed some new tooling.. 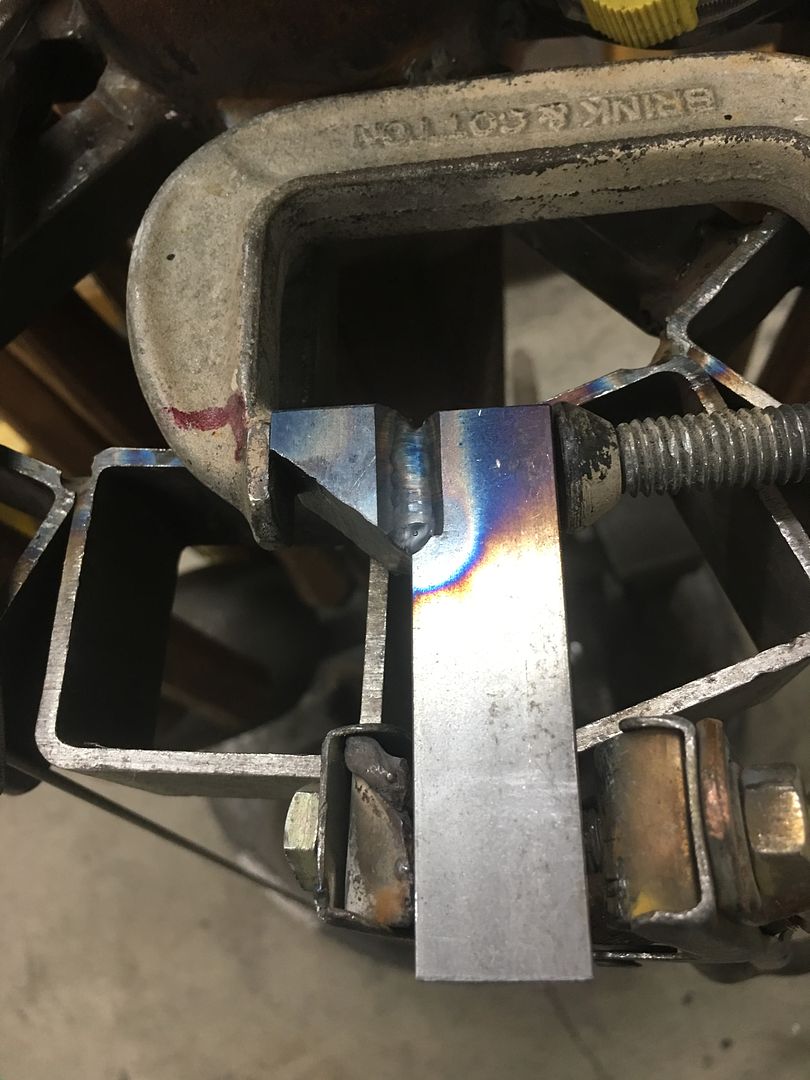 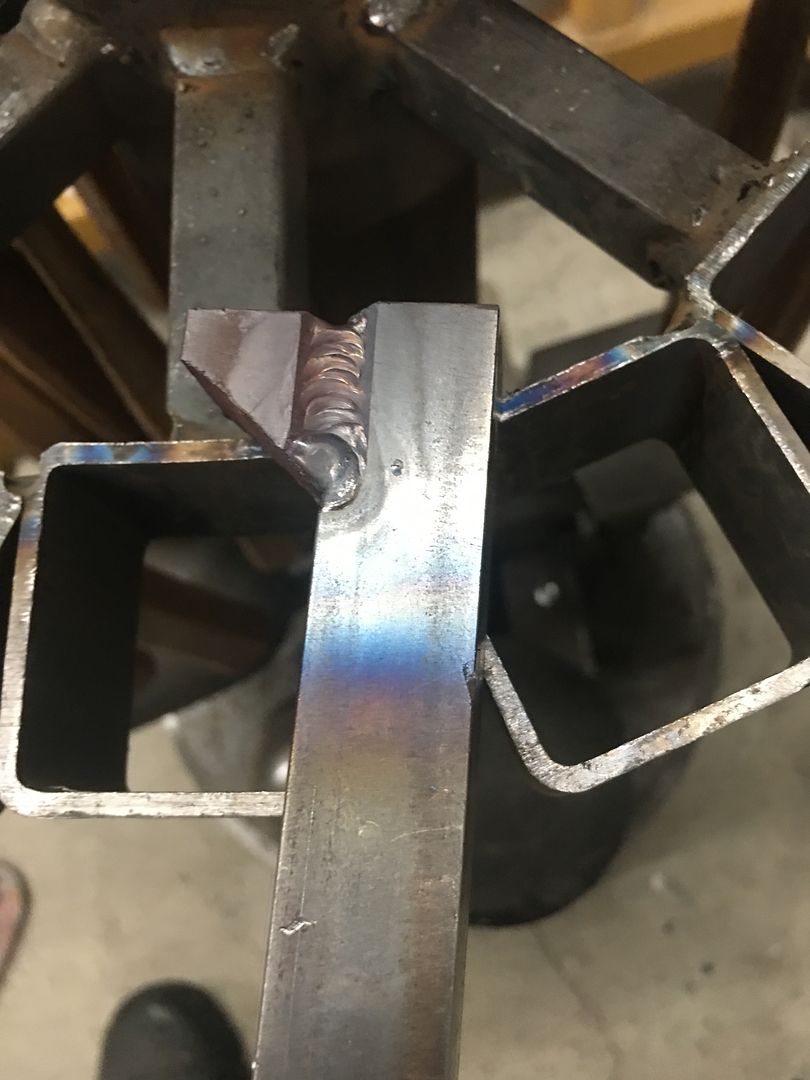  Our first sample, with the proper 3/4 flange...    We had another panel that would require the offset on two adjacent edges, so one more sample...    video action: https://www.youtube.com/watch?v=oxhk_O1FJTM That'll do pig, that'll do. Some of the upholstery parts have been trickling in... so let's add some bling factor.... .JPG)    .JPG) .JPG) .and we made a hand punch for setting the trim tag rivets on the cowl... 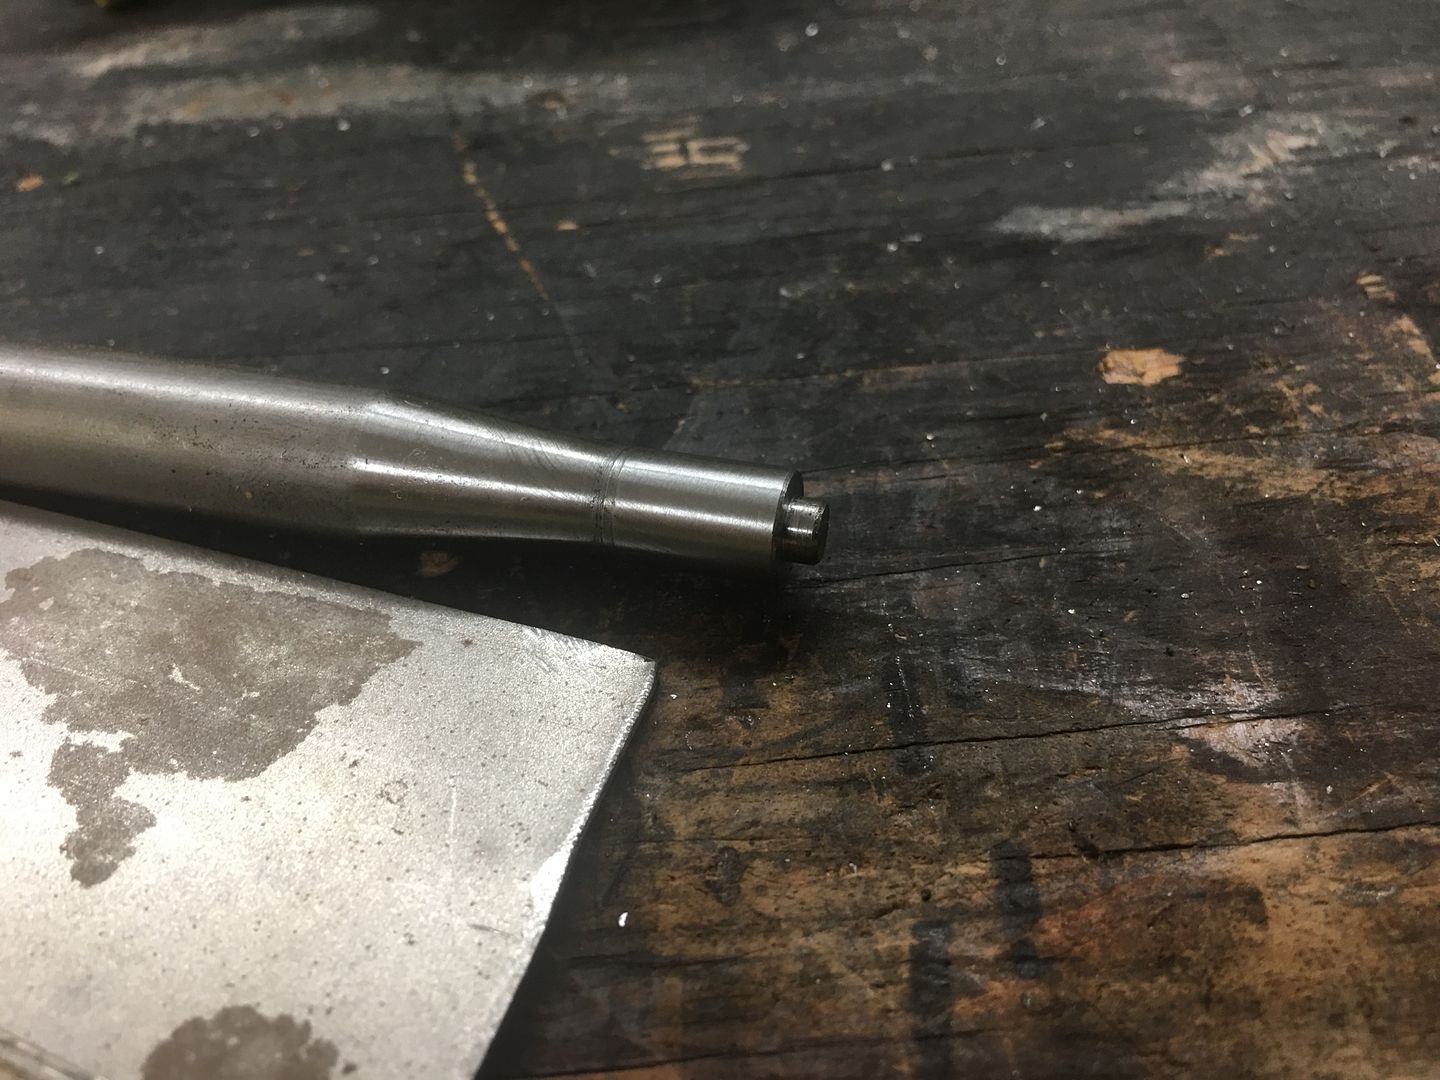 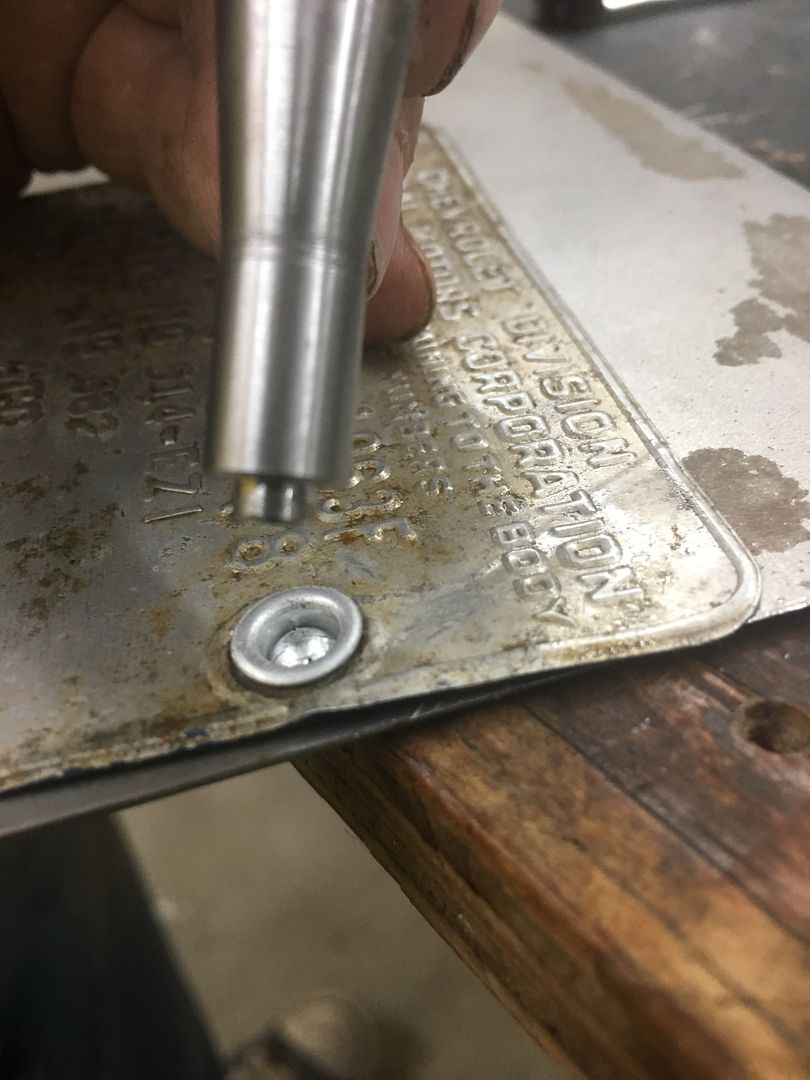 video version: https://www.youtube.com/watch?v=gUl3K5uN5h0 And finally, we also had some 3/8 stainless fuel line to straighten out of it's coil for a big block mopar Video parts 1, 2, and 3: https://www.youtube.com/watch?v=H7eDRdQ-hco https://www.youtube.com/watch?v=np4Lae3FTC8 https://www.youtube.com/watch?v=8NsOkSsVxZ8 .
__________________
Robert |
|
|
|
|
05-27-2020, 08:26 AM
|
#1140 |
|
Senior Member
Join Date: Mar 2011
Location: West Plains, Missouri
Posts: 7,553
|
Re: 55 Wagon Progress
Robert, nice update, super work...Jim
__________________
my build thread: http://67-72chevytrucks.com/vboard/s...d.php?t=459839 Jimbo's long bed step build:http://67-72chevytrucks.com/vboard/s...t=464626<br /> |
|
|
|
|
06-03-2020, 07:12 AM
|
#1141 |
|
Registered User
Join Date: Jan 2013
Location: Leonardtown, MD
Posts: 1,633
|
Re: 55 Wagon Progress
Thanks Jim!
More progress in the shop, another upholstered piece getting assembled... this one the driver's side rear kick panel. Our polished stainless seat belt escutcheons are installed, one in the front for the lap belt and up top for the shoulder belt. .JPG) .JPG) Midrange and tweeter installed.... .JPG) https://www.youtube.com/watch?v=k5egWQaN1MY And we got a new "radius" fixture for the Tommasini wheeling machine, allows you to use it to form radius on flat bar and other shapes.. .JPG) action shot.... https://www.youtube.com/watch?v=r9e822YCYIE
__________________
Robert |
|
|
|
|
06-03-2020, 07:36 AM
|
#1142 |
|
Post Whore
Join Date: May 2015
Location: Alabama
Posts: 14,578
|
Re: 55 Wagon Progress
Those panels look great Robert..!
__________________
Mongo...aka Greg RIP Dad RIP Jesse 1981 C30 LQ9 NV4500..http://67-72chevytrucks.com/vboard/s...d.php?t=753598 Mongos AD- LS3 TR6060...http://67-72chevytrucks.com/vboard/s...34#post8522334 Columbus..the 1957 IH 4x4...http://67-72chevytrucks.com/vboard/s...63#post8082563 2023 Chevy Z71..daily driver |
|
|
|
|
06-03-2020, 08:11 AM
|
#1143 |
|
Senior Member
Join Date: Mar 2011
Location: West Plains, Missouri
Posts: 7,553
|
Re: 55 Wagon Progress
Robert, kick panels look great, more tools, yes, yes...Jim
__________________
my build thread: http://67-72chevytrucks.com/vboard/s...d.php?t=459839 Jimbo's long bed step build:http://67-72chevytrucks.com/vboard/s...t=464626<br /> |
|
|
|
|
06-29-2020, 07:26 AM
|
#1144 |
|
Registered User
Join Date: Jan 2013
Location: Leonardtown, MD
Posts: 1,633
|
Re: 55 Wagon Progress
Thanks guys!!
Overdue for another update... So with all three milk cans delivered, why not a dinner bell? Indeed. This one was missing the clapper, so that's the latest fabrication... 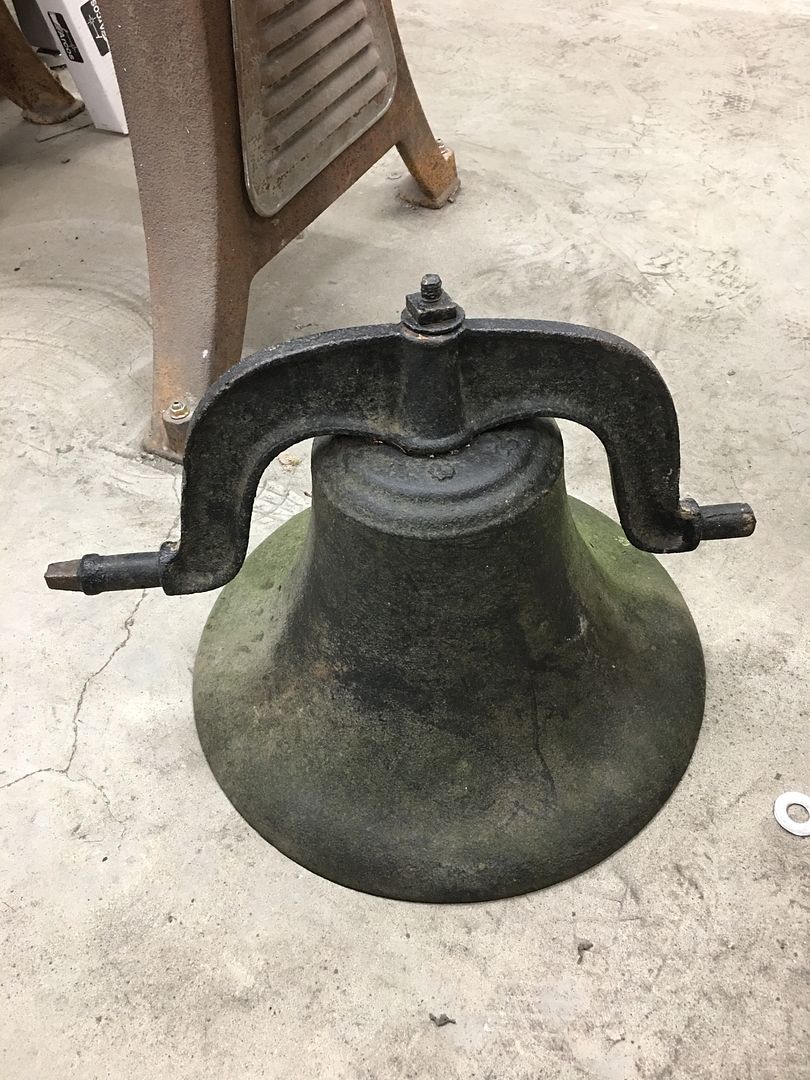 A used 2" hitch ball was reworked in the lathe, and looks like this will be a good start...  Hammer/bench head stand is used as a welding fixture.. Hey, whatever works.. 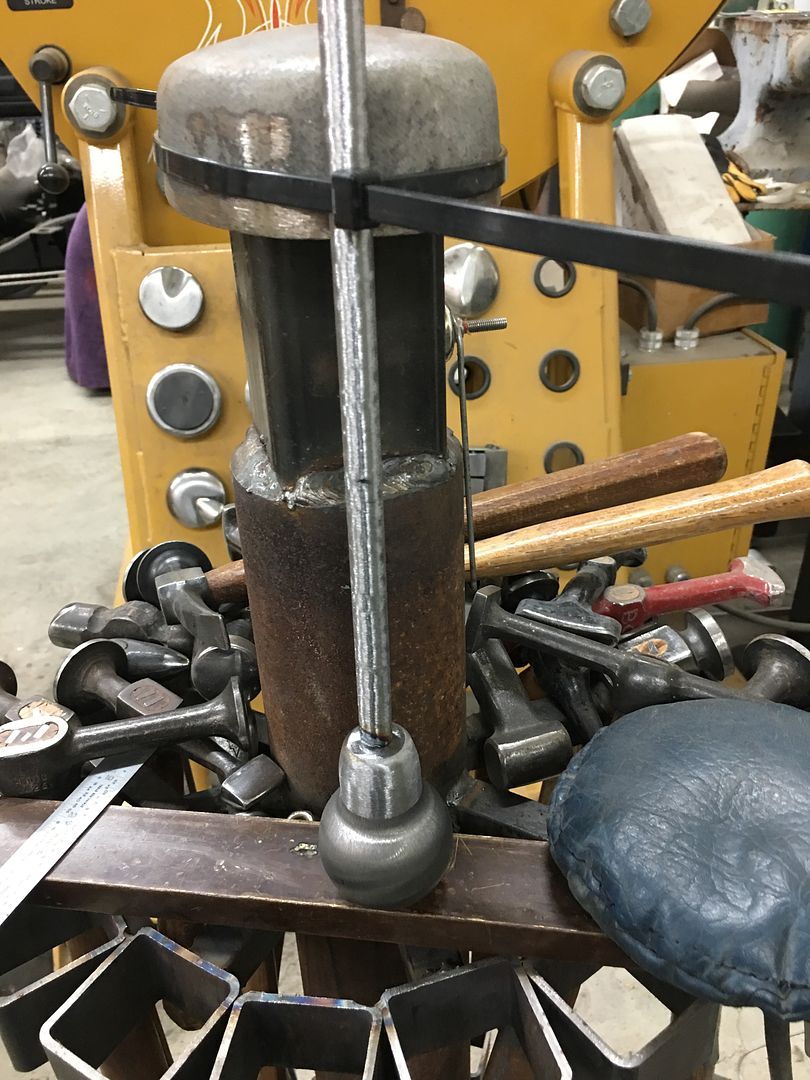 root pass   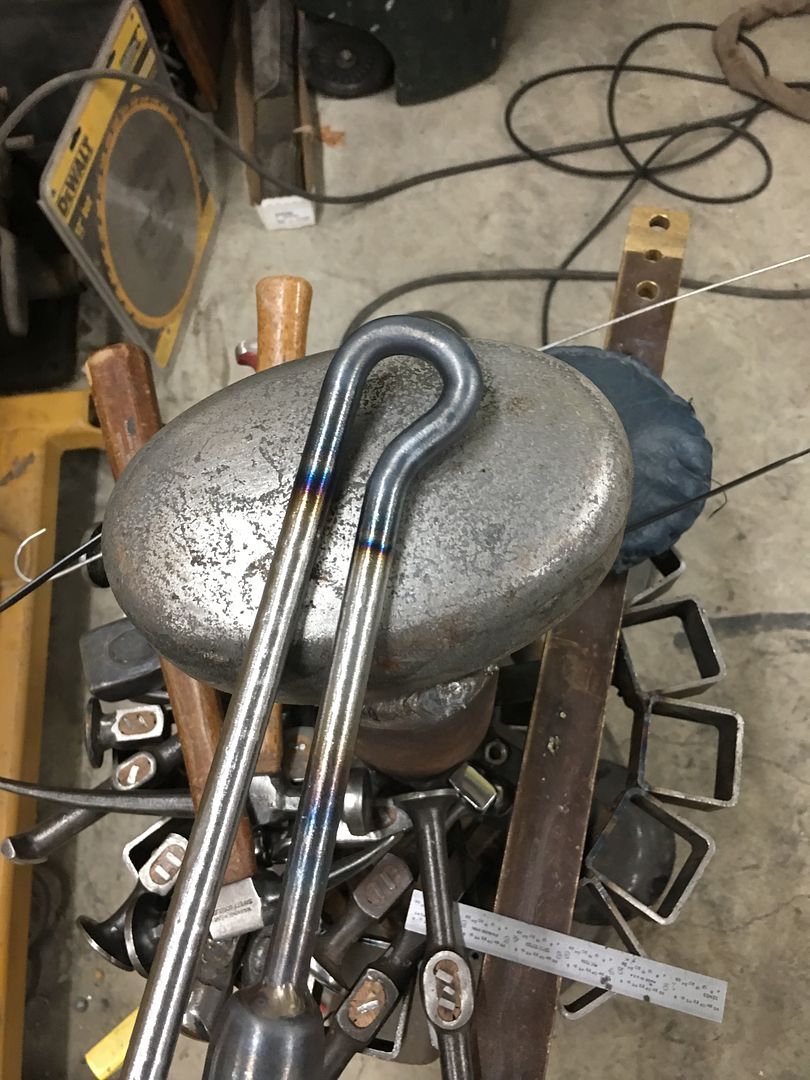 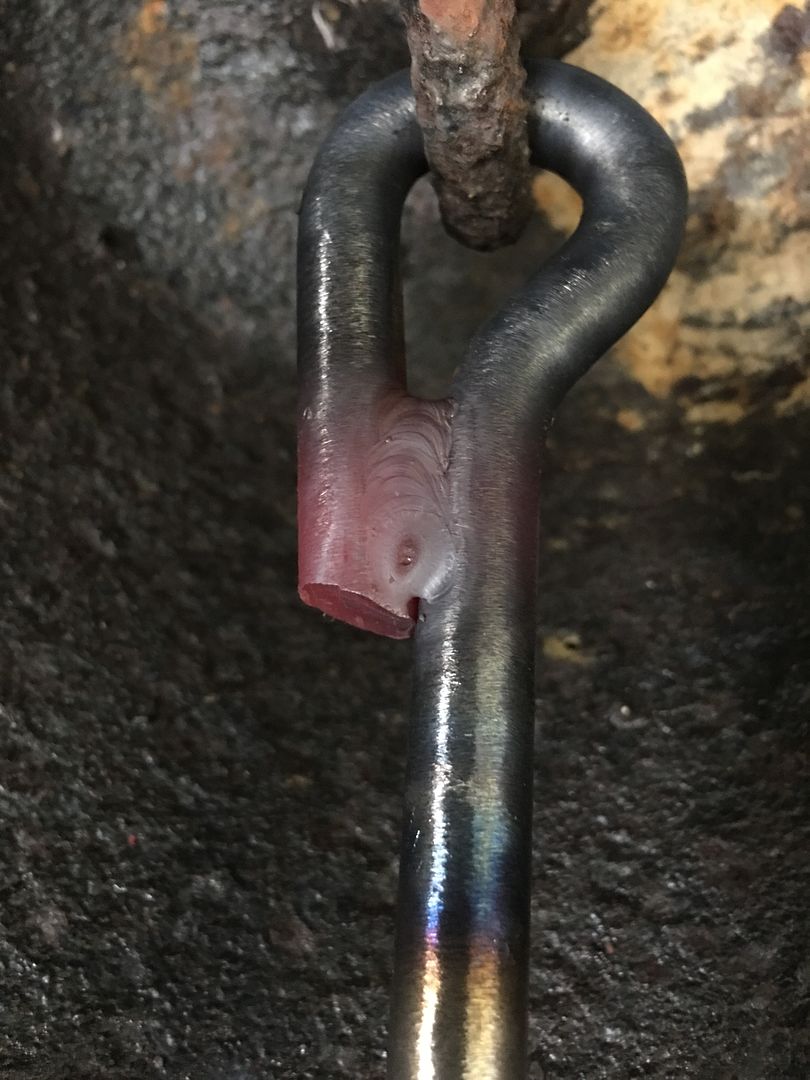 Finished product in action: https://www.youtube.com/watch?v=F875Q5qoVqY We had some dings in the F7 hood to remove that were located in the radius along the sides.. Didn't really have a hammer that fit the exact requirement, so I use a "KIT" that my buddy Will Cronkrite had given me, a piece cut out of a Model A leaf spring. I had more than one BF603 in stock, and rarely use the pick end, so it became the likely candidate. 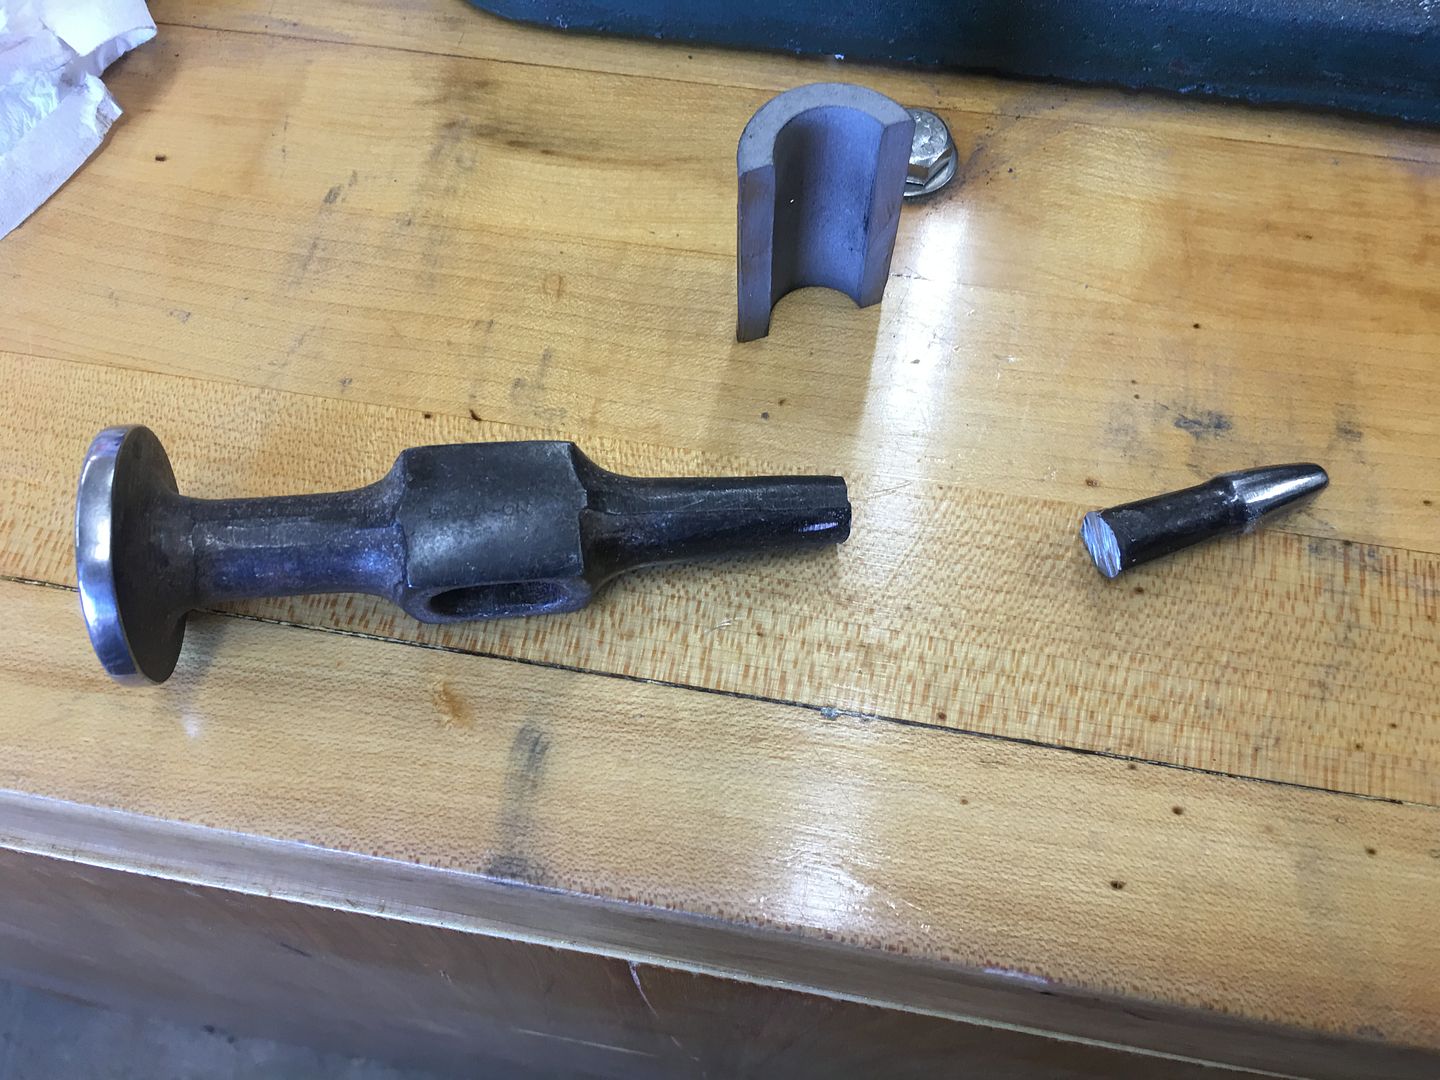 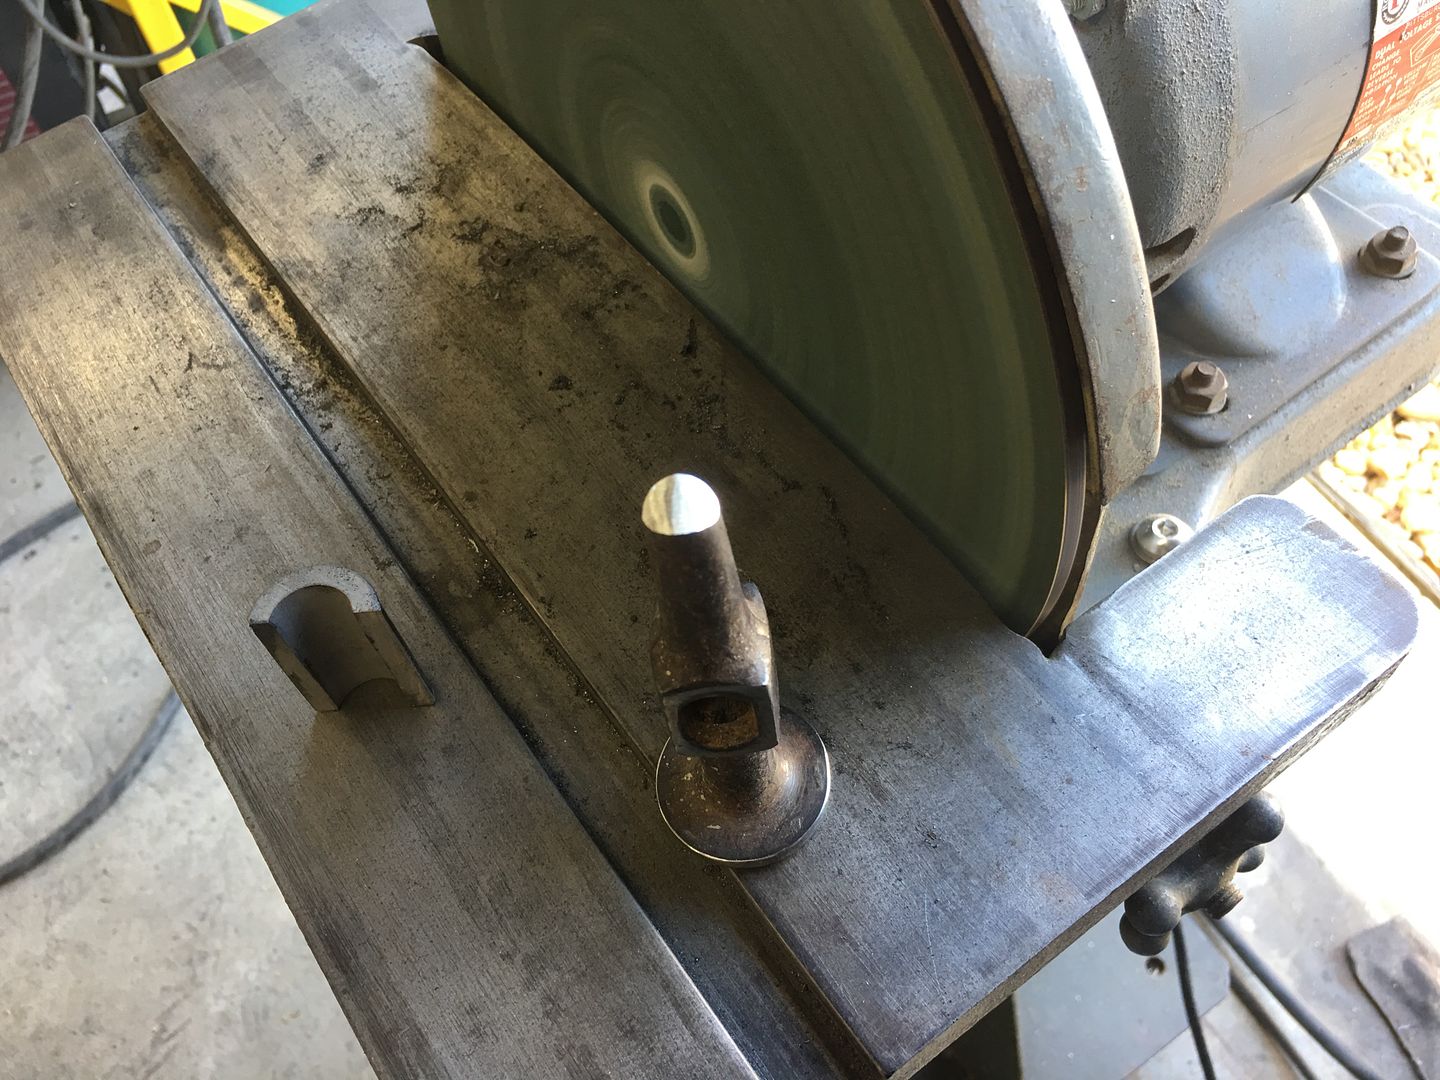 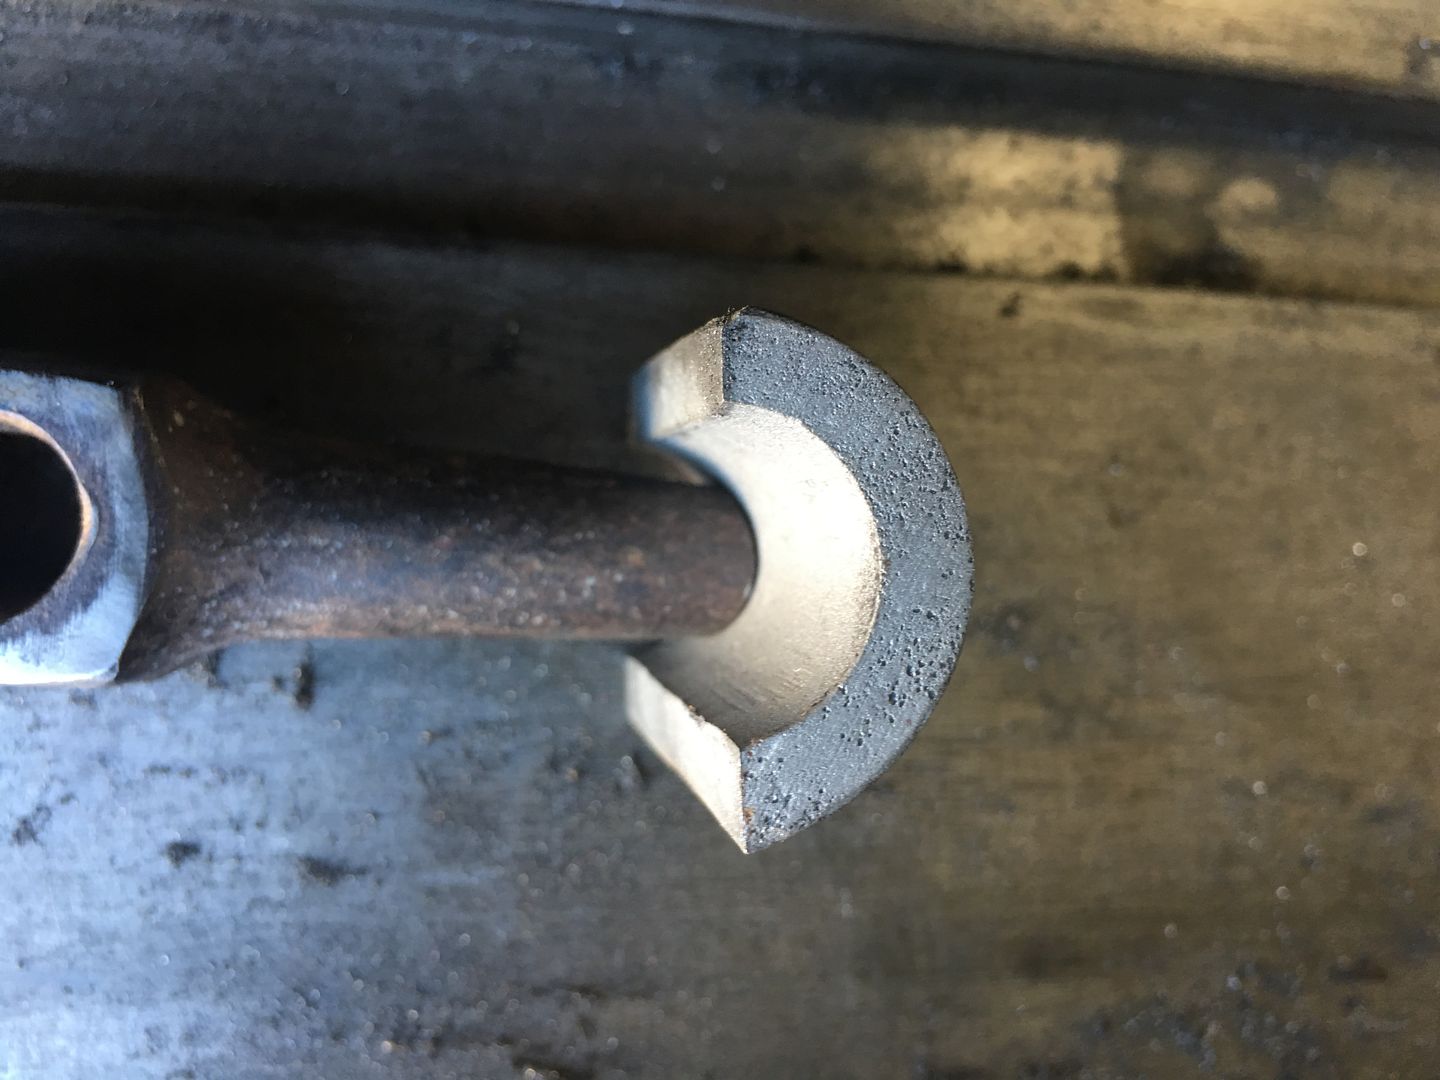 TIG welded in place using ER312 rod 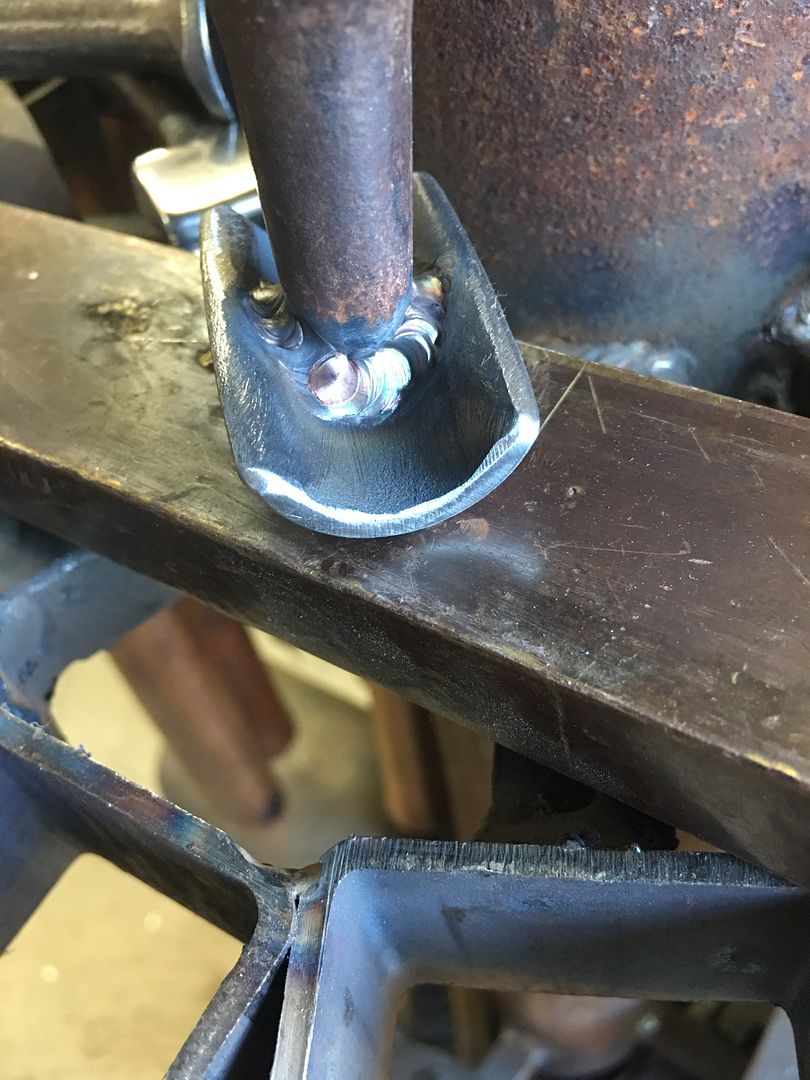 Some crown added long ways and polished up...  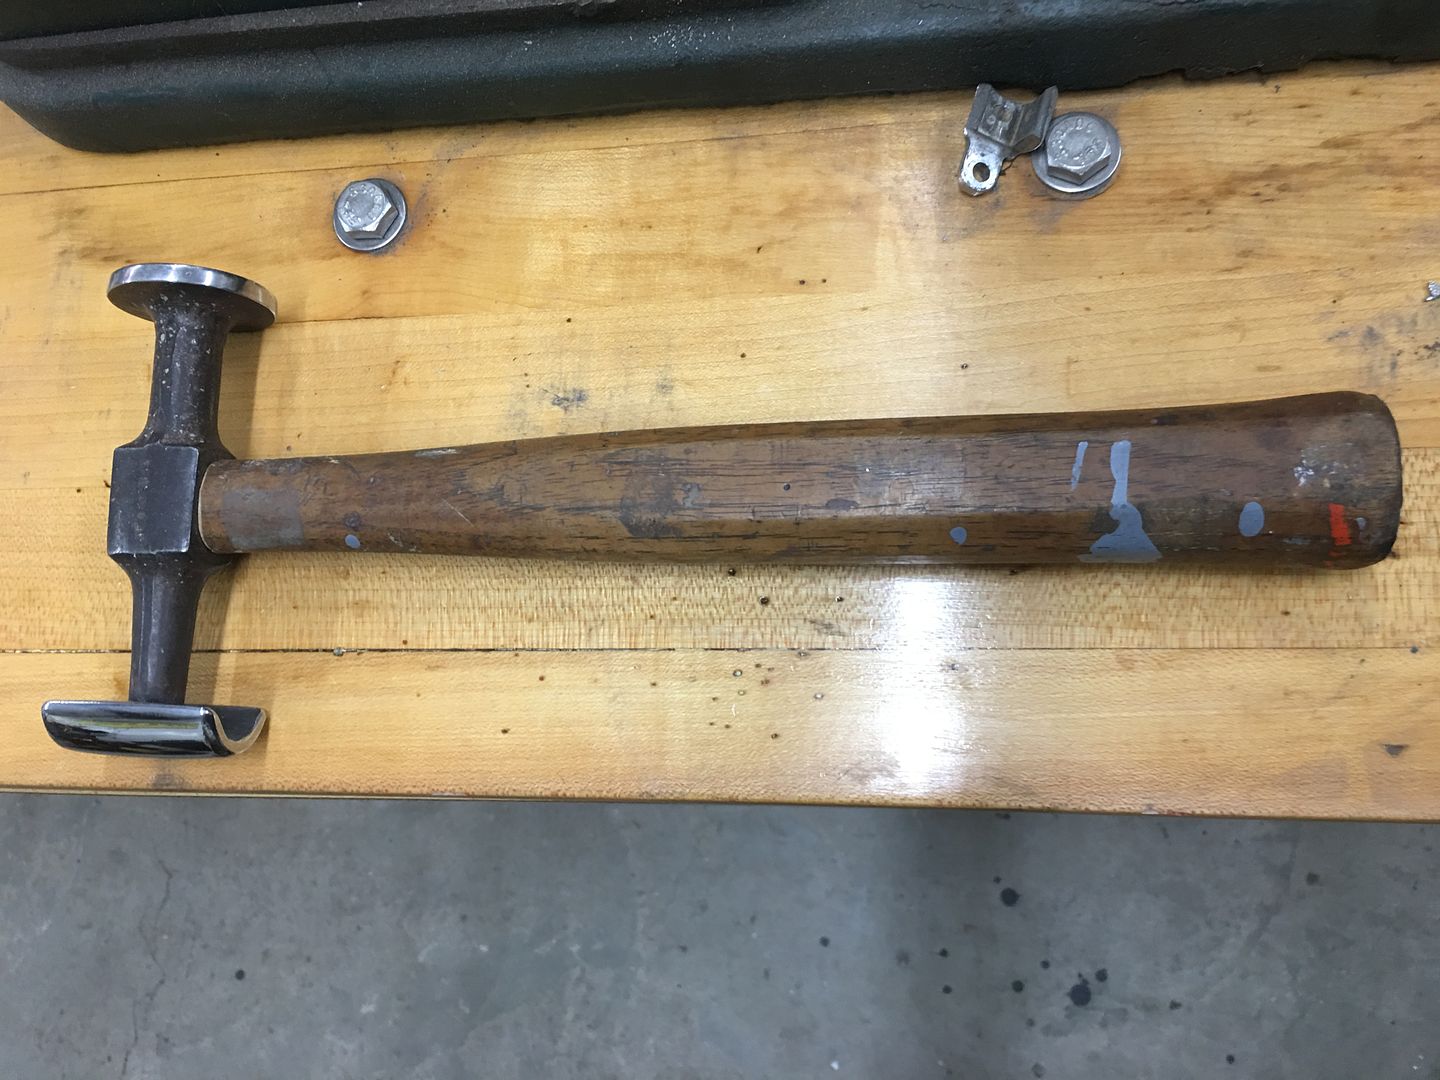 Both of the Wagon's rear kick panels are now prepped, ready to go.. .JPG) 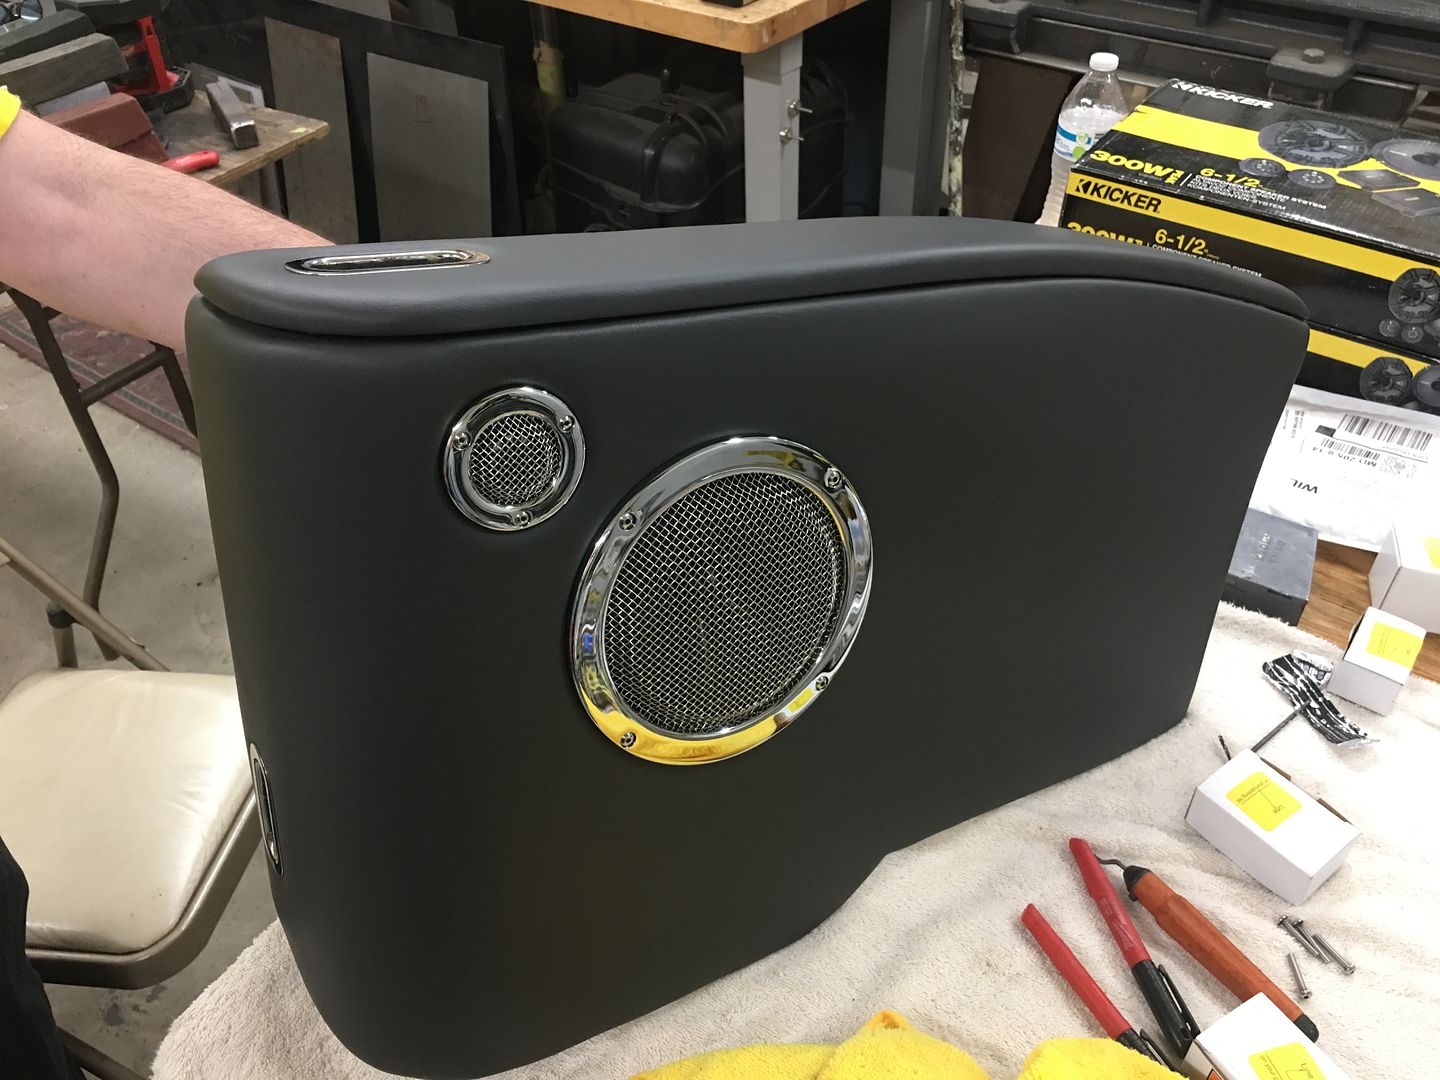 Vince has the core support and associated parts blocked and ready for some green... 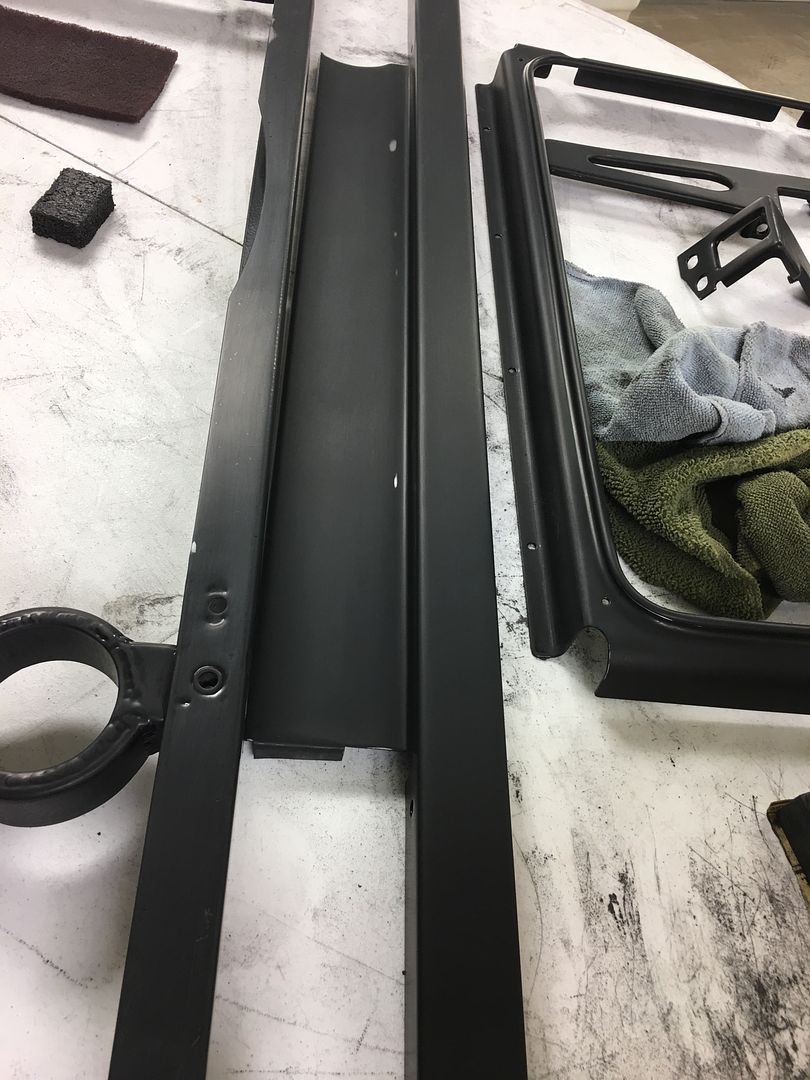 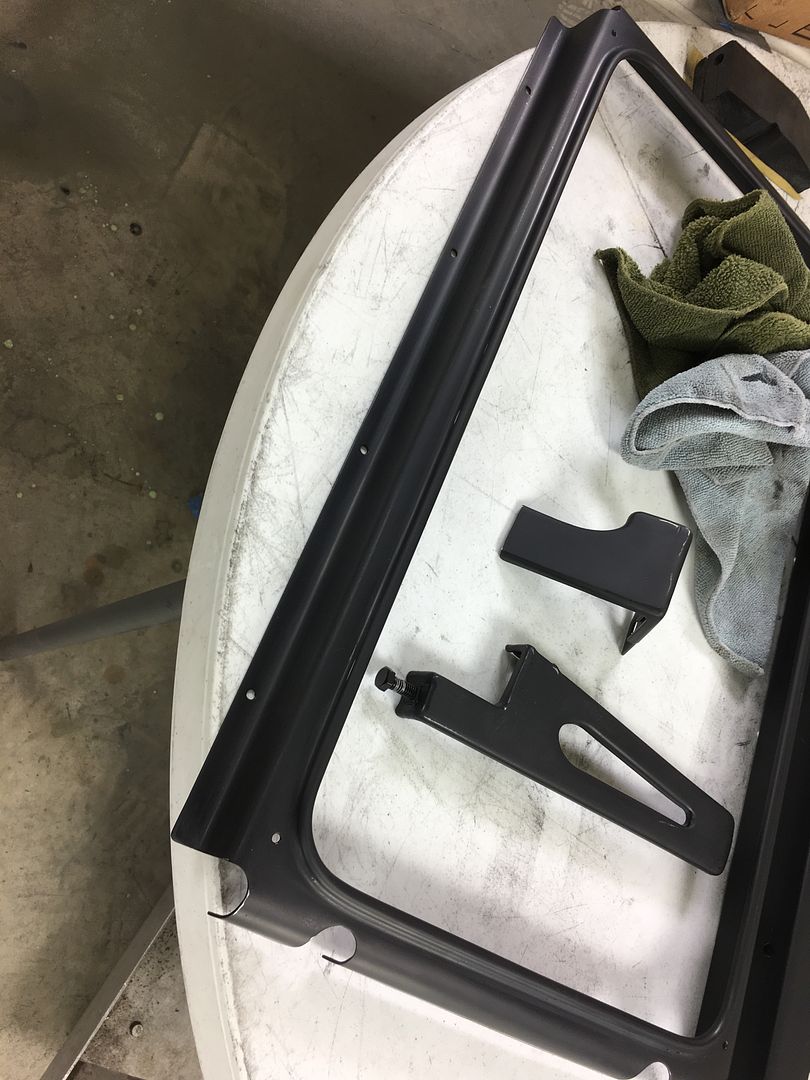 ….and speaking of paint, we got some "new" used light fixtures for the paint booth so we can see a bit better... 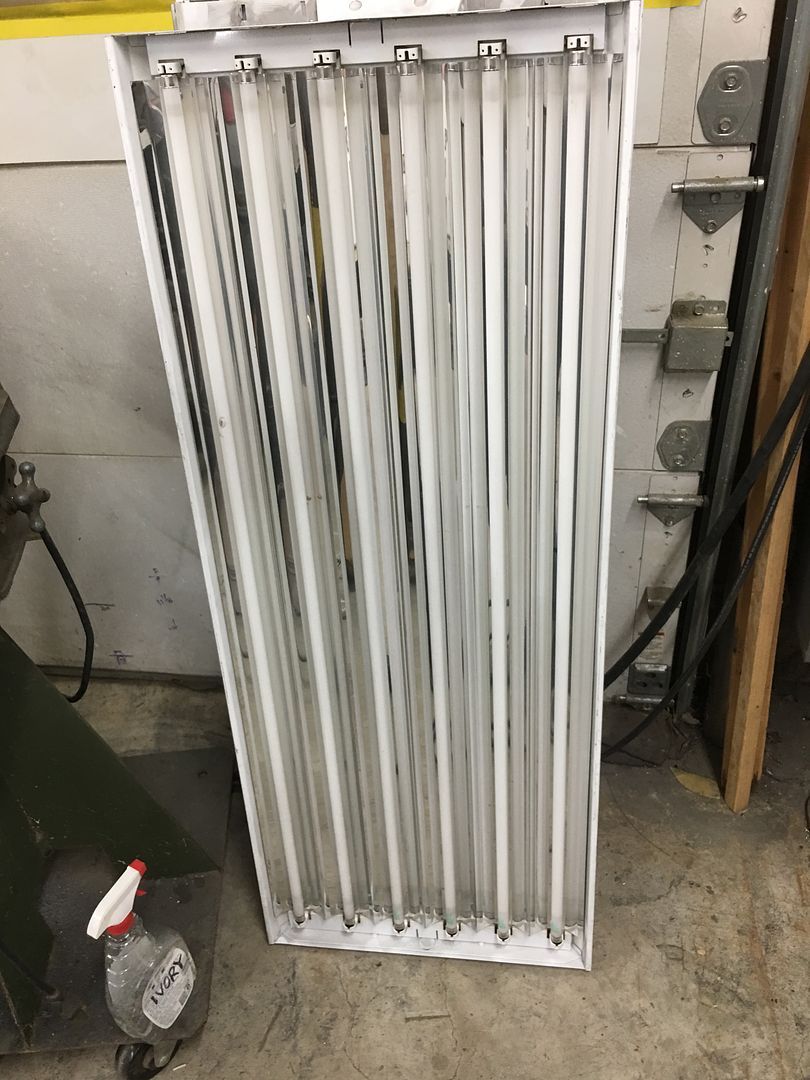 Old next to new... 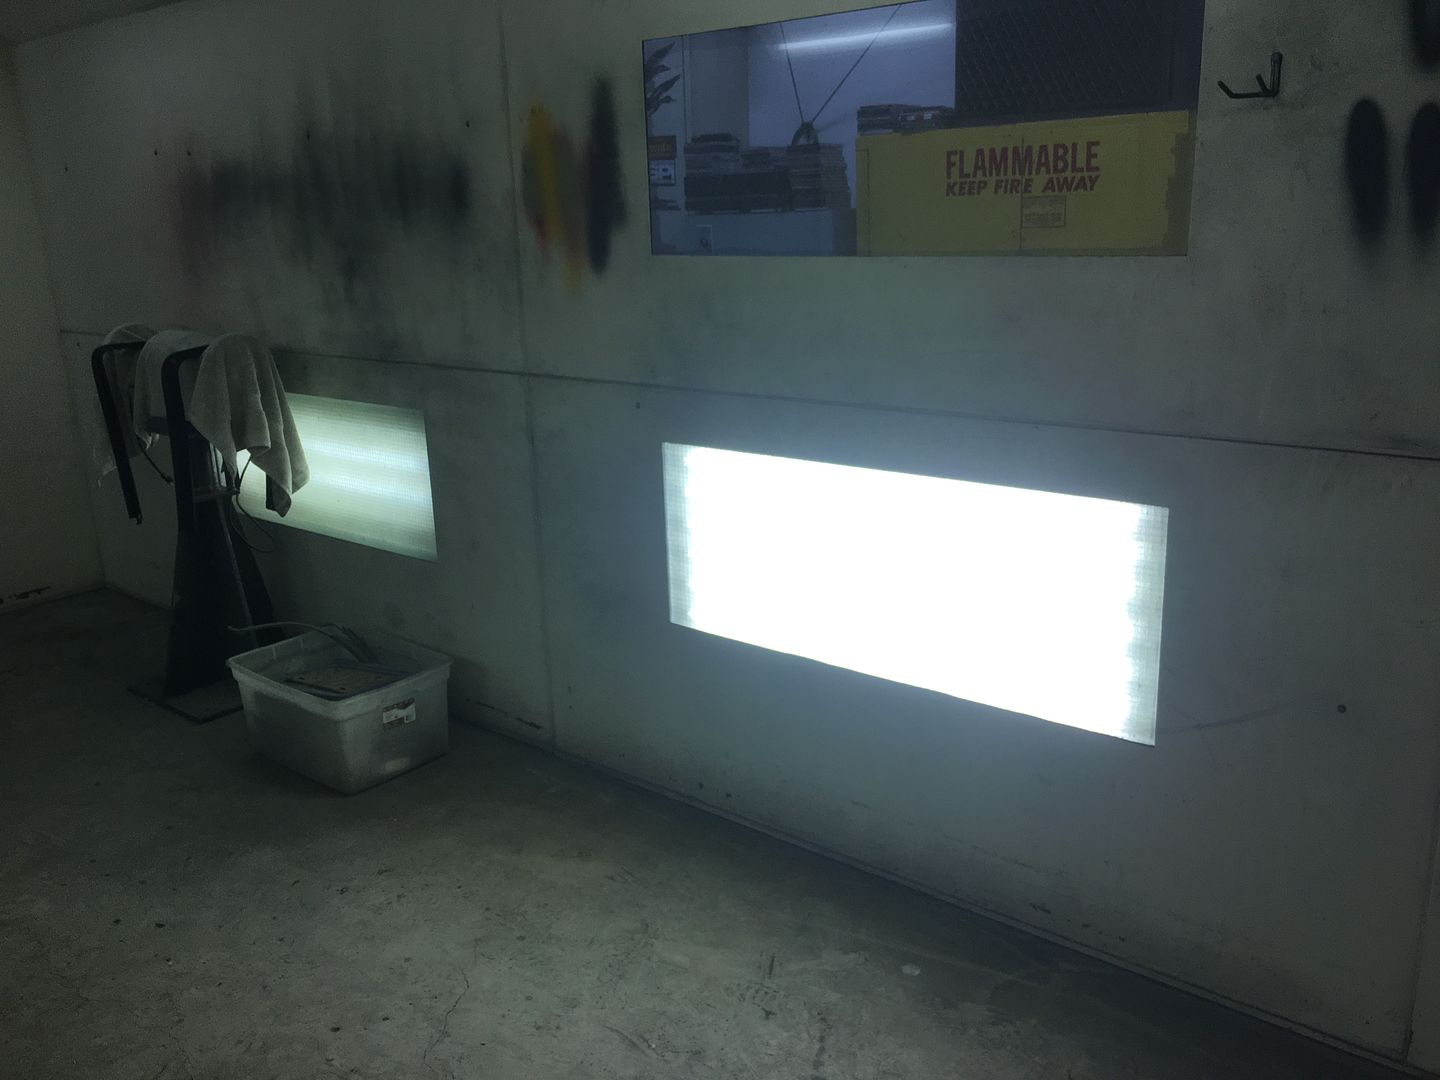 Now that we can see a bit better, it's clear that the walls need a fresh coat of white... 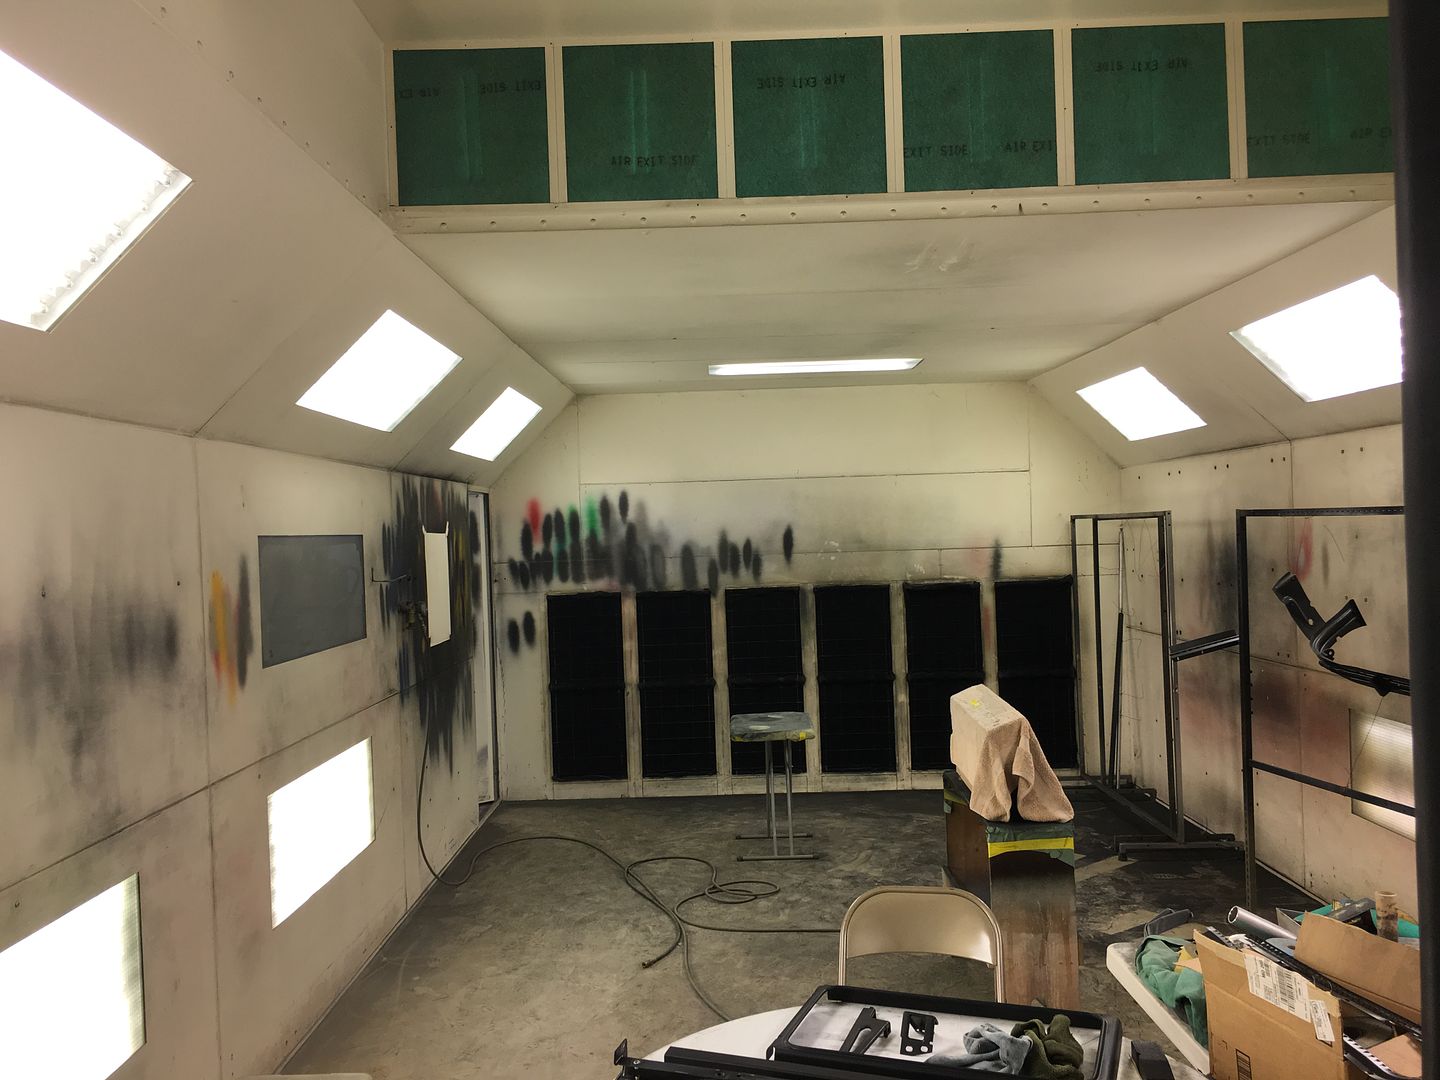 ….And some blocking tips on the F7 hood. We have a nice crease on the inside of the hood from front to back. These scratches show that we would be taking material off the adjacent side if no other steps were taken to stop our sanding block at the center of the crease... 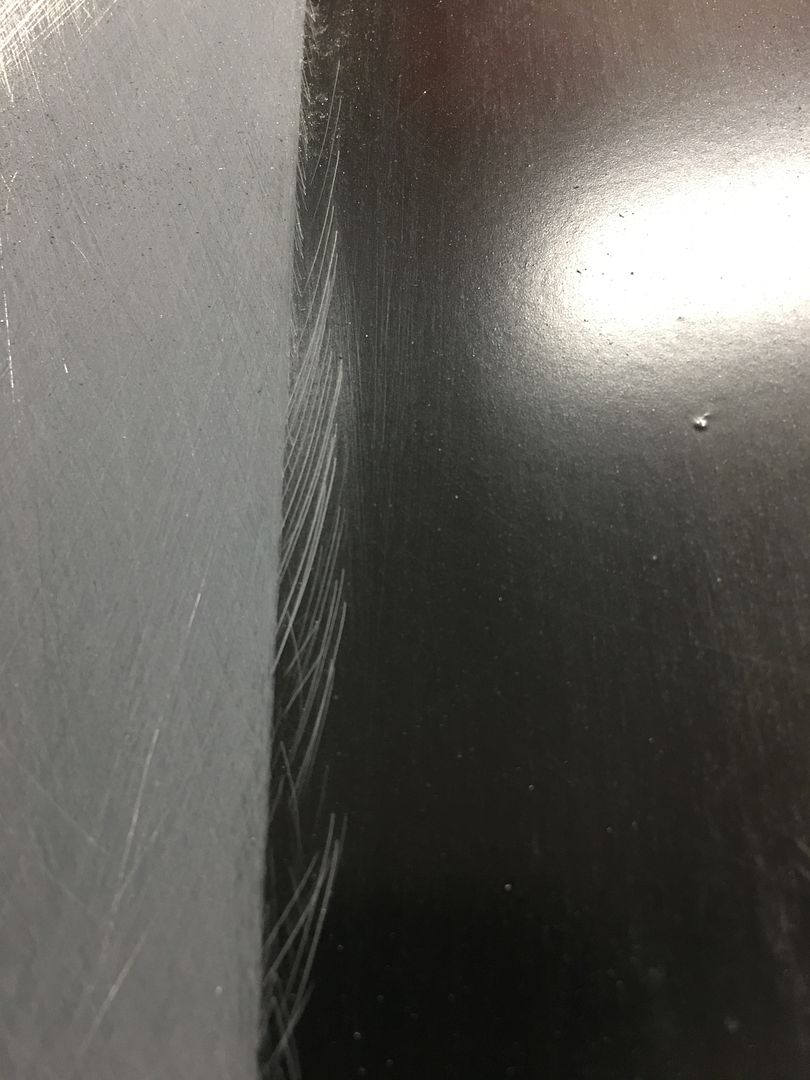 By adding a strip of tape along the center, it gives us a positive stop for the sanding block.. 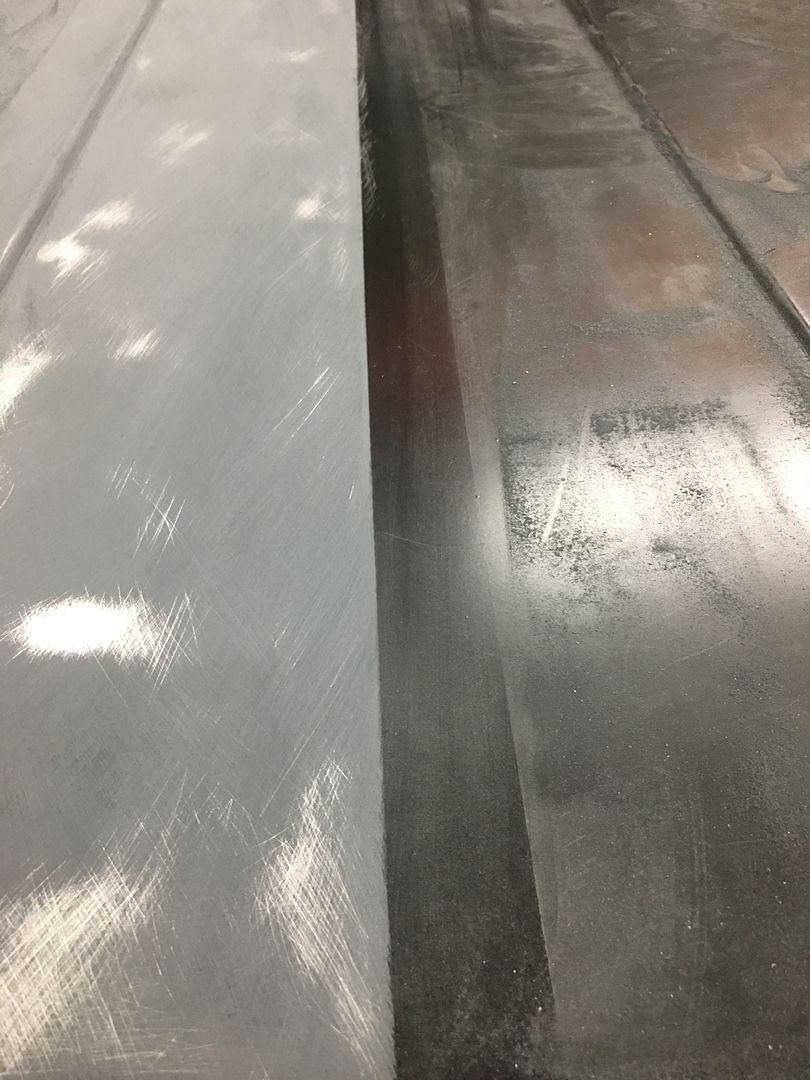 Then switching for the other side.... 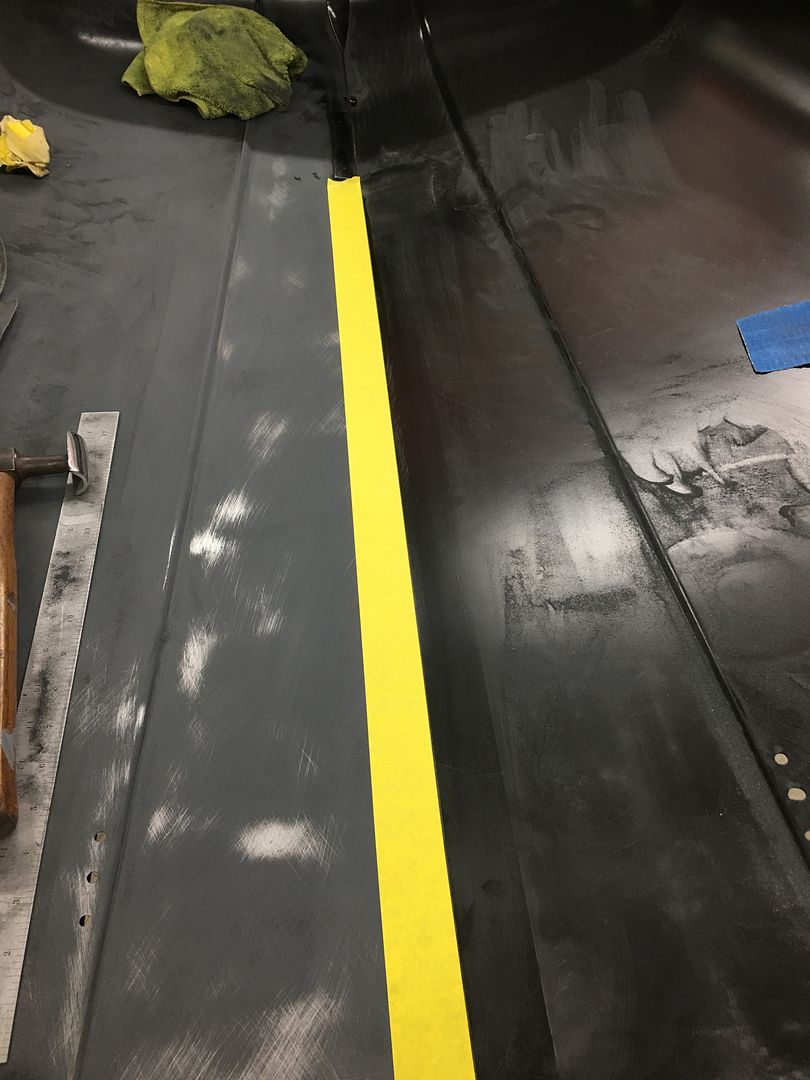 Which leaves us a nice crease in the middle, and panels nice and flat to either side... 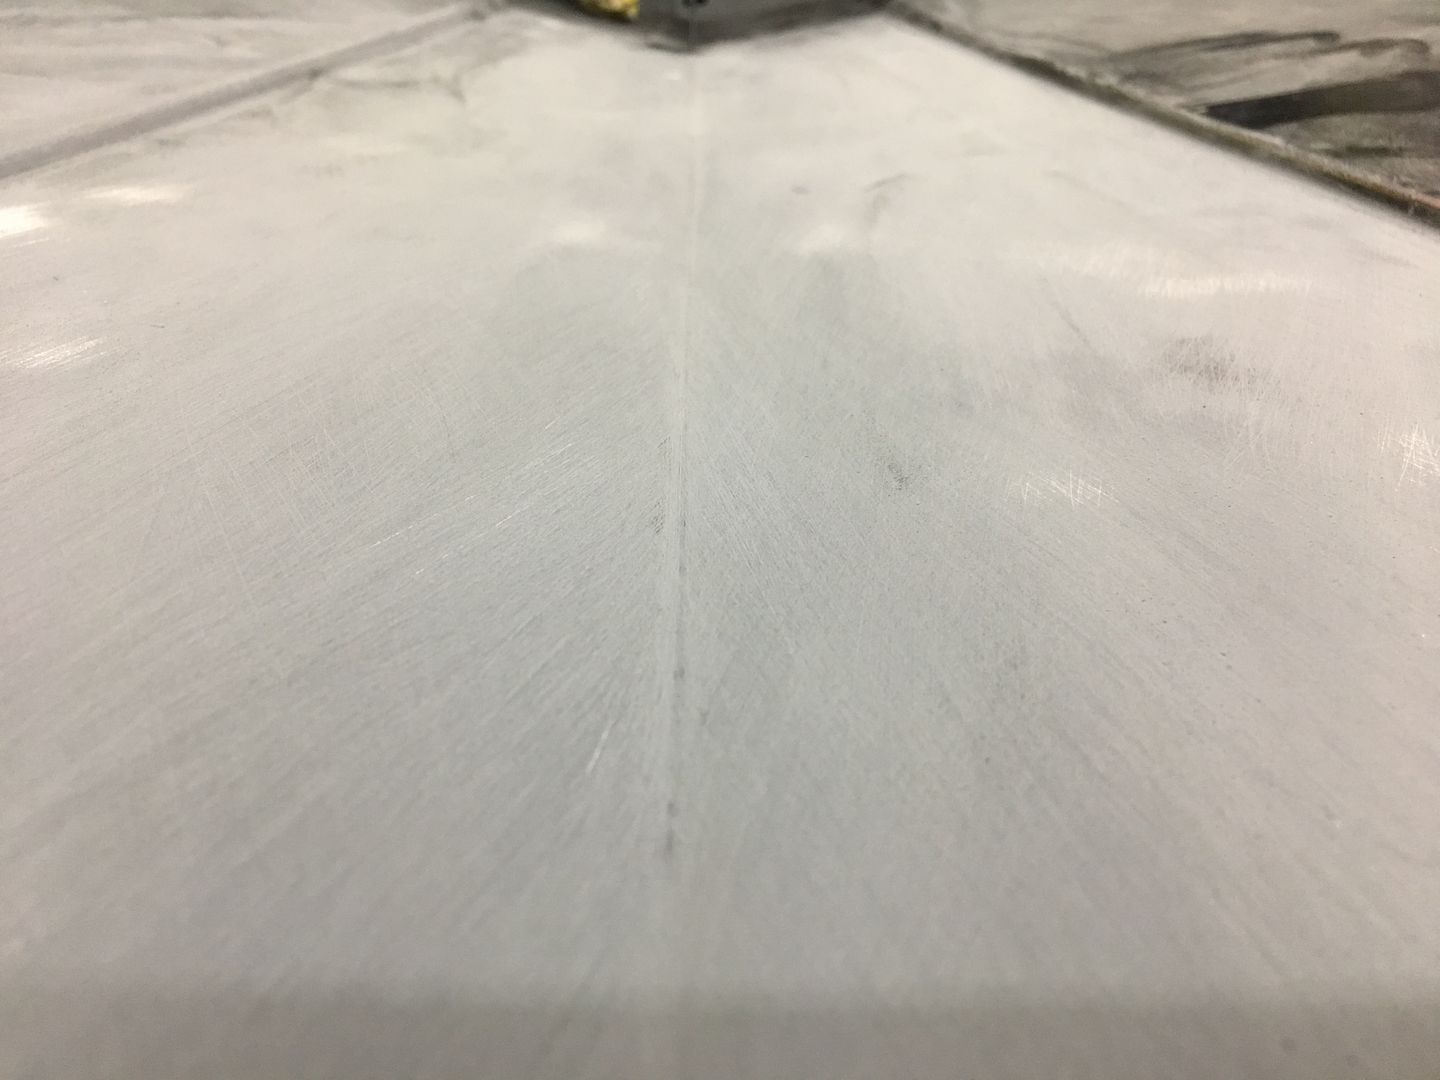
__________________
Robert |
|
|
|
|
06-29-2020, 11:43 AM
|
#1145 |
|
Post Whore
Join Date: May 2015
Location: Alabama
Posts: 14,578
|
Re: 55 Wagon Progress
Nice Robert ...like them old bells...
__________________
Mongo...aka Greg RIP Dad RIP Jesse 1981 C30 LQ9 NV4500..http://67-72chevytrucks.com/vboard/s...d.php?t=753598 Mongos AD- LS3 TR6060...http://67-72chevytrucks.com/vboard/s...34#post8522334 Columbus..the 1957 IH 4x4...http://67-72chevytrucks.com/vboard/s...63#post8082563 2023 Chevy Z71..daily driver |
|
|
|
|
06-29-2020, 11:56 AM
|
#1146 |
|
Senior Member
Join Date: Mar 2011
Location: West Plains, Missouri
Posts: 7,553
|
Re: 55 Wagon Progress
Great work...Jim
__________________
my build thread: http://67-72chevytrucks.com/vboard/s...d.php?t=459839 Jimbo's long bed step build:http://67-72chevytrucks.com/vboard/s...t=464626<br /> |
|
|
|
|
07-01-2020, 08:44 AM
|
#1147 |
|
Registered User
Join Date: Jan 2013
Location: Leonardtown, MD
Posts: 1,633
|
Re: 55 Wagon Progress
Some equipment changes in the shop.. The Baileigh MH19 was sold last week and Saturday morning was picked up for its journey to Pittsburgh...
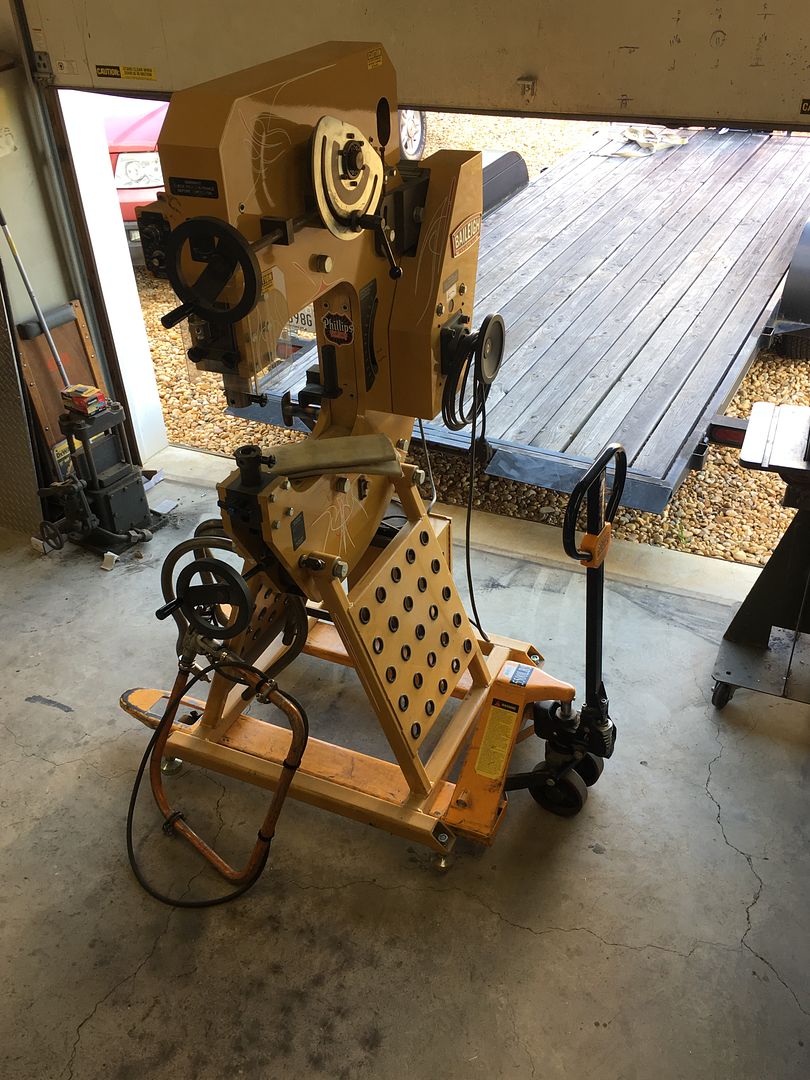 After the Baileigh left, we had another louver job with Cody, this time on a C10 Chevy hood. With the Lennox sitting in the corner like this... 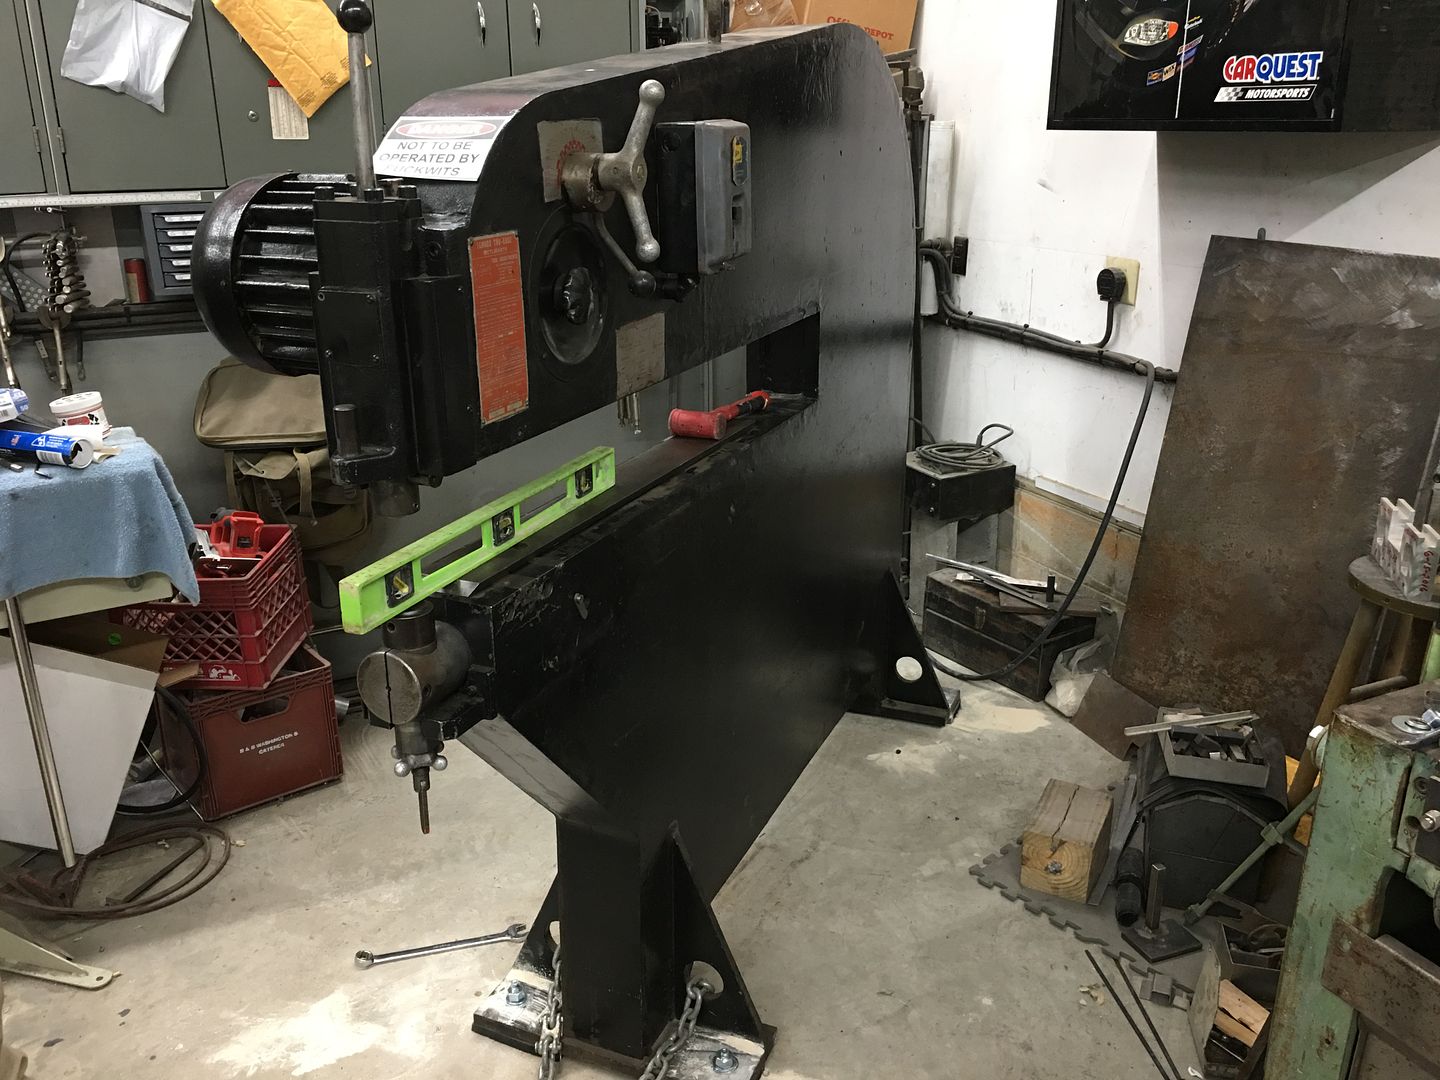 ….. there has been a couple of occasions that large panels would run into interference with the shear. Saturday would be no exception. We had to cut the anchors with a Sawzall and slide it toward the paint booth to make room for the hood... 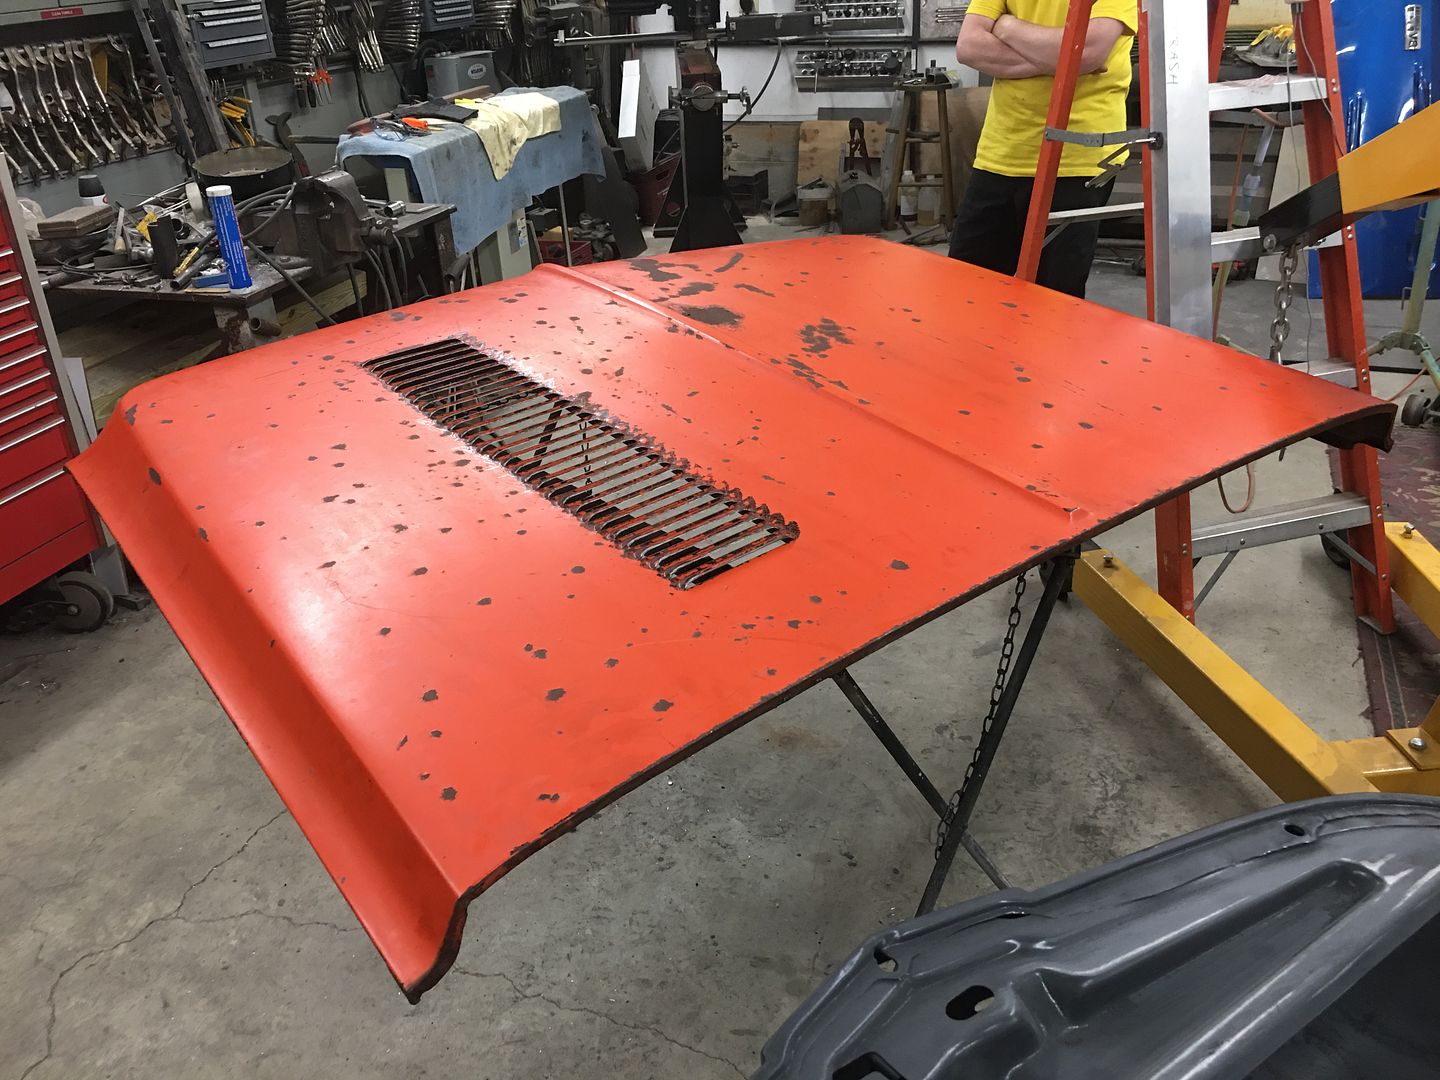 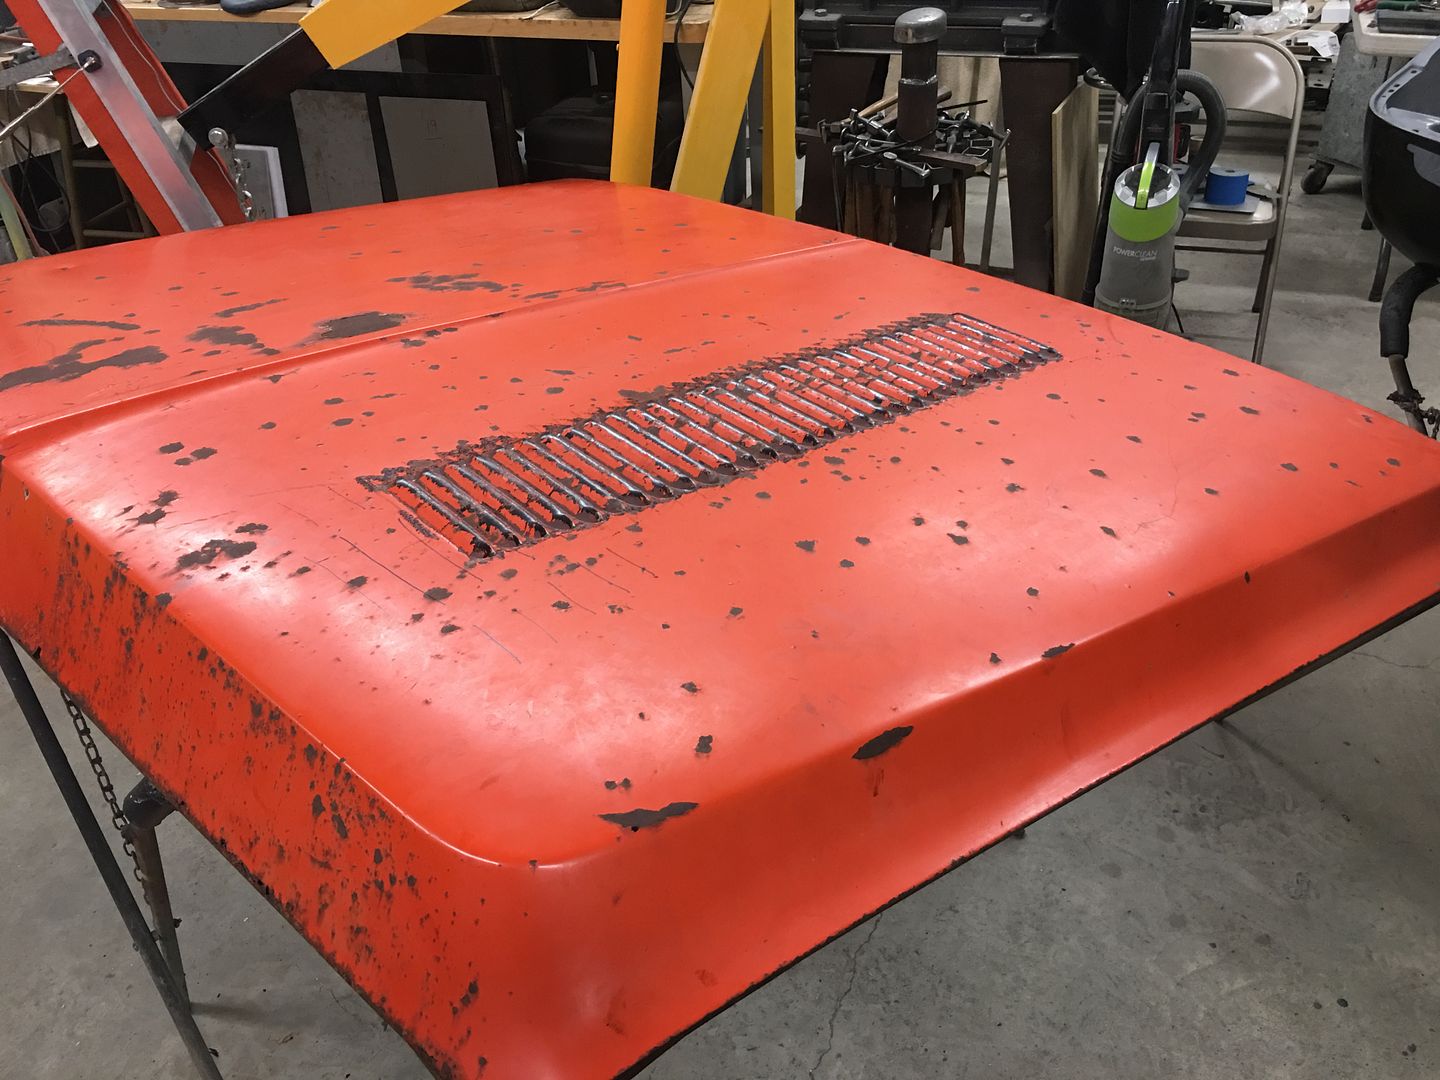 Since the Baileigh was picked up early that morning, the spot it used to be in seemed a better location to eliminate future issues with obstructions to the side.. So we used the 6000 lb capacity engine hoist to move the approx. 4000 lbs of Lennox.. 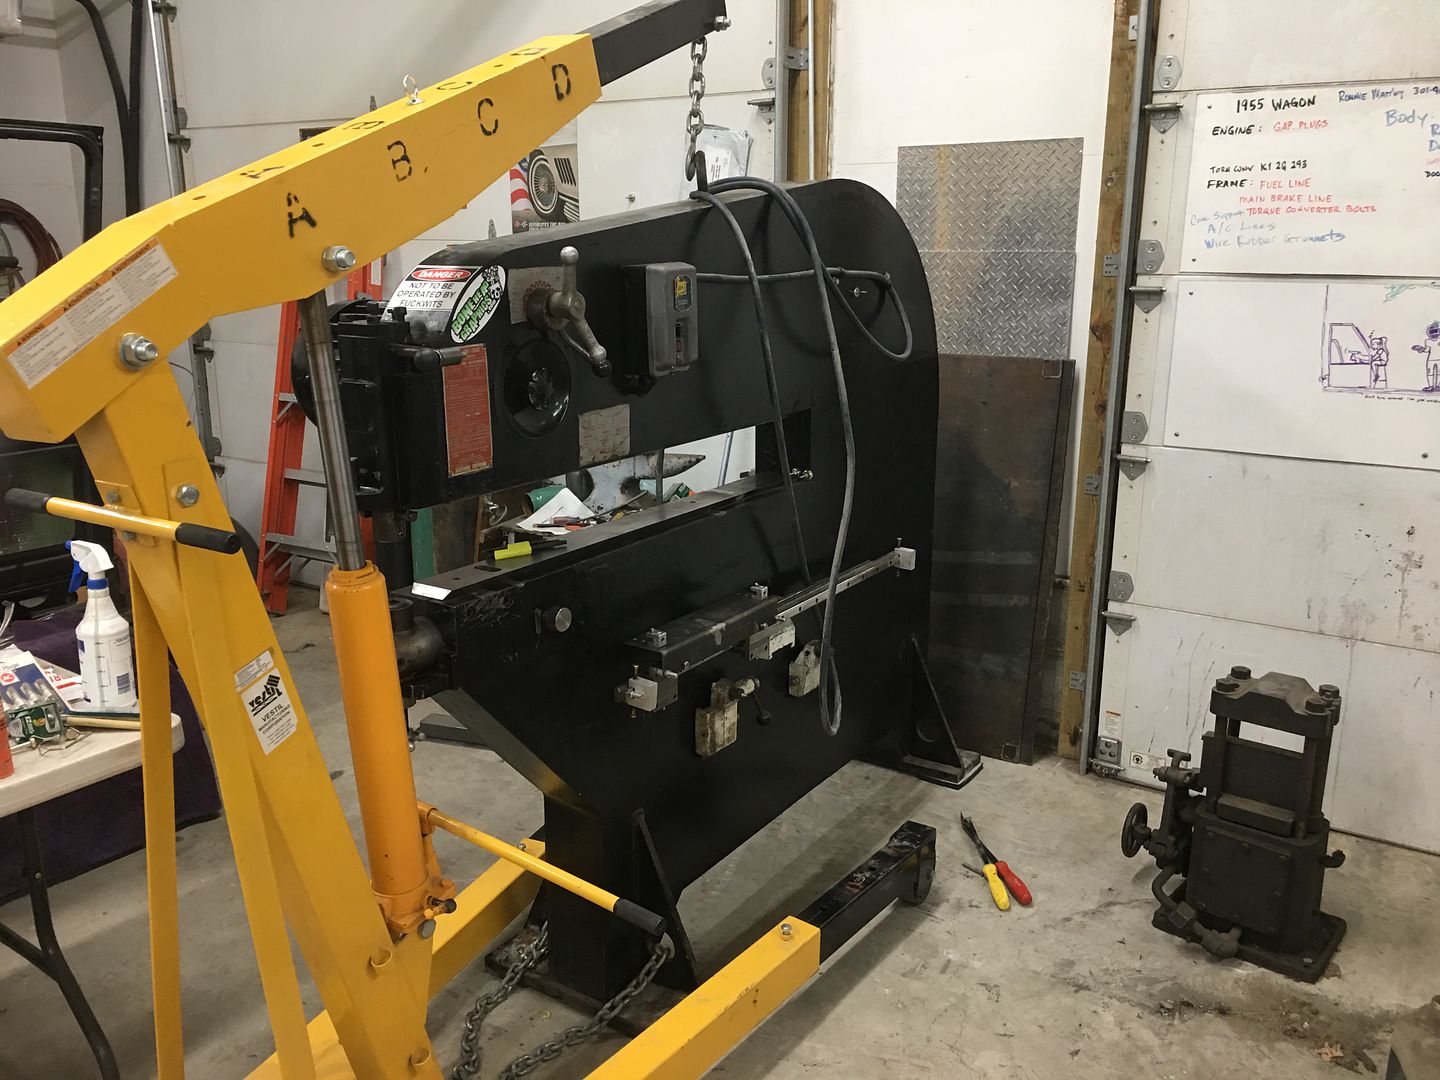 Which left this spot open for the new Powell Hammer, the replacement for the Baileigh. The dies are located higher on the new machine, so any larger panels should clear over top...  Monday was moving day for the Powell hammer, Mario helped with the loading, unloading, and positioning exactly where it was supposed to go... 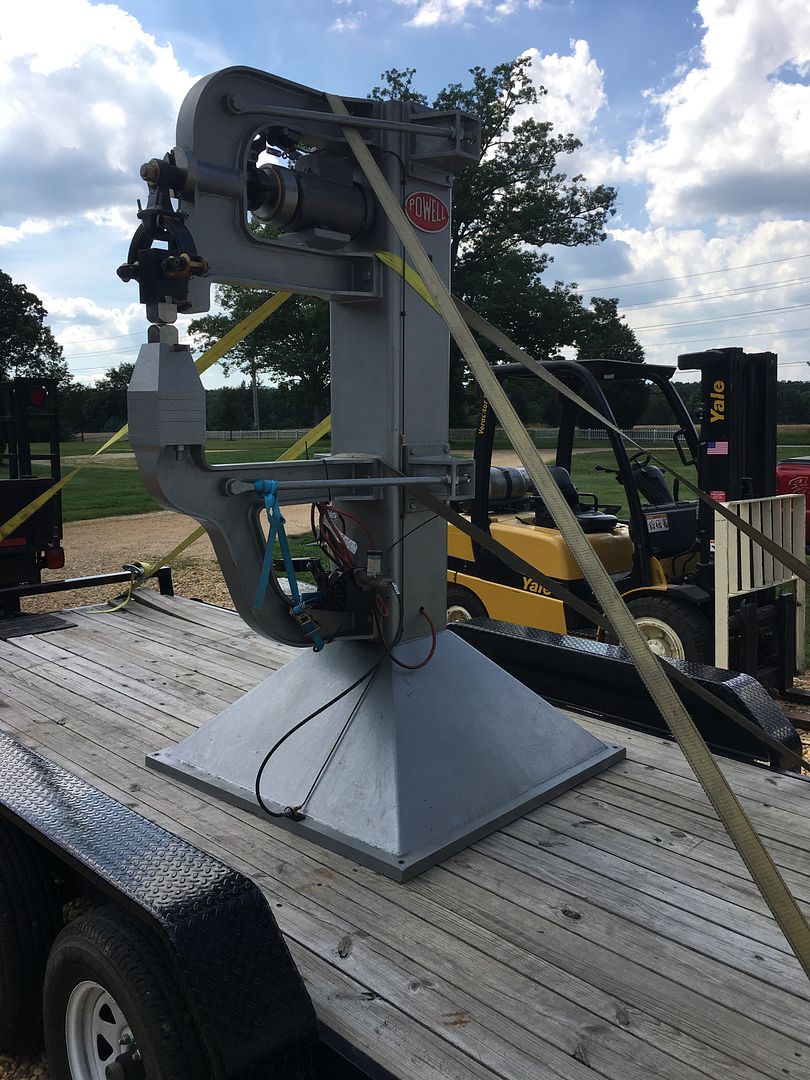 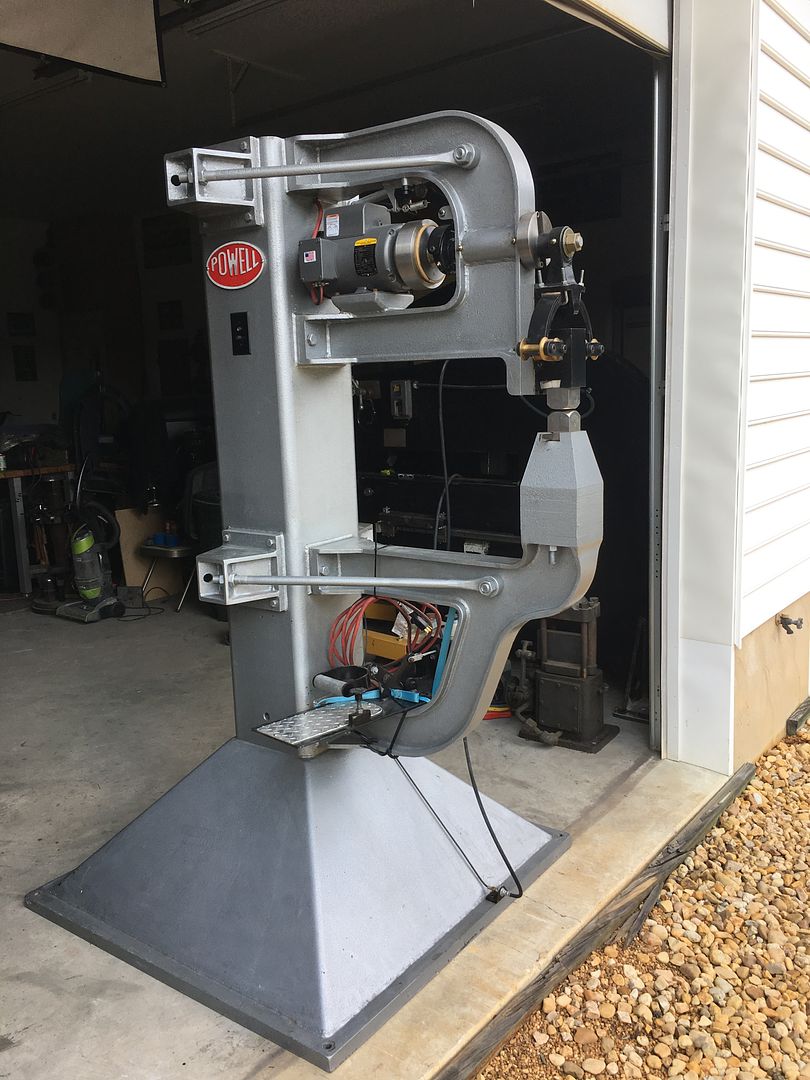 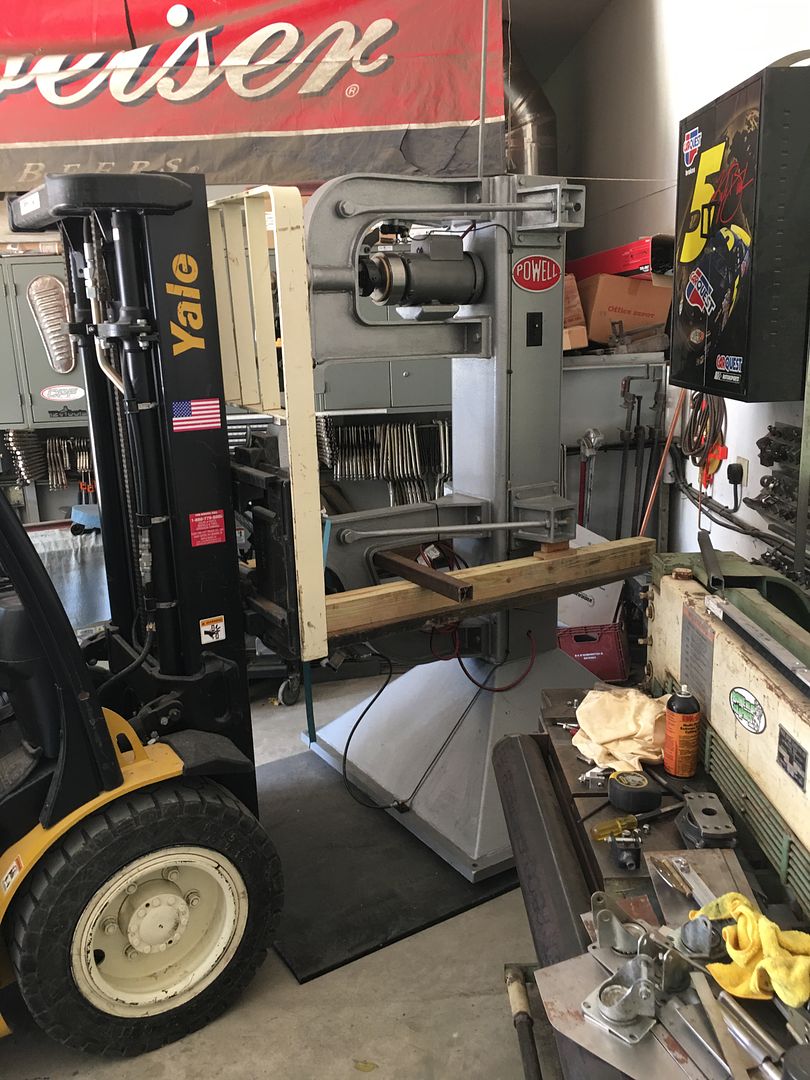 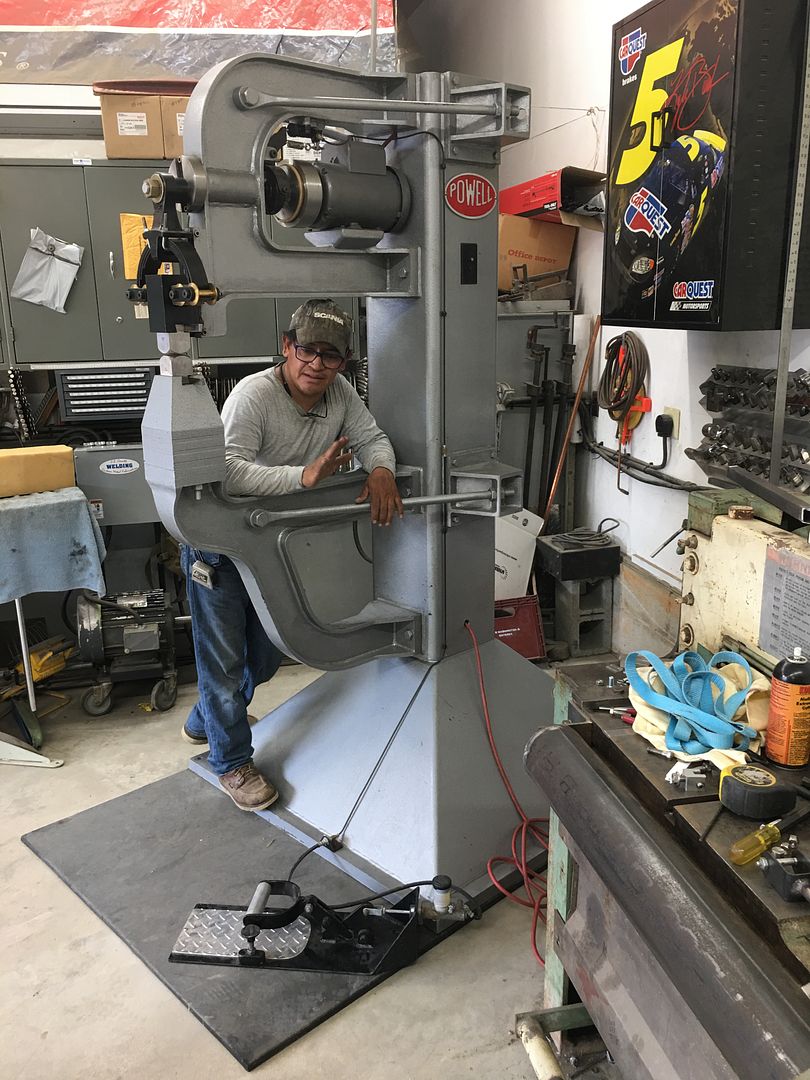 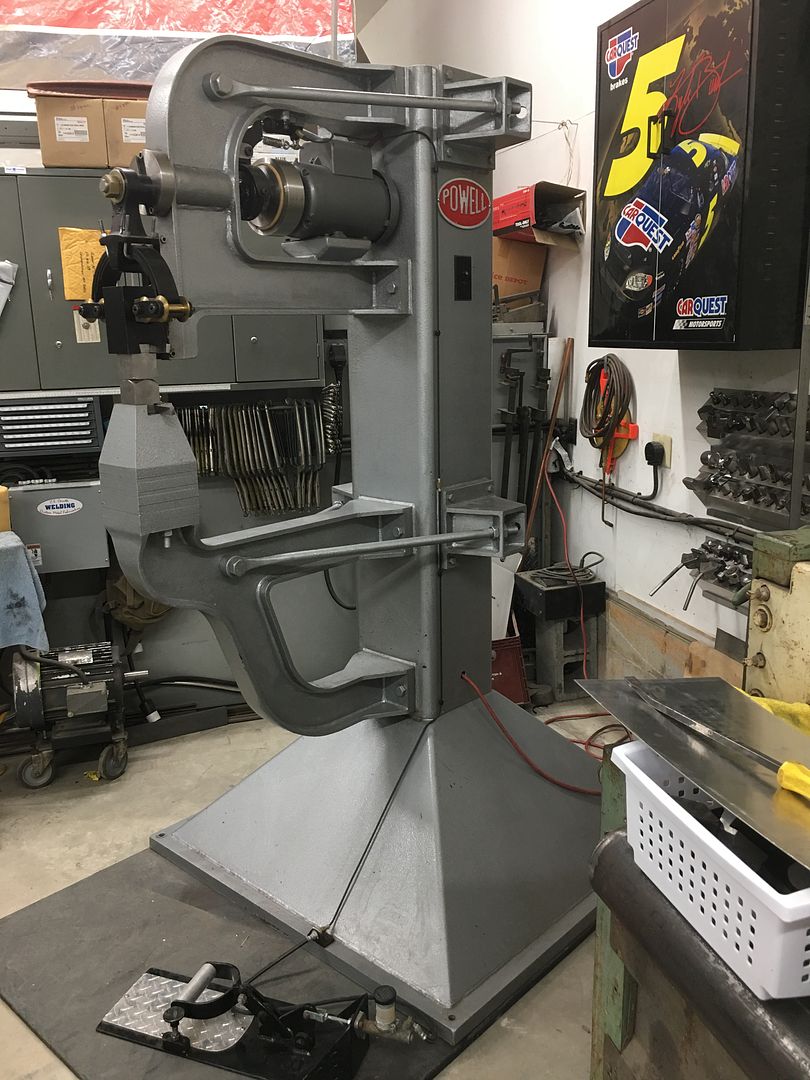 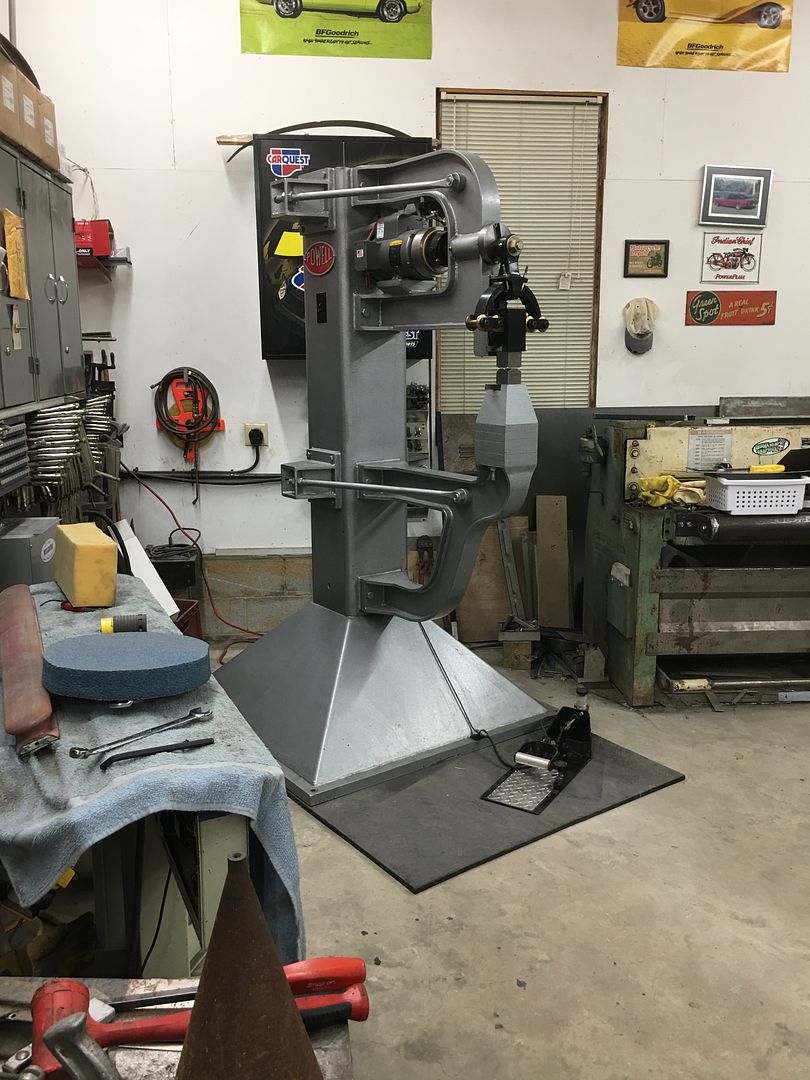 All that's left to do is drill some holes into the concrete and add some "peg" bolts to keep things from moving around.
__________________
Robert |
|
|
|
|
07-01-2020, 01:33 PM
|
#1148 |
|
Post Whore
Join Date: May 2015
Location: Alabama
Posts: 14,578
|
Re: 55 Wagon Progress
Wow...what a piece of equipment that is...!
__________________
Mongo...aka Greg RIP Dad RIP Jesse 1981 C30 LQ9 NV4500..http://67-72chevytrucks.com/vboard/s...d.php?t=753598 Mongos AD- LS3 TR6060...http://67-72chevytrucks.com/vboard/s...34#post8522334 Columbus..the 1957 IH 4x4...http://67-72chevytrucks.com/vboard/s...63#post8082563 2023 Chevy Z71..daily driver |
|
|
|
|
07-01-2020, 02:53 PM
|
#1149 |
|
Senior Member
Join Date: Mar 2011
Location: West Plains, Missouri
Posts: 7,553
|
Re: 55 Wagon Progress
Very nice...Jim
__________________
my build thread: http://67-72chevytrucks.com/vboard/s...d.php?t=459839 Jimbo's long bed step build:http://67-72chevytrucks.com/vboard/s...t=464626<br /> |
|
|
|
|
08-12-2020, 12:19 AM
|
#1150 |
|
Registered User
Join Date: Jan 2013
Location: Leonardtown, MD
Posts: 1,633
|
Re: 55 Wagon Progress
Thanks guys!
The wagon got some paint today! Richard and Brandon Glymph of Absolute Rod and Custom Paint in Annapolis got some of the Organic green Kandy basecoat and clear sprayed. sealer: 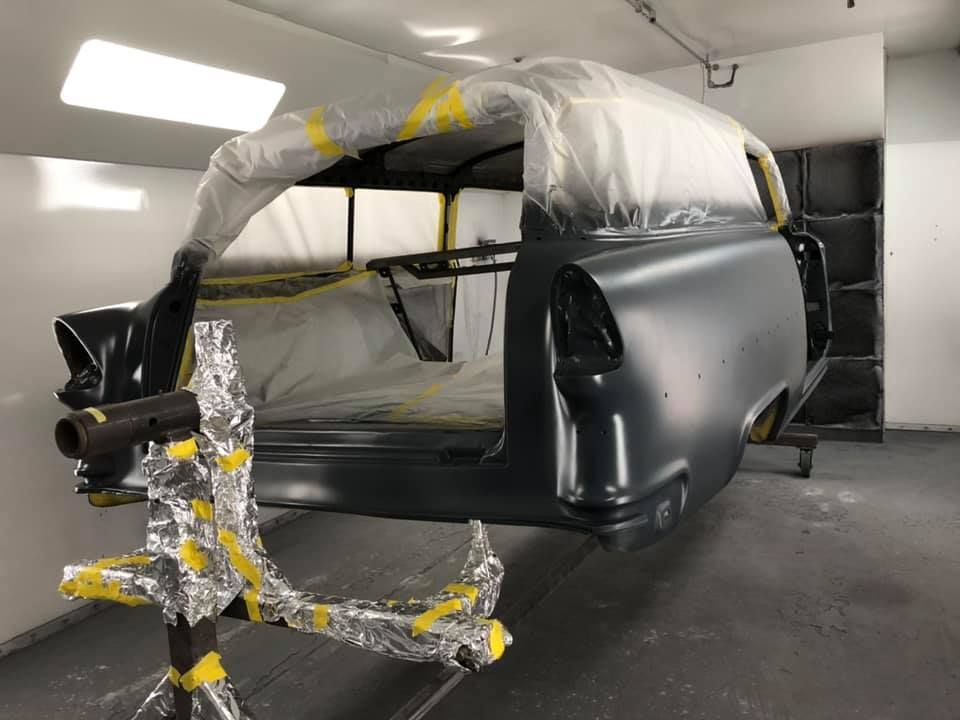 Green: 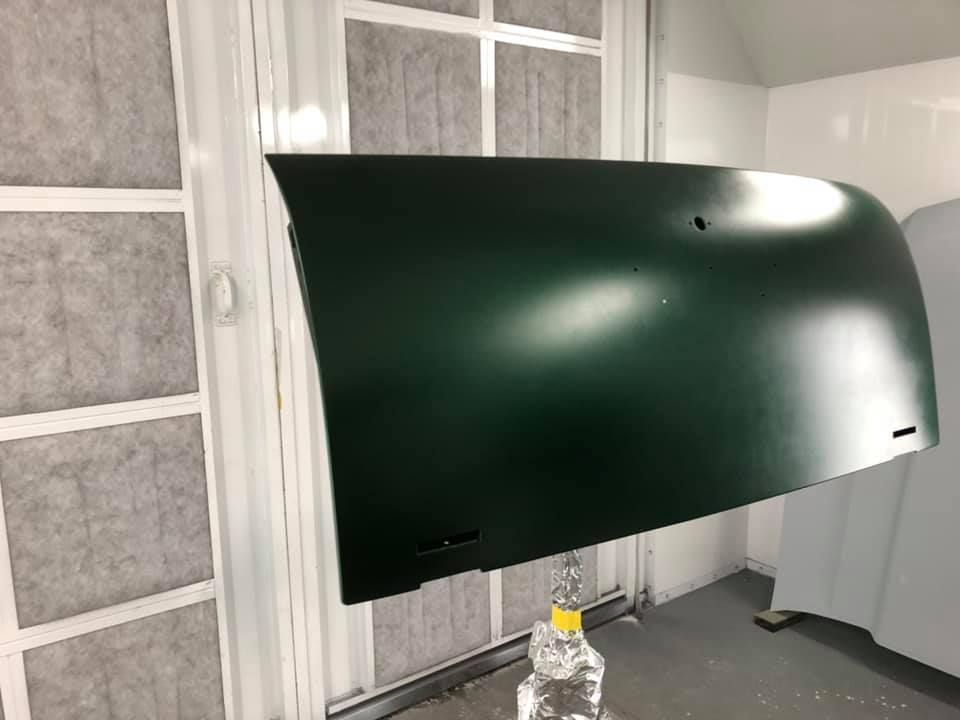 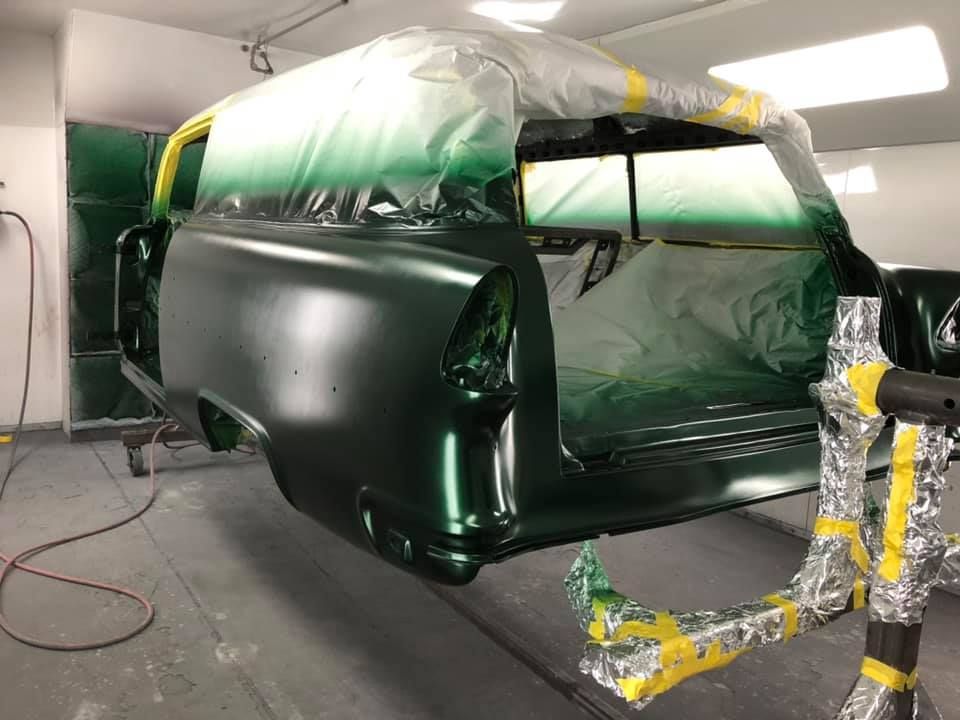 SPI Universal Clear: 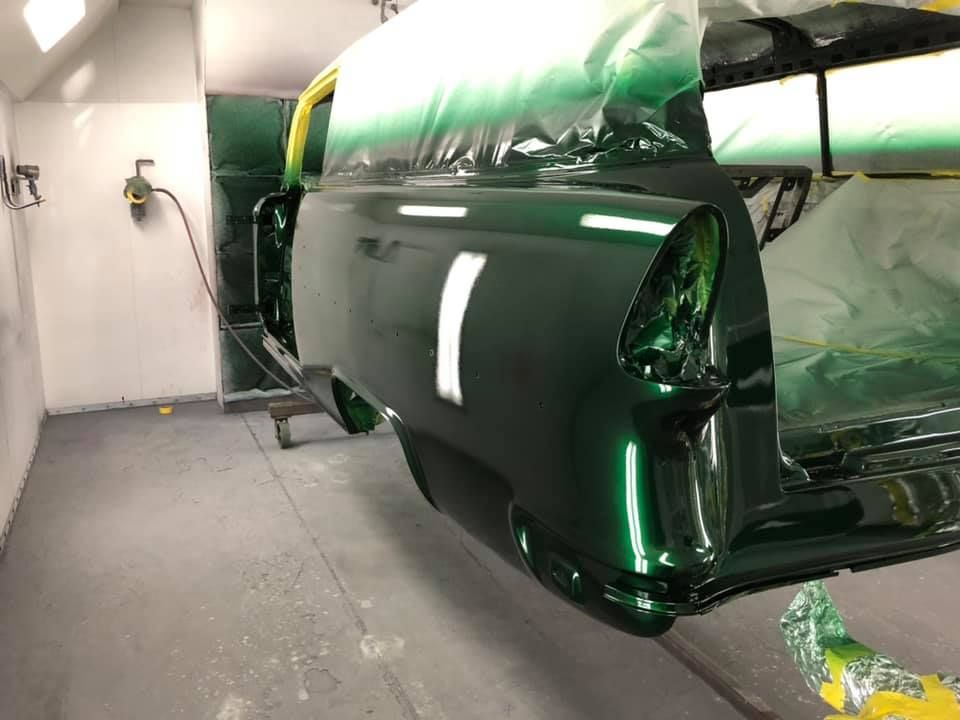 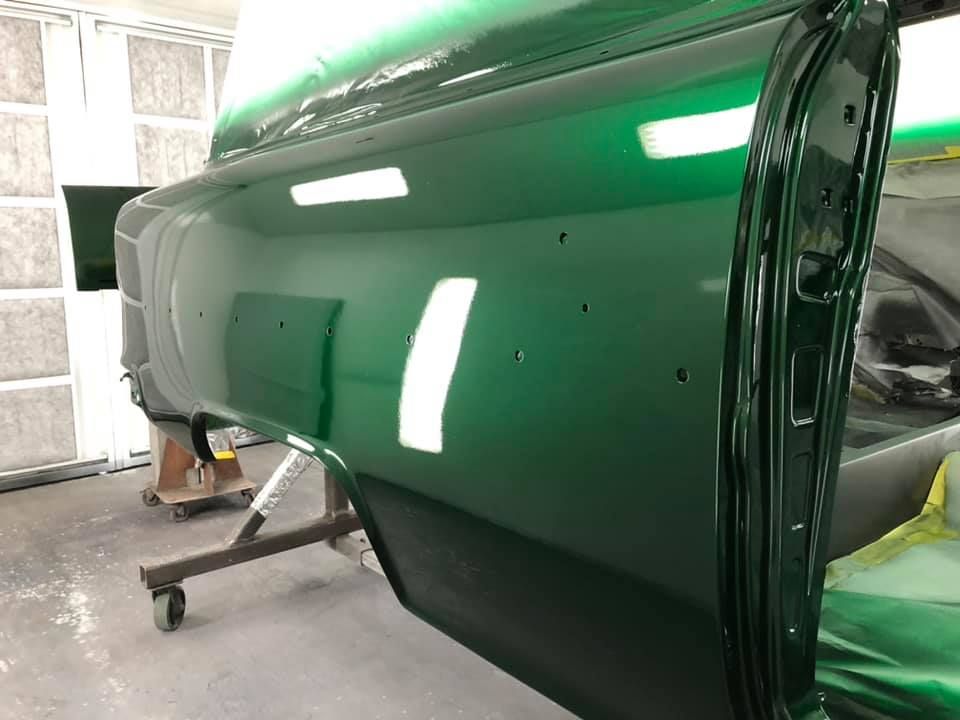 Video shows some of the pop you'll see in the sunlight.. https://www.youtube.com/watch?v=zfd_Dw9uyyA .
__________________
Robert Last edited by MP&C; 08-12-2020 at 11:07 AM. |
|
|
|
 |
| Bookmarks |
| Thread Tools | |
| Display Modes | |
|
|


 Linear Mode

