
|
 12-05-2012, 04:54 PM
|
#226 | |
|
Registered User
Join Date: May 2011
Location: Fort Worth, Texas
Posts: 468
|
Quote:
Nothing like seeing a black paint job that's mirror smooth! Awesomeness X 2! |
|

|

|
|
12-05-2012, 04:58 PM
|
#227 |
|
Registered User
Join Date: Apr 2003
Location: Indep, MO
Posts: 5,893
|
Re: Build #2 Crusader!
X3! What does that SPI stuff run?
Posted via Mobile Device
__________________
Boppa's Old Yeller Truck Build, Old Yeller's New Heart! Project Buzz Bomb Flyin' Low! |
|
|
|
|
12-05-2012, 05:01 PM
|
#228 |
|
Registered User
Join Date: Sep 2011
Location: Rockwall, Texas
Posts: 113
|
Re: Build #2 Crusader!
Low Elco- I think I saw maybe over in the paint section where he said he had about $850 in it total. He can say for sure.
__________________
1990 K5 Blazer (sold) 1983 SWB C-10 to K-20 Conversion |
|
|
|
|
12-05-2012, 05:18 PM
|
#229 |
|
Registered User
Join Date: May 2011
Location: Fort Worth, Texas
Posts: 468
|
With results like that, it looks like it was certainly worth it!
|
|
|
|
|
12-05-2012, 10:31 PM
|
#230 | |
|
Account Suspended
Join Date: Aug 2007
Location: USA
Posts: 1,223
|
Re: Build #2 Crusader!
Quote:
Let me tell you about SPI. There products are awesome. This truck was only my second paint job and the silver 71 Silver dollar was the first. I did a majority of body work on the red Iroc (there wasn't very much) but I didn't do any of the spraying. (to chicken sh!t). Silver and Black The two hardest colors to paint and I dont believe they would have come out as nice if it weren't for SPI and there products. There Epoxy primer is the best. Very user friendly. Easy to mix, long pot life, easy to spray, and easy to sand. It works so well that I didnt use any 2k urethane primer on this truck. Not there is any thing wrong with their 2k primer. I did use it on Silver dollar with great results. You can Spray this epoxy over bare metal, you can lay filler over it. It dries to a semi-gloss finish, so you use it as a guild coat for sanding. You can even mix this epoxy as a sealer. Having one product that takes the place of 2 or 3 is much easier and cheaper. If you think the epoxy primer is good wait till you try the Clear. It is bad a$$ as too. Their Universal Clear is made specifically for custom cars, trucks, bikes, hot rods whenever you need a better than the old "body shop" or production finish. it gives a nice Deep shine. Its easy to spray. Long pot-life so you can take your time. and you can cut and buff on it easy even after a month. if your as slow as I am. If thats not good enough for ya. The price! its crazy. You cant beat there pricing. unless you do some cheap ass clear or dupli-color from Walmart. A spray-able gallon of that clear I was just telling you about is only $141. and a spray-able Gallon of the epoxy is only $135. Everything is affordable. my local paint store couldn't come close. Then there is the customer service. its Fantastic. walk into your local paint supplier and ask for the owners personal phone number, so you can call him on Sunday evening when you have a problem. I can, with SPI. If your a customer of SPI you to can have Barry's personal number. and he calls you back. (trust me Iv done it) Hows that for customer service. If a guy like me that has almost no experience in painting can do what I did with SPI, imagine what someone who knew what they were doing could do. If it all sounds like a sales pitch to you. you might be right. (But its all true.) I believe in their integrity, their products, & their outstanding Customer service, Because I want to be apart of something like that. Im signing up to be a authorized dealer for them at the first of the year. 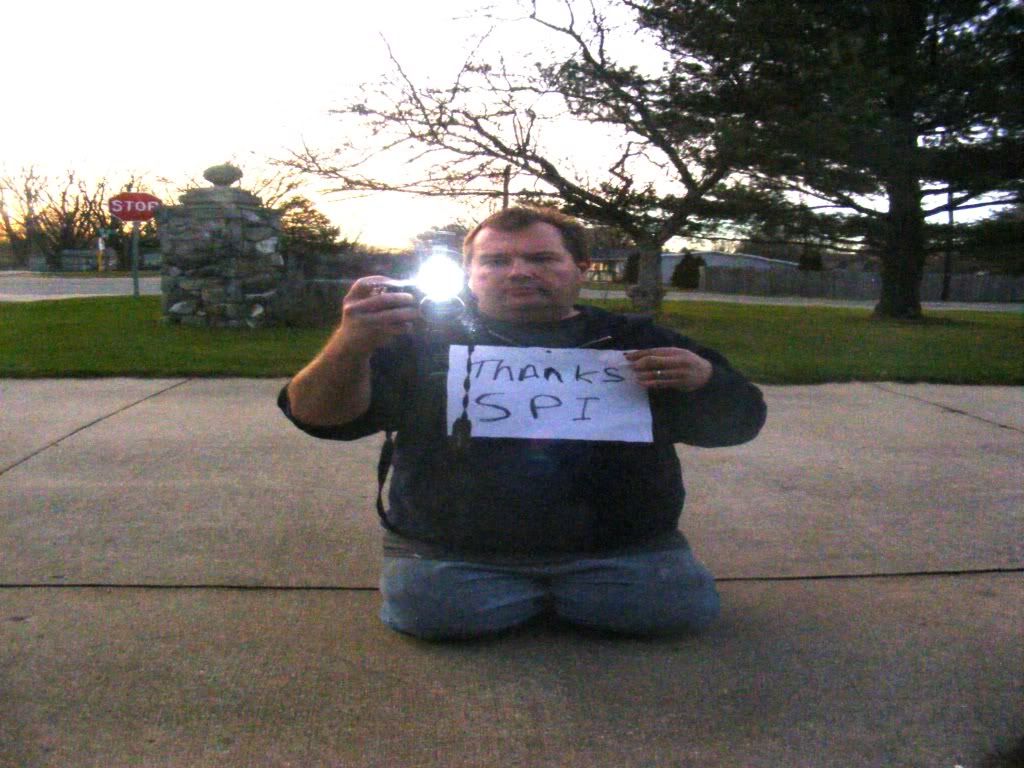
Last edited by mrhino; 12-05-2012 at 10:37 PM. |
|
|
|
|
|
12-07-2012, 11:54 AM
|
#231 |
|
Registered User
Join Date: May 2011
Location: Fort Worth, Texas
Posts: 468
|
Re: Build #2 Crusader!
Thanks for the info on SPI Mike. Do they make a satin or matte black or clear?
Sorry to see that five months of body work wore your legs down to stubs! You'll have to get some sticks to be able to reach the pedals now! 
|
|
|
|
|
12-07-2012, 12:07 PM
|
#232 | |
|
Account Suspended
Join Date: Aug 2007
Location: USA
Posts: 1,223
|
Re: Build #2 Crusader!
Quote:
|
|
|
|
|
|
12-07-2012, 04:52 PM
|
#233 |
|
Registered User
Join Date: May 2011
Location: Fort Worth, Texas
Posts: 468
|
Re: Build #2 Crusader!
Good to know when it comes paint time, which will probably be after the next administration in Washington is through! (It means it will be a while!
)
Last edited by truckzilla; 12-07-2012 at 04:59 PM. |
|
|
|
|
12-07-2012, 05:41 PM
|
#234 | |
|
Account Suspended
Join Date: Aug 2007
Location: USA
Posts: 1,223
|
Re: Build #2 Crusader!
Quote:

|
|
|
|
|
|
12-08-2012, 05:20 PM
|
#235 |
|
Account Suspended
Join Date: Aug 2007
Location: USA
Posts: 1,223
|
Re: Build #2 Crusader!
after finally putty away my buffer. I could start on other areas of the truck. Getting this thing back together. I started with putting sound deadener in the doors.
here is what I did. Having the window, regulator, and the door handle removed sure made this a lot easier job. 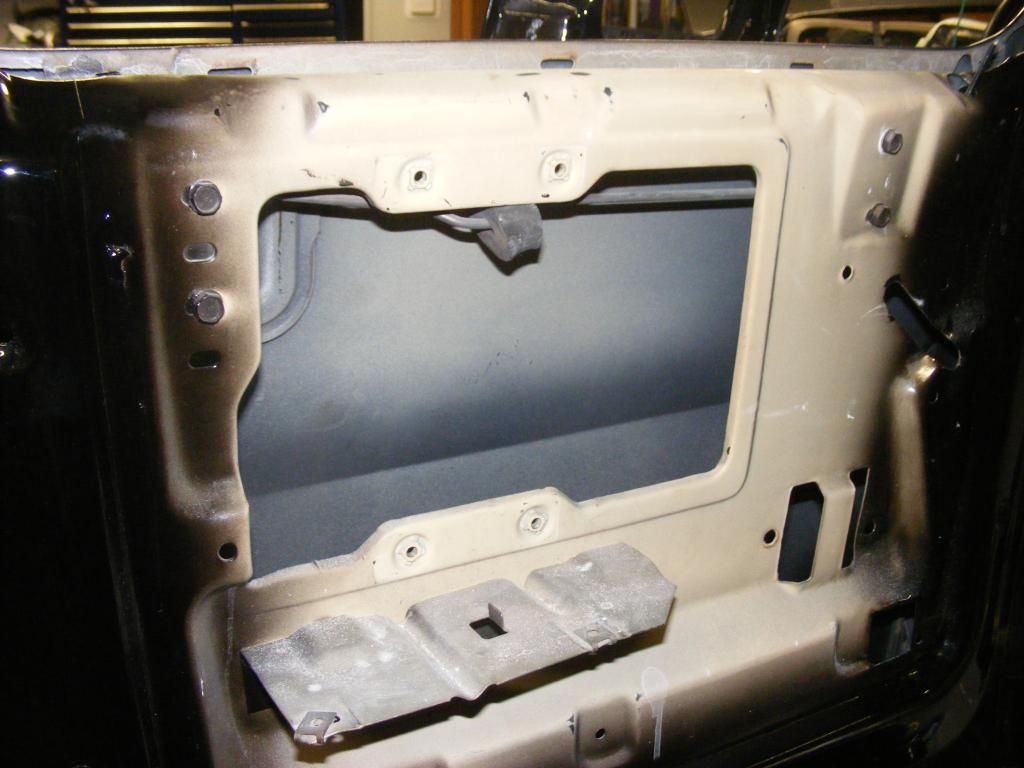 First thing to do is clean the surface you want to stick the material too. I started with a scrapper to remove loose dust and debris 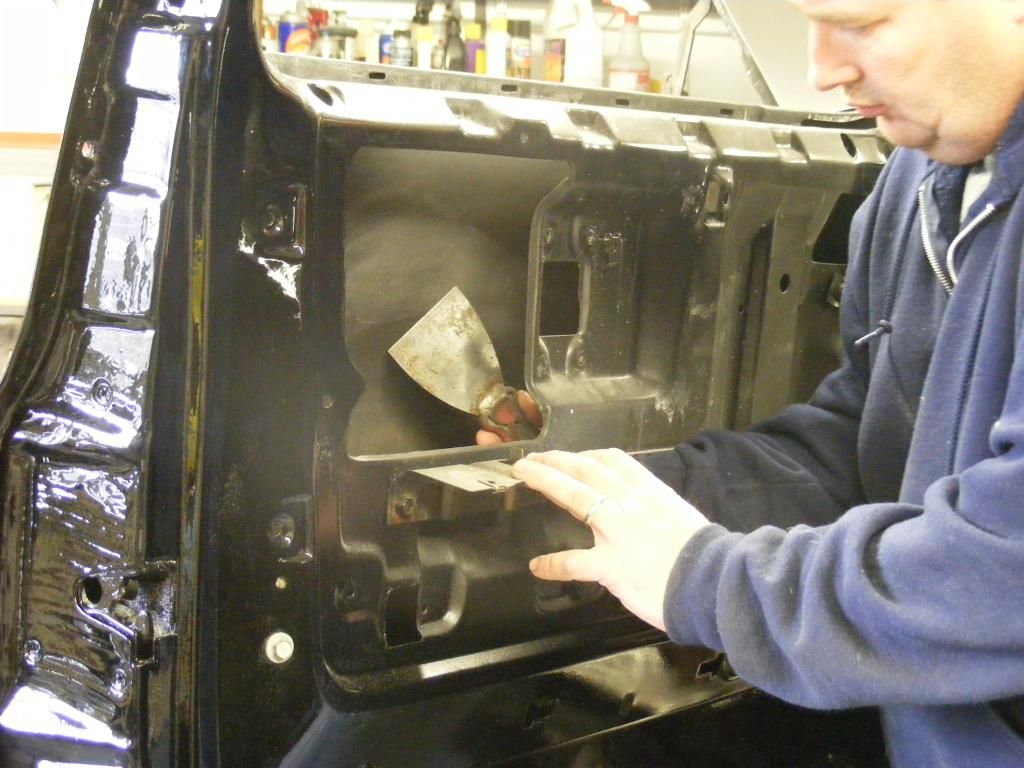 Then i went over it with a scotchbright pad. 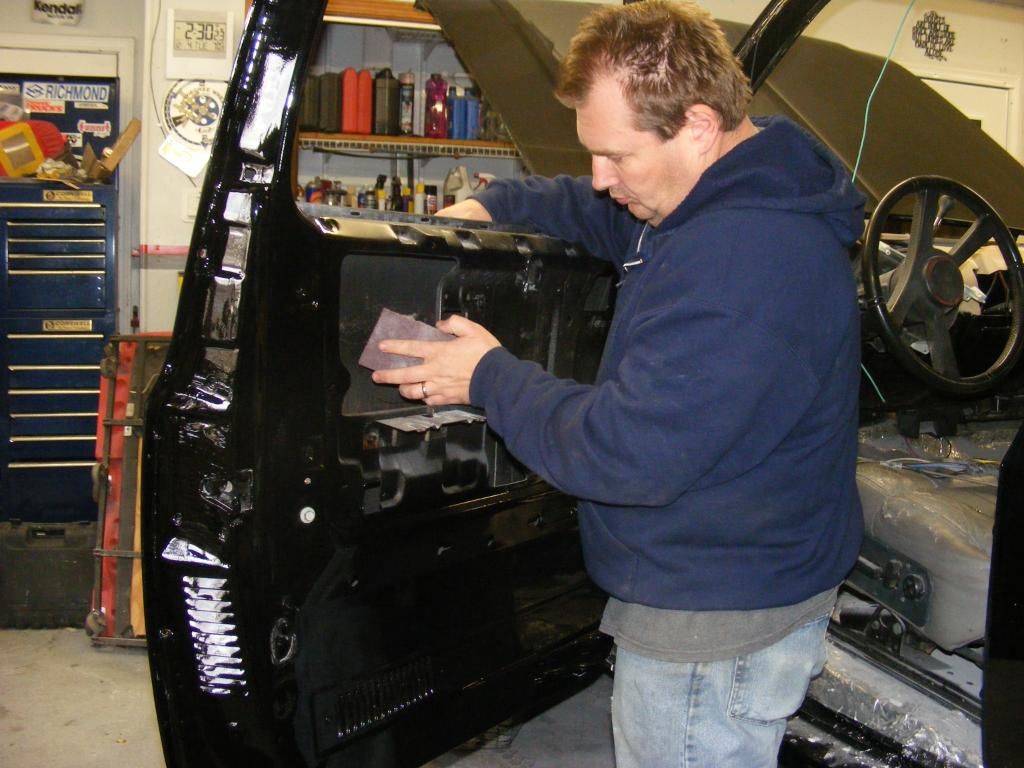 Next I cleaned it with some Glass cleaner. If you have any grease or oily residue, you would want to remove that with some brake clean or some sota solvent. The point here is to have as clean a surface as possible 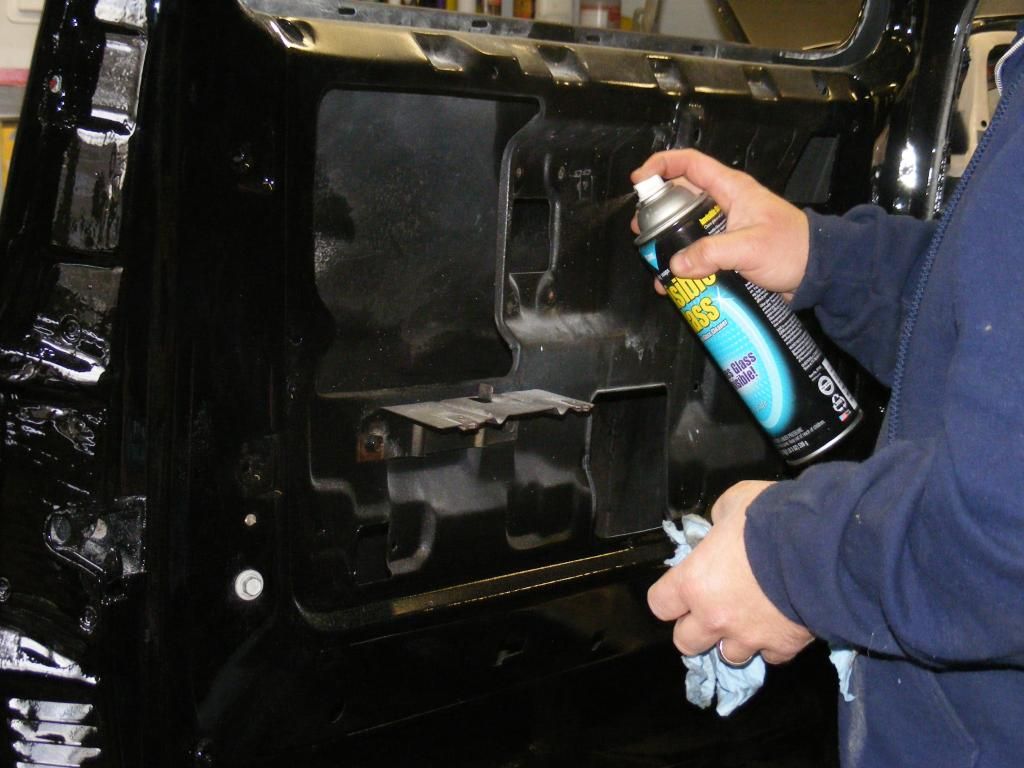 I took a quick measurement. to determine how much to use based on how far my short arms could reach inside the door. 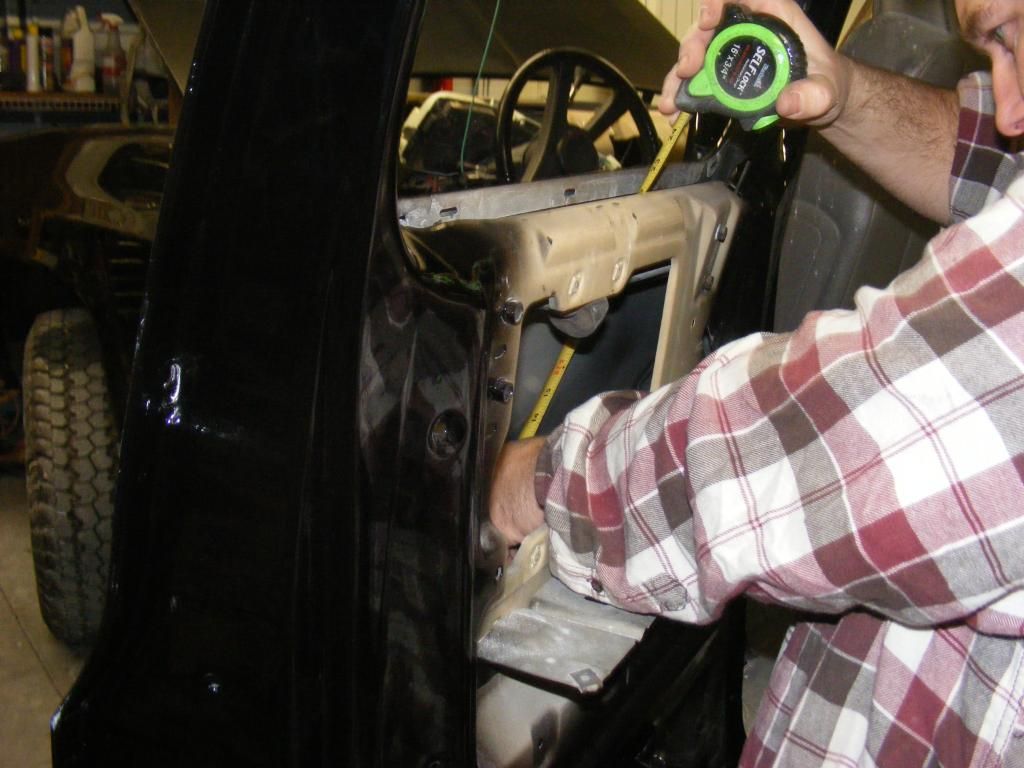 Starting with a 18x32 sheet 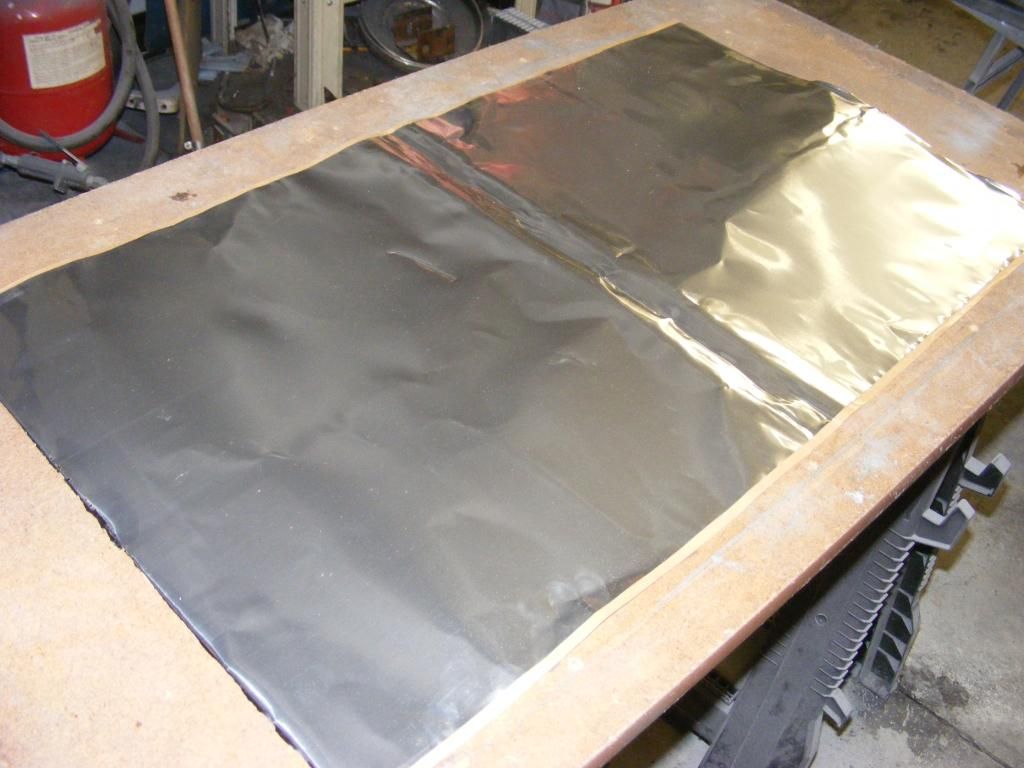 I cut 5" off of the end 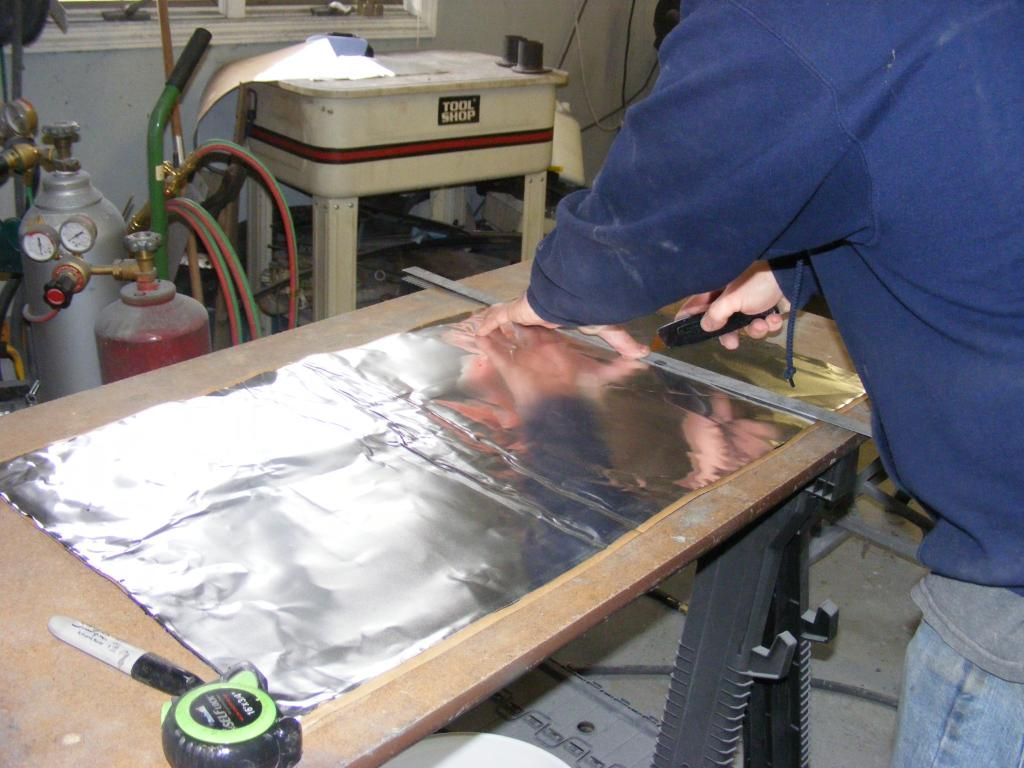 and 5" across the top. leaving me with a 13x27 sheet for the main body of the door. 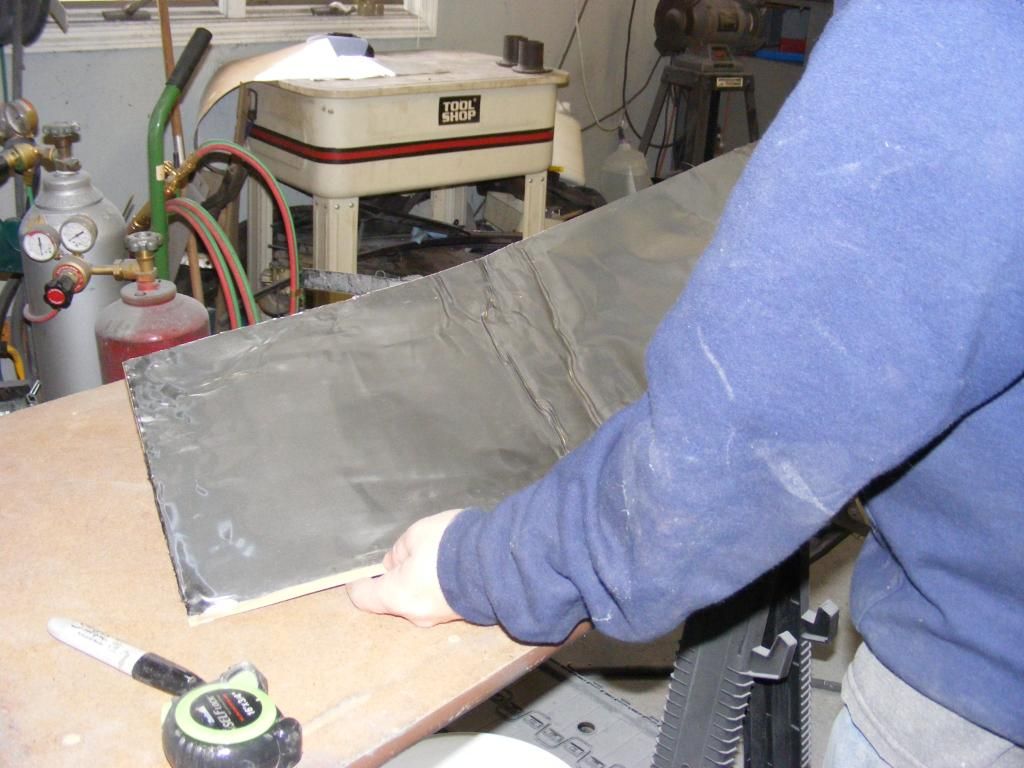 I then slide the piece down into the door checking fitment. Making sure I knew exactly where Im going to put it. 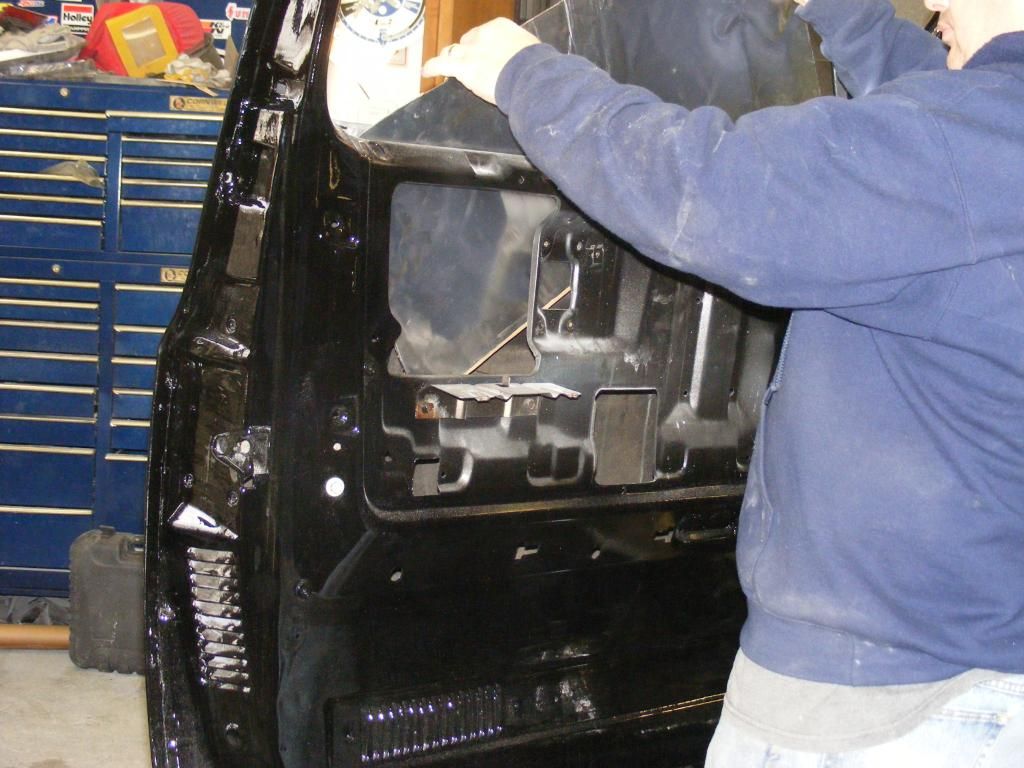 peel off the backing 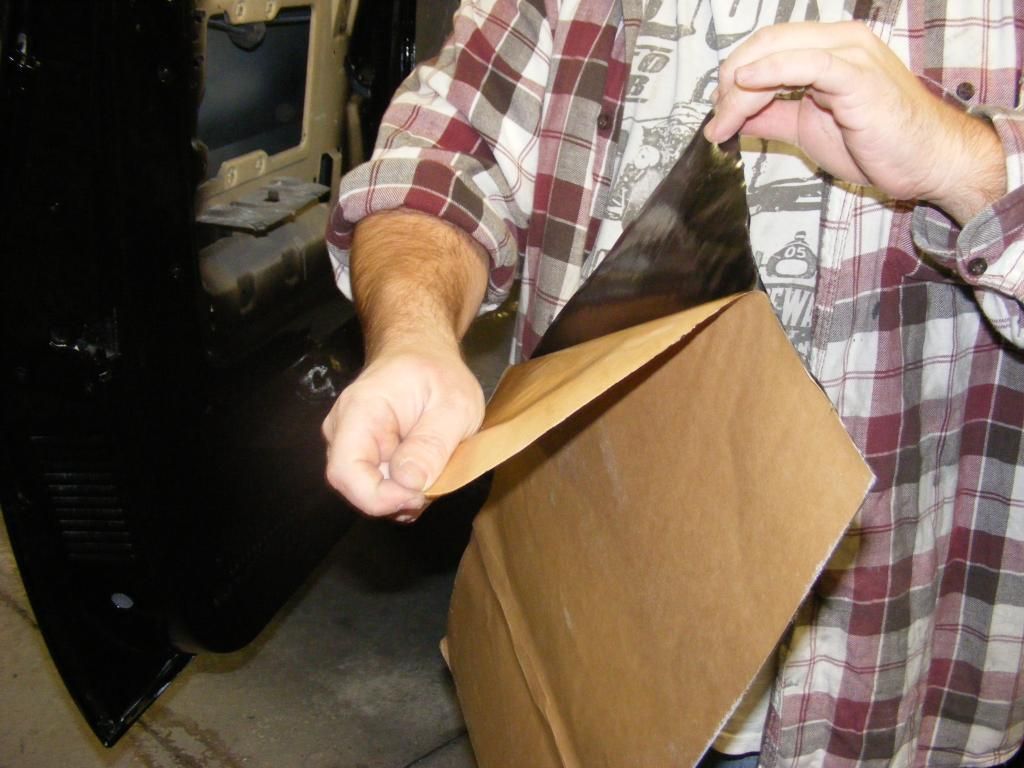 Slide it in place making sure not to touch the sticky side to anything you dont want it stuck to. 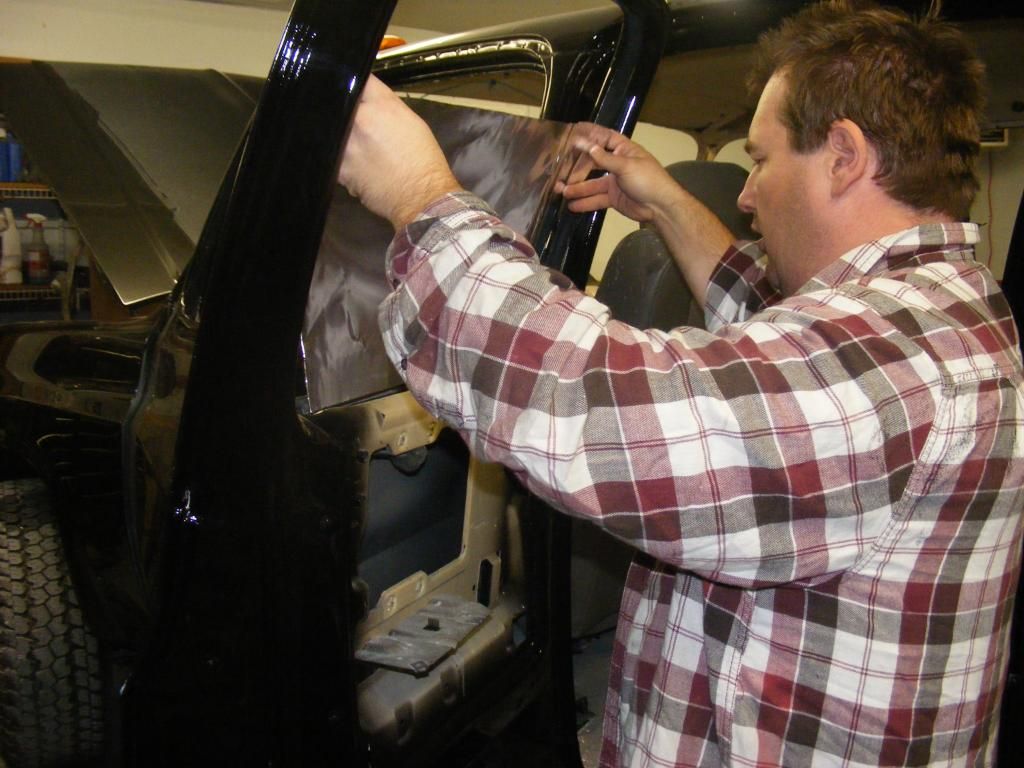 once its in place go ahead and press it down. Here I am using a socket but a roller, your hand anything you can get it there to press it firmly in place 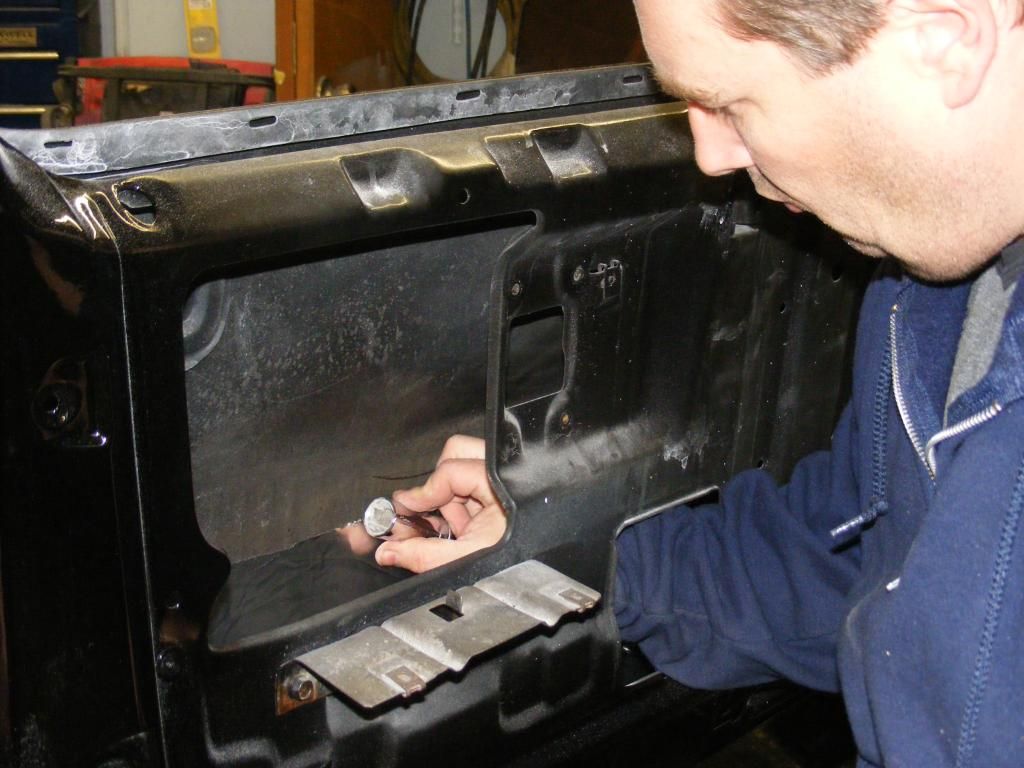 Now its time for the smaller pieces I cut earlier 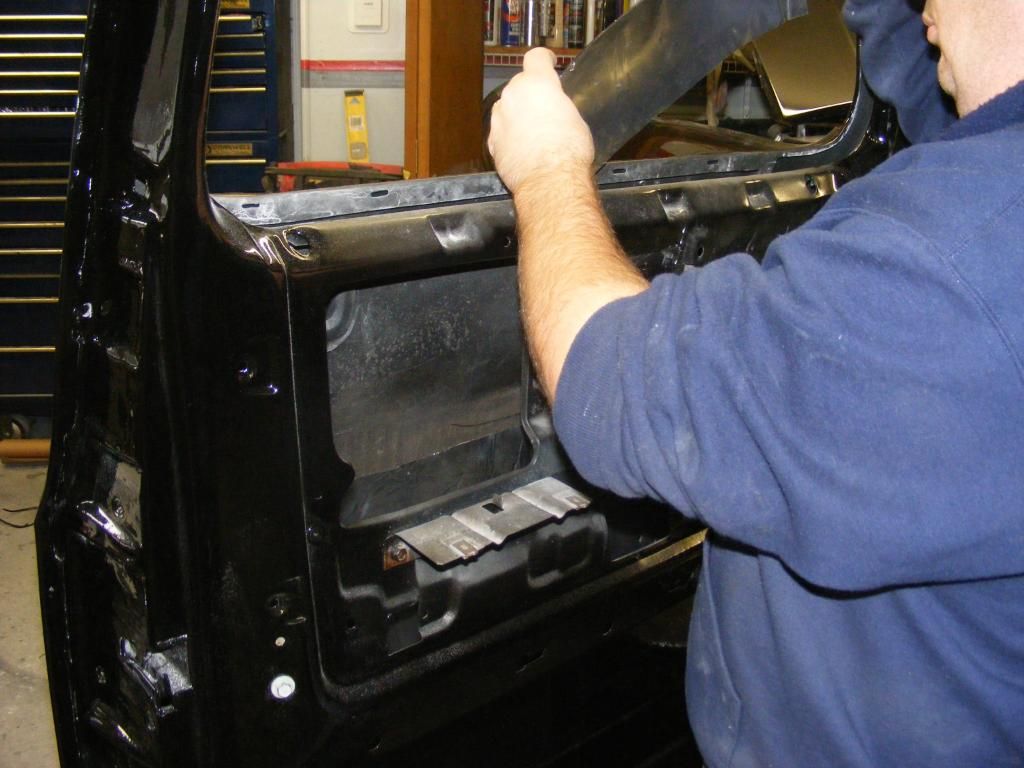 Again making sure I know where It should go. once its pressed in place it. Its there 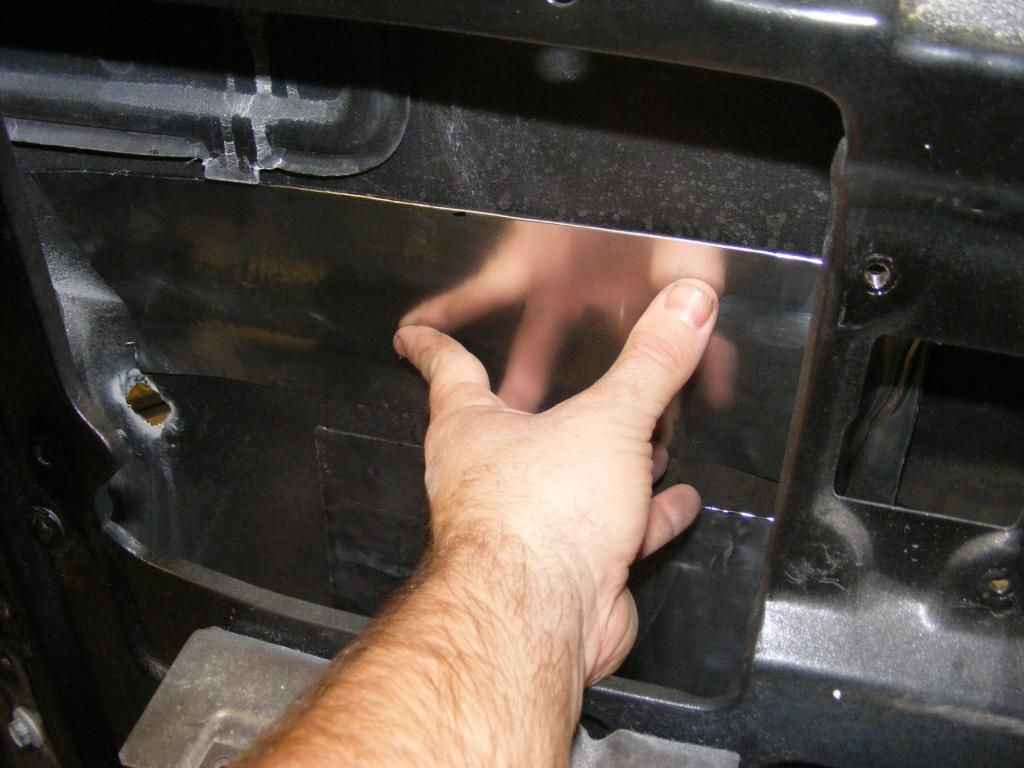 done 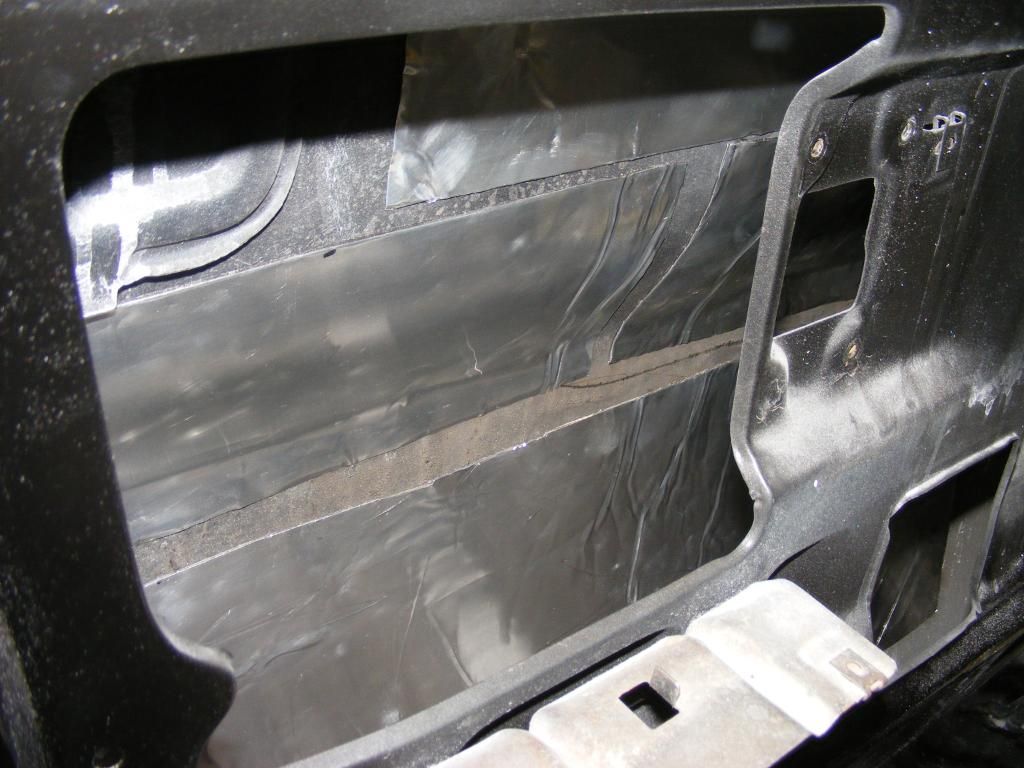 Obviously I couldn't reach everywhere on the panel. not getting 100% coverage. but what I did do was cover roughly 60%. By cutting it into several different pieces I essential cover more area than one full sheet. The main goal is to knock down vibration and Resonance. The door does not have that hollow tinny sound it once did. By using only one sheet You use less martial and therefore the end cost to do a whole truck would be less. There is defiantly a difference in the sound between before and after. Check out the video below and at the end you can hear the difference. Once I get my windows and handles back I will cover the out side of the inside behind the door panel. if that makes sense. https://www.youtube.com/watch?featur...&v=9VWcDhvYJv0 |
|
|
|
|
12-09-2012, 10:42 AM
|
#236 |
|
Registered User
 Join Date: May 2007
Location: Deale Md
Posts: 4,663
|
Re: Build #2 Crusader!
Major props on the body & paint , that's a big ole truck to under take, glad to see you are still going strong on the build well it is for the wife so I'm sure that helps in keeping the fire lit.
__________________
James 63 GMC V6 4speed carryall 65 chevy swb bbw V8 auto 68 K20 327/4 speed, buddy buckets 2002 GMC CC Dually Duramax 64 GMC lwb 3/4 V6 4speed SOLD 66 GMC swb bbw buddy buckets SOLD IG duallyjams The only thing that stays the same is constant change! |
|
|
|
|
12-10-2012, 01:01 PM
|
#237 |
|
Registered User
Join Date: May 2011
Location: Fort Worth, Texas
Posts: 468
|
Re: Build #2 Crusader!
Thanks for showing us all how to do it!
I'm so glad for you that your legs grew back!
|
|
|
|
|
12-18-2012, 06:06 PM
|
#238 |
|
Registered User
Join Date: Aug 2012
Location: Northeast KS
Posts: 1,775
|
Re: Build #2 Crusader!
all i can say is wow! gives me the extra push i need to tackle the paint on my k5 this spring.
__________________
1999 GMC Suburban K2500 SLT, 454/4L80E 1991 Z/28, 6.0L/T56 1949 GMC 250, S10 Frame, 6.0L/4L80E Instagram @aceshighspeedshop |
|
|
|
|
12-19-2012, 09:21 AM
|
#239 | |
|
Account Suspended
Join Date: Aug 2007
Location: USA
Posts: 1,223
|
Re: Build #2 Crusader!
Quote:
|
|
|
|
|
|
12-19-2012, 09:41 AM
|
#240 |
|
Account Suspended
Join Date: Aug 2007
Location: USA
Posts: 1,223
|
Re: Build #2 Crusader!
Iv had this extra air filter kicking around the shop and decide i take a little break from putting wiring and and window installation so I Spent a little time making a dual snorkel air filter.
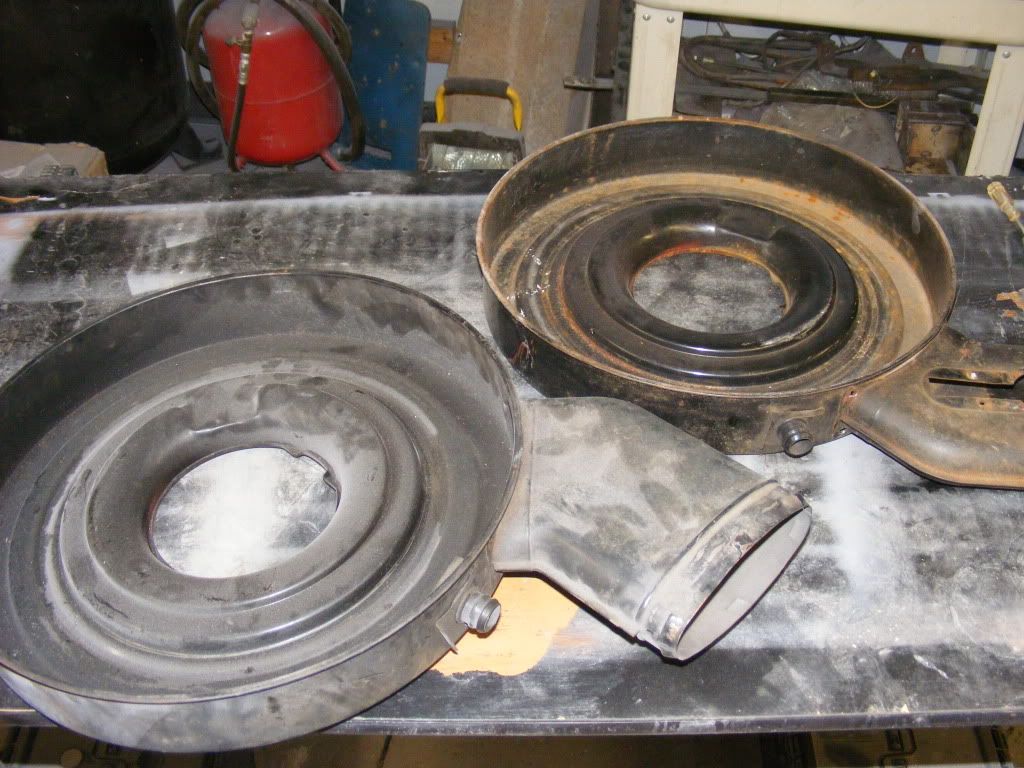 Drilled out the spot welds and removed the inlet from the doner 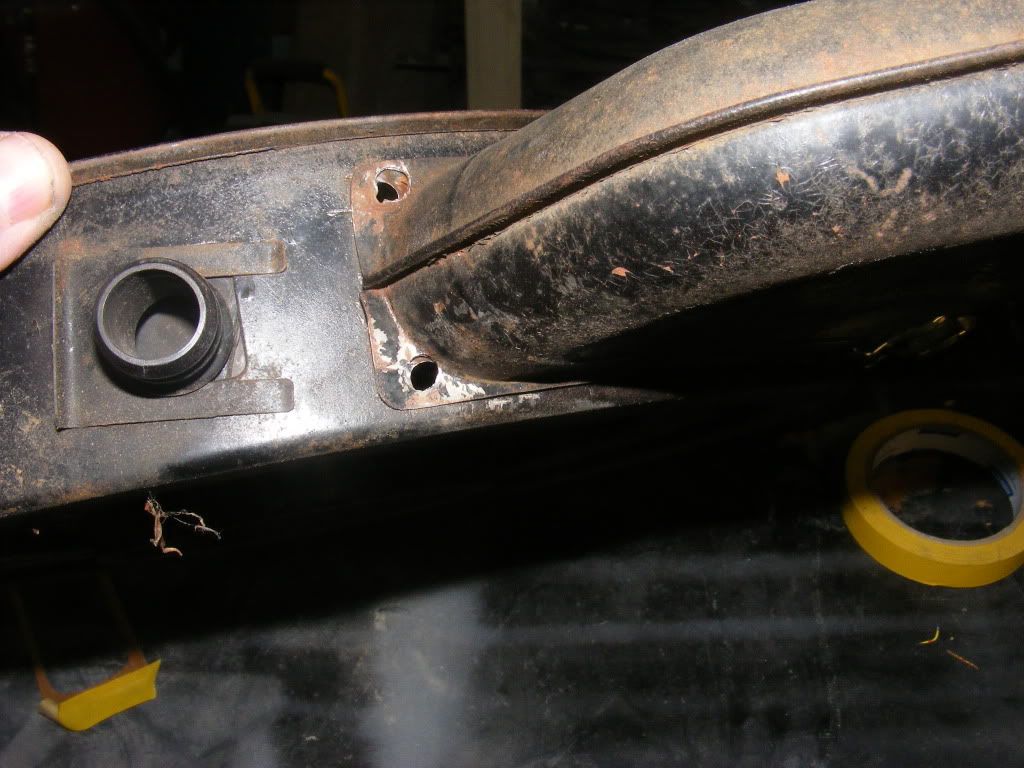 made a template and marked the housing for the air inlet  cut out the opening 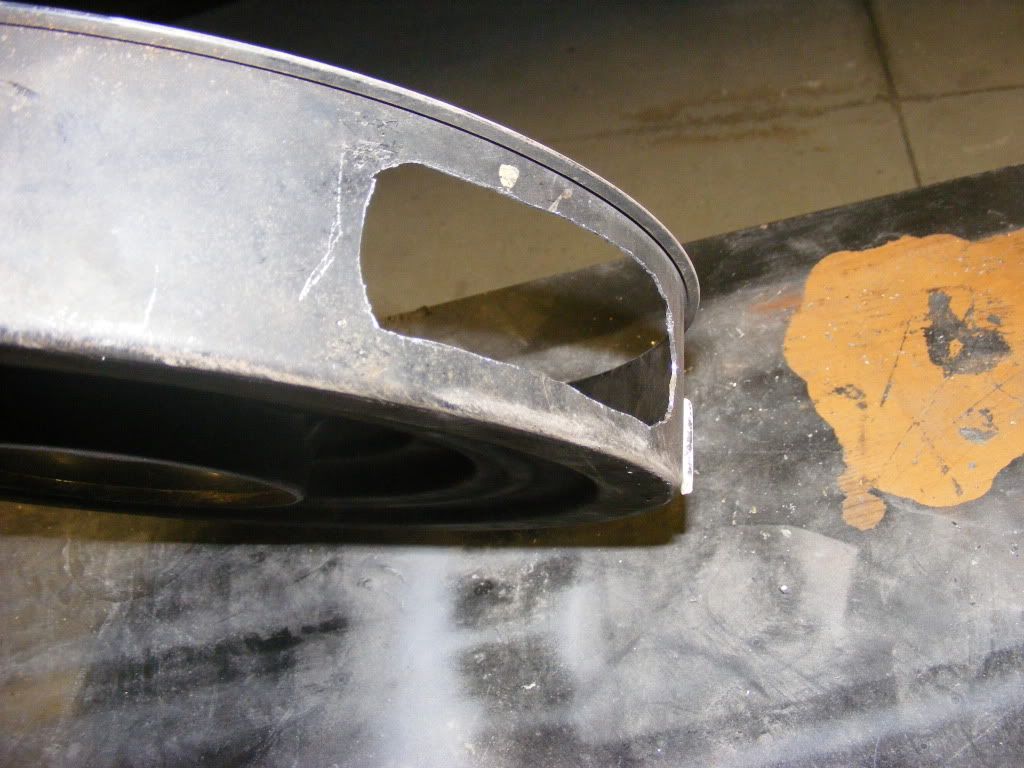 blasted both pieces to remove old paint so I could spot welded them together 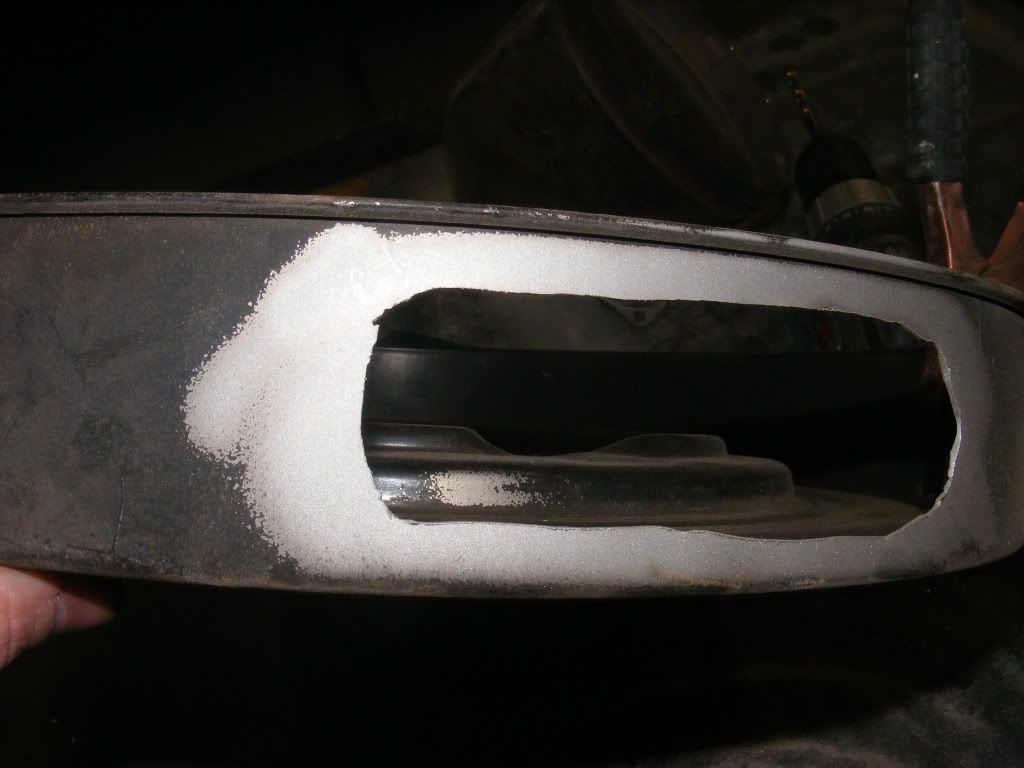 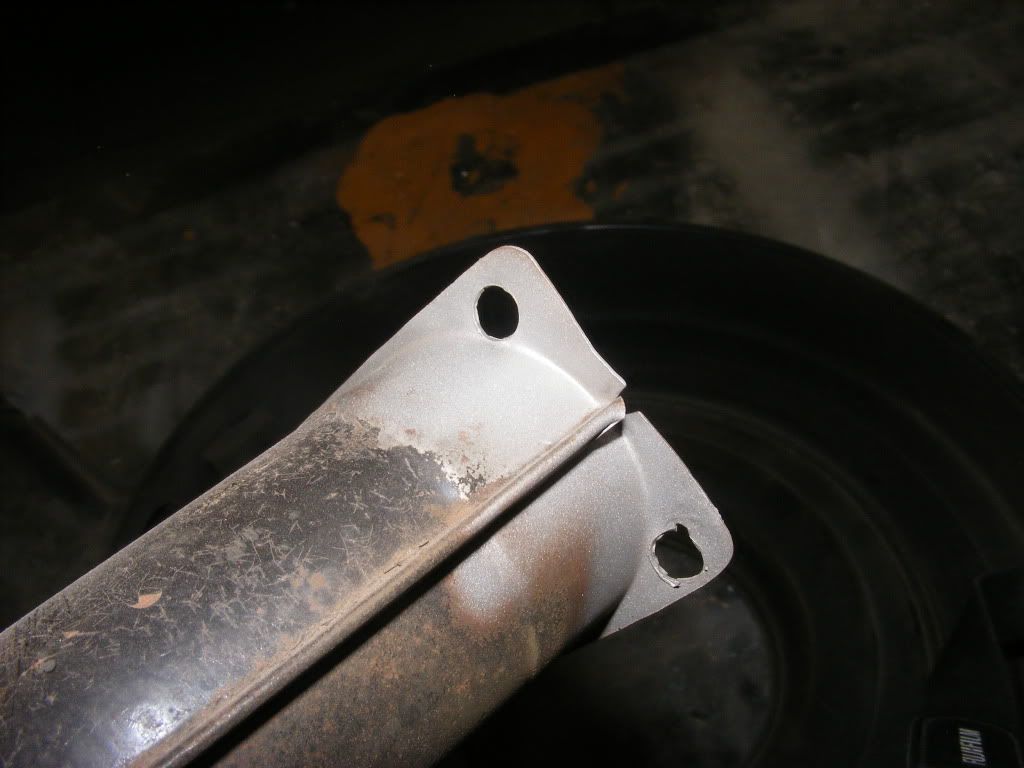 I removed the flap & the pre-heater inlet from the bottom of the doner inlet tube which left a hole. Then I blasted the whole thing getting ready for some fresh paint. 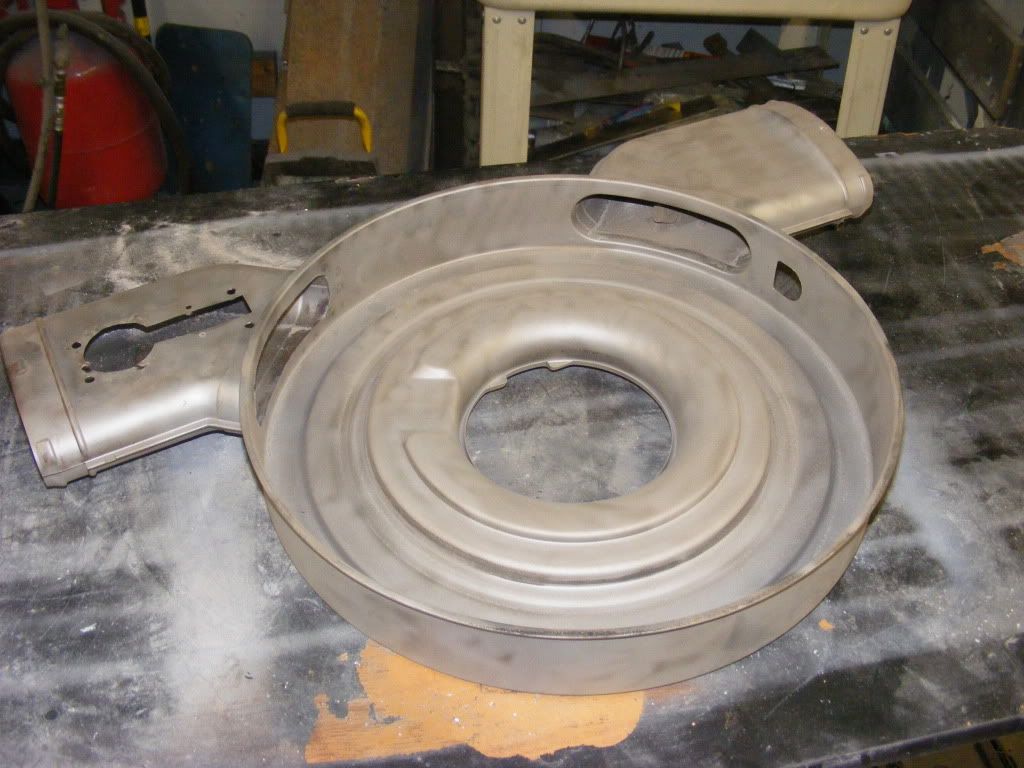 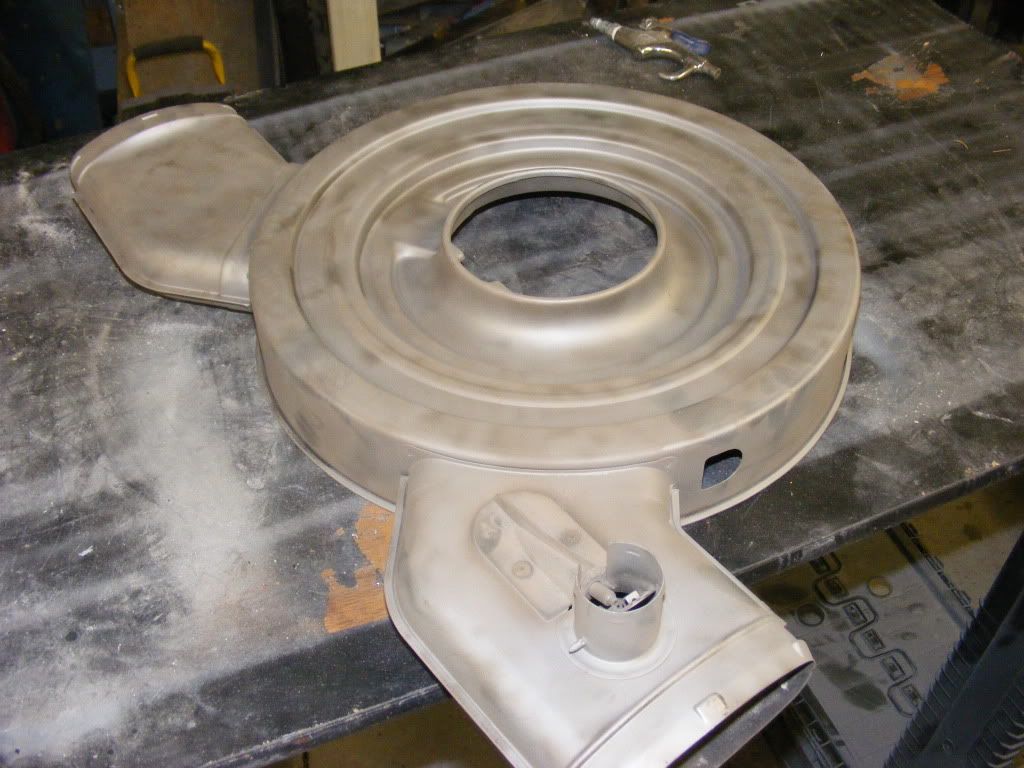 I painted it a semigloss black and made a plate to cover the hole. I used a piece of aluminum and some nice allen head bolts. I figured it would look nice with some sorta emblem or something there. I did find a old Fuel injection emblem and I just stuck it on to see what it looks like. Im thinking a nice 5.7L emblem would look cool 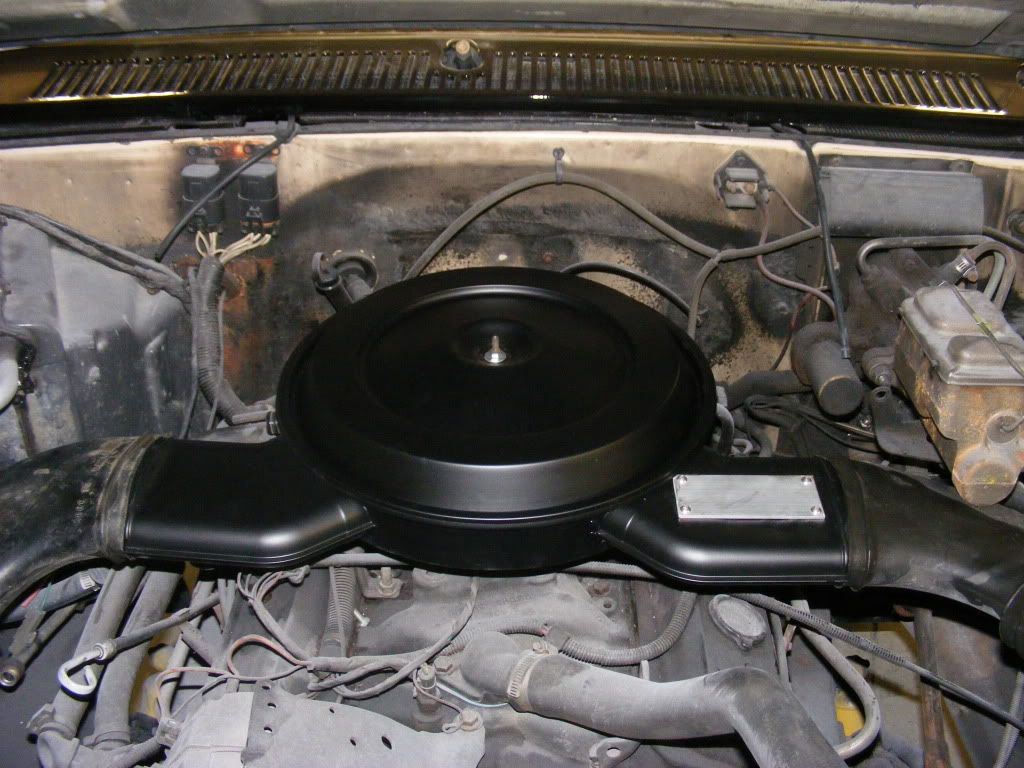 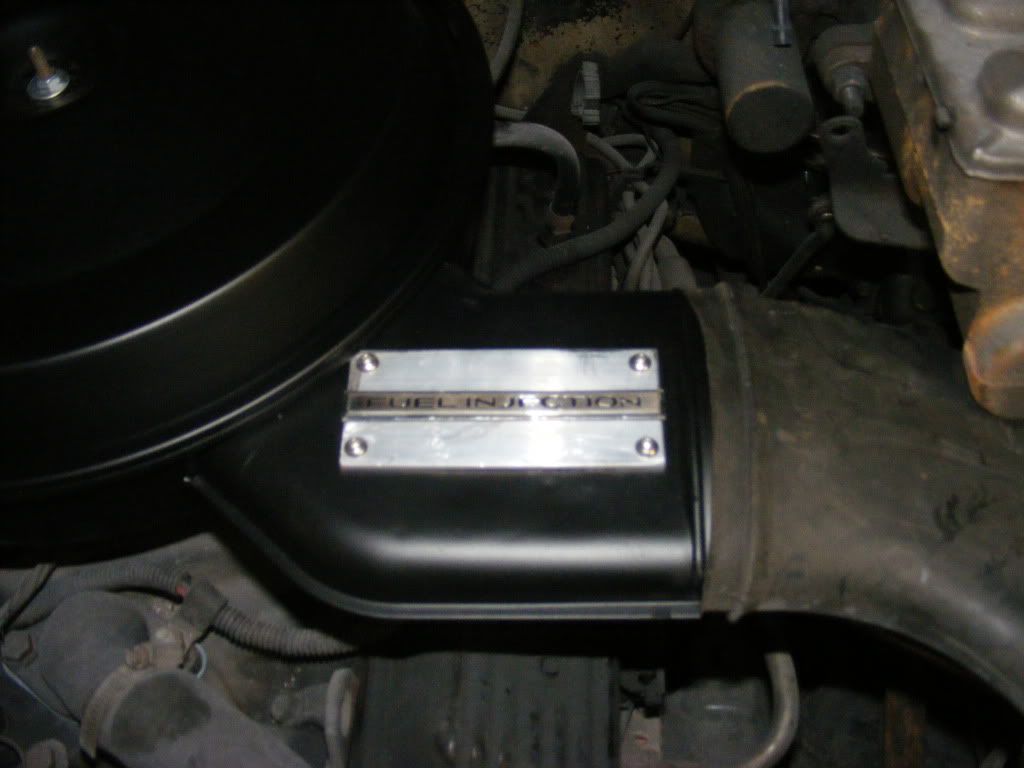 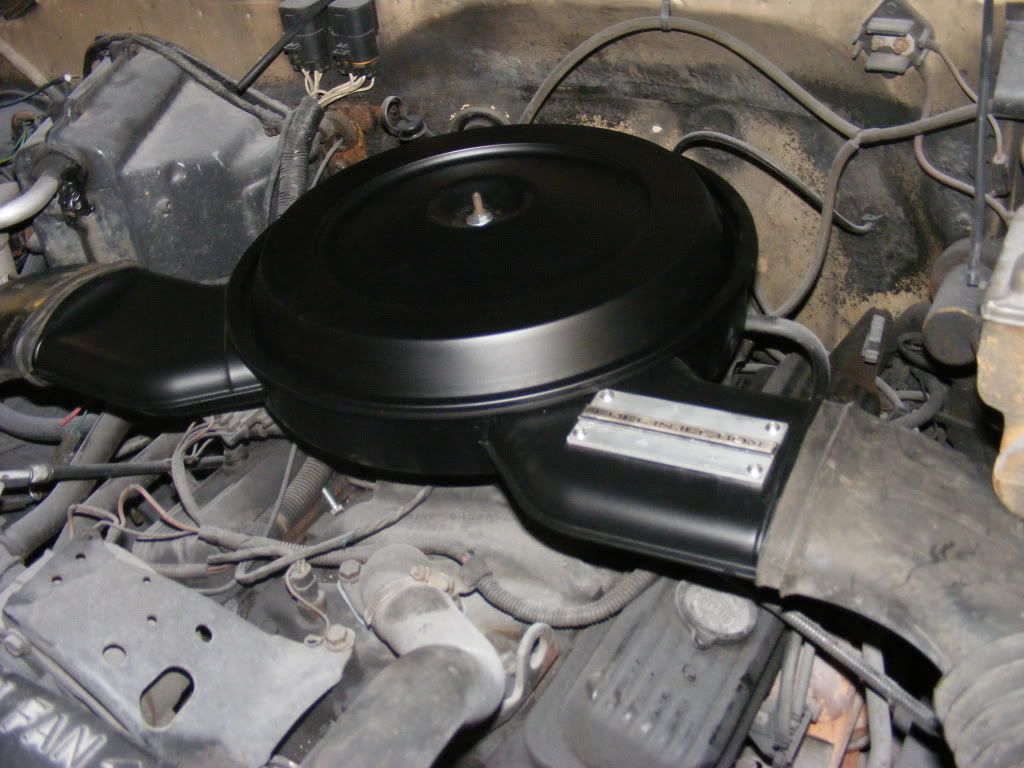 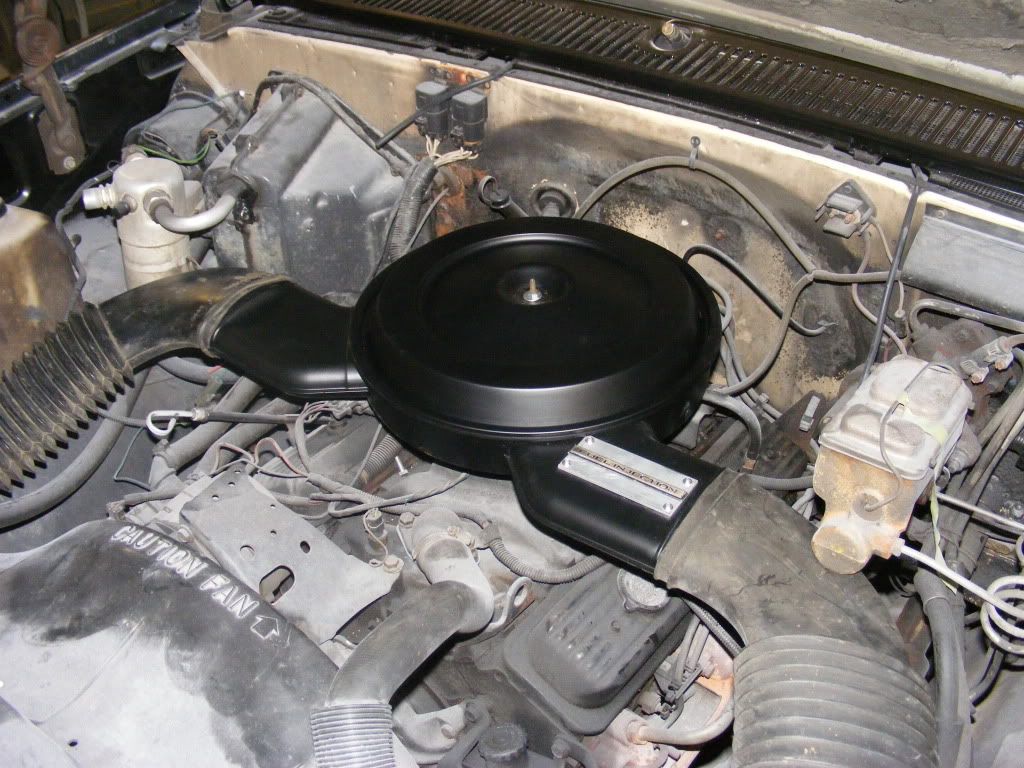 now to get the rest of the engine to look that good |
|
|
|
|
12-19-2012, 09:38 PM
|
#241 |
|
Senior Member
 Join Date: Jun 2011
Location: Washburn, IA
Posts: 600
|
Re: Build #2 Crusader!
Looks factory. I like it
|
|
|
|
|
12-21-2012, 01:43 AM
|
#242 |
|
Registered User
Join Date: Aug 2012
Location: Tennessee
Posts: 49
|
Re: Build #2 Crusader!
 drool. that paint... it's so shiny lol. That air cleaner looks awesome too. drool. that paint... it's so shiny lol. That air cleaner looks awesome too.
__________________
 Money<Time+Trucks |
|
|
|
|
12-21-2012, 01:03 PM
|
#243 |
|
Registered User
Join Date: May 2011
Location: Fort Worth, Texas
Posts: 468
|
Mike, the air filter looks so trick, only a skilled eye would know it didn't come that way from GM.
Which it should have! You rock! |
|
|
|
|
12-31-2012, 06:16 PM
|
#244 |
|
Account Suspended
Join Date: Aug 2007
Location: USA
Posts: 1,223
|
Re: Build #2 Crusader!
Iv starting a lot a little things on the truck, but nothing seams to be getting completed. As soon as I start something, I either have to stop Because I had to order something that I didnt know I needed or worse Had it, but now cant find it. (case in point: The drivers side window regulator. How in the hell do you lose one big ass window regulator). Well when this happens I move on to something else and the process starts all over again. pretty soon you end up with a lot of little project that arent getting done. I suppose it will all come together at one point. Anyway I did recolored the interior trim over the weekend, I even got deb out in the garage to help. As I mentioned in a earlier post that we spent some time gathering a bunch of interior trim pieces from several different trucks. As you can see in the pics we had some white, tan, and red pieces. Using SEM products. We followed their steps and it really turned out nice. they look like they came from the factory this way and it seams to be fairly durable.
First step was to scrub with their SEM soap. Then clean with plastic prep. Then spay each piece down with their "sand Free" Then while the "sand Free is still wet spray on the color. 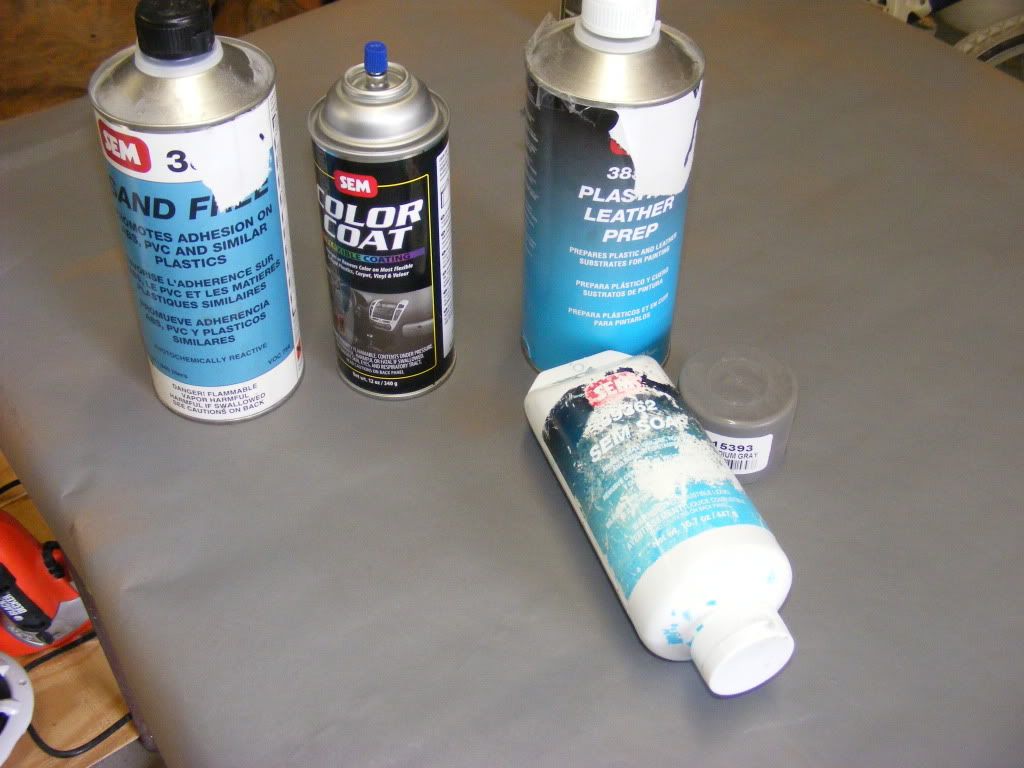 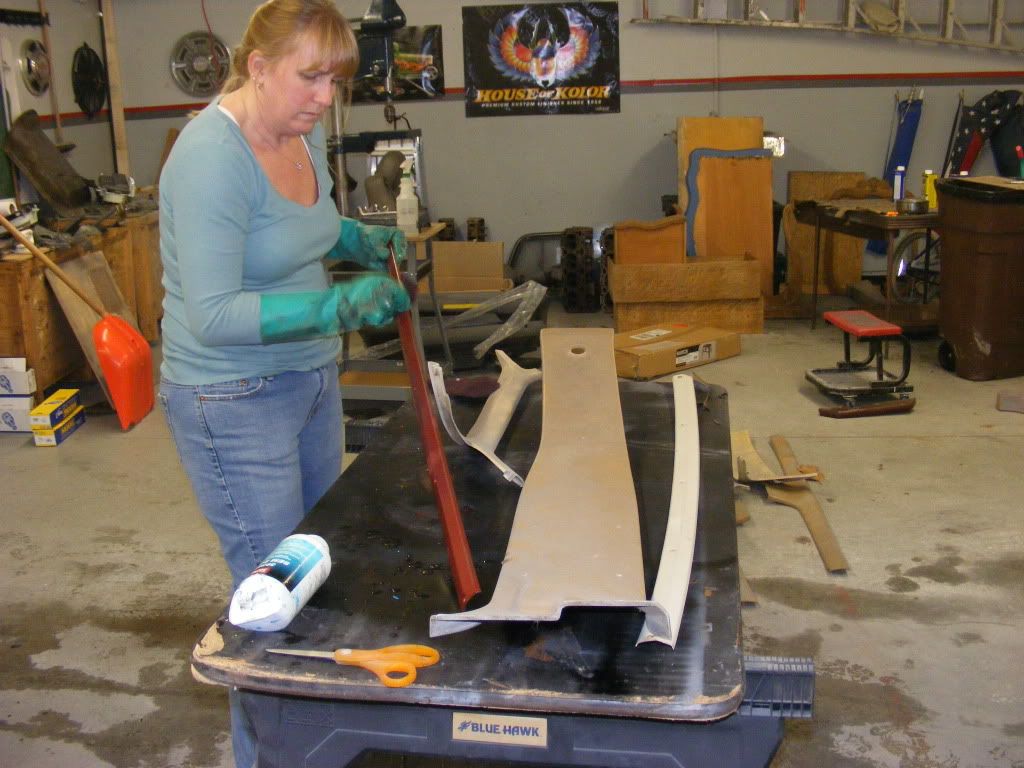  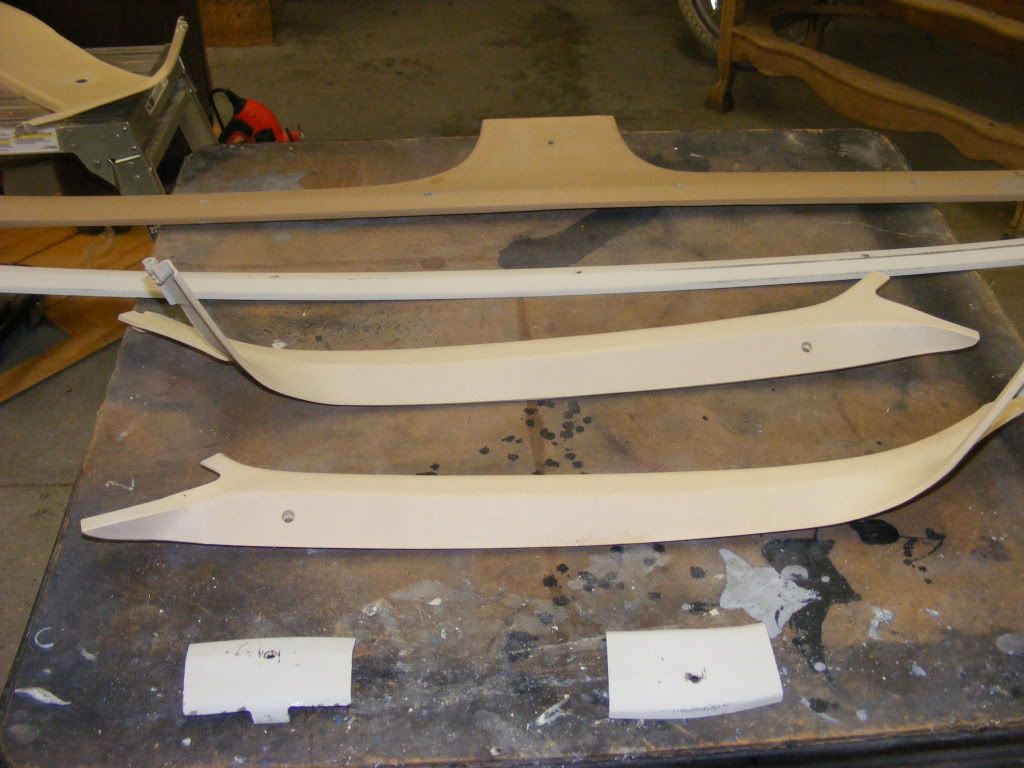 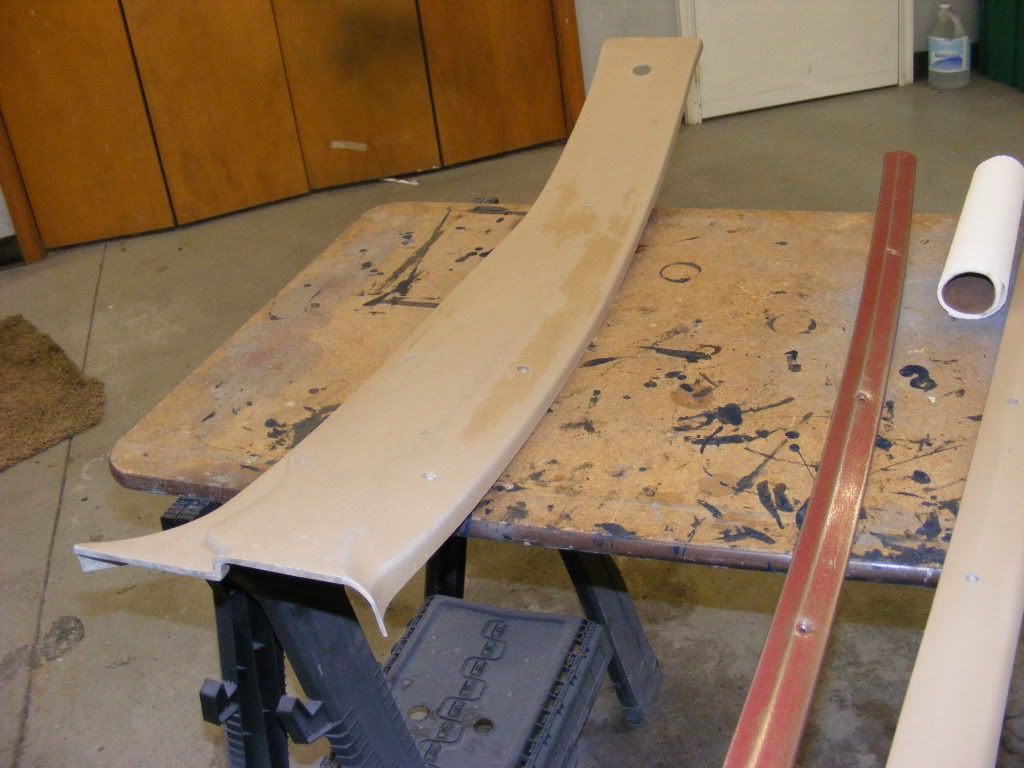  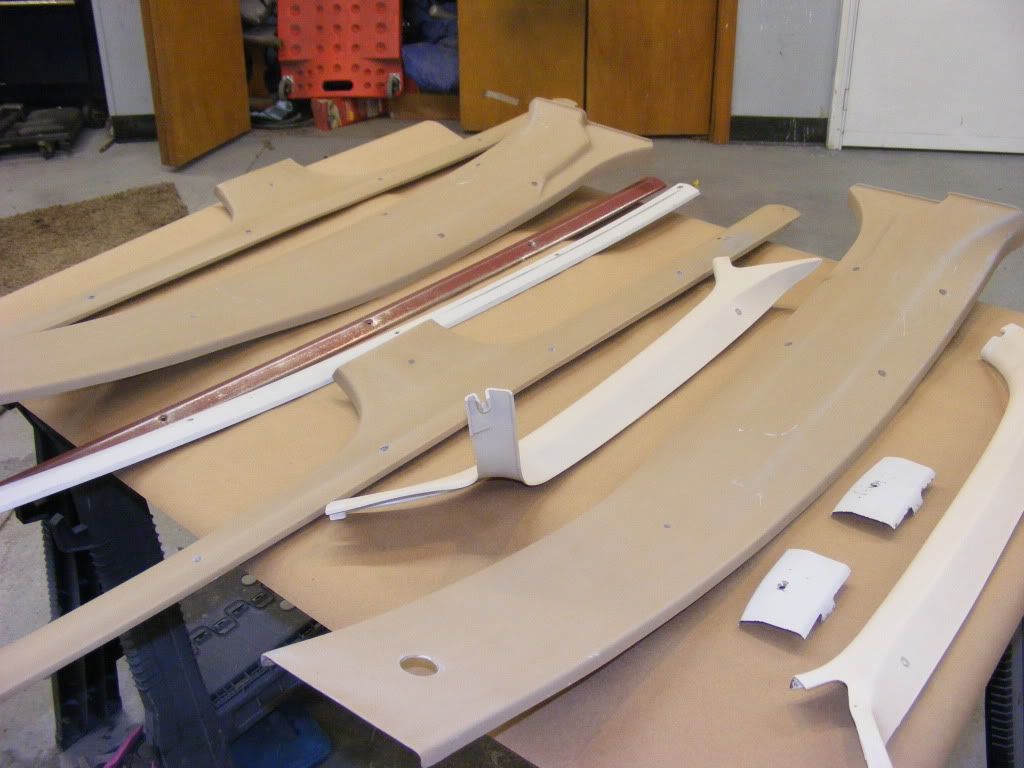  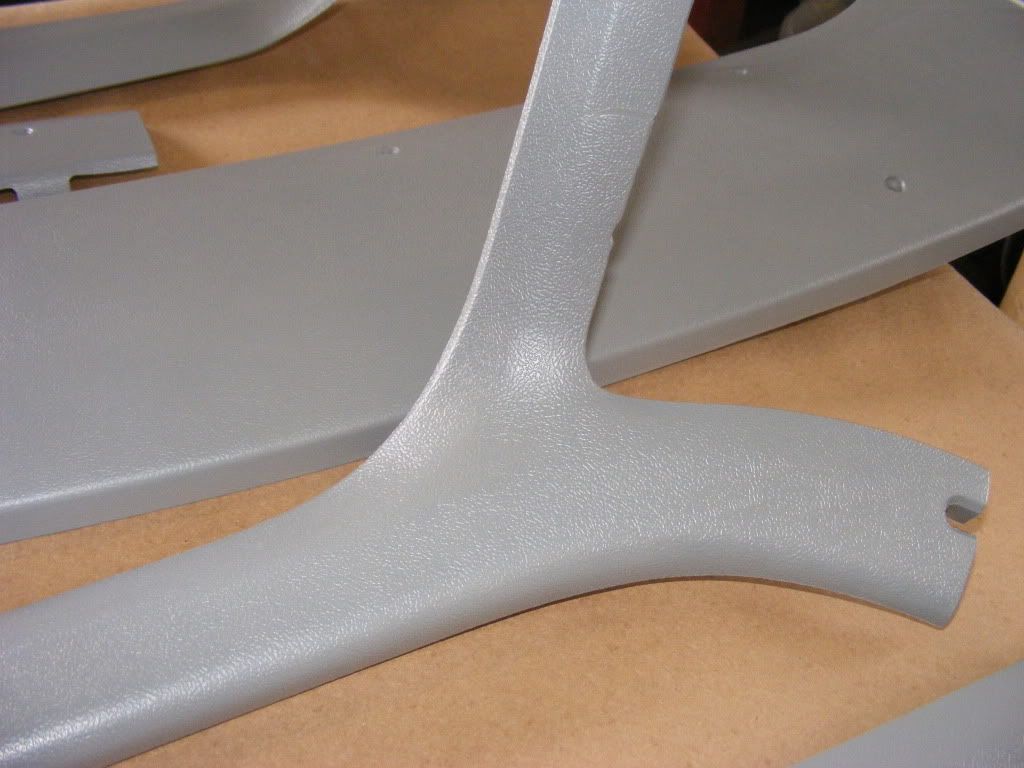 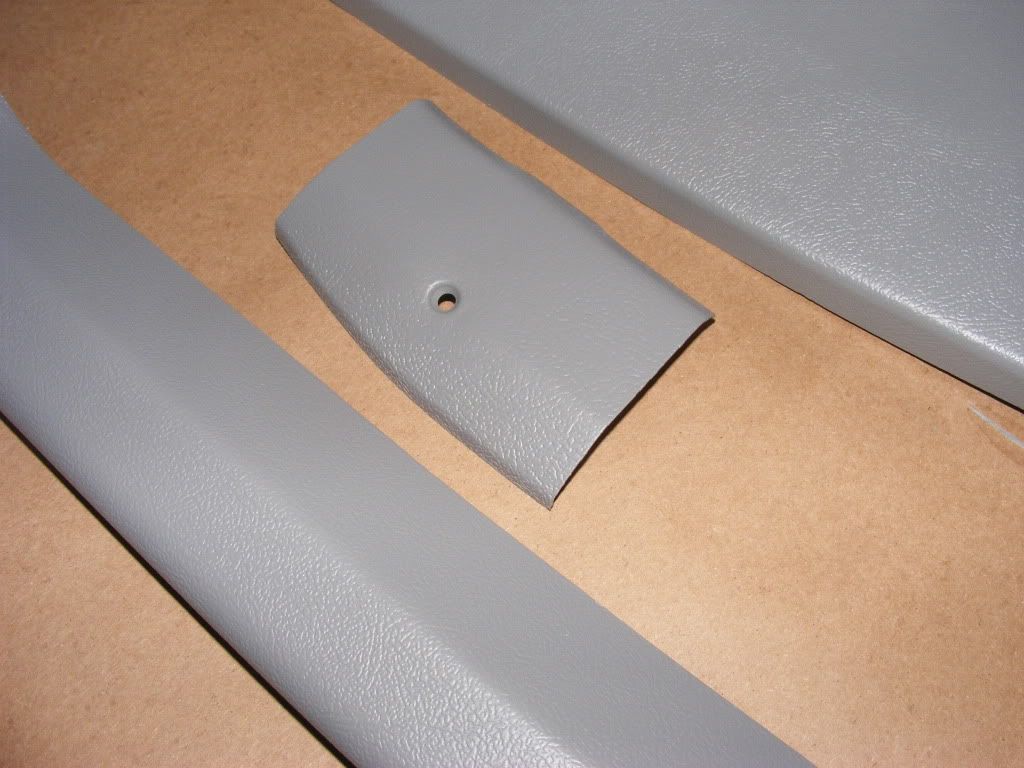 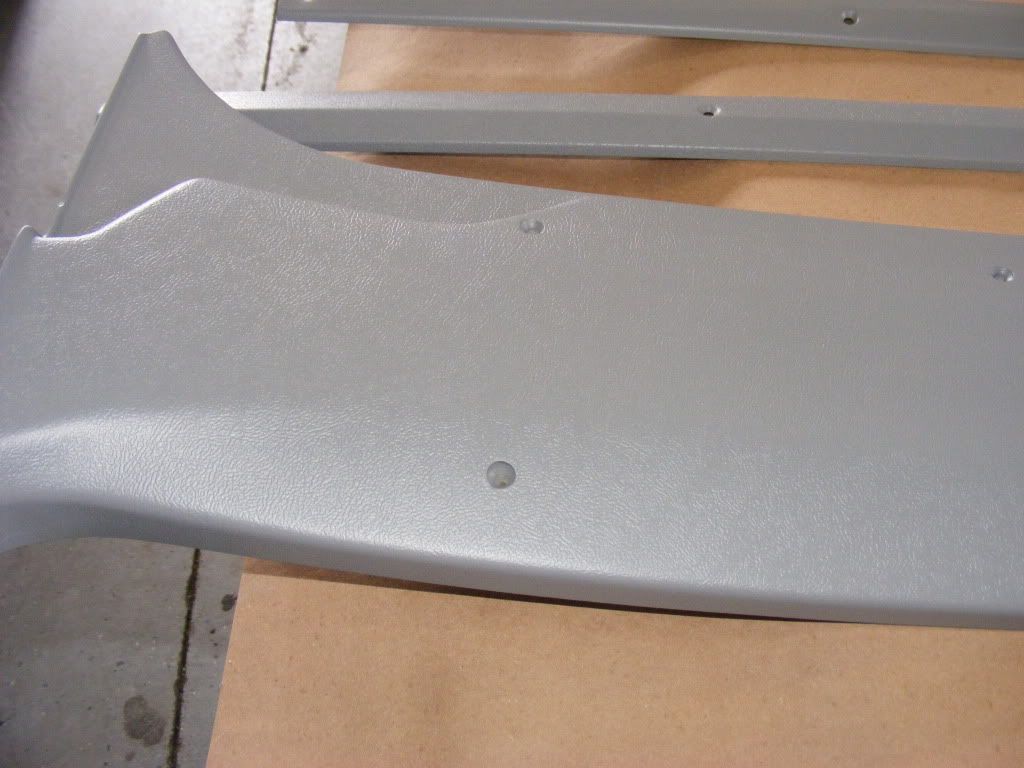   This is how it matches with the gray seat and carpet. They actually look closer then the picture shows. door panels are next. |
|
|
|
|
01-01-2013, 01:53 AM
|
#245 |
|
Registered User
Join Date: Jan 2010
Location: Brandon, Manitoba, Canada
Posts: 782
|
Re: Build #2 Crusader!
nice.....
I used that (except I sprayed mine from an HVLP gun) on my 98 to change to black interior, was also very happy with the results but I used dish soap, and wax/grease remover and scrubbed the parts at least 3 times with a coarse brush. Cannot say enuf about make sure things are clean! I also scuffed my parts with a scotch brite before washing just to be sure adhesion was optimal. Nice work...I have to do the exact same thing to my crews very shortly. One is going tan and other is going grey.
__________________
1967 K30 4x4/12v Cummins/getrag/D60/D70/355s 1967 GMC suburban 4x4/LS swap 5.3/4500/205/10 bolt/14 bolt full floater 1963 C10 reg cab long box 1970 Chevelle 1968 Biscayne 2dr post "...there is no excuse for what I am about to do, but dangit....it's gonna be fun!" |
|
|
|
|
01-01-2013, 03:03 PM
|
#246 |
|
Formerly- 1972SuperCheyenne
Join Date: Oct 2008
Location: Wake Forest NC
Posts: 5,782
|
Re: Build #2 Crusader!
WOW!! Great work.
__________________
--Josh My Build Thread:http://67-72chevytrucks.com/vboard/s...d.php?t=799218 A good crossthread is better than Loctite any day. Life is not about what you have, but who you have to share it with. |
|
|
|
|
01-01-2013, 04:14 PM
|
#247 |
|
Registered User
Join Date: Mar 2011
Location: US
Posts: 82
|
Re: Build #2 Crusader!
Where can i get these spi products please?
|
|
|
|
|
01-01-2013, 05:50 PM
|
#248 | |
|
Account Suspended
Join Date: Aug 2007
Location: USA
Posts: 1,223
|
Re: Build #2 Crusader!
Quote:
|
|
|
|
|
|
01-01-2013, 07:15 PM
|
#249 |
|
Senior Member
Join Date: Jun 2011
Location: Washburn, IA
Posts: 600
|
Re: Build #2 Crusader!
Looks good. I always used Sherwin's interior dye it seems to be closer to the original at least for the dark grays ive done.
|
|
|
|
|
01-03-2013, 02:50 PM
|
#250 |
|
Account Suspended
Join Date: Aug 2007
Location: USA
Posts: 1,223
|
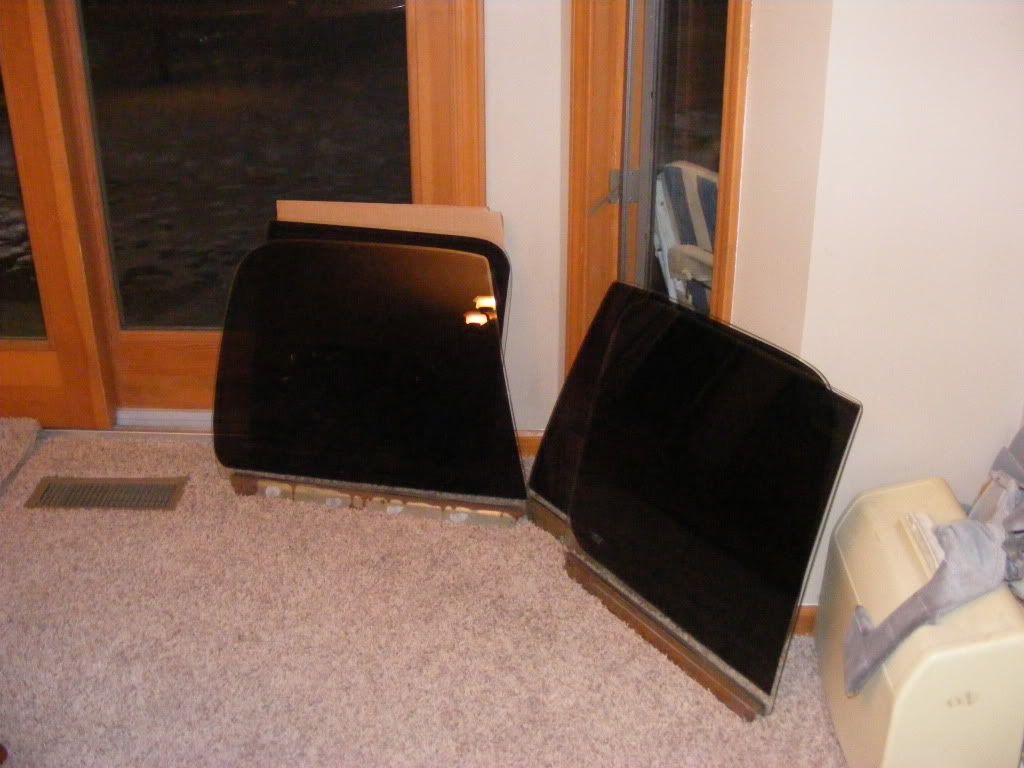
Re: Build #2 Crusader!
Got the windows tinted and the the wing vents back together with new rubber.
 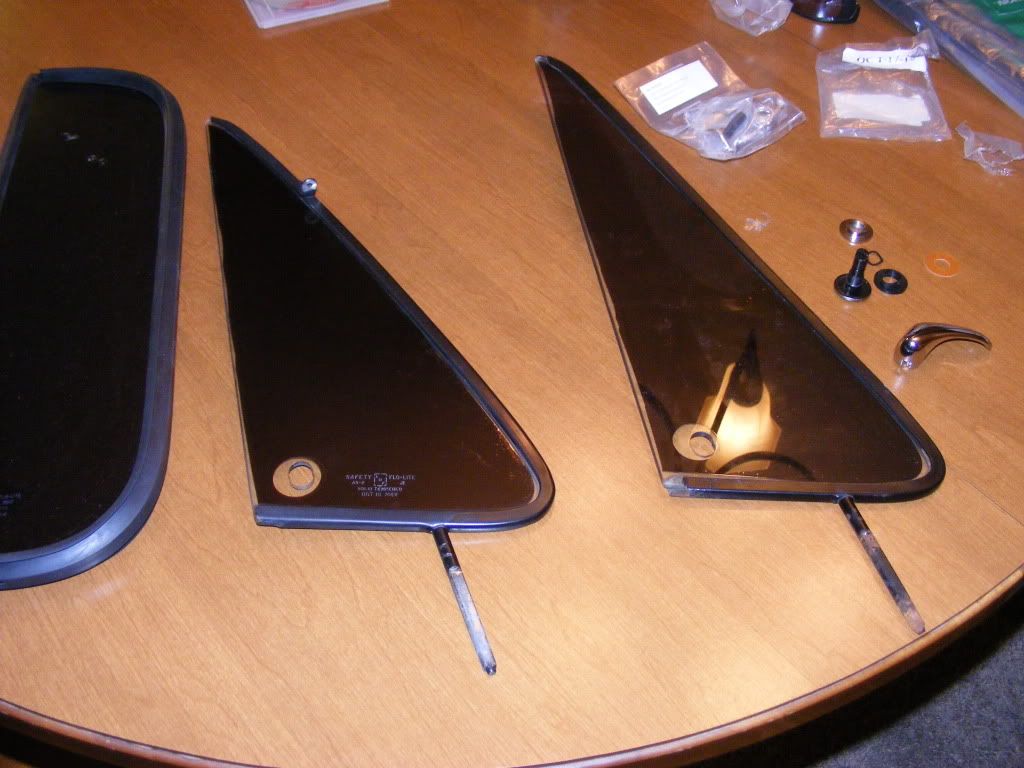 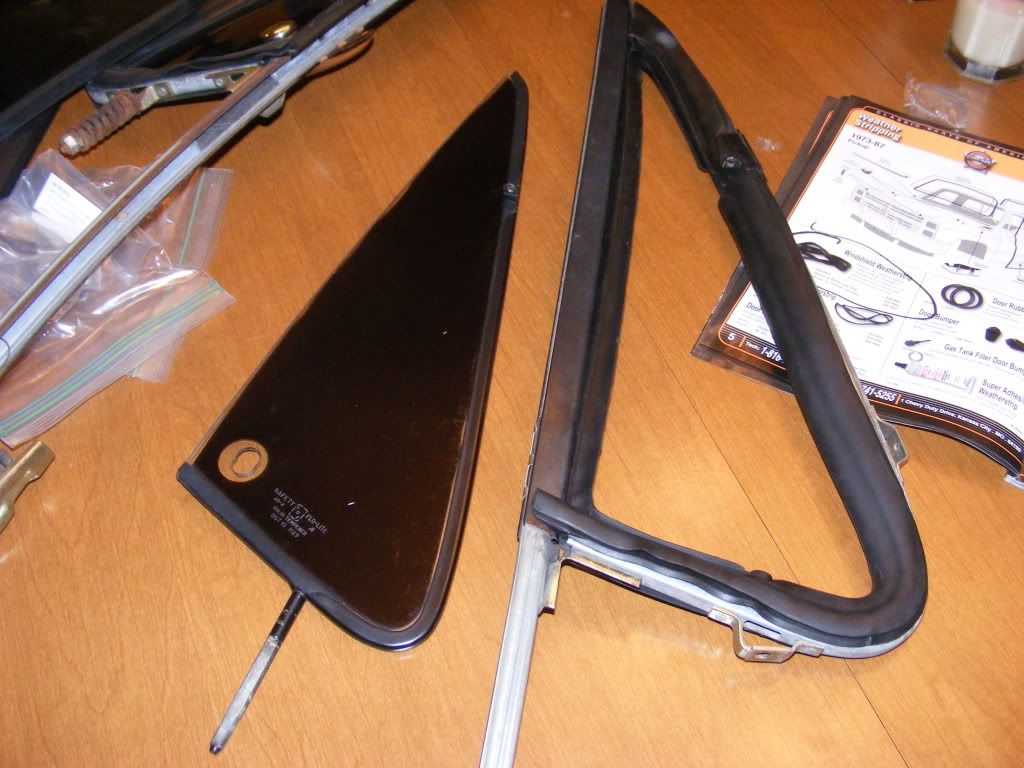 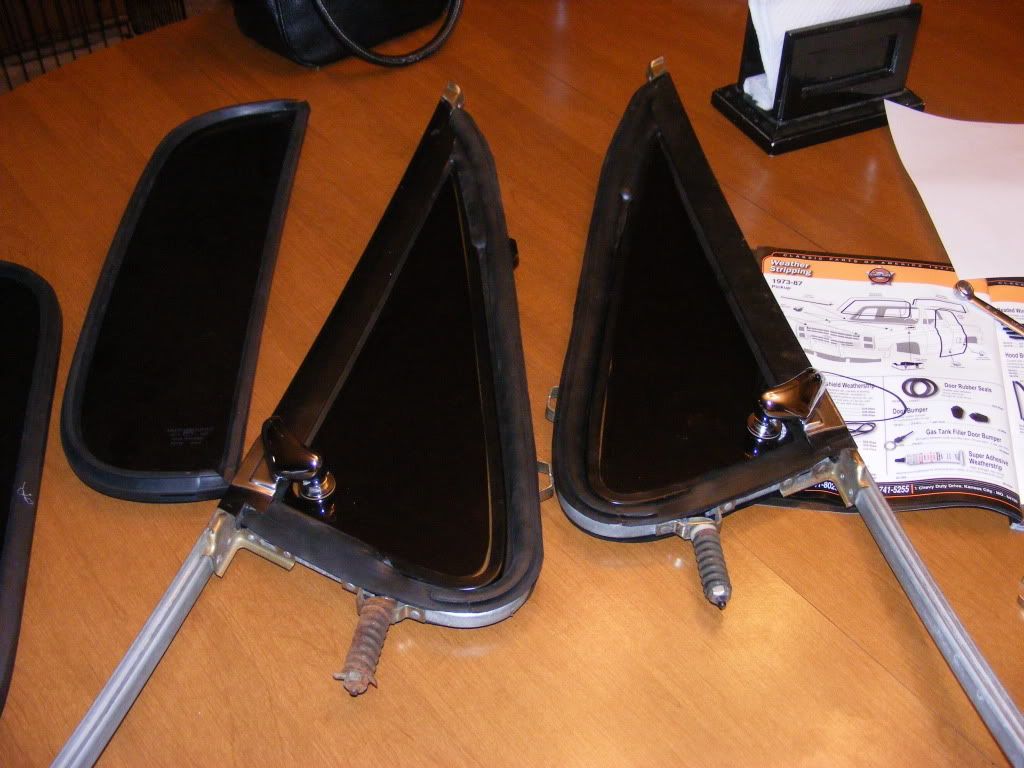 hopefully I can get them all in today |
|
|
|
 |
| Bookmarks |
| Tags |
| black, disc, paint, seats, shortbed |
|
|


 Linear Mode

