
|
 03-14-2019, 08:49 PM
|
#201 |
|
Senior Member
 Join Date: May 2007
Location: Doodah Kansas
Posts: 7,747
|
Re: Wife's 48
man sorry to hear that! feel better soon!
__________________
the mass of men live lives of quiet desperation if there is a problem, I can have it. new project WAYNE http://67-72chevytrucks.com/vboard/s...d.php?t=844393 |

|

|
|
04-01-2019, 04:38 PM
|
#202 |
|
Senior Member
 Join Date: Sep 2017
Location: Bryan, Texas
Posts: 2,275
|
Re: Wife's 48
Surgery went well, but the 6-8 weeks of NO WEIGHT on the foot is getting OLD!
I go out to the shop and touch stuff, but I can't work on anything yet. So nothing to report on "progress" on the truck. However, I do have news to report. My buddy decided he could not swing the 48, so once again I have 2 trucks to build. I don't have room to work on both, so I think that since the 48 cab is sitting on the frame, I'll set the 54 aside and work on the 48 again. When I can go back to work that is.
__________________
8man-aka Robert 1948 on a S10 Frame, small block with a carb 1954 Cab, 53 Front and Bed, 50 Doors, S10 Frame, Power TBD Build thread: "]http://67-72chevytrucks.com/vboard/showthread.php?t=746899&highlight=wife%27s+48[/URL] [/URL]http://67-72chevytrucks.com/vboard/showthread.php?t=840204 |
|
|
|
|
04-01-2019, 07:10 PM
|
#203 |
|
Senior Member
Join Date: Mar 2011
Location: West Plains, Missouri
Posts: 7,553
|
Re: Wife's 48
Take care, and get better soon...Jim
__________________
my build thread: http://67-72chevytrucks.com/vboard/s...d.php?t=459839 Jimbo's long bed step build:http://67-72chevytrucks.com/vboard/s...t=464626<br /> |
|
|
|
|
04-23-2019, 04:37 PM
|
#204 |
|
Senior Member
Join Date: Sep 2017
Location: Bryan, Texas
Posts: 2,275
|
Re: Wife's 48
Not much to report, other than a severe case of cabin fever!
I've been studying all the things I need to do on the 48, as I want to get it done first as it is further along. The 54 has taken a back burner in my planning. I was looking at parts and pieces today and I found a piece of the cab windlace channel I had cut off the bad cab. I saw a tool on here that someone made to repair the channel to make it easier to get the rubber in when ready. Since I have a tall stool at the work bench, a vice, a hacksaw and a file handy I thought it would be a good time to build that tool. I found a piece of flat bar off of something under the workbench just staring at me. 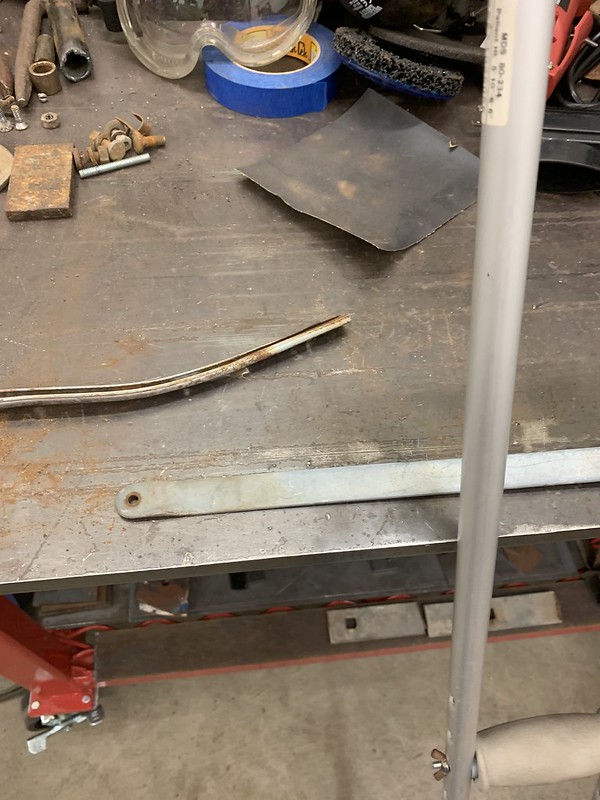 IMG_0023 by Robert Moorman, on Flickr IMG_0023 by Robert Moorman, on FlickrThe piece of the channel I had cut from the bad cab is behind it. So with my trusty hacksaw and file I cut some grooves in a short piece of the flat bar. I drilled the hole a little larger, and found a bolt to use as a handle.  IMG_0024 by Robert Moorman, on Flickr IMG_0024 by Robert Moorman, on FlickrThen I took my piece of channel and my new tool and it works.  IMG_0025 by Robert Moorman, on Flickr IMG_0025 by Robert Moorman, on FlickrI think I can do the drivers side as it is all still welded in place, but I'll have to cut a piece out of the rider's side to do the kick panel replacement, and I don't know if I can save it, but with the tool, I'm hopeful. Then I was caught in the shop and told to come inside. 1 1/2 more weeks on the crutches with no more than 35 lbs on the foot. Then I'll still have the boot for another 2 weeks, but maybe I can do a little more.
__________________
8man-aka Robert 1948 on a S10 Frame, small block with a carb 1954 Cab, 53 Front and Bed, 50 Doors, S10 Frame, Power TBD Build thread: "]http://67-72chevytrucks.com/vboard/showthread.php?t=746899&highlight=wife%27s+48[/URL] [/URL]http://67-72chevytrucks.com/vboard/showthread.php?t=840204 |
|
|
|
|
04-23-2019, 07:21 PM
|
#205 | |
|
Senior Member
Join Date: Mar 2011
Location: West Plains, Missouri
Posts: 7,553
|
Re: Wife's 48
Quote:
 . Hang in there...Jim . Hang in there...Jim
__________________
my build thread: http://67-72chevytrucks.com/vboard/s...d.php?t=459839 Jimbo's long bed step build:http://67-72chevytrucks.com/vboard/s...t=464626<br /> |
|
|
|
|
|
04-25-2019, 02:32 PM
|
#206 | |
|
Senior Member
Join Date: May 2007
Location: Doodah Kansas
Posts: 7,747
|
Re: Wife's 48
Quote:
busted! 
__________________
the mass of men live lives of quiet desperation if there is a problem, I can have it. new project WAYNE http://67-72chevytrucks.com/vboard/s...d.php?t=844393 |
|
|
|
|
|
04-25-2019, 09:19 PM
|
#208 |
|
Senior Member
Join Date: Sep 2017
Location: Bryan, Texas
Posts: 2,275
|
Re: Wife's 48
I snuck out and in less than 30 minutes it was all straightened out. Pretty cool.
__________________
8man-aka Robert 1948 on a S10 Frame, small block with a carb 1954 Cab, 53 Front and Bed, 50 Doors, S10 Frame, Power TBD Build thread: "]http://67-72chevytrucks.com/vboard/showthread.php?t=746899&highlight=wife%27s+48[/URL] [/URL]http://67-72chevytrucks.com/vboard/showthread.php?t=840204 |
|
|
|
|
05-01-2019, 02:50 PM
|
#209 |
|
Senior Member
Join Date: Sep 2017
Location: Bryan, Texas
Posts: 2,275
|
Re: Wife's 48
I was able to get out in the shop again this morning. I've had the stainless trim that goes around the 54 windshield for a while, but I can NOT find the clips that go where the ends come together.
I knew I had some left over stainless trim from the Jeep build, 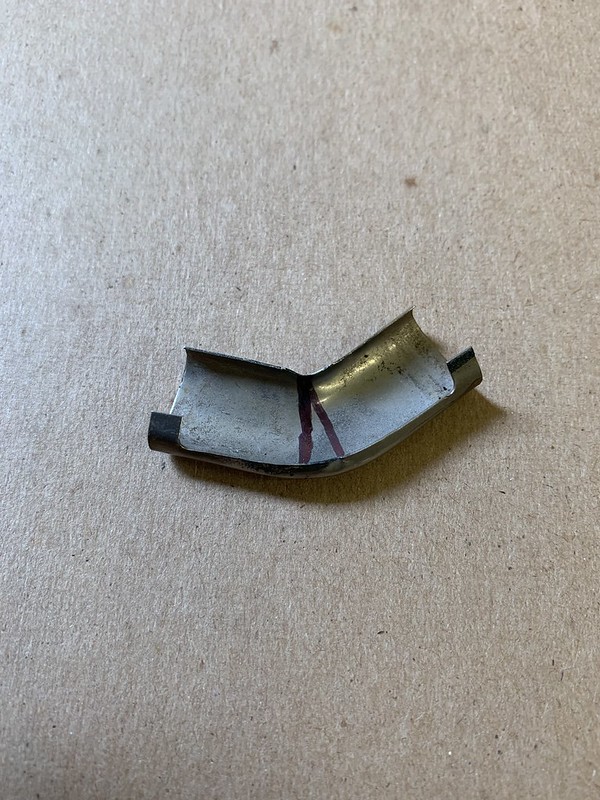 IMG_0027 by Robert Moorman, on Flickr IMG_0027 by Robert Moorman, on Flickrso I cut it into two pieces, trimmed it up and worked on it with a small hammer and a pair of needle nose pliers to "roll" the edge on. 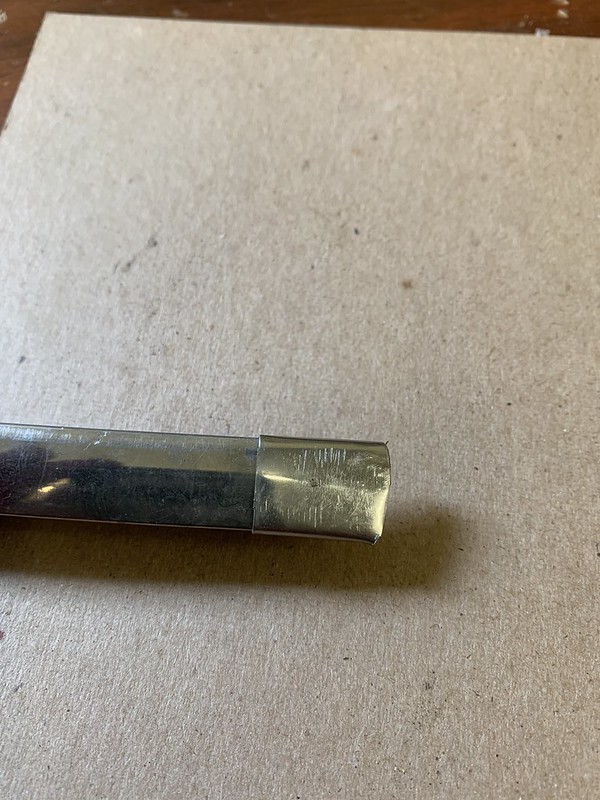 IMG_0028 by Robert Moorman, on Flickr IMG_0028 by Robert Moorman, on FlickrI have some more work to do on it, like smoothing up the edges, working on the width a little and then polishing all the stainless, but I think these will work.
__________________
8man-aka Robert 1948 on a S10 Frame, small block with a carb 1954 Cab, 53 Front and Bed, 50 Doors, S10 Frame, Power TBD Build thread: "]http://67-72chevytrucks.com/vboard/showthread.php?t=746899&highlight=wife%27s+48[/URL] [/URL]http://67-72chevytrucks.com/vboard/showthread.php?t=840204 |
|
|
|
|
05-01-2019, 10:48 PM
|
#210 | |
|
Senior Member
  Join Date: Nov 2008
Location: Glendora, CA
Posts: 6,331
|
Re: Wife's 48
Quote:

__________________
'55 Big Window Shortbed, Drive-It-&-Work-On-It slid down the "slippery slope" to a Frame-Off Rodstoration! LQ4/4l85e/C4 IFS/Mustang 8.8 rearend w/3.73's Dan's '55 Big Window "Build" - Well, Kinda! |
|
|
|
|
|
05-04-2019, 04:43 PM
|
#211 |
|
Senior Member
Join Date: Sep 2017
Location: Bryan, Texas
Posts: 2,275
|
Re: Wife's 48
Ok, walking without crutches for the first time in 8 weeks is a lot better than with crutches, but I still have that #$%^$& Robocop BOOT, so hobbling is more what I'm doing. BUT I got to go in the shop to do some light stuff!
First, since I have the 48 back, I've sidelined the 54 and started looking very closely at the 48. It is sitting on an 85 S10 frame with Skymangs cab mounts. So I got to wondering, how close did I get my first set up to right. I measured from the S10 front bed mount, front side of the hole to the back of the cab, 20 1/4" on one side and 20 5/16" on the drivers side. No, I'm not that good. Then I checked in the front, form the front toe kick lip (original) to the shock, straight ahead, 25 1/16" on the riders and 25" on the drivers. Darn close. Then I thought to check the door sills to the frame: Riders side: 9" at the back and 5 1/4" at the front Driver side: 9 1/2" at back and 5 1/2" at the front I'm very surprised it is that close. I'm guessing those types of differences can be overcome easily, because I tried moving the cab around a little, and I'm not up to that yet. Then I thought about the doors. Since I could mess with them while sitting down, why not. Drivers front  IMG_0037 by Robert Moorman, on Flickr IMG_0037 by Robert Moorman, on FlickrDrivers back  IMG_0036 by Robert Moorman, on Flickr IMG_0036 by Robert Moorman, on FlickrRiders door (I could get back far enough to get a full picture  IMG_0040 by Robert Moorman, on Flickr IMG_0040 by Robert Moorman, on FlickrI hope those gaps work, because I did as has been suggested here and added a little screw to the hinges to help when removing and replacing the doors.  IMG_0039 by Robert Moorman, on Flickr IMG_0039 by Robert Moorman, on FlickrThe "mud" you see on the inside of the door in this picture is a reminder of Hurricane Harvey. My parents house had about 3' of water in it and the barn where the truck was kept had almost 5'. Anyway, after a thorough review, there is some more welding and grinding to be done before I'm happy, I keep learning and the first welds I did were really POOR, but they are getting better, so I'll start on that when I can weld again, translation, when I can wear work boots, not this Robocop boot I have on now.
__________________
8man-aka Robert 1948 on a S10 Frame, small block with a carb 1954 Cab, 53 Front and Bed, 50 Doors, S10 Frame, Power TBD Build thread: "]http://67-72chevytrucks.com/vboard/showthread.php?t=746899&highlight=wife%27s+48[/URL] [/URL]http://67-72chevytrucks.com/vboard/showthread.php?t=840204 |
|
|
|
|
05-04-2019, 11:09 PM
|
#212 |
|
Registered User
Join Date: Nov 2014
Location: Yuba City, CA.
Posts: 678
|
Re: Wife's 48
Glad to hear your back at it. I think the reason its taking me so long on my build is as I get better at fabrication I go back and redo the old crappy looking stuff I did. Sometimes Im just going in circles.

__________________
Jan's 53 |
|
|
|
|
05-04-2019, 11:32 PM
|
#213 |
|
Senior Member
Join Date: Mar 2011
Location: West Plains, Missouri
Posts: 7,553
|
Re: Wife's 48
Glad you getting around better...Jim
__________________
my build thread: http://67-72chevytrucks.com/vboard/s...d.php?t=459839 Jimbo's long bed step build:http://67-72chevytrucks.com/vboard/s...t=464626<br /> |
|
|
|
|
05-05-2019, 12:59 AM
|
#214 | |
|
Senior Member
Join Date: May 2007
Location: Doodah Kansas
Posts: 7,747
|
Re: Wife's 48
woop woop back at it!
Quote:
I am not surprised, skymangs put a lot of thought into his mounts and someone would have to be a clodpated citified moron (movie quote) not to get the cab on right following his directions. funny thing is how your mind can make things really hard, its up to your hands to show it how easy it is.
__________________
the mass of men live lives of quiet desperation if there is a problem, I can have it. new project WAYNE http://67-72chevytrucks.com/vboard/s...d.php?t=844393 Last edited by joedoh; 05-05-2019 at 01:14 AM. |
|
|
|
|
|
05-08-2019, 10:02 AM
|
#215 |
|
Senior Member
Join Date: Sep 2017
Location: Bryan, Texas
Posts: 2,275
|
Re: Wife's 48
I'm still not "getting dirty" in the shop. Welding slag on my Robocop boot wouldn't be good, but that hasn't kept me from picking up some parts.
I have a ZR2 GT4 rear axle and since it has drum brakes decided to use it on the 48. Yesterday I got another one, only this one has disc brakes for the 54.  IMG_0045 by Robert Moorman, on Flickr IMG_0045 by Robert Moorman, on FlickrSince I have a lot of time, I'll clean it up and paint it. Any suggestions? I was thinking about using POR or maybe Master Series rust preventative paints. I was on the S10 site and they were talking about the Blazer brake upgrade. Since we want the 48 to be about stock height, I picked up the front spindle/hub/brake assembly for it. 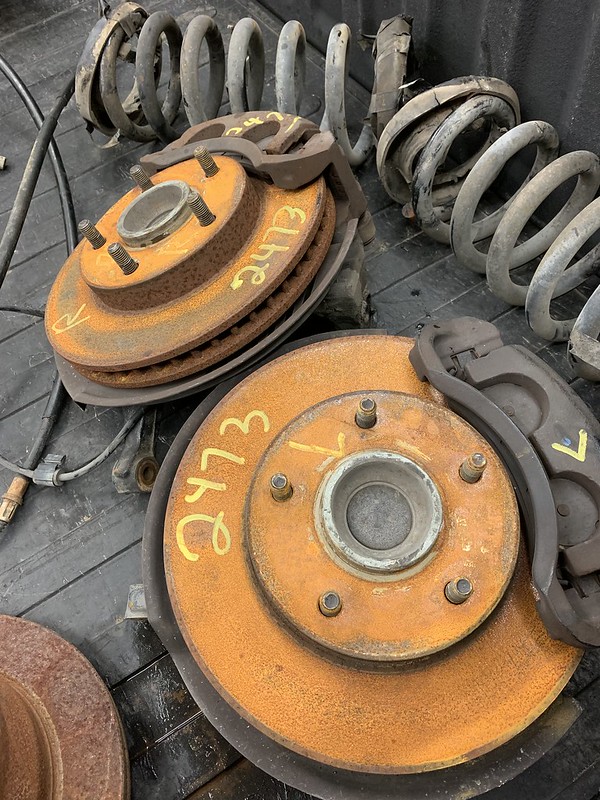 IMG_0044 by Robert Moorman, on Flickr IMG_0044 by Robert Moorman, on FlickrThe calipers are dual piston and the rotors are a little larger, I've read this will improve braking. I have some springs that are 3" shorter than stock on the red S10 parts truck, so I picked up these springs since they were stock, free and look almost new.
__________________
8man-aka Robert 1948 on a S10 Frame, small block with a carb 1954 Cab, 53 Front and Bed, 50 Doors, S10 Frame, Power TBD Build thread: "]http://67-72chevytrucks.com/vboard/showthread.php?t=746899&highlight=wife%27s+48[/URL] [/URL]http://67-72chevytrucks.com/vboard/showthread.php?t=840204 |
|
|
|
|
05-21-2019, 05:45 PM
|
#216 |
|
Senior Member
Join Date: Sep 2017
Location: Bryan, Texas
Posts: 2,275
|
Re: Wife's 48
Tentatively back in the shop. Still hobbling, but I get to go out and "not do too much."
So today I tackled door latches on the 48. Got the latches from Chevs of the 40's, they are made by Trique. I got the riders door done first and then the drivers. I read on here that if I do the riders door first and make a mistake I won't have to look at it every time I get in the truck. 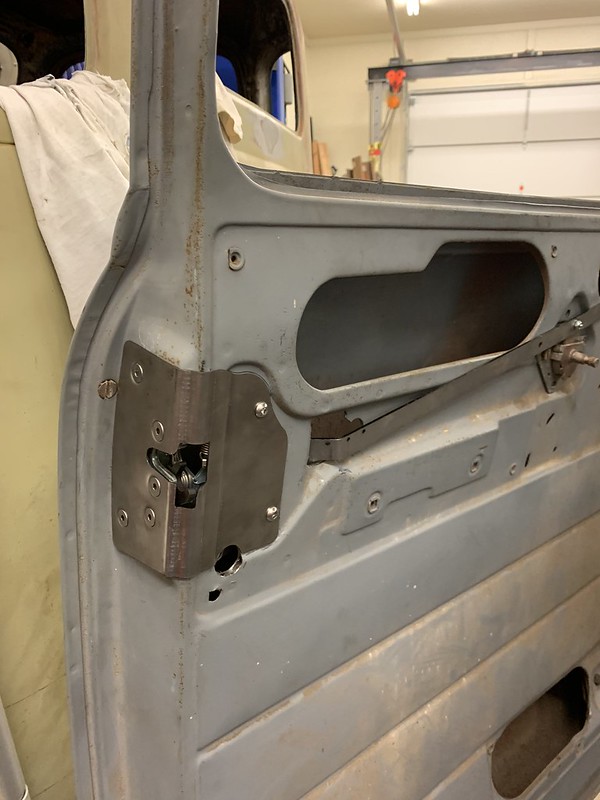 IMG_0065 by Robert Moorman, on Flickr IMG_0065 by Robert Moorman, on Flickr IMG_0068 by Robert Moorman, on Flickr IMG_0068 by Robert Moorman, on FlickrIn the second picture you can see the keyed door lock. That was difficult as the instructions were NOT clear. However, after more time than I care to admit I finally got it installed. Very pleased with the doors. Then I went to put on the latch plates. They were not formed correctly. 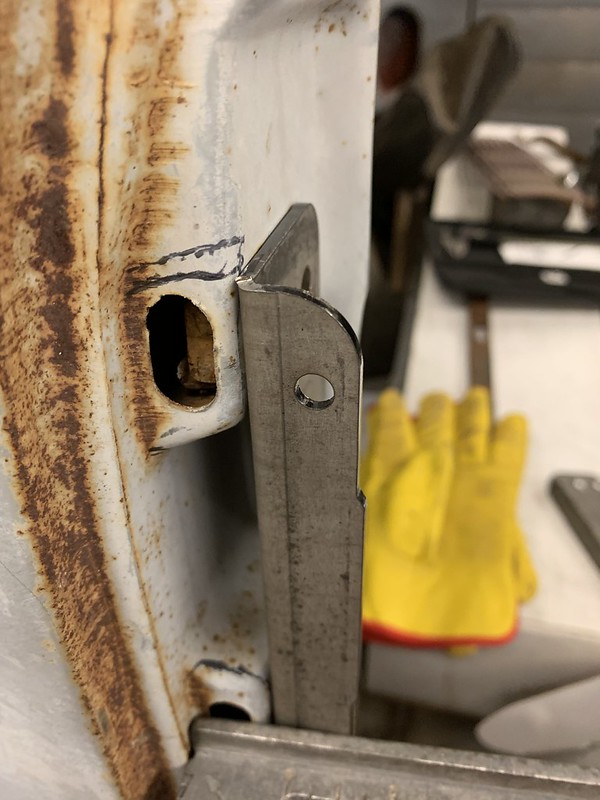 IMG_0062 by Robert Moorman, on Flickr IMG_0062 by Robert Moorman, on FlickrIf you look closely, the plate is turned around backwards and it is flush with the cab steel. It appears to have been bent about 1/4" too close to the bolts. I tried and just could not get it to line up enough to bolt up, so I called Chevs. Great people, they had Trique on the phone once I explained the problem. Trique then let me explain what was wrong, I sent them a few pictures and they put a new set of plates in the mail today. So I'm happy with the outcome and think they are both good people to do business with. While I was working on the latch on the drivers door, I noticed this  IMG_0066 by Robert Moorman, on Flickr IMG_0066 by Robert Moorman, on FlickrThere is supposed to be one of these there 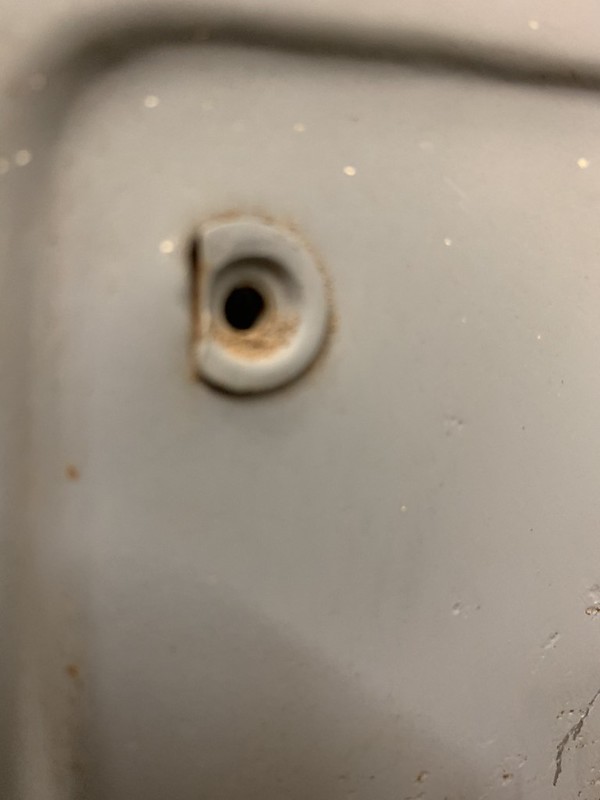 IMG_0067 by Robert Moorman, on Flickr IMG_0067 by Robert Moorman, on FlickrSince I'm thinking about doing a more original door panel on the 48, having the nut in the door would help. I have a junk door that I cut one of the nuts out and the only thing I can figure is to cut a hole in the door and weld it in. Any other suggestions? Next question is about the plate that is on the outside of the door. I've seen some weld in latches, but looking at this I think it could be welded in. I'm giving that some thought. Anyone done the bolt on and then welded it on?
__________________
8man-aka Robert 1948 on a S10 Frame, small block with a carb 1954 Cab, 53 Front and Bed, 50 Doors, S10 Frame, Power TBD Build thread: "]http://67-72chevytrucks.com/vboard/showthread.php?t=746899&highlight=wife%27s+48[/URL] [/URL]http://67-72chevytrucks.com/vboard/showthread.php?t=840204 |
|
|
|
|
05-23-2019, 01:06 AM
|
#217 |
|
Registered User
Join Date: Jul 2017
Location: Joshua, Texas.
Posts: 1,303
|
Re: Wife's 48
Look up threaded rivet nuts for that missing door panel nut. Sounds like a perfect candidate.
Will need to drill it out nice and round. Worse case patch and redrill but a threaded rivet nut would pop right in without needing to access the other side.
__________________
1950 Build |
|
|
|
|
05-23-2019, 02:22 AM
|
#218 |
|
Registered User
Join Date: Nov 2010
Location: calgary alberta
Posts: 7,828
|
Re: Wife's 48
just fab it up, less time and works the same anyway. maybe find a square nut at a farm store and it will fill the hole better. or
-measure off another door so you get the hole in the right place and mark an X on the door that extends out bigger than the hole but so the center of the X is the center of the spot where the nut should be. -find a non plated washer that's bigger than the torn out spot that needs repair if the center of the washer were to be placed on the center of the X you marked. -scribe a line around that washer. use a sharp pointed scribe so you get a fine line -weld a non plated nut on the back side of the washer that is the same thread as what the door hole is supposed to be. using a lubed bolt inside the nut will keep any slag from messing up the threads inside the nut, just ensure you remove the nut before the weld cools off. set it aside to cool -file or grind or burr out the metal from the inside of the circle you had drawn on the door, where the hole was. the washer should fit the hole and the center of the nut that you just welded to the washer should be in the center of the X you marked previously. a little space around the washer is ok, like the thickness of your mig wire (assuming you are mig welding) -using a piece of scrap longer than the washer is wide, drill a hole in the scrap so you can bolt it to the washer that has the nut welded on. the scrap should be a little bigger than the washer, like some flat stock, so you can use this as something to hold the washer into the hole you filed out. it will keep the washer flat with the door. you can hold the scrap to the door with a screw, a small tack weld or a magnet or something like that. it is just thee to hold the washer in place and flat with the door panel till you get the washer tacked in a couple of spots -once the washer is tacked in you can remove the scrap piece and finish welding the washer in. -finish the metal nicely -BOOM, done. and it looks like it was supposed to be there. generally, a round hole is easier to fit a patch to than a non round hole. same for filling other holes, like firewall or dash. better to drill the holes bigger and use a nice clean round patch that you can buy cheap than waste time trying to get a patch fabbed up to fit the torn out spot or a bunch of different sized holes. some places sell the "unholes" (welders series, google it) so that makes it easy. use a step drill instead of a twist drill to get the right size so the hole stays round as you drill |
|
|
|
|
05-23-2019, 08:45 AM
|
#219 |
|
Senior Member
Join Date: Sep 2017
Location: Bryan, Texas
Posts: 2,275
|
Re: Wife's 48
I like both ideas. Thanks guys.
__________________
8man-aka Robert 1948 on a S10 Frame, small block with a carb 1954 Cab, 53 Front and Bed, 50 Doors, S10 Frame, Power TBD Build thread: "]http://67-72chevytrucks.com/vboard/showthread.php?t=746899&highlight=wife%27s+48[/URL] [/URL]http://67-72chevytrucks.com/vboard/showthread.php?t=840204 |
|
|
|
|
05-25-2019, 09:54 AM
|
#220 |
|
Senior Member
Join Date: Sep 2017
Location: Bryan, Texas
Posts: 2,275
|
Re: Wife's 48
Got a little more done yesterday. I have a HF elcheapo stud gun so I tried it out on the riders door. This is the damage from an old mirror.
 IMG_0069 by Robert Moorman, on Flickr IMG_0069 by Robert Moorman, on FlickrUsed 8 studs, 2 to 4 at a time.  IMG_0070 by Robert Moorman, on Flickr IMG_0070 by Robert Moorman, on FlickrHere is the result.  IMG_0071 by Robert Moorman, on Flickr IMG_0071 by Robert Moorman, on FlickrIt's better, but not great. I found Martinsr's how to use a stud gun after I did this. I have a lot to learn on using the stud gun. Then I moved on to that door nut that was ripped out. I used Dsraven's nut on a washer idea, sort of.... 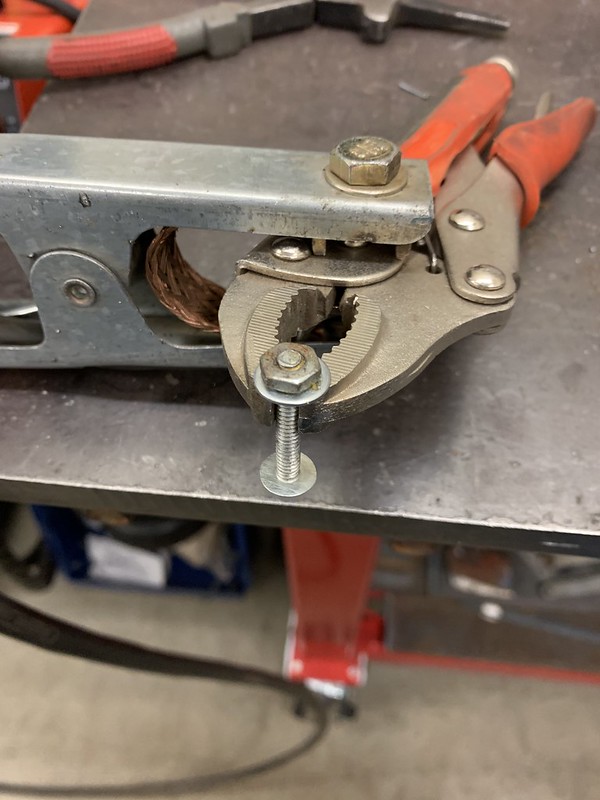 IMG_0075 by Robert Moorman, on Flickr IMG_0075 by Robert Moorman, on FlickrWelded the nut to the washer, and then welded it to washer to the door with the nut to the inside.  IMG_0076 by Robert Moorman, on Flickr IMG_0076 by Robert Moorman, on FlickrIt is pretty centered and is ground down to be about as flat as the old nut. Then I did some touch upon the cowl vent to get rid of some rust spots.  IMG_0073 by Robert Moorman, on Flickr IMG_0073 by Robert Moorman, on FlickrWhile there, I went ahead and welded the windshield bar back in. 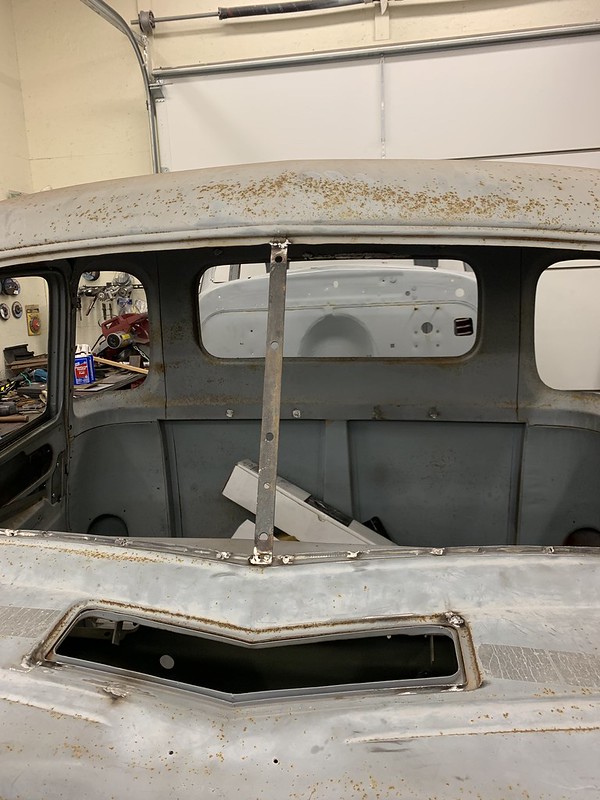 IMG_0072 by Robert Moorman, on Flickr IMG_0072 by Robert Moorman, on FlickrThat is the old bar. I have the new one that I didn't use. If no one else needs one, it'll go in the scrap pile to use for some other type of bracket. 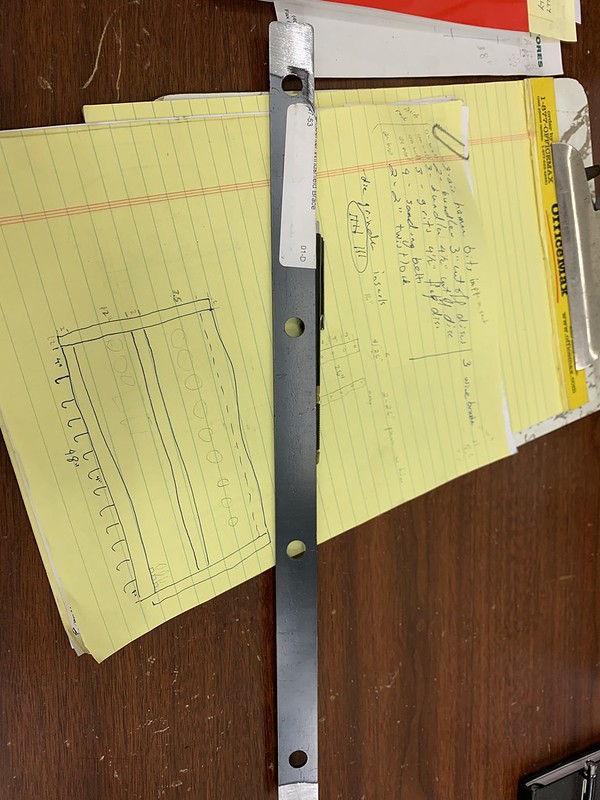 IMG_0074 by Robert Moorman, on Flickr IMG_0074 by Robert Moorman, on FlickrThen I have the Ebrake pedal from a late model Infinity that I want to use, but it didn't even come close to fitting the flat firewall in this old truck. So after some cutting and welding,  IMG_0078 by Robert Moorman, on Flickr IMG_0078 by Robert Moorman, on FlickrIt was then that I realized that the 48 cab firewall is SMOOTH. No stiffeners bent into it to support things. I'll have to think about reinforcing the firewall for the Vintage Air and the brake pedal and Ebrake pedal.
__________________
8man-aka Robert 1948 on a S10 Frame, small block with a carb 1954 Cab, 53 Front and Bed, 50 Doors, S10 Frame, Power TBD Build thread: "]http://67-72chevytrucks.com/vboard/showthread.php?t=746899&highlight=wife%27s+48[/URL] [/URL]http://67-72chevytrucks.com/vboard/showthread.php?t=840204 |
|
|
|
|
06-02-2019, 06:39 PM
|
#221 |
|
Senior Member
Join Date: Sep 2017
Location: Bryan, Texas
Posts: 2,275
|
Re: Wife's 48
Slow weekend, too much other stuff going on. I did find the home for the E-brake pedal. It fit up pretty well once I rebuilt the mounting tabs to fit the firewall.
 IMG_0089 by Robert Moorman, on Flickr IMG_0089 by Robert Moorman, on FlickrNow I will need a grommet for that cable running through the firewall. Anyone have any ideas? I'll have to figure out the mounting for the under cab portion another day.
__________________
8man-aka Robert 1948 on a S10 Frame, small block with a carb 1954 Cab, 53 Front and Bed, 50 Doors, S10 Frame, Power TBD Build thread: "]http://67-72chevytrucks.com/vboard/showthread.php?t=746899&highlight=wife%27s+48[/URL] [/URL]http://67-72chevytrucks.com/vboard/showthread.php?t=840204 |
|
|
|
|
06-02-2019, 07:50 PM
|
#222 |
|
Post Whore
 Join Date: May 2015
Location: Alabama
Posts: 14,583
|
Re: Wife's 48
Looks good...can you grab the grommet from the Infiniti?....I would think about any e-brake cable grommet would work though
__________________
Mongo...aka Greg RIP Dad RIP Jesse 1981 C30 LQ9 NV4500..http://67-72chevytrucks.com/vboard/s...d.php?t=753598 Mongos AD- LS3 TR6060...http://67-72chevytrucks.com/vboard/s...34#post8522334 Columbus..the 1957 IH 4x4...http://67-72chevytrucks.com/vboard/s...63#post8082563 2023 Chevy Z71..daily driver |
|
|
|
|
06-03-2019, 01:01 PM
|
#223 |
|
Registered User
Join Date: Jul 2017
Location: Joshua, Texas.
Posts: 1,303
|
Re: Wife's 48
I was using seam sealer on other spots and used some for my e brake cable. Since it doesn't need to move, I thought why not. Used my finger to clean it up and it looks.
__________________
1950 Build |
|
|
|
|
06-03-2019, 01:09 PM
|
#224 |
|
Senior Member
Join Date: Sep 2017
Location: Bryan, Texas
Posts: 2,275
|
Re: Wife's 48
Thanks. I'll keep that in mind.
__________________
8man-aka Robert 1948 on a S10 Frame, small block with a carb 1954 Cab, 53 Front and Bed, 50 Doors, S10 Frame, Power TBD Build thread: "]http://67-72chevytrucks.com/vboard/showthread.php?t=746899&highlight=wife%27s+48[/URL] [/URL]http://67-72chevytrucks.com/vboard/showthread.php?t=840204 |
|
|
|
|
06-26-2019, 07:46 PM
|
#225 |
|
Senior Member
Join Date: Sep 2017
Location: Bryan, Texas
Posts: 2,275
|
Re: Wife's 48
I have been working, trying to figure out the correct way to mount the radiator. I think this is close to being right. Since I have some extra doors to get parts from, I had plenty of these laying around.
 IMG_0103 by Robert Moorman, on Flickr IMG_0103 by Robert Moorman, on FlickrAnd they looked like the right size to make a bracket for the radiator cushion.  IMG_0104 by Robert Moorman, on Flickr IMG_0104 by Robert Moorman, on FlickrThen I had to figure out how to mount them. Two had to go at the bottom to support the radiator and I decided to mount two on the sides at the top.  IMG_0109 by Robert Moorman, on Flickr IMG_0109 by Robert Moorman, on Flickr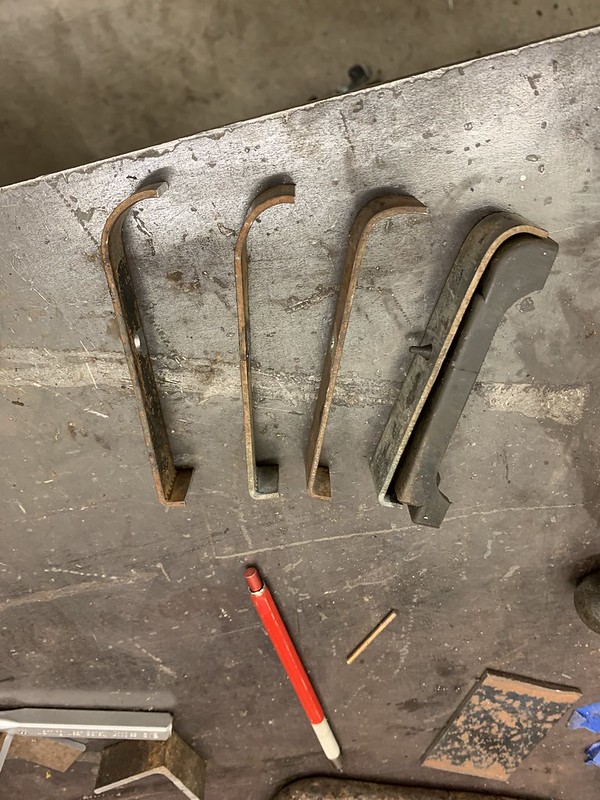 IMG_0105 by Robert Moorman, on Flickr IMG_0105 by Robert Moorman, on FlickrThey look a little like this.  IMG_0108 by Robert Moorman, on Flickr IMG_0108 by Robert Moorman, on FlickrAnd from the front.  IMG_0107 by Robert Moorman, on Flickr IMG_0107 by Robert Moorman, on FlickrAs others have done, I split some rubber hose and used it to press down on the radiator with the top radiator support. No picture of that as others have posted it already.
__________________
8man-aka Robert 1948 on a S10 Frame, small block with a carb 1954 Cab, 53 Front and Bed, 50 Doors, S10 Frame, Power TBD Build thread: "]http://67-72chevytrucks.com/vboard/showthread.php?t=746899&highlight=wife%27s+48[/URL] [/URL]http://67-72chevytrucks.com/vboard/showthread.php?t=840204 |
|
|
|
 |
| Bookmarks |
|
|


 Linear Mode

