
|
 11-06-2011, 11:43 PM
|
#201 |
|
Grandpa in the rustmobile...
Join Date: Nov 2008
Location: Spokane WA/Viola TN
Posts: 11,422
|
Re: Project "My Happy Mess"
Look GREAT!
engine looks terrific! what're you using to clamp wires to the back of the head area/valvecover??
__________________
John Goose-1968 C10 355,9.32-1CR, Vortec Heads ,262 voodoo, 3.73:1 3OTT (HS ride/beater/farm truck) http://67-72chevytrucks.com/vboard/s...d.php?t=317684 Grams 53-1953 Chevrolet Belair http://67-72chevytrucks.com/vboard/s...=1#post4327784 1969 Chevy C10 Shortbed 4.5/6?" Frame off resto http://67-72chevytrucks.com/vboard/s...d.php?t=548136 1999 Toyota Tacoma 4x4 |

|

|
|
11-07-2011, 12:07 AM
|
#202 |
|
Registered User
Join Date: Jul 2011
Location: Des Moines, Iowa
Posts: 3,016
|
Re: Project "My Happy Mess"
Hey John, who said you could post in my thread! j/k!
  Teasing cause I remember talking w/you in the Engine thread a while back before I bought the top-end kit. Thanks for the compliment. Are you talking about holding the wires to the backside of the heads? I wasn't planning on attaching them to the heads themselves. Maybe a couple cheap plastic looms on each side just to hold the wires together. The two metal brackets I attached to the TH350 bellhousing are holding the wires pretty good (tight) in place. No real slack in the lines going to the spark-plugs either. If you notice in the pictues, the brackets on the bellhousing - they are identical brackets (they didn't have L/R). That makes one facing the inside and the other face the outside. I think I'm going to take the passenger's side one off and bend it backwards so it installs like the driver's side, with the wires being inserted from the inside. -------- I'm not even certain those brakets are suppost to bolt up where I put them. I was thinking they were to go on one of the bolts for the bellhousing>engine. But those bolts are too large. So looking around, I found a spot that seems appropritate and went with it. 
__________________
project: "my happy mess" Last edited by litew8; 11-07-2011 at 12:16 AM. |
|
|
|
|
11-07-2011, 12:33 AM
|
#203 |
|
Registered User
Join Date: Jul 2011
Location: Des Moines, Iowa
Posts: 3,016
|
Re: Project "My Happy Mess"
I've just been informed that "The Fixer" has finished drilling the holes in my valve covers! Going over tonight to take a couple pics.
__________________
project: "my happy mess" |
|
|
|
|
11-07-2011, 01:49 AM
|
#204 |
|
Registered User
Join Date: Nov 2011
Location: Westville, IL
Posts: 45
|
Re: Project "My Happy Mess"
First Post ! Awesome documentary footage of the build! I am starting a build myself and find this thread very helpful. keep it up. you rock

|
|
|
|
|
11-07-2011, 02:11 AM
|
#205 |
|
Registered User
Join Date: Jul 2011
Location: Des Moines, Iowa
Posts: 3,016
|
Re: Project "My Happy Mess"
Thanks man! Glad the information can be useful.
Will check in on your thread from time to time. Ask (PM) any question you may have and I might have an answer.
__________________
project: "my happy mess" |
|
|
|
|
11-07-2011, 08:00 PM
|
#206 |
|
Registered User
Join Date: Jul 2011
Location: Des Moines, Iowa
Posts: 3,016
|
Re: Project "My Happy Mess"
Distributor set to TDC, plug wires finished being installed.
Valve cover holes are drilled, K&N breather and PCV valve installed last night. Finished putting the two front looms on the block today. Started (got one side done) scuffing the radiator support for paint. Will post some pics later. Thanks for looking. P.S. My older Brother, lets call him "The Pit Boss" (unless he requests it be changed), has mentioned (behind my back) that the plug wires are going to arc, and that the fuel line routed inbetween the intake will cause vapor lock. PLACE YOUR BETS FOLKS!
__________________
project: "my happy mess" |
|
|
|
|
11-07-2011, 09:39 PM
|
#207 | |
|
VA72C10
 Join Date: Mar 2008
Location: Midlothian, VA
Posts: 25,269
|
Re: Project "My Happy Mess"
Quote:
 .... ....
__________________
Looking for a 67-72 swb or blazer project in or around VA. 
|
|
|
|
|
|
11-07-2011, 09:48 PM
|
#208 |
|
Registered User
Join Date: Jul 2011
Location: Des Moines, Iowa
Posts: 3,016
|
Re: Project "My Happy Mess"
That's okay VA, it's all fun and games. Anything can be fixed!
Keep the bets coming in folks, it's almost race time! "My Happy Mess" will either shoot out of the gate or trip and land head first into the dirt!
__________________
project: "my happy mess" |
|
|
|
|
11-08-2011, 04:22 AM
|
#209 |
|
Registered User
Join Date: Jul 2011
Location: Des Moines, Iowa
Posts: 3,016
|
Re: Project "My Happy Mess"
      Cheap plastic looms      Front retainers -   Moving on...   
__________________
project: "my happy mess" |
|
|
|
|
11-08-2011, 04:32 AM
|
#210 |
|
VA72C10
Join Date: Mar 2008
Location: Midlothian, VA
Posts: 25,269
|
Re: Project "My Happy Mess"
Looking GREAT!!! Nice details!!!!
__________________
Looking for a 67-72 swb or blazer project in or around VA.
|
|
|
|
|
11-08-2011, 05:05 AM
|
#211 |
|
Registered User
Join Date: Nov 2011
Location: Westville, IL
Posts: 45
|
Re: Project "My Happy Mess"
Sweet! looks amazing, do u have plans for the brake booster? chrome? paint?
__________________
Thread to my 68 gmc build, operation : in too deep |
|
|
|
|
11-08-2011, 05:22 AM
|
#212 |
|
Registered User
Join Date: Jul 2011
Location: Des Moines, Iowa
Posts: 3,016
|
Re: Project "My Happy Mess"
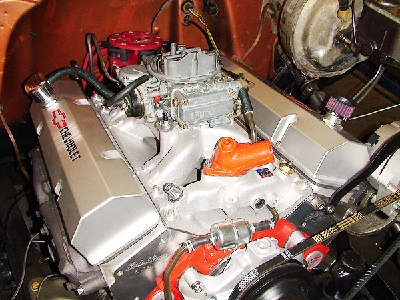
Thanks! The accessories were bought early one morning after researching for a good hour. The baffles I used are from Summit. Didn't see anything similar during my early search. Figured they'd be the best options and I can switch out the breather/pcv to whatever, whenever. The air cleaner is brighter in the pictures. Without the flash it blends in good with the other aluminum. Everything else you see in the engine bay won't be changing (heater box might get painted black and MC might get a new cap). A little old school character. Like good red wine, better aged.
__________________
project: "my happy mess" Last edited by litew8; 11-08-2011 at 05:27 AM. |
|
|
|
|
11-08-2011, 09:28 AM
|
#213 |
|
Senior Member
 Join Date: Mar 2011
Location: West Plains, Missouri
Posts: 7,555
|
Re: Project "My Happy Mess"
Nice job....Jim
__________________
my build thread: http://67-72chevytrucks.com/vboard/s...d.php?t=459839 Jimbo's long bed step build:http://67-72chevytrucks.com/vboard/s...t=464626<br /> |
|
|
|
|
11-08-2011, 11:31 AM
|
#214 |
|
Grandpa in the rustmobile...
Join Date: Nov 2008
Location: Spokane WA/Viola TN
Posts: 11,422
|
Re: Project "My Happy Mess"
thanks for the pix
__________________
John Goose-1968 C10 355,9.32-1CR, Vortec Heads ,262 voodoo, 3.73:1 3OTT (HS ride/beater/farm truck) http://67-72chevytrucks.com/vboard/s...d.php?t=317684 Grams 53-1953 Chevrolet Belair http://67-72chevytrucks.com/vboard/s...=1#post4327784 1969 Chevy C10 Shortbed 4.5/6?" Frame off resto http://67-72chevytrucks.com/vboard/s...d.php?t=548136 1999 Toyota Tacoma 4x4 |
|
|
|
|
11-08-2011, 04:36 PM
|
#215 |
|
Registered User
Join Date: Jul 2011
Location: Des Moines, Iowa
Posts: 3,016
|
Re: Project "My Happy Mess"
Thanks, yw John.
Woodsmith just stopped over with wood finished samples. It is Ash wood. I decided to go with a medium dark (oak) to match the bronze better. I decided to go with a satin finish. Anyone got an example of what it'd look like? Hard to tell what it'd look like with just a sample (he didn't have a sample of satin finish, but semi gloss, don't want gloss).
__________________
project: "my happy mess" |
|
|
|
|
11-08-2011, 07:13 PM
|
#216 |
|
Registered User
Join Date: Jul 2011
Location: Des Moines, Iowa
Posts: 3,016
|
Re: Project "My Happy Mess"
Ash is almost indistinguishable from Oak.
Found a couple pics (russj67). His is stained Oak, but the Ash sample I checked out today looked similar in shade (more like the 1st pic). Don't think this is satin, maybe close.  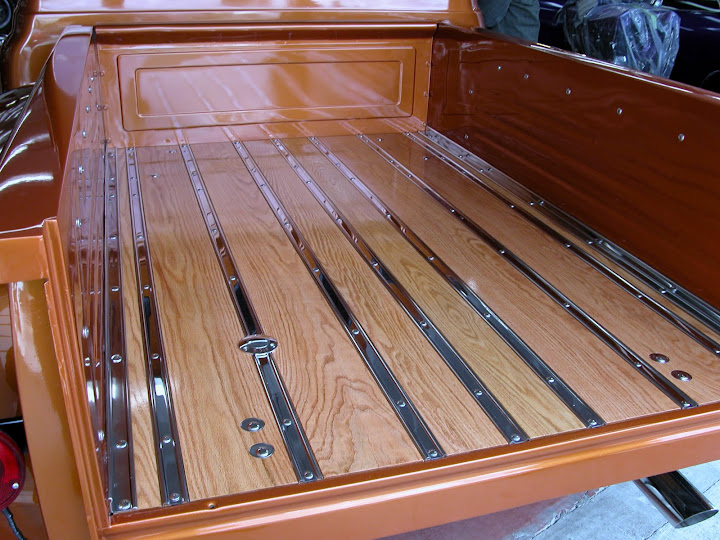
__________________
project: "my happy mess" |
|
|
|
|
11-09-2011, 12:16 AM
|
#217 |
|
Registered User
Join Date: Jul 2011
Location: Des Moines, Iowa
Posts: 3,016
|
Re: Project "My Happy Mess"
Another one I think it will resemble (or close) -
68_short_step's 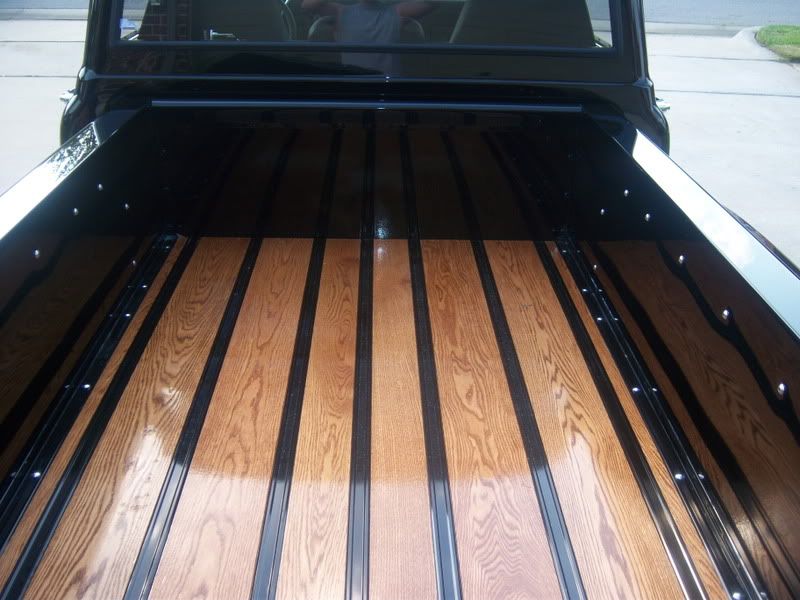
__________________
project: "my happy mess" |
|
|
|
|
11-12-2011, 01:03 AM
|
#218 |
|
Registered User
Join Date: Jul 2011
Location: Des Moines, Iowa
Posts: 3,016
|
Re: Project "My Happy Mess"
Friday Update
Painted some parts during the week - Back by popular demand, Zero Rust!   (not Zero Rust, but a rustoleum type)  Radiator support bushings. Had to buy new bolts/nuts. Didn't come with the kit or they were stripped out beforehand -   Installed power steering lines. Had to modify the return line. Bent the outlet on the backside of pump for hose fitment/clearance. Notice the (universal) return line isn't metal like the original and doesn't run underneath the bracket like pressurized line does.   Will install a magnetic oil pan drain plug. This will be useful especially for the engine's break in period. Will catch any pieces of metal that may be produced.  @mightymouse - thank you for the pictures of your build. After seeing your aluminum radiator a while back, I found one on fleabay on sale and nab'd it. Griffen 2 row, for our trucks.  More fitment issues brought to you by "My Happy Mess" Seems like the radiator doesn't want to seat properly, and maybe I have the wrong size rubber pads the radiator sits on and secures up top with? All of the rubber pads are the same size/length/thickness (even though I specified Upper/Lower) - from Early Classic. I think the pads for the top brackets should be longer and thinner, because the ones they sent don't fill the bracket. The pads that go on the bottom seem to fit okay. But, aside from that, it also seems the brackets don't align with the radiator correctly. I installed the shroud and it bolts up correctly and aligns with the bottom, so that tells me that the radiator support is correct. Not sure why the brackets don't align. Am I forgetting something?  Alignment seems off. And if I put the rubber inserts in, the brackets sit way too high.   The radiator is nearly the exact same size as the one I took out. We may have to do some modifying.  Last but not least, my Woodsmith dropped by with another sample. I asked him if he could darken it up some since the last sample. Not a problem! Forget what he added to darken it, but it works good. He said the wood (I got from Bruce Horkey) has lots of dark grain areas. So a lot of the wood will look like the end of this sample. Golden Oak (with something added to darken), satin finish.  
__________________
project: "my happy mess" Last edited by litew8; 11-12-2011 at 01:23 AM. |
|
|
|
|
11-12-2011, 01:22 AM
|
#219 |
|
GEARHEAD
Join Date: Aug 2003
Location: MN
Posts: 6,112
|
Re: Project "My Happy Mess"
Looks like the passenger radiator hold down should be in the holes to the left and the right one should be moved to the right so the holes line up and the bracket is aligned on the weld seams of the radiator where the tanks are welded on. They fit over the ridge where the tanks are brazed on on the original radiator. I like those valve cover connections you have for the breather. I'd spray some rattle can black on the brake booster though. It pulls your eyes from that great looking engine.
__________________
If no one knows what you're doing, they can't tell you you're doing it wrong HG's Dream Car Build - Shelby Cobra Kit Build your own adjustable track bar 71  Long Fleet C/10 Long Fleet C/10 72  Jimmy 4x4 (Junkyard Jimmy) Jimmy 4x4 (Junkyard Jimmy)HG's Plow Truck '78  K35 Dually K35 DuallyBigass Farm Truck HG's thread of miscellaneous stuff |
|
|
|
|
11-12-2011, 01:28 AM
|
#220 |
|
Registered User
Join Date: Jul 2011
Location: Des Moines, Iowa
Posts: 3,016
|
Re: Project "My Happy Mess"
Thanks hg_notes. Maybe I was so tired tonight I was that far off in placing the top brackets? But if I remember correctly, if the top brackets went over the seams, there's no way the brackets would bolt down to the support. They'd sit too tall. And that might go back to having the wrong pads for the top brackets because the height of the new rad is the same as the one I had. I think I have the originals still in the trunk of my car.
The connectors are actually baffles (all aluminum construct, made?/sold by Summit). They are great for being able to swap accessories out whenever to whatever, but their sole purpose is to prevent oil from splashing up into the breather/pcv. Something I found at the last minute and I'm glad I did. I think they are better than just having a grommet in a hole. Especially true for custom drilled holes.
__________________
project: "my happy mess" Last edited by litew8; 11-12-2011 at 01:45 AM. |
|
|
|
|
11-12-2011, 01:46 AM
|
#221 |
|
GEARHEAD
Join Date: Aug 2003
Location: MN
Posts: 6,112
|
Re: Project "My Happy Mess"
Those rubber pads will crush into the brackets or give enough to bolt down, or they should anyway. But looking at the last pic showing the mounts from the side it looks like the top ones are for a 4 core radiator with 2 core rubbers in them. The hieght would be the same though. Swap to the shorter radiator hold downs with those rubbers in them and put them in with the rubber directly over the tank weld seam.
__________________
If no one knows what you're doing, they can't tell you you're doing it wrong HG's Dream Car Build - Shelby Cobra Kit Build your own adjustable track bar 71 Long Fleet C/10 72 Jimmy 4x4 (Junkyard Jimmy)HG's Plow Truck '78 K35 DuallyBigass Farm Truck HG's thread of miscellaneous stuff |
|
|
|
|
11-12-2011, 01:53 AM
|
#222 |
|
Registered User
Join Date: Jul 2011
Location: Des Moines, Iowa
Posts: 3,016
|
Re: Project "My Happy Mess"
That's an idea and I did think that the top brackets seemed too long, but like you said - if they go over the seams, then they'd be long enough. Trouble is (I think), If I moved one of the brackets (say the passenger's) to the holes on the outside, the shroud won't line up. There's got to be an easy answer to this since both radiators are the same size. Don't think they are 3/4 core brackets because I don't think my truck ever had a need for one since it's been a SB and not BB. But anything is possible. Maybe a PO changed them some time? hmm I need to look back at pics and compare maybe.
__________________
project: "my happy mess" |
|
|
|
|
11-12-2011, 01:56 AM
|
#223 |
|
GEARHEAD
Join Date: Aug 2003
Location: MN
Posts: 6,112
|
Re: Project "My Happy Mess"
Those holes to the left are where it belongs. Measure the distance between holes on the shroud then measure the distance between the flanges on the radiator. Should be close to the same.
__________________
If no one knows what you're doing, they can't tell you you're doing it wrong HG's Dream Car Build - Shelby Cobra Kit Build your own adjustable track bar 71 Long Fleet C/10 72 Jimmy 4x4 (Junkyard Jimmy)HG's Plow Truck '78 K35 DuallyBigass Farm Truck HG's thread of miscellaneous stuff Last edited by hgs_notes; 11-12-2011 at 08:36 AM. |
|
|
|
|
11-12-2011, 03:44 AM
|
#224 |
|
Registered User
Join Date: Aug 2011
Location: Sacramento, California
Posts: 79
|
Re: Project "My Happy Mess"
she's lookin real purdy and hgs has good input, i agree with what he said. but when you get this thing going i'd like to hear some news on how that radiator works out, cause i'd like to get one.
__________________
1970 C/20 4x4, 350, sm465, np205(She tipped over... total rebuild from the frame up!)  ya gotta keep on keepin' on, Life's a garden, dig it! |
|
|
|
|
11-12-2011, 10:29 AM
|
#225 |
|
So Many Ideas, So Little Money
Join Date: Sep 2001
Location: Marshalltown, IA
Posts: 1,610
|
Re: Project "My Happy Mess"
I'm surprized noone had shot a picture of thier under hood, I would but my 71 has no shroud/4 core and my blazer has 4 core/zip tied shroud
lookin good all in all man!
__________________
72 Blazer 3/4 ton running gear 4.10s NP205/TH350 350 4in lift half doors 71 C10 with 454 99 S-10 5.1L SBC 700R4 09 Malibu Marshalltown, Iowa |
|
|
|
 |
| Bookmarks |
|
|


 Linear Mode

