
|
 06-21-2015, 03:12 PM
|
#751 |
|
Registered User
Join Date: Aug 2012
Location: Salem Mo
Posts: 647
|
Re: 1957 Chevy truck re-rebuild
Canadian_Trev, certainly a very uplifting post, thank you.
Sometimes when I post picture after picture, something in the back of my head tries to convince me that all the fabrication pictures are a waste of time. Then someone like yourself re-reminds me of why I start build threads in the first place, not just to show the before and after but also to show the "how it got done" process. My smaller, yet most "go to" tool I have because of the amount of welding and metal work is my 4 1/2" grinder with 40 grit flap discs. If you have a 4 1/2" grinder and do not use flat discs you are wasting the grinder's potential. When I re-welded all the bumper brackets, front and rear, all the grinding was using 40 grit flap discs. When I reshape or close fit sheet metal for a butt joint weld, I use the flap discs vs a pair of tin snips. When I weld the bed end caps on and have all the weld beads to perfect all around the edges, flap discs. In most of these cases after the flap disc grinding I have little or no body filler needed to smooth the area, I go to sand blast, epoxy primer then either paint or feather fill primer. There are techniques to properly use the flap discs to their potential, I can explain them later if anybody is interested. Actually, going back to the build thread of my Willys truck I posted a little time back shows the many of the ways I use the flap discs on the metal work I did on that truck. Has anybody ever worked very hard on something and got rewarded the very next day? I have a story to tell. First, an old picture, I'm sure most remember where the inside of the cab started. It's not the best picture but it's all I got.  Then the ideas of size and shape start to form a frame work.  Then you get the pieces all made and fitting together. It hurts to tear it all apart at this point but you have to believe the next time it's all back together it'll be worth the effort.  Finally paint is done and everything is back together again.  I had the last couple of weeks off knowing the car show is yesterday. I worked very late hours nearly everyday. I was exhausted Friday night at 1:00 in the morning. I said to myself, this all had better be worth it!! Couldn't sleep I was so excited to show the truck, but got through to the morning. The show was great, had a pretty good turn out. Lots of positive comments on the truck. Then came award time. I thought I was good for a truck award only, ha, there other category's that cover overall contests too. Chief of Police Top Choice, First place. Best overall Truck award, First place. Club choice award for overall mechanicals, fit and finish. First place. Best of show, attraction to audience and overall impact. First place. Thank you God for imputing the talents into my hands and giving me the patience to struggle through the many battles we endure through out these projects. I'm so pleased to be able to hopefully inspire many who follow these build threads that are freely available, to raise you own bar and reach for you own higher standard. I very seldom used the phrase "it's good enough" on this truck, why settle when your there right now? Just to prove that you can look like a dork and still do some fine craftsmanship, I present something I never show...... me. I had people congratulating me while this picture was taken and I was paying attention to them vs looking at the camera.  I still have odds and ends to finish, but from here on out this truck is gonna be adding up some miles. Thanks again for everybody's input along the way, Jim
__________________
My 57 Chevy truck build.http://67-72chevytrucks.com/vboard/s...d.php?t=541132 Last edited by Stepside Jim; 06-21-2015 at 03:18 PM. |

|

|
|
06-21-2015, 04:15 PM
|
#752 |
|
Registered User
Join Date: Dec 2013
Location: Purmerend, Netherlands
Posts: 1,657
|
Re: 1957 Chevy truck re-rebuild
Congratulations!!
I've said it before, it's a Masterpiece!! Well deserved, all the first places! I think there's more to come!
__________________
Cheers!! Kees. 1959 Chevy Fleetside Longbed My build: http://67-72chevytrucks.com/vboard/s...d.php?t=643426 Kool Guyz CC Instagram: _King_Kustom_ |

|
|
|
06-21-2015, 04:26 PM
|
#753 |
|
Registered User
Join Date: Aug 2007
Location: Corona, California
Posts: 7,998
|
Re: 1957 Chevy truck re-rebuild
Well deserved awards.
Kim |
|
|
|
|
06-21-2015, 05:34 PM
|
#754 |
|
Senior Member
 Join Date: Jul 2012
Location: Oblong, Illinois
Posts: 7,017
|
Re: 1957 Chevy truck re-rebuild
Congratulations! Very well deserved for a great truck and talented craftsman.
|
|
|
|
|
06-21-2015, 07:47 PM
|
#755 |
|
Registered User
Join Date: Jan 2012
Location: Eastern Ontario, Canada
Posts: 1,041
|
Re: 1957 Chevy truck re-rebuild
You are the first person here that I've heard that uses those flap disks as much as I do! Expensive but are awesome. Shaping is a breeze with them. Please share your tricks to using them. I will probably learn something.
That's quite a tall trophy! You should be proud of that and all that it took to obtain it.
__________________
1952 Canadian Chevy 1300 C4 IFS & D44 IRS 5.3 HO L33 My Build: http://67-72chevytrucks.com/vboard/s...d.php?t=632938 
|
|
|
|
|
06-22-2015, 01:00 AM
|
#756 |
|
A320 Pilot/USAF Retired
Join Date: Mar 2009
Location: Charleston, SC
Posts: 2,622
|
Re: 1957 Chevy truck re-rebuild
Congrats!
__________________
JJ My 1957 build: http://67-72chevytrucks.com/vboard/s...d.php?t=334552 http://www.trifive.com/forums/showthread.php?t=22037 Instagram - Chuckdriver57 |
|
|
|
|
06-22-2015, 09:17 AM
|
#757 |
|
Senior Member
Join Date: Mar 2011
Location: West Plains, Missouri
Posts: 7,553
|
Re: 1957 Chevy truck re-rebuild
Jim, congrats on all the wins, well deserved for a great truck. I was hoping to go to the show, but the doctor told me that drive was to long (90 miles round trip). Hope to see it around at some of the other shows near us...Jim
__________________
my build thread: http://67-72chevytrucks.com/vboard/s...d.php?t=459839 Jimbo's long bed step build:http://67-72chevytrucks.com/vboard/s...t=464626<br /> |
|
|
|
|
06-29-2015, 03:30 PM
|
#758 |
|
Registered User
Join Date: Jul 2014
Location: Clear and Still Idaho
Posts: 509
|
Re: 1957 Chevy truck re-rebuild
Well Done, Jim, Well Done, I've learned so much from your posts. Thanks NC
__________________
Been there, wrecked that 
|
|
|
|
|
06-29-2015, 03:44 PM
|
#759 |
|
Navy Radioman Veteran
Join Date: Jul 2007
Location: Western Kentucky
Posts: 1,350
|
Re: 1957 Chevy truck re-rebuild
Very Nice!
Ken
__________________
1987 Chevrolet R10 Silverado BBC Build thread - SOLD 1986 GMC Sierra Classic - SOLD 1957 Chevy Step Side - At the Body Shop Daily Driver; 2005 Chevrolet Silverado 4x4 Z71 Stepside |
|
|
|
|
06-29-2015, 04:54 PM
|
#760 |
|
Registered User
Join Date: Dec 2011
Location: Southern Oklahoma
Posts: 181
|
Re: 1957 Chevy truck re-rebuild
Jim, this is has truly been a fantastic build. Obviously, others thought so too. Thanks so much for sharing. Wow!
|
|
|
|
|
07-02-2015, 03:21 PM
|
#761 |
|
Registered User
Join Date: Aug 2012
Location: Salem Mo
Posts: 647
|
Re: 1957 Chevy truck re-rebuild
Thanks everybody, as I've mentioned before, It's great where people with the same passion enjoy your work through pictures and explanations.
Going through my pictures there is a set that I haven't posted yet. Nothing big, but being part of the interior it had to be clean and neat when finished. The seat frame, as I said, nothing big but it did take some doing to get it right. It had to first raise the seats to the proper height. I also wanted it to connect to the center shifter hump. It had to support the seat belts and have some nice sheet metal work on the ends for a finished look. At look where it started.  One of the ends that need to be finished.  Back to the bead roller, a tool that really isn't very expensive and has many different purposes. Not only does it ad a visually appealing look here but it also adds strength at the same time.  The seat belt reinforcement plate intruded into the sheet metal area here. With some careful cutting and fitting it actually added a nice look when finished.  With the welding done it was time for the Flap Disc. Used properly you can flatten all the welds, and still end up with nice edges all the way around. Even with the 40 grit disc, there are no cosmetically damaging grind marks.  FarmerSid, one tip I have for the flap disc here is.... Use a disc that will grind the welds flat but leave a small amount of the weld yet to be ground down. basically to where the weld is nearly flush with the metal you've welded on. By using that used 40 grit disc you have to apply pressure while grinding, this will cause the disc to conform to the weld you are grinding, you'll never get a real true flat surface. By leaving just a but of the weld yet to be ground down, now go to a brand new disc, not a slightly used one, a brand new one. Now with the slightest pressure, grind the small bit of weld left over. The new grit on the new disc will grind extremely true and leave a very level surface with no left over weld. the fusion of the weld and the metal blend perfectly together. The direction of the spinning disc is also important, you can not grind into the edge, then to the weld. The disc will glance off the edge and never hit the weld. Grind so the disc spins across the flat or the weld, then off the edge. This way the disc's pressure hits where you want to grind, and not bouncing over where you want to grind. FarmerSid, you may already know all this, but for those checking in, they may want to give this a try. Where was I, on to the next step. I read many posts about sandblasting, within those posts I read so many people saying to stay away from sandblasting. I understand the dust in your lungs issue, wear a mask. I understand the sheet metal warpage issue, don't blast thin sheet metal. There is a ton of excellent areas to sandblast, like this seat frame. In 10 minutes time I have a excellent surface for epoxy primer, I've removed all the marks from bead rolling and any grinding marks. I have a few pits from welding, the blasting cleans the pits perfectly so I can finger apply some spot putty along the edges. Once the putty dries I sand it and go directly to priming and painting.  One coat of epoxy primer, wait a couple of hours, then 2 coats of satin black.  It's been nearly 2 weeks since the car show, we had a little over 60 vehicles. With the participants and the many people who stopped by and visited, then also getting my picture in the paper, it has been fun seeing the changes in people, I'm not only the Mailman, but I can built one heck of a truck also.  Jim
__________________
My 57 Chevy truck build.http://67-72chevytrucks.com/vboard/s...d.php?t=541132 |
|
|
|
|
07-02-2015, 04:08 PM
|
#762 |
|
Senior Member
Join Date: Jul 2012
Location: Oblong, Illinois
Posts: 7,017
|
Re: 1957 Chevy truck re-rebuild
Jim, great tutorial on the seat frame and the grinding flap discs. I rely too much on the 3 inch roloc on my die grinder and have difficulty getting the smoothest / most consistent surface due to lack of surface area on the disc. The larger flap discs will be put to good use.
My opinion on the detail pictures...I really appreciate them, learn from them and improve my skills plus quality of my work with them. Thanks for taking the time to share! |
|
|
|
|
07-03-2015, 09:31 AM
|
#763 |
|
Senior Member
Join Date: Mar 2011
Location: West Plains, Missouri
Posts: 7,553
|
Re: 1957 Chevy truck re-rebuild
Jim, I agree with AD, thanks for the indepth of the build, this is what builders like to see and be able to use...Jim
__________________
my build thread: http://67-72chevytrucks.com/vboard/s...d.php?t=459839 Jimbo's long bed step build:http://67-72chevytrucks.com/vboard/s...t=464626<br /> |
|
|
|
|
07-03-2015, 10:20 AM
|
#764 |
|
Registered User
Join Date: Aug 2007
Location: Corona, California
Posts: 7,998
|
Re: 1957 Chevy truck re-rebuild
Real nice job on the seat frame.
Good info on the flap discs. Kim |
|
|
|
|
07-12-2015, 11:19 PM
|
#765 |
|
Registered User
Join Date: Feb 2013
Location: Grants Pass Oregon
Posts: 473
|
Re: 1957 Chevy truck re-rebuild
Hello Stepside Jim. Great job on your truck.I bet you've passed every store front with a big glass window at least twice now. The details on your truck is what makes it so great and a trophy winner.
Earl
__________________
You have to have patiences or you'll be one. |
|
|
|
|
08-16-2015, 11:13 PM
|
#766 |
|
Registered User
Join Date: Aug 2012
Location: Salem Mo
Posts: 647
|
Re: 1957 Chevy truck re-rebuild
Hi everybody, well it's been over a month since I've posted on my build thread. I noticed when many finish their truck you don't hear much about how life with their finished truck is going.
Let's do an update, kinda the goods and the bads while working out the bugs with such a large project completed. Needless to say, the truck is a blast to drive, the Camaro suspension along with the rear stabilizer bar has this thing handling corners with confidence. It draws a crowd at every stop, thumbs up and waves are very common. The exhaust cut outs are a great hit. Here's a picture of a couple of weeks ago.  Nothing major, I just had an issue with the old oil pan, nothing a new Moroso oil pan didn't fix. The old one had a slow, slow drip out of the drain plug. I also didn't like the drain plug location, new pan, all problems solved. I also had a valve tick, I absolutly hate valves ticking. It's a flat tappet hydraulic cam and lifter, as long as the cam doesn't have flat lobe, I expect NO TICKS. Yet, it ticked. tick tick tick tick tick. After adjusting and adjusting I happened to have it idling and for some reason I rested my hand on the drivers side valve cover, hmmm, I can feel a pulse where the breather cap is located. I then put my hand on the passenger side cover where the PCV valve is, I feel a pulse. This time instead of removing the valve cover and setting it aside I inspected the inside very closely and what did I see? I saw where an intake valve was making contact with the tin oil baffle and making the ticking sound. Just goes to show ya, you never know what pain is lurking around the corner.... or in this case, under the valve cover.  I did a little trimming and things are quieter now...... The Gear vendors overdrive does the job. I had to get used to using the optional manual switch. Now when I get on it I use first, then first over by engaging the overdrive, then hit second while disengaging the overdrive, then reengage overdrive for second over, then I usually go right to third overdrive. Cruising highway at 65 to 70 is no problem after that. May sound like work to engage and disengage, nope, just takes a tap at the right time on a dedicated dimmer switch on the floor. One part I must warn about is the dual electric fan switch box from Derale. The concept is good, one box, one sensor, fans kick on at different times, no external relays. No matter how low I tried to set the first fan, it wouldn't kick one til 195 degrees, by then the one fan didn't have much effect to cool things down and the second fan didn't kick on til 210 degrees, by then 220 and 230 weren't too far off. I got an adjustable unit from Painless, fantastic adjustability. For now I'm using the Painless one to turn on the first fan at 180 and letting the Derale kick on the second fan at 195. Works well for now, I'll probably do some re-doing this winter now that I know what works. I'm up to 400 miles, I'd have a lot more but I live on a gravel road, very slow and pain in the butt 1 mile drive. Good news is, I went to the county commissioners meeting and either I move to get away from the gravel road or I cough up some money to help pay for the road to get sealed. I love my shop so I'm staying, it's not gonna be cheap but I will have no more gravel road next year. I need to remember to bring my camera to get some location shots as I drive the truck. It is always a great morning getting up in the morning and knowing I'm either driving my truck to work or just having a plan to go somewhere in it that day. For all you with finished trucks, you know what I mean. For those still working on your trucks, keep at it, it's worth it in the long run. Also, don't be cheap along the way, build it right, there's nothing worse than driving down the road being a slave to your guages. Jim
__________________
My 57 Chevy truck build.http://67-72chevytrucks.com/vboard/s...d.php?t=541132 |
|
|
|
|
08-17-2015, 12:28 AM
|
#767 |
|
Registered User
Join Date: Aug 2007
Location: Corona, California
Posts: 7,998
|
Re: 1957 Chevy truck re-rebuild
Truck turned out great.
Glad you're having a blast with it. Kim |
|
|
|
|
08-17-2015, 05:52 AM
|
#768 |
|
Registered User
Join Date: Dec 2013
Location: Purmerend, Netherlands
Posts: 1,657
|
Re: 1957 Chevy truck re-rebuild
Good to read an update!
Glad you're able to get rid of all the little bugs and have great fun driving the truck! It sure is a Show Winner! Thanks!
__________________
Cheers!! Kees. 1959 Chevy Fleetside Longbed My build: http://67-72chevytrucks.com/vboard/s...d.php?t=643426 Kool Guyz CC Instagram: _King_Kustom_ |
|
|
|
|
08-17-2015, 08:31 AM
|
#769 |
|
Senior Member
Join Date: Jul 2012
Location: Oblong, Illinois
Posts: 7,017
|
Re: 1957 Chevy truck re-rebuild
Appreciate the updates and advice Jim. Worst part of driving on gravel are the people passing...they don't slow down.
Truck is looking great! |
|
|
|
|
08-19-2015, 03:46 PM
|
#770 |
|
Registered User
Join Date: May 2015
Location: Lyon, FRANCE
Posts: 11
|
Re: 1957 Chevy truck re-rebuild
Very very nice work on your truck Stepside Jim ! Congrats !
|
|
|
|
|
08-20-2015, 11:48 AM
|
#771 |
|
Registered User
Join Date: Jan 2012
Location: Motown
Posts: 7,677
|
Re: 1957 Chevy truck re-rebuild
nice work on the seat pedestal, stepside. looks good
for the gear vendors button... have you tried next to the shift lever like a real 2 speed rearend shifter? my 56 schoolbus had a 2 speed rearend with a push/pull knob on the shift lever this switch is electrical, my bus was vacume  and... has your wife forgiven you for using her curtains as fender covers???  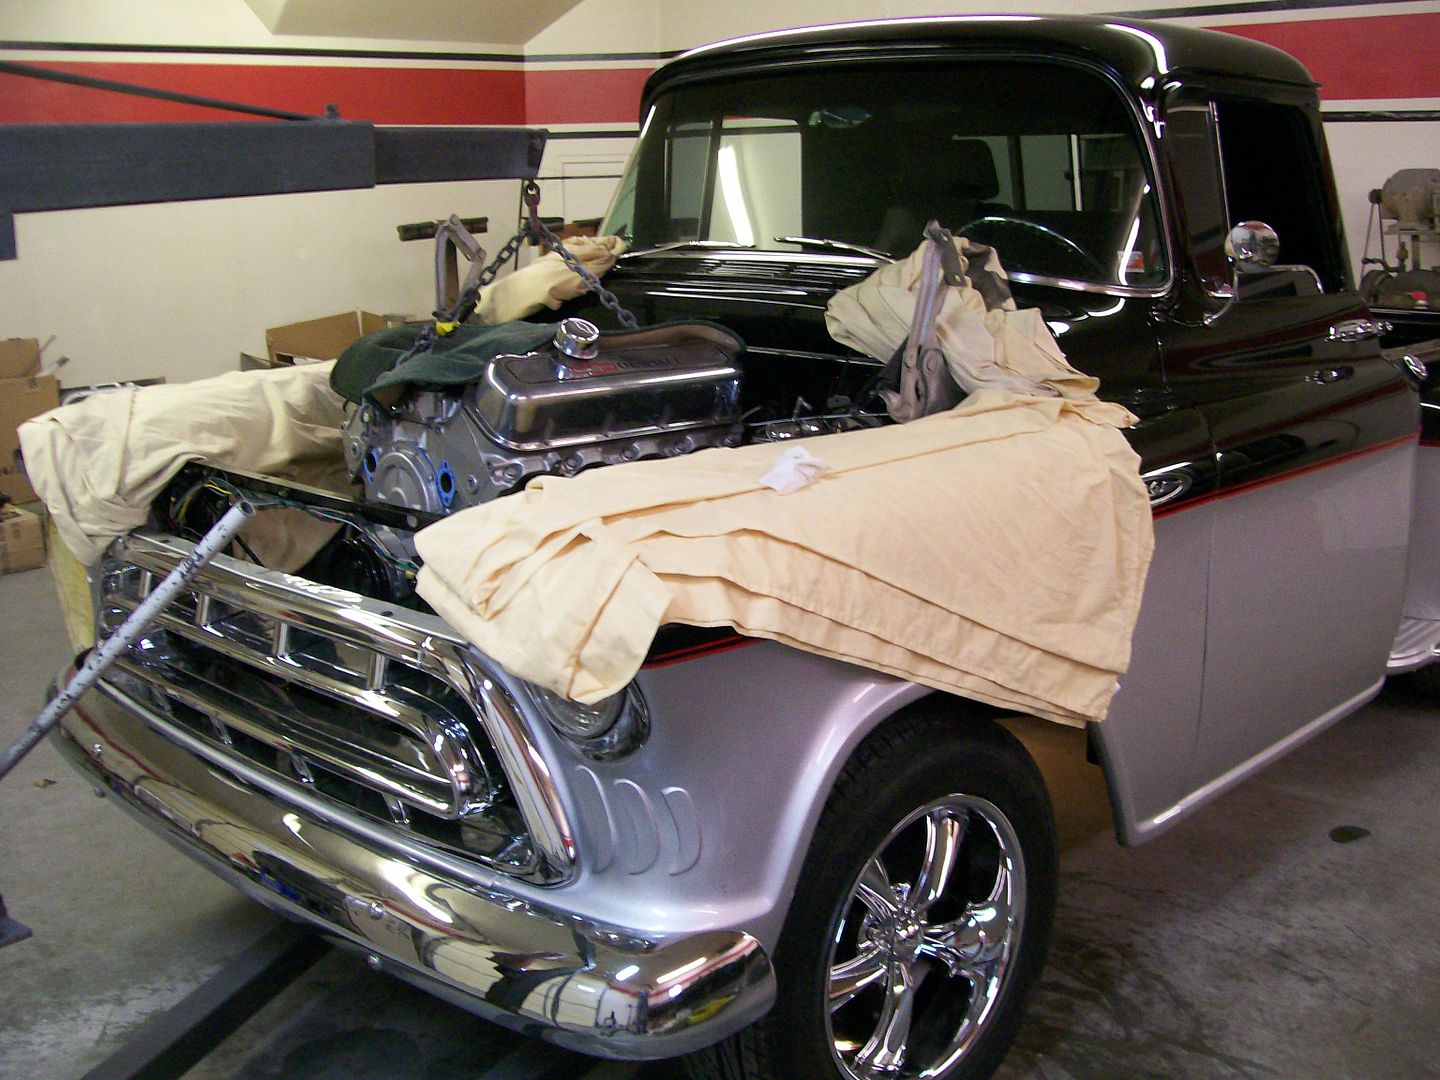
__________________
cool, an ogre smiley Ogre's 58 Truk buildhow to put your truck year and build thread into your signature shop air compressor timer |
|
|
|
|
08-21-2015, 10:06 PM
|
#772 |
|
Registered User
Join Date: Aug 2012
Location: Salem Mo
Posts: 647
|
Re: 1957 Chevy truck re-rebuild
Kim, a"Blast" is a good term, I have a '50 Willy's truck and a '65 Corvette but neither of them draw crowd like this truck does.
RockinKees, always great to hear from you. Some of the bugs are probably because I'm being very picky about what I'll accept, I figure now's the time to debug all I can. Advanced Design, I'm lucky I live on a dead end road so everybody has been very courteous, not having to deal with the dust is gonna be great. Callook64, thanks for checking in. Talk about the world wide web, all the way from France. First post also. _Ogre, did I read the word "Wife" ? For the last 3 years I spent every day off, every vacation day and nearly every holiday on this truck. Ohhhhh, the trouble I'd be in by now. Using the curtains for fender covers would be minimal as compared to the trouble I'd be by now. No wife, just a couple of dogs and they're happy I put a doggy door in the shop for them. Progress wise, yesterday I switched out the 3000 rpm stall converter to a 2400 rpm. The 3000 was ok around town and messing around but on the highway in overdrive I could feel the converter slipping on up hill areas. The 2500 has a much firmer feel now at highway speeds. Hopefully in another month or so I should have everything working together. I want to take a 5 hour round trip to visit the Branson area to visit my step mother, who had to put up with this truck for nearly 30 years, I think she'll enjoy going for a ride. Also to drive past one of the areas that this truck sat for years getting no where. Jim
__________________
My 57 Chevy truck build.http://67-72chevytrucks.com/vboard/s...d.php?t=541132 |
|
|
|
|
08-22-2015, 02:13 AM
|
#773 |
|
Registered User
Join Date: Feb 2015
Location: Crystal City MO
Posts: 3
|
Hey Jim, if you ever get the urge to bring your truck east, as in Festus MO, I'd gladly buy you lunch at my restaurant.

|
|
|
|
|
11-21-2015, 01:52 AM
|
#774 |
|
Registered User
Join Date: Aug 2010
Location: Mtn View, Missouri
Posts: 81
|
Re: 1957 Chevy truck re-rebuild
What a beautiful truck! I just loved all the detailed fabrication. Builds where everything is ordered online then bolted together turn out nice but aren't nearly as interesting. I'll be keeping an eye out for updates. Hopefully you will be back at one of the car shows this summer. I'd love to see this in person as I'm only about an hour from Licking, 30 minutes from Houston.
|
|
|
|
|
11-22-2015, 08:56 PM
|
#775 |
|
Registered User
Join Date: Aug 2012
Location: Salem Mo
Posts: 647
|
Re: 1957 Chevy truck re-rebuild
Oh,oh, I'm back on the first page again. I was holding off for about another week while gathering parts for this winter's upgrades.
First, Overmyhead55, yes, an eastbound trip is definitely gonna have to happen next spring. With this winter's upgrades, the visit will be more pleasant visually. garmar, thanks very much, even after I've been driving it I am still coming up with additions to the truck. I like your term "interesting", to describe the homemade pieces. Here's where I'm at.... I totally pleased with many items, paint, interior, bed, wheels, suspension, ect. There are two areas I do want to upgrade, then I think I'm done. First, with the large diameter tires I want to get a lower first gear. The Turbo 350 will get a 2.75 first gear which numerically should have me close to 4.10 rear ratio when done. The engine is going to undergo changes also. I set this truck up to use Nitrous, surprise to me, Hagerty will no longer cover vehicles with Nitrous. Hmmmm, change in plans. They will however cover vehicles with turbos or Superchargers. With these choices and I want killer torque, a box from Holley should be on my door step tomorrow with my new Supercharger. After that comes a set of aluminum heads with larger chambers to help flow and lower compression ratio. Then pistons and camshaft. I've never stepped into the world of boosting so this will be a new and exciting avenue for me to travel down. I've done a ton of reading on timing, comp. ratios, carb altering, ect. I'm looking forward to the new challenges and especially the first test drive. Yes, it's a big step, but it is the last and biggest step I can make, after that I won't think "what else I can do" I will look and say "this truck is done". Ha,ha, we know that won't happen, but at least I've eliminated what else I can do. Once I get parts and pieces sorted out I'll get some pics posted.
__________________
My 57 Chevy truck build.http://67-72chevytrucks.com/vboard/s...d.php?t=541132 |
|
|
|
 |
| Bookmarks |
|
|


 Linear Mode

