
|
|
|
 08-04-2017, 12:30 AM
|
#1 |
|
Registered User
Join Date: Jul 2017
Location: Joshua, Texas.
Posts: 1,303
|
Re: '50 chevy 3100
When you say to the rings.. do you mean the factory lift points? I've looked and can't see any, this was a new 350 crate motor so I'm not sure but may be there was some on the old 305. I've pulled engines and trans separately, couple bolts on both heads. Just not a engine and trans together, I think this would be best when I try to find the crossmember locations when I drop it into the 3100. So I'm a little worried about where to hook up the chains. Would a leveler allow me to keep distributor on? I know the clearance depends a lot on the distributor when I put the engine in the 3100.
|

|

|
|
08-04-2017, 12:42 AM
|
#2 | |
|
Senior Member
 Join Date: May 2007
Location: Doodah Kansas
Posts: 7,747
|
Re: '50 chevy 3100
Quote:
as long as you dont have the chains in the area of the distributor you can leave it in.
__________________
the mass of men live lives of quiet desperation if there is a problem, I can have it. new project WAYNE http://67-72chevytrucks.com/vboard/s...d.php?t=844393 |
|
|
|
|
|
08-07-2017, 03:15 AM
|
#3 |
|
Registered User
Join Date: Jul 2017
Location: Joshua, Texas.
Posts: 1,303
|
Re: '50 chevy 3100
Got the bad sections of the floor cut out. Also went after other rust spots on the cab, looks like one corner will be replaced as well. Everything is either out or coming out of cab. Nothing is left on the firewall, but I still lack pulling out the gauges. New ones sure are pricey, I feel like I might have seen a thread where a c10 speedometer was used in factory spot, maybe I can make something work. I can also buy the three gauge under dash set as a temporary solution until I can afford new ones. Anyone know of any threads of diy gauge rebuild?
I'm looking at classic parts for a v8 crossmember...what do you guys think? Once floor is in I'll be ready to swap over the IFS and I'll want to put the engine in soon after. Then I can start planning pedal locations and brake lines. |
|
|
|
|
08-07-2017, 08:31 AM
|
#4 |
|
Senior Member
 Join Date: Sep 2016
Location: Hershey, PA
Posts: 1,004
|
Re: '50 chevy 3100
http://67-72chevytrucks.com/vboard/s...=541904&page=6
Starting on post #144 of this thread from @skymangs. That should give you some idea of how you can repurpose the gauge cluster. I'm trying to keep mine as stock as possible for nostalgia, but I have a feeling when all is said and done I'll end up with a set of these I saw in another build: http://newvintageusallc.mybigcommerc...uge-kit-beige/
__________________
Current Build Thread 1930 Ford Model A Modern Twist: Ford Model A Rat Rod With a Modern Twist Build Thread Phase 1 "The Swap": 1949 3100 with S10 swap. Beginner build with ambition! Build Thread Phase 2 "The Drop": Beginner Build with Ambition gets Air Ride |
|
|
|
|
08-08-2017, 03:01 AM
|
#5 |
|
Registered User
Join Date: Jul 2017
Location: Joshua, Texas.
Posts: 1,303
|
Re: '50 chevy 3100
Gigamanx thanks for that link. I have new gauges in the cup but I'm pretty certain I kept the old ones. I'll dig them out and see how they come apart and if I can fit them on a template. If it looks good I'll be willing to rear apart the newer and working ones.
I got the 235 sold! So new goodies are being ordered. Just a few things at a time, nice and slow on ordering stuff. I don't want to buy to much at once. Doesn't mean I'm not looking through a lot of catalogs though! I have found a couple of people who have done this IFS swap and they have been very helpful and forthcoming with info and advice. Lots of pics and a few suggestions and I'm still hooked on the idea. Cab is coming along great and I took a break on it to sand the hood down. So far it looks like the hood and two fenders are dent free. The other two fenders need a little tlc but looks like minor stuff. The bed is in great shape too. Only the cab is in need of a lot of work. The cab is taking a bit longer, my welder friend is teaching me some welding basics and said the floor would be a great place to learn....yea...im learning alright. He checks my work, I redo some, he checks some more. He is thankfully doing big stuff on his own. I'll post some pics soon. |
|
|
|
|
08-10-2017, 02:17 AM
|
#6 |
|
Registered User
Join Date: Jul 2017
Location: Joshua, Texas.
Posts: 1,303
|
Re: '50 chevy 3100
Found crack in the frame!
I was under the cab and noticed it. So passenger side underneath front cab mount bolt. That support piece that the floor welds to covers it up. Anyways theres a rivet that holds the bracket that supports the steps underneath that support. The crack goes through the top of the frame, and through that rivet. So the top L shape of the frame and goes down maybe a third of the way. My welding friend hasn't been back out yet but thinks it shouldn't be a problem to fix. Says frames are cut, shortened or spliced together all the time. I'm concerned as to why it cracked..is the age a problem and will be a further problem? Should be just weld it, or put new metal pieces on either side and sandwich the repair too? Bolted or welded. Would it be good to box the area? |
|
|
|
|
08-10-2017, 02:24 AM
|
#7 |
|
Post Whore
 Join Date: May 2015
Location: Alabama
Posts: 14,596
|
Re: '50 chevy 3100
crack from age and stress..your buddies correct..frames are cut and welded all the time...if done properly I wouldn't have a problem with it..never hurts to box the frame either. .
|
|
|
|
|
08-12-2017, 01:35 AM
|
#8 |
|
Registered User
Join Date: Jul 2017
Location: Joshua, Texas.
Posts: 1,303
|
Re: '50 chevy 3100
I started a new project today and I think it's working out pretty good. I read skymangs thread and I read a tech article on stevebolt about putting a volt meter in an ampmeter spot. So I pulled the gauge cluster out and got it all pulled apart.
Gauge out..  I popped the faces off by grinding the little rivets off.  I grabbed the "new" gauges. From my c10. About five years old, I replaced the big gas gauge for a rpm gauge and had the clock taken out. A nice little kit was available and now it looks like the money won't be wasted. C10 gauges..  Started taking gauges apart.  Now to put the old faces on the new gauges. The screw holes didn't line up and because of the indentions where the screws did go, I decided to flip the gauges over so I could use the flat side. I lined up the new gauges to the old faces and marked and drilled holes. New gauge/old face https://goo.gl/photos/vLn3yPZGqsbZQeDBA It looked good so I decided to do the others. One needle popped off, just needs a little glue. I held them all together with a little tape to check on clearances. https://goo.gl/photos/KoyxfbhKmG8h8rZUA I then put the cover over them. I might need to do something similar to what skymangs did..he had a piece of metal holding all the faces together and it was between the faces and the new gauges. I say this because it would help hold them together and because my new needles are taller than the old ones..so I'll space them back. With cover. https://goo.gl/photos/RxejTzWQsy69aXV88 So I can buy new decals for a few bucks. Not sure yet what I'll do about two gauges being backwards. Two of the old gauges went to the right to show low right? Last edited by Matt_50; 08-12-2017 at 02:04 AM. |
|
|
|
|
08-12-2017, 01:49 AM
|
#9 |
|
Registered User
Join Date: Jul 2017
Location: Joshua, Texas.
Posts: 1,303
|
Re: '50 chevy 3100
I messed up the pics...how do I get the pics to load without needing to click on the link?
Here's the gauge pictures. https://goo.gl/photos/g9wBbFUyu6rX5UfUA |
|
|
|
|
09-06-2017, 09:22 AM
|
#10 |
|
Senior Member
Join Date: Sep 2016
Location: Hershey, PA
Posts: 1,004
|
Re: '50 chevy 3100
Not sure if this helps, but you can see the two bolt holes where I had sprayed PB Blaster to get the two bolts out of the bottom of the core support
[IMG] 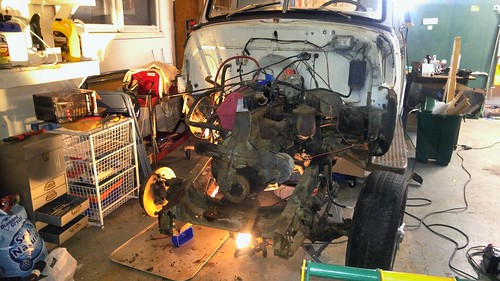
__________________
Current Build Thread 1930 Ford Model A Modern Twist: Ford Model A Rat Rod With a Modern Twist Build Thread Phase 1 "The Swap": 1949 3100 with S10 swap. Beginner build with ambition! Build Thread Phase 2 "The Drop": Beginner Build with Ambition gets Air Ride |
|
|
|
|
09-06-2017, 02:33 PM
|
#11 |
|
Registered User
Join Date: Jul 2017
Location: Joshua, Texas.
Posts: 1,303
|
Re: '50 chevy 3100
Thanks gigamanx does your support sit flush to the crossmember or is there some spacing? I called the guy I got truck from, he said there's another support he had I could look at.
I got the c10 front suspension out and bolted the older one in it's place. Fairly easy, I think easier than swapping stuff from one crossmember to the other, well maybe not.... I think 20 bolts in all, undo power steering lines and brake lines. I raised engine just enough to pull out engine mount bolts and the whole thing came out as one big heavy piece. Sometime in next few days I'll try to get it installed. Found center mark on frame and center mark on suspension. It'll get me real close and I'll just give taps with hammer with fenders on to get perfect. Though I suppose I will need to be very sure to be same on each side..how much off will mess up my caster? |
|
|
|
|
09-06-2017, 04:16 PM
|
#12 | |
|
Senior Member
Join Date: Sep 2016
Location: Hershey, PA
Posts: 1,004
|
Re: '50 chevy 3100
Quote:
__________________
Current Build Thread 1930 Ford Model A Modern Twist: Ford Model A Rat Rod With a Modern Twist Build Thread Phase 1 "The Swap": 1949 3100 with S10 swap. Beginner build with ambition! Build Thread Phase 2 "The Drop": Beginner Build with Ambition gets Air Ride |
|
|
|
|
|
09-07-2017, 08:56 PM
|
#13 |
|
Registered User
Join Date: Jul 2017
Location: Joshua, Texas.
Posts: 1,303
|
Re: '50 chevy 3100
Only spent a few minutes on truck today but I did get old front suspension off..next step is install of new one.
|
|
|
|
|
09-15-2017, 05:29 PM
|
#14 |
|
Registered User
Join Date: Jul 2017
Location: Joshua, Texas.
Posts: 1,303
|
Re: '50 chevy 3100
Suspension installed! Raised the front a little bit but i won't look at making any lowering adjustments until after the weight of the engine is in. I used 1/2 steel plate on either side to mount. Had a machines friend drill them in his off time.
Next rear suspension and installing my 10 bolt rear. Found offset perches and new bushings through classicparts and rockauto...acdelco part numbers too. |
|
|
|
|
12-15-2017, 10:38 PM
|
#15 |
|
Senior Member
Join Date: May 2007
Location: Doodah Kansas
Posts: 7,747
|
Re: '50 chevy 3100
congrats on finishing college! thats a milestone you wont ever regret
__________________
the mass of men live lives of quiet desperation if there is a problem, I can have it. new project WAYNE http://67-72chevytrucks.com/vboard/s...d.php?t=844393 |
|
|
|
|
12-18-2017, 05:54 PM
|
#16 |
|
Registered User
Join Date: Jul 2017
Location: Joshua, Texas.
Posts: 1,303
|
Re: '50 chevy 3100
So today I took the rear axle back off. Not to big a deal, it was all still pretty loose, snug but loose since I knew I was gonna roll it back out. Me and friend put the bed on so could double check that I did center it. I did. Jacked it up and rolled it out. Had to remove old perches, and I got a friend at a machine shop making me tie plates. I have measurements and a pic of what I wanted. When I get the metal back I'll put axle back on. I already has the metal and they arnt charging me, so saved a few bucks. The tie plates in the pic have 6 holes. I'm still not sure whether center bolt goes through center or through the 6th hole...
__________________
1950 Build |
|
|
|
|
12-20-2017, 01:43 AM
|
#17 |
|
Registered User
Join Date: Jul 2017
Location: Joshua, Texas.
Posts: 1,303
|
Re: '50 chevy 3100
Got plates back.. look good, 1/2 plate and no charge to drill holes. Overkill? Maybe lol but the metal was there so....
Anyway, installed and truck is back on the ground. I can now set pinion angle..advice here would be great, and shorten driveshaft. More advice appreciated on how to measure length required too. I can also mock up my fuel tank. I've got a behind the seat tank and a 70 Chevelle tank I'm curious to see how it would look in the rear.
__________________
1950 Build |
|
|
|
|
12-20-2017, 10:13 PM
|
#18 | |
|
Senior Member
Join Date: Sep 2016
Location: Hershey, PA
Posts: 1,004
|
Re: '50 chevy 3100
Quote:

__________________
Current Build Thread 1930 Ford Model A Modern Twist: Ford Model A Rat Rod With a Modern Twist Build Thread Phase 1 "The Swap": 1949 3100 with S10 swap. Beginner build with ambition! Build Thread Phase 2 "The Drop": Beginner Build with Ambition gets Air Ride |
|
|
|
|
|
01-09-2018, 07:27 PM
|
#19 |
|
Registered User
Join Date: Jul 2017
Location: Joshua, Texas.
Posts: 1,303
|
Re: '50 chevy 3100
With the holidays, I didn't touch the truck. But today was a nice day and I spent a little time on it. Got MC and booster installed. As well as brake pedal and bracket. All from the c10. Had to trim the bracket, you can see the piece. I will also bolt it too the dash support bracket. Still needs a little attention but looking good. Notice how the booster mounted to firewall... used existing lip. All the bolts are loose but the bracket will suck up inside a tad more, shouldn't be visible afterward.
__________________
1950 Build |
|
|
|
|
02-28-2018, 12:41 AM
|
#20 |
|
Registered User
Join Date: Apr 2015
Location: Fort Washington Pa
Posts: 145
|
Re: '50 chevy 3100
Very Nice. Thats the most dreaded part. My dash had a million pinholes of rust. Then i wire wheeled them and the pinholes grew a lot bigger. Cut out a lot of it and made new peices. Then POR it.
|
|
|
|
|
02-28-2018, 01:09 AM
|
#21 |
|
Registered User
Join Date: Jul 2017
Location: Joshua, Texas.
Posts: 1,303
|
Re: '50 chevy 3100
I was worried about that, but so far I haven't found any surprise rust. I found a tiny spot near dome light but it's small.
I've got some rubbery stuff used to spray under vehicles. It's thick, like rhino liner once it dries. I worked at dodge for a few years and sometimes the techs would undercoat certain areas under the trucks with it. Would you guys suggest or think it would be good to coat floor before carpet?
__________________
1950 Build |
|
|
|
|
02-28-2018, 10:19 AM
|
#22 |
|
Registered User
Join Date: Apr 2015
Location: Fort Washington Pa
Posts: 145
|
Re: '50 chevy 3100
Theres tons of threads on putting down dynomat or different types of insulation and sound deadening. Its a good idea to. I know i will.
|
|
|
|
|
04-13-2018, 07:19 PM
|
#23 |
|
Registered User
Join Date: Jul 2017
Location: Joshua, Texas.
Posts: 1,303
|
Re: '50 chevy 3100
Got a little done. I cut pieces from donor trucks hood for firewall cover a while back and I tacked it on today. Little bondo.. and some paint. Kinda ugly... still learning... but it came out ok.
Also ficxing up wheel, started filing the cracks.
__________________
1950 Build |
|
|
|
|
04-28-2018, 12:59 AM
|
#24 |
|
Registered User
Join Date: Jul 2017
Location: Joshua, Texas.
Posts: 1,303
|
Re: '50 chevy 3100
Ive been slacking keeping this build thread updated.
Another bed trade was done. No more GMC tailgate And I have better rear fenders. I got a steering column from a 70ish Chevy truck. Solved some of the problems I was facing with the older column. Also using 1950 steering wheel, just modifying it to fit. I also got a wiring kit in a while back and I have a separate thread on it and I'll post in that thread for my electrical adventure in wiring this up. Inside of cab is cleaning up pretty good, got dash holes fixed up too. I've also gotten a few of the old holes in floor taken care of. Lastly, I ditched my cut up trans member and bought a nice kit one.
__________________
1950 Build |
|
|
|
|
04-28-2018, 01:03 AM
|
#25 |
|
Registered User
Join Date: Jul 2017
Location: Joshua, Texas.
Posts: 1,303
|
Re: '50 chevy 3100
Cab cleaning up nice.
__________________
1950 Build |
|
|
|
 |
| Bookmarks |
|
|


 Hybrid Mode
