
|
Register or Log In To remove these advertisements. |
|
|
|
|||||||
 |
|
|
Thread Tools | Display Modes |
 04-09-2009, 09:57 PM
|
#26 |
|
Senior Member
Join Date: Jul 2005
Location: Winters Ca. 95694
Posts: 4,843
|
Re: LFD's XXL DropMember I6 Install
Well since we are this far into it XXL decided he wanted to update the floor and give it a smoother shape. We are also hiding all the brake lines and wires under the tunnel. So here is the second attempt for XXL to look at. I just did a quick wire buck for the shape and if we go with this then I will use it as the form to weld the sheet metal to because I can shape it and try the fit and by looking from the back I can see were the fit is right and were it needs work. Also I can do all this on the bench with a final trim once it is in place. This same design step can be used for many different tasks you might have in the shop were it is hard to get a shape to start with.
Their is about a 1/2" under the front of the seat for sound mat and carpet and then the tunnel will extend to the rear of the cab to cover the drive shaft hoop and hole. Then up at the front of the tunnel I will make a small cover for the wires and lines. Kevin LFD Inc. [IMG] 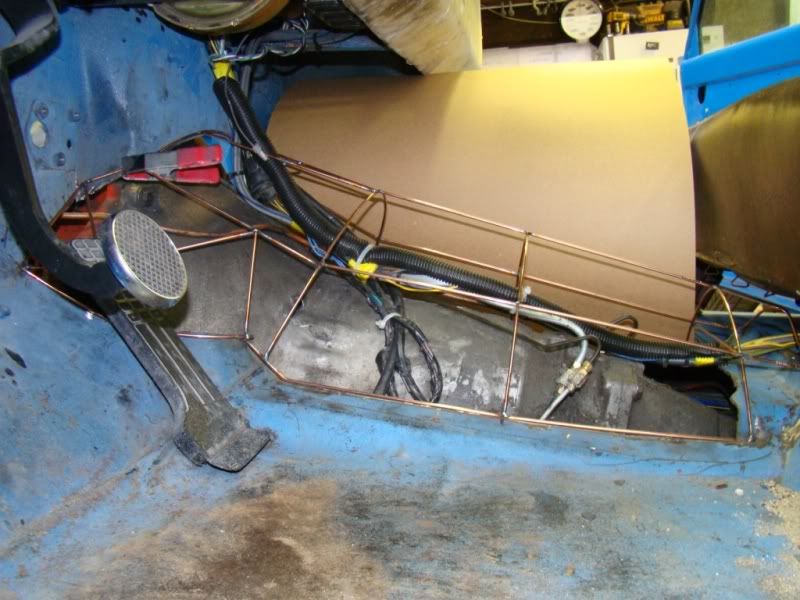 [/IMG] [/IMG][IMG] 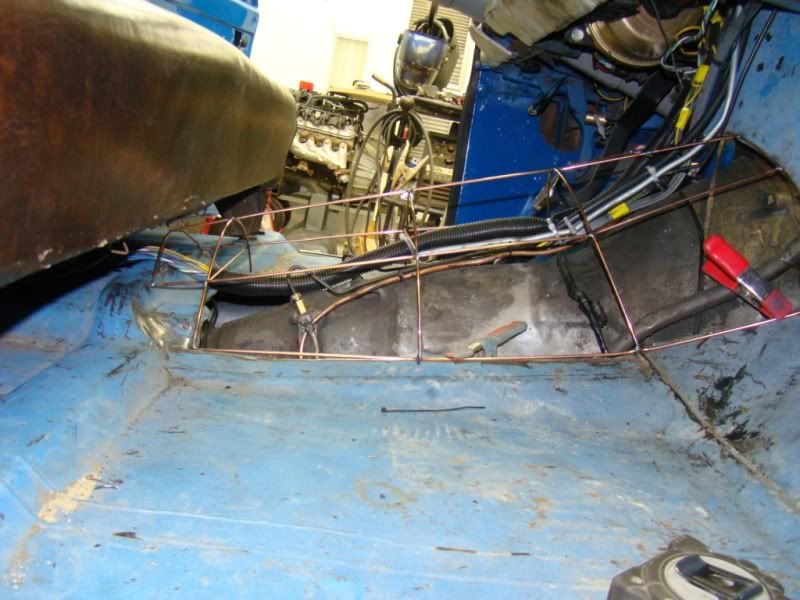 [/IMG] [/IMG][IMG] 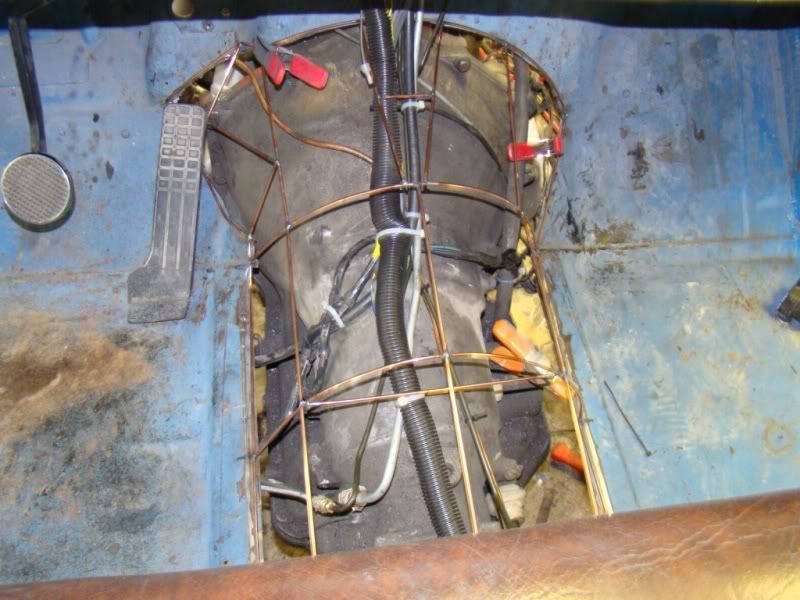 [/IMG] [/IMG][IMG] 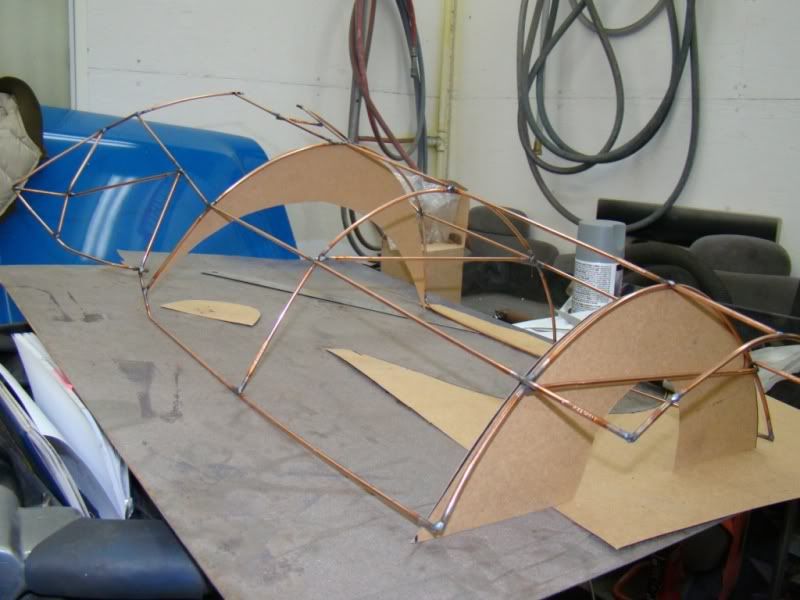 [/IMG] [/IMG][IMG]  [/IMG] [/IMG]
Last edited by Rokcrln; 04-09-2009 at 09:58 PM. |

|

|
|
04-11-2009, 01:17 AM
|
#27 |
|
Señor Member
Join Date: May 2002
Location: Edge of the world
Posts: 5,367
|
Re: LFD's XXL DropMember I6 Install
The wireframe will be useful for keeping my chickens in check when driving to market.
__________________
|
|
|
|
|
04-11-2009, 10:29 AM
|
#28 | |
|
Senior Member
Join Date: Jul 2005
Location: Winters Ca. 95694
Posts: 4,843
|
Re: LFD's XXL DropMember I6 Install
Quote:
 Kevin LFD Inc. |
|
|
|
|
|
04-11-2009, 12:27 PM
|
#29 |
|
Registered User
Join Date: Jun 2006
Location: Indiana
Posts: 4,859
|
Re: LFD's XXL DropMember I6 Install
Mmmm! Chicken marinated in ATF and road grime. Finger lick'n good!
__________________
'70 GMC C1500 LWB Power disc brakes. WooHoo! Posi 6 Lug Dana 60 Last edited by ERASER5; 04-11-2009 at 12:29 PM. |
|
|
|
|
04-11-2009, 01:39 PM
|
#30 | |
|
Señor Member
Join Date: May 2002
Location: Edge of the world
Posts: 5,367
|
Re: LFD's XXL DropMember I6 Install
Quote:
__________________
|
|
|
|
|
|
04-11-2009, 01:41 PM
|
#31 |
|
VA72C10
 Join Date: Mar 2008
Location: Midlothian, VA
Posts: 25,269
|
Re: LFD's XXL DropMember I6 Install
Classic
__________________
Looking for a 67-72 swb or blazer project in or around VA. 
|
|
|
|
|
04-11-2009, 05:50 PM
|
#32 |
|
Senior Member
Join Date: Jul 2005
Location: Winters Ca. 95694
Posts: 4,843
|
Re: LFD's XXL DropMember I6 Install
I had a few hours to get some work done before we leave for the in-laws for the rest of the weekend and I got more done than I had planned. I finished the front of the tunned and got it installed and seam sealed. I will finish the rear after I get it on the ground to make sure their aren't any drive shaft clearance issues when aired out. The paint around the open tunnel hole is a weld through primmer that works great for this kind of job were you will not be pulling the motor for awhile and don't want any rust to start. I spot welded the tunnel about every 3/4" of an inch all the way around and then used a Zink primer over the welds before the seam sealer went on. I left enough of the fire wall lip sticking below the tunnel so when the motor is pulled for re-paint we can just roll that edge over for a nice smooth edge. This way if XXL wants he can install his sound mat and interior and not worry about having to weld the edge for a finished look and burn up his insides.
While I was waiting for the paint to dry on the tunnel and the opening I went ahead and cleaned the frame and gave it a good coat of paint to clean it up a bit. I also pulled the DropMember and drilled out all the frame holes for final assembly. Then last thing before welding in the tunnel was a quick weld job on the motor mounts. So here it sits until Monday after work for the next task. Kevin LFD Inc. One thing I need to add is this tunnel turned out Fricking Bad Ars! I am glad I started with the front because I don't know if I will get as lucky with the section under the seat  [IMG]  [/IMG] [/IMG][IMG] 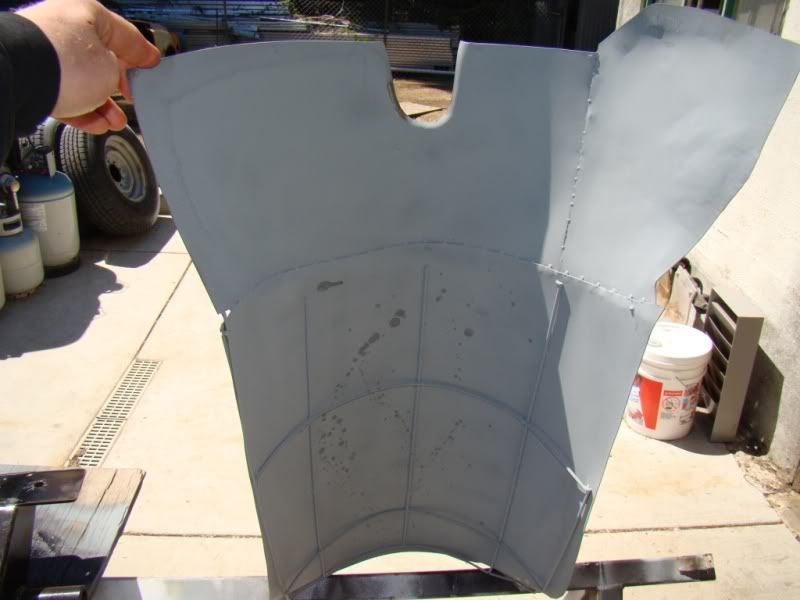 [/IMG] [/IMG][IMG] 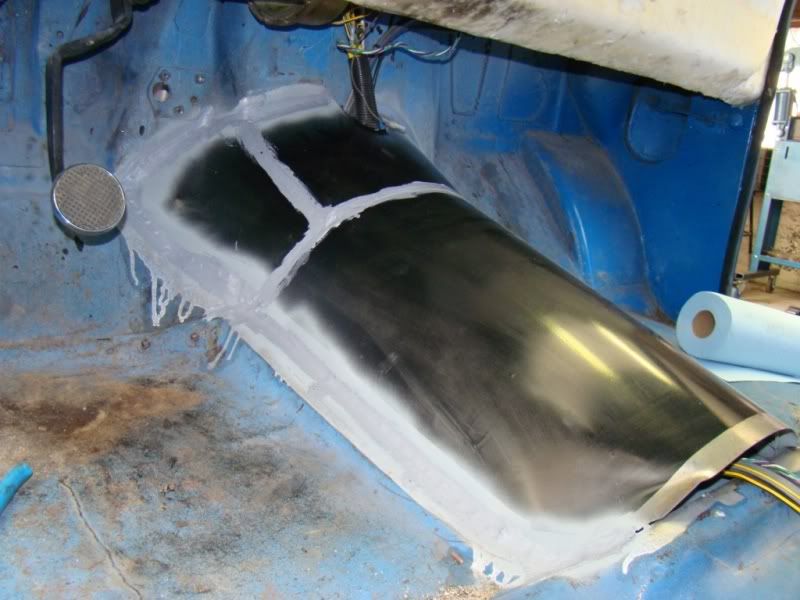 [/IMG] [/IMG][IMG] 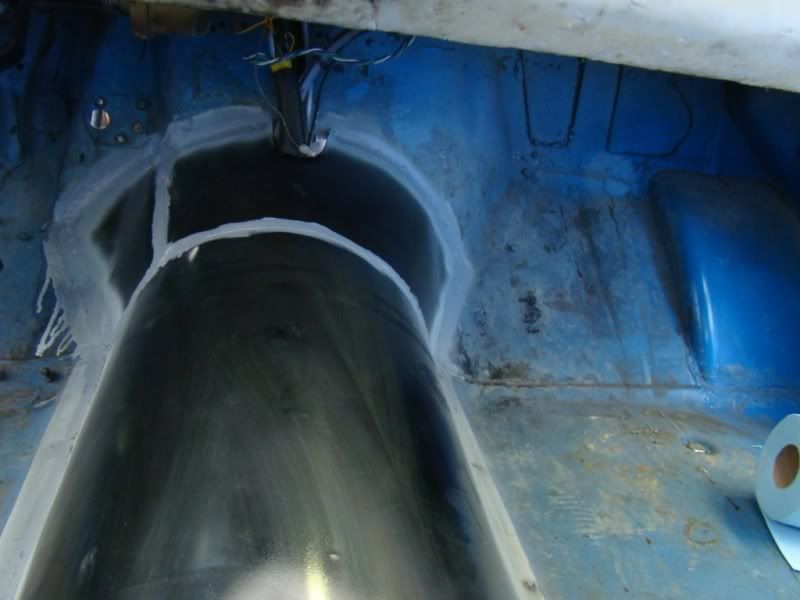 [/IMG] [/IMG][IMG] 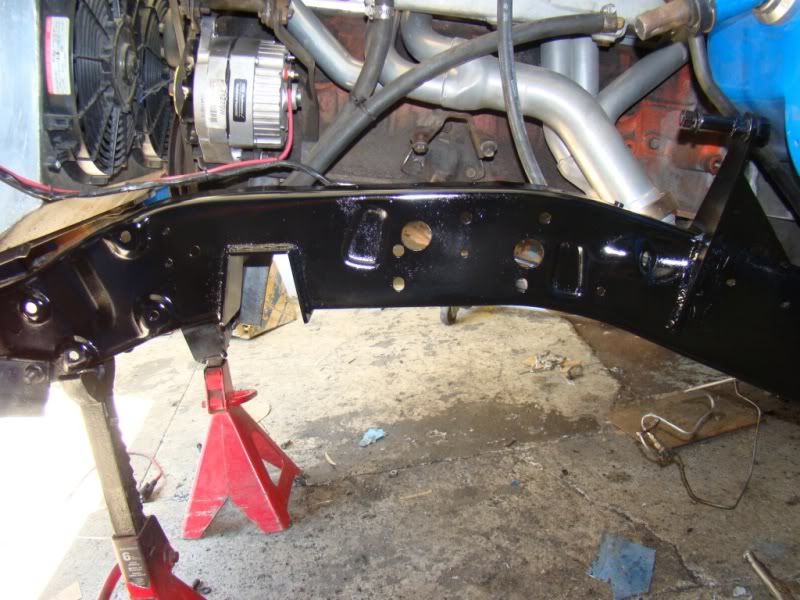 [/IMG] [/IMG][IMG]  [/IMG] [/IMG][IMG] 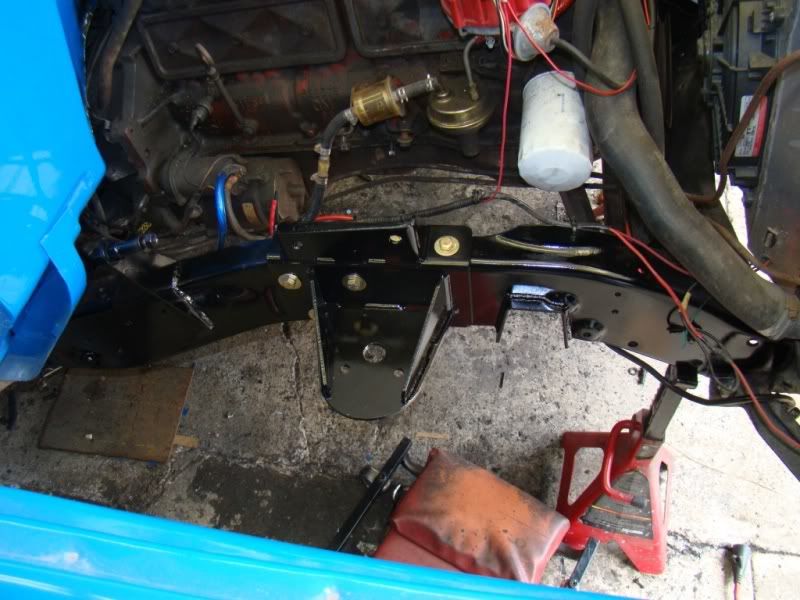 [/IMG] [/IMG][IMG] 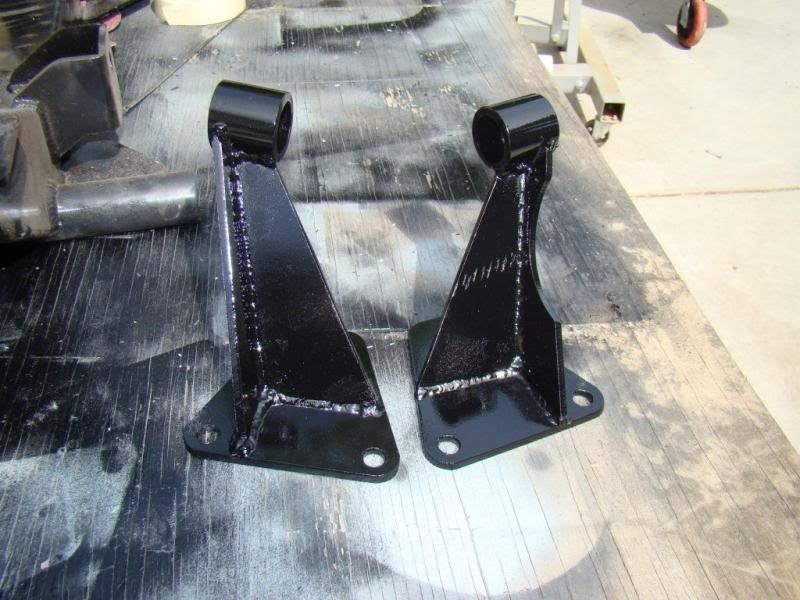 [/IMG] [/IMG]
|
|
|
|
|
04-16-2009, 06:53 AM
|
#33 |
|
Senior Member
Join Date: Jul 2005
Location: Winters Ca. 95694
Posts: 4,843
|
Re: LFD's XXL DropMember I6 Install
Almost their. I have the DropMember fully installed and I must say it went very easy and every bolt hole lined up great. I had cut the cross shafts out of the LCA and then bolted the arms in place using Never Seize on the tube spacer and lock tight on the bolt. It was a little bit of work to get the LCA in place because Nate's tolerances are very tight on this unit but a little trying and it all worked great and I guess no slop on the LCA mounts is a good thing. The rack and bags are in as well as the new motor mounts and I am working on the steering shafts now. Once they are done I will mount the UCA's, tie rod ends and power steering lines and be ready to rock and roll or in this case drag and scrape
I re-worked the throttle and have the trans shifter finished up as well. I had to cut the end of the firewall mount throttle rod off, rotate and then bend it around the header so it would clear both the header at idle and the firewall at full open. It was a biatch to get it just right so the pedal was in the right spot and I had my 3/16" clearance at the header but all is well. Kevin LFD Inc. [IMG]  [/IMG] [/IMG][IMG] 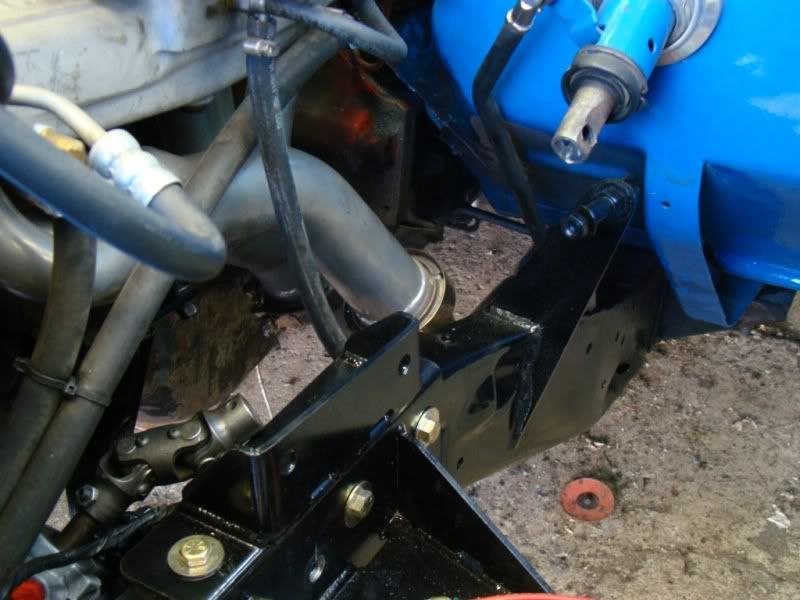 [/IMG] [/IMG][IMG] 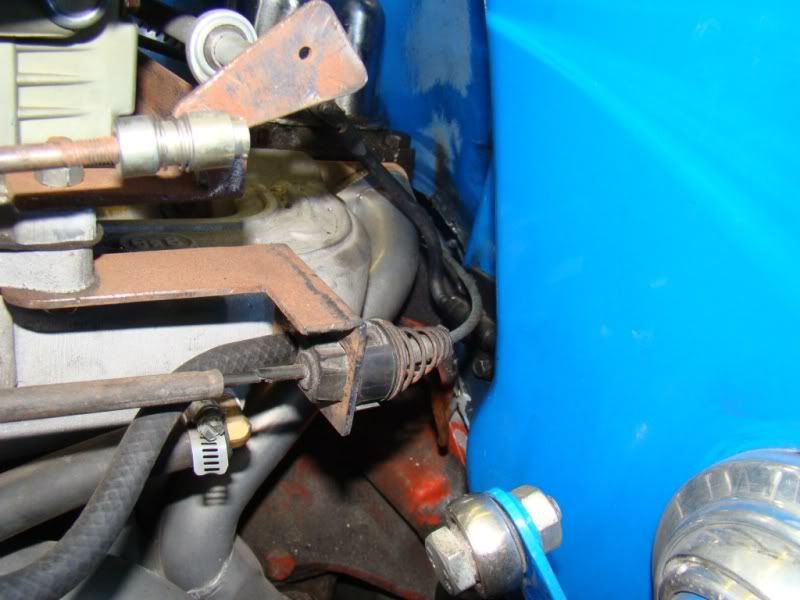 [/IMG] [/IMG]
|
|
|
|
|
04-16-2009, 08:53 AM
|
#34 |
|
PROJECT 7DEUCE
 Join Date: Dec 2002
Location: GRANTS PASS OR
Posts: 21,590
|
Re: LFD's XXL DropMember I6 Install
Ken im sure you will reuse some of the borg joints but what ever ya have left over I could sure use for my pancaked crossmember. Also kevin how much torque is used on the crosshaft nuts as noone seems to know?
__________________
GO BIG GREEN  GO DUCKS GO DUCKSMEMBER #6377 72 k-5 daily driver 6'' lift 35'' 350-350-205 slowly getting rust free. Project "7DEUCE" check out my build http://67-72chevytrucks.com/vboard/s...d.php?t=267665 Tim Powell..R.I.P EastSideLowlife..... R.I.P.. |
|
|
|
|
04-16-2009, 09:14 PM
|
#35 | |
|
Senior Member
Join Date: Jul 2005
Location: Winters Ca. 95694
Posts: 4,843
|
Re: LFD's XXL DropMember I6 Install
Quote:
First off what size joint are you using? Does it have splines on both ends or one end with a DD on the other or is it a DD on both ends? Then if it has the DD style is it the large or small? And lastly how many joints in the system 1, 2 or a max of 3? Then what brand joint is it and how was it heat treated, oil bath fast quench or a slow cool off with DTE? Ok I am almost done, does it have the thin jamb nut or the thicker regular nut? Now that we know just what we are using and how many in the system we can get to the important part of this. Are you going to use a standard or a left hand 7/16 or 1/2" wrench to torque them down. Make sure you keep the Allen wrench in the center while you torque the nut down with ether the left hand or regular wrench. Once that is done check to make sure their is not play in the system and you are set to rock and roll. Sorry it was long winded but as you can see their is allot to take in to get to the answer. Kevin LFD Inc. |
|
|
|
|
|
04-16-2009, 09:55 PM
|
#36 |
|
Senior Member
Join Date: May 2004
Location: johnstown, NY
Posts: 2,393
|
Re: LFD's XXL DropMember I6 Install
I think he was talking about the control arm crossshafts.
|
|
|
|
|
04-16-2009, 10:16 PM
|
#37 | |
|
Señor Member
Join Date: May 2002
Location: Edge of the world
Posts: 5,367
|
Re: LFD's XXL DropMember I6 Install
Quote:
edit: Whoops... what jlaird said.
__________________
Last edited by XXL; 04-16-2009 at 10:17 PM. |
|
|
|
|
|
04-16-2009, 10:57 PM
|
#38 |
|
PROJECT 7DEUCE
Join Date: Dec 2002
Location: GRANTS PASS OR
Posts: 21,590
|
Re: LFD's XXL DropMember I6 Install
MMMMMMMMMMMMMM I was a talking about the control arm shaft nuts.... But m thanks for the detailed info..
__________________
GO BIG GREEN GO DUCKSMEMBER #6377 72 k-5 daily driver 6'' lift 35'' 350-350-205 slowly getting rust free. Project "7DEUCE" check out my build http://67-72chevytrucks.com/vboard/s...d.php?t=267665 Tim Powell..R.I.P EastSideLowlife..... R.I.P.. |
|
|
|
|
04-16-2009, 11:02 PM
|
#39 |
|
Senior Member
Join Date: Aug 2005
Location: tulsa OK
Posts: 3,070
|
Re: LFD's XXL DropMember I6 Install
80 FT LBS at ride height

Last edited by 68 short step; 04-16-2009 at 11:02 PM. |
|
|
|
|
04-16-2009, 11:06 PM
|
#40 | |
|
Señor Member
Join Date: May 2002
Location: Edge of the world
Posts: 5,367
|
Re: LFD's XXL DropMember I6 Install
Quote:
If I do end up with leftovers, I'll let you know.
__________________
Last edited by XXL; 04-16-2009 at 11:07 PM. |
|
|
|
|
|
04-16-2009, 11:08 PM
|
#41 |
|
Senior Member
Join Date: Jul 2005
Location: Winters Ca. 95694
Posts: 4,843
|
Re: LFD's XXL DropMember I6 Install
Yeah sorry guys I got nothing
But what I do is install the nuts and Allen's and tighten them down so they will leave a mark in the shaft. Then I remove the joint and drill the shaft just deep enough to create a dish. Then I re-install the joint and tighten down the Allen as hard as I can with a normal size Allen wrench then same for the jamb nut. I do not use lock tight just arm power and I have never had an issue in over 25yrs. Kevin LFD Inc. |
|
|
|
|
04-16-2009, 11:12 PM
|
#42 |
|
PROJECT 7DEUCE
Join Date: Dec 2002
Location: GRANTS PASS OR
Posts: 21,590
|
Re: LFD's XXL DropMember I6 Install
Thanks ken.......mmmmmmmmmmmmm kevin uhhhhhhhh well how ya doing....hahahha.. Thanks 68 short step
__________________
GO BIG GREEN GO DUCKSMEMBER #6377 72 k-5 daily driver 6'' lift 35'' 350-350-205 slowly getting rust free. Project "7DEUCE" check out my build http://67-72chevytrucks.com/vboard/s...d.php?t=267665 Tim Powell..R.I.P EastSideLowlife..... R.I.P.. |
|
|
|
|
04-16-2009, 11:14 PM
|
#43 | |
|
Senior Member
Join Date: Jul 2005
Location: Winters Ca. 95694
Posts: 4,843
|
Re: LFD's XXL DropMember I6 Install
Quote:
Yes I think 80lbs is about right and at ride height is very important. This is because the bushing will bind up once the nut is tightened. So having it at ride height will cause an equal "bind" for a better work on up and down travel. Kevin LFD Inc |
|
|
|
|
|
04-16-2009, 11:16 PM
|
#44 | |
|
Senior Member
Join Date: Jul 2005
Location: Winters Ca. 95694
Posts: 4,843
|
Re: LFD's XXL DropMember I6 Install
Quote:
Kevin LFD Inc. |
|
|
|
|
|
04-16-2009, 11:36 PM
|
#45 | |
|
Señor Member
Join Date: May 2002
Location: Edge of the world
Posts: 5,367
|
Re: LFD's XXL DropMember I6 Install
Quote:
Thanks, Kevin.
__________________
|
|
|
|
|
|
04-17-2009, 06:48 AM
|
#46 | |
|
Senior Member
Join Date: Jul 2005
Location: Winters Ca. 95694
Posts: 4,843
|
Re: LFD's XXL DropMember I6 Install
Quote:
Kevin LFD Inc. |
|
|
|
|
|
04-17-2009, 10:55 AM
|
#47 | |
|
Señor Member
Join Date: May 2002
Location: Edge of the world
Posts: 5,367
|
Re: LFD's XXL DropMember I6 Install
Quote:
__________________
|
|
|
|
|
|
04-17-2009, 01:51 PM
|
#48 |
|
Registered User
Join Date: Dec 2004
Location: Northern AZ
Posts: 7,271
|
Re: LFD's XXL DropMember I6 Install
I'll take the grime if all the other parts come with it?! Looking sweet, lovin' 6er and all the other stuff as the majority of these "resto" vehicles use a SBC!
|
|
|
|
|
04-18-2009, 11:29 PM
|
#49 |
|
Senior Member
Join Date: Jul 2005
Location: Winters Ca. 95694
Posts: 4,843
|
Re: LFD's XXL DropMember I6 Install
Quick update. I have been doing a few hours each night and another 7 today.
I have finished up the steering, ran new front brake hard lines and flex hoses, new air lines with rubber sleeves. I finished the rack install (had to cut off 2 3/8" from each side) and put the rest of the suspension back in. When I installed the new front flex hoses I drilled a 5/8" hole in the frame then with a small set of hand files I notched the hole so when the brake line went in the hole it held it in place and locked it in with a line holder clamp in the inside of the frame. The old lines had rubbed a few times on the tires so the new ones have a 3/4 rotation in them so they coil up when they get shorter and stay way out of the tire way through out the full suspension cycle. Now when the truck is aired out the frame lays flat on the floor and the entire drive train is 2"+ off the ground. The shocks bottom out as the frame makes contact with the ground and I set the toe in -1/8" at the leading edge of the tires and it stays right there through out the full cycle as well. I am sure I forgot a few things to list but the pics should make up for it. Enjoy. Next will be the remainder of the floor tunnel and some bed work as well as the PS line kit once it gets here Monday. Kevin LFD Inc. [IMG]  [/IMG] [/IMG][IMG]  [/IMG] [/IMG][IMG] 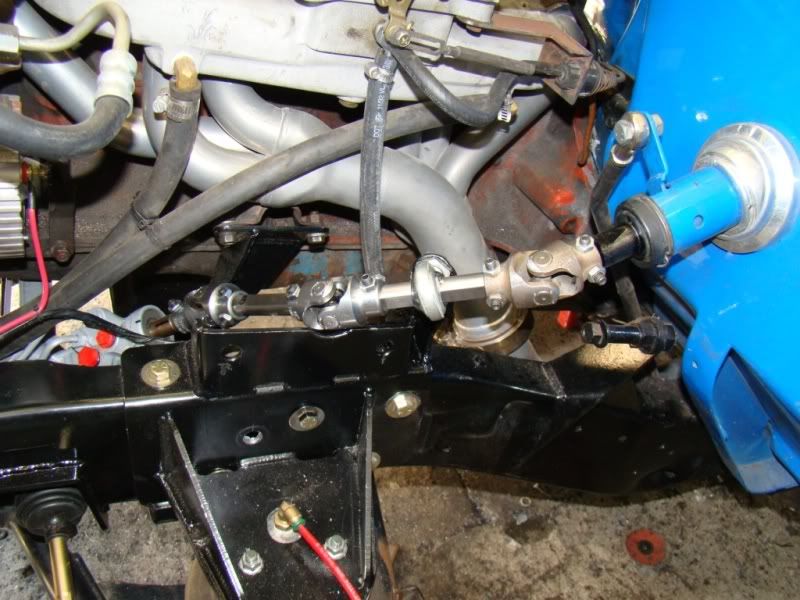 [/IMG] [/IMG][IMG]  [/IMG] [/IMG][IMG] 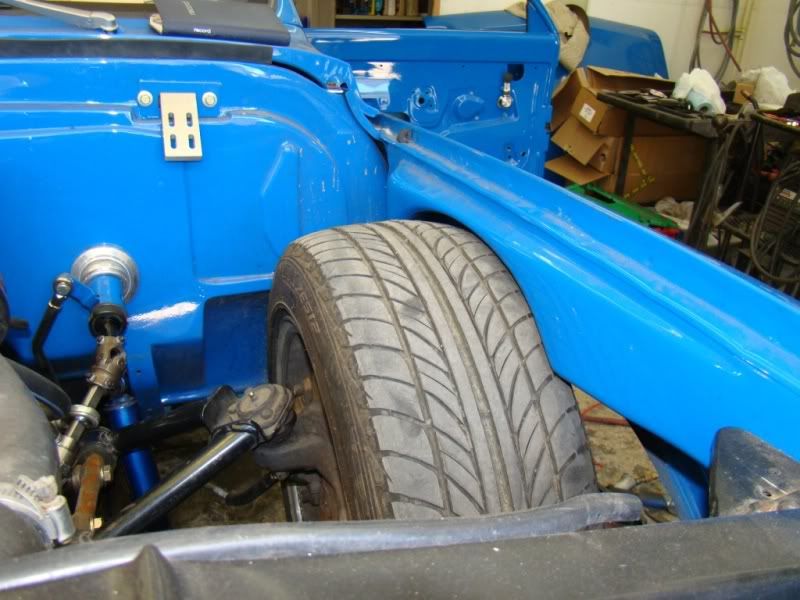 [/IMG] [/IMG][IMG] 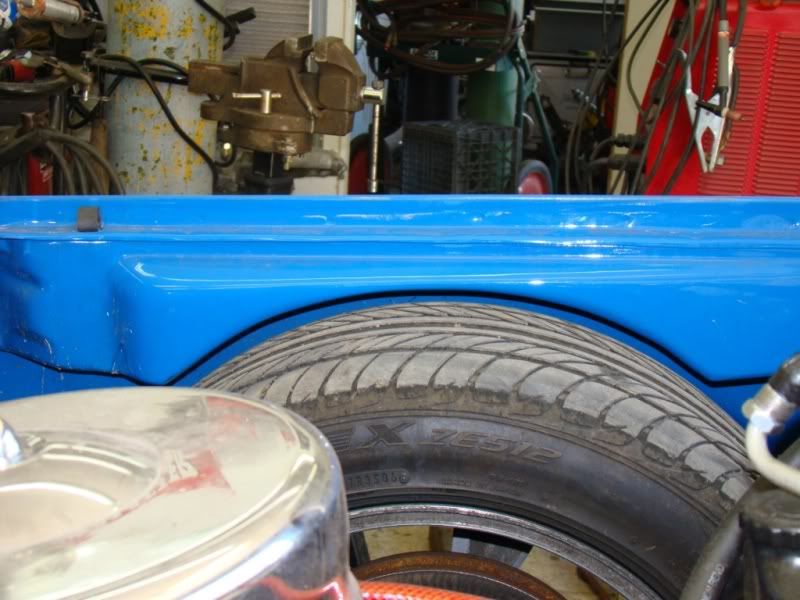 [/IMG] [/IMG][IMG] 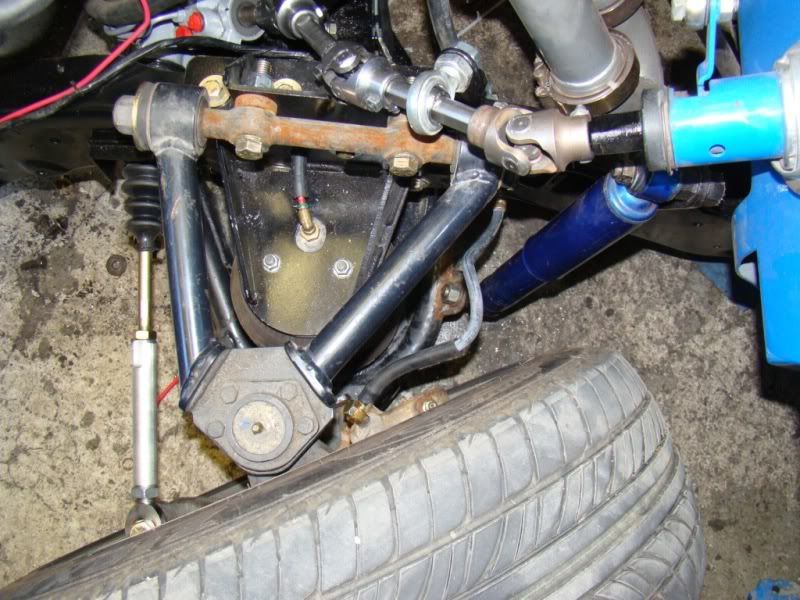 [/IMG] [/IMG][IMG]  [/IMG] [/IMG][IMG]  [/IMG] [/IMG][IMG] 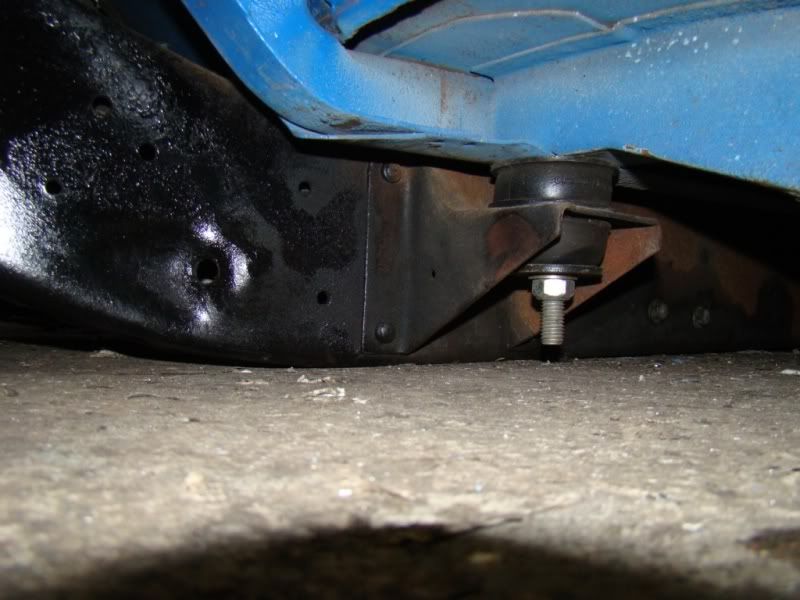 [/IMG] [/IMG]
Last edited by Rokcrln; 04-18-2009 at 11:31 PM. |
|
|
|
|
04-18-2009, 11:34 PM
|
#50 |
|
Senior Member
Join Date: Jul 2005
Location: Winters Ca. 95694
Posts: 4,843
|
Re: LFD's XXL DropMember I6 Install
A few more!
Kevin LFD Inc. [IMG] 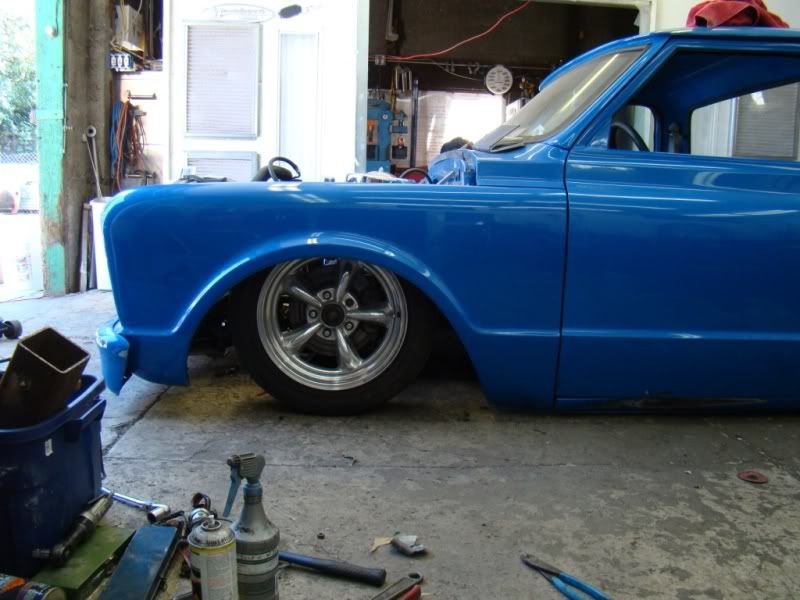 [/IMG] [/IMG][IMG] 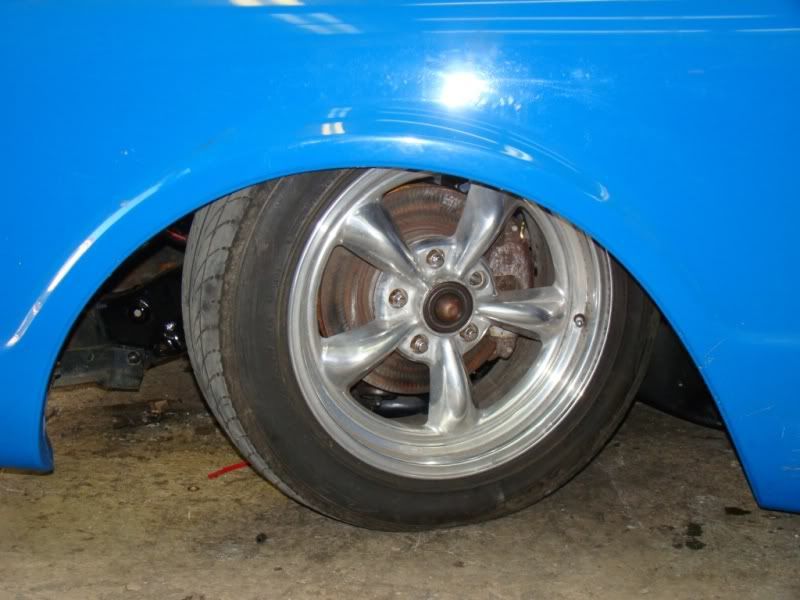 [/IMG] [/IMG][IMG]  [/IMG] [/IMG][IMG]  [/IMG] [/IMG]Clearance with 3" at the rockers! [IMG] 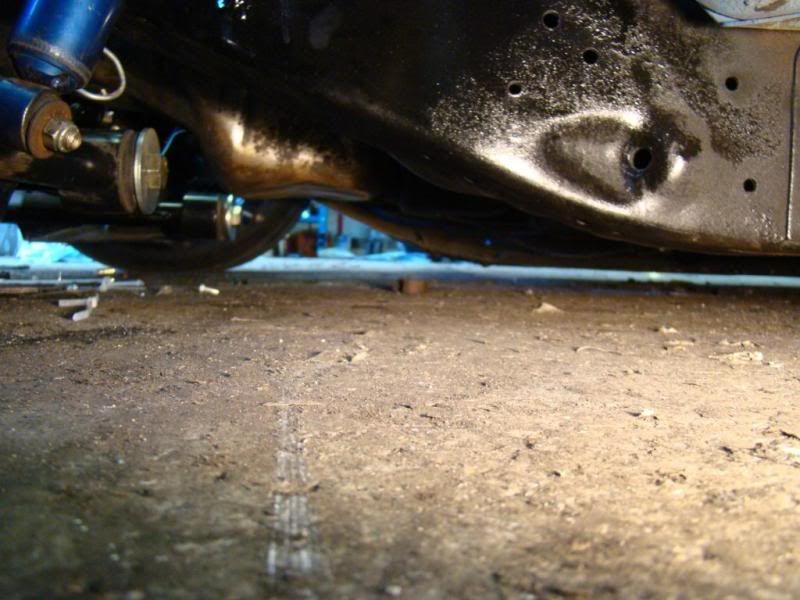 [/IMG] [/IMG]
|
|
|
|
|
| Bookmarks |
|
|


 Linear Mode

