
|
Register or Log In To remove these advertisements. |
|
|
|
|||||||
|
|
Thread Tools | Display Modes |
 07-20-2004, 02:01 AM
|
#1 |
|
Registered User
Join Date: May 2000
Location: Petrolia,Ontario,Canada but working in Port Huron,Mi.
Posts: 1,769
|
Finally got my A/C working(PIC'S)
Well I had rebuilt my A/C and heating system about 5 months ago but never got around to getting the A/C working.
I got er done last week though. I retro'd the system from R12 to R134a and got rid of the POA valve. I used a POA eliminator from Old Air Products.Along with a fixed orafice tube(FOT) and a pressure cutout switch. The system cools O.K.,still some fine tuneing needed but I get about 50F at the vents.Not bad but I'd like it colder. Here's a few pic's of the process. This is the connection to the low pressure side of the system.That's the POA eliminator I had mentioned earlier.An integral pressure cutout switch comes with the POA eliminator. I just spliced into the existing A/C compressor wire.What it does is it shuts down the compressor and prevents the evap. from icing up.(thanks Brian)  Here is the high side connection at the compressor.I used a Sanden SD5H14 compressor.  I used is a RobinAir,1/2hp,6cfm vacume pump to evacuate the system before charging.  The gauge set I used.This allows you to measure the vacume you pull on the system as well as the pressure in the system while chargeing it. In this pic I'm evacuating the system.The gauges are at -29.5inHg,which is as far as you can go on the planet Earth.  The can tap I used.I ended up overcharging the system a bit.I used four(4),12oz cans of R134a to charge it up.  Killin time while evacuateing the system  I connected my can tap to my vacume pump via an adaptor I bought at Car Quest.This way I can eliminate the chance of air getting in the system when I have to change cans during the charging process. 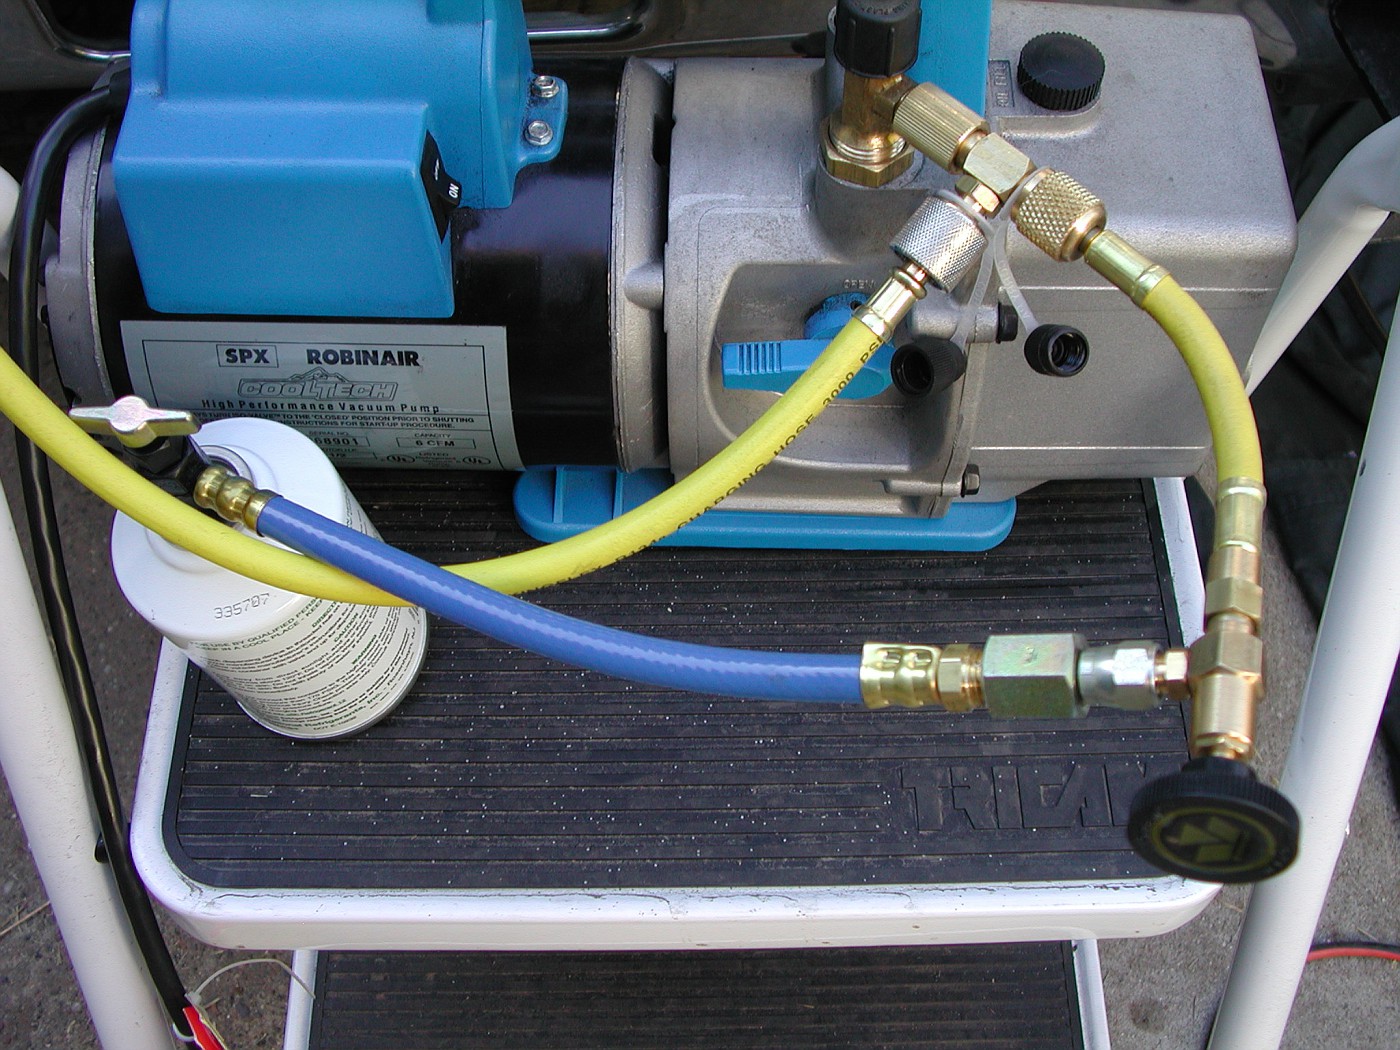 I had to "jump" the cutout switch during the first bit of charging.The compressor would not engage untill some pressure was in the system.  Just an overhead view of things.  This is the top tube of the evaporator core.Condensing like it should,cool to the touch but not iceing up.  And the bottom line.The line on the right is the FOT.It meters the amount of r134a that got through the evap. core.It function like the TVX valve on the old POA system.  Like I said I still nedd to "tune" it a bit.Might need to put in a smaller FOT or take out a bit of R134a.Worst case would be a new parallel flow condensor.I have the orig. type in there now.Through the reading I've done the orig. condensor design may not work that well when retro'd to R134a.
__________________
71 blazer,350SBC,approx.375HP,700R4,factory GM TPI.Dual electric fans,33x12.5x15 ATR on stock suspension. Petrolia,Ontario,Canada but working in Port Huron,MI. See ALL my Blazer pic's HERE Last edited by augie; 04-13-2011 at 01:00 AM. |

|
|
07-20-2004, 07:54 AM
|
#2 |
|
Registered User
Join Date: Feb 2000
Location: Center City, MN, USA
Posts: 3,253
|
BobbyK,
Thanks for the post. I'm in the middle of installing factory AC in my truck (originally non-AC). However I'm going the route of adjusting the factory POA for R-134a and using all stock components. Please post a follow-up if you decide you need a newer style condensor. I too am going to attempt to use a stock one. How long did it take that RobinAir unit to suck it down to -29.5inHg? BTW, in the "killing time" picture... Hockey is life. 
__________________
'70 cab, '71 chassis, 383, TH350, NP205. '71 Malibu convertible '72 Malibu hard top Center City, MN |
|
|
|
07-20-2004, 08:34 AM
|
#3 |
|
Registered User
Join Date: Apr 2004
Location: arkieland
Posts: 1,070
|
With 4 cans you are probably overcharged. With r134a conversions I usually start at 50 percent of the R12 charge, then slowly charge til compressor stays engaged @2000 rpm & suction line is sweating all way back to compressor. If you have adequate airflow thru condensor it should work, although a parallel flow would be better for r134a. That switch in pic is a low pressure cutout for preventing evap freeze up, it can usually be adjusted for optimum performance. Brian
|
|
|
|
07-20-2004, 08:36 AM
|
#4 |
|
Registered User
Join Date: May 2000
Location: Petrolia,Ontario,Canada but working in Port Huron,Mi.
Posts: 1,769
|
"Hockey is life"
That's my montra man! The vacume pump had it down to -29inHg in minutes. I evacuated it for 30 min X2 with 15 min. breaks inbetween.The system held the vacume fine so I was confident I did not have any leaks. I'm going to take the truck for a spin today and see how the A/C performs while the truck is moving.I may also water the condensor down and see if that makes a difference. I will definitley keep the board updated.
__________________
71 blazer,350SBC,approx.375HP,700R4,factory GM TPI.Dual electric fans,33x12.5x15 ATR on stock suspension. Petrolia,Ontario,Canada but working in Port Huron,MI. See ALL my Blazer pic's HERE |
|
|
|
07-20-2004, 08:45 AM
|
#5 |
|
Registered User
Join Date: May 2000
Location: Petrolia,Ontario,Canada but working in Port Huron,Mi.
Posts: 1,769
|
Brian,thanks.
Thinking about it and of course your right.What would a high pressure switch be doing on the low side. I edited my 1st post to reflect that.
__________________
71 blazer,350SBC,approx.375HP,700R4,factory GM TPI.Dual electric fans,33x12.5x15 ATR on stock suspension. Petrolia,Ontario,Canada but working in Port Huron,MI. See ALL my Blazer pic's HERE |
|
|
|
07-20-2004, 07:00 PM
|
#6 |
|
Registered User
Join Date: May 2000
Location: Petrolia,Ontario,Canada but working in Port Huron,Mi.
Posts: 1,769
|
I took the Blazer for a little city and hwy driveing today.
Vent temp's were no better than what they were in my driveway,55-60F. I pulled into the driveway and watered down the condensor. Otherthan decreasing the preasures and makeing my compressor kick in and out it did nothing for the vents temps. With watering down the condensor the presures went down to(at idle) Low-25-30 High-150 They were: low-40 high-210-240 I read on the net that changeing the size of the FOT may make a difference. I'll prob. end up starting over and seeing if I can get the PROPER amount of R134A in the system. My manual says the orig. GM 4 Season A/C system took 3.4 lbs of R-12. So if I start at 60% of that: 1lb=16oz 3.4x16=54.4oz. 60% of 54.4=32.64 1 can of R134a =12oz. So I need to start with 2.72 cans Does that sound right? Would anyone recommend a change of the FOT.There is a white one in there now. Is it normal for some oil to drain out of the bottom(inlet) tube of the Evap. core. It did this when I removed the FOT.
__________________
71 blazer,350SBC,approx.375HP,700R4,factory GM TPI.Dual electric fans,33x12.5x15 ATR on stock suspension. Petrolia,Ontario,Canada but working in Port Huron,MI. See ALL my Blazer pic's HERE Last edited by BobbyK; 09-25-2005 at 12:13 AM. |
|
|
|
07-20-2004, 07:08 PM
|
#7 |
|
Registered User
Join Date: Apr 2004
Location: arkieland
Posts: 1,070
|
I have had good luck using a blue Ford orifice tube, specify one for 1990 full-size Bronco. It is somewhat smaller(orifice size) so it produces a lower evap temp. 2 & 1/2 cans is a good starting point, may not need much more than that. They are not all the same, but they all interchange- there is white,red,blue etc all diff orifice sizes for diff specs. Oil will disperse thru entire system. Hope this helps. Brian
|
|
|
|
07-21-2004, 04:45 PM
|
#8 |
|
Registered User
Join Date: Nov 2001
Location: Springfield, MO
Posts: 2,930
|
Bobby (and all) I have a few ?s. First I also have installed a TPI I however am still at the chassis stage the body is not back on the frame, I have the engine running and broke in. Where did you get the compressor and the brackets? And what are they? I have a 327 short water pump with no acc holes in the heads. I have the original 68 style HUGE bracket that mounts over the valve cover to the intake and exhaust manifold as well as the water pump. I would like to do away with that and get things more aligned. I also have PS and of course Alt. My thoughts were like you did since mine is original air truck but use new compressor but use the remaining items I too will need to replace the POA and probably hoses. Is this a good route? Sounds like it is working for you. I have all the original AC on the truck but I think the new compressors are more efficient?
This AC stuff is foreign to me, I am not sure what needs (or should) be replaced? Any inputs I didnt want to spend the 700-800 for a new entire system? Thanks Dave
__________________
Dave 1968 Custom Chevy with turbo charged 5.3 gen III 4l80e swap 1967-71 GMC 3/4 ton long step 4x4 (not sure what year exactly?) "A good friend will bail you out of jail...but a true friend will be sitting next to you saying "that was frekin awesome". "If it doesn't fit force it...If it breaks then it needed to be replaced anyway!" |
|
|
|
07-21-2004, 05:14 PM
|
#9 |
|
Registered User
Join Date: May 2000
Location: Petrolia,Ontario,Canada but working in Port Huron,Mi.
Posts: 1,769
|
I got all my A/C parts from Ricks Pickup Parts.Ask for Shawn,he's a member here.
1-877-641-1387 www.****************.com The Compressor is a Sanden SD5H14,$210.00 bucks The brackets are Alan Grove,$85.00. If you have all the old R-12 stuff stick with it.Shawn at Ricks Pickup Parts can set you up with a new R-12 compressor and brackets. I'm still messing with my system as I'm not getting adequate cooling yet. I've just changed the orifice tube to the blue Ford one.It's a tad smaller than the white GM I had in there.Brian(64fleetside) suggested this. I'm evacuateing my system out again as we speak. The Alan Grove brackets attach via the 1st 2 exhaust manifold bolts and to the water pump.So you don't need to worry if you don't have any threaded holes in the head. The POA valve can be adjusted to work well with R134a. I'm still messin with things so hold tight.I will be posting updates as I finish things.
__________________
71 blazer,350SBC,approx.375HP,700R4,factory GM TPI.Dual electric fans,33x12.5x15 ATR on stock suspension. Petrolia,Ontario,Canada but working in Port Huron,MI. See ALL my Blazer pic's HERE |
|
|
|
07-21-2004, 05:27 PM
|
#10 |
|
Registered User
Join Date: Nov 2001
Location: Springfield, MO
Posts: 2,930
|
Thanks Bobby that makes it easy. I have ordered from Shawn before so it should be painless again. Did you get your hoses made or did ricks supply them also?
I guess I need to decide to go with the R134 or the R12? I do want to replace the dryer cause my system has been "open" for a while. Dave
__________________
Dave 1968 Custom Chevy with turbo charged 5.3 gen III 4l80e swap 1967-71 GMC 3/4 ton long step 4x4 (not sure what year exactly?) "A good friend will bail you out of jail...but a true friend will be sitting next to you saying "that was frekin awesome". "If it doesn't fit force it...If it breaks then it needed to be replaced anyway!" |
|
|
|
07-22-2004, 01:52 AM
|
#11 |
|
Registered User
Join Date: May 2000
Location: Petrolia,Ontario,Canada but working in Port Huron,Mi.
Posts: 1,769
|
I had the hoses made locally.
I'd replace the receiver/dryer,O-rings, and fully flush the system before evacuateing and charging with R134a.
__________________
71 blazer,350SBC,approx.375HP,700R4,factory GM TPI.Dual electric fans,33x12.5x15 ATR on stock suspension. Petrolia,Ontario,Canada but working in Port Huron,MI. See ALL my Blazer pic's HERE |
|
|
|
07-22-2004, 02:13 AM
|
#12 |
|
Registered User
Join Date: May 2000
Location: Petrolia,Ontario,Canada but working in Port Huron,Mi.
Posts: 1,769
|
Well here's the latest.
Evacuated the system again today to start from scratch. Replaced the Orifice tube from a white GM(.72) one to a Blue Ford (.67)one. Pulled vacume for for 1hr x2 with 30 minutes inbetween.No leaks,presure stayed at -29.5. Added 2.5 cans(30oz) of R134a. At idle Low-40 high-200-210 vent temp 54F abiant temp 2" infront of condensor-84F At about 1500rpm Low-30 high-180 Vent temp-52F Watered down the condensor and presures when to: Low-25 High-140-150 vent temp up to 60F I can't seem to break the 50F mark.
__________________
71 blazer,350SBC,approx.375HP,700R4,factory GM TPI.Dual electric fans,33x12.5x15 ATR on stock suspension. Petrolia,Ontario,Canada but working in Port Huron,MI. See ALL my Blazer pic's HERE |
|
|
|
07-22-2004, 09:02 AM
|
#13 |
|
Registered User
Join Date: Apr 2004
Location: arkieland
Posts: 1,070
|
Try adding a little more very slowly, even at 84 degrees you should have 200-250 psi on high side at least. I like 1500-2000 rpm when charging. Brian
|
|
|
|
07-22-2004, 03:39 PM
|
#14 |
|
Registered User
Join Date: May 2000
Location: Petrolia,Ontario,Canada but working in Port Huron,Mi.
Posts: 1,769
|
Well...good news
Today I added 6oz. of R134a for a total of 36oz in the system.Had some good results with this change. Here's the data as of today(7/22/04) At about 1700rpm low=25 high=peaked at 260 vent temp-44-46F ambiant temp lower today=75F. fan on high Compressor cycled,on for 30sec,off for 5sec. at Idle(approx.700rpm) low=30-38 high=180-230 vent temp=44-46F. fan on high Compressor DID NOT cycle. Here's the kicker. I turned the interior fan on low and my vent temps dropped even more. at idle low=30 high=180 vent temp=38-40F.!!!! Compressor DID NOT cycle. At 1700 rpm low=25 high=200-220 vent temp=42-43F. Compressor cycled,on 30 sec,off 5sec. So I'm pretty happy with those vent temps. Thanks to those that made suggestions. Hope this info. can help others down the line. 
__________________
71 blazer,350SBC,approx.375HP,700R4,factory GM TPI.Dual electric fans,33x12.5x15 ATR on stock suspension. Petrolia,Ontario,Canada but working in Port Huron,MI. See ALL my Blazer pic's HERE |
|
|
|
07-22-2004, 09:32 PM
|
#15 |
|
Registered User
Join Date: Nov 2001
Location: Springfield, MO
Posts: 2,930
|
great news Bobby. I just need to plan my route now.
Dave
__________________
Dave 1968 Custom Chevy with turbo charged 5.3 gen III 4l80e swap 1967-71 GMC 3/4 ton long step 4x4 (not sure what year exactly?) "A good friend will bail you out of jail...but a true friend will be sitting next to you saying "that was frekin awesome". "If it doesn't fit force it...If it breaks then it needed to be replaced anyway!" |
|
|
|
07-22-2004, 10:14 PM
|
#16 |
|
Registered User
Join Date: Apr 2004
Location: arkieland
Posts: 1,070
|
You can adjust the cycling switch(low press sw) by turning the small screw. Just play w/it to obtain max performance, i.e. if you have great temps but comp is kicking in/out too much a small change in the setting may help a lot. It determines the press at which the comp kicks in/out. Engine At 1500 RPM, I usually turn fan off, watch low side guage, it will start dropping. When it is close to 25-30, you want comp to cycle off to prevent freeze up. Adjusting this is important in humid areas especially. Brian
|
|
|
|
07-22-2004, 11:59 PM
|
#17 |
|
On the road
  Join Date: Jan 2004
Location: NATCHITOCHES LOUISIANA
Posts: 805
|
BobbyK,
Thanks for posting all the pics and sharing the info. I too have been fighting the stock AC on my 72 SWB but my results are not as good as yours. I am running the stock A6 compressor, but also have switched out the POA for the same kit you have and have converted to 134A. My truck is great on the highway (not as cold as yours) but idling in traffic the vent temp goes up to 65/70 and it sucks. I have adjusted my charge all over the place, tried every trick I know and pulled what little of my hair I have left out. The thing I think I need to do is to get rid of the expansion valve and use a FOT as you have. I saw a post recently where someone did this but can't find it now. It was a universal FOT and had compression fittings that fit the thing in the line. Any chance you have any info (part number) and details on how you installed this or did you use an evaporator with the fitting for the FOT in place already such as Old Air offers? Any chance of a pic? I have a new stock evaporator and the line is bent upwards to connect to the expansion valve, but have no problems modifying it.Any info is appreciated. Thanks, Mike |
|
|
|
07-23-2004, 09:44 AM
|
#18 |
|
Registered User
Join Date: Jul 2000
Location: NC
Posts: 987
|
BobbyK...quick question. How did you flush your system?
|
|
|
|
07-23-2004, 10:24 AM
|
#19 |
|
Registered User
Join Date: Apr 2004
Location: arkieland
Posts: 1,070
|
The factory a/c in these trucks CAN be made to work quite well, the expansion valve is actually a better metering device than an orifice. Poor performance w/R134 at idle is common. You need LOTS of airflow thru condensor, 4 core rad, seal all around the rad to force all air thru rad/cond. GOOD fan clutch w/7 blade fan or go w/dual electric. If you really want cold, use R12, but it is very costly. Another thing to check is a cruddy evaporator, I have seen them collect leaves, pine needles, then fungus grows etc. restricting airflow thru the evap. I have worked on mobile a/c for nearly 20 years, I have seen a lot. Brian
|
|
|
|
07-24-2004, 01:30 AM
|
#20 |
|
Registered User
Join Date: May 2000
Location: Petrolia,Ontario,Canada but working in Port Huron,Mi.
Posts: 1,769
|
Alex Hayley,the only part I had flushed was the evap. core.It was the only "used" part in the system.Everything else was new.I had the evap. core presure tested and flushed by a local shop.
GSFMECH,I cut the end of the evap. core(the part that extends up) and had a local shop TIG weld on an aluminium fitting so I could just add the FOT on. I believe the fitting size is generic. Here you can see the fitting that was TIGed on  I did buy one of the retrofit replacement FOT's (with compression fittings) but was told they have a tendancy to leak. Here's the FOT kit that uses the compression fittings.I ended up useing this Blue Ford FOT.The one I started with was a White GM FOT  I actually ended up useing this one just without the compression fittings and useing the proper screw on fittings. 64fleetside,I run TWO 14" PermaCool fans with a shroud.The problem with my set up is how how the Condensor is mounted. You vcan see here the large gap at the top of the condensor.There is the same gap at the bottom of the condensor as well.  If I some how make a outside shroud I could cool the condensor even better? All my A/C pic's can be seen HERE
__________________
71 blazer,350SBC,approx.375HP,700R4,factory GM TPI.Dual electric fans,33x12.5x15 ATR on stock suspension. Petrolia,Ontario,Canada but working in Port Huron,MI. See ALL my Blazer pic's HERE Last edited by augie; 04-13-2011 at 01:03 AM. |
|
|
|
07-24-2004, 08:13 AM
|
#21 |
|
blood type; Retumbo
Join Date: Jan 2004
Location: next to my reloading bench
Posts: 10,269
|
judging by how you have lower vent temp with fan on low it sounds like a blend door problem.
for the condensor airflow issue you could put a 12"fan in front of condensor or put a plate covering gap @ top & bottom. the extra fan would be better. use the compressor clutch circuit to activate a relay. optimum pressures for a 75-80 deg. day in sun with fan on high would be low about 30-35 psi, high about 150-175 psi. should have near 20 degree drop in temp across condensor & 5 degree drop across evaporator. I do caution about using the 12 oz cans. while switching cans you could get air in system . I suggest having a good AC shop do the evac & recharge with a machine. R134 is more finicky. R134 usually takes about 75% charge as compared to R12.
__________________
Man rule #77...if you own a 67 stepside with a caddy 472 you will never be in danger of loosing you man card |
|
|
|
07-24-2004, 11:47 PM
|
#22 |
|
On the road
Join Date: Jan 2004
Location: NATCHITOCHES LOUISIANA
Posts: 805
|
BobbyK,
You are the man. Thanks for the info, this is a great post. This is the reason I keep coming back here. A lot of 1st class info and great people. I think I am going to try the FOT and see what happens. I have been running these AC's for the last 25 to 30 years and have tried a lot of different combos from R12 to "freeze 12", cooling fans, R134A in a stock system etc. etc. Back when R12 was cheap and everything was right these systems worked OK. I have had a lot of trouble getting converted to 134A but my current configuration is better than it has ever been since I made the change. Right now going down the highway it is better than my 98 Z71 but in traffic it sucks. Thanks again for the great post, Mike |
|
|
|
07-25-2004, 01:00 AM
|
#23 |
|
Registered User
Join Date: May 2000
Location: Petrolia,Ontario,Canada but working in Port Huron,Mi.
Posts: 1,769
|
68C15- the way I had it set up(my hoses I mean)I was able to pull vacume after changeing cans.
It was like this:screw can to tap.Close valves on gauge.Open valve on can tap,pull vacume on lines,cut off vacume,close can tap valve,pierce can,open can tap valve,then open low side valve on gauge.  Also in regaurds to the blend door.I rebuilt the whole A/C/heater box.The blend door was cleaned,lubed and the seal around that door was in remarkable shape,soft,supple and not deformed. I made sure the door was closeing properly when I reconnected my cables as well. To top it off I clamped off both my inlet and outlet hoses to the heater core,just to make sure no hot coolant was effecting things. I think I will try to fab up an outer shroud to try and direct more air through the condensor. I don't really want to add ANOTHER e-fan (that would make 3)and would prob. go to a parallel flow condensor before I did that. I still need to adjust the cutoff switch to cut the compressor off at the presures you guys have mentioned.
__________________
71 blazer,350SBC,approx.375HP,700R4,factory GM TPI.Dual electric fans,33x12.5x15 ATR on stock suspension. Petrolia,Ontario,Canada but working in Port Huron,MI. See ALL my Blazer pic's HERE Last edited by augie; 04-13-2011 at 01:04 AM. |
|
|
|
06-01-2005, 01:28 PM
|
#24 |
|
Lovin' Life in Miss.!
Join Date: Mar 2004
Location: Puckett, Mississippi
Posts: 1,937
|
BobbyK, thanks man. I've been getting close to doing this. With the info you have provided I think I can finish up when funds permit. The only thing I am thinking of doing differantly is using a variable orifice, supposed to aid idle temps. Here's a link: http://www.acsource.com/index.asp?Pa...S&Category=273
__________________
The truck... you hear that? No really, you did hear that?!!! |
|
|
|
06-01-2005, 01:52 PM
|
#25 |
|
Registered User
Join Date: May 2000
Location: Petrolia,Ontario,Canada but working in Port Huron,Mi.
Posts: 1,769
|
The site I got all my A/C info. from says those things are not worth the 25.00 bucks.
And that your better off just putting in a $3.00 fixed one.I used a Blue "Ford" orifice tube.
__________________
71 blazer,350SBC,approx.375HP,700R4,factory GM TPI.Dual electric fans,33x12.5x15 ATR on stock suspension. Petrolia,Ontario,Canada but working in Port Huron,MI. See ALL my Blazer pic's HERE |
|
|
| Bookmarks |
|
|


 Linear Mode

