
|
Register or Log In To remove these advertisements. |
|
|
|
|||||||
 |
|
|
Thread Tools | Display Modes |
 07-04-2011, 10:53 PM
|
#51 |
|
Registered User
Join Date: Dec 2009
Location: vancouver b.c....is the biggest place most people would know but I am actually out in the valley 45 mins away
Posts: 2,050
|
Re: '62 BBW SWB Highschool ride returns
WOW
Nice job cleaning all of that up....looks great
__________________
1966 Pro street build http://67-72chevytrucks.com/vboard/s...?t=448089[ 1958 LS 2 build http://67-72chevytrucks.com/vboard/s...d.php?t=527123 1966 SBFS low and go http://67-72chevytrucks.com/vboard/s....php?p=5799909 1966 SBFS street HULK http://67-72chevytrucks.com/vboard/s...=1#post5886625 Poject Low and go gets a 6.2 ltr LSA supercharged with 6 speed automatic Aluinum Radiator Dealer pm for details |

|

|
|
07-05-2011, 12:13 AM
|
#52 |
|
Registered User
Join Date: Dec 2010
Location: sanford nc
Posts: 499
|
Re: '62 BBW SWB Highschool ride returns
Hey, Wow your work looks very very good!! What are you using to strip all the old paint off? How are you laying your cab over and manuvering it around?? Do you just have buddys come over and man handle it or are you using a lifting device?? Im doing the same thing to mine but i need to flip it over so I can weld in the new cab support braces.
My build: http://67-72chevytrucks.com/vboard/s...d.php?t=439559
__________________
  69 chevelle malibu, 64 C-10 shortbed 69 chevelle malibu, 64 C-10 shortbed
|
|
|
|
|
07-06-2011, 11:21 AM
|
#53 | ||
|
Registered User
Join Date: Feb 2009
Location: Milwaukie, Oregon
Posts: 204
|
Re: '62 BBW SWB Highschool ride returns
Quote:
 Once the other side is done, it's going back on its back, and the bottom of the cab will be stripped, treated with zinc pre wash, painted with POR 15, sealed, and painted with epoxy. I don't plan on doing this again as long as I live. Quote:
As for laying the cab over, I had my 12 year old son and his friend come out to the garage, and show me how tough they were Can't beat child labor, and young boys wanting to out do their friends...
__________________
"Always try to make the best part you can with the skills you have. If it isn't good enough throw it away and make another. Every time you make a part your skill will increase and you'll make a better part than you were capable of making before." Lil John Buttera |
||
|
|
|
|
08-02-2011, 05:20 PM
|
#54 |
|
Registered User
Join Date: Feb 2009
Location: Milwaukie, Oregon
Posts: 204
|
Re: '62 BBW SWB Highschool ride returns
Got the underside all sealed up and undercoated.
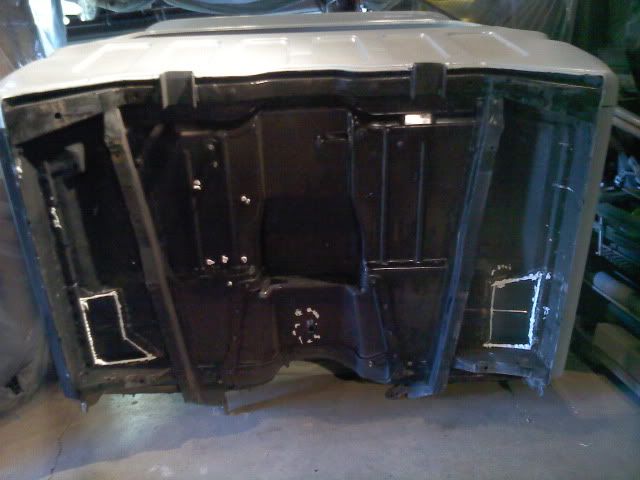 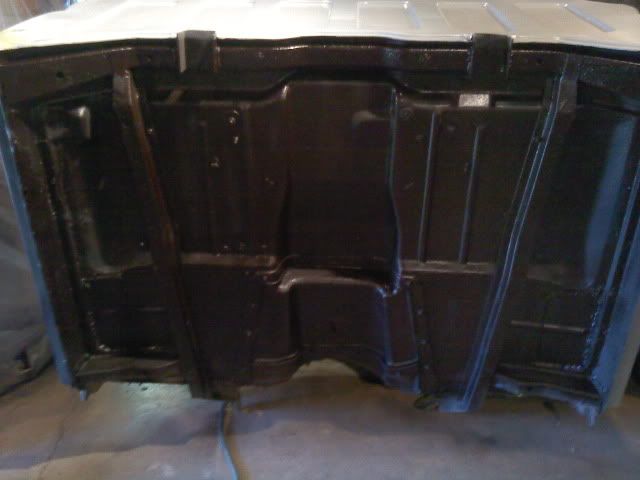 The bondo work is all done on the cab. I just have to spray the high build primer this week, and start blocking. Hopefully it will be blue by the weekend. I have a race Saturday though, so I'm busy getting ready for that. The tow rig (454 Suburban) sprang a leak in the radiator last time out, so I gotta get that taken care of too.
__________________
"Always try to make the best part you can with the skills you have. If it isn't good enough throw it away and make another. Every time you make a part your skill will increase and you'll make a better part than you were capable of making before." Lil John Buttera |
|
|
|
|
08-15-2011, 04:11 PM
|
#55 |
|
Registered User
Join Date: Feb 2009
Location: Milwaukie, Oregon
Posts: 204
|
Re: '62 BBW SWB Highschool ride returns
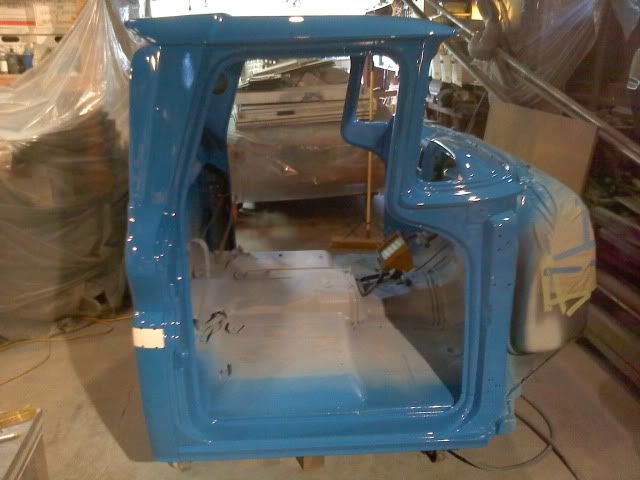
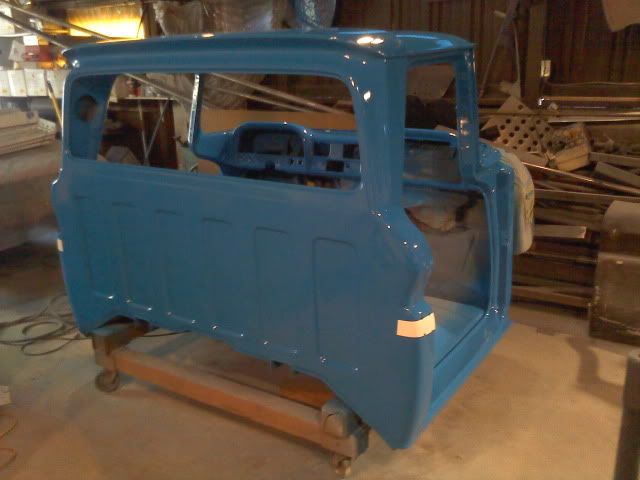
Another milestone. The cab is painted. Now assembly can begin. Next weekend the chassis gets pressure washed, and the cab can go back on.
__________________
"Always try to make the best part you can with the skills you have. If it isn't good enough throw it away and make another. Every time you make a part your skill will increase and you'll make a better part than you were capable of making before." Lil John Buttera |
|
|
|
|
08-16-2011, 01:33 AM
|
#56 |
|
60-66 Nut
  Join Date: Mar 2007
Location: Coeur d'Alene, Idaho
Posts: 23,246
|
Re: '62 BBW SWB Highschool ride returns
WOW! that looks good

__________________
Power Steering Box Adapter Plates For Sale HERE Power Brake Booster Adapter Brackets For Sale '63-'66 HERE and '67-'72 HERE and '60-'62 HERE and "60-'62 with clutch HERE Rear Disc Brake Brackets For Sale. Impala SS calipers HERE Camaro Calipers HERE D52 Calipers HERE 6 Lug HERE Hydroboost Mounting Plates HERE |
|
|
|
|
08-16-2011, 03:54 AM
|
#57 |
|
Senior Member
Join Date: Mar 2011
Location: Tucson, Arizona
Posts: 2,059
|
Re: '62 BBW SWB Highschool ride returns
That's an awsome build. I just discovered your thread a looked through the whole thing. You've got some mad skills there. I'm totally jealous and I love the color. I noticed that you mentioned having some LWB bed sides. Do you still have them and if so what kind of shape are they in? You can PM me with info.
|
|
|
|
|
08-22-2011, 02:51 PM
|
#58 |
|
Registered User
Join Date: Feb 2009
Location: Milwaukie, Oregon
Posts: 204
|
Re: '62 BBW SWB Highschool ride returns
We got a little done this weekend. Got the bed off the frame, killed a nest of wasps, and got the boy to pressure wash the chassis.
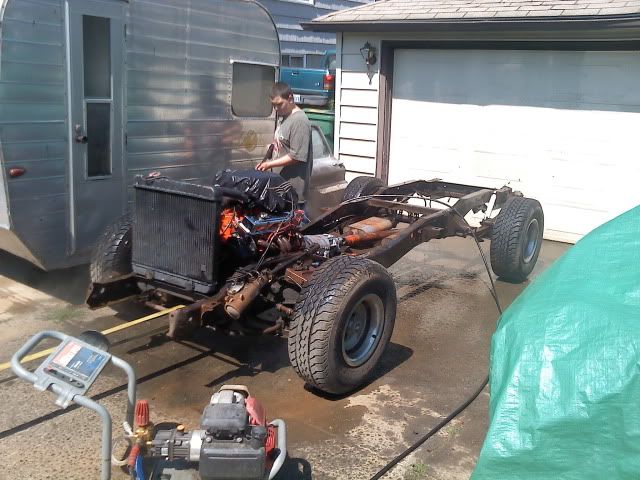 Now to finish cleaning it, and shoot some black on everything that doesn't shine Found a rusted screw in one of the front tires, so I'll have to remember to take it off, and get it patched. Overall everything else looked good. Even found out the rear had a chrome cover on it. I've had the truck since I was in High School, but I put it on this chassis just about the same time my son was born (12 years ago). And I don't remember cleaning it well enough then to see the chrome. It will get some new bushings on the sway bars, and maybe A-arms but otherwise will just get a fresh coat of paint. The motor was a GM crate 350, and the tranny was rebuilt at the same time, as were all the brakes. It has been a dozen years, but the old girl hasn't seen very many miles. Progress might slow a bit over the next month or so. We NEED to do some camping yet this summer. Just as long as its ready to run before the weather turns bad, I'll be happy.
__________________
"Always try to make the best part you can with the skills you have. If it isn't good enough throw it away and make another. Every time you make a part your skill will increase and you'll make a better part than you were capable of making before." Lil John Buttera |
|
|
|
|
08-22-2011, 05:26 PM
|
#59 |
|
Registered User
Join Date: Mar 2011
Location: tulsa,ok.
Posts: 1,803
|
Re: '62 BBW SWB Highschool ride returns
great looking truck! have you thought of the steel floor in the bed from your '78 donor or are you gonna put wood in it?? anyways great work and keep at it, it will diff. be done before the weather gets bad!!
|
|
|
|
|
08-22-2011, 06:52 PM
|
#60 |
|
Registered User
Join Date: Feb 2009
Location: Milwaukie, Oregon
Posts: 204
|
Re: '62 BBW SWB Highschool ride returns
I kept the steel bed floor just for that use. This one is turning out too nice to be a work truck though. The steel floor will probably go in the 4x4, and this one will get nice stained wood.
__________________
"Always try to make the best part you can with the skills you have. If it isn't good enough throw it away and make another. Every time you make a part your skill will increase and you'll make a better part than you were capable of making before." Lil John Buttera |
|
|
|
|
11-16-2011, 01:27 PM
|
#61 |
|
Registered User
Join Date: Feb 2009
Location: Milwaukie, Oregon
Posts: 204
|
Re: '62 BBW SWB Highschool ride returns
Finaly another update.... Not much of one, but it was still progress. The summer is over, so now the rush is on to get something done before it gets too cold again. Got the boy to help clean up the shop a bit over the weekend, and try to make enough room to continue working on the truck. It's been about 10 years since I rebuilt the truck last time, but it hasn't seen many miles since then. At the time I put it on a late model chassis, with power steering, disk brakes, and leaf springs. I replaced the tired 283 with a GM crate motor, and rebuilt the TH-400 tranny. All the brakes and shocks were replaced at the same time. This time I just cleaned up the frame, and repainted it flat black. This isn't going to be a show truck, so I didn't want to spend too much time on detailing the chassis.
We put the cab and one front fender back on so we can make sure the body mount bushings are the right height. Then the front fender will come back off, and the engine will get detailed, and the inner fenders will get painted and put back on. I might actually get to drive it yet this year. 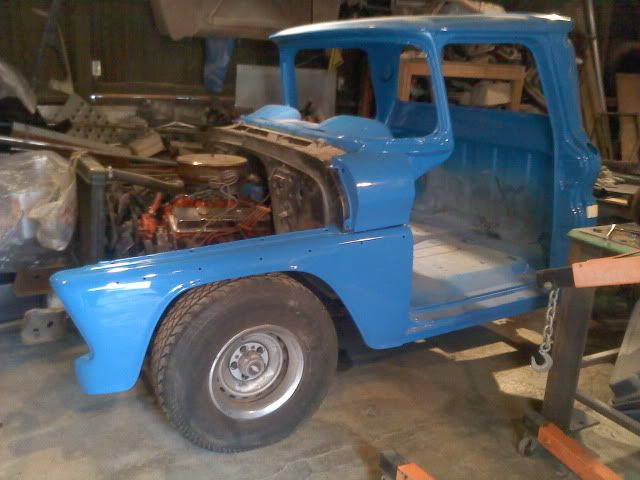
__________________
"Always try to make the best part you can with the skills you have. If it isn't good enough throw it away and make another. Every time you make a part your skill will increase and you'll make a better part than you were capable of making before." Lil John Buttera |
|
|
|
|
12-10-2011, 12:08 AM
|
#62 |
|
Registered User
Join Date: Feb 2009
Location: Christmas Valley, OR
Posts: 17
|
Re: '62 BBW SWB Highschool ride returns
Thinking the kid will drive this and the Corvair will continue to rest in the back yard. Looking good, but I had fenders with no rust you could have had.
|
|
|
|
|
01-03-2012, 07:43 PM
|
#63 |
|
Registered User
Join Date: Feb 2009
Location: Milwaukie, Oregon
Posts: 204
|
Re: '62 BBW SWB Highschool ride returns
Well, it looks like it might get some love in the very near future.... I sold some stuff, so now I can buy other stuff
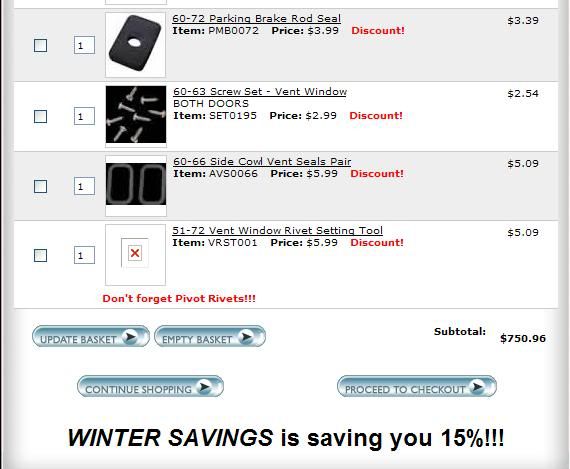 Got everything from Carpet to Weatherstrip. The only things left to buy will be some Chrome trim, and Bed Wood. Bet everything I need to finish putting it together is on its way, and I even have room to work on it. WOOHOO
__________________
"Always try to make the best part you can with the skills you have. If it isn't good enough throw it away and make another. Every time you make a part your skill will increase and you'll make a better part than you were capable of making before." Lil John Buttera |
|
|
|
|
01-04-2012, 12:06 AM
|
#64 |
|
Registered User
Join Date: Dec 2011
Location: Blytheville/Bentonville, AR
Posts: 393
|
Re: '62 BBW SWB Highschool ride returns
Great color!! Good job!!
Posted via Mobile Device |
|
|
|
|
01-04-2012, 03:04 AM
|
#65 |
|
But Found Her 25yrs Later!
Join Date: Oct 2010
Location: Oregon City, Oregon
Posts: 10,468
|
Re: '62 BBW SWB Highschool ride returns
I totally missed this thread.
Looking really, really good. Great patch work. Added to the FAQ: http://67-72chevytrucks.com/vboard/s...43#post4724743
__________________
I lost my 65 - Found it 25 years later: http://67-72chevytrucks.com/vboard/s...d.php?t=426650 66 C20 Service Truck: http://67-72chevytrucks.com/vboard/s...d.php?t=428035 |
|
|
|
|
01-05-2012, 06:29 AM
|
#66 |
|
Registered User
Join Date: Dec 2011
Location: Alaska
Posts: 405
|
Re: '62 BBW SWB Highschool ride returns
Hey, nice work.... keep it up and thanks for sharing your updates with us. Hopefully you will get it together and running soon. Good luck this year with getting it running.
__________________
C@rnut001 (Owen) Alaskan Members Check In http://67-72chevytrucks.com/vboard/s...22#post5094422 http://67-72chevytrucks.com/vboard/s...18#post6778618 |
|
|
|
|
01-16-2012, 10:06 PM
|
#67 |
|
Registered User
Join Date: Feb 2009
Location: Milwaukie, Oregon
Posts: 204
|
Re: '62 BBW SWB Highschool ride returns
Sometime in the last three years I was robbed. The gas filler neck was there when I tore the truck apart. Now it is nowhere to be found. I found GTO parts, Impala parts, Corvair parts, even a few Model A Parts, but no gas filler neck. The tank is cleaned, and painted, I got a new hose, and a new rubber gasket, so I guess it gets a new filler neck too. I forgot to order the gasket for the sender thingy that bolts in the tank, so I needed to place an order anyhow. There was something else I needed, but I can't remember what it was. Maybe I will just wait until tomorrow to order, give me a chance to think of other things I need.
The firewall is painted, tomorrow I just need to find the 3M spray adhesive so I can put the firewall pad in. I got my carpet, jute, and door door sill plates. But they backordered the sound deadener that goes in first, so the carpet will have to wait. I was really looking forward to getting that installed so I could lay on it while I wire the dash. I even bought the speaker wire so it can get put down under the carpet. I am so paranoid that I will break the windshield with it laying around the shop so I was thinking about installing it next. But on the other hand I think it would be easier to work inside the cab if I wait and do the windshield, and back window last. I think I'll start with the door weatherstrip next. Any suggestions? 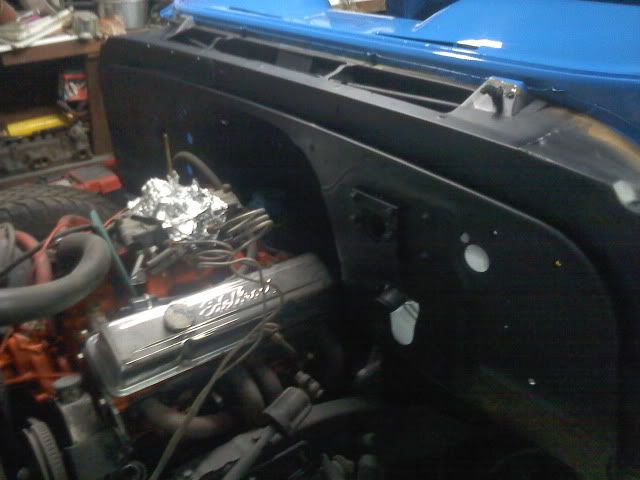
__________________
"Always try to make the best part you can with the skills you have. If it isn't good enough throw it away and make another. Every time you make a part your skill will increase and you'll make a better part than you were capable of making before." Lil John Buttera |
|
|
|
|
01-17-2012, 01:13 AM
|
#68 |
|
Registered User
Join Date: Feb 2009
Location: Christmas Valley, OR
Posts: 17
|
Re: '62 BBW SWB Highschool ride returns
The gas filler neck is under the blanket the windshield is on!! If you need another one give me a call, still got some more parts,
|
|
|
|
|
01-17-2012, 01:38 AM
|
#69 | |
|
Registered User
Join Date: Feb 2009
Location: Milwaukie, Oregon
Posts: 204
|
Re: '62 BBW SWB Highschool ride returns
Quote:
 Posted via Mobile Device
__________________
"Always try to make the best part you can with the skills you have. If it isn't good enough throw it away and make another. Every time you make a part your skill will increase and you'll make a better part than you were capable of making before." Lil John Buttera |
|
|
|
|
|
01-17-2012, 04:59 AM
|
#70 |
|
454 club
Join Date: Oct 2002
Location: Oklahoma
Posts: 1,348
|
Re: '62 BBW SWB Highschool ride returns
good work. it is looking good.
__________________
David 1965 Chevrolet c-10 454 automatic Custom bbw swb. 1965 Chevrolet C-10 swb (Sold) 1963 Chevrolet C-10 6 Cyl automatic with dual exhaust, pb, ps and 17's. R.I.P "I will miss you. 1967 Chevrolet C-10 6 Cyl Custom lwb 1939 Chevrolet Coupe, 350 v8 automatic. 1935 Chevrolet 2 Dr Standard in the works. 2015 Harley Davidson Street Glide. 2023 Chevrolet Stingray Z51 Convertible. I never want to grow up. |
|
|
|
|
01-17-2012, 05:24 PM
|
#71 |
|
Registered User
Join Date: Sep 2011
Location: Tacoma, WA
Posts: 2,425
|
Re: '62 BBW SWB Highschool ride returns
Yeah you are getting along real nicely!
I love that quote of yours too, about making parts. I have started making prototype parts hoping that I can do better on my next attempt instead of trying to make it perfect the first time around. FWIW I would probably put the windshield in the house, like under the bed or behind the couch......
__________________
Michael McMurphy My 66 Stepside My 64 Tow Truck My 66 Tempest Table Of Contents Added to Page1 |
|
|
|
|
01-21-2012, 11:20 PM
|
#72 |
|
Registered User
Join Date: Jan 2012
Location: Killeen, Tx
Posts: 1,348
|
Re: '62 BBW SWB Highschool ride returns
What color is that and where did you get it? My original color is Brigade blue and I am looking foe options!
|
|
|
|
|
01-22-2012, 03:02 PM
|
#73 | |
|
Registered User
Join Date: Feb 2009
Location: Milwaukie, Oregon
Posts: 204
|
Re: '62 BBW SWB Highschool ride returns
Quote:
I should add, the reason I went with a fleet color is that they are moslty solid colors, where as the standard auto colors are mostly metalics. The problem with that being that painting the truck in pieces, at different times as I did, would have made it almost imposible to come out with it not looking like a patchwork quilt. Especially for me.
__________________
"Always try to make the best part you can with the skills you have. If it isn't good enough throw it away and make another. Every time you make a part your skill will increase and you'll make a better part than you were capable of making before." Lil John Buttera Last edited by 66Z71; 01-22-2012 at 03:16 PM. |
|
|
|
|
|
01-22-2012, 03:34 PM
|
#74 |
|
Registered User
Join Date: Feb 2009
Location: Milwaukie, Oregon
Posts: 204
|
Re: '62 BBW SWB Highschool ride returns
Well here's the update for yesterday. Got my sound deadner from Brothers, so I could put the carpet in. What a pain that was. I'm not complaining about the quality or anything, just trying to get a stiff flat something to conform to the conture of the floor. At least it comes in 4 pieces, so I started by laying it all out, and seeing how it fit. Took a bit to guess which piece went where since there are no instructions with it. By the time I was done, I was wishing I could start over, since I think I have learned how to do it right now.
Anyways here are some things I came away from it with. First lay the parts out in the truck, and make witness marks on the floor where the pieces go. Then take everything out, and starting with the drivers side piece spray the adhesive on the floor, and the back of the pad. Let it sit for a few minutes, then carefully start at the top near the dimmer switch, and lay it down. The bend in the floor between the toeboard, and the flat part will probably need a relief cut since the floor also rolls downhill toward the door. I kept my box cutter handy, and made slices as needed. Next I went to the passenger floor, and did the same to it. The pads have nice little cutouts for the studs on the floor that the original rubber mat hooked on. Only thing is the cutouts didn't exactly match my studs... So a little more trimming. I just stuffed the cutout parts back in the holes to make the floor almost flat. The center piece really didn't want to lay over the tranny hump. I made the decision early on to cut it into three pieces. Left, right, and center. That really helped, and kinda freed me from thinking I had to lay it out as it came. That thought really helped with the last piece that went over the firewall part of the tranny hump. It got butchered. My goal at that point was to cover the floor with pieces of pad. Anywhere it started to buckle, I cut it. Pieces trimed off of one spot covered a hole in another spot. All in all I'm happy with it. First layout of the pieces. 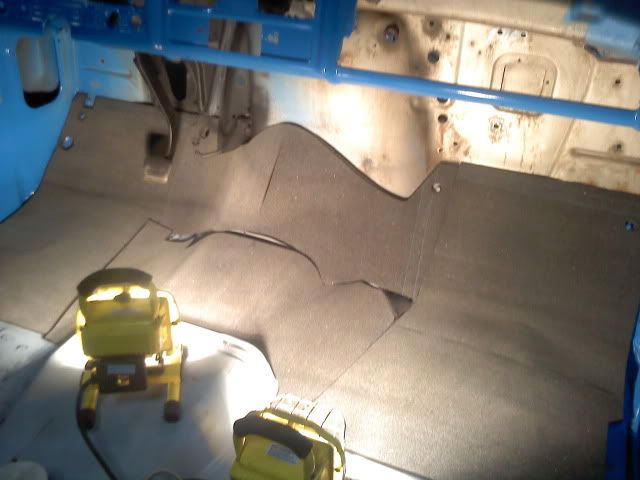 Notice how it doesn't exactly fit. 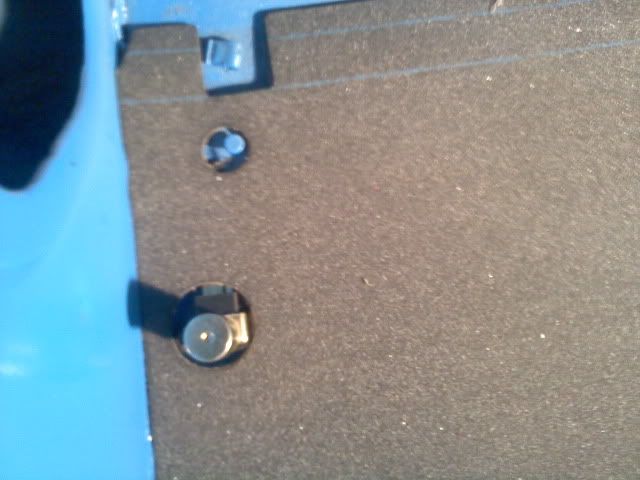 Heres the relief cut. 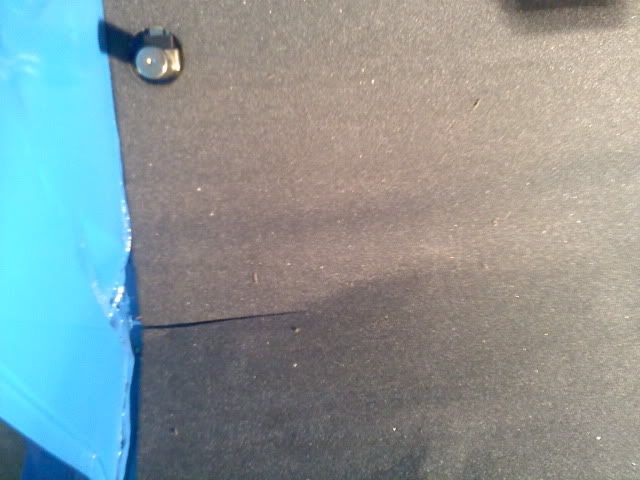 All pieced together, with wires ran for speakers, dome light, and the gas sender. 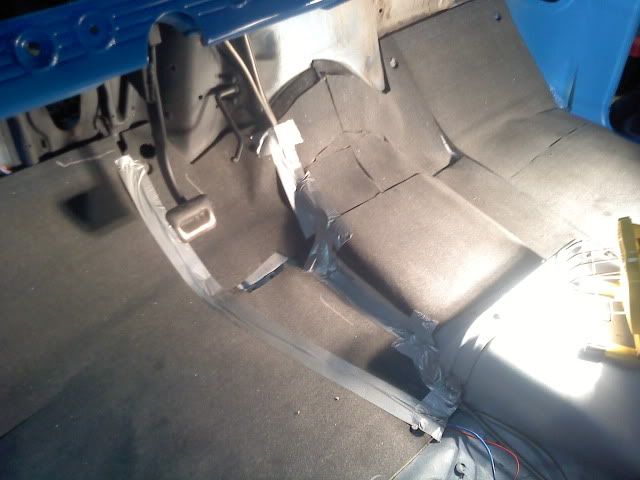 After I got the sound deadner laid down, I went to work on the jute. It was a little harder to guess where things went. I think I finally got it right though. Again i started with the drivers side, since it has the dimmer switch, and gas pedal sticking out of it. Then I went to the passanger side, and did it. When I got to the center I found that there was more jute than floor. I think the first layer of sound deadner might have caused that, but no worries. I trimmed the last piece to fit, and used some of the trimmings to fill in around the top passenger side where there was a small gap. 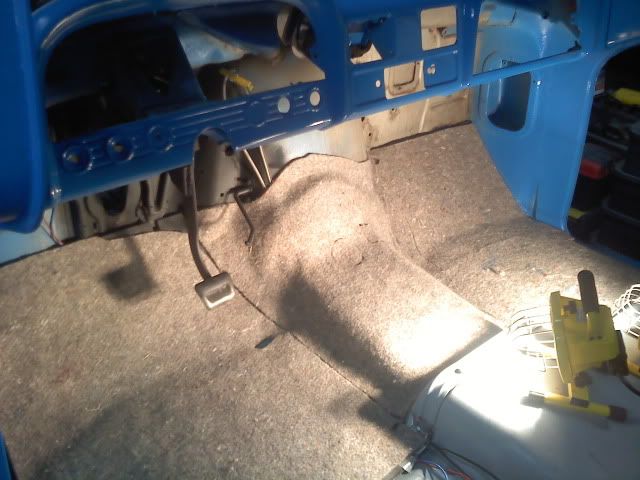 The carpet has been rolled up in the box for who knows how long, so I just layed it out in the truck to relax for now. I will probably wait for a couple of days before I glue it down. It even has jute on the back of it. That floor is so comfortable I am actually looking forward to laying on it and wiring the dash 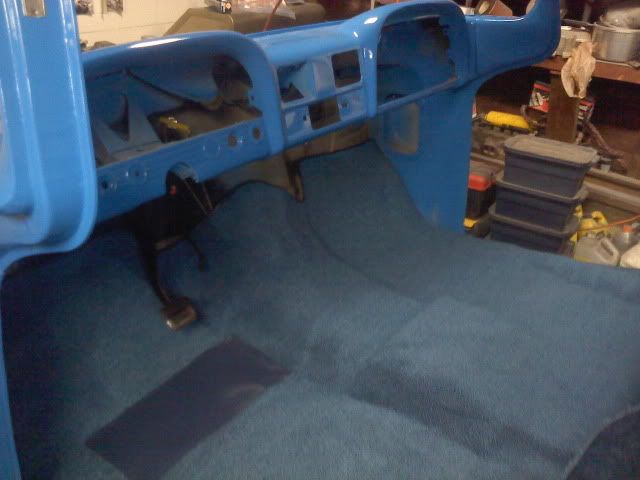 I put the firewall pad on the same way. Only problem is it doesn't lay too well around the top of the tranny hump, but nobody is gonna see up there anyhow. It isn't the same as the stock one. Original was more of a perforated paper/jute pad. This one is Jute, with a soft rubber cover. Since I'm not restoring the truck I think it is a nice upgrade. 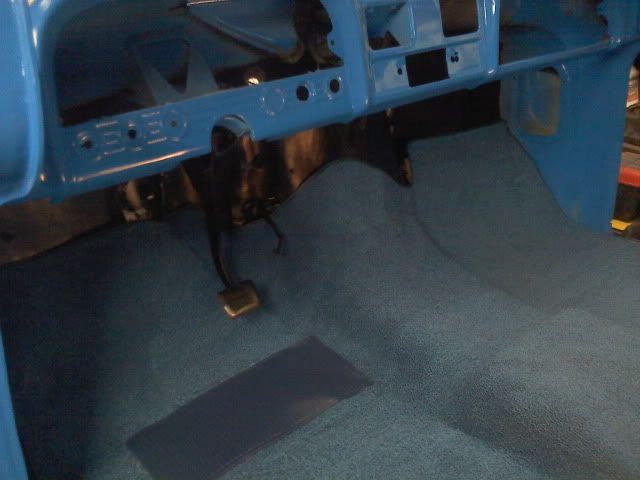 One final shot with the brake pad on, and the throttle pedal sitting in place. 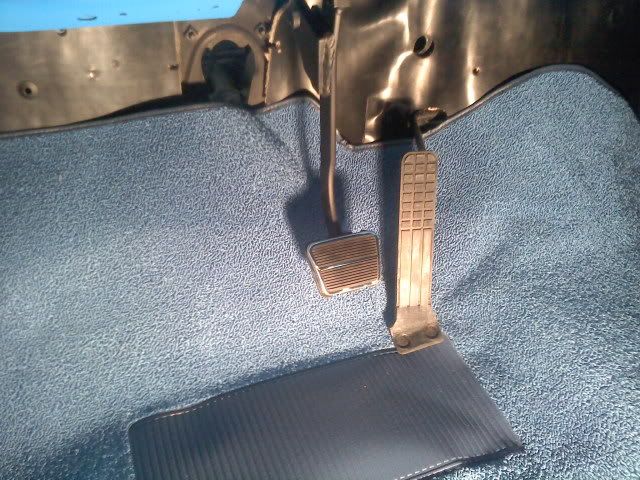 The wife is so looking forward to me getting the seat out of 'her' basement. Just gotta get the gas tank in, then I can finally do it.
__________________
"Always try to make the best part you can with the skills you have. If it isn't good enough throw it away and make another. Every time you make a part your skill will increase and you'll make a better part than you were capable of making before." Lil John Buttera |
|
|
|
|
01-27-2012, 04:31 PM
|
#75 |
|
Registered User
Join Date: Feb 2009
Location: Milwaukie, Oregon
Posts: 204
|
Re: '62 BBW SWB Highschool ride returns
A couple more small milestones. Got the gas tank installed.
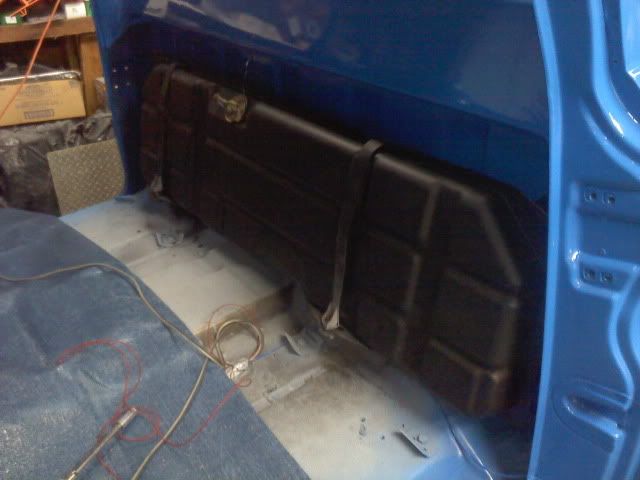 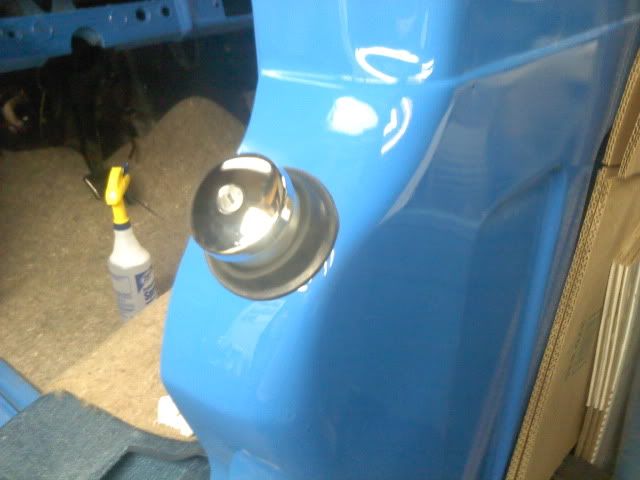 And the seat is sitting in place. I have to pick up some seatbelts after work today, and it can get bolted down. 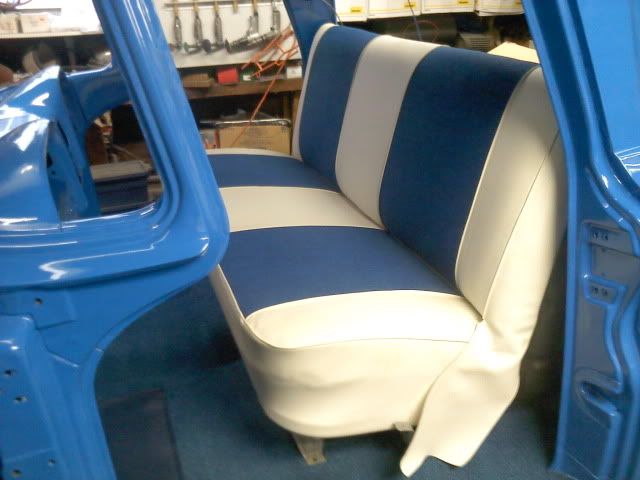 A little buffing goes a long way. 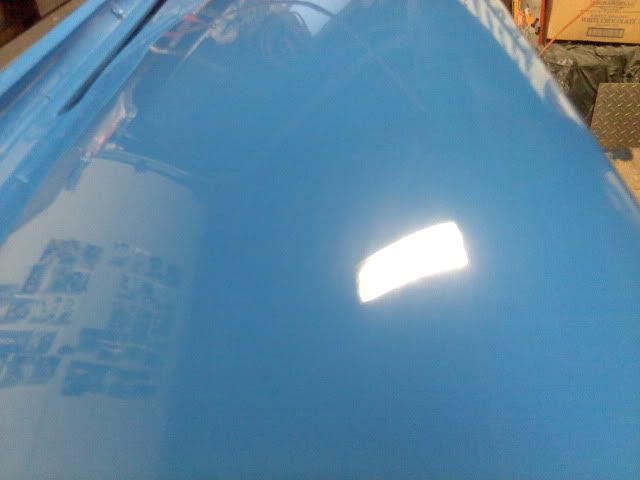 Any recommendations on what wax to use?
__________________
"Always try to make the best part you can with the skills you have. If it isn't good enough throw it away and make another. Every time you make a part your skill will increase and you'll make a better part than you were capable of making before." Lil John Buttera |
|
|
|
|
| Bookmarks |
|
|


 Linear Mode

