
|
Register or Log In To remove these advertisements. |
|
|
|
|||||||
 |
|
|
Thread Tools | Display Modes |
 01-26-2013, 07:18 PM
|
#1 |
|
Registered User
Join Date: Nov 2011
Location: Tustin, CA
Posts: 229
|
The Neutered Jimmy (4X4 to 2X4)
I had started a thread on this Jimmy when I first signed up to the site. I didnt really keep a log of what I was doing to it and didnt realize that I should put a build thread together
just kind of dove in.
So, let me start over. I bought this Jimmy with my Dad in April of 2011. My Dad has had his 1970 Blazer since 1972! I was born in 79 so I have all of my childhood memories surrounding this truck. He just recently found proof that this was Steve McQueens Blazer prior to him owning it, The blazer was used for towing his race Baja Truck .thats a different story. 4WD Jimmy Manual with granny gear Came with 20's and they were not the look I was going for...wanted a smaller rim. so ditched the body molding and got new wheels. here are before and after pics after I started doing whatever I could do to improve this Jimmy that didnt cost too much. I am married with two young kids, so money is as tight as time. I pulled the motor to clean it up and reseal some things, I replaced the steering gearbox and body mounts, replaced passenger side rocker. |

|

|
|
01-26-2013, 07:24 PM
|
#2 |
|
Registered User
Join Date: Nov 2011
Location: Tustin, CA
Posts: 229
|
Re: The Neutered Jimmy (4X4 to 2X4)
I then started prepping for Als Liner. I will carpet it eventually, but the top will remain on the side yard hopefully forever!
[ATTACH][/ATTACH] Over time I started sanding on it in a spot where some bondo was Dont do this until you are ready to commit to doing it all. I then took the majority of it to bare metal. The only good thing about this is that I found out there is hardly any rust.  [ATTACH][/ATTACH] I will try to keep up with the story and get to the conversion part asap. I have work to do in the garage before I can get on this computer. Updates to keep coming.... |
|
|
|
|
01-26-2013, 07:57 PM
|
#3 |
|
Registered User
Join Date: Nov 2011
Location: Tustin, CA
Posts: 229
|
Re: The Neutered Jimmy (4X4 to 2X4)
I sprayed it with a sandable primer as I didnt want it to flash rust. Thats why you see the color change. After I got the Jimmy running and was driving it on the occasional weekend on errands by myself, I thought about the reason I got it which was to take my family in it and make memories like I have. I was going to get a cage built for it (wifes permission included) and just couldnt bring myself to do it.
I then changed it to an automatic, so I got rid of this beast I am a lowered truck guy. I have always loved the look of the 2WD blazer. Went to cruise for the cure with my son and my dads blazer was in the show. I saw Member John Oro's blazer there and made up my mind. I also Love the 4WD with the cage like my brothers 69 (member name dustinU) but it just wasnt me. In my brothers kind words I set out to Neuter this thing! Then bought this from Jeremiah and Jenn King (forum members and great people) to be continued soon.. |
|
|
|
|
01-27-2013, 12:13 PM
|
#4 |
|
Registered User
Join Date: Apr 2008
Location: Md
Posts: 2,450
|
Re: The Neutered Jimmy (4X4 to 2X4)
This could be Jimmy Neutertron...(Don't repeat that in front of the kids).. What are your plans Engine Trans, rear axle...trailing arms?. I went mostly stock with original trailing arms made spring perches. 83 front cross member 2 1/2" drop spindals with and lots of rivets to drill and punch...Let me know if you need measurements, photos etc...Ed
|
|
|
|
|
01-27-2013, 12:19 PM
|
#5 |
|
Registered User
Join Date: Nov 2011
Location: Tustin, CA
Posts: 229
|
Re: The Neutered Jimmy (4X4 to 2X4)
Lol! Thanks notsolo. I actually have it back on the ground. I haven't had time to post so I am catching up.
I did trailing arms in the rear with a 5 inch drop spring. I like your spring perch and I made a similar one. In the front it is cpp OE 2" spindle and 3" spring. The rear is trailing arms and I bought a trailing arm rear with a open 373. My original rear has a 373 posi in it that I will remove someday. I will post pics of rear soon. Also the rear shock crossmember that I think everyone should buy that if you don't have the skills or patience to fabricate one. Posted via Mobile Device |
|
|
|
|
01-27-2013, 12:23 PM
|
#6 |
|
Registered User
Join Date: Nov 2011
Location: Tustin, CA
Posts: 229
|
Re: The Neutered Jimmy (4X4 to 2X4)
Notsolo,
Sorry I could use pics of e brake cable solution if you hooked yours back up. Also motor and Trans are just staying the same. 350/th350 for now. Someday an LS and Porterbuilt drop member. Posted via Mobile Device |
|
|
|
|
01-27-2013, 01:11 PM
|
#7 |
|
Registered User
Join Date: Nov 2011
Location: Tustin, CA
Posts: 229
|
Re: The Neutered Jimmy (4X4 to 2X4)
Lets start this next section of details on the process with a fair warning. This is not a simple bolt in the cross member from a 2WD and youre good to go as some members have stated. Well it is not for my personality anyways. I want to clean and make everything right while doing it on a budget. I bought a 2WD front end off of member Jeremiah King (awesome couple and my go to resource for parts).
A lot of cleaning of parts and learning from this site, I followed LIVRATs process of sectioning the frame to line up where the bolt holes go and referenced those with measurements from other members. Also put in 2nd row escalade seats before I started conversion. I bought all new ball joints, tie rod ends and lowering kit from CPP (thanks to member John Oro for the intro). Obviously I needed to fund this project and of course it started with that money my wife said I could spend on the cage. Then I started selling parts that I was pulling off. This gave me the opportunity to not only pass them on to other board members, but have met some great people on the way. I referenced everyone possible on the conversion. Spoke on the phone with LIVRAT, ORTEGAMOTOR and BIGBLUTHG(bought some fenders) I have been back and forth with GRINGOLOCO on his trailing arm conversion..(his work on that blazer is out of my league)! Keep in mind it is a long process, but you can get it done. I am on a mission to prove it to myself now and I am not a welder or mechanic. Just have played with a couple cars in the past. The lists of parts is where you may fool yourself on the conversion. I read everywhere that you need the x member and trailing arms, here is where I am at so far. Front Cross member with upper and lower arms, Drop spindles, springs, shocks, brake lines, 2WD throttle cable(motor moves far forward), 2WD fan shroud, 5 lug wheels, trailing arms, trailing arm bushings, trailing arm drop crossmember, rear shocks, rear shock mounts, rear Springs, C notch kit, Upper shock mount, New 2WD e brake cables rear section, 2WD trans cross member, coil spring rear axle, new brakes all around, ANOTHER new redhead steering gearbox, Centerlink, Front CPP sway bar with lowered brackets, Pan hard Deluxe CPP adjustable bar, 2WD exhaust manifolds, 2WD front body supports...obviously you can do without a lot of this if you use a flip kit for the leaf rear. |
|
|
|
|
01-27-2013, 01:13 PM
|
#8 | |
|
Registered User
Join Date: Nov 2011
Location: Tustin, CA
Posts: 229
|
Re: The Neutered Jimmy (4X4 to 2X4)
Quote:
Thanks! checked out your build and it is awesome! keep up the great work. |
|
|
|
|
|
01-27-2013, 04:14 PM
|
#9 |
|
Registered User
Join Date: Apr 2008
Location: Md
Posts: 2,450
|
Re: The Neutered Jimmy (4X4 to 2X4)
The E-brake is a work in progress. I have not worked on mine in several months..Family 1st...House 2nd all other crap get in line. Blazer (last)..I was going with Bruce's just a pickup idea 2 1/2" rollers from garage door, mine are mounted under the trans cross member with about a 60" E-brake cable making a U shape from 1 side to the other. That is where I left it...I think the original cable in the tub is too long. Maybe someone will chime in with a solution.
|
|
|
|
|
01-27-2013, 04:54 PM
|
#10 | |
|
Registered User
Join Date: Nov 2011
Location: Tustin, CA
Posts: 229
|
Re: The Neutered Jimmy (4X4 to 2X4)
Quote:
Posted via Mobile Device |
|
|
|
|
|
01-27-2013, 05:48 PM
|
#11 |
|
Registered User
Join Date: Apr 2008
Location: Md
Posts: 2,450
|
Re: The Neutered Jimmy (4X4 to 2X4)
Correction: the rollers I used were steel garage door rollers I was able to bolt them directly to the bottom of the 2wd cross member with 3/8" bolts intermediate cable goes around from side to side...You maybe able to see cable from inside tub is hanging right under the roller..( a bit too long)
|
|
|
|
|
01-27-2013, 05:58 PM
|
#12 |
|
Registered User
Join Date: Apr 2008
Location: Md
Posts: 2,450
|
Re: The Neutered Jimmy (4X4 to 2X4)
Also Where did you get the shock relocation cross member?.
|
|
|
|
|
01-27-2013, 08:26 PM
|
#13 | |
|
Registered User
Join Date: Nov 2011
Location: Tustin, CA
Posts: 229
|
Re: The Neutered Jimmy (4X4 to 2X4)
Quote:
The shock relocation I used is from Rob at No Limit. I will post pics soon, but after head scratching and fabricating a crossmember I saw his kit and it makes so much sense. My shocks are at the optimal 15 degree angle and mount to outside of the frame. Installed in about 30 minutes after playing with crossmember fabrication for a couple days! Posted via Mobile Device |
|
|
|
|
|
01-28-2013, 02:02 PM
|
#14 |
|
Boosted Member
Join Date: May 2002
Location: Mackinaw, IL
Posts: 2,200
|
Re: The Neutered Jimmy (4X4 to 2X4)
Cool project. How hard was it to spray the Al's liner, and how is it holding up?
__________________
1972 2wd K/5 Blazer Turbocharged 370 LSx - 941 rwhp / 1093 rwtq 1969 Chevy K-10 L33 5.3 / 4L80E / NP241 / 4" lift 1964 Buick Skylark Twin TURBO 383 LS pro-touring project 2014 VW Passat TDI - Daily Driver Turbo diesel 2015 Sierra Denali HD Duramax Turbo diesel 2016 Ford Explorer Sport - Twin Turbskis 2017 Polaris RZR Turbo 2014 Nor-Tech Center Console - Twin Supercharged Outboards TURBO ALL THE THINGS!! |
|
|
|
|
01-28-2013, 02:16 PM
|
#15 |
|
Registered User
Join Date: Nov 2011
Location: Tustin, CA
Posts: 229
|
Re: The Neutered Jimmy (4X4 to 2X4)
Thanks! The ALS Liner is super easy and holding up well so far. It's all in the prep work though
Posted via Mobile Device |
|
|
|
|
02-02-2013, 12:19 AM
|
#16 |
|
Registered User
 Join Date: Aug 2003
Location: canyon country, ca, USA
Posts: 336
|
Re: The Neutered Jimmy (4X4 to 2X4)
wow. i'm jealous with your progress! i kicked my camaro outside so i could work on the blazer frame that i pulled out in in december and have yet to finish what i started. looking good. did you get the bracket you needed? if not send me a pic i might be able to help you out with that.
__________________

|
|
|
|
|
02-02-2013, 12:45 AM
|
#17 |
|
Registered User
Join Date: Nov 2011
Location: Tustin, CA
Posts: 229
|
Re: The Neutered Jimmy (4X4 to 2X4)
Thank you. That is motivating and needed. I am getting to the point where I am putting everything back in and it is getting frustrating. Looked in the gas tank and that looks like a stucco wall texture but with rust. So looks like a new tank but that is a project in itself it seems with the neck on a repop. Hang in there it starts to come together after a while.
I haven't gotten any response in the bracket. Link is below. Thank you so much http://67-72chevytrucks.com/vboard/s...d.php?t=562606 http://http://67-72chevytrucks.com/vboard/showthread.php?t=562606 Posted via Mobile Device |
|
|
|
|
02-02-2013, 12:52 AM
|
#18 |
|
Registered User
Join Date: Aug 2003
Location: canyon country, ca, USA
Posts: 336
|
Re: The Neutered Jimmy (4X4 to 2X4)
hey what side is that? i got both still attatched to my frame. mine have bolts, your look like they are riveted on.
__________________
|
|
|
|
|
02-02-2013, 12:55 AM
|
#19 |
|
Registered User
Join Date: Nov 2011
Location: Tustin, CA
Posts: 229
|
Re: The Neutered Jimmy (4X4 to 2X4)
That is the driver side. Not my frame just a pic. They are riveted at the factory but could've been changed. What are you doing with them? Re-using or taking off.
Posted via Mobile Device |
|
|
|
|
02-02-2013, 01:01 AM
|
#20 |
|
Registered User
Join Date: Aug 2003
Location: canyon country, ca, USA
Posts: 336
|
Re: The Neutered Jimmy (4X4 to 2X4)
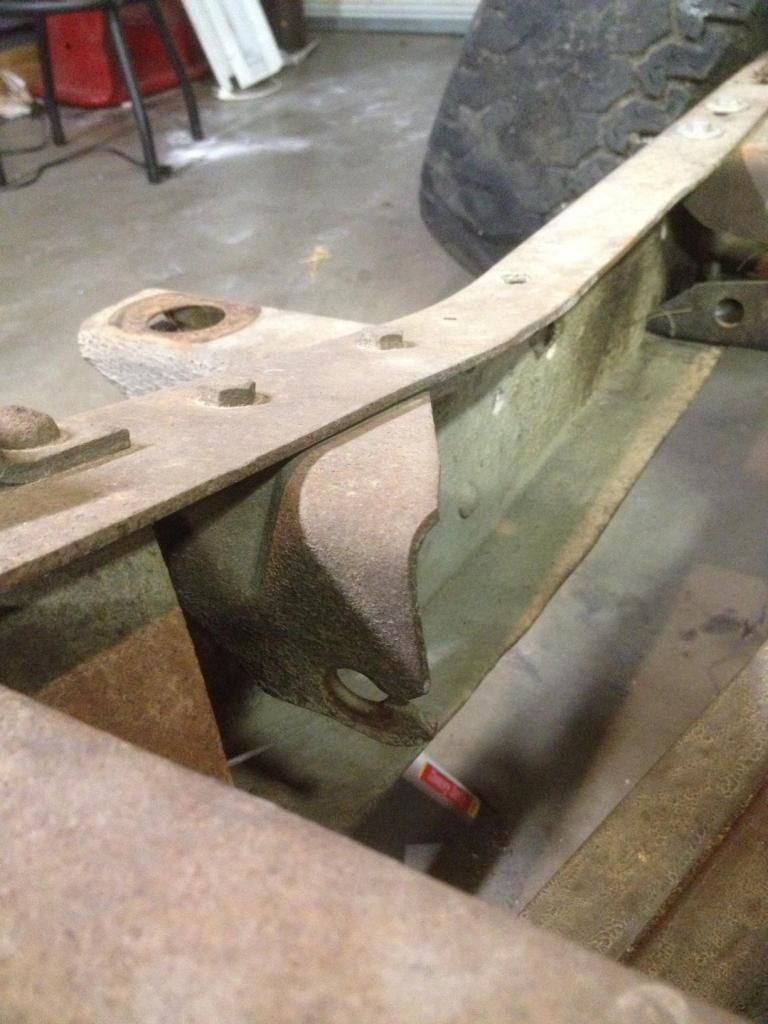 heres the on i got. not using them. using the cable mounts on the trailing arms. if you need it, it's yours.
__________________
|
|
|
|
|
02-02-2013, 01:03 AM
|
#21 |
|
Registered User
Join Date: Nov 2011
Location: Tustin, CA
Posts: 229
|
Re: The Neutered Jimmy (4X4 to 2X4)
I appreciate it, but those are a little further back than the bracket I am looking for. The front cable mounts to the bracket at about where the transfer case would be. Thank you though!
Posted via Mobile Device |
|
|
|
|
02-03-2013, 01:32 AM
|
#22 |
|
A guy with a truck
Join Date: Sep 2005
Location: Germany, for now
Posts: 5,920
|
Re: The Neutered Jimmy (4X4 to 2X4)
Keep the progress coming- this is cool!
Posted via Mobile Device
__________________
-Chris Instagram _elgringoloco_ '70 Short-Wide How to: Ruin a perfectly good C10 70 Blazer ConversionHow To: Ruin a Perfectly Good 4wd '72 Highlander How To: Ruin a Perfectly Good K/5 (SOLD) '72 Blazer 2WD How to: Ruin a perfectly good Blazer (SOLD) '05 Yukon Daily Driven (not so stock) Yukon (SOLD) 07 Yukon Denali (daily) Members met list: SCOTI, darkhorse970, 67cheby, 67cheby'sGirl, klmore, porterbuilt, n2billet, Fastrucken, classicchev, Col Clank, GSFMECH, HuggerCST, Spray-Bomb, BACKYARD88, 5150, fine69, fatbass, smbrouss70, 65StreetCruiser, GAc10boy |
|
|
|
|
02-03-2013, 11:42 AM
|
#23 | |
|
Registered User
Join Date: Nov 2011
Location: Tustin, CA
Posts: 229
|
Re: The Neutered Jimmy (4X4 to 2X4)
Quote:
Posted via Mobile Device |
|
|
|
|
|
02-03-2013, 01:19 PM
|
#24 |
|
Registered User
Join Date: Nov 2011
Location: Tustin, CA
Posts: 229
|
Re: The Neutered Jimmy (4X4 to 2X4)
Ok so after I figured out the front and referenced every measurement possible I was ready for the final test which is the centerlink. I feel I got it as far forward as possible with no rub issues.
Here is a pic of too small of wheels on the front after everything was in place, OH and 33" tires with a 2" lift in the rear....Not quite the hot rod rake I was going for. Moving onto the rear trailing arm set up. As you know these need new spring mounts fabricated so I got some metal and gussets and had a buddy weld them up. As for the trailing arm crossmember placement I referenced Gringoloco and Bigbluthng conversion. I moved it forward then back then forward and back about 30 more times until I had the rear wheels centered. I actually utilized the holes that Gringoloco started with for the e brake cable support on the driver side that I hacked off and now need. It centered the wheels. I will give a side shot later. Here is how it sits now. I think I mentioned that after everything I have tried this is sitting with just a 5" drop spring in the rear, NO blocks. I want it lower, but don't think there is any solution for me to drop the front as of now and I love how level it is here. Thoughts, advice and experience is all welcomed, just yell if you have any for me. Thank you |
|
|
|
|
02-03-2013, 02:46 PM
|
#25 |
|
Registered User
Join Date: Sep 2007
Location: vancouver,wa.
Posts: 282
|
Re: The Neutered Jimmy (4X4 to 2X4)
looking good....you're making it look easy!!
|
|
|
|
|
| Bookmarks |
| Thread Tools | |
| Display Modes | |
|
|


 Linear Mode

