
|
 03-25-2008, 11:45 PM
|
#51 |
|
Registered User
Join Date: Apr 2006
Location: Alabama
Posts: 794
|
Re: 72 project
I got the Balancer and Pulley installed. I'm at another stopping point now. The heads are on and the lifters are in, but i had to order Rocker Arms.
I went with the Comp Cams Magnum Roller Tips in a 1.5 Ratio. So, jsut waiting on them to come in to keep on going with the build. |

|

|
|
03-27-2008, 08:02 PM
|
#52 |
|
Registered User
Join Date: Apr 2006
Location: Alabama
Posts: 794
|
Re: 72 project
Parts are in! Or at least FedX says my rocker arms are sitting on my front porch. I cant wait to get home so I can get back to work on the motor now. Glad I got my yardwork done yesterday
 These are the ones I got: 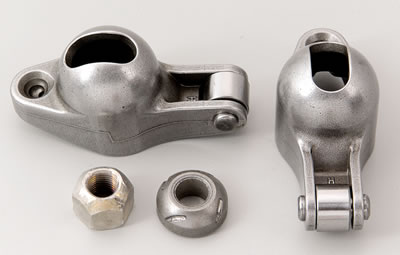 Brand: COMP Cams Product Line: COMP Cams Magnum Rocker Arm Kits Part Type: Rocker Arms Part Number: CCA-RP1412-16 Rocker Arm Mounting Style: Stud Rocker Arm Ratio: 1.5 Rocker Arm Style: Roller tip Stud Size: 3/8 in. Shims Included: No Rocker Arm Material: Steel Self-Aligning: No Rocker Arm Body Style: Standard Rocker Arm Nut Style: Self-locking Slot Style: Long Maximum Spring Diameter (in): 1.500 in. Rocker Arm Finish: Natural Quantity: Sold as a kit. Notes: Kit includes pushrods. |
|
|
|
|
04-01-2008, 09:29 PM
|
#53 |
|
Registered User
Join Date: Apr 2006
Location: Alabama
Posts: 794
|
Re: 72 project
Rocker arms are installed, But I havent got the valve lash set yet.
I'm trying t oget better info on how to do this, but I'm still not 100% on it. Whats the proper way to rotate the crank to set the valves? I have the dampner and pulley installed so I cant get to the key. |
|
|
|
|
04-17-2008, 07:11 PM
|
#54 |
|
Registered User
Join Date: Apr 2006
Location: Alabama
Posts: 794
|
Re: 72 project
Still having trouble rotating the assembly. I was scared of stripping the threads out of the end of the crank trying to turn it with a bolt in the end of it, but after talking with some mroe experience builders I decided to give it a try. But, even with the bolt I still couldnt get the assembly to rotate. I could have applied more torque but I couldnt hold the stand down by myself.
I know that the rotating assembly is installed and torqued correctly, it would rotate prior to installing the heads, but it was very tight. The guy helping me (very experienced builder) said it was tighter than normal but in his opinion would be fine. So...plan B I'm going to go ahead and install the starter and flexplate and bump it over, see if that loosens it up any. |
|
|
|
|
04-17-2008, 10:38 PM
|
#55 |
|
Post Whore
 Join Date: Feb 2000
Location: Rose Hill, KS, USA
Posts: 12,683
|
Re: 72 project
Are your spark plugs installed? If so, yank them out and you won't have to fight compression to turn the motor over.
Keep at it!
__________________
1970 Blazer with a 400 sbc and 4" lift 1980 Pontiac Trans Am, 455 Oldsmobile 2012 Kawasaki Concours 14 |
|
|
|
|
04-18-2008, 12:50 AM
|
#56 |
|
Registered User
Join Date: Apr 2006
Location: Alabama
Posts: 794
|
Re: 72 project
Thats the bad thing.....no plugs in it.
Anyone ever experienced this before? I just came back in from messing with it some, noticed I have to get a different waterpump for one thing. But I had a thought, while I'm almost certain the heads are on the correct positions (same as when I pulled them off) could this cause my problem? From looking at them they are identical lefdt to right, same part # stamped on them, but could swapping them by accident cause a problem? |
|
|
|
|
04-22-2008, 03:17 PM
|
#57 |
|
Registered User
Join Date: Apr 2006
Location: Alabama
Posts: 794
|
Re: 72 project
Alright, With much help from fellow board members, I figured out my problem.
Details here: Link So, I have the valves adjusted and the fuel pump installed. Hopeful to get the intake and dizzy in sometime this week. I recieved the water pump I ordered Saturday as well but it has to be sent back due to a bad chip and crack inside the threaded hole. |
|
|
|
|
04-23-2008, 03:21 PM
|
#58 |
|
Registered User
Join Date: Apr 2006
Location: Alabama
Posts: 794
|
Re: 72 project
I got the intake installed last ngiht as well as the Dizzy and the valve covers.
All thats left for the motor is the water pump headers and the thermostat. Also need motor mounts. Then its time to start on the truck to get this thing back in it so I can fire it up! Can someone recommend where to get new motor mounts from? I'm seeing prices all over the place. |
|
|
|
|
04-23-2008, 04:28 PM
|
#59 |
|
Registered User
Join Date: Apr 2006
Location: Alabama
Posts: 794
|
Re: 72 project
And A picture just for fun
|
|
|
|
|
04-26-2008, 10:53 PM
|
#60 |
|
Registered User
Join Date: Apr 2006
Location: Alabama
Posts: 794
|
Re: 72 project
I just noticed something......
I have these valve covers: LINK I noticed that both sides have baffels and an opening with a grommet I assume is for a breather. The kit comes with one breather? What is done with the other side normally? And where is the oil fill? |
|
|
|
|
04-28-2008, 06:48 AM
|
#62 | |
|
Chasin' the Dream
Join Date: Mar 2008
Location: Lost in the 70's
Posts: 200
|
Re: 72 project
Quote:
__________________
Born with a Bowtie  1971 C/10 350/350 Daily Driver/project Assumption=The mother of all  -ups -ups
|
|
|
|
|
|
04-29-2008, 01:57 AM
|
#63 |
|
Registered User
Join Date: Apr 2006
Location: Alabama
Posts: 794
|
Re: 72 project
I was wondering if you could just remove the baffel from one side and use the breather in the rubbber grommet still but use that as the oil fill as well.....dont know if that word work or not.
But.........got alott of work done yesterday. I'll let the pictures speak for themselves. |
|
|
|
|
04-29-2008, 02:04 AM
|
#64 |
|
Registered User
Join Date: Apr 2006
Location: Alabama
Posts: 794
|
Re: 72 project
It finally came home yesterdaY!
|
|
|
|
|
05-30-2008, 07:45 PM
|
#65 |
|
Registered User
Join Date: Apr 2006
Location: Alabama
Posts: 794
|
Re: 72 project
Time for a "monthly update"
Lately I've been in save up and then order mode. Not a whole lot of actual work getting done, but I did get a brand new 4 core radiator in the other day. New supports and pads are on their way as well. I also purchased an engine hoist for the reinstall( hopefully in about a month) Mostly I've been trying ot get the small things done on the motor. plugs, wires , hoses, belts, etc. Its slow, but I'll get there. |
|
|
|
|
05-30-2008, 08:32 PM
|
#66 |
|
Registered User
Join Date: Jan 2008
Location: Atlanta,Ga
Posts: 660
|
Re: 72 project
Its amazing how we LOVE our trucks!
__________________
www.gkautospa.com Like A Rock! http://67-72chevytrucks.com/vboard/s...d.php?t=397153 |
|
|
|
|
05-31-2008, 08:42 PM
|
#67 |
|
Registered User
Join Date: Apr 2006
Location: Alabama
Posts: 794
|
Re: 72 project
Just got a few more odd and ends ordered. New Alt. bracket, electric fan, and a few other odds and ends.
Next week I need to mock up the carb and figure out what hoses and all I need to get. I'm trying to get as much as possible done prior to installing it in the truck. Any advice or tips for putting this thing i nthe truck would be great! |
|
|
|
|
05-31-2008, 10:05 PM
|
#68 |
|
Registered User
Join Date: Dec 2003
Location: Thomasville, NC
Posts: 1,877
|
Re: 72 project
looks like you're some head way, keep up the hard work

|
|
|
|
|
06-04-2008, 10:05 AM
|
#69 |
|
Registered User
Join Date: Apr 2006
Location: Alabama
Posts: 794
|
Re: 72 project
Got the fan, Alt bracket and things in yesterday but havent gotten to do anything with them yet. I'm going to try to make my stock fan shroud work with the new electric fan, It doesnt look like a big project ot get it to work, but we will see.
still waiting on the radiator mounts to come in. |
|
|
|
|
06-24-2008, 04:07 PM
|
#70 |
|
Registered User
Join Date: Apr 2006
Location: Alabama
Posts: 794
|
Re: 72 project
Radiator mounts came in. I went ahead and sprayed them with some rustoleum. The ALt bracket is for a low mount setup so its getting canned. I'm going to use the stock pieces and I'm still trying to figure out what to do about the PS pump.
I've got some details to finish up, but I'm shooting for the motor reinstall next week! I've got some help to get it in right and we are going to start Tuesday night. I'll have more pics soon. |
|
|
|
|
07-10-2008, 08:06 AM
|
#71 |
|
Registered User
Join Date: Apr 2006
Location: Alabama
Posts: 794
|
Re: 72 project
OK, I'm close but the motor still isnt in. My PS Pump did not line up with my crank pulley so its taken some changes to get it to work.
All better now though, I had to switch to a 3 groove pulley |
|
|
|
|
07-10-2008, 08:08 AM
|
#72 |
|
Registered User
Join Date: Apr 2006
Location: Alabama
Posts: 794
|
Re: 72 project
pics
|
|
|
|
|
07-10-2008, 08:09 AM
|
#73 |
|
Registered User
Join Date: Apr 2006
Location: Alabama
Posts: 794
|
Re: 72 project
AS you can see above, I had to notch the bracket to clear the return hose. I still need to go back and touch that up a little bit.
|
|
|
|
|
11-18-2010, 09:42 AM
|
#74 |
|
Registered User
Join Date: Apr 2006
Location: Alabama
Posts: 794
|
Re: 72 project
wow.... 2 years since i updated this thread. Honestly I "lost" it / forgot about it. I guess that happens when life gets in the way of hobbies.
Fortunately the truck hasnt been forgotten, still looks pretty much the same but I am slowly making progress. Motor / transmission is in. She cranks/runs beautifully. New fuel lines and added an inline canister filter to the frame rail. I have a pair of mufflers attached to the end of the headers just to keep the neighbors happy. Complete set will come at some point when I get her back on the road. I have redone the front brakes - replaced rotors and calipers along with lines. Also replaced the master cylinder and booster. Currently working on converting it to 4 wheel disc. I have the conversion pieces from Brothers and they will go on soon hopefully. The old tires no longer hold air, so I picked up this set from another 72 owner. His was lowered so I will eventually need larger tires, but they will do for now to roll it around the shop when I get the brakes finished. Not pictured....but i am working on installing an underbed fuel tank. Still trying to figure out how to do the filler neck for this though. No rust repair yet.... body work still intimidates me some but its about to be #1 on the list. I'm ready to get this thing back on the road! |
|
|
|
|
11-29-2010, 03:39 PM
|
#75 |
|
Registered User
Join Date: Apr 2006
Location: Alabama
Posts: 794
|
Re: 72 project
Started on rear brake conversion yesterday. Removed all fo the drum components, removed the rear hard lines, then pulled the diff cover and removed the rear axel shafts to get rid of the backing plates
Next step is to replace the axle shaft bearings and then install the Disc kit from Brothers. |
|
|
|
 |
| Bookmarks |
|
|


 Linear Mode

