
|
 04-11-2012, 10:53 PM
|
#76 |
|
Registered User
Join Date: Dec 2008
Location: Spring, Texas
Posts: 202
|
Re: My '59 Apache
Hey neighbor, I have a TH350 you can use. So nice meeting you at the Nifty Fiftee event. I am headed to Austin this weekend for the Roundup.
|

|

|
|
04-12-2012, 12:00 AM
|
#77 |
|
Registered User
Join Date: Aug 2007
Location: Corona, California
Posts: 7,998
|
Re: My '59 Apache
Denee
I agree with OrrieG about making the trans mount removable. That's what I did with mine. I think you may want to wait until you have a trans for mock up before getting to far into it. You might be surprised how well things may fit. Kim |
|
|
|
|
04-12-2012, 12:05 AM
|
#78 | |
|
Registered User
Join Date: Aug 2007
Location: Corona, California
Posts: 7,998
|
Re: Thanks Orrie ;)
Quote:
I used my trans mount after I got my engine at the height I wanted it. The mount may end up under your frame or possibly shimmed up inside of it. If you look at my build my trans mount attaches below my lower frame rail. Kim |
|
|
|
|
|
04-12-2012, 12:08 AM
|
#79 |
|
Registered User
Join Date: Apr 2011
Location: Tucson, Arizona
Posts: 151
|
Re: My '59 Apache
As for your radiator solution I have a nice aluminum summit 2 core in my truck with dual electric fans. Living in AZ with 110 plus weather i needed great cooling and this does the job and its over kill LOL!!! With a alumnium water pump and 160 thermostat I can make the engine stay at ant temp I want.
I just made custom brackets to set it in and put the core support in the 6cyl location |
|
|
|
|
04-12-2012, 04:05 AM
|
#80 |
|
Registered User
Join Date: Jun 2006
Location: Idaho
Posts: 8,800
|
Re: My '59 Apache
Side frame rails should be level and intake manifold carb plane level. IF you got the motor mounts and trans mount from the same company AND they did it right then you should just be confirming their engineering. If you got the motor mounts a little off then like Kim says it will affect the trans mount.
When you are laying under the truck looking for the mc location note the floor cross sills (braces) you do not want to cut those for your door. I moved my mc back so the floor trap door would be behind the front seat brace. Seat lifts up for access. You can see it could have went back probably at least a foot farther. The two bolts in the side frame behind the booster is the side mount for my transfer case/transmission mount. As I am typing this I just remembered it may be farther forward than yours because the transfer is close coupled to the transmission with the mount where the two mate up. Don't know if this is solving any thing but gives you food for thought.
__________________
1959 Chevy Short Fleetside w/ 74 4WD drive train (current project) OrrieG Build Thread 1964 Chevelle Malibu w/ 355-350TH (daily driver) Helpful AD and TF Manual Site Old Car Manual Project |
|
|
|
|
04-12-2012, 08:30 AM
|
#81 |
|
Senior Member
 Join Date: May 2011
Location: Cypress, Tx.
Posts: 1,504
|
A few hours to work today
Good morning! I have a few hours before my grandaughter(4 y/o) gets here, but she's pretty good with being in the garage and likes being around her Naynay(me). I hope I can rub off on her and she picks up "something".
Ok, I don't feel as uncomfortable with the brake mc/booster relocation after seeing Orrie's pics; ). I thought it was pretty geeky on my truck where whomsover put the mc access  ! How stupid, but then~ there's a lot of dumb things that were done on this truck that I have to live with. ! How stupid, but then~ there's a lot of dumb things that were done on this truck that I have to live with.I can fix this! 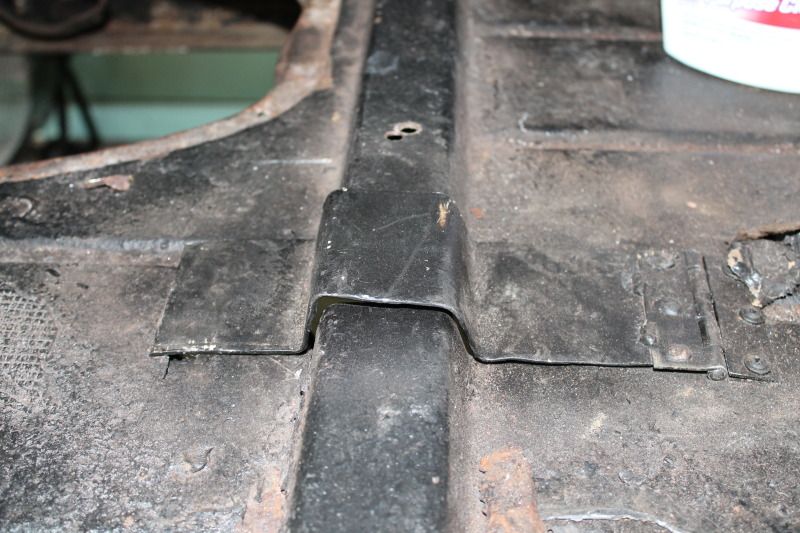 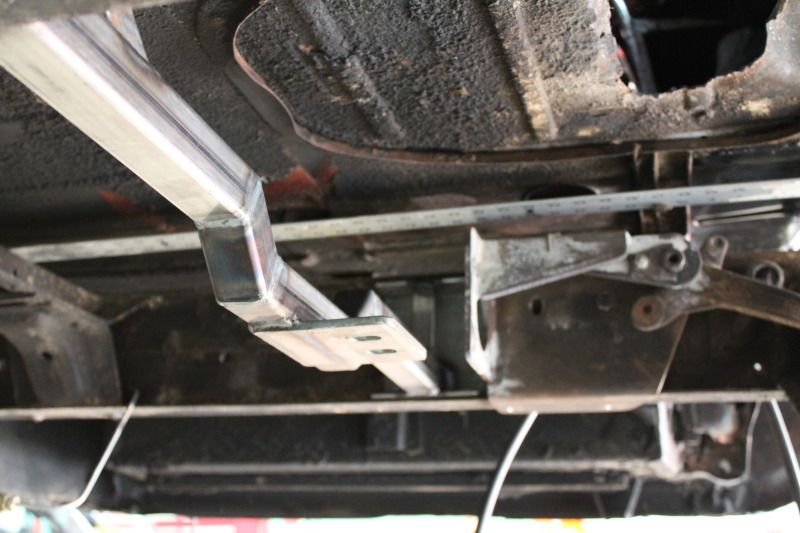 Ogre mentioned about removing/shaving the rail/flange that goes along the top of the firewall? I wrote him to ask him, but he must be busy, maybe he'll pop up. But I'll be in the engine bay today for a few hours. Any ideas how I do this? 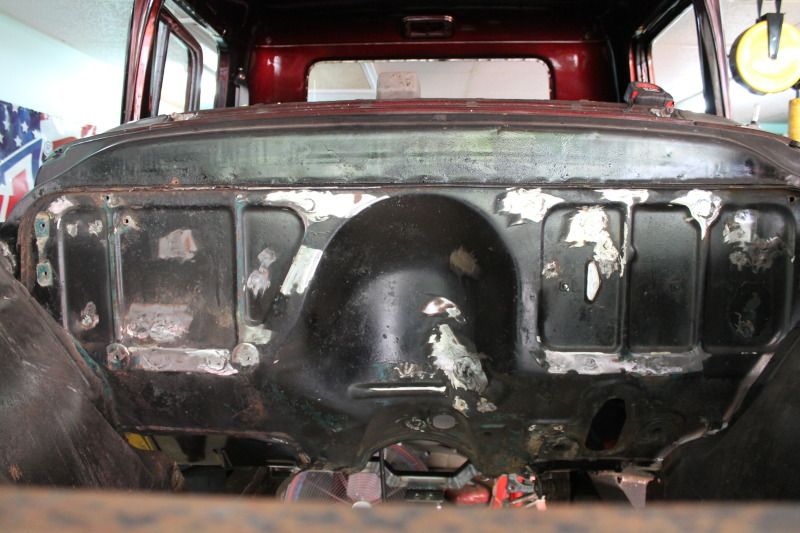 Old crossmember removal? I'd like to tackle this today. I saw where Orrie kept his crossmember in place, but I'd like to cut it, but make it to where it can be bolted back(if room permits), or if ya'll think~ just leave it out? I guess what bothers me about leaving it out, the rear of the front leaf springs it there; seems like it would weaken and allow the frame to flex? but the tranny support will be in there~ taking this into cosideration. So, would a sawzall cut it, or cutting torch(my plasma is out of action  ). Is the frame going to go "Kabunk! when I cut it? ). Is the frame going to go "Kabunk! when I cut it?I was hoping these frame engine mounts were going to go inside the frame. I guess I could cut the top part(after everthing is OK ), and reweld it to where it would be recessed/not showing, then when I box in the rest of the frame, it should look continous. dne' 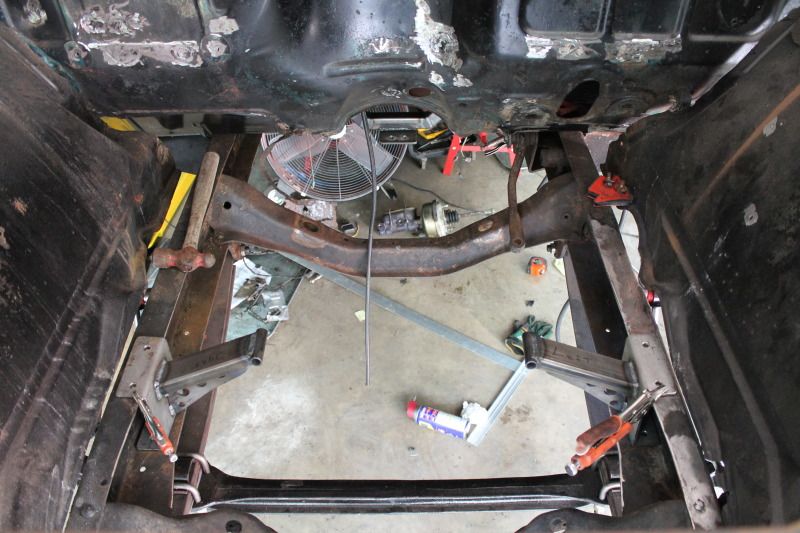
Last edited by Denee007; 04-12-2012 at 08:32 AM. Reason: info |
|
|
|
|
04-12-2012, 08:43 AM
|
#82 |
|
Senior Member
Join Date: May 2011
Location: Cypress, Tx.
Posts: 1,504
|
Mc ?
This is the MC that was on my truck, it showed signs of leaking out the rear, and it's "new". Is there an alternative to this huge mc? maybe one just a tad shorter as well?
don't forget the previous post  there are a couple questions there. there are a couple questions there.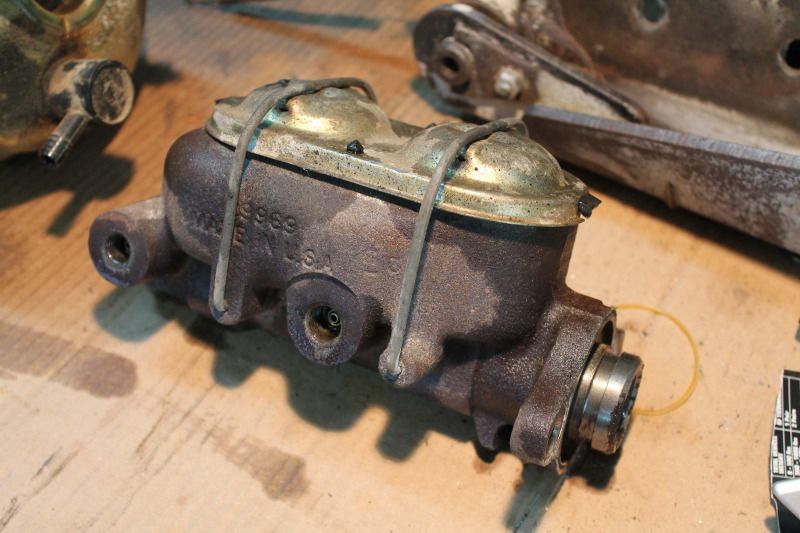
|
|
|
|
|
04-12-2012, 11:13 AM
|
#83 |
|
Registered User
Join Date: Aug 2007
Location: Corona, California
Posts: 7,998
|
Re: My '59 Apache
Denee
Removing fire wall flange: If I were you I would remove a little at a time and then weld that part then move to another section and do the same so you wont change how the cab fits to the fire wall. It will take some time but IMHO be worth the effort. Removing cross member: It should be riveted in from the factory. You should be able to grind off the heads and then use a drift to punch them out. That way you would be able to re-install it if needed. Mine is gone but I have a drive shaft loop that ties my frame together. Engine mounts: I don't see why you can't cut off the top part and then weld and box it all together to achieve the smooth frame that you want. Others may have some different opinions about these items. Kim |
|
|
|
|
04-12-2012, 11:54 AM
|
#84 |
|
Senior Member
Join Date: May 2011
Location: Cypress, Tx.
Posts: 1,504
|
wall flange and crossmember
The wall flange? So I do actually cut off the flange completely at the base of it? then mig it? sigh~ the area over where the battery used to be kind of worries me as it's corroded, but I don't see daylight. or if worser, I could put metal behind it and fill that with weld. I thought maybe one would leave a tiny bit overhang, bend it over with a hammer, then weld.
Well, after looking at the rivets, and I've removed a few, I'd rather not remove rivets. I was thinking more along the lines of taking a good sawzall blade and cutting in the areas where the duct tape is, then I can make tabs to rebolt it back up?(if it fits) or make something else to connect the frame back together. That's what I'm going to do with the engine mounts when I'm absolutely sure. Cut the top/reweld. 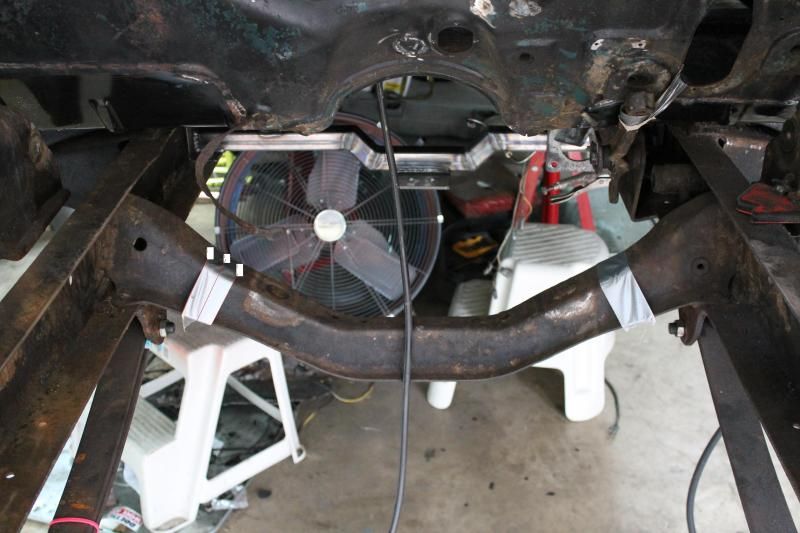
|
|
|
|
|
04-12-2012, 02:09 PM
|
#85 |
|
Registered User
Join Date: Aug 2007
Location: Corona, California
Posts: 7,998
|
Re: My '59 Apache
As far as the cross member what you want to do should work.
If you have some bad metal on the fire wall it's best to replace it with some good stuff. From what I've seen you have the skill to do that. Kim |
|
|
|
|
04-12-2012, 03:07 PM
|
#86 | |
|
Senior Member
Join Date: May 2011
Location: Cypress, Tx.
Posts: 1,504
|
Re: My '59 Apache
Wow Kim, thank you for the compliment!! that makes my day! I'll start on firewall rail next week looks like. I"ll just do about a foot at a time, but now, Babysitting for a few days.
IN the meantime, I've been searching for a mock up tranny. GAry doesn't want me to spend 250 for a new mock up tranny. I found a hollow case on ebay for 159 plus sh. I guess I could put my engine crane through the drivers door and lift the tranny to the correct height; just hate messing with a heavy tranny!  Quote:
|
|
|
|
|
|
04-12-2012, 03:23 PM
|
#87 |
|
Registered User
Join Date: Aug 2007
Location: Corona, California
Posts: 7,998
|
Re: My '59 Apache
Transmissions aren't to bad especially a 350. I used my floor jack under its pan with a piece of plywood to distribute the weight. Of course I don't have a car lift in my garage to get mine up high enough to walk iunder.
Kim |
|
|
|
|
04-17-2012, 07:54 PM
|
#88 |
|
Senior Member
Join Date: May 2011
Location: Cypress, Tx.
Posts: 1,504
|
Worked on other stuff than engine compartment
I welded up some other holes in the passenger compartment, then looked at the long seam/ridge, whatever it's called, and where the battery was, after hitting that part with a 120 grit disc, a bunch of holes showed themselves, then I got uninterested in that idea of smoothing the upper panel of the firewall out, at least for now. Looks Like I'd be best to cut the entire flat portion of the firewall out, and weld in new metal, but darn that sounds like a lot of work!
meanwhile in the Batwoman cave~  I never noticed how weak my floor was, until it hit me, Orrie said "do not cut those sills!", well I did not cut them, they were cut already and pretty screwy the way whomsoever did it! So, I used some scrap from some floor pans and welded that access up! now the floor is quite solid! I'm happy! I'll put a new access when I decide where the mc/pb will be down below. I did order another tranny crossmember from brothers that should be better, or more appropriate for what I'm trying to achieve. it was on sale for 50 bucks, almost half price! ; ) 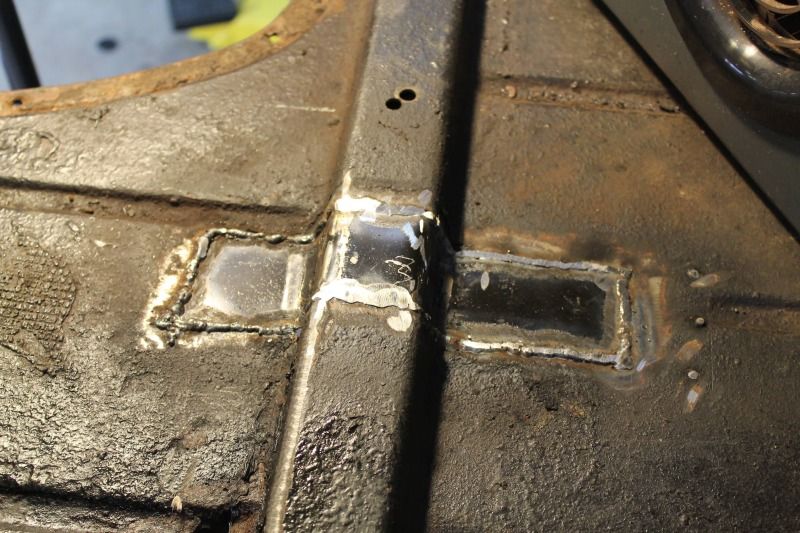 I played with my mock up engine, putting my new brackets on (Alan Groves stuff). I just need exhaust manifolds or headers to be more precise. If I'm satisfied, do I have these pieces powder coated, or do I just paint them? or is chroming something to contemplate?? My mock up engine is so neat! I Had a great day today! Feeling good! 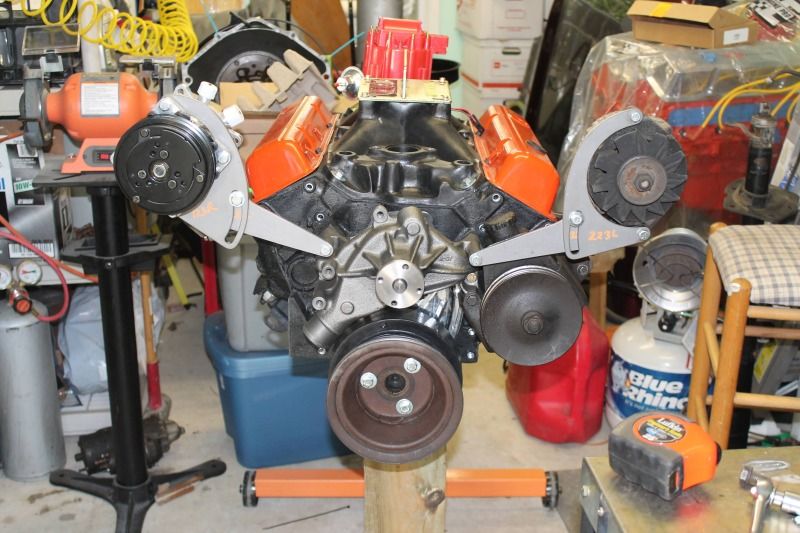
|
|
|
|
|
04-18-2012, 12:33 AM
|
#89 |
|
Registered User
Join Date: Aug 2007
Location: Corona, California
Posts: 7,998
|
Re: My '59 Apache
Looking good.
Personally I like powder coating. It will be the toughest but hard to repair at home. Kim |
|
|
|
|
04-27-2012, 09:56 AM
|
#90 |
|
Senior Member
Join Date: May 2011
Location: Cypress, Tx.
Posts: 1,504
|
attempt for tranny support install
HI!
this is by far the most aggravating part of my project! I dont think the tranny support I have here goes on top of the frame as I have it. I think it must hang below it, which would be good, that would allow more room for access to where the mc/power booster area. I wish transmissions didn't weigh so much! I ran out of steam last night, so this morning I'll start anew. This time I'll remove the top boards (the 2 x 6''s) and see if that will put it at the right height, or close. Then I'll drop my plastic mock up engine in to hopefully tack weld the engine supports into place~ that will be a good goal for today! I haven't finished the firewall by any means, just wanted to accomplish this task. 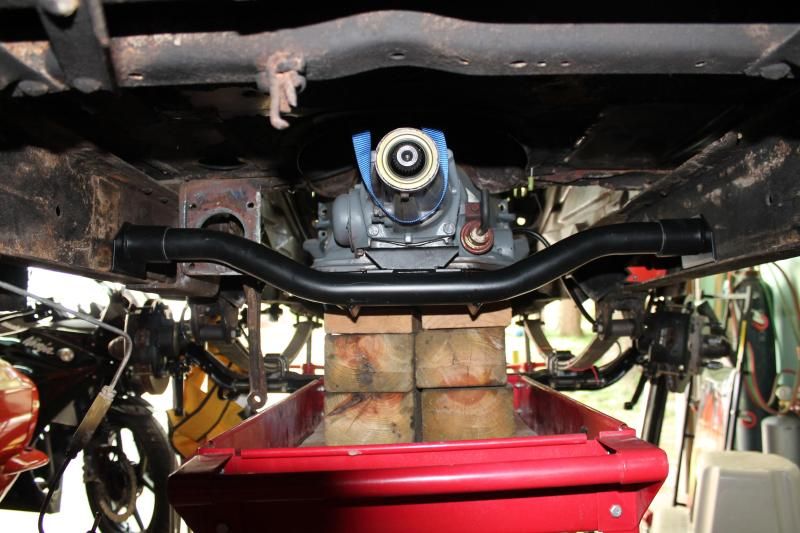 Obviously again, I think I have the tranny too high as it won't go back any further as it hits the firewall, plus getting to the top bolts of the tranny looks impossible to get at. I'll be back~ ; ) 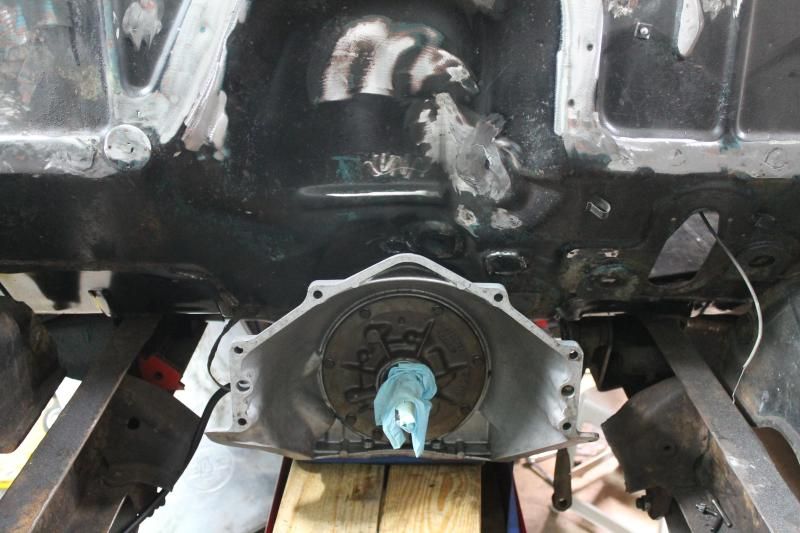 you can see this is where my Little Mule really helps~ there would be no way for me to do this without it! 
Last edited by Denee007; 04-27-2012 at 10:00 AM. Reason: added photo |
|
|
|
|
04-27-2012, 11:48 AM
|
#91 |
|
Registered User
Join Date: Jun 2006
Location: Idaho
Posts: 8,800
|
Re: My '59 Apache
That is hard work. Don't forget that the tail will be tilted about 4 degrees which moves the upper bellhousing closer to the firewall (use a magnetic level on the pan for reference). Looks like the side brackets will go under the frame with some shimming.
__________________
1959 Chevy Short Fleetside w/ 74 4WD drive train (current project) OrrieG Build Thread 1964 Chevelle Malibu w/ 355-350TH (daily driver) Helpful AD and TF Manual Site Old Car Manual Project |
|
|
|
|
04-27-2012, 01:17 PM
|
#92 |
|
Registered User
Join Date: Aug 2007
Location: Corona, California
Posts: 7,998
|
Re: My '59 Apache
Denee
You need to have your trans and engine bolted together to set the angle. I have the same trans mount as you and had to set it below my frame to get the correct angle for the engine/trans. I do have a Chevelle clip so I know that will make a difference. As OrrieG said that is hard work and should be done with someone else helping. Good luck. Kim |
|
|
|
|
04-27-2012, 05:20 PM
|
#93 |
|
Senior Member
Join Date: May 2011
Location: Cypress, Tx.
Posts: 1,504
|
didn't turn out as good as I would have liked
Orrie and Kim~ ; )
Here's what I did; First I leveled the frame of the truck with a level in along both engine frame rails, then from side to side(with a long level). The four tall jack stands the truck sits on are adjustable. Then the tranny was already being held up by my Little Mule, So then I put the mock engine in and bolted it to the boltable/weldable mounts, they're held in by vise grips. I set the engine on the engine supports, then bolted the tranny to the engine. I can elevate/lower the height of the tranny via my little mule. But I cannot remove the little mule, it has to be there, there's no way the mock engine could take the force. Note: I did notice seems like the harmonic balancer maybe too high of the front crossmember, I didn't measure, working too fast today. I removed the intake off of my mock engine and placed the long level on the intake surface of its block. I followed my transmission man's advice on what I just wrote. I put about 2 nickels worth on the rear and placed the long level as said to get the tilt, then attempted to get level on my level. Where I need help~ I didn't take any photos, darn) The tranny support, I put it beneath the frame, but intead of the valley of the support being downward, I turned it around and put it the other way where it's more like a hill(did you get that?) lol. I'm able to get the 4 degrees on the engine, and the crossmember bolts up, but I DON'T THINK THE DRIVESHAFT WILL CLEAR THE NEXT CROSSMEMBER! I put my driveshaft(from the impala) into the tailshaft, but there is no way I can get it's vector to go towards the rear axle yoke without hitting that crossmember, and it has kind of a cutout for a driveshaft. If I lower the tailend of the tranny, I will lose that 4 degree thing, plus this act would put the distributor closer to the firewall. sigh The only thing I can think to do is un-tac my engine support, modify them to where the engine will sit lower, say an inch? I only tacked them in and would be relatively not too bad to undo. otherwise I would have welded them in permanently, but I was smart for once! To end the day, I removed the mock engine, lowerd the tranny onto my cart, pushed the tranny further back under the truck to get it out of the way, and cleaned shop. I'm tired~ I won't get back into the shop until Tuesday!! ; ) |
|
|
|
|
05-02-2012, 01:57 AM
|
#94 |
|
Registered User
Join Date: Jul 2005
Location: AL
Posts: 1,828
|
Re: My '59 Apache
Denee, i am enjoying your build.. i am impressed... i would suggest putting the real engine together with the tranny and slidinging into place.. maybe u will get better results..
i will check back soon. Rich
__________________
" |
|
|
|
|
05-02-2012, 10:02 AM
|
#95 |
|
Registered User
Join Date: Sep 2011
Location: Nevada City, CA
Posts: 908
|
Re: My '59 Apache
At this point, I would look at re-building the offending crossmember. Guys notch the frame to clear the axle tube when they lower the suspension. I think a similar approach, if you have any overhead space to work with before getting to the bed, would help.
If you don't have any space between cross member and bed (I'm a newbie, did I mention?) then your best bet is probably to lower the engine mounts, like you say. I'd first take a look at notching out that cross member & adding steel as needed to keep it structurally sound. |
|
|
|
|
05-02-2012, 11:25 AM
|
#96 |
|
Senior Member
Join Date: May 2011
Location: Cypress, Tx.
Posts: 1,504
|
Re: My '59 Apache
Rich, thank you for commenting
. I just can't handle that heavy engine, that's why I bought the mock up engine.Yossarian19, (Welcome!! ; ), I was looking at that crossmember, notching it, sigh, Looking at that engine supports, to lower the engine, I'll have to do a little surgery,refabbing. Looks like I can only come down and inch or so before loosing some of the support of them. Alas, keeps me thinking! lol 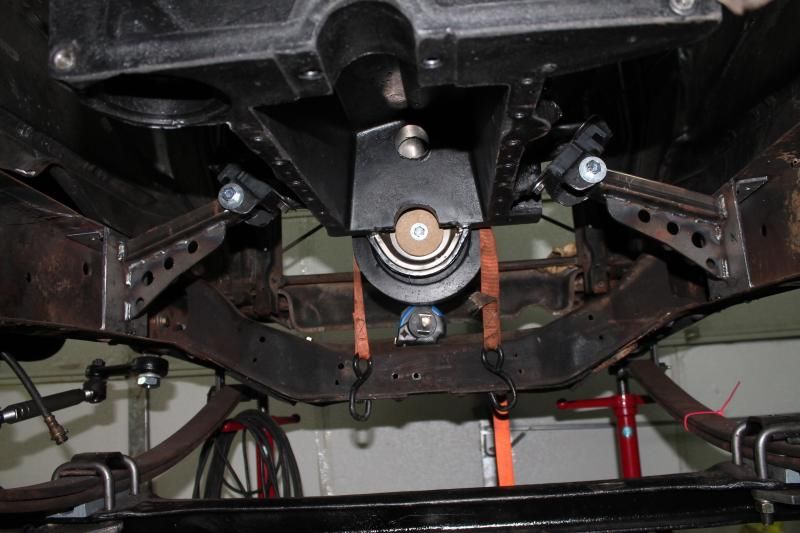
|
|
|
|
|
05-02-2012, 08:55 PM
|
#97 |
|
Senior Member
Join Date: May 2011
Location: Cypress, Tx.
Posts: 1,504
|
I think this will work! ; )
Hi Ya'll! I had a pretty good day! I first want to THANK, all those involved helping me! Your support gives me strength! So, Thank YOU all! ; )
Simple enough, eh! I cut off 1" of the engine support at the bottom, welded that part back on top, but looks like it could add a little support to the support. I had moved the supports forward a half inch, but then after the tranny was in, and leveled, I moved the supports back to the original spot. I hadn't tack welded them in yet.  This poor shot of the tranny and the next crossmember, I still think will need "adjusting". The inch taken off of the engine support didn't seem to translate so much to the tailshaft. I guess I'll be modifying that support. 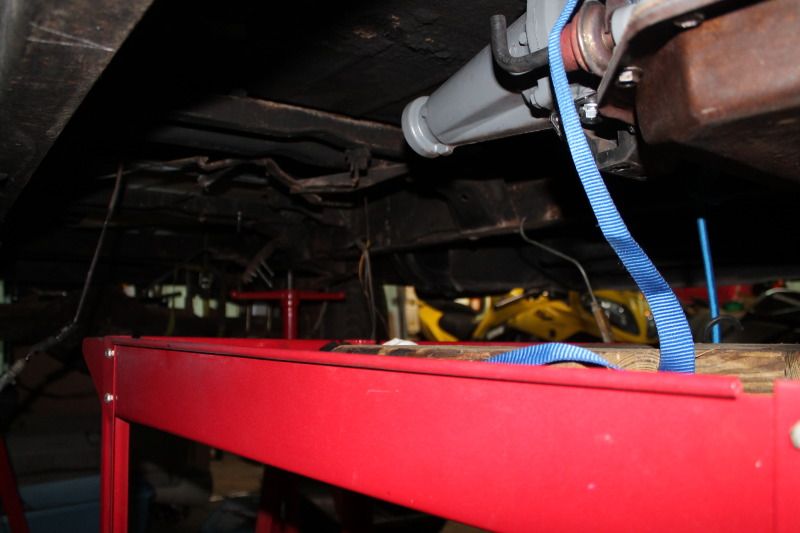  Engine shot: The supports are tacked in, the tranny is attached here and supported by my Little Mule. When I'm thoroughly pleased with where I have the mounts, I'll weld them in permanently ; ) Then maybe work on boxing the front and rear of the engine compartment. 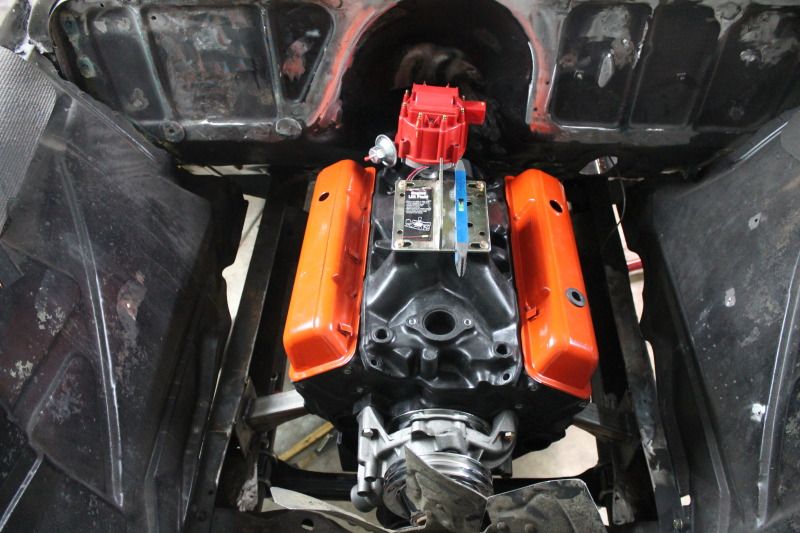 below: Not sure if I'm going to use this fan, I had it left over from the Impala doner car. The fan clutch is shot! The mock up harmonic balancer is about 1" thicker than the one on my real engine, it puts the crankshaft pully further out, this will be remedied when the real engine is installed (someday). * So how do I know what radiator to order. Orrie, you mentioned the 6 cyl or 8 cyl. I will be running AC. I see them on Ebay for a couple hundred or so? I'm not going for a Griffin this time! 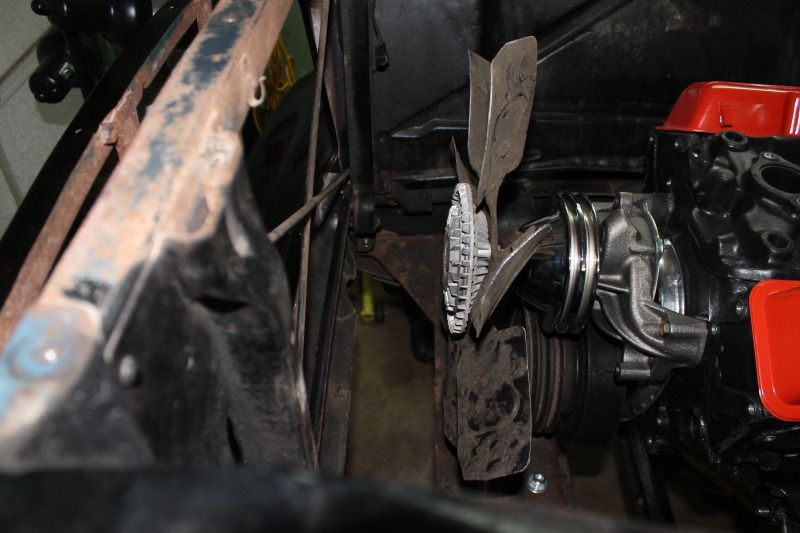
Last edited by Denee007; 05-02-2012 at 09:03 PM. Reason: added info |
|
|
|
|
05-02-2012, 11:44 PM
|
#98 |
|
Registered User
Join Date: Aug 2007
Location: Corona, California
Posts: 7,998
|
Re: My '59 Apache
Good job Denee.
Kim |
|
|
|
|
05-04-2012, 01:19 PM
|
#99 |
|
Senior Member
Join Date: May 2011
Location: Cypress, Tx.
Posts: 1,504
|
a little progress on firewall ridge
Here's what I did, I used my die grinder with a small wire wheel, very stiff, and cleaned the debri and rust, I hadn't done much on this photo. but I worked in the middle of the firewall from the access hole plate. I then placed a length of 1/16" tig rod in the V of the seam to be welded. Then came back and migged it together. Of course there are some areas that I won't be able to do this. I am geared up very well, respirator, goggles, hearing protection, and a ventilator to suck out the nasty air.
 ON the engine side, I used my sawall to cut the ridge off, the used my angle grinder to get the remaining ridge down. This worked very well and I didn't blow near as many holes. Now the battery end of the ridge is going to require replacing some metal, but I think I should finish this today. I sitll haven't welded the metal coming down to the seam, I may just cheat and spray rust encapsulator, then epoxy primer, and filler. or maybe possibly jb weld. 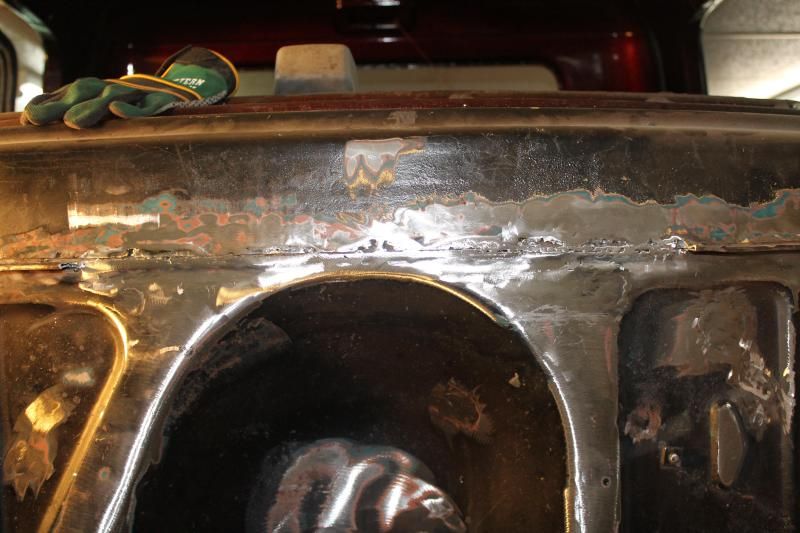
|
|
|
|
|
05-04-2012, 02:31 PM
|
#100 |
|
Registered User
Join Date: Aug 2007
Location: Corona, California
Posts: 7,998
|
Re: My '59 Apache
Looks like you figured out what works for you. Good job.
Kim |
|
|
|
 |
| Bookmarks |
|
|


 Linear Mode

