
|
|
|
 07-20-2011, 01:28 AM
|
#1 |
|
Registered User
Join Date: Jun 2010
Location: Vancouver Island BC
Posts: 652
|
Re: Project '64 Cheapskate
Nice, I like the looks of it. Great combination, good luck with the overlay.
|

|

|
|
07-20-2011, 02:53 AM
|
#2 |
|
Redneck Hillbilly
Join Date: Jan 2010
Location: Backwoods
Posts: 1,307
|
Re: Project '64 Cheapskate
Wow, that interior came out nice. I need to use some of that CLR on my own truck. Nice job!
|
|
|
|
|
07-28-2011, 01:12 AM
|
#3 |
|
Registered User
Join Date: Nov 2008
Location: So. Cal.
Posts: 452
|
Re: Project '64 Cheapskate
I've seen this way cool truck before, I just can't put my finger on where...
Posted via Mobile Device
__________________
It's all about the stance, baby! http://67-72chevytrucks.com/vboard/s...d.php?t=320546 |
|
|
|
|
07-28-2011, 01:47 AM
|
#4 | |
|
Registered User
Join Date: Dec 2008
Location: Oak Hills, California
Posts: 393
|
Re: Project '64 Cheapskate
Quote:
|
|
|
|
|
|
07-28-2011, 08:00 AM
|
#5 | |
|
Registered User
 Join Date: Mar 2005
Location: apple valley, ca
Posts: 2,670
|
Re: Project '64 Cheapskate
Quote:
 . Well, not yet. . Well, not yet.She'll get access on the day I roll up it in the driveway and tell her. "Hey honey, check this out......I got this truck for almost free and built it with almost no money by using all the extra stuff I had laying around!" She's been on me about having a work truck ever since I had a brain fart and sold the '76 Bonanza because it's "just sitting around not being used". As soon as I signed the title over, I knew I had made a bone-headed move. Then not long after, the truck got totalled by the son of the guy I sold it to, and that made it even worse.
__________________
Check out my latest endeavor: https://roundsixpod.com My build threads: '55 Chevy: http://67-72chevytrucks.com/vboard/s...d.php?t=247512 '64 C-20: http://67-72chevytrucks.com/vboard/s...d.php?t=446527 Last edited by chevyrestoguy; 07-28-2011 at 08:05 AM. |
|
|
|
|
|
07-30-2011, 12:34 AM
|
#6 |
|
Registered User
Join Date: Mar 2005
Location: apple valley, ca
Posts: 2,670
|
Re: Project '64 Cheapskate
Well, a week or so ago I added some pictures showing the dash all cleaned up, along with the unfinished gauge cluster. In the left corner of the cluster, I had temporarily mounted a vacuum gauge from a '66 Oldsmobile 442, and promised that I would post up more shots when I had the vacuum gauge finished. Here's a step-by-step pictorial showing what I did:
I love the look of the gauge clusters when they're fully optioned with the tach and vacuum gauges, but finding those gauges can be an expensive endeavor. As the title of the thread proudly proclaims, I'm building this truck on the cheap, so I had to put my thinking cap on to figure how I can duplicate this look without throwing down a lot of dough. I started going on ebay and looking at all the GM vacuum gauges, and the prices were all over the board. The Chevy truck gauge was seemingly impossible to find, and the car gauges were pretty spendy. The beauty of GM stuff is that a lot of it will interchange, and I was taking a gamble on whether it would all fit. On ebay, I started watching one gauge in particular, one from a '66 Olds 442. It was thrashed, and it seemed like nobody was interested. The seller proclaimed that it worked, and that was good enough for me, so I placed a bid with 20 seconds left in the auction, and got it for $28, which is a steal. The housing was nicked up, the chrome was flaking, somebody had put a prisma decal on it, the clear bezel was cracked, but I didn't care because I wasn't going to use any of that stuff. Here it is. Trust me, it looks nicer than it really is: 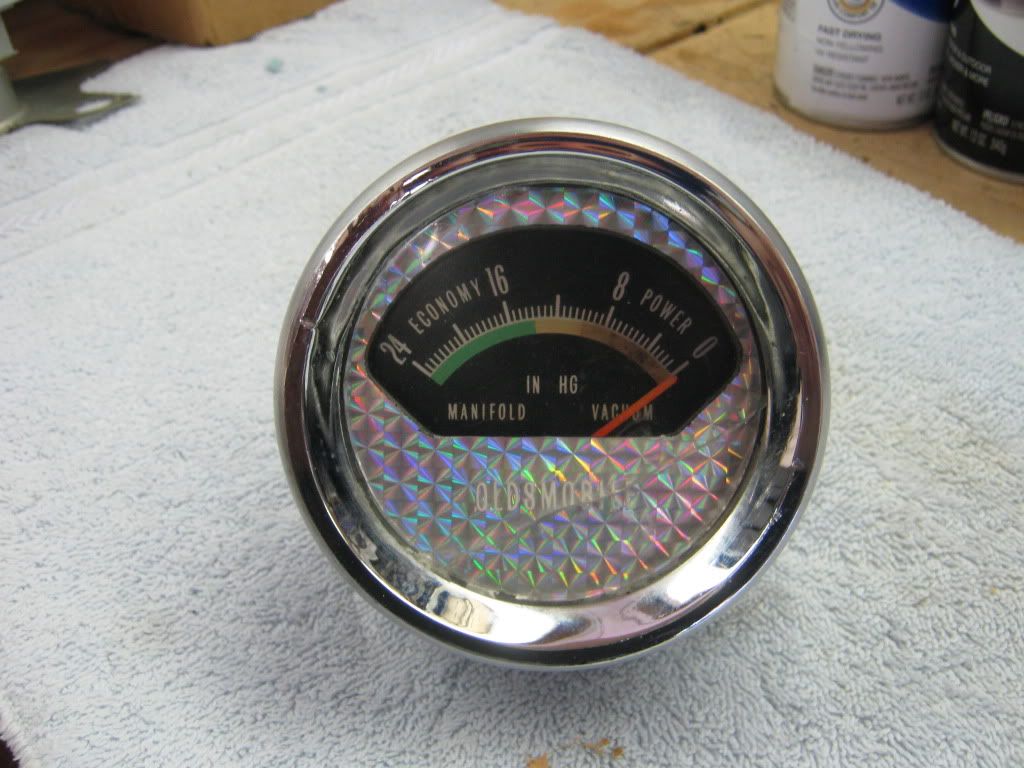 Here it is all disassembled, pretty simple: 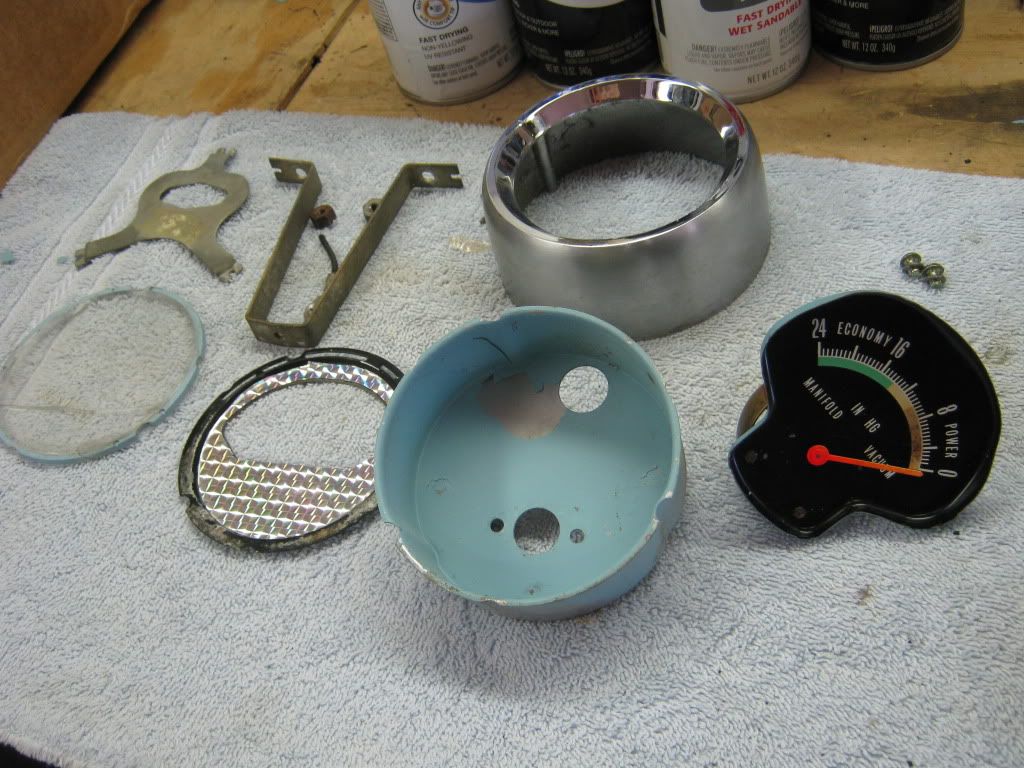 I took the gauge itself and held it up to the truck's cluster and the mounting holes were identical to the ones in the truck's gauge cluster (gotta love GM!) and I bolted it in to see if it would work. It was about 1/2" too high and didn't look right. Plus the font wasn't identical and wasn't the sea-green color of the rest of the gauges: 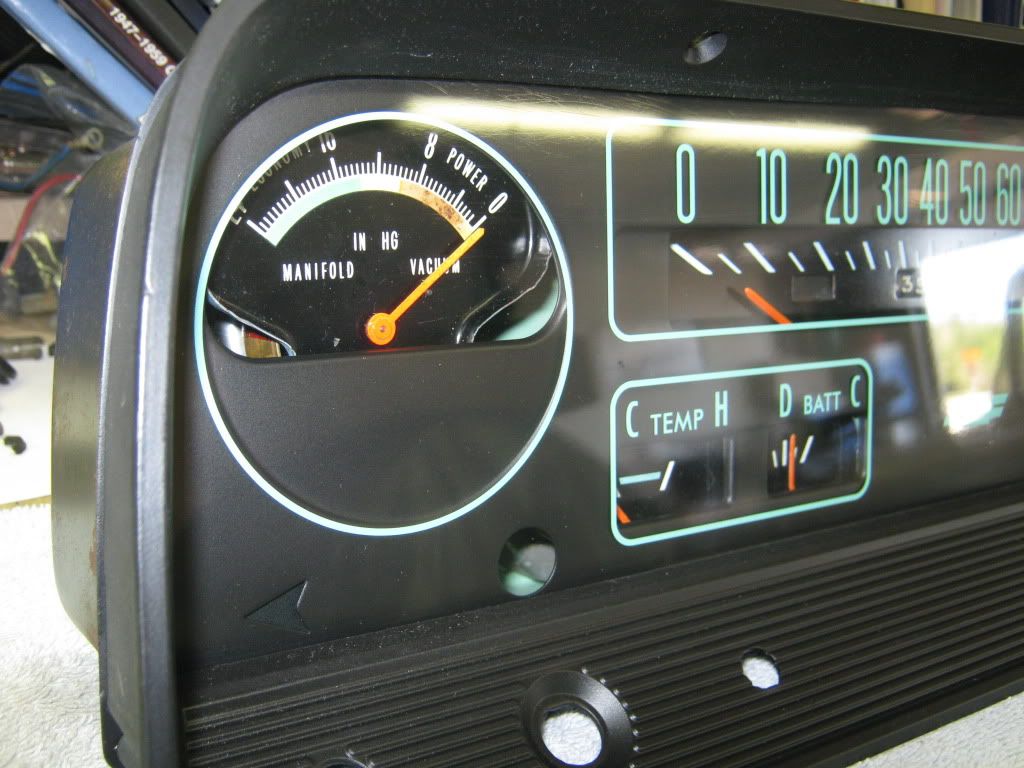 So I started researching what the factory gauge looked like, and lo and behold, I discovered that the faceplate of the vacuum gauge was exactly the same shape and size as the truck's block-off plate. Now I was on to something. If I could use the block-off plate as the gauge face, then a huge part of the puzzle could be solved. 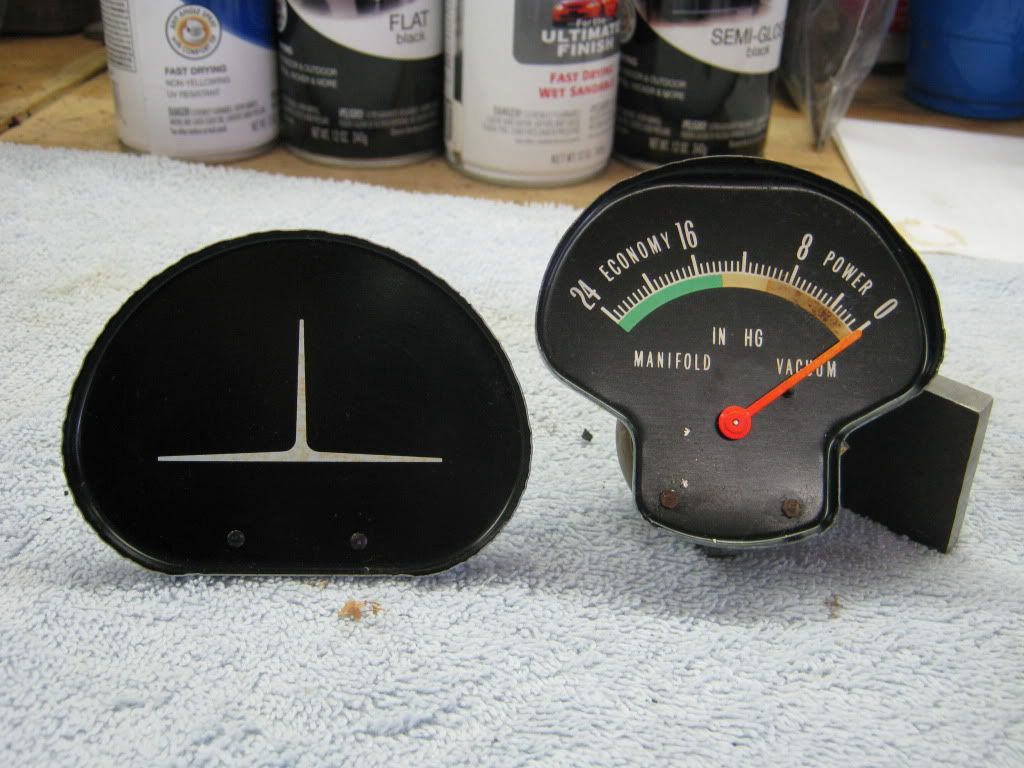 The block-off has two tiny rivets that secure it to a sheetmetal tab that bolts itself to the mounting plate. I made some measurements on the center-to-center spacing of those rivets and compared it to the tiny bolts that secured the faceplate on the Olds vacuum gauge, and they were identical. So I carefully drilled out the rivets and removed the tab from the block-off plate. I also made some measurements of where the hole needed to be for the needle to protrude through and drilled that with a 11/64" bit.  Now came the tricky part, the fonts for the gauge. I had been in contact with a well-known gauge company and had sent them a pdf file showing the decal I wanted them to make. They agreed that they could make it, and I was about 5 minutes from pulling the trigger when I went on the site and saw the thread that Parklane410 posted concerning the gauge overlay kit he was selling. I immediately bought the overlay kit. It was like it was meant to be. Here's what Jason's kit looks like, minus a couple of the overlays for the little gauges that I already installed before I took this picture: 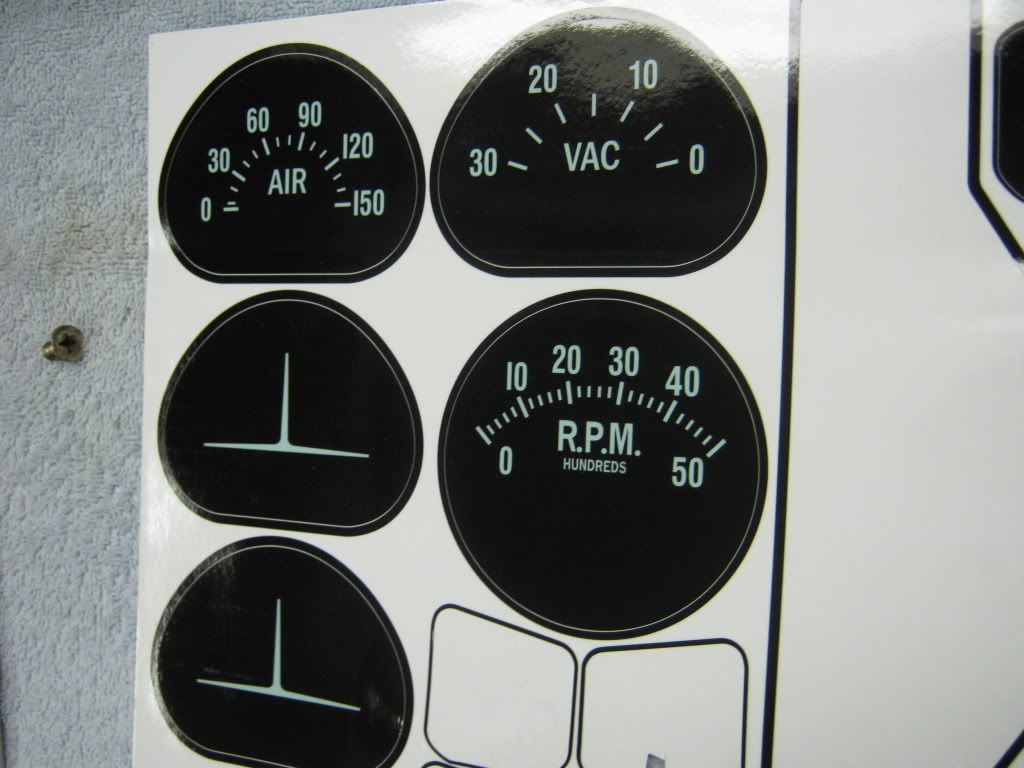 Here's what the old cover plate looks like with the holes drilled and the overlay installed: 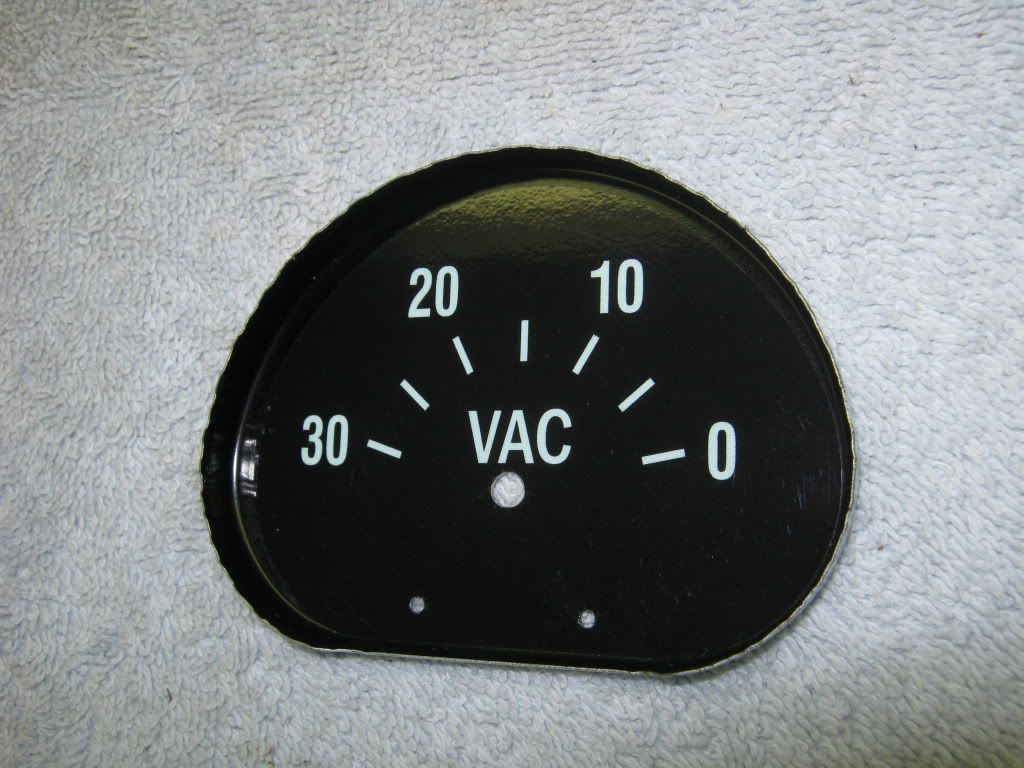 Here it is installed to the truck's original mount plate, using the tiny faceplate mounting screws from the Olds gauge. I also removed the needle stop from the Olds gauge and drilled a tiny hole and super-glued in on the new faceplate. I also determined where zero Hg location was on the gauge and pressed the needle in place. I have yet to paint the needle, but it will be painted. 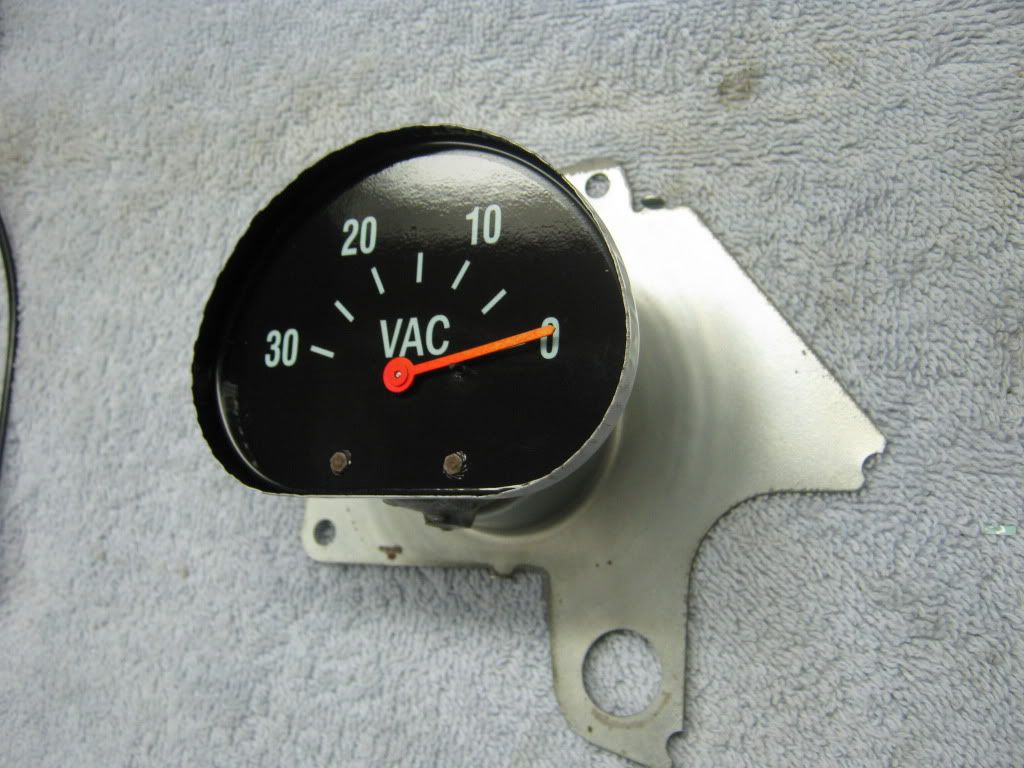 Here it is, installed in the cluster. It looks 100% factory. I figure that I have about $33 invested in it when you consider the ebay price and the overlay price. I wound up overlaying all of the gauges, so the vacuum gauge overlay price was 1/7th of the total cost of the overlay set ($35). That's a heck of a lot cheaper than some of the $200 gauges I was seeing on ebay. 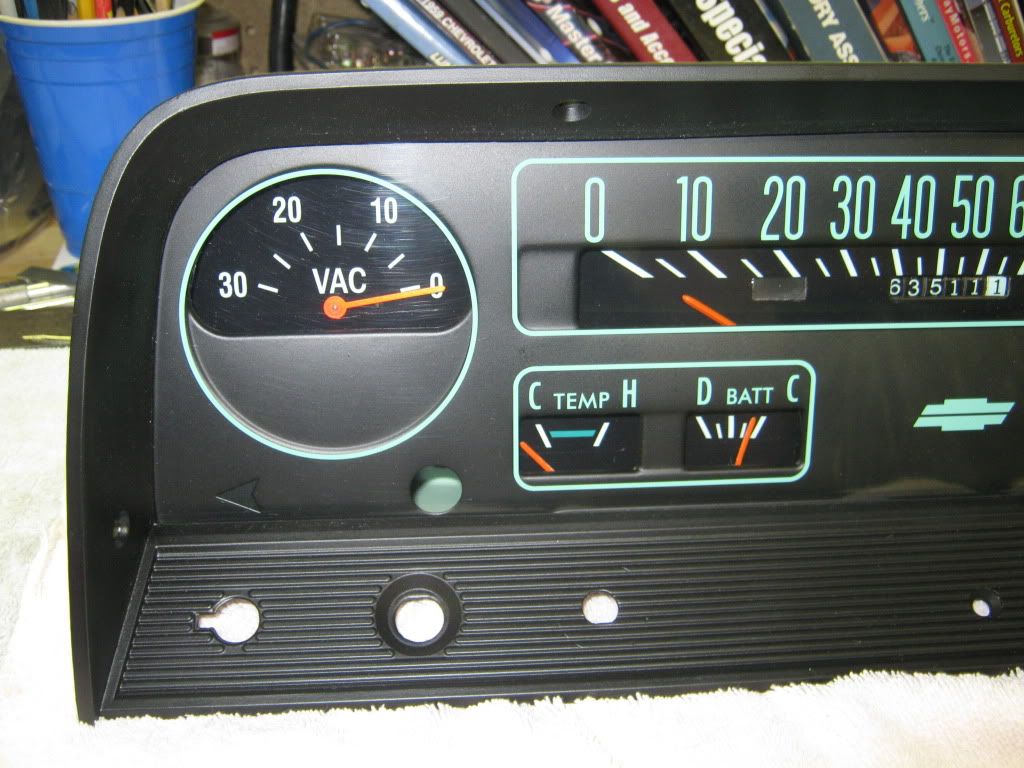 Next step, tach! Stay tuned for more cheap-ass adventures!
__________________
Check out my latest endeavor: https://roundsixpod.com My build threads: '55 Chevy: http://67-72chevytrucks.com/vboard/s...d.php?t=247512 '64 C-20: http://67-72chevytrucks.com/vboard/s...d.php?t=446527 Last edited by chevyrestoguy; 07-30-2011 at 12:44 AM. |
|
|
|
|
08-28-2011, 02:30 AM
|
#7 | |
|
But Found Her 25yrs Later!
Join Date: Oct 2010
Location: Oregon City, Oregon
Posts: 10,506
|
Re: Project '64 Cheapskate
Quote:
__________________
I lost my 65 - Found it 25 years later: http://67-72chevytrucks.com/vboard/s...d.php?t=426650 66 C20 Service Truck: http://67-72chevytrucks.com/vboard/s...d.php?t=428035 |
|
|
|
|
|
09-25-2011, 10:21 PM
|
#8 |
|
Registered User
Join Date: Mar 2005
Location: apple valley, ca
Posts: 2,670
|
Re: Project '64 Cheapskate
I haven't posted in a few weeks, but that doesn't mean that I haven't done anything on the truck. As I posted earlier, I have a '79 Suburban that I am using as a donor for suspension and whatever else. Well, last weekend, I started tearing it down. Some of the parts were ones I was going to keep, others were spoken for by friends, and I was able to post an ad here on the site and so far have had a lot of responses. It's going to donate a lot of parts, and I'm really excited about how it's going to benefit the '64.
In parallel, I have been pulling the suspension out from under the '64. Here's a few shots with the front suspension removed: 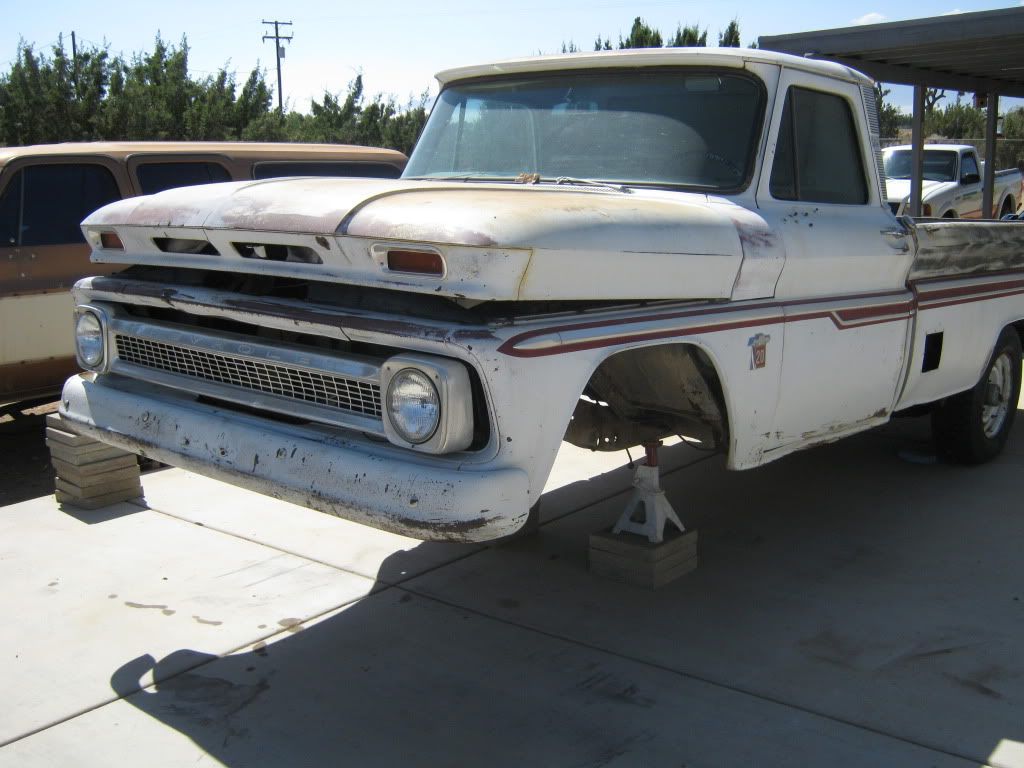 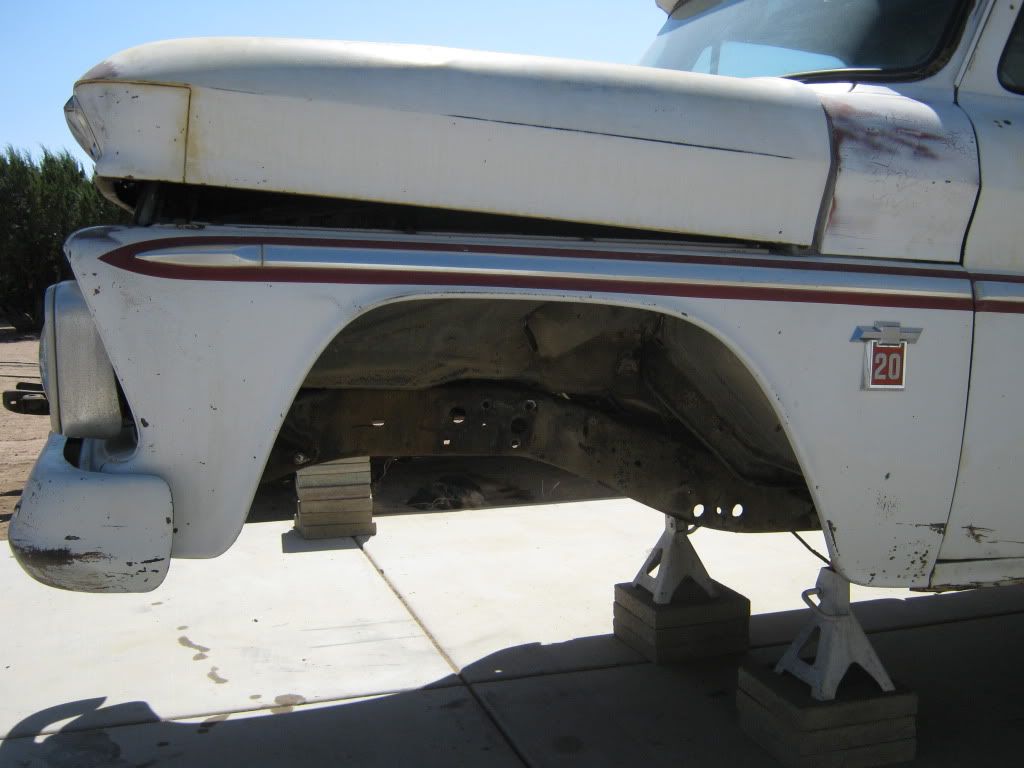 The Donor: 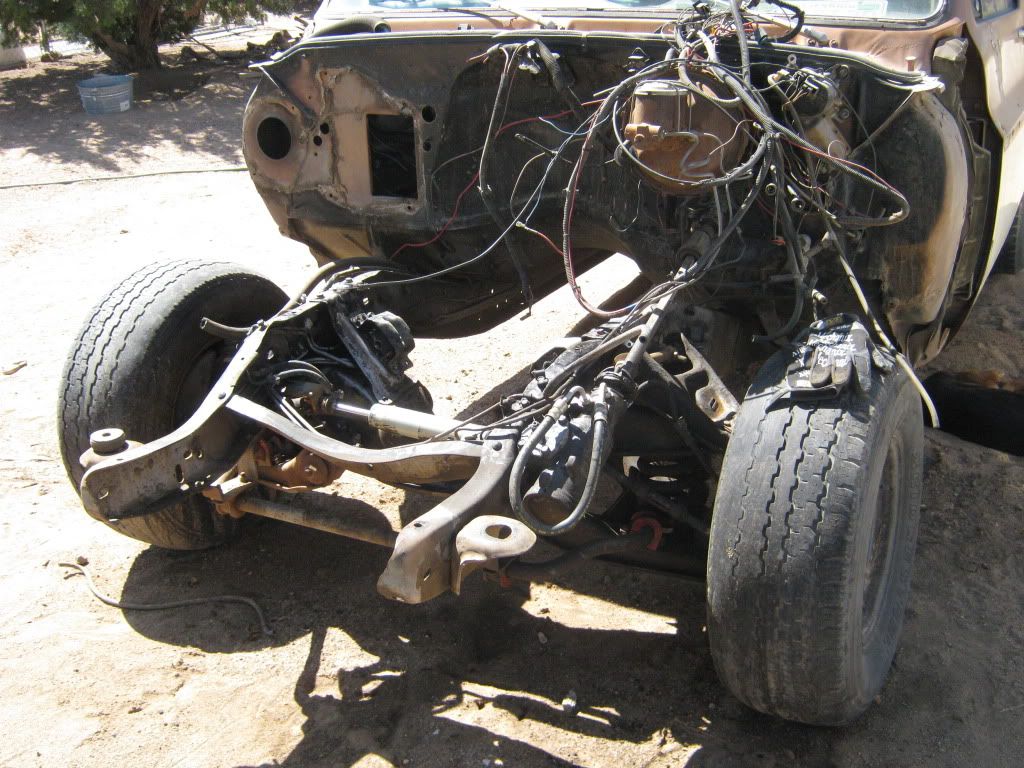 And finally, the pest that wants me to play fetch every 30 seconds. She's a great dog, and she would play fetch until her feet bleed. Yeah, she's addicted to that ball.  Next weekend: Pull the final 14 bolts holding the suspension into the Suburban, stream-clean it all, then start detailing the chassis in preparation for the suspension install. Gotta keep knocking things off the list!
__________________
Check out my latest endeavor: https://roundsixpod.com My build threads: '55 Chevy: http://67-72chevytrucks.com/vboard/s...d.php?t=247512 '64 C-20: http://67-72chevytrucks.com/vboard/s...d.php?t=446527 |
|
|
|
|
07-30-2011, 12:47 AM
|
#9 |
|
1 thing at a time is progress.
Join Date: Jun 2007
Location: Ball Ground GA
Posts: 5,511
|
Re: Project '64 Cheapskate
Very nice work.

__________________
Alan
Philippians 2:14-16 |
|
|
|
|
07-30-2011, 01:04 AM
|
#10 |
|
Registered User
Join Date: Apr 2011
Location: Sulphur, OK
Posts: 316
|
Re: Project '64 Cheapskate
Wow. I never would have thought of that. Impressive
 Posted via Mobile Device
__________________
 1966 C10 LWB, 283, 3 on the tree (lots of work to do!) http://67-72chevytrucks.com/vboard/s...d.php?t=471348 2001 Suburban daily driver 2008 HHR (wife's ride) |
|
|
|
|
07-30-2011, 01:12 AM
|
#11 |
|
60-66 Nut
 Join Date: Mar 2007
Location: Coeur d'Alene, Idaho
Posts: 23,246
|
Re: Project '64 Cheapskate
Very nice work and excellent write up
 Thanks for sharing your research.
__________________
Power Steering Box Adapter Plates For Sale HERE Power Brake Booster Adapter Brackets For Sale '63-'66 HERE and '67-'72 HERE and '60-'62 HERE and "60-'62 with clutch HERE Rear Disc Brake Brackets For Sale. Impala SS calipers HERE Camaro Calipers HERE D52 Calipers HERE 6 Lug HERE Hydroboost Mounting Plates HERE |
|
|
|
|
07-30-2011, 02:33 AM
|
#12 |
|
Registered User
Join Date: Dec 2008
Location: Oak Hills, California
Posts: 393
|
Re: Project '64 Cheapskate
Super nice job. Now this is creative!! I really enjoy reading post like this. Thank you for sharing your hours of research and work with us. Being resourcefull and creative is a lot more diffulcut than jumping the computer and buy new overpriced pc.
|
|
|
|
|
07-30-2011, 09:18 AM
|
#13 |
|
HOW long until spring??
Join Date: Mar 2009
Location: Star Idaho
Posts: 1,413
|
Re: Project '64 Cheapskate
Very nice! I am always glad to see another truck saved from the grave.
It is amazing how good these trucks look with the old patina showing through!! It is not always the easiest way to be creative and use recycled and used parts. It is really a source of pride for me!!!
__________________
69 chevelle convertible 71-C-10 short-wide and low 64 C-10 custom shortbox "Bubba"s Recycling project" |
|
|
|
|
07-30-2011, 10:53 AM
|
#14 |
|
Registered User
Join Date: Mar 2005
Location: apple valley, ca
Posts: 2,670
|
Re: Project '64 Cheapskate
Thanks for the nice comments, guys. So far, this build has been one of the most enjoyable, fun things I have done in a long time. Although I've gone a little overboard on the gauge cluster, the rest of the truck has been a matter of hitting swap meets, wrecking yards, yard sales, and donations of parts from friends. I started this project with that intent. Between myself and my buddies we have tons of extra parts laying around. I've been trading off lots of my extra stuff for the parts I need. I've been very actively selling stuff on Craigslist and ebay, and those profits go to strictly to buying what I need. I'm not raiding the family checkbook at all. Because of that mentality, I have to keep my thinking cap on and my brain spinning. The vacuum gauge mod is one of those things that I've always wanted, but just couldn't bring myself to pay full pop for.
Here's how I envision the final "look" of the truck to be: A nicely patina'd exterior with lots of lettering to resemble an old shop truck. The suspension will be updated with all 73-79 components, and with the exception of the drop spindles and lowered coils, all stock and simple. The engine will be a 350 with a few internal mods, but rock-solid dependable and stock-appearing. The engine compartment will be nicely detailed. The trans will be a 700r4 to help with the fuel mileage. The interior will be a bit nicer, with a clean, fully optioned dash, factory A/C, and 100% sound deadener on the floors and doors. I want it to be quiet inside, dependable under the hood, and nicely "burnished" on the outside. I'm kind of a detail freak, so it'll be spotlessly clean inside and out. Believe it or not, my '55 was supposed to be done this way when I started building it in the '90s, but due to the fact that I kept changing my mind, it went waaay off course and became what it is today. I'm not going to do that again........Doing it this way is a lot more fun!
__________________
Check out my latest endeavor: https://roundsixpod.com My build threads: '55 Chevy: http://67-72chevytrucks.com/vboard/s...d.php?t=247512 '64 C-20: http://67-72chevytrucks.com/vboard/s...d.php?t=446527 |
|
|
|
|
07-30-2011, 04:22 PM
|
#15 |
|
Registered User
Join Date: Dec 2010
Location: Caddo Oklahoma
Posts: 164
|
Re: Project '64 Cheapskate
I am so enjoying this build, it is one of the few I have marked on my favorites. The only problem is it has got me wanting a 64-66 truck, like I need another project. I can't seem to get off my rear and work on my 51. Actually I am waiting on my shop to get below 100 degrees
 ..... Don ..... Don
__________________
My Build Thread 51 chevy http://67-72chevytrucks.com/vboard/s...d.php?t=437496 48,49,50 Chevy trucks. 41 Olds |
|
|
|
|
07-30-2011, 07:24 PM
|
#16 |
|
Registered User
Join Date: Jun 2010
Location: Vancouver Island BC
Posts: 652
|
Re: Project '64 Cheapskate
I knew you'd figure it out, that must have been very rewarding. GREAT DETAIL!!! Look forward to the tach.
|
|
|
|
|
07-31-2011, 09:38 AM
|
#17 |
|
Registered User
Join Date: Jun 2010
Location: Vancouver Island BC
Posts: 652
|
Re: Project '64 Cheapskate
Your detailed info has me going to attempt a 90 ohm fuel gauge guts, in the stock 30 ohm location. (RCI fuel cell recently installed) I'd love to keep my dash stock in appearance also. Great tech article.
|
|
|
|
|
08-06-2011, 06:12 PM
|
#18 |
|
Registered User
Join Date: Apr 2011
Location: Sulphur, OK
Posts: 316
|
Re: Project '64 Cheapskate
That's awesome! WTG
__________________
1966 C10 LWB, 283, 3 on the tree (lots of work to do!) http://67-72chevytrucks.com/vboard/s...d.php?t=471348 2001 Suburban daily driver 2008 HHR (wife's ride) |
|
|
|
|
08-07-2011, 01:30 PM
|
#19 |
|
Registered User
Join Date: Dec 2009
Location: vancouver b.c....is the biggest place most people would know but I am actually out in the valley 45 mins away
Posts: 2,050
|
Re: Project '64 Cheapskate
Dude you got some great skills.....it's really going together nicely ....keep up the good work
__________________
1966 Pro street build http://67-72chevytrucks.com/vboard/s...?t=448089[ 1958 LS 2 build http://67-72chevytrucks.com/vboard/s...d.php?t=527123 1966 SBFS low and go http://67-72chevytrucks.com/vboard/s....php?p=5799909 1966 SBFS street HULK http://67-72chevytrucks.com/vboard/s...=1#post5886625 Poject Low and go gets a 6.2 ltr LSA supercharged with 6 speed automatic Aluinum Radiator Dealer pm for details |
|
|
|
|
08-22-2011, 01:10 PM
|
#20 |
|
Registered User
Join Date: Mar 2005
Location: apple valley, ca
Posts: 2,670
|
Re: Project '64 Cheapskate
Got some things done on the old beater this weekend. I pulled the original 4-speed trans and crossmember out in anticipation of the upcoming suspension swap. I knew those things were heavy, but holey smokes that trans was a greasy, heavy beast! I wound up firing up the torch and cutting the transmission crossmember and lowering it out with the floorjack. I removed the remaining sections of the crossmember and the attaching rivets as well.
I also installed the automatic steering column, replaced the door handles, cut out the old exhaust, and installed the rear view mirror. I'm getting real close to doing the suspension swap, but I'm going to need to steam clean the chassis first. It's a greasy mess, and that job is not going to be very pleasant.
__________________
Check out my latest endeavor: https://roundsixpod.com My build threads: '55 Chevy: http://67-72chevytrucks.com/vboard/s...d.php?t=247512 '64 C-20: http://67-72chevytrucks.com/vboard/s...d.php?t=446527 |
|
|
|
|
08-23-2011, 02:39 AM
|
#21 |
|
Registered User
Join Date: Jun 2010
Location: Vancouver Island BC
Posts: 652
|
Re: Project '64 Cheapskate
I feel your pain, I've spent many hours over the last few months scraping and wiping my frame for new lines, wiring, cross member, and motor trans install. Amazing what you miss while trying to pressure wash it. Good luck, it sure is nice working on when its clean.
|
|
|
|
|
10-13-2011, 05:08 PM
|
#22 |
|
Certified Car Nut
Join Date: Jan 2005
Location: Inglewood, California
Posts: 3,118
|
Re: Project '64 Cheapskate
Well at least it looks like you've been busy.lol
I'm just checking in on you man everything is looking great. |
|
|
|
|
10-14-2011, 10:44 AM
|
#23 |
|
Registered User
Join Date: Mar 2005
Location: apple valley, ca
Posts: 2,670
|
Re: Project '64 Cheapskate
Thanks, Bam!
Yeah, I've been a busy boy lately. I can only work on the '64 during the weekends because my work schedule is crazy from Monday through Friday. I'm also hustling hard to get all the knuckle-busting work completed before it starts turning cold. Once I get the rear end bolted up, I'll mount the exhaust, put the mock-up block and trans in it, set the trans crossmember in place, and then nail-down the exact pinion angle I'm looking for and then I can weld the saddles to the rear housing. I ordered a Super Track Bar kit and a shock re-locator kit from Early Classics yesterday, and they should get here this afternoon. While I have the rear end out, I'm going to flip the front trailing arm brackets and re-bush the trailing arms. It's better to do it now than later!
__________________
Check out my latest endeavor: https://roundsixpod.com My build threads: '55 Chevy: http://67-72chevytrucks.com/vboard/s...d.php?t=247512 '64 C-20: http://67-72chevytrucks.com/vboard/s...d.php?t=446527 |
|
|
|
|
11-30-2011, 12:23 AM
|
#24 |
|
Registered User
Join Date: Mar 2005
Location: apple valley, ca
Posts: 2,670
|
Re: Project '64 Cheapskate
I got a lot of work done on the rear suspension in the last few weekends. First, I flipped the forward trailing arm brackets. Pretty straightforward, but you've got a bunch of those pesky GM rivets to remove. I wound up firing up the torch and heating them until they are cherry red, then hitting the trigger and melting the heads off, taking extra care not to torch the bracket. Then, grab the air chisel and knock what's left of the rivets out. When you flip the brackets, you have to drill 2 new holes per side. I wanted maximum strength, so I stepped up the holes to 7/16ths. A total of 16 fasteners, 32 flat washers and some red Locktite and you're done.
The next step was pressing new bushings into the trailing arms. I fired up the torch and burned out the old rubber and removed the guts. Then, I cleaned up the receptacle in the arms with a barrel sander and knocked the new polyurethane bushings in. I painted the trailing arms and frame with chassis black (satin) paint. I bought a Super Track Bar Kit from Early Classic and CPP 5" drop rear coils and mocked up the rear end. I have still not welded the perches on because I have to mock up the engine/trans and carrier bearing in order to accurately get the pinion angle correct. I just wanted to see if there was anything I needed to address before I set the rear in place for the last time. Here is a picture of the rear suspension. Note: the rear axle is yet to be painted, the pinion angle is not set, the shocks are not installed, and the track bar is not installed. If you look close, you can see the new bolts on the forward trailing arm brackets that are now flipped. 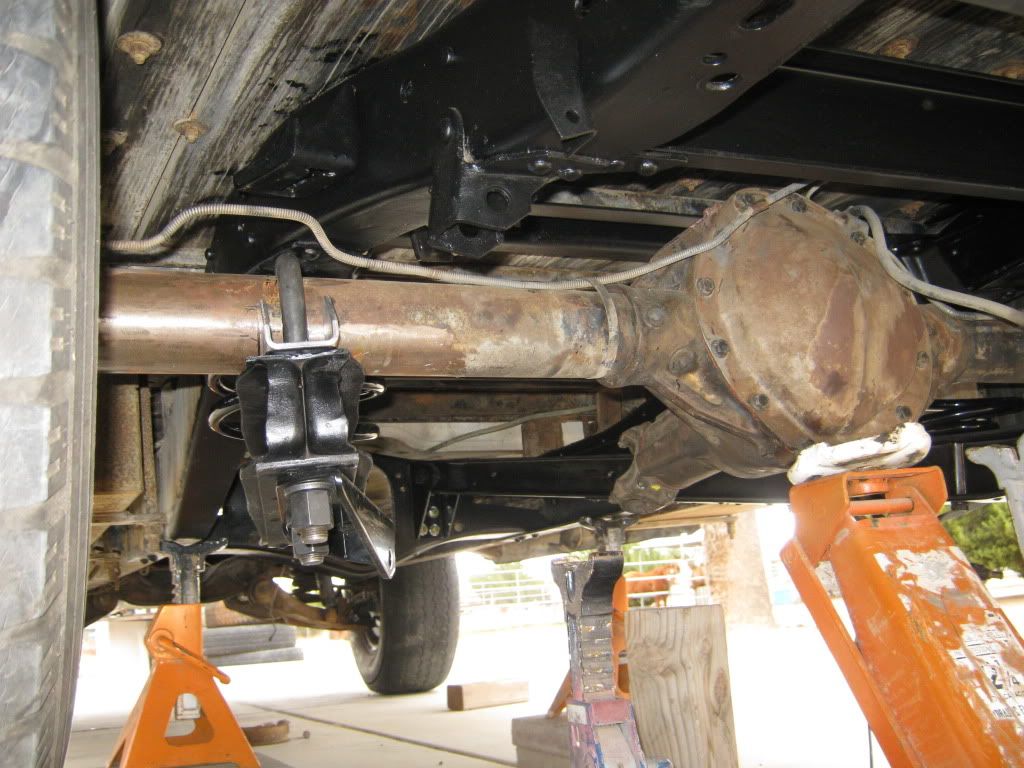 Here's where it should sit at ride height. The wheels are mock ups; the tires are 31x11.50-15 and are really tight inside the wheelwells. I want close to a 30" tall rear tire, and these are relatively close, just a bit too wide. The '79 rear end is 1.5" wider than the original rear end, and that's a bummer because I would love to have a 10" rear rim tucked inside. Not gonna happen, unfortunately. It looks like an 8" will be the widest wheel I can run with this rear axle.  I have already started on doing some suspension mods on the front, but I'll refrain on posting pictures until the mod is done. Until then, hang tight!
__________________
Check out my latest endeavor: https://roundsixpod.com My build threads: '55 Chevy: http://67-72chevytrucks.com/vboard/s...d.php?t=247512 '64 C-20: http://67-72chevytrucks.com/vboard/s...d.php?t=446527 |
|
|
|
|
11-30-2011, 12:48 AM
|
#25 |
|
1 thing at a time is progress.
Join Date: Jun 2007
Location: Ball Ground GA
Posts: 5,511
|
Re: Project '64 Cheapskate
Nice progress!! Lookin' good. BTW it that a Border Collie?
__________________
Alan
Philippians 2:14-16 |
|
|
|
 |
| Bookmarks |
|
|


 Hybrid Mode
